Let's take the guesswork out of plastic repair!!!!!!!
 12-16-2004, 10:31 PM
#1
Senior Member

Thread Starter
Let's take the guesswork out of plastic repair!!!!!!!
I've been threatening this for sometime... Now mods, a sticky if you please...
There are many different products for a plastic repair. For the thirdgen, however, we are concerned with repairing PU, or polyurethane. Oldschool methods are welding with a hot shoe and a string of clear rod. Today we have epoxy polymers that set like nothing else!!!
We use 3M Automix exclusively, but, there are many other fine epoxy kits out there, Lord Fusor, SEM, all will work. The caveat; to make sure you use a flexible repair material. (PU is a flexible part, there are many others today, Rigid, semi-rigid, You get the picture.) In some cases an adhesion promoter will be necessary.
NEVER BONDO, FIBERGLASS, OR POLYPUTTY!!!
TO REPAIR A SIMPLE TEAR:
Remove the part
Wash thoroughly with warm soapy water, (a paint company's plastic parts wash solution will work also, but who's gonna spend that kind of dough for a one time gig?)
REMOVE ALL PAINT AND DEBRIS FROM THE AREA TO BE REPAIRED
Under no circumstances are we to repair over old paint. (that's no different than repairing metal)
Lightly grind the area all around the tear with a 90 degree grinder or equivalent. with 50-80 grit discs, Pay special attention to the tear, taper the edges out in a wide V... inside and out...a groove will be too steep.
Wash again, Dry thoroughly
Clean with plastic parts prep or denatured alcohol.
HERE"S THE BIGGIE
Drill 1/8 inch holes along the perimeter of the repair, both sides, about an eighth to a quarter inch away from the tear, spaced about a quarter inch apart. These are called pinning holes
Load your epoxy gun and mixer tip, squirt liberally over the entire surface of the repair area, front and back.
Using a spreader, push the material around working quickly but not rushed... make sure the material pushes into the pinning holes, when this hardens it will act as fingers locking and holding the repair together.
Let cure 15-20 min in good heat. If you start to sand and the edges begin to peel or chip back wait a little longer.
The first coat will be the structure of the repair, dont worry about how it looks... grind, or sand up the face and coat again.
Let cure
Block sand the 2nd coat flush with the outer surface of the part. (80 g will work to cut and make straight)
Coat again with a flexible skim coat epoxy made by the same company as your repair material.
Block sand flat
Prime, 2K primer WITH A FLEX AGENT!!!!!!
Work up your primer like you would prep for any paint
I will post pics on the next repair we do, as well as some of the materials.

The following users liked this post:
Juju (01-31-2021)
12-16-2004, 10:57 PM
#2
Supreme Member
iTrader: (1)
Join Date: Apr 2004
Location: glenwood IL
Posts: 1,674
Likes: 0
Received 0 Likes
on
0 Posts
Car: 85z28,
Engine: 350
Transmission: 700r4
Good post kev. About the differnt brands. I have use duramix,sem,fuser,and evercoat....If anyone don't know what one to get. U can't beat fuser. That stuff is great. Allways sands out real nice.And sticks. Just my 2 cents.
12-29-2004, 11:52 AM
#3
Senior Member
Thread Starter
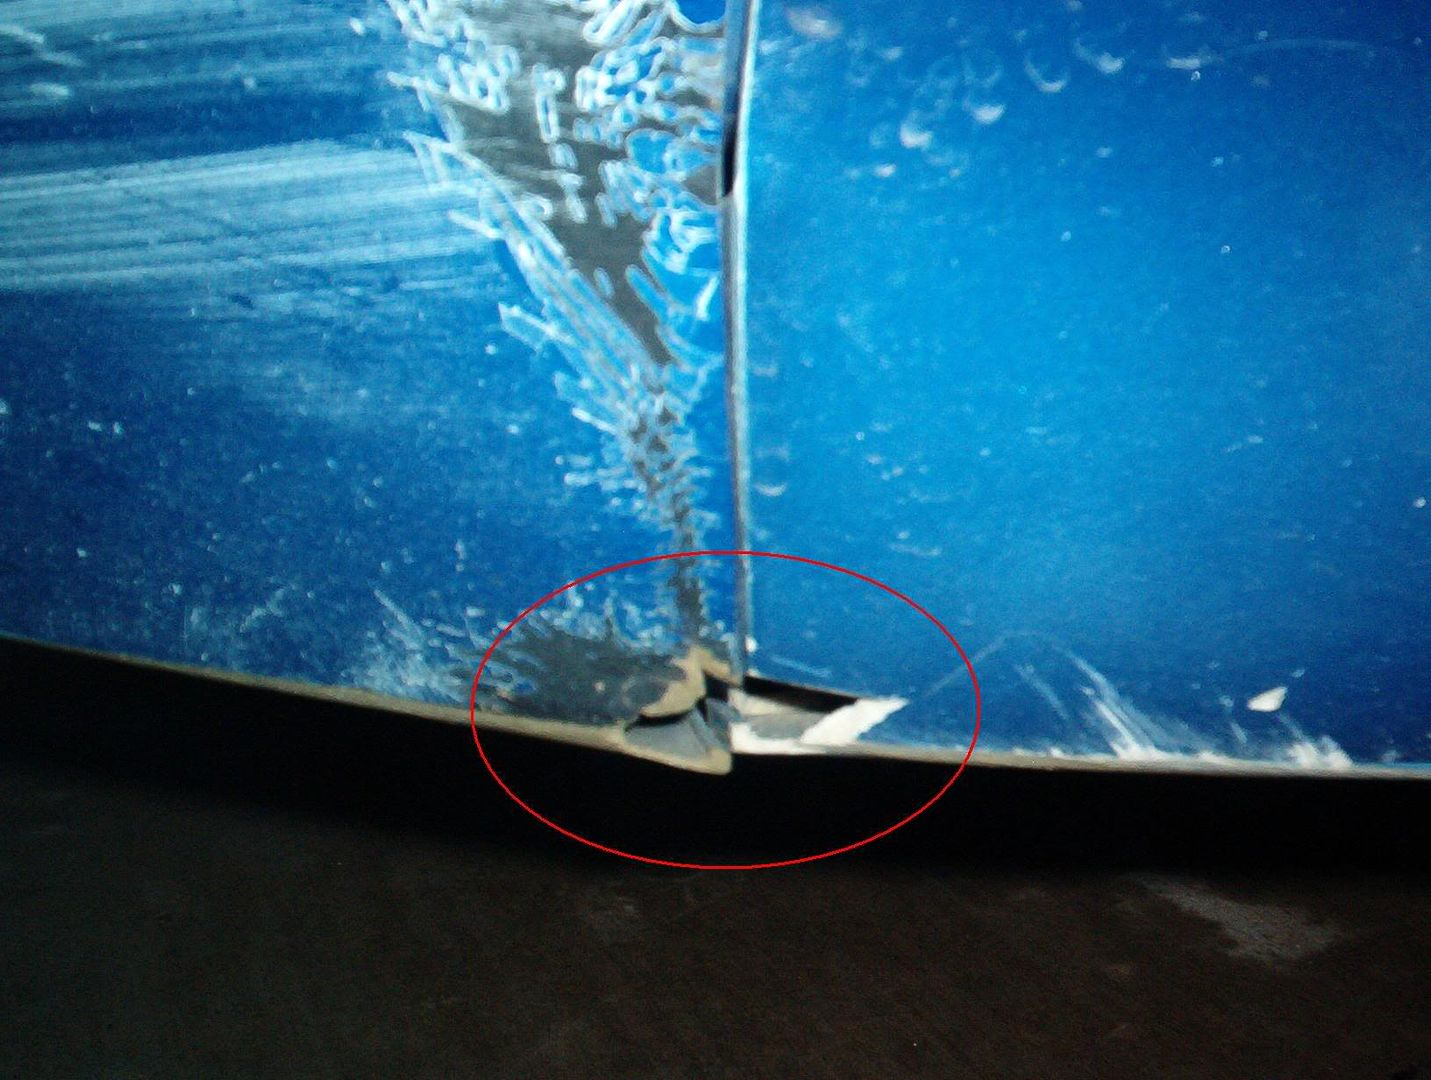
update, here's a fully prepped split for repair, note the pinning holes on either side of the split
12-29-2004, 11:54 AM
#4
Senior Member
Thread Starter
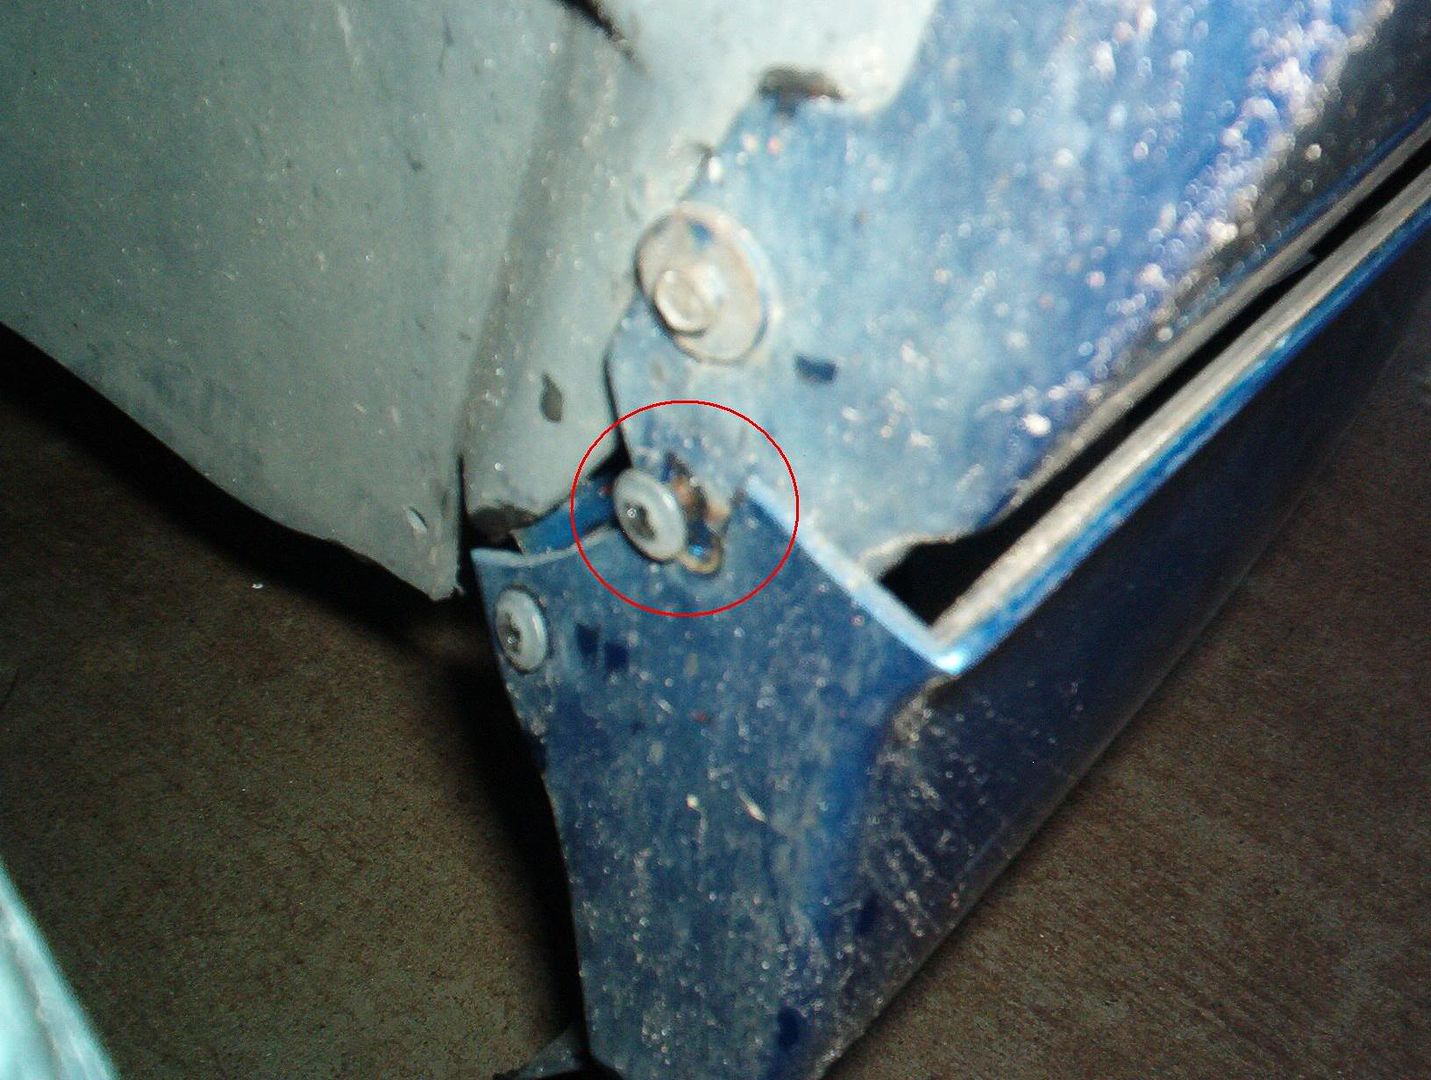
Another, a little fuzzy, but you get the idea..
01-03-2005, 06:42 PM
#5
Junior Member

Join Date: Nov 2004
Location: San Diego, CA
Posts: 28
Likes: 0
Received 0 Likes
on
0 Posts
Car: '91 firebird
Engine: 5.0L V8
how would you repair a groud effect where a piece has broken off and you dont have the broken piece, the pictures should explain it more. will the 3m epoxy that you use on the cracks work?
Last edited by theaddkid2004; 01-03-2005 at 07:01 PM.
01-04-2005, 11:23 AM
#6
Senior Member
Thread Starter
Same Idea, same process, If they are fairly small, (which they appear to be...) you can "build" the areas out of the repair material. It tends to run though, so it's a little work.
You can also cut out squares of fiberglass cloth for a backing that will "make" missing piece.
Another idea, is to have an old "junk' piece of the same material as your ground effects, that you can harvest pieces for the repairs to you "good" ones.
You will want to drill the pinning holes on the replacement piece, as well as all around the existing hole.
Trending Topics
01-13-2005, 12:29 PM
#8
Junior Member

Join Date: Jul 2003
Location: ABQ,NM
Posts: 21
Likes: 0
Received 1 Like
on
1 Post
Car: 92 RS
Transmission: auto
I LOVE THIS SITE!
I don't visit that often anymore but everytime I have a problem I find the answer here. i.e. the wife just knocked a small piece of the fender off on her 94 and the dealer or paint store were no help.
I came here today and the first post I looked at answered my question without even having to ask!
Looks like the proper part no for gluing things on is 3M 0837 flexible bumper and body repair.
PROPS!
I came here today and the first post I looked at answered my question without even having to ask!
Looks like the proper part no for gluing things on is 3M 0837 flexible bumper and body repair.
PROPS!
Last edited by Beartracks; 01-13-2005 at 01:38 PM.
The following users liked this post:
Juju (01-31-2021)
02-14-2005, 08:49 PM
#9
Supreme Member
Join Date: May 2002
Location: PE, Canada
Posts: 1,060
Likes: 0
Received 0 Likes
on
0 Posts
Car: '81 Trans Am
Engine: 6.6L
Transmission: auto 350
ive been searching on this repair,,,, i was just wondering if this method would work on the wrap around aero wing spoilers???
02-14-2005, 08:49 PM
#10
Supreme Member
Join Date: May 2002
Location: PE, Canada
Posts: 1,060
Likes: 0
Received 0 Likes
on
0 Posts
Car: '81 Trans Am
Engine: 6.6L
Transmission: auto 350
opps double post sorry... i tryed to del it but it wont let me??
Last edited by jcurrieirocz; 02-14-2005 at 08:51 PM.
02-24-2005, 10:56 PM
#12
Member

Join Date: Nov 2003
Location: UT
Posts: 363
Likes: 0
Received 0 Likes
on
0 Posts
Car: 88 Camaro S/C
Engine: 350
Transmission: 700-R4
Hey I want to shave the "RS" emblems on the side skirt gfx pieces, i.e, make it flush and smooth. So Could I just cut out a piece of a 85-92 bumper, stick it in there, then drill holes in the patch piece and the gfx piece, and then just follow the instructions and smooth it out?
What about for the Front Emblem on the nose? And the Rear "RS" emblem on the bumper?
thanks for any help
What about for the Front Emblem on the nose? And the Rear "RS" emblem on the bumper?
thanks for any help
02-26-2005, 04:12 PM
#13
Senior Member
Thread Starter
I would treat these as a repair...
grind up the recessed areas, (leave no paint in the area to be bonded.) drill some pinning holes for anchoring, and slick them with the two-part repair material.
This process may take a couple fills.
grind up the recessed areas, (leave no paint in the area to be bonded.) drill some pinning holes for anchoring, and slick them with the two-part repair material.
This process may take a couple fills.
04-21-2005, 10:25 PM
#14
Supreme Member
Join Date: May 2003
Location: Toledo, OH
Posts: 1,995
Likes: 0
Received 0 Likes
on
0 Posts
Car: 1992 Firebird
Engine: forged 357
Transmission: 700r4, 2200-2400 stall, vette servo
Axle/Gears: stock pegleg 2.73 drum (temp)
Originally posted by theaddkid2004
how would you repair a groud effect where a piece has broken off and you dont have the broken piece, the pictures should explain it more. will the 3m epoxy that you use on the cracks work?
how would you repair a groud effect where a piece has broken off and you dont have the broken piece, the pictures should explain it more. will the 3m epoxy that you use on the cracks work?
07-09-2005, 01:52 PM
#15
Supreme Member
delete,, since i am apparently invisible in here.,...
Last edited by Randy82WS7; 07-30-2006 at 07:57 PM.
07-20-2005, 07:43 PM
#16
Banned

Join Date: Jun 2005
Location: Detroit, MI
Posts: 118
Likes: 0
Received 0 Likes
on
0 Posts
Car: 91' Pontiac Firebird
Engine: 388 ci Small block CHEVY (4.060x3.75), Dart Iron Eagle Platinum 200cc, Performer intake, 454 TBI, Long Tubes, True Dual 3" GPs
Transmission: 700R4, B&M, Governer Recal, 20,000 GVW cooler
What about hot glue? Hot or Cold, whatever is sandable?
09-16-2005, 06:48 AM
#17
Supreme Member

Join Date: Sep 2001
Location: Manassas, VA
Posts: 4,231
Likes: 0
Received 1 Like
on
1 Post
Car: 89 Formula Firebird
Engine: 305 - Demon 525
Transmission: 700R4
I didnt see JBweld metioned. Yea, its used on most metals but I have used it to repair that plastic plate that helps activate the turning signals. Still works 2 years later! JBweld comes from Sulphur Springs, Texas. A state where I originally came from.
JBweld comes from Sulphur Springs, Texas. A state where I originally came from.
10-08-2005, 12:03 AM
#18
Supreme Member
iTrader: (1)
Join Date: Feb 2003
Location: check under the car
Posts: 1,143
Likes: 0
Received 4 Likes
on
3 Posts
Car: White 25th Anniversary RS
Engine: lt1
Transmission: t56
Axle/Gears: 4:10
Anyone know were to get a new 92 chin spoiler. mine has a crack in the corner and im sick of it recracking everytime it get brushed on a peble. I want to see if i can get a brand new one.
10-30-2005, 09:38 AM
#19
Senior Member
Join Date: Apr 2005
Location: Eastern Connecticut
Posts: 753
Likes: 0
Received 0 Likes
on
0 Posts
Car: 1989 RS Camaro
Engine: 350 Carb(soon a 400)
Transmission: 5-Speed/th350
Axle/Gears: 10 bolt 3.73
I have a question about scuffs in the front chin spoiler. Is it the same to repair hard scuffs in the chin spoiler as well?
10-30-2005, 04:44 PM
#20
Senior Member
Thread Starter
Deep gouges will repair easier... Just follow the procedure above without the pinning holes, after the repair area is prepared, spread your 2 part repair epoxy in the grooves...prime and paint as normal.
12-19-2005, 12:10 AM
#21
Junior Member

Join Date: Apr 2005
Location: SouthCarolina
Posts: 97
Likes: 0
Received 0 Likes
on
0 Posts
Car: 87 camaro z28
Engine: 2.8l V-6
Transmission: TH-700R4
I had the top piece of my molding around my door break in half from the middle to the back and i was wondering what i can use before i put it in the bodyshop?
03-13-2006, 09:45 PM
#23
Member

Join Date: Jan 2001
Location: North Salem Ny United States
Posts: 257
Likes: 0
Received 0 Likes
on
0 Posts
Car: 86 Z-28
Engine: 356 4-bolt
Transmission: Borg warner T-5
would that whole process be good for a front nose that has the paint spider cracking and chipping off... im of course talking about the prep work to the repair. would 50-80 grit be to abrasive for sanding down the entire nose fore repaint? or is the bench grinder to abrasive? any recommendations for this?
03-19-2006, 04:46 PM
#24
Senior Member
Thread Starter
In this case, just strip off the old offending paint, prime and refinish.
03-19-2006, 09:33 PM
#25
Member
Join Date: Jan 2001
Location: North Salem Ny United States
Posts: 257
Likes: 0
Received 0 Likes
on
0 Posts
Car: 86 Z-28
Engine: 356 4-bolt
Transmission: Borg warner T-5
i know that all i need to do is strip and repaint, but what im asking is how should i go about doing that? what should i use and what steps should i take?
 04-23-2006, 06:50 PM
#27
Member
iTrader: (1)

Join Date: Dec 2005
Location: Highlands, NJ
Posts: 273
Likes: 0
Received 0 Likes
on
0 Posts
Car: 1986 Firebird
Engine: 3.4 outa 95' bird
Transmission: T5
Axle/Gears: 3.42 open rear
i would first contact a tech at fast and ask them, or if it was torqued down properly, maybe a free intake is in the cards?! anyway, i have a bumper from 1990 formula that im putting on my 86 bird, its red, and has a good 2" long gouge on it. i was wondering what i should use to take the old paint off, what to fill the gouge with, and what to primer it, how many coats/what to sand it with? Im having an experienced friend spray it for cost of materials, so i dont need to worry about that
05-20-2006, 06:27 PM
#29
Senior Member
Thread Starter
Urethane Bumper stripper.
39913 - BUMPER STRIPPER
39913 - BUMPER STRIPPER
06-16-2006, 05:00 PM
#30
Junior Member
Join Date: Dec 2001
Location: Brentwood Bay, BC, Canada
Posts: 41
Likes: 0
Received 0 Likes
on
0 Posts
Car: 88 Firebird, 86 Firebird
question
I'm going to try to repair the smashed corner of my rear bumper cover...it's been broken for maybe 10-15 years (before I got it). It's warped some, so the edges don't meet up unless they are held in place. My old man suggested wiring them together while the repair material is put on...my concern is that the goo might stick to the wires. Has anyone done this successfully before, or is there another way I should do it?
06-16-2006, 08:32 PM
#31
Senior Member
Thread Starter
Set it up on stands in the closest possible shape it is when it is on the car. If need be, you can run a couple strips of tape to the corners to help retain it's shape. I don't see why wiring it wouldnt work, as long as it doesn't run through the repair area.
06-25-2006, 05:12 AM
#32
Hey Kevin, great job on the explanation of the procedure!!
But could you (or anyone) tell me where I can find these products? Im headed to the US in a couple of days and would like to pick up some of this as I have not found it over here.
Thanks!

Ken
But could you (or anyone) tell me where I can find these products? Im headed to the US in a couple of days and would like to pick up some of this as I have not found it over here.
Thanks!
Ken
07-06-2006, 05:59 AM
#33
Senior Member
Join Date: Mar 2006
Location: CALI
Posts: 926
Likes: 0
Received 1 Like
on
1 Post
Car: 85' Trans Am !best car ever!
Engine: 305tpi 215hp LB9 two bolt,
Transmission: th-700r4
Axle/Gears: stock (3.27)
I used fiberglass and cloth awhile back for the ground effects under the car literally by the radiator, looks good, out of sight. There was a long parallel crack (two of them) on the door sill. fiberglassed the sill from under, looks great tough as steel.
07-26-2006, 01:55 PM
#34
Member
Join Date: Jul 2005
Posts: 132
Likes: 0
Received 0 Likes
on
0 Posts
Car: 86 trans am
Engine: 350 cid from a 69 chevy truck
Transmission: original 700r4
warped bumper?
I have used a regular hair-dryer set it on high heat, and keep it moving over the warped area while adding enough pressure by either you'r hand (with a glove on), or a piece of wood to straiten out the warp and keep something for support there untile the bumper cools and like magic the warp is gone.
08-22-2006, 08:16 PM
#35
Member

Join Date: Jan 2002
Location: Columbus OH
Posts: 373
Likes: 0
Received 0 Likes
on
0 Posts
i would like to challenge you on your topic of conversation.
you do have good ideas and they do work. they however are no where near the best. my life revolves around the repair of plastic covers. weather it be tpo tpe, pu, pc, whatever. i fix these all day long for bodyshops and sell them for between 150 and 300 a piece.
what you call oldschool, is on the new side of technology. spreading a polyester based material over two sides of a crack is old school. this will wear and not hold up in another forceful hit.
"oldschool" plastic welds when done correctly will hold better the the cover itself. i will provide you pictures of a forceful tear. the cover tore beside the weld. not through the weld. in your type of repair, the repair would have failed almost immediatly.
be sure to be clear on some of the information you provide. adhesion promoter is not to be used on polyurethane. it does not require its application. polycarbonite is also in this list to not use AP. all other plastics require the use.
now the materials you mention are all very good materials. i sell all of them to the market. the one that tops them all that you did not mention (you probably dont know about it) is dominion sure seal.
drilling holes will not make the repair stronger. it will only weaken the substrate. for all reading just in case. the substate is the original material you are trying to repair.
on welds if done correctly there will be no repair material added to the cover. you will have a smoothed over weld and primer to cover it.
the rest of your description is pretty good. i will snap some quick pics tomorrow and get the up on the board so you all can see proper repairs to covers.
if anyone has any questions feel free to email me at pimpjettay2k@yahoo.com
or kclifford@keystone-auto.com
I've been threatening this for sometime... Now mods, a sticky if you please...
There are many different products for a plastic repair. For the thirdgen, however, we are concerned with repairing PU, or polyurethane. Oldschool methods are welding with a hot shoe and a string of clear rod. Today we have epoxy polymers that set like nothing else!!!
We use 3M Automix exclusively, but, there are many other fine epoxy kits out there, Lord Fusor, SEM, all will work. The caveat; to make sure you use a flexible repair material. (PU is a flexible part, there are many others today, Rigid, semi-rigid, You get the picture.) In some cases an adhesion promoter will be necessary.
NEVER BONDO, FIBERGLASS, OR POLYPUTTY!!!
TO REPAIR A SIMPLE TEAR:
Remove the part
Wash thoroughly with warm soapy water, (a paint company's plastic parts wash solution will work also, but who's gonna spend that kind of dough for a one time gig?)
REMOVE ALL PAINT AND DEBRIS FROM THE AREA TO BE REPAIRED
Under no circumstances are we to repair over old paint. (that's no different than repairing metal)
Lightly grind the area all around the tear with a 90 degree grinder or equivalent. with 50-80 grit discs, Pay special attention to the tear, taper the edges out in a wide V... inside and out...a groove will be too steep.
Wash again, Dry thoroughly
Clean with plastic parts prep or denatured alcohol.
HERE"S THE BIGGIE
Drill 1/8 inch holes along the perimeter of the repair, both sides, about an eighth to a quarter inch away from the tear, spaced about a quarter inch apart. These are called pinning holes
Load your epoxy gun and mixer tip, squirt liberally over the entire surface of the repair area, front and back.
Using a spreader, push the material around working quickly but not rushed... make sure the material pushes into the pinning holes, when this hardens it will act as fingers locking and holding the repair together.
Let cure 15-20 min in good heat. If you start to sand and the edges begin to peel or chip back wait a little longer.
The first coat will be the structure of the repair, dont worry about how it looks... grind, or sand up the face and coat again.
Let cure
Block sand the 2nd coat flush with the outer surface of the part. (80 g will work to cut and make straight)
Coat again with a flexible skim coat epoxy made by the same company as your repair material.
Block sand flat
Prime, 2K primer WITH A FLEX AGENT!!!!!!
Work up your primer like you would prep for any paint
I will post pics on the next repair we do, as well as some of the materials.
There are many different products for a plastic repair. For the thirdgen, however, we are concerned with repairing PU, or polyurethane. Oldschool methods are welding with a hot shoe and a string of clear rod. Today we have epoxy polymers that set like nothing else!!!
We use 3M Automix exclusively, but, there are many other fine epoxy kits out there, Lord Fusor, SEM, all will work. The caveat; to make sure you use a flexible repair material. (PU is a flexible part, there are many others today, Rigid, semi-rigid, You get the picture.) In some cases an adhesion promoter will be necessary.
NEVER BONDO, FIBERGLASS, OR POLYPUTTY!!!
TO REPAIR A SIMPLE TEAR:
Remove the part
Wash thoroughly with warm soapy water, (a paint company's plastic parts wash solution will work also, but who's gonna spend that kind of dough for a one time gig?)
REMOVE ALL PAINT AND DEBRIS FROM THE AREA TO BE REPAIRED
Under no circumstances are we to repair over old paint. (that's no different than repairing metal)
Lightly grind the area all around the tear with a 90 degree grinder or equivalent. with 50-80 grit discs, Pay special attention to the tear, taper the edges out in a wide V... inside and out...a groove will be too steep.
Wash again, Dry thoroughly
Clean with plastic parts prep or denatured alcohol.
HERE"S THE BIGGIE
Drill 1/8 inch holes along the perimeter of the repair, both sides, about an eighth to a quarter inch away from the tear, spaced about a quarter inch apart. These are called pinning holes
Load your epoxy gun and mixer tip, squirt liberally over the entire surface of the repair area, front and back.
Using a spreader, push the material around working quickly but not rushed... make sure the material pushes into the pinning holes, when this hardens it will act as fingers locking and holding the repair together.
Let cure 15-20 min in good heat. If you start to sand and the edges begin to peel or chip back wait a little longer.
The first coat will be the structure of the repair, dont worry about how it looks... grind, or sand up the face and coat again.
Let cure
Block sand the 2nd coat flush with the outer surface of the part. (80 g will work to cut and make straight)
Coat again with a flexible skim coat epoxy made by the same company as your repair material.
Block sand flat
Prime, 2K primer WITH A FLEX AGENT!!!!!!
Work up your primer like you would prep for any paint
I will post pics on the next repair we do, as well as some of the materials.
08-22-2006, 09:44 PM
#36
Senior Member
Thread Starter
I would not presume to tell anyone here that Plastic Welding does not work. Nor am I here to debate the repair method I am using. My repair most certainly does not fail immediately. In fact, we have repaired many covers a second time that have been hit in a different area, and our original repair is intact and completely uncompromised. I have, in fact, just within the past couple days, had to re-order a "professionally" remanufactured cover that failed miserably in the welded area...before it was even placed on the car.
I think the key you need to focus on, is the quality of the repair, regardless of the method used. Always, always clean and prep the area to be repaired before, during and after.
Done correctly, welding does a fantastic job. And, don't get me wrong, I have done plenty of plastic welding. I have had formal training by ICAR, in plastic repair. (Originally a plastic welding class.) But once I tried the epoxy repair, and have seen first hand how incredibly simple it is...I have never gone back. My repair is also tried and true in the collision industry, to date. I am in the process however, of compiling my editing of this repair, as ICAR has rescended the "pinning method", citing that they have seen some of the holes re-appear after the repair is on the street.
I am sorry if you think that my method is misleading in any way, but as a professional, and having the necessity to be re-trained in many methods to repair a vehicle, I feel very qualified to give this advice.
I'm sure you are well schooled in your chosen profession as well, and if it works for you, that's fantastic. Please feel free to outline it in this very thread. But I would ask that you try not to stomp all over my repair.
The following users liked this post:
88coupedoop (04-17-2020)
08-23-2006, 07:31 AM
#37
Member
Join Date: Jan 2002
Location: Columbus OH
Posts: 373
Likes: 0
Received 0 Likes
on
0 Posts
Not trying to trash your thread. I am a part of ICar and I know all about it. They hold the meetings in my building.
Like I siad many times, "if done correctly" (quality of workmanship) that is a key. It is known in the bodyshop industry that putting a filler on both sides is not a good repair. No matter the material. It will fail.
I dont think your method is misleading. Just making sure you put out the correct information. And all the information.
I do combo work, so yes I would say I have the proper training. No doubts on you either.
Just remember this. Flex additive is useless after a few days. It evaporates out of the material. Flex additive does not maintain its characteristics in the part after its fully cured.
 08-23-2006, 08:38 PM
#39
Senior Member
Thread Starter
what you call oldschool, is on the new side of technology. spreading a polyester based material over two sides of a crack is old school. this will wear and not hold up in another forceful hit.
1.) Frontside and backside repair IS viable. and necessary in this type of repair. The backside repair is what gives the added strength in a structural tear.Are you saying you only WELD one side?
2.) Who said anything about a "polyester" product? I said 3m Automix or equivalent. It is a URETHANE product, the same as the bumper, in effect it becomes part of the cover.
Here is a link:http://multimedia.mmm.com/mws/mediaw...666I1BCOrrrrQ-
It's a PDF file, so dialup users beware.
It is known in the bodyshop industry that putting a filler on both sides is not a good repair. No matter the material. It will fail.
Just remember this. Flex additive is useless after a few days. It evaporates out of the material. Flex additive does not maintain its characteristics in the part after its fully cured.
I now only say this: That is categorically untrue. Before you make such a generalized statement... PLEASE, please research with the high end paint companies, all offer an elastomeric resin flex agent that does not leave the primer, sealer, or clear.
Thank you for adding your expertise to my post. I welcome it, if only to educate everyone how to repair their car...as these parts become more and more scarce, we will need all the help we can get. And, in truth, I had given up on plastic welding 7 or so years ago, due to the ease of repair in my method.
Last edited by KEVIN G.; 08-23-2006 at 08:45 PM.
09-08-2006, 03:53 AM
#41
Member
Join Date: Jun 2005
Location: Bucyrus, Ohio
Posts: 110
Likes: 0
Received 0 Likes
on
0 Posts
Car: 1986 Trans Am
Have ? for you KEVIN G., will this require flexible repair material? I had this nose laying around and figured might as well fix it. Then possibly sell it. Thanks!!


. Thanks!!

Last edited by Ironmahn; 09-08-2006 at 06:57 AM.
 09-29-2006, 10:46 PM
#43
Banned

Join Date: Mar 2005
Posts: 42
Likes: 0
Received 0 Likes
on
0 Posts
Car: 1982 Corvette
Engine: LS3 Stroker
Axle/Gears: 4.11
I have an 82 Corvette. The front bumper has two tears on it. They are small. You can gauge the size by the 1/8" license plate mounting holes. Kevin G. what would you suggest is the best way to fix it? If I use the Automax which part number is the correct one to use.
thanks,
Josh
thanks,
Josh
10-01-2006, 05:57 PM
#44
Senior Member
Thread Starter
3m is kinda pushing their EZ SAND3M Automotive, Marine and Aerospace : 3M™ Automix™ EZ Sand Flexible Parts Repair Kit, 05895, 5 oz Tubes, 6 kits per case product. We are just starting to use this. They tout it as being used on ANY flexible urethane product. Now, we are only beginning to experiment with this product, but it has worked well.
Another good product that you really don't need to buy a special gun for.. is http://www.evercoat.com/productDetail.aspx?pID=242 Evercoats Maxim product. I have only tried once... so I cannot vouch for the product. but it is an advantage to only load it in an ordinary caulk gun. (It is a dual chamber design.)
Another good product that you really don't need to buy a special gun for.. is http://www.evercoat.com/productDetail.aspx?pID=242 Evercoats Maxim product. I have only tried once... so I cannot vouch for the product. but it is an advantage to only load it in an ordinary caulk gun. (It is a dual chamber design.)
10-11-2006, 01:40 PM
#45
Junior Member

Join Date: Jun 2006
Posts: 10
Likes: 0
Received 0 Likes
on
0 Posts
Kevin awesome thread. Thanks for the tips.
What do you mean by good heat?
Also I noticed you emphasized the use of flex agent. I am in the process of painting my GTA with Nason Acrylic Enamel Nucryl. The body shop where I purchased the material said I would not need to add a flex agent to the paint. Is this not correct?
What do you mean by good heat?
Also I noticed you emphasized the use of flex agent. I am in the process of painting my GTA with Nason Acrylic Enamel Nucryl. The body shop where I purchased the material said I would not need to add a flex agent to the paint. Is this not correct?
10-13-2006, 06:52 PM
#46
Senior Member
Thread Starter
'89GTA,
Sorry, haven't been on in a while...
In my original post, by "good heat" I meant that you need constant dry temps...@70 degrees or better. If it's cold and damp outside, and you don't have heat in the garage...it could impede the integrity of the repair.
Sorry, haven't been on in a while...
In my original post, by "good heat" I meant that you need constant dry temps...@70 degrees or better. If it's cold and damp outside, and you don't have heat in the garage...it could impede the integrity of the repair.
01-10-2007, 03:17 PM
#47
Junior Member

Join Date: Oct 2003
Posts: 46
Likes: 0
Received 0 Likes
on
0 Posts
Kevin,
I see you mention earlier in the thread that you are using a urethane product, but then I see you mention the 05895 which is an epoxy. They do list a 08233 which is Urethane base. Ive been looking over 3M's webpage and they both show to be applicable for flexible bumpers. Curious about pros/cons of urethane/epoxy? Thanks. Also, do these require a special applicator?
EDIT: Deleted info about Evercoat Maxim. After re-reading I see you mentioned it already.
Thanks!
Last edited by luke-gr; 01-10-2007 at 03:22 PM.
01-11-2007, 06:05 PM
#48
Senior Member
Thread Starter
08233 is in the same vein as the older stuff we used to use. It is for larger areas with a longer working time. There are still uses for it, but we are starting to swing to the EZ sand, more and more. I think they are referring to it as an epoxy as far as the technology goes..ie; they are both an epoxy in that they are a two part material that essentially becomes one.
 I thought it required a special gun. Good news.
02-01-2007, 05:49 PM
I thought it required a special gun. Good news.
02-01-2007, 05:49 PM
#50
Another good product that you really don't need to buy a special gun for.. is http://www.evercoat.com/productDetail.aspx?pID=242 Evercoats Maxim product. I have only tried once... so I cannot vouch for the product. but it is an advantage to only load it in an ordinary caulk gun. (It is a dual chamber design.)