Acrylic Painting - Jet Black 85 TransAM, Questions...
 11-23-2015, 03:28 PM
#1
Senior Member

Thread Starter

Join Date: Feb 2009
Location: Brisbane, Australia
Posts: 848
Likes: 0
Received 14 Likes
on
12 Posts
Car: 1985 Pontiac TransAM
Engine: 400SBC 24x conversion
Transmission: T700r Stage2 Shiftkitted
Axle/Gears: 2.77 9 Bolt
Acrylic Painting - Jet Black 85 TransAM, Questions...
Hi Guys,
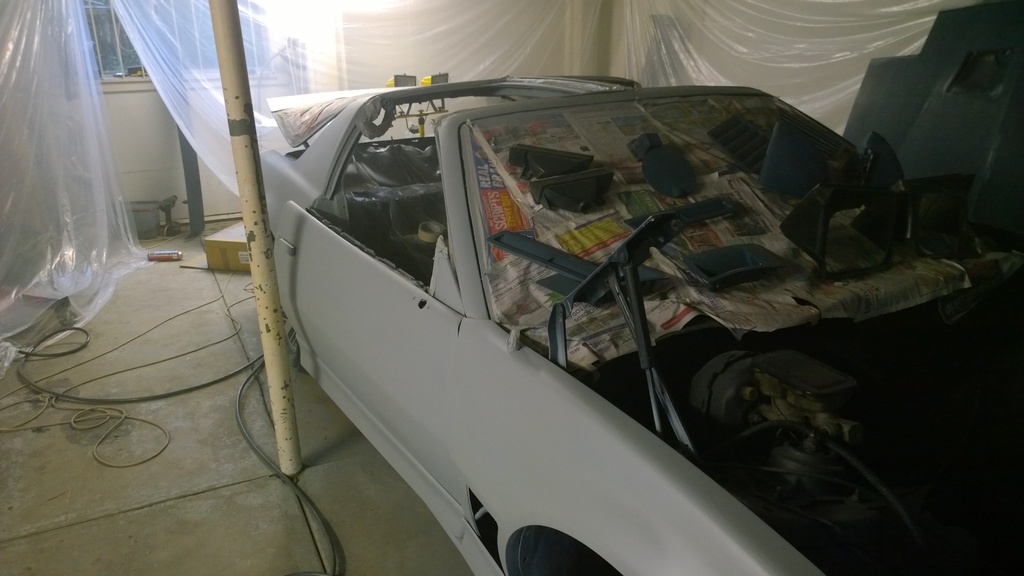
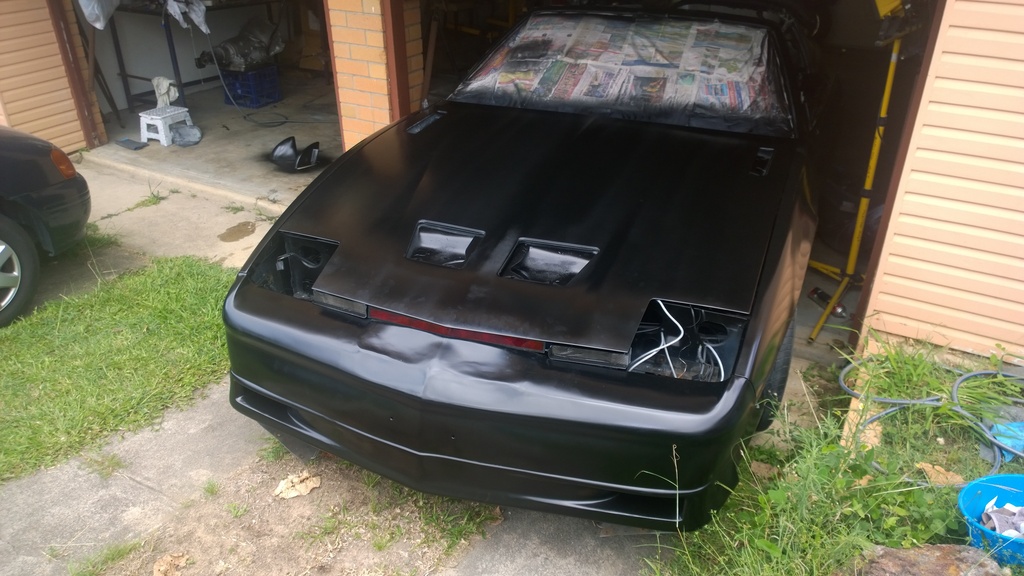
I'm well underway with my project at the moment and have laid the 1st coat of top coat on.
I've never painted before so I've prepared myself for what the end product may look like, but from what I've been told and what I've read, acrylic paint is the beginners best friend because you can essentially sand back and fix any stuff ups you make.

Saying that...
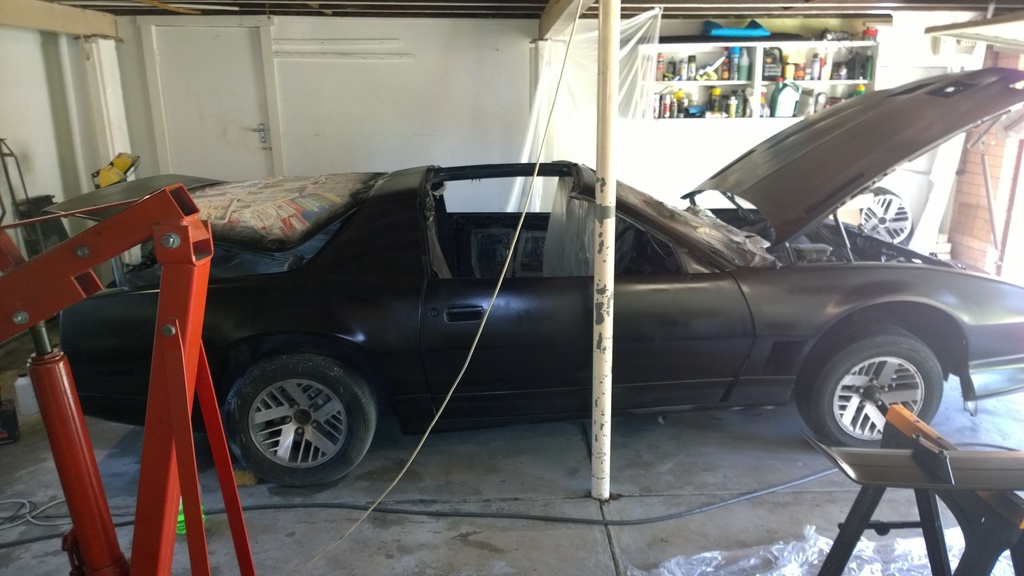
My gun's spray pattern wasn't at the optimal setting, and I think the pressure may have been too high. I had it set at 65psi with the trigger off, and 45psi with the trigger fully depressed, so I think the HVLP gun may have been laying it on too thin/dry. I also got over-excited and threw all of the technique out the window I'd been researching online and was doubling back a bit on some spots.
I guess my first question is, with acrylic before its sanded, buffed and polished, should it look patchy and grainy? or is this a by-product of my inexperience?
Secondly, as I knew it would not be a hassle-free painting experience, I had planned to follow what others have said, and sand between each coat, to fix any runs and dry spots but I'm not sure sure on 2 things:
1) how long to leave the first coat before sanding?
2) 1000,1200 or 1500 grit wet sand paper with soapy water for the between coat sanding?
Next, will 3-4 coats be enough?
Lastly, once the last coat of topcoat is on, and I use a higher ratio of thinners on the last coat, do I need clearcoat?
And if so, do I sand the topcoat with 2000, and buff, but not polish, and then apply clearcoat, or no buff, or just lay it straight on?
Whats the procedure for that?
Any comments or info people can offer would be greatly appreciated.
I'm using a 1.8mm HVLP gun with a 2.5hp, 180LPM 40L compressor which is probably just enough for the job, and using a Sepetone Jet Black High Gloss acrylic paint at 1:1.5 ratio with thinners(40:60 paint/thinners)
I'm well underway with my project at the moment and have laid the 1st coat of top coat on.
I've never painted before so I've prepared myself for what the end product may look like, but from what I've been told and what I've read, acrylic paint is the beginners best friend because you can essentially sand back and fix any stuff ups you make.


Saying that...


My gun's spray pattern wasn't at the optimal setting, and I think the pressure may have been too high. I had it set at 65psi with the trigger off, and 45psi with the trigger fully depressed, so I think the HVLP gun may have been laying it on too thin/dry. I also got over-excited and threw all of the technique out the window I'd been researching online and was doubling back a bit on some spots.
I guess my first question is, with acrylic before its sanded, buffed and polished, should it look patchy and grainy? or is this a by-product of my inexperience?
Secondly, as I knew it would not be a hassle-free painting experience, I had planned to follow what others have said, and sand between each coat, to fix any runs and dry spots but I'm not sure sure on 2 things:
1) how long to leave the first coat before sanding?
2) 1000,1200 or 1500 grit wet sand paper with soapy water for the between coat sanding?
Next, will 3-4 coats be enough?
Lastly, once the last coat of topcoat is on, and I use a higher ratio of thinners on the last coat, do I need clearcoat?
And if so, do I sand the topcoat with 2000, and buff, but not polish, and then apply clearcoat, or no buff, or just lay it straight on?
Whats the procedure for that?
Any comments or info people can offer would be greatly appreciated.
I'm using a 1.8mm HVLP gun with a 2.5hp, 180LPM 40L compressor which is probably just enough for the job, and using a Sepetone Jet Black High Gloss acrylic paint at 1:1.5 ratio with thinners(40:60 paint/thinners)
Last edited by evilstuie; 11-23-2015 at 03:31 PM.
 11-27-2015, 04:44 AM
#2
Senior Member
Thread Starter
Join Date: Feb 2009
Location: Brisbane, Australia
Posts: 848
Likes: 0
Received 14 Likes
on
12 Posts
Car: 1985 Pontiac TransAM
Engine: 400SBC 24x conversion
Transmission: T700r Stage2 Shiftkitted
Axle/Gears: 2.77 9 Bolt
Re: Acrylic Painting - Jet Black 85 TransAM, Questions...
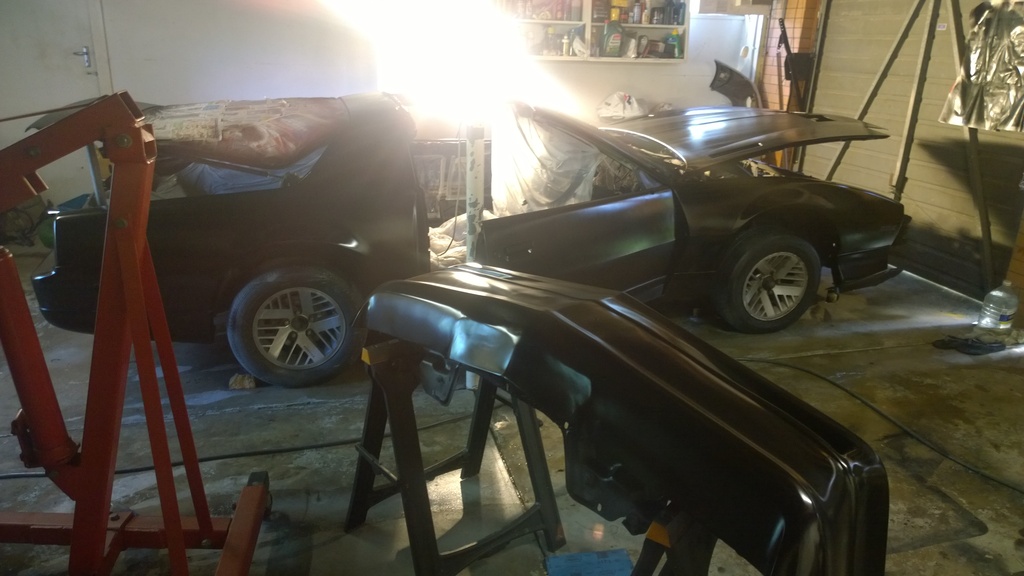
Well I put another 3 coats on today, still have some runs, and had an issue with the spray gun that ended up with low pressure and it spitting the paint on instead of spraying, but fixed most of that.
I just noticed a spot on the hood in between the vents where the paint has gone a light grey when it's dried. Will that buff back to black or do i need to respray that bit?


I just noticed a spot on the hood in between the vents where the paint has gone a light grey when it's dried. Will that buff back to black or do i need to respray that bit?


Last edited by evilstuie; 11-27-2015 at 05:49 AM.
11-27-2015, 09:15 AM
#3
Supreme Member
iTrader: (7)

Join Date: May 2004
Location: Lexington, SC
Posts: 5,291
Likes: 0
Received 58 Likes
on
52 Posts
Car: 1987 SC/1985 TA
Engine: 350/vortec/fitech
Transmission: T56
Axle/Gears: 3.27 9-bolt
Re: Acrylic Painting - Jet Black 85 TransAM, Questions...
never used that paint or your gun(?) but:
I usually spray an HVLP gun at a slightly higher pressure than the gun calls for, usually turns out to be 20-25 psi at the gun with the trigger pulled.
You want to lay a single stage gloss out slowly and thick enough so it shines but does not run. There's sometimes a fine line there.
No need to sand between coats unless you wait too long for the next coat or need to fix something. Usually 15-20 minutes between coats is good.
If it goes on satin, you can usually cut and buff it out. I use the 3M 3 stage compounds after using the 1500 wet sanding discs on a dual action orbital hand sander.
I'd recommend against laying a clear on top of a 2K single stage, especially in black and especially if it's your first job. Once the clear's on that whole panel has to go back down to base for any fixes. A good single stage, IMO, looks blacker than a bc/cc in black.
Try a test panel with your paint and gun set at a lower pressure and lay it on fairly good. Should come out real glossy with only a little cutting required to flatten it.
11-28-2015, 12:19 AM
#5
Senior Member
Thread Starter
Join Date: Feb 2009
Location: Brisbane, Australia
Posts: 848
Likes: 0
Received 14 Likes
on
12 Posts
Car: 1985 Pontiac TransAM
Engine: 400SBC 24x conversion
Transmission: T700r Stage2 Shiftkitted
Axle/Gears: 2.77 9 Bolt
Re: Acrylic Painting - Jet Black 85 TransAM, Questions...
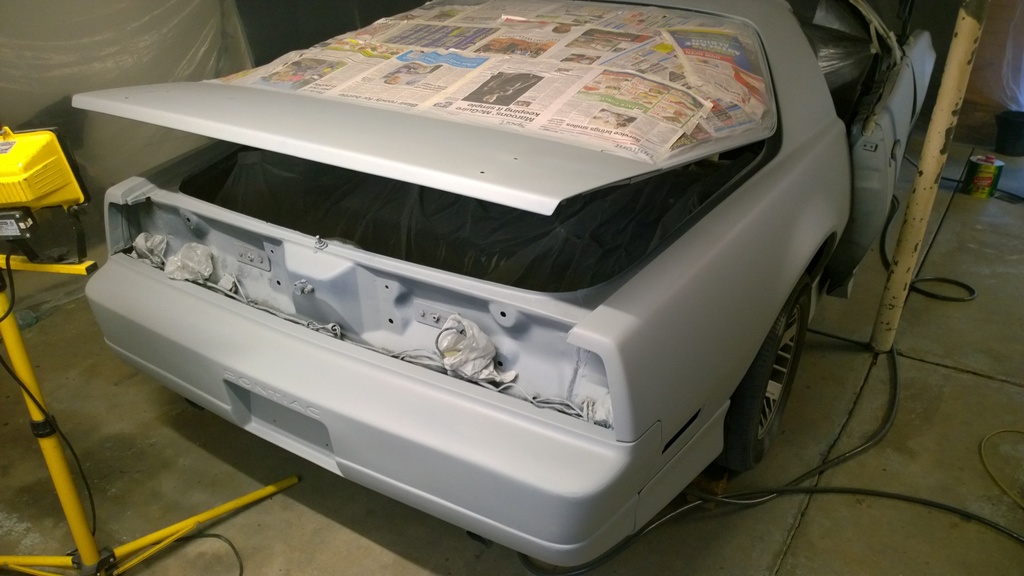
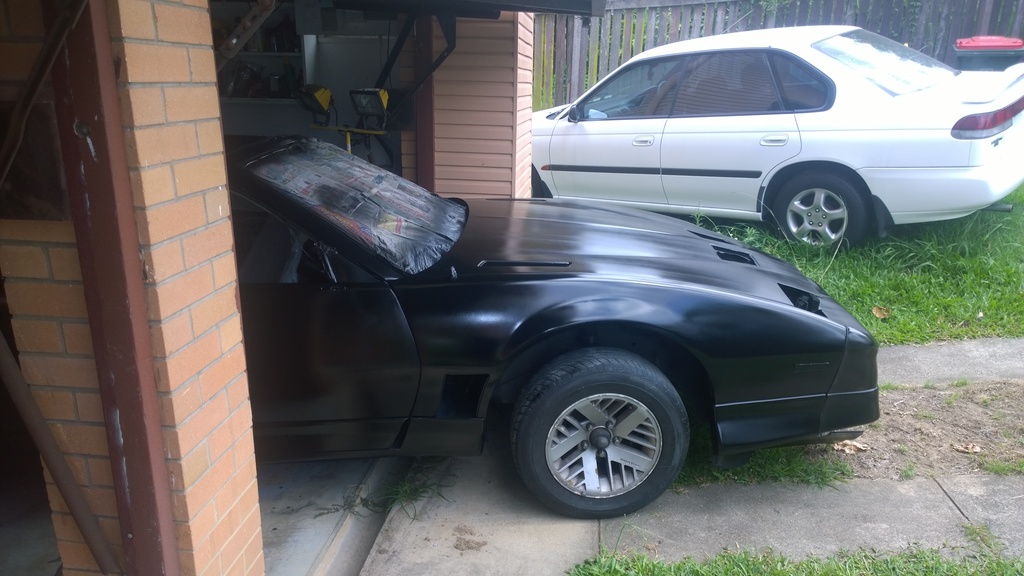
So I checked up the paint instructions and it said it would be fine to sand 24 hours after application. I'm still going to give it another day just to be safe, but I bolted the bumper back on and rolled it out in the sun to see how horrible it looked, and it doesn't look too bad even before the sanding and buffing.
You might be able to see the grey tinge bit in between the two center vents, but overall it doesn't look TOOooo bad.
There's some spray lines on the bonnet...I'm assuming they'll buff out?
I also couldnt help but chuck the light on haha.
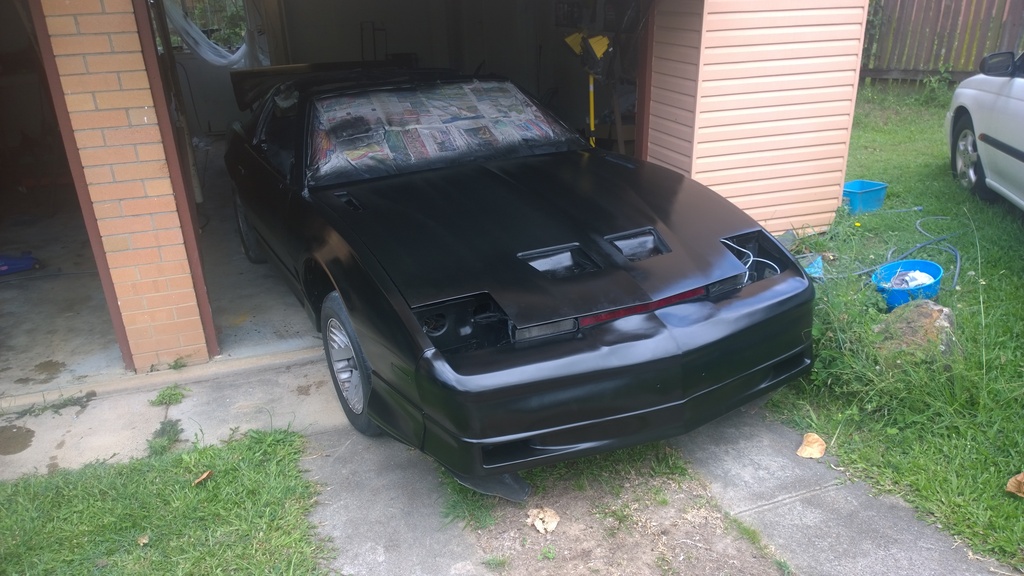
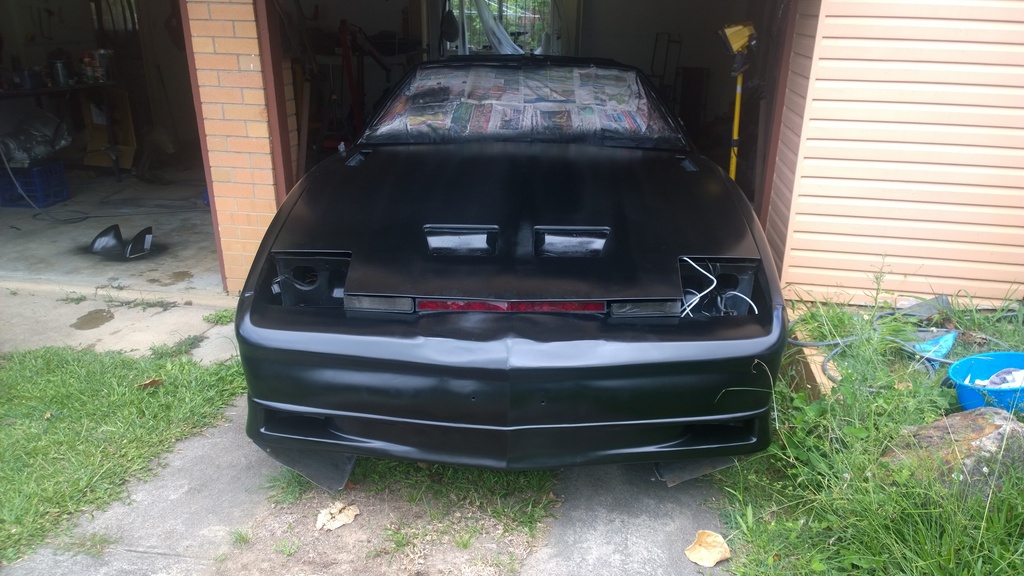
You might be able to see the grey tinge bit in between the two center vents, but overall it doesn't look TOOooo bad.
There's some spray lines on the bonnet...I'm assuming they'll buff out?
I also couldnt help but chuck the light on haha.


 11-28-2015, 07:39 PM
#6
Senior Member

Re: Acrylic Painting - Jet Black 85 TransAM, Questions...
You nozzle tip is likely too large, should be around a 1.4. 1.8 is for something like a sealer/primer.
Most HVLP guns shoot around 12-18psi measured at the gun with the trigger pulled. My first attempt I was too high at 22psi and got some roughness with some striping in the paint (like what you have but not as predominant).
When the pressure is too high, you're literally bouncing the paint off the surface once it hits it and also drying it out before it settles in on the panel, giving you a rough finish. The pattern should be around 8" in a nice "cigar" shape.
Paint needs to be sprayed on thick, but just thin enough that it doesn't run, this allows it to flow out.
Not trying to bash your efforts in anyway, just a bit of advice from a fellow "garage painter". Best thing is to practice, I did my car TWICE, and part of my new trade in the airforce have 2 months of painting training (year long course, it was just a portion) and still have lots of experience to gain... A few more cars to paint before I feel really comfortable.
Black is not a new guy friendly colour either, but it's one of the best!
11-29-2015, 04:07 AM
#7
Senior Member
Thread Starter
Join Date: Feb 2009
Location: Brisbane, Australia
Posts: 848
Likes: 0
Received 14 Likes
on
12 Posts
Car: 1985 Pontiac TransAM
Engine: 400SBC 24x conversion
Transmission: T700r Stage2 Shiftkitted
Axle/Gears: 2.77 9 Bolt
Re: Acrylic Painting - Jet Black 85 TransAM, Questions...
Thanks for the tips WTR388.
Yeah I got the gun setup right at the end, but the bonnet was where all my gun problems happened unfortunately.
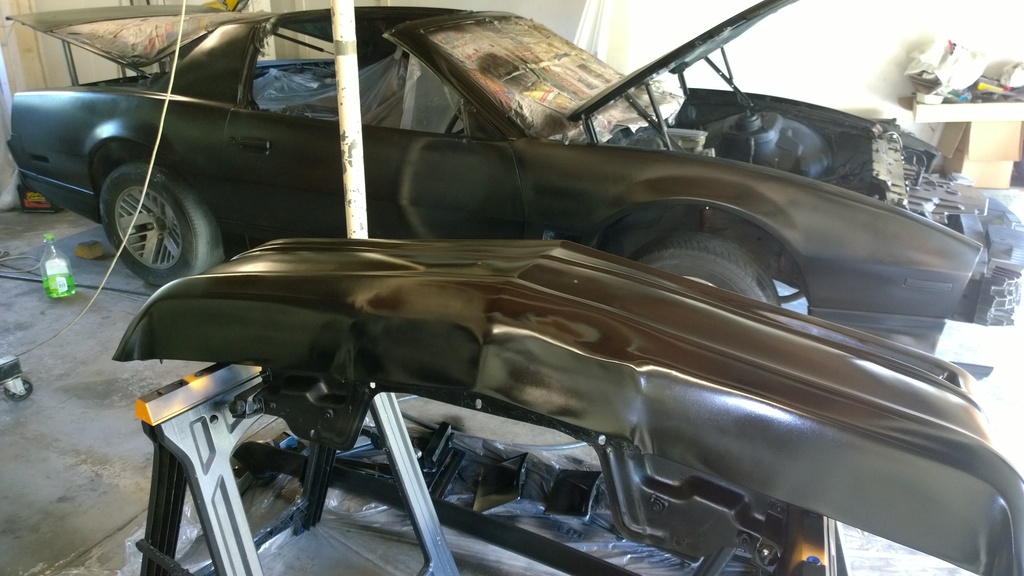
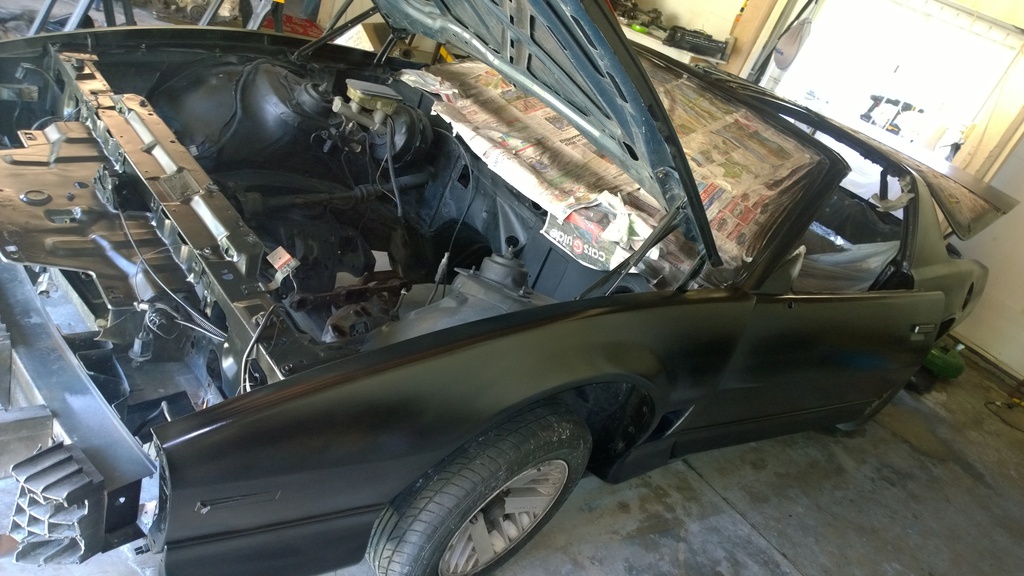
I hit the car with 1500 wet all over today and it looks like the hood has come good.
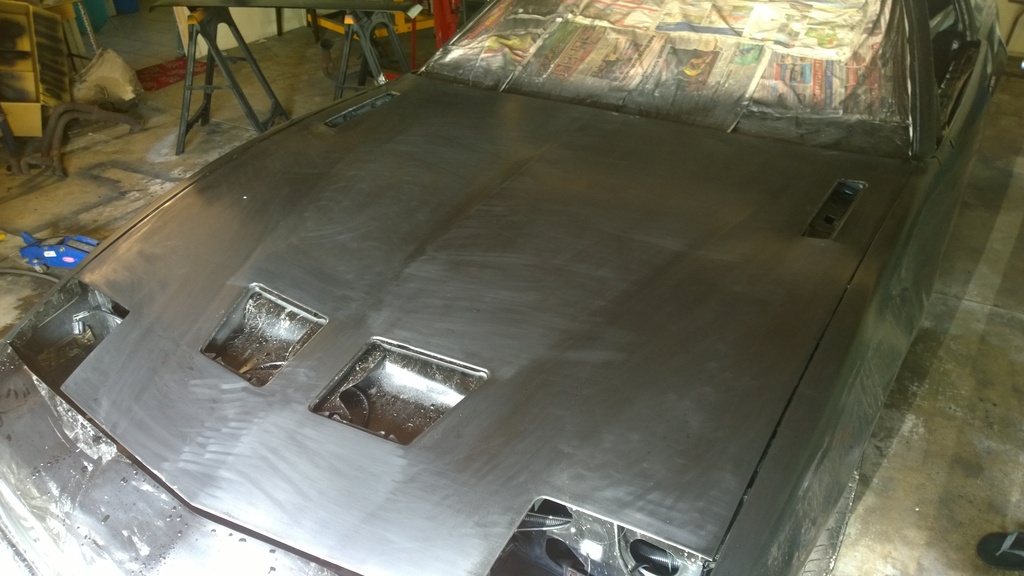
Unfortunately, I got carried away on the rear hatch and went back to primer on the edges, so I'm gonna have to put at least one more coat on that. But as far as I'm concerned, the car is black now, so a respray later will be a lot easier than a colour change, so I'll buff it and see what sort of end job I have.
As you did, I'll most likely use the skills and practice I racked up this go to do a better job next time. It just feels a bit sad when you get to the end of the paint job and know where you went wrong and how you could've done it better.
wet with the hose after sanding, very smooth now.
Yeah I got the gun setup right at the end, but the bonnet was where all my gun problems happened unfortunately.
I hit the car with 1500 wet all over today and it looks like the hood has come good.

Unfortunately, I got carried away on the rear hatch and went back to primer on the edges, so I'm gonna have to put at least one more coat on that. But as far as I'm concerned, the car is black now, so a respray later will be a lot easier than a colour change, so I'll buff it and see what sort of end job I have.
As you did, I'll most likely use the skills and practice I racked up this go to do a better job next time. It just feels a bit sad when you get to the end of the paint job and know where you went wrong and how you could've done it better.
wet with the hose after sanding, very smooth now.

Trending Topics
11-29-2015, 03:18 PM
#8
Re: Acrylic Painting - Jet Black 85 TransAM, Questions...
psi too high, 20-25 is about where it should be.
Also what works for me is to open the fan and fluid ***** open all the way, then take a practice panel and figure out how fast you should move the gun. Works for me, but i'm no pro either.
Also what works for me is to open the fan and fluid ***** open all the way, then take a practice panel and figure out how fast you should move the gun. Works for me, but i'm no pro either.
11-29-2015, 03:30 PM
#9
Senior Member
Thread Starter
Join Date: Feb 2009
Location: Brisbane, Australia
Posts: 848
Likes: 0
Received 14 Likes
on
12 Posts
Car: 1985 Pontiac TransAM
Engine: 400SBC 24x conversion
Transmission: T700r Stage2 Shiftkitted
Axle/Gears: 2.77 9 Bolt
Re: Acrylic Painting - Jet Black 85 TransAM, Questions...
Hey Bill,
Thanks for that, yeah I just had some really bad luck with the gun on the top coat.
Do you think looking at the rubbed back hood it will polish up fine, or will the streaks come out after buffing?
Thanks for that, yeah I just had some really bad luck with the gun on the top coat.
Do you think looking at the rubbed back hood it will polish up fine, or will the streaks come out after buffing?
11-29-2015, 04:21 PM
#10
Supreme Member
Join Date: Jun 2011
Location: knoxville tn
Posts: 2,036
Likes: 0
Received 5 Likes
on
5 Posts
Car: 86 IROC
Engine: 5.0 TPI
Transmission: 700-R-4
Axle/Gears: 2.73 open
Re: Acrylic Painting - Jet Black 85 TransAM, Questions...
im assuming you are using acrylic enamel . IMHO the best paint ,period . if you add the hardner to it .it drys fast and hard . most of the time a light sanding /buffing is all that it needs after it drys . and its a single stage . no need for any puny clear coat
11-29-2015, 04:55 PM
#11
Senior Member
Thread Starter
Join Date: Feb 2009
Location: Brisbane, Australia
Posts: 848
Likes: 0
Received 14 Likes
on
12 Posts
Car: 1985 Pontiac TransAM
Engine: 400SBC 24x conversion
Transmission: T700r Stage2 Shiftkitted
Axle/Gears: 2.77 9 Bolt
Re: Acrylic Painting - Jet Black 85 TransAM, Questions...
It's an acrylic lacquer:
http://www.septone.com.au/detail.asp...239&page_num=1
I didn't use any hardener, and wasn't going to use a clear coat, was just going to buff and shine.
I got a variable speed rotary buffer with wool pad, but from what I've been reading, should I switch to foam pad?
http://www.septone.com.au/detail.asp...239&page_num=1
I didn't use any hardener, and wasn't going to use a clear coat, was just going to buff and shine.
I got a variable speed rotary buffer with wool pad, but from what I've been reading, should I switch to foam pad?
11-29-2015, 07:25 PM
#12
Senior Member
Thread Starter
Join Date: Feb 2009
Location: Brisbane, Australia
Posts: 848
Likes: 0
Received 14 Likes
on
12 Posts
Car: 1985 Pontiac TransAM
Engine: 400SBC 24x conversion
Transmission: T700r Stage2 Shiftkitted
Axle/Gears: 2.77 9 Bolt
Re: Acrylic Painting - Jet Black 85 TransAM, Questions...
Also, what sort of cutting compound should I use for acrylic.
I think it'll need to be pretty light as I think I should've maybe put some more top coats on, or at least more on the edges, but I'm going to tape the edges off for the buffing anyway, and do them lightly by hand.
I think it'll need to be pretty light as I think I should've maybe put some more top coats on, or at least more on the edges, but I'm going to tape the edges off for the buffing anyway, and do them lightly by hand.
11-30-2015, 03:53 PM
#14
Senior Member
Thread Starter
Join Date: Feb 2009
Location: Brisbane, Australia
Posts: 848
Likes: 0
Received 14 Likes
on
12 Posts
Car: 1985 Pontiac TransAM
Engine: 400SBC 24x conversion
Transmission: T700r Stage2 Shiftkitted
Axle/Gears: 2.77 9 Bolt
Re: Acrylic Painting - Jet Black 85 TransAM, Questions...
cool thanks.
What about polish/wax?
Any particular type to use for acrylic?
What about polish/wax?
Any particular type to use for acrylic?
11-30-2015, 10:54 PM
#15
Member
Re: Acrylic Painting - Jet Black 85 TransAM, Questions...
Don't bother buffing it if you plan on putting more paint on, also don't use any wax for at least 6 months after painting.
12-01-2015, 04:43 AM
#16
Senior Member
Thread Starter
Join Date: Feb 2009
Location: Brisbane, Australia
Posts: 848
Likes: 0
Received 14 Likes
on
12 Posts
Car: 1985 Pontiac TransAM
Engine: 400SBC 24x conversion
Transmission: T700r Stage2 Shiftkitted
Axle/Gears: 2.77 9 Bolt
Re: Acrylic Painting - Jet Black 85 TransAM, Questions...
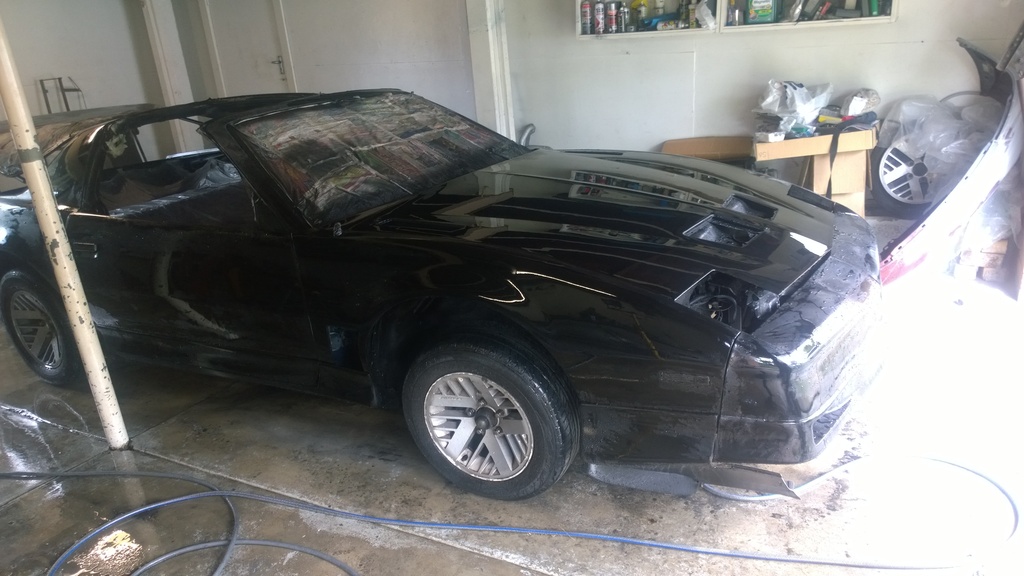
So...
I buffed it, and it looks pretty great...
except for a few edges where I went too far and went back to primer :'(
can I 600 sand these areas, add more paint, then sand and buff to blend, or will I have to redo it all?
I buffed it, and it looks pretty great...
except for a few edges where I went too far and went back to primer :'(
can I 600 sand these areas, add more paint, then sand and buff to blend, or will I have to redo it all?
12-01-2015, 04:45 AM
#17
Senior Member
Thread Starter
Join Date: Feb 2009
Location: Brisbane, Australia
Posts: 848
Likes: 0
Received 14 Likes
on
12 Posts
Car: 1985 Pontiac TransAM
Engine: 400SBC 24x conversion
Transmission: T700r Stage2 Shiftkitted
Axle/Gears: 2.77 9 Bolt
Re: Acrylic Painting - Jet Black 85 TransAM, Questions...

Last edited by evilstuie; 12-01-2015 at 10:02 PM.
12-01-2015, 09:54 PM
#18
Member
Re: Acrylic Painting - Jet Black 85 TransAM, Questions...
You will have to repaint the whole panel, there is no easy way to just paint part of a panel. When you buff the rest of the car make sure the buffing pad is always spinning away from the edge of the panel, not towards it. That accounts for a lot of the buffing mistakes I've seen.
12-02-2015, 01:06 PM
#19
Senior Member
Thread Starter
Join Date: Feb 2009
Location: Brisbane, Australia
Posts: 848
Likes: 0
Received 14 Likes
on
12 Posts
Car: 1985 Pontiac TransAM
Engine: 400SBC 24x conversion
Transmission: T700r Stage2 Shiftkitted
Axle/Gears: 2.77 9 Bolt
Re: Acrylic Painting - Jet Black 85 TransAM, Questions...
So I can't patch paint and sand/buff it to blend it?
12-02-2015, 09:11 PM
#20
Member
Re: Acrylic Painting - Jet Black 85 TransAM, Questions...
No, you really can't. You could try but the paint will pull back and look bad, then you will have to paint it a 3rd time 
12-03-2015, 12:22 AM
#21
Supreme Member
iTrader: (7)
Join Date: May 2004
Location: Lexington, SC
Posts: 5,291
Likes: 0
Received 58 Likes
on
52 Posts
Car: 1987 SC/1985 TA
Engine: 350/vortec/fitech
Transmission: T56
Axle/Gears: 3.27 9-bolt
Re: Acrylic Painting - Jet Black 85 TransAM, Questions...
A single stage can usually be blended in. I've no experience with your paint though. Tryin won't hurt though.
12-03-2015, 09:15 AM
#22
Re: Acrylic Painting - Jet Black 85 TransAM, Questions...
In my (limited) experience, base-clear is much easier to work with. If you end up repainting I'd go that route next time.
12-03-2015, 04:26 PM
#24
Member
Join Date: Mar 2014
Location: PA
Posts: 140
Likes: 0
Received 0 Likes
on
0 Posts
Car: 87 Camaro LT
Engine: 383 Twin Turbo - In progress
Axle/Gears: 3.43
Re: Acrylic Painting - Jet Black 85 TransAM, Questions...
What tip size are you using and what gun?
Your psi is way too high. Every gun is different. I haven't painted for a bit but with mine I usually have it at 14-14.25 psi with a spray pattern of 8 inch. You need to take a test panel and spray it till you get what is optitum.
When painting, and depending on how much wave you don't mind in the finished paint job, you need to sand your primer flat with 400. Use guide coat if needed. If you don't mind waves in the paint then you're free here to just keep rolling.
If you make a mistake like you did on a panel you have two options. One is to sand it back to primer and respray the primer then sand to as flat as you care too, the flatter the better, then respray your base coat. or 2). scratch the whole panel with 200, respray primer and sand with 400 till desired flatness.
Option 2 is the fastest but you will risk paint failure earlier by peeling or bad adhesion if not done correctly. Option one is your best choice.
When spraying, make sure you spray it thick enough to cover but it doesn't run, staying in a "straight" run across the panel while making sure to over lap as you're spraying.
If you are going for a well done finish, let it dry for 24 hours, then color sand to remove the over spray and repaint one more time with base coat and repeat the 24 hour cure and color sand.
After that you are free to start your clear coating process. Everyone is different here and many methods will work the same. My pop use to do 3 dust coats, wet sand flat, then do a thick clear, wet sand again flat, then spray 3 heavy coats of clear, wet sand flat, buff and polish. My father and I always laid a thick coat on first, wet sand flat, two more thick coats, wet sand flat again, and then buff and polish. One guy I know use to just clear it 4 times really heavy, then wet sand it all and buff and polish.
The end product though for waves really comes down to how you prep and how flat you manage to get your panels. If you're panels aren't straight when your do your base coat, then they'll wave after your clear coat.
Depending on how glossy you want your black, it'll show more of how the panels were done at first. I give you props for doing black on your first time, black is truly the hardest color to do because it shows everything.
Good luck and have fun while doing it, it'll pay off no matter what in the end when you hit the road the first time in that paint job because you did it.
12-04-2015, 07:44 AM
#25
Re: Acrylic Painting - Jet Black 85 TransAM, Questions...
Also make sure you're not holding the gun too far from the surface. I believe 6-8 inches from the surface is about right.