Body General body information and techniques for restoration, repairs, and modifications.

Paint and Body Project on my 89 IROC

Thread Tools
 
Search this Thread
 
Old 05-21-2016, 09:44 PM
  #1  
Member

Thread Starter
 
spurgeon76's Avatar
 
Join Date: Sep 2005
Location: Yorktown, VA
Posts: 389
Received 3 Likes on 2 Posts
Car: 1989 IROC-Z
Engine: L98
Transmission: 700R4
Axle/Gears: 4th gen rear with 3.42
Paint and Body Project on my 89 IROC

So it's time I finally get the old girl ready for paint. I will be prepping the car, stripping her down, sanding her, and taking her in for a MAACO paint single stage Urethane paint job in the original White. I started today by removing the stripes with a 3M Eraser wheel and then removing the front bumper cover so I can fix the giant crack between the fog light opening and the turn signal on the driver's side. I will be using Eastwood epoxy primer (I hear its just Kirker Enduro Prime) and Finish 1 FP410 2K primer for the spot repairs I will have to do. This is going to be a summer project so I plan to update it as I go (mainly every weekend).


Before.


Before.


Before.


Before.


Stripes Removed.


Stripes Removed.
Old 05-21-2016, 09:48 PM
  #2  
Junior Member
 
Matt trans am's Avatar
 
Join Date: May 2016
Location: Ottawa. On canada
Posts: 60
Likes: 0
Received 0 Likes on 0 Posts
Car: 1985 trans am
Engine: 350
Transmission: T-5
Axle/Gears: 2.73
Re: Paint and Body Project on my 89 IROC

Nice
Old 05-21-2016, 09:50 PM
  #3  
Member

Thread Starter
 
spurgeon76's Avatar
 
Join Date: Sep 2005
Location: Yorktown, VA
Posts: 389
Received 3 Likes on 2 Posts
Car: 1989 IROC-Z
Engine: L98
Transmission: 700R4
Axle/Gears: 4th gen rear with 3.42
Re: Paint and Body Project on my 89 IROC


What's left of her stripes.


3M Eraser works like magic.


Cracked/torn bumper cover.


Grill insert and turn lights removed.


Front Bumper cover removed.
Old 05-22-2016, 10:06 PM
  #4  
Senior Member
iTrader: (-1)
 
Brando5641's Avatar
 
Join Date: Oct 2008
Location: Siloam Springs AR.
Posts: 809
Likes: 0
Received 1 Like on 1 Post
Car: 1998 Trans/Am, 1989 RS Camaro
Engine: LS1, LQ9 6.0
Transmission: 4L60E, 4L60E
Axle/Gears: 2.73, 2.73
Re: Paint and Body Project on my 89 IROC

I would replace that bumper cover and mirror. IMO
Old 05-23-2016, 06:08 PM
  #5  
Member

Thread Starter
 
spurgeon76's Avatar
 
Join Date: Sep 2005
Location: Yorktown, VA
Posts: 389
Received 3 Likes on 2 Posts
Car: 1989 IROC-Z
Engine: L98
Transmission: 700R4
Axle/Gears: 4th gen rear with 3.42
Re: Paint and Body Project on my 89 IROC

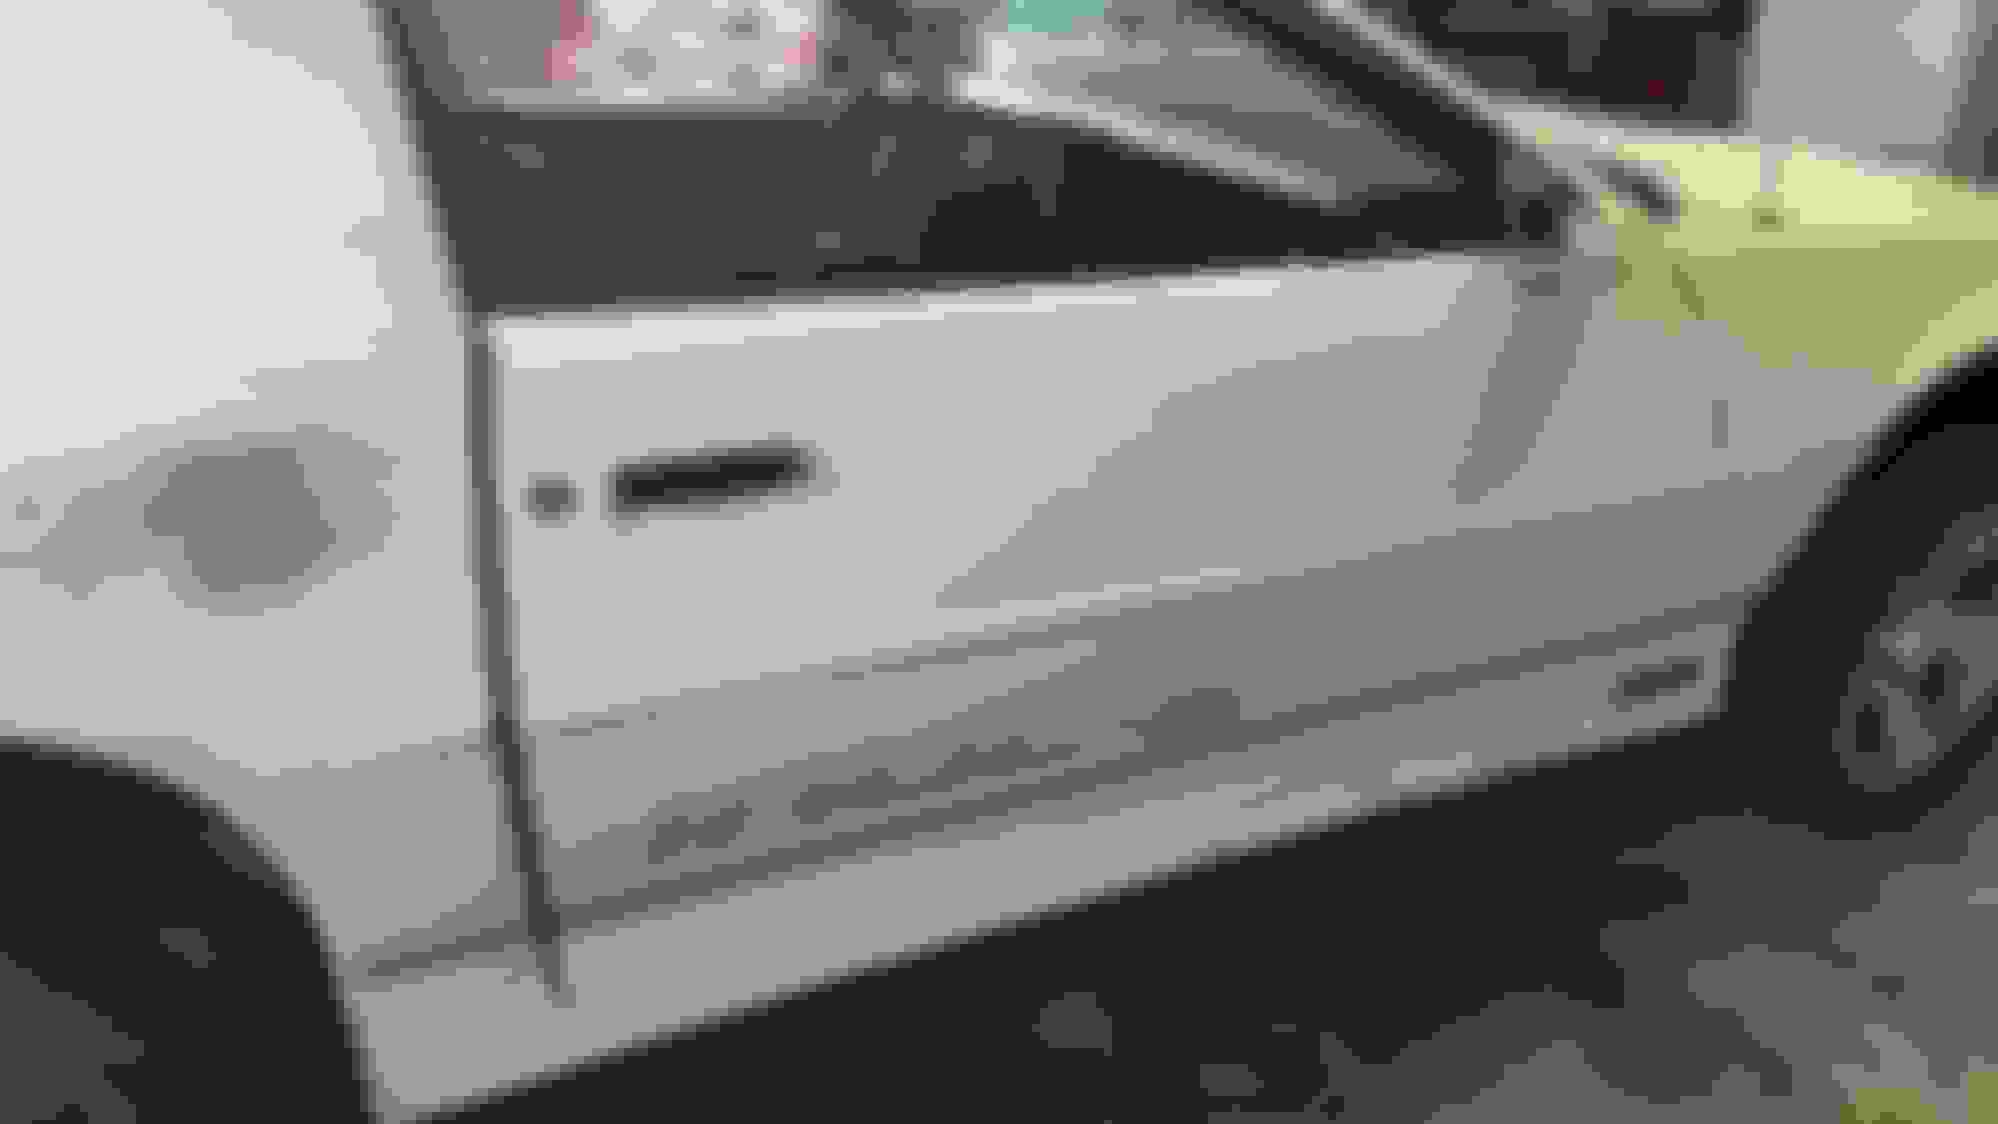
For the cost of a bumper repair kit I am going to make a attempt at repairing the bumper cover myself. If it fails or I bugger it up completely I am more than ready to buy a new one. As for the mirror, if you look closely you will see a dent under the mirror. The guy bought it off of said that a shelf in his garage collapsed and something heavy landed on the mirror. It not only dented the mirror but it peeled the top of the door skin about 2 inches away from the glass. I was able to straighten it out so its not noticeable but the whole door needs replaced as I intend to do. So yes I will replace the mirror with the door and I will replace the bumper cover if my repair looks bad. I appreciate the opinions.
Old 05-23-2016, 11:26 PM
  #6  
Supreme Member

iTrader: (15)
 
Tibo's Avatar
 
Join Date: Jun 2003
Location: Desert
Posts: 5,025
Received 76 Likes on 66 Posts
Car: 1991 Z28 Vert
Engine: 383 single plane efi
Transmission: T-56
Axle/Gears: 8.8 with 3.73s
Re: Paint and Body Project on my 89 IROC

Originally Posted by Brando5641
I would replace that bumper cover and mirror. IMO
Agreed 100%. I just finished lots of bumper work on mine, filling in the big factory indentations and repairing a 3-4" crack in the middle of the bumper. It was a time consuming project. Your crack is very long and goes to an edge. You would need to use strips of urethane and epoxy them over the cut like you would steri strips on a deep cut on your body. You would also want to drill through the bumper and urethane strips so the epoxy had little finger projections to help hold it. Seriously for the amount of time and supplies you'll have in this you're better off grabbing a better piece from a yard or part out. I would also heavily advise against single stage. It will never have the gloss or depth of a base coat clear coat. You also won't have the level of uv and scratch resistance a clear coat has. Difference in price for single stage vs clear coat isn't really night and day either. You'll want this paint job to last the entire time you own the car, don't end up wanting to kick yourself everyday when you think you only did this to save a few bucks.

Seriously, you'll have more than you think in repairing it. You'll need the flexible bumper adhesive, flexible filler like poly flex, compatible plastic strips. If you found a bumper for $100 take it. After $100 it just depends on how much time you have vs funds.

Last edited by Tibo; 05-23-2016 at 11:32 PM.
Old 05-25-2016, 11:03 PM
  #7  
Senior Member
iTrader: (-1)
 
Brando5641's Avatar
 
Join Date: Oct 2008
Location: Siloam Springs AR.
Posts: 809
Likes: 0
Received 1 Like on 1 Post
Car: 1998 Trans/Am, 1989 RS Camaro
Engine: LS1, LQ9 6.0
Transmission: 4L60E, 4L60E
Axle/Gears: 2.73, 2.73
Re: Paint and Body Project on my 89 IROC

My 89 I painted had a badly ripped front bumper. I was able to repair it but like Tibo said, the amount of time alone is worth jut finding another bumper. I understand if you are on a super tight budget but if you can afford it get another bumper.
If you have no choice but to repair it use the 3M or Bondo brand Bumper repair 2 part epoxy. It works good.
If you are looking for a budget friendly paint go to Paintforcars.com Get basecoat clear coat. Its much more forgiving.

Not trying to nit pick just speaking from experience.
Old 05-29-2016, 01:14 PM
  #8  
Member

Thread Starter
 
spurgeon76's Avatar
 
Join Date: Sep 2005
Location: Yorktown, VA
Posts: 389
Received 3 Likes on 2 Posts
Car: 1989 IROC-Z
Engine: L98
Transmission: 700R4
Axle/Gears: 4th gen rear with 3.42
Re: Paint and Body Project on my 89 IROC


Back side of the front bumper cover before trimming the extra fiberglass tape.


Front side curing.
Old 05-29-2016, 01:16 PM
  #9  
Member

Thread Starter
 
spurgeon76's Avatar
 
Join Date: Sep 2005
Location: Yorktown, VA
Posts: 389
Received 3 Likes on 2 Posts
Car: 1989 IROC-Z
Engine: L98
Transmission: 700R4
Axle/Gears: 4th gen rear with 3.42
Re: Paint and Body Project on my 89 IROC

Pulled off the body molding strips, the IROC badges on the rocker ground effects, the outer door sweeps, and the side mirrors.
Old 05-29-2016, 01:19 PM
  #10  
Member

Thread Starter
 
spurgeon76's Avatar
 
Join Date: Sep 2005
Location: Yorktown, VA
Posts: 389
Received 3 Likes on 2 Posts
Car: 1989 IROC-Z
Engine: L98
Transmission: 700R4
Axle/Gears: 4th gen rear with 3.42
Re: Paint and Body Project on my 89 IROC


Badge removed.


Molding and outer door felt removed.
Old 05-29-2016, 01:21 PM
  #11  
Member

Thread Starter
 
spurgeon76's Avatar
 
Join Date: Sep 2005
Location: Yorktown, VA
Posts: 389
Received 3 Likes on 2 Posts
Car: 1989 IROC-Z
Engine: L98
Transmission: 700R4
Axle/Gears: 4th gen rear with 3.42
Re: Paint and Body Project on my 89 IROC


I dont think i have the talent to fix this, so im gonna replace the door.
Old 05-29-2016, 01:46 PM
  #12  
Supreme Member

iTrader: (15)
 
Tibo's Avatar
 
Join Date: Jun 2003
Location: Desert
Posts: 5,025
Received 76 Likes on 66 Posts
Car: 1991 Z28 Vert
Engine: 383 single plane efi
Transmission: T-56
Axle/Gears: 8.8 with 3.73s
Re: Paint and Body Project on my 89 IROC

I would remove the door and take it to a body shop or welder then. It wouldn't be difficult to cut that out and weld in a new patch. Same process as shaved door handles. Compare that price to a parts yard door in good shape. A different door will probably be a different color which would mean sanding the entire thing down and it would possibly hang differently.
Old 05-29-2016, 02:04 PM
  #13  
Member

Thread Starter
 
spurgeon76's Avatar
 
Join Date: Sep 2005
Location: Yorktown, VA
Posts: 389
Received 3 Likes on 2 Posts
Car: 1989 IROC-Z
Engine: L98
Transmission: 700R4
Axle/Gears: 4th gen rear with 3.42
Re: Paint and Body Project on my 89 IROC

That's an idea I hadn't thought about. My local junkyard has an 86 Z28 door for $150. It's blue with PW, PM, and PL's. They also have a white door from a 91 Firebird but then I would have to drill the door for the gfx.
Old 05-29-2016, 02:39 PM
  #14  
Member
iTrader: (1)
 
valicswarrior's Avatar
 
Join Date: Oct 2010
Location: Virginia Beach, VA
Posts: 347
Likes: 0
Received 0 Likes on 0 Posts
Car: 1985 Firebird S/E
Engine: SBC 350, mild cam Vortec heads
Transmission: Rebuilt 700R4 vette servo+shift kit
Axle/Gears: 3.73
Re: Paint and Body Project on my 89 IROC

as far as i know the doors for camaro's and firebird's are a different shape.
Old 05-29-2016, 02:43 PM
  #15  
Member

Thread Starter
 
spurgeon76's Avatar
 
Join Date: Sep 2005
Location: Yorktown, VA
Posts: 389
Received 3 Likes on 2 Posts
Car: 1989 IROC-Z
Engine: L98
Transmission: 700R4
Axle/Gears: 4th gen rear with 3.42
Re: Paint and Body Project on my 89 IROC

The doors are the same. It's the GFX that are different
Old 05-29-2016, 07:16 PM
  #16  
Member

Thread Starter
 
spurgeon76's Avatar
 
Join Date: Sep 2005
Location: Yorktown, VA
Posts: 389
Received 3 Likes on 2 Posts
Car: 1989 IROC-Z
Engine: L98
Transmission: 700R4
Axle/Gears: 4th gen rear with 3.42
Re: Paint and Body Project on my 89 IROC


Got a couple of low spots but its definitely looking better.
Old 05-30-2016, 12:56 AM
  #17  
Senior Member
 
Billgluckman's Avatar
 
Join Date: Jan 2015
Posts: 565
Received 47 Likes on 41 Posts
Re: Paint and Body Project on my 89 IROC

It'd be a lot cheaper to replace the door in my area. A door is 60 bucks in the junkyard here.
Old 05-30-2016, 07:46 AM
  #18  
Member

Thread Starter
 
spurgeon76's Avatar
 
Join Date: Sep 2005
Location: Yorktown, VA
Posts: 389
Received 3 Likes on 2 Posts
Car: 1989 IROC-Z
Engine: L98
Transmission: 700R4
Axle/Gears: 4th gen rear with 3.42
Re: Paint and Body Project on my 89 IROC

Man, I'm jealous.
Old 05-30-2016, 10:52 AM
  #19  
Member
iTrader: (3)
 
dbrochard's Avatar
 
Join Date: Nov 2014
Location: Connecticut
Posts: 227
Likes: 0
Received 5 Likes on 5 Posts
Car: 1991 Camaro RS
Engine: 305 TBI
Transmission: WC T5
Axle/Gears: Torsen 3.73
Re: Paint and Body Project on my 89 IROC

If you want I have a manual mirror and a power mirror for that passenger side you have to replace. PM me if you are interested
Old 06-04-2016, 10:56 AM
  #20  
Member

Thread Starter
 
spurgeon76's Avatar
 
Join Date: Sep 2005
Location: Yorktown, VA
Posts: 389
Received 3 Likes on 2 Posts
Car: 1989 IROC-Z
Engine: L98
Transmission: 700R4
Axle/Gears: 4th gen rear with 3.42
Re: Paint and Body Project on my 89 IROC


Got some 2k primer on it this morning. Its got a little orangle peel but nothing I cant sand out.

Last edited by spurgeon76; 06-04-2016 at 12:31 PM.
Old 06-04-2016, 10:03 PM
  #21  
Supreme Member

iTrader: (15)
 
Tibo's Avatar
 
Join Date: Jun 2003
Location: Desert
Posts: 5,025
Received 76 Likes on 66 Posts
Car: 1991 Z28 Vert
Engine: 383 single plane efi
Transmission: T-56
Axle/Gears: 8.8 with 3.73s
Re: Paint and Body Project on my 89 IROC

It looks like it came out well. The chin spoiler being bolted to the bumper cover will add some strength but I would still be extremely careful not to flex it when handling it until it is mounted and then be very careful when pulling up to parking blocks, curbs or walls. It looks like you did a good job but I would still be conscientious about the strength of it.
Old 06-05-2016, 08:43 PM
  #22  
Senior Member
iTrader: (-1)
 
Brando5641's Avatar
 
Join Date: Oct 2008
Location: Siloam Springs AR.
Posts: 809
Likes: 0
Received 1 Like on 1 Post
Car: 1998 Trans/Am, 1989 RS Camaro
Engine: LS1, LQ9 6.0
Transmission: 4L60E, 4L60E
Axle/Gears: 2.73, 2.73
Re: Paint and Body Project on my 89 IROC

Originally Posted by Tibo
It looks like it came out well. The chin spoiler being bolted to the bumper cover will add some strength but I would still be extremely careful not to flex it when handling it until it is mounted and then be very careful when pulling up to parking blocks, curbs or walls. It looks like you did a good job but I would still be conscientious about the strength of it.
^^^^^^ Yes
Old 06-06-2016, 05:11 PM
  #23  
Member

Thread Starter
 
spurgeon76's Avatar
 
Join Date: Sep 2005
Location: Yorktown, VA
Posts: 389
Received 3 Likes on 2 Posts
Car: 1989 IROC-Z
Engine: L98
Transmission: 700R4
Axle/Gears: 4th gen rear with 3.42
Re: Paint and Body Project on my 89 IROC

I agree. I will be taking it easy with the bumper cover. I do have to say that so far it seems pretty strong with the back side reinforced with the fiberglass mesh.
Old 06-08-2016, 08:09 PM
  #24  
Member

Thread Starter
 
spurgeon76's Avatar
 
Join Date: Sep 2005
Location: Yorktown, VA
Posts: 389
Received 3 Likes on 2 Posts
Car: 1989 IROC-Z
Engine: L98
Transmission: 700R4
Axle/Gears: 4th gen rear with 3.42
Re: Paint and Body Project on my 89 IROC


Ok, so i thought i would at least take a shot at the door dent (see above #11 for the before). What do you guys think about my hammering skills so far? The problem is the damn door reinforcement strip that runs behind the top half of the door. I cannot get a dolly on the backside at all. I figured spending a couple of hours on this might be cheaper than a door swap. If anyone has any recommendations I am all ears.
Old 06-09-2016, 10:28 AM
  #25  
Supreme Member

iTrader: (15)
 
Tibo's Avatar
 
Join Date: Jun 2003
Location: Desert
Posts: 5,025
Received 76 Likes on 66 Posts
Car: 1991 Z28 Vert
Engine: 383 single plane efi
Transmission: T-56
Axle/Gears: 8.8 with 3.73s
Re: Paint and Body Project on my 89 IROC

Just be cautious not to overwork the area and get the tin can effect. If you can push it in and it rebounds out or vice versa it really takes a skilled person to fix it.
Old 06-13-2016, 06:33 PM
  #26  
Member

Thread Starter
 
spurgeon76's Avatar
 
Join Date: Sep 2005
Location: Yorktown, VA
Posts: 389
Received 3 Likes on 2 Posts
Car: 1989 IROC-Z
Engine: L98
Transmission: 700R4
Axle/Gears: 4th gen rear with 3.42
Re: Paint and Body Project on my 89 IROC


Slathered it in some bondo glass to give the mounting holes some strength. Don't worry none of the dents are deeper than an 1/8th of an inch.
Old 06-13-2016, 06:35 PM
  #27  
Member

Thread Starter
 
spurgeon76's Avatar
 
Join Date: Sep 2005
Location: Yorktown, VA
Posts: 389
Received 3 Likes on 2 Posts
Car: 1989 IROC-Z
Engine: L98
Transmission: 700R4
Axle/Gears: 4th gen rear with 3.42
Re: Paint and Body Project on my 89 IROC


Sanded the fiberglass with some 80 grit. They are not joking when they say this stuff is hard to sand.
Old 06-13-2016, 06:39 PM
  #28  
Member

Thread Starter
 
spurgeon76's Avatar
 
Join Date: Sep 2005
Location: Yorktown, VA
Posts: 389
Received 3 Likes on 2 Posts
Car: 1989 IROC-Z
Engine: L98
Transmission: 700R4
Axle/Gears: 4th gen rear with 3.42
Re: Paint and Body Project on my 89 IROC


After getting the fiberglass sanded out I filled the low spots with body filler. Then I sanded it with 80 grit and 180 grit and feathered the paint edges with 180 then 320.
Old 06-13-2016, 06:41 PM
  #29  
Member

Thread Starter
 
spurgeon76's Avatar
 
Join Date: Sep 2005
Location: Yorktown, VA
Posts: 389
Received 3 Likes on 2 Posts
Car: 1989 IROC-Z
Engine: L98
Transmission: 700R4
Axle/Gears: 4th gen rear with 3.42
Re: Paint and Body Project on my 89 IROC


3 coats of Eastwood Epoxy primer later. Yes it has a few runs but i will sand them out. I just wanted to get the bare metal covered.

Last edited by spurgeon76; 06-13-2016 at 06:56 PM.
Old 06-19-2016, 09:13 PM
  #30  
Senior Member
iTrader: (4)
 
Arizona IROC's Avatar
 
Join Date: Jan 2008
Location: Rustfree Gilbert Arizona
Posts: 545
Likes: 0
Received 0 Likes on 0 Posts
Car: 1989 IROC
Engine: 305TPI
Transmission: 700R4
Axle/Gears: 2:73 posi
Re: Paint and Body Project on my 89 IROC

I would sand the body down with 400 grit or so and use the stock paint as the base without sanding the whole car down to metal. Just bare metal wherever the bad paint checking is and where the bondo needs to be applied. Then finish off with high build primer and last minute block sanding before taking it down to MAACO
Old 06-20-2016, 08:57 AM
  #31  
Supreme Member

iTrader: (15)
 
Tibo's Avatar
 
Join Date: Jun 2003
Location: Desert
Posts: 5,025
Received 76 Likes on 66 Posts
Car: 1991 Z28 Vert
Engine: 383 single plane efi
Transmission: T-56
Axle/Gears: 8.8 with 3.73s
Re: Paint and Body Project on my 89 IROC

If it's a dark or metallic color go to 600 grit. You can use a pre existing paint job as a base before color but the adhesion of the color coat may be effected. Always best to at least spray a coat of epoxy primer of the same manufacturer that made the paint you'll use.
Old 06-27-2016, 08:02 PM
  #32  
Member

Thread Starter
 
spurgeon76's Avatar
 
Join Date: Sep 2005
Location: Yorktown, VA
Posts: 389
Received 3 Likes on 2 Posts
Car: 1989 IROC-Z
Engine: L98
Transmission: 700R4
Axle/Gears: 4th gen rear with 3.42
Re: Paint and Body Project on my 89 IROC


Been busy at work so this has been a slow project. Finally got the spoiler and tail lights removed. A lot of grime under there.
Old 06-27-2016, 08:16 PM
  #33  
Member

Thread Starter
 
spurgeon76's Avatar
 
Join Date: Sep 2005
Location: Yorktown, VA
Posts: 389
Received 3 Likes on 2 Posts
Car: 1989 IROC-Z
Engine: L98
Transmission: 700R4
Axle/Gears: 4th gen rear with 3.42
Re: Paint and Body Project on my 89 IROC

That is pretty much the plan.
Old 06-27-2016, 08:22 PM
  #34  
Member

Thread Starter
 
spurgeon76's Avatar
 
Join Date: Sep 2005
Location: Yorktown, VA
Posts: 389
Received 3 Likes on 2 Posts
Car: 1989 IROC-Z
Engine: L98
Transmission: 700R4
Axle/Gears: 4th gen rear with 3.42
Re: Paint and Body Project on my 89 IROC

Originally Posted by Arizona IROC
I would sand the body down with 400 grit or so and use the stock paint as the base without sanding the whole car down to metal. Just bare metal wherever the bad paint checking is and where the bondo needs to be applied. Then finish off with high build primer and last minute block sanding before taking it down to MAACO
That is pretty close to the plan. Since I am keeping it White I was planning to only spot prime the areas that need it and have MAACO use a sealer.
Old 06-27-2016, 08:23 PM
  #35  
Member

Thread Starter
 
spurgeon76's Avatar
 
Join Date: Sep 2005
Location: Yorktown, VA
Posts: 389
Received 3 Likes on 2 Posts
Car: 1989 IROC-Z
Engine: L98
Transmission: 700R4
Axle/Gears: 4th gen rear with 3.42
Re: Paint and Body Project on my 89 IROC

Originally Posted by Tibo
If it's a dark or metallic color go to 600 grit. You can use a pre existing paint job as a base before color but the adhesion of the color coat may be effected. Always best to at least spray a coat of epoxy primer of the same manufacturer that made the paint you'll use.
I am planning to keep it white but pay for MAACO to use a sealer since I will be spot priming.
Old 07-09-2016, 10:24 PM
  #36  
Member

Thread Starter
 
spurgeon76's Avatar
 
Join Date: Sep 2005
Location: Yorktown, VA
Posts: 389
Received 3 Likes on 2 Posts
Car: 1989 IROC-Z
Engine: L98
Transmission: 700R4
Axle/Gears: 4th gen rear with 3.42
Re: Paint and Body Project on my 89 IROC

**UPDATE**
I broke my foot in four places on the 3rd of July in an ATV accident so sanding the body for paint has been put on hold. I will continue to update with any progress I make but the doctor said no walking for 6 weeks.
Old 07-09-2016, 10:48 PM
  #37  
Supreme Member

iTrader: (11)
 
DynoDave43's Avatar
 
Join Date: Aug 2013
Location: MICHIGAN
Posts: 4,636
Received 751 Likes on 577 Posts
Car: 1988 Trans Am
Engine: L03
Transmission: 700R4
Axle/Gears: 10 Bolt 2.73 Open
Re: Paint and Body Project on my 89 IROC

Ouch. Sorry to hear that.
Old 10-03-2016, 06:34 PM
  #38  
Member

Thread Starter
 
spurgeon76's Avatar
 
Join Date: Sep 2005
Location: Yorktown, VA
Posts: 389
Received 3 Likes on 2 Posts
Car: 1989 IROC-Z
Engine: L98
Transmission: 700R4
Axle/Gears: 4th gen rear with 3.42
Re: Paint and Body Project on my 89 IROC

Update:
So I'm finally up and walking again after crushing and breaking my foot in 14 places. I got all the paint that was flaking off on the A pillar, roof, reardeck, quarter panels sanded off. Then I sprayed it all with Eastwood's Epoxy primer. I managed to get a lot of runs on the quarter panels so I waited 7 days and wet sanded it all with 320. The plan is to spray it with Finish 1 2K high build primer this weekend. Pics are below.

Last edited by spurgeon76; 10-03-2016 at 06:44 PM.
Old 10-03-2016, 06:34 PM
  #39  
Member

Thread Starter
 
spurgeon76's Avatar
 
Join Date: Sep 2005
Location: Yorktown, VA
Posts: 389
Received 3 Likes on 2 Posts
Car: 1989 IROC-Z
Engine: L98
Transmission: 700R4
Axle/Gears: 4th gen rear with 3.42
Re: Paint and Body Project on my 89 IROC

Old 10-03-2016, 06:35 PM
  #40  
Member

Thread Starter
 
spurgeon76's Avatar
 
Join Date: Sep 2005
Location: Yorktown, VA
Posts: 389
Received 3 Likes on 2 Posts
Car: 1989 IROC-Z
Engine: L98
Transmission: 700R4
Axle/Gears: 4th gen rear with 3.42
Re: Paint and Body Project on my 89 IROC

Old 10-03-2016, 06:36 PM
  #41  
Member

Thread Starter
 
spurgeon76's Avatar
 
Join Date: Sep 2005
Location: Yorktown, VA
Posts: 389
Received 3 Likes on 2 Posts
Car: 1989 IROC-Z
Engine: L98
Transmission: 700R4
Axle/Gears: 4th gen rear with 3.42
Re: Paint and Body Project on my 89 IROC

Old 10-03-2016, 06:37 PM
  #42  
Member

Thread Starter
 
spurgeon76's Avatar
 
Join Date: Sep 2005
Location: Yorktown, VA
Posts: 389
Received 3 Likes on 2 Posts
Car: 1989 IROC-Z
Engine: L98
Transmission: 700R4
Axle/Gears: 4th gen rear with 3.42
Re: Paint and Body Project on my 89 IROC

Old 10-05-2016, 03:41 AM
  #43  
Supreme Member

iTrader: (2)
 
mikeceli's Avatar
 
Join Date: Jan 2005
Location: S. UTAH
Posts: 1,239
Likes: 0
Received 161 Likes on 133 Posts
Car: 1989 IROC-Z 305 LB9 AT Convertible
Engine: LB9 305
Transmission: AT
Re: Paint and Body Project on my 89 IROC

Good work! How's the foot?
Old 10-07-2016, 06:00 PM
  #44  
Member

Thread Starter
 
spurgeon76's Avatar
 
Join Date: Sep 2005
Location: Yorktown, VA
Posts: 389
Received 3 Likes on 2 Posts
Car: 1989 IROC-Z
Engine: L98
Transmission: 700R4
Axle/Gears: 4th gen rear with 3.42
Re: Paint and Body Project on my 89 IROC

The foot is slowly getting better. Because I crushed it, it's still swollen.
Old 11-10-2016, 03:30 PM
  #45  
Member

Thread Starter
 
spurgeon76's Avatar
 
Join Date: Sep 2005
Location: Yorktown, VA
Posts: 389
Received 3 Likes on 2 Posts
Car: 1989 IROC-Z
Engine: L98
Transmission: 700R4
Axle/Gears: 4th gen rear with 3.42
Re: Paint and Body Project on my 89 IROC


Finally got the Urethane primer laid down


Finally got the Urethane Primer laid down.
Old 12-23-2016, 08:44 PM
  #46  
Junior Member

 
badazz81z28's Avatar
 
Join Date: Jan 2010
Posts: 17
Likes: 0
Received 0 Likes on 0 Posts
Re: Paint and Body Project on my 89 IROC

Spurgeon, where you at on this?
Old 06-11-2017, 04:29 PM
  #47  
Member

Thread Starter
 
spurgeon76's Avatar
 
Join Date: Sep 2005
Location: Yorktown, VA
Posts: 389
Received 3 Likes on 2 Posts
Car: 1989 IROC-Z
Engine: L98
Transmission: 700R4
Axle/Gears: 4th gen rear with 3.42
Re: Paint and Body Project on my 89 IROC

Update: Block Sanding sucks.
Old 06-19-2017, 12:13 PM
  #48  
Member

Thread Starter
 
spurgeon76's Avatar
 
Join Date: Sep 2005
Location: Yorktown, VA
Posts: 389
Received 3 Likes on 2 Posts
Car: 1989 IROC-Z
Engine: L98
Transmission: 700R4
Axle/Gears: 4th gen rear with 3.42
Re: Paint and Body Project on my 89 IROC

Update: Block sanding on the back half of the car is finished. I need to spray a few low spots with more urethane primer, then block it again. I will start sanding the old paint this week.


All times are GMT -5. The time now is 05:03 PM.