EBL P4 w/Boost Control....
 06-28-2016, 02:28 PM
#1


EBL P4 w/Boost Control....
I've gotten a lot of requests over the years to do a writeup on, not only how I installed my EBL-P4, but how to set it up in general, as well as setting it up to be boost pressure ready. To start with, my vehicle is a 1990 Pontiac GTA, originally coming from the factory with the infamous '7730 Speed Density ECM from General Motors. I'm not going to get into the wiring itself of the EBL-P4, because to be honest it is just a few pins needing to be moved...
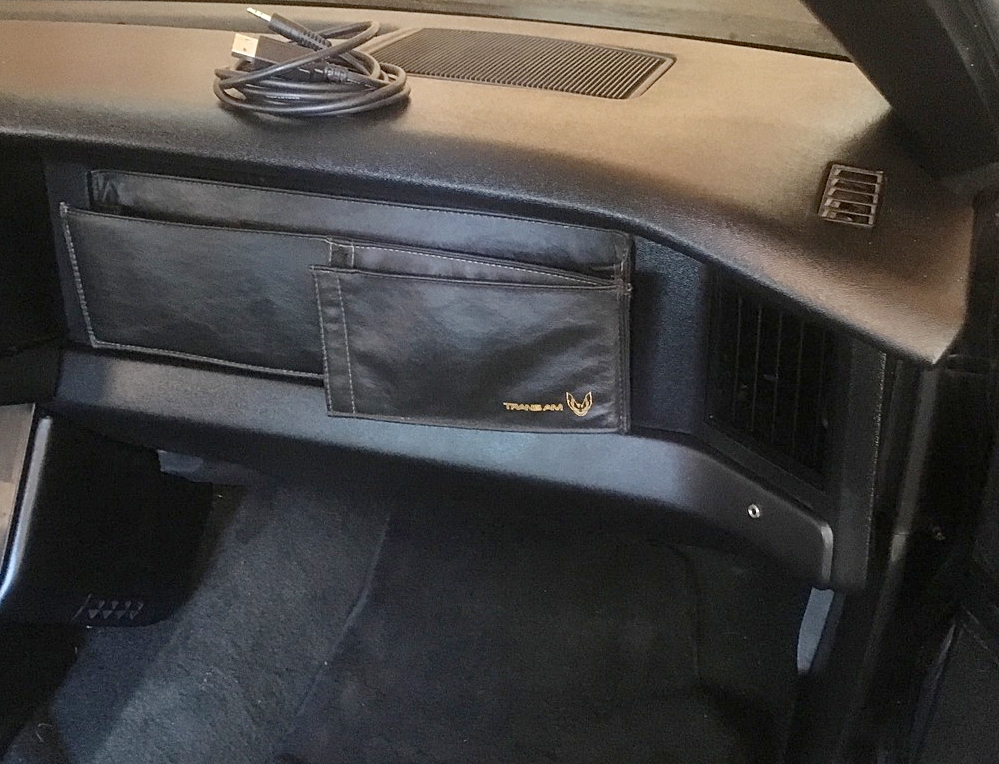
Now, you received your EBL-P4 in the mail and you're eager to get started. Well, after pulling the stock ECM, changing a few pins, then reinstalling the newly connected EBL-P4 back into the stock location, it's all down hill from this point. Aside from the pin swap themselves, the EBL-P4 system is essentially plug and play. With the EBL-P4 in place, it's time to provide for it either a 2 Bar MAP sensor, or 3 Bar MAP sensor. I chose to use a 2 Bar MAP sensor from a Buick Grand National from GM, as they are still plentiful. Minor trimming needs to be done inside where the stock connector meets the new 2 Bar MAP sensor, but that takes a few seconds. I wanted my install to be a little unique, and stand out from the others, and I wanted access to the system without having to drop anything from under the dashboard. I decided to drill a small hole into one of the interior panels near the EBL-P4 unit itself, slide the EBL's USB female connector through it, then hold it and secure it into place with the correct sized nut. Easy access for Flash tuning your new ECM anytime, and anywhere...
Will continue with the setup very soon...
 06-28-2016, 03:19 PM
#2
Re: EBL P4 w/Boost Control....
Okay, the next step is to get your hands on the laptop you will be using to do all of your tuning with, and slide in the system CD that came with your EBL-P4 package. If by chance your laptop is not CD ready, then all you need to do is go to the Dynamic EFI website and download the very same programs directly from the page, you will want to include both the setup, and the What's Up Display (WUD) in which we use for Flashing in new bins and data-logging. Once installed into your laptop, you will then want to connect your EBL-P4 system to the laptop via the USB cable that is provided with your new system. Allow for a few seconds for the laptop to recognize the new EBL-P4 hardware, and approve it...
So, you have your new EBL-P4 installed, your have your new 2 or 3 Bar MAP sensor ready, and now you have all of your tuning software loaded into your laptop with your laptop now being EBL-P4 compatible. Now, you will need to utilize a program to allow for the bins that are included with the EBL-P4 package to be loaded into, modified, then Flashed into the EBL-P4. What we use is Tuner Pro V5, which is a free program for everyone. Be sure your wifi is on with the laptop, log onto the internet, then download Tuner Pro V5 directly from their website. I am not going to get into how to use Tuner Pro V5 in general, this thread is going to assume you already know how to use it, and if you don't, there are quite a few tutorials out there on it...
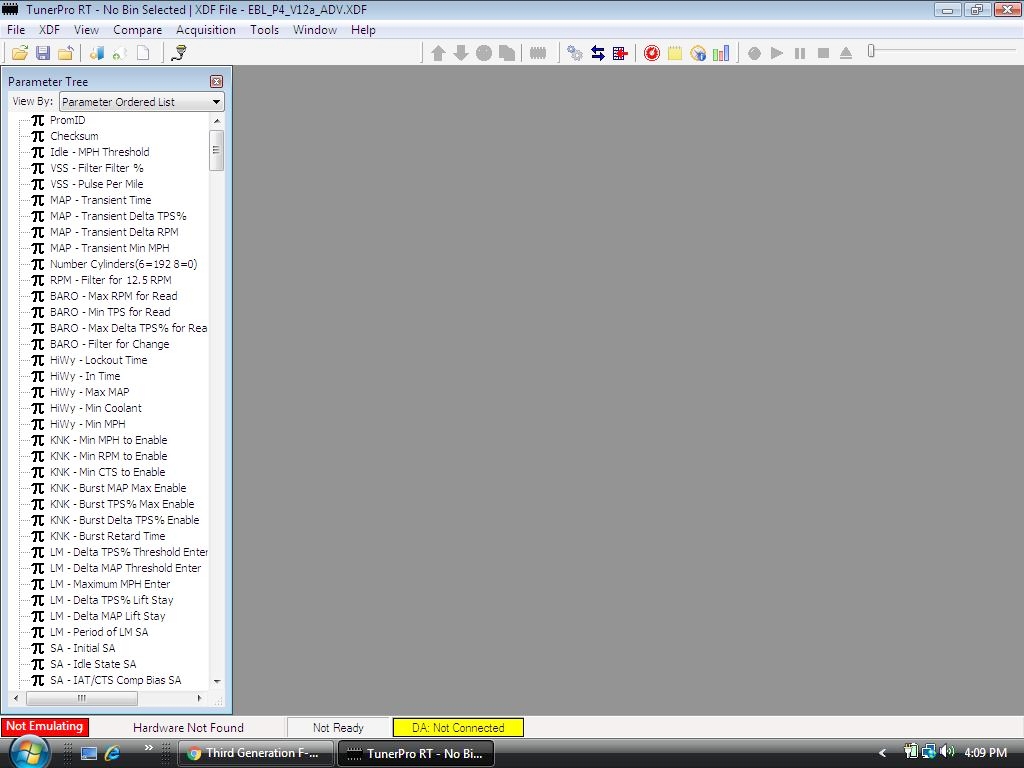
Now, we can test for WUD port compatibility later on, but at this point you will want to open Tuner Pro V5 after it has installed correctly, then in the upper left hand corner select the proper XDF needed which of course is included with your EBL-P4 system. If the system has trouble pulling up the folder immediately, take your time and search for it, it will be under; Computer, c:, Program Files, Dynamic EFI. Select your XDF, and load it into Tuner Pro V5. Note that there was no bin selected, that will be the very next step...
So, you have your new EBL-P4 installed, your have your new 2 or 3 Bar MAP sensor ready, and now you have all of your tuning software loaded into your laptop with your laptop now being EBL-P4 compatible. Now, you will need to utilize a program to allow for the bins that are included with the EBL-P4 package to be loaded into, modified, then Flashed into the EBL-P4. What we use is Tuner Pro V5, which is a free program for everyone. Be sure your wifi is on with the laptop, log onto the internet, then download Tuner Pro V5 directly from their website. I am not going to get into how to use Tuner Pro V5 in general, this thread is going to assume you already know how to use it, and if you don't, there are quite a few tutorials out there on it...
Now, we can test for WUD port compatibility later on, but at this point you will want to open Tuner Pro V5 after it has installed correctly, then in the upper left hand corner select the proper XDF needed which of course is included with your EBL-P4 system. If the system has trouble pulling up the folder immediately, take your time and search for it, it will be under; Computer, c:, Program Files, Dynamic EFI. Select your XDF, and load it into Tuner Pro V5. Note that there was no bin selected, that will be the very next step...
06-28-2016, 03:34 PM
#3
Re: EBL P4 w/Boost Control....
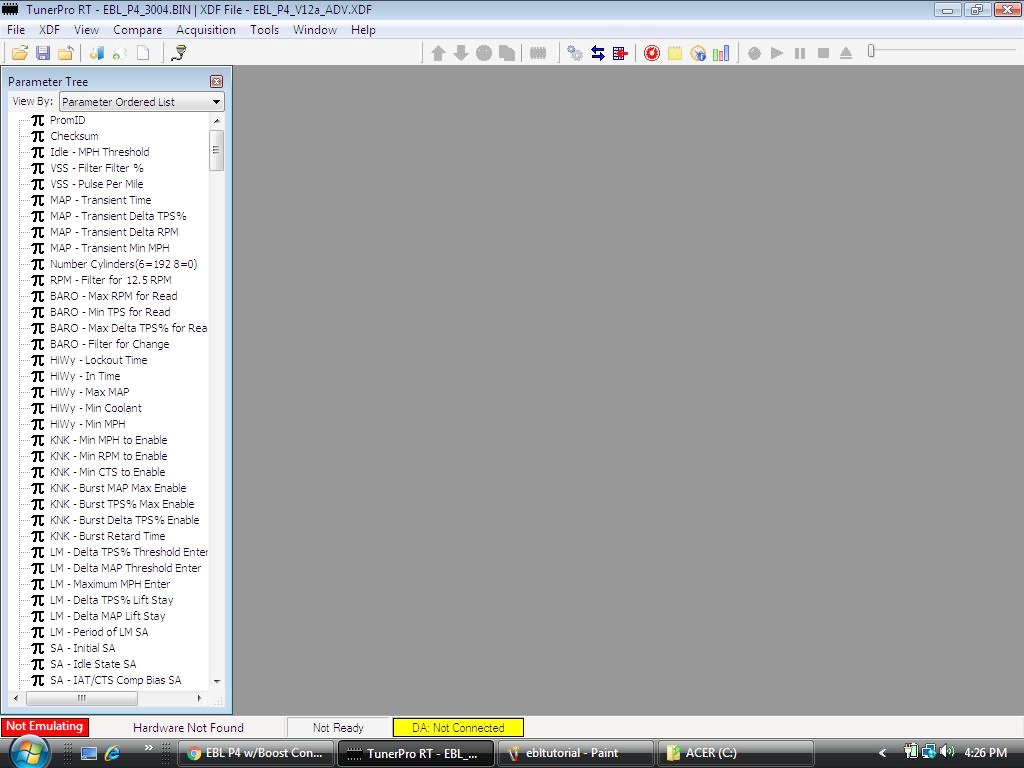
Okay, with the XDF selected, you can now move onto loading the bin in which to use to get you started. Without getting too deep into it, think of the XDF as a road map to the tables that are found in the bin that the engine uses to control the engine. The bin itself holds the characteristics of your engine to help the ECM calculate what it needs to to keep the engine happy. The EBL-P4 system comes with calibration bins to help get you started, so don't feel like you are on your own, you most certainly are not, in fact far from it. Select a bin that is closest to the engine at hand, in this case I am running a highly modified 305, but I don't need a highly modified 305 bin, I just need a stock 305 bin, I'm the one that will tune for the difference. In your case though, your engine might not be as radical, and again it makes no difference, just select the bin (which are labeled) that is closest to your setup. In my case I chose to select bin# 3004, which is TPI oriented from the getgo. Select your bin based on your setup, and load it into Tuner Pro V5...
06-28-2016, 05:14 PM
#4
Re: EBL P4 w/Boost Control....
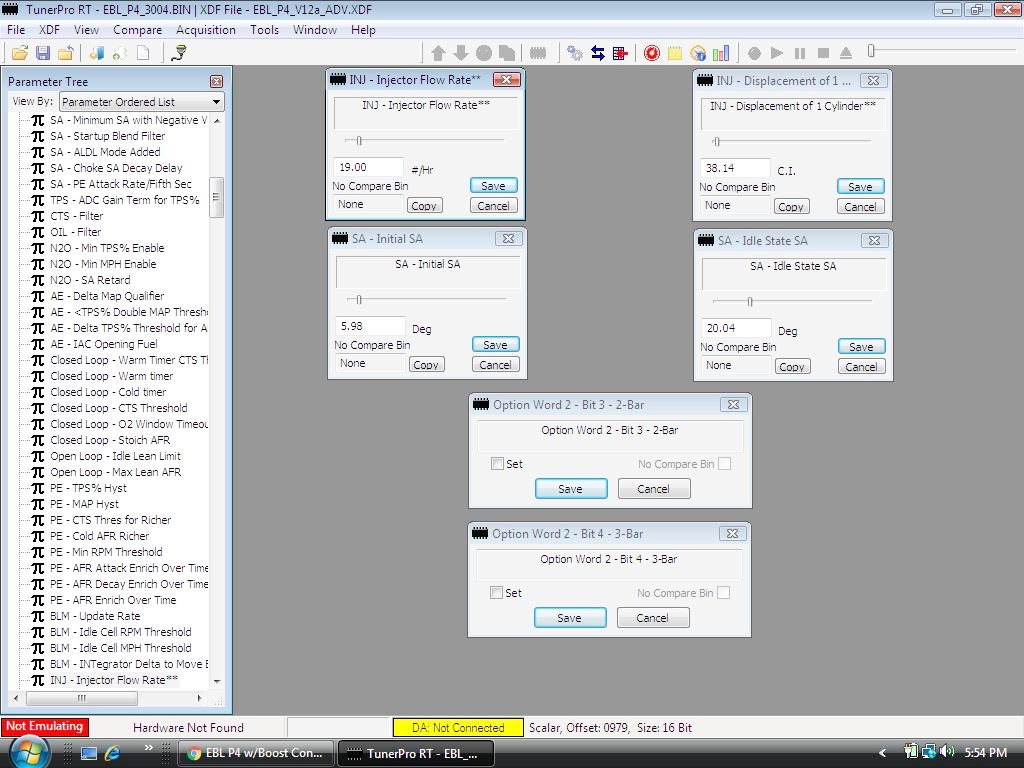
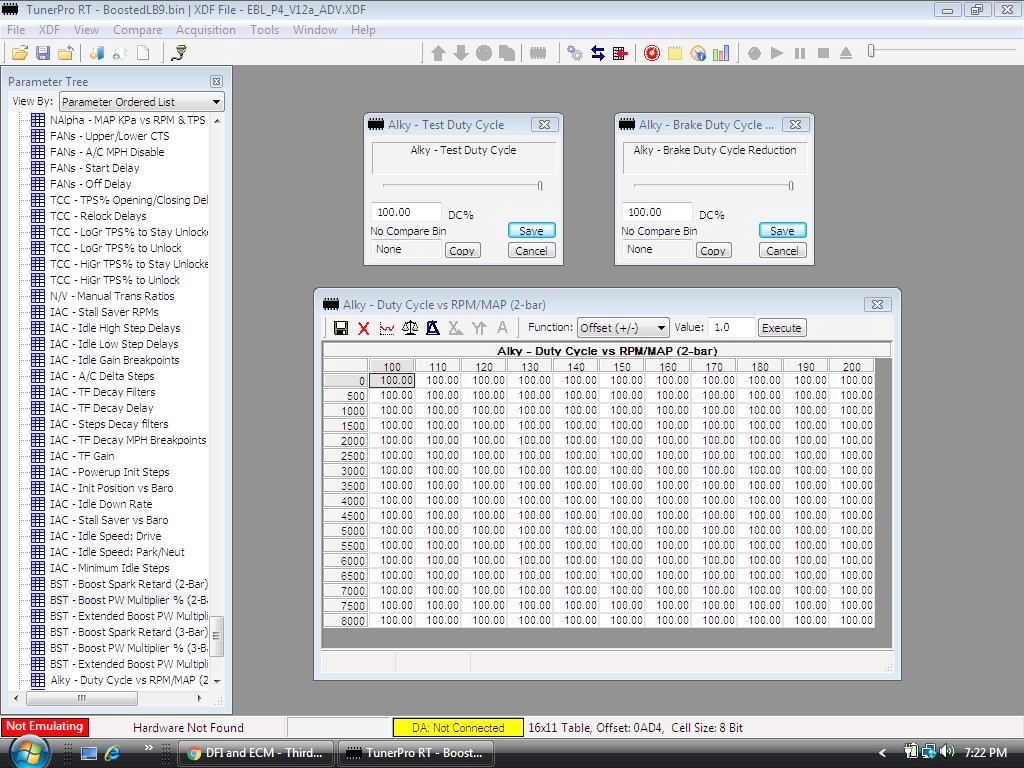
Okay, now with the correct XDF and starter bin loaded into Tuner Pro V5, we are going to make the necessary changes that correspond to your particular engine. The areas you want to initially pay your first attention to are your; injector flow (size), engine displacement, spark advance, and you also want to tell the EBL-P4 if you are running either a 2 Bar MAP sensor or a 3 Bar Map sensor. In the picture below I pulled up these areas into Tuner Pro V5, which you will find by scrolling through the parameter tree on the left side of the screen. You will notice in the first box on the top left it will show you your injector flow, this is the area in which you are telling your system how big your injectors are at 43.5 psi of fuel pressure, which is standard. Stock, the setting is 19-lbs because that is what LB9 engines come with from the factory. However with boosted setups, you will want at least 42-lbs to keep the injectors from stressing themselves while providing more than enough room for a good amount of horsepower. If this is the size you went with you would enter the numerical value of 42.00 and save it, if it is another size, then make sure you indicate the correct size. The box to the right of that is your engine displacement, the system needs to know how big your engine is in conjunction with your injector size. In this case it is showing 38.14 because that is per cylinder, multiply that by eight and you get 305 cubic inches. If by chance you are running say a 383, then you would change that value to 47.88 and hit save. Heading back over to the left of that box, but going downward, you will see where it says your Initial SA. This is essentially what tuners refer to as your "spark reference", because your Initial SA must be the same as your base timing that you set your distributor by hand. In this case it is 6* BTDC, which is a stock setting for an LB9. Now unless you are cammed, there is really no reason to change that setting, but if you are cammed, depending on just how much, you might want to bump up your Initial timing to at least 10* BTDC, but remember to set your base timing by hand at the same number if you do...
The box to the immediate right of that one is your Idle State SA, this is where you set your timing during engine idle. As you can see, in a stock application for an LB9 engine GM chose 20* BTDC. Again though, depending on how big of a cam you have, you might want to consider bumping it up a few degrees if need be. Save your changes, if any. The final two boxes underneath are your MAP settings. You only need to set one depending on if it's a 2 Bar or 3 Bar Map sensor. At this point there is really nothing left to change just to get the engine up and running, as remember, if and when you changed your injector and engine size then you told the system ahead of time, so all other area's ideally will be fine. If the cam is that big, then yes you will want to fine tune it, but that is later on in the process. Set your MAP sensor value depending on which one you have, and save it...
The box to the immediate right of that one is your Idle State SA, this is where you set your timing during engine idle. As you can see, in a stock application for an LB9 engine GM chose 20* BTDC. Again though, depending on how big of a cam you have, you might want to consider bumping it up a few degrees if need be. Save your changes, if any. The final two boxes underneath are your MAP settings. You only need to set one depending on if it's a 2 Bar or 3 Bar Map sensor. At this point there is really nothing left to change just to get the engine up and running, as remember, if and when you changed your injector and engine size then you told the system ahead of time, so all other area's ideally will be fine. If the cam is that big, then yes you will want to fine tune it, but that is later on in the process. Set your MAP sensor value depending on which one you have, and save it...
Last edited by Street Lethal; 06-28-2016 at 05:18 PM.
06-28-2016, 05:29 PM
#5
Re: EBL P4 w/Boost Control....
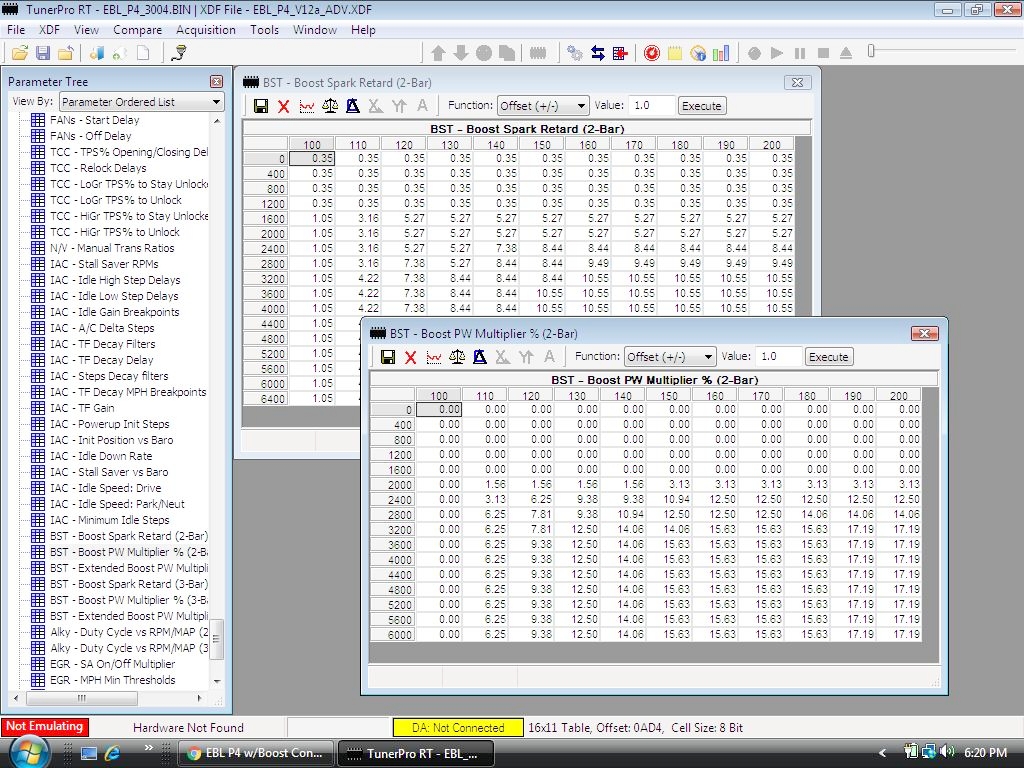
With the above changes made, you have essentially told the EBL-P4 system what it needs to know in terms of making all of its' calculations with. However, at this point you are asking yourself, how does the EBL-P4 account for the added boost pressure? When you set your Map sensor value to either 2 Bar or 3 Bar, the system immediately switches to a boost coded algorithm. In my case, I am running a 2 Bar MAP sensor, and after I set that value as such, the system will immediately tune for the boost pressure using these two areas; Boost Pulse Width Multiplier and Boost Spark Retard. The values are already there to help you get started using both a mathematical equation, as well as an average of what is already known. These values can of course be changed by the user, but again they are there not only to help you get started, but as a fail safe just in case you forget...
06-28-2016, 05:39 PM
#6
Re: EBL P4 w/Boost Control....
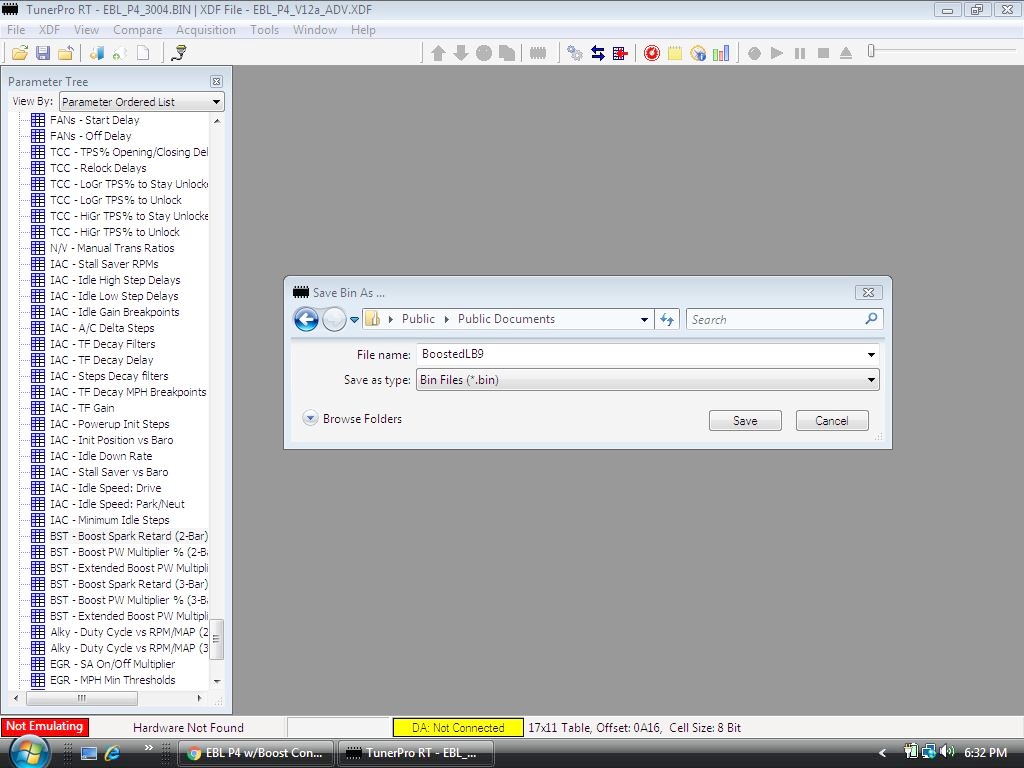
In just these few short steps, the bin is now tuned for boost. These simple steps now allow your EBL-P4 to know what it is working with, and why. With all of the changes that you made above already saved, it is now time to save the bin with a new title. You cannot overwrite an existing bin that the system comes with, so the title must be changed. However you can overwrite your own bins once you save them elsewhere. Click on save bin as, and select a new title. There is no reason to include .bin after your title, the system automatically does that for you. In my case I chose Boosted LB9, and I saved it separately away from the EBL-P4 bins. Once this is done you now have your boosted starter bin, but you're not there just yet, next up is the What's Up Display...
06-28-2016, 05:48 PM
#7
Re: EBL P4 w/Boost Control....
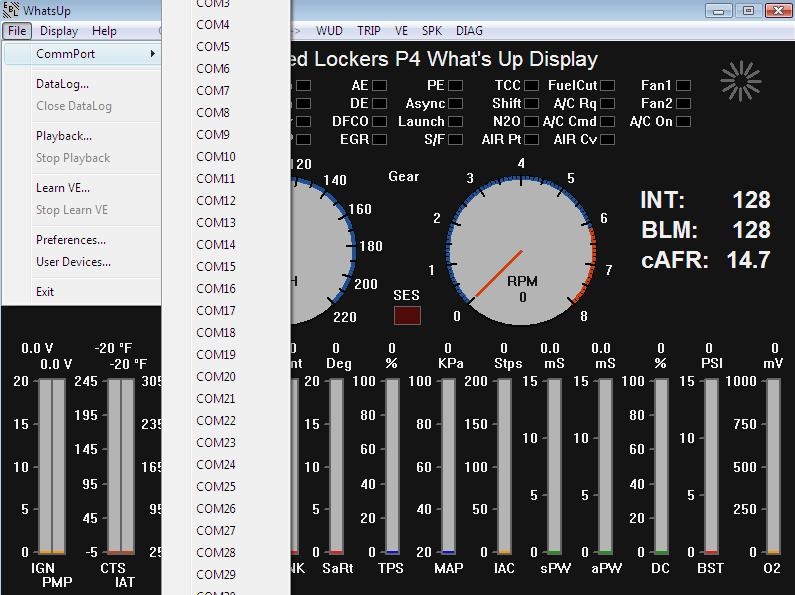
After saving your new startup bin on your laptop, you can close out of Tuner Pro V5 for now. Open up your WUD application, and with the key on / engine off, wait for the WUD display to light up indicating it is communicating. If however there is no communication, scroll through the communication ports until you find the correct one that can communicate with your laptop. This gets tricky when your laptop has multiple USB ports, it's usually either 1,2 or 3...
Trending Topics
06-28-2016, 05:58 PM
#8
Re: EBL P4 w/Boost Control....
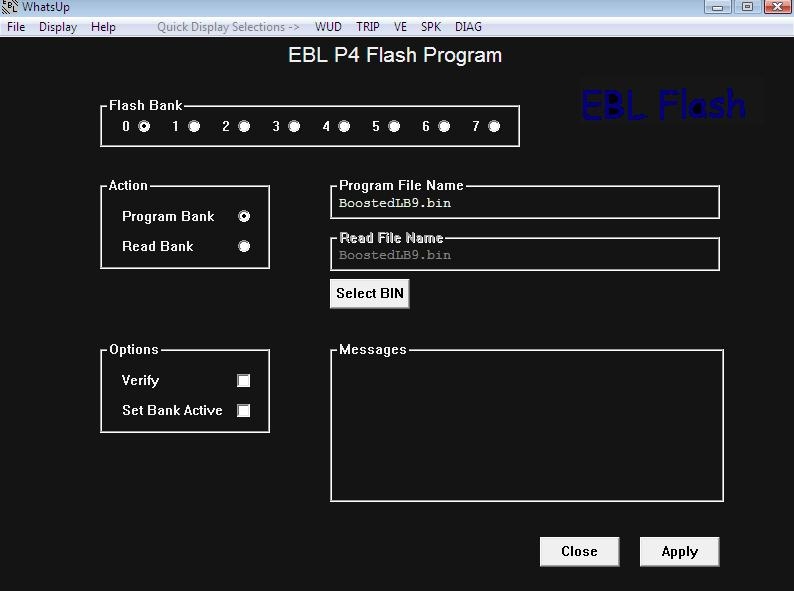
Okay, with the EBL-P4 now communicating with the WUD app, you will then toggle over to the Flash portion of the WUD, and click on Select Bin, find the folder that houses your new starter bin and double click it. You will now see it in the Flash portion of the WUD app. Once loaded into the WUD, you will then click on Apply. Give it a second or two, and it will be confirmed with a "success" indication. If by chance you do not get a successful upload, make sure your key is key on / engine off, as that is a common mistake to have the key turned all the way off. Once successful, the EBL-P4 is now boost ready. But don't start the engine just yet, patience grasshopper, one more thing to do, as a precaution...
06-28-2016, 06:06 PM
#9
Re: EBL P4 w/Boost Control....
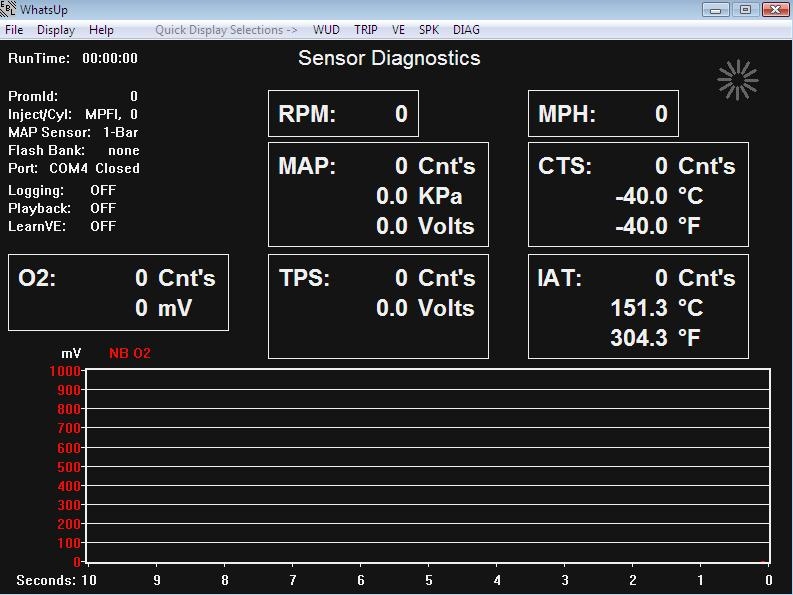
Okay, the final step prior to starting the engine is checking your sensor data. With the new starter bin already Flashed into the system, and with the WUD communicating with the key on / engine off, you will want to toggle over to the Sensor Diagnostic screen to make sure the sensors are reading what they should be reading at key on. If all is good, and you gave everything else under the hood a thorough check to be sure you didn't forget anything else you might have been working on, or removed, then it is time to take a deep breath and hold, cross those fingers, and start the engine. I'm kidding about holding your breath and crossing your fingers as the engine should fire right up... 
06-28-2016, 06:31 PM
#10
Re: EBL P4 w/Boost Control....
With the engine started, or about to start, you're going to want to check some key area's before even attempting a test drive. You will want to confirm your IAC and MAP locations during idle, you will want to confirm your Idle State SA to see if it is stationary, or sporadic, etc. A good idea prior to turning the key would be to set up a datalog, this way you can record everything then review it later to help you fine tune the engine. You could also set up a VE Learn, and let the EBL-P4 essentially dial in the fueling for you during idle, but note that you need to target a specific coolant temperature while being in that temperature to do it correctly. Once you dial in your idle, part throttle, and wide open throttle, which will happen very efficiently, you can then explore some of the features that the EBL-P4 gives you. One of my favorites is Alky Injection, you can really dial that stuff in with this system very accurately. Warning, don't become an Alky junky like me, as that stuff gets very addicting lol.
06-28-2016, 07:05 PM
#11
Re: EBL P4 w/Boost Control....
The above is pretty much all it takes to get your EBL-P4 boost ready, and despite the amount of writing I did the whole process literally takes but only a mere few minutes after the EBL-P4 is installed. I'm going to keep away from tuning any further mainly because everyone has their own style of tuning as well as preferences, however if existing EBL-P4 users, as well as brand new EBL-P4 users, who are looking to install a blower or turbo charger to their engine have any questions regarding the process, by all means don't ever hesitate. I was planning on taking some local video of how docile my engine has become with the EBL-P4 controlling it, and maybe some footage of some wide open hits on the highway. I will definitely add them to this thread as time allows for me to...
Boost on everyone...
- Rob
Boost on everyone...
- Rob
07-06-2016, 04:38 PM
#12
Re: EBL P4 w/Boost Control....
I'm going to keep updating this thread to both go over and share the features the system gives you. I already mentioned the Alky Injection Control feature and showed where you would tune for it in the XDF, but I will delve into it a little further and show the install as well as what exactly you're looking to do with it because I know it can be confusing for new boost tuners. Will also be covering another important feature that the EBL-P4 gives you for you guys running a turbo charger like me, and that of course is Electronic Boost Control. Will cover this extensively, and it is during this particular area in which it is very important to get some video up so you have a better understanding of what we're doing. Stay tuned...
- Rob
- Rob
 07-22-2016, 04:38 PM
#14
Re: EBL P4 w/Boost Control....
You're more than welcome. I made some changes to my wastegate setup, and am in the mist of moving everything around, then extending the electrical wiring and vacuum lines. Will continue with the EBC very soon, and hopefully have some detailed videos included...


Thread
Thread Starter
Forum
Replies
Last Post
Dartht33bagger
DIY PROM
30
08-14-2018 03:43 PM
RunawayRadio
Engine/Drivetrain/Suspension Wanted
4
07-05-2016 11:04 PM

