LS1 swap for my '89 GTA
 02-15-2015, 02:54 AM
#851
Junior Member
Join Date: Jun 2014
Location: Los Angeles, Ca
Posts: 37
Likes: 0
Received 0 Likes
on
0 Posts
Car: 1989 Iroc-Z
Engine: LS1
Transmission: Tick Stage 2 T56
Axle/Gears: 2.77
Re: LS1 swap for my '89 GTA
Wow great thread. are you satisfied with the fat mat? I'm thinking of doing that to my Camaro.
-Ben
-Ben
 02-15-2015, 04:27 AM
#852
Re: LS1 swap for my '89 GTA

Fed my motor crumbs to the pigeons and they were also quite satisfied at the time.
Haven't seen them in a while, though

Don't forget to seal the housings up with some body or weatherstrip sealant.
02-15-2015, 09:03 AM
#853
Supreme Member

Thread Starter
iTrader: (1)
Join Date: Mar 2007
Location: Apopka, Florida
Posts: 1,237
Likes: 0
Received 7 Likes
on
6 Posts
Car: 1989 Pontiac Trans Am GTA
Engine: cammed LS1
Transmission: Monster SS 4L65E
Axle/Gears: 9 bolt posi w/ 3.70 gears
Re: LS1 swap for my '89 GTA

There were new gaskets in the kit, so we just used those to seal everything up. Hopefully that will be adequate.
02-16-2015, 02:36 PM
#854
Member
iTrader: (1)
Join Date: Sep 2003
Posts: 455
Likes: 0
Received 0 Likes
on
0 Posts
Car: 1988 firebird trans am GTA
Engine: 5.7L w/hsr
Transmission: 700r4
Axle/Gears: posi 3.23
Re: LS1 swap for my '89 GTA
Excellent thread man, I'm just beginning the process myself. I will be picking my ls1 short block (forged rods/pistons) up from the shop in the next few days and have started acquiring parts for the impending transplant. While I'm aiming for more of a utilitarian GTA instead of a show car the work you put in and pictures you shared were a hell of an inspiration for me. Keep up the good work!
02-25-2015, 08:45 AM
#855
Supreme Member
Thread Starter
iTrader: (1)
Join Date: Mar 2007
Location: Apopka, Florida
Posts: 1,237
Likes: 0
Received 7 Likes
on
6 Posts
Car: 1989 Pontiac Trans Am GTA
Engine: cammed LS1
Transmission: Monster SS 4L65E
Axle/Gears: 9 bolt posi w/ 3.70 gears
Re: LS1 swap for my '89 GTA
Excellent thread man, I'm just beginning the process myself. I will be picking my ls1 short block (forged rods/pistons) up from the shop in the next few days and have started acquiring parts for the impending transplant. While I'm aiming for more of a utilitarian GTA instead of a show car the work you put in and pictures you shared were a hell of an inspiration for me. Keep up the good work!
 Are you planning on starting a build thread for yours? I would like to follow along if you are.
What all did you have done to the engine? There's definitely nothing wrong with utilitarian. You will love it once it's done. I feel like I am driving a new car now that mine is pretty close to done. Good luck with your swap.
02-25-2015, 08:47 AM
#856
Supreme Member
Thread Starter
iTrader: (1)
Join Date: Mar 2007
Location: Apopka, Florida
Posts: 1,237
Likes: 0
Received 7 Likes
on
6 Posts
Car: 1989 Pontiac Trans Am GTA
Engine: cammed LS1
Transmission: Monster SS 4L65E
Axle/Gears: 9 bolt posi w/ 3.70 gears
Re: LS1 swap for my '89 GTA
Last edited by dprest68; 02-25-2015 at 08:52 AM.
02-25-2015, 09:18 AM
#857

Re: LS1 swap for my '89 GTA
I guess we could all just meet up at this instead. https://www.facebook.com/events/1421273338166633. What do you think?
02-25-2015, 09:37 AM
#858
Supreme Member
Thread Starter
iTrader: (1)
Join Date: Mar 2007
Location: Apopka, Florida
Posts: 1,237
Likes: 0
Received 7 Likes
on
6 Posts
Car: 1989 Pontiac Trans Am GTA
Engine: cammed LS1
Transmission: Monster SS 4L65E
Axle/Gears: 9 bolt posi w/ 3.70 gears
Re: LS1 swap for my '89 GTA
I finally did my first oil change after my swap this past weekend. I am guessing I have over 500 miles on it by now. I need to get my odometer fixed. The oil was black, but I expected that. And there were some fine metal particles that came out of the filter when I dumped the oil out of it, but I expected that too. The only thing that threw me off a little was the sludge on the end of the drain plug.
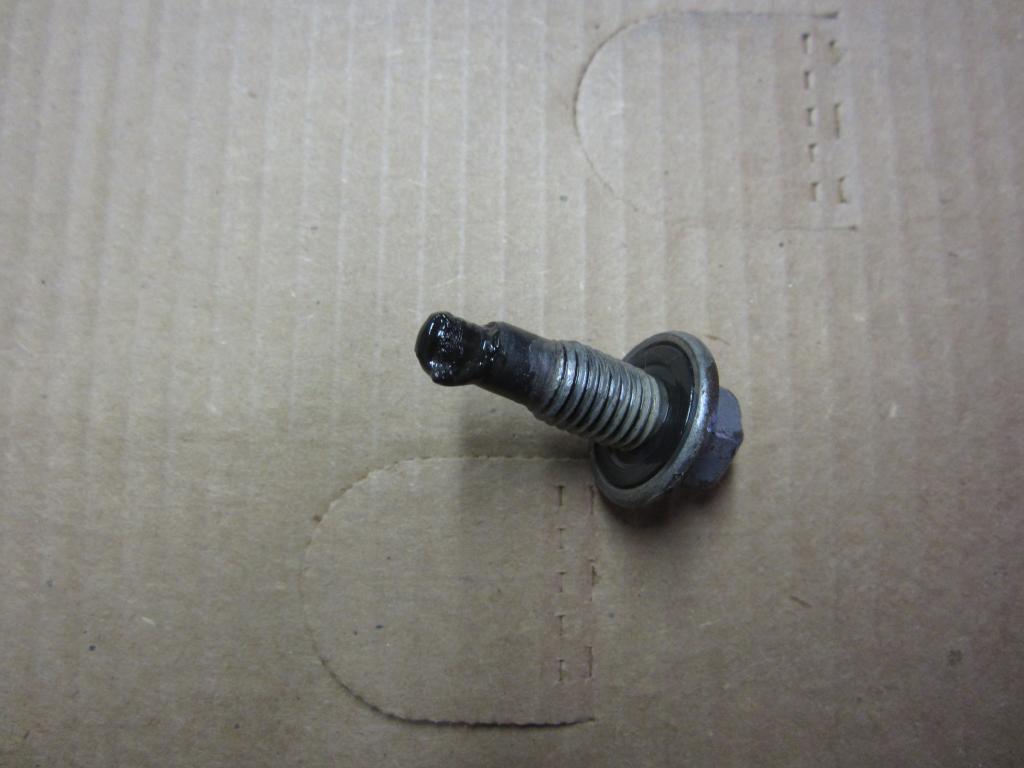
I cleaned half of the sludge off of it before I took this picture, There were no clunks of metal in it or anything. It was just sludge. I am assuming it was from when I got coolant down in there from my head gasket problem. I didn't find any other traces of sludge in the oil that came out of it, so I think what little bit of coolant that was left in there just settled down at the plug.
I also removed the air filter, cleaned it and oiled it with some blue oil to match the car better.

I didn't think the filter was that dirty until I started cleaning it. I guess I am going to have to clean it pretty frequently with the ram air set-up.
The stereo system is now back in the car too and sounds awesome. I will post some more pics for that later. I also snapped some pictures for a GM Weather-Pack connector tutorial in case any of you would like to try using these cool weatherproof quick disconnect connectors for your wiring harness.
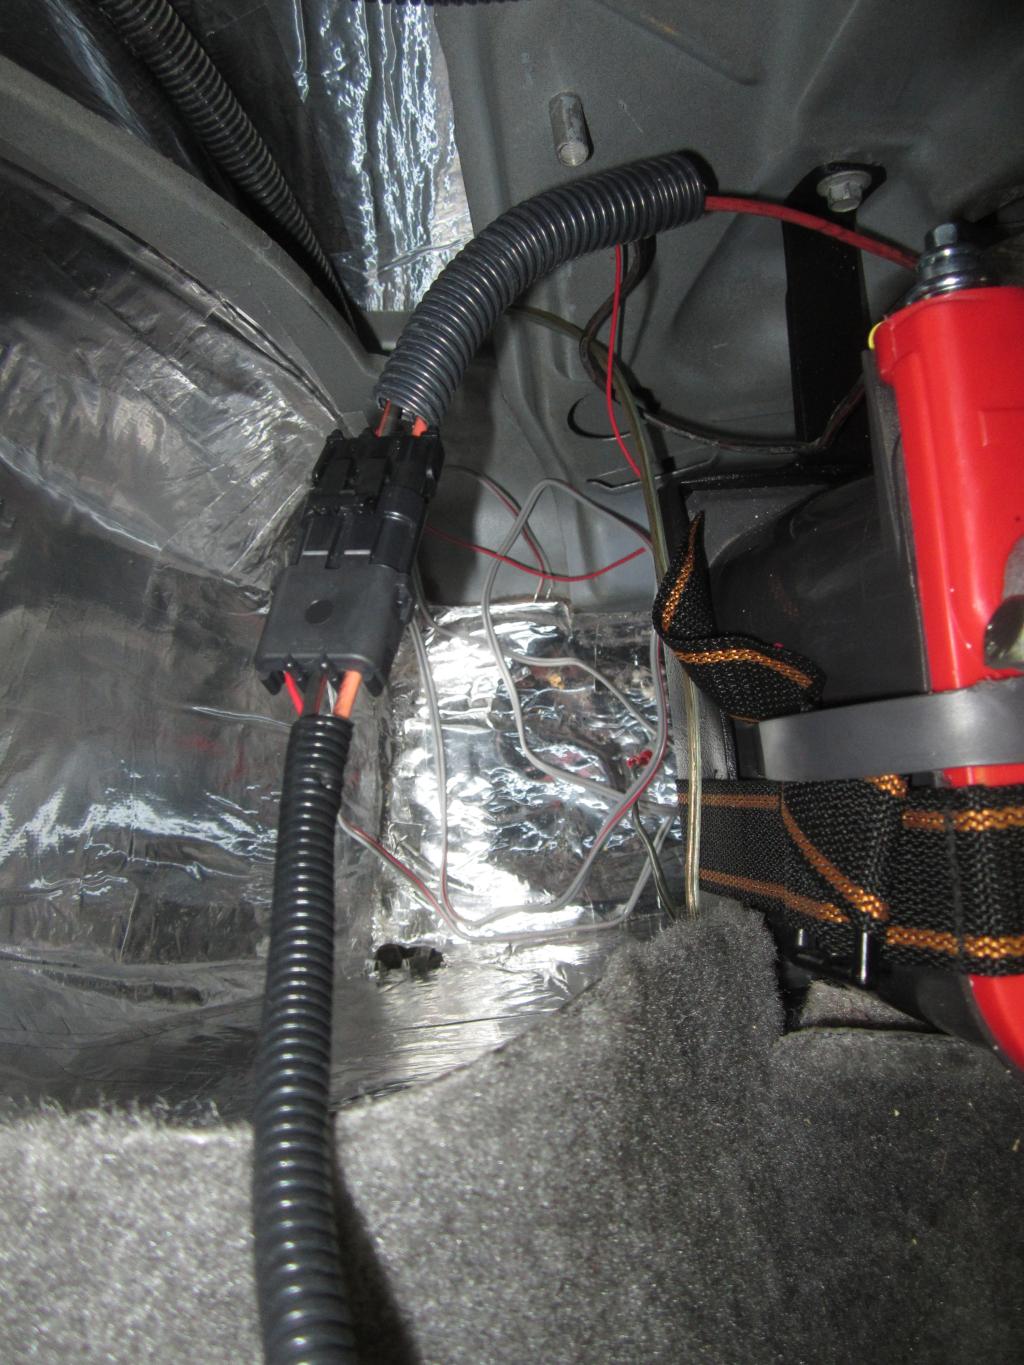
Here's the Weather-Pack connector for the power wires for the amps.
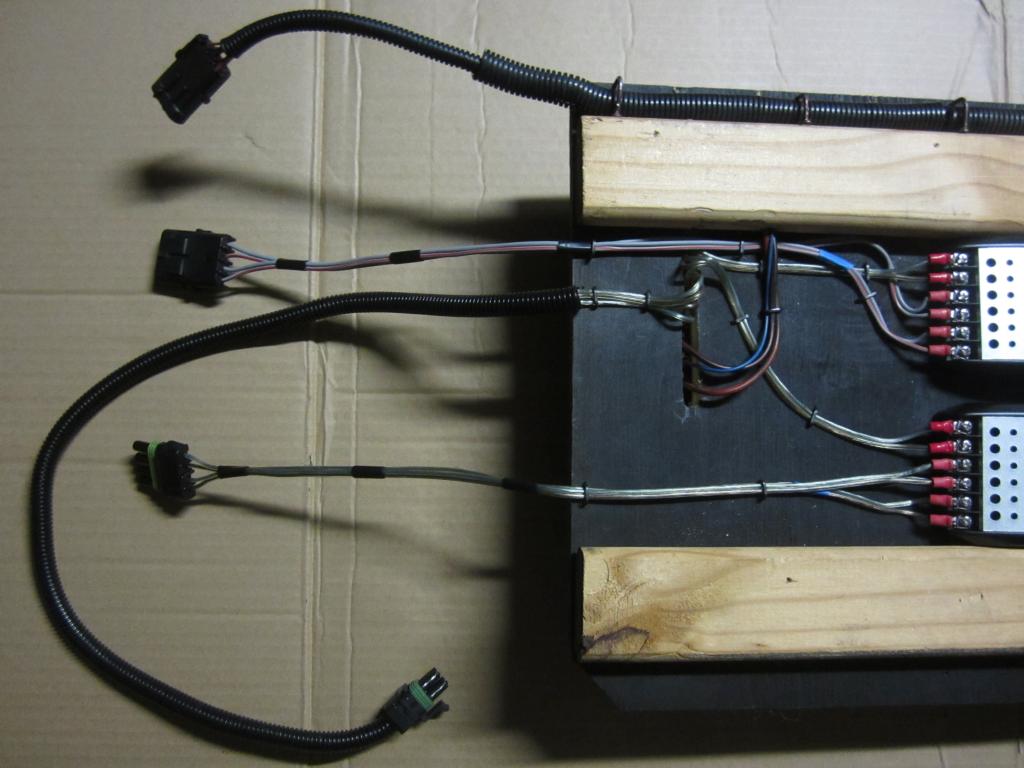
I used the Weather-Pack connectors to make it easier to remove my amp tray from my car. I think it turned out pretty nice. This is the backside of the amp tray. All of my wires are hidden.
02-25-2015, 09:53 AM
#859
02-26-2015, 08:14 AM
#860
Supreme Member
iTrader: (30)

Join Date: Jul 2000
Location: Fort Myers, FL
Posts: 1,512
Received 16 Likes
on
9 Posts
Car: 91 Firebird
Engine: 6.0
Transmission: T56
Axle/Gears: 3.73
Re: LS1 swap for my '89 GTA
I clicked on the link and it said the content was unavailable or something like that
besides, my car is down for a bit....... damn fire
besides, my car is down for a bit....... damn fire
02-26-2015, 08:29 AM
#861
Supreme Member
Thread Starter
iTrader: (1)
Join Date: Mar 2007
Location: Apopka, Florida
Posts: 1,237
Likes: 0
Received 7 Likes
on
6 Posts
Car: 1989 Pontiac Trans Am GTA
Engine: cammed LS1
Transmission: Monster SS 4L65E
Axle/Gears: 9 bolt posi w/ 3.70 gears
Re: LS1 swap for my '89 GTA
Did you have a fire Jason?
 02-26-2015, 01:56 PM
#862
Re: LS1 swap for my '89 GTA
Hmmm, that's odd. Luis said he had the same problem. You may have to be a member to view it, I'm not sure. Anyway, it's the 1st Annual FLCFA (Florida Camaro & Firebird Association) Anniversary Party at Fort DeSoto Park in St. Pete on April 19th from 10am to 5pm. The only slight problem that I found is it's for members only, but it's free to join on FB. Here's a link https://www.facebook.com/groups/flcfa/
Did you have a fire Jason?
Did you have a fire Jason?
I am a member of the facebook group and although I've never done anything with them, I've known some of them for years. Actually knew most of them from the first Florida Camaro & Firebird Association(FLCFA) before it disbanded.
I'm sure they won't mind if others show up uninvited. Knowing these guys, the more...the merrier. With that said, bring your own food/drinks.
Last edited by CharcoalBird; 02-26-2015 at 02:11 PM.
02-27-2015, 04:55 AM
#863
Supreme Member
iTrader: (30)
Join Date: Jul 2000
Location: Fort Myers, FL
Posts: 1,512
Received 16 Likes
on
9 Posts
Car: 91 Firebird
Engine: 6.0
Transmission: T56
Axle/Gears: 3.73
Re: LS1 swap for my '89 GTA
I will put in for the time off from work
I *might* have the car fixed by then. It isn't a priority
the clutch line split open, and a small fire started from the brake fluid spraying onto the header...... thankfully home depot has fire extinguishers at every entrance.....
I *might* have the car fixed by then. It isn't a priority
the clutch line split open, and a small fire started from the brake fluid spraying onto the header...... thankfully home depot has fire extinguishers at every entrance.....
03-02-2015, 08:30 AM
#864
04-02-2015, 01:54 AM
#866
Supreme Member
Thread Starter
iTrader: (1)
Join Date: Mar 2007
Location: Apopka, Florida
Posts: 1,237
Likes: 0
Received 7 Likes
on
6 Posts
Car: 1989 Pontiac Trans Am GTA
Engine: cammed LS1
Transmission: Monster SS 4L65E
Axle/Gears: 9 bolt posi w/ 3.70 gears
Re: LS1 swap for my '89 GTA
I will put in for the time off from work
I *might* have the car fixed by then. It isn't a priority
the clutch line split open, and a small fire started from the brake fluid spraying onto the header...... thankfully home depot has fire extinguishers at every entrance.....
I *might* have the car fixed by then. It isn't a priority
the clutch line split open, and a small fire started from the brake fluid spraying onto the header...... thankfully home depot has fire extinguishers at every entrance.....
My fuse box set-up remains stock. I didn't change anything on that. The only thing I added to the electrical system was a junction block for all of the hot wires under the hood.

on the right side of the picture
04-02-2015, 02:08 AM
#867
Supreme Member
Thread Starter
iTrader: (1)
Join Date: Mar 2007
Location: Apopka, Florida
Posts: 1,237
Likes: 0
Received 7 Likes
on
6 Posts
Car: 1989 Pontiac Trans Am GTA
Engine: cammed LS1
Transmission: Monster SS 4L65E
Axle/Gears: 9 bolt posi w/ 3.70 gears
Re: LS1 swap for my '89 GTA
I was planning on taking the car to a show a few weeks ago with Luis. We got half way there and realized the alternator wasn't charging. So we turned around and headed back home. Luckily I had replaced the back battery with a new Kinetics 1200 battery so at least we had plenty of juice to get back. I have been trying to figure out this alternator issue for awhile now. Best I can tell, once it gets hot, it stop charging. Once you let it cool down, it will start charging again. I took the alternator off the car two weeks ago and took it over to Autozone to have it tested. It tested just fine. So, instead of continuing to deal with the unreliable alternator, I decided to call Summit and have them send me a new high output Power Master unit. I still haven't finished getting it back in the car yet, but hopefully I will have no more issues with it. I also bought a 6 gauge cable to run from the new alternator to the junction block. I think that will help too. And the front battery has since been removed from the car. That frees up around 35 pounds off the front end.
I now have what I need to get my a/c hoses made to get my a/c working. I just need to get the car back together and get it over to the mechanic so that he can get it made. It will be getting hot here soon, so that is becoming a priority.
I now have what I need to get my a/c hoses made to get my a/c working. I just need to get the car back together and get it over to the mechanic so that he can get it made. It will be getting hot here soon, so that is becoming a priority.
04-02-2015, 06:41 AM
#869
Re: LS1 swap for my '89 GTA
I guess "testing" the alternator only includes checking input and output over a given period of time, but not putting the bearings under load and surely not adding heat to the equation.
Probably some weak soldered connections in there.
Would have gotten a new one, too, or a repair kit if available.
Should work for you now
Probably some weak soldered connections in there.
Would have gotten a new one, too, or a repair kit if available.
Should work for you now
04-02-2015, 08:33 AM
#870
Supreme Member
Thread Starter
iTrader: (1)
Join Date: Mar 2007
Location: Apopka, Florida
Posts: 1,237
Likes: 0
Received 7 Likes
on
6 Posts
Car: 1989 Pontiac Trans Am GTA
Engine: cammed LS1
Transmission: Monster SS 4L65E
Axle/Gears: 9 bolt posi w/ 3.70 gears
Re: LS1 swap for my '89 GTA
I guess "testing" the alternator only includes checking input and output over a given period of time, but not putting the bearings under load and surely not adding heat to the equation.
Probably some weak soldered connections in there.
Would have gotten a new one, too, or a repair kit if available.
Should work for you now
Probably some weak soldered connections in there.
Would have gotten a new one, too, or a repair kit if available.
Should work for you now
So maybe one day I will take it over to a shop and have them fix it just to have a back-up.
04-02-2015, 09:47 AM
#871
Member
Join Date: Dec 2014
Location: Garland, TX
Posts: 431
Likes: 0
Received 1 Like
on
1 Post
Car: 2014 Z28 #80
Re: LS1 swap for my '89 GTA
All the testing machine does is test the output to see if it falls within the set specifications. Used to work at O'reilly, so I speak from experience. It'll pass it even if the bearings are shot and squealing. Can't make the machine run for that long, unfortunately, as it's pre-programmed to run only until peak voltage/amperage is achieved.
04-06-2015, 05:02 PM
#872
Junior Member

Join Date: Dec 2014
Posts: 6
Likes: 0
Received 0 Likes
on
0 Posts
Re: LS1 swap for my '89 GTA
So what was the issue for the car not starting???
Luis and I went over to the exhaust shop last Friday to pick-up my car. The exhaust system turned-out great, but the guy didn't leave the car up on the lift for me like he said he would. So I was unable to get pics of the exhaust with the car up in the air. Here are two of the final pics

Everything looks good except for where he had to cross the cross member. It's the best we could come up with without having to do some custom fabrication. I will drive it for awhile to see if I have any problems with it.
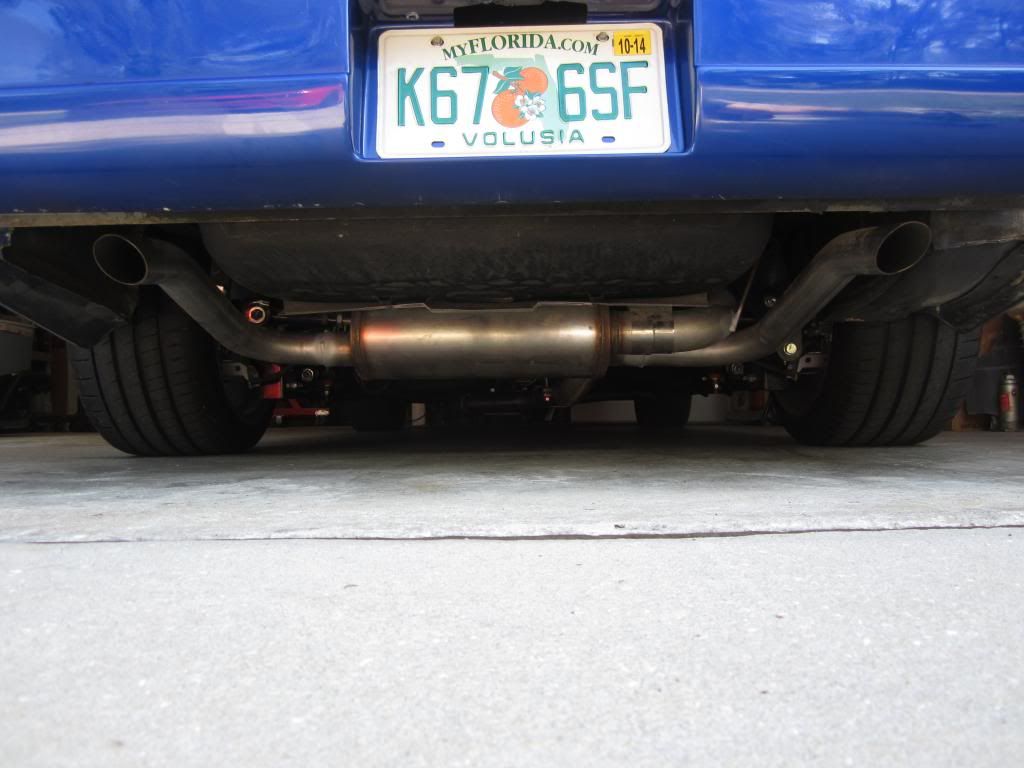
He welded the two tail pipes on to the muffler and got them aligned perfectly. And we left two of the band clamps on the pipe over the axle in case the fuel tank needs to be removed again.
So there is more to this story... They had moved the car out of their garage and it was sitting outside. So we went out there to hear the new exhaust and the car wouldn't start. Just my luck! They took the car back inside and checked a few things. It turns out that the starter relay wasn't getting energized. So we assumed that the starter relay had gone bad. So we drove around to a few of the local parts stores looking for a new relay. Of course no one had one. So we went back to my house and pulled the relay off of the red '89. We were pretty sure that relay worked since we had recently turned that engine over. With that relay and a few tools, we went back to the exhaust shop. I plugged that relay in and it still wouldn't turn the engine over. At this point we decided to take the relays over to NAPA to have them tested. The test showed that they were both working fine. Tired and ready to throw in the towel, we headed back over to the exhaust shop again. This time I removed the relay all together and just used a jumper to start the car so that we could get it over to the tire shop to have the alignment done.

Here's the location of the starter relay
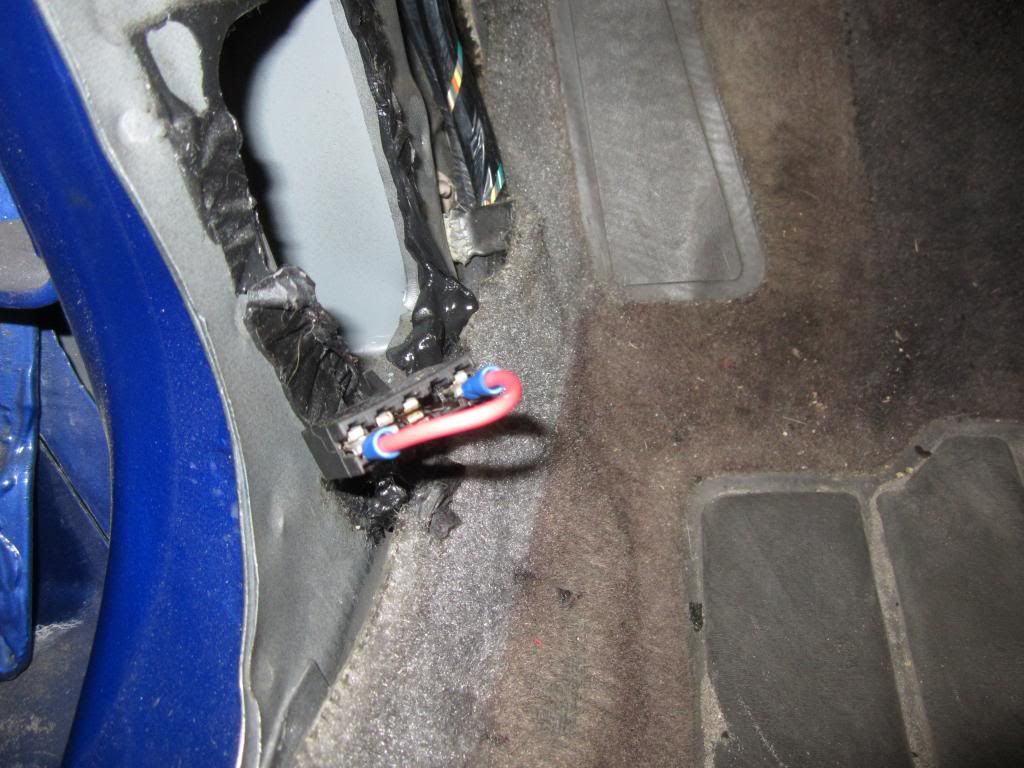
And here's the jumper wire installed
Once we finally got the car back home at around 5pm, keeping in mind that we started this little adventure at 9am, Luis removed the park/nuetral safety switch and proceeded to refurbish it. I installed two different other spare P/N switches that I had laying around while he was doing that. None of them solved the problem. So, knowing that neither the relay nor the P/N switch is the problem, we have no idea what the problem actually is. Maybe the ignition switch or the wiring? Any ideas?
 I don't know enough about the wiring inside the car to know what to look for.

Everything looks good except for where he had to cross the cross member. It's the best we could come up with without having to do some custom fabrication. I will drive it for awhile to see if I have any problems with it.

He welded the two tail pipes on to the muffler and got them aligned perfectly.
And we left two of the band clamps on the pipe over the axle in case the fuel tank needs to be removed again.So there is more to this story... They had moved the car out of their garage and it was sitting outside. So we went out there to hear the new exhaust and the car wouldn't start.
Just my luck! They took the car back inside and checked a few things. It turns out that the starter relay wasn't getting energized. So we assumed that the starter relay had gone bad. So we drove around to a few of the local parts stores looking for a new relay. Of course no one had one. So we went back to my house and pulled the relay off of the red '89. We were pretty sure that relay worked since we had recently turned that engine over. With that relay and a few tools, we went back to the exhaust shop. I plugged that relay in and it still wouldn't turn the engine over. At this point we decided to take the relays over to NAPA to have them tested. The test showed that they were both working fine. Tired and ready to throw in the towel, we headed back over to the exhaust shop again. This time I removed the relay all together and just used a jumper to start the car so that we could get it over to the tire shop to have the alignment done.
Here's the location of the starter relay

And here's the jumper wire installed
Once we finally got the car back home at around 5pm, keeping in mind that we started this little adventure at 9am, Luis removed the park/nuetral safety switch and proceeded to refurbish it. I installed two different other spare P/N switches that I had laying around while he was doing that. None of them solved the problem. So, knowing that neither the relay nor the P/N switch is the problem, we have no idea what the problem actually is. Maybe the ignition switch or the wiring? Any ideas?
I don't know enough about the wiring inside the car to know what to look for.
04-09-2015, 09:32 AM
#873
Supreme Member
Thread Starter
iTrader: (1)
Join Date: Mar 2007
Location: Apopka, Florida
Posts: 1,237
Likes: 0
Received 7 Likes
on
6 Posts
Car: 1989 Pontiac Trans Am GTA
Engine: cammed LS1
Transmission: Monster SS 4L65E
Axle/Gears: 9 bolt posi w/ 3.70 gears
Re: LS1 swap for my '89 GTA
All the testing machine does is test the output to see if it falls within the set specifications. Used to work at O'reilly, so I speak from experience. It'll pass it even if the bearings are shot and squealing. Can't make the machine run for that long, unfortunately, as it's pre-programmed to run only until peak voltage/amperage is achieved.
I never did figure it out. I suspect it has something to do with VATS though. I ran the jumper wires over to a switch and I am using it as an anti-theft device now.
01-19-2017, 01:10 AM
#874
Supreme Member
Thread Starter
iTrader: (1)
Join Date: Mar 2007
Location: Apopka, Florida
Posts: 1,237
Likes: 0
Received 7 Likes
on
6 Posts
Car: 1989 Pontiac Trans Am GTA
Engine: cammed LS1
Transmission: Monster SS 4L65E
Axle/Gears: 9 bolt posi w/ 3.70 gears
Re: LS1 swap for my '89 GTA
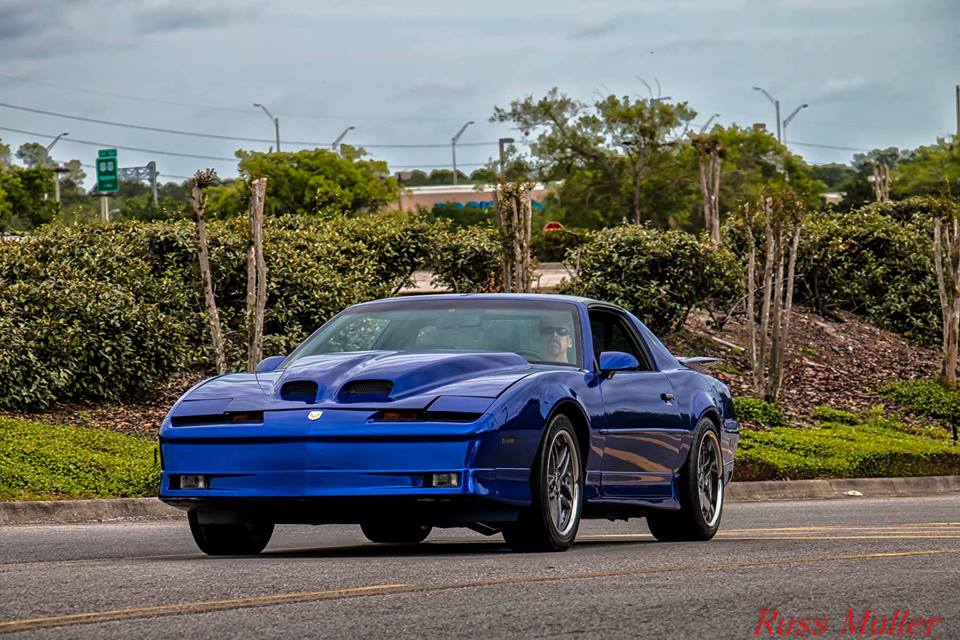
Back from the dead! Here are a few glamour shots. I will post an update here soon.


 01-19-2017, 08:18 AM
#876
Supreme Member
Thread Starter
iTrader: (1)
Join Date: Mar 2007
Location: Apopka, Florida
Posts: 1,237
Likes: 0
Received 7 Likes
on
6 Posts
Car: 1989 Pontiac Trans Am GTA
Engine: cammed LS1
Transmission: Monster SS 4L65E
Axle/Gears: 9 bolt posi w/ 3.70 gears
Re: LS1 swap for my '89 GTA
Hey Jason! Yeah, the transmission stopped shifting into OD, then it went down a cylinder, so I got irritated and just let it sit in the garage until recently. I have been really busy with work though, so that's part of it. Still trying to figure out those two issues. Luis & I have been troubleshooting it, but no luck so far. The exhaust manifold temperature on the number 7 cylinder is only about half of what the other cylinders are. And it's getting spark & fuel, so we're at a loss. We also checked around the engine with a stethoscope & nothing sounded out of the ordinary. I'm just going to take it over to the mechanic & let him figure it out! lol. I may contact the tuner to see if he has any ideas.
How's it going with your ride?
How's it going with your ride?
01-19-2017, 11:02 AM
#877
Supreme Member
Thread Starter
iTrader: (1)
Join Date: Mar 2007
Location: Apopka, Florida
Posts: 1,237
Likes: 0
Received 7 Likes
on
6 Posts
Car: 1989 Pontiac Trans Am GTA
Engine: cammed LS1
Transmission: Monster SS 4L65E
Axle/Gears: 9 bolt posi w/ 3.70 gears
Re: LS1 swap for my '89 GTA
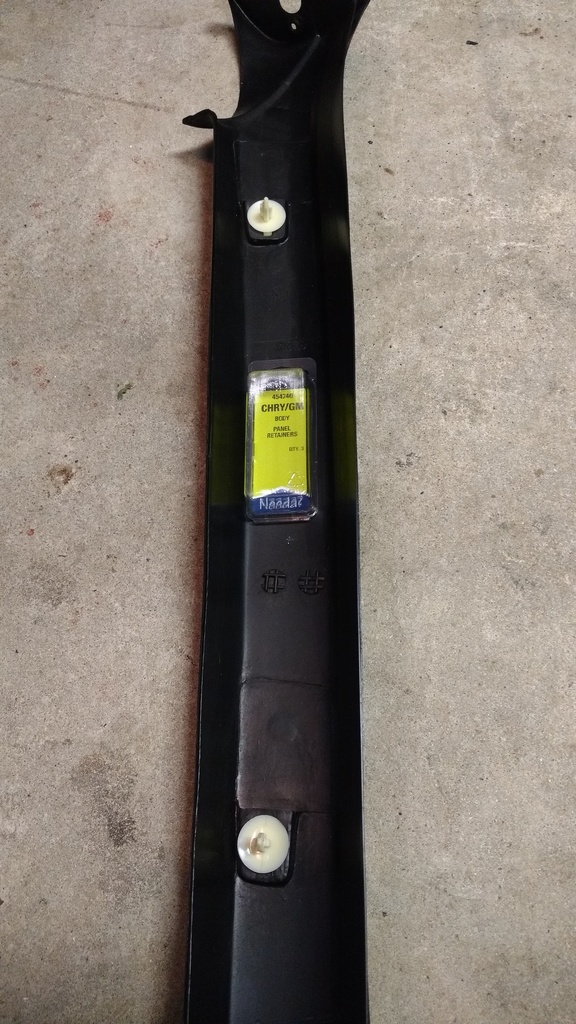
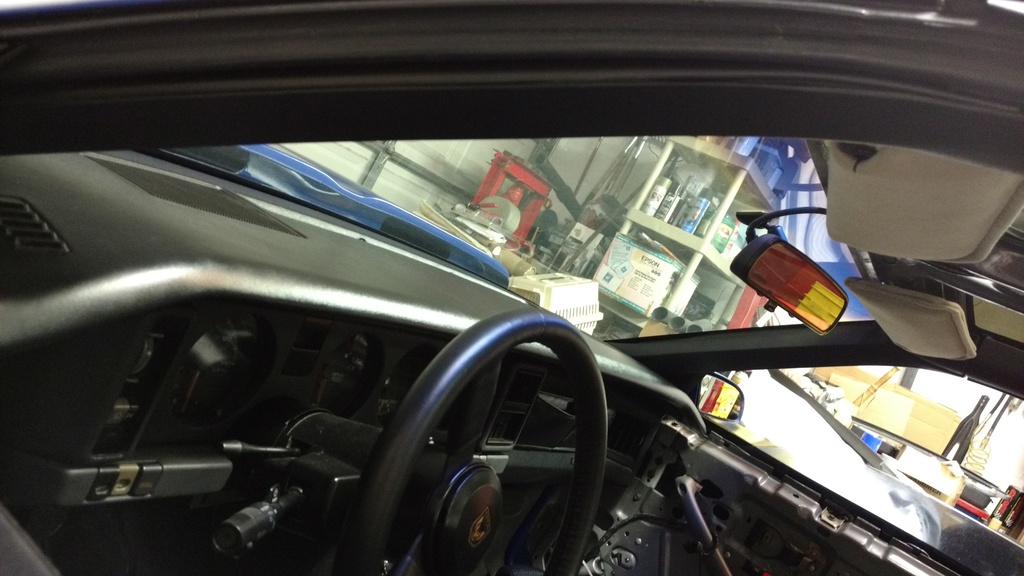
The rubber seals on my A-pillar mouldings were quite tired so I replaced them with new 36" long door sweep rubber seals that I picked up from the hardware store. The rubber seal at the top of the pic is the worn out original. The piece in the middle with the blue stripe is the amount that was cut off. You can see the new seal on the moulding beside the cut-off piece.

I had to buy new clips from the autoparts store. The original ones broke upon removal from the car.
A-pillar Moulding installed. You can see the Bluetooth speaker & new dash pad speaker grills installed as well.
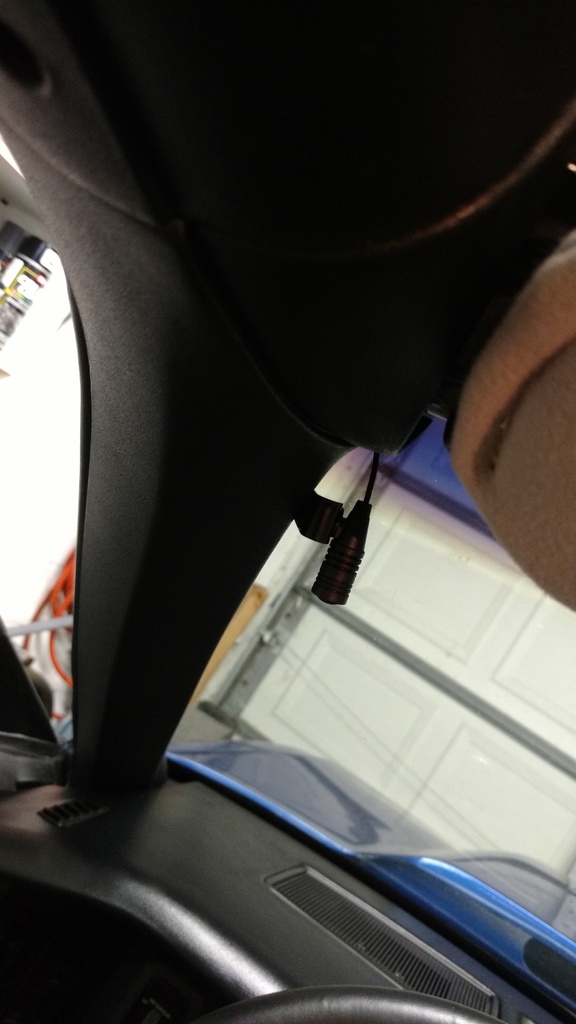
You can kind of see the A-pillar moulding seal in this pic

I had to buy new clips from the autoparts store. The original ones broke upon removal from the car.

A-pillar Moulding installed. You can see the Bluetooth speaker & new dash pad speaker grills installed as well.

You can kind of see the A-pillar moulding seal in this pic

Last edited by dprest68; 01-19-2017 at 11:53 AM.
01-19-2017, 11:12 AM
#878
Supreme Member
Thread Starter
iTrader: (1)
Join Date: Mar 2007
Location: Apopka, Florida
Posts: 1,237
Likes: 0
Received 7 Likes
on
6 Posts
Car: 1989 Pontiac Trans Am GTA
Engine: cammed LS1
Transmission: Monster SS 4L65E
Axle/Gears: 9 bolt posi w/ 3.70 gears
Re: LS1 swap for my '89 GTA
Finally got the driver's side kick panel installed. What a pain the rear.
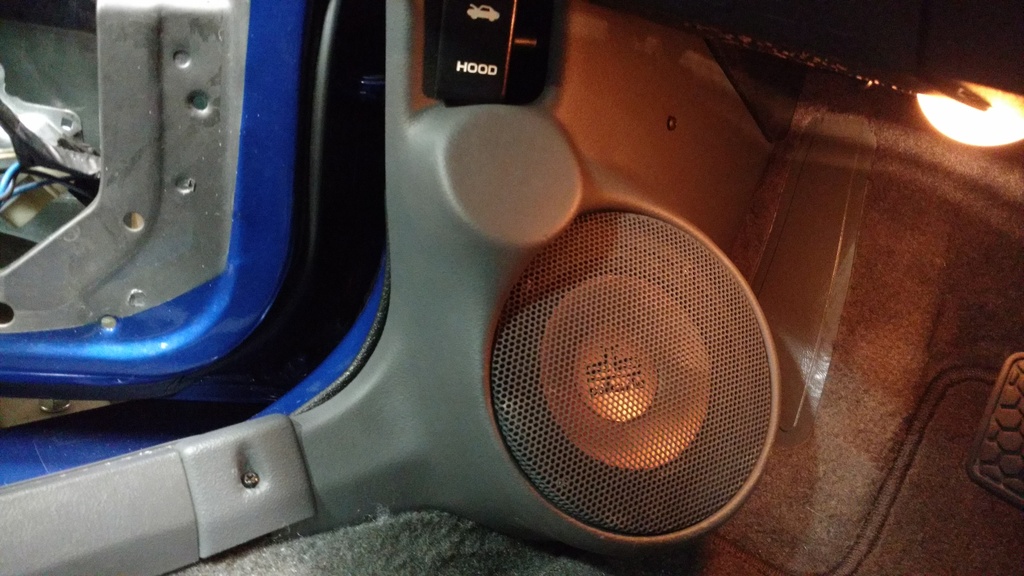
Actually, the only thing that was difficult about it was getting that screw in the middle of the panel installed. There are quite a few wires behind this panel and you have to make sure you aren't drilling into any of them. I stuffed the area behind the speaker with Polyfil before I buttoned it up. The system sounds awesome. It just sucks that this kick panel sticks out so far since that is usually where I rest my left foot when I'm driving. Oh the sacrifices we make! lol

Actually, the only thing that was difficult about it was getting that screw in the middle of the panel installed. There are quite a few wires behind this panel and you have to make sure you aren't drilling into any of them. I stuffed the area behind the speaker with Polyfil before I buttoned it up. The system sounds awesome. It just sucks that this kick panel sticks out so far since that is usually where I rest my left foot when I'm driving. Oh the sacrifices we make!
lol
01-19-2017, 11:16 AM
#879
Supreme Member
Thread Starter
iTrader: (1)
Join Date: Mar 2007
Location: Apopka, Florida
Posts: 1,237
Likes: 0
Received 7 Likes
on
6 Posts
Car: 1989 Pontiac Trans Am GTA
Engine: cammed LS1
Transmission: Monster SS 4L65E
Axle/Gears: 9 bolt posi w/ 3.70 gears
Re: LS1 swap for my '89 GTA
The rear hatch motor has been slowing down, so I replaced it with a fixed unit.
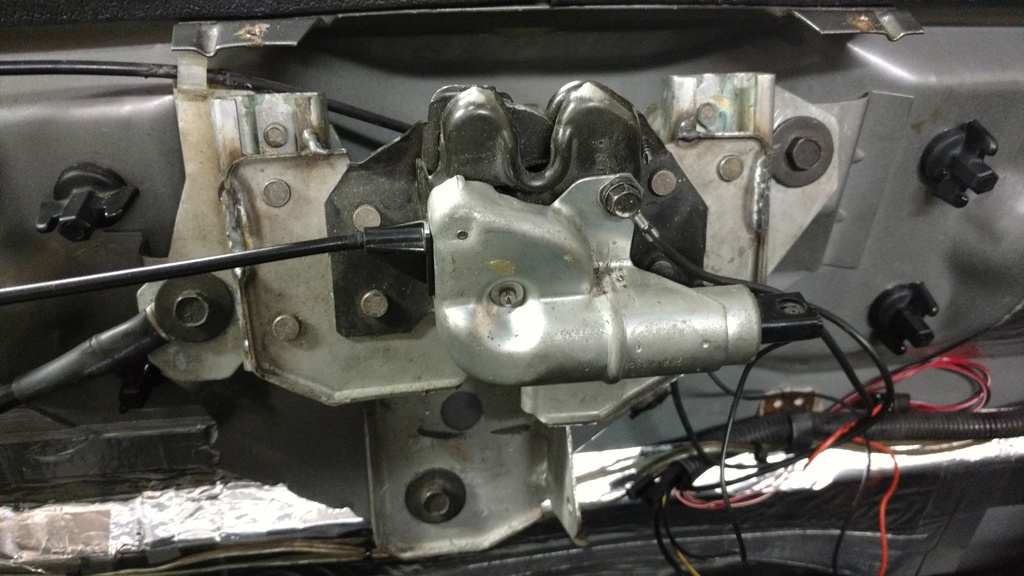
Upon inspection after removal, the guides on the original unit are looking a bit tired. Everything else looked fine on it. Maybe one day I will put new guides on it and put it back in the car if I get bored.

Upon inspection after removal, the guides on the original unit are looking a bit tired. Everything else looked fine on it. Maybe one day I will put new guides on it and put it back in the car if I get bored.
01-19-2017, 11:50 AM
#880
Supreme Member
Thread Starter
iTrader: (1)
Join Date: Mar 2007
Location: Apopka, Florida
Posts: 1,237
Likes: 0
Received 7 Likes
on
6 Posts
Car: 1989 Pontiac Trans Am GTA
Engine: cammed LS1
Transmission: Monster SS 4L65E
Axle/Gears: 9 bolt posi w/ 3.70 gears
Re: LS1 swap for my '89 GTA
On to the engine bay...
I had the mechanic build a new A/C hose for it the last time I had it in the shop. He still has to build the other hose that goes up to the condenser. I guess he screwed up the fitting he needed to build that hose. Crap happens I guess. lol
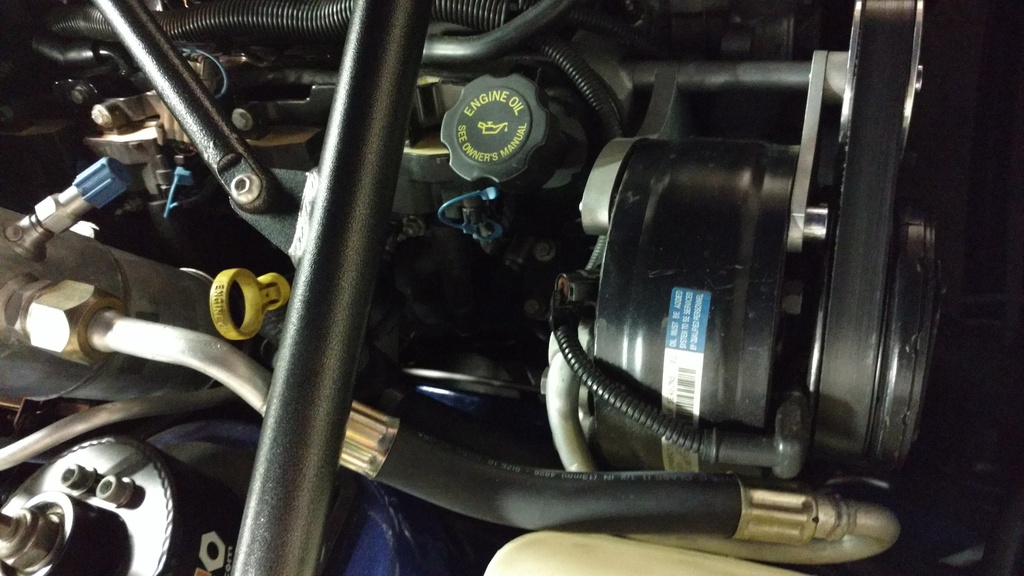
Finally figured out the belt squeal issue. the belt tensioner pulley was on backwards. Yes, backwards! lol. One side had a fatter lip that rides beside the belt. because it was on backwards it was actually rubbing the tensioner itself.
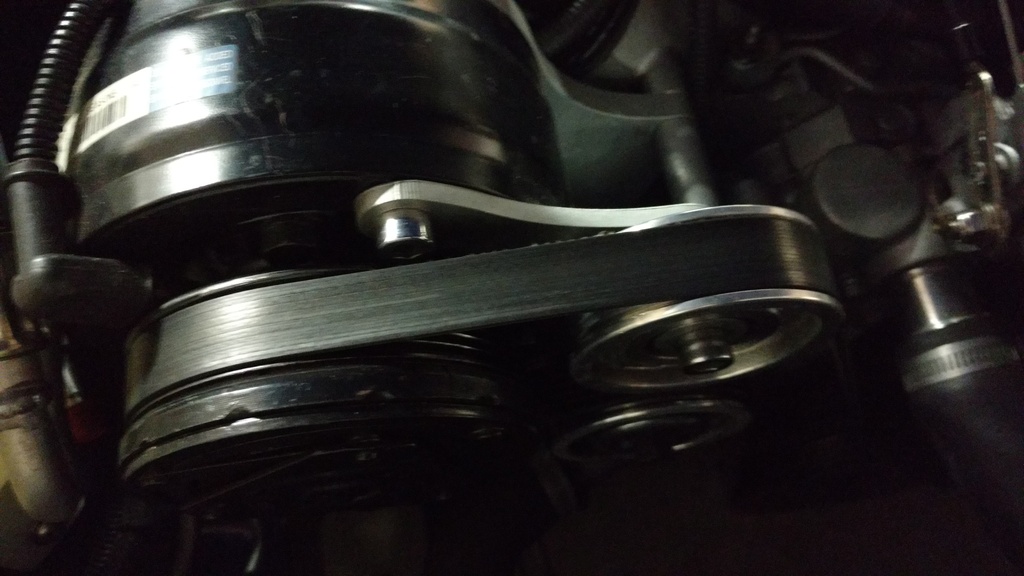
Thanks Luis for figuring that one out. Not even the mechanic could figure that one out.
Last, but not least, we finally got the throttle to go wide open when pushing the go pedal to the floor.
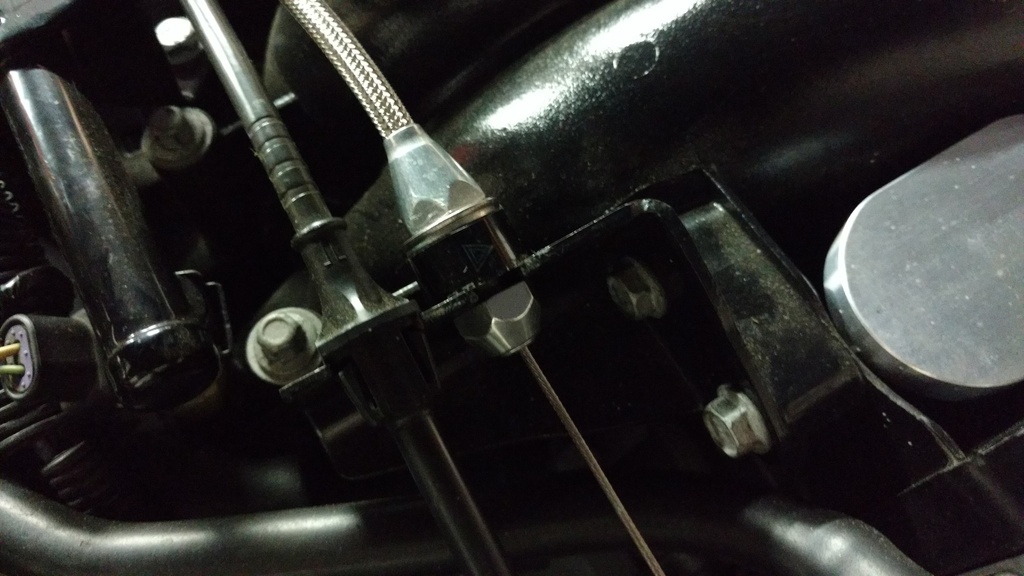
We added this spacer where the cable connects to the bracket. If you notice there's a triangle on the spacer. It's actually an old hazard button that Luis cut down to the size we needed. Then he cut a section out of it so we could slide it into place without disassembling the cable from the throttle body. It basically made the spacer like a U shape. I'm expecting another 100 horsepower out of it now!
Last edited by dprest68; 01-19-2017 at 11:57 AM.
01-20-2017, 08:11 AM
#882
Supreme Member
Thread Starter
iTrader: (1)
Join Date: Mar 2007
Location: Apopka, Florida
Posts: 1,237
Likes: 0
Received 7 Likes
on
6 Posts
Car: 1989 Pontiac Trans Am GTA
Engine: cammed LS1
Transmission: Monster SS 4L65E
Axle/Gears: 9 bolt posi w/ 3.70 gears
Re: LS1 swap for my '89 GTA
Yeah Luis came across one of my old hazard buttons. He's like "hey, let's use that". I'm like "go for it!"
01-24-2017, 11:59 PM
#883
Supreme Member
Thread Starter
iTrader: (1)
Join Date: Mar 2007
Location: Apopka, Florida
Posts: 1,237
Likes: 0
Received 7 Likes
on
6 Posts
Car: 1989 Pontiac Trans Am GTA
Engine: cammed LS1
Transmission: Monster SS 4L65E
Axle/Gears: 9 bolt posi w/ 3.70 gears
Re: LS1 swap for my '89 GTA
Took the car over to the mechanic today. He checked all of the same stuff that Luis & I checked and came to the same conclusion ...that the #7 cylinder was misfiring. Upon doing a compression check, he found that the cylinder was only producing about half what the other cylinders were. He pulled the valve cover on that side to find the intake rocker arm off to the side of the valve and the lock nut had loosened. He put it back together and tightened down the locking nut. And guess what... it broke, just like the other one did back when I was having the car tuned originally. The original locking nuts had a reduced size head on them with a groove below that. Both broke where that groove is because that is where the metal is the thinnest. The new nuts have a larger hex head and no groove. I decided I needed to contact Comp Cams about this issue to get a full set of all new lock nuts. While discussing this with the guy in the warranty department, he told me that they haven't had this problem with these nuts before. He said I need to have the valve train geometry checked. It sounded to him like I may be having coil bind that is overstressing my nuts. HEY... get your mind out of the gutter! So I am going to have the mechanic check to see if the pushrods are the correct length and get that corrected if they aren't. I told him I had a pretty mild cam and he said if the pushrods aren't the correct length it could still be binding the valve springs. So we'll see what happens. I figured all of the nuts may be stressed and I don't want to have this problem again. That's why I decided to buy all new nuts. And they gave me a decent discount too, so that was nice. I'm just glad it was something this simple and not something wrong with the engine!
So I am going to have the mechanic check to see if the pushrods are the correct length and get that corrected if they aren't. I told him I had a pretty mild cam and he said if the pushrods aren't the correct length it could still be binding the valve springs. So we'll see what happens. I figured all of the nuts may be stressed and I don't want to have this problem again. That's why I decided to buy all new nuts. And they gave me a decent discount too, so that was nice. I'm just glad it was something this simple and not something wrong with the engine!
01-26-2017, 02:26 AM
#884
Supreme Member
iTrader: (6)
Join Date: Aug 2011
Location: San Diego, California For Now
Posts: 2,379
Likes: 0
Received 10 Likes
on
10 Posts
Car: 88 Formula, 90 Iroc RIP, 92 RS Sold
Engine: 305 to 350
Transmission: 700r4
Axle/Gears: 10 Bolt
Re: LS1 swap for my '89 GTA
Is it me or front ride height is higher than the rear ?
Yea sounds like geometry is jack up did you out pushrods stock length or measured them most cam company recommend a certain x length but highly recommend to measure as each engine is different but with valve train geometry and stability power can be gain or lose with poor setup
Lucky it's easy fix that would have me shittin bricks lol
Nice pics tho
Last edited by Zach/90\irocZ; 01-26-2017 at 02:32 AM.
01-26-2017, 08:46 AM
#885
Supreme Member
Thread Starter
iTrader: (1)
Join Date: Mar 2007
Location: Apopka, Florida
Posts: 1,237
Likes: 0
Received 7 Likes
on
6 Posts
Car: 1989 Pontiac Trans Am GTA
Engine: cammed LS1
Transmission: Monster SS 4L65E
Axle/Gears: 9 bolt posi w/ 3.70 gears
Re: LS1 swap for my '89 GTA
Is it me or front ride height is higher than the rear ?
Yea sounds like geometry is jack up did you out pushrods stock length or measured them most cam company recommend a certain x length but highly recommend to measure as each engine is different but with valve train geometry and stability power can be gain or lose with poor setup
Lucky it's easy fix that would have me shittin bricks lol
Nice pics tho
Yea sounds like geometry is jack up did you out pushrods stock length or measured them most cam company recommend a certain x length but highly recommend to measure as each engine is different but with valve train geometry and stability power can be gain or lose with poor setup
Lucky it's easy fix that would have me shittin bricks lol
Nice pics tho
As far as the pushrods go, I remember checking the length when I assembled the engine, but I don't remember much more than that. That was like 6 years ago! Heck, I don't remember what I had for lunch yesterday! lol. I am going to have them checked to make sure the lengths are correct for sure. I don't want to have this problem again.
01-28-2017, 02:52 AM
#887
Supreme Member
iTrader: (6)
Join Date: Aug 2011
Location: San Diego, California For Now
Posts: 2,379
Likes: 0
Received 10 Likes
on
10 Posts
Car: 88 Formula, 90 Iroc RIP, 92 RS Sold
Engine: 305 to 350
Transmission: 700r4
Axle/Gears: 10 Bolt
Re: LS1 swap for my '89 GTA
Ahhh OK sweet lol yes should settle then takes more time since lighter engine combo as well
Yea I forget my keys everyday or which pocket I out them in lmao always the little things that turn to big headaches
Yea I forget my keys everyday or which pocket I out them in lmao always the little things that turn to big headaches
Thanks Zach. Yes, you are correct. The front end is setting a touch higher than the rear. I'm not sure if the front springs have settled fully yet. The car still has less than 500 miles on it. I figured I would leave it that way until around a 1000 miles, then get the front end realigned. I will adjust the rear height if need be at that point.
As far as the pushrods go, I remember checking the length when I assembled the engine, but I don't remember much more than that. That was like 6 years ago! Heck, I don't remember what I had for lunch yesterday! lol. I am going to have them checked to make sure the lengths are correct for sure. I don't want to have this problem again.
As far as the pushrods go, I remember checking the length when I assembled the engine, but I don't remember much more than that. That was like 6 years ago! Heck, I don't remember what I had for lunch yesterday! lol. I am going to have them checked to make sure the lengths are correct for sure. I don't want to have this problem again.
01-30-2017, 01:50 PM
#888
Supreme Member
Thread Starter
iTrader: (1)
Join Date: Mar 2007
Location: Apopka, Florida
Posts: 1,237
Likes: 0
Received 7 Likes
on
6 Posts
Car: 1989 Pontiac Trans Am GTA
Engine: cammed LS1
Transmission: Monster SS 4L65E
Axle/Gears: 9 bolt posi w/ 3.70 gears
Re: LS1 swap for my '89 GTA
Finally got the car running last week the way it should have been running all along. And the rest of the new rocker arm nuts came in over the weekend. So I will take it over to the mechanic towards the end of the week to get that taken care of along with a few other things.
I have had my eye on this rearend for the car. Maybe one day. It's pretty pricey though.
http://www.hawksmotorsports.com/heid...ar-suspension/
I have had my eye on this rearend for the car. Maybe one day. It's pretty pricey though.
http://www.hawksmotorsports.com/heid...ar-suspension/
01-30-2017, 08:32 PM
#889
COTM Editor
iTrader: (22)
Join Date: Mar 2001
Posts: 9,892
Likes: 0
Received 1,855 Likes
on
1,270 Posts
Car: '89 Firebird
Engine: 7.0L
Transmission: T56
Re: LS1 swap for my '89 GTA
Why are you paying somebody to torque a few bolts?
If you do it yourself then you can double check pushrod length as well. It is very easy and might settle your mind about a few things.
If you do it yourself then you can double check pushrod length as well. It is very easy and might settle your mind about a few things.
01-30-2017, 08:36 PM
#890
Member
iTrader: (2)
Join Date: Feb 2010
Posts: 460
Likes: 0
Received 3 Likes
on
3 Posts
Car: '89 Camaro
Engine: LS1
Transmission: 4L65/70E
Axle/Gears: 9 Inch, 3.70 gears
Re: LS1 swap for my '89 GTA
Dave, do you still have a 10 bolt in that car? I'm glad to see you and Luis are still working on cars, I miss reading his threads, super attention to detail.
01-30-2017, 09:29 PM
#891
Supreme Member
Thread Starter
iTrader: (1)
Join Date: Mar 2007
Location: Apopka, Florida
Posts: 1,237
Likes: 0
Received 7 Likes
on
6 Posts
Car: 1989 Pontiac Trans Am GTA
Engine: cammed LS1
Transmission: Monster SS 4L65E
Axle/Gears: 9 bolt posi w/ 3.70 gears
Re: LS1 swap for my '89 GTA
Yep, he was always very informative in his threads.
01-30-2017, 10:44 PM
#892
Member
iTrader: (2)
Join Date: Feb 2010
Posts: 460
Likes: 0
Received 3 Likes
on
3 Posts
Car: '89 Camaro
Engine: LS1
Transmission: 4L65/70E
Axle/Gears: 9 Inch, 3.70 gears
Re: LS1 swap for my '89 GTA
9 bolt, 10 bolt..... Same thing. I purchased a new 9 inch last summer, I felt like I was gambling with the old 10 bolt.
02-02-2017, 01:46 PM
#893
Supreme Member
iTrader: (6)
Join Date: Aug 2011
Location: San Diego, California For Now
Posts: 2,379
Likes: 0
Received 10 Likes
on
10 Posts
Car: 88 Formula, 90 Iroc RIP, 92 RS Sold
Engine: 305 to 350
Transmission: 700r4
Axle/Gears: 10 Bolt
Re: LS1 swap for my '89 GTA
Finally got the car running last week the way it should have been running all along. And the rest of the new rocker arm nuts came in over the weekend. So I will take it over to the mechanic towards the end of the week to get that taken care of along with a few other things.
I have had my eye on this rearend for the car. Maybe one day. It's pretty pricey though.
http://www.hawksmotorsports.com/heid...ar-suspension/
I have had my eye on this rearend for the car. Maybe one day. It's pretty pricey though.
http://www.hawksmotorsports.com/heid...ar-suspension/
02-02-2017, 06:46 PM
#894
Supreme Member
Thread Starter
iTrader: (1)
Join Date: Mar 2007
Location: Apopka, Florida
Posts: 1,237
Likes: 0
Received 7 Likes
on
6 Posts
Car: 1989 Pontiac Trans Am GTA
Engine: cammed LS1
Transmission: Monster SS 4L65E
Axle/Gears: 9 bolt posi w/ 3.70 gears
Re: LS1 swap for my '89 GTA
I have actually been considering an 8.8. If I recall correctly though, it didn't seem like they were much cheaper than the 9", 12 bolt or S60. So yeah, I'm just going to have to weigh all of my options. I know the IRS has some performance benefits over the straight axles, but the cost is a major factor.
02-04-2017, 09:59 PM
#895
Supreme Member
iTrader: (6)
Join Date: Aug 2011
Location: San Diego, California For Now
Posts: 2,379
Likes: 0
Received 10 Likes
on
10 Posts
Car: 88 Formula, 90 Iroc RIP, 92 RS Sold
Engine: 305 to 350
Transmission: 700r4
Axle/Gears: 10 Bolt
Re: LS1 swap for my '89 GTA
Well 8.8 diy will save you but from hawks not much diff from 9" 12 or s60
But at the same time iirc from a article 8.8 took less power to run vs the others all are pretty strong and seen all take heavy abuse manual cars so can go wrong with either one
Heidits is sure nice but for street car think it's a bit much a road racer scca autocross etc be worth the time and effort but properly tuned rear can perform just as well but then again I'm poor lol I'm sure if I had money to blow I would get
Detroit speed rear end setup is pretty cool also
Last edited by Zach/90\irocZ; 02-05-2017 at 02:13 AM.
02-08-2017, 11:07 AM
#896
Supreme Member
Thread Starter
iTrader: (1)
Join Date: Mar 2007
Location: Apopka, Florida
Posts: 1,237
Likes: 0
Received 7 Likes
on
6 Posts
Car: 1989 Pontiac Trans Am GTA
Engine: cammed LS1
Transmission: Monster SS 4L65E
Axle/Gears: 9 bolt posi w/ 3.70 gears
Re: LS1 swap for my '89 GTA
Yeah, I looked at that set-up yesterday. It's a pretty cool setup. Sucks that you have to do metal work to install it though and you may not be able to put the back seats back in the car.
Looking on their site though I found this setup that I might have to switch over to for the front of my car to get the ride height the way I want it if the springs don't settle anymore.
https://www.detroitspeed.com/1982-19...-jack-kit.html
It's a bit pricey, but I think it's well worth it to be able to adjust the ride height exactly the way you want it.
02-08-2017, 06:19 PM
#897
Supreme Member
iTrader: (6)
Join Date: Aug 2011
Location: San Diego, California For Now
Posts: 2,379
Likes: 0
Received 10 Likes
on
10 Posts
Car: 88 Formula, 90 Iroc RIP, 92 RS Sold
Engine: 305 to 350
Transmission: 700r4
Axle/Gears: 10 Bolt
Re: LS1 swap for my '89 GTA
Yea but can modify rear seats lol
Why not get weight jack setup I ran weight jack with Koni and stock shocks and kyb and really brought it to another level with spring rates I got
But I don't know I still favor the live rear axle setup all my other cars have independent rear handle well but still like the live rear axle on Camaro
Yea there front is coilovers setup
Yeah, I looked at that set-up yesterday.
It's a pretty cool setup. Sucks that you have to do metal work to install it though and you may not be able to put the back seats back in the car.
Looking on their site though I found this setup that I might have to switch over to for the front of my car to get the ride height the way I want it if the springs don't settle anymore.
https://www.detroitspeed.com/1982-19...-jack-kit.html
It's a bit pricey, but I think it's well worth it to be able to adjust the ride height exactly the way you want it.
04-18-2017, 03:47 PM
#898
Supreme Member
Thread Starter
iTrader: (1)
Join Date: Mar 2007
Location: Apopka, Florida
Posts: 1,237
Likes: 0
Received 7 Likes
on
6 Posts
Car: 1989 Pontiac Trans Am GTA
Engine: cammed LS1
Transmission: Monster SS 4L65E
Axle/Gears: 9 bolt posi w/ 3.70 gears
Re: LS1 swap for my '89 GTA
Been making some progress here lately with the car. I got the shifter linkage adjusted so that I can now pull the shifter all the way back to first gear which also made it so that my back-up lights stay on when in reverse instead of flickering like they used to do. The A/C system is now fully charged, but doesn't work yet. There is a short in the system somewhere that will need to be tracked down. It blows the fuse when you turn the system on. I also ended up putting a new battery in the car. I can now drive the car without having to worry about reliability issues. The most recent development is the rear end gear started singing. A couple people that I talked to said it happens sometimes. So I am looking at replacing the stock gear with a new 3.70:1 gearset from Motive Gear. The fun never ends!
04-18-2017, 03:57 PM
#899
Supreme Member
Thread Starter
iTrader: (1)
Join Date: Mar 2007
Location: Apopka, Florida
Posts: 1,237
Likes: 0
Received 7 Likes
on
6 Posts
Car: 1989 Pontiac Trans Am GTA
Engine: cammed LS1
Transmission: Monster SS 4L65E
Axle/Gears: 9 bolt posi w/ 3.70 gears
Re: LS1 swap for my '89 GTA
Got the door panels back on the car so that it would be more presentable at car shows.
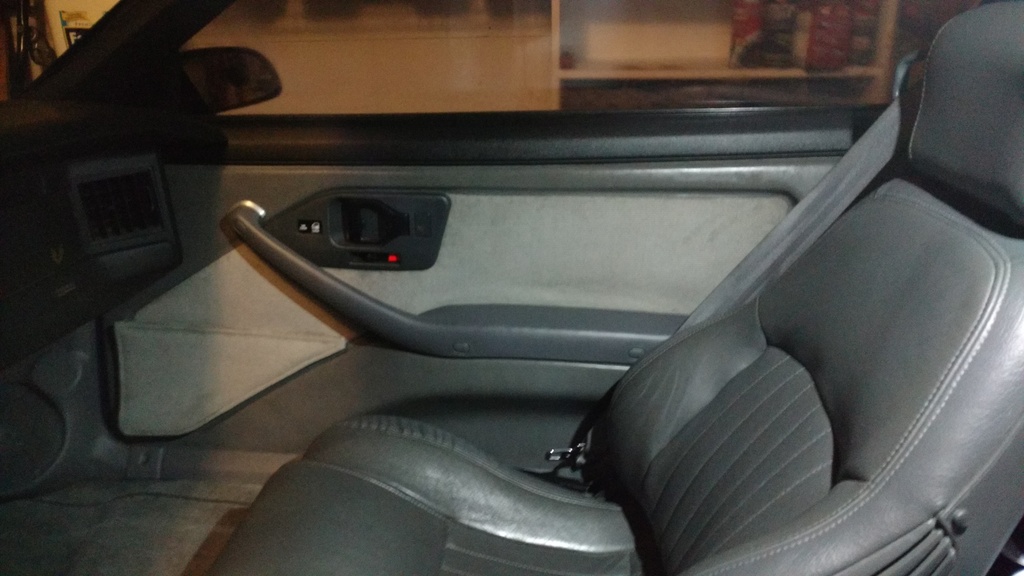
I cleaned the carpeted area of the door panels real good then pulled tight and re-stapled the door pocket elastic bands. It looks much better now. I put the stock top plates back on the door panels, but I am going to order new ones from Hawks. Once those come in I will put the visqueen water shields back on the doors when I take the panels back off.

I cleaned the carpeted area of the door panels real good then pulled tight and re-stapled the door pocket elastic bands. It looks much better now. I put the stock top plates back on the door panels, but I am going to order new ones from Hawks. Once those come in I will put the visqueen water shields back on the doors when I take the panels back off.
04-18-2017, 04:13 PM
#900
Supreme Member
Thread Starter
iTrader: (1)
Join Date: Mar 2007
Location: Apopka, Florida
Posts: 1,237
Likes: 0
Received 7 Likes
on
6 Posts
Car: 1989 Pontiac Trans Am GTA
Engine: cammed LS1
Transmission: Monster SS 4L65E
Axle/Gears: 9 bolt posi w/ 3.70 gears
Re: LS1 swap for my '89 GTA
Next up, Luis & I are tackling the headliner
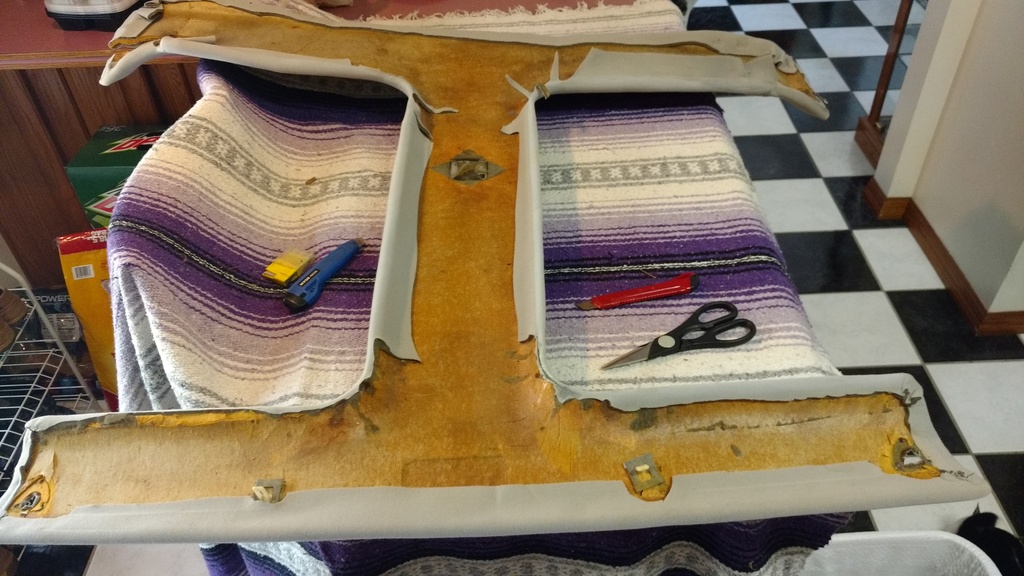
As you can see, the last person that recovered it did a pretty crappy job. We're working on removing the old headliner material then we are going to use fiberglass to strengthen the stock fiberboard. It's in pretty rough shape as you can see...
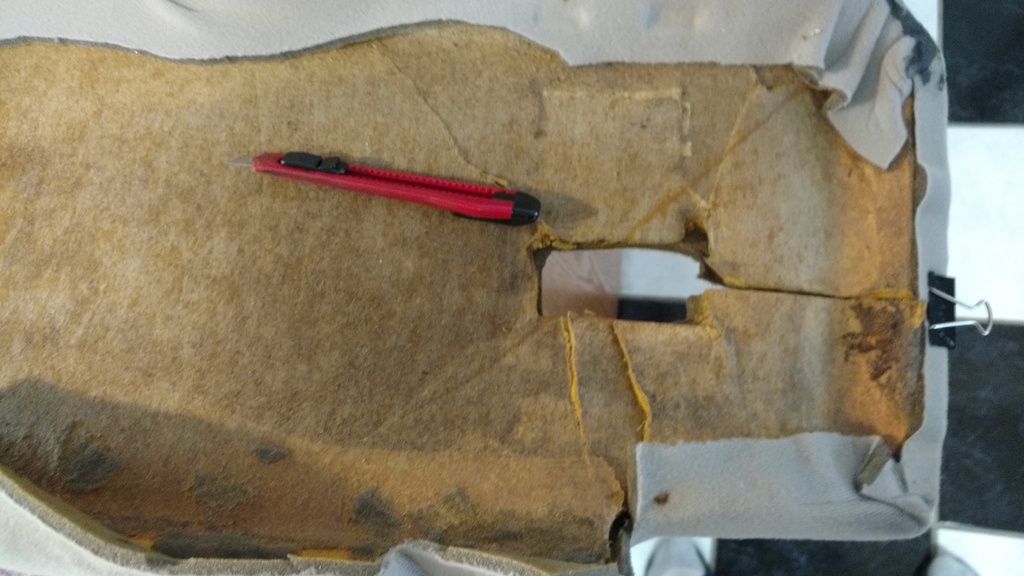
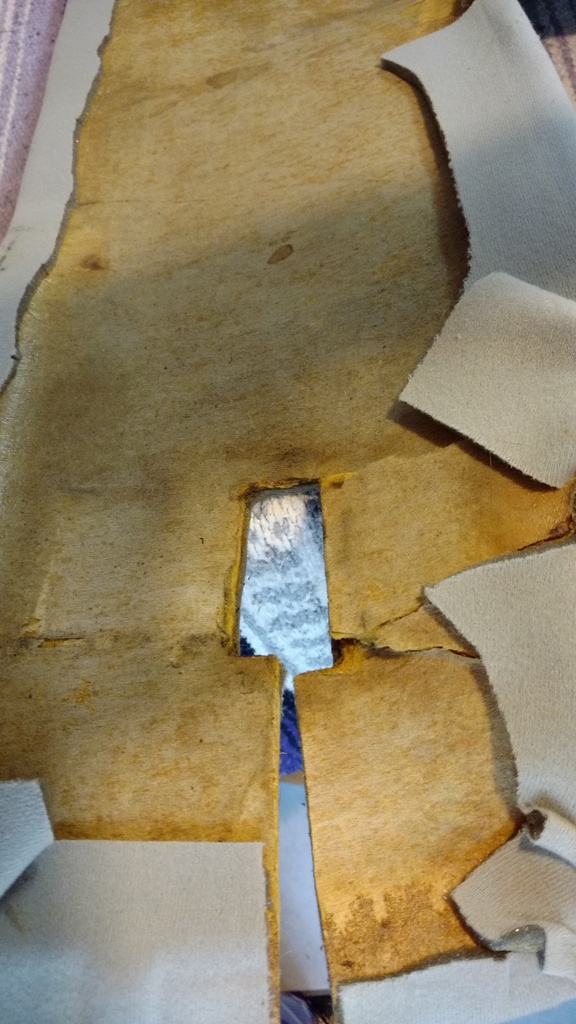
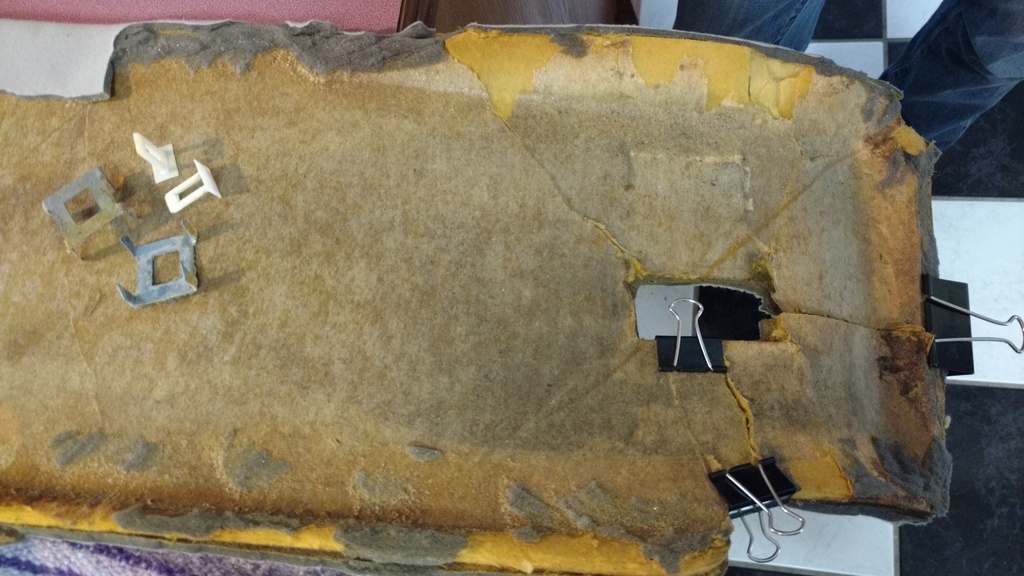
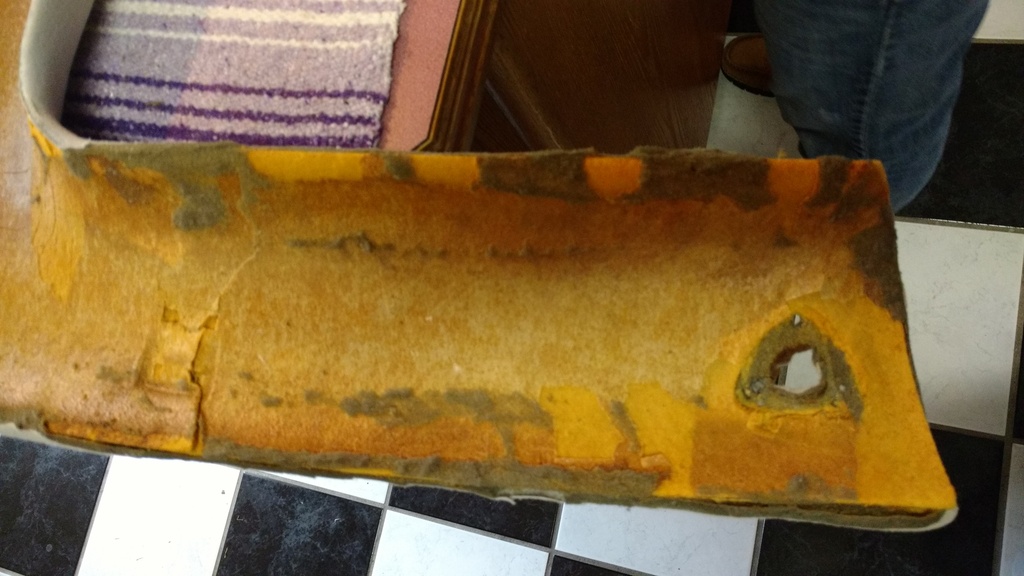
To start with we are going to fiberglass the broken & cracked areas. We will eventually do the entire board so that there will be no weak areas that can crack again. We are going to put a thin sheet of aluminum in the fiberglass where the visors mount since that is a high stress area for the fiberboard. I think we also have come up with a good way to reinstall the stock mounting clips at the front of the headliner. Stay tuned...
I did buy an ABS headliner for the car a while back, but decided not to use it since it kind of looked cheap & it doesn't fit all that great.

As you can see, the last person that recovered it did a pretty crappy job. We're working on removing the old headliner material then we are going to use fiberglass to strengthen the stock fiberboard. It's in pretty rough shape as you can see...


To start with we are going to fiberglass the broken & cracked areas. We will eventually do the entire board so that there will be no weak areas that can crack again. We are going to put a thin sheet of aluminum in the fiberglass where the visors mount since that is a high stress area for the fiberboard. I think we also have come up with a good way to reinstall the stock mounting clips at the front of the headliner. Stay tuned...
I did buy an ABS headliner for the car a while back, but decided not to use it since it kind of looked cheap & it doesn't fit all that great.
Last edited by dprest68; 04-18-2017 at 04:18 PM.