LS1/6 build and swap .. so long SBC
 03-07-2011, 11:00 PM
#1
LS1/6 build and swap to F1C Procharger
Been building on my car for the last few years, finally putting some real horsepower into it. Built up a 406 SBC which put down some good numbers, but that extra shot of NOS had me wanting that kind of power all the time.
As I was building up my car I had found a good source of 4th gen parts from a local owner who was slowly converting his 01 TransAm to a dedicated drag car. First I picked up rear LS1 rear brakes, which before I left turned into a rear end and wheels / tires, then came his leather seats, then his T56. Everytime I bought more parts, that LS1 under the hood kept calling my name and I knew one day I would have a chance to pick it up as he was going BBC if she ever came apart.
After spending a year on building and installing my 406 SBC and the rest of my undercarriage finally coming together, that day came. Buddy installed a new dual bottle NOS kit in the rear window without any bottle covers, bottles got hot and his next run down the track went lean. One cylinder plug electrode later, #4 cylinder was low on compression and the LS1 was for sale. What to do .... only 600 miles on my 406 SBC.. With the 406 already maxed out due to the stock crank and rods and me wanting more, I left it to fate to determine. First guy to come by bought the 406. Guess I am going LS1 ...woohoo!!
As the cylinders on the LS1 were in perfect shape I thought I might get lucky and get away with only a ring job and some new bearings. Once I got it apart #4 piston was tight on the pin, so here we go.
I have been doing a lot of research on this board before going the LS1 route and in doing so, appreciate all the knowledgable builders on here who I welcome your guys input in helping me put this thing together correctly.
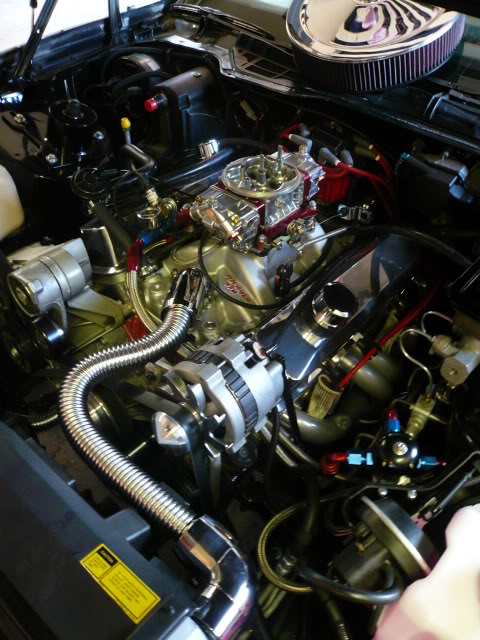
Here is a going away pick of the 406 for old times sakes, just before she was pulled.
Once I got the LS1 apart I went after smoothing all the oil flow points to help the oil returns and some general block clean up to remove any casting slag on the inside and outside. I had done this on the 406 as well and was suprised how clean the LS1 casting was from stock.
Front and rear oil returns cleaned.
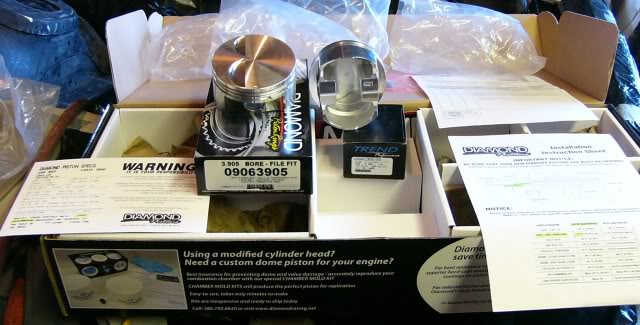
Seeing my car is already setup for NOS, I decided to go with some forged pistons in the build, so picked up a sweet set of Diamonds with small reliefs and some ARP 2000 rod bolts. Real MAN jewelry ...lol.
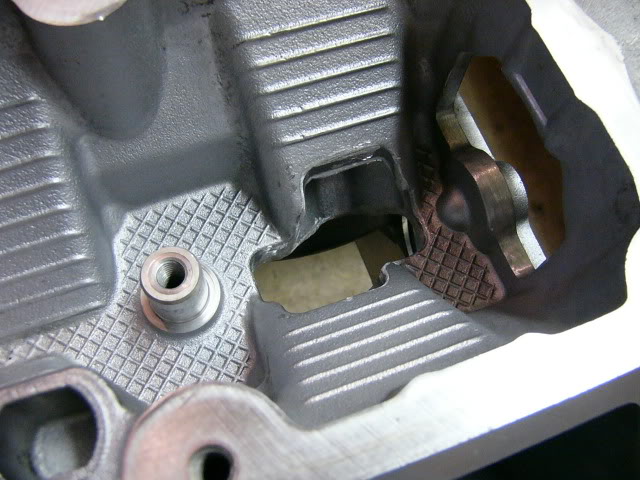
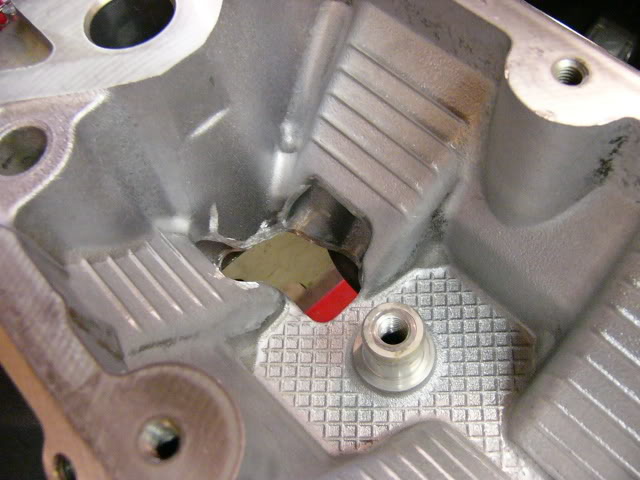
Found this interesting when I was prepping the pistons ...
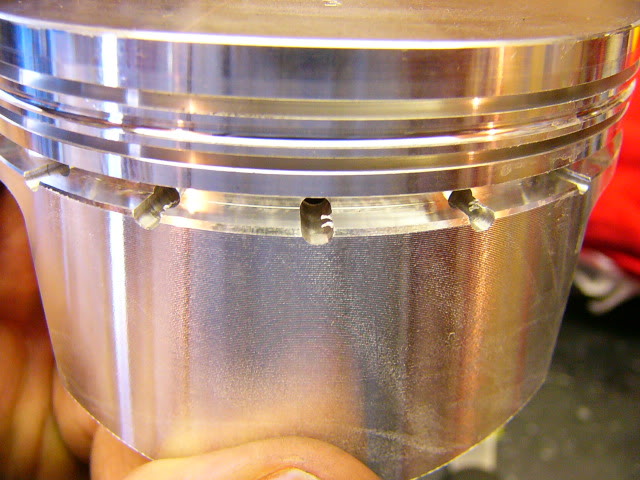
cleaned them up to get rid of all maching slivers and off to the machine shop she goes.
As I was building up my car I had found a good source of 4th gen parts from a local owner who was slowly converting his 01 TransAm to a dedicated drag car. First I picked up rear LS1 rear brakes, which before I left turned into a rear end and wheels / tires, then came his leather seats, then his T56. Everytime I bought more parts, that LS1 under the hood kept calling my name and I knew one day I would have a chance to pick it up as he was going BBC if she ever came apart.
After spending a year on building and installing my 406 SBC and the rest of my undercarriage finally coming together, that day came. Buddy installed a new dual bottle NOS kit in the rear window without any bottle covers, bottles got hot and his next run down the track went lean. One cylinder plug electrode later, #4 cylinder was low on compression and the LS1 was for sale. What to do .... only 600 miles on my 406 SBC.. With the 406 already maxed out due to the stock crank and rods and me wanting more, I left it to fate to determine. First guy to come by bought the 406. Guess I am going LS1 ...woohoo!!
As the cylinders on the LS1 were in perfect shape I thought I might get lucky and get away with only a ring job and some new bearings. Once I got it apart #4 piston was tight on the pin, so here we go.
I have been doing a lot of research on this board before going the LS1 route and in doing so, appreciate all the knowledgable builders on here who I welcome your guys input in helping me put this thing together correctly.
Here is a going away pick of the 406 for old times sakes, just before she was pulled.
Once I got the LS1 apart I went after smoothing all the oil flow points to help the oil returns and some general block clean up to remove any casting slag on the inside and outside. I had done this on the 406 as well and was suprised how clean the LS1 casting was from stock.
Front and rear oil returns cleaned.
Seeing my car is already setup for NOS, I decided to go with some forged pistons in the build, so picked up a sweet set of Diamonds with small reliefs and some ARP 2000 rod bolts. Real MAN jewelry ...lol.
Found this interesting when I was prepping the pistons ...
cleaned them up to get rid of all maching slivers and off to the machine shop she goes.
Last edited by HP52TA; 04-25-2017 at 11:11 PM.
 03-08-2011, 12:06 AM
#2
Moderator

iTrader: (14)
Join Date: Mar 2000
Location: Littleton, CO USA
Posts: 43,169
Likes: 0
Received 35 Likes
on
34 Posts
Car: 82 Berlinetta/57 Bel Air
Engine: LS1/LQ4
Transmission: 4L60E/4L80E
Axle/Gears: 12B-3.73/9"-3.89
Finding that sort of lack of quality control is disappointing. Should have sent them back. Hope that's all that was wrong with them.
What caused the low compression, burnt valves?
What heads are you going to run?
What caused the low compression, burnt valves?
What heads are you going to run?
03-08-2011, 10:40 AM
#3
Supreme Member
iTrader: (4)
Join Date: Mar 2009
Location: Pepperell, MA
Posts: 3,079
Likes: 0
Received 3 Likes
on
3 Posts
Car: 1987 Trans Am
Engine: LQ9/L92
Transmission: 4L60E
Re: LS1/6 build and swap .. so long SBC
look forward to another 3rd gen joining the LSx family, looks like you're off to a good start.
03-08-2011, 11:02 AM
#4
Supreme Member
iTrader: (1)
Join Date: Mar 2007
Location: Apopka, Florida
Posts: 1,237
Likes: 0
Received 7 Likes
on
6 Posts
Car: 1989 Pontiac Trans Am GTA
Engine: cammed LS1
Transmission: Monster SS 4L65E
Axle/Gears: 9 bolt posi w/ 3.70 gears
Re: LS1/6 build and swap .. so long SBC
That was a nice looking 406 you had. I'm sure your LSx will look equally impresive once finished. Good luck with it.
03-08-2011, 01:33 PM
#5
Re: LS1/6 build and swap .. so long SBC
Heads will be a rebuilt used set of Patriot Performance 243 (LS6) heads. I bought a used set as I wanted to do a little port/polishing and machining to get the compression closer to 11:1. The heads were to have had only 7K miles on them, but I think the seller forgot a zero in that mileage call. I did some slight porting and polishing and sent them to the machine shop for a full rebuild. I'll post some pics when I get them back.
Those pistons were quite a surprise! I thought in buying a Diamond piston that they would be ready to slide in. After seeing that, I went over everyone of them with a fine toothed comb to make sure no other flaws were there. A welding cleaning tip made quick work of those leftovers bits in the oil holes and everything else looked fine.
Those pistons were quite a surprise! I thought in buying a Diamond piston that they would be ready to slide in. After seeing that, I went over everyone of them with a fine toothed comb to make sure no other flaws were there. A welding cleaning tip made quick work of those leftovers bits in the oil holes and everything else looked fine.
03-09-2011, 08:31 PM
#6
Re: LS1/6 build and swap .. so long SBC
While waiting for the engine parts to come back from the machinist I got a few other things together.
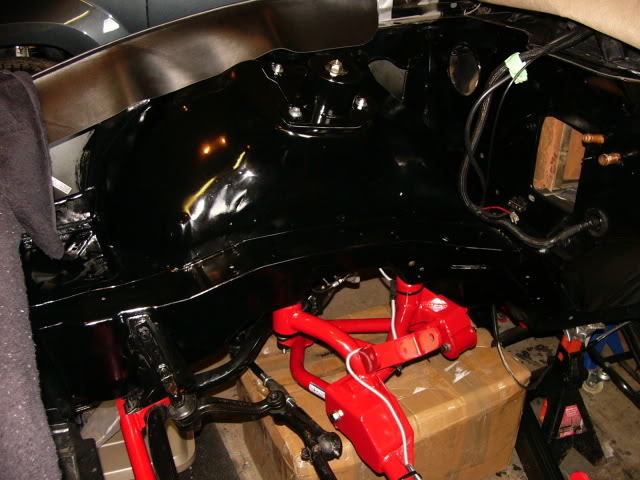
Brake lines reinstalled with some creative relocation to give them some support and protection. Hoping this should also provide additional clearance for the heeaders. I hated to use the tie wraps for this but wasn't willing to drill into the K member in fear of cracks developing in the future.

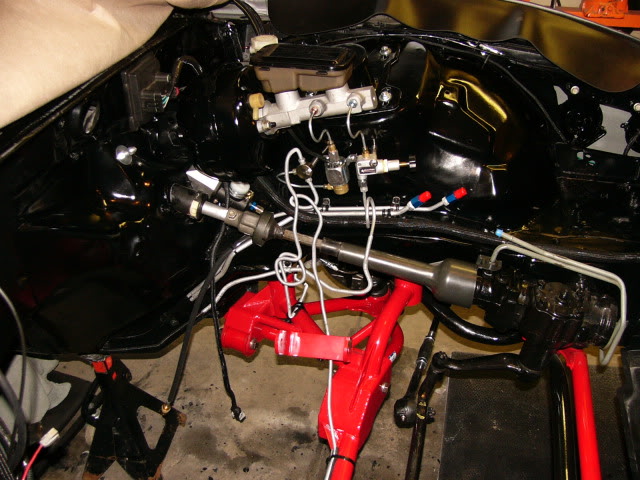
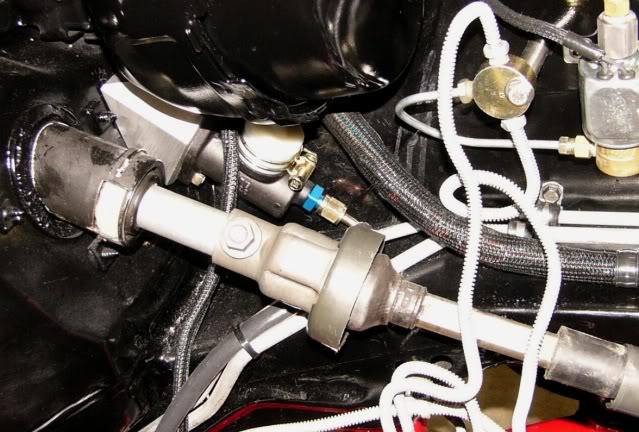
Got the new Tick Performance clutch master cylinder installed. Had to do a little body modification at the lower fitting to get an unobstructed fit.
Thinking of doing a battery relocation with running the wire inside the cab from the spare tire location. Any ideas as to the best location to mount a distribution block in the engine bay? Looking to keep the wire passage through the firewall as hidden as possible too.
Brake lines reinstalled with some creative relocation to give them some support and protection. Hoping this should also provide additional clearance for the heeaders. I hated to use the tie wraps for this but wasn't willing to drill into the K member in fear of cracks developing in the future.
Got the new Tick Performance clutch master cylinder installed. Had to do a little body modification at the lower fitting to get an unobstructed fit.
Thinking of doing a battery relocation with running the wire inside the cab from the spare tire location. Any ideas as to the best location to mount a distribution block in the engine bay? Looking to keep the wire passage through the firewall as hidden as possible too.
03-09-2011, 10:24 PM
#7
Moderator
iTrader: (14)
Join Date: Mar 2000
Location: Littleton, CO USA
Posts: 43,169
Likes: 0
Received 35 Likes
on
34 Posts
Car: 82 Berlinetta/57 Bel Air
Engine: LS1/LQ4
Transmission: 4L60E/4L80E
Axle/Gears: 12B-3.73/9"-3.89
I routed my brake lines behind the steering shaft to get them away from the headers.
Trending Topics
03-10-2011, 09:41 AM
#8
Supreme Member
iTrader: (1)
Join Date: Mar 2007
Location: Apopka, Florida
Posts: 1,237
Likes: 0
Received 7 Likes
on
6 Posts
Car: 1989 Pontiac Trans Am GTA
Engine: cammed LS1
Transmission: Monster SS 4L65E
Axle/Gears: 9 bolt posi w/ 3.70 gears
Re: LS1/6 build and swap .. so long SBC
That's a clean looking engine bay you have there. Very nice 
Last edited by dprest68; 03-16-2011 at 01:09 AM.
03-17-2011, 10:26 PM
#10
Re: LS1/6 build and swap .. so long SBC
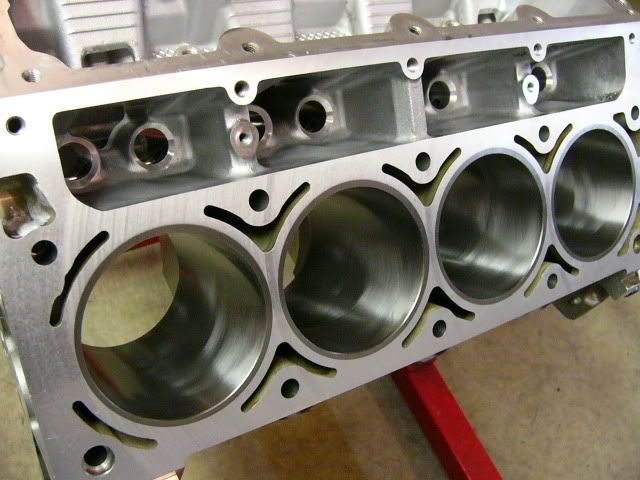
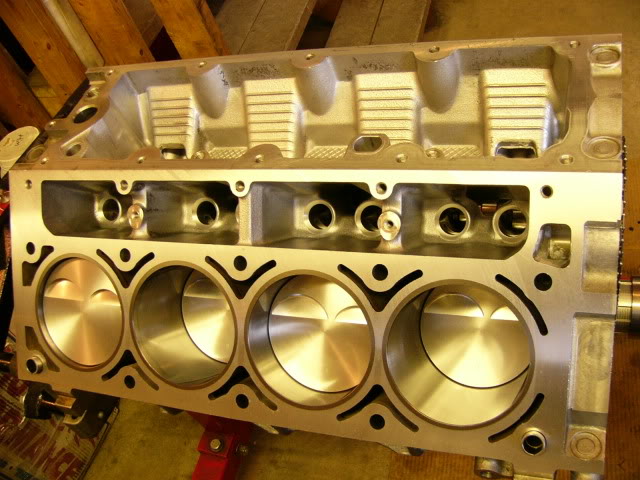
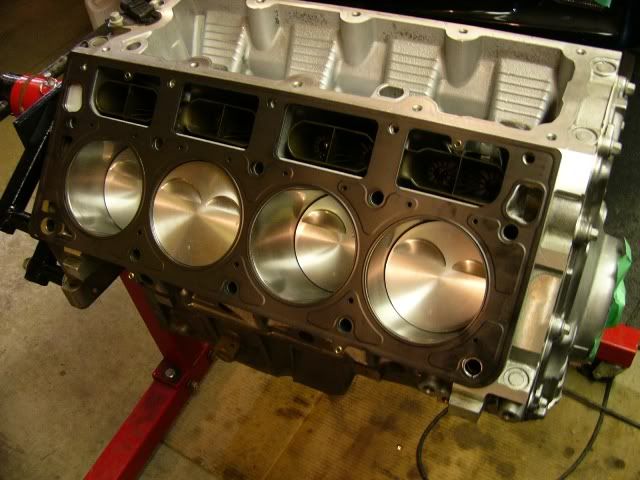
Got my block back from the machine shop and she is ready for assembly. WooHoo!! Time to put something together instead of ripping things apart!
Cylinders were deck plate bored and honed to 3.905�, providing 0.005� clearance for the forged pistons. 0.004� is recommended for N/A, with the extra thousand added for nitrous use. Deck was milled 0.003� to provide a new flat surface for the 0.040� Cometic heads gaskets I will be using. New Clevite cam bearings were installed to complete the block work.
Mmmm fresh bores.
Pistons were installed on the stock LS1 rods. I had replaced the rod bolts with ARP 2000s and checked the big end clearances before taking them to the machine shop to have the pistons swapped. Out of round was less than 0.0002�, so all was good.

Got the new pistons installed and the rotating assembly balanced to with � gram. The new forged pistons weigh in at 402 grams which is 32 grams lighter then the stockers.
ARP main studs were installed to replace the stock bolts. Before taking her to the machine shop, all the mains with studs installed were checked for out of round with less than 0.0002� so I foregone the align hone on the mains.
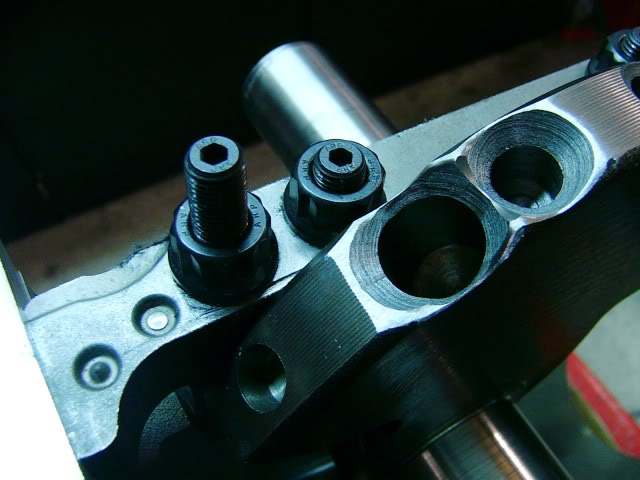
Here are a couple pics of the machining done to get here all balanced. First one you can see the shaving done on the rods big end, second one shows the holes drilled in the crank counterweights. Straight cut holes are stock with the beveled holes the new ones added to rebalance the crank.

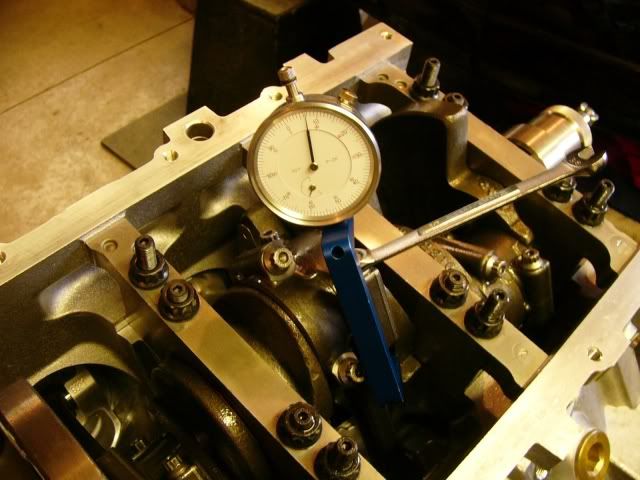
Rod bolts were tightened using the stretch method to ensure proper fastener tension. To use my bolt stretch dial indicator, I found replacing the stock spring in the dial indicator with the spring from a pen gave me the required tension needed to use it in the upright position as pictured. This was not possible with the stock spring as it would not hold the dial indicator tightly in place to provide a correct measurement.
Cylinders were deck plate bored and honed to 3.905�, providing 0.005� clearance for the forged pistons. 0.004� is recommended for N/A, with the extra thousand added for nitrous use. Deck was milled 0.003� to provide a new flat surface for the 0.040� Cometic heads gaskets I will be using. New Clevite cam bearings were installed to complete the block work.
Mmmm fresh bores.
Pistons were installed on the stock LS1 rods. I had replaced the rod bolts with ARP 2000s and checked the big end clearances before taking them to the machine shop to have the pistons swapped. Out of round was less than 0.0002�, so all was good.
Got the new pistons installed and the rotating assembly balanced to with � gram. The new forged pistons weigh in at 402 grams which is 32 grams lighter then the stockers.
ARP main studs were installed to replace the stock bolts. Before taking her to the machine shop, all the mains with studs installed were checked for out of round with less than 0.0002� so I foregone the align hone on the mains.
Here are a couple pics of the machining done to get here all balanced. First one you can see the shaving done on the rods big end, second one shows the holes drilled in the crank counterweights. Straight cut holes are stock with the beveled holes the new ones added to rebalance the crank.
Rod bolts were tightened using the stretch method to ensure proper fastener tension. To use my bolt stretch dial indicator, I found replacing the stock spring in the dial indicator with the spring from a pen gave me the required tension needed to use it in the upright position as pictured. This was not possible with the stock spring as it would not hold the dial indicator tightly in place to provide a correct measurement.
03-17-2011, 10:27 PM
#11
Re: LS1/6 build and swap .. so long SBC
Got the Vengeance Racing Vindicator cam installed. New Comp Cams double roller chain and sprockets.
Degree�d in the cam. I used a piece of plate steel bolted to the block for mounting my dial indicator. Needed to install a slightly longer bolt in the dial indicator to get sufficient reach to the lifter.
I found it interesting that I need to install the cam sprocket at 4 degrees advance to get the intake centerline lined up to the 108 degrees, actually ending up at 107 degrees, one degree advanced.
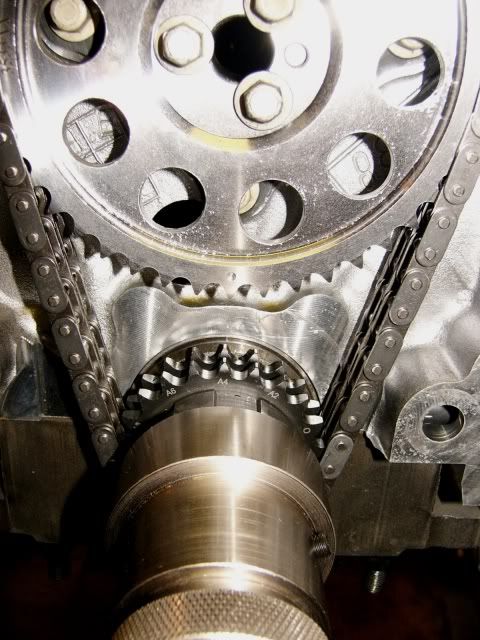
More to come �
Degree�d in the cam. I used a piece of plate steel bolted to the block for mounting my dial indicator. Needed to install a slightly longer bolt in the dial indicator to get sufficient reach to the lifter.
I found it interesting that I need to install the cam sprocket at 4 degrees advance to get the intake centerline lined up to the 108 degrees, actually ending up at 107 degrees, one degree advanced.
More to come �
03-17-2011, 11:04 PM
#12
Supreme Member
iTrader: (1)
Join Date: Mar 2007
Location: Apopka, Florida
Posts: 1,237
Likes: 0
Received 7 Likes
on
6 Posts
Car: 1989 Pontiac Trans Am GTA
Engine: cammed LS1
Transmission: Monster SS 4L65E
Axle/Gears: 9 bolt posi w/ 3.70 gears
Re: LS1/6 build and swap .. so long SBC
 That's going to be one sweet engine when you get it finished!
 03-17-2011, 11:22 PM
#13
Re: LS1/6 build and swap .. so long SBC
I found it interesting that I need to install the cam sprocket at 4 degrees advance to get the intake centerline lined up to the 108 degrees, actually ending up at 107 degrees, one degree advanced.
I had a custom grind come back that was way off from straight up and really had to advance the sprocket to get the centerline lined up. My previous custom grind ground by comp cam installed just fine. Sometimes the pin isnt positioned rightGreat looking build so far. what kind of numbers you looking for on motor? mid high 400whp for certain. My buddy has a 6.0 with a polluter cam, thats in the 240's duration, somewhat similar to the vindicator and it runs very strong in a 80's el camino. Good build you got going.
03-23-2011, 10:22 PM
#14
Re: LS1/6 build and swap .. so long SBC
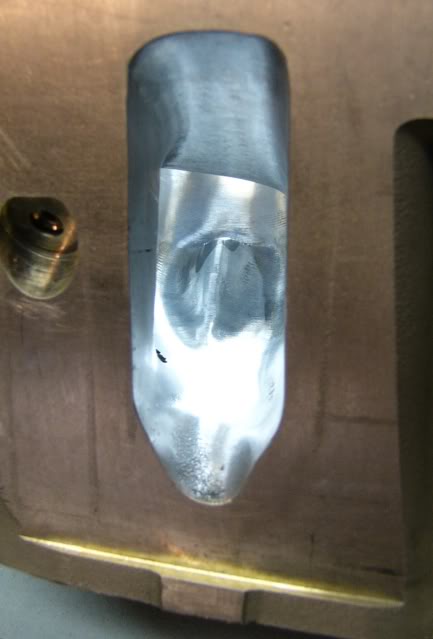
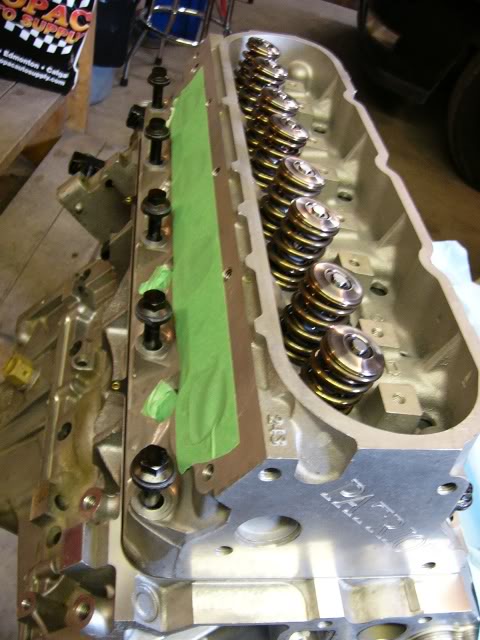
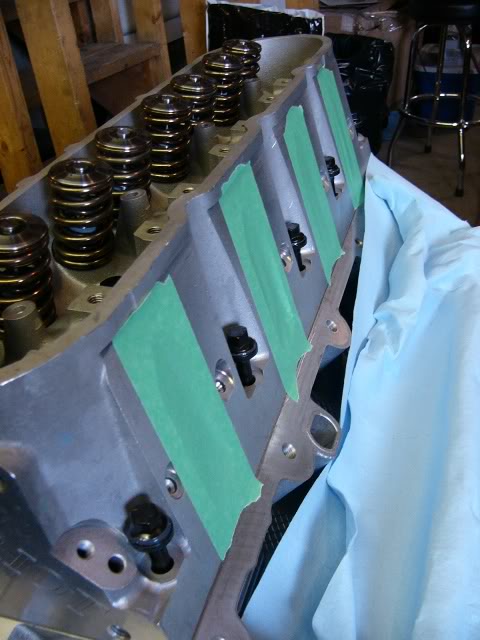
Thanks for the support guys. Haven't had much time to move ahead, so thought I would throw up some pics of my porting clean up before the heads go on.
I had picked up a used set of Partiot 2013 LS6 heads. These were CNC'd before I got out the grinder, so my work focused on smoothing and blending more so than any reshaping. Port work consisted of work around the guides, smoothing the short side turn and blending the transition in the bowl. One trick I have learned when doing the polishing with sanding rolls is to dip the roll in ATF, keeps the aluminum from clogging the roll quite well.
After my polishing, the heads were then fully rebuilt with new guides and fresh valve grind by my machine shop. Also had them mill the heads 0.012" dropping the head volume by 2cc down to 62cc, which gives me around 11:1 static compression to work with my vindicator cam. I am hoping to have around 525 hp at the crank naturally aspirated, with the amount of juice added depending on the future rear end upgrade. Sometimes this game feels like you are chasing your tail ...
Intake posts were smoothed and blended, port walls left rough from the sanding rolls. You can see still where the CNC had left quite a ridge above the guide on the long side turn.
Exhausts and combustion chambers were smoothed and polished down from a course to fine grit rolls and them finish polished with the cross buff pads.

To help save some knuckles when changing plugs, I also cleaned up the knife sharp edges around the plug holes and smoothed out the V casting marks. I've read that heads that have these V marks make around 6-8 horsepower more than heads that don't due to the casting process.
Next up will be to get these babies installed and confirm piston to valve clearance.
I had picked up a used set of Partiot 2013 LS6 heads. These were CNC'd before I got out the grinder, so my work focused on smoothing and blending more so than any reshaping. Port work consisted of work around the guides, smoothing the short side turn and blending the transition in the bowl. One trick I have learned when doing the polishing with sanding rolls is to dip the roll in ATF, keeps the aluminum from clogging the roll quite well.
After my polishing, the heads were then fully rebuilt with new guides and fresh valve grind by my machine shop. Also had them mill the heads 0.012" dropping the head volume by 2cc down to 62cc, which gives me around 11:1 static compression to work with my vindicator cam. I am hoping to have around 525 hp at the crank naturally aspirated, with the amount of juice added depending on the future rear end upgrade. Sometimes this game feels like you are chasing your tail ...
Intake posts were smoothed and blended, port walls left rough from the sanding rolls. You can see still where the CNC had left quite a ridge above the guide on the long side turn.
Exhausts and combustion chambers were smoothed and polished down from a course to fine grit rolls and them finish polished with the cross buff pads.
To help save some knuckles when changing plugs, I also cleaned up the knife sharp edges around the plug holes and smoothed out the V casting marks. I've read that heads that have these V marks make around 6-8 horsepower more than heads that don't due to the casting process.
Next up will be to get these babies installed and confirm piston to valve clearance.
03-24-2011, 10:14 PM
#15
Senior Member
iTrader: (8)

Join Date: Sep 2010
Location: Cincinnati, Ohio
Posts: 732
Likes: 0
Received 0 Likes
on
0 Posts
Car: '89 GTA
Engine: 5.7L LS1
Transmission: 4L60E
Axle/Gears: 9 bolt 3.27
Re: LS1/6 build and swap .. so long SBC
Nice work. You got awfully close to those valve guides. 
03-27-2011, 01:31 PM
#16
Re: LS1/6 build and swap .. so long SBC
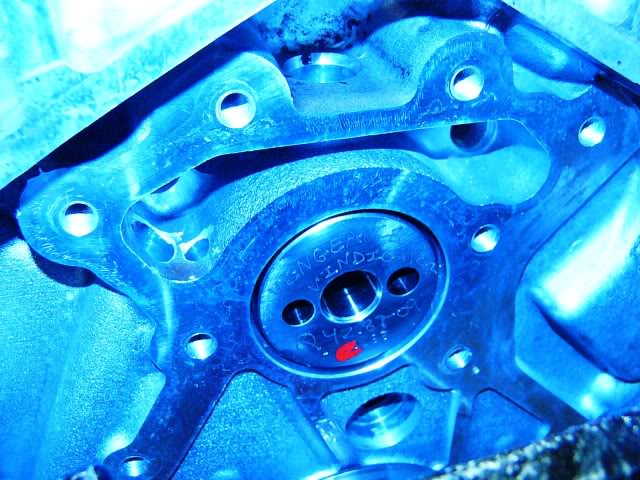
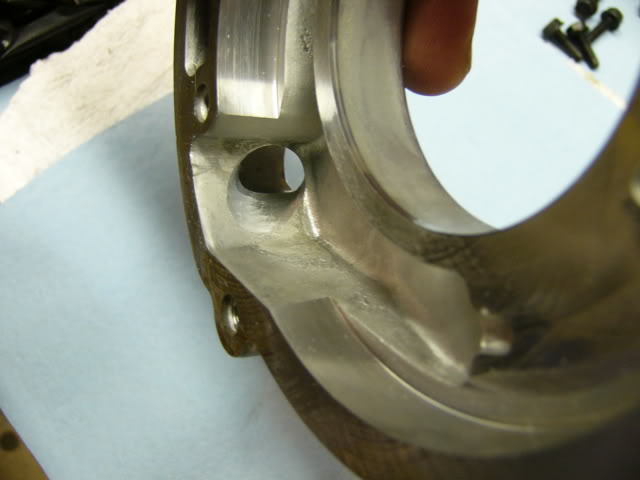
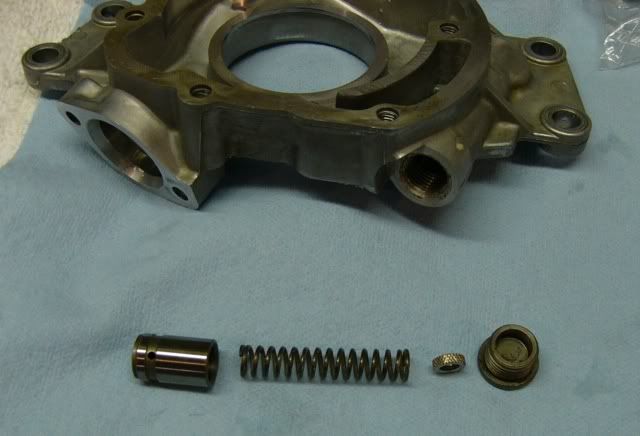
On to the oil pump mods and install. In keeping with my less oil flow resistance = more power theory, I ported the oil pump to improve the inlet and outlet flow.
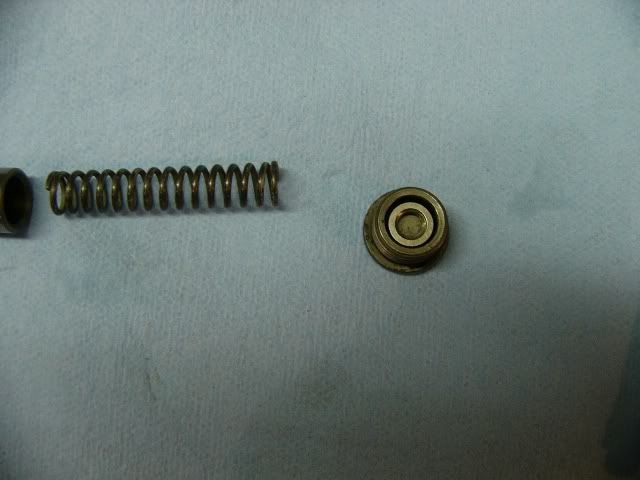
Inlet of pump edges smoothed. After installing the pickup tube, I think any work to the inlet is really all for nothing as the pickup tube inserts past most of the ported area.
Outlet porting is where all the benefits will occur. I wish I would have taken a before picture to see the difference in flow capability.
Before installing the pump, I added a spacer to increase the blowoff spring pressure. SLP sells a spacer specifically for this purpose, but I dug throught my tickle trunk and came up with the one shown. My spacer thickness is 0.120", not sure of the exact dimensions of the SLP model.

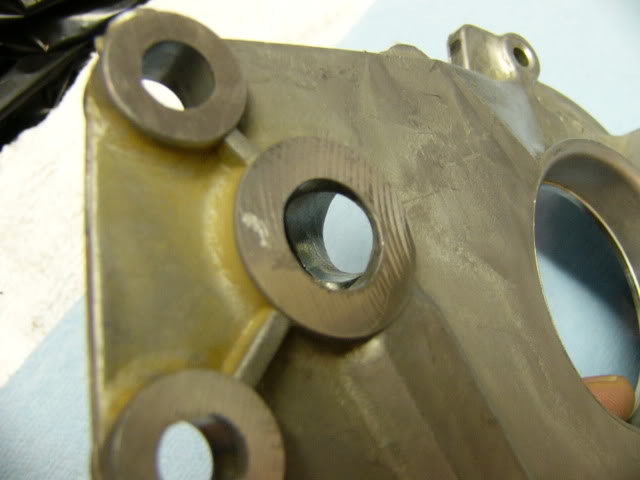
Installed pump with supplied spacers for the double roller timing chain.
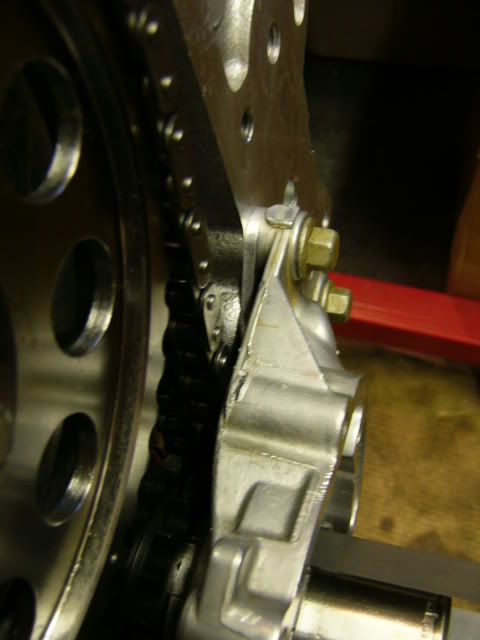
You need to be careful with the driver side spacer to ensure it is correctly aligned with the outlet port. INCORRECT positioning shown.
Inlet of pump edges smoothed. After installing the pickup tube, I think any work to the inlet is really all for nothing as the pickup tube inserts past most of the ported area.
Outlet porting is where all the benefits will occur. I wish I would have taken a before picture to see the difference in flow capability.
Before installing the pump, I added a spacer to increase the blowoff spring pressure. SLP sells a spacer specifically for this purpose, but I dug throught my tickle trunk and came up with the one shown. My spacer thickness is 0.120", not sure of the exact dimensions of the SLP model.
Installed pump with supplied spacers for the double roller timing chain.
You need to be careful with the driver side spacer to ensure it is correctly aligned with the outlet port. INCORRECT positioning shown.
03-27-2011, 01:38 PM
#17
Supreme Member
iTrader: (5)
Join Date: Jan 2002
Location: Orland Park, IL
Posts: 13,619
Likes: 0
Received 3 Likes
on
3 Posts
Car: 1984 Z28
Engine: SLOW carbed ls
Transmission: TH400 with brake, 8" PTC converter
Axle/Gears: moser 9" 4.11
Re: LS1/6 build and swap .. so long SBC
get ready to grind a lot on the pump and timing chain cover also for clearance now that you're running a double roller timing chain set. I spent probably an hour with mine going back and forth double checking it
03-27-2011, 01:46 PM
#19
Senior Member
iTrader: (8)
Join Date: Sep 2010
Location: Cincinnati, Ohio
Posts: 732
Likes: 0
Received 0 Likes
on
0 Posts
Car: '89 GTA
Engine: 5.7L LS1
Transmission: 4L60E
Axle/Gears: 9 bolt 3.27
Re: LS1/6 build and swap .. so long SBC
On to the oil pump mods and install. In keeping with my less oil flow resistance = more power theory, I ported the oil pump to improve the inlet and outlet flow.
Before installing the pump, I added a spacer to increase the blowoff spring pressure. SLP sells a spacer specifically for this purpose, but I dug throught my tickle trunk and came up with the one shown. My spacer thickness is 0.120", not sure of the exact dimensions of the SLP model.
Before installing the pump, I added a spacer to increase the blowoff spring pressure. SLP sells a spacer specifically for this purpose, but I dug throught my tickle trunk and came up with the one shown. My spacer thickness is 0.120", not sure of the exact dimensions of the SLP model.
03-27-2011, 08:57 PM
#21
Re: LS1/6 build and swap .. so long SBC
Getting the oil pump lined up was a bit of a chore. Worked best installing multiple feeler gauges around the crank to get the pump centered before and during the tightening of the mounting bolts. Final check provided 0.003" clearance around crankshaft.
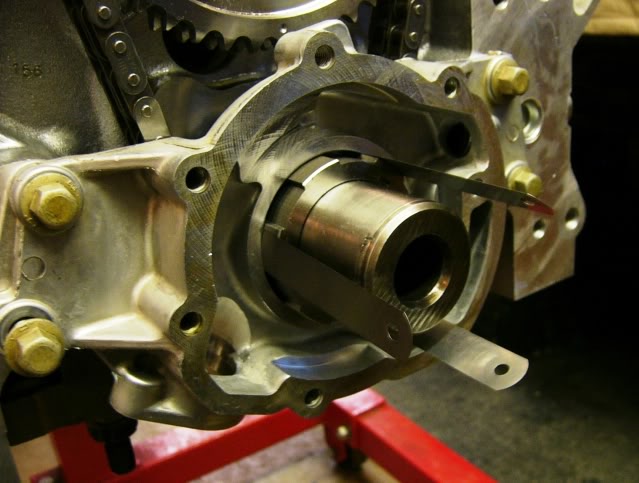
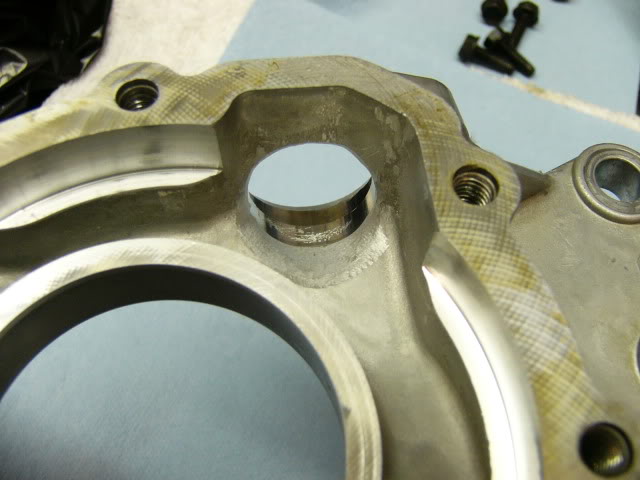
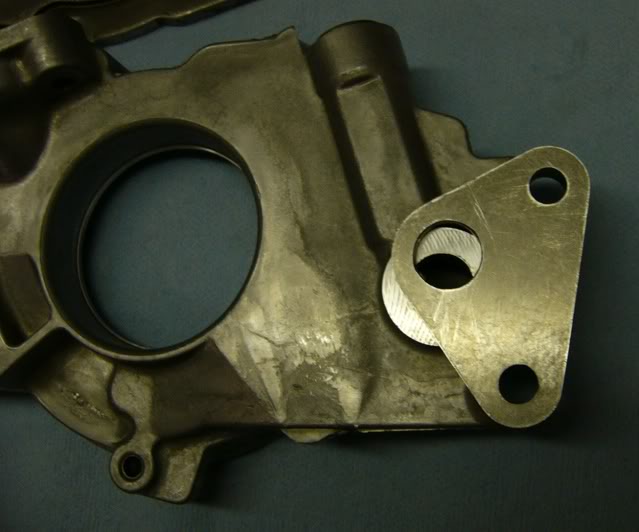
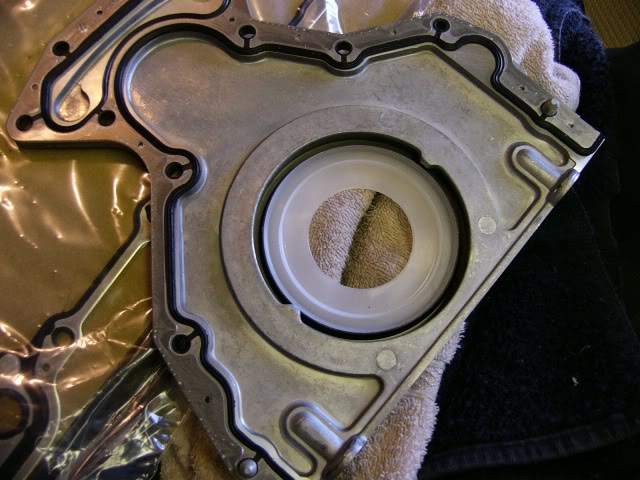
As xpndbl3 mentioned, I too ran into the undocumented task of clearancing the front cover before it would fit properly. At first I thought it was the pump mounting bolts sticking out too far, but it was actually the cover hitting this point on the pump itself.
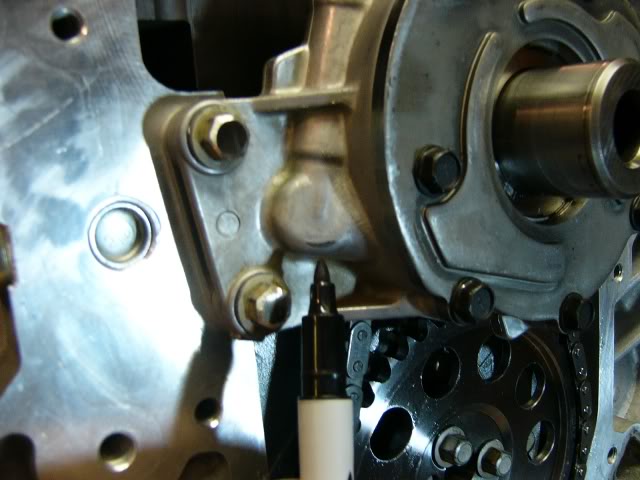
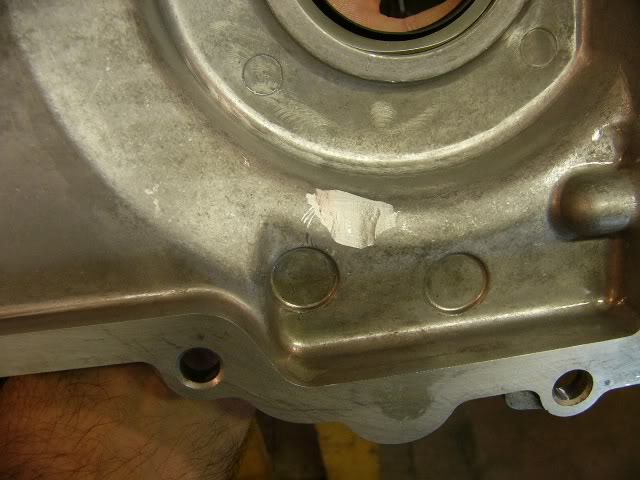
It would be very easy to miss this if you relied on the damper to self center the cover. Before clearancing, it would tighten down just fine, but in doing so, it misaligned the cover from the center of the seal, moving it slightly to the passenger side. This could have ended in a major oil leak. Here is the clearancing I had to do to the cover.
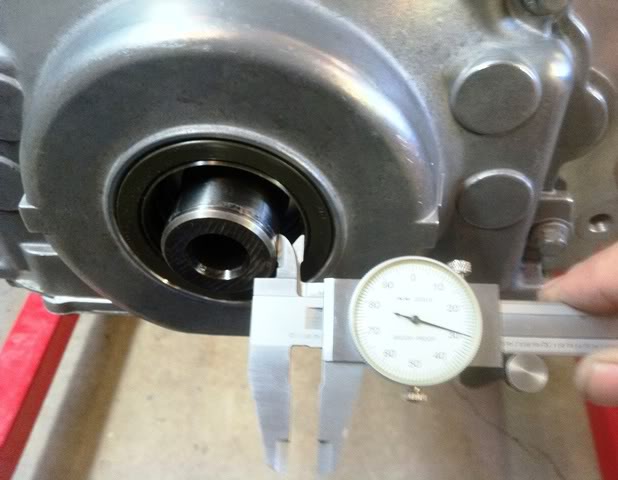
I then installed the cover and used my calipers to make sure the seal was centered for future installation of the damper.
For the rear cover, it went pretty smooth with the install tool that was supplied with the new seal. This may be a cheap alternative to buying a specialty tool for the rear cover install to ensure the seal lip does not get folded over during the installation.
I won't bore you with oil pan install, just ensured the back of the pan lined up with the block and bolted her down.
Before installing the lifters and trays I added some drain holes to help with oil drain back. Holes are 1/2" in diameter, with center being 30mm from the tray bottom.
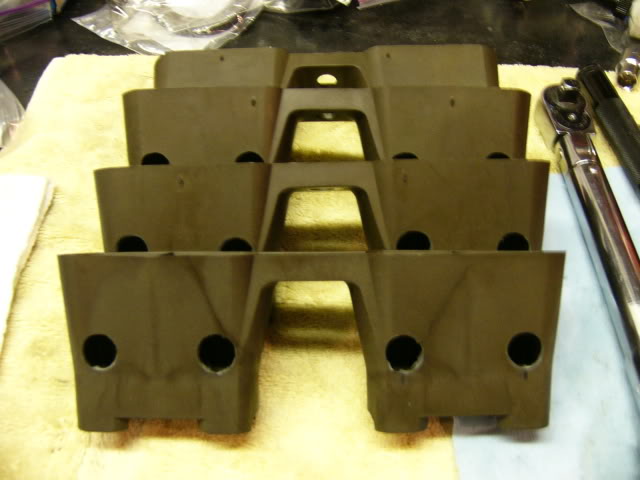
Trays installed, you can see how this provides a path for the oil.
As xpndbl3 mentioned, I too ran into the undocumented task of clearancing the front cover before it would fit properly. At first I thought it was the pump mounting bolts sticking out too far, but it was actually the cover hitting this point on the pump itself.
It would be very easy to miss this if you relied on the damper to self center the cover. Before clearancing, it would tighten down just fine, but in doing so, it misaligned the cover from the center of the seal, moving it slightly to the passenger side. This could have ended in a major oil leak. Here is the clearancing I had to do to the cover.
I then installed the cover and used my calipers to make sure the seal was centered for future installation of the damper.
For the rear cover, it went pretty smooth with the install tool that was supplied with the new seal. This may be a cheap alternative to buying a specialty tool for the rear cover install to ensure the seal lip does not get folded over during the installation.
I won't bore you with oil pan install, just ensured the back of the pan lined up with the block and bolted her down.
Before installing the lifters and trays I added some drain holes to help with oil drain back. Holes are 1/2" in diameter, with center being 30mm from the tray bottom.
Trays installed, you can see how this provides a path for the oil.
Last edited by HP52TA; 03-27-2011 at 09:36 PM.
03-27-2011, 09:12 PM
#22
Re: LS1/6 build and swap .. so long SBC
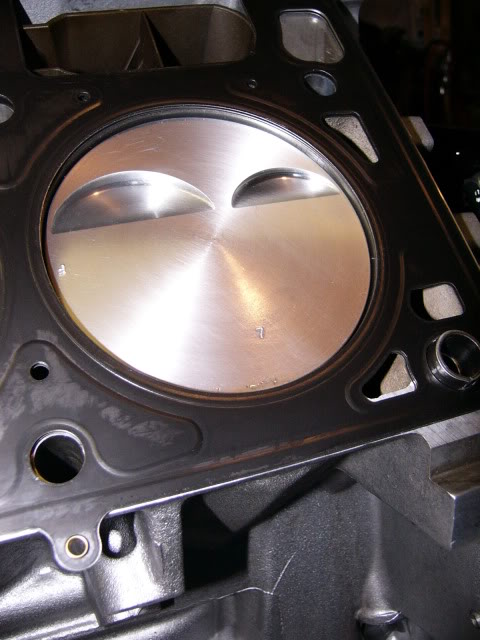
Installed the Cometic 0.040" head gaskets with the "Front" marker DOWN on the Driver side and UP on the Passenger side.

Installed the ARP bolts with assembly lube on the threads and under the washers and torqued down.
With the heads mounted, I couldn't resist ... I had to mount up the headers for a look. Man, these 2" primaries look huge.
Installed the ARP bolts with assembly lube on the threads and under the washers and torqued down.
With the heads mounted, I couldn't resist ... I had to mount up the headers for a look. Man, these 2" primaries look huge.
Last edited by HP52TA; 04-05-2011 at 09:42 PM. Reason: Corrected gasket install.
03-28-2011, 04:45 AM
#24
Supreme Member
Join Date: Jul 2003
Location: any clime or place...
Posts: 2,779
Likes: 0
Received 2 Likes
on
2 Posts
Car: 1987 Camaro SC, 1999 Z28
Engine: GMPP 350HO, LS1
Transmission: Built 700r4/EDGE 3200, T56
Axle/Gears: 3.42 Eaton 7.625, 3.42 Zexel Torsen
Re: LS1/6 build and swap .. so long SBC
very intense! salivated every minute reading it haha.
 03-31-2011, 10:24 PM
#26
Re: LS1/6 build and swap .. so long SBC
Waiting to hear back on my adjustable roller rockers that wouldn't fit in the heads, so got to work putting my intake system together.
Manifold is a Victor Jr that has been plumbed with internal spray bars for the N2O system. RP 42 # injectors, tied in with the Edelbrock fuel rail.
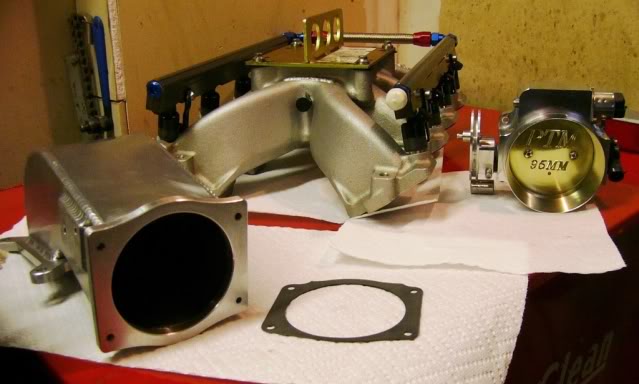
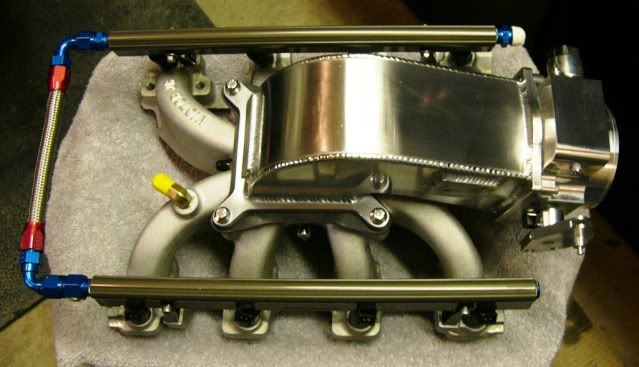
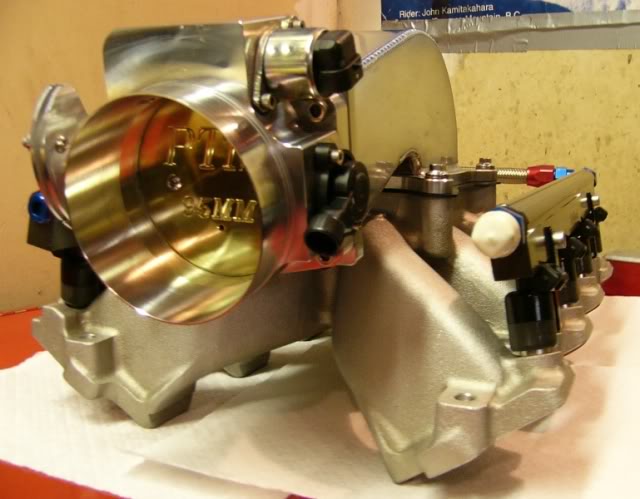
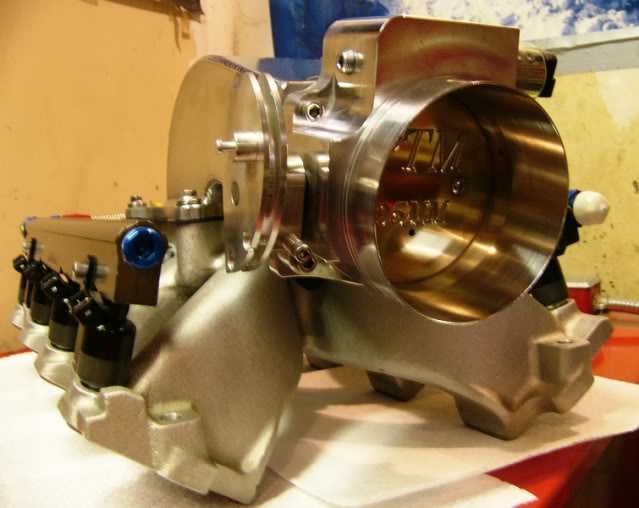
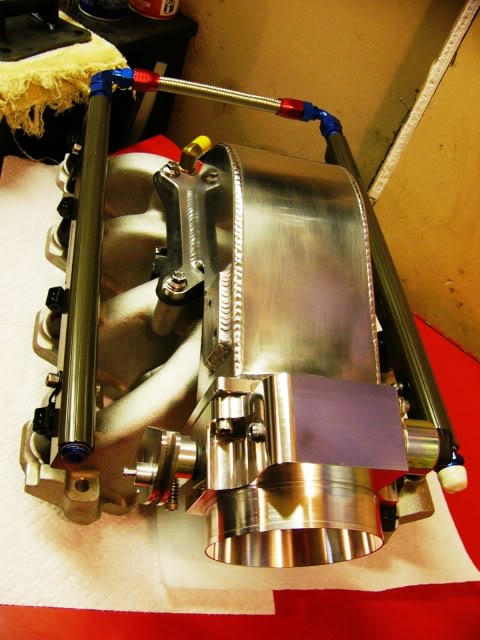
Manifold is a Victor Jr that has been plumbed with internal spray bars for the N2O system. RP 42 # injectors, tied in with the Edelbrock fuel rail.
03-31-2011, 10:28 PM
#27
Supreme Member
iTrader: (5)
Join Date: Jan 2002
Location: Orland Park, IL
Posts: 13,619
Likes: 0
Received 3 Likes
on
3 Posts
Car: 1984 Z28
Engine: SLOW carbed ls
Transmission: TH400 with brake, 8" PTC converter
Axle/Gears: moser 9" 4.11
Re: LS1/6 build and swap .. so long SBC
I'd swap that out for a 4150 style throttle body unless you're planning on forced induction, it'll be worth some good power over that elbow. Other than that it looks great, who did your spray bar and did they flow it before sending it to you?
03-31-2011, 10:45 PM
#28
Supreme Member

Join Date: Feb 2010
Location: Orlando
Posts: 1,446
Likes: 0
Received 2 Likes
on
2 Posts
Car: 1991 Camaro Z28
Engine: 357, Canfield heads, solid roller,
Transmission: Upgraded 03 Cobra T56
Axle/Gears: 9" 3.50 gears and Detroit Locker
Re: LS1/6 build and swap .. so long SBC
Damn that intake looks good, especially the last pic!
04-02-2011, 04:32 PM
#29
Re: LS1/6 build and swap .. so long SBC
I never got the name of the company that installed the spray bar when I picked this stuff up, but yes they were flowed as part of the install. I can find out if you want. The complete intake assembly came as part of my "broken" engine buy. There are definatly plans of forced induction in the future. Just not sure how far off that future is. For now I will just have to install a bigger pill if I need to go faster.
04-04-2011, 09:17 PM
#30
Moderator
iTrader: (14)
Join Date: Mar 2000
Location: Littleton, CO USA
Posts: 43,169
Likes: 0
Received 35 Likes
on
34 Posts
Car: 82 Berlinetta/57 Bel Air
Engine: LS1/LQ4
Transmission: 4L60E/4L80E
Axle/Gears: 12B-3.73/9"-3.89
Is this correct? I installed them with "Front" to the front. I pulled the driver side head off when I saw this, comparing the two choices, the difference seems to be in the coolant passages on the ends above the cylinders - one end is blocked off, the other has two holes in it; at least on the LS1 version. The difference would seem to be how the coolant is routed block-to-head front vs. back.
I have searched several different terms to try to get the skinny on this, and can't come up with an authoritative answer, including Cometic's site.
I don't feel like torquing them down again until I know for sure which way they are supposed to go.
I have searched several different terms to try to get the skinny on this, and can't come up with an authoritative answer, including Cometic's site.
I don't feel like torquing them down again until I know for sure which way they are supposed to go.
Last edited by five7kid; 04-04-2011 at 09:20 PM.
04-04-2011, 09:45 PM
#31
Moderator
iTrader: (14)
Join Date: Mar 2000
Location: Littleton, CO USA
Posts: 43,169
Likes: 0
Received 35 Likes
on
34 Posts
Car: 82 Berlinetta/57 Bel Air
Engine: LS1/LQ4
Transmission: 4L60E/4L80E
Axle/Gears: 12B-3.73/9"-3.89
Okay, did a little more searching. If these guys are correct, "FRONT" means "front".
http://www.gmhightechperformance.com.../photo_59.html
And, looking at the gaskets more carefully, the coolant passages on the ends are different both top & bottom, as they described.
So, "FRONT" will be "up" on the passenger side, and "down" on the driver side.
And, apparently, I did it right the first time.
And, HP52TA, you may want to reconsider your assembly...
04-04-2011, 10:14 PM
#32
Re: LS1/6 build and swap .. so long SBC
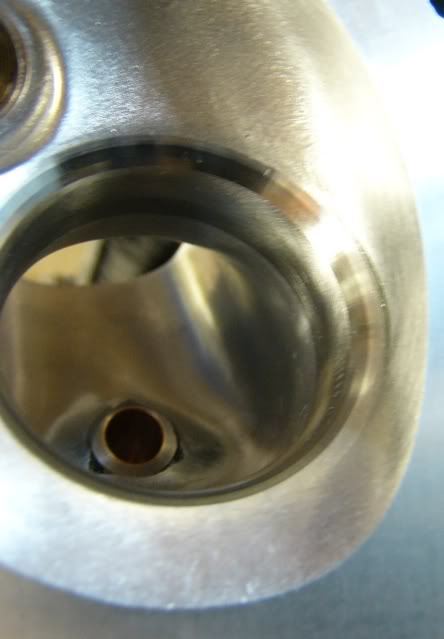
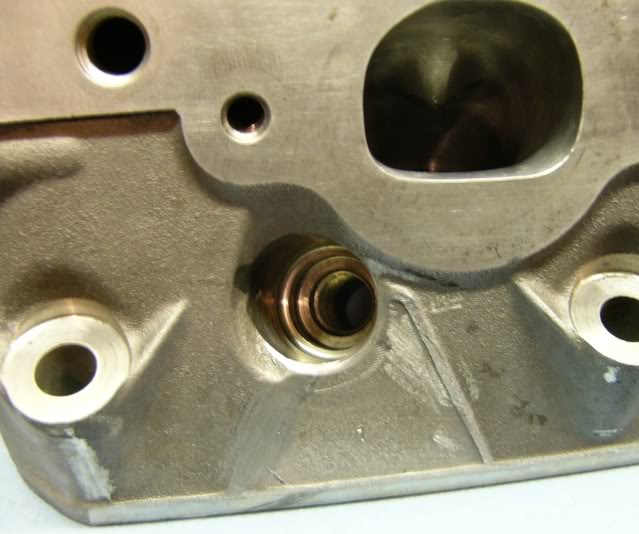
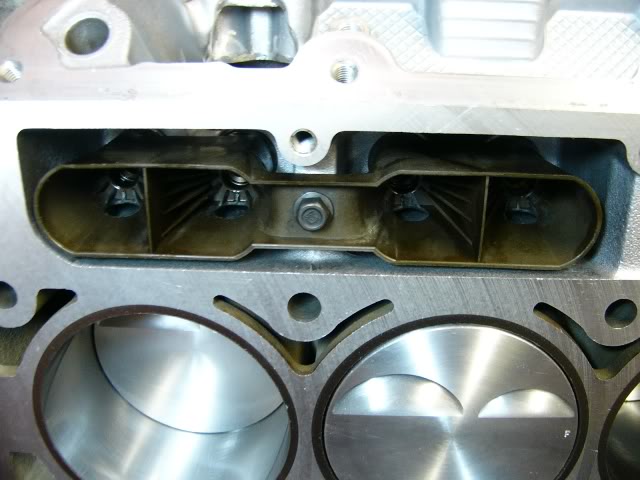
I just double checked how the stock (2001 LS1) head gaskets came off and they too were mounted with the coolant holes at the rear on both sides. I could see this from the impression left in the gasket. With that, I have to believe my passenger side is installed correctly. This makes sense to me after reviewing the block water ports. Going to remove and check the driver side head.
Here are a couple pics of the passenger side head for reference.


Other than the required RA finish needed for install, the Cometic instructions that came with them don't tell you anything beyond the obvious either.
Here are a couple pics of the passenger side head for reference.
Other than the required RA finish needed for install, the Cometic instructions that came with them don't tell you anything beyond the obvious either.
Last edited by HP52TA; 04-04-2011 at 10:56 PM.
04-04-2011, 10:42 PM
#33
Re: LS1/6 build and swap .. so long SBC
After checking your link I do have concern. I was positive I had the FRONT facing up and at the front of the block on both sides. I doubt they have a right and left head gasket though so I think I'll have to pull my driver side head to confirm.
Just when I thought I take WAY too many pictures, I don't have a pic of the driver side head gasket to confirm. Will keep you posted.
Just when I thought I take WAY too many pictures, I don't have a pic of the driver side head gasket to confirm. Will keep you posted.
04-04-2011, 11:11 PM
#34
Moderator
iTrader: (14)
Join Date: Mar 2000
Location: Littleton, CO USA
Posts: 43,169
Likes: 0
Received 35 Likes
on
34 Posts
Car: 82 Berlinetta/57 Bel Air
Engine: LS1/LQ4
Transmission: 4L60E/4L80E
Axle/Gears: 12B-3.73/9"-3.89
I looked & looked over your pics, over everything I could find on the internet, and concluded the passenger side was easy, and the drive side was suspicious.
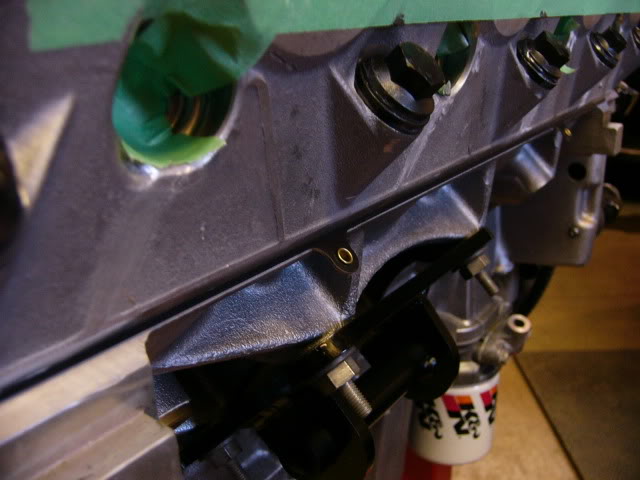
Before you pull the head, look at the rivets that stick out at the bottom of the gasket. The "head" should be "up" on the passenger side, and "down" on the driver side (what I'm calling the head is the larger side of the rivets). If that's the way yours look, then you're fine.
Of course, the one pic you have of the driver side has the headers on it, which blocks the view of the rivets...
04-05-2011, 01:34 PM
#36
Re: LS1/6 build and swap .. so long SBC
Before you pull the head, look at the rivets that stick out at the bottom of the gasket. The "FRONT" should be "up" on the passenger side, and "down" on the driver side (what I'm calling the head is the larger side of the rivets). If that's the way yours look, then you're fine.
I got a reply back from Cometic too:
"Our LS1 gaskets are the same part number for both the left and right banks of the engine. The end of the gasket marked "front" must be installed on the front of the block as the gaskets are not symmetrical."
04-05-2011, 01:59 PM
#37
Moderator
iTrader: (14)
Join Date: Mar 2000
Location: Littleton, CO USA
Posts: 43,169
Likes: 0
Received 35 Likes
on
34 Posts
Car: 82 Berlinetta/57 Bel Air
Engine: LS1/LQ4
Transmission: 4L60E/4L80E
Axle/Gears: 12B-3.73/9"-3.89
Let me try saying it a different way:
The "FRONT" mark and the heads of the rivets are on the same side of the gasket.
So, on the passenger side, in order for the "FRONT" mark to be at the front of the engine, the "FRONT" mark and the rivet heads will be "up" when placed on the block.
On the driver side, in order for the "FRONT" mark to be at the front end of the engine, the "FRONT" mark and rivet heads will be "down" when placed on the block.
Phew!
(Type that enough times, and "front" starts to look like a word from a foreign language.)
04-05-2011, 09:40 PM
#38
Re: LS1/6 build and swap .. so long SBC
Sorry to put you through all that.
I had a hard time telling the difference between up and down on the rivet, but sure enough I had the driver side on incorrectly. It is actually easier to see the difference in the picture. Pulled the head and got her on right.
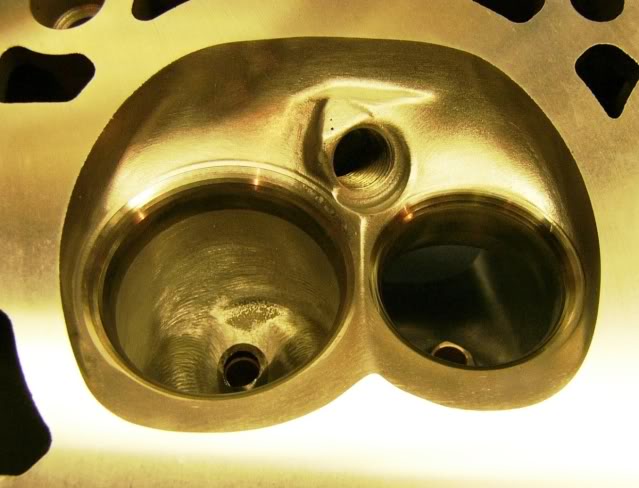
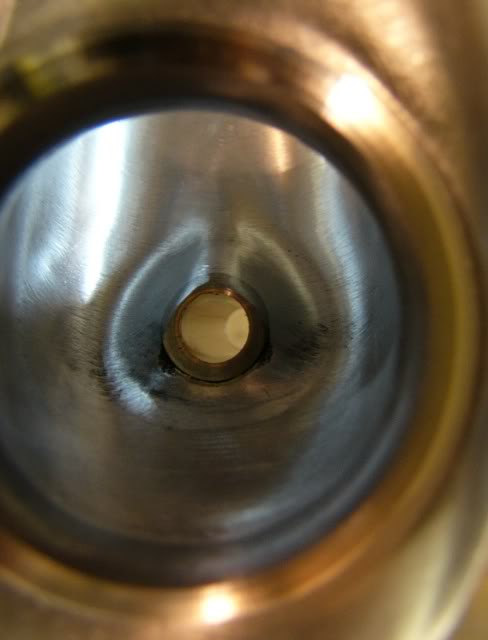
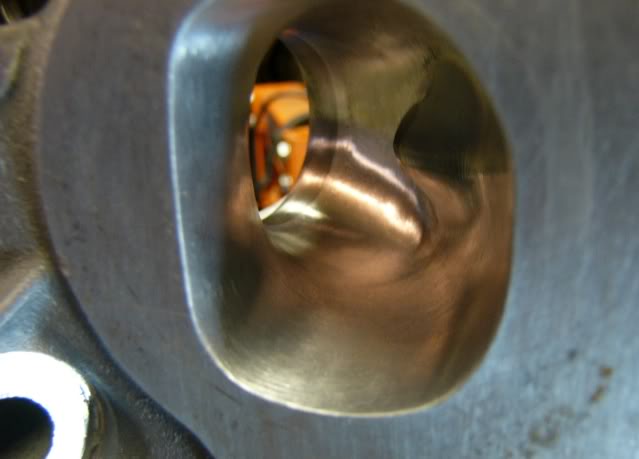
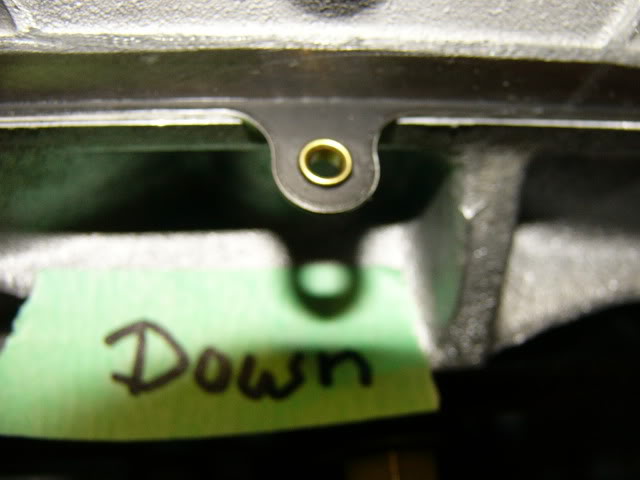
Here is a shot of the back of the driver side head with the gasket correctly oriented. ("Front" marking on the gasket facing down, located at the front of the head) You can see how the rivet looks with the gasket in this position, as well as the coolant port, (located at the 10 o'clock position on cylinder 7) that would have been in the incorrect position.
Here are some comparison pictures;
Passenger side head gasket with "Front" mark facing UP

Driver side head gasket with "Front" mark facing DOWN
Many thanks to five7kid for catching my goof up.
I had a hard time telling the difference between up and down on the rivet, but sure enough I had the driver side on incorrectly. It is actually easier to see the difference in the picture. Pulled the head and got her on right.
Here is a shot of the back of the driver side head with the gasket correctly oriented. ("Front" marking on the gasket facing down, located at the front of the head) You can see how the rivet looks with the gasket in this position, as well as the coolant port, (located at the 10 o'clock position on cylinder 7) that would have been in the incorrect position.
Here are some comparison pictures;
Passenger side head gasket with "Front" mark facing UP
Driver side head gasket with "Front" mark facing DOWN
Many thanks to five7kid for catching my goof up.
Last edited by HP52TA; 04-05-2011 at 10:00 PM.
04-05-2011, 10:06 PM
#39
Re: LS1/6 build and swap .. so long SBC
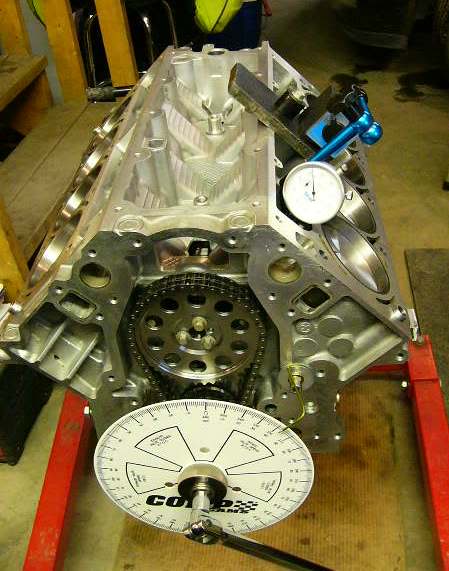
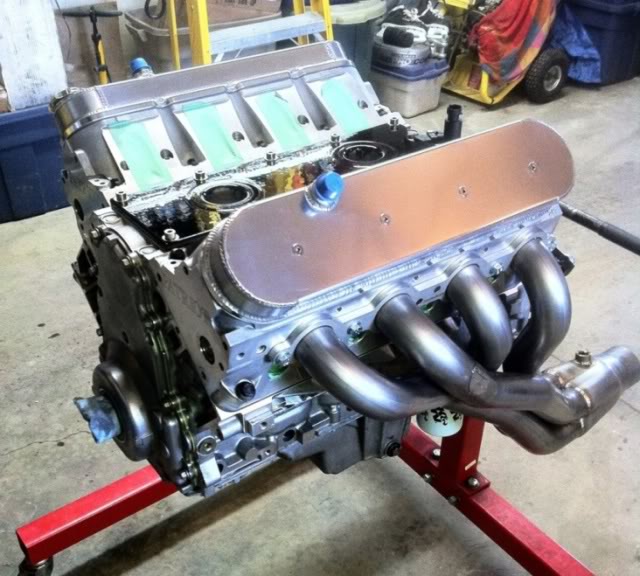
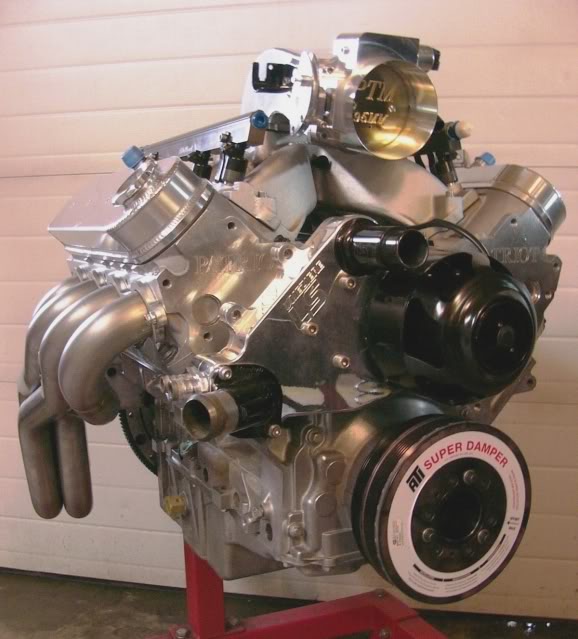
So glad to have that head gasket issue resolved I installed the intake and headers one last time for a complete engine pic. Accessories were fitted but need a little clean up before they go on for good.
I have given up on the adjustable roller rockers and am going to go with a trunnion upgrade of the stockers instead.
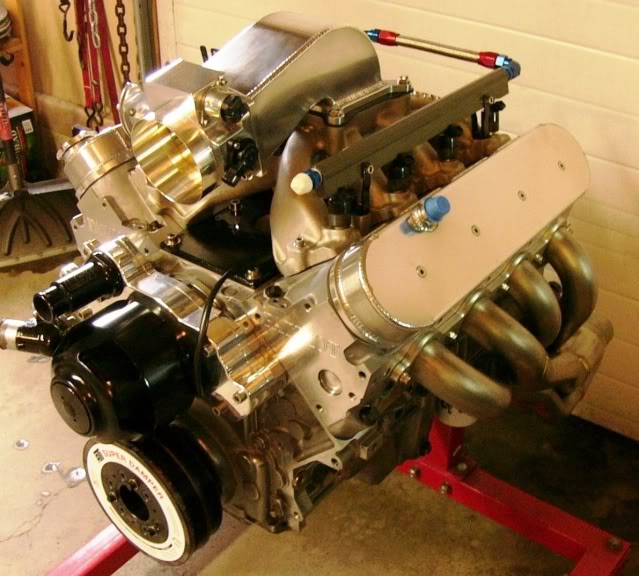
On to the wiring ...
I have given up on the adjustable roller rockers and am going to go with a trunnion upgrade of the stockers instead.
On to the wiring ...
04-06-2011, 12:49 AM
#40
Supreme Member
iTrader: (1)
Join Date: Mar 2007
Location: Apopka, Florida
Posts: 1,237
Likes: 0
Received 7 Likes
on
6 Posts
Car: 1989 Pontiac Trans Am GTA
Engine: cammed LS1
Transmission: Monster SS 4L65E
Axle/Gears: 9 bolt posi w/ 3.70 gears
Re: LS1/6 build and swap .. so long SBC
Looks awesome man! Keep up the good work
Keep up the good work
04-06-2011, 02:23 AM
#41
Senior Member
iTrader: (8)
Join Date: Sep 2010
Location: Cincinnati, Ohio
Posts: 732
Likes: 0
Received 0 Likes
on
0 Posts
Car: '89 GTA
Engine: 5.7L LS1
Transmission: 4L60E
Axle/Gears: 9 bolt 3.27
Re: LS1/6 build and swap .. so long SBC
Shiny.
I've been told that no aftermarket rocker arms can hold a candle to the stock GM pieces. Those full rollers might net you a couple extra horses but I know a guy who says he has seen just about every single kind break. For example he just did a 427 LSX with an F1R procharger and used the stock L92 rockers.
I've been told that no aftermarket rocker arms can hold a candle to the stock GM pieces. Those full rollers might net you a couple extra horses but I know a guy who says he has seen just about every single kind break. For example he just did a 427 LSX with an F1R procharger and used the stock L92 rockers.
05-06-2011, 10:46 PM
#42
Re: LS1/6 build and swap .. so long SBC
Been a while ... wiring moving on slowly, but surely.
Looking to replace the stock LS1 CTS with the Hawks one. Anyone use this, mine never came with a pin out.
http://www.hawksthirdgenparts.com/co...onversion.aspx
Thinking the center lead is for the 3rd Gen dash temp with the outers replacing the stocker?
http://i443.photobucket.com/albums/q...g/P1030345.jpg
05-07-2011, 02:01 AM
#43
Senior Member
iTrader: (8)
Join Date: Sep 2010
Location: Cincinnati, Ohio
Posts: 732
Likes: 0
Received 0 Likes
on
0 Posts
Car: '89 GTA
Engine: 5.7L LS1
Transmission: 4L60E
Axle/Gears: 9 bolt 3.27
Re: LS1/6 build and swap .. so long SBC
If you search for the thread entitled "additional swap information" you'll find the information that you're looking for.
https://www.thirdgen.org/forums/ltx-...formation.html
And the pinout is located in the first post.
https://www.thirdgen.org/forums/ltx-...formation.html
And the pinout is located in the first post.
Last edited by White'89; 05-07-2011 at 11:15 AM.
05-07-2011, 04:09 PM
#44
Member
Join Date: Sep 2000
Location: Crestline,OH
Posts: 464
Likes: 0
Received 0 Likes
on
0 Posts
Car: 1987 Formula 350
Engine: 6.0 boost and smak
Transmission: 4l80e
Axle/Gears: 9bolt 3.27
Re: LS1/6 build and swap .. so long SBC
this might interest you too, this line (brakes I am guessing), would be a little better if you would run it across the firewall, like behind the intake and heads.
a. you will be able to check it/change it without going under
B. the important one you can drop the k member and engine without disconnecting that line again and again....
a. you will be able to check it/change it without going under
B. the important one you can drop the k member and engine without disconnecting that line again and again....
05-07-2011, 04:12 PM
#45
Member
Join Date: Sep 2000
Location: Crestline,OH
Posts: 464
Likes: 0
Received 0 Likes
on
0 Posts
Car: 1987 Formula 350
Engine: 6.0 boost and smak
Transmission: 4l80e
Axle/Gears: 9bolt 3.27
Re: LS1/6 build and swap .. so long SBC
OH... you engine is beautiful on the stand.... almost a shame to put that in a car... should be in the living room...
05-13-2011, 11:14 PM
#46
Re: LS1/6 build and swap .. so long SBC
If you search for the thread entitled "additional swap information" you'll find the information that you're looking for.
https://www.thirdgen.org/forums/ltx-...formation.html
And the pinout is located in the first post.
https://www.thirdgen.org/forums/ltx-...formation.html
And the pinout is located in the first post.

Been real busy with work so haven't been making too much progress, mostly small tasks as time allows. Been working on the wiring and have it mostly complete, but still sorting out a few connections ...Many Thanks to Pocket for his excellent wiring how to coverage. We are lucky to have members like him that donate that amount of information and time.
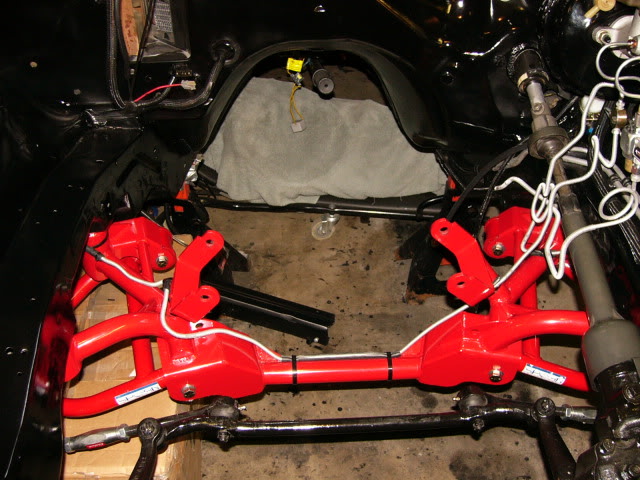
Decided this was a good time to do the battery relocation with all the other wiring going on.
Got the Racetronics fuel pump installed but am wondering about powering it. With the regular battery location, power distribution is at the alternator, but with the relocation, I am going to power it from the battery itself.
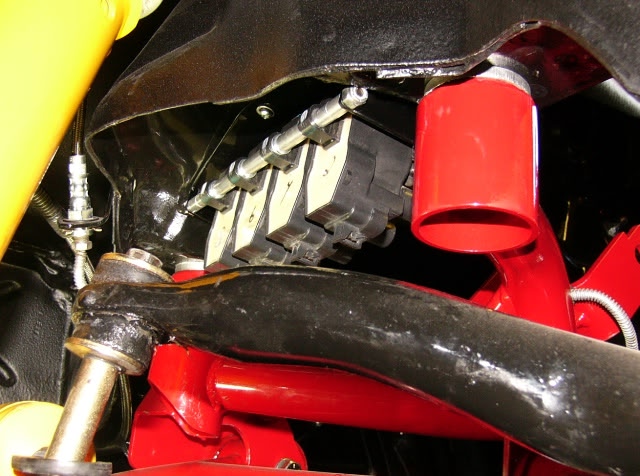
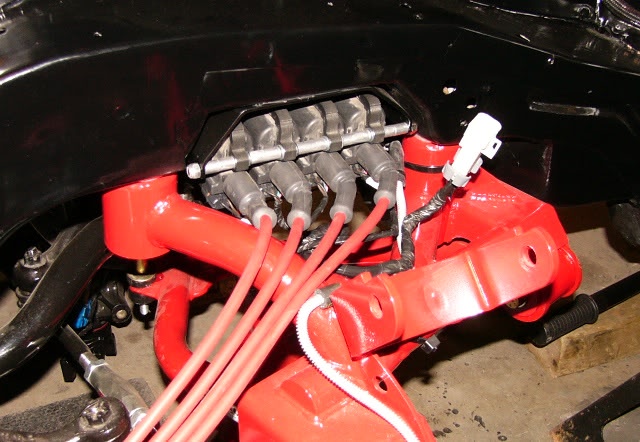
With no coil brackets on my valve covers and running coilovers up front, I decided to get creative with the coil location and mounted them in the old spring buckets. Mades some brackets to hide them up and away from harm. Let me know what you think.
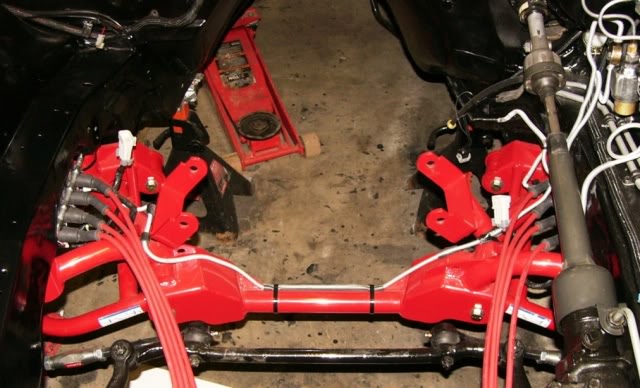
Got the brake lines relocated as well to add some more header clearance. Hoping to get the bell and clutch on tomorrow.
05-26-2011, 06:19 AM
#48
Supreme Member

Re: LS1/6 build and swap .. so long SBC
wow..talked about a full wire tuck job.well done on the coils.thats going to have many heads scratching how the motor runs when you cant see a single wire to operate it lol.she should be a beast of a motor when its fired up too.