What ever happened to QwkTrip's car anyway?
 01-10-2012, 06:14 PM
#51
Supreme Member

iTrader: (1)
Join Date: Sep 2004
Location: Verona Va
Posts: 1,320
Likes: 0
Received 0 Likes
on
0 Posts
Car: 86 Trans Am,03 Yukon,92 Z28
Engine: 5.3, 5.3, lb9
Transmission: th350,4l60e,700r4
Axle/Gears: 3.73,3.73,2.73
Re: What ever happened to QwkTrip's car anyway?
Sweet build! I'm gona watch his one lol
 01-13-2012, 12:32 AM
#52
COTM Editor
Thread Starter
iTrader: (22)
Join Date: Mar 2001
Posts: 9,891
Likes: 0
Received 1,855 Likes
on
1,270 Posts
Car: '89 Firebird
Engine: 7.0L
Transmission: T56
Re: What ever happened to QwkTrip's car anyway?
I got my new Hawks 2" headers and exhaust system (Stainless Works). First impression is that it looks ABSOLUTELY FANTASTIC! I knew the headers would be very nice, but the exhaust system blew me away. This is the kind of stuff you see from custom rod shops, and don't expect from off-the-shelf mail order. Hawks is selling a top-tier product. Assuming it all fits in the car, I would do this again in a heart beat.
I'll post pictures later.
I'll post pictures later.
01-13-2012, 12:35 AM
#53
Supreme Member
Join Date: Mar 2004
Location: In the Garage
Posts: 2,519
Likes: 0
Received 4 Likes
on
3 Posts
Car: Camaro
Engine: 6.2L
Transmission: T56
Re: What ever happened to QwkTrip's car anyway?
I got my new Hawks 2" headers and exhaust system (Stainless Works). First impression is that it looks ABSOLUTELY FANTASTIC! I knew the headers would be very nice, but the exhaust system blew me away. This is the kind of stuff you see from custom rod shops, and don't expect from off-the-shelf mail order. Hawks is selling a top-tier product. Assuming it all fits in the car, I would do this again in a heart beat.
I'll post pictures later.
I'll post pictures later.
Not knocking at Hawks just hoping they learned from last time
 01-15-2012, 02:10 PM
#54
COTM Editor
Thread Starter
iTrader: (22)
Join Date: Mar 2001
Posts: 9,891
Likes: 0
Received 1,855 Likes
on
1,270 Posts
Car: '89 Firebird
Engine: 7.0L
Transmission: T56
Re: What ever happened to QwkTrip's car anyway?
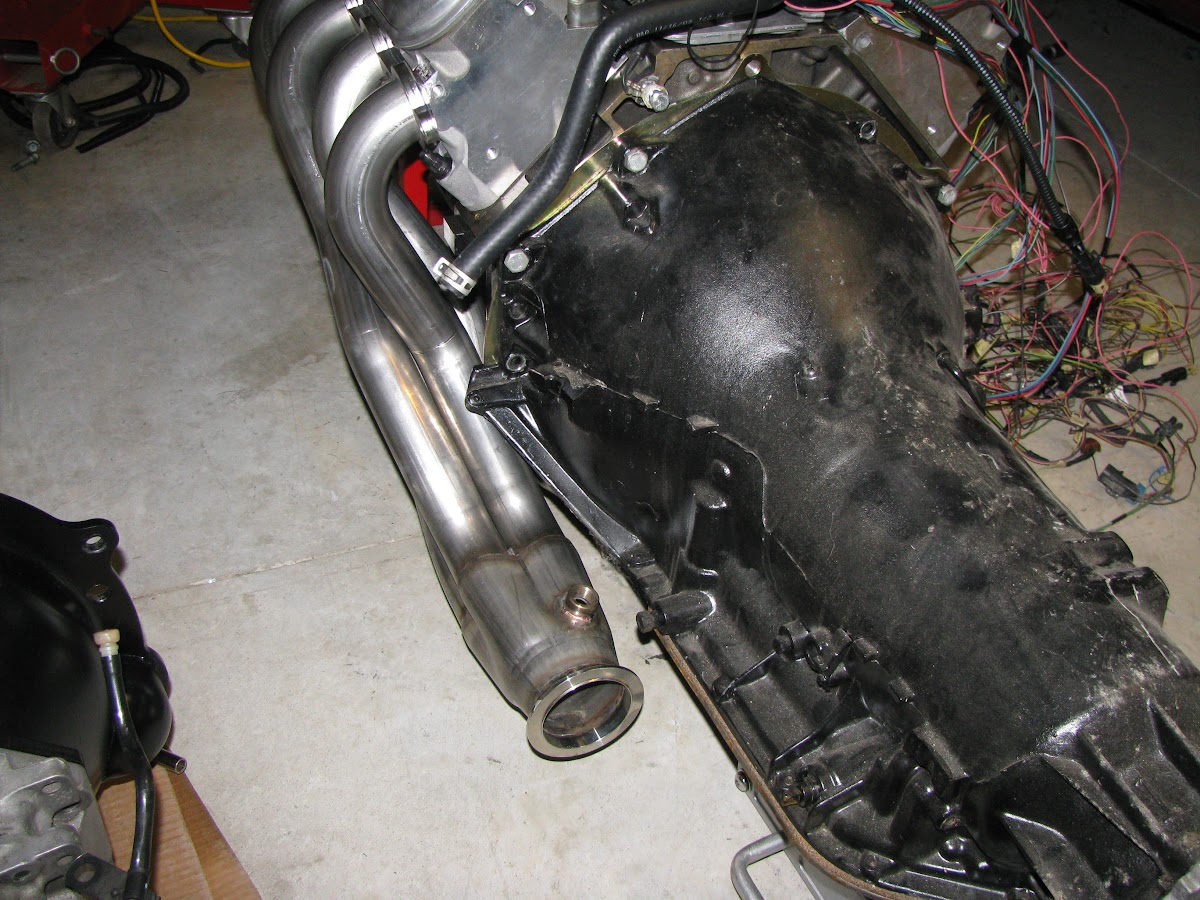
Here is a look at the 2" primary headers. The car has a tiny trans tunnel so the headers intentionally were kept extremely tight to the engine. You can see the stock T56 bellhousing fits with tiny clearance. The starter motor bulge in the housing is actually located between header tubes. The Quick Time housing won't fit without significant trimming on driver side, as you can see by the position of the plate.
At first I didn't think the Y-pipe fit but I had it twisted wrong. Once I got the orientation right it fits like a glove. Loving the workmanship on that thing!
Stock bellhousing

Quick Time housing plate

Headers - big 2" primaries

Y-pipe

At first I didn't think the Y-pipe fit but I had it twisted wrong. Once I got the orientation right it fits like a glove. Loving the workmanship on that thing!
Stock bellhousing
Quick Time housing plate
Headers - big 2" primaries
Y-pipe
Last edited by QwkTrip; 04-17-2019 at 08:29 PM.
01-15-2012, 02:14 PM
#55
Supreme Member
Join Date: Mar 2004
Location: In the Garage
Posts: 2,519
Likes: 0
Received 4 Likes
on
3 Posts
Car: Camaro
Engine: 6.2L
Transmission: T56
Re: What ever happened to QwkTrip's car anyway?
LOL Them are some PHAT pipes haha
Look great too I must say very nice!
FWIW my 1 3/4" are so tight on the drivers side where the QT bell is. I never thought to do a mock up on them and had pot committed to my install and now the damn thing vibrates against the header sometimes. I have about 1/8" tops maybe less in there. Oh well they aint comin back out now shes turn key and staying that way.
Speaking of turn key I start the car at least once every couple of days..... This new found wail is soooooo choice. The 6.2 has a very different sound than the LS1 did.... Very sinister
01-15-2012, 02:26 PM
#56
COTM Editor
Thread Starter
iTrader: (22)
Join Date: Mar 2001
Posts: 9,891
Likes: 0
Received 1,855 Likes
on
1,270 Posts
Car: '89 Firebird
Engine: 7.0L
Transmission: T56
Re: What ever happened to QwkTrip's car anyway?
I've been looking into options for underhood electrical center. I don't like the cheap-o fuse blocks that most people make with parts from Autozone. And 4th gen electrical centers cost a fortune and most are corroded and looking nasty. I have found some real nice OE style electrical centers from Cooper Bussmann and Delphi.
Cooper Bussmann make a blank box that you can order with different options of buss bars, uses Metri-pack 280 connectors, and is sealed with a nice lid. Just load it with your wires, fuses, and relays. You can also order it with ring terminal stud on the buss bar where you attach a primary cable. One drawback is it doesn't seem like it can handle a lot of current.
http://www.cooperindustries.com/cont...5300_rtmr.html
Delphi also sells a true OE style electrical center that you can build using modular inserts. I'm liking this more and more and might be the way I go. All the parts are for sale on the www.mouser.com website. Here is a link to the Delphi catalog. Electrical centers start on page 311, http://delphi.com/pdf/contact/brochu...balCatalog.pdf
Last edited by QwkTrip; 01-18-2012 at 09:55 PM.
01-15-2012, 02:31 PM
#57
COTM Editor
Thread Starter
iTrader: (22)
Join Date: Mar 2001
Posts: 9,891
Likes: 0
Received 1,855 Likes
on
1,270 Posts
Car: '89 Firebird
Engine: 7.0L
Transmission: T56
01-15-2012, 02:32 PM
#58
Supreme Member
Join Date: Mar 2004
Location: In the Garage
Posts: 2,519
Likes: 0
Received 4 Likes
on
3 Posts
Car: Camaro
Engine: 6.2L
Transmission: T56
Re: What ever happened to QwkTrip's car anyway?
I don't like the cheap-o fuse blocks that most people make with parts from Autozone.
http://www.youtube.com/watch?v=MOUhGcsHqDM
01-15-2012, 07:01 PM
#59
Junior Member
Join Date: Apr 2006
Location: windsor, ontario
Posts: 90
Likes: 0
Received 0 Likes
on
0 Posts
Car: 1985 iroc z
Engine: 6.0L coming
Transmission: 4L80E coming
Axle/Gears: 10 bolt 3.73
Re: What ever happened to QwkTrip's car anyway?
I just watched that entire clip cause I love those old cartoons 
01-15-2012, 07:54 PM
#60
COTM Editor
Thread Starter
iTrader: (22)
Join Date: Mar 2001
Posts: 9,891
Likes: 0
Received 1,855 Likes
on
1,270 Posts
Car: '89 Firebird
Engine: 7.0L
Transmission: T56
Re: What ever happened to QwkTrip's car anyway?
I took a stab at the fuel system wiring. I have a 4th gen fuel tank with Racetronix Hot Wire kit so that has to be built in. I'm not educated on how to draw schematics properly so I just do what works for my mind.
The Racetronix relay is all the way back by the tank and I don't need/want the stock 3rd gen relay any longer. It's no loss because those 3rd gen fuel pump relays are total pile of junk and the connectors short out. I'm still going to use the original wire bundle that routes to the back of the car. The original power to 3rd gen fuel pump is now signal to Racetronix fuel pump relay. The original fuel gage sender wire is still needed, but the last wire in the bundle will become the ground for fuel gage sender, since the 4th gen tank is plastic and I need to add a fuel sender ground.
The Racetronix harness has redundant heavy ground wires that is added to increase fuel pump performance. I'll make this my primary ground to body. Also, when the Racetronix harness is used with 4th gen car the relay coil ground is sent back to body harness, but I'm all out of wires in my 3rd gen harness so I'm dead ending that wire at the connector and relying on the body ground.
By the way, if you need to replace the Weather-Pack connector at the back of the car the Delphi part number is 12020829. And yes, it was a pain in the rear to find that.
Update: I ended up making some simple changes to the Racetronix harness to improve the physical layout of the wiring. See post #250 and #251, https://www.thirdgen.org/forums/ltx-...ml#post5893401
Last edited by QwkTrip; 05-22-2021 at 07:29 PM.
01-16-2012, 02:05 PM
#61
COTM Editor
Thread Starter
iTrader: (22)
Join Date: Mar 2001
Posts: 9,891
Likes: 0
Received 1,855 Likes
on
1,270 Posts
Car: '89 Firebird
Engine: 7.0L
Transmission: T56
Re: What ever happened to QwkTrip's car anyway?
I have the day off today so I took some time to look through 2000 Camaro power distribution and created a simplified version for myself to use. I've highlighted in red text the fuses that are used in the LS1 swap. This exercise was very helpful to me and I'm going to rethink how I set up my underhood electrical center for the engine swap.
In factory F body LS1 car,

In factory F body LS1 car,
- "PCM Batt" fuse is connected to battery
- "PCM IGN" fuse is connected to key switch and is active in RUN and START key switch positions
- Everything else is powered by a relay that is active in RUN and START key switch positions, and that relay is protected by a 50A maxi-fuse
Last edited by QwkTrip; 04-17-2019 at 08:29 PM.
01-16-2012, 08:44 PM
#62
COTM Editor
Thread Starter
iTrader: (22)
Join Date: Mar 2001
Posts: 9,891
Likes: 0
Received 1,855 Likes
on
1,270 Posts
Car: '89 Firebird
Engine: 7.0L
Transmission: T56
Re: What ever happened to QwkTrip's car anyway?
I took a serious look at using the 3rd gen fuse block in order to keep from making an underhood electrical center. But I've decided I'm not using the 3rd gen fuse block for most engine functions because the 3rd gens are known for large voltage drop in harness. I want everything running to full potential, especially injectors and coils. Right or wrong, I'm making an underhood electrical center for engine.
Here is concept that works like the 4th gen setup. I am assuming I can take out the 10A fuse from ENG CTL under the driver side dash and safely insert a 15A fuse in place.
Update: I ended up buying a pre-made power center that is very similar. See post #131. https://www.thirdgen.org/forums/ltx-...ml#post5778785
Last edited by QwkTrip; 05-22-2021 at 07:28 PM.
01-16-2012, 09:56 PM
#63
Member
iTrader: (1)
Join Date: Aug 2010
Location: MD
Posts: 486
Likes: 0
Received 0 Likes
on
0 Posts
Car: 88 Iroc-z
Engine: ls1
Transmission: t56
Axle/Gears: 3.42
Re: What ever happened to QwkTrip's car anyway?
Very very nice build, me so jealous :drool: haha. Id take either of those set ups you had id take in a heartbeat. Exhaust looks very nice I might add also  . Can't wait to see this monster when its finished! Are you selling the old headers?
. Can't wait to see this monster when its finished! Are you selling the old headers?
01-16-2012, 10:39 PM
#64
COTM Editor
Thread Starter
iTrader: (22)
Join Date: Mar 2001
Posts: 9,891
Likes: 0
Received 1,855 Likes
on
1,270 Posts
Car: '89 Firebird
Engine: 7.0L
Transmission: T56
Re: What ever happened to QwkTrip's car anyway?
Thank you very much.
Yes, 1-3/4" headers will be for sale. I'm asking friends first. Don't know what is the outcome yet.
Yes, 1-3/4" headers will be for sale. I'm asking friends first. Don't know what is the outcome yet.
01-17-2012, 12:24 AM
#65
COTM Editor
Thread Starter
iTrader: (22)
Join Date: Mar 2001
Posts: 9,891
Likes: 0
Received 1,855 Likes
on
1,270 Posts
Car: '89 Firebird
Engine: 7.0L
Transmission: T56
Re: What ever happened to QwkTrip's car anyway?
Earlier I posted that the exhaust Y-pipe didn't align properly with the headers. It was "user malfunction". I had the pipe twisted into the wrong position. I tried again tonight and it fits like a glove! I updated post #54 with picture.
Last edited by QwkTrip; 04-30-2020 at 06:20 PM.
01-18-2012, 11:00 PM
#66
COTM Editor
Thread Starter
iTrader: (22)
Join Date: Mar 2001
Posts: 9,891
Likes: 0
Received 1,855 Likes
on
1,270 Posts
Car: '89 Firebird
Engine: 7.0L
Transmission: T56
Re: What ever happened to QwkTrip's car anyway?
Updated fuel system and underhood electrical center wiring diagrams. Posts #59 and #61.
03-05-2012, 10:41 PM
#67
COTM Editor
Thread Starter
iTrader: (22)
Join Date: Mar 2001
Posts: 9,891
Likes: 0
Received 1,855 Likes
on
1,270 Posts
Car: '89 Firebird
Engine: 7.0L
Transmission: T56
Re: What ever happened to QwkTrip's car anyway?
I installed the Tick clutch master cylinder over the weekend. Had to make a choice between modifying the 3rd gen pedals or using 4th gen pedals. I had previously bought a 4th gen pedal assembly that was used in a 3rd gen swap so I knew I already had a bolt-in solution. Out came the 3rd gen assembly and in went the 4th gen! Below is a picture of the 4th gen pedal assembly after I painted it flat black (gas pedal hacked off), and another in the car with the Tick adjustable rod in place.
I do like the 4th gen setup better. It has a proper pedal stop for the clutch instead of going all the way to floor. And it has a spring assist that helps hold the clutch at bottom so your leg doesn't tire in traffic. Combine that with the adjustable Tick and the pedal position is really nice. Another nice surprise is that my clutch safety switch and brake light switch both swapped over! All I had to do for the brake light switch was get a $5 retainer clip for 2001 Camaro (AC Delco p/n D7085) so I could attached the switch to 4th gen pedal.
Pedal set painted flat black

Under the dash

Tick master cylinder. It clears... barely. No, that's not more mouse poo. Just clumps of grease after scraping clean the steering shaft.
Update: I ended up rotating the top hat for improved hose routing. See post #178.https://www.thirdgen.org/forums/ltx-...ml#post5820919

On a side note, people often wonder what is the difference between 3rd gen and 4th gen clutch rod pin? The 3rd gen pin is shorter and larger in diameter. Picture of 3rd gen pin....

... and a picture of the 4th gen pin. Note that the caliper is set at the diameter of the 3rd gen pin.

I do like the 4th gen setup better. It has a proper pedal stop for the clutch instead of going all the way to floor. And it has a spring assist that helps hold the clutch at bottom so your leg doesn't tire in traffic. Combine that with the adjustable Tick and the pedal position is really nice. Another nice surprise is that my clutch safety switch and brake light switch both swapped over!
All I had to do for the brake light switch was get a $5 retainer clip for 2001 Camaro (AC Delco p/n D7085) so I could attached the switch to 4th gen pedal.Pedal set painted flat black
Under the dash
Tick master cylinder. It clears... barely. No, that's not more mouse poo. Just clumps of grease after scraping clean the steering shaft.
Update: I ended up rotating the top hat for improved hose routing. See post #178.https://www.thirdgen.org/forums/ltx-...ml#post5820919
On a side note, people often wonder what is the difference between 3rd gen and 4th gen clutch rod pin? The 3rd gen pin is shorter and larger in diameter. Picture of 3rd gen pin....
... and a picture of the 4th gen pin. Note that the caliper is set at the diameter of the 3rd gen pin.
Last edited by QwkTrip; 05-22-2021 at 07:04 PM.
04-21-2012, 02:43 AM
#68
COTM Editor
Thread Starter
iTrader: (22)
Join Date: Mar 2001
Posts: 9,891
Likes: 0
Received 1,855 Likes
on
1,270 Posts
Car: '89 Firebird
Engine: 7.0L
Transmission: T56
Re: What ever happened to QwkTrip's car anyway?
I spent some time on the back end of the motor working on flywheel housing. I had to check for run-out to centerline of crank, and make a notch for header pipes to pass thru.
First, I installed a kevlar trans pilot bushing in the bell end of the crank. I put Locktite on the OD before tapping it in, per the instructions. I chose to not use a needle bearing only because if it does fail then it can trash the transmission and is nearly impossible to dig out of the crank.
Update: I switched to a stock GM pilot bearing. See post #86, https://www.thirdgen.org/forums/ltx-...ml#post5405374

Then I moved on to flywheel housing mounting. I installed a set of long transmission dowels with zero offset and measured the housing run out. Good news is that the run out is acceptable and no offset dowels are needed. Yes, I had to use a mirror to take the readings.
  It was the only way I could get the needle in correct position.

Next I had to notch out for the header tubes. I don't know what is the proper method but all I owned in that department was a couple of hand files and a sawsall. So I bought myself an angle grinder and just started grinding. I have to say, I did a darn good job considering that I've never held a grinder in my life! If the bolt hole wasn't in that location then you would think it was made that way. The exhaust now fits nicely with a little clearance to spare. This is with the Hawks 2" primary headers.


I mounted the flywheel and twin disc clutch and torqued everything down. This was a slightly used clutch I bought from the part out of a twin turbo car. I finally figured out the clutch is a RAM RTrack 10.5. That should be adequate.

First, I installed a kevlar trans pilot bushing in the bell end of the crank. I put Locktite on the OD before tapping it in, per the instructions. I chose to not use a needle bearing only because if it does fail then it can trash the transmission and is nearly impossible to dig out of the crank.
Update: I switched to a stock GM pilot bearing. See post #86, https://www.thirdgen.org/forums/ltx-...ml#post5405374
Then I moved on to flywheel housing mounting. I installed a set of long transmission dowels with zero offset and measured the housing run out. Good news is that the run out is acceptable and no offset dowels are needed.
Yes, I had to use a mirror to take the readings. It was the only way I could get the needle in correct position.Next I had to notch out for the header tubes. I don't know what is the proper method but all I owned in that department was a couple of hand files and a sawsall. So I bought myself an angle grinder and just started grinding. I have to say, I did a darn good job considering that I've never held a grinder in my life! If the bolt hole wasn't in that location then you would think it was made that way. The exhaust now fits nicely with a little clearance to spare. This is with the Hawks 2" primary headers.
I mounted the flywheel and twin disc clutch and torqued everything down. This was a slightly used clutch I bought from the part out of a twin turbo car. I finally figured out the clutch is a RAM RTrack 10.5. That should be adequate.
Last edited by QwkTrip; 05-22-2021 at 07:28 PM.
04-21-2012, 02:54 AM
#69
COTM Editor
Thread Starter
iTrader: (22)
Join Date: Mar 2001
Posts: 9,891
Likes: 0
Received 1,855 Likes
on
1,270 Posts
Car: '89 Firebird
Engine: 7.0L
Transmission: T56
Re: What ever happened to QwkTrip's car anyway?
The last thing I did was tighten down the 16mm bolt on the front pulley/damper. A lot of people seem to have a really hard time getting that bolt tight. All I can say is if you have the right tools then you can do it with one hand tied behind your back. It was that easy!  I used an ARP bolt instead of the stock GM torque to yield bolt. The ARP bolt is re-useable if you ever want to take it off again, and the torque needed to tighten is only 235 lb-ft. I bought a special tool that mounts where the starter goes and locks the flywheel in place (Kent-Moore J-42386-A). I also happen to have a 250 lb-ft torque wrench. I was able to tighten the bolt with the engine simply sitting on a floor stand and all I had to do was put my weight on the torque wrench until I heard the click. Literally no effort involved.

Just a word of warning, you should never use the bolt to drive on the pulley/damper. The bolt is too short and will grab only a couple threads. People think it will be okay but the likely outcome is that the threads inside the crank will strip out and you'll ruin the crank. You need a proper damper installation tool. Again, Kent-Moore makes these but it is expensive. I made my own tool by buying some M16 all-thread, 4 nuts and 2 fender washers. I put a generous amount of grease on the thread that will insert into the crank, and put grease between the two washers so everything slips easy. Washers go against the damper. Two nuts jammed together will push in the damper, and two more nuts jammed together give you something to turn with a wrench. Damper will go on nice and easy until the washers bottom against the crank. Then just install the bolt and you're done.

I used an ARP bolt instead of the stock GM torque to yield bolt. The ARP bolt is re-useable if you ever want to take it off again, and the torque needed to tighten is only 235 lb-ft. I bought a special tool that mounts where the starter goes and locks the flywheel in place (Kent-Moore J-42386-A). I also happen to have a 250 lb-ft torque wrench. I was able to tighten the bolt with the engine simply sitting on a floor stand and all I had to do was put my weight on the torque wrench until I heard the click. Literally no effort involved.Just a word of warning, you should never use the bolt to drive on the pulley/damper. The bolt is too short and will grab only a couple threads. People think it will be okay but the likely outcome is that the threads inside the crank will strip out and you'll ruin the crank. You need a proper damper installation tool. Again, Kent-Moore makes these but it is expensive. I made my own tool by buying some M16 all-thread, 4 nuts and 2 fender washers. I put a generous amount of grease on the thread that will insert into the crank, and put grease between the two washers so everything slips easy. Washers go against the damper. Two nuts jammed together will push in the damper, and two more nuts jammed together give you something to turn with a wrench. Damper will go on nice and easy until the washers bottom against the crank. Then just install the bolt and you're done.
Last edited by QwkTrip; 04-17-2019 at 08:27 PM.
04-21-2012, 09:52 PM
#70
COTM Editor
Thread Starter
iTrader: (22)
Join Date: Mar 2001
Posts: 9,891
Likes: 0
Received 1,855 Likes
on
1,270 Posts
Car: '89 Firebird
Engine: 7.0L
Transmission: T56
Re: What ever happened to QwkTrip's car anyway?
Today was a day of disappointment. I couldn't get my transmission to go into the pilot bushing and then I realized the trans input shaft is bent. I got taken to the cleaners on my used transmission. Some people are just rotten, I guess.
So.... back to square one with transmission. These are my options:
So.... back to square one with transmission. These are my options:
- Rebuild the T56. I would predict a $2K bill unless I have the guts to do it myself. I'm 4 hour drive from RPM Transmission in Indiana so I could drop it off.
- Use the TH400 that I have already. Need to buy a torque converter. Not sure if my exhaust will fit with it. Easy enough to find out though because I have everything to test fit.
- Sell all my transmissions and get a well built 4L60E. That's a $4k bill for trans and converter (looked into it before)
- Try to snake in a stock 4L80E with a converter and just run it. I have no idea what are the fitment issues with that.
04-21-2012, 10:14 PM
#71
Re: What ever happened to QwkTrip's car anyway?
fix the t56. you've done so much going in this direction, to go this far only to cut a corner? it'll end up sitting in the garage till you "get around to it" again....you obviously have the coin to do this...do it right
my .02
my .02
04-21-2012, 11:34 PM
#72
Senior Member

Join Date: Jun 2003
Location: Rockville, MD
Posts: 828
Likes: 0
Received 2 Likes
on
2 Posts
Car: 1989 Camaro RS
Engine: Ellis Juan
Transmission: t-56
Re: What ever happened to QwkTrip's car anyway?
Today was a day of disappointment. I couldn't get my transmission to go into the pilot bushing and then I realized the trans input shaft is bent. I got taken to the cleaners on my used transmission. Some people are just rotten, I guess.
So.... back to square one with transmission. These are my options:
So.... back to square one with transmission. These are my options:
- Rebuild the T56. I would predict a $2K bill unless I have the guts to do it myself. I'm 4 hour drive from RPM Transmission in Indiana so I could drop it off.
- Use the TH400 that I have already. Need to buy a torque converter. Not sure if my exhaust will fit with it. Easy enough to find out though because I have everything to test fit.
- Sell all my transmissions and get a well built 4L60E. That's a $4k bill for trans and converter (looked into it before)
- Try to snake in a stock 4L80E with a converter and just run it. I have no idea what are the fitment issues with that.
04-22-2012, 12:24 AM
#73
COTM Editor
Thread Starter
iTrader: (22)
Join Date: Mar 2001
Posts: 9,891
Likes: 0
Received 1,855 Likes
on
1,270 Posts
Car: '89 Firebird
Engine: 7.0L
Transmission: T56
Re: What ever happened to QwkTrip's car anyway?
Thanks. When an input shaft is bent, what are the odds the problem ends there? This was a custom built transmission with a Viper output shaft. It must have taken a hell of a punch to bend that upgraded input shaft.
I bolted up my TH400 and at first inspection it appears that the 2" primary Hawks headers will work with some tweaks to transmission housing. The driver side clears no problem. On the passenger side the QuickTime backing plate identifies the silhouette that I cannot exceed without interfering with the passenger side header. It seems if I trim the ear off the TH400 housing near the starter motor then the header tubes on passenger side will clear. This setup also requires the auto transmission Y-pipe in order to clear the trans oil pan on passenger side. Good news is I bought one "just in case" because the Y-pipe is no longer sold individually. Hawks had just one remaining back in storage and I took it.
I'll need to dwell on this for a bit. I talked to my friend that built my TH400 years ago and he did confirm my thoughts that it has an upgraded sun gear and kevlar clutches. It is ready to rock and roll with this LSx with no changes needed.
Last edited by QwkTrip; 04-17-2019 at 08:27 PM.
04-22-2012, 01:13 AM
#74
Re: What ever happened to QwkTrip's car anyway?
call the guys at "texas drivetrain performance" about you t56 before you make a decision. They are real nice and will talk you thorough all of your options on the phone, they also have a very good reputation for doing t56's, and are priced well
04-22-2012, 02:24 AM
#75
Supreme Member
iTrader: (7)
Join Date: Jun 2008
Location: Minnesota
Posts: 1,468
Likes: 0
Received 0 Likes
on
0 Posts
Car: 89 IROC-Z
Engine: 370 LSX, LS3 Top End
Transmission: Built T-56
Axle/Gears: 9" Aluminum Center 3.89's
Re: What ever happened to QwkTrip's car anyway?
A stalled auto is pretty hard to beat...
But like said above call Jason? at TDP he'll tell you everything you need to know without a sales pitch
But like said above call Jason? at TDP he'll tell you everything you need to know without a sales pitch
04-22-2012, 02:29 AM
#76
Senior Member
Join Date: Jun 2003
Location: Rockville, MD
Posts: 828
Likes: 0
Received 2 Likes
on
2 Posts
Car: 1989 Camaro RS
Engine: Ellis Juan
Transmission: t-56
Re: What ever happened to QwkTrip's car anyway?
fairly good i think. the input shaft set with the gear is a separate assembly from the main shaft gear set. pop the front cover off and look =)
10-17-2012, 08:41 PM
#77
COTM Editor
Thread Starter
iTrader: (22)
Join Date: Mar 2001
Posts: 9,891
Likes: 0
Received 1,855 Likes
on
1,270 Posts
Car: '89 Firebird
Engine: 7.0L
Transmission: T56
Re: What ever happened to QwkTrip's car anyway?
I haven't touched the car since May. Today I made a very long day of it to take the T56 transmission to RPM Transmissions in Anderson, IN. I was hoping they would just need to replace the input shaft but those hopes were dashed when all the parts were laid out on the table. I'm glad I took it to the pro's because that transmission was shot. Turns out the shop that built the trans last time didn't dowel the front cover correctly and that is probably what caused the cascade of failures. In short, RPM had to toss away about 1/3 the internal parts. Fortunately, the Viper output shaft was saved.
I just wanted to sell the trans and cash out but it was worthless in the broken condition, so I gave them the go ahead to put it back together the right way. I now have a properly built Level 5 transmission (without polishing) from RPM industries for the price of a Level 4. The guys at RPM Transmission are very knowledgeable and kind. And they handed me a transmission that looks showroom new! I didn't even realize that was my trans at first glance. It's also nice to know they are really proud of their work. They basically claimed that trans by stamping a code on it and putting their logo in several locations. They want people to know they made it and that they will take care of their customers.
Now it's time to get tinkering again!
Last edited by QwkTrip; 04-17-2019 at 12:54 AM.
10-17-2012, 08:45 PM
#78
Supreme Member
Join Date: Mar 2004
Location: In the Garage
Posts: 2,519
Likes: 0
Received 4 Likes
on
3 Posts
Car: Camaro
Engine: 6.2L
Transmission: T56
Re: What ever happened to QwkTrip's car anyway?
Thats badass! RPM built a buddy of mines trans. Fastest 4L60E in the world and its a street car
10-17-2012, 08:48 PM
#79
COTM Editor
Thread Starter
iTrader: (22)
Join Date: Mar 2001
Posts: 9,891
Likes: 0
Received 1,855 Likes
on
1,270 Posts
Car: '89 Firebird
Engine: 7.0L
Transmission: T56
Re: What ever happened to QwkTrip's car anyway?
Is that the sunset orange Corvette? They had pictures of it in their front office.
They had a supercharged LS7 Z06 with with 1100 HP sitting on the showroom floor in the front lobby.
They had a supercharged LS7 Z06 with with 1100 HP sitting on the showroom floor in the front lobby.
10-17-2012, 08:54 PM
#81
COTM Editor
Thread Starter
iTrader: (22)
Join Date: Mar 2001
Posts: 9,891
Likes: 0
Received 1,855 Likes
on
1,270 Posts
Car: '89 Firebird
Engine: 7.0L
Transmission: T56
Re: What ever happened to QwkTrip's car anyway?
That's fast.
But it's not the fastest any more. They have another customer in the 6 second zone now!
But it's not the fastest any more. They have another customer in the 6 second zone now!
10-17-2012, 09:01 PM
#83
Member
iTrader: (1)
Join Date: Aug 2010
Location: MD
Posts: 486
Likes: 0
Received 0 Likes
on
0 Posts
Car: 88 Iroc-z
Engine: ls1
Transmission: t56
Axle/Gears: 3.42
Re: What ever happened to QwkTrip's car anyway?
I haven't touched the car since May. Today I made a very long day of it to take the T56 transmission to RPM Industries in Anderson, IN. I was hoping they would just need to replace the input shaft but those hopes were dashed when all the parts were laid out on the table. I'm glad I took it to the pro's because that transmission was shot. Turns out the shop that built the trans last time didn't dowel the front cover correctly and that is probably what caused the cascade of failures. In short, RPM had to toss away about 1/3 the internal parts. Fortunately, the Viper output shaft was saved.
I just wanted to sell the trans and cash out but it was worthless in the broken condition, so I gave them the go ahead to put it back together the right way. I now have a properly built Level 5 transmission (without polishing) from RPM industries for the price of a Level 4. The guys at RPM Industries are very knowledgeable and kind. And they handed me a transmission that looks showroom new! I didn't even realize that was my trans at first glance. It's also nice to know they are really proud of their work. They basically claimed that trans by stamping a code on it and putting their logo in several locations. They want people to know they made it and that they will take care of their customers.
Now it's time to get tinkering again!
10-17-2012, 11:33 PM
#84
COTM Editor
Thread Starter
iTrader: (22)
Join Date: Mar 2001
Posts: 9,891
Likes: 0
Received 1,855 Likes
on
1,270 Posts
Car: '89 Firebird
Engine: 7.0L
Transmission: T56
10-19-2012, 12:10 AM
#85
Senior Member
iTrader: (1)
Join Date: Aug 2006
Location: Bethlehem, CT
Posts: 632
Likes: 0
Received 4 Likes
on
4 Posts
Car: 1983 Firebird SE
Engine: C5 LS1
Transmission: 6 speed
Axle/Gears: 3.42
Re: What ever happened to QwkTrip's car anyway?
Hey Qwk Trip-
Hang in there. My car got done, and is a joy. LSxs transform these cars.
Hang in there. My car got done, and is a joy. LSxs transform these cars.
10-19-2012, 12:38 AM
#86
COTM Editor
Thread Starter
iTrader: (22)
Join Date: Mar 2001
Posts: 9,891
Likes: 0
Received 1,855 Likes
on
1,270 Posts
Car: '89 Firebird
Engine: 7.0L
Transmission: T56
Re: What ever happened to QwkTrip's car anyway?
Thanks, bud.
Tonight I put the clutch back on (for the final time!) and mounted the transmission. I also had to remove the kevlar pilot bushing I installed earlier and replace it with a stock GM roller bearing.
RPM Transmission made no bones about it that I should use a stock GM roller bearing. I shared my concern that I've read a lot of stories about pilot bearing failures causing transmission damage (a lot like what I just repaired), but RPM said they had never seen a factory installed pilot bearing fail. Every failure they've seen was installed at home and the bearing was damaged by rough handling and forcing the transmission in place. They said to gently play with the transmission until it easily slides into place and the bearing won't be damaged. It took a lot of fiddling around but sure enough I finally found the sweet spot and the transmission slid right into place. I had to use a floor jack because there was no way I could man-handle that trans with the finesse needed. Usually I install the transmission under the car after the engine goes in but I knew it would be too hard this time.
I also tried to find good information about how to remove the pilot bushing but seriously, I could not find a single thread anywhere without people doing some type of difficult destructive method. Most people cuss for hours trying to do it. I knew there had to be a better way. Again, RPM Transmissions came to the rescue and told me to rent a blind hole puller. The auto stores kept trying to give me gear pullers but I finally found a store that knew what I was talking about. Basically, it's a cone that expands inside the bearing and then you use a slide hammer to remove the bearing. At first I couldn't budge the bushing because I had applied some Loctite to hold it in, so I drove it in further to break the bond and then pulled out the bushing with ease.
Blind hole puller tool set - used for removing pilot bushing/bearing.
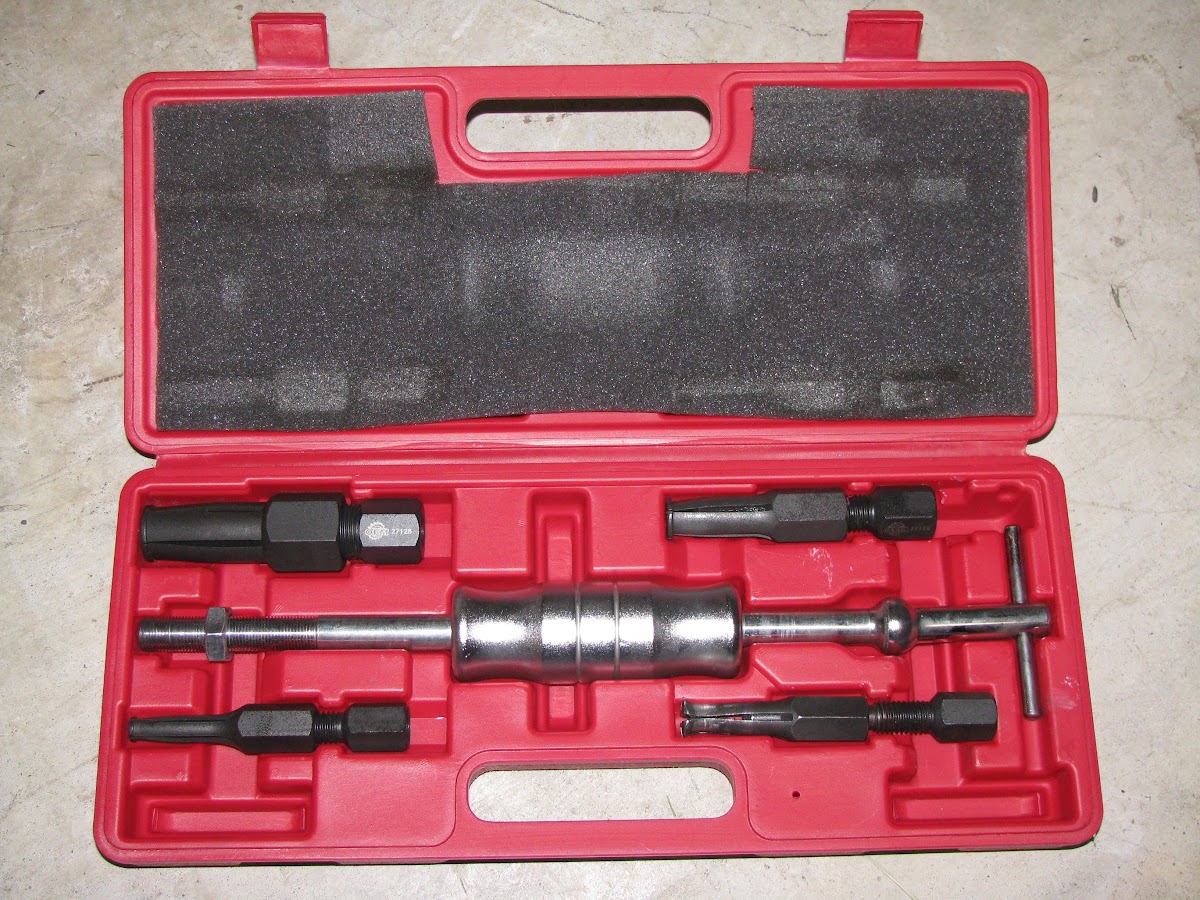
Here's the part number in case you just can't find the right size.

Bushing removed. There's $40 down the drain.")

Be sure to install the bearing in the correct orientation. The sealed casing (shown) needs to face out toward the transmission. This prevents clutch dust from contaminating the roller needles.

Pilot bearing installed flush with the crankshaft.

Ram RTrack dual disc clutch that I picked up used. I had RPM Transmissions inspect it when they repaired the transmission and they gave it the green light for me to use.

Transmission mounted. I have to get the proper hardware to secure it to the engine. The blast shield housing has a thinner flange thickness than a stock T56 housing so I have to get shorter bolts so I don't punch through into the engine water jacket. Looks like a 35mm long bolt is about right.

Tonight I put the clutch back on (for the final time!) and mounted the transmission. I also had to remove the kevlar pilot bushing I installed earlier and replace it with a stock GM roller bearing.
RPM Transmission made no bones about it that I should use a stock GM roller bearing. I shared my concern that I've read a lot of stories about pilot bearing failures causing transmission damage (a lot like what I just repaired), but RPM said they had never seen a factory installed pilot bearing fail. Every failure they've seen was installed at home and the bearing was damaged by rough handling and forcing the transmission in place. They said to gently play with the transmission until it easily slides into place and the bearing won't be damaged. It took a lot of fiddling around but sure enough I finally found the sweet spot and the transmission slid right into place. I had to use a floor jack because there was no way I could man-handle that trans with the finesse needed. Usually I install the transmission under the car after the engine goes in but I knew it would be too hard this time.
I also tried to find good information about how to remove the pilot bushing but seriously, I could not find a single thread anywhere without people doing some type of difficult destructive method. Most people cuss for hours trying to do it. I knew there had to be a better way. Again, RPM Transmissions came to the rescue and told me to rent a blind hole puller. The auto stores kept trying to give me gear pullers but I finally found a store that knew what I was talking about. Basically, it's a cone that expands inside the bearing and then you use a slide hammer to remove the bearing. At first I couldn't budge the bushing because I had applied some Loctite to hold it in, so I drove it in further to break the bond and then pulled out the bushing with ease.
Blind hole puller tool set - used for removing pilot bushing/bearing.
Here's the part number in case you just can't find the right size.
Bushing removed. There's $40 down the drain.
Be sure to install the bearing in the correct orientation. The sealed casing (shown) needs to face out toward the transmission. This prevents clutch dust from contaminating the roller needles.
Pilot bearing installed flush with the crankshaft.
Ram RTrack dual disc clutch that I picked up used. I had RPM Transmissions inspect it when they repaired the transmission and they gave it the green light for me to use.
Transmission mounted. I have to get the proper hardware to secure it to the engine. The blast shield housing has a thinner flange thickness than a stock T56 housing so I have to get shorter bolts so I don't punch through into the engine water jacket. Looks like a 35mm long bolt is about right.
Last edited by QwkTrip; 04-17-2019 at 08:26 PM.

 10-23-2012, 09:22 PM
#88
COTM Editor
Thread Starter
iTrader: (22)
Join Date: Mar 2001
Posts: 9,891
Likes: 0
Received 1,855 Likes
on
1,270 Posts
Car: '89 Firebird
Engine: 7.0L
Transmission: T56
Re: What ever happened to QwkTrip's car anyway?
Well, the QuickTime housing isn't very "bolt friendly". Clearance to housing and oil pan is so tight in some locations that you need to change the hardware to socket cap screws.
I am using a mix of flange bolts (M10x1.5-35mm) and socket cap screws to mount the housing to the block. The socket screws go in the 3:00 and 9:00 positions because the housing is so close to bolt heads that the flange bolts won't fit. No washer is needed with a steel housing since the bolt won't gaul the surface, like it does with stock aluminum housing.
There are extra holes around the bottom to secure the block protector plate to the housing. I used 3/8" bolts in those location, like QuickTime intended, but switched over to socket cap screws. You can see why in the picture below. Clearance to oil pan is really tight.
Last edited by QwkTrip; 04-17-2019 at 08:25 PM.
10-23-2012, 11:21 PM
#89
COTM Editor
Thread Starter
iTrader: (22)
Join Date: Mar 2001
Posts: 9,891
Likes: 0
Received 1,855 Likes
on
1,270 Posts
Car: '89 Firebird
Engine: 7.0L
Transmission: T56
Re: What ever happened to QwkTrip's car anyway?
Previously I was debating options for mounting knock sensors (post #41). I decided to drill out the holes in the block and resize them for the larger LS1 style knock sensor. Procedure is simple: Drill out the existing knock sensor holes in side of block and tap for M10x1.5 thread, and then torque down the knock sensor to 15 lb-ft.
The proper drill bit size is 8.5 mm, but I don't have a metric drill bit set (most people don't), so I used a 5/16 inch drill bit instead. The 5/16 inch is slightly undersized (7.94 mm) so it causes the thread depth to be increased. Basically, the sensor is going to fit pretty snug. NEVER cheap out on a tap. Cheap taps break off in the hole, and good luck getting it back out. I used a high quality flat bottom tap (M10 x 1.5) from McMaster-Carr. This is the same tap needed for making the alternator mounting hole on iron blocks so you'll get your money worth by end of project. A shot of brake cleaner in the hole will clean out all the debris and leave you with a clean hole ready to accept the knock sensor.
LS1 type knock sensor mounted in Gen IV block after resizing hole for M10x1.5 thread.
Last edited by QwkTrip; 04-30-2020 at 06:22 PM.
10-29-2012, 10:28 PM
#90
COTM Editor
Thread Starter
iTrader: (22)
Join Date: Mar 2001
Posts: 9,891
Likes: 0
Received 1,855 Likes
on
1,270 Posts
Car: '89 Firebird
Engine: 7.0L
Transmission: T56
Re: What ever happened to QwkTrip's car anyway?
I need small harness clips to hold a few wires to the engine but I've given up trying to find what I need. Problem is most clips have very small mounting holes, whereas the available bolt holes on engine are a mix of relatively large 8mm and 10mm diameter. And clips with the right bolt hole size have wire loops that are too big. So I'm doing an experiment and making my own.
I took some sheet metal and cut out strips with tin snips. Then I shaped the loop by rolling it around a bar (screw driver in this case), drilled holes, rounded the ends with a file, and then dipped the whole thing in rubber coating. This is my first prototype drying after dipping. It will hold a wire coming from the knock sensor. It's sized just right to hold the wire loom and will mount to a 8mm hole on the side of the block.

I took some sheet metal and cut out strips with tin snips. Then I shaped the loop by rolling it around a bar (screw driver in this case), drilled holes, rounded the ends with a file, and then dipped the whole thing in rubber coating. This is my first prototype drying after dipping. It will hold a wire coming from the knock sensor. It's sized just right to hold the wire loom and will mount to a 8mm hole on the side of the block.
Last edited by QwkTrip; 04-17-2019 at 08:25 PM.
10-29-2012, 11:04 PM
#92
COTM Editor
Thread Starter
iTrader: (22)
Join Date: Mar 2001
Posts: 9,891
Likes: 0
Received 1,855 Likes
on
1,270 Posts
Car: '89 Firebird
Engine: 7.0L
Transmission: T56
Re: What ever happened to QwkTrip's car anyway?
Performix "Plasti Dip"
I got it at an Ace Hardware store. It comes in different colors, and you can get it in aerosol can or a jar. I got the jar. One of the intended uses is dipping bare metal tools to make hand grips.
I got it at an Ace Hardware store. It comes in different colors, and you can get it in aerosol can or a jar. I got the jar. One of the intended uses is dipping bare metal tools to make hand grips.
10-30-2012, 10:39 PM
#94
COTM Editor
Thread Starter
iTrader: (22)
Join Date: Mar 2001
Posts: 9,891
Likes: 0
Received 1,855 Likes
on
1,270 Posts
Car: '89 Firebird
Engine: 7.0L
Transmission: T56
Re: What ever happened to QwkTrip's car anyway?
Some time this winter, I think. I am just tinkering on it here and there. I've got to do a bunch of things to the car while the engine is out so I'm in no hurry to set the engine in yet.
11-02-2012, 09:11 PM
#95
COTM Editor
Thread Starter
iTrader: (22)
Join Date: Mar 2001
Posts: 9,891
Likes: 0
Received 1,855 Likes
on
1,270 Posts
Car: '89 Firebird
Engine: 7.0L
Transmission: T56
Re: What ever happened to QwkTrip's car anyway?
43 inch leads on the O2 sensor, huh? I guess Denso really wanted to make sure you could reach the engine harness even if you put the O2 sensors in the muffler! Not sure what I'm going to do with the extra 40 inches!

Last edited by QwkTrip; 04-17-2019 at 08:23 PM.
11-02-2012, 09:19 PM
#96
Supreme Member
Join Date: Mar 2004
Location: In the Garage
Posts: 2,519
Likes: 0
Received 4 Likes
on
3 Posts
Car: Camaro
Engine: 6.2L
Transmission: T56
Re: What ever happened to QwkTrip's car anyway?
Where did that come from? Ive never seen one even close to that length. Is that from a STS type rear mount kit or something?
11-02-2012, 09:33 PM
#97
COTM Editor
Thread Starter
iTrader: (22)
Join Date: Mar 2001
Posts: 9,891
Likes: 0
Received 1,855 Likes
on
1,270 Posts
Car: '89 Firebird
Engine: 7.0L
Transmission: T56
Re: What ever happened to QwkTrip's car anyway?
It's the rear O2 sensor for a 2000 Corvette. Those sensors have stronger heating elements than F body sensors so codes don't throw with long tube headers. And you have to get the rear sensor because the front sensor has a totally different plug that won't work with a LS1 F body harness.
11-02-2012, 11:08 PM
#99
COTM Editor
Thread Starter
iTrader: (22)
Join Date: Mar 2001
Posts: 9,891
Likes: 0
Received 1,855 Likes
on
1,270 Posts
Car: '89 Firebird
Engine: 7.0L
Transmission: T56
Re: What ever happened to QwkTrip's car anyway?
Advance Auto. They are supposed to be direct fit.
11-03-2012, 09:03 AM
#100
Supreme Member
Join Date: Mar 2004
Location: In the Garage
Posts: 2,519
Likes: 0
Received 4 Likes
on
3 Posts
Car: Camaro
Engine: 6.2L
Transmission: T56
Re: What ever happened to QwkTrip's car anyway?
Ive never seen one nearly so long ( thats what she said too :P )
lol Regardless the plug "differences" are easily solved with a razor knife btw Just carefully cut the part out in between the pins where it blocks the plug from going in if that makes any sense to ya.
lol Regardless the plug "differences" are easily solved with a razor knife btw
Just carefully cut the part out in between the pins where it blocks the plug from going in if that makes any sense to ya. 
