New to this Section- First LS Swap
 03-16-2016, 08:38 AM
#101
Supreme Member

Thread Starter
iTrader: (1)
Join Date: Feb 2003
Location: Marietta, GA
Posts: 2,024
Likes: 0
Received 1 Like
on
1 Post
Car: 92 Z28
Engine: LS1
Transmission: T56
Axle/Gears: 3.73 10 bolt
Re: New to this Section- First LS Swap
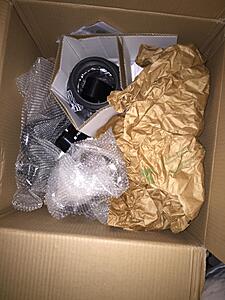
More stuff! I got a Spectre CAI on ebay for under $100 for a GTO. And my second PR length checker showed up.
Measuring on the circle of the cam this time I get 0 lash right at 7.2875 (or 9 and 3/4 turns on the checker). The pre load rating for LS7 lifters is between .060 and .100. So I could run either a 7.35 and still be just on the bottom end of that with a .0625 pre load. I decided to clay at that size and see if I would still need to fly cut.
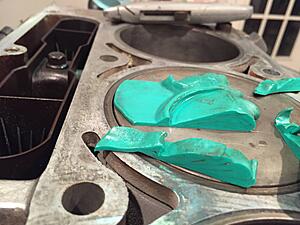
And as you can see... I do. Intake clearance is only .05 and exhaust is about .07. Since I have to fly cut anyways I think I'm gonna run a little longer rod to get in the mid range on pre load for this lifter. So throwing in a 7.375 should give me .0875 pre load. From what I'm reading .080 is the sweet spot for noise and getting the most out of your cam without pre loading the lifter too much.
 03-21-2016, 08:38 AM
#102
Supreme Member
Thread Starter
iTrader: (1)
Join Date: Feb 2003
Location: Marietta, GA
Posts: 2,024
Likes: 0
Received 1 Like
on
1 Post
Car: 92 Z28
Engine: LS1
Transmission: T56
Axle/Gears: 3.73 10 bolt
Re: New to this Section- First LS Swap
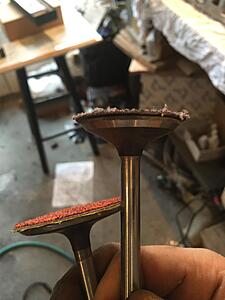
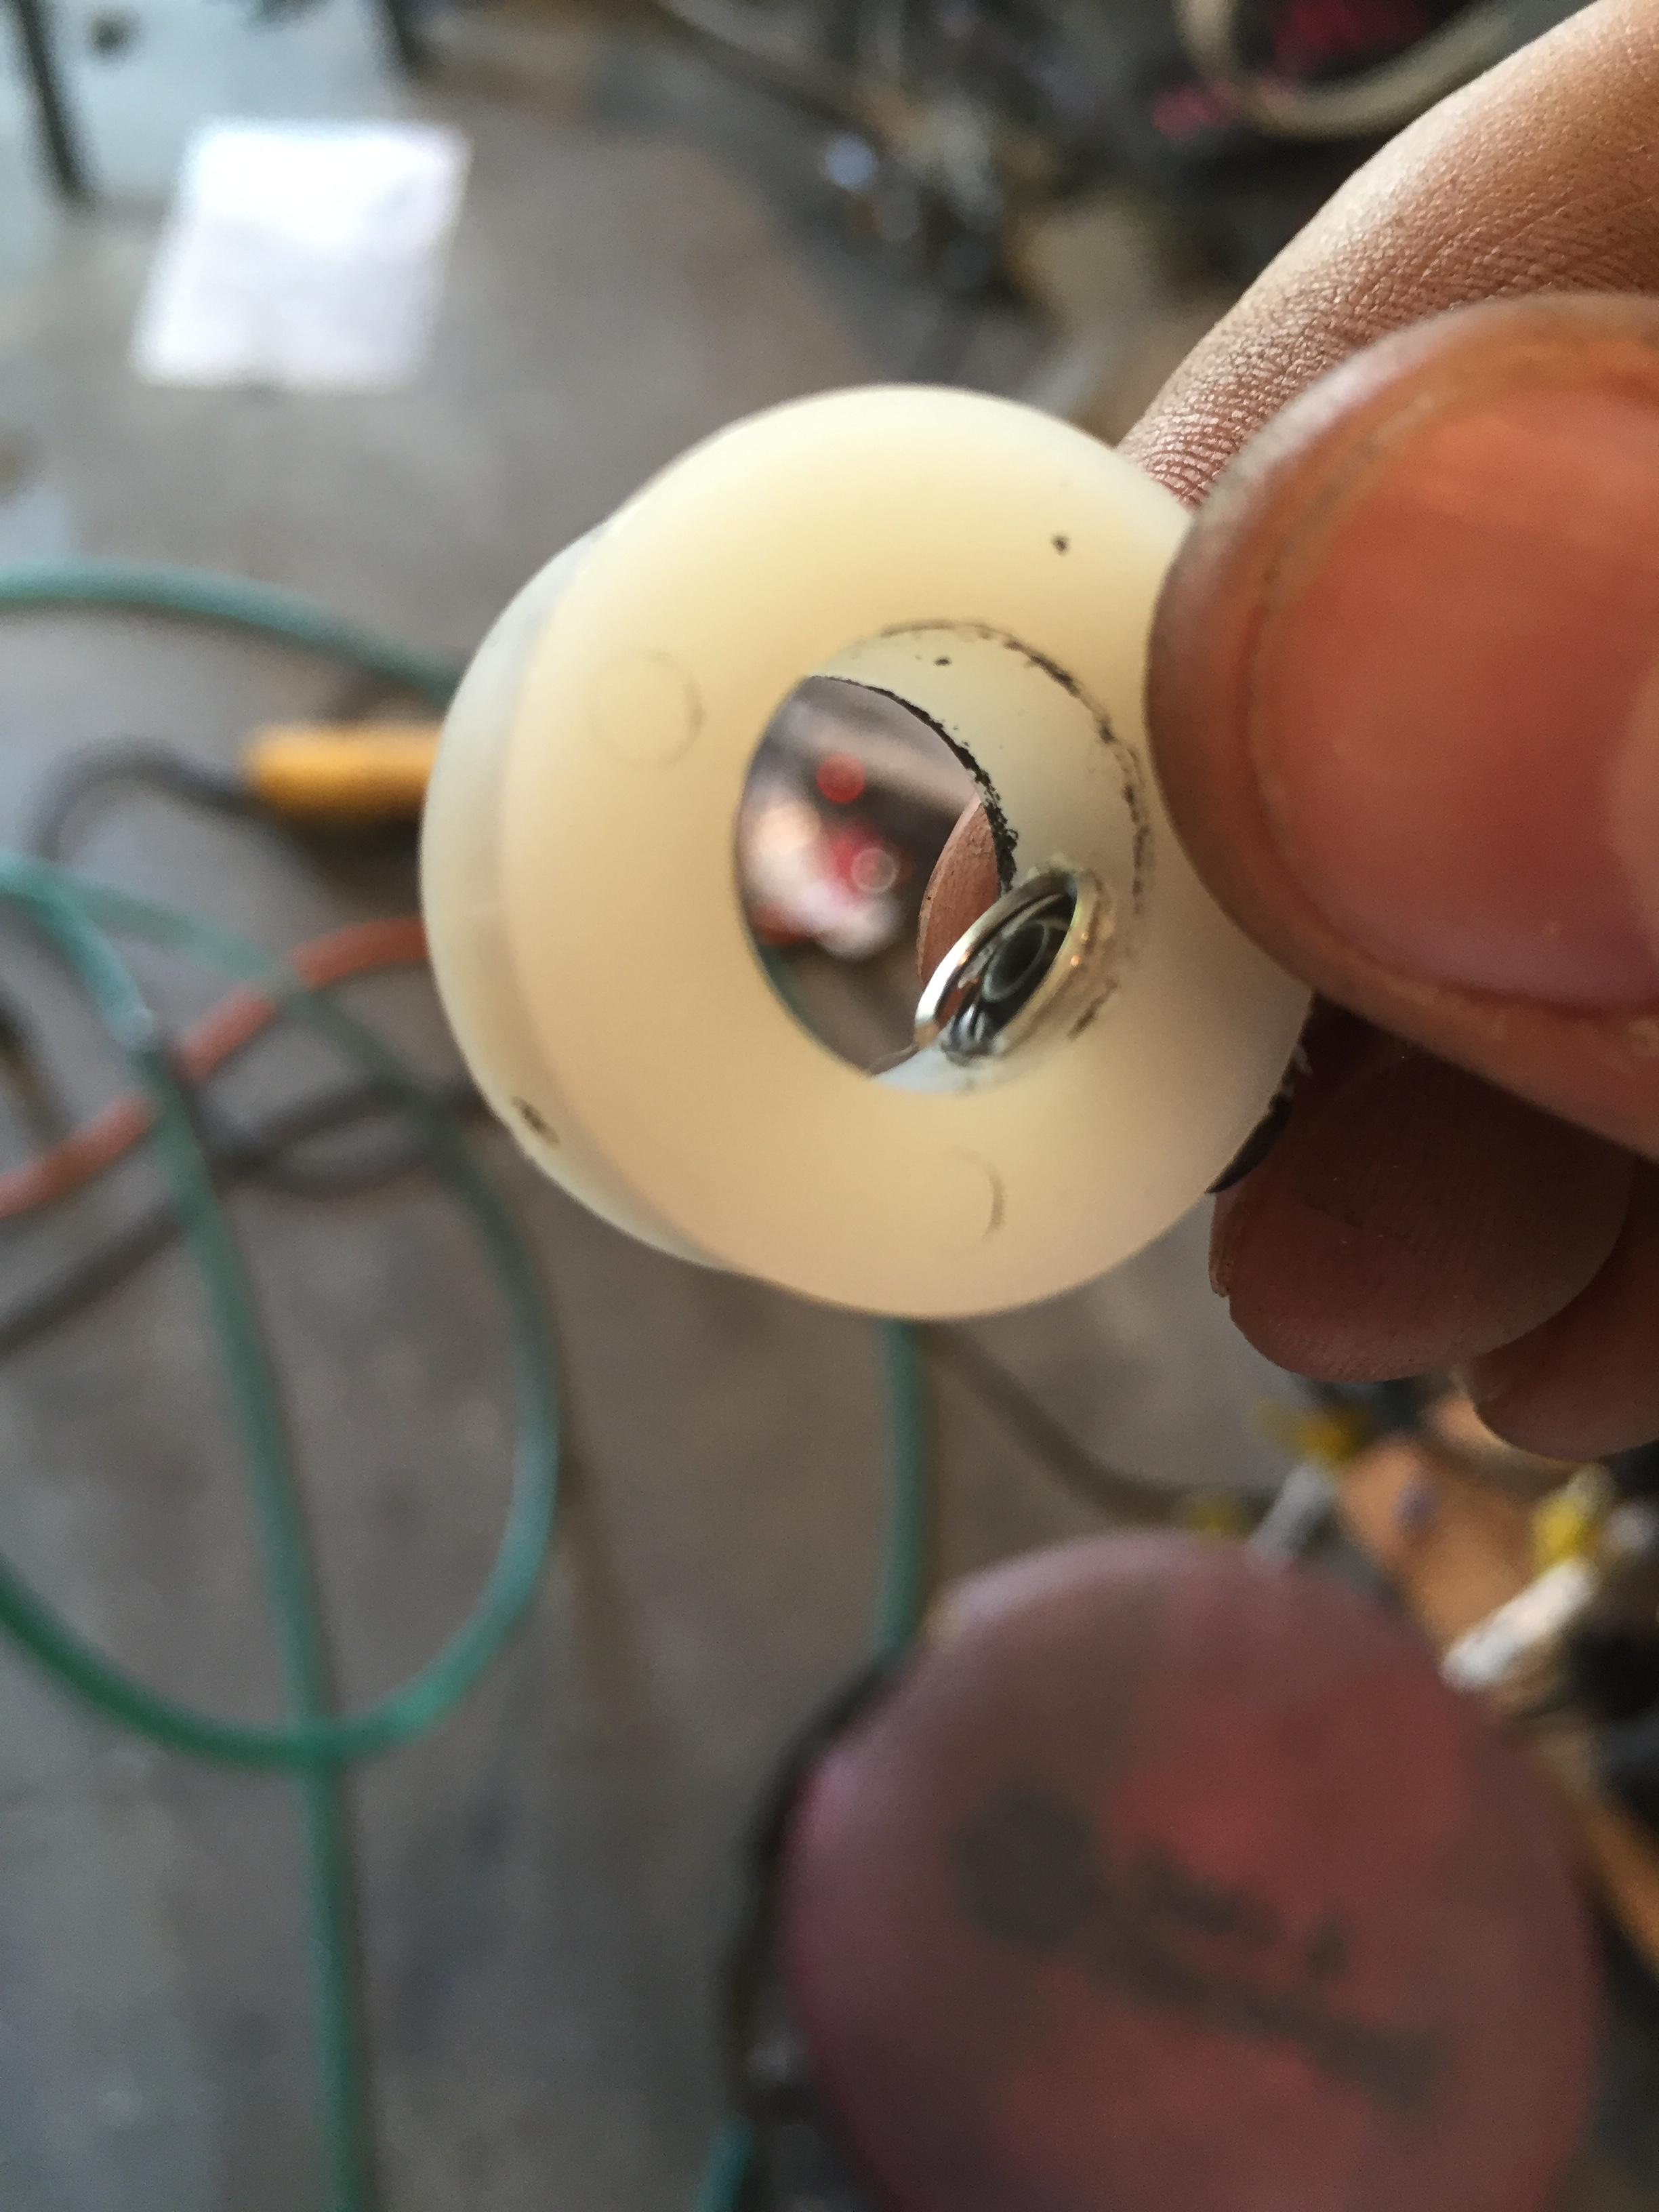
Shade tree ingenuity at work. I couldn't find any collars to put on the valves to make the cutting tool. So I had to make a damn collar out of a nylon spacer and then put in a helicoil to make sure I could torque it down a bit without stripping the threads.

Made the tools out of some extra valves and super glued a roloc pad to each. I had to use a 3" on the intake to get a bit of overlap over the edge of the valve and then grind both of them down so I had just a little overlap.
Fit like a glove
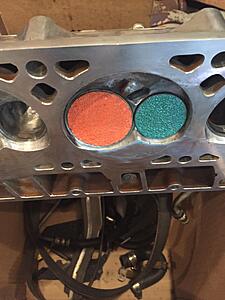
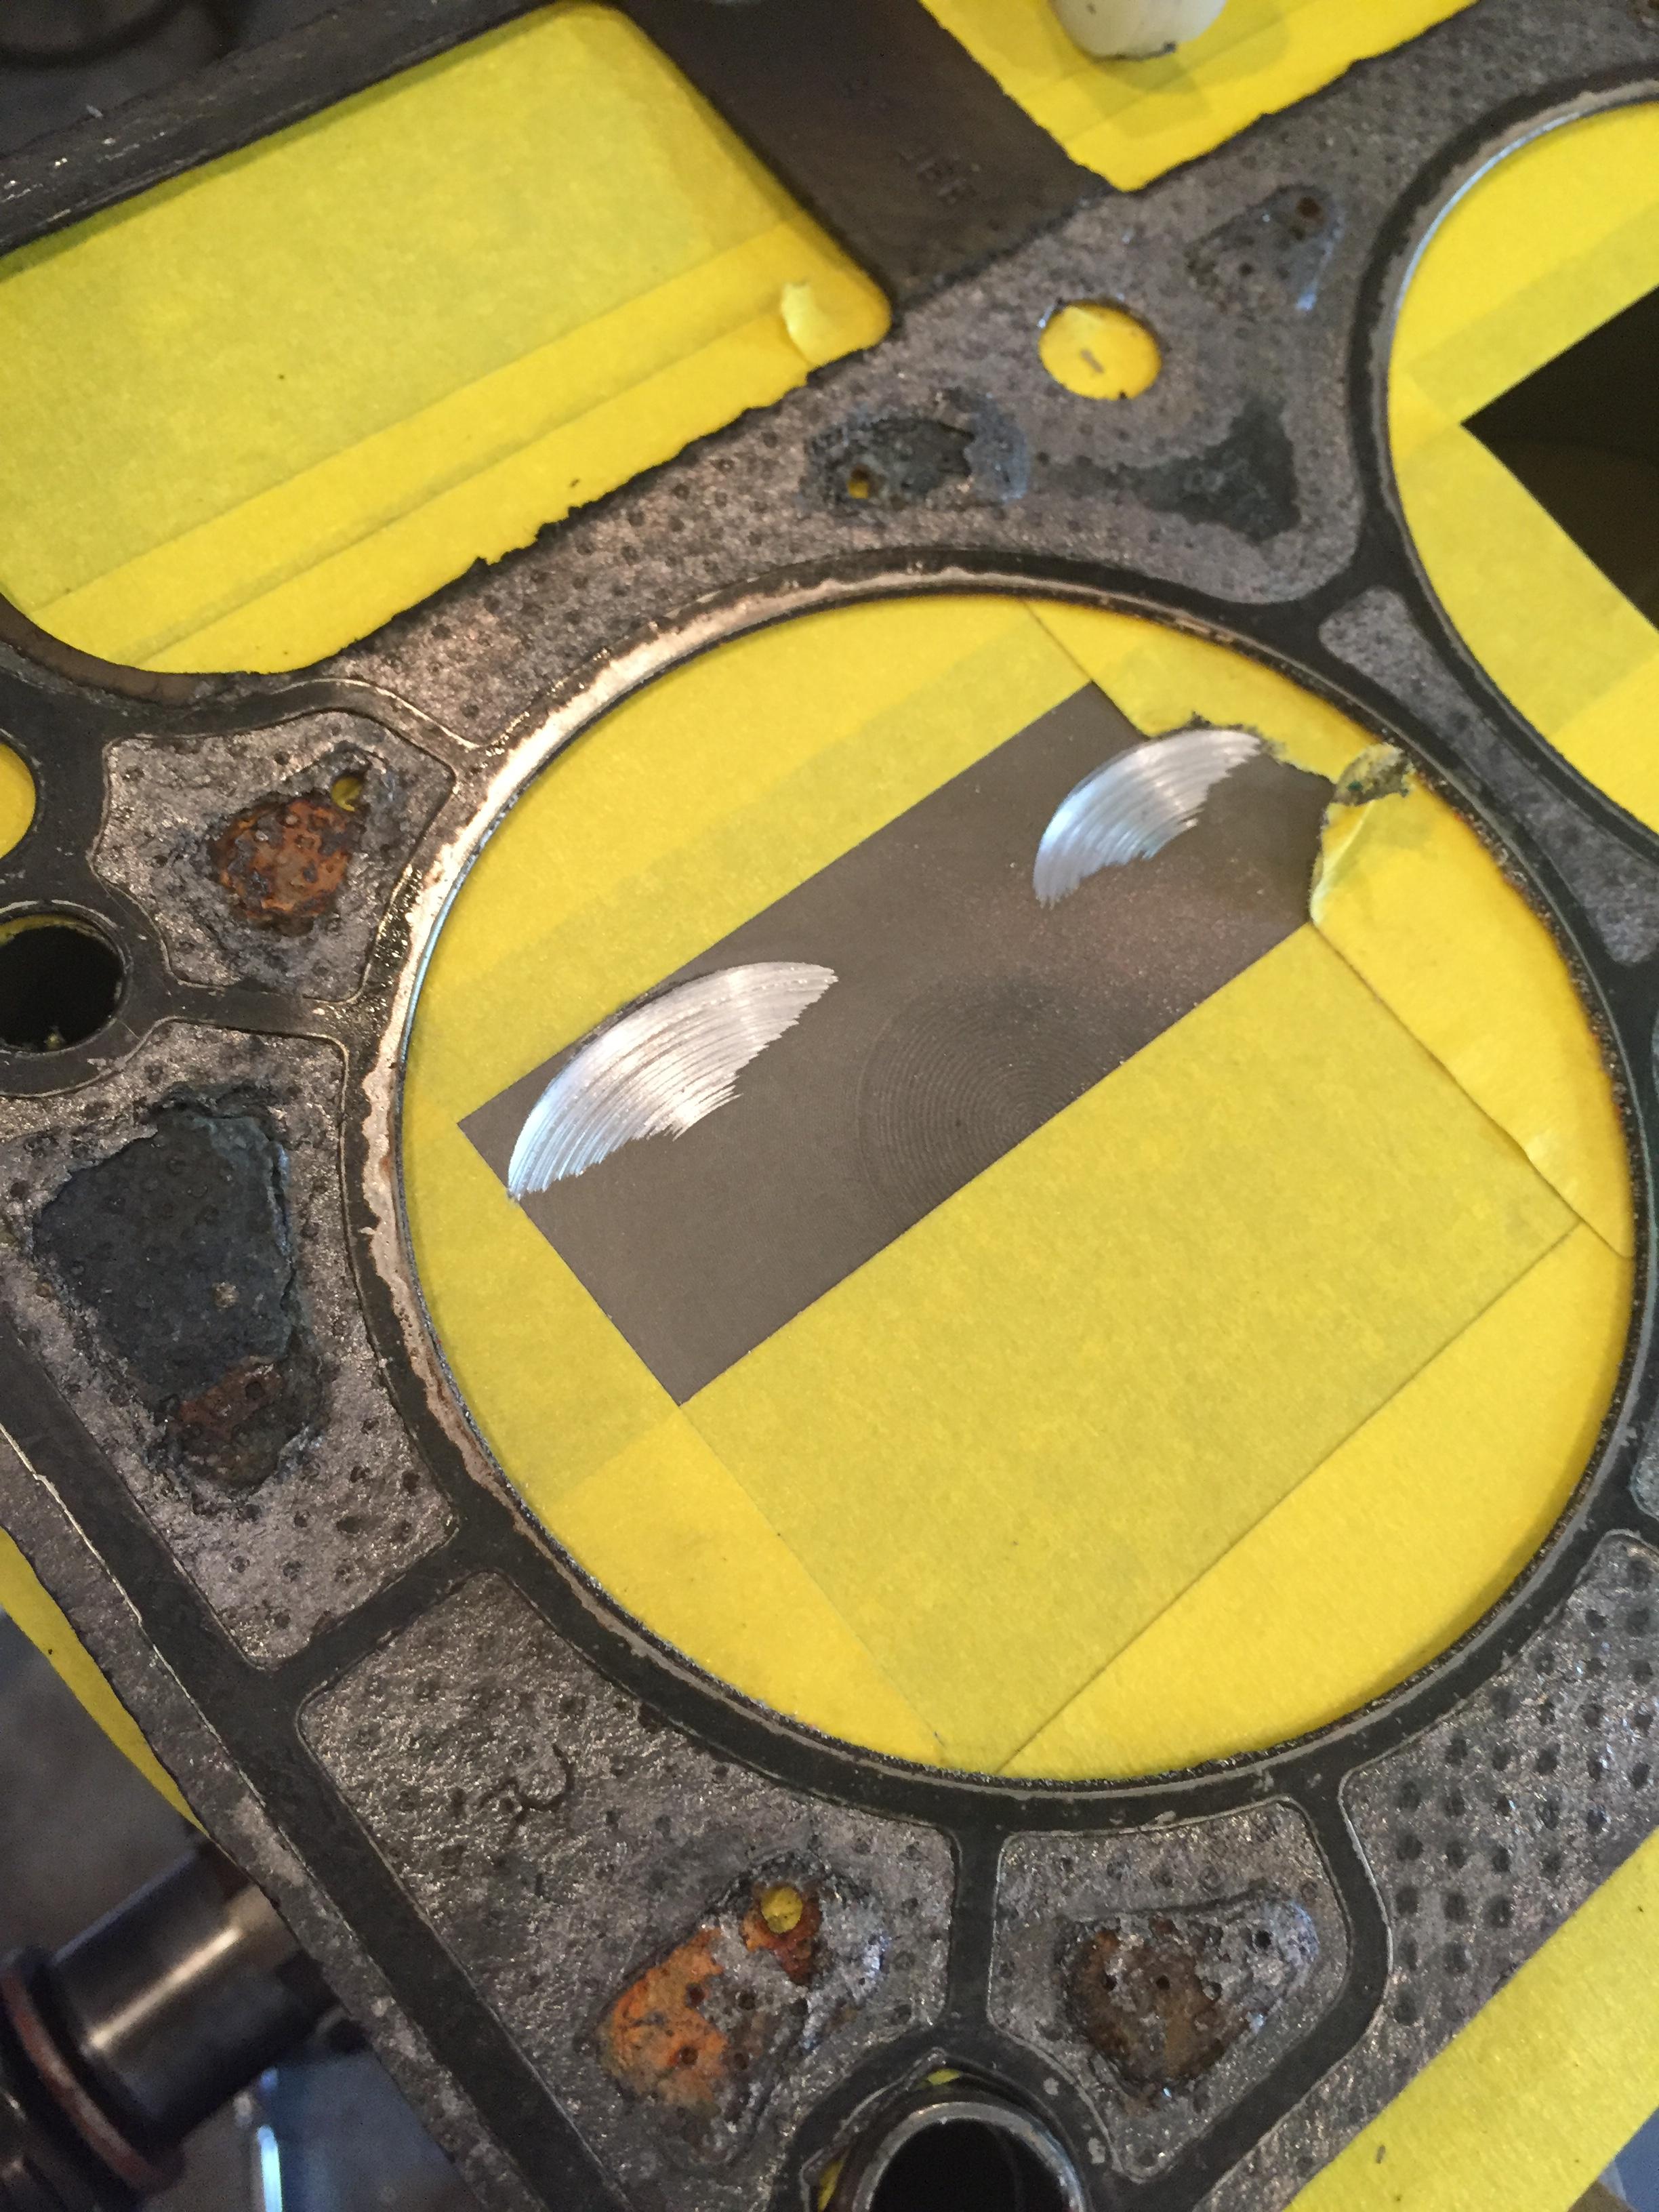
Taped up the whole block so I could just move the valves, and rotate the engine over to get each cylinder at TDC.
Disassembled one of the heads and torqued down a few old head bolts. Then spaced out the collars to they would keep me from over grinding on the pistons. Hooked the valves up to my drill and went to work. I used a very small feeler gauge while I was grinding to make sure I wasn't putting any pressure on the collar, thus pushing it back and grinding too far. Also shoved my shop vac in the intake port while I was grinding to prevent metal shavings from going everywhere.
It wasn't really pretty getting here, but they came out great.

Nice and even between cylinders too.
Then it was time to get back to "normal engine building".
Installing SLP oil pump

This is what I used to hold the crank in place to install the Harmonic Balancer, along with the Scoggin Dickey HB tool. Just put in a couple of the flywheel bolts in and hooked up a spanner wrench.
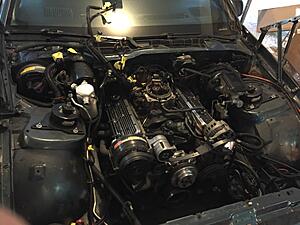
All buttoned up, heads on, rockers with the trunion kit/comp cams pushrods/LS7 lifters/LS3 Trays/LS6 valley cover etc on, then just threw the covers on to keep dirt out.
Made the tools out of some extra valves and super glued a roloc pad to each. I had to use a 3" on the intake to get a bit of overlap over the edge of the valve and then grind both of them down so I had just a little overlap.

Fit like a glove

Taped up the whole block so I could just move the valves, and rotate the engine over to get each cylinder at TDC.

Disassembled one of the heads and torqued down a few old head bolts. Then spaced out the collars to they would keep me from over grinding on the pistons. Hooked the valves up to my drill and went to work. I used a very small feeler gauge while I was grinding to make sure I wasn't putting any pressure on the collar, thus pushing it back and grinding too far. Also shoved my shop vac in the intake port while I was grinding to prevent metal shavings from going everywhere.

It wasn't really pretty getting here, but they came out great.
Nice and even between cylinders too.

Then it was time to get back to "normal engine building".
Installing SLP oil pump

This is what I used to hold the crank in place to install the Harmonic Balancer, along with the Scoggin Dickey HB tool. Just put in a couple of the flywheel bolts in and hooked up a spanner wrench.

All buttoned up, heads on, rockers with the trunion kit/comp cams pushrods/LS7 lifters/LS3 Trays/LS6 valley cover etc on, then just threw the covers on to keep dirt out.
 03-21-2016, 11:09 AM
#103
COTM Editor
iTrader: (11)
Join Date: Mar 2006
Location: WINDSOR, CO
Posts: 4,098
Likes: 0
Received 12 Likes
on
12 Posts
Car: 91 Z28, 87 SC, 90 IROC, 92 RS
Engine: LS1, 305 TPI, L98, NADA
Transmission: T56, 700r4's, and NADA
Axle/Gears: 3.89, 3.42, 3.23, NADA
Re: New to this Section- First LS Swap
Shiny!!!!! Looks great man
03-25-2016, 08:17 AM
#104
Supreme Member
Thread Starter
iTrader: (1)
Join Date: Feb 2003
Location: Marietta, GA
Posts: 2,024
Likes: 0
Received 1 Like
on
1 Post
Car: 92 Z28
Engine: LS1
Transmission: T56
Axle/Gears: 3.73 10 bolt
Re: New to this Section- First LS Swap
Well my "3.73"s showed up yesterday..

Only problem is, they are 3.42s. I'm running 3.23s right now so these would be mostly pointless. If it was a 4.10 I'd probably just run it.
Dude is trying to say I switched the gears already and am trying to scam him. Paypal resolution center here I come.

Only problem is, they are 3.42s. I'm running 3.23s right now so these would be mostly pointless. If it was a 4.10 I'd probably just run it.

Dude is trying to say I switched the gears already and am trying to scam him. Paypal resolution center here I come.
03-28-2016, 10:26 AM
#105
Supreme Member
Thread Starter
iTrader: (1)
Join Date: Feb 2003
Location: Marietta, GA
Posts: 2,024
Likes: 0
Received 1 Like
on
1 Post
Car: 92 Z28
Engine: LS1
Transmission: T56
Axle/Gears: 3.73 10 bolt
Re: New to this Section- First LS Swap
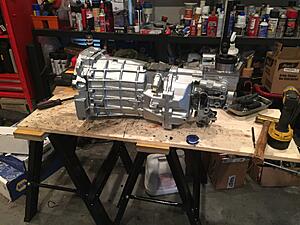
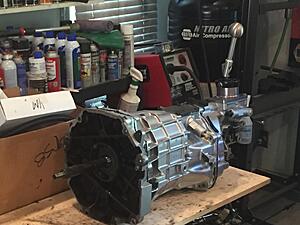
Rebuilt the trans this weekend. Looked like it already had a fairly recent rebuild, blocker rings were carbon fiber and in decent shape. Some of the dog teeth were pretty flat and I ground them down so they were pointed again. Went ahead and replaced 2nd gear with the Viper gear and put the new rings in along with billet keys in 1-2, 3-4 with brass fork bushing on those gears and a steel 3-4 fork. I messed up the output shaft bushing and didn't really like the seal that it came with the kit either. So I am going to order a seal with the extension housing and then press on the output bushing instead of trying to hammer it on and finish that up next weekend. My kit was missing one set of fork bushings and keys for either 5-6 or reverse, so I went ahead and got brass fork bushings for both and some new keys for one of those synchros. Will just take a minute to replace.
This was my first trans, but it is really pretty easy. My 5-6 gear came right off with a little heat, but it can be a bear apparently. Everything was in pretty good shape accept the bearing on the end of the main shaft fell apart when I took it out. So that got replaced as well. For some reason the first time I put it all together it wouldn't shift into 3 or 4 and the main shaft was binding. I took it back down and inspected but nothing seemed wrong. Just put it back together and it was fine, dunno what the issue was.
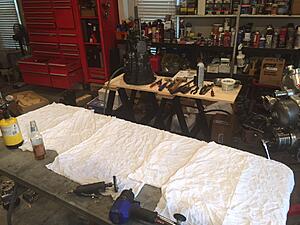
This was my table set up. Just screwed a peice of 3/4 mdf to some wood saw horses and drilled a hole in it for the input shaft. Made it pretty easy to stand up and lean it sideways. Then just set up my spare table with some lint free towels on it so I could clean everything nice and good while I disassembled.
All back together aside from needing to seal up the tail shaft. Got everything painted as well.
This was my first trans, but it is really pretty easy. My 5-6 gear came right off with a little heat, but it can be a bear apparently. Everything was in pretty good shape accept the bearing on the end of the main shaft fell apart when I took it out. So that got replaced as well. For some reason the first time I put it all together it wouldn't shift into 3 or 4 and the main shaft was binding. I took it back down and inspected but nothing seemed wrong. Just put it back together and it was fine, dunno what the issue was.
This was my table set up. Just screwed a peice of 3/4 mdf to some wood saw horses and drilled a hole in it for the input shaft. Made it pretty easy to stand up and lean it sideways. Then just set up my spare table with some lint free towels on it so I could clean everything nice and good while I disassembled.

All back together aside from needing to seal up the tail shaft. Got everything painted as well.
 03-28-2016, 04:35 PM
#106
Member
Join Date: Dec 2014
Location: Garland, TX
Posts: 431
Likes: 0
Received 1 Like
on
1 Post
Car: 2014 Z28 #80
Re: New to this Section- First LS Swap
This is good info! Any chance you have other pictures?
I'm going to have to tear mine apart and put a rebuild/upgrade kit in it later on this year. I've done tons of auto's/transaxles but not a manual (couldn't be any harder than the auto's lol), and while I've found several good articles on it, walk-through's seem scarce.
I'm going to have to tear mine apart and put a rebuild/upgrade kit in it later on this year. I've done tons of auto's/transaxles but not a manual (couldn't be any harder than the auto's lol), and while I've found several good articles on it, walk-through's seem scarce.
03-29-2016, 09:15 AM
#107
Supreme Member
Thread Starter
iTrader: (1)
Join Date: Feb 2003
Location: Marietta, GA
Posts: 2,024
Likes: 0
Received 1 Like
on
1 Post
Car: 92 Z28
Engine: LS1
Transmission: T56
Axle/Gears: 3.73 10 bolt
Re: New to this Section- First LS Swap
This is good info! Any chance you have other pictures?
I'm going to have to tear mine apart and put a rebuild/upgrade kit in it later on this year. I've done tons of auto's/transaxles but not a manual (couldn't be any harder than the auto's lol), and while I've found several good articles on it, walk-through's seem scarce.
I'm going to have to tear mine apart and put a rebuild/upgrade kit in it later on this year. I've done tons of auto's/transaxles but not a manual (couldn't be any harder than the auto's lol), and while I've found several good articles on it, walk-through's seem scarce.
03-29-2016, 04:09 PM
#108
Senior Member

Re: New to this Section- First LS Swap
Awesome, I've been looking for at least a year for decent video on tear down/rebuild on a T-56... I've been driving around with no 4th, I intend to get the stage 2 kit from the gear box and do a rebuild this spring. Gotta do some floor/rocker work, so figured I would pull the trans to give me more room anyways and I finally have a garage to call my own to blow a trans apart in.
Do you need to press anything back or will a tap from a mallet work to seat things?
I'll likely just use a really long puller, but might take it to work and use the press if I gotta.
Do you need to press anything back or will a tap from a mallet work to seat things?
I'll likely just use a really long puller, but might take it to work and use the press if I gotta.
03-30-2016, 07:34 AM
#109
Supreme Member
Thread Starter
iTrader: (1)
Join Date: Feb 2003
Location: Marietta, GA
Posts: 2,024
Likes: 0
Received 1 Like
on
1 Post
Car: 92 Z28
Engine: LS1
Transmission: T56
Axle/Gears: 3.73 10 bolt
Re: New to this Section- First LS Swap
Awesome, I've been looking for at least a year for decent video on tear down/rebuild on a T-56... I've been driving around with no 4th, I intend to get the stage 2 kit from the gear box and do a rebuild this spring. Gotta do some floor/rocker work, so figured I would pull the trans to give me more room anyways and I finally have a garage to call my own to blow a trans apart in.
Do you need to press anything back or will a tap from a mallet work to seat things?
I'll likely just use a really long puller, but might take it to work and use the press if I gotta.
Do you need to press anything back or will a tap from a mallet work to seat things?
I'll likely just use a really long puller, but might take it to work and use the press if I gotta.
Last edited by grngryoutmyway; 03-30-2016 at 07:41 AM.
03-30-2016, 03:06 PM
#110
Member
Join Date: Dec 2014
Location: Garland, TX
Posts: 431
Likes: 0
Received 1 Like
on
1 Post
Car: 2014 Z28 #80
Re: New to this Section- First LS Swap
Saved the videos. Thanks for the links!
I've got a shop press and big splitters, so when the time comes I should be just fine.
I've got a shop press and big splitters, so when the time comes I should be just fine.
04-04-2016, 08:07 AM
#111
Supreme Member
Thread Starter
iTrader: (1)
Join Date: Feb 2003
Location: Marietta, GA
Posts: 2,024
Likes: 0
Received 1 Like
on
1 Post
Car: 92 Z28
Engine: LS1
Transmission: T56
Axle/Gears: 3.73 10 bolt
Re: New to this Section- First LS Swap
Exhaust showed up. And I got way too much 16g sheet metal. But never hurts to have extra 
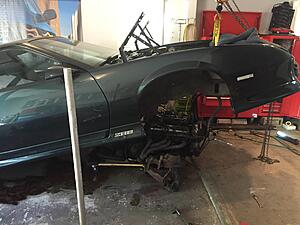
And I ALMOST got the engine out over the weekend. Everything is pulled from the rear, trans is hanging, wiring/cables/vacuums all disconnected. Just need to hook the car up to the hoist and pull about 10 bolts and she is out.


And I ALMOST got the engine out over the weekend. Everything is pulled from the rear, trans is hanging, wiring/cables/vacuums all disconnected. Just need to hook the car up to the hoist and pull about 10 bolts and she is out.
 04-04-2016, 09:06 AM
#112
COTM Editor
iTrader: (11)
Join Date: Mar 2006
Location: WINDSOR, CO
Posts: 4,098
Likes: 0
Received 12 Likes
on
12 Posts
Car: 91 Z28, 87 SC, 90 IROC, 92 RS
Engine: LS1, 305 TPI, L98, NADA
Transmission: T56, 700r4's, and NADA
Axle/Gears: 3.89, 3.42, 3.23, NADA
Re: New to this Section- First LS Swap
Exhaust showed up. And I got way too much 16g sheet metal. But never hurts to have extra


And I ALMOST got the engine out over the weekend. Everything is pulled from the rear, trans is hanging, wiring/cables/vacuums all disconnected. Just need to hook the car up to the hoist and pull about 10 bolts and she is out.

And I ALMOST got the engine out over the weekend. Everything is pulled from the rear, trans is hanging, wiring/cables/vacuums all disconnected. Just need to hook the car up to the hoist and pull about 10 bolts and she is out.
04-05-2016, 11:44 AM
#113
Senior Member
Re: New to this Section- First LS Swap
Whats the sheet metal for?
I gotta do the drivers floor and both inner rockers, not sure what gauge to use, 22 is easy to find.
Might also cut out and clean up my frame repair. It works just fine, but isn't the prettiest.
I gotta do the drivers floor and both inner rockers, not sure what gauge to use, 22 is easy to find.
Might also cut out and clean up my frame repair. It works just fine, but isn't the prettiest.
04-05-2016, 12:25 PM
#114
Supreme Member
Thread Starter
iTrader: (1)
Join Date: Feb 2003
Location: Marietta, GA
Posts: 2,024
Likes: 0
Received 1 Like
on
1 Post
Car: 92 Z28
Engine: LS1
Transmission: T56
Axle/Gears: 3.73 10 bolt
Re: New to this Section- First LS Swap
We have real different builds but somehow have a lot of the same parts. Will be interesting to compare when we are both done.. whenever that will be. 
Just cleaning up engine bay stuff, no rust damage or anything. I think 22 is what most newer cars are body panel wise our is a little thicke r18-20?, I would probably use at least 18 for the pans tho.
Don't go to Home Depot or Lowes look for a place around you that just sells metal. I could have gotten anything from like 6-26 g from this place.
Don't go to Home Depot or Lowes look for a place around you that just sells metal. I could have gotten anything from like 6-26 g from this place.
04-05-2016, 04:01 PM
#115
04-07-2016, 08:17 AM
#116
Supreme Member
Thread Starter
iTrader: (1)
Join Date: Feb 2003
Location: Marietta, GA
Posts: 2,024
Likes: 0
Received 1 Like
on
1 Post
Car: 92 Z28
Engine: LS1
Transmission: T56
Axle/Gears: 3.73 10 bolt
Re: New to this Section- First LS Swap
Following your progress too man, lets get it done! Have a show at the end of May so it is starting to get crunch time.
Stainless J bend showed up so I can make a transition from the Kooks mid length to the hooker duals.

And got a correct gear set from a much better ebay seller this time

Three day weekend so the engine will be out tomorrow and hopefully everything else in the bay. Hoping to get everything welded up this weekend and then body work and paint not too far behind.
04-11-2016, 07:36 AM
#117
Supreme Member
Thread Starter
iTrader: (1)
Join Date: Feb 2003
Location: Marietta, GA
Posts: 2,024
Likes: 0
Received 1 Like
on
1 Post
Car: 92 Z28
Engine: LS1
Transmission: T56
Axle/Gears: 3.73 10 bolt
Re: New to this Section- First LS Swap
Good bit of progress over the weekend. Finished the trans, I had ordered billet keys and brass fork bushings for 5-6 and revers so it has them throughout. I don't think I will ever need it, but my kit was missing one set of regular replacements so I figured why not. Also got a short throw shifter stick that angles over a bit so it will fit the stock shifter plate (hopefully) and a new ****.
Engine came out from the bottom. I'm going to box the k member and paint it so I figured I might as well pull it that way. Only issue was the trolley I put the engine on couldn't handle the weight and cracked. I had put a second one and the jack to move it. Cheap HF stuff..
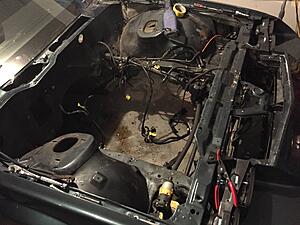
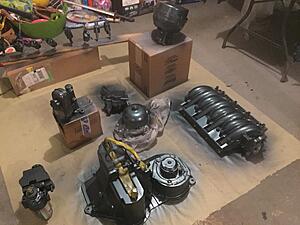
Got everything else pulled. I guess I'm going to pull the body harness too and re loom it.

Also picked up a plastic gas tank so I think I'm done with parts aside from probably a few things for wiring and some paint stuff.

Engine came out from the bottom. I'm going to box the k member and paint it so I figured I might as well pull it that way. Only issue was the trolley I put the engine on couldn't handle the weight and cracked. I had put a second one and the jack to move it. Cheap HF stuff..

Got everything else pulled. I guess I'm going to pull the body harness too and re loom it.

Also picked up a plastic gas tank so I think I'm done with parts aside from probably a few things for wiring and some paint stuff.
04-11-2016, 10:08 AM
#118
Senior Member
iTrader: (1)
Join Date: Aug 2006
Location: Bethlehem, CT
Posts: 632
Likes: 0
Received 4 Likes
on
4 Posts
Car: 1983 Firebird SE
Engine: C5 LS1
Transmission: 6 speed
Axle/Gears: 3.42
Re: New to this Section- First LS Swap
You MIGHT want to pull the steering box off to check for cracks behind it. My '83 needed some attention there.
 04-11-2016, 10:22 AM
#119
Supreme Member
Thread Starter
iTrader: (1)
Join Date: Feb 2003
Location: Marietta, GA
Posts: 2,024
Likes: 0
Received 1 Like
on
1 Post
Car: 92 Z28
Engine: LS1
Transmission: T56
Axle/Gears: 3.73 10 bolt
Re: New to this Section- First LS Swap
Good idea. I replaced it not too long ago and it was fine then, so it is probably still fine. I'm going to at least loosen it up when doing paint, I should be able the peek behind it then.
Last edited by grngryoutmyway; 04-11-2016 at 10:38 AM.
04-11-2016, 11:17 AM
#120
COTM Editor
iTrader: (11)
Join Date: Mar 2006
Location: WINDSOR, CO
Posts: 4,098
Likes: 0
Received 12 Likes
on
12 Posts
Car: 91 Z28, 87 SC, 90 IROC, 92 RS
Engine: LS1, 305 TPI, L98, NADA
Transmission: T56, 700r4's, and NADA
Axle/Gears: 3.89, 3.42, 3.23, NADA
Re: New to this Section- First LS Swap
Holy crap son! You better hope for more 3 day weekends lol! That is a bunch of work to do. I got til July, but needs to be race ready then. Gonna be worth it all!
04-11-2016, 12:43 PM
#121
Supreme Member
Thread Starter
iTrader: (1)
Join Date: Feb 2003
Location: Marietta, GA
Posts: 2,024
Likes: 0
Received 1 Like
on
1 Post
Car: 92 Z28
Engine: LS1
Transmission: T56
Axle/Gears: 3.73 10 bolt
Re: New to this Section- First LS Swap
Tell me about it man. Can only put in time on the weekends too. Wife is getting pissed already lol. We will see if I make it tho! It's gonna be close.
04-18-2016, 08:35 AM
#122
Supreme Member
Thread Starter
iTrader: (1)
Join Date: Feb 2003
Location: Marietta, GA
Posts: 2,024
Likes: 0
Received 1 Like
on
1 Post
Car: 92 Z28
Engine: LS1
Transmission: T56
Axle/Gears: 3.73 10 bolt
Re: New to this Section- First LS Swap
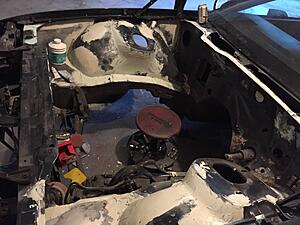
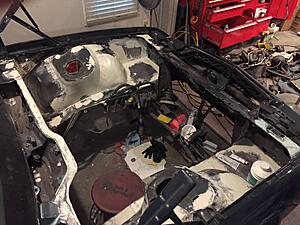
Started on the engine bay work. Cross cut the bumps for the bottles and hammer/dollied them down smooth.
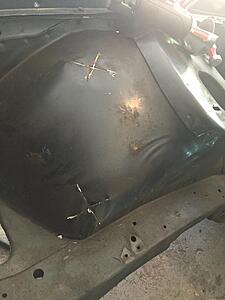
Drivers side was a little more difficult than the passenger lol.
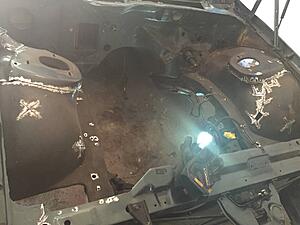
Got everything welded and mostly ground down. I was having a lot of popping in my welds and couldn't figure out why. My mask is a shytty HF one and I can't see too good so I didn't notice until I was almost done but the tip in my mig handle was wore out and the spool was jumping all over the place. So it made for a lot of grinding
Also got the patch panels about done. Hopefully next weekend the bay and everything else is ready for primer/paint.
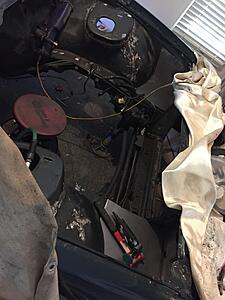
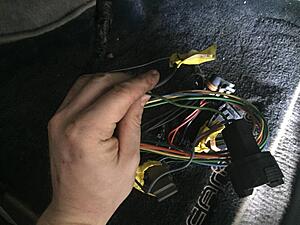
If I am going this route for the AC.

Does all of this harness accept for the Green wire going to the dryer (ac command), and the vacuum line for the heater valve get cut out? Then just plug the vac lines that aren't used?

Drivers side was a little more difficult than the passenger lol.

Got everything welded and mostly ground down. I was having a lot of popping in my welds and couldn't figure out why. My mask is a shytty HF one and I can't see too good so I didn't notice until I was almost done but the tip in my mig handle was wore out and the spool was jumping all over the place. So it made for a lot of grinding
Also got the patch panels about done. Hopefully next weekend the bay and everything else is ready for primer/paint.

If I am going this route for the AC.
Does all of this harness accept for the Green wire going to the dryer (ac command), and the vacuum line for the heater valve get cut out? Then just plug the vac lines that aren't used?
 04-18-2016, 12:43 PM
#123
COTM Editor
iTrader: (11)
Join Date: Mar 2006
Location: WINDSOR, CO
Posts: 4,098
Likes: 0
Received 12 Likes
on
12 Posts
Car: 91 Z28, 87 SC, 90 IROC, 92 RS
Engine: LS1, 305 TPI, L98, NADA
Transmission: T56, 700r4's, and NADA
Axle/Gears: 3.89, 3.42, 3.23, NADA
Re: New to this Section- First LS Swap
It like we keep going back and forth for progress lol! Looking good. I still haven't cut my upper bump on the drivers side as I was gonna weld up the lower outer one first to give some stability to hammer and dolly.
Keep up the great work man.
Keep up the great work man.
04-18-2016, 02:02 PM
#124
Supreme Member
Thread Starter
iTrader: (1)
Join Date: Feb 2003
Location: Marietta, GA
Posts: 2,024
Likes: 0
Received 1 Like
on
1 Post
Car: 92 Z28
Engine: LS1
Transmission: T56
Axle/Gears: 3.73 10 bolt
Re: New to this Section- First LS Swap
I was doing the upper first and then some way I cut it it seemed better (at the time) to go ahead and do the whole thing. I think it was trying to fold on the center but I can't remember. The top is pretty funky.
04-25-2016, 08:49 AM
#125
Supreme Member
Thread Starter
iTrader: (1)
Join Date: Feb 2003
Location: Marietta, GA
Posts: 2,024
Likes: 0
Received 1 Like
on
1 Post
Car: 92 Z28
Engine: LS1
Transmission: T56
Axle/Gears: 3.73 10 bolt
Re: New to this Section- First LS Swap
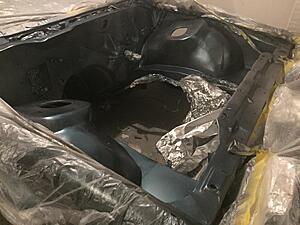
Panels welded in and everything ground down. I did a first coat of Evercoat Metal to Metal filler and then as seen here skimmed it with some glaze. I ran out of time to sand down the glaze, but it should knock down pretty quick. Really happy with the body work , I didn't need nearly as much filler as I would have expected.
Going to prime next weekend, prep all the other stuff that's getting body colored, and then hopefully base and clear everything as well. Then I'll have 4 weekends to put it all together and run wiring, yikes.


Going to prime next weekend, prep all the other stuff that's getting body colored, and then hopefully base and clear everything as well. Then I'll have 4 weekends to put it all together and run wiring, yikes.
04-25-2016, 05:12 PM
#126
COTM Editor
iTrader: (11)
Join Date: Mar 2006
Location: WINDSOR, CO
Posts: 4,098
Likes: 0
Received 12 Likes
on
12 Posts
Car: 91 Z28, 87 SC, 90 IROC, 92 RS
Engine: LS1, 305 TPI, L98, NADA
Transmission: T56, 700r4's, and NADA
Axle/Gears: 3.89, 3.42, 3.23, NADA
Re: New to this Section- First LS Swap
Panels welded in and everything ground down. I did a first coat of Evercoat Metal to Metal filler and then as seen here skimmed it with some glaze. I ran out of time to sand down the glaze, but it should knock down pretty quick. Really happy with the body work , I didn't need nearly as much filler as I would have expected.


Going to prime next weekend, prep all the other stuff that's getting body colored, and then hopefully base and clear everything as well. Then I'll have 4 weekends to put it all together and run wiring, yikes.
Going to prime next weekend, prep all the other stuff that's getting body colored, and then hopefully base and clear everything as well. Then I'll have 4 weekends to put it all together and run wiring, yikes.
What's the difference with the Evercoat Metal to metal. I got Evercoat as well, but not a "Metal to Metal"... Maybe I need to exchange mine before this weekend when I start "mudding" mine?
04-26-2016, 09:55 AM
#127
Supreme Member
Thread Starter
iTrader: (1)
Join Date: Feb 2003
Location: Marietta, GA
Posts: 2,024
Likes: 0
Received 1 Like
on
1 Post
Car: 92 Z28
Engine: LS1
Transmission: T56
Axle/Gears: 3.73 10 bolt
Re: New to this Section- First LS Swap
If you already have Evercoat I wouldn't bother exchanging it. M2M supposedly has metal fibers and is more more resistant to moisture/more durable/harder than normal fillers. Others will tell you that is BS, and really all comes down to personal preference. It is similar to All Metal if you have heard of that, which I actually bought originally, but it was all dried up. It is a bit harder to sand since it is harder and is tougher to feather out, hence the glaze, also apparently even worse to breathe in, and more expensive.
Last edited by grngryoutmyway; 04-26-2016 at 10:02 AM.
04-26-2016, 10:27 AM
#128
COTM Editor
iTrader: (11)
Join Date: Mar 2006
Location: WINDSOR, CO
Posts: 4,098
Likes: 0
Received 12 Likes
on
12 Posts
Car: 91 Z28, 87 SC, 90 IROC, 92 RS
Engine: LS1, 305 TPI, L98, NADA
Transmission: T56, 700r4's, and NADA
Axle/Gears: 3.89, 3.42, 3.23, NADA
Re: New to this Section- First LS Swap
Me either man, likewise on your car. Since your gutting the Ac you will end up a lot cleaner too.
If you already have Evercoat I wouldn't bother exchanging it. M2M supposedly has metal fibers and is more more resistant to moisture/more durable/harder than normal fillers. Others will tell you that is BS, and really all comes down to personal preference. It is similar to All Metal if you have heard of that, which I actually bought originally, but it was all dried up. It is a bit harder to sand since it is harder and is tougher to feather out, hence the glaze, also apparently even worse to breathe in, and more expensive.
If you already have Evercoat I wouldn't bother exchanging it. M2M supposedly has metal fibers and is more more resistant to moisture/more durable/harder than normal fillers. Others will tell you that is BS, and really all comes down to personal preference. It is similar to All Metal if you have heard of that, which I actually bought originally, but it was all dried up. It is a bit harder to sand since it is harder and is tougher to feather out, hence the glaze, also apparently even worse to breathe in, and more expensive.
Quick question and I'll let you get back at it. Did you throw a bead down the seam of the inner fender to the "frame" (like next to the steering shaft area or heater hose pipe area) or just fill it in with the body filler? Pretty tight small seam, looks like could just be filled.
04-26-2016, 10:57 AM
#129
Supreme Member
Thread Starter
iTrader: (1)
Join Date: Feb 2003
Location: Marietta, GA
Posts: 2,024
Likes: 0
Received 1 Like
on
1 Post
Car: 92 Z28
Engine: LS1
Transmission: T56
Axle/Gears: 3.73 10 bolt
Re: New to this Section- First LS Swap
I consistently judge my products by their health warning and typically choose to stray away from products that won't kill me in the long run, as they typically work better HAHA. I did a little digging and it seems like the M2M is good stuff, but again the opinions are like you said... either will work. Good to know about it though.
Quick question and I'll let you get back at it. Did you throw a bead down the seam of the inner fender to the "frame" (like next to the steering shaft area or heater hose pipe area) or just fill it in with the body filler? Pretty tight small seam, looks like could just be filled.
Quick question and I'll let you get back at it. Did you throw a bead down the seam of the inner fender to the "frame" (like next to the steering shaft area or heater hose pipe area) or just fill it in with the body filler? Pretty tight small seam, looks like could just be filled.
04-26-2016, 11:36 AM
#130
COTM Editor
iTrader: (11)
Join Date: Mar 2006
Location: WINDSOR, CO
Posts: 4,098
Likes: 0
Received 12 Likes
on
12 Posts
Car: 91 Z28, 87 SC, 90 IROC, 92 RS
Engine: LS1, 305 TPI, L98, NADA
Transmission: T56, 700r4's, and NADA
Axle/Gears: 3.89, 3.42, 3.23, NADA
Re: New to this Section- First LS Swap
No worries, I'd much rather talk shop than do my day job. I just filled that seam to the "frame" and then filled to the back piece of sheet metal where it arches up in the middle. The only reason I would think to weld it is for structure, but I can't imagine that would do much anyways.
Yeah the smoothed firewall, I hope, is worth all the effort. I'm feeling overwhelmed with all the little stuff that needs done... Oh well Keep on trucking!
04-26-2016, 12:24 PM
#131
Supreme Member
Thread Starter
iTrader: (1)
Join Date: Feb 2003
Location: Marietta, GA
Posts: 2,024
Likes: 0
Received 1 Like
on
1 Post
Car: 92 Z28
Engine: LS1
Transmission: T56
Axle/Gears: 3.73 10 bolt
Re: New to this Section- First LS Swap
You're tellin me man. I'm planning out the few days left I have to work on it before it needs to be run.. It's looking grim..
4-30-Finish sanding, prep all other parts, primer
5-1-BC/CC, Box/paint K member
5-7-Finish K member, Install clutch/trans/accessories, bolt engine to K member
5-8-Engine in, Swap Gears/Start on Fuel
5-14-Finish Gas tank, Rear Battery install, Start wiring
5-15-Wiring
5-21-Wiring
5-22-Exhaust, Final Assembly/Bugs
5-26-Break in, Alignment, Hope it doesn't blow up
It seems do able, but really no wiggle room, can't mess anything up at this point. Like you said, keep on truckin.
Last edited by grngryoutmyway; 04-26-2016 at 12:27 PM.
04-26-2016, 05:19 PM
#132
COTM Editor
iTrader: (11)
Join Date: Mar 2006
Location: WINDSOR, CO
Posts: 4,098
Likes: 0
Received 12 Likes
on
12 Posts
Car: 91 Z28, 87 SC, 90 IROC, 92 RS
Engine: LS1, 305 TPI, L98, NADA
Transmission: T56, 700r4's, and NADA
Axle/Gears: 3.89, 3.42, 3.23, NADA
Re: New to this Section- First LS Swap
Firewall will be well worth it, mine is just a cruiser (and I live GA) so I'm keeping AC. It would look way better without it tho.
You're tellin me man. I'm planning out the few days left I have to work on it before it needs to be run.. It's looking grim..
4-30-Finish sanding, prep all other parts, primer
5-1-BC/CC, Box/paint K member
5-7-Finish K member, Install clutch/trans/accessories, bolt engine to K member
5-8-Engine in, Swap Gears/Start on Fuel
5-14-Finish Gas tank, Rear Battery install, Start wiring
5-15-Wiring
5-21-Wiring
5-22-Exhaust, Final Assembly/Bugs
5-26-Break in, Alignment, Hope it doesn't blow up
It seems do able, but really no wiggle room, can't mess anything up at this point. Like you said, keep on truckin.
05-02-2016, 07:51 AM
#133
Supreme Member
Thread Starter
iTrader: (1)
Join Date: Feb 2003
Location: Marietta, GA
Posts: 2,024
Likes: 0
Received 1 Like
on
1 Post
Car: 92 Z28
Engine: LS1
Transmission: T56
Axle/Gears: 3.73 10 bolt
Re: New to this Section- First LS Swap
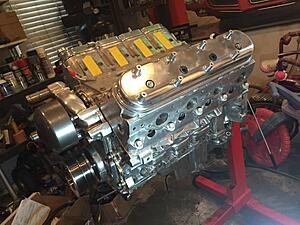
Well it is all almost one color now. It was almost 9 and I got a run in the base and was having a chemical reaction in one spot on the fire wall. So I opted to wait and finish basing tonight and clear. The body work is just ok, but I'm wore out lol. Shiny engine will make up for it anyways
All the rest of the stuff I'm painting.
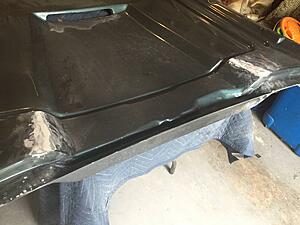
The SS hood was rubbing in a couple spots so I ground them down a bit and filled with long grain FG filler and then some glaze since I was painting anyways.

All the rest of the stuff I'm painting.

The SS hood was rubbing in a couple spots so I ground them down a bit and filled with long grain FG filler and then some glaze since I was painting anyways.

Last edited by grngryoutmyway; 05-02-2016 at 08:09 AM.
05-02-2016, 11:42 AM
#134
COTM Editor
iTrader: (11)
Join Date: Mar 2006
Location: WINDSOR, CO
Posts: 4,098
Likes: 0
Received 12 Likes
on
12 Posts
Car: 91 Z28, 87 SC, 90 IROC, 92 RS
Engine: LS1, 305 TPI, L98, NADA
Transmission: T56, 700r4's, and NADA
Axle/Gears: 3.89, 3.42, 3.23, NADA
Re: New to this Section- First LS Swap
Looks great all in one color. I think the body color on all the other parts is gonna look really nice man. Help smooth out the firewall without really smoothing anything. I plan on gloss blacking just about everything lol. The body color coils are so dumb  Haha! I bet you can taste it now lol
Haha! I bet you can taste it now lol
05-02-2016, 12:15 PM
#135
Supreme Member
Thread Starter
iTrader: (1)
Join Date: Feb 2003
Location: Marietta, GA
Posts: 2,024
Likes: 0
Received 1 Like
on
1 Post
Car: 92 Z28
Engine: LS1
Transmission: T56
Axle/Gears: 3.73 10 bolt
Re: New to this Section- First LS Swap
Looks great all in one color. I think the body color on all the other parts is gonna look really nice man. Help smooth out the firewall without really smoothing anything. I plan on gloss blacking just about everything lol. The body color coils are so dumb Haha! I bet you can taste it now lol
Haha! I bet you can taste it now lol
05-02-2016, 05:09 PM
#136
COTM Editor
iTrader: (11)
Join Date: Mar 2006
Location: WINDSOR, CO
Posts: 4,098
Likes: 0
Received 12 Likes
on
12 Posts
Car: 91 Z28, 87 SC, 90 IROC, 92 RS
Engine: LS1, 305 TPI, L98, NADA
Transmission: T56, 700r4's, and NADA
Axle/Gears: 3.89, 3.42, 3.23, NADA
Re: New to this Section- First LS Swap
Yea, that was the plan, might also fall in the "too lazy to tape it off club" but whatever. And painted coils are stupid! I dropped off the strut towers and an astro steering shaft to get "Chrome" powder coated too. I debated doing the steering rack and K member as well, but I would have to take apart the gear box etc.. and really don't have time/monies now. Ideally I want to get as much of the car either body color or polished/chrome as possible. But this should pop plenty for right now.
I think its a good plan and will look really sharp. Polished/chrome looks very nice with your body color. I think you're gonna have enough chrome/polished to keep peoples eyes interested in there, and focused on what they need.
05-03-2016, 07:45 AM
#137
Supreme Member
Thread Starter
iTrader: (1)
Join Date: Feb 2003
Location: Marietta, GA
Posts: 2,024
Likes: 0
Received 1 Like
on
1 Post
Car: 92 Z28
Engine: LS1
Transmission: T56
Axle/Gears: 3.73 10 bolt
Re: New to this Section- First LS Swap
Hitting what I need to right now, but I'm sure I'll dive back in later. Clear came out real good. I really like the way it turned out when I painted the outside of the car, but I also wet sanded it down. I got good coverage and shine with two coats this time. Might sand a little trash out of it later, but it is fine as is.


I have no earthy idea how the water pump turned out like this. But it looks intentional and matches the project so I guess it stays lol.

Might be one one little run on the back of a fender well, but I couldn't see it when I went back to check so it may have flattened out.

Dirty rest of the car looks really dirty now.
 05-03-2016, 10:00 AM
#138
COTM Editor
iTrader: (11)
Join Date: Mar 2006
Location: WINDSOR, CO
Posts: 4,098
Likes: 0
Received 12 Likes
on
12 Posts
Car: 91 Z28, 87 SC, 90 IROC, 92 RS
Engine: LS1, 305 TPI, L98, NADA
Transmission: T56, 700r4's, and NADA
Axle/Gears: 3.89, 3.42, 3.23, NADA
Re: New to this Section- First LS Swap
Dude it looks so good in all that clear. Gotta be a great feeling to be done with that stage.
Did you set up a booth in the garage, or roll it out an open air spray it?
Did you set up a booth in the garage, or roll it out an open air spray it?
05-03-2016, 10:40 AM
#139
Supreme Member
Thread Starter
iTrader: (1)
Join Date: Feb 2003
Location: Marietta, GA
Posts: 2,024
Likes: 0
Received 1 Like
on
1 Post
Car: 92 Z28
Engine: LS1
Transmission: T56
Axle/Gears: 3.73 10 bolt
Re: New to this Section- First LS Swap
I don't know that you would call it setting up a booth. Bay was done where it sits and the rest of the parts were on the floor in the other garage spot and the hood set on a table. I just blew out the garage real good a few hours before I was going to spray, set up a few fans for some cross flow and opened the doors up. Fortunately it was raining while I was spraying both nights so there wasn't much floating around in the air. When I sprayed the whole car I was a little more methodical, but this time around the area was pretty contained so I just tried to clean up the area around where I was spraying as best I could.
This was from a couple years back when I sprayed the car.

 05-03-2016, 11:35 AM
#140
COTM Editor
iTrader: (11)
Join Date: Mar 2006
Location: WINDSOR, CO
Posts: 4,098
Likes: 0
Received 12 Likes
on
12 Posts
Car: 91 Z28, 87 SC, 90 IROC, 92 RS
Engine: LS1, 305 TPI, L98, NADA
Transmission: T56, 700r4's, and NADA
Axle/Gears: 3.89, 3.42, 3.23, NADA
Re: New to this Section- First LS Swap
Nice booth man! Freaking garage is deep dude. Anyway, I thought that for the engine bay I could pull off the same and clean things up around the area and be ok to spray without making a complete "booth". Your results look good, so I figured I'd ask.
05-04-2016, 09:31 AM
#141
Member
Join Date: Dec 2014
Location: Garland, TX
Posts: 431
Likes: 0
Received 1 Like
on
1 Post
Car: 2014 Z28 #80
Re: New to this Section- First LS Swap
Just don't do what I did when I did my booth and not have any fans to help lol. I did plastic from the fenders/cowl/rad support to the ceiling and left the bottom open... yeah, with with a full on mask with filters, and sealed goggles I nearly killed myself from the fumes lol. The booth I built to paint the whole car worked a helluva lot better.
Looks fricking awesome, man! LOVE that color.
Looks fricking awesome, man! LOVE that color.
05-09-2016, 07:40 AM
#142
Supreme Member
Thread Starter
iTrader: (1)
Join Date: Feb 2003
Location: Marietta, GA
Posts: 2,024
Likes: 0
Received 1 Like
on
1 Post
Car: 92 Z28
Engine: LS1
Transmission: T56
Axle/Gears: 3.73 10 bolt
Re: New to this Section- First LS Swap
Kind of a crappy weekend for the project. I got side tracked with some unexpected stuff Sat morning instead of getting going early. I managed to notch, box, and get the k member painted along with some smaller stuff.

I started to put the engine together and apparently had the wrong oil pressure sensor in the box. The threads looked very similar but it must have had pipe thread on it, cause it snapped the top of the elevated area it seats in
I managed to find a 16 x 1.5 tap to clean it up and ground down the surface flat again while being careful to not get anything in the oil passages. I think the gasket seated ok but we ill see.
Got all the accessories back on and torqued down. Then started to work on the pilot bearing which does not want to come out. Bread- no, grease - no, went and rented a puller tool and snapped the finger off of it after 2-3 good whacks of the slide hammer")
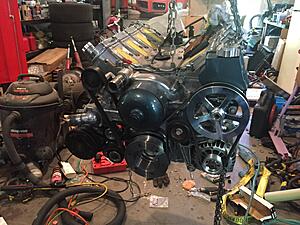
As you can see garage is getting kinda dirty at this point lol. Hopefully I can get the trans and the rest of the stuff on the engine bolted up during the week and drop it in early Sat so I don't get behind on the behind (rear end/gas tank).

I started to put the engine together and apparently had the wrong oil pressure sensor in the box. The threads looked very similar but it must have had pipe thread on it, cause it snapped the top of the elevated area it seats in
I managed to find a 16 x 1.5 tap to clean it up and ground down the surface flat again while being careful to not get anything in the oil passages. I think the gasket seated ok but we ill see.
Got all the accessories back on and torqued down. Then started to work on the pilot bearing which does not want to come out. Bread- no, grease - no, went and rented a puller tool and snapped the finger off of it after 2-3 good whacks of the slide hammer

As you can see garage is getting kinda dirty at this point lol. Hopefully I can get the trans and the rest of the stuff on the engine bolted up during the week and drop it in early Sat so I don't get behind on the behind (rear end/gas tank).
05-09-2016, 01:22 PM
#143
COTM Editor
iTrader: (11)
Join Date: Mar 2006
Location: WINDSOR, CO
Posts: 4,098
Likes: 0
Received 12 Likes
on
12 Posts
Car: 91 Z28, 87 SC, 90 IROC, 92 RS
Engine: LS1, 305 TPI, L98, NADA
Transmission: T56, 700r4's, and NADA
Axle/Gears: 3.89, 3.42, 3.23, NADA
Re: New to this Section- First LS Swap
Motor is looking killer man!
05-10-2016, 08:31 AM
#144
Supreme Member
Thread Starter
iTrader: (1)
Join Date: Feb 2003
Location: Marietta, GA
Posts: 2,024
Likes: 0
Received 1 Like
on
1 Post
Car: 92 Z28
Engine: LS1
Transmission: T56
Axle/Gears: 3.73 10 bolt
Re: New to this Section- First LS Swap
Thanks man, gettin there.
Got the old pilot out and new clutch in last night. Measured the spacing and it looks like I do need to run a spacer on the slave cylinder. Also noticed I'm missing a few bolts to mount the trans to the bell housing so good thing I went ahead and did this so I can order parts.
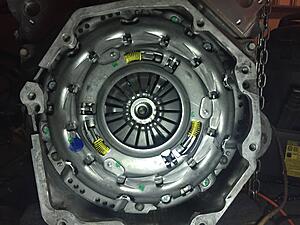
This is all that was left of the old pilot (it was toasted). I took a small pneumatic saw zaw and cut some ribs in it without going all the way through, so I didn't damage the crank. Then took a punch to it to knock a nib in. Snapped right in pieces and fell out. This is after I wasted like 2 hrs Sunday trying to do it the right way
 05-10-2016, 10:46 AM
#145
Re: New to this Section- First LS Swap
Looks good! Alittle worried about your nicely painted waterpump pulley... my new HV LS1 pump pulley litterally only has idle time on it so far and I'm pretty sure if I painted it the bent would have tore it up and made it look like poo.
I didn't have bellhousing bolts either. I orderd some dorman metric studs from summit for like $10 and got some metric nuts and washers from home depot that are all metric 10.9 or greater. After years of bellhousing bolts in SBC, BBF etc I switched to studs when I was using billet trans adapters and I will never go back to bolts. The studs basically align everything as it comes in and helps alot with the crank pilot. I know yours is a manual but I do this now on with all my auto cars.
I didn't have bellhousing bolts either. I orderd some dorman metric studs from summit for like $10 and got some metric nuts and washers from home depot that are all metric 10.9 or greater. After years of bellhousing bolts in SBC, BBF etc I switched to studs when I was using billet trans adapters and I will never go back to bolts. The studs basically align everything as it comes in and helps alot with the crank pilot. I know yours is a manual but I do this now on with all my auto cars.
05-10-2016, 11:31 AM
#146
Supreme Member
Thread Starter
iTrader: (1)
Join Date: Feb 2003
Location: Marietta, GA
Posts: 2,024
Likes: 0
Received 1 Like
on
1 Post
Car: 92 Z28
Engine: LS1
Transmission: T56
Axle/Gears: 3.73 10 bolt
Re: New to this Section- First LS Swap
Yea, hopefully the belt will just cut a groove and it wont chip. Only one way to find out though. Only other option would be to buy a billet pulley. I didn't look to hard, but I didn't see any I liked so I figured I'd try this first.
I ordered some trans housing bolts with my slave cylinder spacer from Tick. I believe they are the same, if not I can just find some 10.9 and call it a day, these aren't TTY or anything. Studs would be cool, the trans has some guide studs on the trans and the back of the engine to line it up as well.
I ordered some trans housing bolts with my slave cylinder spacer from Tick. I believe they are the same, if not I can just find some 10.9 and call it a day, these aren't TTY or anything. Studs would be cool, the trans has some guide studs on the trans and the back of the engine to line it up as well.
05-10-2016, 11:43 AM
#147
COTM Editor
iTrader: (11)
Join Date: Mar 2006
Location: WINDSOR, CO
Posts: 4,098
Likes: 0
Received 12 Likes
on
12 Posts
Car: 91 Z28, 87 SC, 90 IROC, 92 RS
Engine: LS1, 305 TPI, L98, NADA
Transmission: T56, 700r4's, and NADA
Axle/Gears: 3.89, 3.42, 3.23, NADA
Re: New to this Section- First LS Swap
I think on that painted pulley, when the belt cuts up the finish on the paint, just strip it off from the face back, then call it good.
05-10-2016, 06:35 PM
#148
Supreme Member
iTrader: (24)
Join Date: Jun 2005
Location: NC
Posts: 7,890
Likes: 0
Received 59 Likes
on
43 Posts
Car: 92 Firebird
Engine: Supercharged 6.0
Transmission: T56
Axle/Gears: 8.8 3.73
Re: New to this Section- First LS Swap
Good job on the bushing. I had to extract a cast iron bushing installed backwards from an engine last year. The rounded over side would not let the little puller fingers grips so I had to get creative. Turns out a 1/2NPT tap starts nearly perfectly. Cut threads, screwed a 3" nipple in and welded a nut to the end. Slide hammer did the rest
I recommend taking the PP back off and setting the adjuster to zero using a press. First 1-200 miles will be super grippy as the adjuster finds a happy place. If the preset adjustment is too far out you risk having a slippy clutch from the start which cannot be changed without pulling the trans and resetting the adjustment
I recommend taking the PP back off and setting the adjuster to zero using a press. First 1-200 miles will be super grippy as the adjuster finds a happy place. If the preset adjustment is too far out you risk having a slippy clutch from the start which cannot be changed without pulling the trans and resetting the adjustment
05-11-2016, 08:12 AM
#149
Supreme Member
Thread Starter
iTrader: (1)
Join Date: Feb 2003
Location: Marietta, GA
Posts: 2,024
Likes: 0
Received 1 Like
on
1 Post
Car: 92 Z28
Engine: LS1
Transmission: T56
Axle/Gears: 3.73 10 bolt
Re: New to this Section- First LS Swap
Good job on the bushing. I had to extract a cast iron bushing installed backwards from an engine last year. The rounded over side would not let the little puller fingers grips so I had to get creative. Turns out a 1/2NPT tap starts nearly perfectly. Cut threads, screwed a 3" nipple in and welded a nut to the end. Slide hammer did the rest
I recommend taking the PP back off and setting the adjuster to zero using a press. First 1-200 miles will be super grippy as the adjuster finds a happy place. If the preset adjustment is too far out you risk having a slippy clutch from the start which cannot be changed without pulling the trans and resetting the adjustment
I recommend taking the PP back off and setting the adjuster to zero using a press. First 1-200 miles will be super grippy as the adjuster finds a happy place. If the preset adjustment is too far out you risk having a slippy clutch from the start which cannot be changed without pulling the trans and resetting the adjustment
I've read up on the LS7 clutch/pp a good bit. There seems to be a lot of conflicting info on the pressure plate adjustment. I measured to see if I needed a shim on the slave cylinder with this set up and in fact I did. Have you noticed the same, and did that effect the clutch starting out so low, which seems to be the main complaint? From what I've read on both sides of the argument it adjusts itself back out after a couple hundred miles, which is fine by me. I have to break in the engine and clutch at the same time, so not going to be going to crazy with the shifting anyways.
I picked up the Tick master as well so that will throw in another monkey wrench into getting it set up decent off the bat.
Just don't do what I did when I did my booth and not have any fans to help lol. I did plastic from the fenders/cowl/rad support to the ceiling and left the bottom open... yeah, with with a full on mask with filters, and sealed goggles I nearly killed myself from the fumes lol. The booth I built to paint the whole car worked a helluva lot better.
Looks fricking awesome, man! LOVE that color.
Looks fricking awesome, man! LOVE that color.
I have never been able to pull off goggles when painting, I always fog them up real quick and can't see anything. I probably need to get a full hood but I don't paint that often, getting clear off your eyelashes with paint thinner kinda hurts.
Thanks, I love the color too, it is probably the most commented about thing on the car. The picture I had when I went to look at the car was like a .5 megapixel and it looked army green. I was pleasantly surprised when we finally saw it, but that was a looong time ago.
Last edited by grngryoutmyway; 05-11-2016 at 08:26 AM.
05-11-2016, 09:54 AM
#150
Member
Join Date: Dec 2014
Location: Garland, TX
Posts: 431
Likes: 0
Received 1 Like
on
1 Post
Car: 2014 Z28 #80
Re: New to this Section- First LS Swap
Yeah, the booth I built when I did the whole car was a TON better. Didn't need goggles, but definitely kept the mask. Fumes were up and gone, and I made sure the positive pressure was always up. Nobody in the house could even tell I was painting.
I'll keep that in mind for future paint projects. My wife has decided she doesn't want a satin or matte paint job, which means I'll have to learn to clear, and the last thing I want to do is get knocked out while doing it. lol
I'll keep that in mind for future paint projects. My wife has decided she doesn't want a satin or matte paint job, which means I'll have to learn to clear, and the last thing I want to do is get knocked out while doing it. lol