Pulling apart my 87 IROC
 10-22-2009, 06:45 PM
#101
Senior Member

Join Date: Apr 2006
Location: CT
Posts: 685
Likes: 0
Received 0 Likes
on
0 Posts
Car: 1988 Iroc
Engine: 5.7L
Transmission: '96 T56, Hurst Shifter, Mech VSS
Axle/Gears: 3.45 9 Bolt
Re: Pulling apart my 87 IROC
Lovin the build.
Question, you responded to one of my threads on the leaky gas tank filler neck, what did you do to prepare the tank before you soldered the filler again so that you wouldn't blow yourself up from the fumes.
Question, you responded to one of my threads on the leaky gas tank filler neck, what did you do to prepare the tank before you soldered the filler again so that you wouldn't blow yourself up from the fumes.
 11-01-2009, 02:52 PM
#104
Re: Pulling apart my 87 IROC
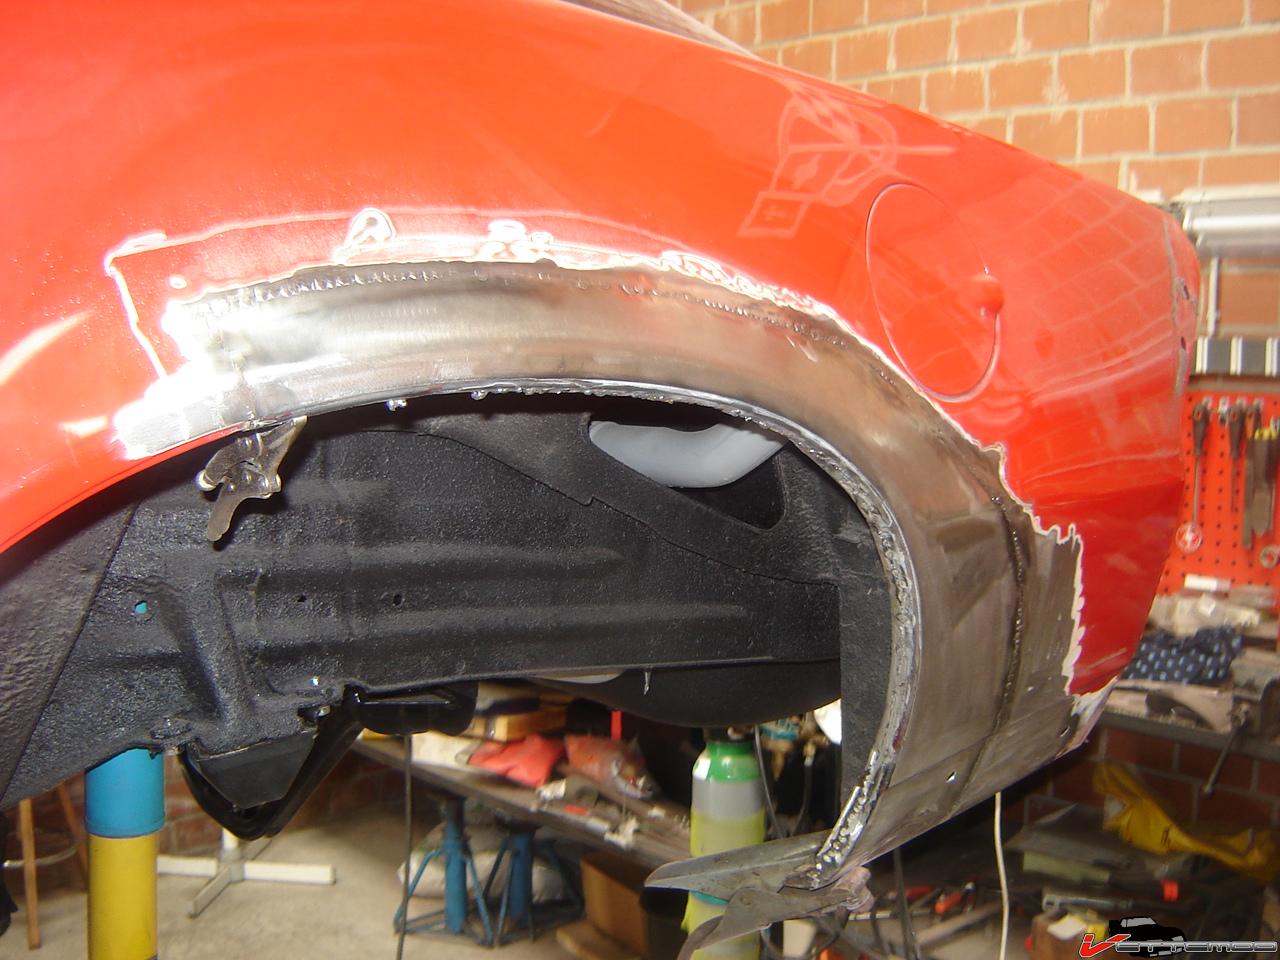
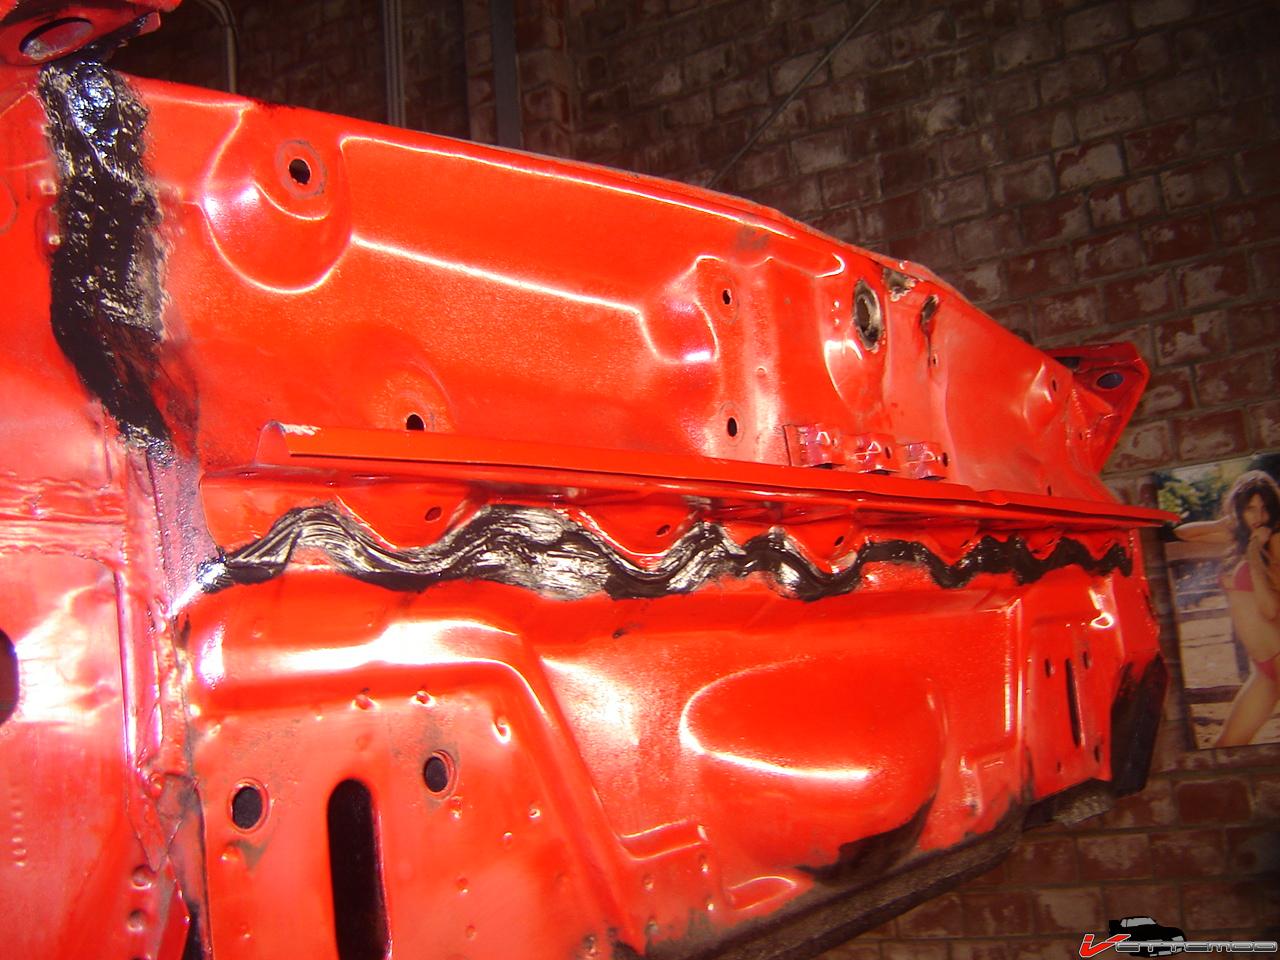
Fender as good as finished and did a mock up fit of the new manifold. Fender needs a little more grinding on the outside and some finish welding on the fender lip, the ugly weld blobs are from where zinc coating and other crap oozed out and pushed the molten weld pool out. Nothing a little grinding and some more welding can't fix. Still amazed at how these cars rust with all that zinc coating. The porous glue/sealer crap on the inside doesn't help here either.
Last edited by Twin_Turbo; 11-01-2009 at 06:55 PM.
11-01-2009, 06:11 PM
#105
Re: Pulling apart my 87 IROC
Had a little tear in the metal around the key hole...I wonder how it got there, very weird. Welded it up, ground it down.
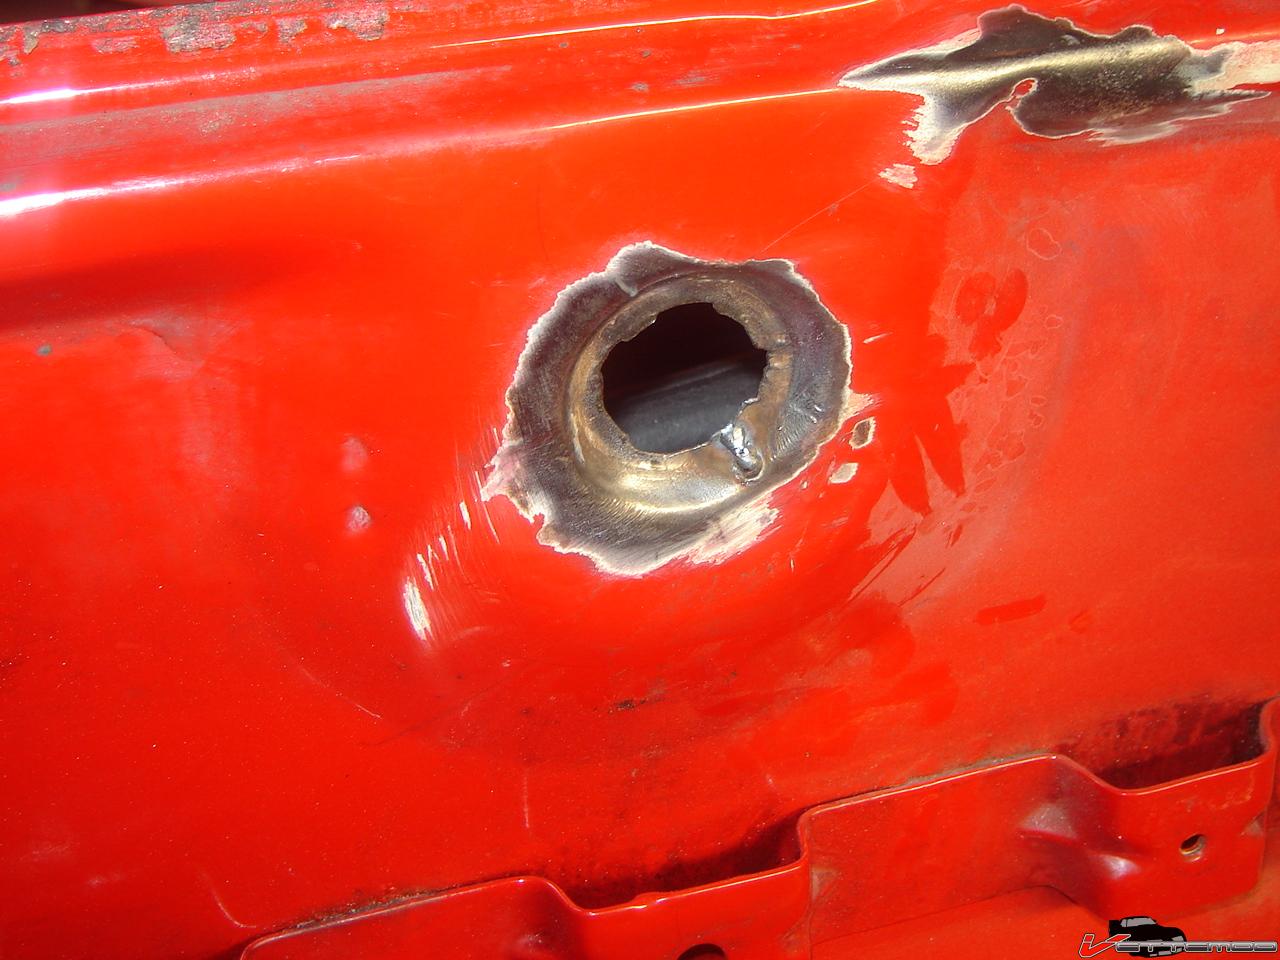
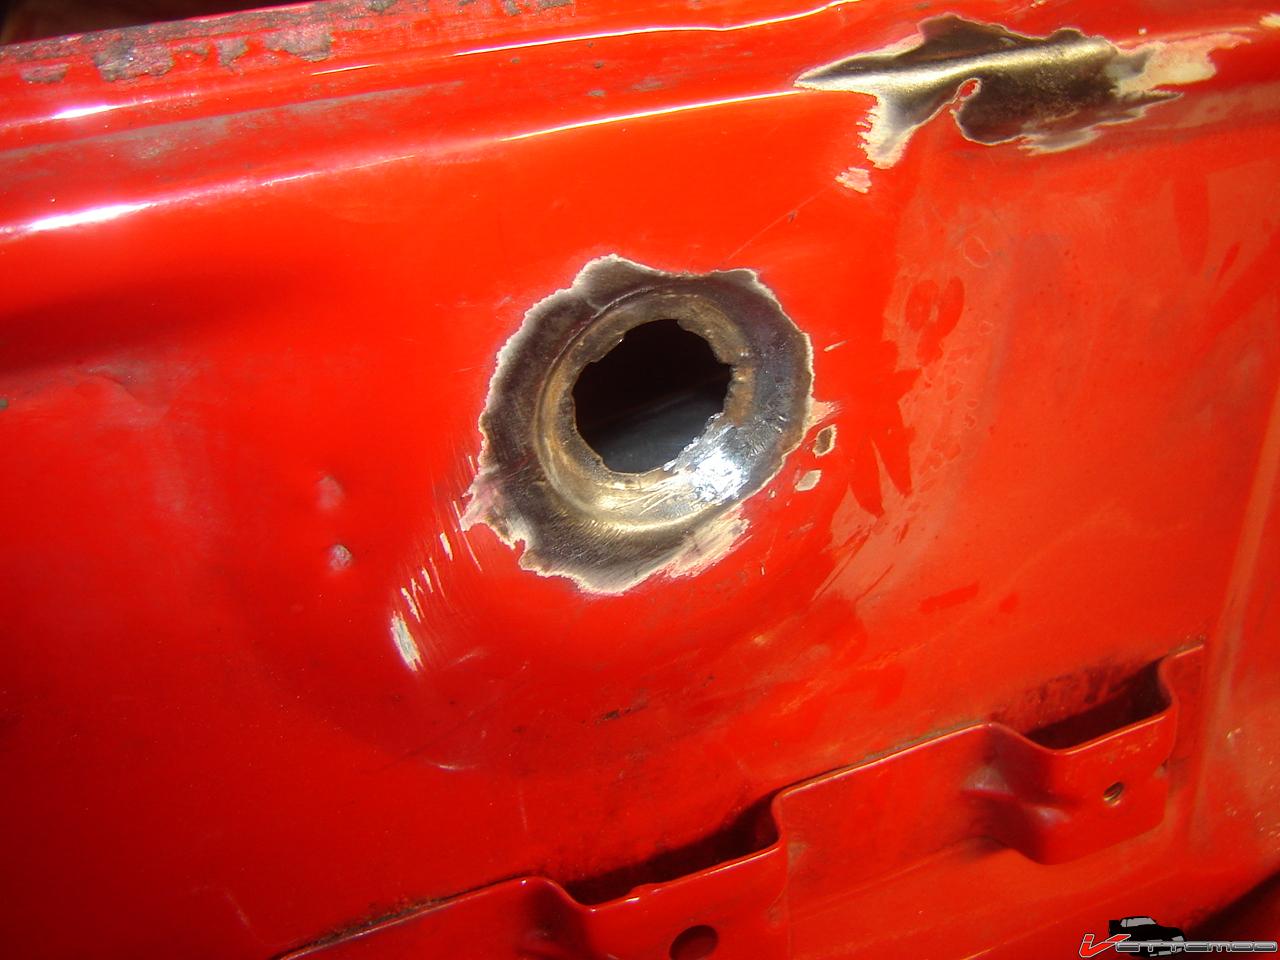
Found some more little rust spots under the flange on the bottom there, where the bumper goes over. All the rusty areas are again where the seam sealer is..it's the same crap over and over. Already fixed the seam where the quarter panel and rear panel are spot welded together.
Found some more little rust spots under the flange on the bottom there, where the bumper goes over. All the rusty areas are again where the seam sealer is..it's the same crap over and over. Already fixed the seam where the quarter panel and rear panel are spot welded together.
11-01-2009, 06:51 PM
#106
Senior Member
iTrader: (4)
Join Date: Nov 2007
Location: Mechanicsville Virginia
Posts: 715
Likes: 0
Received 0 Likes
on
0 Posts
Car: 1989 Turbo Trans Am gta
Engine: 383 78mm turbo
Transmission: Th350 rmvb with brake
Axle/Gears: 9 bolt 3.45s
Re: Pulling apart my 87 IROC
this is awsome, i like it. Subscribing.
11-01-2009, 06:54 PM
#107
Re: Pulling apart my 87 IROC
Completely missed this, I cleaned out the tank real good and let it stink out for a couple of days. Hook up exhaust to the tank and run it full w/ exhaust fumes for a couple of minutes works well also.
11-03-2009, 01:04 PM
#108
Member
Join Date: Apr 2006
Location: Bardstown, KY
Posts: 216
Likes: 0
Received 0 Likes
on
0 Posts
Car: 99 HOSS 6 Speed
Engine: LS1
Transmission: T56
Axle/Gears: 3.42
Re: Pulling apart my 87 IROC
Had a little tear in the metal around the key hole...I wonder how it got there, very weird. Welded it up, ground it down.
Found some more little rust spots under the flange on the bottom there, where the bumper goes over. All the rusty areas are again where the seam sealer is..it's the same crap over and over. Already fixed the seam where the quarter panel and rear panel are spot welded together.
Found some more little rust spots under the flange on the bottom there, where the bumper goes over. All the rusty areas are again where the seam sealer is..it's the same crap over and over. Already fixed the seam where the quarter panel and rear panel are spot welded together.
I feel your pain....I have ground most of the factory seam seal out of my car. And like you said that is usually where rust starts. Now the problem I am having is that I coated the underside of the car with Chassis Saver (similar to POR-15). Seam sealer will not stick to it! So, now i guess I have to grind the Chassis Saver out of the seams....
 11-03-2009, 01:19 PM
#109
Re: Pulling apart my 87 IROC
I don't use seam sealer, I use black polymer/sealer nowadays. It glues almost anything and it seals too. It vulcanizes to a nice semi hard durable rubber finish, not rock hard. I used it to repair ribber firewall plugs (where cables go through) and everything, used it to glue windshields, corvette firewall (fiberglass on steel) and what not. It's vastly superior to ordinary seam sealer. It's too runny and sometimes grainy and a messy job to brush on. This stuff can be used in an applicator gun and then smeared out with a spatula or your fingers. It sticks to the rubberized bedliner and POR15 too.
11-04-2009, 08:40 AM
#111
Member
Join Date: Apr 2006
Location: Bardstown, KY
Posts: 216
Likes: 0
Received 0 Likes
on
0 Posts
Car: 99 HOSS 6 Speed
Engine: LS1
Transmission: T56
Axle/Gears: 3.42
Re: Pulling apart my 87 IROC
I don't use seam sealer, I use black polymer/sealer nowadays. It glues almost anything and it seals too. It vulcanizes to a nice semi hard durable rubber finish, not rock hard. I used it to repair ribber firewall plugs (where cables go through) and everything, used it to glue windshields, corvette firewall (fiberglass on steel) and what not. It's vastly superior to ordinary seam sealer. It's too runny and sometimes grainy and a messy job to brush on. This stuff can be used in an applicator gun and then smeared out with a spatula or your fingers. It sticks to the rubberized bedliner and POR15 too.
Do you have a brand name or can you let me know where I can get some?
Thanks
11-04-2009, 02:08 PM
#113
Supreme Member
Re: Pulling apart my 87 IROC
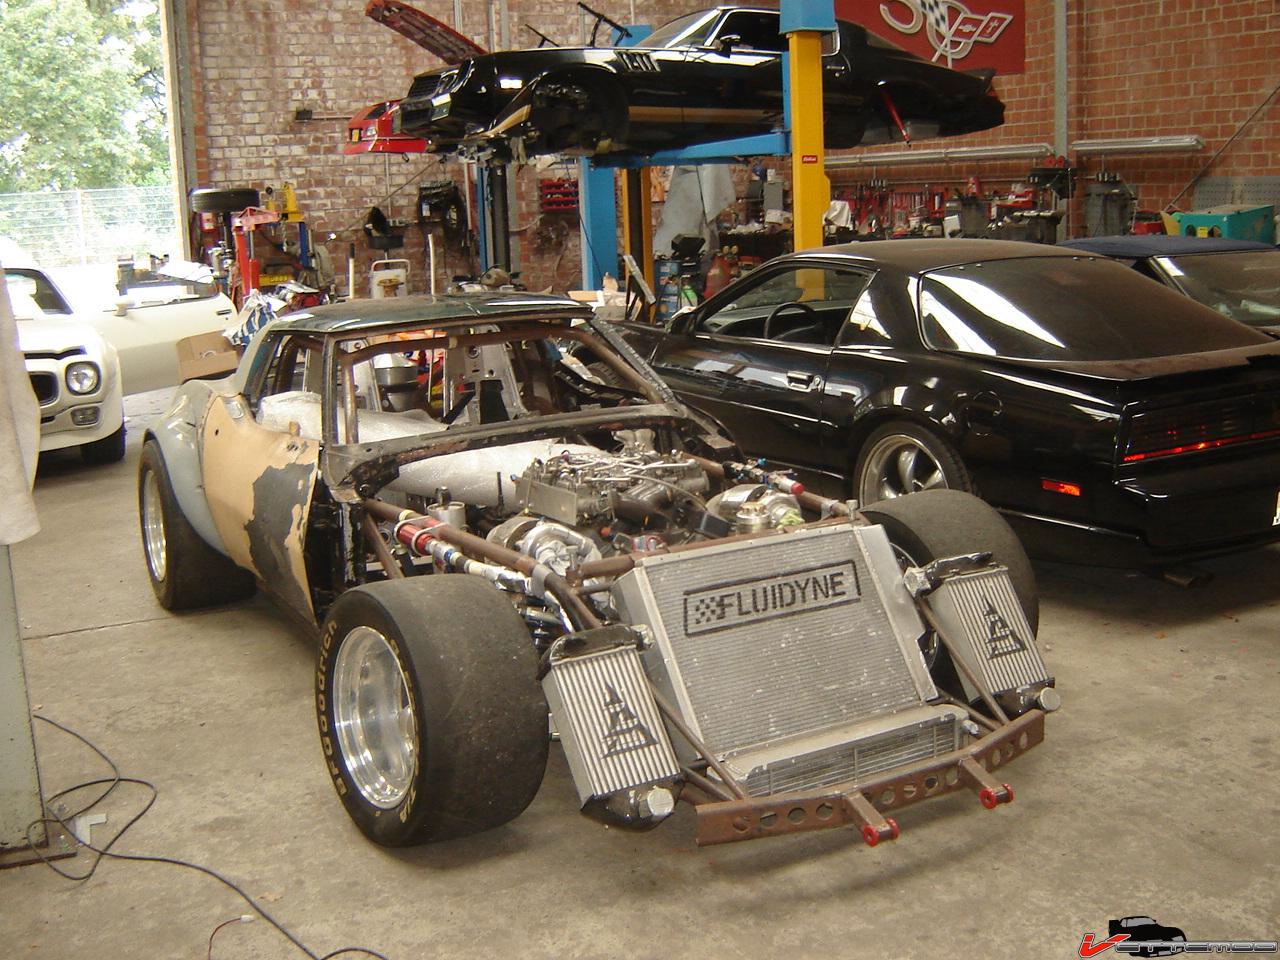
twin turbo awesome work, I'm very jealous of your garage!
Can you give us a link where we can see a little more about your corvette? that thing looks insane! is that what your signiture pic is?
Can you give us a link where we can see a little more about your corvette? that thing looks insane! is that what your signiture pic is?
11-04-2009, 02:17 PM
#114
Re: Pulling apart my 87 IROC
Yes, that's the car in the sig.
Go here: http://members.home.nl/m.b.p.jongman
There's some pics here in the fab section in the show your custom fab thread
Go here: http://members.home.nl/m.b.p.jongman
There's some pics here in the fab section in the show your custom fab thread

 11-04-2009, 07:49 PM
#116
Re: Pulling apart my 87 IROC
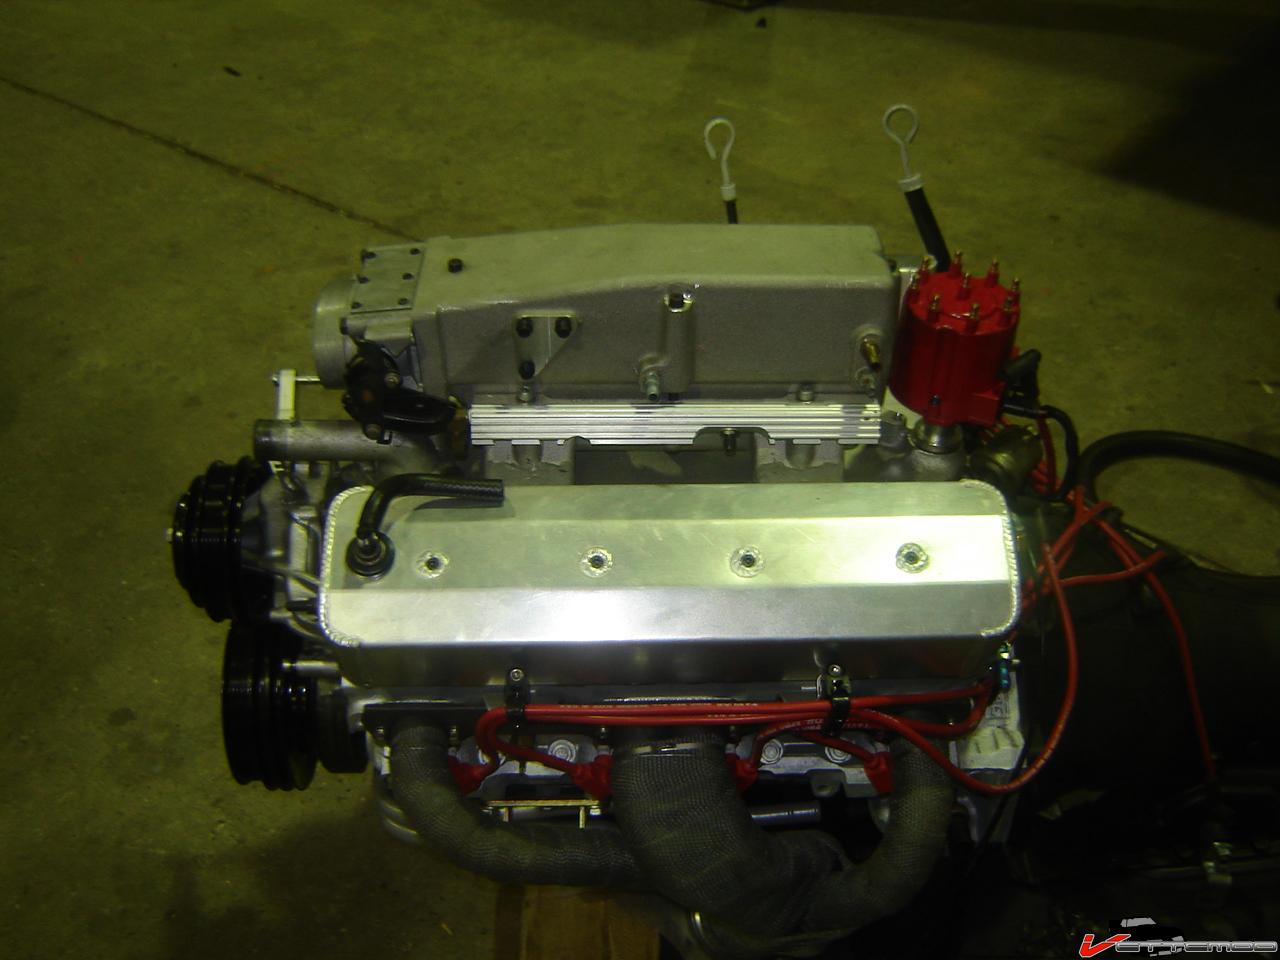
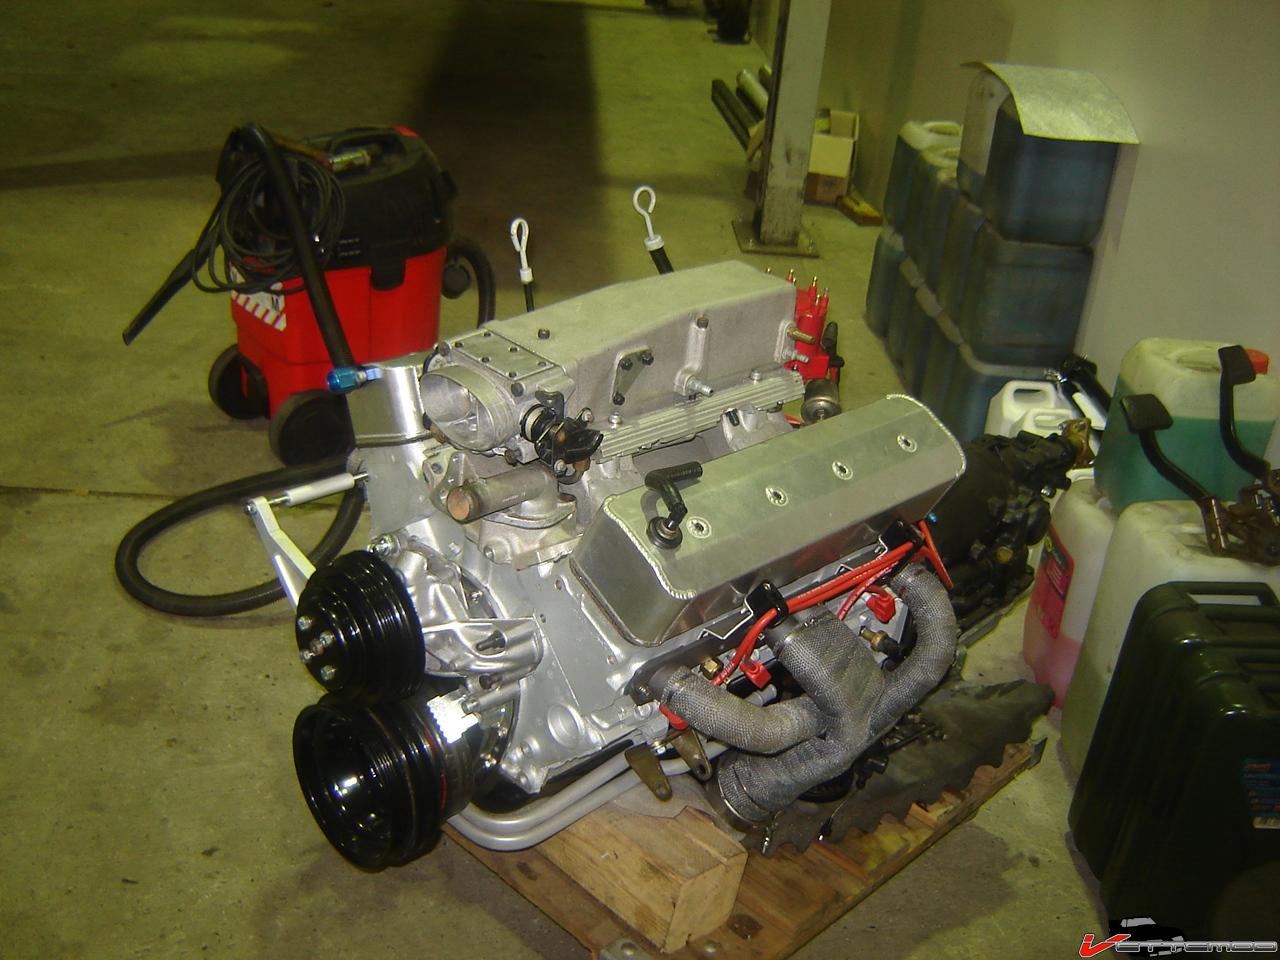
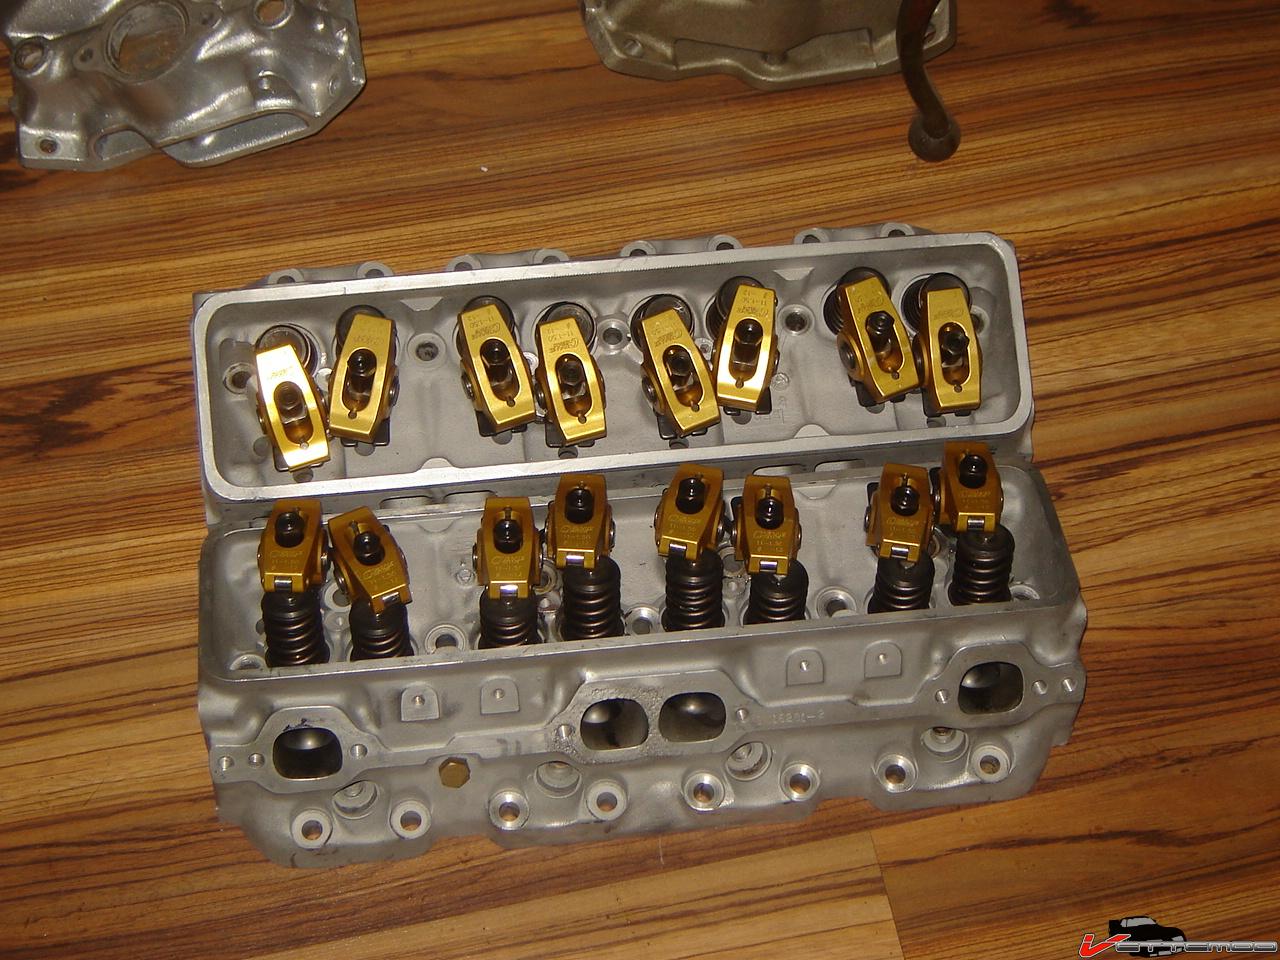
The wire looms are actually for perimeter bolt covers, they have an allen screw that replaces the bolts for the covers. They are Taylor brand. Taylor also has aluminum brackets that can be used on heads with mounting holes for heat shielding on the side. They do need a bit of trimming to fit though. I also needed to notch the header flanges to clear the bolts that hold the brackets to the head.
Here's a pic of them on a perimeter bolt cover and a pic of the alu brackets:
They are taylor part numbers:
TAY-42502
TAY-42600
Here's a pic of them on a perimeter bolt cover and a pic of the alu brackets:
They are taylor part numbers:
TAY-42502
TAY-42600
11-04-2009, 09:12 PM
#117
Senior Member
iTrader: (4)
Join Date: Nov 2007
Location: Mechanicsville Virginia
Posts: 715
Likes: 0
Received 0 Likes
on
0 Posts
Car: 1989 Turbo Trans Am gta
Engine: 383 78mm turbo
Transmission: Th350 rmvb with brake
Axle/Gears: 9 bolt 3.45s
Re: Pulling apart my 87 IROC
ohhh thank you for the part numbers and the info. I was misled by the center holes on the valve covers. those spark plug wires separators look great on the engine. When is the engine going in the car?
11-05-2009, 04:28 AM
#118
Re: Pulling apart my 87 IROC
Hopefully this or next week but waiting on Summit parts and having it out makes me wonder if I don't need to cam it up and swap on some TFS heads. Problem si, for the heads I'll need special rockers and pushrods and living here makes waiting on parts a nightmare.
11-05-2009, 05:38 AM
#119
Junior Member
Join Date: Mar 2008
Location: Palmdale, CA
Posts: 56
Likes: 0
Received 0 Likes
on
0 Posts
Car: 1984 Z28 Camaro
Engine: 305 -> 383 Stroker
Transmission: T5 -> T56
Axle/Gears: 3.73 Posi
 11-08-2009, 03:03 AM
#121
Re: Pulling apart my 87 IROC
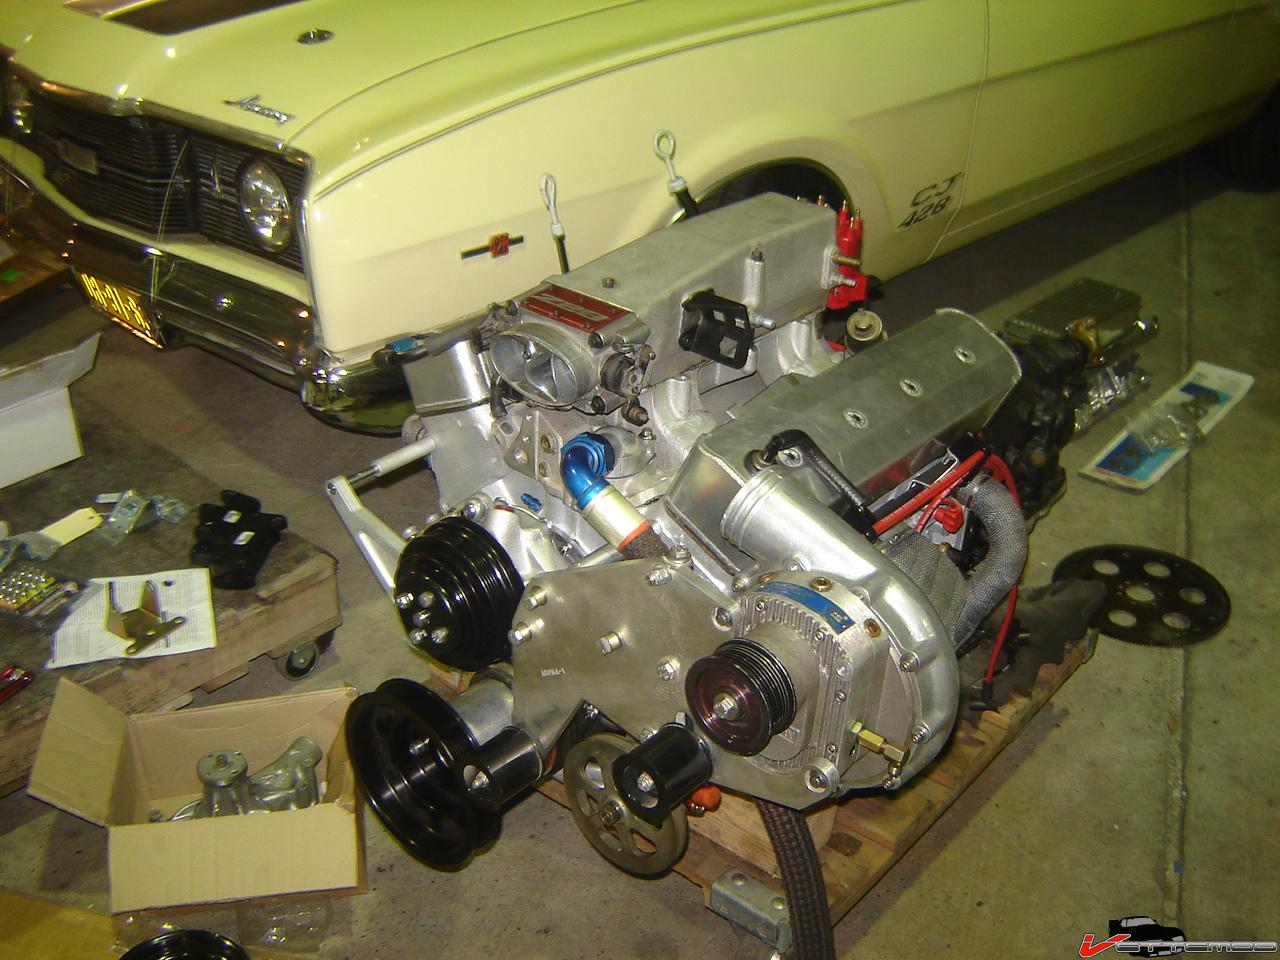
Fiddled some more with the supercharger. Got the brand new bracket in that I bought here, nice to have the bolts and the spacers instead of having to come up with that myself. The bolts were actually too long, I suspect there's a piece of the serpentine (88+) brackets up against the head that makes for this difference. Didn't check against all the stuff from the 92 GTA to compare to (it's in a box..didn't feel like digging through it LOL) So I used a couple of little spacers, the blower sits a bit further back this way. One of 2 things will happen, it will fit like this and I have to mill down the drive arbord for the drive pulley or I'll have to shim it up against the head, I'll probably do that so I can fab a 1/2" thick bracket that bolts to the 3rd head bolt mount hole and these 2 long bolts for the blower bracket and weld on a threaded boss that the shorter bolt on the bracket goes through. This one goes into something that I don't have either, something off that serpentine system..possibly the alternator?? The el cheapo air filter has got to go..that thing screams *****. I've got some big K&N cone style ones that I'll use.
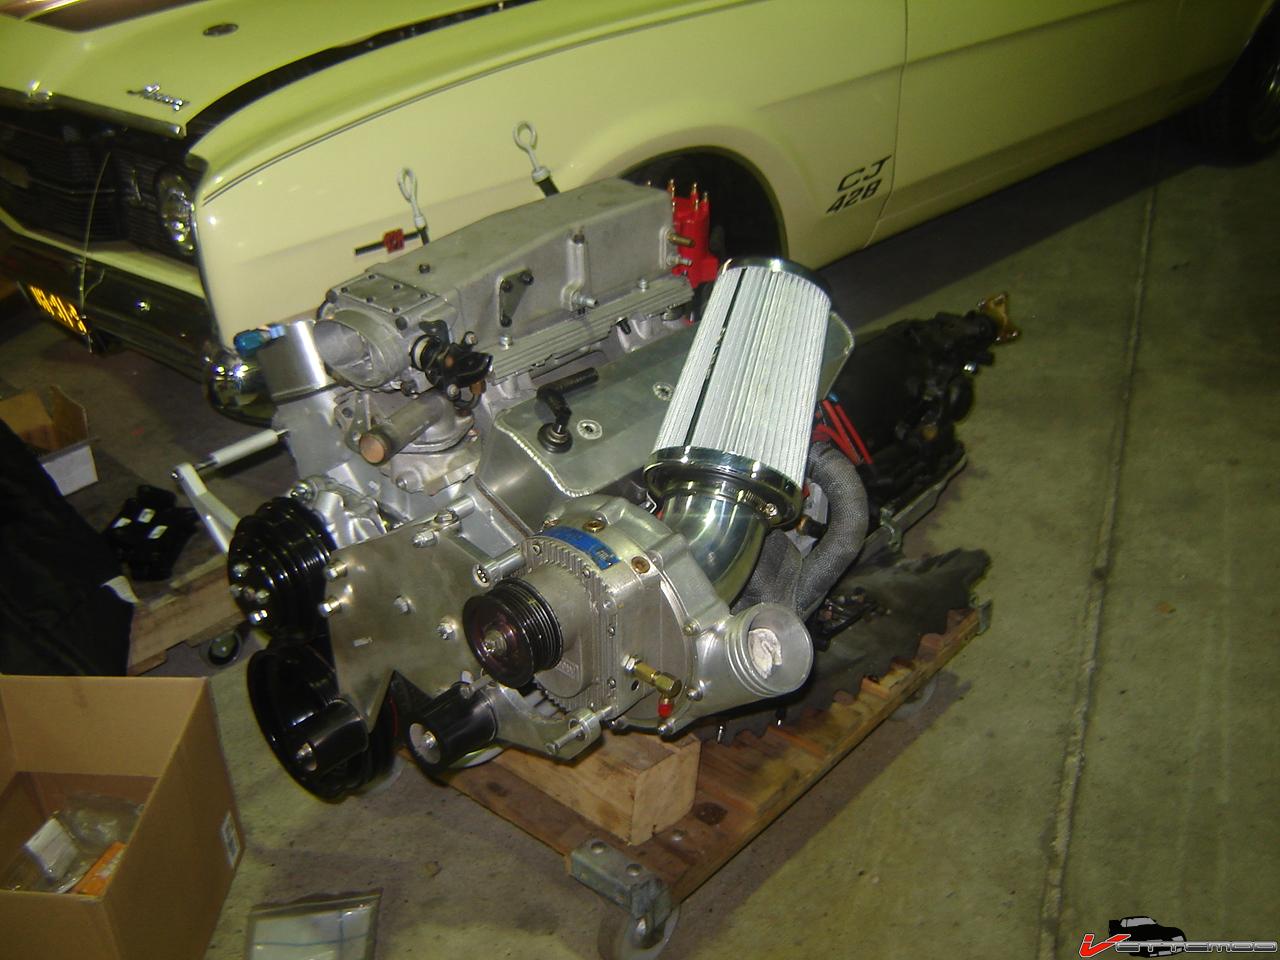
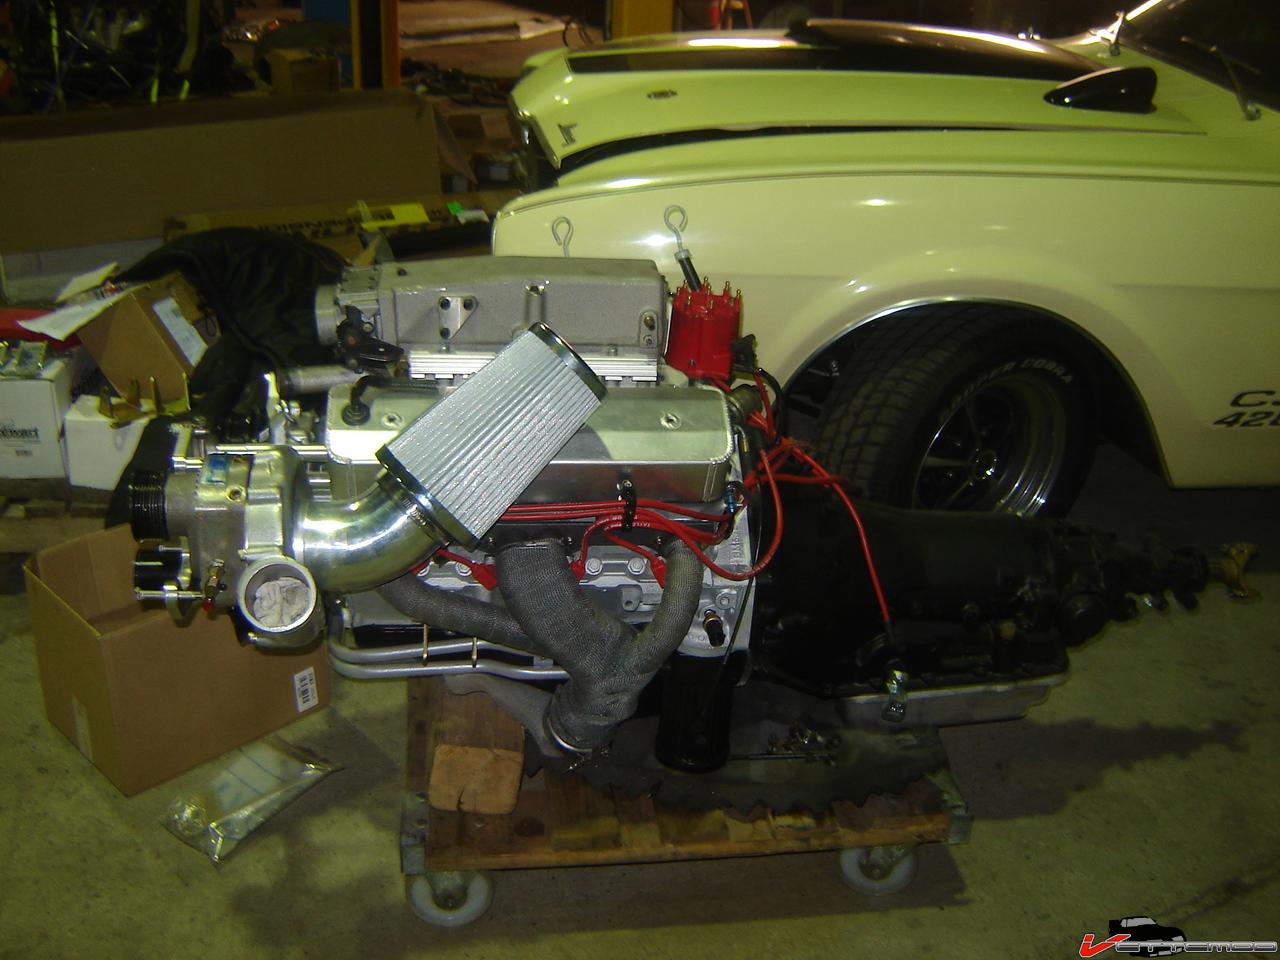
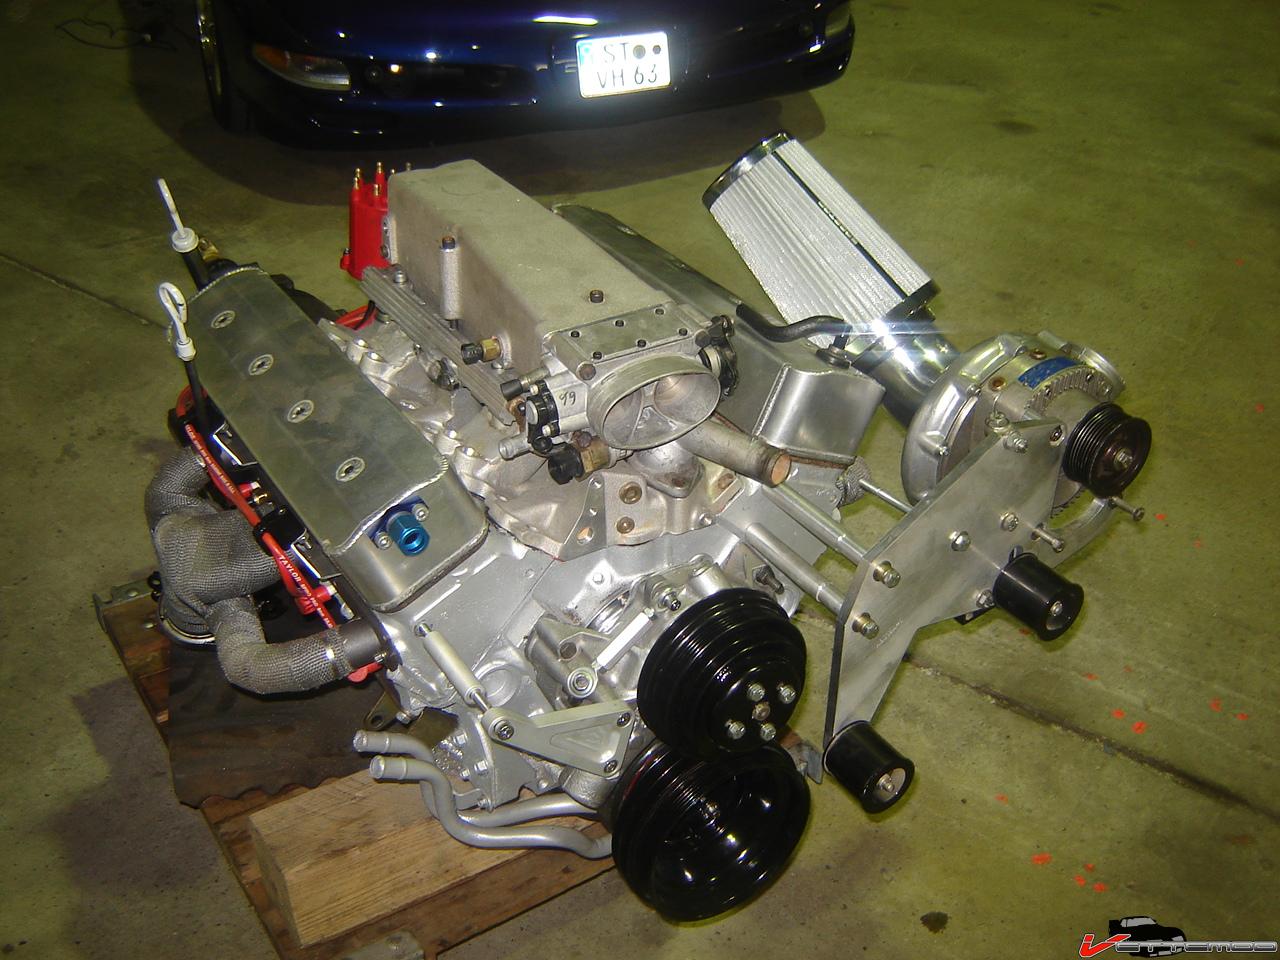
oh and I got this neat billet CV products timing pointer
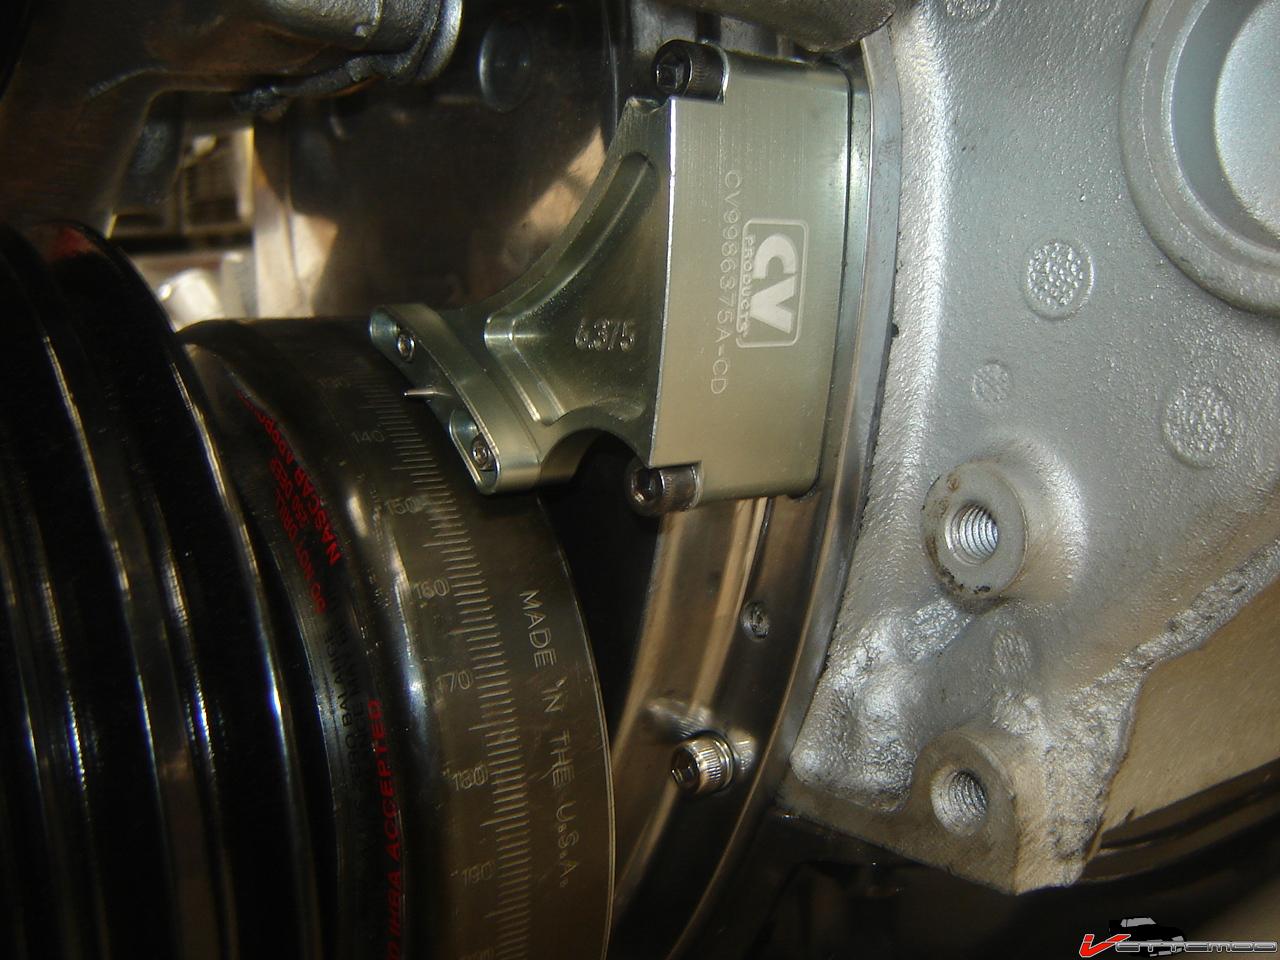
oh and I got this neat billet CV products timing pointer
Last edited by Twin_Turbo; 11-08-2009 at 05:39 PM.
11-09-2009, 07:56 AM
#122
Member

Join Date: Mar 2005
Location: cleveland
Posts: 155
Likes: 0
Received 0 Likes
on
0 Posts
Car: 92 camaro z28
Re: Pulling apart my 87 IROC
This build is great. Just one question....why did you decide to keep the a-arms and the other front end pieces white/grey color?
11-09-2009, 08:10 AM
#123
Re: Pulling apart my 87 IROC
Why grey? Because it's different...black becomes boring after having it done a couple of times. This is sort of like a race car scheme where they paint everything light/medium grey.
I'm not following what you mean with "keep them grey" they were powdercoated grey on purpose
I'm not following what you mean with "keep them grey" they were powdercoated grey on purpose
11-10-2009, 09:21 AM
#124
Member
Join Date: Oct 2009
Location: Phoenix Az
Posts: 105
Likes: 0
Received 0 Likes
on
0 Posts
Car: Trans Am
Engine: V8 350 TPI
Transmission: Auto
Re: Pulling apart my 87 IROC
wow!!
just went through everything..great work man i wait to see this finished work!!
subscribing!
just went through everything..great work man i wait to see this finished work!!
subscribing!
11-11-2009, 03:50 PM
#125
Re: Pulling apart my 87 IROC
Well, fixed the rust under the seams on the rear, I welded it all back up, used rust converter epoxy (combo stuff) on the steel and then sealed it all off with sealer, also sealed the upper part of that long bumper flange where the water collects. This isn't going to rust anymore.

11-22-2009, 04:36 PM
#126
Re: Pulling apart my 87 IROC
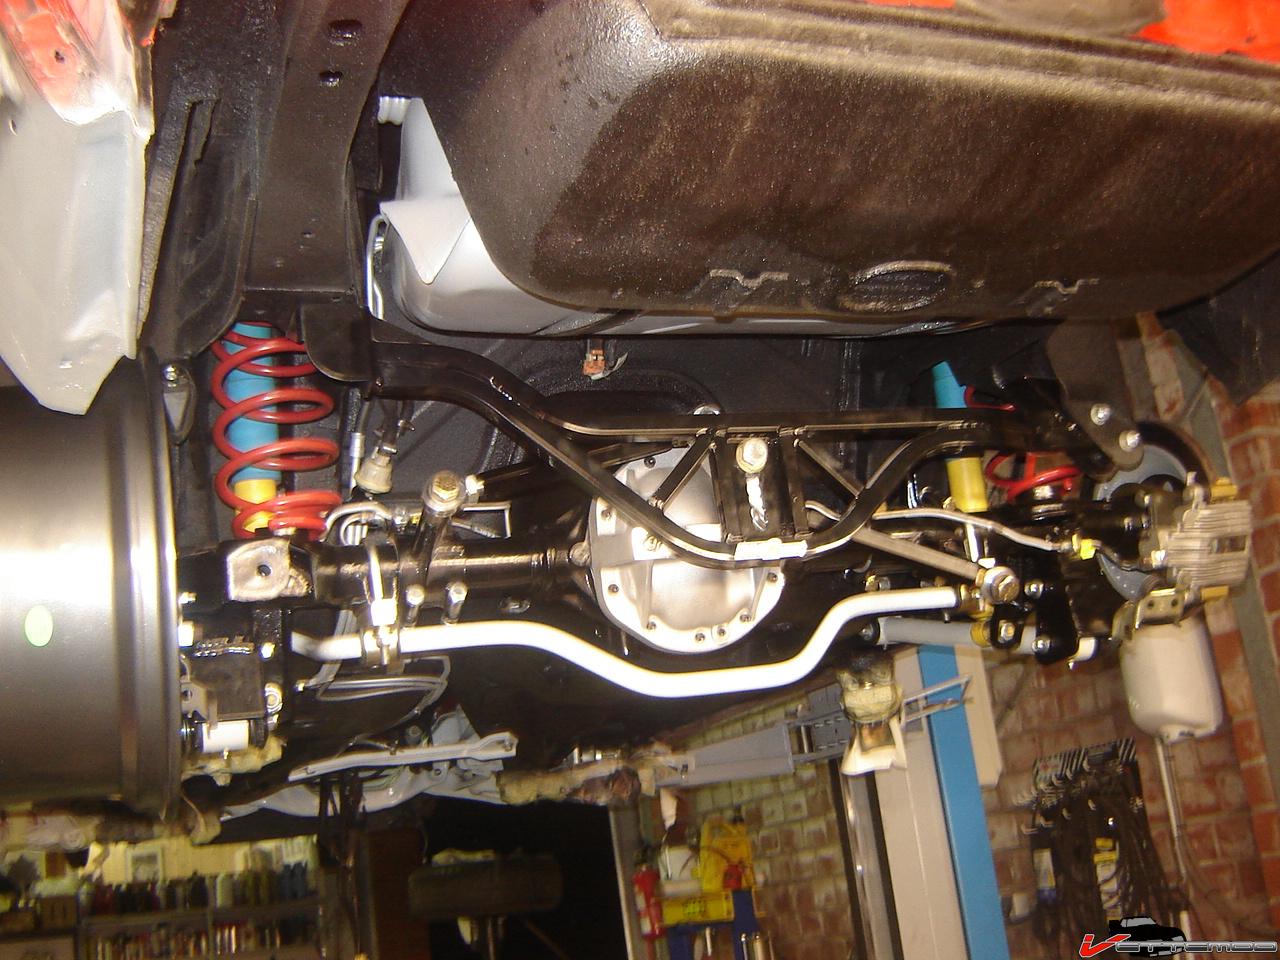
Finally had some time to do something constructive... I got the rear axle in, another big hurdle crossed. Posi all shimmed up nice and tight.
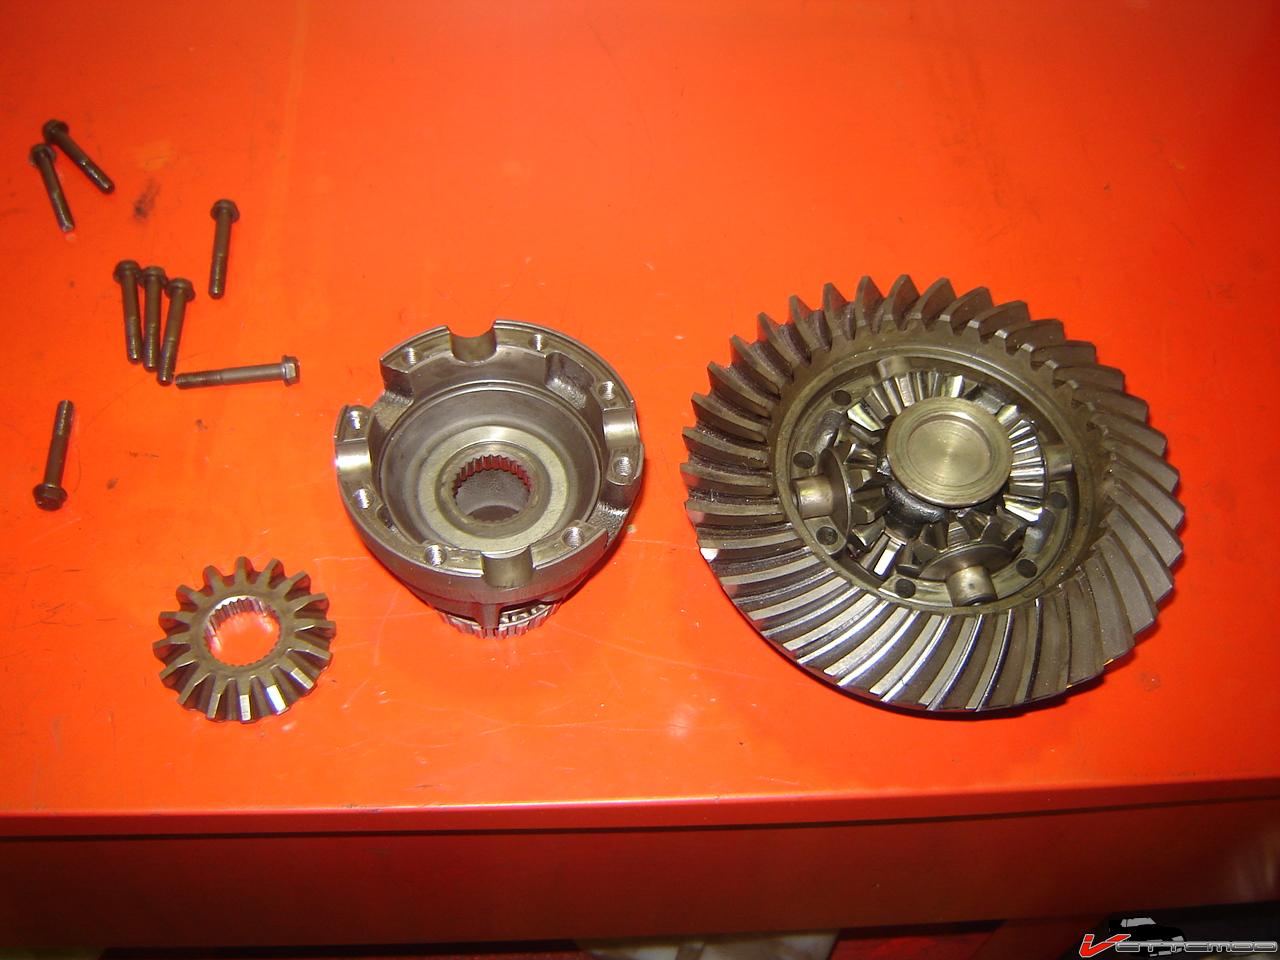
Since the watts linkage required plugging off the tube vent I relocated it here, replaced it with an aluminum NPT threaded piece instead.
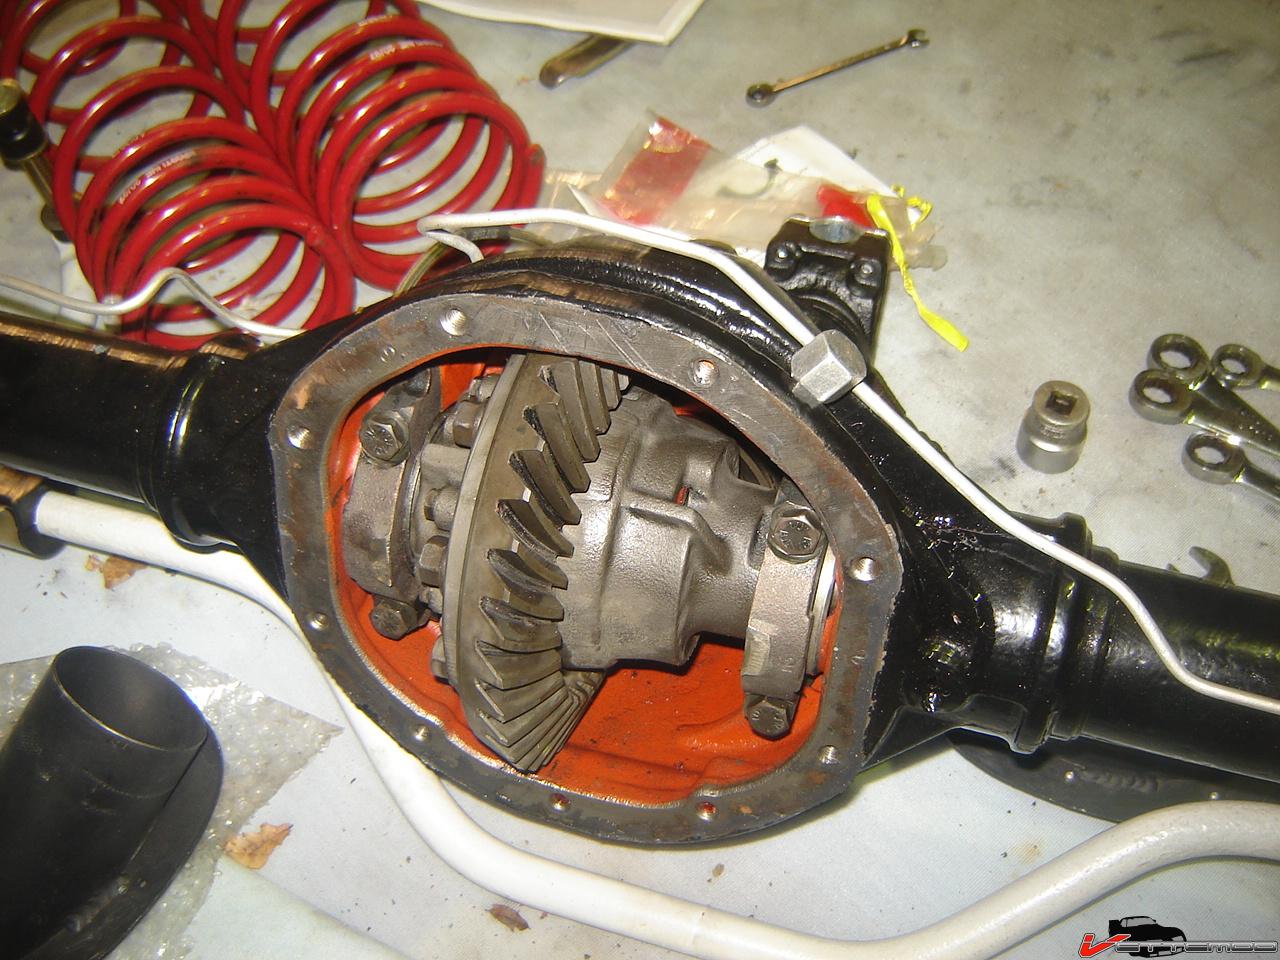
Since the watts linkage required plugging off the tube vent I relocated it here, replaced it with an aluminum NPT threaded piece instead.
Last edited by Twin_Turbo; 11-22-2009 at 04:39 PM.
 11-23-2009, 12:04 PM
#128
Member
Join Date: Apr 2006
Location: Bardstown, KY
Posts: 216
Likes: 0
Received 0 Likes
on
0 Posts
Car: 99 HOSS 6 Speed
Engine: LS1
Transmission: T56
Axle/Gears: 3.42
Re: Pulling apart my 87 IROC
Looks like you are getting close.....I am taking a few steps back on my car. I am getting ready to sand blast all the Chassis Saver off the bottom of the car. Then just spray with some Epoxy Prmer, then my bed liner like you did. I bought the Upol kit.
11-23-2009, 09:31 PM
#129
Supreme Member
Join Date: Sep 2009
Location: Tigard, OR
Posts: 1,319
Likes: 0
Received 0 Likes
on
0 Posts
Car: 87 iroc-z camaro
Engine: 305TPI
Transmission: 700R4
Axle/Gears: G92 3.23 posi
Re: Pulling apart my 87 IROC
....
Last edited by iroc stangs; 11-23-2009 at 09:39 PM.
11-23-2009, 09:37 PM
#130
Supreme Member
Join Date: Sep 2009
Location: Tigard, OR
Posts: 1,319
Likes: 0
Received 0 Likes
on
0 Posts
Car: 87 iroc-z camaro
Engine: 305TPI
Transmission: 700R4
Axle/Gears: G92 3.23 posi
Re: Pulling apart my 87 IROC
wow man i read through the whole thing and man YOU HAVE DONE A KILLER JOB! wow everything looks great and your doing this hell quick to but still very nice! i like the underbody and i also hate sticky, rusty crap i always like to get what i can off even if its somewhere where someone wont look. and i gotta give ya kudos for doing this by your self and not just taking it to a resto place and saying what you want done you actualy are doing this buy your self and not trying to sound rude but i know you got money to! just look at that garage and those cars hell i would love to have all that all i have is a used old tool box and some ratches, wrenches, screwdrivers and a jack not much for me lol. but hell of a nice job though and i cant wait tell its finished. how much longer do you think it'll be? and those m6 rims dont look to dang bad they go nice. haha its gonna be funny when the others aint gonna be laughin at you anymore when your done! great job though.
11-26-2009, 04:13 PM
#131
Re: Pulling apart my 87 IROC
more problems with new parts that really aren't needed but should be cool to have...damned summit radiator doesn't fit right, needs custom sheet aluminum bracket to mount and also some cutting and welding on the side tank.
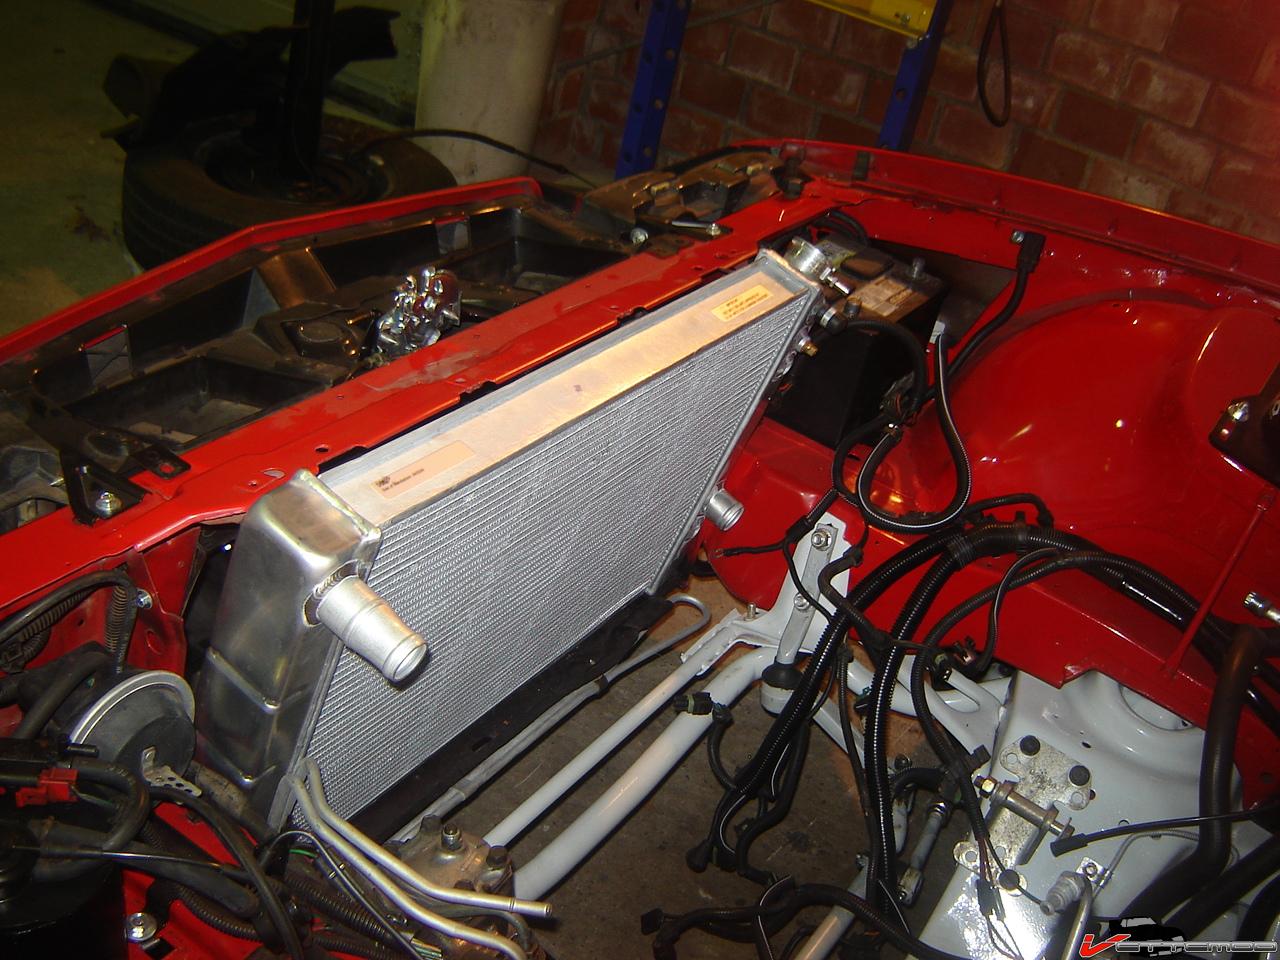

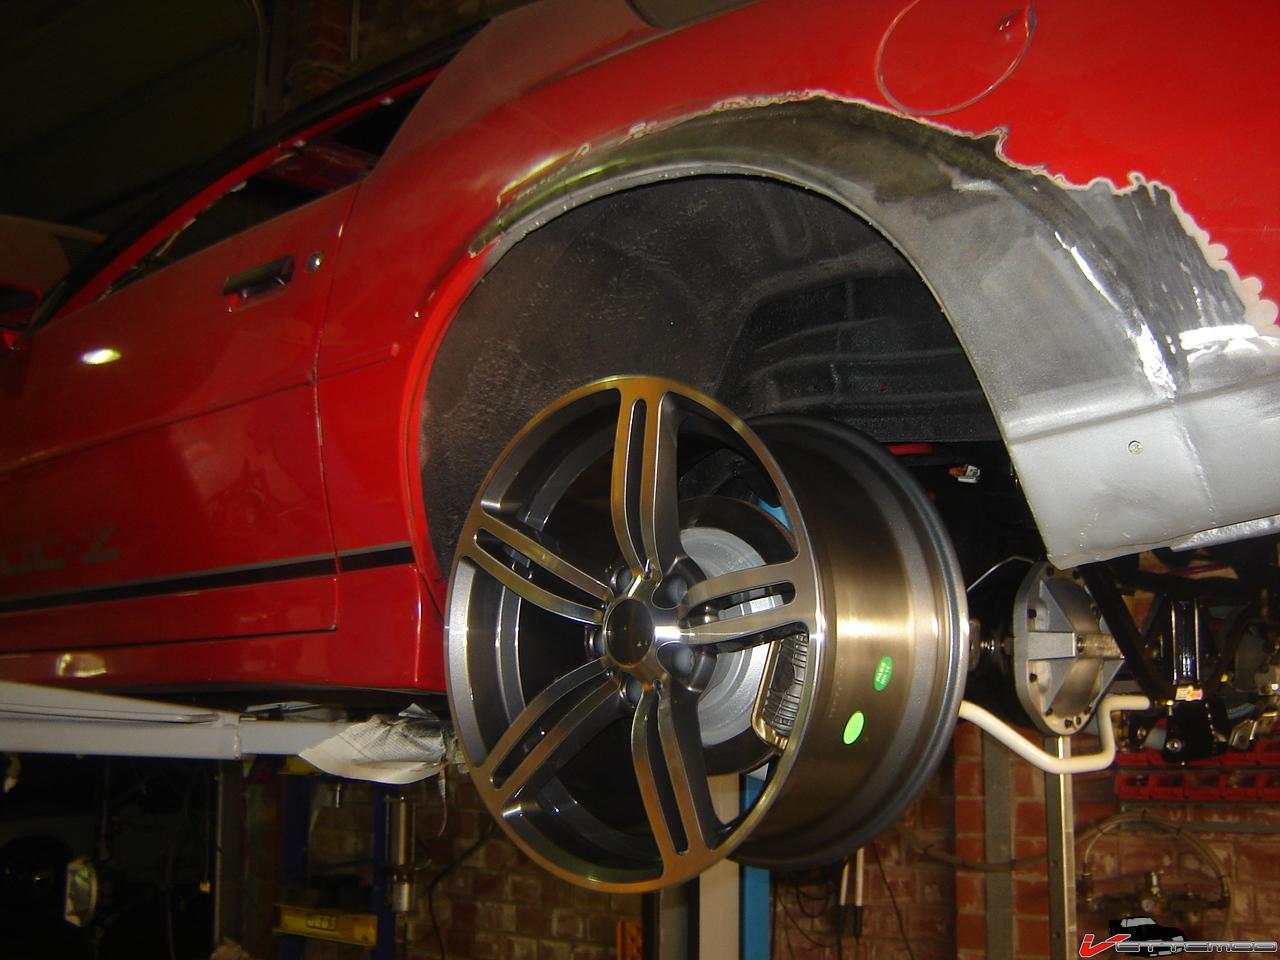
but the car is back on the ground, still sitting a little high due to no weight on it (engine and tranny not in car) Got the fender done finally,...all it needs is a little filler.

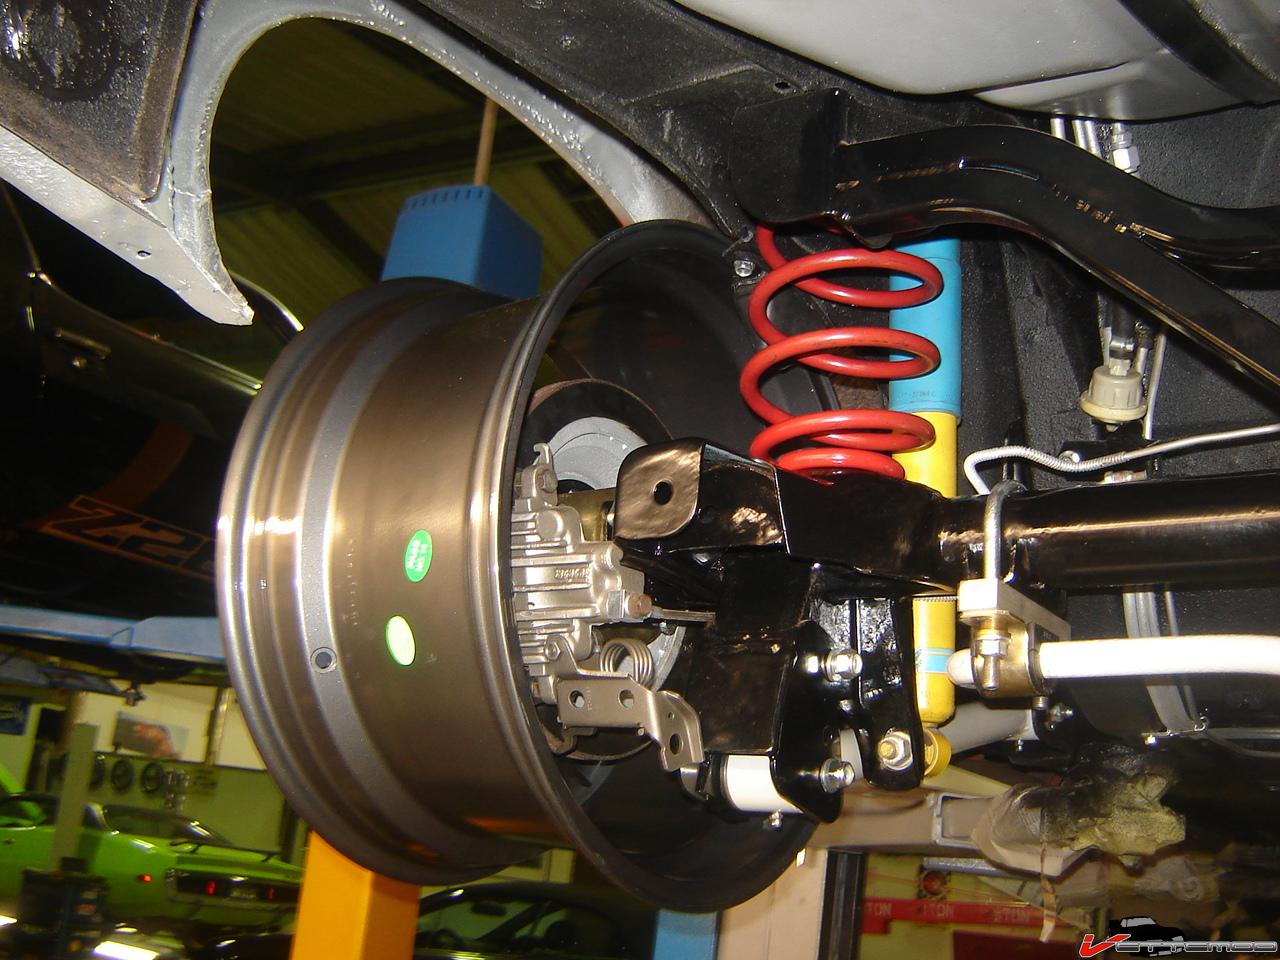
Fays 2 looking nice from the rear
but the car is back on the ground, still sitting a little high due to no weight on it (engine and tranny not in car) Got the fender done finally,...all it needs is a little filler.
Fays 2 looking nice from the rear
11-27-2009, 07:37 AM
#132
Member
Join Date: Apr 2006
Location: Bardstown, KY
Posts: 216
Likes: 0
Received 0 Likes
on
0 Posts
Car: 99 HOSS 6 Speed
Engine: LS1
Transmission: T56
Axle/Gears: 3.42
Re: Pulling apart my 87 IROC
That sucks about the radiator. Where is it hitting? I am asking because my original is toast (plastic tanks are busted) and I need a new one. I was going to go with an aluminum one as well.
11-27-2009, 08:47 AM
#133
Re: Pulling apart my 87 IROC
It doesn't hit if you don't mind it sitting slightly off center, I however hate that and will probably thin the section that sits next to the steering box like the stock radiator has.
If you don't mind how it looks you can just throw it in there with some foam underneath it and mcguyver some top mounts but for a rad advertised as drop in replacement this blows green donkey D's. Now I need new fans too because there's no way in hell I'm gonna ghetto rig the stock dual fan setup in there
If you don't mind how it looks you can just throw it in there with some foam underneath it and mcguyver some top mounts but for a rad advertised as drop in replacement this blows green donkey D's. Now I need new fans too because there's no way in hell I'm gonna ghetto rig the stock dual fan setup in there
Last edited by Twin_Turbo; 11-27-2009 at 08:56 AM.
11-28-2009, 09:53 AM
#134
Re: Pulling apart my 87 IROC
Car is looking AWESOME Twin... Really moving along too.
Im really excited to hear how you like that Watts link...Ive given serious consideration to switching over to that style of set up. Gotta hear more reviews first.
Keep up the good work!
J.
Im really excited to hear how you like that Watts link...Ive given serious consideration to switching over to that style of set up. Gotta hear more reviews first.
Keep up the good work!
J.
11-29-2009, 04:23 PM
#135
Re: Pulling apart my 87 IROC
I added a factory fuse holder and relay to power the additional booster fuel pump. I like stuff to look factory and hate crappy wiring and lack of detail
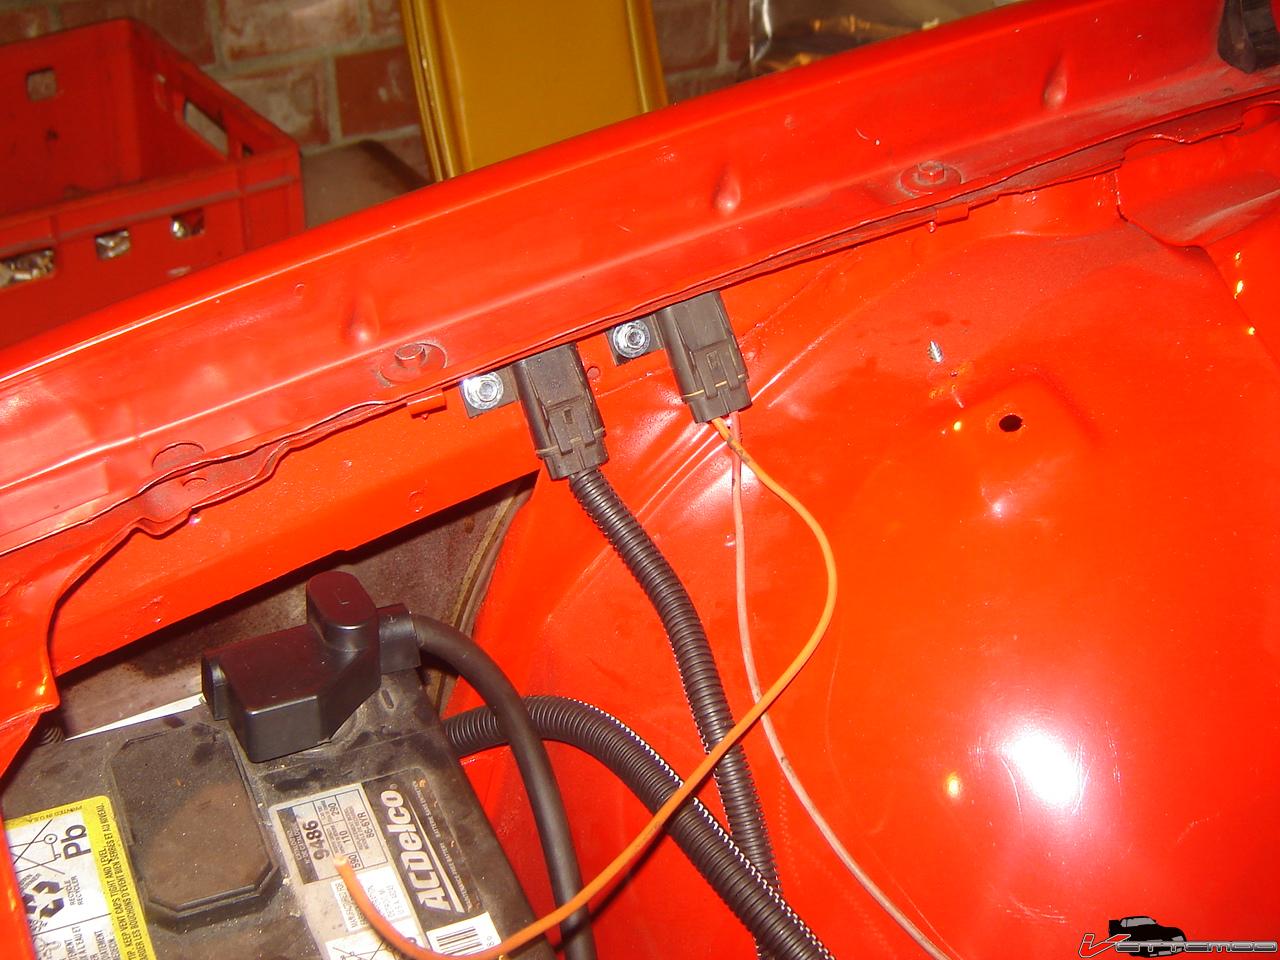
I positioned the relay like this so I could use a hole that was already drilled there by someone who installed a remote washer pump, probably unaware that you can simply swap out the ones in the wiper motor. Even wired it off the original prongs inside the wiper motor (pump was missing)
I also clocked the compressor differently, I don't want to route the pipes through the sides of the battery tray and opposite side, going totally custom. Thinking about machining the drive mandrel for grooves like a serpentine pulley and drive stuff straight from it using a 5" water pump pulley and a smaller alternator pulley.
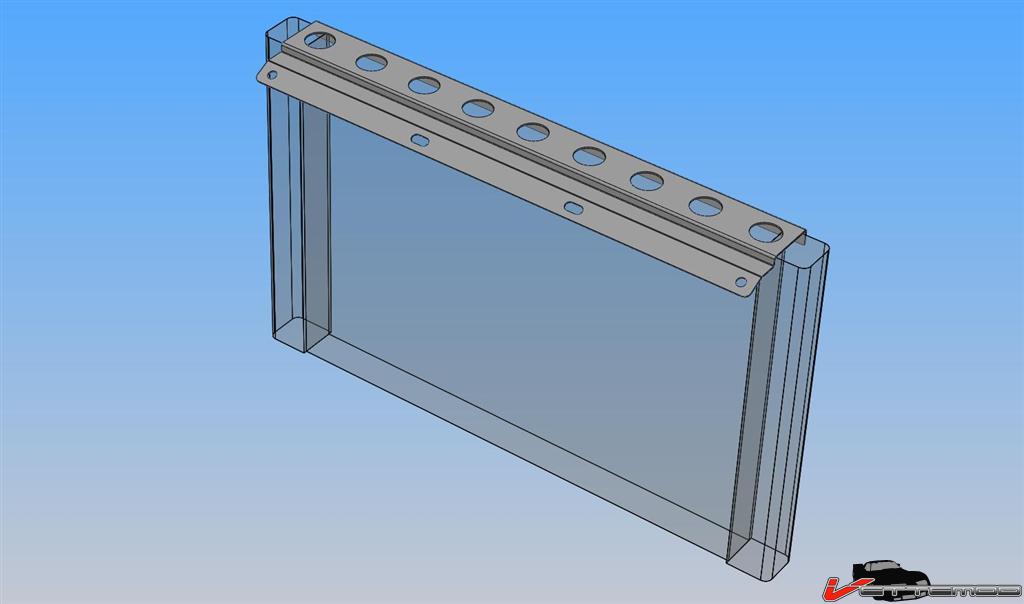
Also designed a rad upper mount, hopefully I'll have that done soon. The holes will be dimple died (.75" die) I'll share the model w/ anyone who wants it after I am done with it and can confirm it's 100% accurate and fits.
I positioned the relay like this so I could use a hole that was already drilled there by someone who installed a remote washer pump, probably unaware that you can simply swap out the ones in the wiper motor. Even wired it off the original prongs inside the wiper motor (pump was missing)
I also clocked the compressor differently, I don't want to route the pipes through the sides of the battery tray and opposite side, going totally custom. Thinking about machining the drive mandrel for grooves like a serpentine pulley and drive stuff straight from it using a 5" water pump pulley and a smaller alternator pulley.
Also designed a rad upper mount, hopefully I'll have that done soon. The holes will be dimple died (.75" die) I'll share the model w/ anyone who wants it after I am done with it and can confirm it's 100% accurate and fits.
Last edited by Twin_Turbo; 11-29-2009 at 05:22 PM.
11-29-2009, 05:42 PM
#136
Member
iTrader: (2)
Join Date: Jul 2008
Location: near chicago illinois
Posts: 475
Likes: 0
Received 0 Likes
on
0 Posts
Car: have a 92 camaro rs...in pieces
Engine: none now...probably 383 stroker
Transmission: none yet
Axle/Gears: none
Re: Pulling apart my 87 IROC
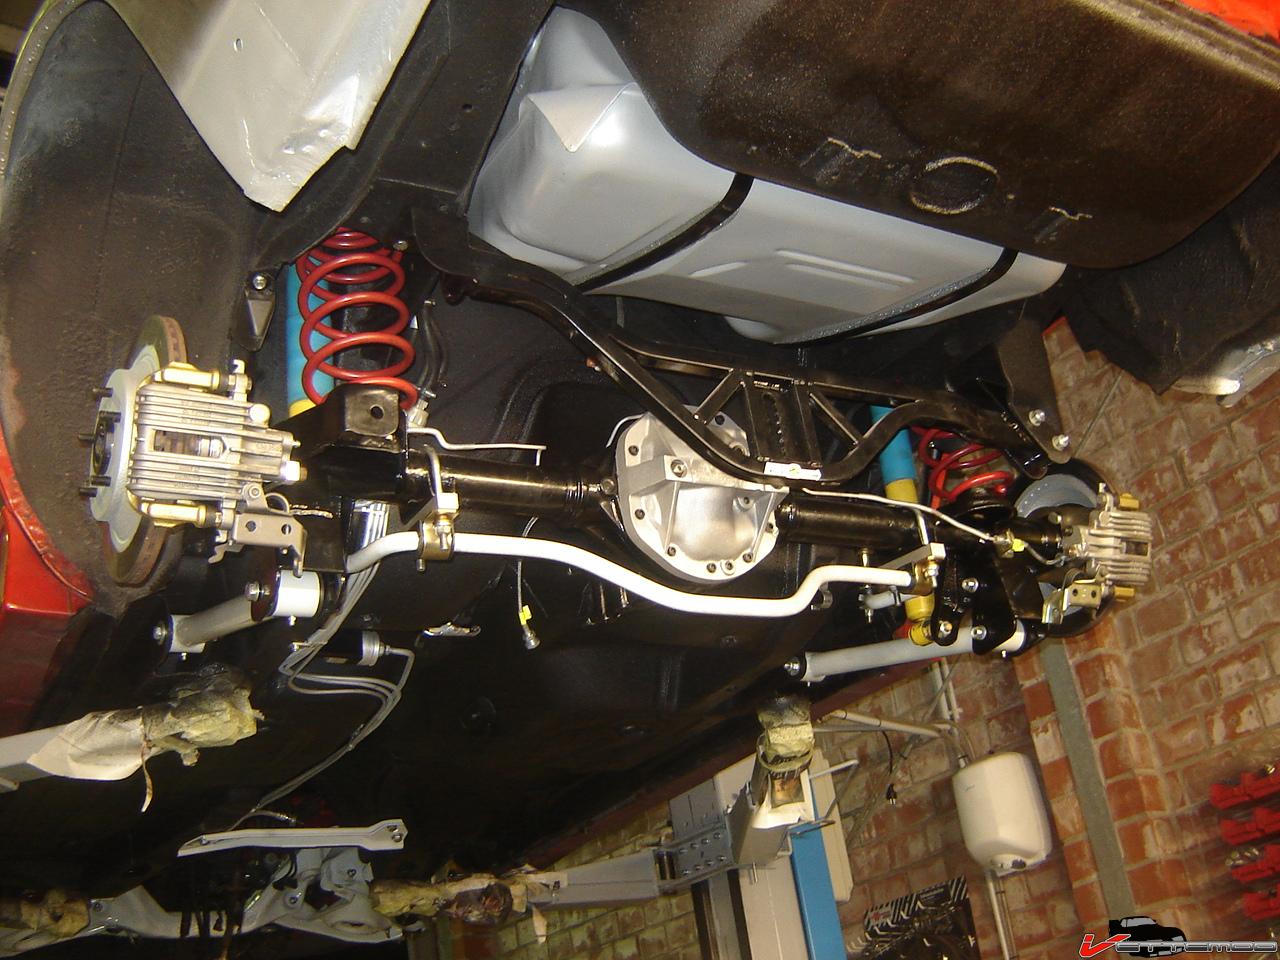
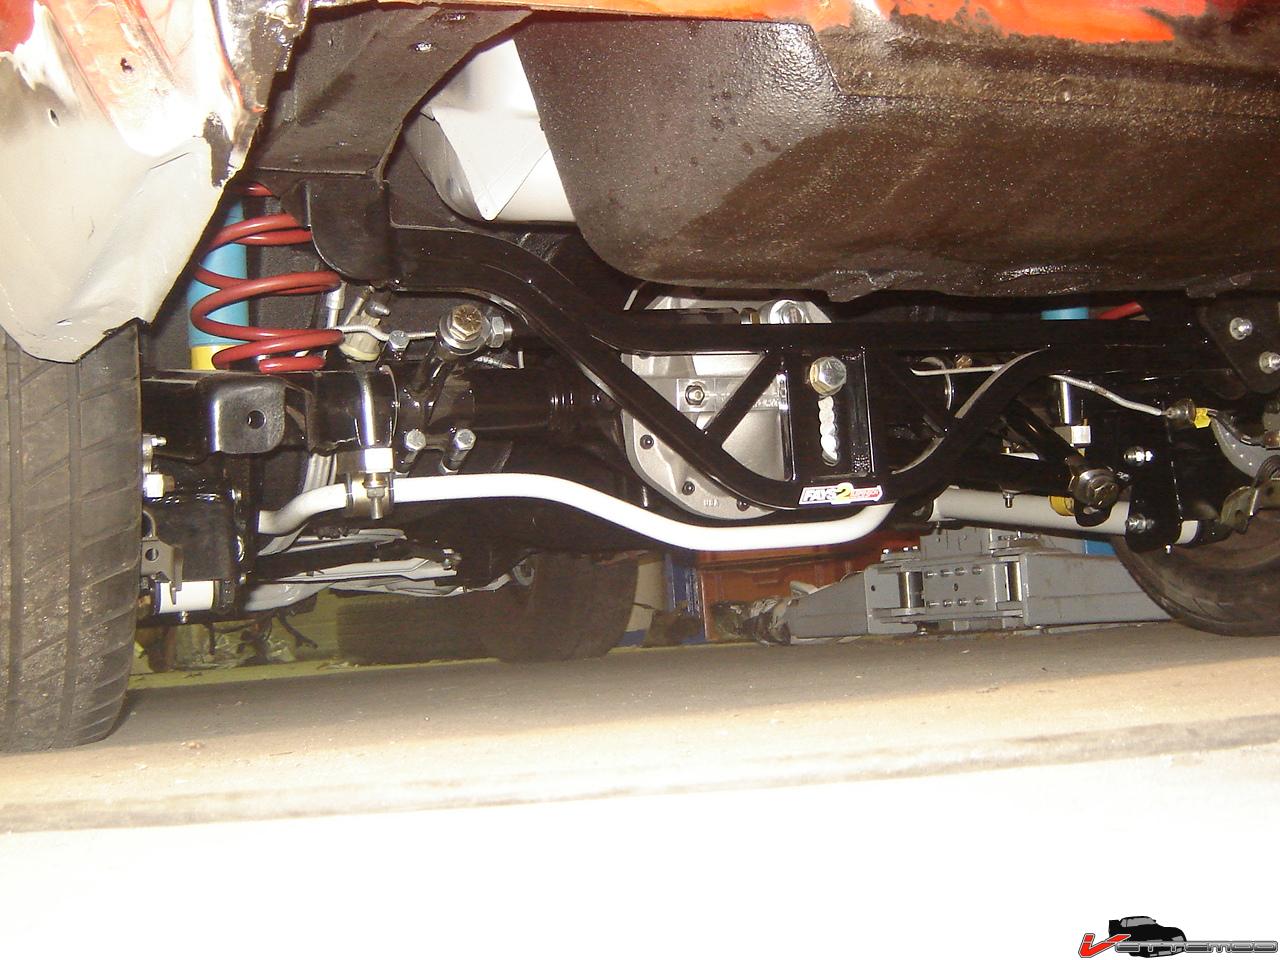
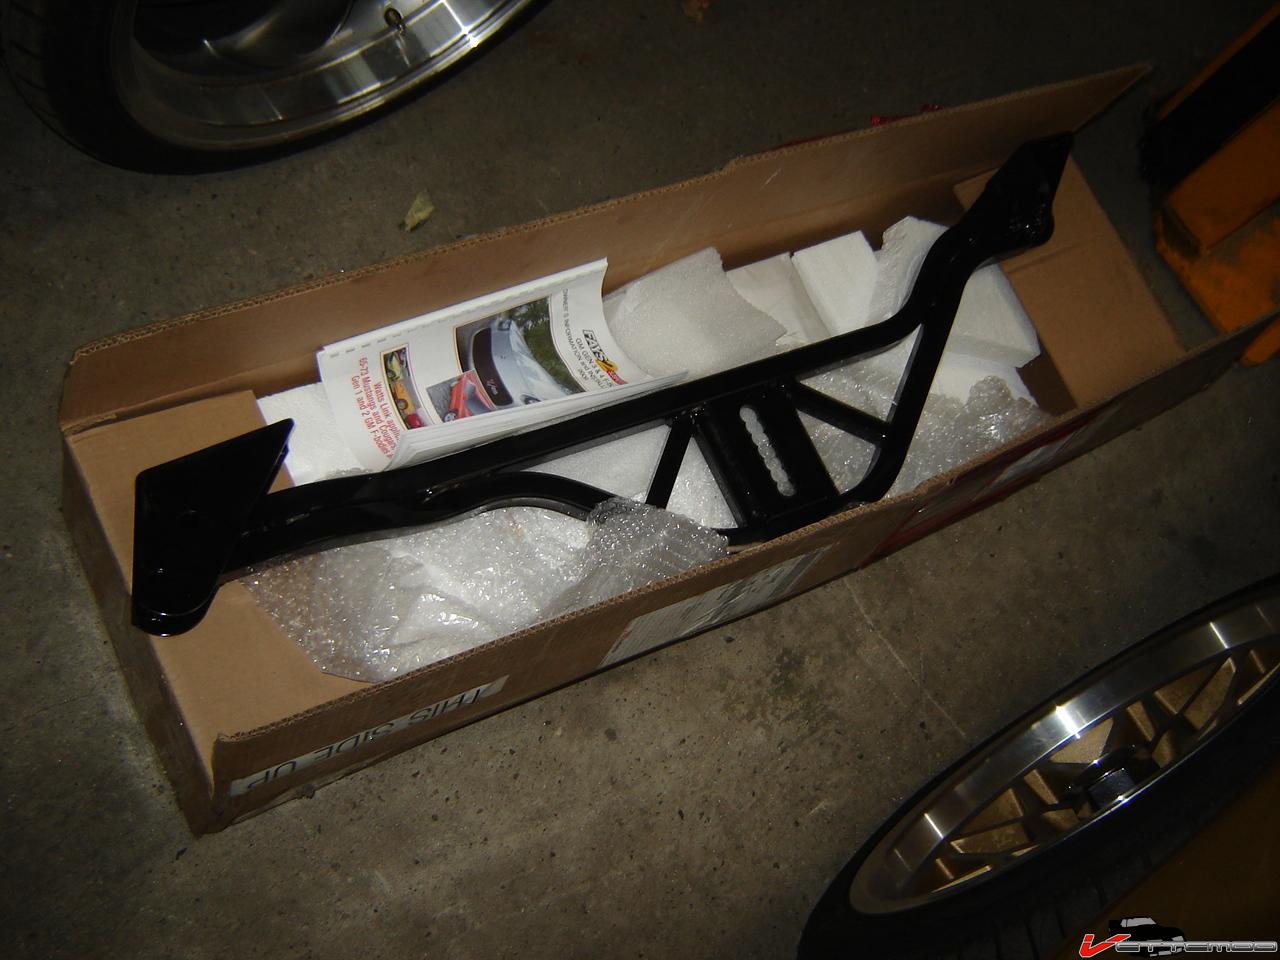
Whats this part? Does it serve like a combo track bar and track bar brace in one? N whats the bolt in the middle for? Very sick work by the way, nice job.
11-29-2009, 06:07 PM
#138
Member
iTrader: (2)
Join Date: Jul 2008
Location: near chicago illinois
Posts: 475
Likes: 0
Received 0 Likes
on
0 Posts
Car: have a 92 camaro rs...in pieces
Engine: none now...probably 383 stroker
Transmission: none yet
Axle/Gears: none
Re: Pulling apart my 87 IROC
Interesting, sorry if that was a stupid question. So bolts up and no welding required, looks nice. Heres another possible dumb question, but what does the bolt in the middle set exactly?
11-29-2009, 06:12 PM
#139
Re: Pulling apart my 87 IROC
Yup, all bolt in (designed for a 10 bolt, 9 bolt needs minor tweaking), the center bold is for the watts linkage center pivot. It's a design where it pivots on the bar and not like normally on the diff. It's the other way around.
11-29-2009, 06:21 PM
#140
Member
iTrader: (2)
Join Date: Jul 2008
Location: near chicago illinois
Posts: 475
Likes: 0
Received 0 Likes
on
0 Posts
Car: have a 92 camaro rs...in pieces
Engine: none now...probably 383 stroker
Transmission: none yet
Axle/Gears: none
Re: Pulling apart my 87 IROC
Last questions, dont wanna clog up your thread. Not really sure what you mean about, pivots on the bar and not like normally on the diff. Im just now learning this stuff. You say 9/10 bolt, what about for a 9"?
12-19-2009, 08:42 AM
#142
Member
Join Date: Apr 2006
Location: Bardstown, KY
Posts: 216
Likes: 0
Received 0 Likes
on
0 Posts
Car: 99 HOSS 6 Speed
Engine: LS1
Transmission: T56
Axle/Gears: 3.42
Re: Pulling apart my 87 IROC
How is the car coming along? I havent seen any updates in a while. Mine is on the back burner until after the holidays.
12-19-2009, 11:01 AM
#143
Re: Pulling apart my 87 IROC
Was waiting on parts, tomorrow I'm going to go at it again. It was -15C here today, a little too cold to work on the car since I don't have a heater in the main shop. I'd freeze mah nutz off 
Last edited by Twin_Turbo; 12-19-2009 at 11:21 AM.
12-19-2009, 12:58 PM
#144
Supreme Member
Join Date: Sep 2009
Location: Tigard, OR
Posts: 1,319
Likes: 0
Received 0 Likes
on
0 Posts
Car: 87 iroc-z camaro
Engine: 305TPI
Transmission: 700R4
Axle/Gears: G92 3.23 posi
Re: Pulling apart my 87 IROC
lol that bites it was around 35f degrees for a while a couple days back and was getting in the lower 20's in the nights or something close. im suprised you dont have a heater because dont you have a BIG AZZ SHOP!?
12-19-2009, 03:32 PM
#146
Supreme Member
iTrader: (1)
Join Date: Jun 2009
Location: Central Connecticut
Posts: 1,777
Likes: 0
Received 0 Likes
on
0 Posts
Car: 91 Trans Am 'vert
Engine: LB9
Transmission: T5
Axle/Gears: 3.45 9 bolt
Re: Pulling apart my 87 IROC
Hey I meant to ask, are you gonna need a cowl hood or something for that intake you're putting on your 350?
12-19-2009, 05:28 PM
#148
Supreme Member
Join Date: Sep 2009
Location: Tigard, OR
Posts: 1,319
Likes: 0
Received 0 Likes
on
0 Posts
Car: 87 iroc-z camaro
Engine: 305TPI
Transmission: 700R4
Axle/Gears: G92 3.23 posi
Re: Pulling apart my 87 IROC
lol that bites i guess your gonna need plenty of thermals! you could always try 1 of those little heaters like i have a small lightweight easy to move around heater that i got for like 10 bucks originally 30 or so it works really good but always freaking causes a surge so i cant use it for more then a couple mins but of course im living in a old crappy duplex lol.
12-20-2009, 08:29 AM
#149
Member
Join Date: Apr 2006
Location: Bardstown, KY
Posts: 216
Likes: 0
Received 0 Likes
on
0 Posts
Car: 99 HOSS 6 Speed
Engine: LS1
Transmission: T56
Axle/Gears: 3.42
Re: Pulling apart my 87 IROC
Now since I insulated I can heat and cool it pretty easy. I have AC and a heat pump. MY garage is only about 800 square feet though, 26' x 30'.
12-21-2009, 02:58 PM
#150
Re: Pulling apart my 87 IROC
Our shop is 8400 sq.ft. Imagine the bill to heat all that. The insulation in the large shop area is non existent and with a kerosene heaters you put a lot of moisture in the air, it'll condense on the steel rafters and drip down on the cars and workbenches. A bad idea. Had it happen with humid summers where the water vapor would condense and it almost flooded my 5000$ tig machine 
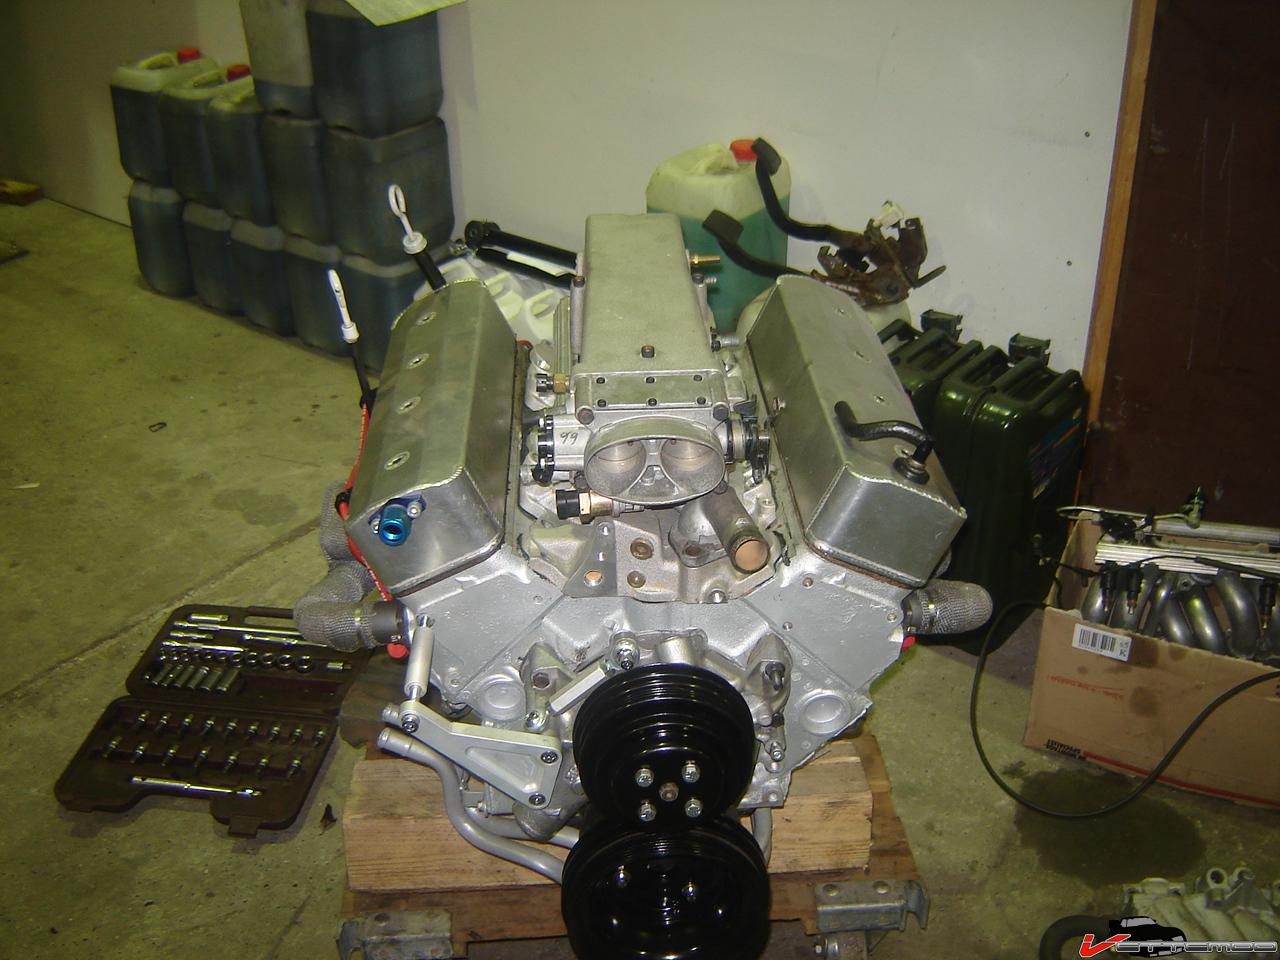
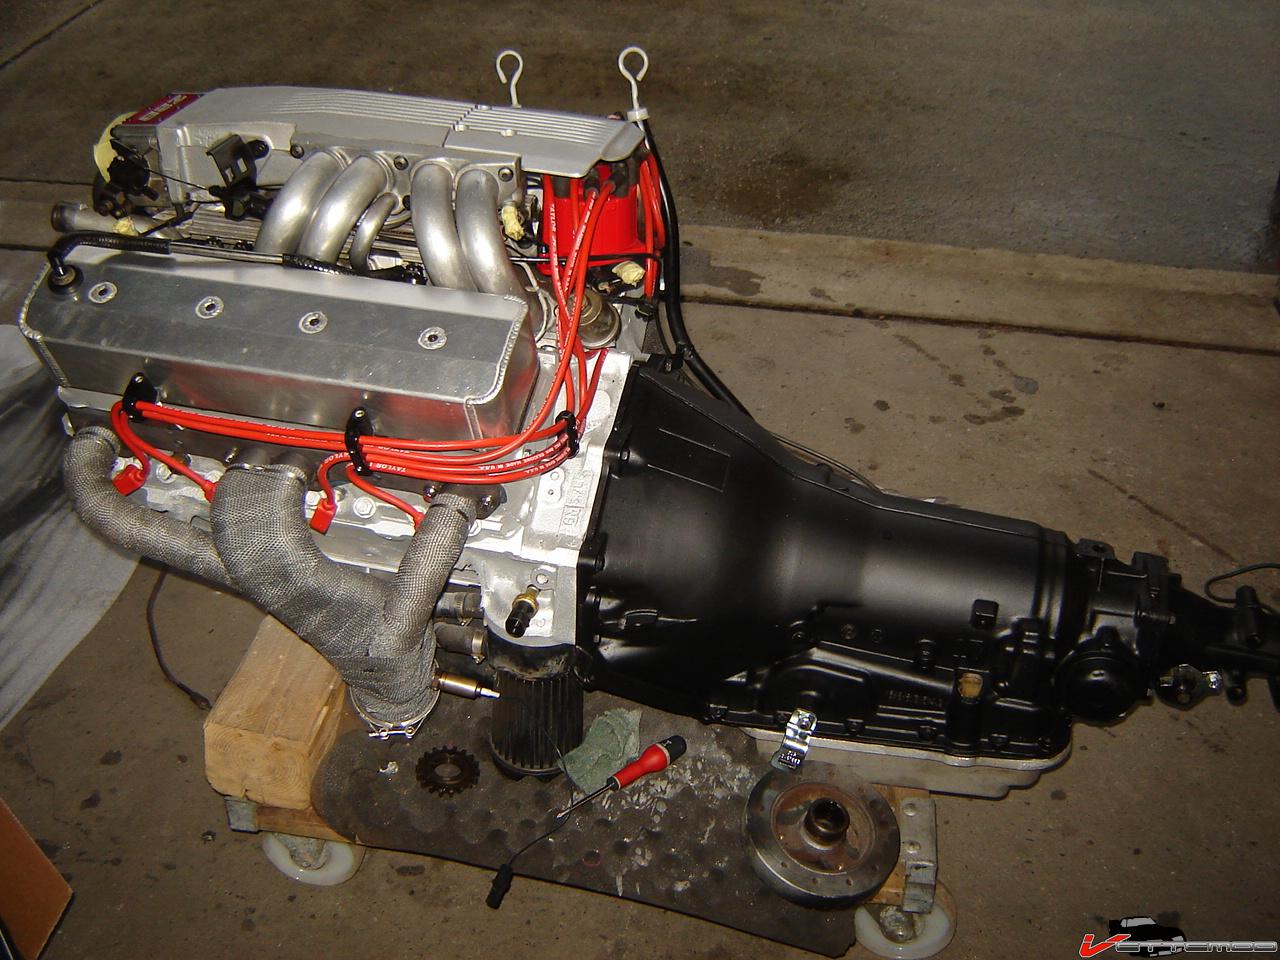
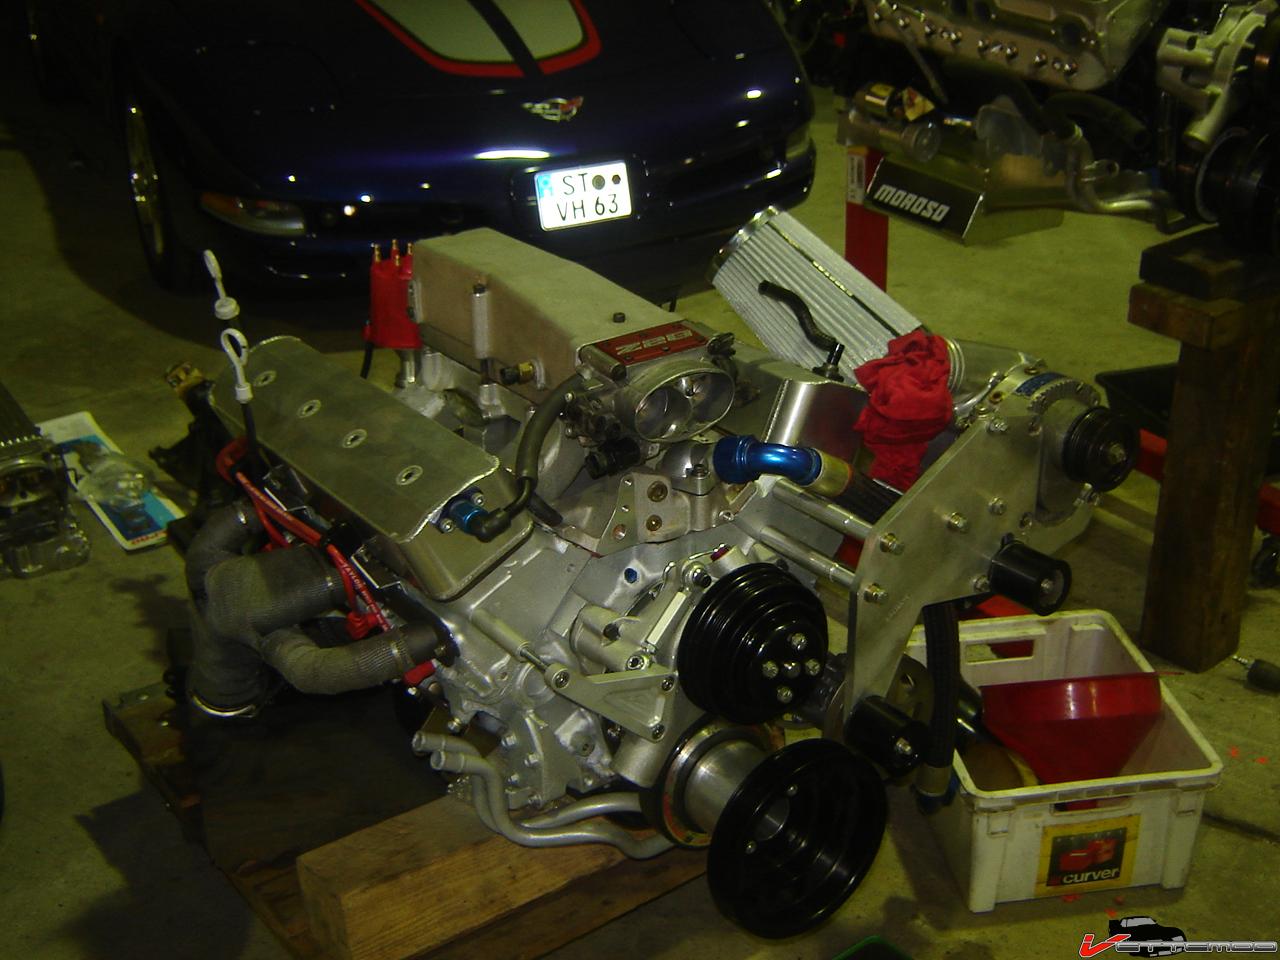
Well, got the TFS G1 heads I bought from here from "79 Trans am" so the engine will come apart again, I'm going to paint it red. The silver was too overwhelming with all the aluminum parts. Going to upgrade the fasteners w/ ARP most everywhere, it'll have to hold for now. If the thing grenades I'm swapping for a de-stroked 400 most lilkely.
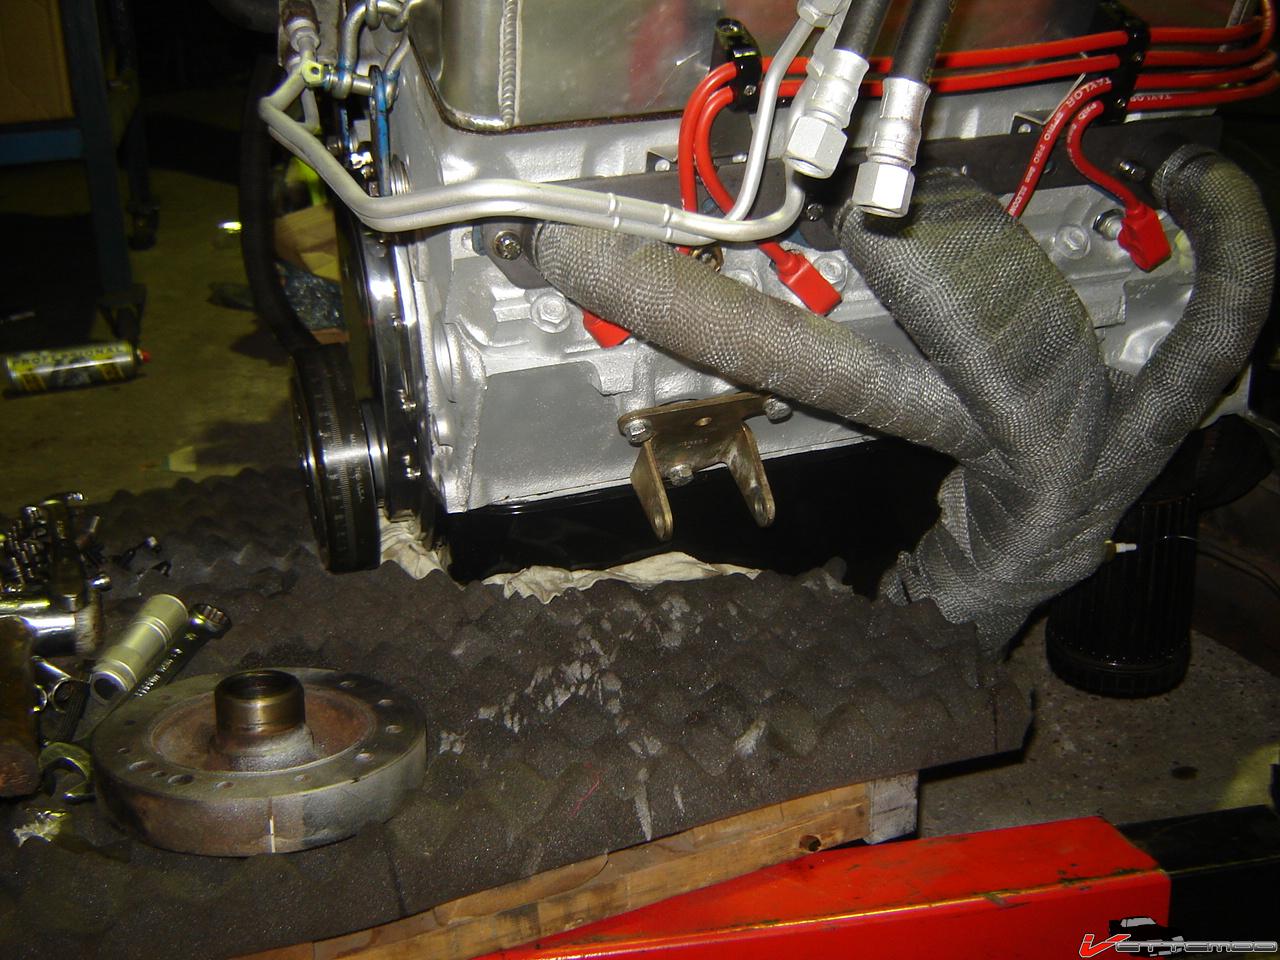
If someone is going install a moroso F body kicked out pan, it doesn't fit with a normal filter and the OEM oil to water heat exchanger (modine)
There's just no room to get the filter started without denting the pan.... uh oh!!
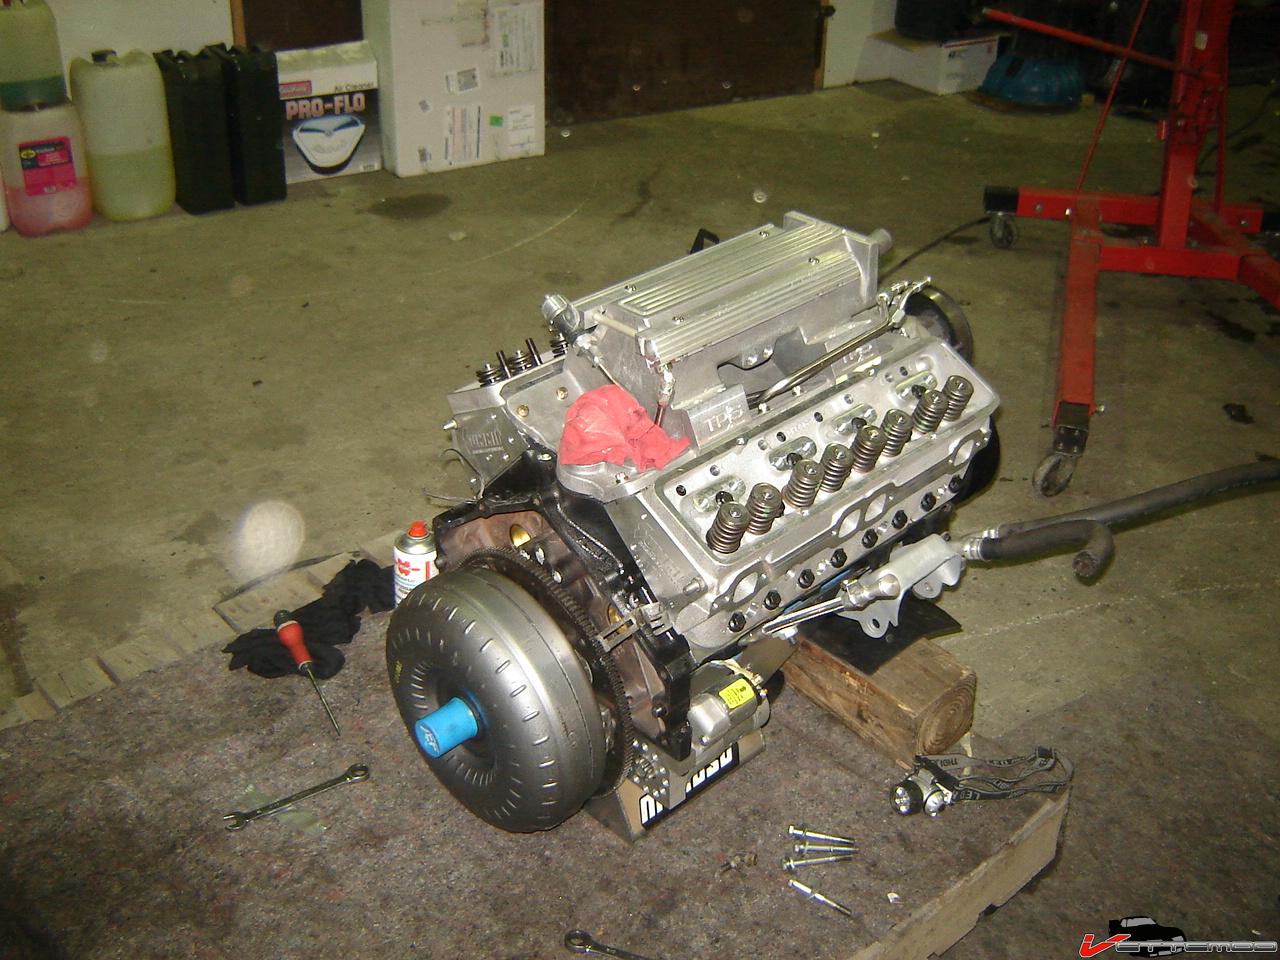
Well, got the TFS G1 heads I bought from here from "79 Trans am" so the engine will come apart again, I'm going to paint it red. The silver was too overwhelming with all the aluminum parts. Going to upgrade the fasteners w/ ARP most everywhere, it'll have to hold for now. If the thing grenades I'm swapping for a de-stroked 400 most lilkely.
If someone is going install a moroso F body kicked out pan, it doesn't fit with a normal filter and the OEM oil to water heat exchanger (modine)
There's just no room to get the filter started without denting the pan.... uh oh!!
Last edited by Twin_Turbo; 12-21-2009 at 03:20 PM.