84 Z28 H.O. Man Diary
 11-20-2011, 12:46 AM
#1
Senior Member

Thread Starter
Join Date: Sep 2003
Location: Hurlburt Field
Posts: 738
Likes: 0
Received 1 Like
on
1 Post
Car: 84 Z28, '15 Colorado
Engine: L69
Transmission: A4
Axle/Gears: 3.73
84 Z28 H.O. Man Diary
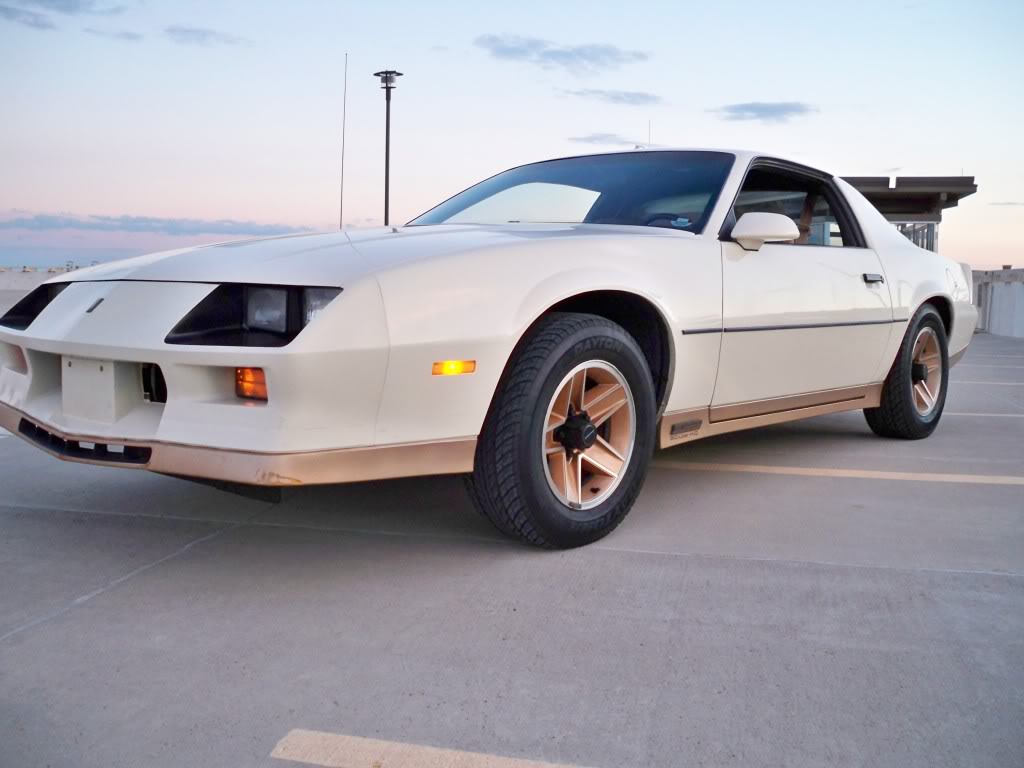
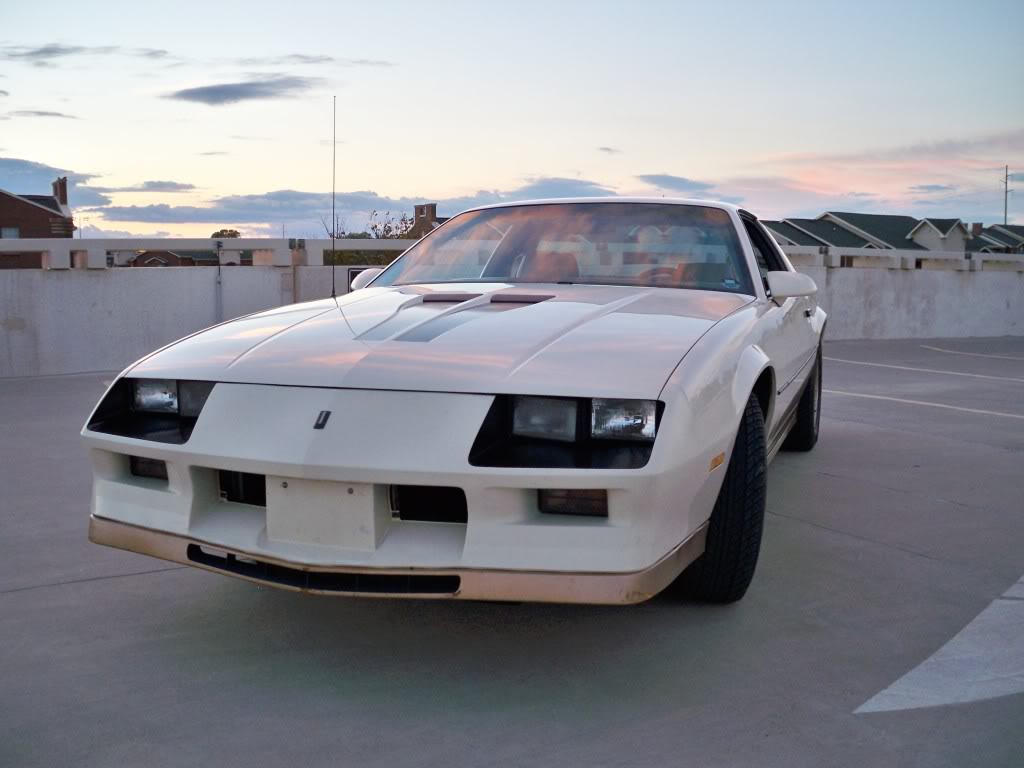
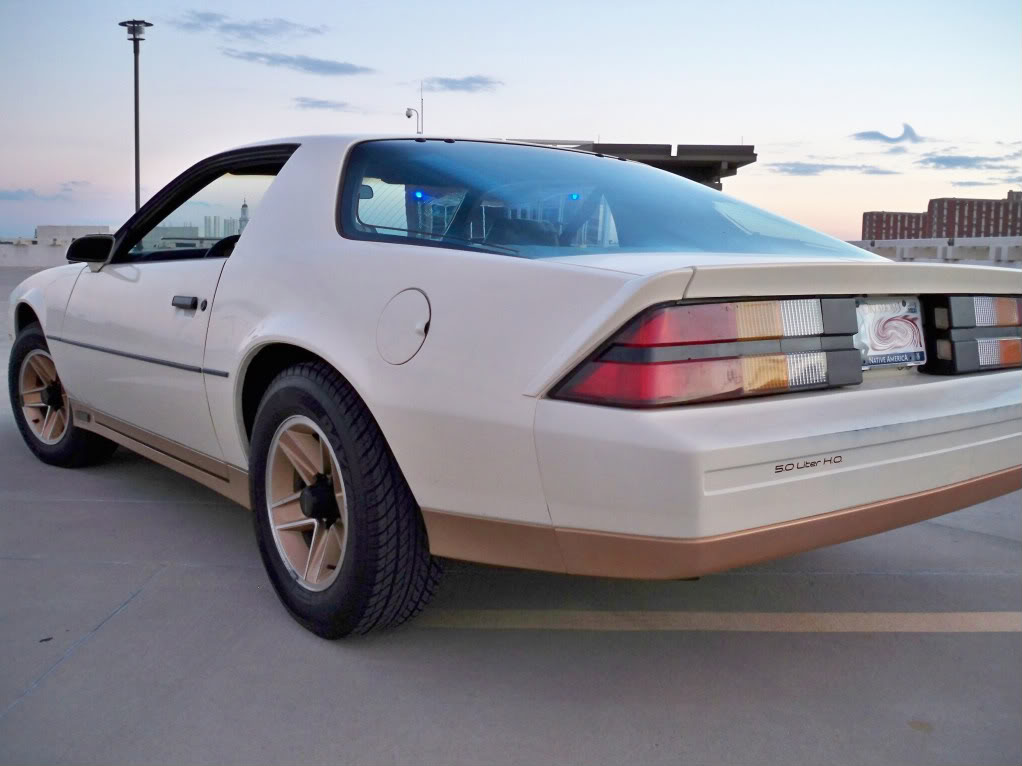
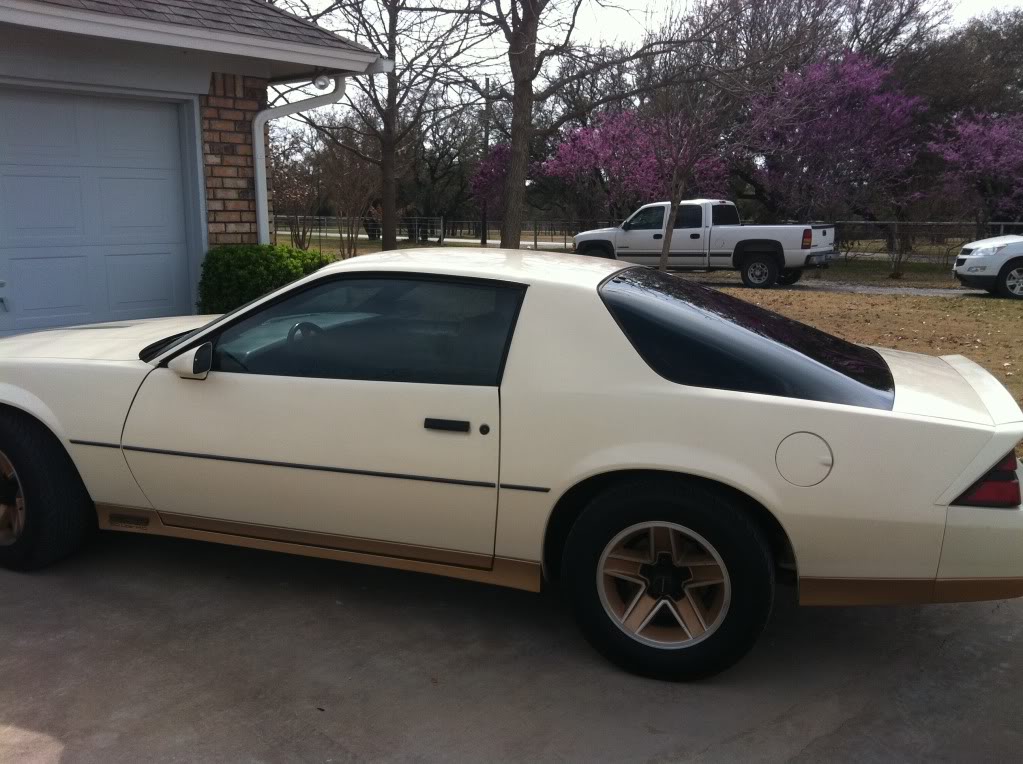
Around March 2010 or so I bought a 1984 L69 Z28 from a member in Oklahoma. They had taken nice care of the car: (even though I question some repairs) stock replacement of some suspension parts, rubberized undercoating in the wheel wells, paint brush touch ups under the hood.... (this would be one of those questioned repairs).
Anywho, aside from some rust on the underside of the hood the car was in pretty damn good shape. The only thing the car needed was new tires, new windshield and the AC system fixed. So I handed over the denaros and this is what I got
The interior was pretty good for its age. The dash was 100% perfect and the original radio even worked flawlessly.
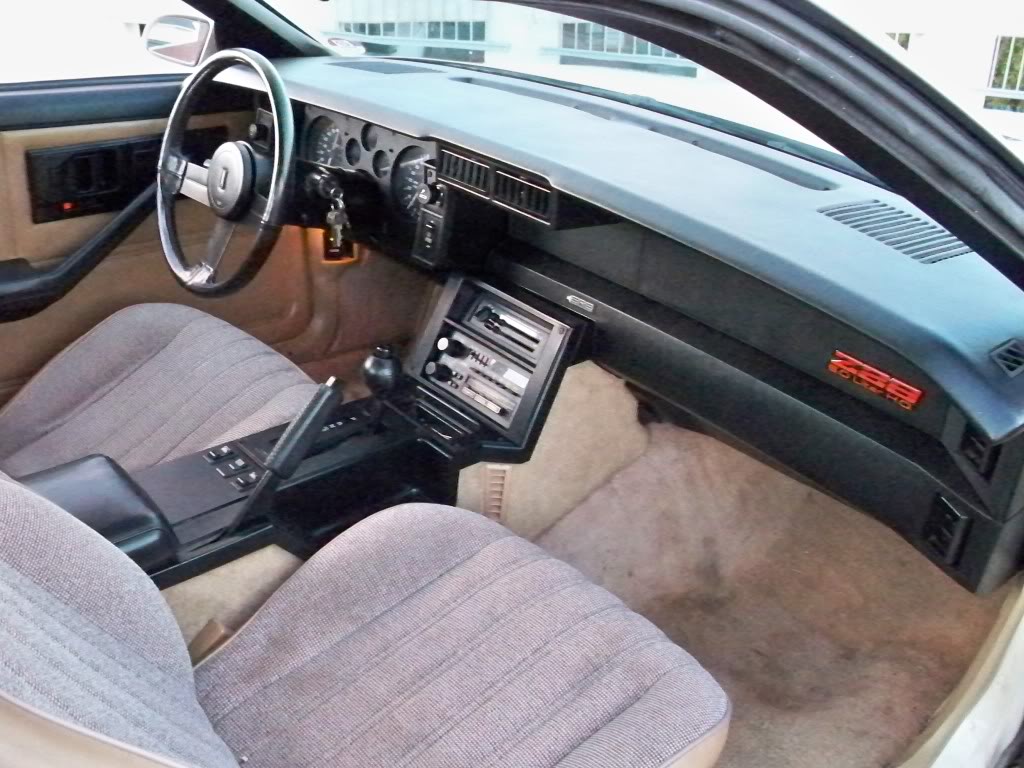
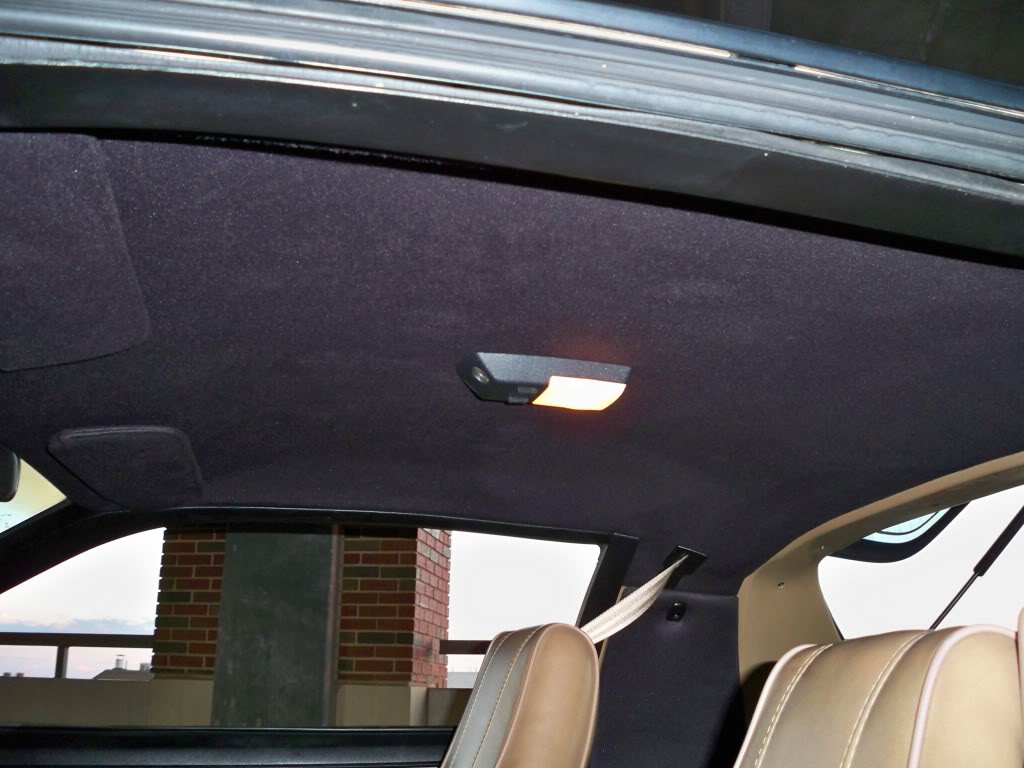
They had put new sail panels, sun visors and hardware, and new headliner. However, instead of replacing them with the stock tan color, they used black. Kinda weird I thought, but the more I drove the car the more and more I like the "2-tone" aspect of it.
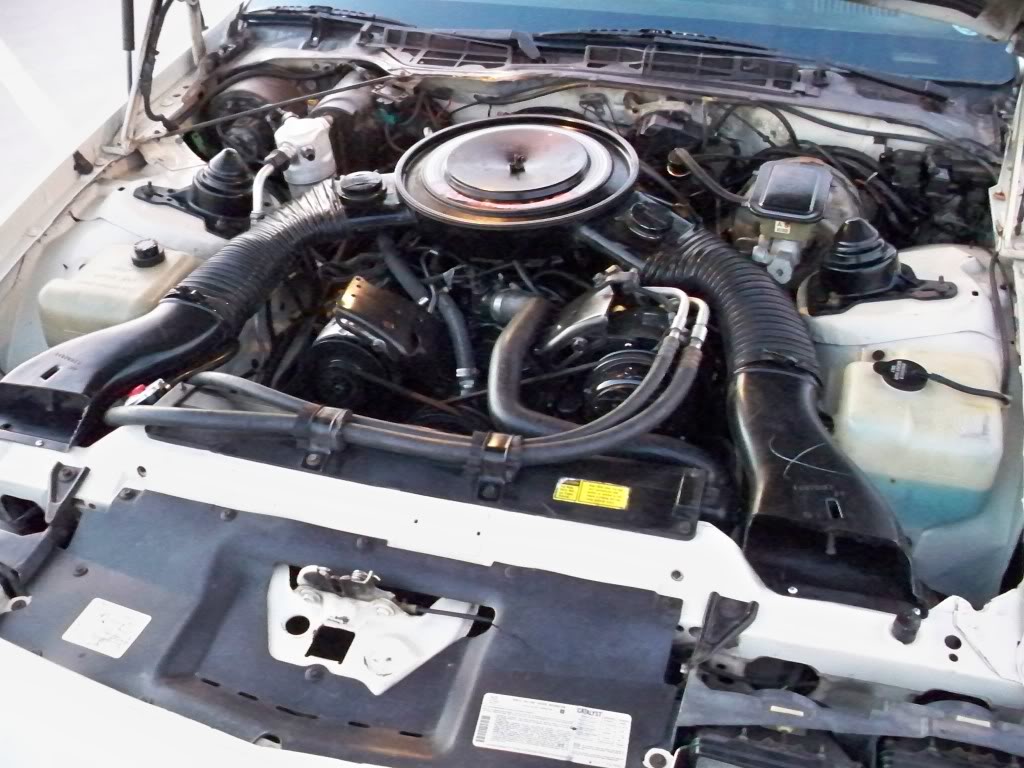
I feel like I paid a bit too much for the car, but it had good miles for its age, but primarily, the engine only had 2500 miles on it. They previous owners decided to do a stock rebuild. Awesome! Now I won't have to worry about any engine problems. The tranny had also been serviced and was found to be near perfect. I bit the bullet and drove her home.
Anywho, aside from some rust on the underside of the hood
the car was in pretty damn good shape. The only thing the car needed was new tires, new windshield and the AC system fixed. So I handed over the denaros and this is what I gotThe interior was pretty good for its age. The dash was 100% perfect and the original radio even worked flawlessly.
They had put new sail panels, sun visors and hardware, and new headliner. However, instead of replacing them with the stock tan color, they used black. Kinda weird I thought, but the more I drove the car the more and more I like the "2-tone" aspect of it.
I feel like I paid a bit too much for the car, but it had good miles for its age, but primarily, the engine only had 2500 miles on it. They previous owners decided to do a stock rebuild. Awesome! Now I won't have to worry about any engine problems. The tranny had also been serviced and was found to be near perfect. I bit the bullet and drove her home.
Last edited by IROCtheRoad; 12-19-2011 at 12:13 PM.
 11-20-2011, 12:58 AM
#2
Senior Member
Thread Starter
Join Date: Sep 2003
Location: Hurlburt Field
Posts: 738
Likes: 0
Received 1 Like
on
1 Post
Car: 84 Z28, '15 Colorado
Engine: L69
Transmission: A4
Axle/Gears: 3.73
Re: 84 Z28 H.O. Man Diary
The moment I got home it was time to add my personal touches. I IMMEDIATELY took the 85 speedo out, grabbed my extra nearly brand new 145 speedo, adjusted the mileage, and my coolness factory just went up a notch. I got the speedo from my old Camaro that was totalled about 5 years back or so
https://www.thirdgen.org/forums/auto...4-totaled.html
The next day I went and got the windows tinted.
In a matter of weeks I was about to be stationed at Nellis AFB, Nevada so getting the AC system fixed was a priority. I bought a new compressor, condenser, orifice tube, and AC lines. I didn't want to convert to R134 so I bought R406a "Autofrost" which was a recommendation from Reid Fleming
https://www.thirdgen.org/forums/cool...st-review.html
Installed everything and took it to a mechanic to charge it for me. Vacuum held well, but they had to do some "rewire" on the condensor side to make it work on full blast..... ok....... Next day we packed up and moved to Vegas.
~Move to Vegas~
Drove the car around and the AC worked for about 2 days. Yeah, 2 days. Took it to a mechanic and the system was empty. Great, that's $80 in Autofrost down the drain. Luckily the shop back in Texas had put a dye in the system. Well we coulnd't find a leak ANYWHERE. FML. We figured the mechanic in Texas didn't fill the system all the way and didn't fill the car up with the dye either and had just charged me for it anyways and pocketed the freon.
Last edited by IROCtheRoad; 11-20-2011 at 09:13 PM.
11-20-2011, 01:04 AM
#3
Senior Member
Thread Starter
Join Date: Sep 2003
Location: Hurlburt Field
Posts: 738
Likes: 0
Received 1 Like
on
1 Post
Car: 84 Z28, '15 Colorado
Engine: L69
Transmission: A4
Axle/Gears: 3.73
Re: 84 Z28 H.O. Man Diary
Since we had just moved and my military backpay hadn't come in yet, I wasn't able to fix the AC system.
In the mean time:
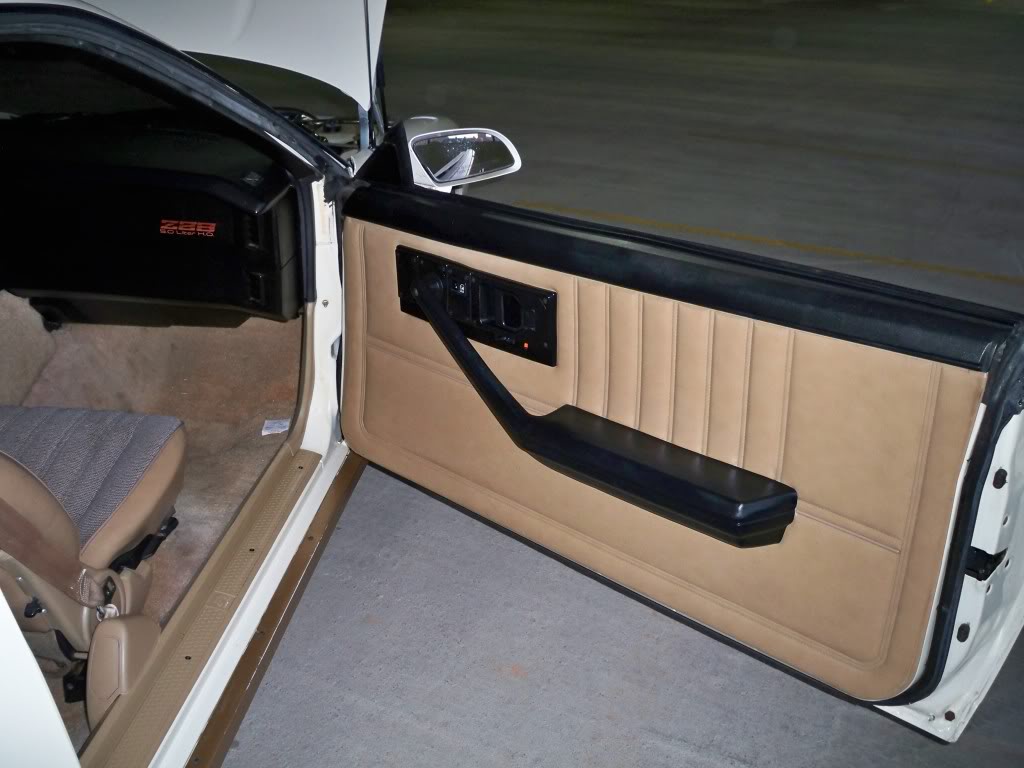
The windows were just barely working do so I ordered new window motors and weatherstripping kit from 1AAuto (who are fantastic to work with, especially Dan) and new window switches from Classic Industries. Comes to find out I wasn't getting 12v to my motors and with a little shooting of the wires I found my switches were bad. Once I replaced them the window worked well enough, but I went ahead and replaced the motors anyways.
I didn't pull the mechanism out of the doors. Instead, like my 2002 Camaro, I drilled out the pop rivets, pulled the old one out, installed new one, and BAM!, windows motors are done. The windows still don't move up and down as fast as I would like, but they appear to be about normal for a 3rd gen.
I also installed new door lock switches because the original ones were beyond faded.
While I had the door panels off I fixed any and all loose and rattly parts. That made a HUGE difference. The ride is so much more pleasant now.
In the mean time:
The windows were just barely working do so I ordered new window motors and weatherstripping kit from 1AAuto (who are fantastic to work with, especially Dan) and new window switches from Classic Industries. Comes to find out I wasn't getting 12v to my motors and with a little shooting of the wires I found my switches were bad. Once I replaced them the window worked well enough, but I went ahead and replaced the motors anyways.
I didn't pull the mechanism out of the doors. Instead, like my 2002 Camaro, I drilled out the pop rivets, pulled the old one out, installed new one, and BAM!, windows motors are done. The windows still don't move up and down as fast as I would like, but they appear to be about normal for a 3rd gen.
I also installed new door lock switches because the original ones were beyond faded.
While I had the door panels off I fixed any and all loose and rattly parts. That made a HUGE difference. The ride is so much more pleasant now.
11-20-2011, 01:20 AM
#4
Senior Member
Thread Starter
Join Date: Sep 2003
Location: Hurlburt Field
Posts: 738
Likes: 0
Received 1 Like
on
1 Post
Car: 84 Z28, '15 Colorado
Engine: L69
Transmission: A4
Axle/Gears: 3.73
Re: 84 Z28 H.O. Man Diary
I had made a few trips from Ft. Worth to Sheppard AFB, and now around Las Vegas and I noticed I was running rich and getting TERRIBLE gas mileage. I'm talking about 12 on the highway and 8 around base.
I attributed this to 2 things: 1) When the engine was rebuilt a new 1967 327 specced cam was installed. The car sounded nice, but I could tell it was a mismatch. 2) This is my first carburated car, and I could never hear the secondaries open up that everyone keeps telling me about. Well I figured it was time for a rebuild.
With the help from the interwebs, this site, and my factory service manual, I decided to tackle my first carb rebuild. I bought the HP kit from Cliff's High Performance and went to town.
Straight off the engine
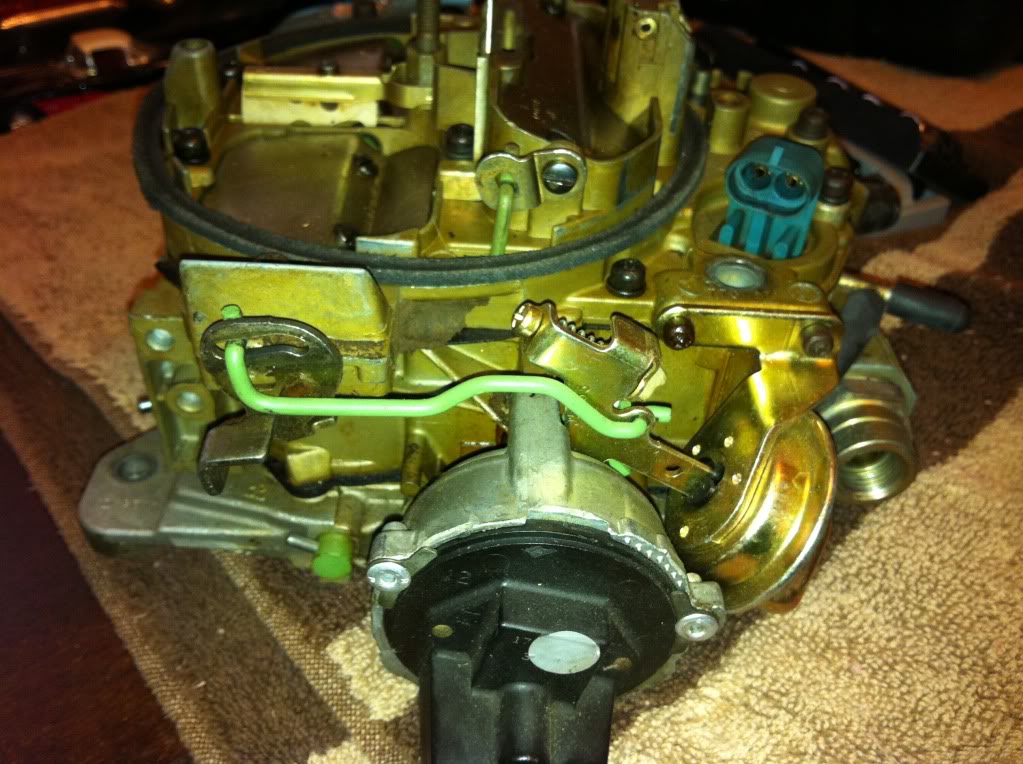
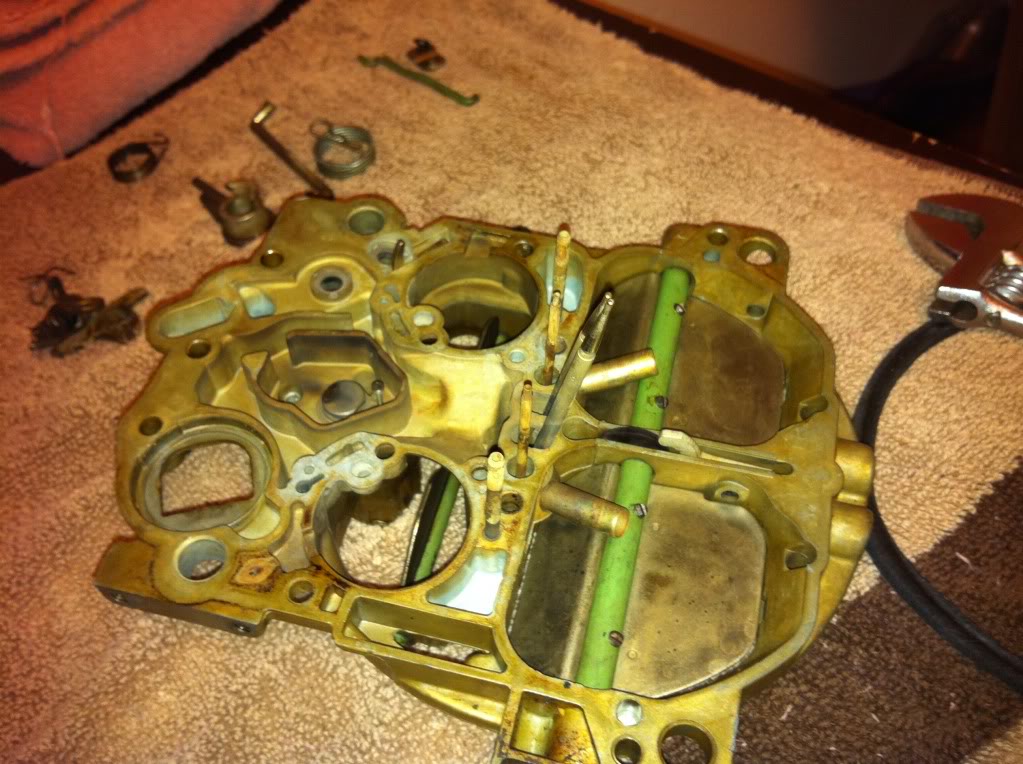
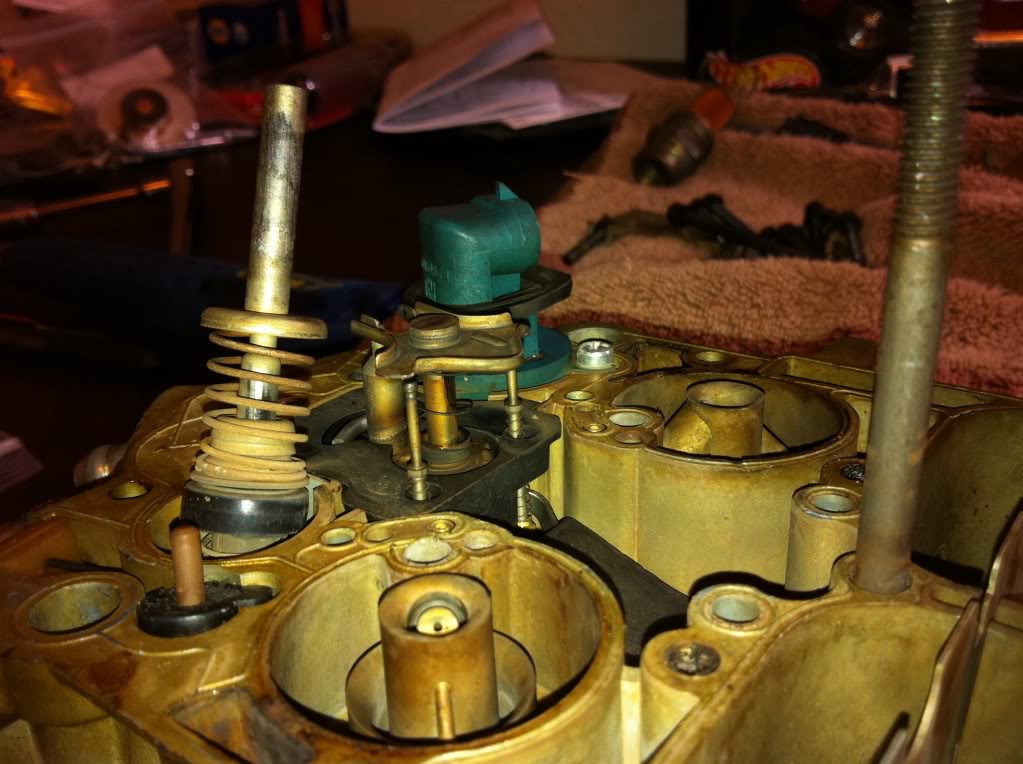
All in all it wasn't THAT hard. I was just very meticulous on picture taking and laying my parts out in order. I also replace every sensor in the carb along with it's pigtail.
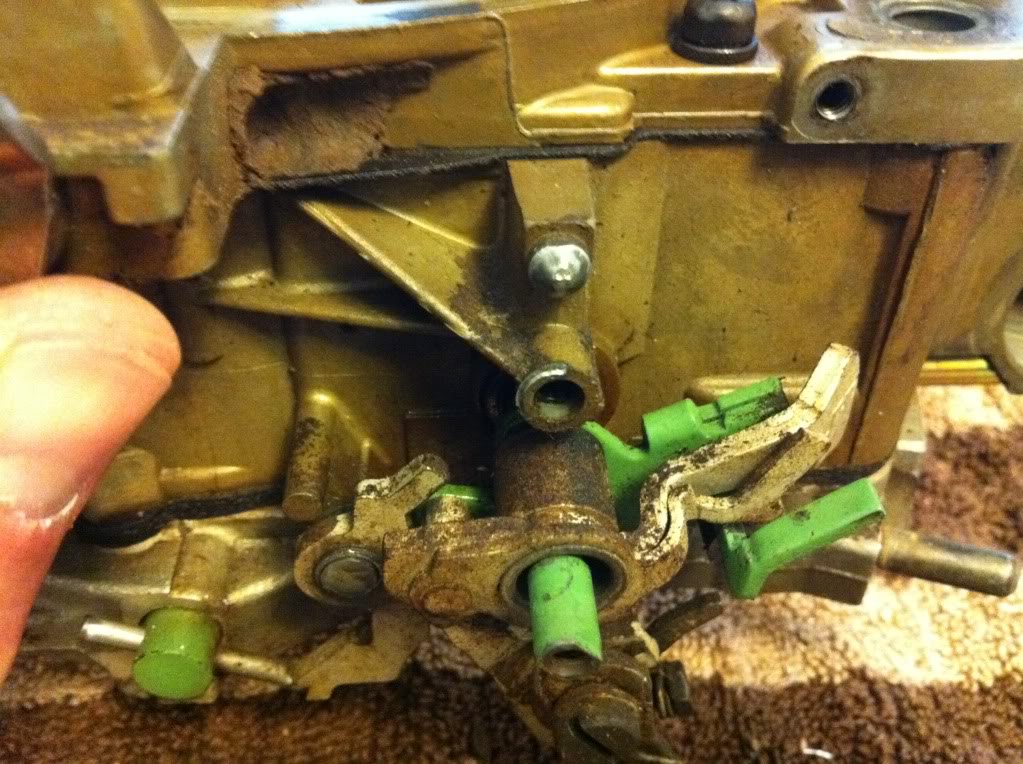
Unfortunately, as I learn more and more and quadrajets, the more and more times I've taken it apart to check something, modifying something, or fix something. By doing this I eventually learned why I was getting horrible gas mileage: my secondaries were sticking open That explains the 8 mpg.
I'm not sure why, but the rod the flaps were connected to were sticking on the airhorne. Once again I took the top part apart, "modified" it, and got it back together. Secondaries slap shut like the are supposed to.
I attributed this to 2 things: 1) When the engine was rebuilt a new 1967 327 specced cam was installed. The car sounded nice, but I could tell it was a mismatch. 2) This is my first carburated car, and I could never hear the secondaries open up that everyone keeps telling me about. Well I figured it was time for a rebuild.
With the help from the interwebs, this site, and my factory service manual, I decided to tackle my first carb rebuild. I bought the HP kit from Cliff's High Performance and went to town.
Straight off the engine
All in all it wasn't THAT hard. I was just very meticulous on picture taking and laying my parts out in order. I also replace every sensor in the carb along with it's pigtail.
Unfortunately, as I learn more and more and quadrajets, the more and more times I've taken it apart to check something, modifying something, or fix something. By doing this I eventually learned why I was getting horrible gas mileage: my secondaries were sticking open
That explains the 8 mpg.I'm not sure why, but the rod the flaps were connected to were sticking on the airhorne. Once again I took the top part apart, "modified" it, and got it back together. Secondaries slap shut like the are supposed to.
11-20-2011, 01:28 AM
#5
Senior Member
Thread Starter
Join Date: Sep 2003
Location: Hurlburt Field
Posts: 738
Likes: 0
Received 1 Like
on
1 Post
Car: 84 Z28, '15 Colorado
Engine: L69
Transmission: A4
Axle/Gears: 3.73
Re: 84 Z28 H.O. Man Diary
I bought this car so I could have a dependable car that I didn't have to fix because it was broken, but to fix what I wanted to fix. Well...... I ended up making this a car to fix.
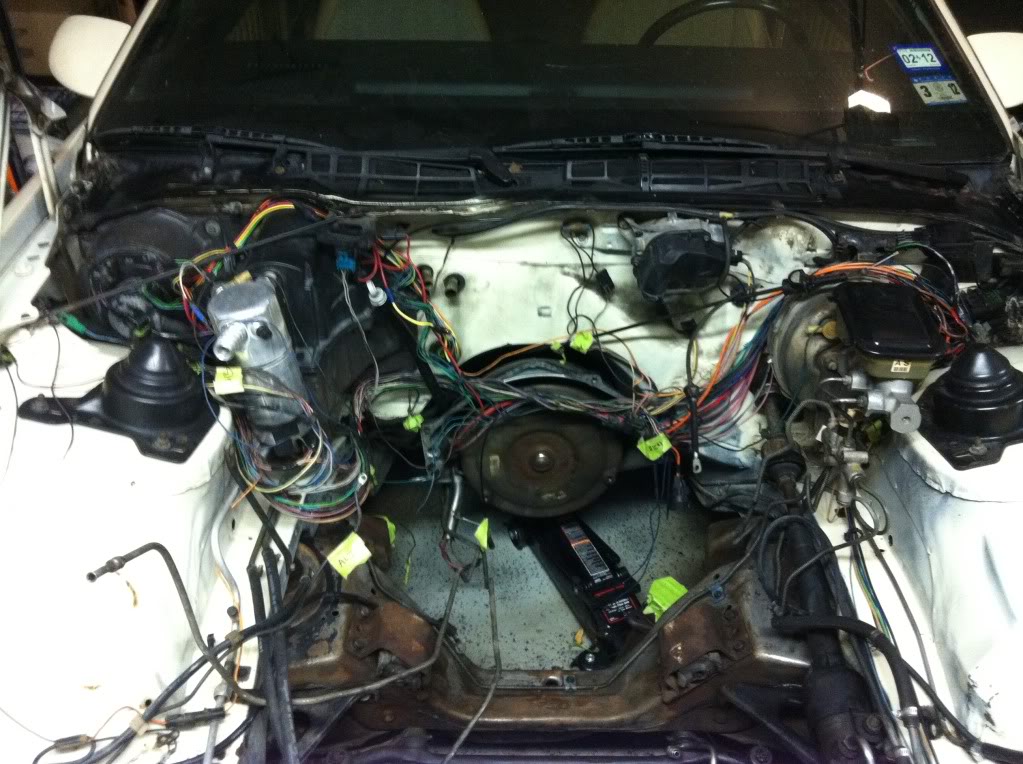
Since I blamed the cam as part of the gas problem, I decided to pull the engine. I had never done this before so the learning curve was going to be a big one. So about 5 months ago I began pulling the engine.
Between the military, the Mrs, and the baby, the car has come in 4th place so it's been taking me a loooong time to do this.
Here's a few pictures of the past few months.
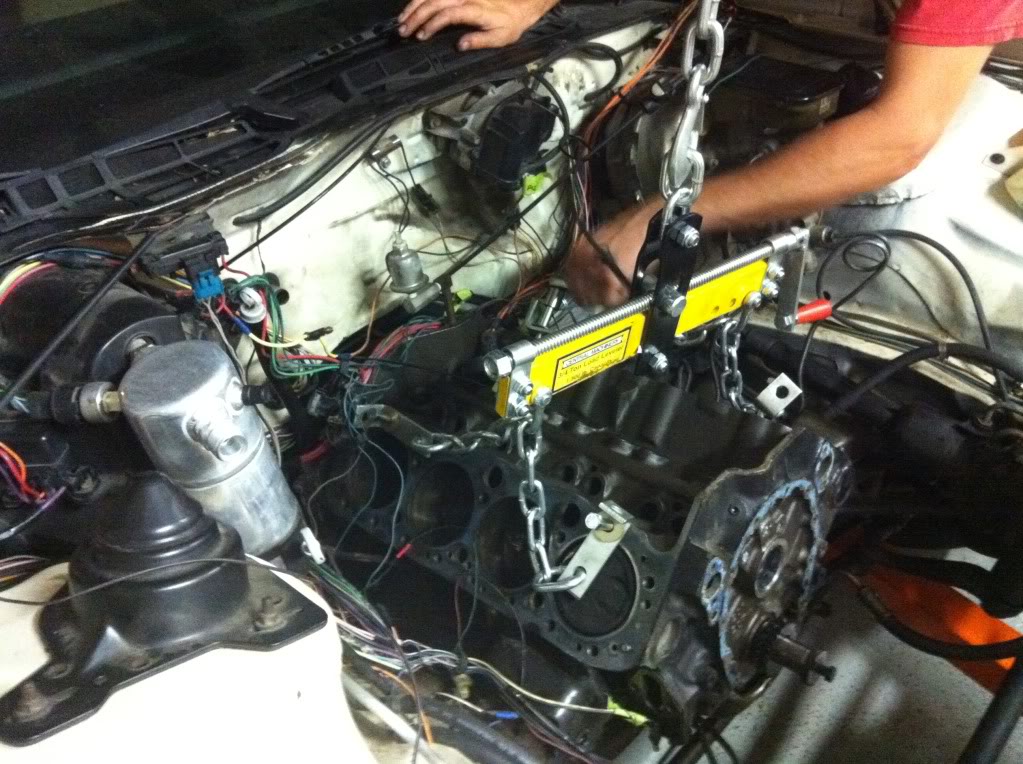
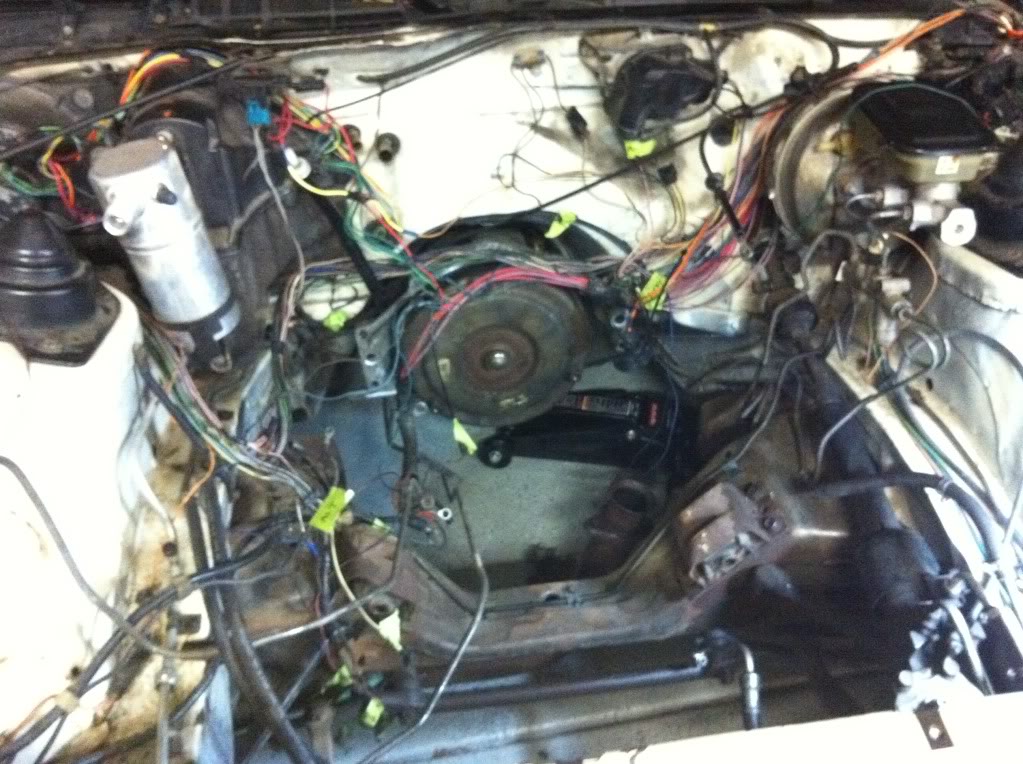
Engine out
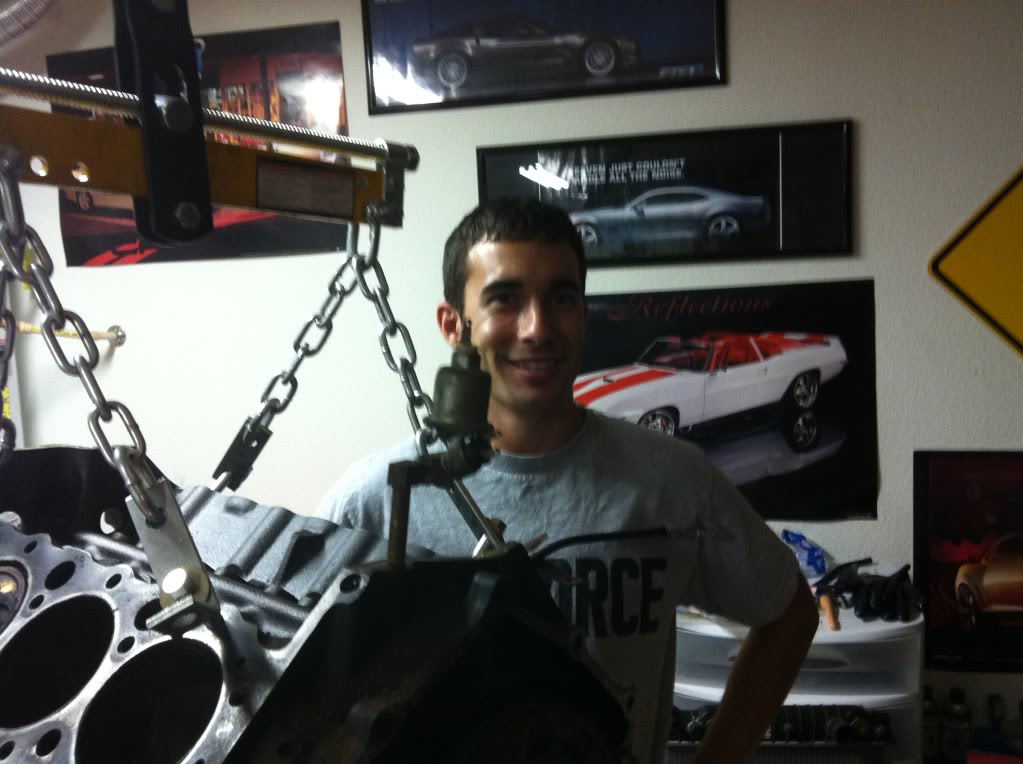
Me posing for the camera
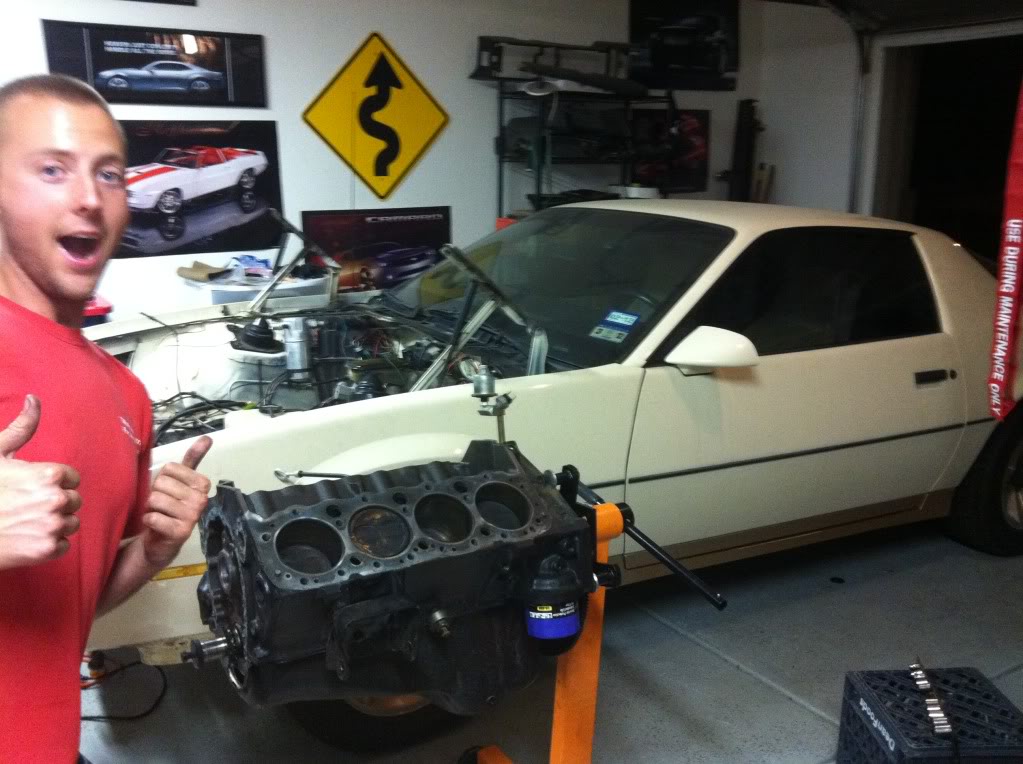
And my buddy who helped me
Since I blamed the cam as part of the gas problem, I decided to pull the engine. I had never done this before so the learning curve was going to be a big one. So about 5 months ago I began pulling the engine.
Between the military, the Mrs, and the baby, the car has come in 4th place so it's been taking me a loooong time to do this.
Here's a few pictures of the past few months.
Engine out
Me posing for the camera
And my buddy who helped me
Last edited by IROCtheRoad; 11-27-2011 at 09:31 PM.
11-20-2011, 01:33 AM
#6
Senior Member
Thread Starter
Join Date: Sep 2003
Location: Hurlburt Field
Posts: 738
Likes: 0
Received 1 Like
on
1 Post
Car: 84 Z28, '15 Colorado
Engine: L69
Transmission: A4
Axle/Gears: 3.73
Re: 84 Z28 H.O. Man Diary
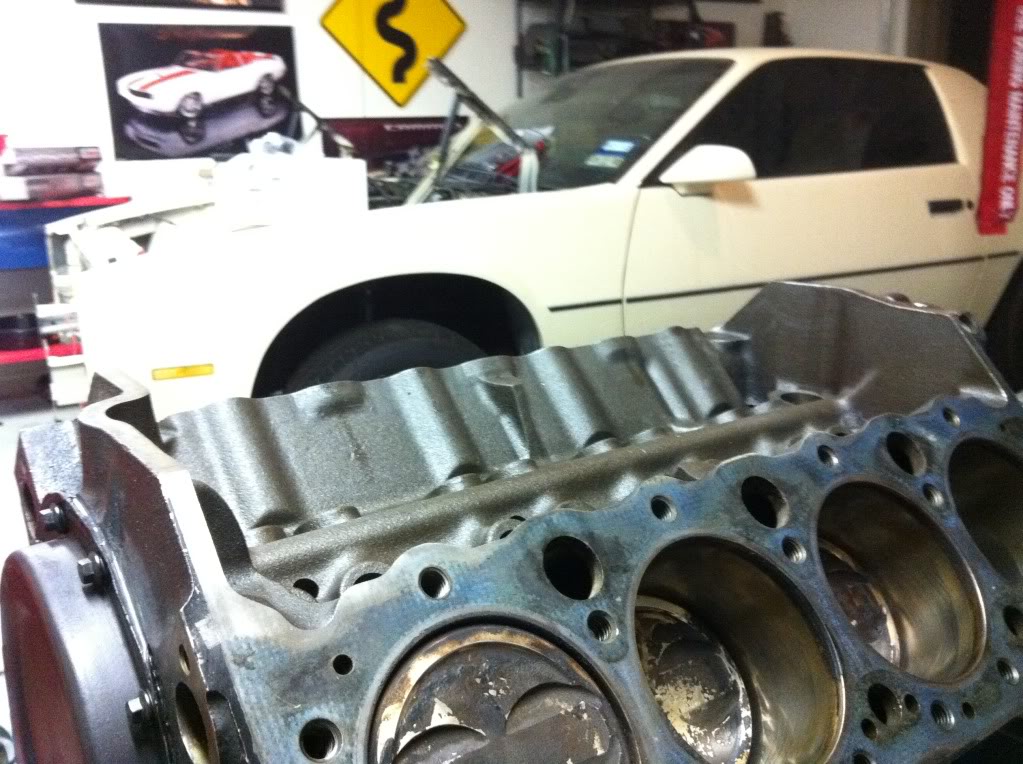
This just goes to show how rich the engine was running. Remember, the engine had less than 3000 miles with brand new pistons
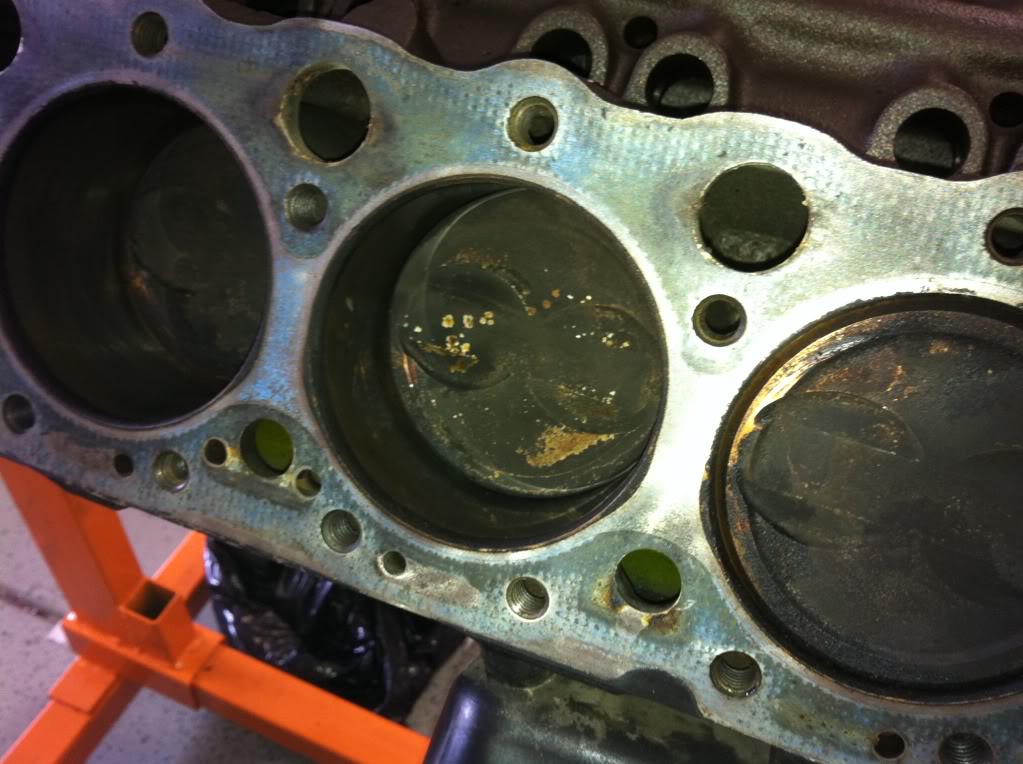
I also washed the engine bay 3 times to get it as clean as possible.
Before [notice the bottom left and whole left side]:

After:
I also washed the engine bay 3 times to get it as clean as possible.
Before [notice the bottom left and whole left side]:
After:
Last edited by IROCtheRoad; 11-27-2011 at 09:33 PM.
11-20-2011, 01:39 AM
#7
Senior Member
Thread Starter
Join Date: Sep 2003
Location: Hurlburt Field
Posts: 738
Likes: 0
Received 1 Like
on
1 Post
Car: 84 Z28, '15 Colorado
Engine: L69
Transmission: A4
Axle/Gears: 3.73
Re: 84 Z28 H.O. Man Diary
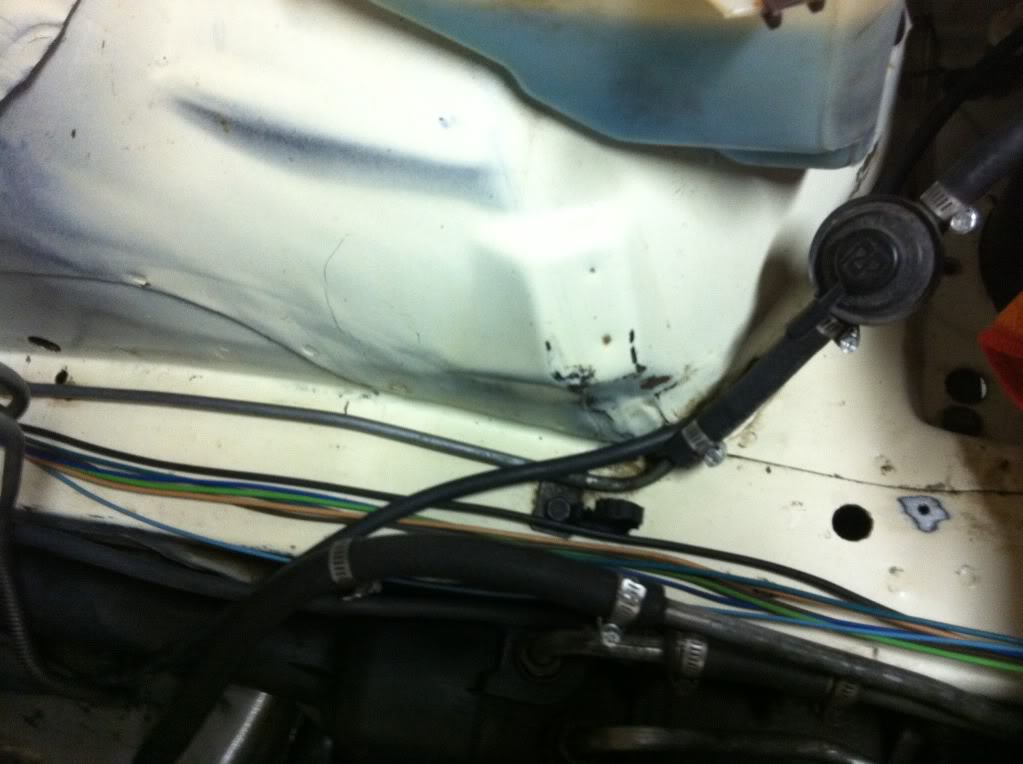
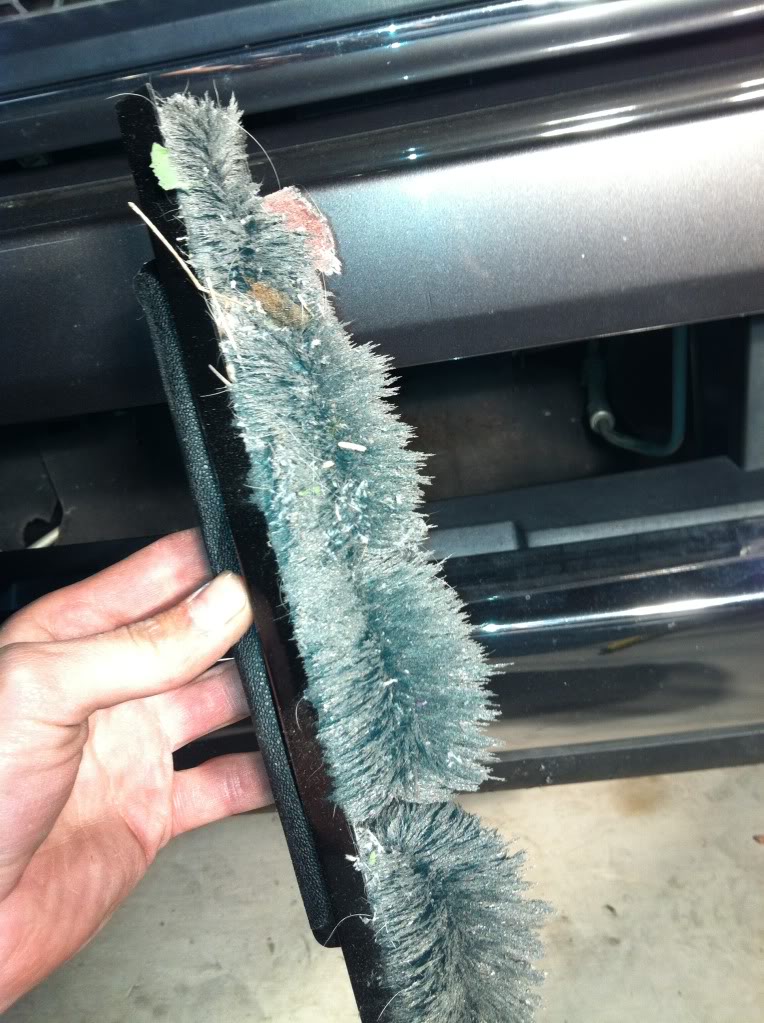
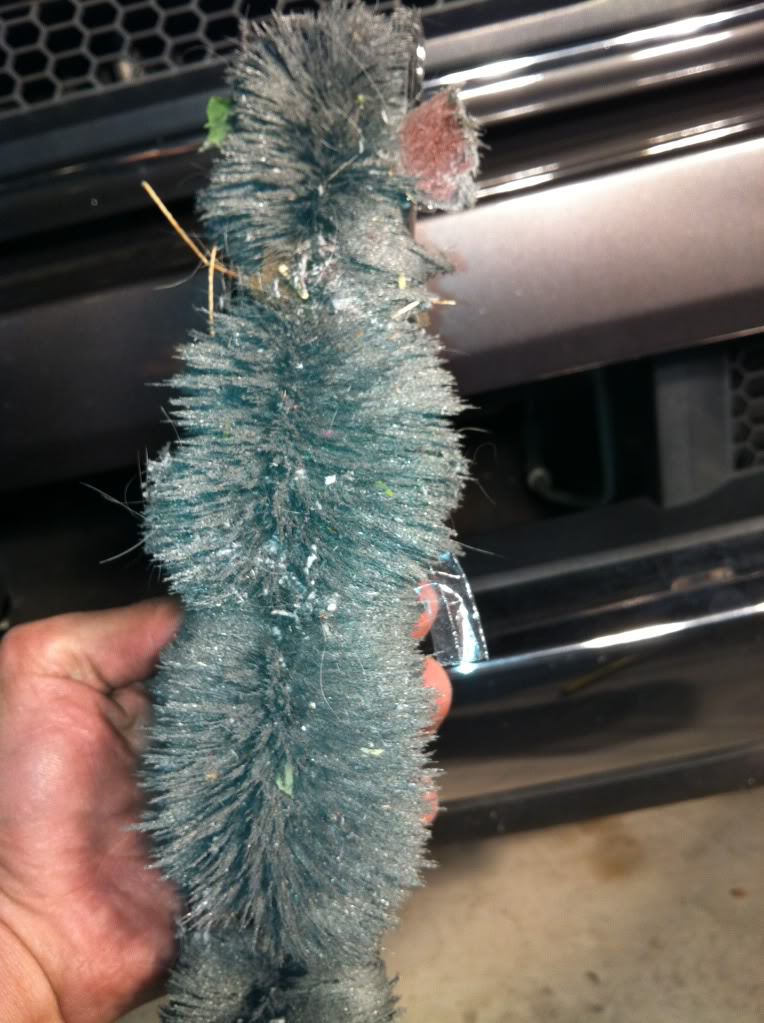
I took off all of the wires looms so I can replace them with braided wiring like we use on our aircraft. Once I took off the looms I was greeted with a crap nest of spliced wires.
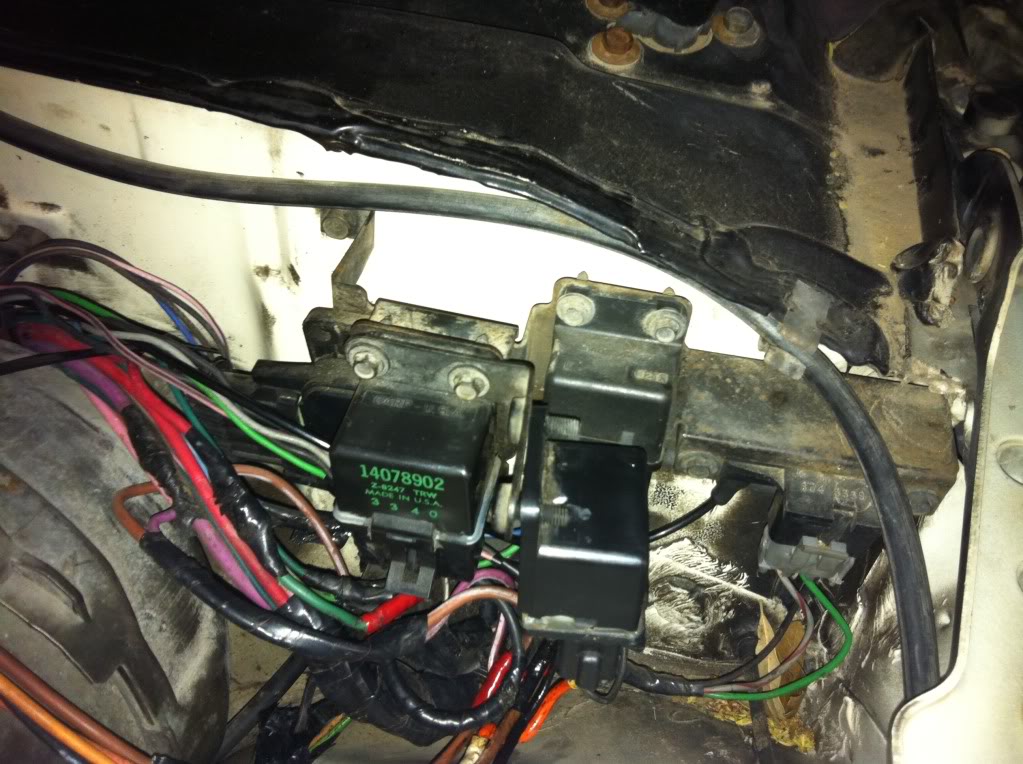
Out came the service manual. From the best I could tell is that a dealership had added the pusher pump out back and spliced into wires for it's ground and main power source. The fans were also being bypassed by an adjustable controller and the factory relay was all hacked into. I didn't like any of this so I decided to gut everything and install my own relays and controllers from Painless Wiring.
More pictures to come.
Last edited by IROCtheRoad; 11-27-2011 at 09:35 PM.
Trending Topics
11-20-2011, 01:40 AM
#8
Senior Member
Thread Starter
Join Date: Sep 2003
Location: Hurlburt Field
Posts: 738
Likes: 0
Received 1 Like
on
1 Post
Car: 84 Z28, '15 Colorado
Engine: L69
Transmission: A4
Axle/Gears: 3.73
Re: 84 Z28 H.O. Man Diary
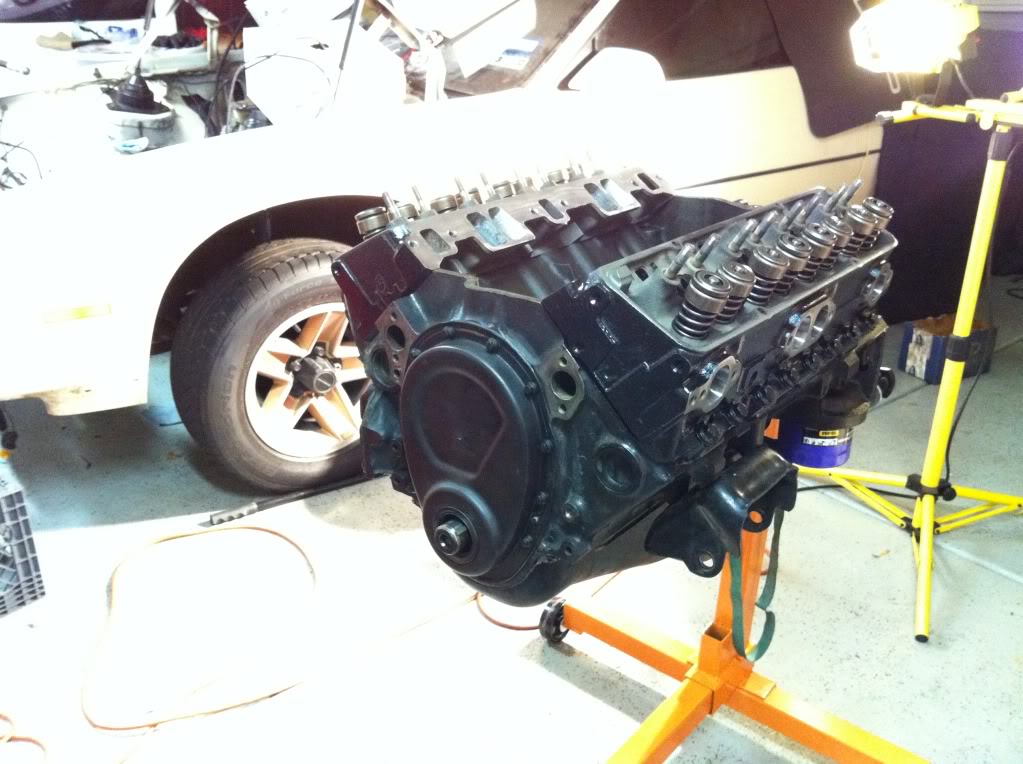
Here's the engine as it stands now:
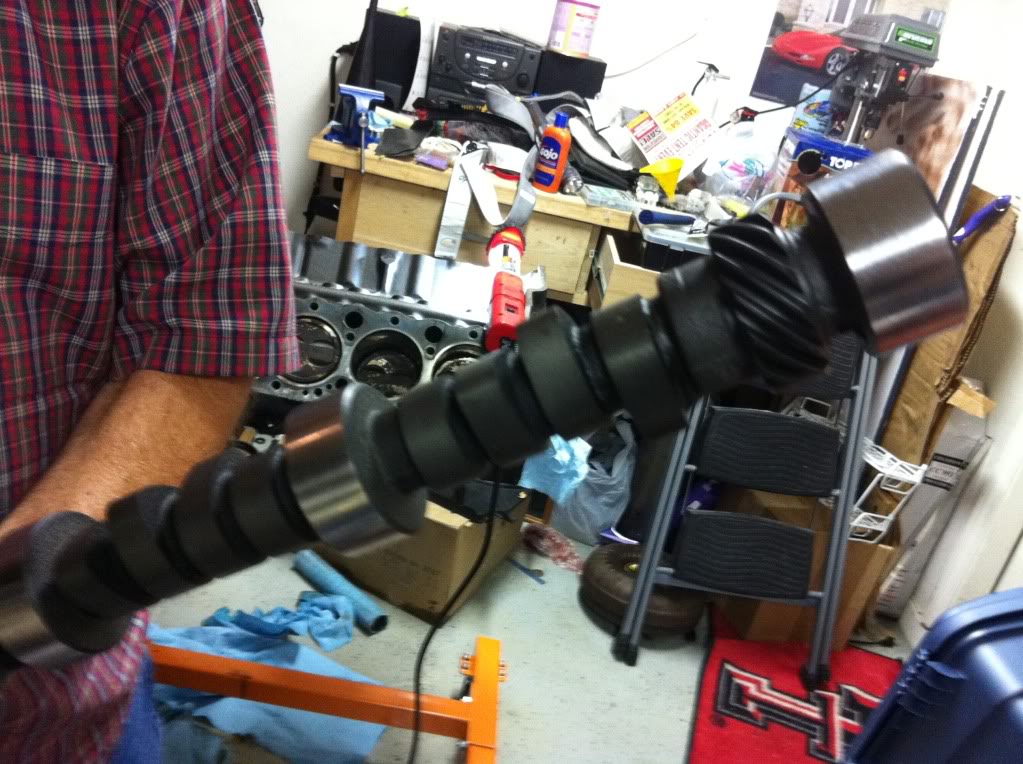
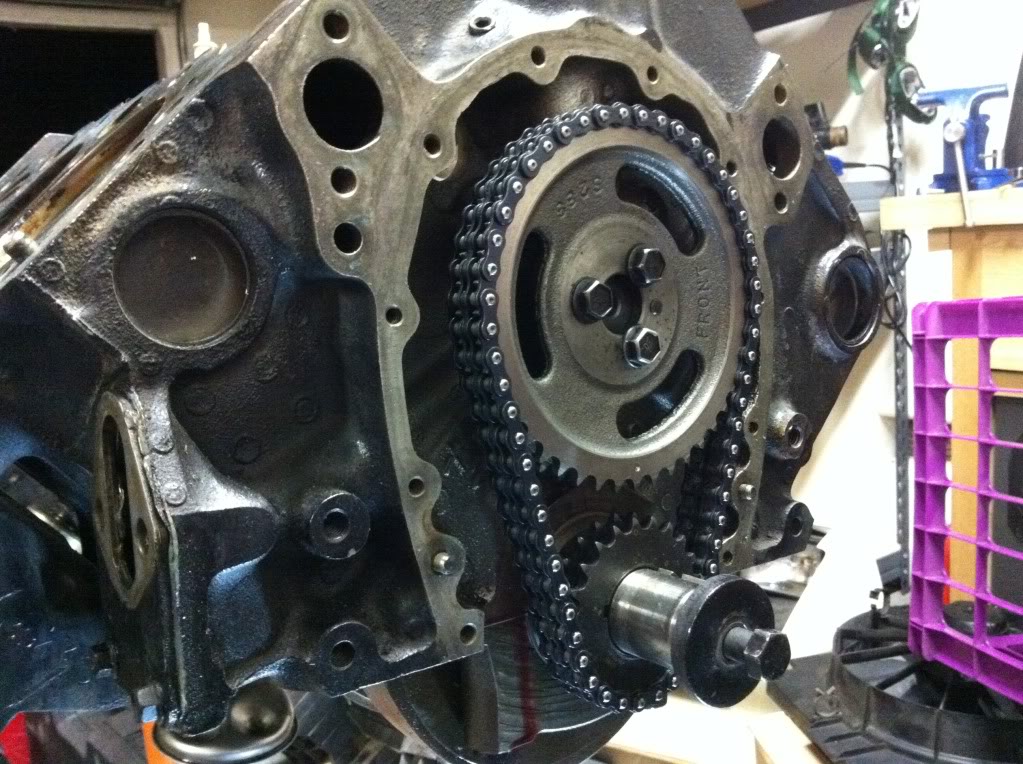
Comp Cams XE262 and double timing chain
My dad flew in for my son's birthday so we had a little father/son bonding. Pictured with a Melling high volume / high pressure oil pump that was put in prior to me.
Comp Cams XE262 and double timing chain
My dad flew in for my son's birthday so we had a little father/son bonding. Pictured with a Melling high volume / high pressure oil pump that was put in prior to me.
Last edited by IROCtheRoad; 11-27-2011 at 09:36 PM.
11-20-2011, 01:43 AM
#9
Senior Member
Thread Starter
Join Date: Sep 2003
Location: Hurlburt Field
Posts: 738
Likes: 0
Received 1 Like
on
1 Post
Car: 84 Z28, '15 Colorado
Engine: L69
Transmission: A4
Axle/Gears: 3.73
Re: 84 Z28 H.O. Man Diary
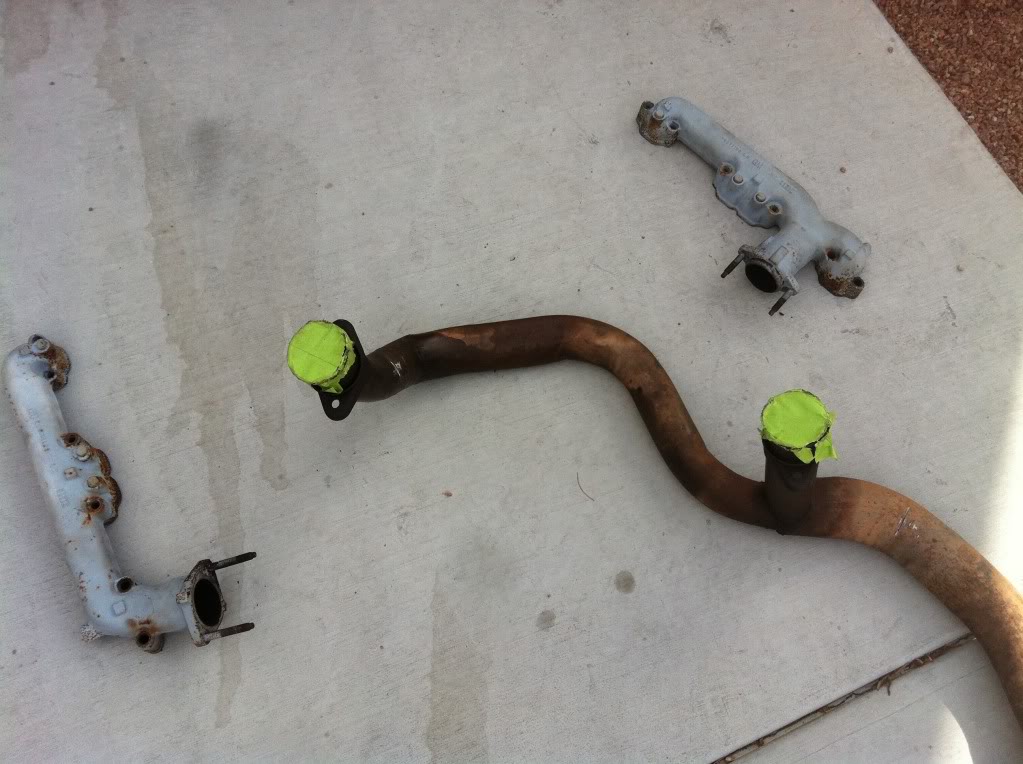
Exhaust Out

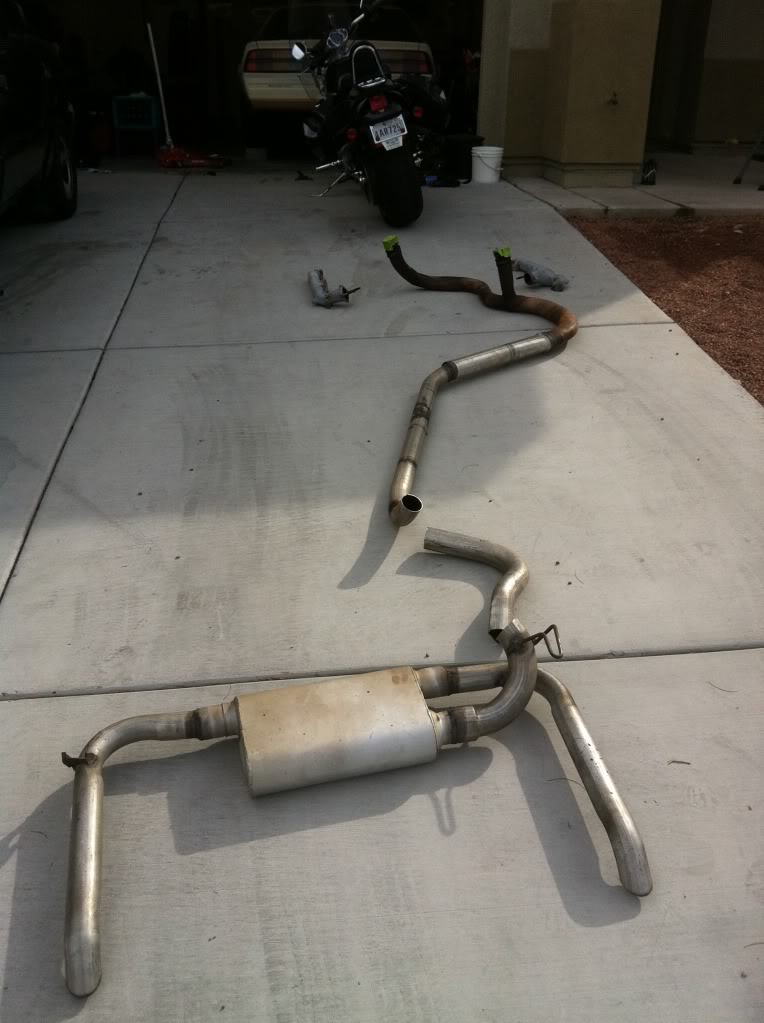
Going in is a set of Dyno Don's headers that I'm picking up over Thanksgiving weekend and a Hooker Catback system that Jegs STILL has on backorder.
Going in is a set of Dyno Don's headers that I'm picking up over Thanksgiving weekend and a Hooker Catback system that Jegs STILL has on backorder.
Last edited by IROCtheRoad; 11-27-2011 at 09:37 PM.
11-20-2011, 01:47 AM
#10
Senior Member
Thread Starter
Join Date: Sep 2003
Location: Hurlburt Field
Posts: 738
Likes: 0
Received 1 Like
on
1 Post
Car: 84 Z28, '15 Colorado
Engine: L69
Transmission: A4
Axle/Gears: 3.73
Re: 84 Z28 H.O. Man Diary
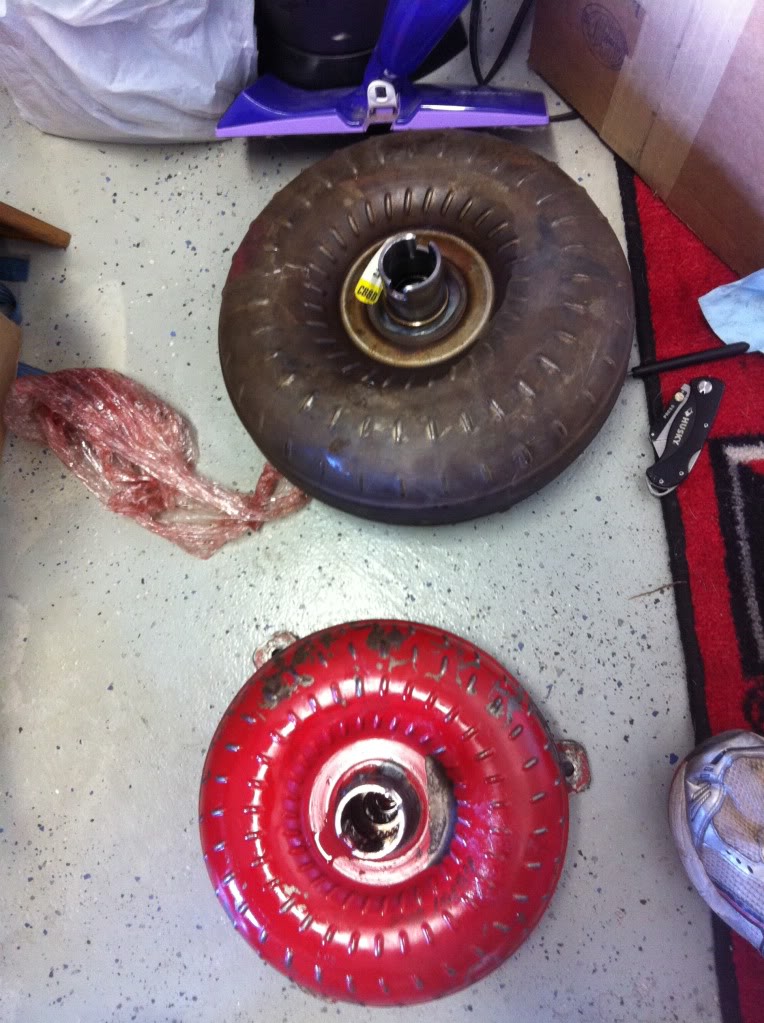
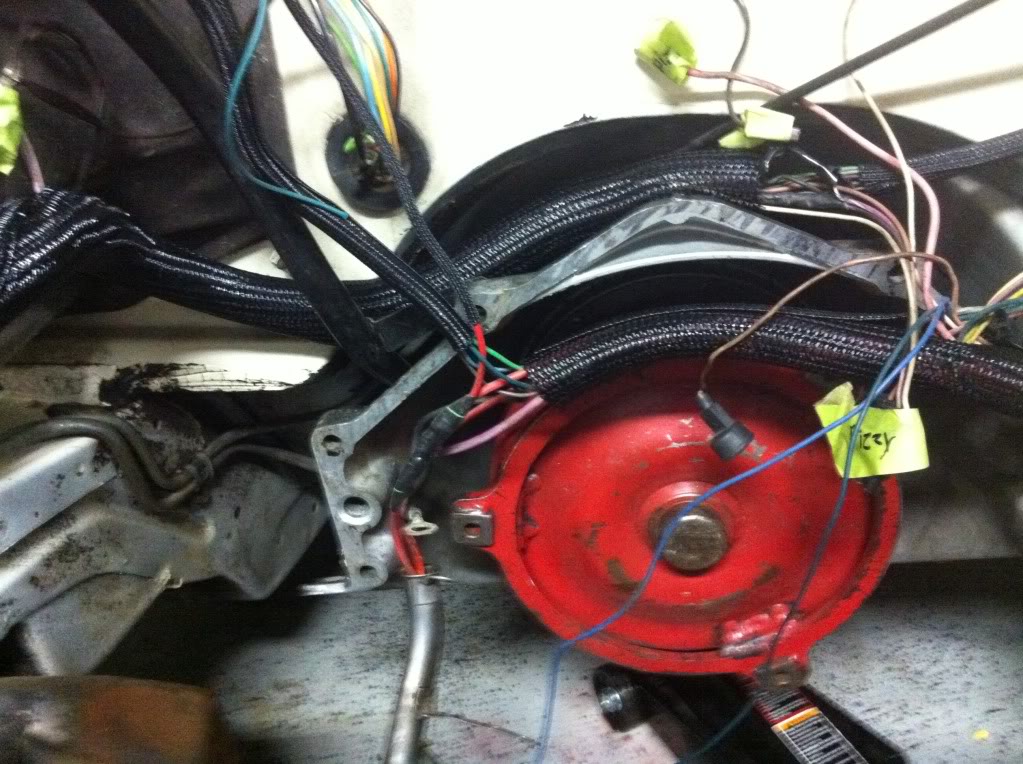
Since I have the earlier 27 spline 700R4 my lock up torque converters options are limited. I found a Hugh's 3000 stall lockup on the classified here with very low miles on it. I guess we'll find out how well it works with my setup.
I also got new motor mounts installed. I will NEVER do this again. F*** that.
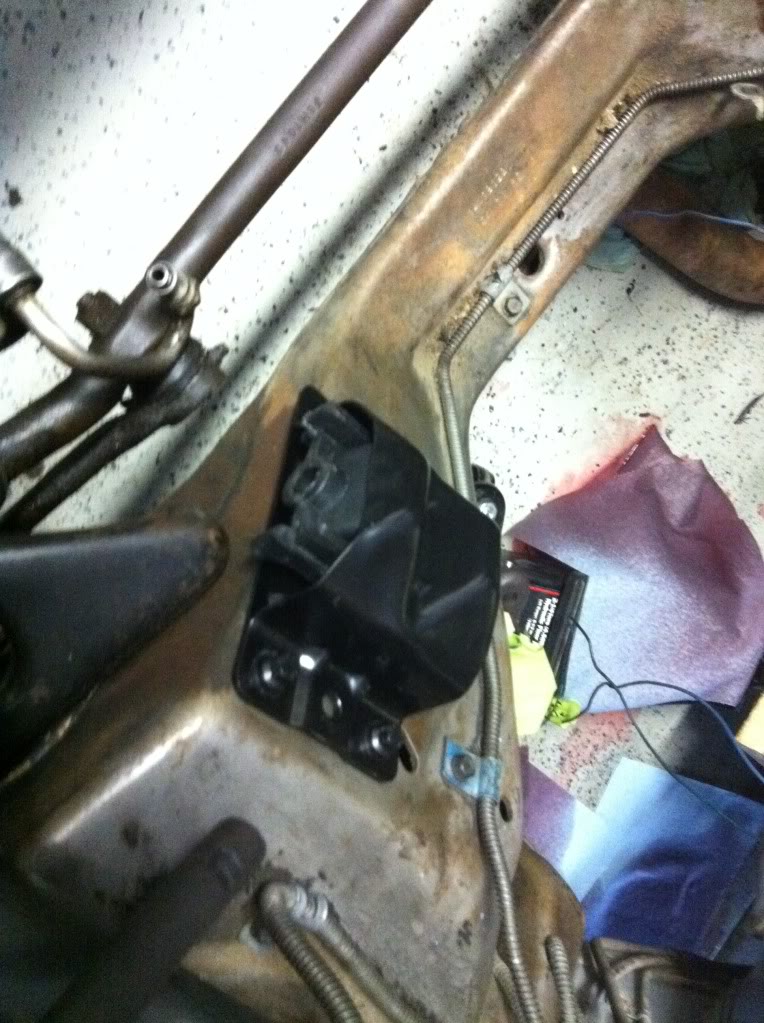
I also got new motor mounts installed. I will NEVER do this again. F*** that.
Last edited by IROCtheRoad; 11-27-2011 at 09:38 PM.
11-20-2011, 01:48 AM
#11
Senior Member
Thread Starter
Join Date: Sep 2003
Location: Hurlburt Field
Posts: 738
Likes: 0
Received 1 Like
on
1 Post
Car: 84 Z28, '15 Colorado
Engine: L69
Transmission: A4
Axle/Gears: 3.73
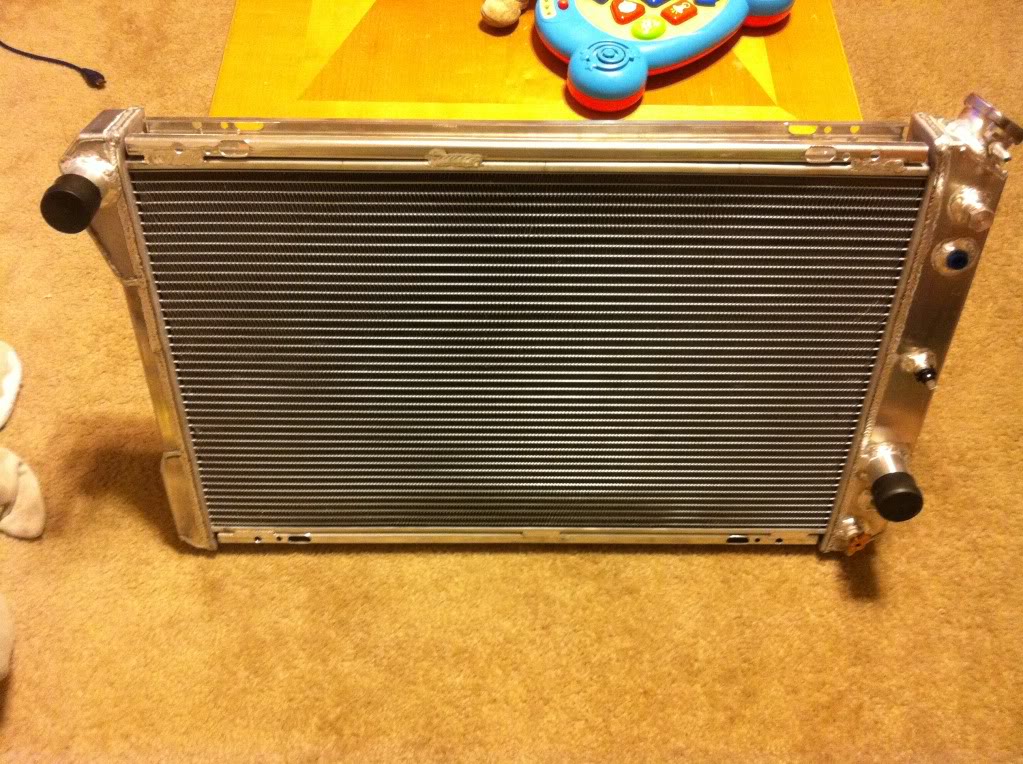
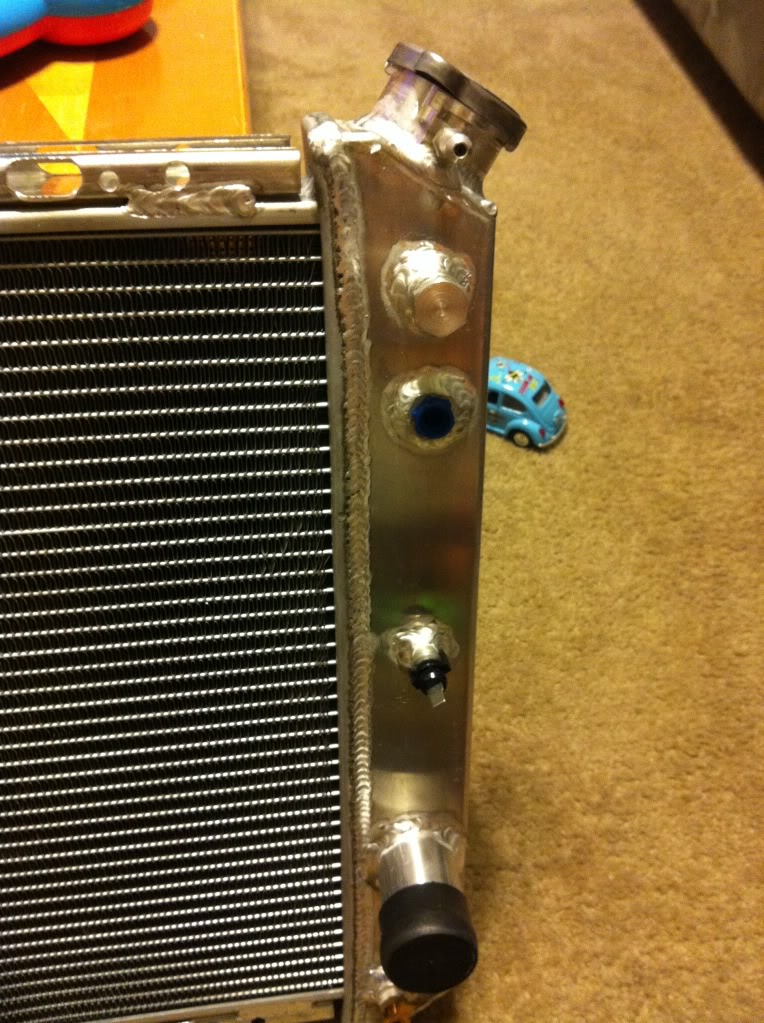
Re: 84 Z28 H.O. Man Diary
Brand new 3 core aluminium radiator just waiting to go in. This will be matted up to a LS1 fan setup with Painless Wiring kit I have.
Last edited by IROCtheRoad; 11-27-2011 at 09:39 PM.
11-20-2011, 02:39 AM
#12
Senior Member
Thread Starter
Join Date: Sep 2003
Location: Hurlburt Field
Posts: 738
Likes: 0
Received 1 Like
on
1 Post
Car: 84 Z28, '15 Colorado
Engine: L69
Transmission: A4
Axle/Gears: 3.73
Re: 84 Z28 H.O. Man Diary
A few pictures of some of the parts I have waiting to install.


Originally I was following this article to build up my little 305 untill I can get the money saved up to do a 383 with my race rods and pistons.
http://www.superchevy.com/technical/...ild/index.html
I had purchased a XE268 cam, Trickflow 175 heads, the whole 9 yards (I've never really gotten that expression, but anywho). I waited for over 2 months while Summit kept pushing back the ship date from October 15 to December 12 so I cancelled them and sent back the cam and gave up on my 380 hp 305.
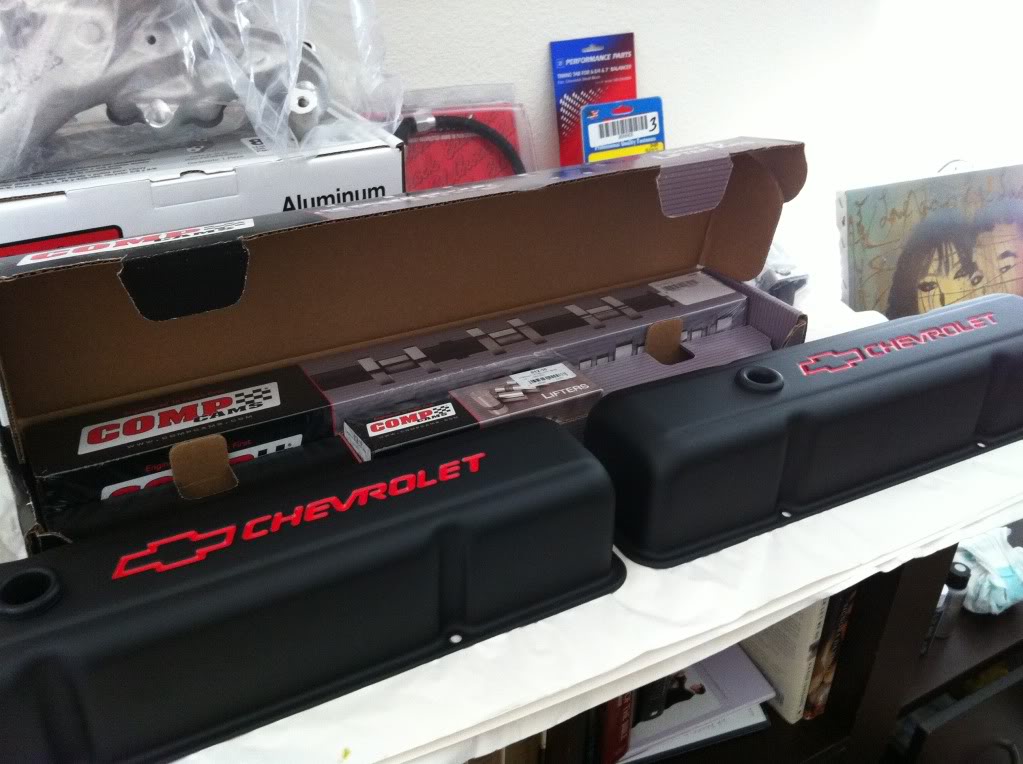
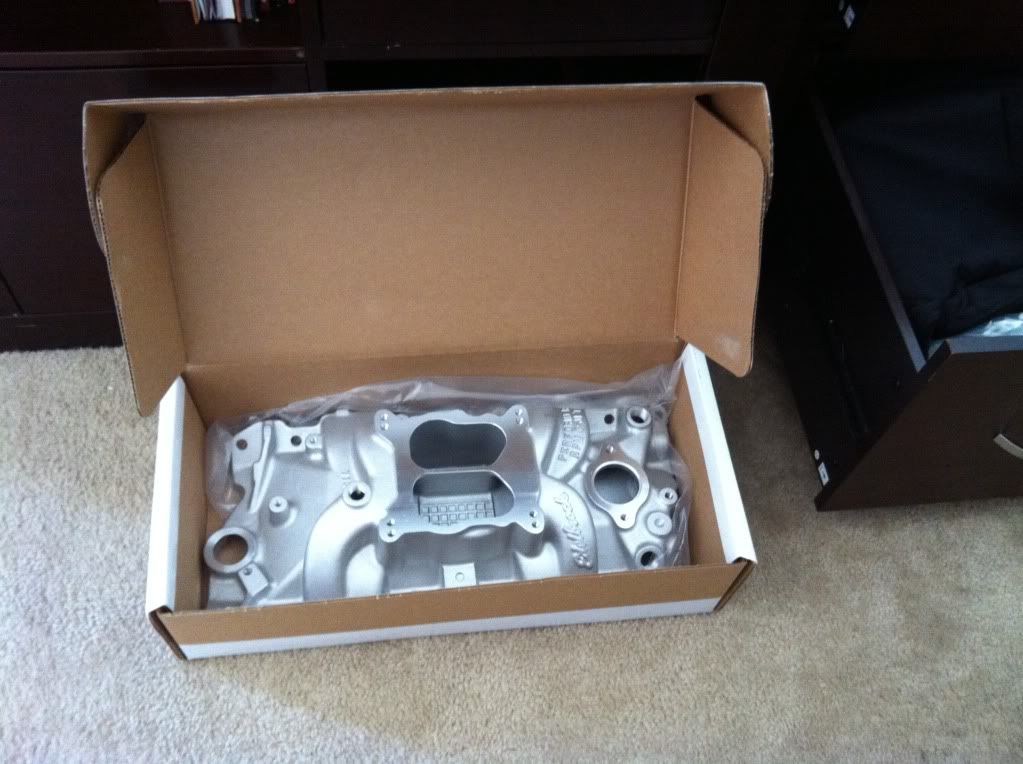
With the XE262 cam my build goes as follows:
CompCam XE262 cam
Hardened pushrods
CompCam red aluminium 1.5 rollers
Edelbrock RPM Performer Intake
DynoDon Headers with Hooker Catback
Hughs 3000 stall lock up T/C
Ported and Polished 416s (see next)
Originally I was following this article to build up my little 305 untill I can get the money saved up to do a 383 with my race rods and pistons.
http://www.superchevy.com/technical/...ild/index.html
I had purchased a XE268 cam, Trickflow 175 heads, the whole 9 yards (I've never really gotten that expression, but anywho). I waited for over 2 months while Summit kept pushing back the ship date from October 15 to December 12 so I cancelled them and sent back the cam and gave up on my 380 hp 305.
With the XE262 cam my build goes as follows:
CompCam XE262 cam
Hardened pushrods
CompCam red aluminium 1.5 rollers
Edelbrock RPM Performer Intake
DynoDon Headers with Hooker Catback
Hughs 3000 stall lock up T/C
Ported and Polished 416s (see next)
11-20-2011, 02:45 AM
#13
Senior Member
Thread Starter
Join Date: Sep 2003
Location: Hurlburt Field
Posts: 738
Likes: 0
Received 1 Like
on
1 Post
Car: 84 Z28, '15 Colorado
Engine: L69
Transmission: A4
Axle/Gears: 3.73
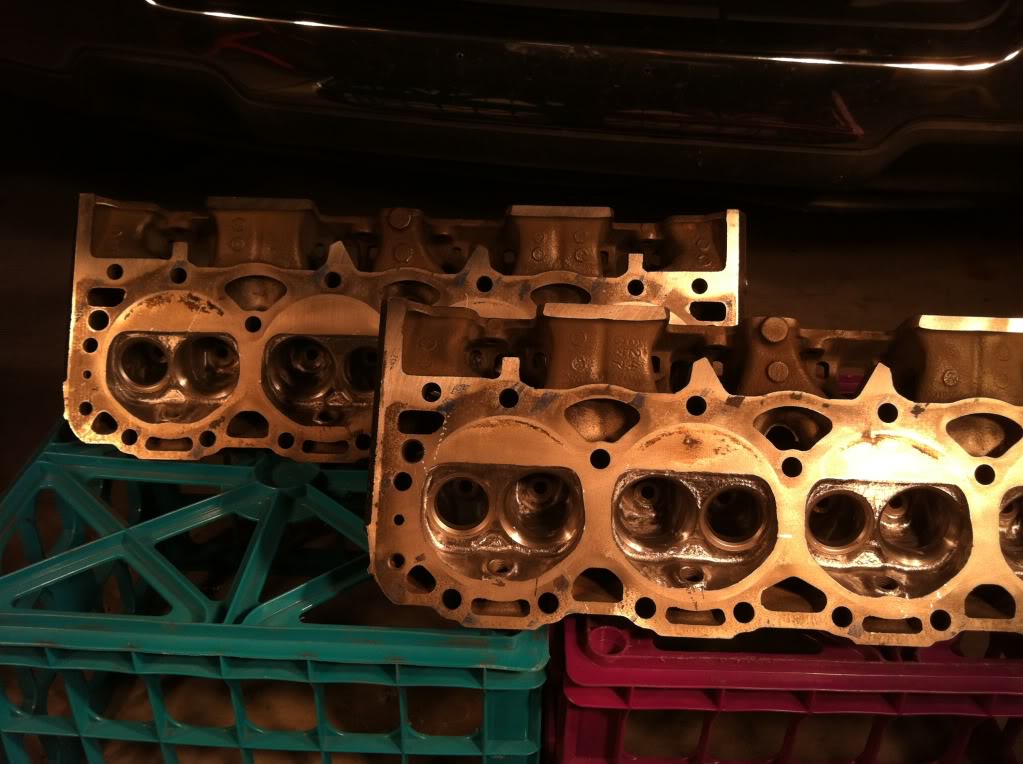
Re: 84 Z28 H.O. Man Diary
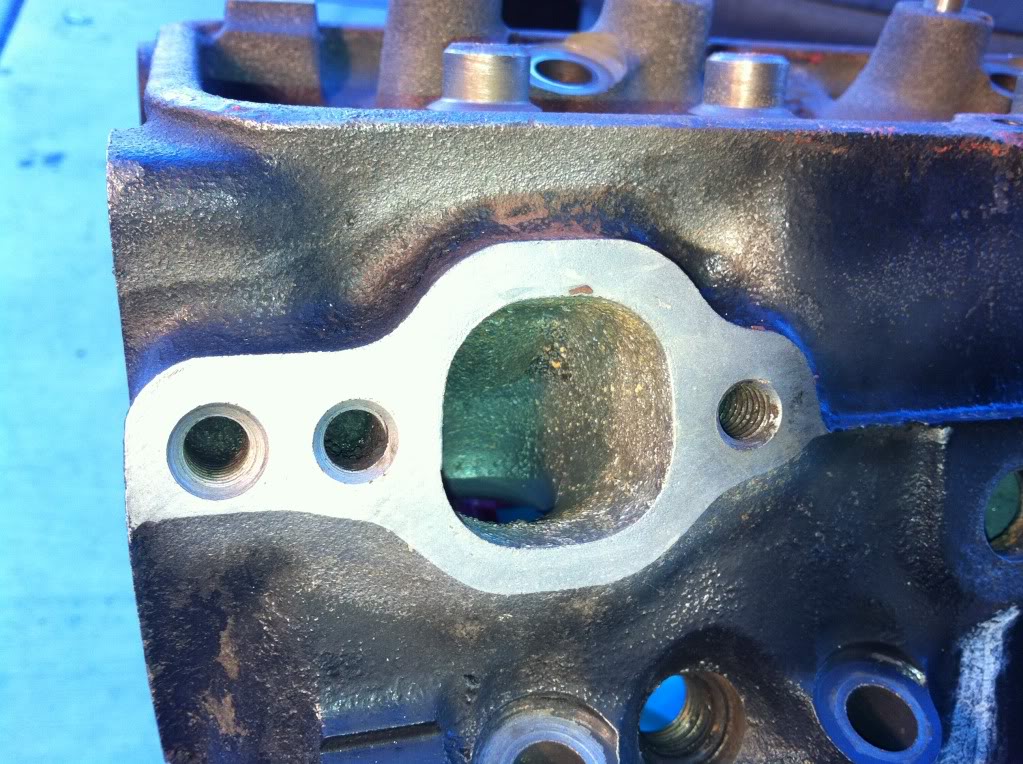
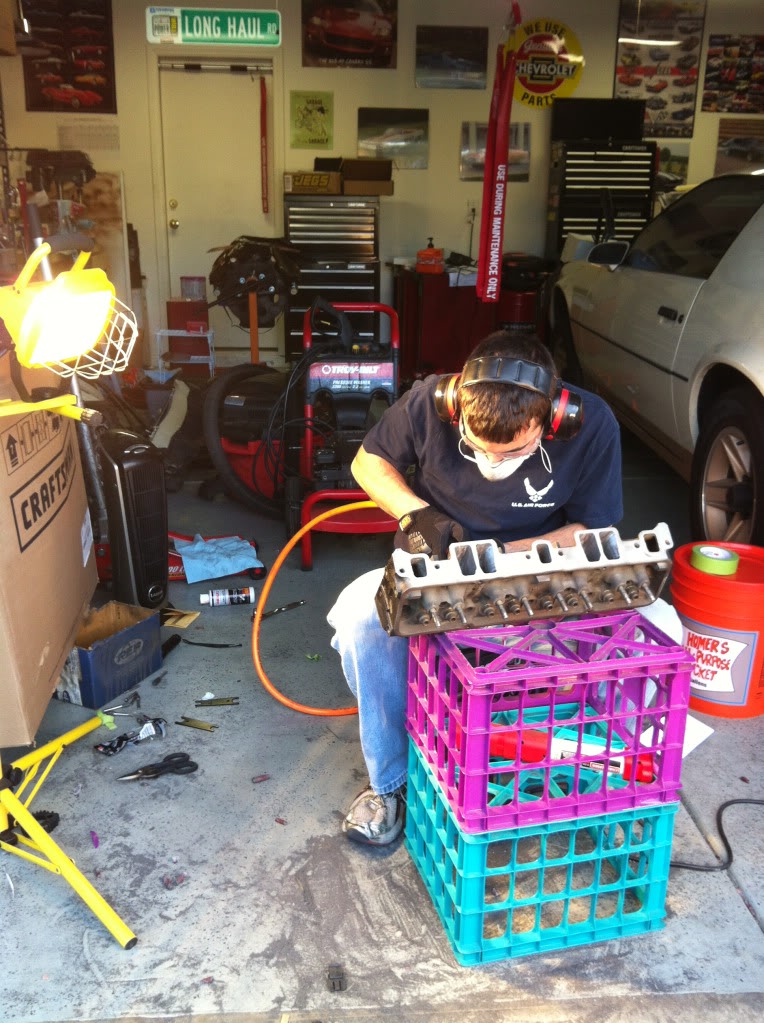
With the Trickflow 175s cancelled I decided to man up and take my crack at porting and polishing. I bought a 20 gallon air compressor (all my budget could afford), Husky air gun, carbides from Eastwood, and a Trickflow polishing kit.
Before I did this I took my heads down to a local engine builder who took apart my heads and did a 3 angle valve job. He increased the intake to 1.94 and we left the exhaust at 1.5. I bought SS Summit Racing valves.
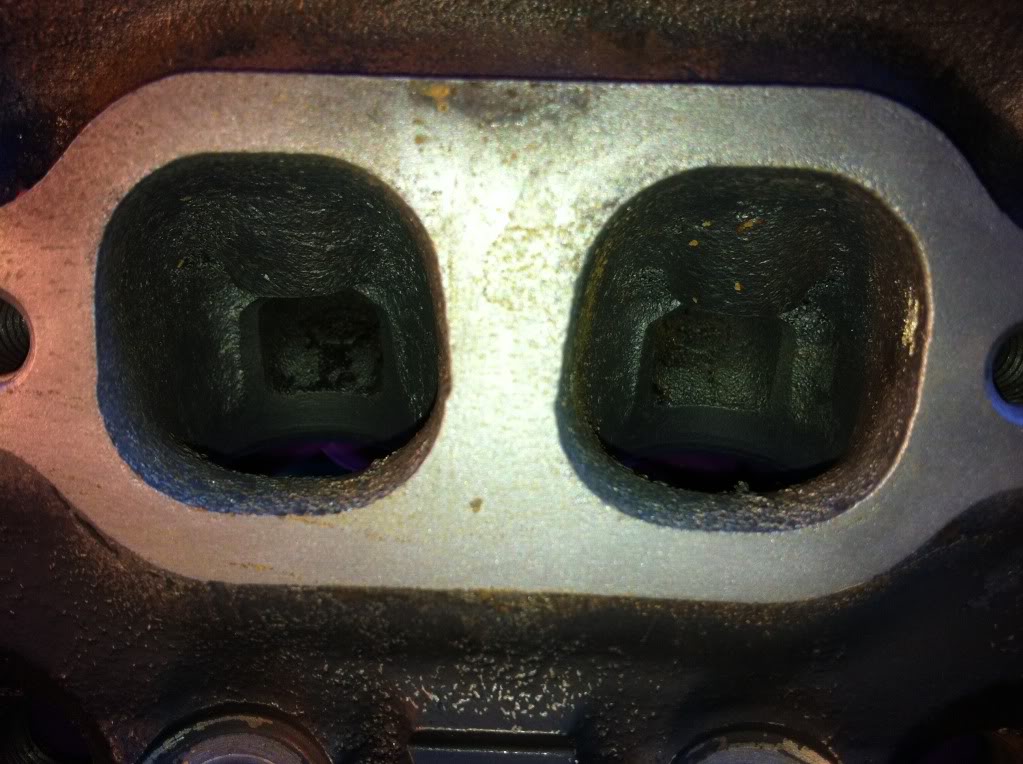
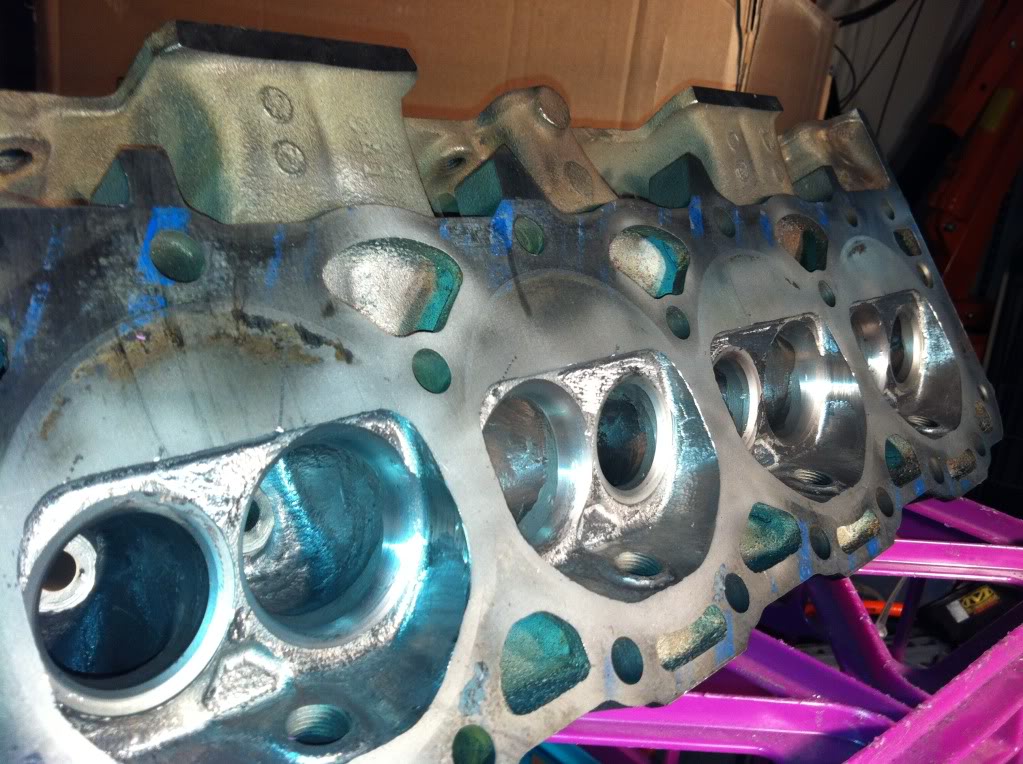
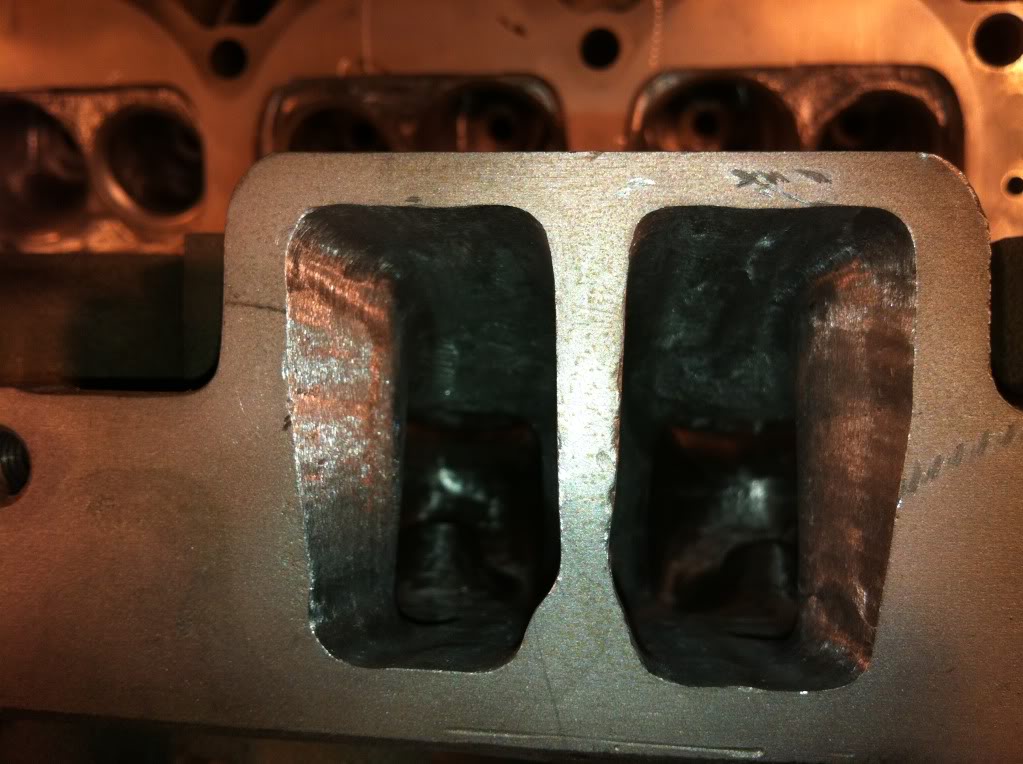
Here are a few pictures that show just how rough the stock casting is.
Here's my little setup I got
Before I did this I took my heads down to a local engine builder who took apart my heads and did a 3 angle valve job. He increased the intake to 1.94 and we left the exhaust at 1.5. I bought SS Summit Racing valves.
Here are a few pictures that show just how rough the stock casting is.
Here's my little setup I got
11-20-2011, 02:48 AM
#14
Senior Member
Thread Starter
Join Date: Sep 2003
Location: Hurlburt Field
Posts: 738
Likes: 0
Received 1 Like
on
1 Post
Car: 84 Z28, '15 Colorado
Engine: L69
Transmission: A4
Axle/Gears: 3.73
Re: 84 Z28 H.O. Man Diary
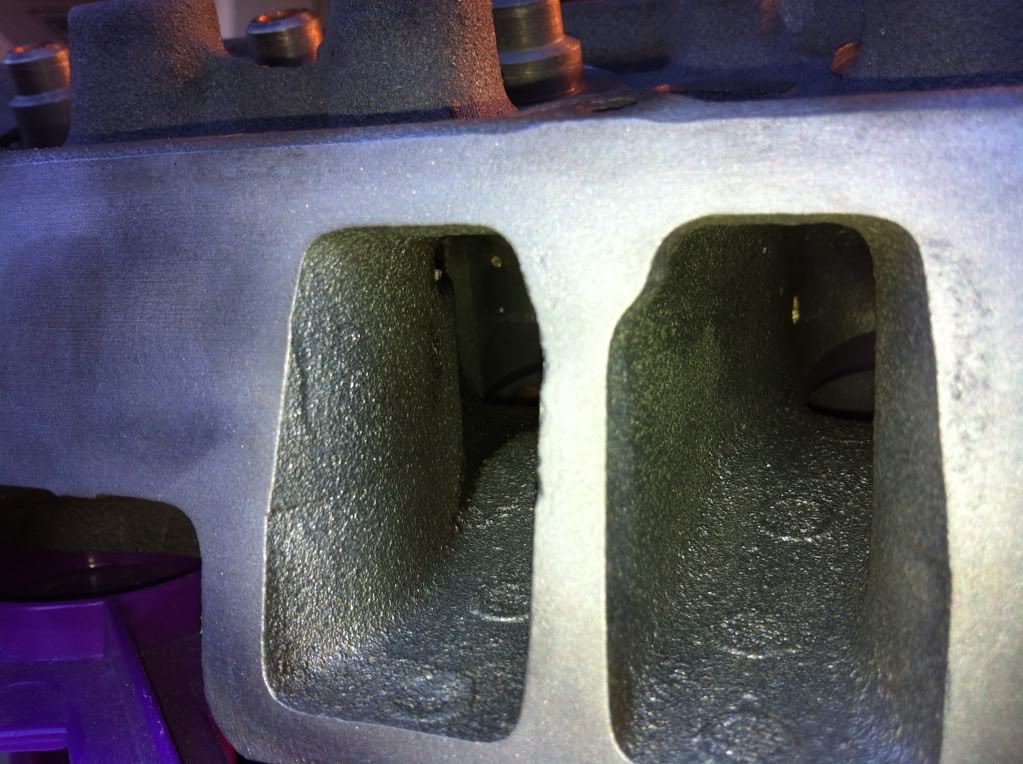
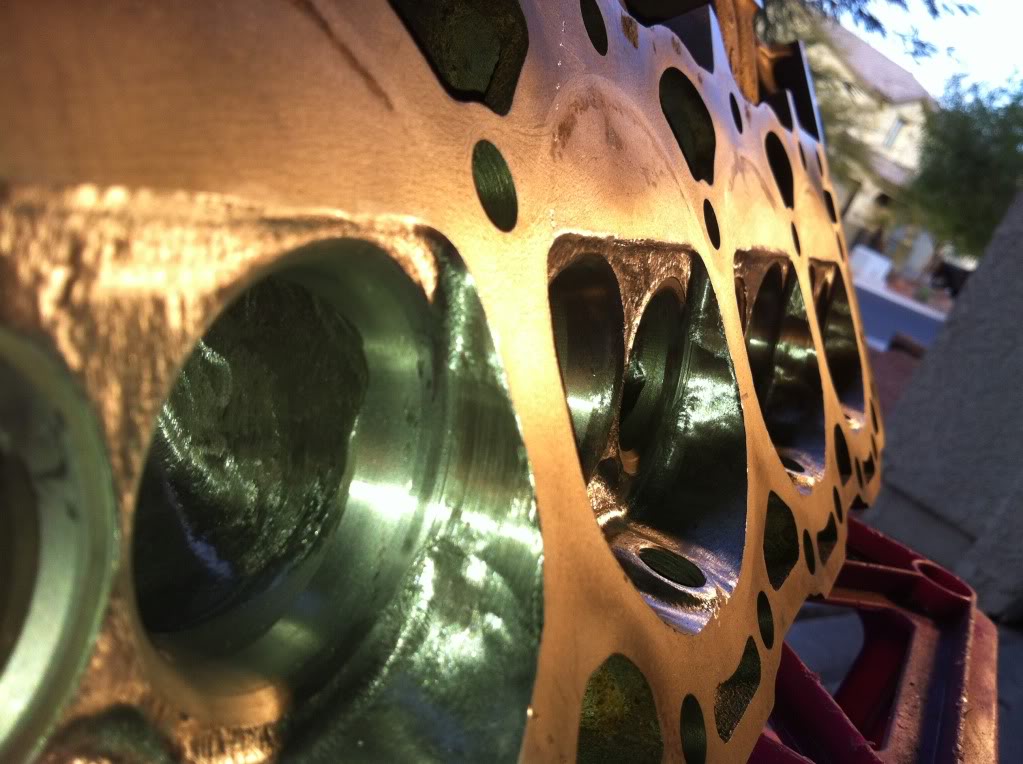
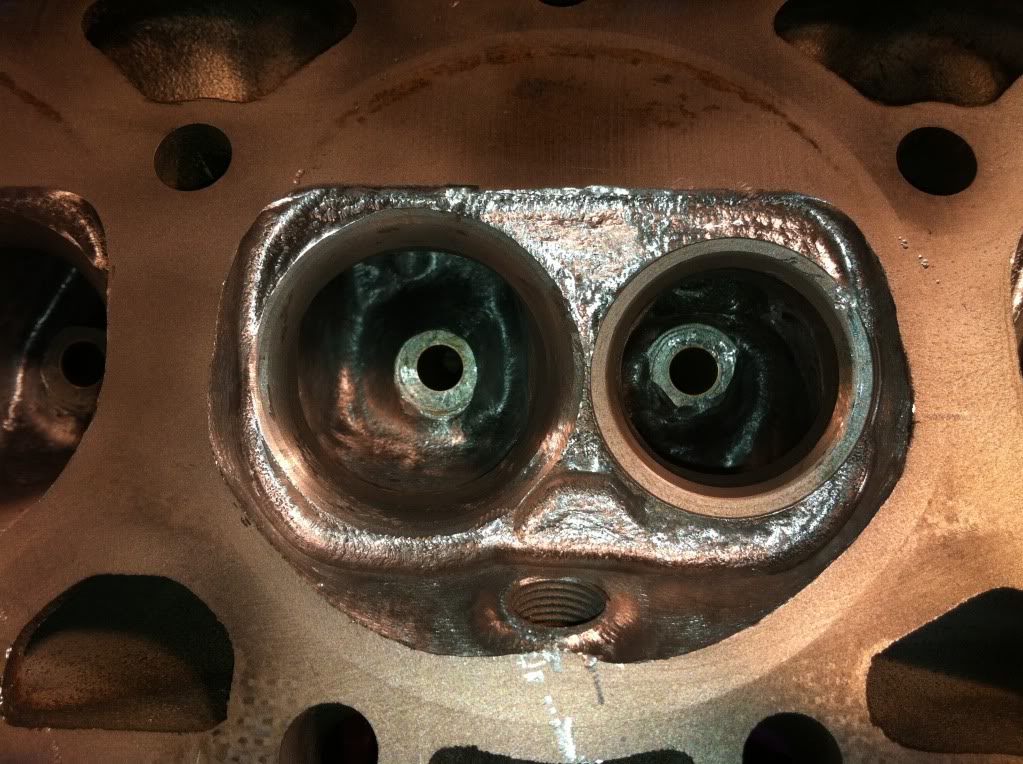
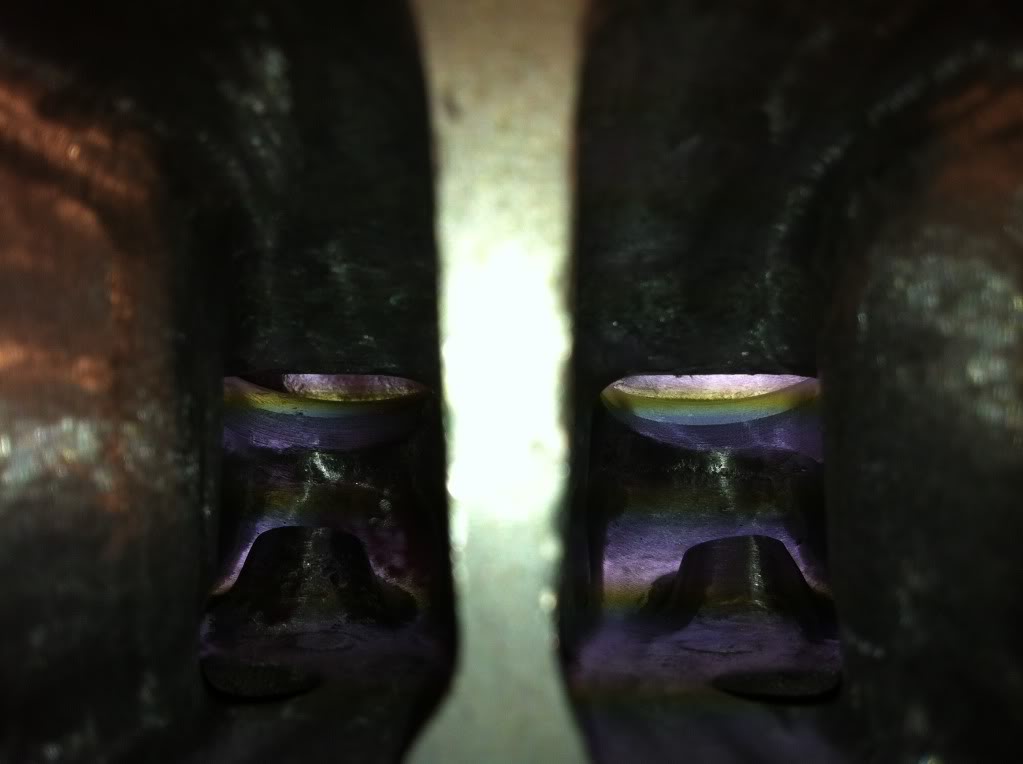
My Iphone isn't taking the best pictures of the inner ports but here are the better ones.
I just did a very light port to clear up the rough spots. I'm admittedly too afraid to cut too much out of them.
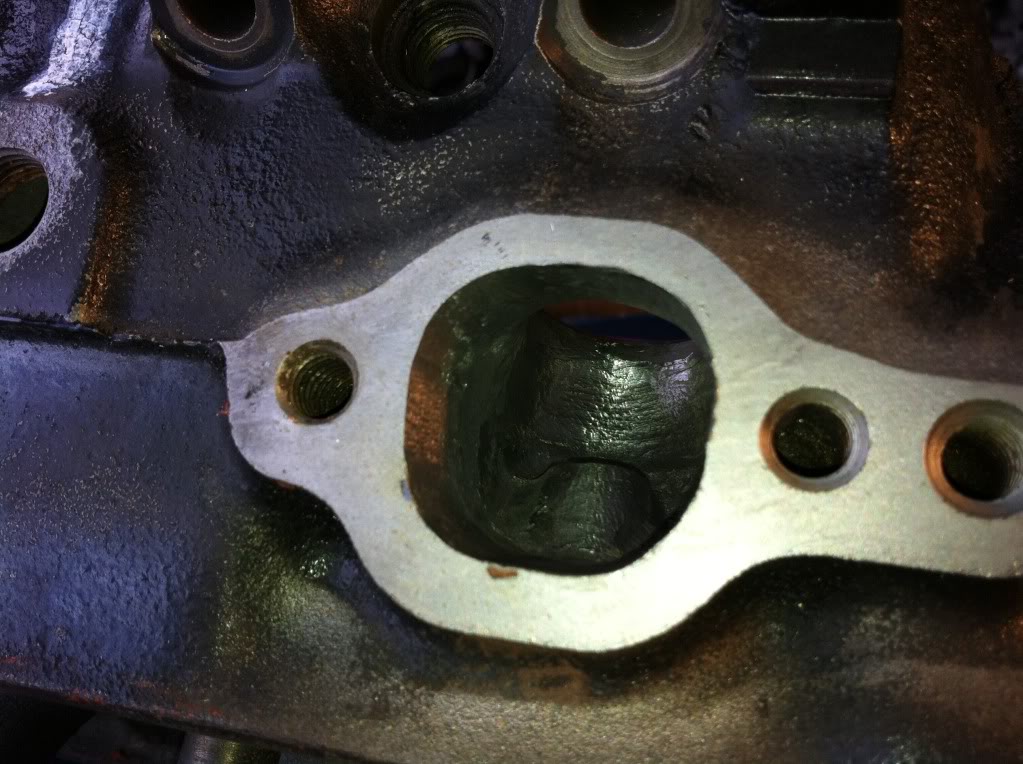
The whole head has been ported with extremely light touch up in the bowel area
I just did a very light port to clear up the rough spots. I'm admittedly too afraid to cut too much out of them.
The whole head has been ported with extremely light touch up in the bowel area
11-20-2011, 02:57 AM
#15
Senior Member
Thread Starter
Join Date: Sep 2003
Location: Hurlburt Field
Posts: 738
Likes: 0
Received 1 Like
on
1 Post
Car: 84 Z28, '15 Colorado
Engine: L69
Transmission: A4
Axle/Gears: 3.73
Re: 84 Z28 H.O. Man Diary
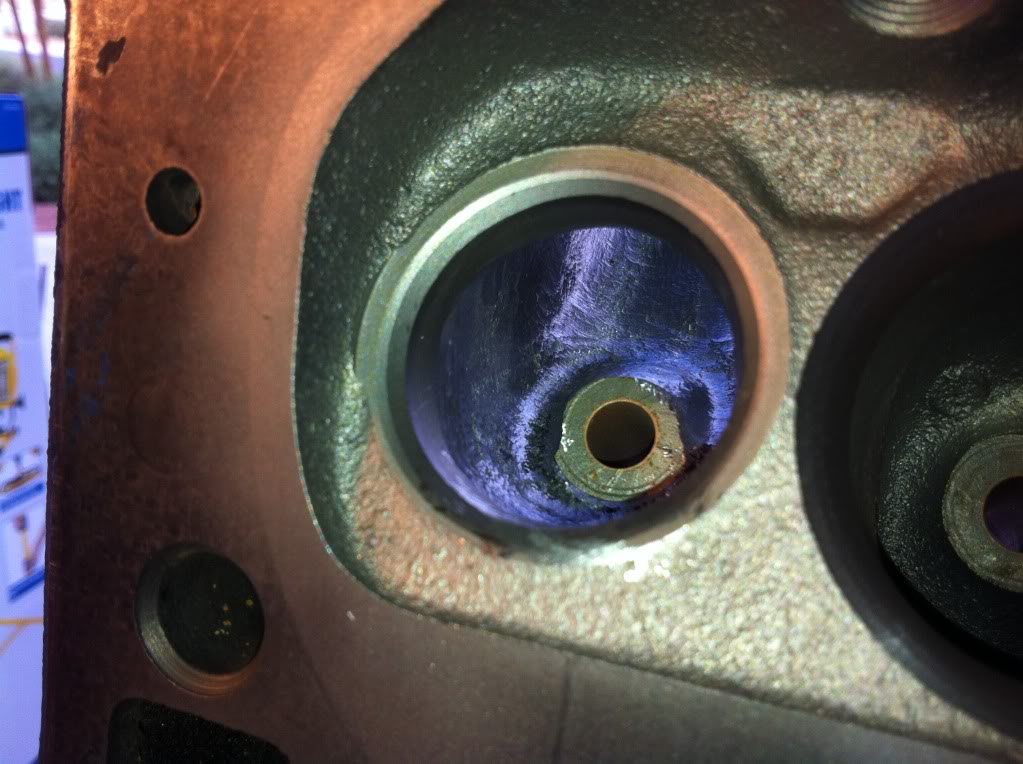
Today I started polishing. The Trickflow is doing great, but the little rolls suck! They keep falling apart or flying off of the mandrel so I've had to do the bowels with a bigger roll that I had hoped for.
Here's a few of how the polishing is coming along
I'm not able to polish the intake runners in the heads. I've ordered another mandrel that will hopefully reach further inward.
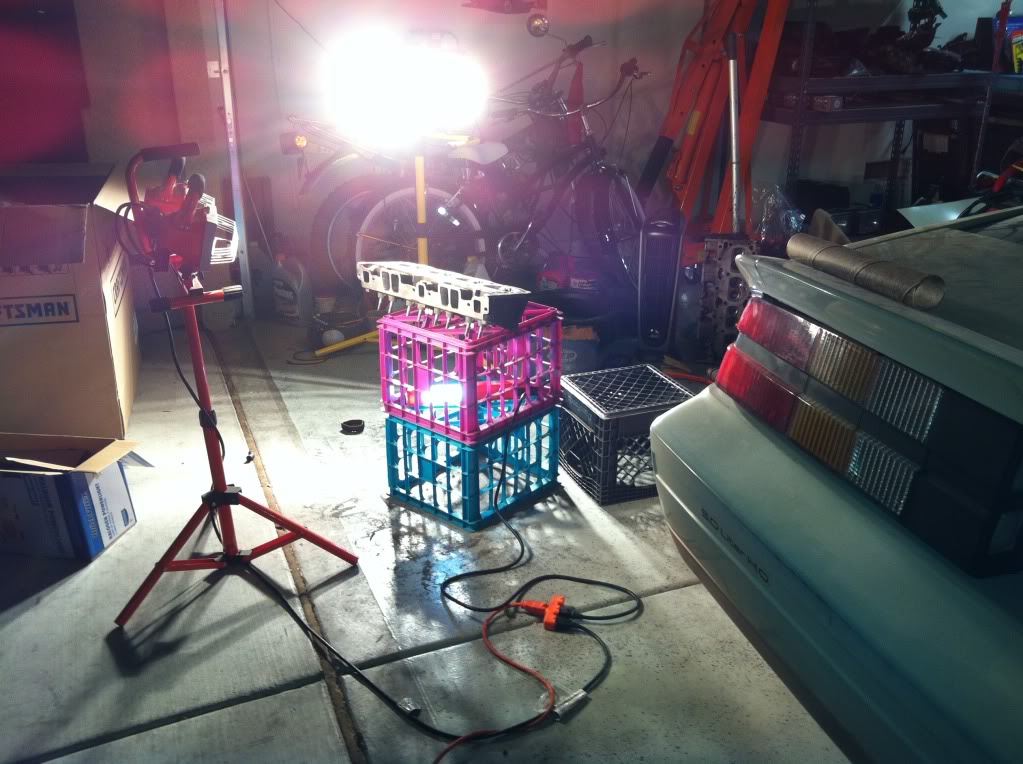
Like I said earlier I bought a Husky 20 gallon air compressor. The compressor its self is very nice, but it can't keep up with the air gun (I'm sure I'm using the wrong terminology here). I spend a lot of time waiting on the compressor to fill back up with air.
So in the meantime I've come up with this:
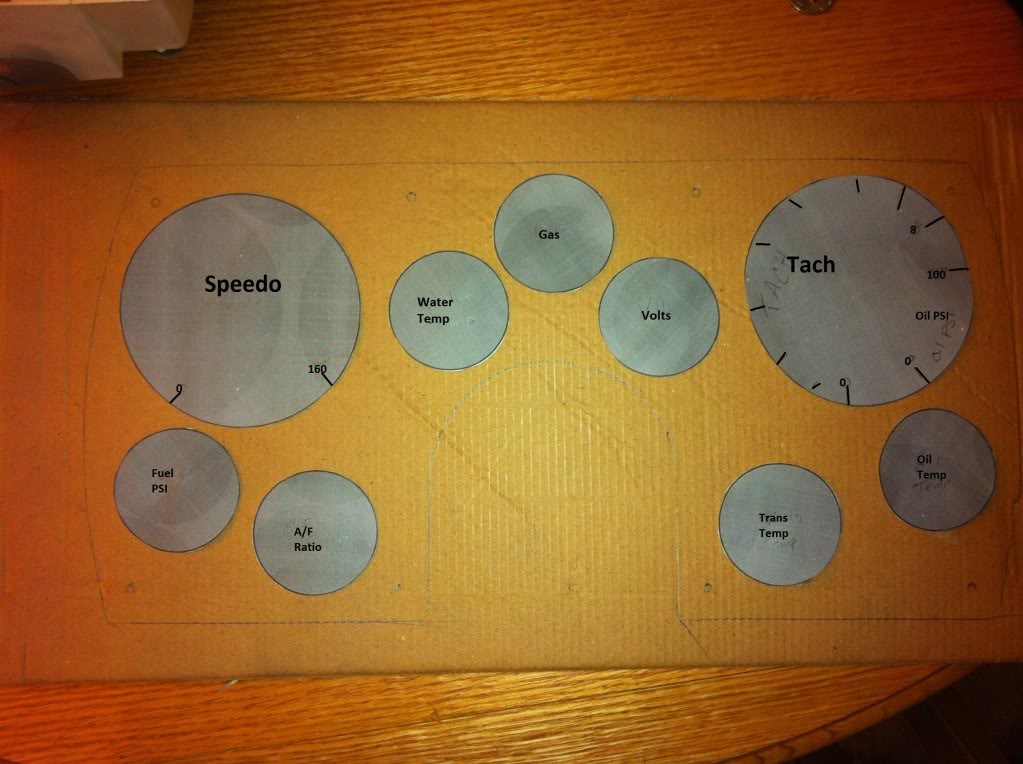
I'll be getting a full set of custom gauges from Speedhut.com including their GPS speedo. If you have any ideas on how to improve my rough idea please let me know
Here's a few of how the polishing is coming along
I'm not able to polish the intake runners in the heads. I've ordered another mandrel that will hopefully reach further inward.
Like I said earlier I bought a Husky 20 gallon air compressor. The compressor its self is very nice, but it can't keep up with the air gun (I'm sure I'm using the wrong terminology here). I spend a lot of time waiting on the compressor to fill back up with air.
So in the meantime I've come up with this:
I'll be getting a full set of custom gauges from Speedhut.com including their GPS speedo. If you have any ideas on how to improve my rough idea please let me know
11-20-2011, 02:58 AM
#16
Senior Member
Thread Starter
Join Date: Sep 2003
Location: Hurlburt Field
Posts: 738
Likes: 0
Received 1 Like
on
1 Post
Car: 84 Z28, '15 Colorado
Engine: L69
Transmission: A4
Axle/Gears: 3.73
Re: 84 Z28 H.O. Man Diary
I almost forgot! This has been my daily driver for the past 5-6 months or so.
2007 Harley VRod
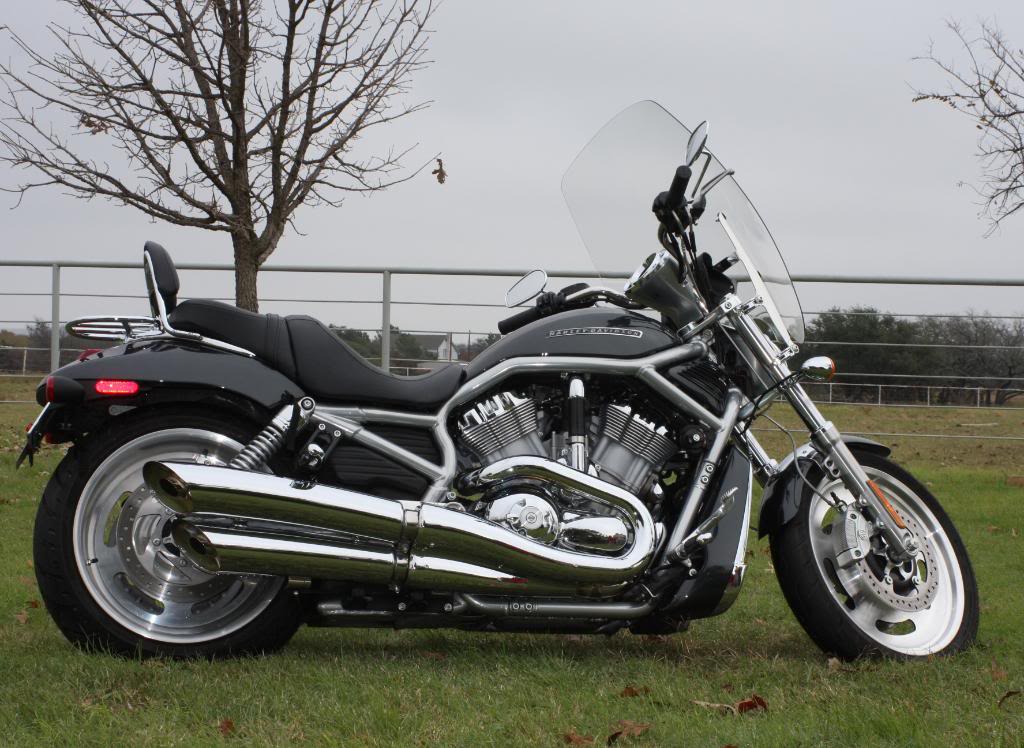
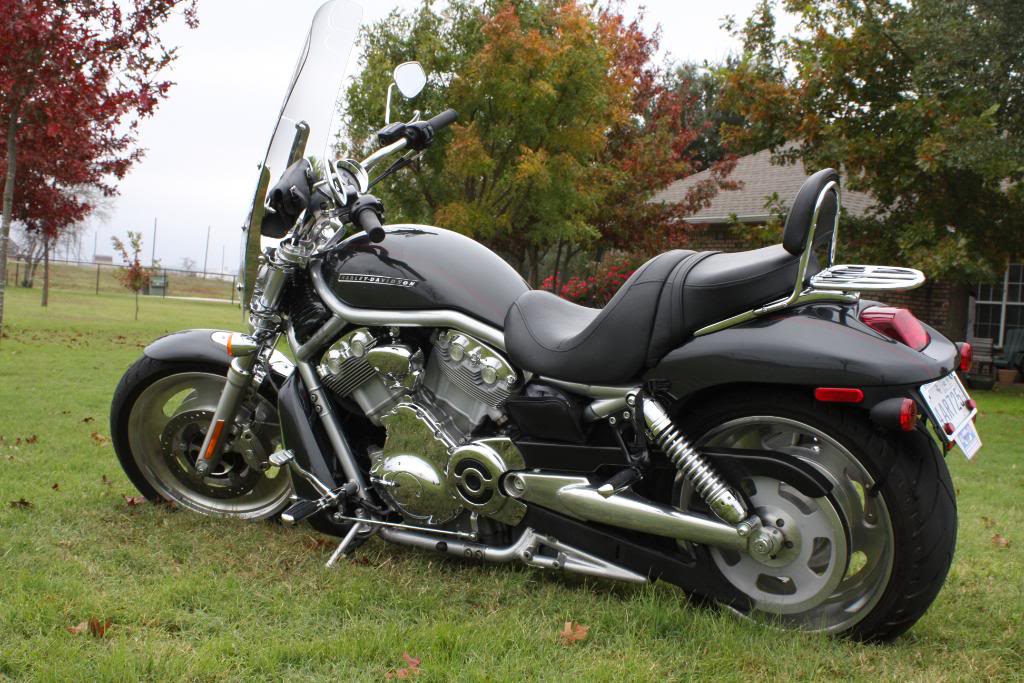
I miss grass..... and trees.... and fresh air......
2007 Harley VRod
I miss grass..... and trees.... and fresh air......
11-20-2011, 03:08 AM
#17
Senior Member
Thread Starter
Join Date: Sep 2003
Location: Hurlburt Field
Posts: 738
Likes: 0
Received 1 Like
on
1 Post
Car: 84 Z28, '15 Colorado
Engine: L69
Transmission: A4
Axle/Gears: 3.73
Re: 84 Z28 H.O. Man Diary
So that covered pretty much the past 5 months or so. I'll be updating and building as time allows.
I'm currently polishing the second head. Once that's done I'll send the heads back to the engine shop so they can do a very minor decking and re-installing the springs/valves. After that it should be fairly smooth sailing as far as the engine build goes.
I've decided to ditch the AC system for the time being. I have major vacuum leaks in the dash and the thing is literally spitting out black particles from the vents. Once I get the delete panel, I will eventually get a Vintage Air system to replace, well, everything. Unfortunately, that will have to wait until I get the 383 built (or the 302.....) so in a few years I'll have AC again.
11-20-2011, 09:06 PM
#18
Senior Member
Thread Starter
Join Date: Sep 2003
Location: Hurlburt Field
Posts: 738
Likes: 0
Received 1 Like
on
1 Post
Car: 84 Z28, '15 Colorado
Engine: L69
Transmission: A4
Axle/Gears: 3.73
Re: 84 Z28 H.O. Man Diary
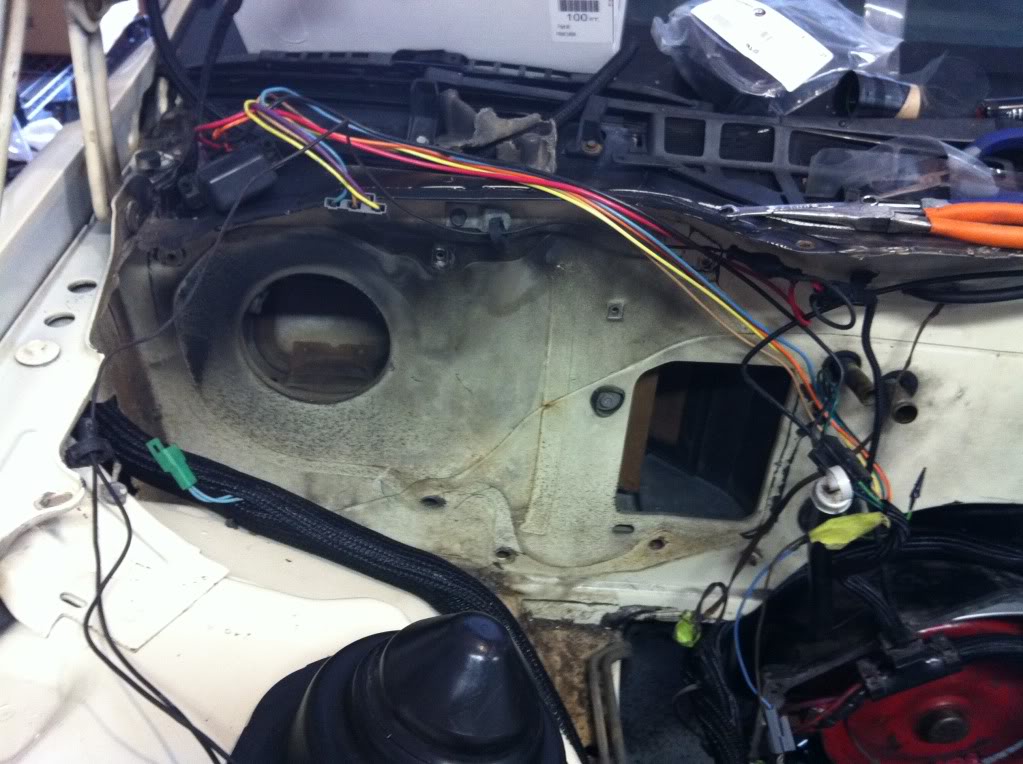
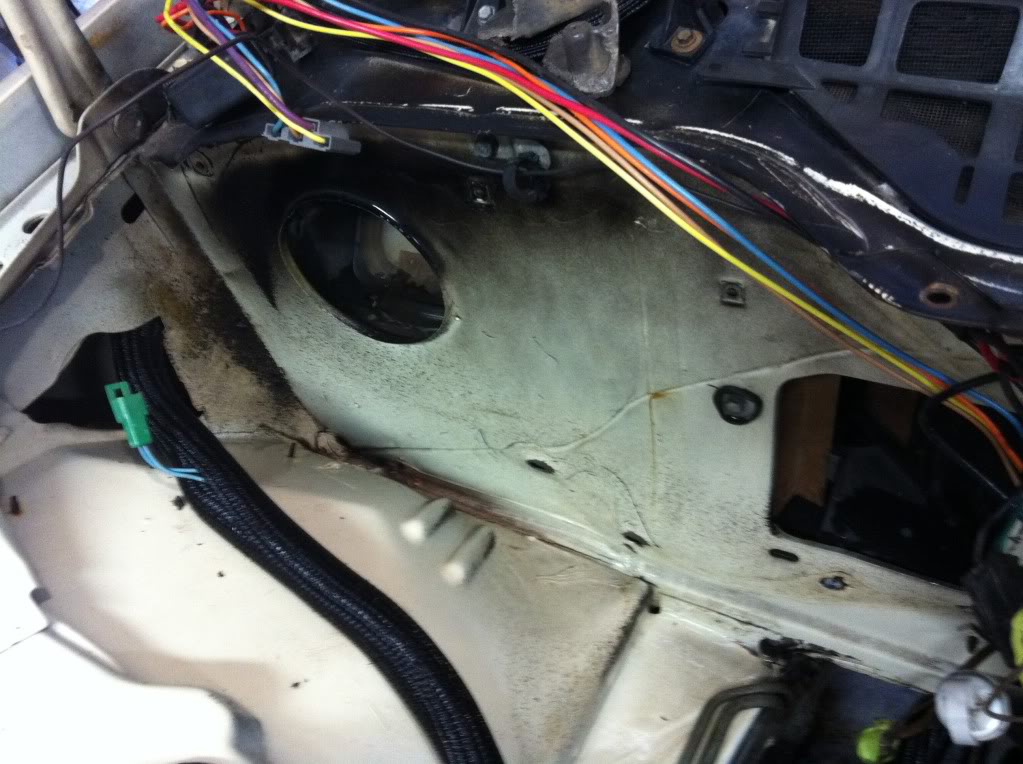
Today I spent about 6 hours or so working on the heads and finishing some other projects while the baby was asleep.
I removed the AC box.
Before cleaning
After cleaning
I scrubbed as hard as I could. That's the best it would turn out.
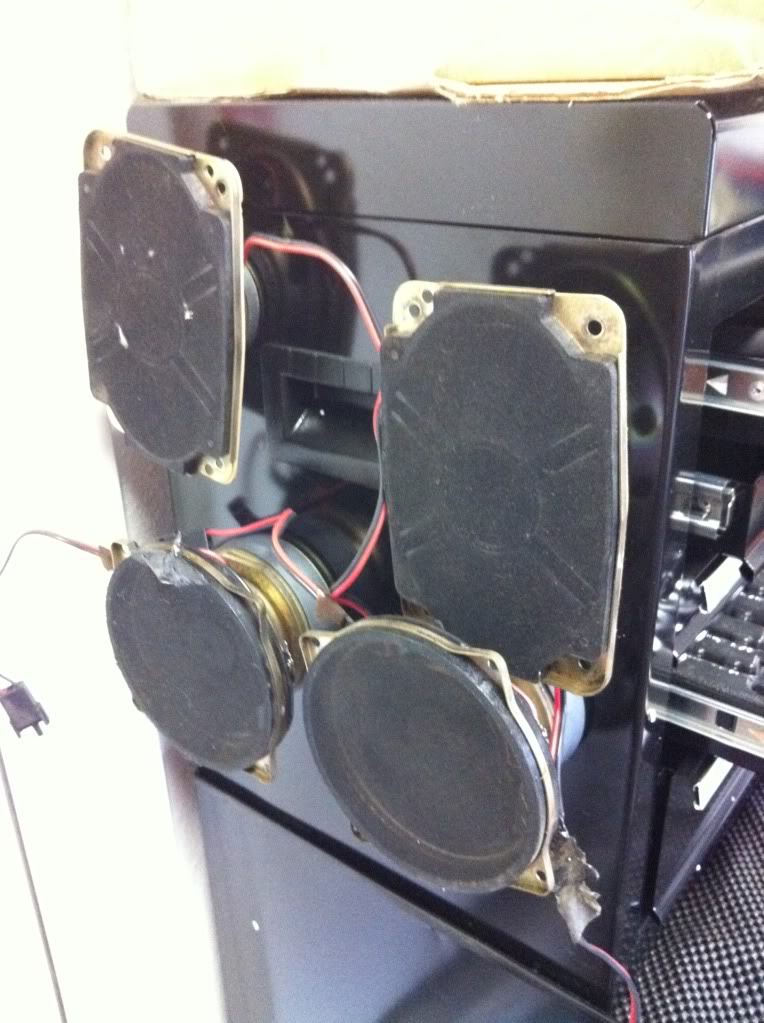
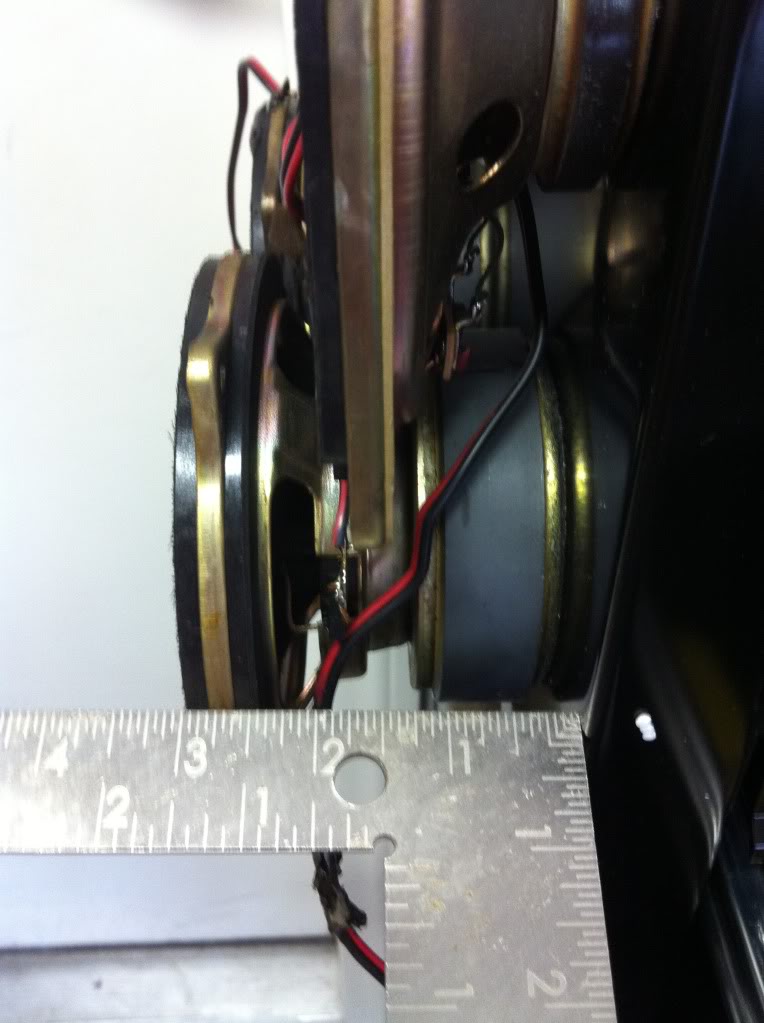
I also removed the stock subs from their housing. Here is a picture showing how deep they are.
And finally a shot or 2 of what my new wire looms look like. I'm no where near done, but just a general idea.

I removed the AC box.
Before cleaning
After cleaning
I scrubbed as hard as I could. That's the best it would turn out.
I also removed the stock subs from their housing. Here is a picture showing how deep they are.
And finally a shot or 2 of what my new wire looms look like. I'm no where near done, but just a general idea.
11-20-2011, 09:28 PM
#19
Member
Join Date: Jan 2011
Location: Guelph, ON
Posts: 188
Likes: 0
Received 1 Like
on
1 Post
Car: 1984 Chevrolet Camaro z28
Engine: 383 sbc
Transmission: 700r4
Axle/Gears: Stock...this is next
Re: 84 Z28 H.O. Man Diary
great job on keeping this journal up to date. I have an 84 z28 too, though not the HO. I will be following your thread, I want to eventually get the coveted 383 into mine too. For now, built a mild (350hp) 350 to put in next weekend. Good luck on your build.
11-20-2011, 10:14 PM
#20
 11-27-2011, 01:52 AM
#22
Senior Member
Thread Starter
Join Date: Sep 2003
Location: Hurlburt Field
Posts: 738
Likes: 0
Received 1 Like
on
1 Post
Car: 84 Z28, '15 Colorado
Engine: L69
Transmission: A4
Axle/Gears: 3.73
Re: 84 Z28 H.O. Man Diary
Thank you for the kind words everyone.
I picked up Don's Headers from his shop in California over the weekend. Great guy by-the-way.
I don't have many pictures yet, but here are some teasers:
I FINALLY finished porting the heads. More pictures!!!!
I'm still not a fan of how the combustion chambers turned out, but this is as polished as I could COMFORTABLY get them.
 11-27-2011, 01:58 AM
#24
Senior Member
Thread Starter
Join Date: Sep 2003
Location: Hurlburt Field
Posts: 738
Likes: 0
Received 1 Like
on
1 Post
Car: 84 Z28, '15 Colorado
Engine: L69
Transmission: A4
Axle/Gears: 3.73
Re: 84 Z28 H.O. Man Diary
Exhaust
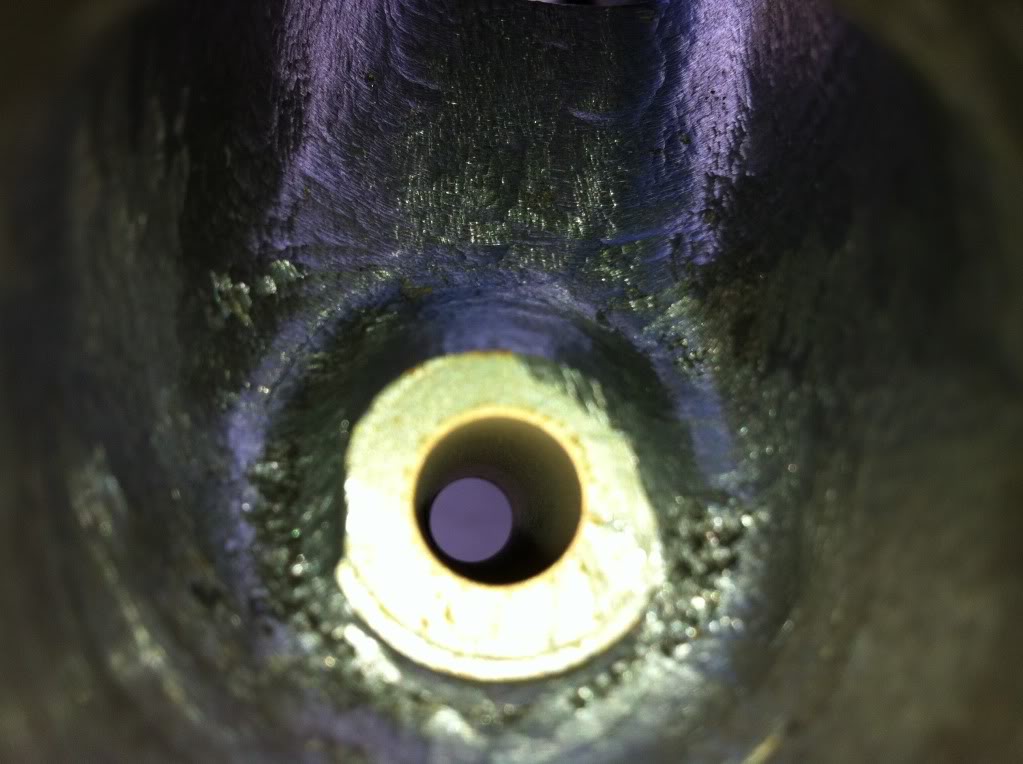
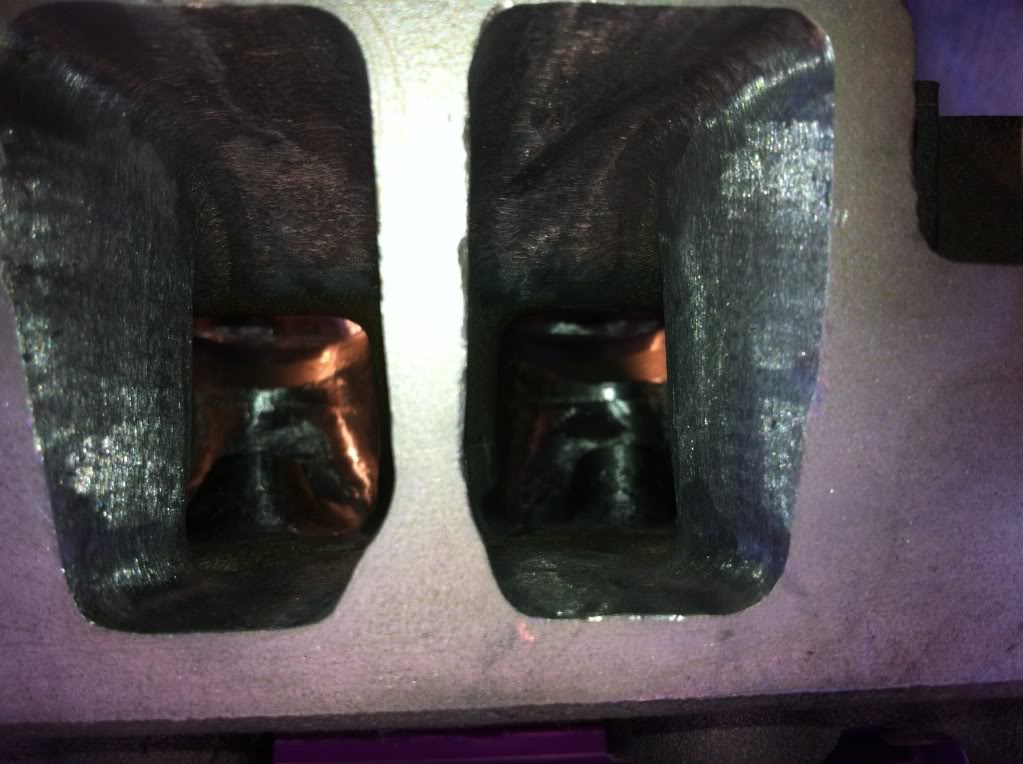
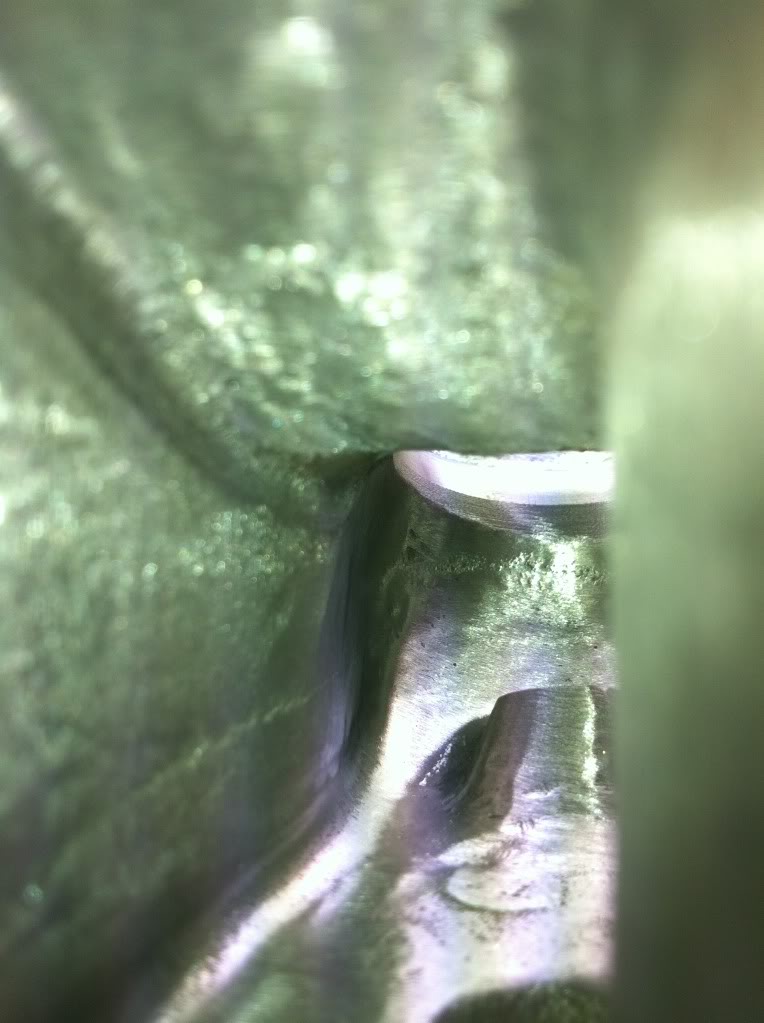
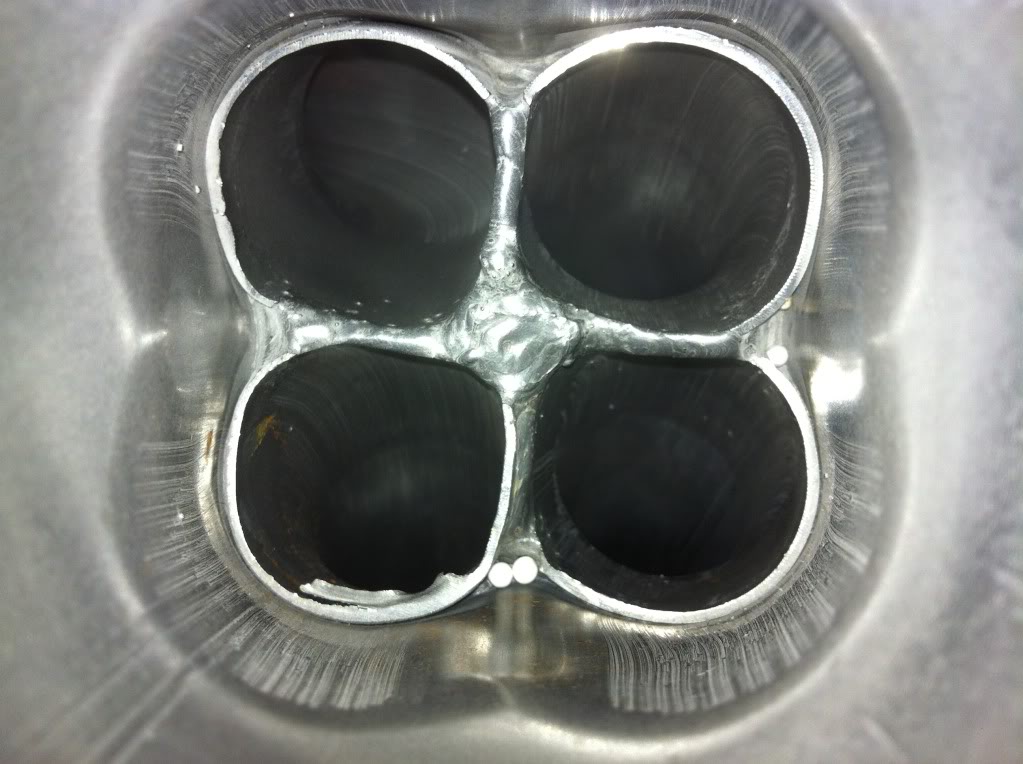
If you look on the bottom left of the picture you can see some 'pitting.' On a few of the ports I had this. I would sand and sand and sand away but they would keep showing up. I went as deep as I was comfortable with (hehe) and ended up with this:
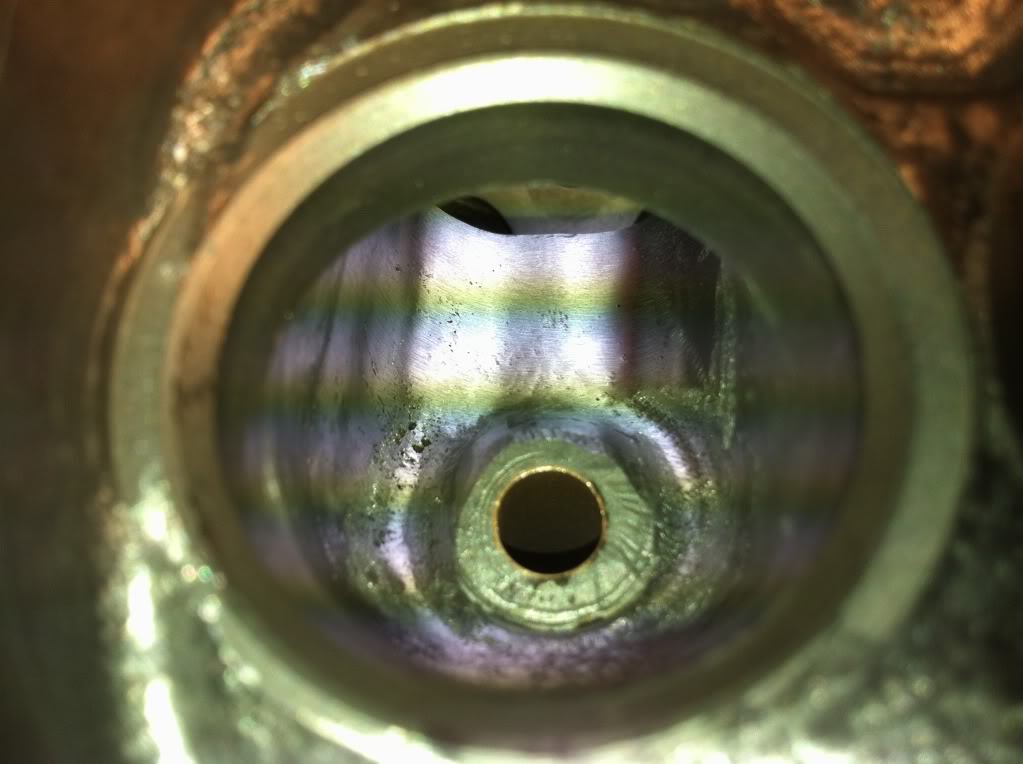
Monday I'll take them to the shop to get the valve seats retouched up since I ended up touching the valve area a few times..... A mild mill, retouch, cleaning, and reinstall and I'll FINALLY have heads again.
Overall I'm fairly happy with how everything turned out with the exception of what I've mentioned. I give kudos to those that can make heads look damn near perfect. I have over 30 hours into the heads so I'm not going to complain.
Doing this was very easy; just took some time and patience. Like I said, I didn't do a whole lot of grinding. The majority of the metal dust came from doing a thorough job of polishing. Just make sure you have a good compressor or you'll spend half your time waiting on the air to catch up with you.
If you look on the bottom left of the picture you can see some 'pitting.' On a few of the ports I had this. I would sand and sand and sand away but they would keep showing up. I went as deep as I was comfortable with (hehe) and ended up with this:
Monday I'll take them to the shop to get the valve seats retouched up since I ended up touching the valve area a few times..... A mild mill, retouch, cleaning, and reinstall and I'll FINALLY have heads again.
Overall I'm fairly happy with how everything turned out with the exception of what I've mentioned. I give kudos to those that can make heads look damn near perfect. I have over 30 hours into the heads so I'm not going to complain.
Doing this was very easy; just took some time and patience. Like I said, I didn't do a whole lot of grinding. The majority of the metal dust came from doing a thorough job of polishing. Just make sure you have a good compressor or you'll spend half your time waiting on the air to catch up with you.
Last edited by IROCtheRoad; 11-27-2011 at 02:08 AM.
11-27-2011, 02:03 AM
#25
Senior Member
Thread Starter
Join Date: Sep 2003
Location: Hurlburt Field
Posts: 738
Likes: 0
Received 1 Like
on
1 Post
Car: 84 Z28, '15 Colorado
Engine: L69
Transmission: A4
Axle/Gears: 3.73
Re: 84 Z28 H.O. Man Diary
Here's the kit I used. The Carbide bits are from Eastwood and are awesome! They even have free shipping right now.
The polish kit is from Trickflow. I wasn't too terribly happy with it. The rolls would spontaneously break or come apart. This is all I had left after 2 heads with a good 20 or so failing on me. I saved these few just in case I ever need to sand something during the build. Next time I do this I'll get the Eastwood sanding rolls and give them a try.
The rod on the far right (the 6 incher) is also from Eastwood. I needed a longer dowel to reach the center of the heads. Worked almost perfect. I ended up taking a die grinder and grinding the length down (where the rolls go on) so the smaller sand rolls would fit. Other than that it worked flawlessly.

My pile of sand rolls
My pile of metal with a spring for reference.
The polish kit is from Trickflow. I wasn't too terribly happy with it. The rolls would spontaneously break or come apart. This is all I had left after 2 heads with a good 20 or so failing on me. I saved these few just in case I ever need to sand something during the build. Next time I do this I'll get the Eastwood sanding rolls and give them a try.
The rod on the far right (the 6 incher) is also from Eastwood. I needed a longer dowel to reach the center of the heads. Worked almost perfect. I ended up taking a die grinder and grinding the length down (where the rolls go on) so the smaller sand rolls would fit. Other than that it worked flawlessly.
My pile of sand rolls
My pile of metal with a spring for reference.
11-27-2011, 02:04 AM
#26
Senior Member
Thread Starter
Join Date: Sep 2003
Location: Hurlburt Field
Posts: 738
Likes: 0
Received 1 Like
on
1 Post
Car: 84 Z28, '15 Colorado
Engine: L69
Transmission: A4
Axle/Gears: 3.73
Re: 84 Z28 H.O. Man Diary
Final post for the night.
This is what metal shaving look like when you use a magnet to clean it up. I was thoroughly tickled by this
This is what metal shaving look like when you use a magnet to clean it up. I was thoroughly tickled by this
11-27-2011, 07:23 AM
#27
Member

Join Date: Apr 2008
Location: Mechanicsville VA
Posts: 320
Received 0 Likes
on
0 Posts
Car: 1991 Z-28
Engine: 383 TPI
Transmission: 700R4
Axle/Gears: 2.73
Re: 84 Z28 H.O. Man Diary
Great project....I like the wire loom material you used. Where do you get that? Any idea if it holds up to the heat any better than normal wire loom?
11-27-2011, 03:20 PM
#28
Junior Member
Join Date: Oct 2005
Location: Ottawa (Canada)
Posts: 49
Likes: 0
Received 1 Like
on
1 Post
Car: 83 Z28 / 87 IROC-Z / 95 Z28
Engine: LG4 / LG4 / LT1
Transmission: 200C / 700R4 / T56
Axle/Gears: 3.08 / 3.23 / 3.42
Re: 84 Z28 H.O. Man Diary
Awesome "diary"...these kinds of threads are my favourite to see on here. The car looks great and clean, and with the work you're doing it'll haul-***.
Keep sharing!
Keep sharing!
11-27-2011, 09:28 PM
#29
Senior Member
Thread Starter
Join Date: Sep 2003
Location: Hurlburt Field
Posts: 738
Likes: 0
Received 1 Like
on
1 Post
Car: 84 Z28, '15 Colorado
Engine: L69
Transmission: A4
Axle/Gears: 3.73
Re: 84 Z28 H.O. Man Diary
So half of my pictures are gone...... fixing.....
Never change the name of your albums on Photobucket.com
Never change the name of your albums on Photobucket.com
Last edited by IROCtheRoad; 11-28-2011 at 06:37 PM.
11-27-2011, 09:43 PM
#30
Senior Member
Thread Starter
Join Date: Sep 2003
Location: Hurlburt Field
Posts: 738
Likes: 0
Received 1 Like
on
1 Post
Car: 84 Z28, '15 Colorado
Engine: L69
Transmission: A4
Axle/Gears: 3.73
Re: 84 Z28 H.O. Man Diary
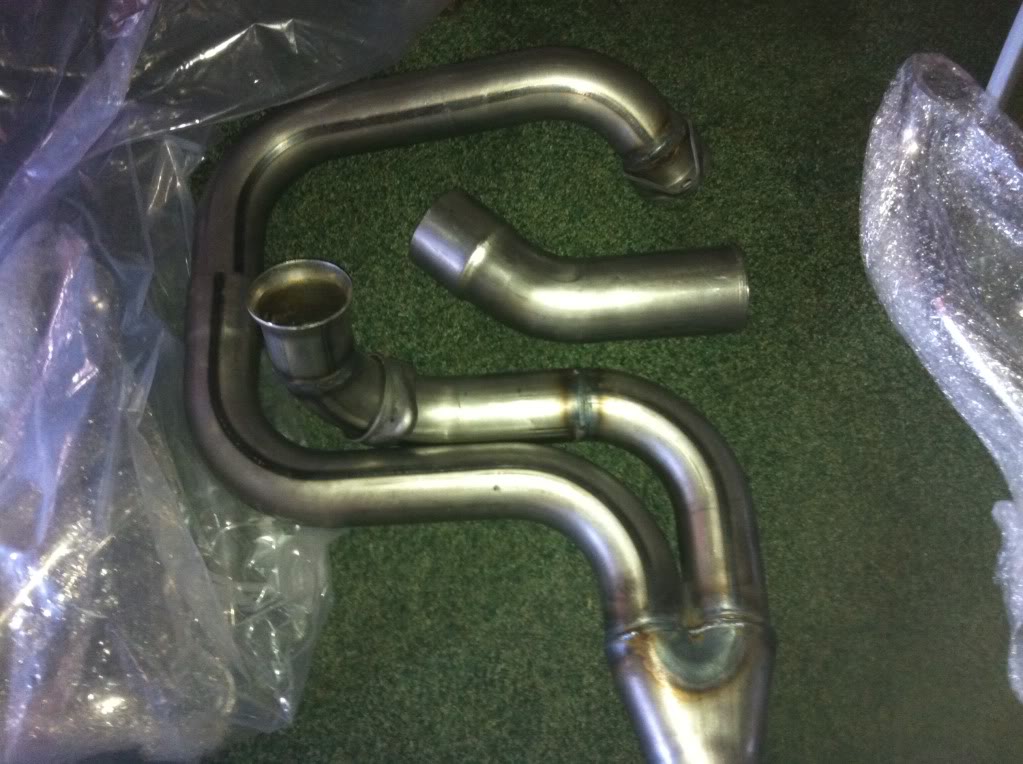
Exhaust Pictures from Don himself!!!!!
Comparisons shots:
Old
New
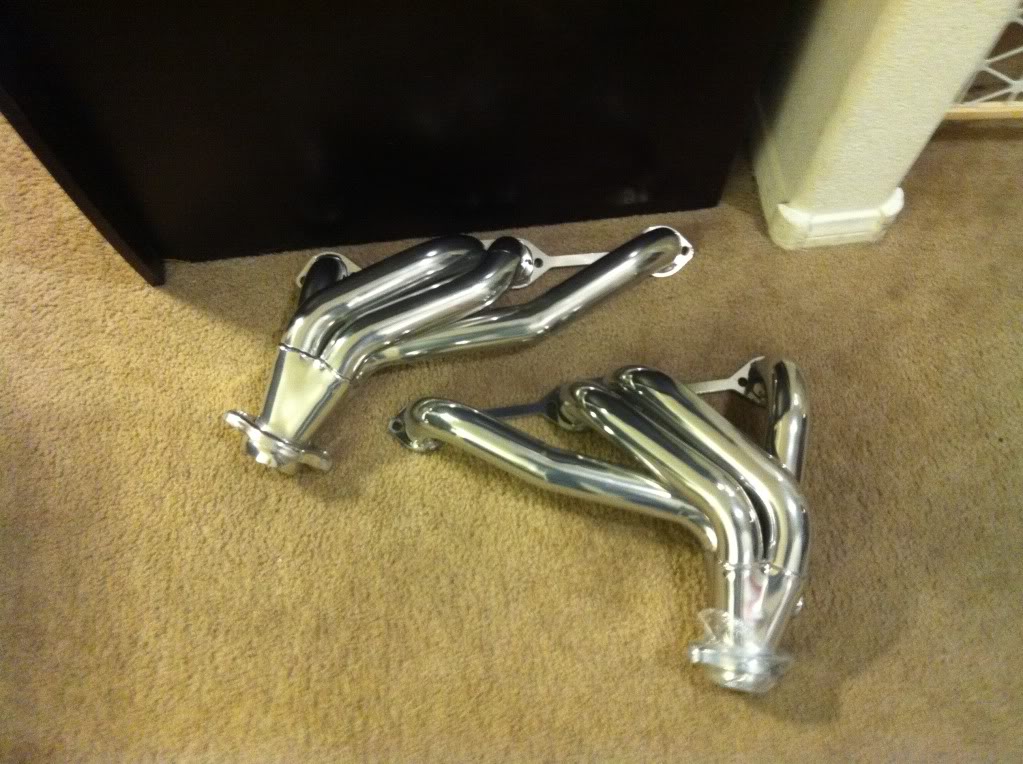
My ONLY complaint is this scratch here:
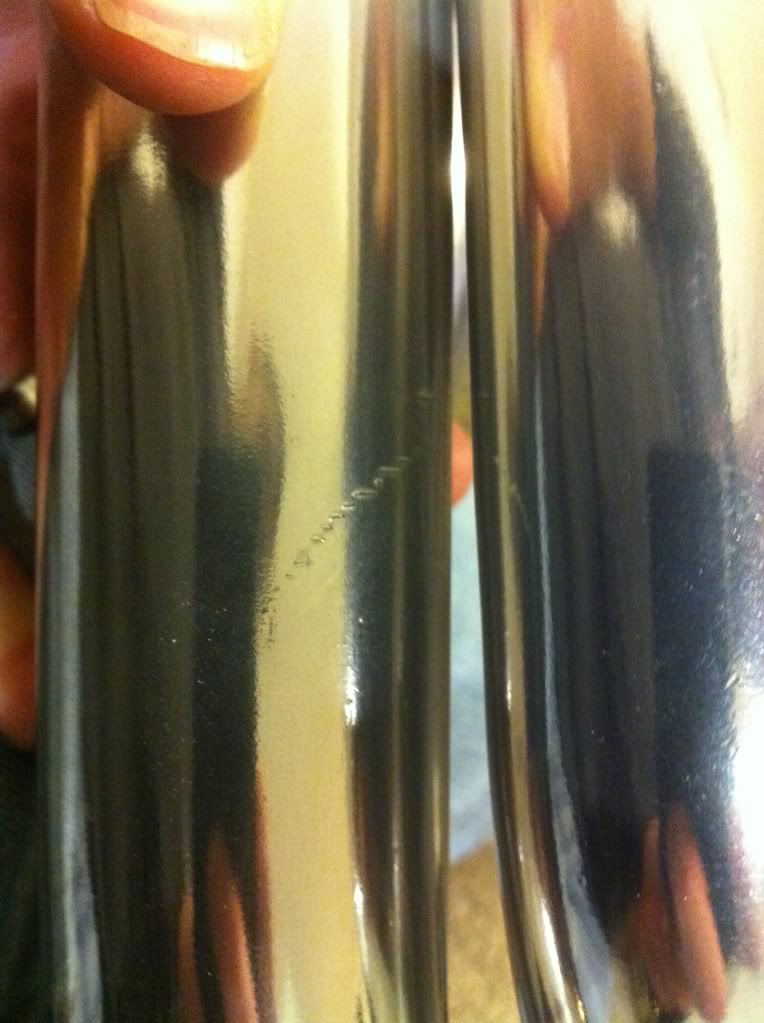
Oh well.
Once I get the exhaust fabricated up I'm thinking I'll have the y-pipe coated as well to reduce the temps on the oil and starter.
Comparisons shots:
Old
New
My ONLY complaint is this scratch here:
Oh well.
Once I get the exhaust fabricated up I'm thinking I'll have the y-pipe coated as well to reduce the temps on the oil and starter.
11-27-2011, 09:54 PM
#31
Senior Member
Thread Starter
Join Date: Sep 2003
Location: Hurlburt Field
Posts: 738
Likes: 0
Received 1 Like
on
1 Post
Car: 84 Z28, '15 Colorado
Engine: L69
Transmission: A4
Axle/Gears: 3.73
Re: 84 Z28 H.O. Man Diary
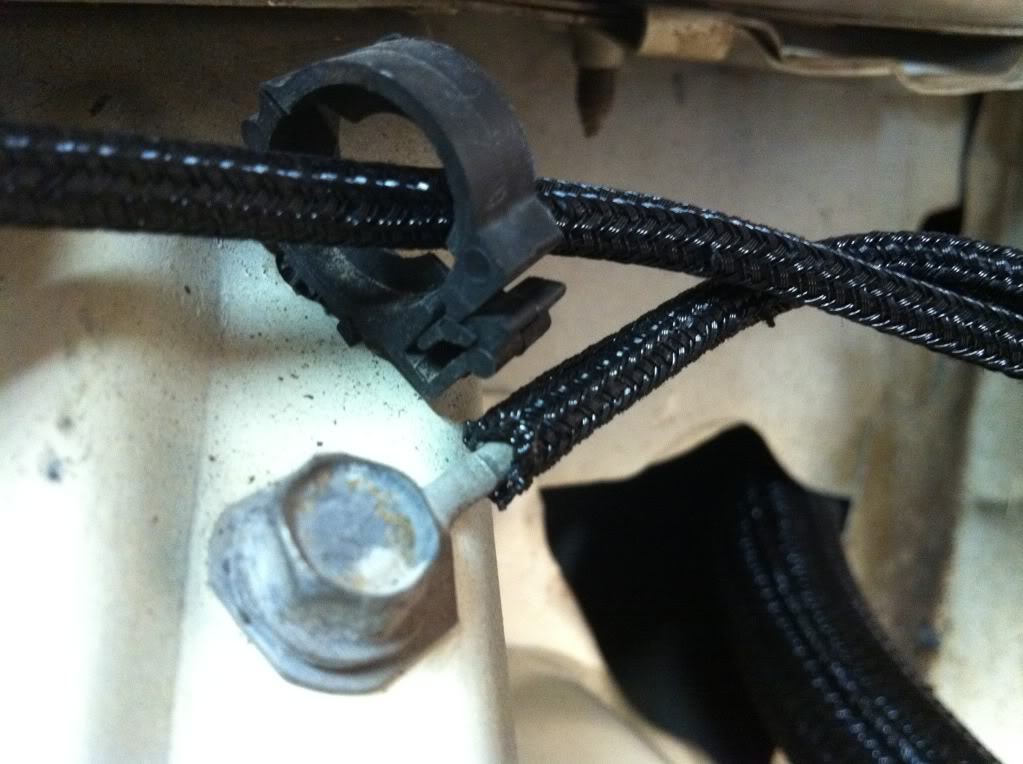
I bought the Flexo stuff so you can easily install and remove the wiring without cutting up the wires. As you can see in the pictures, once everything is in place and you make the cuts for the wires going in different directions, you can barely see the opening.
I also bought the 4-to-1 heat shrink as well for when I start doing the hoses.
A few pointers:
Make sure you buy a hot rope cutting knife or a hot knife that has the blade attachment. I bought a Welco brand from Lowes and it's working pretty good. It's best to have a helper to hold the braiding taunt so you can get a clean cut without getting the braid too hot.
For wires that need to go in another direction, make a diagonal slit for the wire(s) so it doesn't look weird.
Last edited by IROCtheRoad; 11-27-2011 at 09:58 PM.
11-27-2011, 10:52 PM
#33
Supreme Member
iTrader: (3)

Join Date: Jul 2009
Location: Chicago, IL
Posts: 1,311
Likes: 0
Received 3 Likes
on
3 Posts
Car: 1986 Pontiac Firebird
Engine: 97 LT1 W/ Alot of goodies.
Transmission: 4L60E W/ Yank SS3600
Axle/Gears: 3.27 9 Bolt BW
Re: 84 Z28 H.O. Man Diary
Love the wiring loom. I was into PC building and used similar looking stuff to do custom looming for my builds. I might try this out on my car as well.
Amazing progress so far, and awww man why you have to post those headers. Makes me want to cut out buying tools and get back into finishing my 86.
Amazing progress so far, and awww man why you have to post those headers. Makes me want to cut out buying tools and get back into finishing my 86.
11-27-2011, 10:53 PM
#34
Senior Member
Join Date: Mar 2009
Location: Bloomfield, IN
Posts: 880
Likes: 0
Received 1 Like
on
1 Post
Car: 87 Camaro
Engine: 305
Transmission: 700R4
Re: 84 Z28 H.O. Man Diary
Very nice build thread! I do have to ask, though..with all the money you've spent on the project here why didn't you get some good flowing 305 vortec heads? Those wire looms look excellent and the headers look even better  I can't wait to see the final product once you have the engine reinstalled!
I can't wait to see the final product once you have the engine reinstalled!
11-27-2011, 11:41 PM
#35
Senior Member
Thread Starter
Join Date: Sep 2003
Location: Hurlburt Field
Posts: 738
Likes: 0
Received 1 Like
on
1 Post
Car: 84 Z28, '15 Colorado
Engine: L69
Transmission: A4
Axle/Gears: 3.73
Re: 84 Z28 H.O. Man Diary
Very nice build thread! I do have to ask, though..with all the money you've spent on the project here why didn't you get some good flowing 305 vortec heads? Those wire looms look excellent and the headers look even better I can't wait to see the final product once you have the engine reinstalled!
I can't wait to see the final product once you have the engine reinstalled!I seriously thought about getting vortecs, but I ended up wanting to keep the engine 'original' since I already had the stock (aka I didn't have to buy them) heads. After reading the threads about ported 416s I figured they would be good enough (sigh...) for my plans. I would be doing the same thing to Vortecs either way so financially this is better for me. Being enlisted isn't necessarily a big money maker
 11-28-2011, 01:30 AM
#36
Senior Member
Thread Starter
Join Date: Sep 2003
Location: Hurlburt Field
Posts: 738
Likes: 0
Received 1 Like
on
1 Post
Car: 84 Z28, '15 Colorado
Engine: L69
Transmission: A4
Axle/Gears: 3.73
Re: 84 Z28 H.O. Man Diary
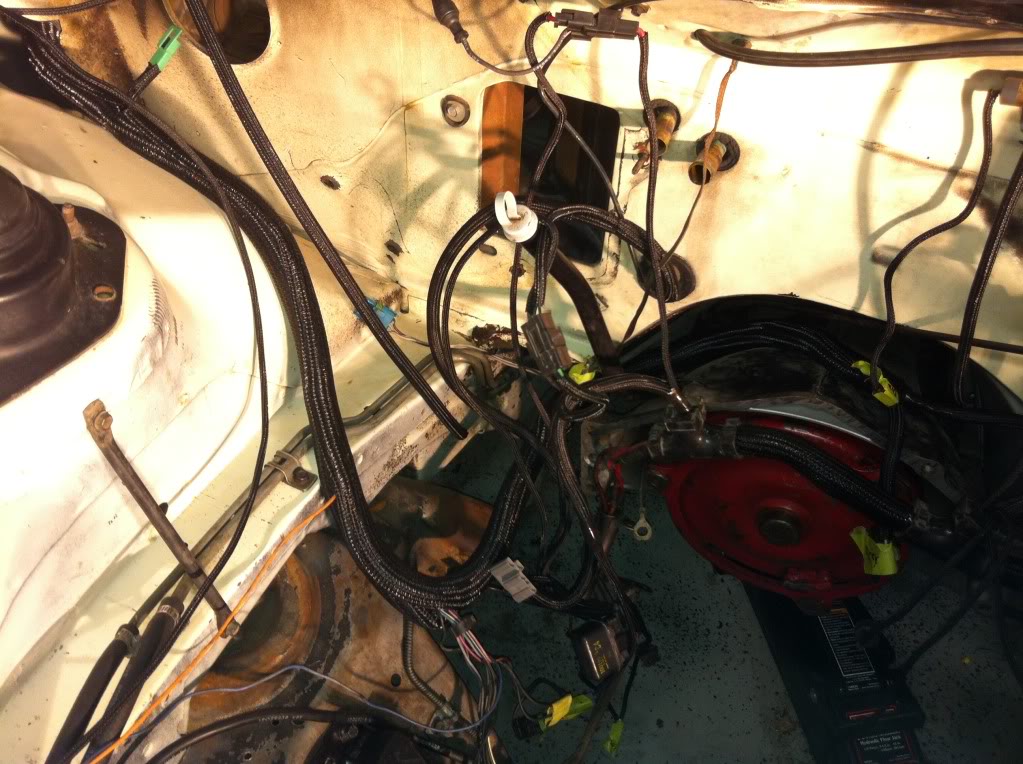
Just got back from the garage doing wire looms. Here's a few pictures to enjoy.
This is how good you can make your wires look.
I know it looks like a cluster F of wire loom, but everything is down in the corner and not in its proper space. I'm very very happy with how this is coming along.
Passenger side pretty much completed.
This is how good you can make your wires look.
I know it looks like a cluster F of wire loom, but everything is down in the corner and not in its proper space. I'm very very happy with how this is coming along.
Passenger side pretty much completed.
11-28-2011, 06:53 PM
#37
Member
Join Date: Apr 2008
Location: Mechanicsville VA
Posts: 320
Received 0 Likes
on
0 Posts
Car: 1991 Z-28
Engine: 383 TPI
Transmission: 700R4
Axle/Gears: 2.73
Re: 84 Z28 H.O. Man Diary
thanks for the info on the wire loom. Keep up the good work....I'm enjoying following your story..........
11-28-2011, 07:12 PM
#38
Member
iTrader: (5)
Join Date: Jul 2008
Location: Michigan, West Bloomfield
Posts: 254
Likes: 0
Received 0 Likes
on
0 Posts
Car: 84 z28, 86 irocz
Engine: LS6, 305 TPI
Transmission: TH350, T56
Axle/Gears: 3.73, 4.10
Re: 84 Z28 H.O. Man Diary
Cool build, I also have a 84 z that was originally a H.O 5 speed. But thats long gone along with it looking nothing like a 84.
11-29-2011, 12:35 AM
#39
Supreme Member
iTrader: (10)
Join Date: Oct 2007
Location: Fl.
Posts: 1,881
Likes: 0
Received 2 Likes
on
2 Posts
Car: 83 Trans Am / 96 Jeep XJ
Engine: 355 / 4.0 I6
Transmission: TH350 / Auto
Axle/Gears: 3.23 10-bolt / 4wd
Re: 84 Z28 H.O. Man Diary
Nice build, keep it coming.
I also just changed the motor mounts in my third gen, and I agree with you 100%. Never again. lol
I also just changed the motor mounts in my third gen, and I agree with you 100%. Never again. lol
11-29-2011, 01:25 AM
#40
Senior Member
Join Date: Apr 2006
Location: Pgh PA
Posts: 835
Received 0 Likes
on
0 Posts
Car: 89 5.7 IROC/95 LT1 Corvette
Engine: All 5.7's
Transmission: 700R4 (Roessler)/ZF6
Axle/Gears: 10 bolt Zexel 3.23's. CTW 17" wheel
Re: 84 Z28 H.O. Man Diary
A few pictures of some of the parts I have waiting to install.

Originally I was following this article to build up my little 305 untill I can get the money saved up to do a 383 with my race rods and pistons.
http://www.superchevy.com/technical/...ild/index.html
I had purchased a XE268 cam, Trickflow 175 heads, the whole 9 yards (I've never really gotten that expression, but anywho). I waited for over 2 months while Summit kept pushing back the ship date from October 15 to December 12 so I cancelled them and sent back the cam and gave up on my 380 hp 305.
With the XE262 cam my build goes as follows:
CompCam XE262 cam
Hardened pushrods
CompCam red aluminium 1.5 rollers
Edelbrock RPM Performer Intake
DynoDon Headers with Hooker Catback
Hughs 3000 stall lock up T/C
Ported and Polished 416s (see next)
Hey Airman, Thanks for your service! "The whole 9 yards" In the second world war, when loading the wing mounted .50 cal M2's on a Fighter, the ground crew had benches that were 27 feet long to measure 1500 (I think) rounds of .50. So when you expended all your ammo, you gave it the "whole 9 yards". I just ported my heads last winter also my car runs great! Nice job on your car!
Last edited by Eagle223usa; 11-29-2011 at 01:29 AM.
11-29-2011, 02:40 AM
#41
Senior Member
Thread Starter
Join Date: Sep 2003
Location: Hurlburt Field
Posts: 738
Likes: 0
Received 1 Like
on
1 Post
Car: 84 Z28, '15 Colorado
Engine: L69
Transmission: A4
Axle/Gears: 3.73
Re: 84 Z28 H.O. Man Diary
Hey Airman, Thanks for your service! "The whole 9 yards" In the second world war, when loading the wing mounted .50 cal M2's on a Fighter, the ground crew had benches that were 27 feet long to measure 1500 (I think) rounds of .50. So when you expended all your ammo, you gave it the "whole 9 yards". I just ported my heads last winter also my car runs great! Nice job on your car!
And again, thank you for the kind words everyone.
I dropped my heads off at Nevada Valve Train here in Las Vegas. They will be done on Wednesday
--Resurfaced the MINIMUM I could possible go so I don't bump of the compression too much.
--Hot tanked
--Resurface valves
--Reassemble
If you ever deal with them, only talk with Russell. The older gentleman I talked with today (who I assume is the owner) was very rude and I nearly walked out on him. Just a heads up.
11-30-2011, 04:35 PM
#42
Supreme Member
iTrader: (1)
Join Date: Jun 2009
Location: Central Connecticut
Posts: 1,777
Likes: 0
Received 0 Likes
on
0 Posts
Car: 91 Trans Am 'vert
Engine: LB9
Transmission: T5
Axle/Gears: 3.45 9 bolt
Re: 84 Z28 H.O. Man Diary
Looks good! I especially like what you did with the wire looms. Keep up the good work. 
11-30-2011, 05:32 PM
#43
Supreme Member
iTrader: (3)
Join Date: Jul 2011
Location: Katy TEXAS (West Houston)
Posts: 1,826
Likes: 0
Received 0 Likes
on
0 Posts
Car: 1992 Camaro RS
Engine: 5.0 TBI L03 V8
Transmission: Rebuilt 700R4 W/ Corvette shift kit
Axle/Gears: 2:73 open
Re: 84 Z28 H.O. Man Diary
Noice.
12-02-2011, 08:35 AM
#44
Senior Member
Thread Starter
Join Date: Sep 2003
Location: Hurlburt Field
Posts: 738
Likes: 0
Received 1 Like
on
1 Post
Car: 84 Z28, '15 Colorado
Engine: L69
Transmission: A4
Axle/Gears: 3.73
Re: 84 Z28 H.O. Man Diary
I picked up the heads today. They look absolutely fantastic. They only had to take .0080 off so I've very pleased with that. They gave me high compliments on the polish work I did.
We are working mandatory 12s this week, through the weekend, and all next week as well (our tax dollars being used to the max ), so no updates for another week.
We are working mandatory 12s this week, through the weekend, and all next week as well (our tax dollars being used to the max
), so no updates for another week.
12-02-2011, 09:04 PM
#46
Supreme Member
iTrader: (3)
Join Date: Jul 2011
Location: Katy TEXAS (West Houston)
Posts: 1,826
Likes: 0
Received 0 Likes
on
0 Posts
Car: 1992 Camaro RS
Engine: 5.0 TBI L03 V8
Transmission: Rebuilt 700R4 W/ Corvette shift kit
Axle/Gears: 2:73 open
Re: 84 Z28 H.O. Man Diary
Right on.
12-09-2011, 02:25 AM
#47
Senior Member
Thread Starter
Join Date: Sep 2003
Location: Hurlburt Field
Posts: 738
Likes: 0
Received 1 Like
on
1 Post
Car: 84 Z28, '15 Colorado
Engine: L69
Transmission: A4
Axle/Gears: 3.73
Re: 84 Z28 H.O. Man Diary
HUGE UPDATE:
I got the heads back from the machine shop. They were very impressed with how the porting came out. He did have to touch up a few exhaust valves, but nothing big.
Heads shaved .008. I have no idea what the compression is going to be, but it should be around 9.6.1 or so
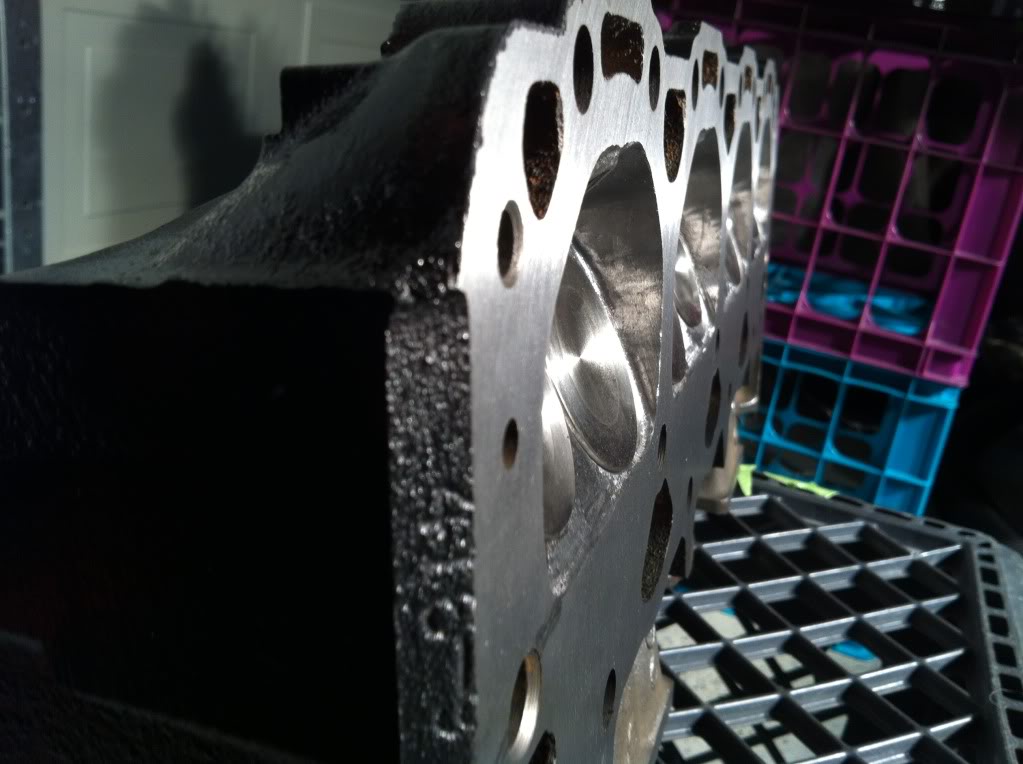
I got the heads back from the machine shop. They were very impressed with how the porting came out. He did have to touch up a few exhaust valves, but nothing big.
Heads shaved .008. I have no idea what the compression is going to be, but it should be around 9.6.1 or so
12-09-2011, 02:30 AM
#48
Senior Member
Thread Starter
Join Date: Sep 2003
Location: Hurlburt Field
Posts: 738
Likes: 0
Received 1 Like
on
1 Post
Car: 84 Z28, '15 Colorado
Engine: L69
Transmission: A4
Axle/Gears: 3.73
Re: 84 Z28 H.O. Man Diary
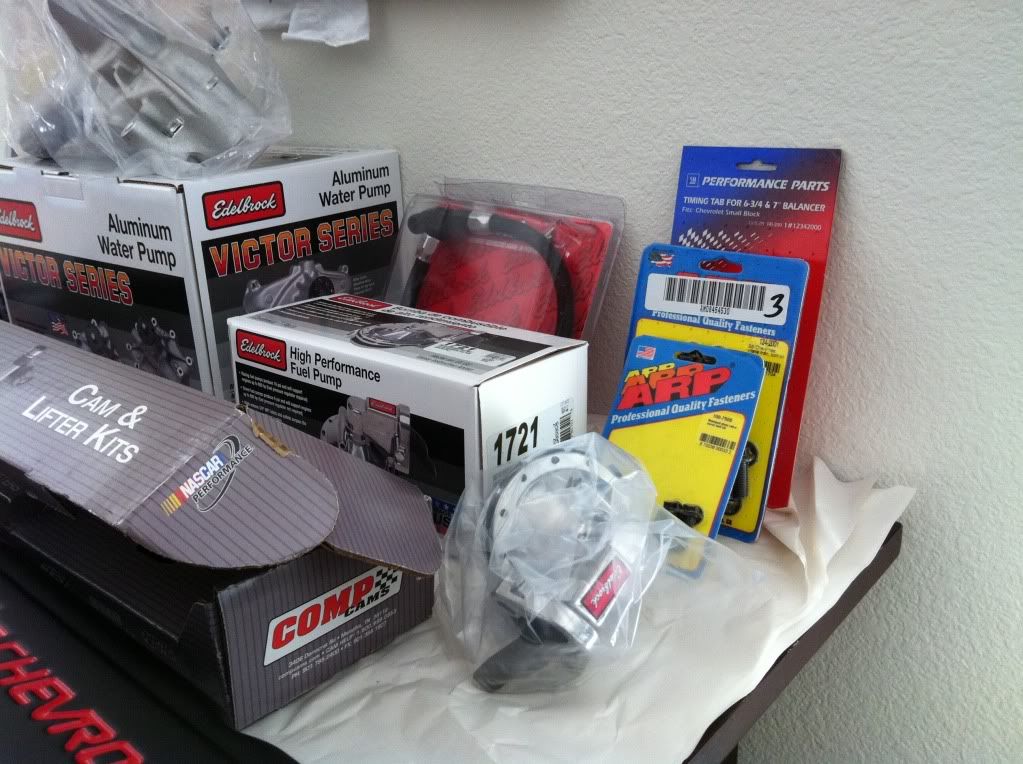
So the build up begins!!!!
Before you go about putting things on, you REALLY REALLY REALLY need to clean all the bolt holes out with a thread chaser. I used Summit Racing SUM-900200 - Summit Racing� Thread Cleaning Tap Sets
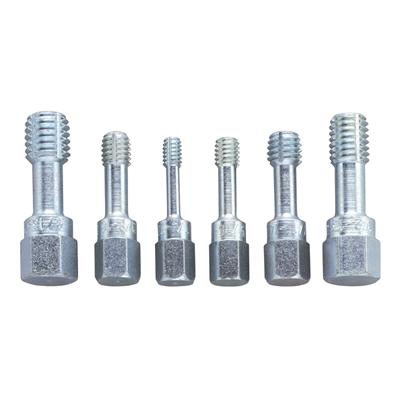
This not only cleans out the dirty, nasty threads, but it allows you to get the proper torque value on all of your bolts. A few hours worth cleaning is well worth it.
I originally had bought all ARP cleaning threads, but they were on backorder for a looooong time. I cancelled my order and decided to give the Summit Racing brand a shot. The entire Summit kit cost less than ONE ARP..... I was a bit scepticle. However, the inexpensive Summit brand worked flawlessly. Highly recommended
Before you go about putting things on, you REALLY REALLY REALLY need to clean all the bolt holes out with a thread chaser. I used Summit Racing SUM-900200 - Summit Racing� Thread Cleaning Tap Sets
This not only cleans out the dirty, nasty threads, but it allows you to get the proper torque value on all of your bolts. A few hours worth cleaning is well worth it.
I originally had bought all ARP cleaning threads, but they were on backorder for a looooong time. I cancelled my order and decided to give the Summit Racing brand a shot. The entire Summit kit cost less than ONE ARP..... I was a bit scepticle. However, the inexpensive Summit brand worked flawlessly. Highly recommended
12-09-2011, 02:31 AM
#49
Senior Member
Thread Starter
Join Date: Sep 2003
Location: Hurlburt Field
Posts: 738
Likes: 0
Received 1 Like
on
1 Post
Car: 84 Z28, '15 Colorado
Engine: L69
Transmission: A4
Axle/Gears: 3.73
Re: 84 Z28 H.O. Man Diary
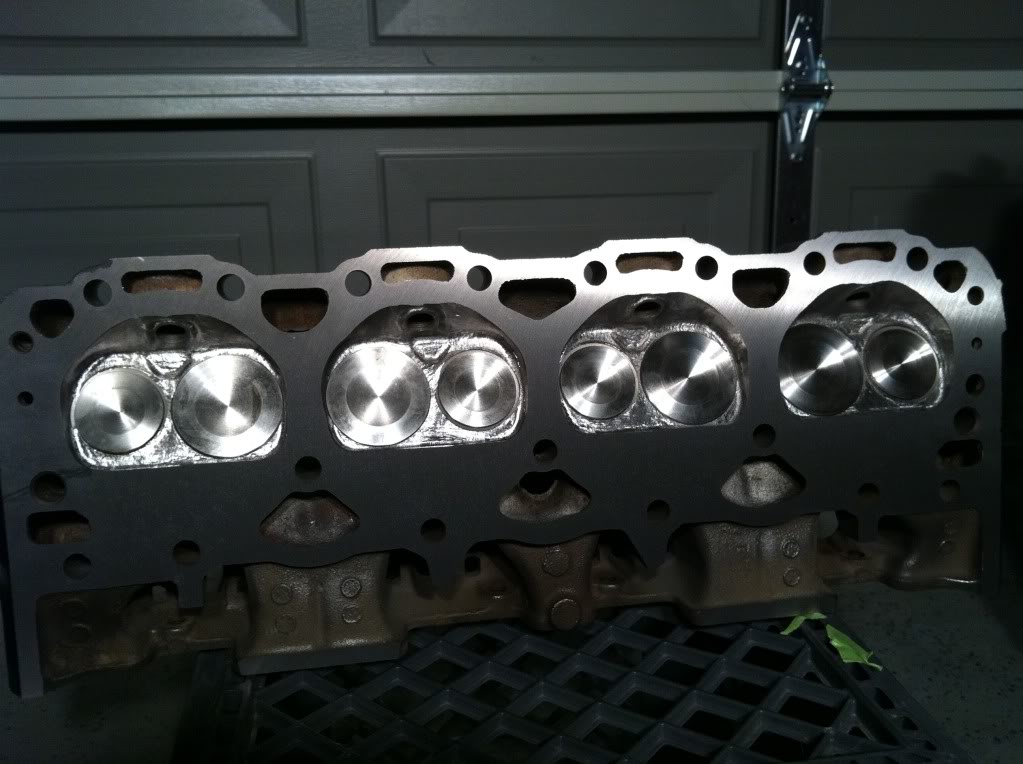
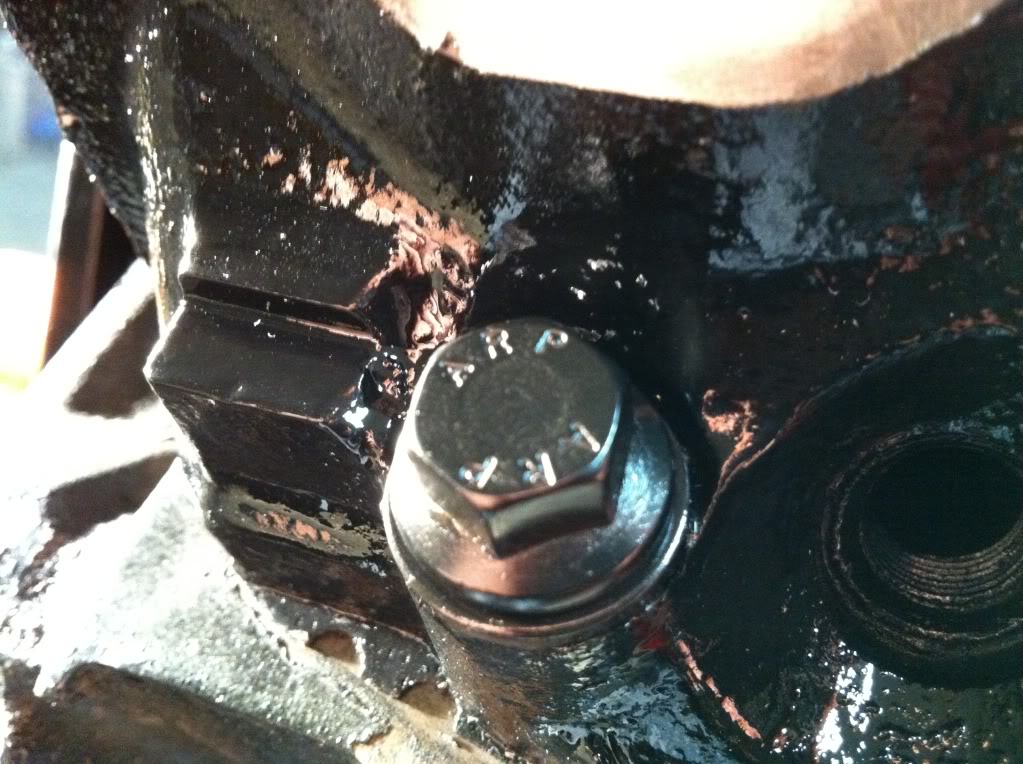
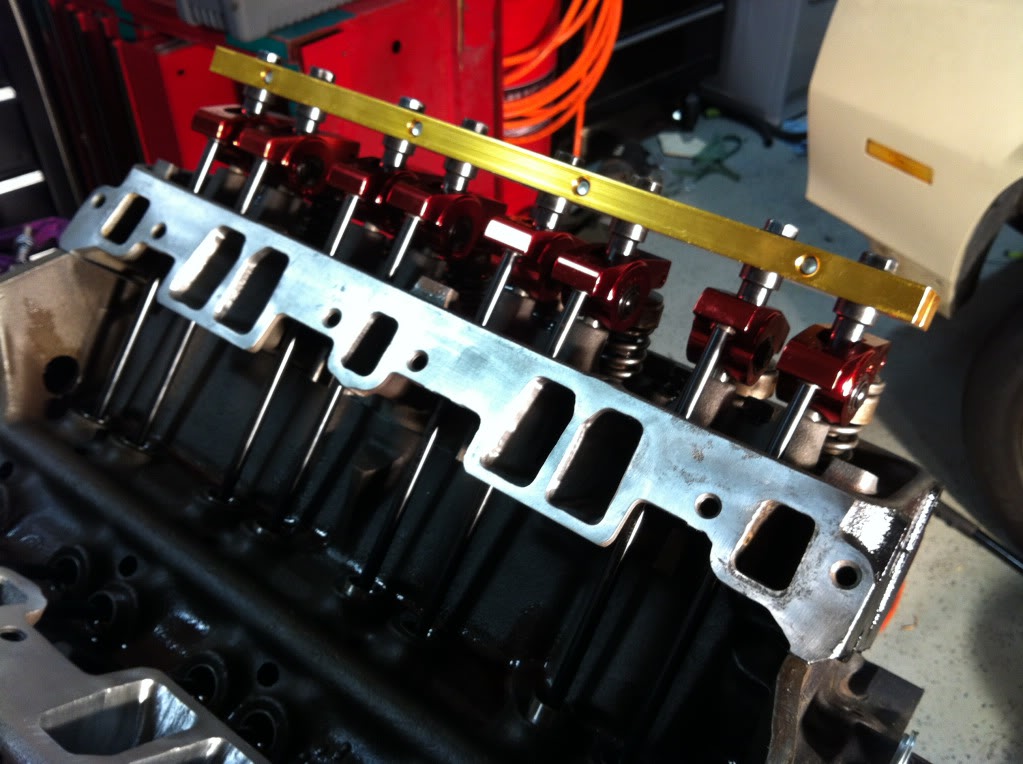
Here are the heads all assembled with some pictures of my pretty and stupid expensive ARP head bolts
12-09-2011, 02:35 AM
#50
Senior Member
Thread Starter
Join Date: Sep 2003
Location: Hurlburt Field
Posts: 738
Likes: 0
Received 1 Like
on
1 Post
Car: 84 Z28, '15 Colorado
Engine: L69
Transmission: A4
Axle/Gears: 3.73
Re: 84 Z28 H.O. Man Diary
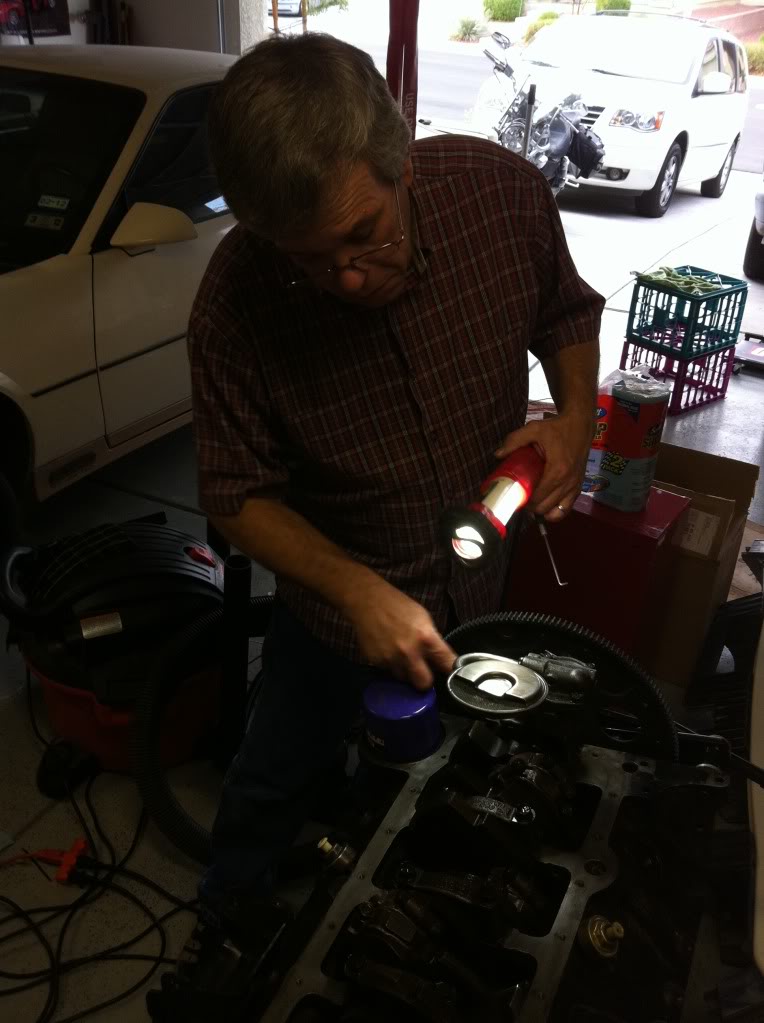
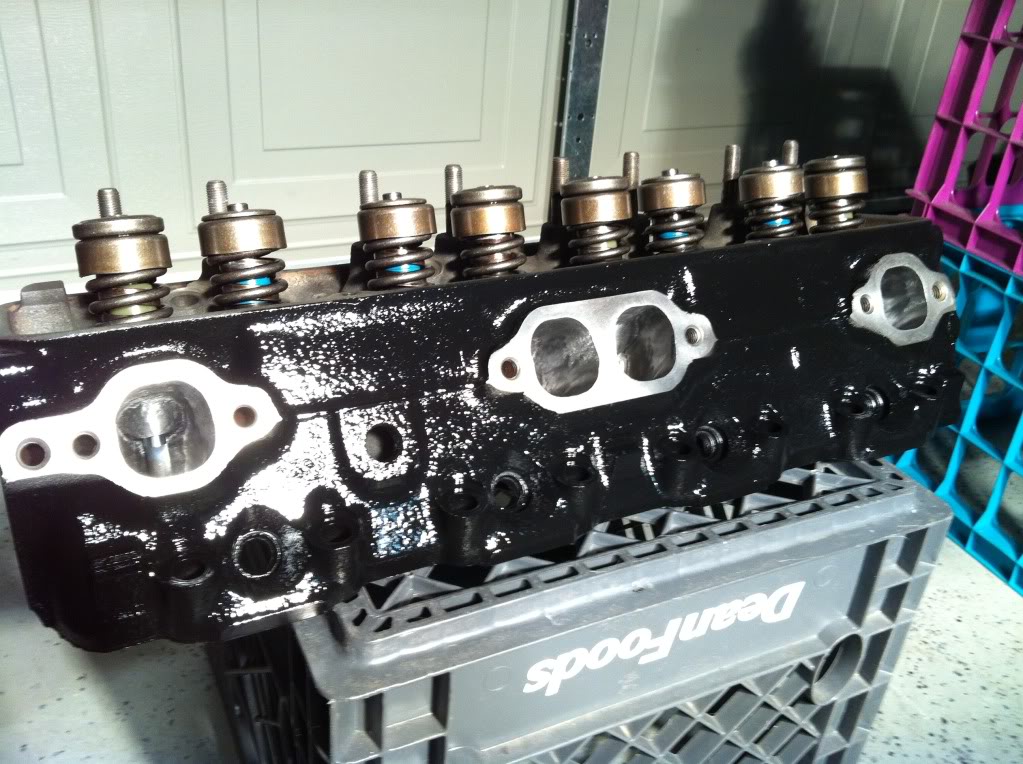
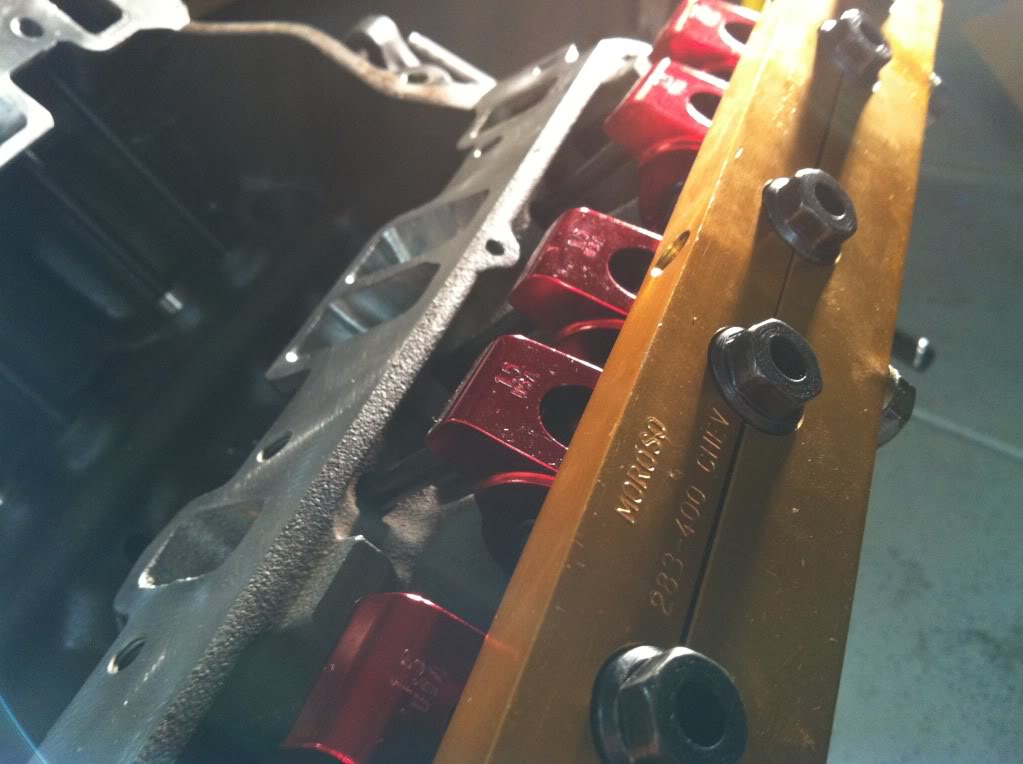
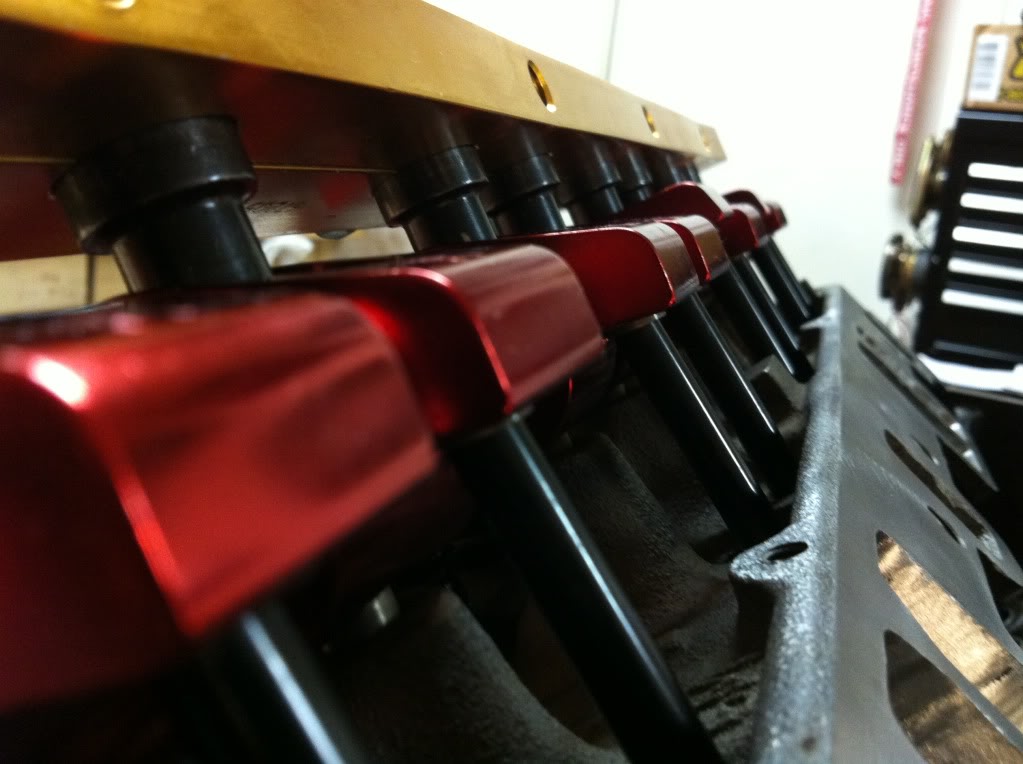
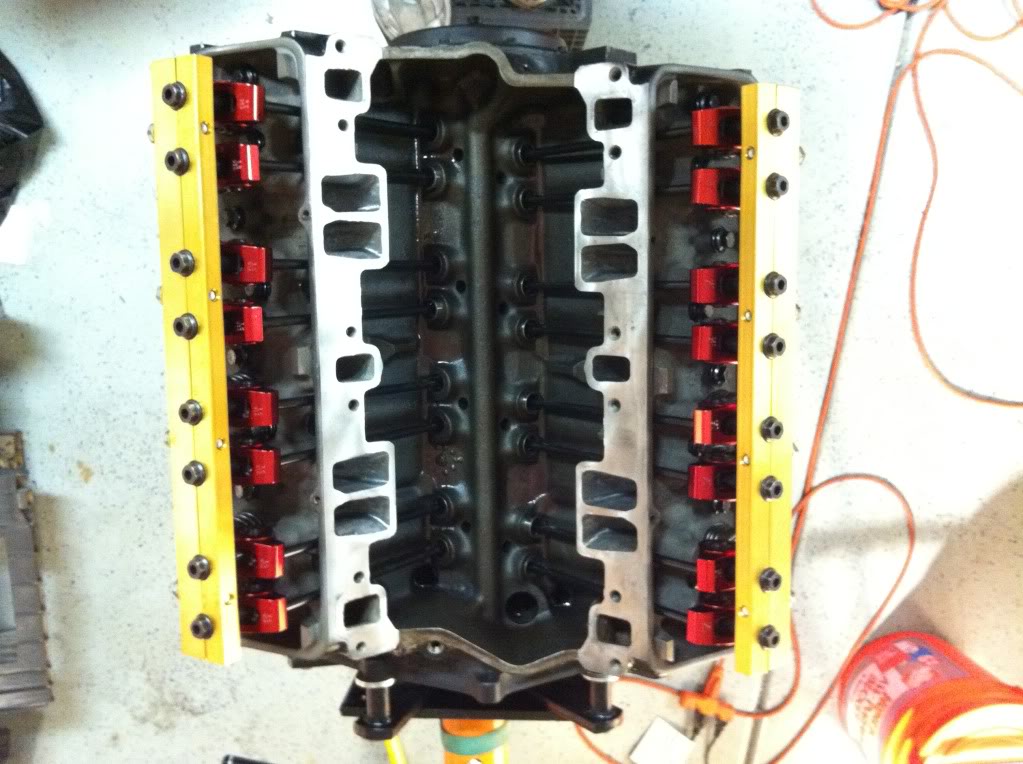
My lovely wife got the baby down to sleep early so she decided to come into the garage with me
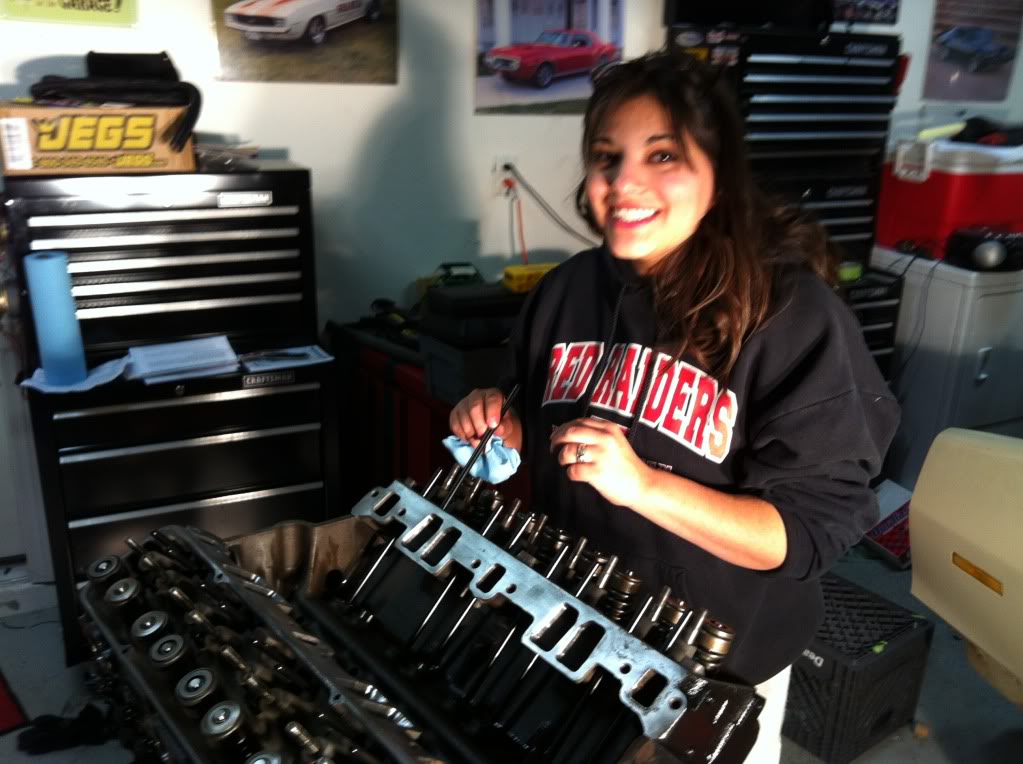
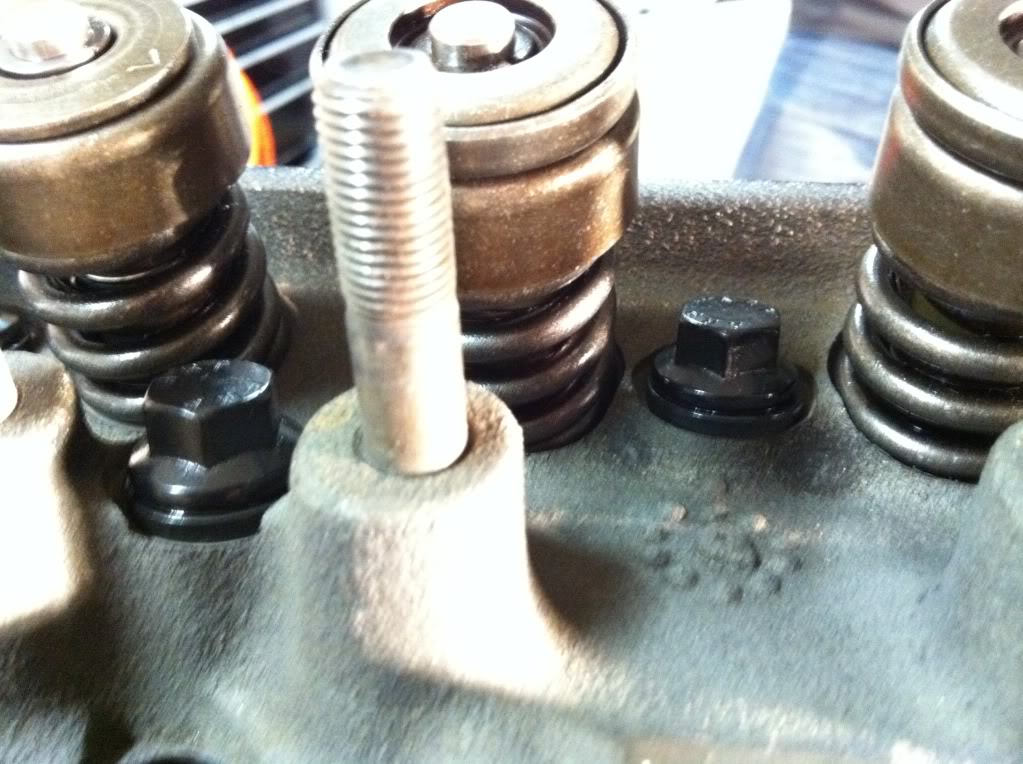
One side all done. Comp Cams 1.5 Aluminum Rollers (thanks Dad), Comp Cams hardened pushrods, and Moroso stud girdles (thanks again, dad)!
One side all done. Comp Cams 1.5 Aluminum Rollers (thanks Dad), Comp Cams hardened pushrods, and Moroso stud girdles (thanks again, dad)!