When you click on links to various merchants on this site and make a purchase, this can result in this site earning a commission. Affiliate programs and affiliations include, but are not limited to, the eBay Partner Network.
Re: Long time coming AKA My 91 Z28 Vert build thread
I was also able to squeeze dual 14" fans in there. There is enough clearance between the frame rails to possibly fit dual 16" fans but the problem would be the steering box. Radiator would need moved forward an inch. Maybe you could fit them diagonally. I'll make this fan mount like the other fan mount I made for the other Camaro, I'll put a bow tie emblem on the back side and polish the whole thing up pretty. :-)
Re: Long time coming AKA My 91 Z28 Vert build thread
From the engine bay side, there is a bolt in the middle of the plug you have to remove to separate the plug halves. Then the is one nut on each side of the connector. Remove those and the wiggle the plug vertically while you push it through the firewall into the passenger compartment. It's pretty easy to do, and kinda hard to explain.
I was planning on doing this on my camaro, but I need to keep the heater functional.
Re: Long time coming AKA My 91 Z28 Vert build thread
Originally Posted by 92RS_Ttop
From the engine bay side, there is a bolt in the middle of the plug you have to remove to separate the plug halves. Then the is one nut on each side of the connector. Remove those and the wiggle the plug vertically while you push it through the firewall into the passenger compartment. It's pretty easy to do, and kinda hard to explain.
I was planning on doing this on my camaro, but I need to keep the heater functional.
I'll have to take some measurements and stare at it a while. I'm worried I would turn it into an eye sore.
Re: Long time coming AKA My 91 Z28 Vert build thread
I think as long as the wiring is run neatly, with new split loom, it'll look good. Maybe take the driver side harness off and move it over there to get an idea of how it looks. Use some double sided tape to hold the plug to the firewall. Remember, most of the wiring coming from the passenger side of the engine bay is for the fuel injection and sensors, with a couple power and ground wires. I think everything could be routed behind the engine/intake to keep it pretty well hidden.
Re: Long time coming AKA My 91 Z28 Vert build thread
I altered the lower radiator mount. Removed all the middle posts and welded on a horizontal bar that I welded some bolts flush into. The bolts will be for mounting the fans and this way you don't have to hold the fans in place as you bolt them on. I'll just slide them on the lower bolts and tighten the nuts.
A trained eye will notice that the radiator will now sit lower than the stock radiator by an inch I believe. Looking at my other Camaro this shouldn't be an issue, I'll just have to cut an inch off of the bottom of the air dam. Who knows, might help cooling!
Re: Long time coming AKA My 91 Z28 Vert build thread
I started working on the rear bumper, mainly filling in the horizontal indentation. The indentation is about 5/8" tall and 1/8" deep. I decided to do it the same way I filled the side ground effects. I cut strips of plastic (abs in this case) from a 1/8" thick sheet, scuffed them with 60 grit sandpaper, drilled some holes in those strips as well as the bumper (fingers for the adhesive to better grip) and them attached with flexible bumper adhesive. I checked the bond after 8 hours and with my fingers I couldn't even come close to pulling the strips off. Time will tell if this way is a good idea but I'm still hesitant to plastic weld this being that it's an easily viewable area. So far I've decided to leave the emblem as it will be the only emblem left inside and outside the car. Each tube of flexible bumper adhesive is about $6 and I've used 3 tubes so far, I'll probably use 5 total. There isn't a whole lot of adhesive in the tubes.
Re: Long time coming AKA My 91 Z28 Vert build thread
Fill strip on the bumper looks pretty good. I plan on doing this eventually on my camaro. I don't think plastic welding would work anyhow in this case, as your joining an abs strip to a urethane bumper. From the little I've researched plastic welding it's very difficult, if not impossible, to weld different types of plastic successfully, like urethane and abs. I can't tell from the pics, but did you chamfer the holes at all? I think that would give the adhesive something extra to "grab" onto to make the bond stronger.
Re: Long time coming AKA My 91 Z28 Vert build thread
Originally Posted by 92RS_Ttop
Fill strip on the bumper looks pretty good. I plan on doing this eventually on my camaro. I don't think plastic welding would work anyhow in this case, as your joining an abs strip to a urethane bumper. From the little I've researched plastic welding it's very difficult, if not impossible, to weld different types of plastic successfully, like urethane and abs. I can't tell from the pics, but did you chamfer the holes at all? I think that would give the adhesive something extra to "grab" onto to make the bond stronger.
I did chamfer the holes on the sides that mated together. I did it more so to funnel the excess adhesive out from the matting surface and into the finger holes I drilled. The drill bit wanted to bite into the urethane so easily that I had to spin the bit as fast as it would go and use very little pressure to only make a chamfer instead of a bigger hole.
If you have an extra bumper you could cut out the indented strip by carefully cutting along the wall of the indentation and then welding it up level with the surface. That's probably the best method but you would need to use a dremel and wear magnifiers to make the cut and then be proficient at plastic welding and make the weld. I didn't go that route because my plastic welding abilities are about as good or dependable as my Russian roulette playing abilities.
Re: Long time coming AKA My 91 Z28 Vert build thread
Put some welds in the indentations around the wiper motor mounting area. The firewall is starting to look and feel pretty smooth. In a first step point of view.
I decided to keep the windshield wipers after reading the laws for a few states. Basically every vehicle that came with wipers has to keep the wipers on and functional. Yes, yes, we all know someone who removed and blocked theirs off or we saw a car at a show that has them removed and they are driving the car on public roads yada,yada, yada. But the thought looms that if I moved to another state or sold the car to another state's driver and the car had to undergo a safety inspection it would not pass without functional wipers. Also if any LEO wanted to be a thorn in my side he could do a variety of things. Welding over and smoothing out the wiper mounting area is permanent with no return, unlike many of the other laws that our vehicles may skirt or disregard altogether.
EDIT:
Another before and after comparison shot to show how much of the groove I filled is actually visible.
Re: Long time coming AKA My 91 Z28 Vert build thread
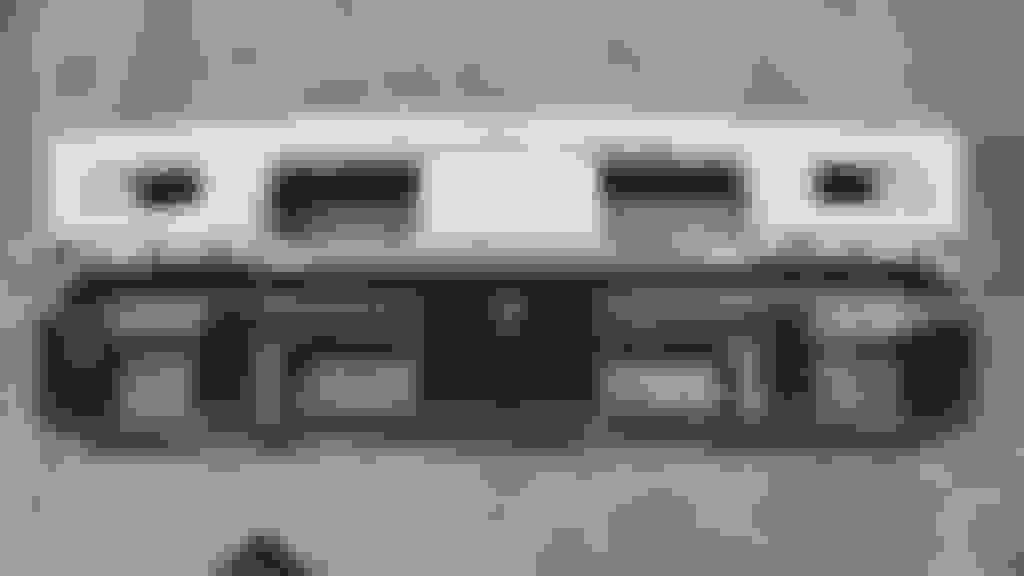
I also started to work on the dash some more. Fueled soul did a good write up on how he removed the center vent so I'm following just that with a small change. The change I want to make is to put some sort of thin smd led in that portion so when the doors open or a switch is flicked it lights up. The convertible model hasn't much in the way of interior lights so I'm hoping this could help.
I also am filling in the side vents. I'll probably spray the dash a matte black since upholstering it might be too expensive or time consuming.
Re: Long time coming AKA My 91 Z28 Vert build thread
Well I accidentally burned or melted that vent drain cover on the cowl so I had the idea of welding in and making a nice looking version. Basically think of the vents on the new Z/28, same concept. Make a "floor" that is welded to the front of the vent and slant it down to the back and the back will then be drilled sheet metal to allow for the drainage.
Re: Long time coming AKA My 91 Z28 Vert build thread
Haven't put much time into the Camaro, wife has made other plans and projects for me and I've worked some extra shifts. This is just a quick shot of the dash with the center vent removed and some plastic sheet glued in. I'll have to sand it and then I'll use some 2 part epoxy for leveling perfectly with the rest of the dash. I've tried out some different brands of plastic epoxy/glue and my opinion is that the permatex brand plastic welder epoxy is the best. Loctite brand 2 part plastic epoxy was horrible, goop brand plastic contact cement was better than that. I'll definitely paint the dash and I'll probably use SEM plastic paint. If it looks cheap I'll post up the cash or time to cover the dash in a material.
Re: Long time coming AKA My 91 Z28 Vert build thread
Pictures after sanding the first portion of filler and applying the second helping.
Before I put it on it felt pretty good and smooth with my hand feeling it. After putting it on I found out some areas were not as good as I thought. Still I don't think anything is more than 1/8" thick/deep.
Re: Long time coming AKA My 91 Z28 Vert build thread
Took a 1/2" diameter carbide bit to the inside corners of the welds and they came out pretty good. I use a 3/8" carbide bit next to achieve a curve that is smaller and less noticeable. Afterwards I'll throw some filler over them to smooth it out more.
Re: Long time coming AKA My 91 Z28 Vert build thread
I made some templates for the cowl. Somehow I totally forgot that at least one should be removable for access to all of the wiper system. So I'm basically going to be welding in a little frame for a perforated metal piece to be riveted to. Rivets should look much cleaner than bolts and if I ever need access to the wiper assembly I can easily drill them out. Not sure if I'll go perforated or slotted for the plate. I cut out the raised ridge around the perimeter and used a hammer and dolly to flatten out the entire area.
Re: Long time coming AKA My 91 Z28 Vert build thread
Originally Posted by LC2 TECH
Make sure you leave some airflow into the car so you don't have fogging issues with the windshield.
Not sure I follow. I don't think the cabin in a Thirdgen convertible is sealed off well enough to allow for fogging to arise. If it is I wouldn't think the situation would arise in Arizona's climate.
Re: Long time coming AKA My 91 Z28 Vert build thread
I have the pieces glued into place on the dash where the center vent was. I think I'll use some pliable filler to get the rounded corner of the dash correct. Not too bad so far.
Re: Long time coming AKA My 91 Z28 Vert build thread
Originally Posted by Tibo
Not sure I follow. I don't think the cabin in a Thirdgen convertible is sealed off well enough to allow for fogging to arise. If it is I wouldn't think the situation would arise in Arizona's climate.
I live in Phoenix and can tell you from experience it can have an effect on a cool day, especially if there is any humidity in the air.
Re: Long time coming AKA My 91 Z28 Vert build thread
Originally Posted by LC2 TECH
I live in Phoenix and can tell you from experience it can have an effect on a cool day, especially if there is any humidity in the air.
I need you to elaborate a little. Is your car's interior completely sealed or is it stock? Is it only on days when it's raining? Is it only on days when it's cold and your sitting in your car windows up? I'm interested to hear more from you but at the same time I feel like its such a non issue because it's a convertible, it'll only be driven in nice weather and if any fogging began you just have to crack a window.
I can understand that if it's hot rain on a cold day (or vice versa) the windows could fog but I wouldn't drive this in the rain by choice. In fact the only reason I left the wipers on is in case I move or the car was sold out of state I know some states require wipers (in order to license them) if the car came with them.
Re: Long time coming AKA My 91 Z28 Vert build thread
Found a few low spots and even one high spot. You don't need to have a shop do the bodywork and paint in order to get professional results.
You can see the classic low spots of the Thirdgen. This car was repainted using the old scuff and squirt technique so I have the advantage of having a bit of prior paint to sand down and work with.
Re: Long time coming AKA My 91 Z28 Vert build thread
Originally Posted by 92RS_Ttop
I think as long as the wiring is run neatly, with new split loom, it'll look good. Maybe take the driver side harness off and move it over there to get an idea of how it looks. Use some double sided tape to hold the plug to the firewall. Remember, most of the wiring coming from the passenger side of the engine bay is for the fuel injection and sensors, with a couple power and ground wires. I think everything could be routed behind the engine/intake to keep it pretty well hidden.
UPDATE: It is a good idea and would be great for engine changes, I would just rather stick with using a hole saw to make a single hole and use a gromett. I want to use some larger power cables and I don't want to drill or be routing separate power cables and ecm wires. I think a single hole in the vicinity of the old heater hose location(s) will do well.
Re: Long time coming AKA My 91 Z28 Vert build thread
I sanded more on the strut towers and the sides of the frame rails. I'll see about posting some updated pictures as I have since looked at the prior pics of the towers with body filler and much of that was sanded off or down!
This coming week I'll also see about making the templates to fit where the door handles and locks are, then transfer them to metal to cut out and weld into the doors. This car is getting the shaved handle treatment.
Re: Long time coming AKA My 91 Z28 Vert build thread
Was able to get the passenger side welded on but to my disbelief I still warped the door! I took an hour to spot weld it, skipped around and did 4 at a time on opposite sides. Waited between them till it was only like warm. Still warped but it shouldn't be a big problem.
EDIT: I was outside and using flux core. I'm blaming the flux core's nature to use more heat for the cause of the warpage. I switched to regular mig for the other side and was surprised how much less heat it put down. I had been using flux core so much I had forgotten that mig would be a better choice. I would say if you have an issue with blowing holes and melting metal using a mig you should go and practice with flux core because when you're good with flux core your regular mig skills will be much better and you'll warp less if at all.
Re: Long time coming AKA My 91 Z28 Vert build thread
I'll get some more pictures up in a bit. I wanted to take time to voice my opinion on the basic evercoat body filler. Their light weight non-clogging filler. It dries rock hard and sands like concrete. I'm glad it's hard but the time I'm spending sanding it isn't worth the few dollars I saved over their rage, maybe z grit. I'm trying to do everything manually with longboards and I have to do the rough sanding of this with a da sander. It also doesn't seem much different than Bondo. Both are hard sanding and usually dry with a ever so slightly tackiness. This probably just has less pinhole problems is all. I'm someone who doesn't like to waste material so I will probably try to finish up the evercoat but in the future I will never stray from rage or maybe z grit if rage isn't available.
Re: Long time coming AKA My 91 Z28 Vert build thread
I believe I have 95% of the body work done for the shaved door handles. I've been using a 16" long board but I'll buy a 24" to ensure straightness. I don't think there's more than 1/16" of filler, definitely not 1/8". I also have most of the car done in 120 grit.
Re: Long time coming AKA My 91 Z28 Vert build thread
Some more recent pics of the engine bay. I used a 3/8" carbide cutter to round the welds down as far as I could and then used my finger to put the filler in the corners. Then I used a sanding bit to shape the filler and hand sanding to further it.
The struts towers are definitely smooth and far better than stock. I've found out unless you have lots of hammer and dolly experience and lots of free time you will not get the strut towers perfectly smooth and use less than 1/8" filler. But for a Thirdgen Camaro, these strut towers will look great!
Re: Long time coming AKA My 91 Z28 Vert build thread
Well, I used the wrong body hammer technique for a high spot on the passenger side door. I used hammer on dolly and should have used a hammer off dolly or a pick hammer and the raised spot got worse and my skills couldn't fix it. Matter of fact, I made it worse. So worse I said screw it and I cut out a chunk of the door like in a rust repair and welded in a new sheet. I do t think I had any warpage, I'll find out when I go out to grind the welds down. In retrospect I should have left the high spot alone as it was really minimal, like you couldn't feel it but the 24" long board found it. Now look what I got myself into.
Re: Long time coming AKA My 91 Z28 Vert build thread
I believe I have the emblem made for the rear bumper to the correct size as well as the dash. I have a friend with a 3d printer who can print it for me. I learned how to use the software and create it myself because I was so put off by how much some of the members on here are trying to sell one for. I could make one from scratch in less than 15 mins. Now the I know how. I won't make these for anybody but I will share the file once I can print it and confirm the dimensions are correct. Chances are their is a 3d printer you can use within 20 miles of you or there are online shops that will print it and mail it to you.
Re: Long time coming AKA My 91 Z28 Vert build thread
I got around to painting the dash, I used plastic dip stuff. Not happy with it and no I'm stuck with peeling the stuff off. I found that the plastic dip stuff grabbed onto dust too well. It did give an exact match for the finish of the factory dash though. I guess I'll have to go the route of regular plastic paint.
Re: Long time coming AKA My 91 Z28 Vert build thread
Over the holiday week I found (and jumped at) such a good deal for this project that I have to brag about it. I bought a T56 with a nearly new clutch and a pro 5.0 shifter for less than what most people pay for just a t56! The seller says it has aftermarket internals but I won't believe that part until I open it up, which I'm not sure I will. I don't want to say the exact amount but let's leave it at most people would pay $1500-2000 for this set up and I didn't pay half that.
Re: Long time coming AKA My 91 Z28 Vert build thread
I welded up the hole on the driver's side of the firewall where the emissions equipment wiring went through. I also worked on the tedious parts of the engine bay that required hand sanding. Applying and sanding all of the filler in and around the corners where I welded.
Re: Long time coming AKA My 91 Z28 Vert build thread
With the way that I have the front end right now you'll be able to see the actual bumper when the hood is up. I am also removing the license plate portion of the bumper cover to increase air flow. I could just cut a chunk out of the middle if the bumper but seeing as I don't like it anyway I thought I'd make my own.
Re: Long time coming AKA My 91 Z28 Vert build thread
This is the bumper and bumper cover separated. The actual bumper weighs 30 pounds and is 1/8" steel with that egg crate plastic held in by a few sheet metal screws.
Right now I don't understand the reasoning behind using a strong heavy bumper when it's mounted to 14-16 gauge steel. It would seem that the bumpers only practical purpose is to tie the front frame rails together and for low speed impacts.
Anyway, I'm going to take a swing at building a tubular bumper. I think it will weigh 15 pounds when I'm done. I started out by using two 6x6 at 1/8" thick plate steel to fit the front of the frame rails and I traced the mounting pattern on.
Then I drilled the holes and welded in some 10mm x 1.5 bolts. The stock size is 9mm x 1.5 but 10 is easier to find and stronger.
Next I started on the main cross bars, I'll use two, an upper and a lower. I decided to use 1"x1" at 1/8" steel tube. The bumper cover has lower tabs that mount to the lower bumper so just using a straight bar won't work well. I decided to bend it and I was able to use the existing bumper as the perfect Jig/template. I lot the rosebud on the O/A torch and heated it up and bent it piece by piece. Though not perfect iys pretty close and if it's not against the bumper you don't know.
My acetylene ran out at the end so I had to switch to a handheld map gas torch. But that the top bar and where I'm at currently. I'll make the lower bar this week as well as the legs to connect them to the mounting plates. I'll also use some 1/2" tube to make the support pieces for the bumper cover unless I get bored and just reuse the eggcrate stuff.
Re: Long time coming AKA My 91 Z28 Vert build thread
More progress of the front tubular bumper I'm making. I measured the dimensions of the stock setup on my 92 and found the top bar needed to be one inch higher than the mounting pad. So made an angled bar that was 2" long with a 30* cut at either end that gave me a one inch rise and would put the center of the bar over the mounting locations for the bumper cover.
Re: Long time coming AKA My 91 Z28 Vert build thread
Took the bumper off and welded around the bars and then added in some vertical bars between the two main bars. So next I'll have to modify the egg crate slightly to mount to the new tubular bumper. Without the eggcrate material the tubular piece I made weighs in at ~15 pounds. I really searched for Camaro or Thirdgen tubular front bumper and I had only found two other examples So I was kinda making up what I thought would work best. There seems to be a number of tubular front bumpers available for a fourth gen and a lot for our mustang friends. What I saw ranged from a simple round tube with 2 90* bends to dual bars with several smaller connecting bars and flat pads for the bumper cover.
Re: Long time coming AKA My 91 Z28 Vert build thread
I do think this is good enough for street use since again the metal it's mounted to is probably 16 gauge and will flex and bend before this or the stock bumper will. I think it's only purpose on these cars is to prevent a car or object from going through the bumper. In a front end collision I full well expect a Thirdgen or any unibody car to just fold up and be totaled.
Also you can look at a few factory authorized upgrades to cars like the 1LE that used an aluminum bumper or the newer boss mustangs that use a simple straight and single round tube that goes from one mounting pad to the other.
Re: Long time coming AKA My 91 Z28 Vert build thread
I have been thinking about the upcoming issues I would be dealing with as far as the wiring goes. My problems were that the car used to have an alarm, the installation of which was done horribly as I showed in previous pictures. I would have to remove and reconnect a few wires. I also had no ignition key for the vehicle and it has the vehicle anti theft system so I would at least need to replace the ignition cylinder. There are a few other small issues but I decided that instead of fixing and chasing down every wiring issue I will just pull the wiring harness and steering column out of my 92 (which obviously works and I have keys for) and put it in this convertible. It's an extra step in this build but I think it might end up saving me time and it will save me from some headache.
Re: Long time coming AKA My 91 Z28 Vert build thread
I was able to separate the top cowl metal from the firewall metal by grinding through the cowls plug welds. Now I can cut out some new sheet metal and leave a square to river in the perforated sheet metal.
Re: Long time coming AKA My 91 Z28 Vert build thread
I was able to get the new cowl cover cut out and fitting perfectly. Next I'll cut out the inside and the portion over the passenger side wiper mount so it will be a frame for the perforated steel to river to on the underside.
I'm not yet sure if I want to paint the perforated steel white like the body or a silver color.
 10-20-2015, 03:21 PM