LQ408, F1C Procharged Style - 89 TransAm
 01-26-2016, 11:41 AM
#51
Re: LQ408, F1C Procharged Style - 89 TransAm
Looks good! I'm assuming your running the battery in the trunk? How are you going to solve the hood closing latch? or are you doing hood pins or just a pin on/quick fastner hood? Make sure you top coat that POR15 as UVs will discolor it.
I just got my supercharger mounted up. Thinking of just running the water/meth but your IC setup is giving me ideas for my TA clone. I just like the OEM hood latch with my 4" bolt on cowl hood... even though I run aerolatch hood pins as well.
I just got my supercharger mounted up. Thinking of just running the water/meth but your IC setup is giving me ideas for my TA clone. I just like the OEM hood latch with my 4" bolt on cowl hood... even though I run aerolatch hood pins as well.
 01-26-2016, 09:25 PM
#52
Re: LQ408, F1C Procharged Style - 89 TransAm
Yes, battery in back trunk.
The mount on top of the intercooler is the modified bracket to support the upper filler panel. The upper panel will fit back into the stock location and act as the upper portion of my air dam, as well will allow me to utilize the stock hood latch.
Thanks for the POR 15 warning. I did do a second coat with Topcoat on top of the POR15 base coat. It is way more difficult doing the second coat. I find to get the same smooth finish as the initial coat, you have to apply it quickly and not go back on the freshly painted surface, or it will streak. Had lots of grief with the second coat when doing the engine bay for this same reason. I have found foam brushes also work the best.
01-26-2016, 09:34 PM
#53
Re: LQ408, F1C Procharged Style - 89 TransAm
When I take in my template, I'll see what the cost will be to build extra versions if you are still interested. I am sure quantity will lower the one off price. Canuck bucks here too, so it should be a great discount once converted.
01-26-2016, 09:54 PM
#54
Re: LQ408, F1C Procharged Style - 89 TransAm
Yes, battery in back trunk.
The mount on top of the intercooler is the modified bracket to support the upper filler panel. The upper panel will fit back into the stock location and act as the upper portion of my air dam, as well will allow me to utilize the stock hood latch.
Thanks for the POR 15 warning. I did do a second coat with Topcoat on top of the POR15 base coat. It is way more difficult doing the second coat. I find to get the same smooth finish as the initial coat, you have to apply it quickly and not go back on the freshly painted surface, or it will streak. Had lots of grief with the second coat when doing the engine bay for this same reason. I have found foam brushes also work the best.
The mount on top of the intercooler is the modified bracket to support the upper filler panel. The upper panel will fit back into the stock location and act as the upper portion of my air dam, as well will allow me to utilize the stock hood latch.
Thanks for the POR 15 warning. I did do a second coat with Topcoat on top of the POR15 base coat. It is way more difficult doing the second coat. I find to get the same smooth finish as the initial coat, you have to apply it quickly and not go back on the freshly painted surface, or it will streak. Had lots of grief with the second coat when doing the engine bay for this same reason. I have found foam brushes also work the best.
Yea it's very easy to get streaks, I tend to use a spray type of paint as the final coat for the smooth finish and the UV protectant. Since the POR15 is the strong finish the topcoat is mostly for looks.
I might be interested in a cope of your air dam depending on the price. Just mocked up my charge tubing and it's super clean right to the TB lol. Running a crap ton of tubing isn't really gona look great or be easy to do.
02-24-2016, 10:11 AM
#55
Supreme Member

iTrader: (2)
Join Date: Feb 2005
Location: West Warwick RI, postal code: 02893
Posts: 4,337
Received 55 Likes
on
41 Posts
Car: Building LS3, T56 Z28
Engine: LS3
Transmission: T-56
Axle/Gears: Moser/ 4.11
Re: LQ408, F1C Procharged Style - 89 TransAm
How do you plan to clock the sc? Always seems like a strange part of the tubing on third gens.
02-25-2016, 07:05 AM
#56
Supreme Member
iTrader: (2)
Join Date: Feb 2005
Location: West Warwick RI, postal code: 02893
Posts: 4,337
Received 55 Likes
on
41 Posts
Car: Building LS3, T56 Z28
Engine: LS3
Transmission: T-56
Axle/Gears: Moser/ 4.11
Re: LQ408, F1C Procharged Style - 89 TransAm
Sorry to ask a back to back question, but what ignition system do you plan to run?
02-25-2016, 01:28 PM
#57
Re: LQ408, F1C Procharged Style - 89 TransAm
No worries, ask away.
SC will be clocked towards the engine with the outlet on a horizontal plane, 180 piping from SC to driver fender. The bracket I have is built by Indiana Musclecar and as that is the route Justin designed it for, I plan to run the tubing in that same location.
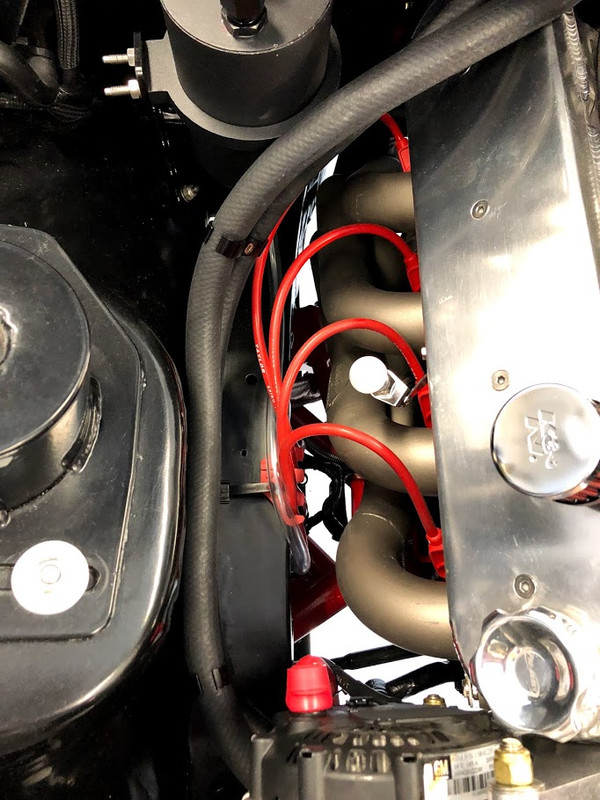
Ignition is stock 2001 Transam, I plan to run two to three plug ranges cooler and decrease gap to 0.025". Check out post #46 in my earlier build if you want see how I will be running the coils and wires, as I will be reusing this same setup.
https://www.thirdgen.org/forums/ltx-...uild-swap.html
Been working on the car body as of late, preparing for paint, so not time has been spent on the new engine build yet. Hope to have that coming together soon.
SC will be clocked towards the engine with the outlet on a horizontal plane, 180 piping from SC to driver fender. The bracket I have is built by Indiana Musclecar and as that is the route Justin designed it for, I plan to run the tubing in that same location.
Ignition is stock 2001 Transam, I plan to run two to three plug ranges cooler and decrease gap to 0.025". Check out post #46 in my earlier build if you want see how I will be running the coils and wires, as I will be reusing this same setup.
https://www.thirdgen.org/forums/ltx-...uild-swap.html
Been working on the car body as of late, preparing for paint, so not time has been spent on the new engine build yet. Hope to have that coming together soon.
03-27-2016, 06:28 AM
#58
Supreme Member
iTrader: (2)
Join Date: Feb 2005
Location: West Warwick RI, postal code: 02893
Posts: 4,337
Received 55 Likes
on
41 Posts
Car: Building LS3, T56 Z28
Engine: LS3
Transmission: T-56
Axle/Gears: Moser/ 4.11
Re: LQ408, F1C Procharged Style - 89 TransAm
What brackets are you using for the sc?
05-21-2016, 09:40 AM
#59
Re: LQ408, F1C Procharged Style - 89 TransAm
Any updates? I just ordered the same FMIC but slightly thinner at 3.25" and need to figure out how to run the piping with the battery in the stock pass side tray location. Coming up the driver side to the TB is going to be easy but getting it from the supercharger around the battery is going to be a PITA.
11-13-2016, 12:41 PM
#60
Re: LQ408, F1C Procharged Style - 89 TransAm
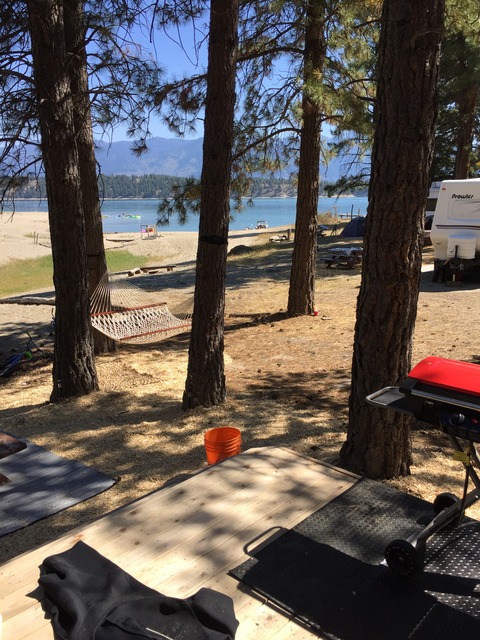
Finally getting back to this, had another project come up so had priorities switched. Fell upon a rustic lake lot, renovated an RV, added solar power and parked her. Next it needed a deck, then it was getting really hot out, so... I spent some time in a hammock and drank some beer. Eh! I'm Canadian.
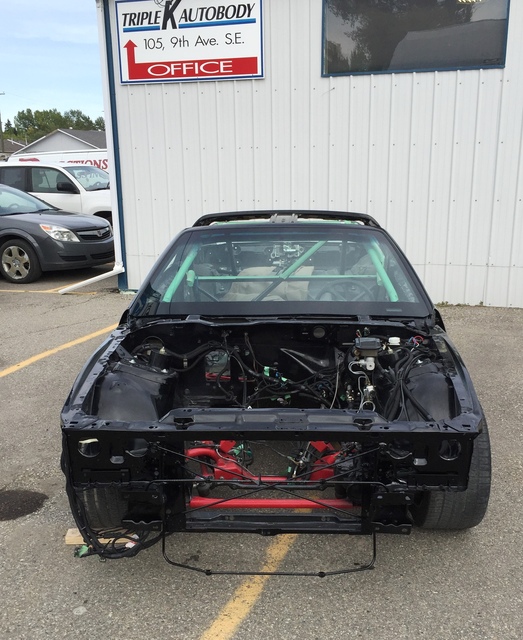
Anyways, back to the build. While I was busy with other things, the car was in for paint on the main chassis, so it is ready to go back together. I have to complete final fit with the interooler before front end heads to paint.
Chassis, fresh out of the body shop.
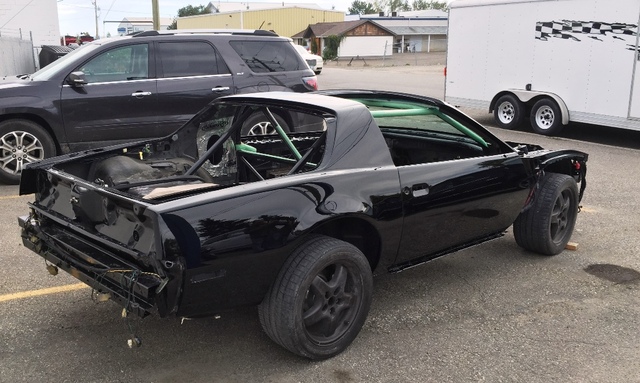
A plug for my painter, he's an avid road course racer himself.
Also managed to get my air dam fabrication completed. The cardboard template didn't quite translate to the 14 gauge stainless, due to the additional stiffness, it would not follow the bumper curvature as well as the cardboard, so a slight mod was required to make things fit within my bumper cutouts. They had fun welding these vertical edges of the air dam back together. Let me know what you think.
Some minor customization to make everything fit and clearance just right.
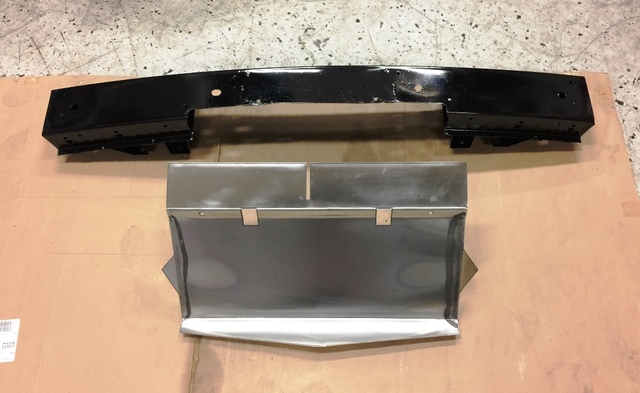
L brackets mount lower portion of air dam to bottom of bumper. This should provide ample support to the front bumper cover which is cutout to match and mount to the bottom flare.

Sitting just above the air dam is where the filler panel will mount. The bracket shown bolts to the I/C brace under the air dam, filler panel itself will mount to this adjustable bracket.
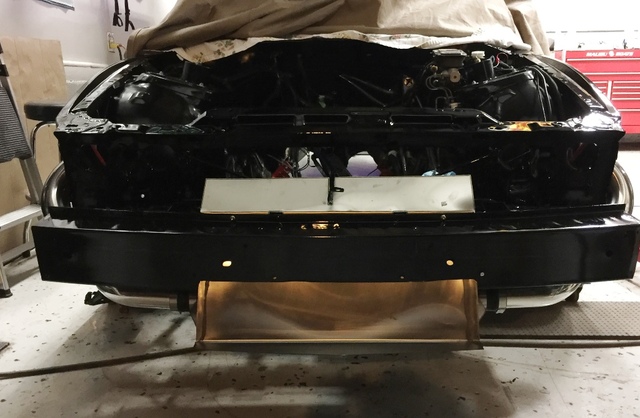
Money shot ....breath

Anyways, back to the build. While I was busy with other things, the car was in for paint on the main chassis, so it is ready to go back together. I have to complete final fit with the interooler before front end heads to paint.
Chassis, fresh out of the body shop.

A plug for my painter, he's an avid road course racer himself.

Also managed to get my air dam fabrication completed. The cardboard template didn't quite translate to the 14 gauge stainless, due to the additional stiffness, it would not follow the bumper curvature as well as the cardboard, so a slight mod was required to make things fit within my bumper cutouts. They had fun welding these vertical edges of the air dam back together. Let me know what you think.
Some minor customization to make everything fit and clearance just right.

L brackets mount lower portion of air dam to bottom of bumper. This should provide ample support to the front bumper cover which is cutout to match and mount to the bottom flare.

Sitting just above the air dam is where the filler panel will mount. The bracket shown bolts to the I/C brace under the air dam, filler panel itself will mount to this adjustable bracket.

Money shot ....breath

Last edited by HP52TA; 11-13-2016 at 12:44 PM.
11-14-2016, 11:34 AM
#61
Supreme Member
12-01-2016, 09:13 PM
#62
Re: LQ408, F1C Procharged Style - 89 TransAm
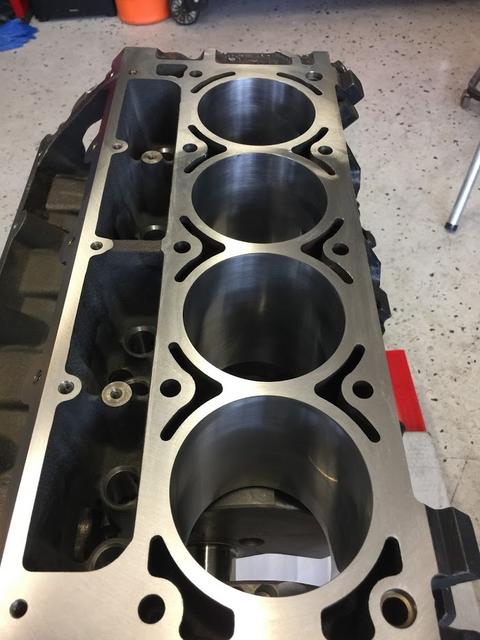
Block and rotating assembly now at machine shop, hoping to have it back for the holiday break so I can start the engine build.
Had the pistons coated prior to boring. Domes were treated with ceramic, while skirts and internals have received a permanently bonded lubricant film called Policoat.
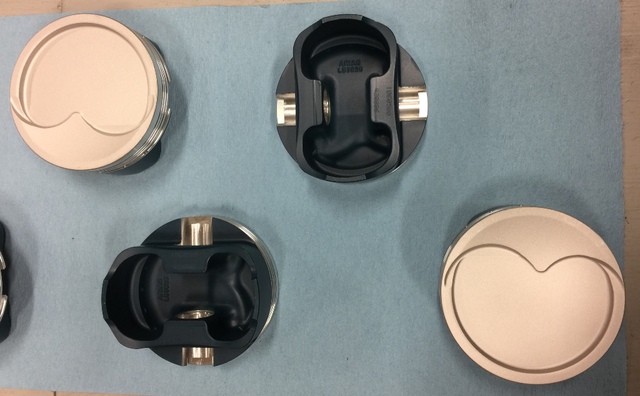
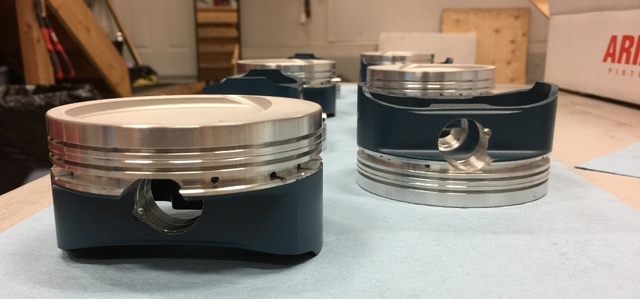
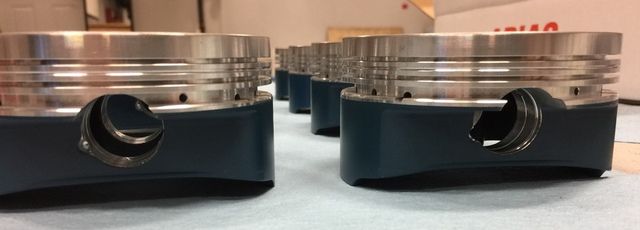
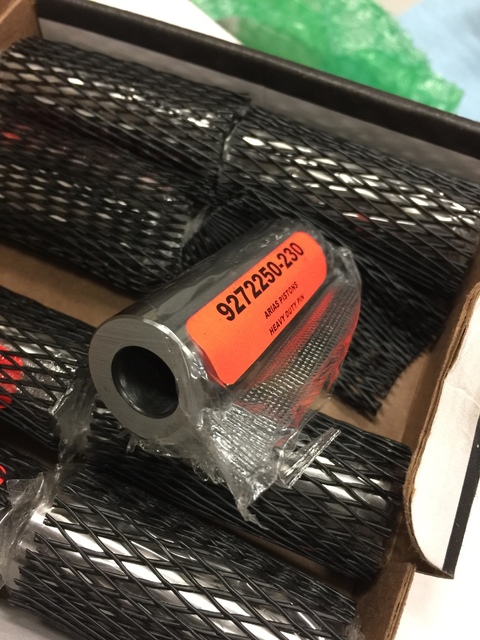
Pins were upgraded to the HD version.
Had the pistons coated prior to boring. Domes were treated with ceramic, while skirts and internals have received a permanently bonded lubricant film called Policoat.


Pins were upgraded to the HD version.
 12-02-2016, 05:10 AM
#63
Supreme Member
iTrader: (2)
Join Date: Feb 2005
Location: West Warwick RI, postal code: 02893
Posts: 4,337
Received 55 Likes
on
41 Posts
Car: Building LS3, T56 Z28
Engine: LS3
Transmission: T-56
Axle/Gears: Moser/ 4.11
Re: LQ408, F1C Procharged Style - 89 TransAm
How do you plan on making air go up into the intercooler? Seems like it might want to just pass under the car instead. Also what sc brackets are you going to run?
12-02-2016, 06:02 AM
#64
Re: LQ408, F1C Procharged Style - 89 TransAm
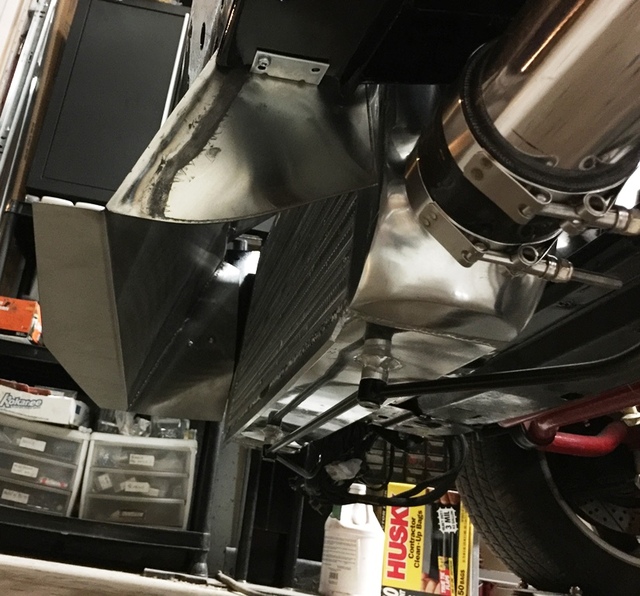
i will first be counting on the stock spoiler to force airflow in that direction. If my IAT ends up higher than desired, plan B is to utilize the 1/2" strip of aluminum that is welded to the front bottom of the IC. If you look closely, you can see it in the pictures. This was installed, so I can mount a strip of rubber to act as an additional air scoop to force air into the IC itself.
Plan C, meth injection.
SC bracket is from Indiana Musclecar.
Plan C, meth injection.
SC bracket is from Indiana Musclecar.
04-18-2017, 10:12 PM
#65
Re: LQ408, F1C Procharged Style - 89 TransAm
Hey guys, Been going hard on getting the main chassis of the car itself back together as my cage certification is to happen this weekend. Driver seat and stereo, (Yes, street car with a real stereo  and removeable sub) are mounted, so after the inspection the passenger seat and interior should happen fairly quickly.
Managed to get the short block pre-assembly completed. Need to get the main clearances opened up slightly, so block will have to go back to machinist for a touch up, then it will be ready for final assembly. Headers are off for ceramic coating and cut-out is all wired in.
and removeable sub) are mounted, so after the inspection the passenger seat and interior should happen fairly quickly. Managed to get the short block pre-assembly completed. Need to get the main clearances opened up slightly, so block will have to go back to machinist for a touch up, then it will be ready for final assembly. Headers are off for ceramic coating and cut-out is all wired in.
10-30-2017, 09:59 PM
#66
Re: LQ408, F1C Procharged Style - 89 TransAm
Build back on! Actually have been building for a while, so have a bit of a back log to update you guys on.
Cage certification was completed last summer, small success but in the right direction.
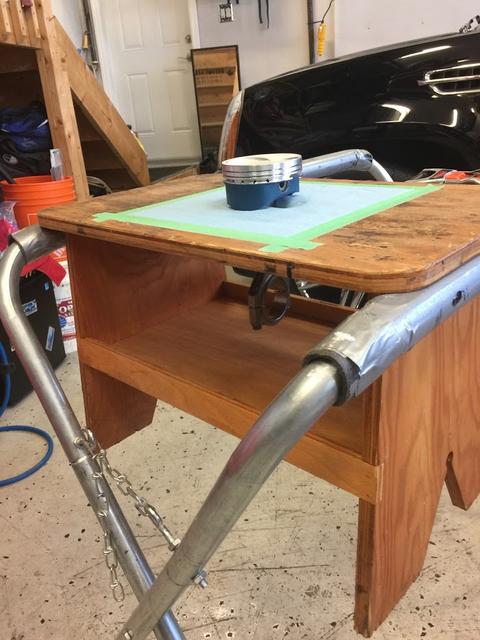
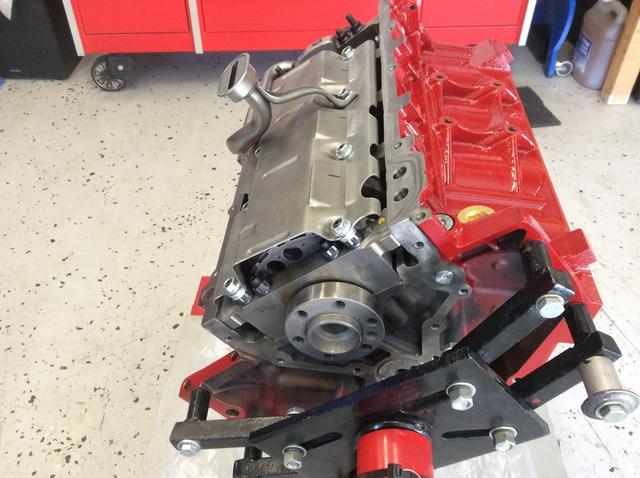
Engine assembly time, nothing like the right tool for the job... here's my make shift piston assembly stand, worked great. I have been finding these body work stands to be the perfect temporary work bench.
Bores opened up 0.030", mains line honed and head surface decked. All straight, true and ready for assembly. 4.00" Eagle crank, with H beam rods and ARP 2000 bolts cleared stock assembly fine, without any additional block clearancing required for rod bolts.
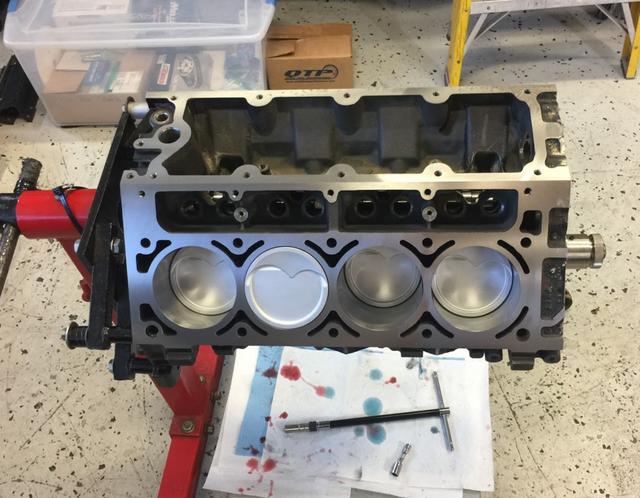
Short block assembled.
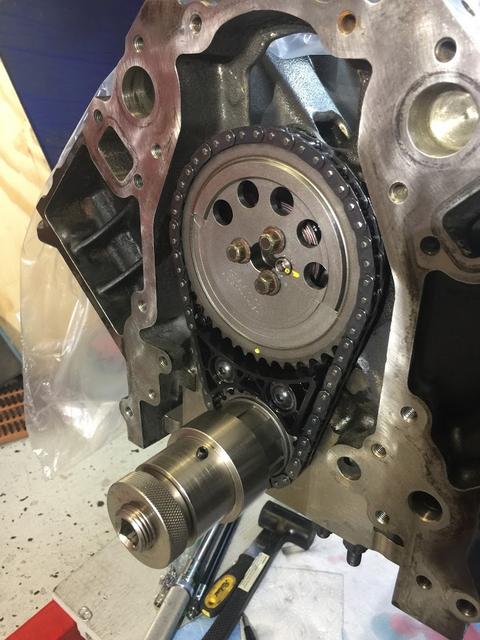
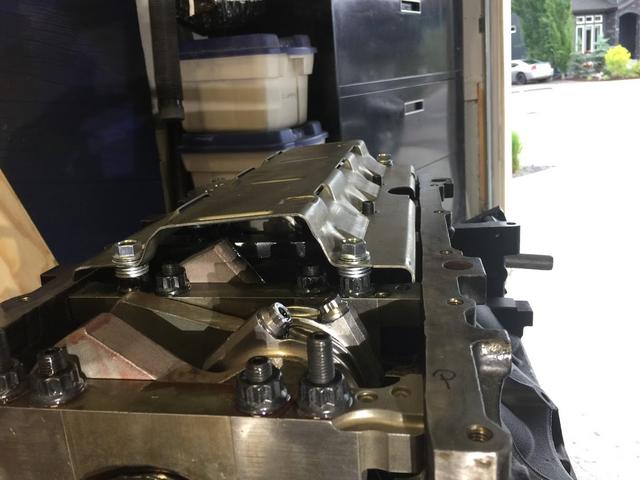
Installed and degree'd cam with a Comp Cams 3158kt adjustable LS2 single row timing chain which allows me to use the front mount LS2 cam sensor. Trick Flow bracket installed on cam plate, allowing chain tensioner mounting without the need to drill the two holes in the block.
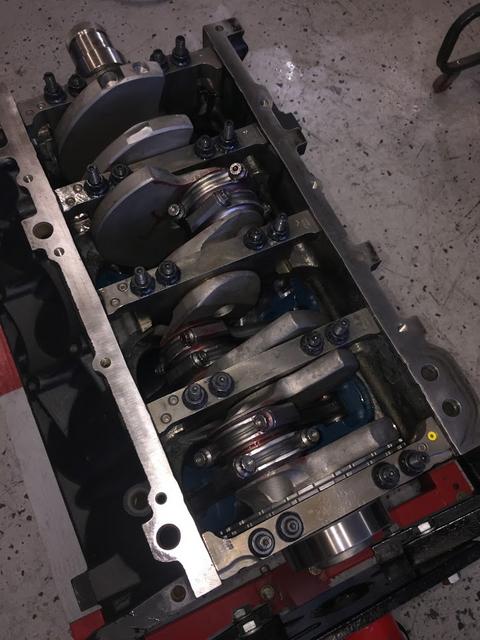
Stroker crank needed some additional clearance, I didn't want to limit oil flow through the windage tray therefore washers used to provide additional clearance. Once tightened down, nuts finished up flush with end of studs.
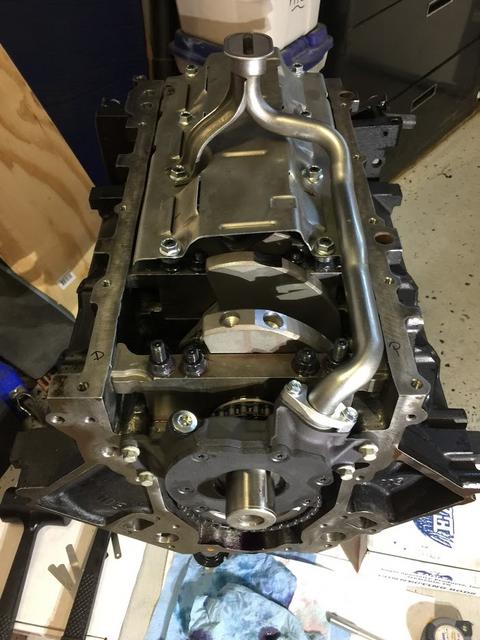
Melling Hi-volume / pressure pump clearanced and installed. Oil pickup to pan clearance adjusted due to elevated windage tray, pickup installed with Muscle Rods tube support bracket, providing two bolt mounting for additional support.

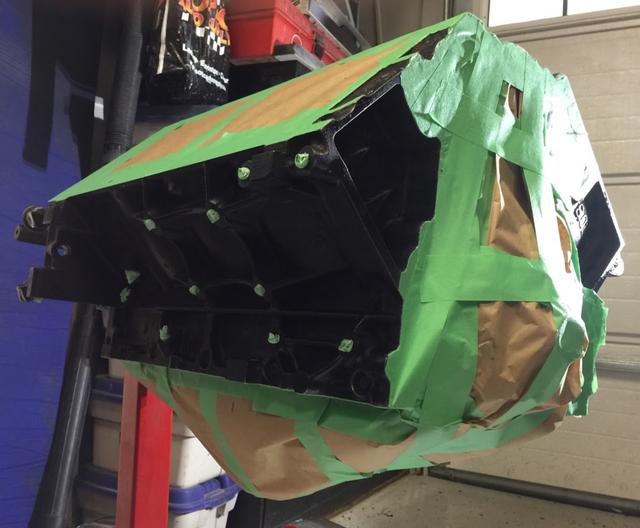
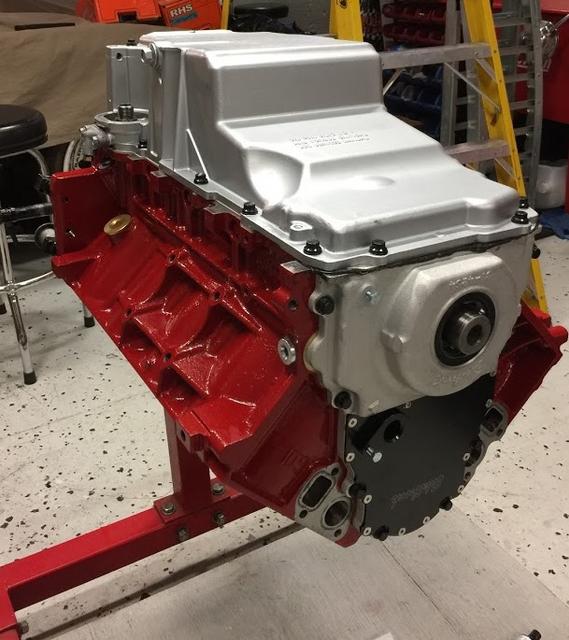
Block masked off, ready for paint.
Cage certification was completed last summer, small success but in the right direction.
Engine assembly time, nothing like the right tool for the job... here's my make shift piston assembly stand, worked great. I have been finding these body work stands to be the perfect temporary work bench.
Bores opened up 0.030", mains line honed and head surface decked. All straight, true and ready for assembly. 4.00" Eagle crank, with H beam rods and ARP 2000 bolts cleared stock assembly fine, without any additional block clearancing required for rod bolts.
Short block assembled.
Installed and degree'd cam with a Comp Cams 3158kt adjustable LS2 single row timing chain which allows me to use the front mount LS2 cam sensor. Trick Flow bracket installed on cam plate, allowing chain tensioner mounting without the need to drill the two holes in the block.
Stroker crank needed some additional clearance, I didn't want to limit oil flow through the windage tray therefore washers used to provide additional clearance. Once tightened down, nuts finished up flush with end of studs.
Melling Hi-volume / pressure pump clearanced and installed. Oil pickup to pan clearance adjusted due to elevated windage tray, pickup installed with Muscle Rods tube support bracket, providing two bolt mounting for additional support.
Block masked off, ready for paint.
Last edited by HP52TA; 06-05-2018 at 06:05 PM. Reason: Resolve picture links
10-31-2017, 08:40 PM
#68
Re: LQ408, F1C Procharged Style - 89 TransAm
Trick Flow bracket TFS-K30675600 should fix you up. Same reason I purchased this kit after already buying an LS2 dampener, much easier than drilling the block.
https://www.trickflow.com/parts/tfs-k30675600
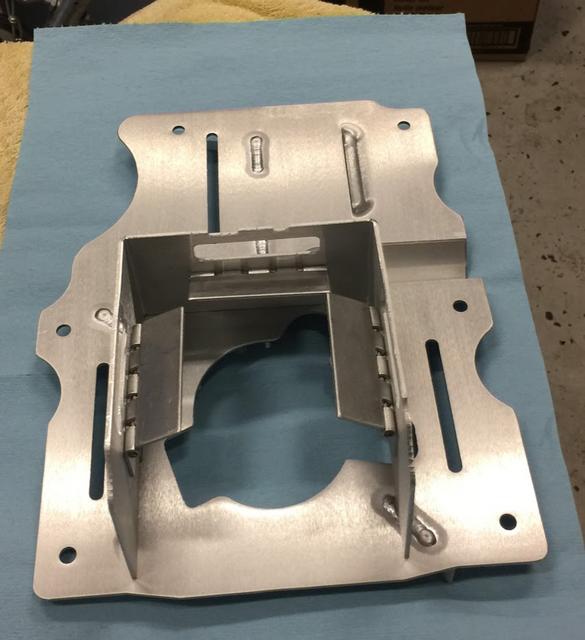
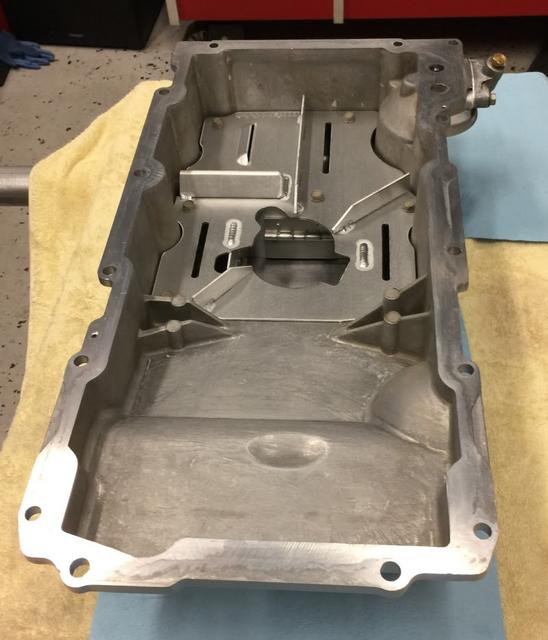
To help support oil control, I replaced the stock internals with an Improved Racing pan baffle (EGM-200 for the F body pan) providing trap doors on three sides. Should work well for both road course or drag. No clearance issues with the elevated windage tray either.
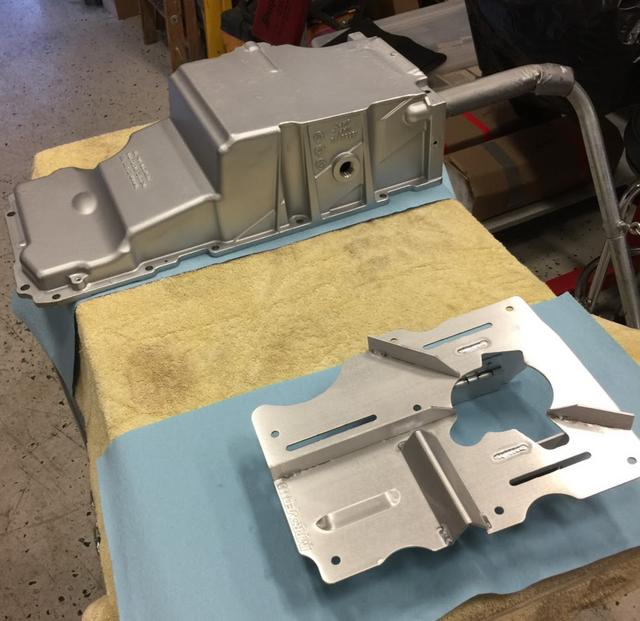
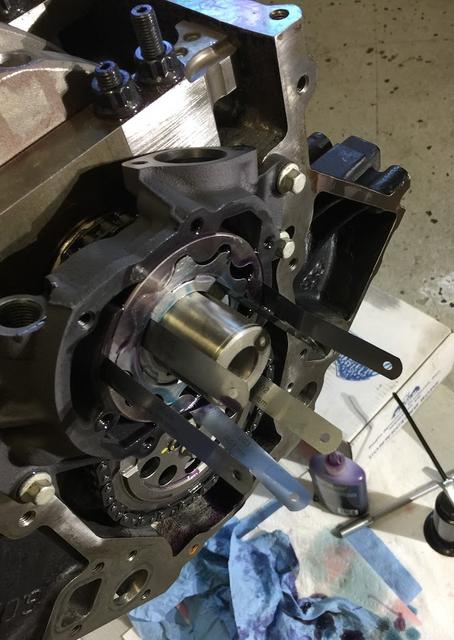
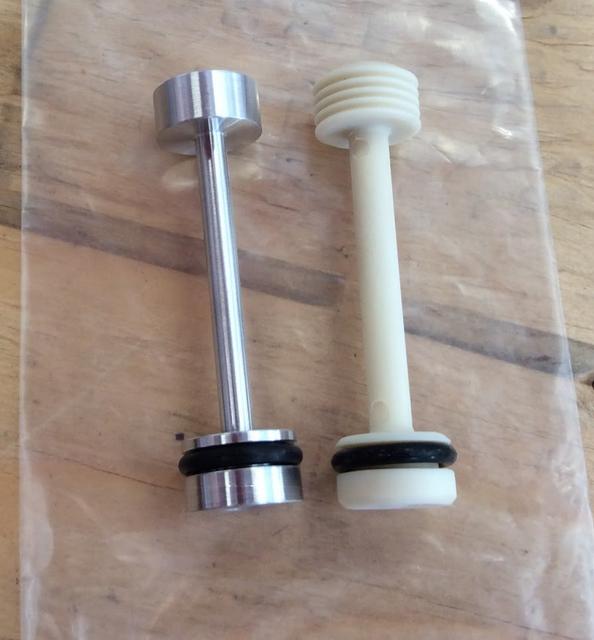
Oil barbell upgraded to a Sac City Corvette version. The smaller diameter shaft slightly reduces flow restriction after filter in comparison to stock barbell and hey its billet. May never see it again, thus the picture.
Also picked up their seal install and alignment tools that worked well for both rear seal install and front alignment.
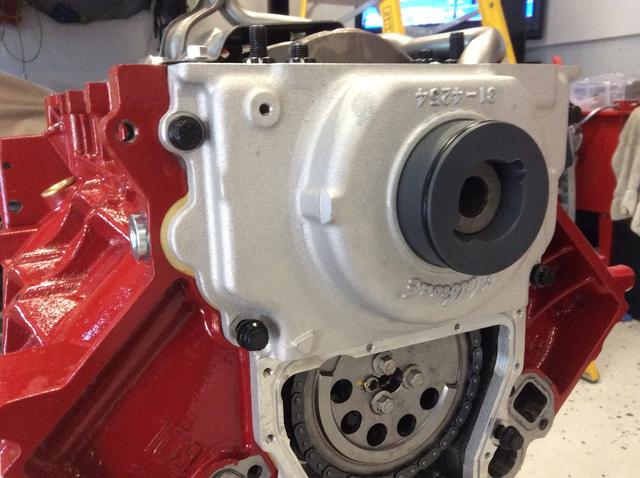
Planning to eventually have both an N/A and boost tune, allowing me to disable the supercharger should I choose to do so for road course days. To go along with that plan, also installed an Edelbrock timing cover with access panel. Pan on and the bottom end is a wrap.
https://www.trickflow.com/parts/tfs-k30675600
To help support oil control, I replaced the stock internals with an Improved Racing pan baffle (EGM-200 for the F body pan) providing trap doors on three sides. Should work well for both road course or drag. No clearance issues with the elevated windage tray either.
Oil barbell upgraded to a Sac City Corvette version. The smaller diameter shaft slightly reduces flow restriction after filter in comparison to stock barbell and hey its billet. May never see it again, thus the picture.
Also picked up their seal install and alignment tools that worked well for both rear seal install and front alignment.
Planning to eventually have both an N/A and boost tune, allowing me to disable the supercharger should I choose to do so for road course days. To go along with that plan, also installed an Edelbrock timing cover with access panel. Pan on and the bottom end is a wrap.
Last edited by HP52TA; 06-05-2018 at 06:06 PM. Reason: Resolve picture links
10-31-2017, 09:01 PM
#69
Supreme Member
Re: LQ408, F1C Procharged Style - 89 TransAm
Good to see you back at it and looking forward to the completion. Maybe you'll end up here at Castrol Raceway....
10-31-2017, 10:41 PM
#70
Re: LQ408, F1C Procharged Style - 89 TransAm
Interesting, I wish it didn�t come with the plastic damper as I already have one. Plus it says u need to remove the oil pump to install it.
Nice work on the Engine. I hope u didn�t put rtv along the whole front and rear covers. U just need a dab in the corners and all seals should be installed dry including the pan.
I did the same Billet oil barbel and the sacks city align it tools, all nice pieces! Didn�t knotice anything with the barbell but it was tight to go in and pretty sure the block scraped the aluminum alittle.
I also just picked up a 2 peice timing cover, eBay version was only $53 and I�m going to give it a whirl. Looks exactly the same as the edelbrock.
11-01-2017, 10:58 PM
#71
Re: LQ408, F1C Procharged Style - 89 TransAm
Interesting, I wish it didn�t come with the plastic damper as I already have one. Plus it says u need to remove the oil pump to install it.
Nice work on the Engine. I hope u didn�t put rtv along the whole front and rear covers. U just need a dab in the corners and all seals should be installed dry including the pan.
Nice work on the Engine. I hope u didn�t put rtv along the whole front and rear covers. U just need a dab in the corners and all seals should be installed dry including the pan.
Both seals are installed dry, it still doesn't feel right not putting grease on the front rubber seal, but as you say dry it is. Back cover does only have dabs in the corner joints, but after my previous LS1 build had a leak at those rear corners, I go with a medium size dab now to ensure the full gasket joint is sealed. That LS1 small dab cost me a clutch disc and well ... let's not talk about that.
Front cover was a little different story however, with the crank seal centered, I was seeing a gap of 0.030" between the Edelbrock timing cover and the pan. So, I slightly off centered the cover which closed the gap to 0.025" but did not want to go further, however with the gap still greater than the recommended 0.020", a bead of silicone was placed between the timing cover and pan gasket to ensure a solid seal. Pan will still come off without issue as the silicone is only on the timing cover side and the timing cover should only need come off if the whole engine has to come apart. I am attributing the extra gap to the line hole and the aftermarket cover fitting a little different than stock.
11-02-2017, 09:45 PM
#72
Re: LQ408, F1C Procharged Style - 89 TransAm
To keep the budget in tact, I am reusing my 243 Patriot heads from my earlier LS1 build, freshened them up at the machine shop with a resurface, valve grind and soda blast, then I installed new seals and BTR SK001 spring kit with Ti retainers installed, shimmed to correct install height.
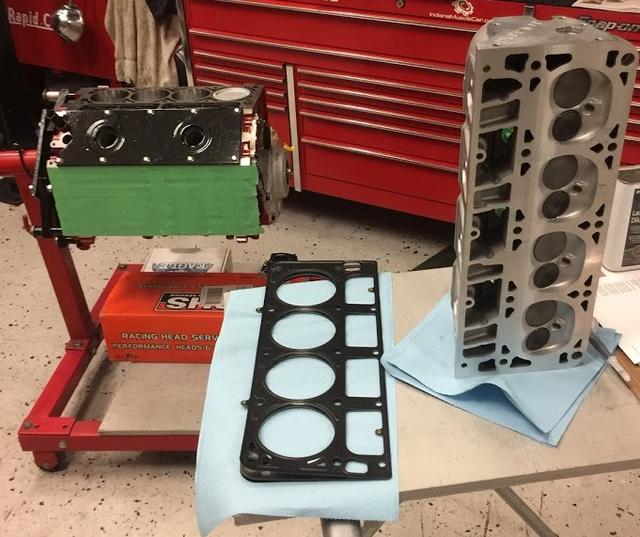
New LS7 lifters and trays installed, with Cometic 0.040" MLS head gaskets.

Heads, all sensors and poly motor mounts installed.
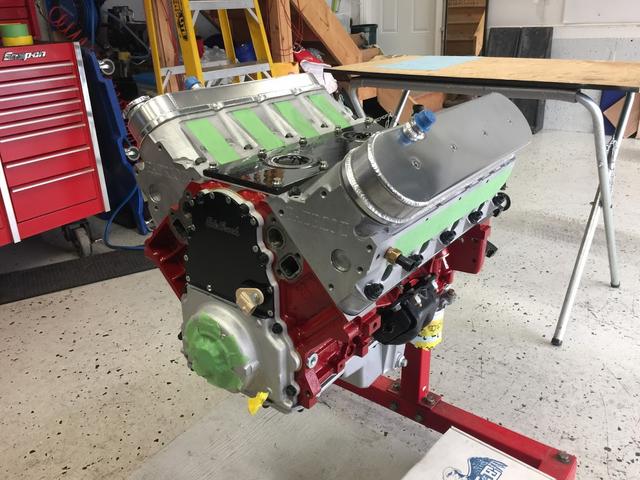
Now to the fun stuff, Procharger mock up!
Procharger power steering bracket for iron block installed with C6 corvette power steering pump. Procharger has two different brackets, one for aluminum block and one for iron block, as iron block mounts upper/outer mount to side of block as it is missing the threaded hole on the outer edge that the aluminum blocks have.
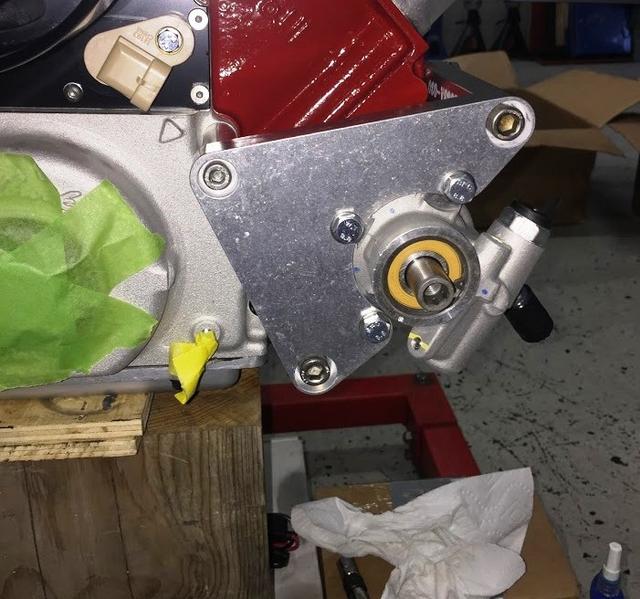
During install, noticed side mount hole misaligned with threads in block.
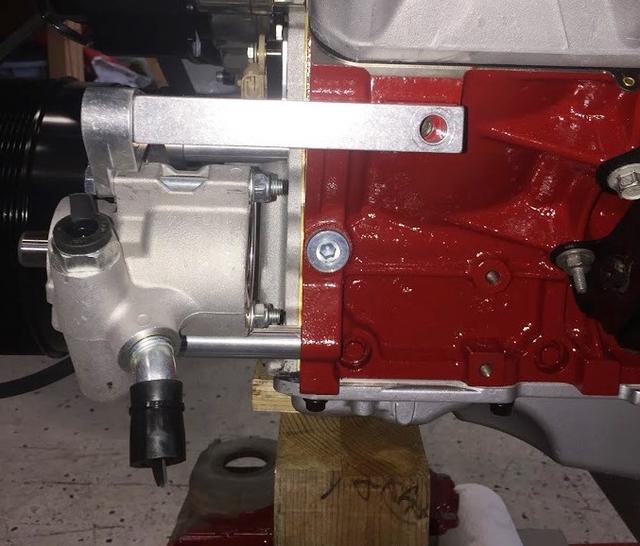
Attempted installation as supplied, but belt alignment was off due to the outer mount pushing the pump forward on the outer edge. Elongated bracket hole, allowing the step in the mount to meet flush with the block; belt alignment now bang on.
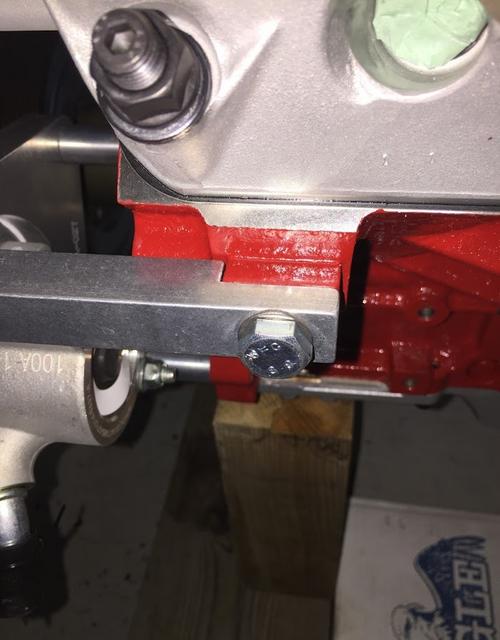
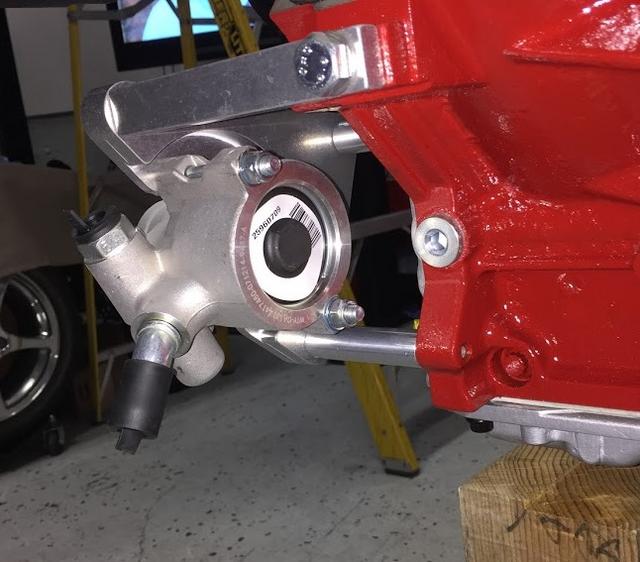
That return line connection position doesn't look ideal, that may have to be addressed once engine installed.
New LS7 lifters and trays installed, with Cometic 0.040" MLS head gaskets.
Heads, all sensors and poly motor mounts installed.
Now to the fun stuff, Procharger mock up!
Procharger power steering bracket for iron block installed with C6 corvette power steering pump. Procharger has two different brackets, one for aluminum block and one for iron block, as iron block mounts upper/outer mount to side of block as it is missing the threaded hole on the outer edge that the aluminum blocks have.
During install, noticed side mount hole misaligned with threads in block.
Attempted installation as supplied, but belt alignment was off due to the outer mount pushing the pump forward on the outer edge. Elongated bracket hole, allowing the step in the mount to meet flush with the block; belt alignment now bang on.
That return line connection position doesn't look ideal, that may have to be addressed once engine installed.
Last edited by HP52TA; 06-05-2018 at 06:07 PM. Reason: Resolve picture links
11-02-2017, 09:53 PM
#73
Re: LQ408, F1C Procharged Style - 89 TransAm
Looking good! I thought I was going to see procharger pics... lol but nope. Idk those spring specs but i kinda wish you went with a better lifter. Those Ls7 lifters are known to not like heavy valve trains , aggressive cams and higher than stock spring pressures. They were meant for light weight weight valves, Stock like cams and LS6 style springs. I would have liked to see a Morel 5315 or better.
11-06-2017, 10:06 PM
#74
Re: LQ408, F1C Procharged Style - 89 TransAm
Thanks, sorry for the tease.
During last Black Friday sale shopping, I was actually planning to go with the Morels, however BTR sold out just as I was ordering, $400 lifters were not in the budget at the time, so went with the LS7 lifters with the plan to replace them when the heads get upgraded in the future. My cam specs are not that radical @.615 lift, stock LS1 rockers with trunion upgrade, although spring pressures have increased. Lifters are not ideal, but hope they suffice until the future head upgrade which will include lifters and rockers, but for now many other parts to be purchased to get this thing running.
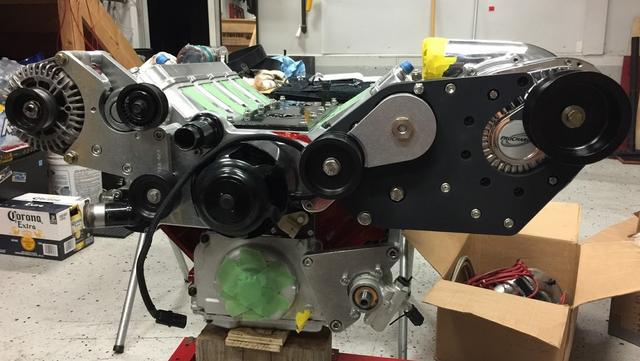
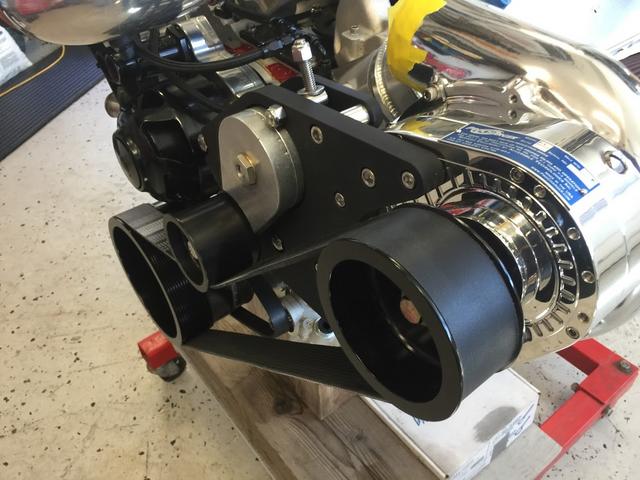
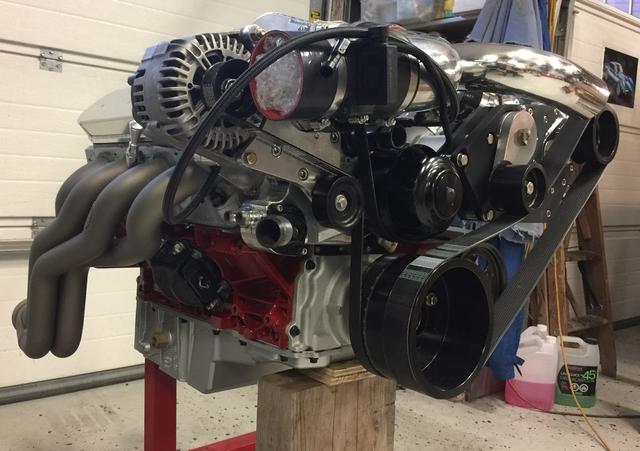
Carrying on with the mock up, Indiana Musclecar supercharger bracket installed with Procharger alternator relocation bracket and C6 corvette alternator. All were direct bolt ons without any issue, great job Justin!
When the crank was in for balancing, I had my machine shop cut in a second keyway in the crank and the ATI balancer (917242) to ensure there is no concern of the balancer spinning on the crank. Boiled the inner crank hub prior to its installation and it went on nice and smooth.
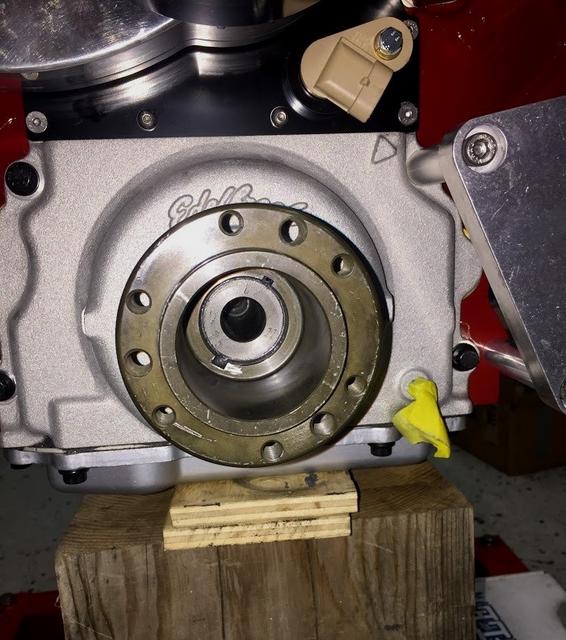
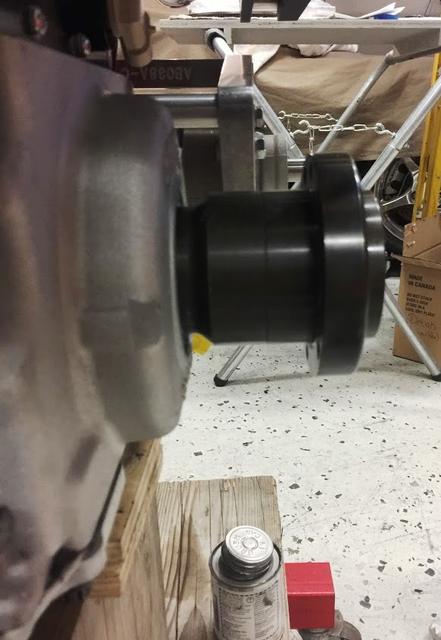
ARP bolt installed in the balancer and lower Procharger crank pulley installed and belt length checked.
During last Black Friday sale shopping, I was actually planning to go with the Morels, however BTR sold out just as I was ordering, $400 lifters were not in the budget at the time, so went with the LS7 lifters with the plan to replace them when the heads get upgraded in the future. My cam specs are not that radical @.615 lift, stock LS1 rockers with trunion upgrade, although spring pressures have increased. Lifters are not ideal, but hope they suffice until the future head upgrade which will include lifters and rockers, but for now many other parts to be purchased to get this thing running.
Carrying on with the mock up, Indiana Musclecar supercharger bracket installed with Procharger alternator relocation bracket and C6 corvette alternator. All were direct bolt ons without any issue, great job Justin!
When the crank was in for balancing, I had my machine shop cut in a second keyway in the crank and the ATI balancer (917242) to ensure there is no concern of the balancer spinning on the crank. Boiled the inner crank hub prior to its installation and it went on nice and smooth.
ARP bolt installed in the balancer and lower Procharger crank pulley installed and belt length checked.
Last edited by HP52TA; 06-05-2018 at 06:08 PM. Reason: Resolve picture links
11-06-2017, 11:16 PM
#75
Re: LQ408, F1C Procharged Style - 89 TransAm
Very nice! Man that�s a wide belt lol.
No prob on the lifters, they will work (dunno for how long) but might not like rpm. morels are nice, just get the drop
in 5315 or the new part number, i got mine new from cospeed for less than $200 shipped. I ended up having to run a shorter pushrod 7.350 vs the 7.40 stickers due to the shorter travel of the 5315s, the LS7 have huge travel so they will take a stock pushrod no matter what you have done lol but that�s also part of the prob.
When you say trunion upgrade i hope u didn�t do captured roller bearings! They are making a mess in these motors. Basically almost immediately the bearings wear into the trunion and spread metal dust into the Engine. Doesn�t matter if they are BTR, comp, trickflow etc. they all have the fatial flaw. Stock the ride on a metal sleeve so no issue. The hot ticket now are bushing kits. Swap all the crap out and press in some bushings and your golden. Virtually no wear, higher bearing contact area, stronger and quieter. Plus since they are bronze the wear material doesn�t affect things. I did a straub kit and love it with my morels, quiet as hell, much quieter than the stockers.
11-27-2017, 09:08 PM
#76
Re: LQ408, F1C Procharged Style - 89 TransAm
Belt is a 12 rib, so hopefully no slippage .
Trunnion upgrade is a BTR bearing kit, again bought last BF. When you mentioned the bearing wear I did some searching, only thing I came up with, was people losing the circlips, but would be interested in hearing more on that. The previous Comp Cams kit I installed had two rockers that I never could get to rotate smoothly for their full 360 rotation, even replaced the rocker body and issue remained. If it was run in this condition, I could see this causing the metal dust condition you spoke of.
Lifters and valve train will get a future upgrade when new heads go on. This is where a few budget constraints were made for the mean time.
. Trunnion upgrade is a BTR bearing kit, again bought last BF. When you mentioned the bearing wear I did some searching, only thing I came up with, was people losing the circlips, but would be interested in hearing more on that. The previous Comp Cams kit I installed had two rockers that I never could get to rotate smoothly for their full 360 rotation, even replaced the rocker body and issue remained. If it was run in this condition, I could see this causing the metal dust condition you spoke of.
Lifters and valve train will get a future upgrade when new heads go on. This is where a few budget constraints were made for the mean time.
Last edited by HP52TA; 11-27-2017 at 09:14 PM.
11-27-2017, 10:00 PM
#77
Re: LQ408, F1C Procharged Style - 89 TransAm
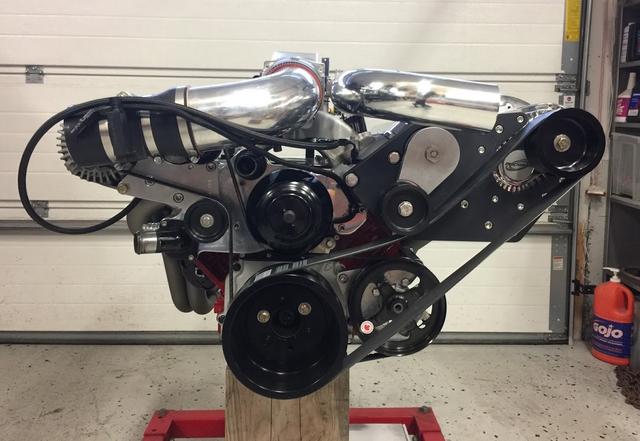
Finished mocking up the engine with the new supercharger and accessory brackets. New ATI balancer (917242) installed with Procharger lower crank pulley. (One bolt removed in pic, needing thick washers for final install) All pulleys and belts checked from crank pulley to ensure proper alignment.
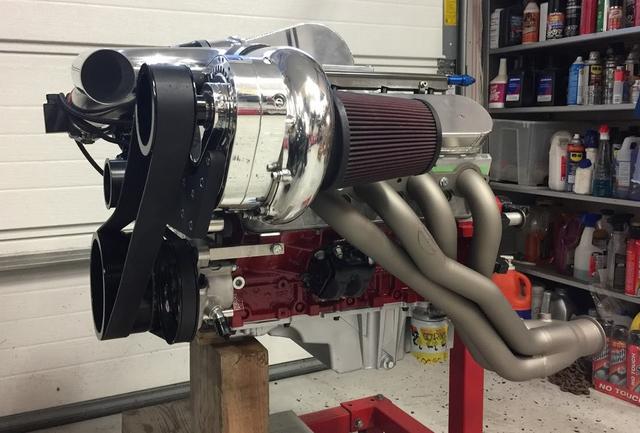
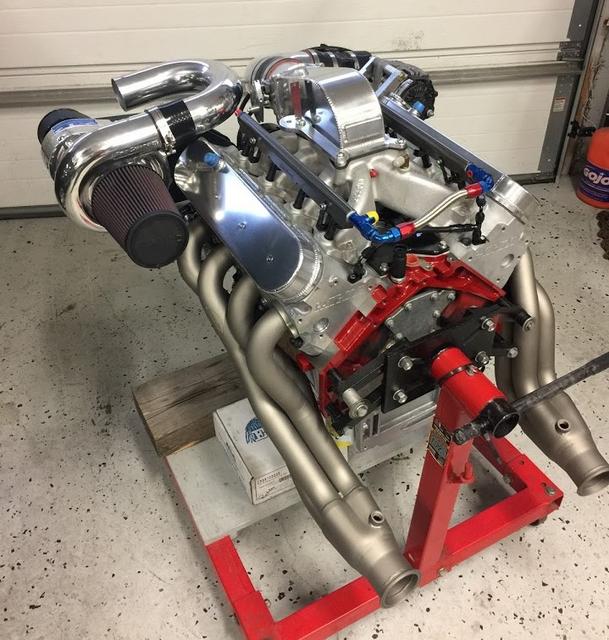
Reusing my Victor Jr. intake, nitrous spray bars have been blocked off and 80# injectors installed.
To help keep under hood temperatures down, I also had my headers ceramic coated in a Titanium colour. These are Hawks Stainless Works with 2" primaries into 3"collectors that will tie into my existing exhaust.
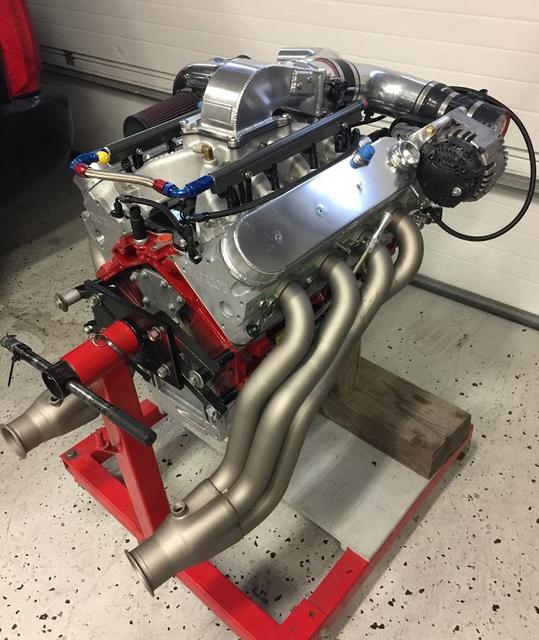
Last edited by HP52TA; 06-05-2018 at 06:08 PM. Reason: Resolve picture links
11-27-2017, 10:31 PM
#78
Re: LQ408, F1C Procharged Style - 89 TransAm
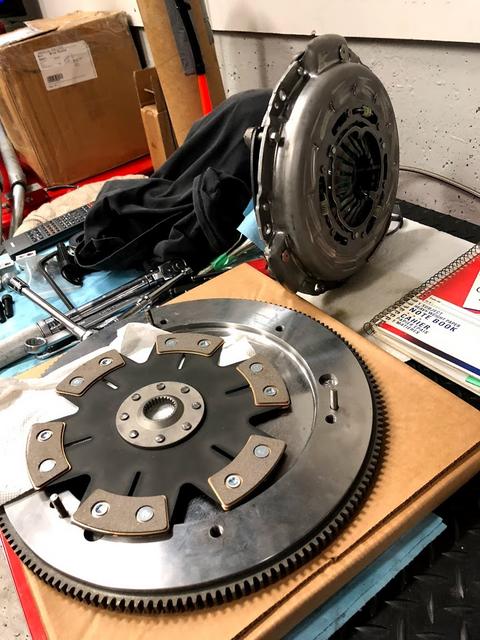
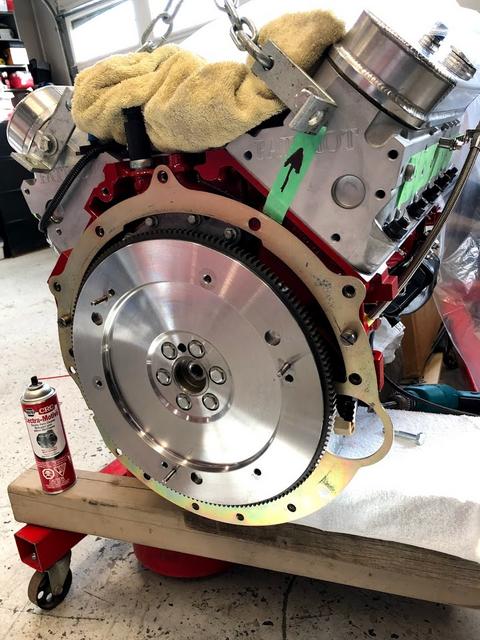
Reusing my Quicktime Bell, which was clearanced for the headers in my previous build. New Monster Lt1-SC/R twin disc clutch and 18# lightweight flywheel assembly installed with new pilot bearing. Clutch and flywheel were included when engine balancing was performed, where a slight adjustment was made.
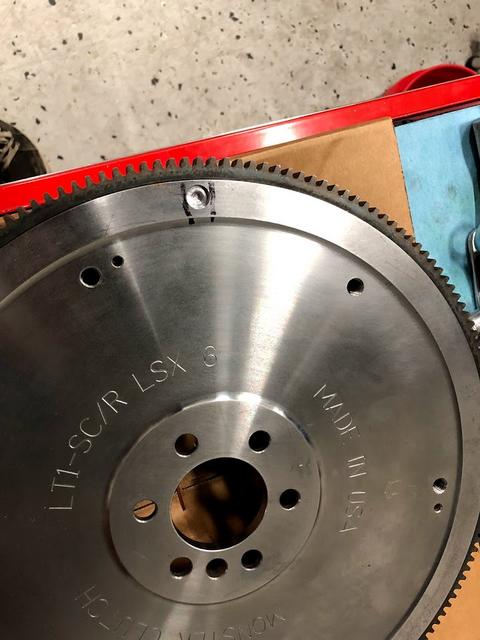
Centered bell housing with crank using offset dowels to get alignment within spec, arrow indicates direction of offset required. You must use GM bolts with this kit (No ARP allowed), the bolts included even look to be ground down for a little extra clearance.
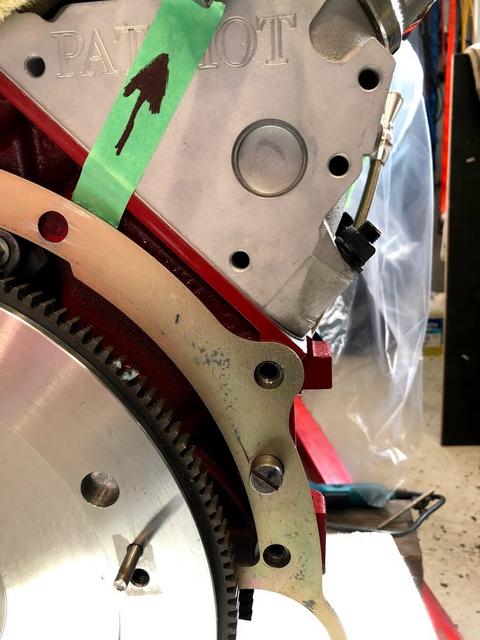
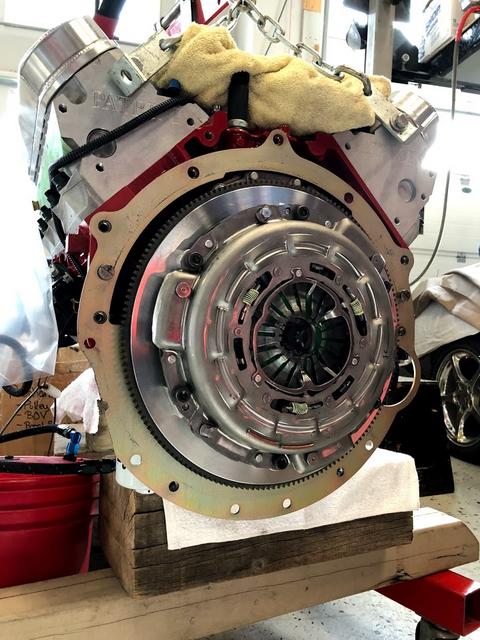

Centered bell housing with crank using offset dowels to get alignment within spec, arrow indicates direction of offset required. You must use GM bolts with this kit (No ARP allowed), the bolts included even look to be ground down for a little extra clearance.
Last edited by HP52TA; 06-05-2018 at 06:09 PM. Reason: Resolve picture links
12-10-2017, 03:18 PM
#79
Supreme Member
Re: LQ408, F1C Procharged Style - 89 TransAm
That looks pretty good. Was that by a local company?
I've thought of doing the same but I'm not sure if it's worth the investment for an entry level header such as my own.

I've thought of doing the same but I'm not sure if it's worth the investment for an entry level header such as my own.
Last edited by skinny z; 12-10-2017 at 03:23 PM.
12-10-2017, 09:36 PM
#81
Re: LQ408, F1C Procharged Style - 89 TransAm
Ceramic coating was done by Top Gun Coatings here in Calgary. They were the ones who also coated my pistons mentioned earlier. They have a half dozen colours and there price is the same regardless of colour chosen. I had done a set of mild steel shorty headers on my truck many years ago and they lasted for seven years of daily driving, so I felt it was worth the cost of coating for the extended longevity it provided. Used headers have a slight upcharge for the additional cleaning, but like these, they come out looking brand new.
 12-12-2017, 06:40 AM
#83
Supreme Member
Re: LQ408, F1C Procharged Style - 89 TransAm
can always spray it with meth to . if iats are to high
12-17-2017, 07:06 PM
#84
Re: LQ408, F1C Procharged Style - 89 TransAm
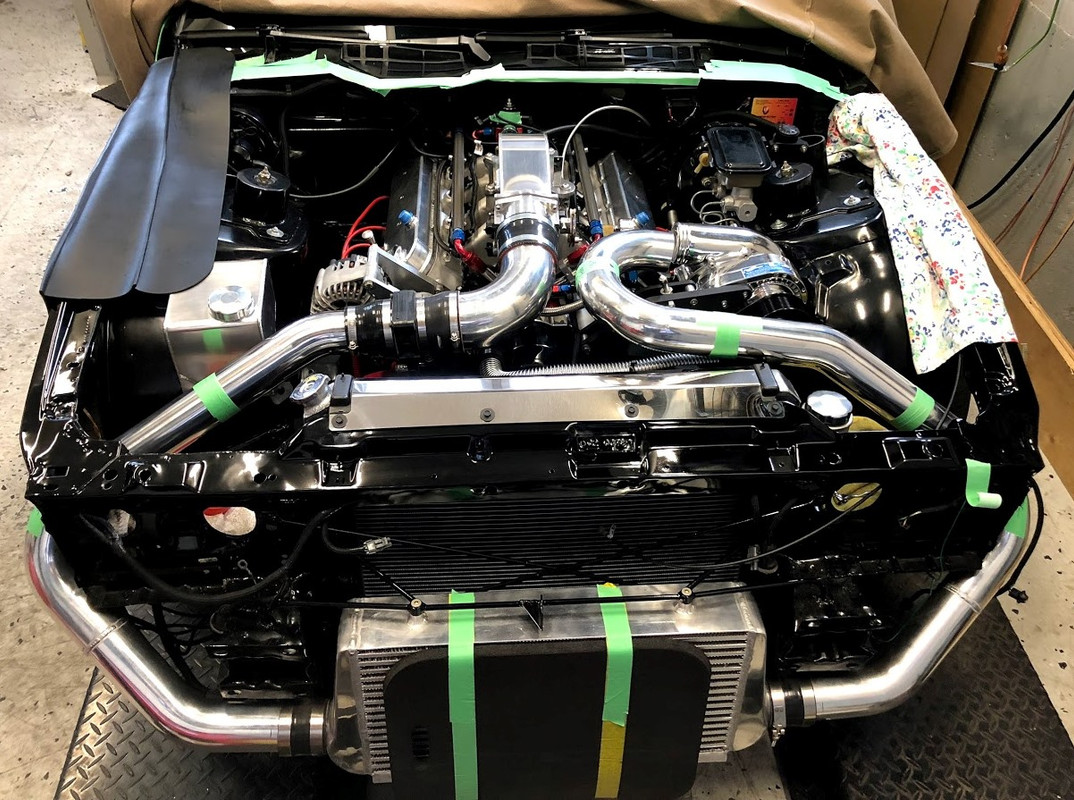
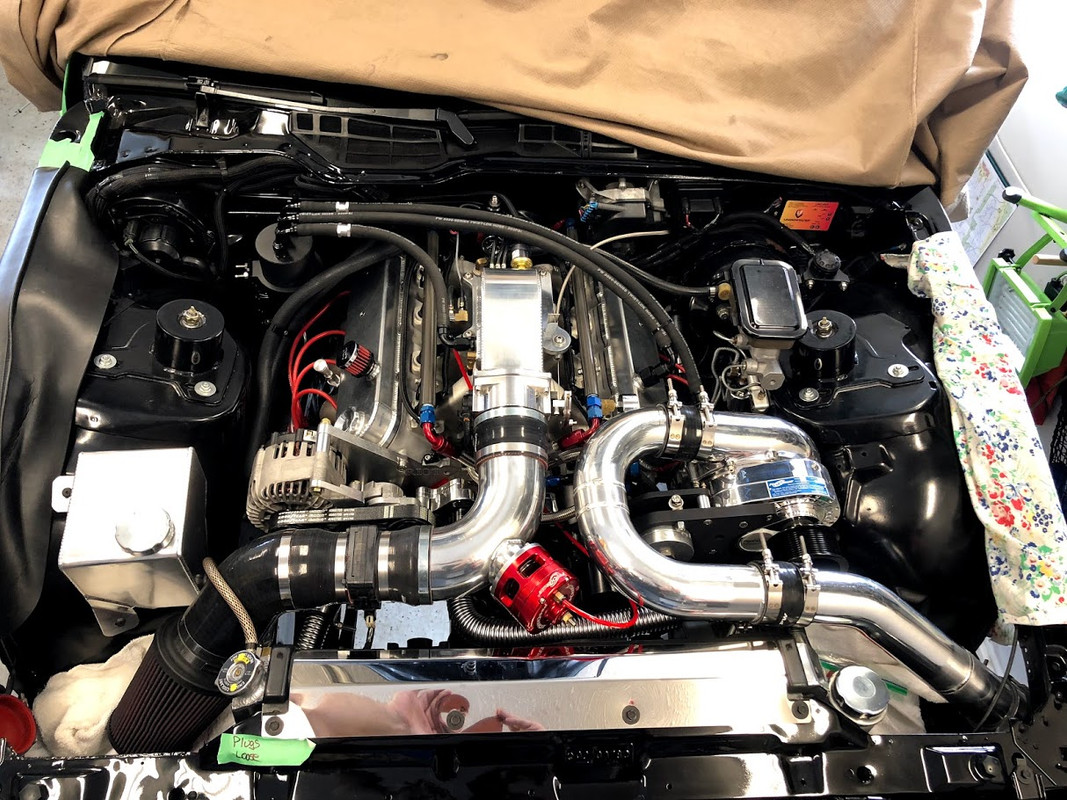
Finally, an engine in my car again 
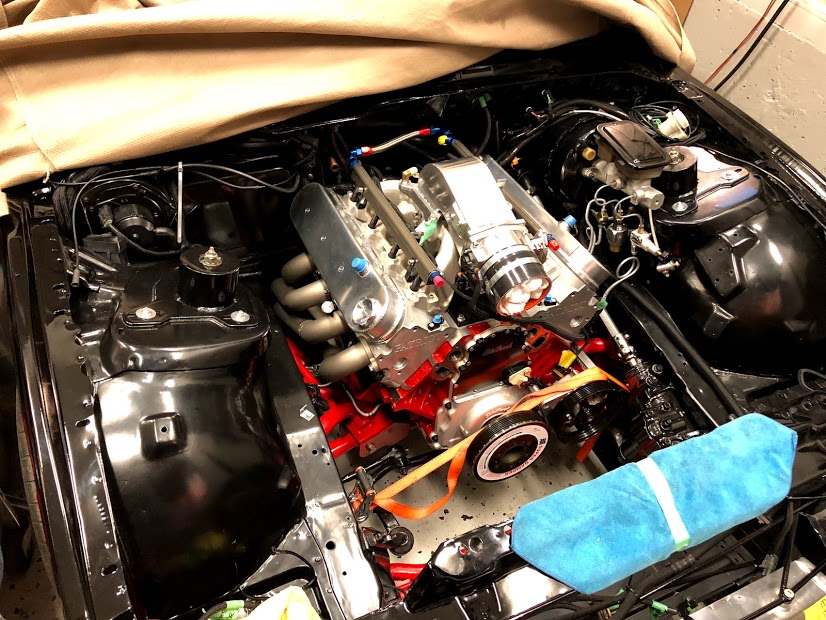
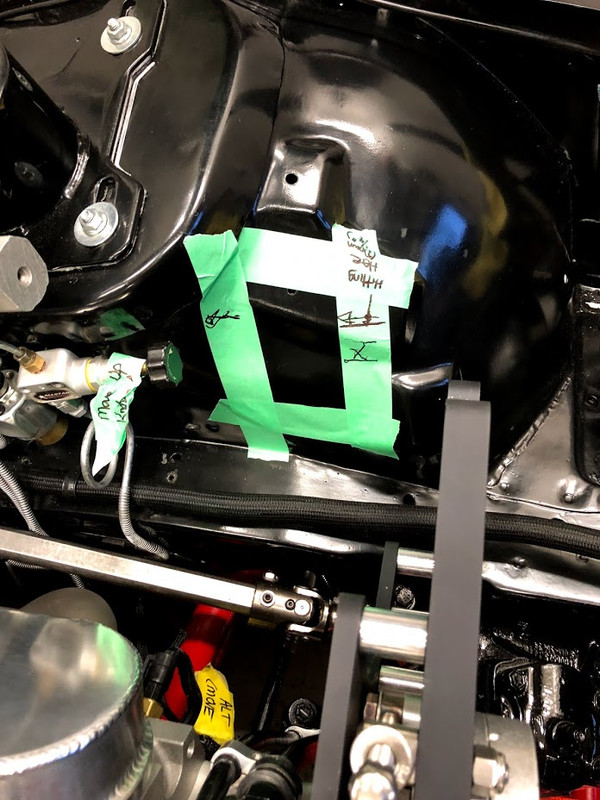
Test fit the Procharger, which was just touching the driver side fender so marked it out for a little clearancing.
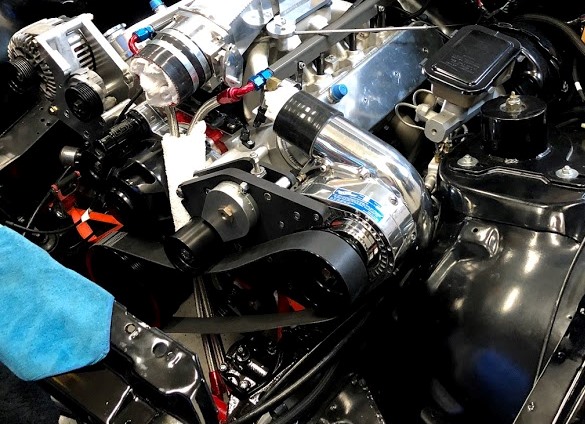
Nothing too severe was needed, gave it an extra 1/4" where the ridge was to keep it from rubbing. Also reversed proportioning valve to give more room for intake piping later.
To prevent steam issues, connected all four cylinder corners of the heads to a common line to radiator for connection.
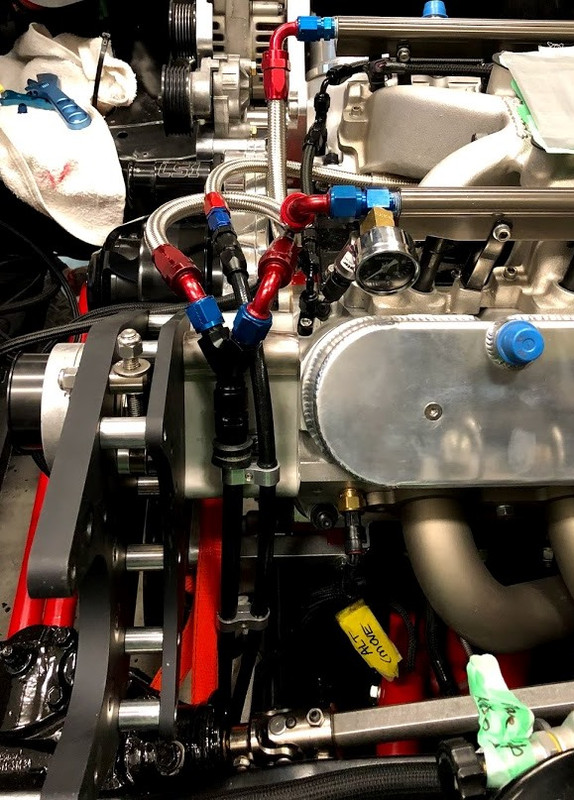
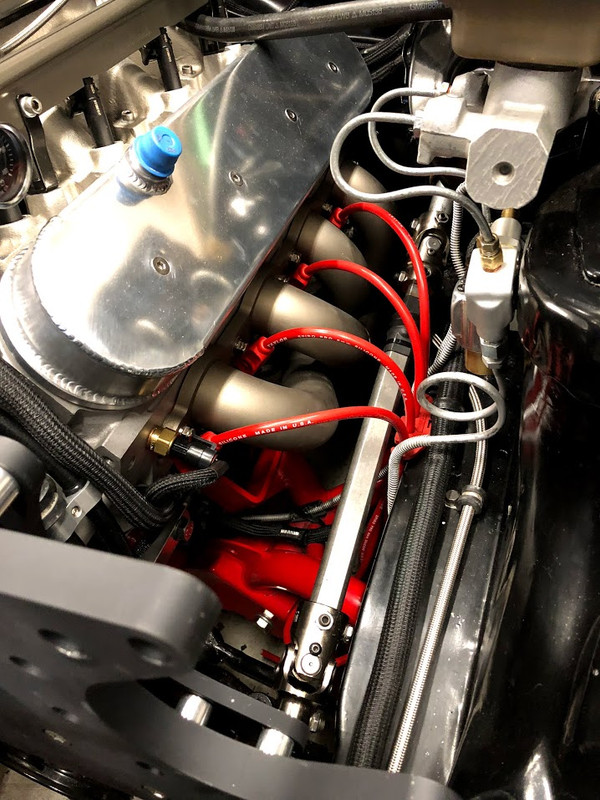
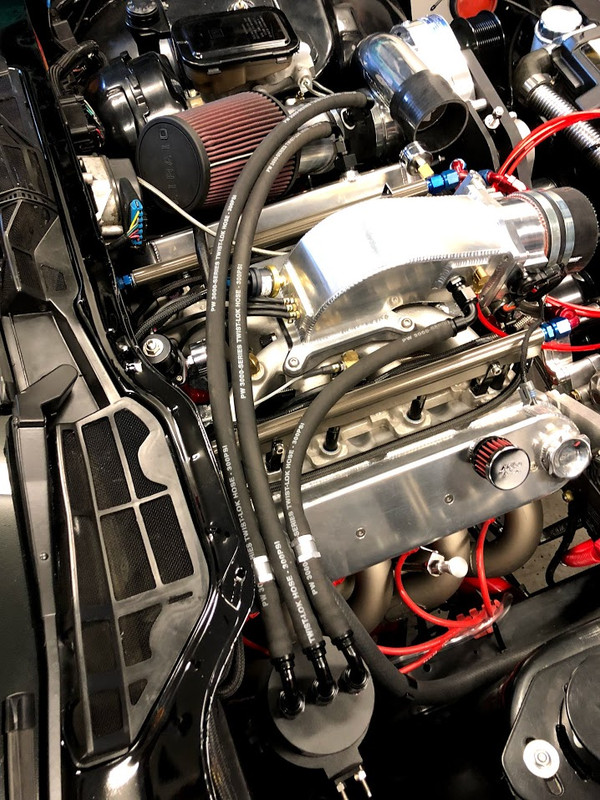
With changing the cam sensor to LS2 style, this freed up a few bolt holes in the top rear of the block, so I built a fuel regulator bracket that mounts to them; also mounted my boost sensor to the back if it to keep it hidden. -6 rail to reg and return line to the front of the block.
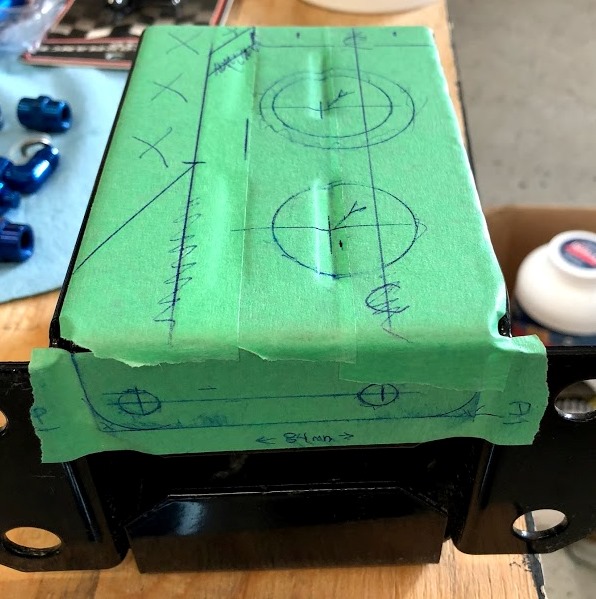
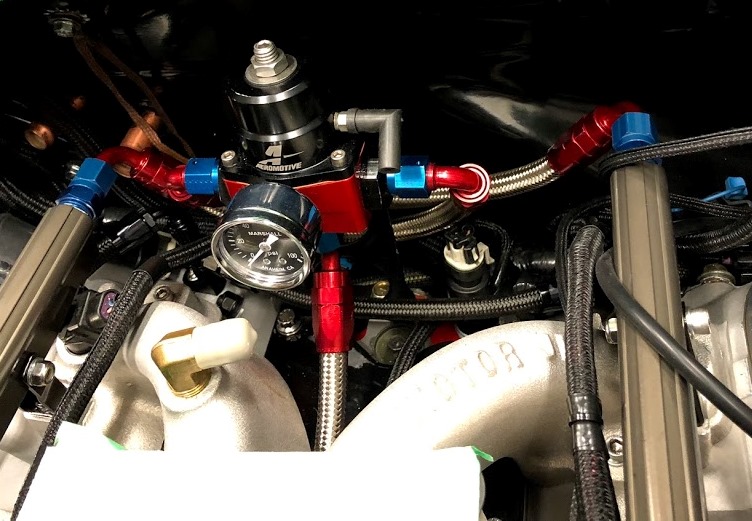
Supply is -8, Y'd to two equal length -8 lines to each rail. With the increased volume created in front of the rails this should help prevent pressure drop at the injectors.
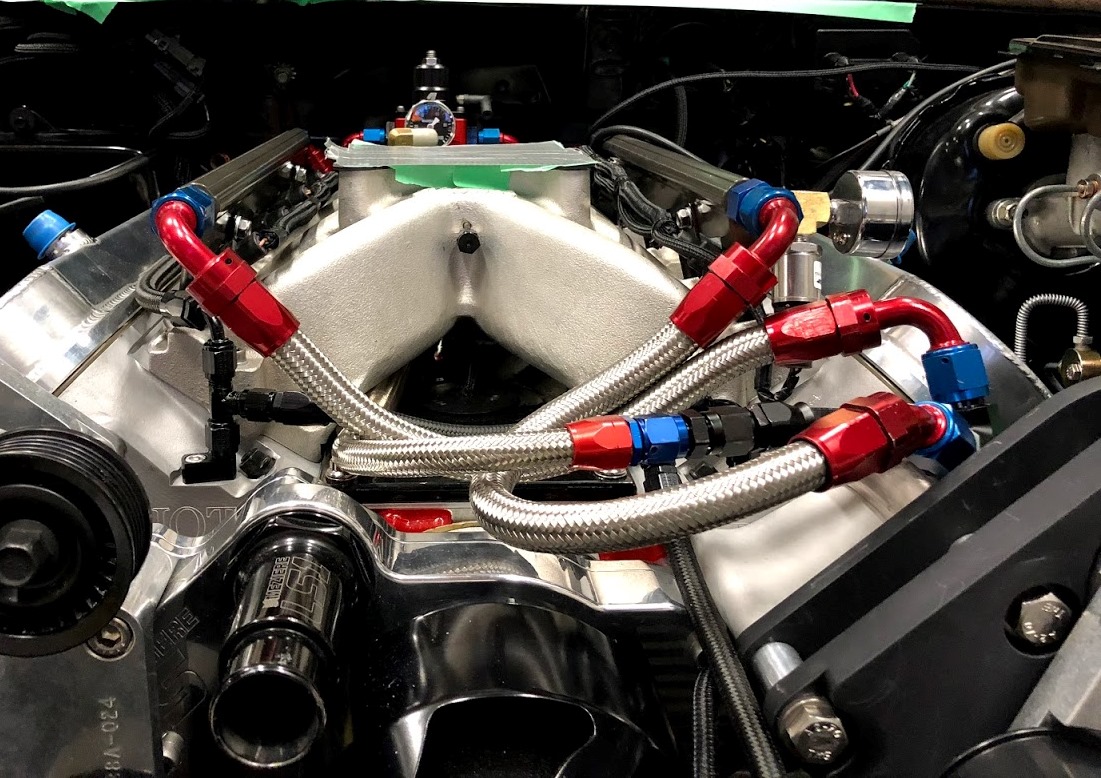
Then, final connection to teflon lines running back to fuel tank.
Test fit the Procharger, which was just touching the driver side fender so marked it out for a little clearancing.
Nothing too severe was needed, gave it an extra 1/4" where the ridge was to keep it from rubbing. Also reversed proportioning valve to give more room for intake piping later.
To prevent steam issues, connected all four cylinder corners of the heads to a common line to radiator for connection.
With changing the cam sensor to LS2 style, this freed up a few bolt holes in the top rear of the block, so I built a fuel regulator bracket that mounts to them; also mounted my boost sensor to the back if it to keep it hidden. -6 rail to reg and return line to the front of the block.
Supply is -8, Y'd to two equal length -8 lines to each rail. With the increased volume created in front of the rails this should help prevent pressure drop at the injectors.
Then, final connection to teflon lines running back to fuel tank.
Last edited by HP52TA; 06-05-2018 at 06:10 PM. Reason: Resolve picture links
12-17-2017, 07:49 PM
#85
Re: LQ408, F1C Procharged Style - 89 TransAm
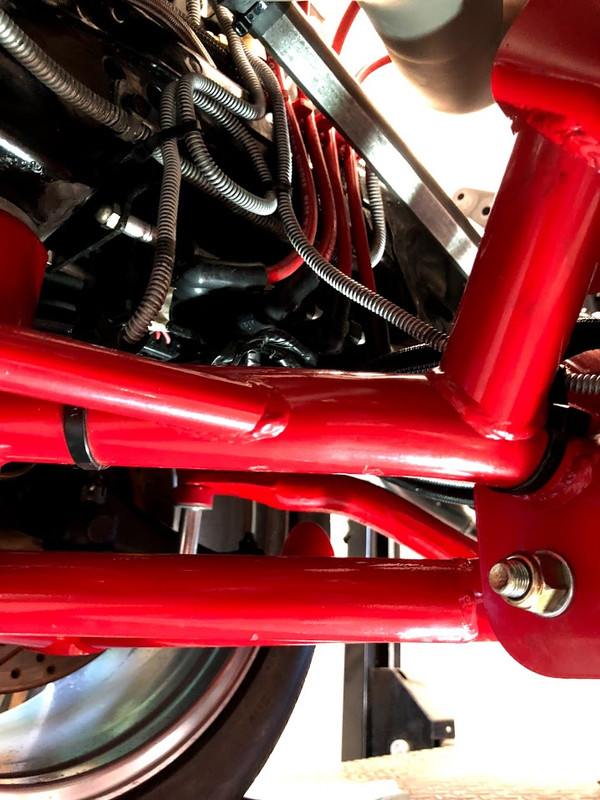
Hey guys, any inspectors out there see any issues with my fuel line routing passing NHRA inspection?
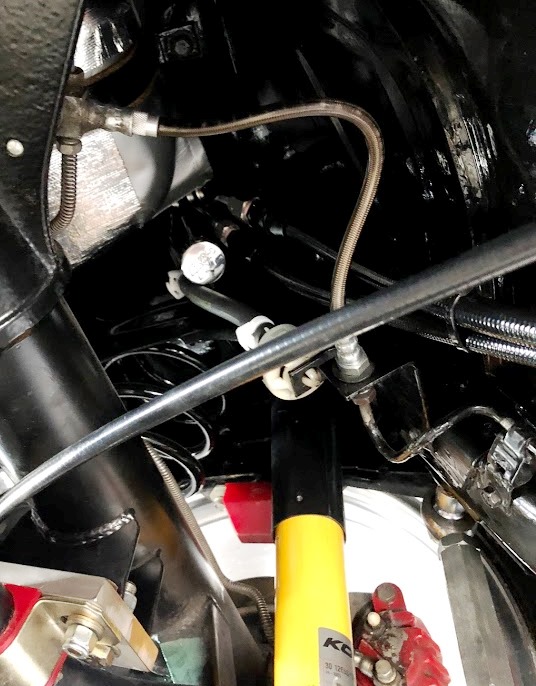
Inline fuel filter mounted to modified stock fuel filter bracket.
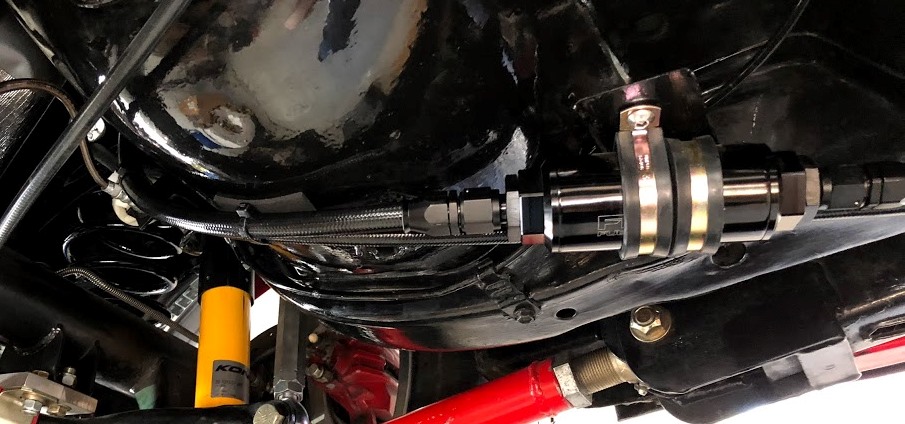
All tywraps were replaced with two hole separators for better support.
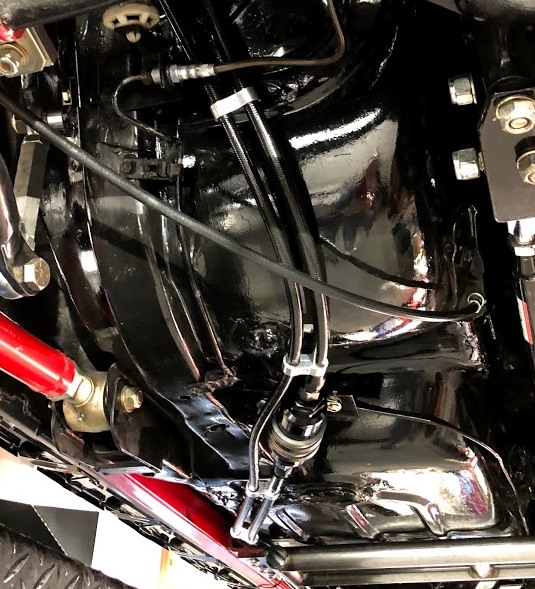
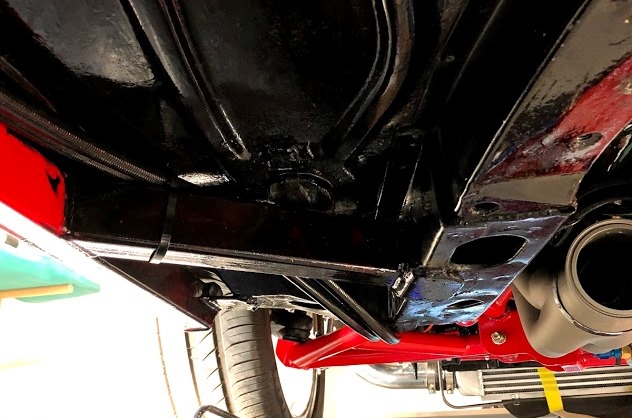
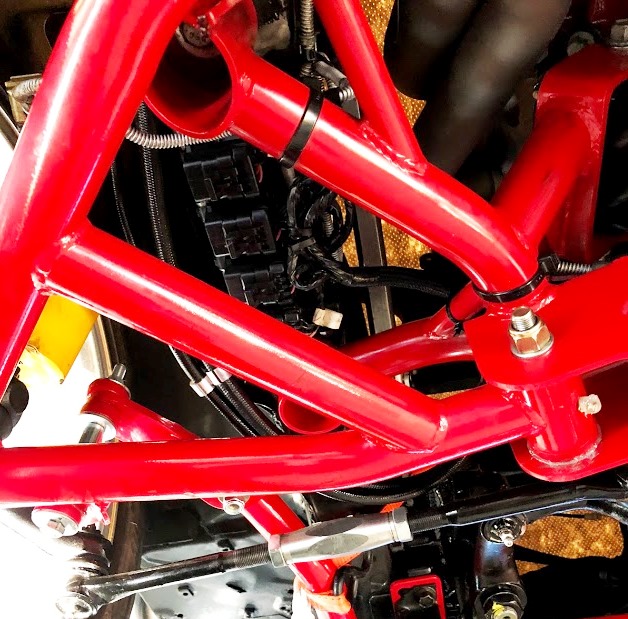
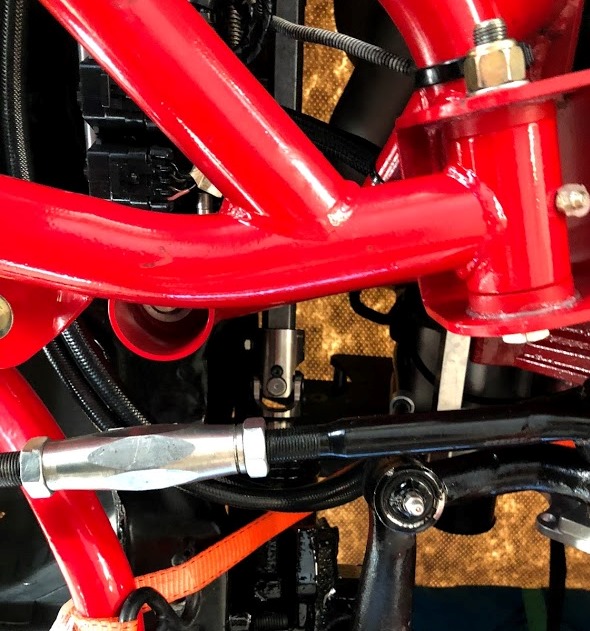
Location of lines behind the front driver tire are of biggest concern? They are not a low point, but think I could always mount these higher on the body (left of the frame hole) and even add a protection plate if required?
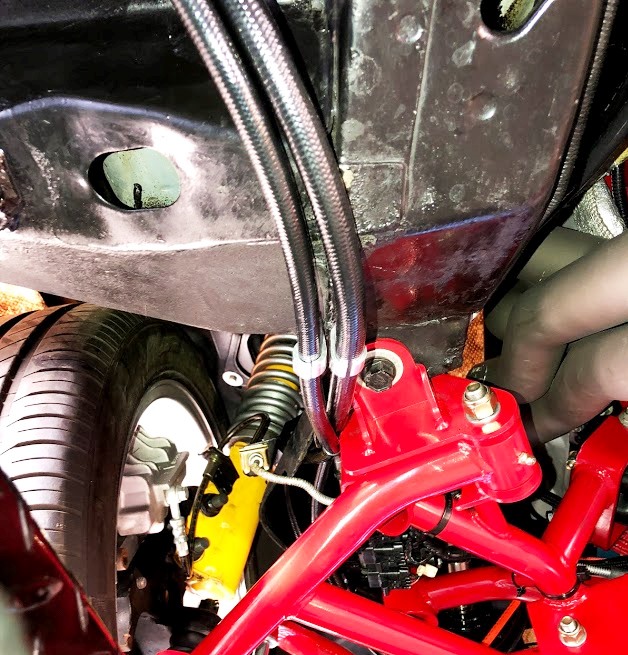
Lines continue up through stock spring perch location where my ignition coils are mounted, then onto connection at front of motor shown earlier.

Inline fuel filter mounted to modified stock fuel filter bracket.
All tywraps were replaced with two hole separators for better support.
Location of lines behind the front driver tire are of biggest concern? They are not a low point, but think I could always mount these higher on the body (left of the frame hole) and even add a protection plate if required?
Lines continue up through stock spring perch location where my ignition coils are mounted, then onto connection at front of motor shown earlier.
Last edited by HP52TA; 06-05-2018 at 06:11 PM. Reason: Resolve picture links
 12-17-2017, 09:37 PM
#87
Re: LQ408, F1C Procharged Style - 89 TransAm
Looks real good!
not sure about the fuel lines. But I would have tried to keep them in the frame rails to be safe like stock. I know that puts them real close to the headers tho. That might be a rule tho. I ran mine outside like yours for conscience and keeping away from the header heat. But I don�t drive at the track.
So your running -8 Teflon fuel lines and your running the stock EFI tank! Looks like the stock lines at the front driver corner that you adapted into the Teflon lines. Only reason I ask is that the -8 is fine but bottle necks at the stock sized feed and return lines.
12-18-2017, 08:20 AM
#88
Senior Member
Join Date: Jan 2008
Location: Massachusetts
Posts: 631
Likes: 0
Received 7 Likes
on
6 Posts
Car: 86' IROC
Engine: Supercharged 350
Transmission: T56
Axle/Gears: 3.45
Re: LQ408, F1C Procharged Style - 89 TransAm
Sure seems like every procharger install needs to bang out the drivers side fender well liner.
Im no inspector, but i would think that line running under the frame rail would be a issue. I personally wouldnt like the idea of going over a speed bump and blowing out the fuel line. I'd also be cautious about that spot where it touches the subframe.
On my car, i routed my nylon lines above the transmission. I was concerned about them melting even though its around 500*, so i wrapped them in heat shield products fire sleeve.
12-18-2017, 08:47 PM
#89
Re: LQ408, F1C Procharged Style - 89 TransAm
LOL, glad you like it 
Yep, stock tank. Not too concerned about the tank lines with their short length of restriction, velocity will be higher at that point but with dual pumps, they should be able to deliver the flow without issue. The teflon lines flow quite a bit better than rubber lines as well. I reviewed my fuel demands with Racetronix and they felt these dual pumps are good for at least 900hp in this configuration.
Here's a link to the dual pump tank install if your interested:
https://www.thirdgen.org/forums/powe...umps-plug.html
After a second look I am going to move them over behind the wheel. They are not the lowest point, but only headers are hanging lower. If the car ever bottomed to the frame rails, the lines would be hit. With moving them outward to the other side of the frame hole, they will be above the bottom of the frame rail by about an inch.
With that change, from what I understand from the rule book, I should be good. They are confined by the body at that point, as well protected on both sides so they should meet the rule.
So your running -8 Teflon fuel lines and your running the stock EFI tank! Looks like the stock lines at the front driver corner that you adapted into the Teflon lines. Only reason I ask is that the -8 is fine but bottle necks at the stock sized feed and return lines.
Here's a link to the dual pump tank install if your interested:
https://www.thirdgen.org/forums/powe...umps-plug.html
With that change, from what I understand from the rule book, I should be good. They are confined by the body at that point, as well protected on both sides so they should meet the rule.
12-18-2017, 10:18 PM
#90
Re: LQ408, F1C Procharged Style - 89 TransAm
Just realized your doing dual 255s, that�s not a lot of pump. I already run a walbro 450 intank in a stock 89 tank with AN to metric adapters. But I think the -8 was alittle overkill being that your pumping from a smaller 3/8� OD with crimp bends into a -8 Or 1/2� ID hose for pressure and then restricting the return from the same 1/2� ID hose to a 5/16� OD hardline with crimp bends. Your would have been fine with -6 an for both.
Im on the fence if my 450 (not the high pressure version) would keep up with 58psi base pressure and 12psi of boost (70psi is a lot for the non high pressure version) as I think the relief opens at 80psi. So I�ve been throwing around the idea of dual pumps but in series to give me super high pressure capabilities and the ability to increase flow by 10-40%. Picked up a AEM 380 just for that purpose. Either way you would be fine.
Im on the fence if my 450 (not the high pressure version) would keep up with 58psi base pressure and 12psi of boost (70psi is a lot for the non high pressure version) as I think the relief opens at 80psi. So I�ve been throwing around the idea of dual pumps but in series to give me super high pressure capabilities and the ability to increase flow by 10-40%. Picked up a AEM 380 just for that purpose. Either way you would be fine.
12-18-2017, 10:30 PM
#91
Re: LQ408, F1C Procharged Style - 89 TransAm
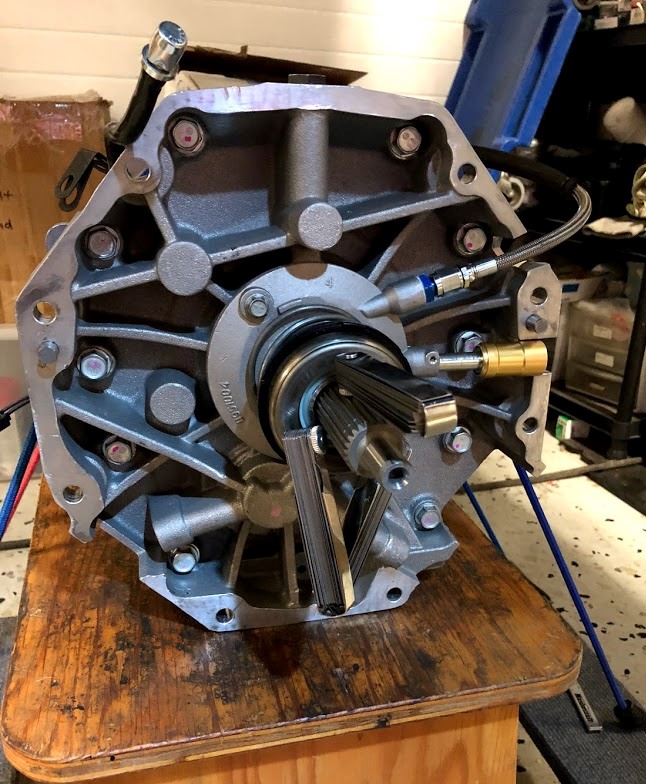
Sooo time for a story, headed down to the border to pickup my brand new Tick Performance Level IV T56 Magnum (you know, the one that you have to save for ever for, to afford), only to watch the guy roll it out on a two wheel cart ... on one end! I looked at him in disbelief, wondering why he would tip it on end.... instructions on top of box in black felt marker "Do Not Drop" "High Value". Ok, now what does that mean to a professional cargo mover .... "Do Not Drop", nothing else!
Not a single red sticker indicating This Side Up or anything close! Well at least when they threw the forged 1350 yoke and u joint in with the transmission they were in their own boxes ..... until the tranny was flipped on end for probably the tenth or twentieth time as it was shipped across the USA.
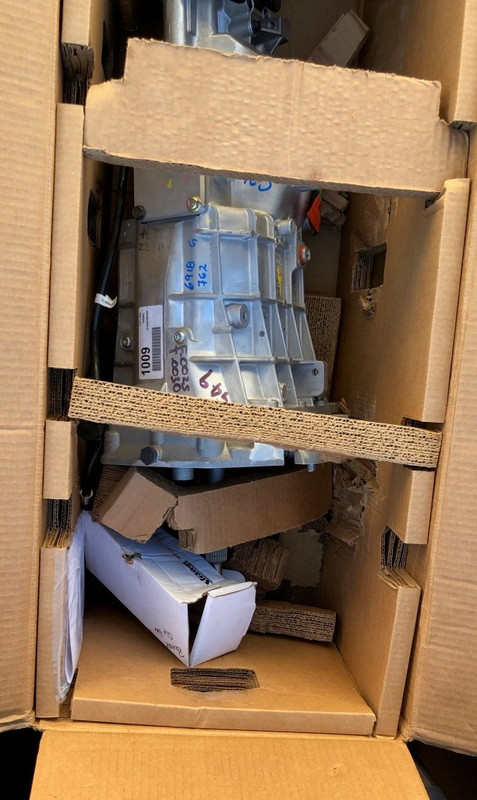
Nothing a garbage bag and can of spray foam couldn't have prevented. Rant end, you been warned.
They came good on replacing the damaged yoke, it was double boxed with padding between the two boxes to ensure no damage occurred during shipping ... go figure. The dents in the tranny I will have to live with, glad it wasn't powdercoated. At least it wasn't dropped on end, all shifting is fine and no major damage to the input shaft.
Enough whining. Before installing the tranny, I cleaned up all the sharp edges left from the casting with roll cartridges to prevent cutting hands when working on it.
Checked "A" (surface to bell) minus "B" (throwout bearing to transmission) measurements and installed my same slave cylinder spacer as ran previously to get correct clearance. Thought this clearance may have changed with now running a twin disc, but same shimming was required.
Tick provides some good instruction here:
http://www.tickperformance.com/tick-...im-kit-3-pack/
Installed new GM slave cylinder and made sure it was centered on main shaft before tightening down.
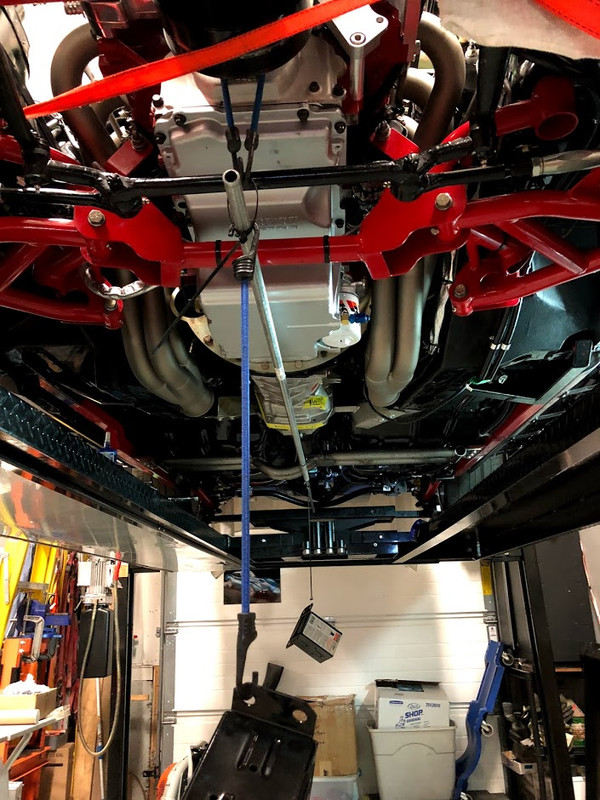
Transmission installed with my existing Spohn T56 X member. Installed the new 31 spline yoke on my existing driveshaft now having 1350 joints on both ends. Once the driveline was installed, I lined up the motor/trans with the diff. As the rear end was already aligned between fenders at ride height, I used tywraps around the front crank journal and the transmission output journal with my high tech alignment tools to align the driveshaft at the rear end .100" off center, which should end up fairly close to perfectly centered under squat during hard acceleration. Then, tightened engine mounts to K member and tranny to X member and frame.
Not a single red sticker indicating This Side Up or anything close! Well at least when they threw the forged 1350 yoke and u joint in with the transmission they were in their own boxes ..... until the tranny was flipped on end for probably the tenth or twentieth time as it was shipped across the USA.
Nothing a garbage bag and can of spray foam couldn't have prevented. Rant end, you been warned.
They came good on replacing the damaged yoke, it was double boxed with padding between the two boxes to ensure no damage occurred during shipping ... go figure. The dents in the tranny I will have to live with, glad it wasn't powdercoated. At least it wasn't dropped on end, all shifting is fine and no major damage to the input shaft.
Enough whining. Before installing the tranny, I cleaned up all the sharp edges left from the casting with roll cartridges to prevent cutting hands when working on it.
Checked "A" (surface to bell) minus "B" (throwout bearing to transmission) measurements and installed my same slave cylinder spacer as ran previously to get correct clearance. Thought this clearance may have changed with now running a twin disc, but same shimming was required.
Tick provides some good instruction here:
http://www.tickperformance.com/tick-...im-kit-3-pack/
Installed new GM slave cylinder and made sure it was centered on main shaft before tightening down.
Transmission installed with my existing Spohn T56 X member. Installed the new 31 spline yoke on my existing driveshaft now having 1350 joints on both ends. Once the driveline was installed, I lined up the motor/trans with the diff. As the rear end was already aligned between fenders at ride height, I used tywraps around the front crank journal and the transmission output journal with my high tech alignment tools to align the driveshaft at the rear end .100" off center, which should end up fairly close to perfectly centered under squat during hard acceleration. Then, tightened engine mounts to K member and tranny to X member and frame.
Last edited by HP52TA; 06-05-2018 at 06:13 PM. Reason: Resolve picture links
12-18-2017, 10:50 PM
#92
Re: LQ408, F1C Procharged Style - 89 TransAm
I was originally thinking of going that route with an external pump, but was concerned with pump noise (lol, now thinking this is a very minor concern) however also liked the option of two pumps in the tank. With the Racetronix wiring kit, it is a jumper move away from choosing which pump is your primary. Adds some flexibility to keep you going should you lose a pump.
06-05-2018, 10:33 PM
#93
Re: LQ408, F1C Procharged Style - 89 TransAm
Few life events have been taking priority over the build, however a little progress has been made when time was available. Here are some updates from work that has occurred over the last few months.
With my coils located in the spring pockets, installed new plug wires keeping them short as possible. The 60 degree plug boots worked out quite well and should have no heat problems even without heat sleeves. No issues with supercharger clearance either and all plugs easily accessible without its removal.
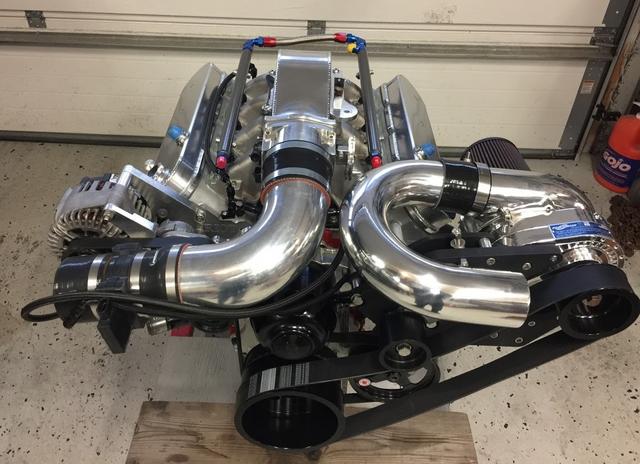
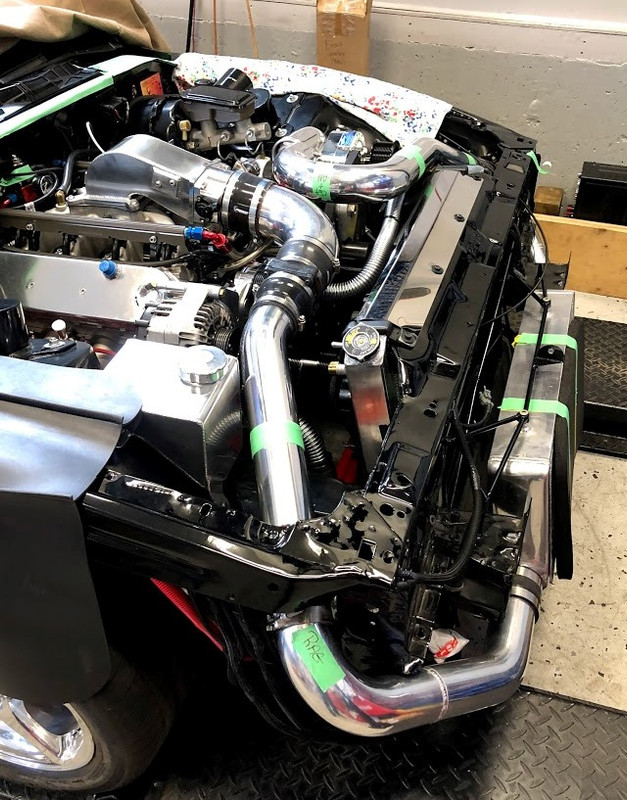
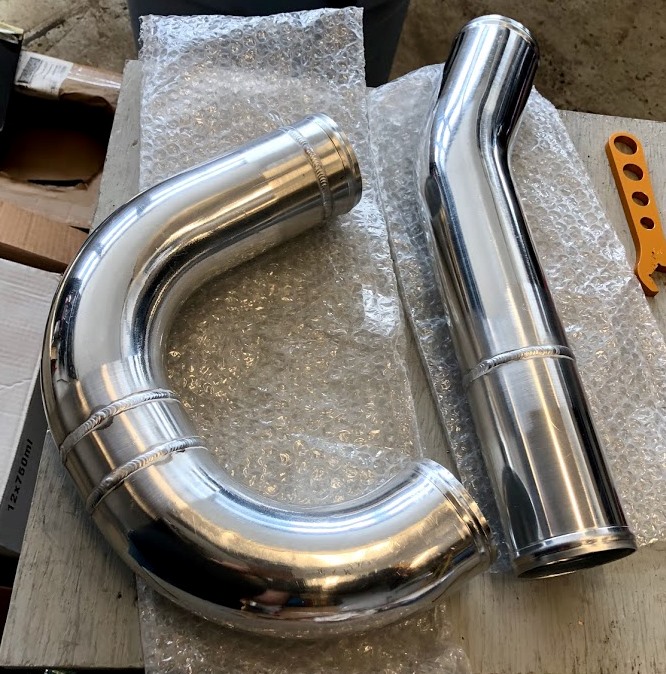
All intercooler tubing has been fabricated and test fitted within my fenders. All ends either rolled or welded to prevent blow-off. Then disassembled the intake side in preparation for N/A startup and break in.
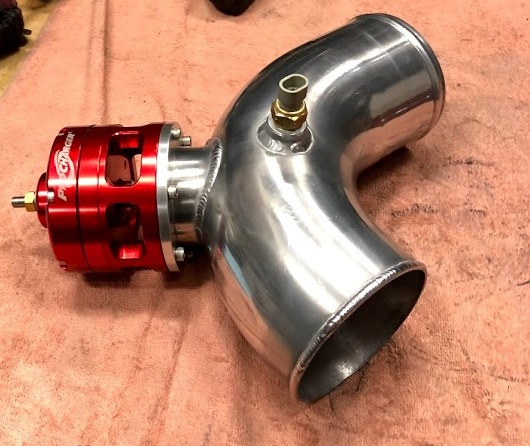
Installed a McNally catch can to help evacuate the engine and minimize oil mist from entering engine bay. Check valves installed on the two lines to automatically select vacuum source between intake elbow at idle or S/C inlet under boost conditions.
Found these little 10/32" brass fittings for boost line connections to back of intake elbow. They came with a fiber gasket to ensure a good seal.
Filter inlet cut from a 90 degree hose fitting to provide an unrestricted airflow into the supercharger.
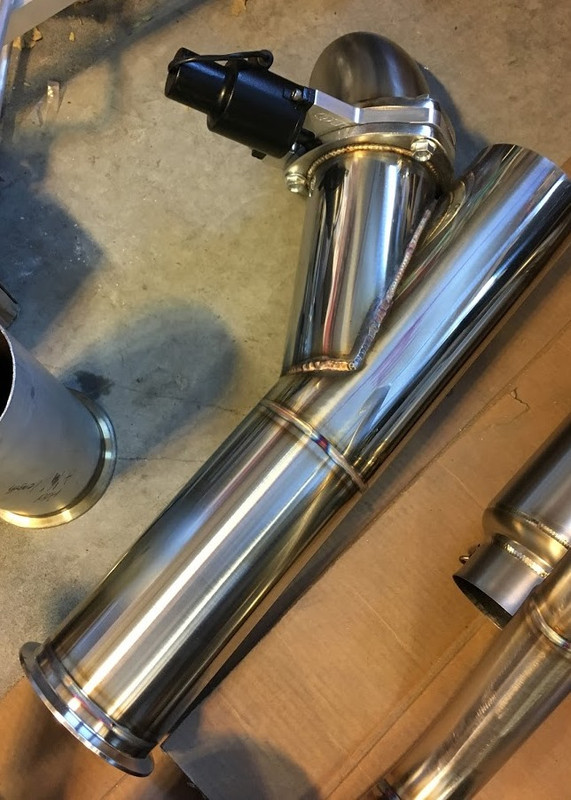
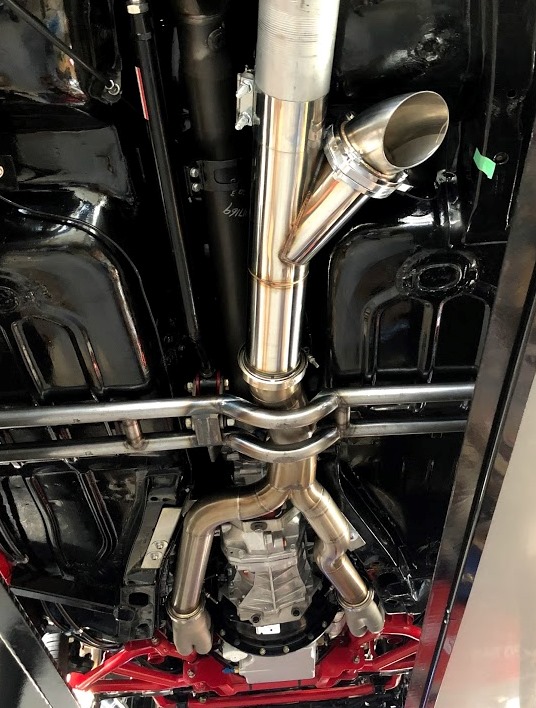
I also modified my exhaust system, as I couldn't resist the addition of a remote controlled cutout, then had my favorite welder perform some more of his art work on the SS tubing, as well as build me a custom downturn. My neighbours are going to love me. LOL
First start coming next....
With my coils located in the spring pockets, installed new plug wires keeping them short as possible. The 60 degree plug boots worked out quite well and should have no heat problems even without heat sleeves. No issues with supercharger clearance either and all plugs easily accessible without its removal.
All intercooler tubing has been fabricated and test fitted within my fenders. All ends either rolled or welded to prevent blow-off. Then disassembled the intake side in preparation for N/A startup and break in.
Installed a McNally catch can to help evacuate the engine and minimize oil mist from entering engine bay. Check valves installed on the two lines to automatically select vacuum source between intake elbow at idle or S/C inlet under boost conditions.
Found these little 10/32" brass fittings for boost line connections to back of intake elbow. They came with a fiber gasket to ensure a good seal.
Filter inlet cut from a 90 degree hose fitting to provide an unrestricted airflow into the supercharger.
I also modified my exhaust system, as I couldn't resist the addition of a remote controlled cutout, then had my favorite welder perform some more of his art work on the SS tubing, as well as build me a custom downturn. My neighbours are going to love me. LOL
First start coming next....
Last edited by HP52TA; 06-05-2018 at 10:39 PM.
06-05-2018, 10:54 PM
#94
COTM Editor
iTrader: (22)
Join Date: Mar 2001
Posts: 9,892
Likes: 0
Received 1,855 Likes
on
1,270 Posts
Car: '89 Firebird
Engine: 7.0L
Transmission: T56
Re: LQ408, F1C Procharged Style - 89 TransAm
Fantastic. Looking forward to seeing the results.
06-06-2018, 08:02 AM
#95
Senior Member
Join Date: Jan 2008
Location: Massachusetts
Posts: 631
Likes: 0
Received 7 Likes
on
6 Posts
Car: 86' IROC
Engine: Supercharged 350
Transmission: T56
Axle/Gears: 3.45
Re: LQ408, F1C Procharged Style - 89 TransAm
This build makes me want to completely strip down my car and start over. So amazing, keep up the good work.
06-06-2018, 08:19 PM
#96
Supreme Member
Re: LQ408, F1C Procharged Style - 89 TransAm
Life can get in the way of the hobby can't it? Witness my own endeavors.
A couple of observations that have prompted a couple of questions.
Is the filter element capable of supporting your horsepower goals? I suppose with a supercharger you'll have power to spare however to me the fundamentals still apply.
And the same for the location of your cutout. One distance from the end of the primaries to another can mean a significant difference in horsepower and torque production. Was this a calculated distance?
A third question and somewhat related. Will you be at Castrol Raceway (Edmonton) this season? I'd really like to check this beast out in person.
06-10-2018, 10:10 PM
#97
Re: LQ408, F1C Procharged Style - 89 TransAm
First hit may occur in the fall, but can't promise anything at this time.
06-10-2018, 10:53 PM
#98
Re: LQ408, F1C Procharged Style - 89 TransAm
Base tune, N/A.
First start. Video is a little shaky, as phone was set on lift.
https://photos.app.goo.gl/L84pdkapLktTie6dA
First..ish start idle
https://photos.app.goo.gl/YsUXhxqaNE9zYeCv8
Cutout test pre-tune
https://photos.app.goo.gl/wP9sfcTYnQR22tqAA
On the hooks, pre-tune idle
https://photos.app.goo.gl/FLaBSAxMRPSPbbpp6
Final run, cutout open
https://photos.app.goo.gl/UumHL7j7itKAGve39
06-11-2018, 08:48 AM
#99
Senior Member
Join Date: Jan 2008
Location: Massachusetts
Posts: 631
Likes: 0
Received 7 Likes
on
6 Posts
Car: 86' IROC
Engine: Supercharged 350
Transmission: T56
Axle/Gears: 3.45
Re: LQ408, F1C Procharged Style - 89 TransAm
I assume it will be pretty substantial. My little V3 gains a extra 1.5-2PSI from running no filter and my friends LS3 picked up 2-3 PSI with his D1 last week.
06-11-2018, 12:14 PM
#100
Supreme Member
Re: LQ408, F1C Procharged Style - 89 TransAm
No CFDs or any other elegant calculations were performed, just went with longest 4" inlet filter I could fit in the location. I was thinking of also purchasing a Turbo Guard screen for drag racing, but I really don't like the idea of running without a filtered inlet. I plan to do some testing with/without the filter on the dyno to determine what the losses are and will post results when it happens.
The curious thing I've found with some is that they'll say, "I'm making x HP. The filter is fine. When in reality they could be making " (x + 10%[x]) if their filter choice was really off the mark in the first place.
And running without a filter, on the street or the track, is simply not an option for me.
I'm sure the following is nothing new to anyone here, however it might be used as a point of conversation.


