Suspension How To...
 10-20-2009, 07:31 PM
#1
Supreme Member
Thread Starter
iTrader: (2)
Join Date: Mar 2005
Location: East Tennesse
Posts: 2,820
Likes: 0
Received 3 Likes
on
3 Posts
Car: 1991 RS Camaro
Engine: L03 (want LS1)
Transmission: 700R-4 (and T56)
Axle/Gears: 4th Gen 3.23 posi
Suspension How To...
Introduction
There are normally at least 1-50 people a month asking about how to either lower a car or build one to take the twisties like a... well, fast. We made this write up so to avoid re-posts. We'll include a listing of things that should be done to prepare the car modifications as well as a listing of what parts are available to be installed on the cars and in what order they will be most beneficial. Bare in mind, there is no perfect set-up for all cars or people. Every car is an individual as much as every person. You'll need to modify your car accordingly. This is just a basic guide for 3rd gen F-Bodies. One thing to keep in mind is to have a plan- don’t just go buying parts and throwing them at the car hope to get a cohesive result. Sit down, read, discuss, plan, then start buying parts.
This article was a combined effort of myself, Racing Geek and Samdweezel0, both members of TGO. Racing Geek proofread my work (it really needed it) and added to the original drafts while Samdweezel0 contributed all pictures that aren't of my car. Couldn't have done it without the help guys!
Important Information to consider as you read: If you are looking to improve the handling of the car, you'll want to keep the following list of modifications in mind after you complete the Chassis Preparation and Steering Preparation:
1. Tires: Good ones = MONEY. Some street tires I've heard good things about are GoodYear Eagle F1 GS-D3s, Kumho MXs (although, I've heard MXs aren't a very good wet traction option), Kuhmo XS, BFGoodrich g-Force Sports (had two sets of em), Sumitomo HTR Z III. Some more track oriented tires that can be driven on the street are the Falken RT-615, Nitto NT05s, NT555 RII. You'll want to look into what you intend on using the tires for before buying. You'll want to consider if you want a street only tire, track/street tire, is dry only ok, or do you need wet/dry, will need all seasons or will summer tires be ok? I'll update this section as time allows.
2. Shocks: (again, money) KONIs, Bilstein HDs, Tokicos, KYBs. What you buy depends on how much money you want to spend and what you want from the car.
3. Springs/Sway bars: Springs...lower isn't better unless you have the spring rates to back it up, especially when it reduces your suspension compression travel too much. The right spring rate and ride height with the right shocks makes a big difference. With sway bars, the biggest you can get isn't necessarily the best; finding a balanced set of bars for your car is very important. For example, my 25.4mm rear bar was too big and caused the car to over-steer (the back wants to swing out and pass the front) instead of under-steer (the tendency for the front to plow straight ahead), especially under throttle.
Allignment
An aggressive street alignment (usually overlooked) is in there somewhere... not sure where to list it, but it is VERY important. For the street, something like 4 to 5* positive caster, -.5 to -1.0* camber, with a fuzz (1/32 to 3/32 of outward toe seems to be a good compromise between a true track alignment and too much tire wear. Inward tow will promote a more stable car when driving straight and will induce less scrub when on long turns. However, turn in is crisper with outward tow, but the car will require more attention do drive straight, as it will have the tendency to wander. Small amounts of toe will also have a greater affect on tire wear than small amounts of camber.
Explanation of alignment angles for clarity: (from intraxracing.com)
Camber:
This is probably is the most familiar term of the 3.
Camber is the angle of the wheels, relative to the road, looking at the car from the front (or rear).
Try to imagine a vertical line through the middle of the wheel
0 degrees camber is when this imaginary line is in square with the road. (black)
Positive camber occurs when the "middle-lines" are in "V-shape" (red line)
Negative camber occurs when the "middle-lines"are in "A-shape" (green line)

Caster:
Caster is found by looking at the car from the side.
Imagine/draw an axis-line through the steering-turning-axis of the wheel.
Most of the time, it will be through the upper and lower ball-joints or through the
centerline of the McPherson-strut.
Positive caster occurs when the top of this axis-line tilts towards the rear of the
car. (green line), Negative caster is the opposite (red line)
Positive caster provides the self-centering-force which makes the car go straight without holding the steering wheel.

Toe:
This is found by looking at the car from the top (or bottom) ;
Imagine lines through the middle of the wheels in riding direction.
TOE-IN occurs when these lines are in "A-shape", when crossed in front of the wheels. (red lines)
TOE-OUT occurs when these lines are in "V-shape"; and crossed behind wheels. (green lines)

Most people won't agree with that listing/order, but it's what the autocrossers and road course racers recommend when you’re first getting into it. All the other stuff helps of course, but you will see the most bang for the buck with that list... just expect a lot of bucks.
Chassis Preparation:
The first thing that needs to be done is to take into consideration the age and design of the car- it's old and the cars weren't very rigid even from the factory.
Subframe Connectors (SFCs):
That's why the bare minimum recommended for these cars is a good set of SFCs (in my opinion, weld in are the best, but some think bolt-ins are ok. I’d rather not run the risk of the bolt holes stretching out and things getting loose)
Wonder Bar:
If you plan to install larger than stock tires, or just jerk the car around any, a “Wonder Bar,” more accurately called a tubular steering brace, is good insurance. This ties the two sides of the front sub-frame together to reinforce the area around the steering box. During initial testing by GM, the engineers found this area to be prone to cracks due to the stress that the stock IROC-Z could dish out. Keep in mind that is when the IROC-Z was stock... your modifying your car. For this reason, most IROCs, more specifically the ones with 16" wheels, came equipped with this from the factory.
Bushings:
Next is to check the bushings for wear and tear and replace as needed. This includes inner and outer tie rod ends, ball joints, sway bar bushings, control arm bushings, etc. Replacing these bushings isn't an absolute necessity, but starting to modify, or even drive a car with worn out or broken components is just crazy. This is especially true if you are going to build the car to turn. Also, if you have the funds and desire, you can replace the stock components with aftermarket pieces for added strength and reduced weight.
If your bushings look anything like this, you need to replace them:


Lower Control Arm Relocation Brackets (LCARBs):
In addition, when you lower a car, it affects your suspension geometry. The basic fix for the LCAs is relocation brackets. They will allow you set the angle of the LCAs back to stock after lowering. Ideally, you want them to be level with the ground when the suspension is loaded. Here's a link for an explanation.
Spohn
Hotpart (J&M)
UMI
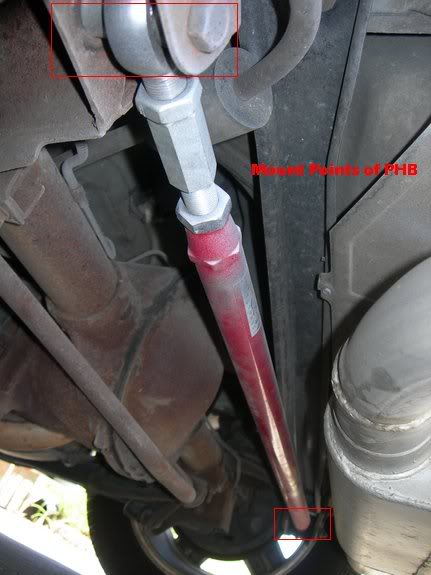
Panhard Bar (PHB)
An adjustable PHB is a good idea, because lowering a car without one will cause the rear axle to move off center. It's not very noticeable nor necessary, but it is a good idea. When lowering, your PHB may also change its angle in relation to the ground. Just like the LCAs, you want this to be kept level with the ground. This way the rear axle will swing in the same arc downward as it would if it were moved upward the same distance. It simply provides more predictable handling. Parts offerings are covered in a later section.
SFCs:
Spohn
UMI Performace
Top Down Solutions
Wonder Bar:
Spohn
UMI
Top Down Solutions
LCARBs:
Spohn
BMR Fabrication
UMI Performace
J&M (Hotpart)
PHB:
J&M (Hotpart)
Spohn
UMI Performance
BMR Fabrication
Strano Parts
2...............................Steering Preparation
3...............................Suspension Part/Bushing Selection
4...............................Part Installation-
.................................Front Struts
.................................Springs
5...............................Front Springs (cont...)
.................................Ball Joints
.................................A-Arm Bushings
6...............................Front Sway Bar
.................................Steering Components
7...............................Rear Shocks
.................................Rear Springs
8...............................Rear Sway Bar
.................................Lower Control Arms
.................................Panhard Bar (Rod)
There are normally at least 1-50 people a month asking about how to either lower a car or build one to take the twisties like a... well, fast. We made this write up so to avoid re-posts. We'll include a listing of things that should be done to prepare the car modifications as well as a listing of what parts are available to be installed on the cars and in what order they will be most beneficial. Bare in mind, there is no perfect set-up for all cars or people. Every car is an individual as much as every person. You'll need to modify your car accordingly. This is just a basic guide for 3rd gen F-Bodies. One thing to keep in mind is to have a plan- don’t just go buying parts and throwing them at the car hope to get a cohesive result. Sit down, read, discuss, plan, then start buying parts.
This article was a combined effort of myself, Racing Geek and Samdweezel0, both members of TGO. Racing Geek proofread my work (it really needed it) and added to the original drafts while Samdweezel0 contributed all pictures that aren't of my car. Couldn't have done it without the help guys!
Important Information to consider as you read: If you are looking to improve the handling of the car, you'll want to keep the following list of modifications in mind after you complete the Chassis Preparation and Steering Preparation:
1. Tires: Good ones = MONEY. Some street tires I've heard good things about are GoodYear Eagle F1 GS-D3s, Kumho MXs (although, I've heard MXs aren't a very good wet traction option), Kuhmo XS, BFGoodrich g-Force Sports (had two sets of em), Sumitomo HTR Z III. Some more track oriented tires that can be driven on the street are the Falken RT-615, Nitto NT05s, NT555 RII. You'll want to look into what you intend on using the tires for before buying. You'll want to consider if you want a street only tire, track/street tire, is dry only ok, or do you need wet/dry, will need all seasons or will summer tires be ok? I'll update this section as time allows.
2. Shocks: (again, money) KONIs, Bilstein HDs, Tokicos, KYBs. What you buy depends on how much money you want to spend and what you want from the car.
3. Springs/Sway bars: Springs...lower isn't better unless you have the spring rates to back it up, especially when it reduces your suspension compression travel too much. The right spring rate and ride height with the right shocks makes a big difference. With sway bars, the biggest you can get isn't necessarily the best; finding a balanced set of bars for your car is very important. For example, my 25.4mm rear bar was too big and caused the car to over-steer (the back wants to swing out and pass the front) instead of under-steer (the tendency for the front to plow straight ahead), especially under throttle.
Allignment
An aggressive street alignment (usually overlooked) is in there somewhere... not sure where to list it, but it is VERY important. For the street, something like 4 to 5* positive caster, -.5 to -1.0* camber, with a fuzz (1/32 to 3/32 of outward toe seems to be a good compromise between a true track alignment and too much tire wear. Inward tow will promote a more stable car when driving straight and will induce less scrub when on long turns. However, turn in is crisper with outward tow, but the car will require more attention do drive straight, as it will have the tendency to wander. Small amounts of toe will also have a greater affect on tire wear than small amounts of camber.
Explanation of alignment angles for clarity: (from intraxracing.com)
Camber:
This is probably is the most familiar term of the 3.
Camber is the angle of the wheels, relative to the road, looking at the car from the front (or rear).
Try to imagine a vertical line through the middle of the wheel
0 degrees camber is when this imaginary line is in square with the road. (black)
Positive camber occurs when the "middle-lines" are in "V-shape" (red line)
Negative camber occurs when the "middle-lines"are in "A-shape" (green line)
Caster:
Caster is found by looking at the car from the side.
Imagine/draw an axis-line through the steering-turning-axis of the wheel.
Most of the time, it will be through the upper and lower ball-joints or through the
centerline of the McPherson-strut.
Positive caster occurs when the top of this axis-line tilts towards the rear of the
car. (green line), Negative caster is the opposite (red line)
Positive caster provides the self-centering-force which makes the car go straight without holding the steering wheel.
Toe:
This is found by looking at the car from the top (or bottom) ;
Imagine lines through the middle of the wheels in riding direction.
TOE-IN occurs when these lines are in "A-shape", when crossed in front of the wheels. (red lines)
TOE-OUT occurs when these lines are in "V-shape"; and crossed behind wheels. (green lines)
Most people won't agree with that listing/order, but it's what the autocrossers and road course racers recommend when you’re first getting into it. All the other stuff helps of course, but you will see the most bang for the buck with that list... just expect a lot of bucks.
Chassis Preparation:
The first thing that needs to be done is to take into consideration the age and design of the car- it's old and the cars weren't very rigid even from the factory.
Subframe Connectors (SFCs):
That's why the bare minimum recommended for these cars is a good set of SFCs (in my opinion, weld in are the best, but some think bolt-ins are ok. I’d rather not run the risk of the bolt holes stretching out and things getting loose)
Wonder Bar:
If you plan to install larger than stock tires, or just jerk the car around any, a “Wonder Bar,” more accurately called a tubular steering brace, is good insurance. This ties the two sides of the front sub-frame together to reinforce the area around the steering box. During initial testing by GM, the engineers found this area to be prone to cracks due to the stress that the stock IROC-Z could dish out. Keep in mind that is when the IROC-Z was stock... your modifying your car. For this reason, most IROCs, more specifically the ones with 16" wheels, came equipped with this from the factory.
Bushings:
Next is to check the bushings for wear and tear and replace as needed. This includes inner and outer tie rod ends, ball joints, sway bar bushings, control arm bushings, etc. Replacing these bushings isn't an absolute necessity, but starting to modify, or even drive a car with worn out or broken components is just crazy. This is especially true if you are going to build the car to turn. Also, if you have the funds and desire, you can replace the stock components with aftermarket pieces for added strength and reduced weight.
If your bushings look anything like this, you need to replace them:
Lower Control Arm Relocation Brackets (LCARBs):
In addition, when you lower a car, it affects your suspension geometry. The basic fix for the LCAs is relocation brackets. They will allow you set the angle of the LCAs back to stock after lowering. Ideally, you want them to be level with the ground when the suspension is loaded. Here's a link for an explanation.
Spohn
Hotpart (J&M)
UMI
Panhard Bar (PHB)
An adjustable PHB is a good idea, because lowering a car without one will cause the rear axle to move off center. It's not very noticeable nor necessary, but it is a good idea. When lowering, your PHB may also change its angle in relation to the ground. Just like the LCAs, you want this to be kept level with the ground. This way the rear axle will swing in the same arc downward as it would if it were moved upward the same distance. It simply provides more predictable handling. Parts offerings are covered in a later section.
SFCs:
Spohn
UMI Performace
Top Down Solutions
Wonder Bar:
Spohn
UMI
Top Down Solutions
LCARBs:
Spohn
BMR Fabrication
UMI Performace
J&M (Hotpart)
PHB:
J&M (Hotpart)
Spohn
UMI Performance
BMR Fabrication
Strano Parts
Table of Contents:
Post#.........................Information
2...............................Steering Preparation
3...............................Suspension Part/Bushing Selection
4...............................Part Installation-
.................................Front Struts
.................................Springs
5...............................Front Springs (cont...)
.................................Ball Joints
.................................A-Arm Bushings
6...............................Front Sway Bar
.................................Steering Components
7...............................Rear Shocks
.................................Rear Springs
8...............................Rear Sway Bar
.................................Lower Control Arms
.................................Panhard Bar (Rod)
Last edited by 91_5.7_TPI; 11-21-2009 at 11:03 PM.

The following users liked this post:
bigwolf699 (04-18-2023)
10-20-2009, 07:32 PM
#2
Supreme Member
Thread Starter
iTrader: (2)
Join Date: Mar 2005
Location: East Tennesse
Posts: 2,820
Likes: 0
Received 3 Likes
on
3 Posts
Car: 1991 RS Camaro
Engine: L03 (want LS1)
Transmission: 700R-4 (and T56)
Axle/Gears: 4th Gen 3.23 posi
Re: Suspension How To...
Steering Preparation:
Most likely, the steering components on your car are in pretty sad shape. Before you start making the car handle better, you�ll probably want to address that as well. I use NAPA or Moog parts for the steering linkage bushings (tie rods, ball joints, etc). This is pretty much common sense if you�re staying stock in this area- replace what needs to be replaced with the best you can afford. You really do get what you pay for. Many of the stock steering boxes are worn out and have a lot of slop/play in the steering. There are a few options to remedy this. The cheapest and simplest is to adjust the box on the car. If there is still slop/play, the next is to remove the box and bench adjust it.
Original information found in this article.
There is also a tech article on TGO, found here, that details rebuilding the box with pictures.
Another option is purchasing a remanufactured box from your normal parts suppliers. From what I've seen, results are hit and miss with these because some worker in a factory in Mexico isn't really concerned with how the box �feels� after they're done. Another option is buying a new box. Since this is the way I plan to go, I'll recommend Lee Manufacturing. Pricey, yes. Worth it, most likely. Just make sure you contact them with your needs/wants for the car. In addition, you'll most likely need new strut mounts. Now, the stock pieces are fine for DD (daily driver) duty, but if you are more performance oriented on your build, you'll want something a little more resilient.
Steering Boxes
Lee Manufacturing boxes
Flaming River boxes
Strut Mounts
Spohn
J&M (Hotpart) Mounts
Most likely, the steering components on your car are in pretty sad shape. Before you start making the car handle better, you�ll probably want to address that as well. I use NAPA or Moog parts for the steering linkage bushings (tie rods, ball joints, etc). This is pretty much common sense if you�re staying stock in this area- replace what needs to be replaced with the best you can afford. You really do get what you pay for. Many of the stock steering boxes are worn out and have a lot of slop/play in the steering. There are a few options to remedy this. The cheapest and simplest is to adjust the box on the car. If there is still slop/play, the next is to remove the box and bench adjust it.
Originally Posted by J. Matthew Daugherty & Jeff Davidson
Steering gear adjustment
Removing slop in the GM steering box
Part One
contributed by J. Matthew Daugherty
Does your car wander across truck grooves in the road, but didn't used to? Does the steering wheel have a lot of travel before your car begins turning? Generally feel numb on center?
Having a car with over 100K on it assures you that you'll have some chassis parts to replace and some steering "slop" to take care of. Idler arm, drag link, tie rods, ball joints, steering box, shocks, springs, bushings all could use replacing when they're high mileage.
The stock steering box on your g-body has an adjustment that is free, takes very little time to do and requires minimal tools. This adjustment removes slop in the preload of the gears in the steering box.
Tools
3/16" allen wrench
5/8" box end wrench
lubricating oil
Procedure
use oil to lubricate threads of locknut and adjustment plug (right on top, can't miss it)
raise the front end of the car so both front wheels are off the ground
put the box end wrench on the locknut
use allen wrench to hold the adjustment plug at the top of the box
holding the allen wrench stationary, loosen the locknut with the box end wrench several turns
turn the adjustment plug clockwise until snug to remove slack, then back it out 90 degrees.
holding the allen wrench stationary, tighten the locknut, remove wrenches
start car, run steering wheel through full rotation, checking for binding
if binding, repeat steps 3-8, backing out adjustment plug slightly more
lower car from jack (stands) drive car, note improvement!
I was AMAZED at how much slop this took out of the front end of my 131K '86 Monte Carlo SS (factory quick ratio box). I seriously doubt it had ever been done by prior owners.
I had recently put new upper ball joints, inner & outer tie rods with billet tie rod sleeves, 235/60 tires on stock 15x7" wheels, and have much more in store, but this made the biggest difference. Hope it helps someone.
Part Two:
contributed by Jeff Davidson
Well, after swapping the steering box twice in 4 days, I can tell you how to do it Not that bad a job really. The hardest part seems to be getting the center link to let go of the pitman arm.
I did learn some useful tricks while I had the stock LS (like slow) steering box out. There are two adjustments you can make to a GM box. One is the thrust bearing preload and the other is the pitman shaft "over center" sector adjustment. I set both of these with the box clamped in a vise. I have tried the "over center" adjustment many times when the box was in the car, but after doing it out of the car, I can see why the service manual says that it must be done on the bench. The previous adjustment turned out to be way to tight, even though it was set with more than a quarter turn that is sometimes recommended.
After I did the following adjustments, I couldn't believe how much better the steering felt. All of the slop and stickiness(?) on center was gone. It felt like a brand new box. Hmmm. I recommend these procedures for any used box and would go so far to say that it would be worthwhile to remove your steering box just to re-set it up. The results are worth the time and trouble.
Make sure to get as much fluid out of the box before attempting these adjustments!
Adjust thrust bearing preload. This adjustment sets the bearing preload for the worm gear shaft that the steering wheel turns. At the rear of the box there is a large lock nut with three slots. This holds the adjuster plug in position. Loosen this and remove. Using a spanner wrench or suitable tool (I used a large set of needle nose pliers!), turn the adjusting plug to tighten it. The correct torque is 20 ft. lbs. The point is to snug up the bearings, removing any clearances. Now, mark the position of the adjustment plug and also mark the housing in the same spot. Measure back counterclockwise 1/2" on the housing from your mark. Turn (loosen) the adjuster plug back until the mark on it lines up with the second mark on the housing. Reinstall the lock nut while making sure the adjuster plug does not move. Finished!
Pitman shaft "over center" adjustment. This can be done on the car, but I don't recommend doing it that way anymore. The loads of the other parts of the steering system and the position of the box in the car make it impossible to "feel" the way it should be setup. Loosen the lock nut on top of the box while holding the adjusting screw. Back off the lock nut a few turns. Put a small adjustable wrench on the input shaft, making sure that the box is in its straight ahead position (flat on shaft is horizontal, pitman arm almost inline with box). Rotate the input shaft back and forth slowly while also slowly turning the screw on top in, until you can feel that the box gets a little stiffer as is goes thru the straight ahead position. The trick is to get it so that you can just barely turn the shaft with your fingers. The on center torque only affects the box through about 30-40 degrees of motion. The box should turn easliy with your fingers outside of this range. The correct torque to turn the shaft over-center is 6 to 10 inch pounds, not even one foot pound! The point is to get the over-center adjustment just right. Try it several times before you do call it done. Fininshed
After you do these adjustments and put the box in the car, you will notice that the steering feels like new again. No play, no slop, and lots of road feel. If the "over center" adjustment is even slightly too tight, the steering will feel 'numb' on center and not want to return to center after a turn. I was amazed.
Removing slop in the GM steering box
Part One
contributed by J. Matthew Daugherty
Does your car wander across truck grooves in the road, but didn't used to? Does the steering wheel have a lot of travel before your car begins turning? Generally feel numb on center?
Having a car with over 100K on it assures you that you'll have some chassis parts to replace and some steering "slop" to take care of. Idler arm, drag link, tie rods, ball joints, steering box, shocks, springs, bushings all could use replacing when they're high mileage.
The stock steering box on your g-body has an adjustment that is free, takes very little time to do and requires minimal tools. This adjustment removes slop in the preload of the gears in the steering box.
Tools
3/16" allen wrench
5/8" box end wrench
lubricating oil
Procedure
use oil to lubricate threads of locknut and adjustment plug (right on top, can't miss it)
raise the front end of the car so both front wheels are off the ground
put the box end wrench on the locknut
use allen wrench to hold the adjustment plug at the top of the box
holding the allen wrench stationary, loosen the locknut with the box end wrench several turns
turn the adjustment plug clockwise until snug to remove slack, then back it out 90 degrees.
holding the allen wrench stationary, tighten the locknut, remove wrenches
start car, run steering wheel through full rotation, checking for binding
if binding, repeat steps 3-8, backing out adjustment plug slightly more
lower car from jack (stands) drive car, note improvement!
I was AMAZED at how much slop this took out of the front end of my 131K '86 Monte Carlo SS (factory quick ratio box). I seriously doubt it had ever been done by prior owners.
I had recently put new upper ball joints, inner & outer tie rods with billet tie rod sleeves, 235/60 tires on stock 15x7" wheels, and have much more in store, but this made the biggest difference. Hope it helps someone.
Part Two:
contributed by Jeff Davidson
Well, after swapping the steering box twice in 4 days, I can tell you how to do it
Not that bad a job really. The hardest part seems to be getting the center link to let go of the pitman arm. I did learn some useful tricks while I had the stock LS (like slow) steering box out. There are two adjustments you can make to a GM box. One is the thrust bearing preload and the other is the pitman shaft "over center" sector adjustment. I set both of these with the box clamped in a vise. I have tried the "over center" adjustment many times when the box was in the car, but after doing it out of the car, I can see why the service manual says that it must be done on the bench. The previous adjustment turned out to be way to tight, even though it was set with more than a quarter turn that is sometimes recommended.
After I did the following adjustments, I couldn't believe how much better the steering felt. All of the slop and stickiness(?) on center was gone. It felt like a brand new box. Hmmm. I recommend these procedures for any used box and would go so far to say that it would be worthwhile to remove your steering box just to re-set it up. The results are worth the time and trouble.
Make sure to get as much fluid out of the box before attempting these adjustments!
Adjust thrust bearing preload. This adjustment sets the bearing preload for the worm gear shaft that the steering wheel turns. At the rear of the box there is a large lock nut with three slots. This holds the adjuster plug in position. Loosen this and remove. Using a spanner wrench or suitable tool (I used a large set of needle nose pliers!), turn the adjusting plug to tighten it. The correct torque is 20 ft. lbs. The point is to snug up the bearings, removing any clearances. Now, mark the position of the adjustment plug and also mark the housing in the same spot. Measure back counterclockwise 1/2" on the housing from your mark. Turn (loosen) the adjuster plug back until the mark on it lines up with the second mark on the housing. Reinstall the lock nut while making sure the adjuster plug does not move. Finished!
Pitman shaft "over center" adjustment. This can be done on the car, but I don't recommend doing it that way anymore. The loads of the other parts of the steering system and the position of the box in the car make it impossible to "feel" the way it should be setup. Loosen the lock nut on top of the box while holding the adjusting screw. Back off the lock nut a few turns. Put a small adjustable wrench on the input shaft, making sure that the box is in its straight ahead position (flat on shaft is horizontal, pitman arm almost inline with box). Rotate the input shaft back and forth slowly while also slowly turning the screw on top in, until you can feel that the box gets a little stiffer as is goes thru the straight ahead position. The trick is to get it so that you can just barely turn the shaft with your fingers. The on center torque only affects the box through about 30-40 degrees of motion. The box should turn easliy with your fingers outside of this range. The correct torque to turn the shaft over-center is 6 to 10 inch pounds, not even one foot pound! The point is to get the over-center adjustment just right. Try it several times before you do call it done. Fininshed
After you do these adjustments and put the box in the car, you will notice that the steering feels like new again. No play, no slop, and lots of road feel. If the "over center" adjustment is even slightly too tight, the steering will feel 'numb' on center and not want to return to center after a turn. I was amazed.
There is also a tech article on TGO, found here, that details rebuilding the box with pictures.
Another option is purchasing a remanufactured box from your normal parts suppliers. From what I've seen, results are hit and miss with these because some worker in a factory in Mexico isn't really concerned with how the box �feels� after they're done. Another option is buying a new box. Since this is the way I plan to go, I'll recommend Lee Manufacturing. Pricey, yes. Worth it, most likely. Just make sure you contact them with your needs/wants for the car. In addition, you'll most likely need new strut mounts. Now, the stock pieces are fine for DD (daily driver) duty, but if you are more performance oriented on your build, you'll want something a little more resilient.
Steering Boxes
Lee Manufacturing boxes
Flaming River boxes
Strut Mounts
Spohn
J&M (Hotpart) Mounts
Last edited by 91_5.7_TPI; 10-20-2009 at 07:38 PM.
10-20-2009, 07:33 PM
#3
Supreme Member
Thread Starter
iTrader: (2)
Join Date: Mar 2005
Location: East Tennesse
Posts: 2,820
Likes: 0
Received 3 Likes
on
3 Posts
Car: 1991 RS Camaro
Engine: L03 (want LS1)
Transmission: 700R-4 (and T56)
Axle/Gears: 4th Gen 3.23 posi
Re: Suspension How To...
Suspension Part/Bushing Selection:
A word of caution, polyurethane anywhere will squeak more than rubber if improperly lubricated, but it's not really enough to be a bother as long as you’re in the car. Also be sure to use the special silicone based synthetic grease on polyurethane bushings such as what can be found here... Silicone Grease. The normal petroleum based grease corrodes the poly bushings and you will have to replace it on a more regular basis.
Rear Lower Control Arm:
While polyurethane is great in sway bars, it looses its shine in places like the rear lower control arms (LCAs). In the LCAs, the polyurethane can create bind in hard cornering. This bind is caused by the LCAs not being able to work as they are designed to. As the rear of the car moves over the rear axle (imagine the axle as fixed and the body as mobile). When the car enters the turn, the body tries to move to the outside of the turn due to momentum, while the axle tries to remain in place (you hope). Now, if taken from a helicopter view, this motion has an effect on the suspension linkages. The most apparent is in the LCAs. As the body moves over the axle, the LCAs are put into stress (bind). The factory rubber bushings allowed for this by flexing and allowing the energy of the movement to be absorbed and dissipated easily. Polyurethane is stiffer than the rubber, and doesn't allow this dissipation so nicely. They can cause the bind I mentioned and snap back into their original position. I've had this happen to me on several occasions, and it's interesting to say the least. One choice is replacing the old bushings with new rubber ones. If you're looking for more flair, rod ends work well in the LCAs, but to some they are too harsh. I have a set of LCAs built from parts ordered from the circle track suppliers. It has heavy duty rubber bushing on the body and a rod end on the axle. I am replacing my rod ends on the custom LCAs with the Del-Sphere ends from Spohn. Another nice option is the 3 Piece Poly-Ball Bushings found from Hotpart.
J&M (Hotpart)
Spohn
UMI Performance
BMR Fabrication
Strano Parts
Panhard Bar:
The PHB doesn't see the same twisting forces as the LCAs, so replacing the bushings with either rubber or polyurethane will work here as well. Although, for some, stock parts aren't the way to go. Vendors offer many options. I prefer a combo ended set up for the PHB. The PHB will transmit vibrations and noise as well as anything else on the car, but if you want the car to handle, you want to maximize desirable movement while minimizing deflection and compression. In other words, great handling will generally cause your ride quality to go down, unless you have the money/expertise for some fairly radical parts/mods.
J&M (Hotpart)
Spohn
UMI Performance
BMR Fabrication
Strano Parts
Front A-Arms:
A-arms don't see the same twisting forces that the LCAs undergo either, so polyurethane replacements are pretty good here as well. If you are staying with the stock pieces, a nicer option is the Del-A-Lum bushings offered by Global West. If upgrading to aftermarket tubular a-arms, then most offer the option of either rod ends or polyurethane. This choice will hinge on your plans with the car and the amount of road noise and vibration you’re willing to endure.
Spohn
UMI Performance
BMR Fabrication
Sway Bars & Bushings:
Odds are, yours are shot. Replacing them with rubber is an idea, but in most cases the polyurethane are cheaper (at least in my experience). They also effectively increase the size of the sway bars- increasing the stiffness of the bushings acts in a similar fashion to going up slightly in sway bar diameter. There is also the option of upgrading sway bars. You can get GM sway bars or aftermarket pieces. The advantage of the GM bars is the cost- they are usually readily available and cheaper than aftermarket pieces. You can usually get 2-5 GM bars for the cost of one aftermarket, but you'll need to get bushings for them. Sway bars are a great tuning aid for handling, so having several is a good idea. There are several combinations of sway bars in use. Some are 36/24, 36/21, 34/21 and so on. The best way to determine what you like and what your car ‘likes’ is to get several sway bars and try multiple combinations. There is no magic combination or set of bars for every car out there - every car is different and so is every driver.
Spohn
BMR Fabrication
Strano Parts The Strano Parts hollow 22mm rear bar~ the stiffness of stock 21 but 4lbs lighter than the 19
Top Down Solutions
Springs/Shocks:
When replacing springs, get shocks at the same time. You will save time and probably money as well. Even if you aren't lowering it, getting new shocks will be a good idea. Odds are, the ones on your car are shot. If you lower a car, it does more than just make it look cool.
Lowering springs normally not only lower the car (causing the shocks to sit at a place they are not designed to do), but have a higher spring rate (stiffer). Both of these related facts cause stock or replacement shocks (Auto Zone, Advance, NAPA, etc) to wear out much faster and not even do a good job of dampening the suspension when brand new. This isn't only bad for handling, it's literally dangerous after prolonged periods; it causes the vehicle to be harder to control at speed and can increase braking distance.
Your wallet and goals with the car will determine what you want to purchase. Shocks to consider are KONIs, Bilstein HDs, Tokicos, KYBs these are somewhat common listed in price and (my opinion) quality.
Once you determine what shocks you want to go with, there are several options of where to buy. The best prices I've found for KONIs is J&M. Shox.com also has nice prices on combination deals. Shocks are fairly easy to find and offered by many vendors, so shop around for the best deals.
For springs, I'll link to Lowering 101. It offers a nice compilation of options for springs, air bags, coil-overs, and weight jacks. You'll want to (as at all other times) do research to determine what would be best for your application, weight/balance of the car, and also factor in your personal preference. Spring choice is critical, but they aren't terribly expensive, so as with sway bars, you might want to test several combinations to determine what suites you and the car the best.
Tires:
Tire selection is a bit more of a tedious process. You will need to decide what you plan to do with the car-
-if you'll need all seasons
-if you can get away with summer only tires, will you need wet/dry or dry only traction
-will you be just running the roads and just playing with your car or if you'll actually compete with it in an auto-x setting
-how often you can can afford to replace them
-how much can you afford to spend on a set
Weigh and balance all these issues, talk to people online or auto-crossers, see what they are running, and make a educated decision.
Spending Estimates
To give you an estimate, I have the following in my suspension:
KONIs around ........................$750
Pro-Kit: ................................$245
Camber/caster plates ..............$149
Wonder bar............................$70
LCAs around ..........................$200
PHB .....................................$160
Sway bars..............................$230
SFCs....................................$200
brake upgrades ......................$700
tires (summer)........................$600
Total = $3200
This thread is meant as an in depth introduction to the world of F-Body performance suspension. A greater depth of varity of information in this thread can be found by searching the forums. This is by no means the only way to go about making your car handle, but it stands to give an idea of where to start modding and what questions to ask.
Last edited by 91_5.7_TPI; 10-22-2009 at 09:34 AM.
10-20-2009, 07:34 PM
#4
Supreme Member
Thread Starter
iTrader: (2)
Join Date: Mar 2005
Location: East Tennesse
Posts: 2,820
Likes: 0
Received 3 Likes
on
3 Posts
Car: 1991 RS Camaro
Engine: L03 (want LS1)
Transmission: 700R-4 (and T56)
Axle/Gears: 4th Gen 3.23 posi
Re: Suspension How To...
This section of the article will include some directions for the removal and installation of the basic suspension components. Pictures provided by Samdweezel0
Front End-
Struts
Tools- Jack, jacks stand (x2) ratchet/socket, and wrench set
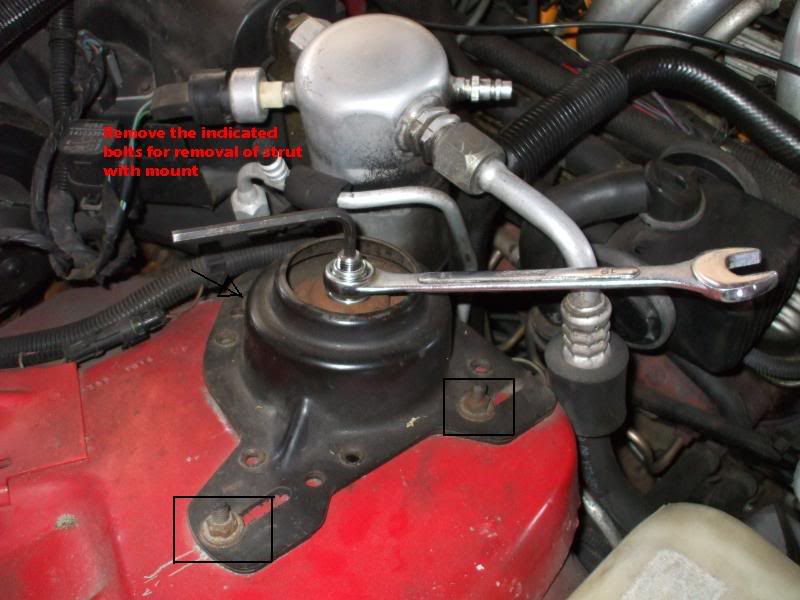
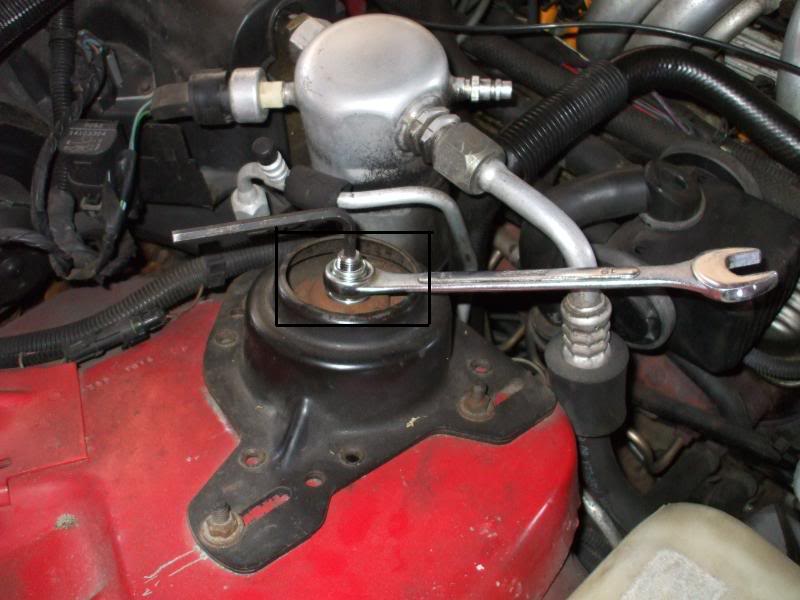
Directions- The removal of the struts is a fairly straightforward operation. First, you must jack the car off the ground, put it on jack stands, and remove the wheels. This is required for any suspension work. Next, the correct tools must be found for the removal of the struts. The following bolts must be removed to remove the strut.
(If you are planning to replace the strut mounts, refer to the second picture. If you are only replacing struts, refer to the 3rd picture.)
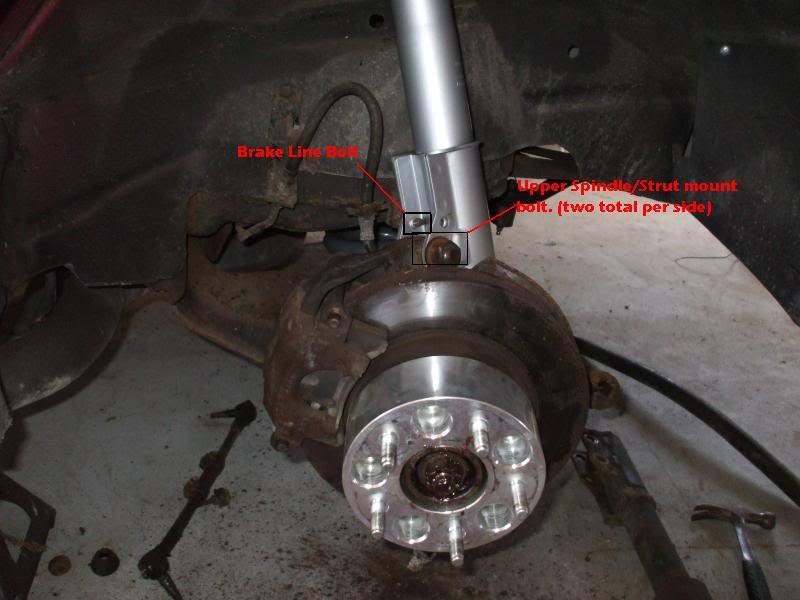
strut mount to strut tower bolts
strut to strut mount bolt
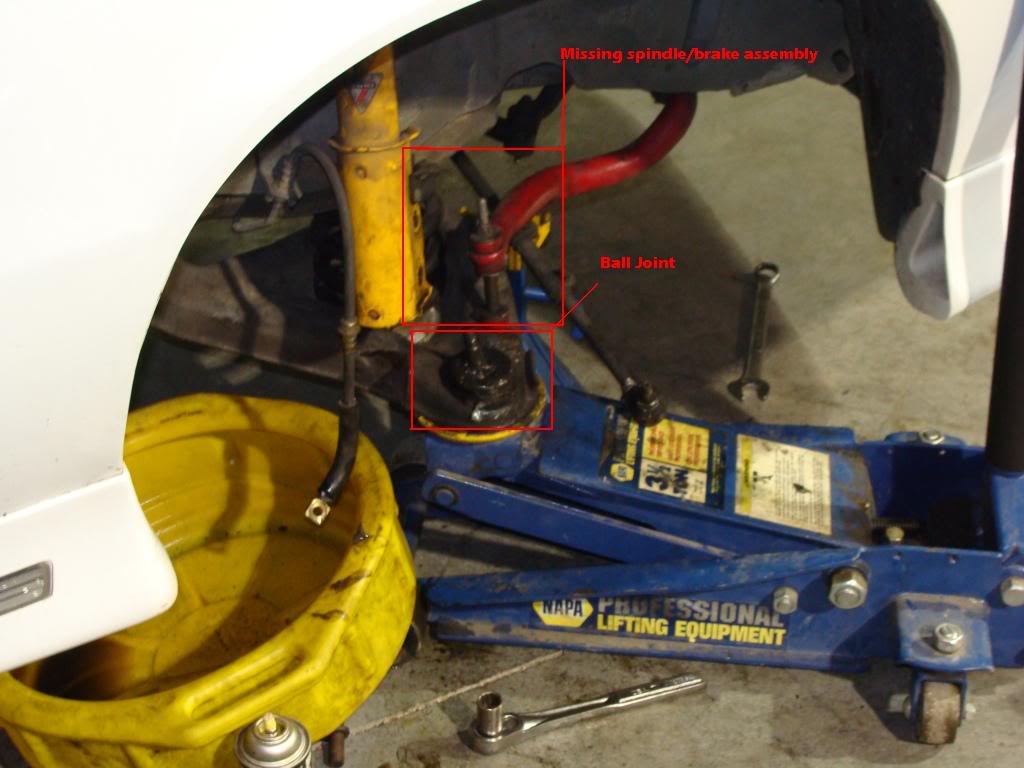
With strut removal, you'll have to support the a-arm with something. In most cases, I use a jack and support the car with stands. This picture shows the general idea, but with the spindle removed for my brake conversion:
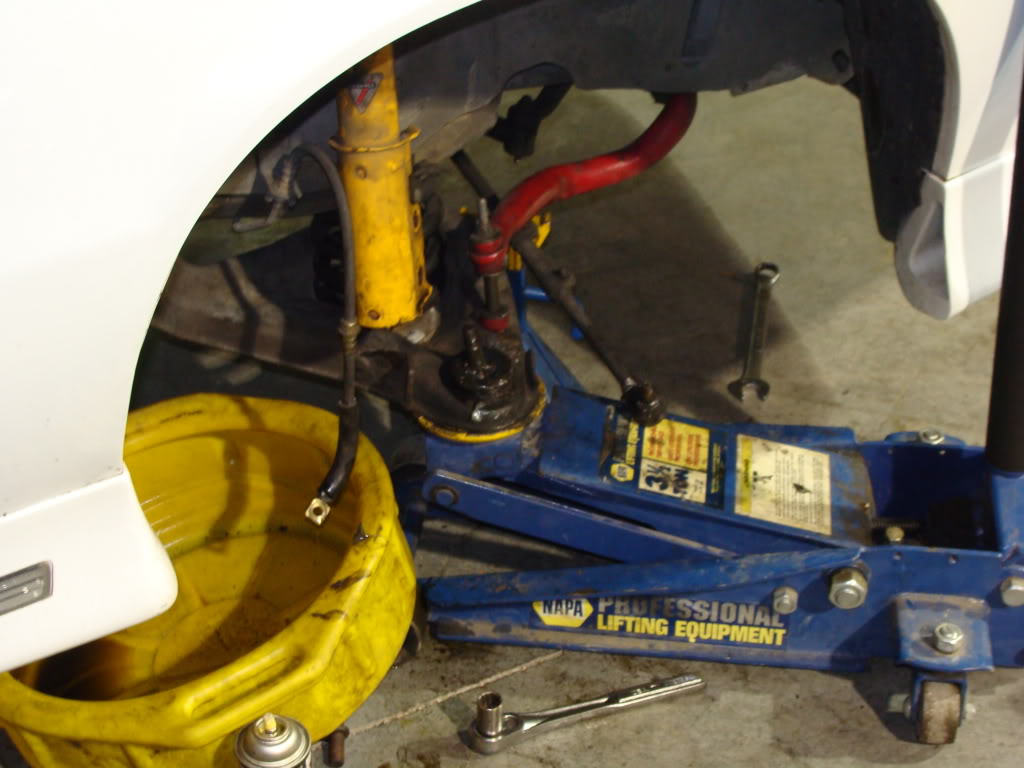
My normal method for dealing with the spring while replacing struts or the spring itself is to place the jack under the a-arm you're working on after the car on stands. Then, I raise the jack so that some weight of the car is supported, but not enough to compress the spring much.
Springs
Directions- Although the initial steps are the same in both replacing the front springs and struts, replacing the springs requires more care than does the replacement of the struts. The springs are under pressure and if they are let loose suddenly, can cause serious personal injury. There are spring compressors available from parts stores for this operation. They will compress and control the spring for removal. It is normally advised to chain the spring to control arm to prevent it flying loose and striking whatever may be in the way.
Once the a-arm is supported and you are ready to remove the spring, you must first take the castle nut off the ball joint.
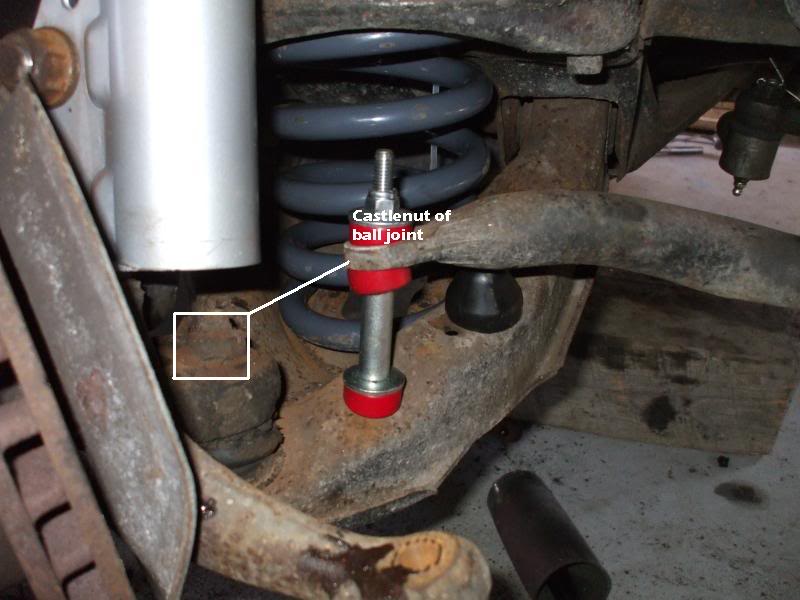
Once this nut is removed, the use of a ball joint tool or pickle fork may be required to unseat the ball joint from the a-arm. Make sure the a-arm is supported by the jack for this step. Now, lower the jack slowly until you can remove the spring without fear of injury.
(cont...)
Front End-
Struts
Tools- Jack, jacks stand (x2) ratchet/socket, and wrench set
Directions- The removal of the struts is a fairly straightforward operation. First, you must jack the car off the ground, put it on jack stands, and remove the wheels. This is required for any suspension work. Next, the correct tools must be found for the removal of the struts. The following bolts must be removed to remove the strut.
(If you are planning to replace the strut mounts, refer to the second picture. If you are only replacing struts, refer to the 3rd picture.)
strut mount to strut tower bolts
strut to strut mount bolt
With strut removal, you'll have to support the a-arm with something. In most cases, I use a jack and support the car with stands. This picture shows the general idea, but with the spindle removed for my brake conversion:
My normal method for dealing with the spring while replacing struts or the spring itself is to place the jack under the a-arm you're working on after the car on stands. Then, I raise the jack so that some weight of the car is supported, but not enough to compress the spring much.
Springs
Directions- Although the initial steps are the same in both replacing the front springs and struts, replacing the springs requires more care than does the replacement of the struts. The springs are under pressure and if they are let loose suddenly, can cause serious personal injury. There are spring compressors available from parts stores for this operation. They will compress and control the spring for removal. It is normally advised to chain the spring to control arm to prevent it flying loose and striking whatever may be in the way.
Once the a-arm is supported and you are ready to remove the spring, you must first take the castle nut off the ball joint.
Once this nut is removed, the use of a ball joint tool or pickle fork may be required to unseat the ball joint from the a-arm. Make sure the a-arm is supported by the jack for this step. Now, lower the jack slowly until you can remove the spring without fear of injury.
(cont...)
Last edited by 91_5.7_TPI; 10-20-2009 at 07:37 PM.
10-20-2009, 07:34 PM
#5
Supreme Member
Thread Starter
iTrader: (2)
Join Date: Mar 2005
Location: East Tennesse
Posts: 2,820
Likes: 0
Received 3 Likes
on
3 Posts
Car: 1991 RS Camaro
Engine: L03 (want LS1)
Transmission: 700R-4 (and T56)
Axle/Gears: 4th Gen 3.23 posi
Re: Suspension How To...
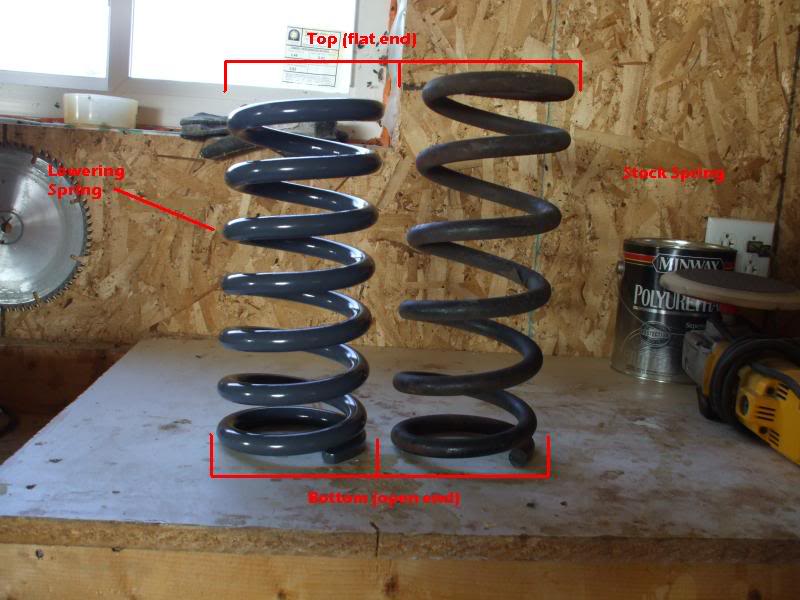
When installing new or even stock springs, you must be sure to install them correctly. Indexing the spring is something that is frequently over-looked. You must install the flat end of the spring in the cup of the K-member (the car) and the open end of the spring in the correct location on the a-arm. The next picture shows the indention in the spring pocket of the a-arm where the open end of the coil must sit to achieve the correct installation.
Reinstalling the spring with a spring compressor is easier than without. With a compressor, you merely install the spring and jack the a-arm up and reattach the ball joint to the a-arm, then release the compressor. Without a compressor, you must install the spring and slowly jack the arm up, insuring that the spring remains in the correct location.
Ball Joint
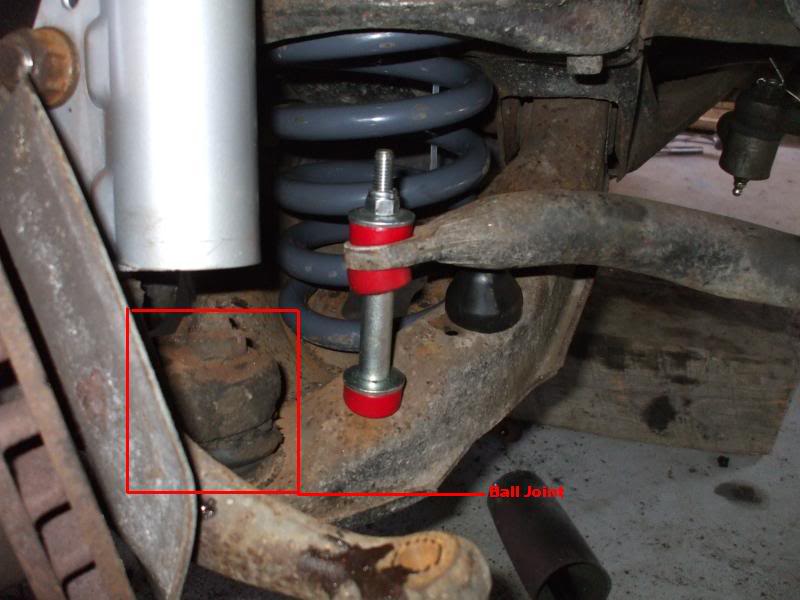
Directions- The ball joints can now be done at this point, but they do not require the removal of the spring. They can be done by merely supporting the a-arm with a jack as previously described and then removing the ball joint from the arm. There are a few ways to do this. You can take the arm off (see next section) and have the ball joint pressed out/in. There is also the option to remove/install the ball joint with the arm on the car. For the second method, I normally get the spindle/brakes out of the way (usually requires removing the caliper and tying it off and then removing the spindle, but I've done it by just working around the spindle/brake assembly), and use a 2 lbs sledge (shop hammer, etc) to remove the ball joint. You're replacing it, so beating it up shouldn't be a issue. Take care not hit anything else. To reinstall, I have been known to use a small piece of a 2x4 (wood) and the same hammer. This method can damage the ball joint if your not careful and should be done with the grease fitting not yet installed. The wood is used to avoid metal on metal strikes while still transferring the force to install the ball joint. You can freeze the ball joint to shrink it slightly to make the install easier, but I found this out after the brute force method had already worked twice for me.
A-Arm Bushings
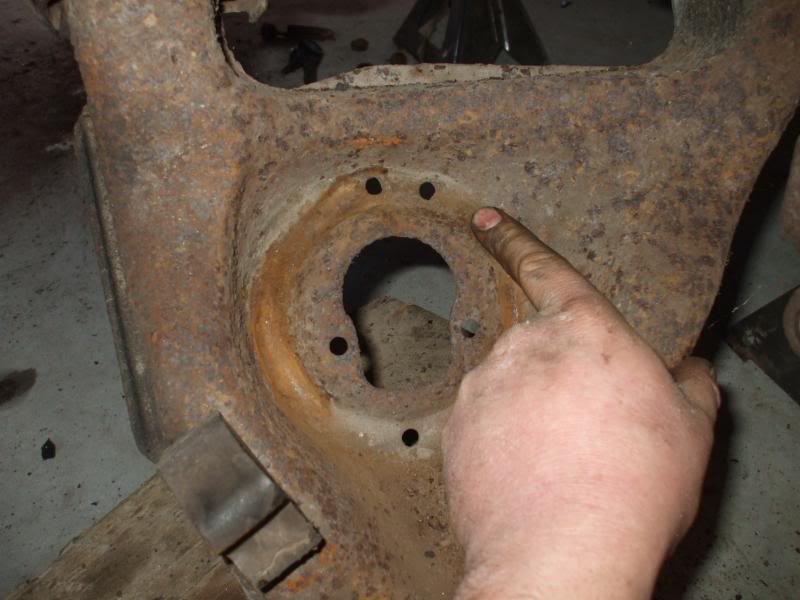
Directions- Now that we're down this far (assuming you can get to the point where the spring is out of the a-arm and the arm is hanging freely), we can tackle the a-arm bushings. With the car broken down this far, there really isn't a good reason to not replace them. There are two bolts per side to be removed before you can take out the a-arm and change the bushings. This picture shows the location of the front bolt. The other bolt is behind this one on the other part of the arm. Removing the bolts can be difficult since the nut can be seized or the bolt can be seized in the inner bushing sleeve. In addition, the locations of the bolts make them difficult to liberate. It's easier every time you do it. I've had mine out about 3 times for one reason or another. When replacing the bushings, the best option to have someone with the proper equipment to press them in and out. You can do it yourself, but it�s a lot of time and effort from what I�ve heard.

(cont...)
Reinstalling the spring with a spring compressor is easier than without. With a compressor, you merely install the spring and jack the a-arm up and reattach the ball joint to the a-arm, then release the compressor. Without a compressor, you must install the spring and slowly jack the arm up, insuring that the spring remains in the correct location.
Ball Joint
Directions- The ball joints can now be done at this point, but they do not require the removal of the spring. They can be done by merely supporting the a-arm with a jack as previously described and then removing the ball joint from the arm. There are a few ways to do this. You can take the arm off (see next section) and have the ball joint pressed out/in. There is also the option to remove/install the ball joint with the arm on the car. For the second method, I normally get the spindle/brakes out of the way (usually requires removing the caliper and tying it off and then removing the spindle, but I've done it by just working around the spindle/brake assembly), and use a 2 lbs sledge (shop hammer, etc) to remove the ball joint. You're replacing it, so beating it up shouldn't be a issue. Take care not hit anything else. To reinstall, I have been known to use a small piece of a 2x4 (wood) and the same hammer. This method can damage the ball joint if your not careful and should be done with the grease fitting not yet installed. The wood is used to avoid metal on metal strikes while still transferring the force to install the ball joint. You can freeze the ball joint to shrink it slightly to make the install easier, but I found this out after the brute force method had already worked twice for me.
A-Arm Bushings
Directions- Now that we're down this far (assuming you can get to the point where the spring is out of the a-arm and the arm is hanging freely), we can tackle the a-arm bushings. With the car broken down this far, there really isn't a good reason to not replace them. There are two bolts per side to be removed before you can take out the a-arm and change the bushings. This picture shows the location of the front bolt. The other bolt is behind this one on the other part of the arm. Removing the bolts can be difficult since the nut can be seized or the bolt can be seized in the inner bushing sleeve. In addition, the locations of the bolts make them difficult to liberate. It's easier every time you do it. I've had mine out about 3 times for one reason or another. When replacing the bushings, the best option to have someone with the proper equipment to press them in and out. You can do it yourself, but it�s a lot of time and effort from what I�ve heard.
(cont...)
10-20-2009, 07:35 PM
#6
Supreme Member
Thread Starter
iTrader: (2)
Join Date: Mar 2005
Location: East Tennesse
Posts: 2,820
Likes: 0
Received 3 Likes
on
3 Posts
Car: 1991 RS Camaro
Engine: L03 (want LS1)
Transmission: 700R-4 (and T56)
Axle/Gears: 4th Gen 3.23 posi
Re: Suspension How To...
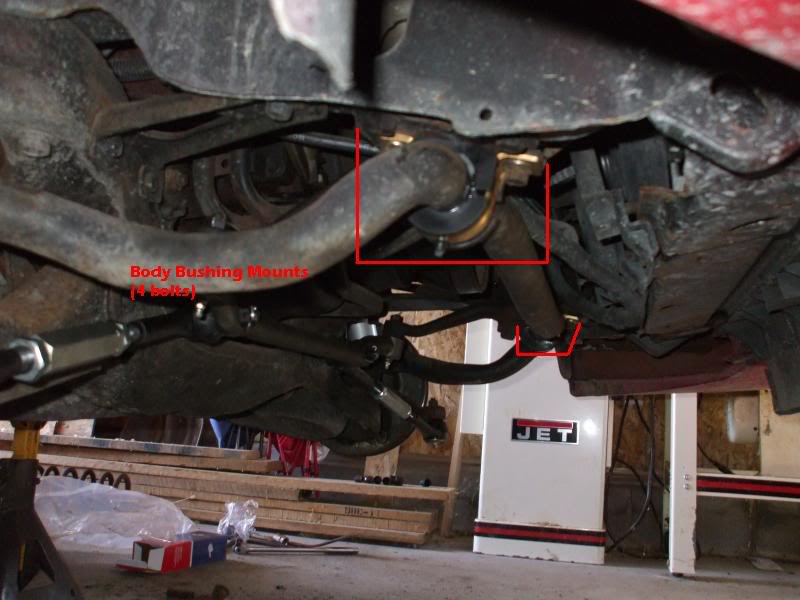
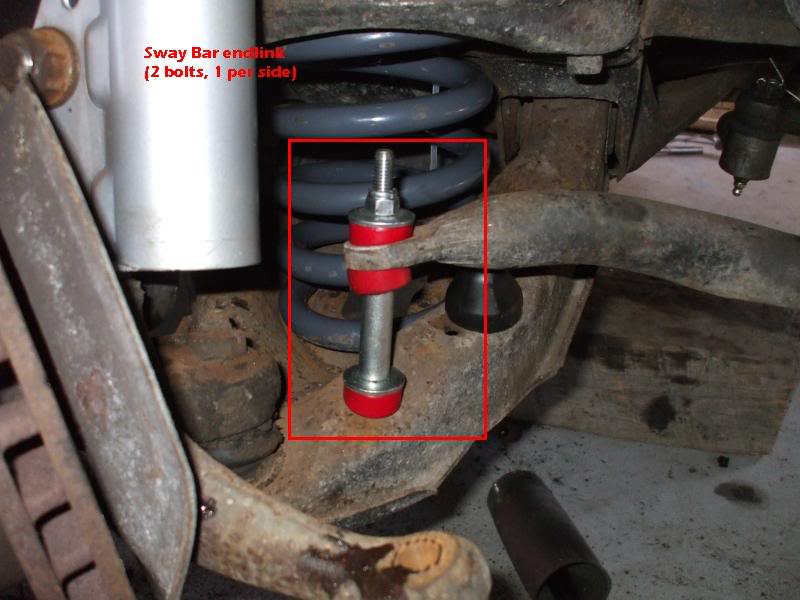
Sway Bar Bushings/End links
Directions- Replacing the sway bar end links and bushings is a very simple job to do. The car must be jacked up and the job is easier with the wheels off. Once you're ready, there are a total of six bolts per sway bar (4 body bushing bolts and 2 end link bolts) that must be removed to replace the bushings. Keep in mind that the car's suspension should be loaded when final tightening of the end links is done. That is, the weight of the car should be on the suspension.
You want the end links to be installed so that they are straight and the bolts snug but not tight enough that the bushings are being squeezed out.
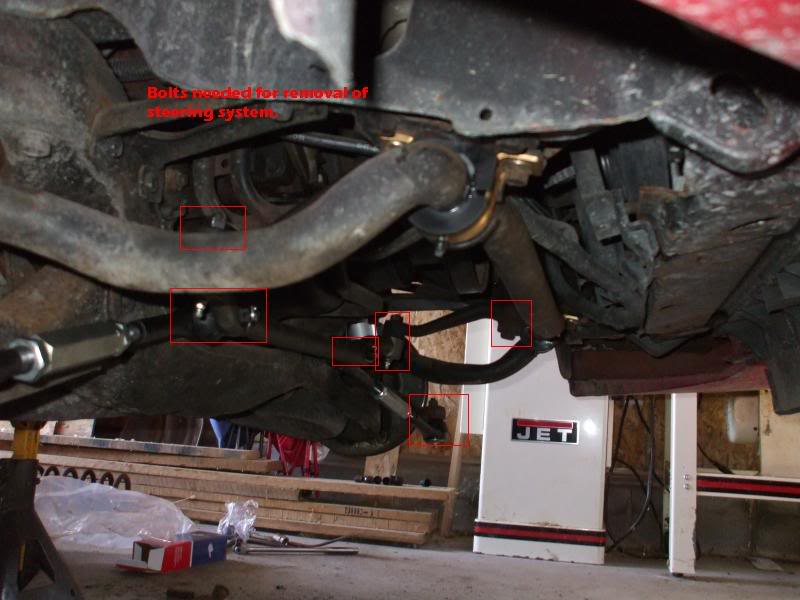
Steering Components
Tools-
Directions-Installing steering components is less involved than installing new springs or a-arm bushings in that less disassembly of the front suspension is required, but it entails in most cases a new alignment. The names and parts of the steering components can be see in this thread. As I've said, reading through this post should help you understand the location, name, and purpose of the steering and suspension in the front.
(cont...)
Directions- Replacing the sway bar end links and bushings is a very simple job to do. The car must be jacked up and the job is easier with the wheels off. Once you're ready, there are a total of six bolts per sway bar (4 body bushing bolts and 2 end link bolts) that must be removed to replace the bushings. Keep in mind that the car's suspension should be loaded when final tightening of the end links is done. That is, the weight of the car should be on the suspension.
You want the end links to be installed so that they are straight and the bolts snug but not tight enough that the bushings are being squeezed out.
Steering Components
Tools-
Directions-Installing steering components is less involved than installing new springs or a-arm bushings in that less disassembly of the front suspension is required, but it entails in most cases a new alignment. The names and parts of the steering components can be see in this thread. As I've said, reading through this post should help you understand the location, name, and purpose of the steering and suspension in the front.
(cont...)
Last edited by 91_5.7_TPI; 10-20-2009 at 07:39 PM.
10-20-2009, 07:35 PM
#7
Supreme Member
Thread Starter
iTrader: (2)
Join Date: Mar 2005
Location: East Tennesse
Posts: 2,820
Likes: 0
Received 3 Likes
on
3 Posts
Car: 1991 RS Camaro
Engine: L03 (want LS1)
Transmission: 700R-4 (and T56)
Axle/Gears: 4th Gen 3.23 posi
Re: Suspension How To...
Rear End-
Shocks
Directions-In order to remove the shocks, you'll need to take the nuts off the top of the shock. These are located inside the car behind the rear seats.
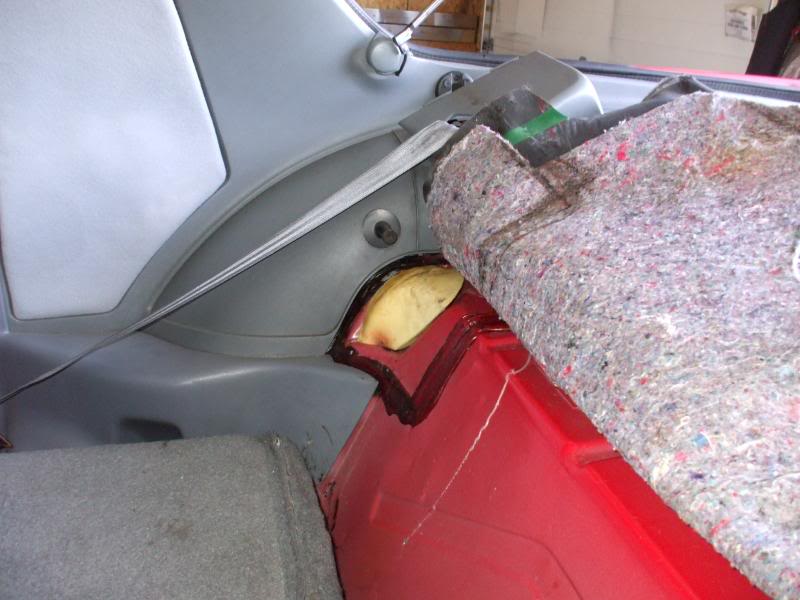
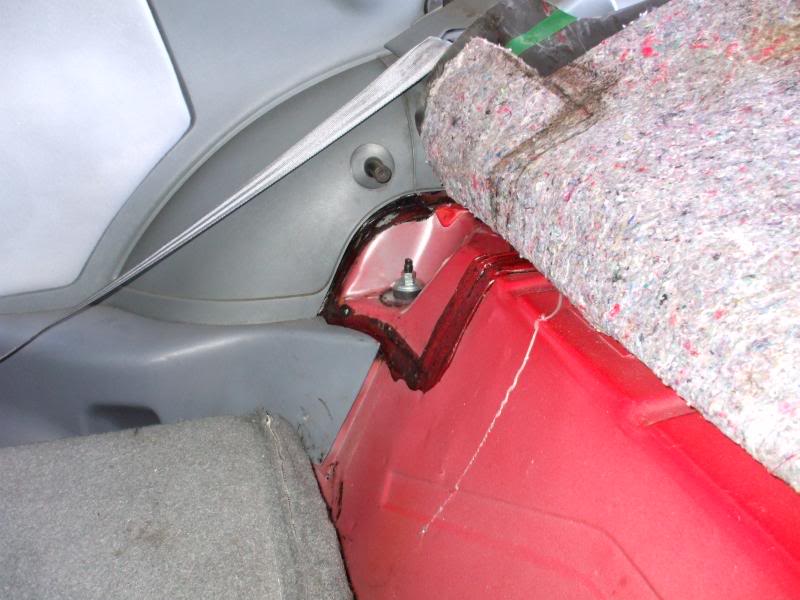
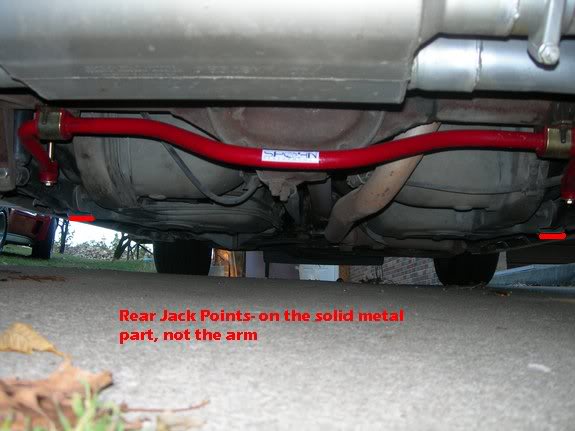
Then, you jack the car up and place it on jack stands. I normally jack the car the up from the center section of the rear differential. I place the jack stands under the body mount point of the rear LCAs so that you can raise or lower the rear differential and suspension as needed.
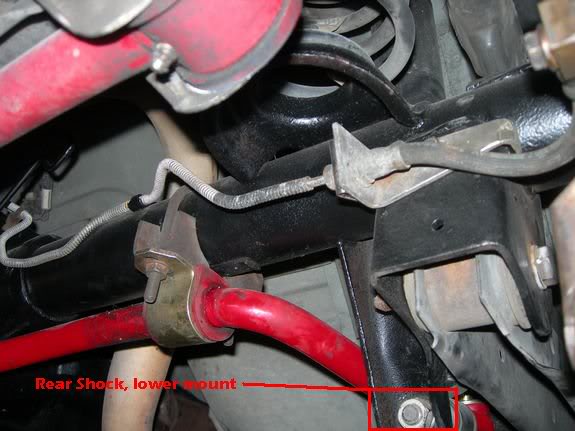
Now that the car has been jacked up and is put on jack stands, lower the rear end (with the jack) so that the rear is hanging down and the shock rod comes out of the upper mount point. Then, you have to remove the lower shock mount. There are two, one at each end of the rear end. Once these have been removed, you can replace the shock.
Springs
Tools- no other tools than required to remove rear shocks
Directions- Now, with the rear end hanging and the upper shock mount loose, you can replace the springs. If you are just replacing the springs, you don't have to remove the lower shock mount. With the rear shock's upper mount loose and the suspension lowered to the point that the upper mounts are free of the body, you can probably just work the springs out without any more difficulty. There's nothing holding them in other than the weight of the car.
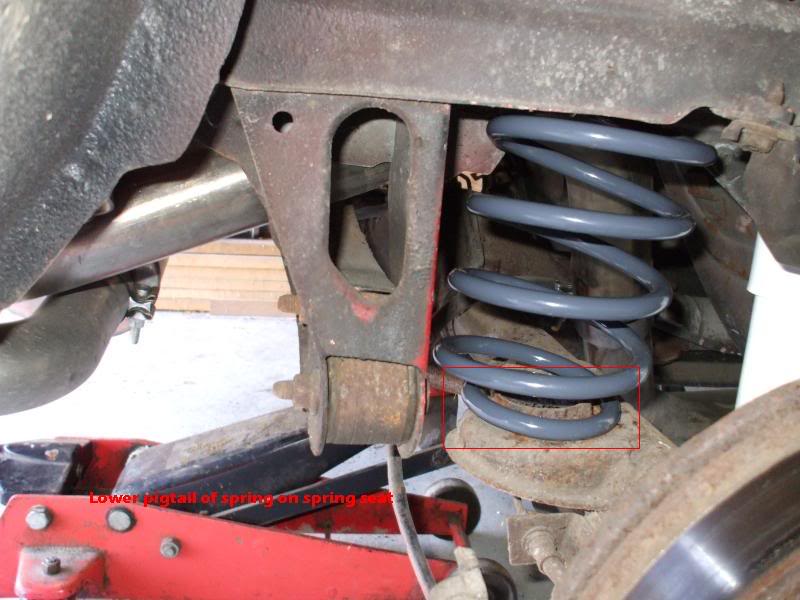
When reinstalling the spring, make sure that the smaller end of the spring goes in on the bottom. This pigtailed end will fit the axle mount while the upper end of the spring will not. The rear spring installation is a fairly straightforward and simple operation. With the jack still at the same position, just reinstall the spring the way the old one came out. If you are using the stock spring isolator, set it on top of the spring and install the assembly. If you are using the heater hose mod, then have the heater hose on the spring before installation.
(cont�)
Shocks
Directions-In order to remove the shocks, you'll need to take the nuts off the top of the shock. These are located inside the car behind the rear seats.
Then, you jack the car up and place it on jack stands. I normally jack the car the up from the center section of the rear differential. I place the jack stands under the body mount point of the rear LCAs so that you can raise or lower the rear differential and suspension as needed.
Now that the car has been jacked up and is put on jack stands, lower the rear end (with the jack) so that the rear is hanging down and the shock rod comes out of the upper mount point. Then, you have to remove the lower shock mount. There are two, one at each end of the rear end. Once these have been removed, you can replace the shock.
Springs
Tools- no other tools than required to remove rear shocks
Directions- Now, with the rear end hanging and the upper shock mount loose, you can replace the springs. If you are just replacing the springs, you don't have to remove the lower shock mount. With the rear shock's upper mount loose and the suspension lowered to the point that the upper mounts are free of the body, you can probably just work the springs out without any more difficulty. There's nothing holding them in other than the weight of the car.
When reinstalling the spring, make sure that the smaller end of the spring goes in on the bottom. This pigtailed end will fit the axle mount while the upper end of the spring will not. The rear spring installation is a fairly straightforward and simple operation. With the jack still at the same position, just reinstall the spring the way the old one came out. If you are using the stock spring isolator, set it on top of the spring and install the assembly. If you are using the heater hose mod, then have the heater hose on the spring before installation.
(cont�)
Last edited by 91_5.7_TPI; 10-20-2009 at 07:40 PM.
The following users liked this post:
Acroyer (09-14-2022)
Trending Topics
10-20-2009, 07:36 PM
#8
Supreme Member
Thread Starter
iTrader: (2)
Join Date: Mar 2005
Location: East Tennesse
Posts: 2,820
Likes: 0
Received 3 Likes
on
3 Posts
Car: 1991 RS Camaro
Engine: L03 (want LS1)
Transmission: 700R-4 (and T56)
Axle/Gears: 4th Gen 3.23 posi
Re: Suspension How To...
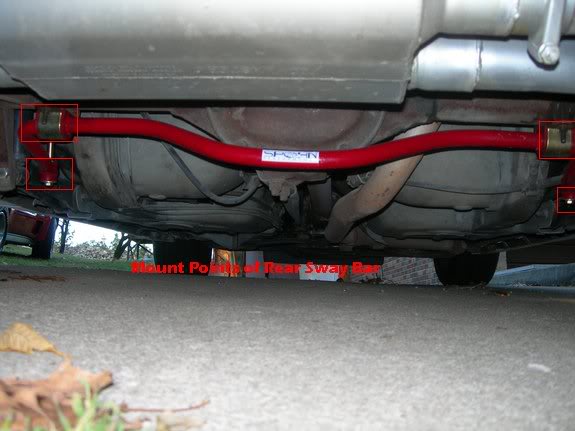
Rear Sway Bar
Directions-Replacing the rear sway bar bushings is just about the same as replacing the front bushings. Same number of bolts and bushings they are just mounted differently. The same principles apply to the rear as do the front. The suspension must be loaded and you don't want to overtighten the endlinks. Also, make sure that the axle mounts are in the correct position as to not bend the end links foward or backward. (I've had to replace endlinks because of this)
Rear Lower Control Arms
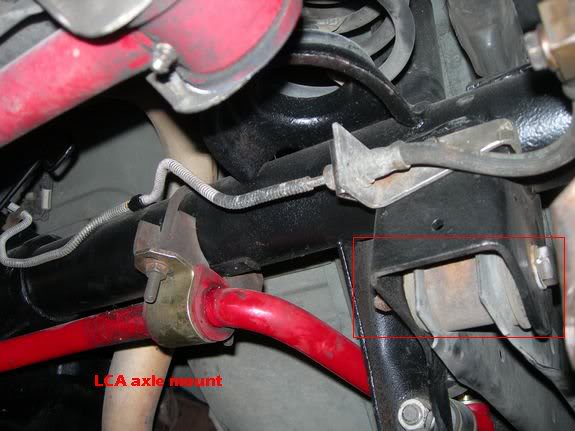
Directions- Replacing the bushings in the LCAs is similar to replacing the bushings in the A-arms. But, in this case, you don't have to remove the springs, only the control arm. First, with the car on it's previously mentioned jack points and rear end supported by a jack, you remove the bolts on the LCA. But, by removing both LCAs and the bolts holding the shocks on, there's not much supporting the rear end from flopping side to side. I know this because I almost dropped the rear end on my friend's head...heh. Either have a jack at both ends or leave the shocks attached and the jack in the middle. Once the arms are safely out, you have several options. You can try to beat, push, or coerce them out yourself. Then there's the melting trick. Or you can have someone press them out. Unless you are horribly strapped for cash and have no friends with this capacity, I'd have them pressed out. Much less headache. The reinstall is essentially the reverse of installation. The reason to not support the weight of the car on the rear axle when doing this is the fact you'll have to work the jack some to get the bolts to line up in their respective holes. I've tried it both ways, and if you can bench press the car while holding the LCA and lining up the bolts....well, then you are more of a man than me and probably have more than two arms.
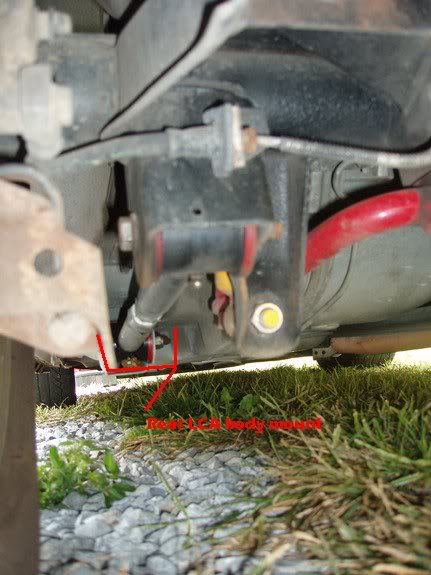
Panhard Bar
Directions- The same ideas of jacking/stand placement applies from the LCAs, as does bushing replacement.
Location of PHB bolts-
I plan to make addition to this post listing the tool sizes used on the different parts of the build. Or, if anyone has the info handy, feel free to add it.
Directions-Replacing the rear sway bar bushings is just about the same as replacing the front bushings. Same number of bolts and bushings they are just mounted differently. The same principles apply to the rear as do the front. The suspension must be loaded and you don't want to overtighten the endlinks. Also, make sure that the axle mounts are in the correct position as to not bend the end links foward or backward. (I've had to replace endlinks because of this)
Rear Lower Control Arms
Directions- Replacing the bushings in the LCAs is similar to replacing the bushings in the A-arms. But, in this case, you don't have to remove the springs, only the control arm. First, with the car on it's previously mentioned jack points and rear end supported by a jack, you remove the bolts on the LCA. But, by removing both LCAs and the bolts holding the shocks on, there's not much supporting the rear end from flopping side to side. I know this because I almost dropped the rear end on my friend's head...heh. Either have a jack at both ends or leave the shocks attached and the jack in the middle. Once the arms are safely out, you have several options. You can try to beat, push, or coerce them out yourself. Then there's the melting trick. Or you can have someone press them out. Unless you are horribly strapped for cash and have no friends with this capacity, I'd have them pressed out. Much less headache. The reinstall is essentially the reverse of installation. The reason to not support the weight of the car on the rear axle when doing this is the fact you'll have to work the jack some to get the bolts to line up in their respective holes. I've tried it both ways, and if you can bench press the car while holding the LCA and lining up the bolts....well, then you are more of a man than me and probably have more than two arms.
Panhard Bar
Directions- The same ideas of jacking/stand placement applies from the LCAs, as does bushing replacement.
Location of PHB bolts-
I plan to make addition to this post listing the tool sizes used on the different parts of the build. Or, if anyone has the info handy, feel free to add it.
Last edited by 91_5.7_TPI; 10-20-2009 at 07:41 PM.
10-20-2009, 09:07 PM
#9
Junior Member
Join Date: Nov 2007
Location: Southern California / Antelope Valley
Posts: 63
Likes: 0
Received 0 Likes
on
0 Posts
Car: Camaros and Suburbans
Engine: V8's
Re: Suspension How To...
What a great thread, this will come in very handy! I've sent you a P.M.
I've never set-up a 3rd gen Camaro for road racing, (or drag racing for that matter), and I have been thinking about it pretty seriously these days.
I've subscribed to this thread.

I've never set-up a 3rd gen Camaro for road racing, (or drag racing for that matter), and I have been thinking about it pretty seriously these days.
I've subscribed to this thread.
Last edited by Jimmy D; 10-21-2009 at 02:52 PM.
11-09-2009, 06:37 PM
#11
Supreme Member
Thread Starter
iTrader: (2)
Join Date: Mar 2005
Location: East Tennesse
Posts: 2,820
Likes: 0
Received 3 Likes
on
3 Posts
Car: 1991 RS Camaro
Engine: L03 (want LS1)
Transmission: 700R-4 (and T56)
Axle/Gears: 4th Gen 3.23 posi
Re: Suspension How To...
Thanks guys! I hope it proves helpful to someone. Lotta time in this one lol
11-11-2009, 08:02 PM
#14
Supreme Member
Thread Starter
iTrader: (2)
Join Date: Mar 2005
Location: East Tennesse
Posts: 2,820
Likes: 0
Received 3 Likes
on
3 Posts
Car: 1991 RS Camaro
Engine: L03 (want LS1)
Transmission: 700R-4 (and T56)
Axle/Gears: 4th Gen 3.23 posi
Re: Suspension How To...
I'm not sure which bumpstops they are; that is Samdweezel0's car pictured. I'm sure he'd be happy to tell you if you sent him a PM.
 11-14-2009, 05:45 PM
#17
Junior Member

Join Date: Jan 2009
Location: Victoria, B.C. (thats Canada)
Posts: 84
Likes: 0
Received 0 Likes
on
0 Posts
Car: 1991 Camaro RS
Engine: 305 TBI
Transmission: WC T-5 (slushbox)
Axle/Gears: 3.08
Re: Suspension How To...
Wow this is some great information. Just have one question. I just changed my a arm bushings to polyurethane, and have noticed they are really squeeky when going over bumps and such, should I try and grease between the urethane and the metal? I'll be taking the control arms out again soon to put new springs in and want to do something about it because it sounds horrible.
11-14-2009, 08:05 PM
#19
Supreme Member
Join Date: Nov 2007
Location: IL
Posts: 1,092
Likes: 0
Received 1 Like
on
1 Post
Car: 88 IROC, 76 Malibu Classic
Engine: 350 TPI, 350
Transmission: 700R4, 4-speed
Axle/Gears: 10 bolt ????
Re: Suspension How To...
I've got to add a little piece of info. Having a set of winter rims and tires is a good idea. that way you can get good tires for 2 very different driving conditions.
This should definitely be a sticky. It could replace a few stickys like lowering 101 because it's already linked to.
This should definitely be a sticky. It could replace a few stickys like lowering 101 because it's already linked to.
11-14-2009, 10:42 PM
#20
Supreme Member
Thread Starter
iTrader: (2)
Join Date: Mar 2005
Location: East Tennesse
Posts: 2,820
Likes: 0
Received 3 Likes
on
3 Posts
Car: 1991 RS Camaro
Engine: L03 (want LS1)
Transmission: 700R-4 (and T56)
Axle/Gears: 4th Gen 3.23 posi
Re: Suspension How To...
1991_305RS-
Yes, greasing between the bushing and the frame mount should eleminate some noise. Mine still made some noise, but it's quietened with time.
chevyracingrox-
I agree. I have two sets of wheels- my stock 16s with high performance all season and my ZR1s (should have some NITTO NT-05s this summer). I'm actually thinking about a third set for show/cruise wheels lol
11-15-2009, 12:13 AM
#21
Supreme Member
iTrader: (5)
Join Date: Aug 2007
Location: Milwaukee, Wisconsin
Posts: 1,525
Likes: 0
Received 1 Like
on
1 Post
Car: 1987 IROC-Z
Engine: 383 with Edelbrock ProFlow EFI
Transmission: TH350
Axle/Gears: 12 bolt 3.73 Eaton posi
Re: Suspension How To...
A note on the polyurethane... make sure you keep greasing it. I typically go over all the bushings on my car at the beginning of every season (spring, summer, etc...). Some may say that is too often, and others say that isn't often enough, but all I can say is that it's been working for me. Not a squeak yet.
I have summer tires on my IROC rims and an extra set of IROC rims in the basement that I was planning on putting slicks on for autocross next year. I don't drive my car in the winter. Usually I just go without a vehicle and get rides from friends or use public transportation. Depending on your situation, you may be able to do what I do and not have to worry about a winter setup.
Mike
11-18-2009, 08:47 AM
#22
Supreme Member
Thread Starter
iTrader: (2)
Join Date: Mar 2005
Location: East Tennesse
Posts: 2,820
Likes: 0
Received 3 Likes
on
3 Posts
Car: 1991 RS Camaro
Engine: L03 (want LS1)
Transmission: 700R-4 (and T56)
Axle/Gears: 4th Gen 3.23 posi
Re: Suspension How To...
I need to take my arms off all around the car and re-grease them. Even the rear rubber bushings sqeak some in cold weather, at least over speed bumps. At least the new Spohn Del-Spheres don't squeak any haha
11-18-2009, 01:20 PM
#24
Senior Member
iTrader: (15)

Join Date: Jan 2009
Location: Ogden UT
Posts: 753
Likes: 0
Received 0 Likes
on
0 Posts
Car: '88 Camaro (Gone...)
Re: Suspension How To...
Very true, but the illustrations are invaluable IMHO. Chilton's isn't too much help if you didn't already have a good idea of what you were doing
11-18-2009, 07:41 PM
#25
Senior Member

Join Date: Jul 2008
Location: Ft Wayne, IN
Posts: 808
Likes: 0
Received 2 Likes
on
2 Posts
Car: 2003 F-150
Engine: 4.6L Modular V8
Transmission: 4R70W
Axle/Gears: Ford 8.8"/3.55 LSD
Re: Suspension How To...
 I have my Haynes sitting right next to me and the pics and first hand knowledge are a very helpful. This thread completes what Haynes left out and goes a few step further.
11-18-2009, 10:26 PM
I have my Haynes sitting right next to me and the pics and first hand knowledge are a very helpful. This thread completes what Haynes left out and goes a few step further.
11-18-2009, 10:26 PM
#26
Supreme Member
Thread Starter
iTrader: (2)
Join Date: Mar 2005
Location: East Tennesse
Posts: 2,820
Likes: 0
Received 3 Likes
on
3 Posts
Car: 1991 RS Camaro
Engine: L03 (want LS1)
Transmission: 700R-4 (and T56)
Axle/Gears: 4th Gen 3.23 posi
Re: Suspension How To...
I agree that while this is a pretty basic guide, it offers some things you won't find in Chilton's or Hayne's manual (such as the vendor listings, guide to alignment basics, general ideas on how to plan your build, where to spend the money for the best effect, some aftermarket parts/bushing selection, a little technical discussion, etc). In addition, it's online-therefor easily accessible and not as easily misplaced (I tend to misplace manuals haha), ''free'', and offers a better set of pictures than the manuals do (from what I've seen).
Thanks for your kind words, guys. I'm sure I speak for my co-author as well as myself when I say I appreciate them. I hope to see it become a sticky, not because I'm involved, but because we took our time to try to help the community and I think this thread (and future discussion in it) can be a source of helpful information.
Thanks for your kind words, guys. I'm sure I speak for my co-author as well as myself when I say I appreciate them. I hope to see it become a sticky, not because I'm involved, but because we took our time to try to help the community and I think this thread (and future discussion in it) can be a source of helpful information.
11-18-2009, 10:28 PM
#27
Supreme Member
iTrader: (5)
Join Date: Aug 2007
Location: Milwaukee, Wisconsin
Posts: 1,525
Likes: 0
Received 1 Like
on
1 Post
Car: 1987 IROC-Z
Engine: 383 with Edelbrock ProFlow EFI
Transmission: TH350
Axle/Gears: 12 bolt 3.73 Eaton posi
Re: Suspension How To...
That and the color pictures make things a lot easier to see.
12-11-2009, 12:37 PM
#28
Senior Member
iTrader: (10)
Join Date: Jan 2009
Location: Edmonton, Alberta.
Posts: 718
Likes: 0
Received 1 Like
on
1 Post
Car: 1988 Pontiac Trans Am GTA.
Engine: 385 stroker sbc
Transmission: TKO600
Axle/Gears: Moser 9" 3.70 Wavetrac
Re: Suspension How To...
What the eff, you need to peel back your carpet to do the rear struts. F***
 12-11-2009, 12:40 PM
#30
Senior Member
iTrader: (10)
Join Date: Jan 2009
Location: Edmonton, Alberta.
Posts: 718
Likes: 0
Received 1 Like
on
1 Post
Car: 1988 Pontiac Trans Am GTA.
Engine: 385 stroker sbc
Transmission: TKO600
Axle/Gears: Moser 9" 3.70 Wavetrac
Re: Suspension How To...
Oh, okay =). Man I was just freakin out, wasnt too sure about peeling it back. . Is it glued just in the spot around the strut botls?
12-11-2009, 12:49 PM
#31
Supreme Member
iTrader: (5)
Join Date: Aug 2007
Location: Milwaukee, Wisconsin
Posts: 1,525
Likes: 0
Received 1 Like
on
1 Post
Car: 1987 IROC-Z
Engine: 383 with Edelbrock ProFlow EFI
Transmission: TH350
Axle/Gears: 12 bolt 3.73 Eaton posi
Re: Suspension How To...
There is no "peeling" involved. I suppose the better word is "pull" since the carpet shouldnt be stuck to the floor there. I was able to get enough access to the area by pulling the carpet sideways away from the plastic. I guess I was lucky since I read about most people needing to pull the plastics to get the carpet up. Either way, it isn't that big of a job.
12-11-2009, 12:59 PM
#32
02-07-2010, 01:27 PM
#33
Senior Member
Join Date: Mar 2006
Location: CALI
Posts: 926
Likes: 0
Received 1 Like
on
1 Post
Car: 85' Trans Am !best car ever!
Engine: 305tpi 215hp LB9 two bolt,
Transmission: th-700r4
Axle/Gears: stock (3.27)
Re: Suspension How To...
Heres Gm Specs. Picture and my personal dialog on my experience adjusting the Steering box......
Make sure the input shaft is dead center. remove the box from car (MY NOTE: with or without the pitman arm still on, however it easier without because the pitman arm still installed while adjusting the box is a nuisance and gets in the way, but so is removing the pitman arm with a puller then the whole 180ftlbs torque can be a strain), drain fluid from the steering box, place on bench. Loosen the Pitman Arm shaft lock nut and screw out the allen stud counter-clockwise till it stops, Mark and Remove the lock-ring on on the input shaft and with a spanner wrench torque to 22ft lbs. clockwise till it bottoms out the thrust bearing. mark a reference line on the housing and spanner input, measure counterclockwise 1/2inch! then counter clockwise turn the spanner input and meet the lines with the reference. (MY NOTE: i go back a little more because when i install the lock-ring tight, it moves the spanner to the second line perfect) Then install the lock ring. tight tight (or to reference point but usually its off after adjustment) using a socket and big hammer to bump the lock ring tight. Next make sure the Allen screw is completely back out counter-clockwise. Then turn the Allen one full turn clockwise--> important! (MY NOTE: i put a bunch of masking tape on the input splines and got a socket to fit without damaging the splines) put a torque wrench (INCHES!!! NOT FOOT) and slowly from 6inchlbs torque setting, and turn the torque setting up constantly working up the torque settings till you hear a click and make note of the reading from your torque wrench. add 10inchlbs more to the torque wrench the numbers you just found out and dial it in on your torque (from the previous torque you found out while checking the loose torque of the steering box input shaft.) (SEE THE PICTURE) and with the new torque value usually between 26-32inchlbs, turn in the allen screw a little at time while moving the shaft back and forth no more than 1/4 turn in each direction from center till you here the click from the torque wrench, then slighty back off the allen screw till the torque wrench doesnt click then tighten the the allen screw until the torque wrench just clicks. (millimeter movement) then tight the locknut with a 5/8 to 20ftlbs, while holding the allen wrench on the screw, keeping it from moving. (MY NOTE: i like to make it tight with my wrench first, then i mark the allen wrench angle, then put a scoket on the locknut and torque to like 22ftlbs, then check the angle of the allen wrench should be the same, I do this because its the only way to torque it to spec. correctly while "holding the allen screw. " Message for further detail if needed -Transam85dudeman
Make sure the input shaft is dead center. remove the box from car (MY NOTE: with or without the pitman arm still on, however it easier without because the pitman arm still installed while adjusting the box is a nuisance and gets in the way, but so is removing the pitman arm with a puller then the whole 180ftlbs torque can be a strain), drain fluid from the steering box, place on bench. Loosen the Pitman Arm shaft lock nut and screw out the allen stud counter-clockwise till it stops, Mark and Remove the lock-ring on on the input shaft and with a spanner wrench torque to 22ft lbs. clockwise till it bottoms out the thrust bearing. mark a reference line on the housing and spanner input, measure counterclockwise 1/2inch! then counter clockwise turn the spanner input and meet the lines with the reference. (MY NOTE: i go back a little more because when i install the lock-ring tight, it moves the spanner to the second line perfect) Then install the lock ring. tight tight (or to reference point but usually its off after adjustment) using a socket and big hammer to bump the lock ring tight. Next make sure the Allen screw is completely back out counter-clockwise. Then turn the Allen one full turn clockwise--> important! (MY NOTE: i put a bunch of masking tape on the input splines and got a socket to fit without damaging the splines) put a torque wrench (INCHES!!! NOT FOOT) and slowly from 6inchlbs torque setting, and turn the torque setting up constantly working up the torque settings till you hear a click and make note of the reading from your torque wrench. add 10inchlbs more to the torque wrench the numbers you just found out and dial it in on your torque (from the previous torque you found out while checking the loose torque of the steering box input shaft.) (SEE THE PICTURE) and with the new torque value usually between 26-32inchlbs, turn in the allen screw a little at time while moving the shaft back and forth no more than 1/4 turn in each direction from center till you here the click from the torque wrench, then slighty back off the allen screw till the torque wrench doesnt click then tighten the the allen screw until the torque wrench just clicks. (millimeter movement) then tight the locknut with a 5/8 to 20ftlbs, while holding the allen wrench on the screw, keeping it from moving. (MY NOTE: i like to make it tight with my wrench first, then i mark the allen wrench angle, then put a scoket on the locknut and torque to like 22ftlbs, then check the angle of the allen wrench should be the same, I do this because its the only way to torque it to spec. correctly while "holding the allen screw. " Message for further detail if needed -Transam85dudeman
Last edited by transam85dudeman; 02-07-2010 at 01:41 PM.
03-05-2010, 07:36 AM
#34
Senior Member
Join Date: Mar 2009
Location: Bloomfield, IN
Posts: 880
Likes: 0
Received 1 Like
on
1 Post
Car: 87 Camaro
Engine: 305
Transmission: 700R4
Re: Suspension How To...
Wow this is a huge help! I vote sticky as well lol. So I'm going out to do my back shocks today and I was wondering, what is the heater hose mod?
03-05-2010, 09:04 AM
#35
Supreme Member
iTrader: (5)
Join Date: Aug 2007
Location: Milwaukee, Wisconsin
Posts: 1,525
Likes: 0
Received 1 Like
on
1 Post
Car: 1987 IROC-Z
Engine: 383 with Edelbrock ProFlow EFI
Transmission: TH350
Axle/Gears: 12 bolt 3.73 Eaton posi
Re: Suspension How To...
Instead of using the thick rubber isolator on top of the rear spring, you can slip some heater hose over the top coil or two and it will still isolate the spring from the metal of the rear subframe but it won't raise up the back of the car like the stock rubber isolator will. I can't remember what the drop is off hand, but if I had to guess, I would say ~1/2". Good luck!
03-05-2010, 08:13 PM
#36
Senior Member
Join Date: Mar 2009
Location: Bloomfield, IN
Posts: 880
Likes: 0
Received 1 Like
on
1 Post
Car: 87 Camaro
Engine: 305
Transmission: 700R4
Re: Suspension How To...
Yeah I had good luck too lol. I put my car on the lift and my old springs pretty much just fell out. My mechanic said he'd never seen that happen before lmao.
03-09-2010, 09:15 AM
#37
Supreme Member
Thread Starter
iTrader: (2)
Join Date: Mar 2005
Location: East Tennesse
Posts: 2,820
Likes: 0
Received 3 Likes
on
3 Posts
Car: 1991 RS Camaro
Engine: L03 (want LS1)
Transmission: 700R-4 (and T56)
Axle/Gears: 4th Gen 3.23 posi
Re: Suspension How To...
I use my rear isolators in the winter with my 16s and take them out in the summer with my 17s. The rear end in the car is a 4th gen, so the 17s fit alot better. The outer shoulder of the 16s rub. So, the extra ~1/2 inch of tire to wheel well clearance keeps that from happening.
03-10-2010, 11:27 AM
#38
Member

Join Date: Jan 2001
Location: Greenfield, WI
Posts: 278
Likes: 0
Received 0 Likes
on
0 Posts
Car: 1988 Trans Am
Engine: 305 TBI
Transmission: 5 spd
Axle/Gears: 10 bolt w/eaton posi 3.73
Re: Suspension How To...
I think this needs a sticky too.. Lots of good info in here. I am doing spings, shocks, LCA and LCARB, and a PHB this spring.
03-11-2010, 06:48 PM
#39
Junior Member

Join Date: Oct 2008
Location: Colorado
Posts: 73
Likes: 0
Received 0 Likes
on
0 Posts
Car: 1988 IROC
Engine: 305 TPI
Transmission: BW 5-Speed
Axle/Gears: 3:73
Re: Suspension How To...
I have a side question on rear calipers for a camaro. There was a GM recall on the 82-86 camaro for the "Clutch Park Brake Adjuster" not working properly so the parking brake would not operate. Recall # 86C28.
I've heard conflicting feedback that this recall actually included 82-88. Can anyone confirm this? Or does anyone know of another recall # that includes 82-88? I have the recall document for 82-86 (86C28) and, as it says, it only covers 82-86.
I have an 88 IROZ and the parking brake just flat out doesn't work and it's adjusted properly. I thought if there was a recall (on the 88) I could get the upgrade kit installed by GM for free and it would fix my problem. By the way the kit for the 82-86 upgrade is GM P/N 18019028 and is still available through GM.
Probabaly a much better approach would be to just upgrade the rear calipers with newer and better ones. Does anyone have a suggestion on a reasonably priced good quality OEM replacement they could recommend? Our IROZ is all stock so real high performance is not necessary.
Thanks everyone!
04-26-2010, 08:52 PM
#40
Junior Member
iTrader: (1)

Join Date: Aug 1999
Location: Winnipeg,MB,Canada
Posts: 98
Likes: 0
Received 0 Likes
on
0 Posts
Car: 1991 GTA
Engine: L98 350
Transmission: 4L60
Re: Suspension How To...
There is a lot of good information in this article as well as the other stickies. I think this one should be one of them also. Just my 2 cents.
04-30-2010, 10:17 AM
#41
Member
Join Date: Aug 2003
Location: Chesapeake, VA
Posts: 482
Likes: 0
Received 0 Likes
on
0 Posts
Car: 1991 Formula Firebird
Engine: L98 with headers/exhaust
Transmission: 700R4
Axle/Gears: 3.23 10-bolt
Re: Suspension How To...
I further the nomination for "sticky" status. Lots of good stuff consolidated here...
05-12-2010, 12:52 PM
#42
Member
iTrader: (1)

Join Date: Jun 2005
Location: Brooklyn NY
Posts: 192
Likes: 0
Received 0 Likes
on
0 Posts
Car: 1985 iroc
Engine: 5.0
Transmission: auto
Re: Suspension How To...
question here guys, sorry i was searching but found nuthin'...i have the lowering springs in the front and a new swaybar. the bar came with end links that are too small. what size end link should i be using? does the lowering affect the size of this?
09-25-2010, 07:34 PM
#43
Supreme Member
Thread Starter
iTrader: (2)
Join Date: Mar 2005
Location: East Tennesse
Posts: 2,820
Likes: 0
Received 3 Likes
on
3 Posts
Car: 1991 RS Camaro
Engine: L03 (want LS1)
Transmission: 700R-4 (and T56)
Axle/Gears: 4th Gen 3.23 posi
Re: Suspension How To...
Have you resolved this issue? I've not been very active on here at all in months.
01-25-2011, 12:07 AM
#44
Junior Member
Join Date: Nov 2010
Location: Albertville AL
Posts: 30
Likes: 0
Received 0 Likes
on
0 Posts
Car: 85 Trans am
Engine: 350 carbed
Transmission: 700r4
Axle/Gears: 9 bolt rear disk
Re: Suspension How To...
So glad this is a sticky. it really deserves to be. I found it while searching Google on how to adjust the steering box. Guess I should look closer to home huh? Thanks to this info my car now drives worlds better. Thanks 91_5.7_TPI!!!
Depending on the drop it may be required to use a smaller end link. or if you have access to a chop saw you could cut the center spacers down a bit to level out your sway bar. Once you have that done cut the bolt section so you wont have all that sticking out and hitting something and clean the threads up with a tap before reinstalling. And as always measure twice cut once.
Depending on the drop it may be required to use a smaller end link. or if you have access to a chop saw you could cut the center spacers down a bit to level out your sway bar. Once you have that done cut the bolt section so you wont have all that sticking out and hitting something and clean the threads up with a tap before reinstalling. And as always measure twice cut once.
01-25-2011, 12:12 AM
#45
Senior Member
Join Date: Mar 2006
Location: CALI
Posts: 926
Likes: 0
Received 1 Like
on
1 Post
Car: 85' Trans Am !best car ever!
Engine: 305tpi 215hp LB9 two bolt,
Transmission: th-700r4
Axle/Gears: stock (3.27)
Re: Suspension How To...
ya dude if you look above you can see the post i made how to adjust the steering box.. been a year since the rebuild, and its fine.... endlink??how about chamber offset adjusters.. btw i think stock is the best... i run stock height, im able to go off road.... screw lowering the 3rd gen...
01-26-2011, 10:42 AM
#46
Junior Member

Join Date: Jun 2010
Location: New Orleans
Posts: 79
Likes: 0
Received 0 Likes
on
0 Posts
Car: 1987 IROC - Z
Engine: 5.0 TPI
Transmission: 700r4
Re: Suspension How To...
01-26-2011, 11:44 AM
#47
Supreme Member
iTrader: (6)

Join Date: Oct 2006
Location: West of Toronto
Posts: 3,041
Likes: 0
Received 6 Likes
on
6 Posts
Car: 89 IROC
Engine: 305 TPI / ZZ4 cam
Transmission: Stage 2 700R4, LS1 driveshaft
Axle/Gears: Strange 3.42 w/ Auburn
Re: Suspension How To...
Great info. I'm in the middle of swapping out my suspension and this is a great guide on what to buy and why.....much thanks 
01-26-2011, 03:21 PM
#48
Senior Member
Join Date: Mar 2006
Location: CALI
Posts: 926
Likes: 0
Received 1 Like
on
1 Post
Car: 85' Trans Am !best car ever!
Engine: 305tpi 215hp LB9 two bolt,
Transmission: th-700r4
Axle/Gears: stock (3.27)
Re: Suspension How To...
just click it, and then click it again.. it should get bigger!!! or heres a link https://www.thirdgen.org/forums/atta...trggear-4-.jpg i did a complete rebuild on the steering box and powersteering system (box, pump, filter, lines, )...at the time a year ago... and its still working nice.... no leaks, and the box is like new! little things like that save a lot of cash helps me feel less of a piece of ****...my notes are a bit confusing, but it helped..there two torque wrenches required, inch and foot
Last edited by transam85dudeman; 01-26-2011 at 03:31 PM.


