Front Spring install --------->
 05-21-2013, 11:19 PM
#1
Front Spring install --------->
I've installed a lot of front springs over the years and figured I'd share a picture that explains how to get them installed correctly, with limited tools, @ a limited expense and as quickly as possible. It too about 45 minutes to INSTALL each of the springs in a car with no front end or engine / tranny. BE SURE to properly jack ANY car you get under !!
I used an internal Spring compressor rented from AutoZone along with 2 floor jacks.
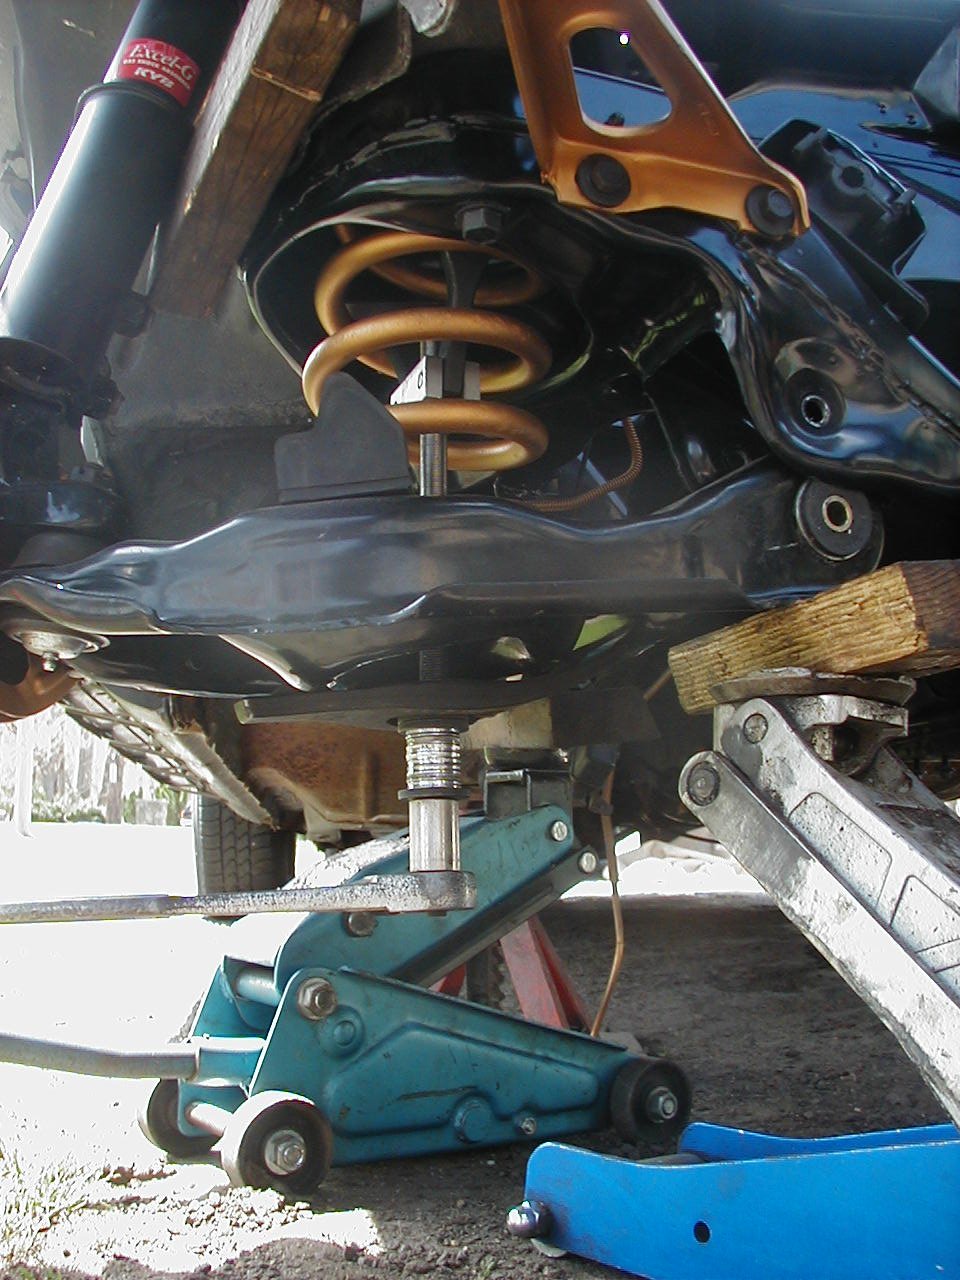
1: Allow the entire front suspension to hang by the strut. Place a lowered jack ( & block if you choose ) under each end of the lower control arm. Use tape to hold the spring insulator in place at the top of the spring.
2: Place the front spring into the control arm pocket and be sure the end of the coil completely covers 1 inspection hole completely while leavening the other inspection hole completely un-covered. Raise both ends of the arms using the jacks until the top of the spring is correctly positioned around the upper spring pocket. I place the jacks as shown so that I have room to work the ratchet while staying clear or the end of each arm of the control arm. ( You will need to stick a prybar in there later to get the bushing holes aligned so the bolt will slide thru.)
3: Add about 2-to-3 inches of spacers/washers to the bottom of the spring compressor, then re-install the compressor "fingers". ( black washers shown came with compressor, chrome washers are wheel stud washers that I added ) Only spin the inner "finger" part of the compressor till the screw is flush with the top of the finger assembly. Place the spring compressor inside the spring and place the fork at the bottom. Place the fingers in the proper spot ( one finger high coil and 1 finger a coil lower ) and then turn the entire assembly until the Fork comes into contact with the bottom of the control arm. ( I prefer to always position the fork in the position shown in this pic..... seems to grab the best for me here. )
At this point the suspension should be loosely fitted into the proper position. This is when you will need to make adjustments to the alignment each end of the lower control arm. Move the jacks each end into position as close as possible to the pockets in the engine crossmember. ( kick them, use a pry-bar, whatever it takes,... there should not be much tension on anything yet and that's why the adjustment is made now ! ) A block of wood should be placed between the strut and the engine cradle to assist alignment when jacking. (a 2x4 works good slightly smaller is better - see pic). Double check the end of the coil for inspection hole alignment as well.
4: Give the spring compressor a 2-3 turns using a 3/4" ratchet and socket; this will lock the spring to the lower control arm. Give each jack a couple small pumps. The purpose of the jacks is to keep the top of the spring correctly seated - NOT TO COMPRESS THE SPRING ! EVERY time you pump the jacks you need to watch the jackstands supporting the car because it will not take much to lift the car off of them; particularly if there is no engine in the car. ( off the jacks just a little is not a problem - when it happens it's a good indicator that's it's time for step 5 ! )
5: Get to work turning the spring compressor tighter. I would not advise a power tool here because they can shake the compressor causing it to lose grip and break free. Turn the compressor till it gets real hard to turn with ONLY the 3/4" ratchet ( NO pipe on the end ! ), then turn it a couple more times - with a pipe extension this time.
6: Take a look a the alignment of each arm of the control arm. Be sure they are in-line with the pockets above and then raise each jack a few small pumps. This will reduce the stress on the spring compressor a little and will bring the arms closer to their proper position. ALLOW THE FRONT "ARM" to be raised slightly LOWER then the rear "arm" of the control arm. The REAR arm will fall into place before the front arm will.
Keep tension on the Spring compressor foremost and the Jacks secondary.
7: Repeat steps 5 & 6 for 3-4 iterations. At that point your front suspension should look like the picture above. You might need to pry each end of the control arm one-way or the other so that it fits into position correctly.
8: Repeat steps 5 & 6 until the rear end of the control arm is in place and the bushing bolt hole is visible thru the engine cradle. pry the end so that the bolt can be inserted from front-to-back. It's VERY rare that the bolt will pass all the way thru - your just trying to get it in the front hole first ! I find that large screwdriver thru the bushing hole works best. If you have a clear view and know that the bolt is very close,... but not pushing in - use a hammer to TAP it thru. Once the bolt in the front side you may need to pry the control arm back/forth to get it all the way thru. TAPPING with a hammer and turning the bolt with a ratchet will help. Place the bolt loosely on the backside of the bolt and remove that jack.
9: Place the un-used jack under the ball-joint end of the control arm. This jack should ONLY be used for minor support and MINOR adjustments to alignment. Resist the temptation to raise this jack !!! Doing so will cause the front end of the control arm the opposite direction you want it to move !! Remember to keep watching the jacks that are supporting the body....... SLIGHTLY raised off the jack is fine - anything more than a finger-width is too much.
10: Get back to turning the spring compressor ! At this stage you should only make a few complete turns with the compressor and then a small pump of the floor jack while prying/guiding the front end of the control arm into place. It will take longer than you will expect before the front end of the control arm is in a position where the bushing hole will be visible thru the engine cradle. Once the hole is visible you will need a small prybar / breaker bar, large screwdriver to pry the holes into proper alignment. Insert bolt from front-to-back, place nut loosely on back, remove all jacks, torque bolts, done.
Now go enjoy your new springs !!

I used an internal Spring compressor rented from AutoZone along with 2 floor jacks.
1: Allow the entire front suspension to hang by the strut. Place a lowered jack ( & block if you choose ) under each end of the lower control arm. Use tape to hold the spring insulator in place at the top of the spring.
2: Place the front spring into the control arm pocket and be sure the end of the coil completely covers 1 inspection hole completely while leavening the other inspection hole completely un-covered. Raise both ends of the arms using the jacks until the top of the spring is correctly positioned around the upper spring pocket. I place the jacks as shown so that I have room to work the ratchet while staying clear or the end of each arm of the control arm. ( You will need to stick a prybar in there later to get the bushing holes aligned so the bolt will slide thru.)
3: Add about 2-to-3 inches of spacers/washers to the bottom of the spring compressor, then re-install the compressor "fingers". ( black washers shown came with compressor, chrome washers are wheel stud washers that I added ) Only spin the inner "finger" part of the compressor till the screw is flush with the top of the finger assembly. Place the spring compressor inside the spring and place the fork at the bottom. Place the fingers in the proper spot ( one finger high coil and 1 finger a coil lower ) and then turn the entire assembly until the Fork comes into contact with the bottom of the control arm. ( I prefer to always position the fork in the position shown in this pic..... seems to grab the best for me here. )
At this point the suspension should be loosely fitted into the proper position. This is when you will need to make adjustments to the alignment each end of the lower control arm. Move the jacks each end into position as close as possible to the pockets in the engine crossmember. ( kick them, use a pry-bar, whatever it takes,... there should not be much tension on anything yet and that's why the adjustment is made now ! ) A block of wood should be placed between the strut and the engine cradle to assist alignment when jacking. (a 2x4 works good slightly smaller is better - see pic). Double check the end of the coil for inspection hole alignment as well.
4: Give the spring compressor a 2-3 turns using a 3/4" ratchet and socket; this will lock the spring to the lower control arm. Give each jack a couple small pumps. The purpose of the jacks is to keep the top of the spring correctly seated - NOT TO COMPRESS THE SPRING ! EVERY time you pump the jacks you need to watch the jackstands supporting the car because it will not take much to lift the car off of them; particularly if there is no engine in the car. ( off the jacks just a little is not a problem - when it happens it's a good indicator that's it's time for step 5 ! )
5: Get to work turning the spring compressor tighter. I would not advise a power tool here because they can shake the compressor causing it to lose grip and break free. Turn the compressor till it gets real hard to turn with ONLY the 3/4" ratchet ( NO pipe on the end ! ), then turn it a couple more times - with a pipe extension this time.
6: Take a look a the alignment of each arm of the control arm. Be sure they are in-line with the pockets above and then raise each jack a few small pumps. This will reduce the stress on the spring compressor a little and will bring the arms closer to their proper position. ALLOW THE FRONT "ARM" to be raised slightly LOWER then the rear "arm" of the control arm. The REAR arm will fall into place before the front arm will.
Keep tension on the Spring compressor foremost and the Jacks secondary.
7: Repeat steps 5 & 6 for 3-4 iterations. At that point your front suspension should look like the picture above. You might need to pry each end of the control arm one-way or the other so that it fits into position correctly.
8: Repeat steps 5 & 6 until the rear end of the control arm is in place and the bushing bolt hole is visible thru the engine cradle. pry the end so that the bolt can be inserted from front-to-back. It's VERY rare that the bolt will pass all the way thru - your just trying to get it in the front hole first ! I find that large screwdriver thru the bushing hole works best. If you have a clear view and know that the bolt is very close,... but not pushing in - use a hammer to TAP it thru. Once the bolt in the front side you may need to pry the control arm back/forth to get it all the way thru. TAPPING with a hammer and turning the bolt with a ratchet will help. Place the bolt loosely on the backside of the bolt and remove that jack.
9: Place the un-used jack under the ball-joint end of the control arm. This jack should ONLY be used for minor support and MINOR adjustments to alignment. Resist the temptation to raise this jack !!! Doing so will cause the front end of the control arm the opposite direction you want it to move !! Remember to keep watching the jacks that are supporting the body....... SLIGHTLY raised off the jack is fine - anything more than a finger-width is too much.
10: Get back to turning the spring compressor ! At this stage you should only make a few complete turns with the compressor and then a small pump of the floor jack while prying/guiding the front end of the control arm into place. It will take longer than you will expect before the front end of the control arm is in a position where the bushing hole will be visible thru the engine cradle. Once the hole is visible you will need a small prybar / breaker bar, large screwdriver to pry the holes into proper alignment. Insert bolt from front-to-back, place nut loosely on back, remove all jacks, torque bolts, done.
Now go enjoy your new springs !!

The following 2 users liked this post by John in RI:
Jones_84_Z28 (02-05-2021), thainglo (04-08-2020)
10-04-2014, 03:51 AM
#2
Re: Front Spring install --------->
John,
I just wanted to thank you for your well-written post. I just used it to replace the original front springs on my 92 Z28 and it sure was helpful. (I know that they are original springs because I drove this car off the dealer lot in May 1992 and it has been with me ever since.)
The shop manual says to install the front A-arm pivot bolt first, which would lead a reasonable person to believe that the front A-arm should be raised higher than the rear while installing. That is misleading. As per your recommendation, raising the rear about an inch or two higher than the front as I ratcheted both jacks up made it slip right in. I installed the rear bolts first.
Keeping the spring in the upper spring perch is imperative and I noticed that it had a tendency to want to move out of it when the spring was compressed too much and the control arm jacks were not raised up to keep it secure up in the upper perch. It's easy to miss this because you can't see the upper perch too well with the spring in the way.
By the way, I used a different spring compressor since I already had one for my Mercedes vehicles. My spring compressor is a Klann tool made in Germany. The nice part about this tool design is that it is virtually impossible for the spring to slip out. You could probably throw it across the garage and it wouldn't let go.
I noticed that you can get a Klann knock-off tool that will fit the 5 1/2" diameter Camaro springs if you don't want to rent or buy the claw-type tool and do the pipe modification that you mentioned. The larger plates in this kit are normally used on the Mercedes W126 (1979-1991 S-Class) and W140 (1992-1999 S-Class) chasis.
http://www.ebay.com/itm/Telescopic-Coil-Spring-Compressor-Strut-Tool-For-Mercedes-Benz-5-piece-W124-W126-/371114872940?hash=item56682b906c&item=371114872940&pt=Motors_Automotive_Tools&vxp=mtr
For about $100, the knock-off kit--just like the genuine Klann--comes with two sizes of plates--120mm and 140mm diameter. The larger 140mm plates will fit my Z28 springs.
This is not a bad deal considering the genuine Klann kit (KL-0025-1K) with both sets of plates is about $1500. http://www.samstagsales.com/klann_spring.htm
In order for this kit to work, I had to use the lower plate under the control arm rather than sandwiching it in at the bottom of the spring. The shop manual also depicts the spring compressor under the control arm. Otherwise, the worm gear on the telescoping piece will hit the top of the spring perch--probably like the claw-type rental kit does without the modification you mention.
Anyway, thanks again!
Jon
10-06-2014, 11:01 PM
#3
Senior Member

iTrader: (3)

Join Date: Oct 2012
Location: SC
Posts: 725
Likes: 0
Received 0 Likes
on
0 Posts
Car: '87 IROC-Z | '99 SS
Engine: LB9 | LS1
Transmission: 700R4 | T56
Re: Front Spring install --------->
John,
I just wanted to thank you for your well-written post. I just used it to replace the original front springs on my 92 Z28 and it sure was helpful. (I know that they are original springs because I drove this car off the dealer lot in May 1992 and it has been with me ever since.)
The shop manual says to install the front A-arm pivot bolt first, which would lead a reasonable person to believe that the front A-arm should be raised higher than the rear while installing. That is misleading. As per your recommendation, raising the rear about an inch or two higher than the front as I ratcheted both jacks up made it slip right in. I installed the rear bolts first.
Keeping the spring in the upper spring perch is imperative and I noticed that it had a tendency to want to move out of it when the spring was compressed too much and the control arm jacks were not raised up to keep it secure up in the upper perch. It's easy to miss this because you can't see the upper perch too well with the spring in the way.
By the way, I used a different spring compressor since I already had one for my Mercedes vehicles. My spring compressor is a Klann tool made in Germany. The nice part about this tool design is that it is virtually impossible for the spring to slip out. You could probably throw it across the garage and it wouldn't let go.
I noticed that you can get a Klann knock-off tool that will fit the 5 1/2" diameter Camaro springs if you don't want to rent or buy the claw-type tool and do the pipe modification that you mentioned. The larger plates in this kit are normally used on the Mercedes W126 (1979-1991 S-Class) and W140 (1992-1999 S-Class) chasis.
Telescopic Coil Spring Compressor Strut Tool for Mercedes Benz 5 Piece W124 W126 | eBay
For about $100, the knock-off kit--just like the genuine Klann--comes with two sizes of plates--120mm and 140mm diameter. The larger 140mm plates will fit my Z28 springs.
This is not a bad deal considering the genuine Klann kit (KL-0025-1K) with both sets of plates is about $1500. http://www.samstagsales.com/klann_spring.htm
In order for this kit to work, I had to use the lower plate under the control arm rather than sandwiching it in at the bottom of the spring. The shop manual also depicts the spring compressor under the control arm. Otherwise, the worm gear on the telescoping piece will hit the top of the spring perch--probably like the claw-type rental kit does without the modification you mention.
Anyway, thanks again!
Jon
Thanks for the tip! I have one of these "knock-off" spring compressor when I was replacing the springs on my w210. It really is a nice compressor. Nice to know it should work well on my F-Body
10-06-2014, 11:13 PM
#4
Re: Front Spring install --------->
Glad that someone got some use out of that post !!
Also good to see that there's another type of spring compressor that's easy (& kinda' safe) to use !
That seems to big the biggest "problem" that most guys run into when doing front springs.
Also good to see that there's another type of spring compressor that's easy (& kinda' safe) to use !
Otherwise, the worm gear on the telescoping piece will hit the top of the spring perch--probably like the claw-type rental kit does without the modification you mention.
10-09-2014, 03:56 AM
#5
Re: Front Spring install --------->
Glad that someone got some use out of that post !!
Thanks for the tip! I have one of these "knock-off" spring compressor when I was replacing the springs on my w210. It really is a nice compressor. Nice to know it should work well on my F-Body
Last edited by emeryz28; 10-09-2014 at 04:08 AM.
 11-04-2014, 04:14 PM
#7
Junior Member

Join Date: Jul 2012
Location: rainy old england
Posts: 9
Likes: 0
Received 0 Likes
on
0 Posts
Car: 91 camaro&66 mustang
Engine: 305 camaro/351w mustang
Transmission: auto box camaro/5spd tremec mustang
Re: Front Spring install --------->
Hi John, Ihave just replaced the balljoints & a-arm bushes on my rs,Also swaybar & endlinks.(polybushes).When i finished and let the car down off the jack stands the front sits high.(like theres no engine in car).I was told to let the weight of the car sit on suspension before tightening a-arm bolts.tried this no different.springs are originals put back in.Also replaced steering joints.measured them and made new ones up to same lenght.Car drives fine but looks stupidly high at front.Any ideas????.
Trending Topics
11-04-2014, 04:49 PM
#8
Re: Front Spring install --------->
When you installed the springs, did you installed them so that only one drain hole was showing in the lower control arm? The end of the spring on the bottom would be facing in toward the engine.
It could be possible that the springs did not fully seat in the upper perch (see first pic). I had problems with the spring wanting to jump out to the side, especially if I compressed the spring too much and didn't jack up the control arm to keep the spring from falling away from the upper perch.
Just my 2 cents.
Last edited by emeryz28; 11-04-2014 at 07:02 PM. Reason: Added Shop Diagram
11-05-2014, 12:03 AM
#9
Re: Front Spring install --------->
When you installed the springs, did you installed them so that only one drain hole was showing in the lower control arm? The end of the spring on the bottom would be facing in toward the engine.
It could be possible that the springs did not fully seat in the upper perch (see first pic). I had problems with the spring wanting to jump out to the side, especially if I compressed the spring too much and didn't jack up the control arm to keep the spring from falling away from the upper perch.
Just my 2 cents.
It could be possible that the springs did not fully seat in the upper perch (see first pic). I had problems with the spring wanting to jump out to the side, especially if I compressed the spring too much and didn't jack up the control arm to keep the spring from falling away from the upper perch.
Just my 2 cents.
For example; I bought a car once that had the whole front end completely rebuilt with new parts (Guy gutted the car and was going to race it.) I didn't notice at first cause the nose was high due to the lack of an engine/tranny,...but soon realized that BOTH front springs were not properly mounted and had to get re-set after I bought the car.
 11-05-2014, 10:46 AM
#10
Junior Member
Join Date: Jul 2012
Location: rainy old england
Posts: 9
Likes: 0
Received 0 Likes
on
0 Posts
Car: 91 camaro&66 mustang
Engine: 305 camaro/351w mustang
Transmission: auto box camaro/5spd tremec mustang
Re: Front Spring install --------->
Thanks for the info john&emeryz28.Ihave to get under with my torch and have a look.Ihave noticed that when reversing off driveway with steering on lock the springs make a noise like they may be binding.thanks anyway.let you know what i find.

Thread
Thread Starter
Forum
Replies
Last Post
1988iroc350tpi
Tech / General Engine
8
08-14-2015 07:52 PM
TA8487
Engine/Drivetrain/Suspension Parts for Sale
0
08-11-2015 09:02 PM