Adventures of a front suspension noob
 12-06-2014, 01:42 AM
#1
Supreme Member

Thread Starter

Join Date: Jun 2005
Location: Sydney, Australia
Posts: 1,380
Likes: 0
Received 5 Likes
on
5 Posts
Car: '86 TA
Engine: '74 350
Transmission: 700r4
Axle/Gears: 2.77
Adventures of a front suspension noob
Got a little time to kill, so I thought I'd write up my recent front suspension rebuild. Warning long post, it's a rainy afternoon.
I had a front strut fail - the right side would intermittently bind up and release with accompanying off-putting pops and groans. I've had the car over a decade, and the only thing I've ever replaced suspension-wise was the struts (Delco's), about 10 yrs ago. I decided it was time for a full rebuild. All steering parts were replaced a couple yrs ago, now it was the suspension's turn.
Went with KYB-AGX, Moog 5662, Founders strut mounts, Moog bj's, new pivot bolts, and generally clean & paint whatever was going back on. Kept the factory bushings - they were in surprisingly very good condition, and removing them vs potentially damaging the a-arms (importing replacements would be stupid expensive shipping-wise) - decided to err on the side of caution.
My aims were -
* Fix the obvious failed strut.
* Get some more caster, steering has never self-centred as well as it should.
* Try and do something about the horrible harsh ride it's had since I bought it. The front was stiff as hell, you could only bounce it a couple of mm with your full weight. Has a 36mm sway bar, so WS6 originally I presume with the factory stiffer springs. I prefer a firm ride as opposed to marshmallowy, but this was bone-shaking.
* Raise the ride height. I bottom the nose out on my steep driveway and various other bump I drive over. Like stock 4 X 4 look would be fine.
Initial alignment as far as I could measure - camber -1 deg, caster 3.5 deg, ride height about 27 1/4" floor to fender, both sides. Toe-in about 3-5mm.
New parts:
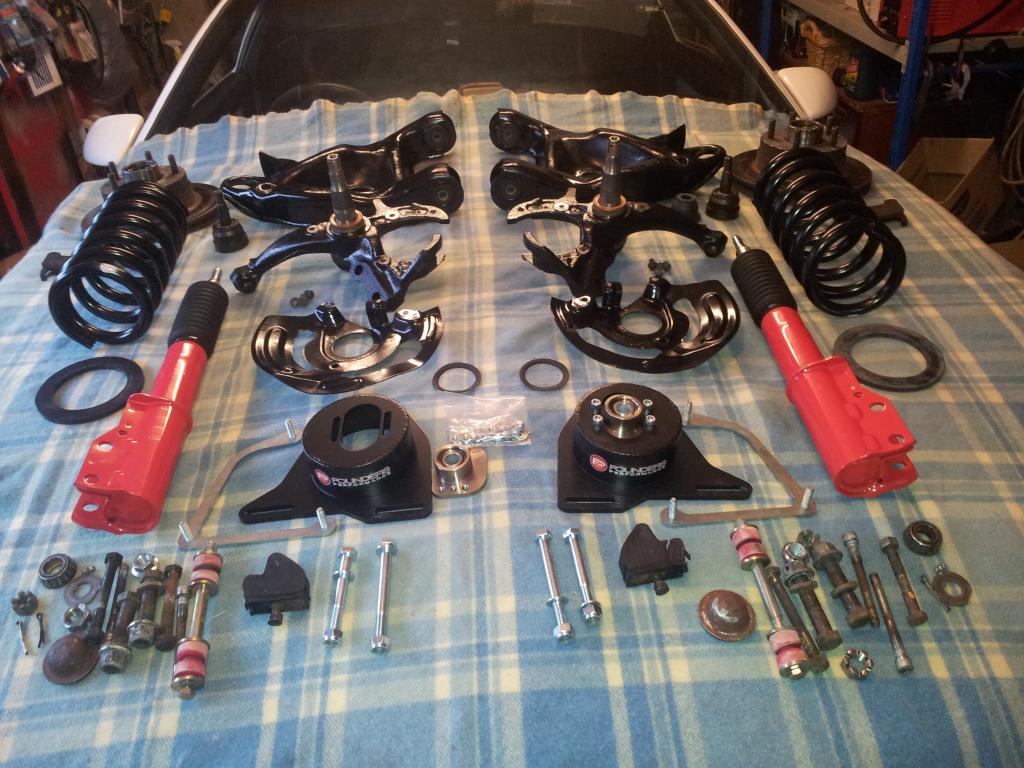
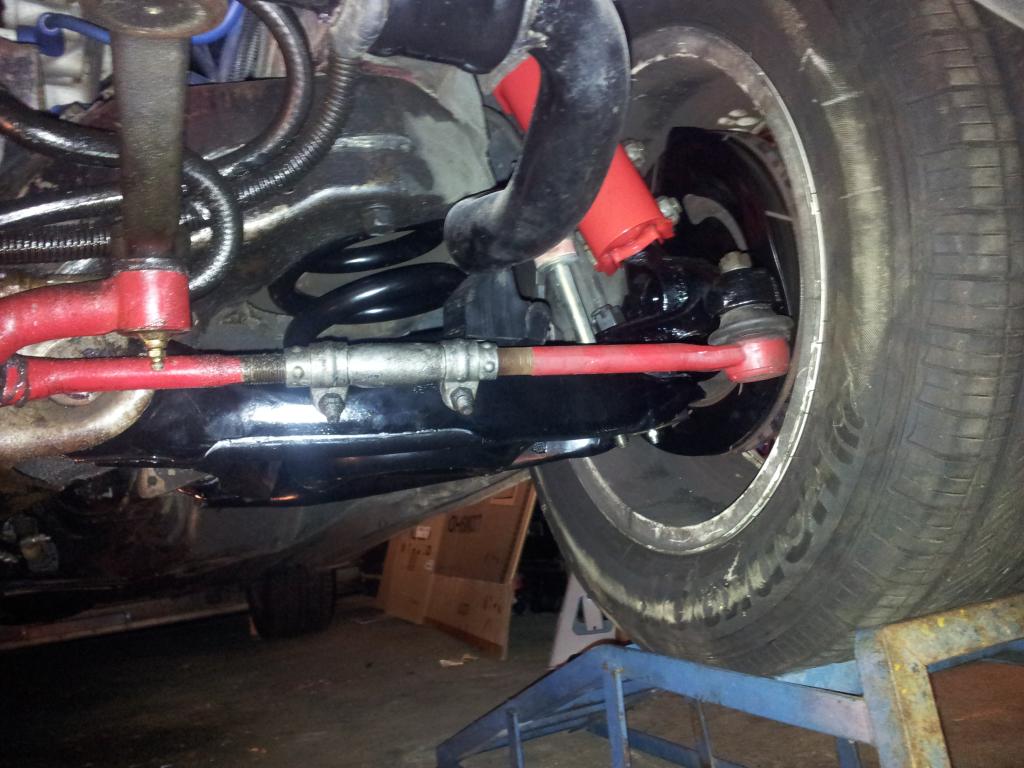
Installed:
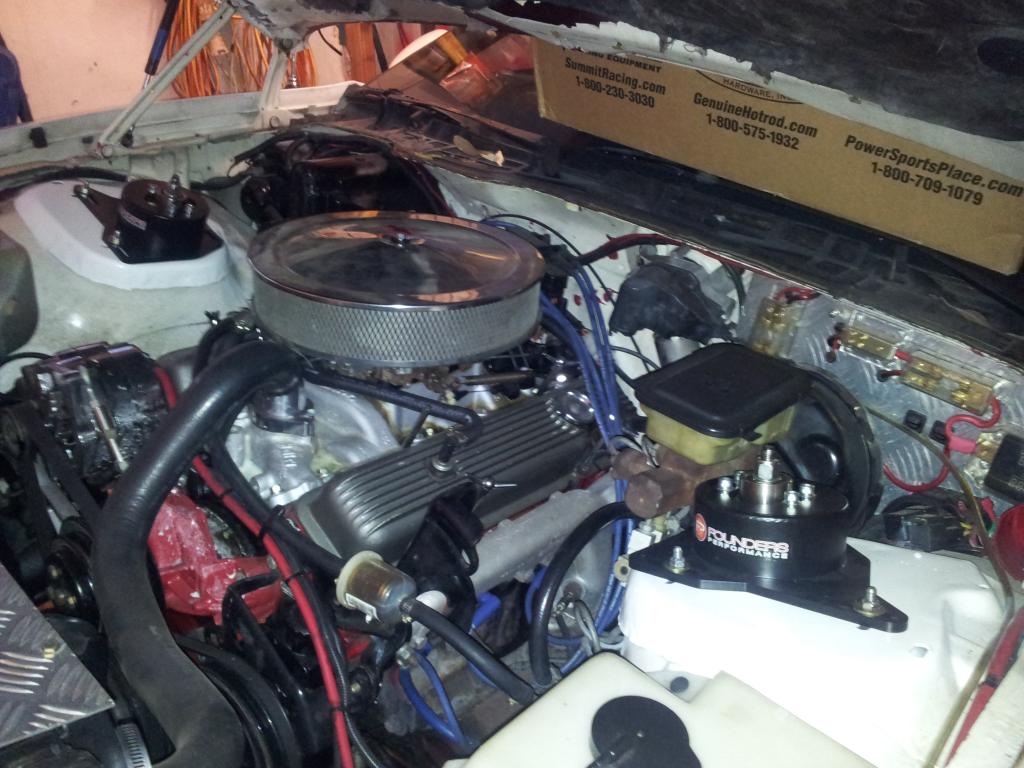
Topside:
Results after rebuild -
* Found failed strut, flogged out strut mount bearings, broken sway bay bracket, worn ball joints, binding a-arm bushings (see below).
* Now zero front suspension noise, and smooth operation.
* More caster available - currently set to 4.7 deg, due to the Founders mounts. Unfortunately, I've lost a lot of camber on the lh side because of the proximity of the brake booster (https://www.thirdgen.org/forums/susp...-mount-vs.html) - can only get about -0.4 degrees. Mirrored this to the rhs of course.
* The ride is massively better, probably mostly to do with the a-arms bushings.
* Ride height is up nearly an inch, to just shy of 28". Clears my driveway just fine now Interesting this, as the new spring's free length was the same as the old. I guess the new ones actually have a higher rate.
* As a bonus, steering is noticabley smoother, feels more accurate, and centre play has reduced a lot.
It now rides better than my 5 year old daily driver, and about as well as my dad's new car. In the front at least. As soon as the bumps progress to the back, the stock 100k mile rear suspension is shown up horribly by comparison - next project
OBSERVATIONS:
I have never worked on this style of front suspension before, on previous cars over the years it's been all coilovers or torsion bar type deals. So quite a bit of resarching was in order, especially on the subject of compressing these massive springs - looked pretty scary tbh especially once I got my hands on the replacements.
During the work I noticed a few possible pitfalls that I hadn't seen mentioned during my various researches here. The following is probably pretty obvious stuff to guys who've done it before or do it for a living - but for front suspension noobs like me:
A-ARM INSTALLATION WITH STOCK RUBBER BUSHINGS
My TA has always suffered from a bone-shaking ride. Handles like on rails, but roughest ride I've ever driven.
Not using any fancy Delrin etc articulation helpers here. Figuring out how the stock rubber bushings worked - thru various searching I was sort of surprised to find out that the pivot bolts are done up tight, and all a-arm articulation is supposed to come from the compliance of the rubber.
In my case, after I had the springs out, both a-arms were locked in a drooped down position, rather than resting approximately horizonally at ride-height as you might expect. I could only articulate them upward by hand by an inch or so; to get them back to ride height would have taken a lot of jacking to wind the rubber bushes up, which made no sense to me. Soon as I loosened the pivot bolts, they drooped and pivoted freely as you would expect.
So I suspect that all these years, my rough ride came down to the bushings being twisted up permanently and offering a huge resistance to upward wheel travel. Previously trying the bounce test on the front resulted in only a couple mm movement down and up; after the rebuild it bounces and rebounds like a proper suspension should, and the ride is transformed. It's still a firm ride, but now very comfortable.
I surmise that the arms had been off the car or relaxed for whatever reason by a PO before I bought it, it was up on a hoist, and the guy just cranked the pivot bolts up tight with the suspension fully drooped. I've read a few 'mystery rough rides' type threads in my travels here, maybe this is something to look into. Just loosen and re-torque the pivot bolts while loaded at ride height.
FRONT SPRING END TYPE AND ORIENTATION:
I have not found any specific mention of this on these forums during my general searching - the stock front springs for stock arms and crossmember have a 'square' end, and a tangential end. Stand the spring on the floor on the square end, it'll sit perfectly upright. Stand it on the tangential end, it'll lean off to an angle or even fall over.
The square end HAS to go in the top (crossmember) pocket, 'cause the pocket is flat. The tangential end HAS to go in the bottom (a-arm) pocket, 'cause the pocket has a spiral tapered ramp stamped in it that roughly matches the spring wind. 'Indexing' the spring at install time means slotting the bottom coil into this tapered ramp in the right orientation, so the end of the spring is at the bottom of the ramp, and overall sits approx flat/parallel with the top pocket at ride height. Purpose being I would guess, to stop the spring rotating or moving around, and making clunky noises.
If you don't pay attention and inadvertantly install the spring upside down, or it's got 2 square ends, or no square ends, or you randomly picked the square end when you were cutting off coils, will upset the required match between pocket type and spring end. Say for eg. you wind up with the square end in the arm, it would not be able to seat at the bottom of the ramp. This would pop up the ride height by about twice the depth of the ramp, approx an extra inch at the fender. And possibly rattle around too. Which is what I read a few guys having problems with after spring install/cutting.
INSTALLING STOCK STYLE FRONT SPRINGS - AN EASY METHOD:
There are many threads I've found here with guys having a hard time installing springs - agonising over the right/wrong spring compressor to use, or crowbars, or try to compress the arm + spring and attempt to insert the pivot bolts, etc etc. I stumbled upon a far easier and quicker method, no compressors or danger required.
I don't trust spring compressors especially with springs this huge, and I couldn't get the crowbar method to work either - to much slip to compress the spring and fighting gravity all the time trying to hold the spring up. My method - just fit the bottom pocket first, pop in the top pocket, and jack it all up. The spring install portion only took a few minutes a side.
Step by step:
This is starting with no front suspension parts on the car at all, and the car on stands. Tools - just me, a trolley jack, and a chain with links approx 15-20mm long. This took longer to type up, than to actually fit the springs:
1. Fit a-arm. Snug the pivot bolts so that the arm will just articulate freely thru 90 deg. Point arm at the floor. Remove zerk from ball joint to avoid danage.
2. Tape the isolator firmly to the top (square end!) of the spring.
3. Put the tangential end of the spring in the a-arm pocket first, and index it.
4. Chain the spring to the the a-arm, between the pivots. Make it 'loosly tight' so the spring can't fall out of the pocket, but you can still wiggle it round a little. I just put a nut and bolt between a couple of links as I stretched it all together.
5. Rotate the top of the spring up, and pop it into the inside edge of the top pocket retainer 'lump', while lifting the a-arm by hand up to keep it there, making sure not to dislodge the isolator. Might need a little light encouragement with a hammer at the top, might not.
At this point the spring will be sitting at about 45 deg between the bottom and top pockets, with you holding the a-arm up with one hand. Then -
6. Grab your jack with the other hand, place under the a-arm at the ball joint. It will be at a funky angle initially, but goes up just fine - then crank it up to horizontal. Make sure the spring is seated in both pockets as it goes up. You gotta jack it at the ball joint for mamixum leverage to compress the spring to approx ride height - if you jack it under the pocket, and the car will come off the stands before it gets high enough. Helps to have a trolley jack, so it can roll outwards along the floor as the arm goes up. That's it, the spring is now in position. Fit the knucke/strut etc to lock it all in, using the jack to manipulate the strut when bolting it to the strut mount.
So - the jack does all the compressing, and gravity helps rather than hinders. Since the spring is chained to the a-arm firmly in the pocket, and is trapped between both upper and lower pocket, there is zero chance it's going to pop out and meet you in the face. Ie scary factor zero. Plus you can keep ALL your bits away from the compressing spring as further peace of mind.
Obviously, use a PROPER jack like a beefy hydraulic trolley job or such, NOT some deadly scissor jack pos.
7. Complete the rest of the job, get the weight back on the road wheels so it's at ride height, and THEN fully torque the a-arm pivot bolts. Then alignment time.
FRONT SPRING INDEXING - SLIGHT PROBLEM WITH THE MOOGS
I could not quite get the springs to sit in the 'proper' indexed position, which seems by consensus to be 'end of spring between the two drain holes'. The way the spring wanted to sit naturally during step 4 above, was just behind both drain holes. This seems to be due the Moogs manufacture - the tangential end of the spring was sticking straight out a little outside the main diameter of the spring, and they didn't want to sit flat in the pocket at the 'proper' index spot. Indexed at this position about an inch around from where they should be, does not make the spring ride up the pocket ramp and thus does not affect ride height.
Rather than attempt to grind them concentric - they picked their spot and seemed quite stable there - so I left it at that. After several weeks now, no problems have surfaced.
I had a front strut fail - the right side would intermittently bind up and release with accompanying off-putting pops and groans. I've had the car over a decade, and the only thing I've ever replaced suspension-wise was the struts (Delco's), about 10 yrs ago. I decided it was time for a full rebuild. All steering parts were replaced a couple yrs ago, now it was the suspension's turn.
Went with KYB-AGX, Moog 5662, Founders strut mounts, Moog bj's, new pivot bolts, and generally clean & paint whatever was going back on. Kept the factory bushings - they were in surprisingly very good condition, and removing them vs potentially damaging the a-arms (importing replacements would be stupid expensive shipping-wise) - decided to err on the side of caution.
My aims were -
* Fix the obvious failed strut.
* Get some more caster, steering has never self-centred as well as it should.
* Try and do something about the horrible harsh ride it's had since I bought it. The front was stiff as hell, you could only bounce it a couple of mm with your full weight. Has a 36mm sway bar, so WS6 originally I presume with the factory stiffer springs. I prefer a firm ride as opposed to marshmallowy, but this was bone-shaking.
* Raise the ride height. I bottom the nose out on my steep driveway and various other bump I drive over. Like stock 4 X 4 look would be fine.
Initial alignment as far as I could measure - camber -1 deg, caster 3.5 deg, ride height about 27 1/4" floor to fender, both sides. Toe-in about 3-5mm.
New parts:

Installed:

Topside:

Results after rebuild -
* Found failed strut, flogged out strut mount bearings, broken sway bay bracket, worn ball joints, binding a-arm bushings (see below).
* Now zero front suspension noise, and smooth operation.
* More caster available - currently set to 4.7 deg, due to the Founders mounts. Unfortunately, I've lost a lot of camber on the lh side because of the proximity of the brake booster (https://www.thirdgen.org/forums/susp...-mount-vs.html) - can only get about -0.4 degrees. Mirrored this to the rhs of course.
* The ride is massively better, probably mostly to do with the a-arms bushings.
* Ride height is up nearly an inch, to just shy of 28". Clears my driveway just fine now
Interesting this, as the new spring's free length was the same as the old. I guess the new ones actually have a higher rate.* As a bonus, steering is noticabley smoother, feels more accurate, and centre play has reduced a lot.
It now rides better than my 5 year old daily driver, and about as well as my dad's new car. In the front at least. As soon as the bumps progress to the back, the stock 100k mile rear suspension is shown up horribly by comparison - next project
OBSERVATIONS:
I have never worked on this style of front suspension before, on previous cars over the years it's been all coilovers or torsion bar type deals. So quite a bit of resarching was in order, especially on the subject of compressing these massive springs - looked pretty scary tbh especially once I got my hands on the replacements.
During the work I noticed a few possible pitfalls that I hadn't seen mentioned during my various researches here. The following is probably pretty obvious stuff to guys who've done it before or do it for a living - but for front suspension noobs like me:
A-ARM INSTALLATION WITH STOCK RUBBER BUSHINGS
My TA has always suffered from a bone-shaking ride. Handles like on rails, but roughest ride I've ever driven.
Not using any fancy Delrin etc articulation helpers here. Figuring out how the stock rubber bushings worked - thru various searching I was sort of surprised to find out that the pivot bolts are done up tight, and all a-arm articulation is supposed to come from the compliance of the rubber.
In my case, after I had the springs out, both a-arms were locked in a drooped down position, rather than resting approximately horizonally at ride-height as you might expect. I could only articulate them upward by hand by an inch or so; to get them back to ride height would have taken a lot of jacking to wind the rubber bushes up, which made no sense to me. Soon as I loosened the pivot bolts, they drooped and pivoted freely as you would expect.
So I suspect that all these years, my rough ride came down to the bushings being twisted up permanently and offering a huge resistance to upward wheel travel. Previously trying the bounce test on the front resulted in only a couple mm movement down and up; after the rebuild it bounces and rebounds like a proper suspension should, and the ride is transformed. It's still a firm ride, but now very comfortable.
I surmise that the arms had been off the car or relaxed for whatever reason by a PO before I bought it, it was up on a hoist, and the guy just cranked the pivot bolts up tight with the suspension fully drooped. I've read a few 'mystery rough rides' type threads in my travels here, maybe this is something to look into. Just loosen and re-torque the pivot bolts while loaded at ride height.
FRONT SPRING END TYPE AND ORIENTATION:
I have not found any specific mention of this on these forums during my general searching - the stock front springs for stock arms and crossmember have a 'square' end, and a tangential end. Stand the spring on the floor on the square end, it'll sit perfectly upright. Stand it on the tangential end, it'll lean off to an angle or even fall over.
The square end HAS to go in the top (crossmember) pocket, 'cause the pocket is flat. The tangential end HAS to go in the bottom (a-arm) pocket, 'cause the pocket has a spiral tapered ramp stamped in it that roughly matches the spring wind. 'Indexing' the spring at install time means slotting the bottom coil into this tapered ramp in the right orientation, so the end of the spring is at the bottom of the ramp, and overall sits approx flat/parallel with the top pocket at ride height. Purpose being I would guess, to stop the spring rotating or moving around, and making clunky noises.
If you don't pay attention and inadvertantly install the spring upside down, or it's got 2 square ends, or no square ends, or you randomly picked the square end when you were cutting off coils, will upset the required match between pocket type and spring end. Say for eg. you wind up with the square end in the arm, it would not be able to seat at the bottom of the ramp. This would pop up the ride height by about twice the depth of the ramp, approx an extra inch at the fender. And possibly rattle around too. Which is what I read a few guys having problems with after spring install/cutting.
INSTALLING STOCK STYLE FRONT SPRINGS - AN EASY METHOD:
There are many threads I've found here with guys having a hard time installing springs - agonising over the right/wrong spring compressor to use, or crowbars, or try to compress the arm + spring and attempt to insert the pivot bolts, etc etc. I stumbled upon a far easier and quicker method, no compressors or danger required.
I don't trust spring compressors especially with springs this huge, and I couldn't get the crowbar method to work either - to much slip to compress the spring and fighting gravity all the time trying to hold the spring up. My method - just fit the bottom pocket first, pop in the top pocket, and jack it all up. The spring install portion only took a few minutes a side.
Step by step:
This is starting with no front suspension parts on the car at all, and the car on stands. Tools - just me, a trolley jack, and a chain with links approx 15-20mm long. This took longer to type up, than to actually fit the springs:
1. Fit a-arm. Snug the pivot bolts so that the arm will just articulate freely thru 90 deg. Point arm at the floor. Remove zerk from ball joint to avoid danage.
2. Tape the isolator firmly to the top (square end!) of the spring.
3. Put the tangential end of the spring in the a-arm pocket first, and index it.
4. Chain the spring to the the a-arm, between the pivots. Make it 'loosly tight' so the spring can't fall out of the pocket, but you can still wiggle it round a little. I just put a nut and bolt between a couple of links as I stretched it all together.
5. Rotate the top of the spring up, and pop it into the inside edge of the top pocket retainer 'lump', while lifting the a-arm by hand up to keep it there, making sure not to dislodge the isolator. Might need a little light encouragement with a hammer at the top, might not.
At this point the spring will be sitting at about 45 deg between the bottom and top pockets, with you holding the a-arm up with one hand. Then -
6. Grab your jack with the other hand, place under the a-arm at the ball joint. It will be at a funky angle initially, but goes up just fine - then crank it up to horizontal. Make sure the spring is seated in both pockets as it goes up. You gotta jack it at the ball joint for mamixum leverage to compress the spring to approx ride height - if you jack it under the pocket, and the car will come off the stands before it gets high enough. Helps to have a trolley jack, so it can roll outwards along the floor as the arm goes up. That's it, the spring is now in position. Fit the knucke/strut etc to lock it all in, using the jack to manipulate the strut when bolting it to the strut mount.
So - the jack does all the compressing, and gravity helps rather than hinders. Since the spring is chained to the a-arm firmly in the pocket, and is trapped between both upper and lower pocket, there is zero chance it's going to pop out and meet you in the face. Ie scary factor zero. Plus you can keep ALL your bits away from the compressing spring as further peace of mind.
Obviously, use a PROPER jack like a beefy hydraulic trolley job or such, NOT some deadly scissor jack pos.
7. Complete the rest of the job, get the weight back on the road wheels so it's at ride height, and THEN fully torque the a-arm pivot bolts. Then alignment time.
FRONT SPRING INDEXING - SLIGHT PROBLEM WITH THE MOOGS
I could not quite get the springs to sit in the 'proper' indexed position, which seems by consensus to be 'end of spring between the two drain holes'. The way the spring wanted to sit naturally during step 4 above, was just behind both drain holes. This seems to be due the Moogs manufacture - the tangential end of the spring was sticking straight out a little outside the main diameter of the spring, and they didn't want to sit flat in the pocket at the 'proper' index spot. Indexed at this position about an inch around from where they should be, does not make the spring ride up the pocket ramp and thus does not affect ride height.
Rather than attempt to grind them concentric - they picked their spot and seemed quite stable there - so I left it at that. After several weeks now, no problems have surfaced.


Thread
Thread Starter
Forum
Replies
Last Post