I need a sanity check before proceeding ...
 10-06-2014, 09:42 PM
#1
Member
Thread Starter

Join Date: May 2014
Location: Seattle, WA
Posts: 184
Likes: 0
Received 0 Likes
on
0 Posts
Car: '84 Camaro Z28
Engine: 305 HO
I need a sanity check before proceeding ...
Okay guys, let me give you some history:
This is my wife's car. It sat for 12 years and was running good before it was parked. She informed me that the engine and transmission had been previously rebuilt. Now, I'm in the process of restoring it.
So far, I've replaced some obvious things that were needed: fuel pump, starter, battery, heater / radiator hoses, belts, tires, checked the brakes, changed the oil/filter, flushed cooling system / new antifreeze, topped off the AT fluid (it was low) etc. I repaired the emission exhaust tubes that connect to the exhaust manifold on the driver's side as those had rusted out. I reconnected the heat riser valve and ensured it worked. The hose for it was just laying across the intake, disconnected. I also ran a new air line from the diverter valve to the CC.
At this point, I haven't given it a tune, yet. I figured that I'd see what codes were being thrown and deal with any other issues not related to ignition before doing the tuneup.
Several days ago, I put a vacuum gauge on it ... connected it at the power assist vacuum hose to the brakes master cylinder. It showed 20 lbs of pressure and read steady. When I gunned it, it it dropped to almost zero, and when I let off it, it rose to about 23 - 24 lbs and then back to 20 lbs. From what I saw, these were good indications.
Lately, it's been getting temperamental in the mornings. I had "adjusted" the choke (or so I thought) in the beginning because it seemed to idle high. Then, I found out how it's supposed to operate. I have since re-adjusted the choke and choke idle, and it appears to be "normal", again.
Today, I took for a test spin. I had previously repaired the battery tray because of rust, and the battery was removed (of course), so I know all the codes had cleared. After the test spin, Code 45 (Rich exhaust) was the only code stored. This could either be a sticky or faulty Mixture Control Solenoid or the O2 sensor. The Mixture Control Solenoid clicks (actually clicks repeatedly) when the key is turned to the "on" position, so I figured that must be working. I've had my doubts about the O2 sensor, so I went ahead and replaced it, today. I cleared the codes, again, and took it for another spin. It seemed to run better, but it seemed to bog a little after kicking it around 60 mph. Also, it seems to hesitate a little (sometimes) when taking off from a dead stop.
The next round of codes I got after replacing the 02 sensor was 13 (O2 circuit) and 44 (Lean exhaust).
Possible problems for code 13 (O2 circuit):
Sticking or misadjusted TPS
Faulty wiring and/or connectors from O2 sensor
Faulty O2 sensor
Possible problems for code 44 (Lean exhaust):
Faulty or sticking mixture control (M/C) solenoid
Faulty or loose wiring and/or connections at the ECM, terminals 9 and 14
Vacuum leakage at carburetor base gasket
Faulty or loose vacuum hoses
Faulty or leaking intake manifold gasket
Air leakage at air management system-to-exhaust ports and at decel valve
Faulty O2 sensor
The way I see it, I replaced the O2 sensor because it was running rich and the M/C solenoid is supposedly working. (Can someone verify that it's suppose to repeatedly click with the key in the "ON" position?) In any case, code 45 cleared, so I did conclude that O2 sensor was, in fact, faulty before replacement.
As for the codes 13 and 44, I don't see the O2 sensor as a problem. Also, the pressure gauge indication I got several days ago indicated no vacuum leaks. (All vacuum hoses are connected, appear good, and nothing showed up on the pressure gauge). However, I have noticed traces of gas on the intake manifold. About a week ago, it flooded (my fault), and gas seeped out of the base of the carb onto the intake. Since then, I've noticed the intake in that area being "wet" on occasion. I'm thinking the carb base gasket was old and dried out and started seeping after reviving the beast and driving it for a few weeks.
I'm going to replace the carb base gasket, tomorrow. I can also see the sticking or misadjusted TPS being a problem, but I don't know what to do to unstick it or adjust it. This is where I need help. Also (one last time), I need someone to inform me if the M/C solenoid is supposed to behave the way I described, previously.
Does all this make sense as far as how to proceed. Any suggestions and help is greatly appreciated.
(Sorry for the long post. Just wanted to ensure everyone understood exactly what the scenario looks like.)
 10-07-2014, 07:01 AM
#2
Supreme Member

iTrader: (1)

Join Date: Sep 2005
Posts: 26,050
Received 1,671 Likes
on
1,268 Posts
Car: Yes
Engine: Usually
Transmission: Sometimes
Axle/Gears: Behind me somewhere
Re: I need a sanity check before proceeding ...
it's suppose to repeatedly click with the key in the "ON" position?
I'd leave the O2 sensor alone at this point and instead, troubleshoot a lean condition. (I.e., BELIEVE what it's telling you, instead of assuming that what it's telling you, is wrong)
First thing I'd do is run a gallon of lacquer thinner through the gas tank to try to de-varnish all of that and the lines as much as practical without removing them and boiling them out, when the fuel is as low as you dare to let it get; then after it's all gone and it has 100% fresh gas in it, I'd change out the fuel filter (located inside the fuel inlet nut on the carb). Use a 5/8" flare nut wrench on the line nut and a 1" wrench to hold the inlet nut still, to properly loosen the nut without destroying the fuel line; then remove the big nut and change out the filter.
Reason for the gas seepage is typical carb death. It's dissimilar-metal corrosion around all the plugs in the bottom of the fuel bowl. VERY common, virtually 100% in fact, for carbs that have sat around untouched for a long time, especially if not in a climate-controlled environment (such as in an unheated garage). There's no cure for that other than, remove the carb, tear it down, soak it in the heavy thick brown stank carb cleaner to remove all the varnish that is surely filling it, wire-brush the area around the plugs down to clean metal, sterilize them with lacquer thinner, and epoxy over them being careful to fully cover over the junction between the plug and the carb chinesium. If you see white powder ANYWHERE on the carb that 2 different metals touch each other, then those plugs are CERTAINLY eroded and leaking since, being at the bottom of the carb and therefore right where all the moisture collects, they are invariably THE FIRST thing to develop that electrolysis corrosion.
Vacuum leaks won't show up on a vacuum gauge unless they'r eso huge and hideous, that you can hear them with your ears as well as see them on the gauge. Not a valid troubleshooting method.
You'll get a new carb base gasket in your carb kit. It's not "The Problem", but new is always good anyway. The TPS doesn't "stick" generally, if it does you can see it, but since you'll have it out of the carb during the tear-down clean-up and re-build, you can replace it if you want.
10-07-2014, 07:53 AM
#3
Supreme Member
iTrader: (2)
Join Date: Apr 2000
Location: Huntsville AL
Posts: 3,938
Received 97 Likes
on
62 Posts
Car: 88GTA
Engine: 5.7TPI
Transmission: Auto
Axle/Gears: 3.27
Re: I need a sanity check before proceeding ...
mlbinseattle......I have no input to your problems; I just wanted to commend you on such a thorough troubleshooting process.
Sofa has you covered!
Sofa has you covered!
10-07-2014, 09:20 AM
#4
Supreme Member
iTrader: (7)

Join Date: May 2004
Location: Lexington, SC
Posts: 5,291
Likes: 0
Received 58 Likes
on
52 Posts
Car: 1987 SC/1985 TA
Engine: 350/vortec/fitech
Transmission: T56
Axle/Gears: 3.27 9-bolt
Re: I need a sanity check before proceeding ...
The MCS cycles at 10 Hz. At least it's supposed to, I'm sure there's some variance within the hardware.
If you decide to tear the carb down, ensure that you count turns for the lean stop screw (holds down the MCS) so it can be re-installed to the same height. Same with the idle mixture screws, IAB and rich stop. Can help you through that if you need.
The TPS can be checked by back probing the B and C pins (middle and bottom) with a meter. It should read near 0.40 at idle (key on, engine does not need to be running) and near 4.0V at WOT. It should vary somewhat linearly between the two. It is not uncommon for one to fail and read WOT at all throttle positions keeping the motor out of closed loop and rich.
Once everything is clean and buttoned up I like to set base timing to 0-4 with EST disconnected, set idle speed, adjust TPS to near 0.40V then set IAB using a dwell meter with all the vac ports capped. Get dwell near 50% then reconnect the vac lines noting any changes in dwell. Reset idle and TPS if needed.
10-07-2014, 10:47 AM
#5
Supreme Member
Join Date: Jun 2011
Location: knoxville tn
Posts: 2,036
Likes: 0
Received 5 Likes
on
5 Posts
Car: 86 IROC
Engine: 5.0 TPI
Transmission: 700-R-4
Axle/Gears: 2.73 open
Re: I need a sanity check before proceeding ...
Yes it's supposed to do that; should cycle around 7 - 8 times a second, and should do it for probably 20 seconds or more after you turn the key on, at which time it gives up waiting for you to start the car and then doesn't do it again until it gets pulses from the ignition. Then whenever the car is running, it should again always be cycling, 100% of the time. Should never stop.
I'd leave the O2 sensor alone at this point and instead, troubleshoot a lean condition. (I.e., BELIEVE what it's telling you, instead of assuming that what it's telling you, is wrong)
First thing I'd do is run a gallon of lacquer thinner through the gas tank to try to de-varnish all of that and the lines as much as practical without removing them and boiling them out, when the fuel is as low as you dare to let it get; then after it's all gone and it has 100% fresh gas in it, I'd change out the fuel filter (located inside the fuel inlet nut on the carb). Use a 5/8" flare nut wrench on the line nut and a 1" wrench to hold the inlet nut still, to properly loosen the nut without destroying the fuel line; then remove the big nut and change out the filter.
Reason for the gas seepage is typical carb death. It's dissimilar-metal corrosion around all the plugs in the bottom of the fuel bowl. VERY common, virtually 100% in fact, for carbs that have sat around untouched for a long time, especially if not in a climate-controlled environment (such as in an unheated garage). There's no cure for that other than, remove the carb, tear it down, soak it in the heavy thick brown stank carb cleaner to remove all the varnish that is surely filling it, wire-brush the area around the plugs down to clean metal, sterilize them with lacquer thinner, and epoxy over them being careful to fully cover over the junction between the plug and the carb chinesium. If you see white powder ANYWHERE on the carb that 2 different metals touch each other, then those plugs are CERTAINLY eroded and leaking since, being at the bottom of the carb and therefore right where all the moisture collects, they are invariably THE FIRST thing to develop that electrolysis corrosion.
Vacuum leaks won't show up on a vacuum gauge unless they'r eso huge and hideous, that you can hear them with your ears as well as see them on the gauge. Not a valid troubleshooting method.
You'll get a new carb base gasket in your carb kit. It's not "The Problem", but new is always good anyway. The TPS doesn't "stick" generally, if it does you can see it, but since you'll have it out of the carb during the tear-down clean-up and re-build, you can replace it if you want.
10-07-2014, 01:54 PM
#6
Member
Thread Starter
Join Date: May 2014
Location: Seattle, WA
Posts: 184
Likes: 0
Received 0 Likes
on
0 Posts
Car: '84 Camaro Z28
Engine: 305 HO
Re: I need a sanity check before proceeding ...
Yes it's supposed to do that; should cycle around 7 - 8 times a second, and should do it for probably 20 seconds or more after you turn the key on, at which time it gives up waiting for you to start the car and then doesn't do it again until it gets pulses from the ignition. Then whenever the car is running, it should again always be cycling, 100% of the time. Should never stop.
Thank you. I feel better having had this confirmed. (This project has definitely been a learning ordeal, and I've never really dealt with carbs all that much.)
I'd leave the O2 sensor alone at this point and instead, troubleshoot a lean condition. (I.e., BELIEVE what it's telling you, instead of assuming that what it's telling you, is wrong)
I hear ya. After reading and re-reading your post several times, I get the feeling that the ECM "assumes" that the carb is not plagued with old age deterioration and spits out codes based on what a normal carb should be doing.
Reason for the gas seepage is typical carb death. It's dissimilar-metal corrosion around all the plugs in the bottom of the fuel bowl. VERY common, virtually 100% in fact, for carbs that have sat around untouched for a long time, especially if not in a climate-controlled environment (such as in an unheated garage). There's no cure for that other than, remove the carb, tear it down, soak it in the heavy thick brown stank carb cleaner to remove all the varnish that is surely filling it, wire-brush the area around the plugs down to clean metal, sterilize them with lacquer thinner, and epoxy over them being careful to fully cover over the junction between the plug and the carb chinesium. If you see white powder ANYWHERE on the carb that 2 different metals touch each other, then those plugs are CERTAINLY eroded and leaking since, being at the bottom of the carb and therefore right where all the moisture collects, they are invariably THE FIRST thing to develop that electrolysis corrosion.
I was afraid of this. I had been thinking that the carb needed a good cleaning. I've seen small gas engine carbs gunked up from sitting for long periods. Those wouldn't start until the bowl was pulled and bowl/jet was cleaned of all gunk from old gas. I suppose it's time for me to get a Haynes Rochester Carb manual and begin reading. I'll pull the carb and give it a good cleaning while ensuring to take into account everything you've pointed out to me.
Vacuum leaks won't show up on a vacuum gauge unless they'r eso huge and hideous, that you can hear them with your ears as well as see them on the gauge. Not a valid troubleshooting method.
This is good to know. Thanks.
You'll get a new carb base gasket in your carb kit. It's not "The Problem", but new is always good anyway. The TPS doesn't "stick" generally, if it does you can see it, but since you'll have it out of the carb during the tear-down clean-up and re-build, you can replace it if you want.
And that's why I needed the sanity check. What I thought was the problem ... isn't.
I fully intend to clean the carb and do everything that's needed to it. It may have to wait a bit before that happens, but I'll probably attempt it within the next month.
One thing I forgot to mention is that there is a big ole exhaust leak right beside #7 cylinder. It feels like it's coming out around the corner of the exhaust manifold. I'm wondering if that's having an effect on the exhaust reading at the O2 sensor since it's so close to it?
By the way, thanks much for all the input. I definitely learned a lot!
10-07-2014, 01:56 PM
#7
Member
Thread Starter
Join Date: May 2014
Location: Seattle, WA
Posts: 184
Likes: 0
Received 0 Likes
on
0 Posts
Car: '84 Camaro Z28
Engine: 305 HO
Re: I need a sanity check before proceeding ...

Trending Topics
10-07-2014, 01:58 PM
#8
Member
Thread Starter
Join Date: May 2014
Location: Seattle, WA
Posts: 184
Likes: 0
Received 0 Likes
on
0 Posts
Car: '84 Camaro Z28
Engine: 305 HO
Re: I need a sanity check before proceeding ...
The MCS cycles at 10 Hz. At least it's supposed to, I'm sure there's some variance within the hardware.
If you decide to tear the carb down, ensure that you count turns for the lean stop screw (holds down the MCS) so it can be re-installed to the same height. Same with the idle mixture screws, IAB and rich stop. Can help you through that if you need.
The TPS can be checked by back probing the B and C pins (middle and bottom) with a meter. It should read near 0.40 at idle (key on, engine does not need to be running) and near 4.0V at WOT. It should vary somewhat linearly between the two. It is not uncommon for one to fail and read WOT at all throttle positions keeping the motor out of closed loop and rich.
Once everything is clean and buttoned up I like to set base timing to 0-4 with EST disconnected, set idle speed, adjust TPS to near 0.40V then set IAB using a dwell meter with all the vac ports capped. Get dwell near 50% then reconnect the vac lines noting any changes in dwell. Reset idle and TPS if needed.
If you decide to tear the carb down, ensure that you count turns for the lean stop screw (holds down the MCS) so it can be re-installed to the same height. Same with the idle mixture screws, IAB and rich stop. Can help you through that if you need.
The TPS can be checked by back probing the B and C pins (middle and bottom) with a meter. It should read near 0.40 at idle (key on, engine does not need to be running) and near 4.0V at WOT. It should vary somewhat linearly between the two. It is not uncommon for one to fail and read WOT at all throttle positions keeping the motor out of closed loop and rich.
Once everything is clean and buttoned up I like to set base timing to 0-4 with EST disconnected, set idle speed, adjust TPS to near 0.40V then set IAB using a dwell meter with all the vac ports capped. Get dwell near 50% then reconnect the vac lines noting any changes in dwell. Reset idle and TPS if needed.
10-07-2014, 02:01 PM
#9
Member
Thread Starter
Join Date: May 2014
Location: Seattle, WA
Posts: 184
Likes: 0
Received 0 Likes
on
0 Posts
Car: '84 Camaro Z28
Engine: 305 HO
Re: I need a sanity check before proceeding ...
Indeed. Have you seen what vinegar does to rust? I took a 4:1 solution of water and vinegar (1 part vinegar to 4 parts water) along with a red Scotch-Brite pad to get rid of surface rust on the body. I didn't even need to take out the sander. Vinegar is awesome.
10-07-2014, 02:01 PM
#10
 10-07-2014, 08:31 PM
#11
Supreme Member
iTrader: (1)
Join Date: Sep 2005
Posts: 26,050
Received 1,671 Likes
on
1,268 Posts
Car: Yes
Engine: Usually
Transmission: Sometimes
Axle/Gears: Behind me somewhere
Re: I need a sanity check before proceeding ...
A couple of things to keep straight:
Vinegar does indeed eat corrosion; but it doesn't rebuild the metal. Once gone, the metal is gone. In fact cleaning the corrosion out of the cracks chemically might even make the leaks worse.
Getting rid of the corrosion on the surface, as by scouring, is useless. Its only benefit is that it "looks" better, to someone who is easily distracted from the reality of what "looks" tell about how something WORKS.
And, any time you use acid on a metal with such poor corrosion resistance as chinesium (actually, zamak or whatever it is they cast carbs out of... the cheeeeeeeepest stuff they can find that won't dissolve in gasoline) if you leave ANY of it on the metal, it will generate corrosion of its own. It MUST BE neutralized. Baking soda works well for that.
10-08-2014, 11:14 PM
#12
Member
Thread Starter
Join Date: May 2014
Location: Seattle, WA
Posts: 184
Likes: 0
Received 0 Likes
on
0 Posts
Car: '84 Camaro Z28
Engine: 305 HO
Re: I need a sanity check before proceeding ...
A couple of things to keep straight:
Vinegar does indeed eat corrosion; but it doesn't rebuild the metal. Once gone, the metal is gone. In fact cleaning the corrosion out of the cracks chemically might even make the leaks worse.
Getting rid of the corrosion on the surface, as by scouring, is useless. Its only benefit is that it "looks" better, to someone who is easily distracted from the reality of what "looks" tell about how something WORKS.
And, any time you use acid on a metal with such poor corrosion resistance as chinesium (actually, zamak or whatever it is they cast carbs out of... the cheeeeeeeepest stuff they can find that won't dissolve in gasoline) if you leave ANY of it on the metal, it will generate corrosion of its own. It MUST BE neutralized. Baking soda works well for that.
Vinegar does indeed eat corrosion; but it doesn't rebuild the metal. Once gone, the metal is gone. In fact cleaning the corrosion out of the cracks chemically might even make the leaks worse.
Getting rid of the corrosion on the surface, as by scouring, is useless. Its only benefit is that it "looks" better, to someone who is easily distracted from the reality of what "looks" tell about how something WORKS.
And, any time you use acid on a metal with such poor corrosion resistance as chinesium (actually, zamak or whatever it is they cast carbs out of... the cheeeeeeeepest stuff they can find that won't dissolve in gasoline) if you leave ANY of it on the metal, it will generate corrosion of its own. It MUST BE neutralized. Baking soda works well for that.
I've watched a video on youtube that someone produced about how to rebuild a Rochester Quadrajet. I only watched enough of it see how he disassembled it and came to the conclusion that carb rebuild ... especially on this carb ... wasn't for the faint of heart. It's like rebuilding an automatic transmission. You practically need to be a wizard. At least that's my opinion. I've rebuilt engines in the past, and I don't have any problem with that. But, when it comes to intricate details such as the inner workings of a carb and the consequences of not following the exact procedure of a rebuild, I get very nervous. In any case, I don't have the measuring tools or a carb stand to attempt such a task.
If someone can convince me that someone like me can do it and show me that it's not as mind-blowing as it seems, I might very well attempt it. In all likelihood, I will probably end up purchasing a rebuilt carb.
10-09-2014, 06:56 AM
#13
Supreme Member
iTrader: (7)
Join Date: May 2004
Location: Lexington, SC
Posts: 5,291
Likes: 0
Received 58 Likes
on
52 Posts
Car: 1987 SC/1985 TA
Engine: 350/vortec/fitech
Transmission: T56
Axle/Gears: 3.27 9-bolt
Re: I need a sanity check before proceeding ...
I've done both and the carb is MUCH easier.
If your throttle bushings are not worn, there's no reason not to tackle it yourself. If you fail you're only out the $10-12 for the rebuild kit and a can of carb cleaner (gallon of dip preferably). Expect to need a TPS which may add $15-20 to the job.
No special tools required other than the idle mixture screwdriver and a dwell meter, which you'll need to fine tune a rebuilt carb anyway.
At least open it up and have a look-see.
I did this a long time ago (not really). Would probably add more if I were to do it now, but peruse:
https://www.thirdgen.org/forums/carb...-ccc-qjet.html
10-09-2014, 07:27 AM
#14
Supreme Member
Join Date: Jun 2011
Location: knoxville tn
Posts: 2,036
Likes: 0
Received 5 Likes
on
5 Posts
Car: 86 IROC
Engine: 5.0 TPI
Transmission: 700-R-4
Axle/Gears: 2.73 open
Re: I need a sanity check before proceeding ...
The carb is shot as it has gotten worse over the last day. Seepage is worse, and now, it doesn't idle steady at all. The carb definitely needs to be rebuilt, and if I do that, it'll get soaked in carb cleaner while apart.
I've watched a video on youtube that someone produced about how to rebuild a Rochester Quadrajet. I only watched enough of it see how he disassembled it and came to the conclusion that carb rebuild ... especially on this carb ... wasn't for the faint of heart. It's like rebuilding an automatic transmission. You practically need to be a wizard. At least that's my opinion. I've rebuilt engines in the past, and I don't have any problem with that. But, when it comes to intricate details such as the inner workings of a carb and the consequences of not following the exact procedure of a rebuild, I get very nervous. In any case, I don't have the measuring tools or a carb stand to attempt such a task.
If someone can convince me that someone like me can do it and show me that it's not as mind-blowing as it seems, I might very well attempt it. In all likelihood, I will probably end up purchasing a rebuilt carb.
10-09-2014, 04:33 PM
#15
Member
Thread Starter
Join Date: May 2014
Location: Seattle, WA
Posts: 184
Likes: 0
Received 0 Likes
on
0 Posts
Car: '84 Camaro Z28
Engine: 305 HO
Re: I need a sanity check before proceeding ...
I've done both and the carb is MUCH easier.
If your throttle bushings are not worn, there's no reason not to tackle it yourself. If you fail you're only out the $10-12 for the rebuild kit and a can of carb cleaner (gallon of dip preferably). Expect to need a TPS which may add $15-20 to the job.
No special tools required other than the idle mixture screwdriver and a dwell meter, which you'll need to fine tune a rebuilt carb anyway.
At least open it up and have a look-see.
I did this a long time ago (not really). Would probably add more if I were to do it now, but peruse:
https://www.thirdgen.org/forums/carb...-ccc-qjet.html
If your throttle bushings are not worn, there's no reason not to tackle it yourself. If you fail you're only out the $10-12 for the rebuild kit and a can of carb cleaner (gallon of dip preferably). Expect to need a TPS which may add $15-20 to the job.
No special tools required other than the idle mixture screwdriver and a dwell meter, which you'll need to fine tune a rebuilt carb anyway.
At least open it up and have a look-see.
I did this a long time ago (not really). Would probably add more if I were to do it now, but peruse:
https://www.thirdgen.org/forums/carb...-ccc-qjet.html
I never thought I'd use a dwell meter, again. Only thing I ever used one for was to set the dwell on the old points/condenser type distributors back in the '70's. I'm beginning to feel like a teenager, again. lol. Guess I'll have to get one off eBay. I really don't feel like spending $100+ on a digital meter that I'll probably never use all that much.
I have a few questions about the fuel well plugs you talked about in one of your photos. How many are there? I saw two discolored ones, but it seems like there were four total. Or were the other two something else besides fuel plugs? Were these originally welded or sealed in epoxy from the factory? Do these start leaking because the metal corrodes; therefore, needing to be sealed in JB Weld?
Another thing I discovered is that my wife's ex had cut the light blue wire that connects to the electric heater on the choke. It's sticking out about two inches from the wiring harness. I wonder why he did that, and I wonder if it's because the choke heater quit working. The three rivots that hold the case on have been drilled and replaced with screws, so I know that carb has been dealt with, before. I'm hoping I don't run into any problems with the electric choke, anyway. I'm going to a short length of wire and a connector to the existing wire and see what happens. The choke light in the dash has come on a time or two in the past, and I have reviewed the wiring diagram, so I know the signal should be making it there.
I'm sure I'll have other questions, especially when it comes time to make any adjustments after it's reinstalled.
Thanks a bundle to everyone. I'm sure I would have never considered rebuilding a carb without your help.
10-09-2014, 04:46 PM
#16
Supreme Member
iTrader: (7)
Join Date: May 2004
Location: Lexington, SC
Posts: 5,291
Likes: 0
Received 58 Likes
on
52 Posts
Car: 1987 SC/1985 TA
Engine: 350/vortec/fitech
Transmission: T56
Axle/Gears: 3.27 9-bolt
Re: I need a sanity check before proceeding ...
IIRC there are five plugs in the bottom of the carburetor that can be epoxied. Two larger ones in the rear, two smaller ones up front and one up front canted at an angle. The forward ones are most prone to leaking. These are the remains of a drill hole, or bore, from the factory to create interior passages in the casting. The factory seals them with metal plug (no epoxy). The metal plug is not the same type metal as the casting and over time the two corrode where they are in contact and leak.
Try Rock Auto for the parts you need. I picked up a half dozen of the choke pigtails a few years back for next to nothing. No need to spend big $ on a rebuild kit either, it's all just soft parts. I've used several kinds and they're all essentially the same. Each kit is designed to fit multiple models and you'll have extra gaskets and such you may not need.
If you get in and need any other parts, springs, rods, etc. let me know before you order anything as I've got a few shells laying around. Any good TPS is long since gone though.
10-20-2014, 03:13 PM
#17
Member
Thread Starter
Join Date: May 2014
Location: Seattle, WA
Posts: 184
Likes: 0
Received 0 Likes
on
0 Posts
Car: '84 Camaro Z28
Engine: 305 HO
Re: I need a sanity check before proceeding ...
Okay, I believe I have everything needed to begin the carb rebuild. I've had to purchase parts/tools and wait for these to arrive. naf, you've said that you use an appropriate size roll pin gently tapped over the TPS adjustment screw to make that adjustment, so, I'm picking up a roll pin assortment from the local Harbor Freight store. (The actual tool is like $20, and the roll pin assortment was only $5.) I've got a DMM that has the dwell function, idle mixture adjustment tool, and a Haynes Rochester Carb manual, also. (Got these off Amazon and eBay). The manual and the idle mixture adjustment tool should arrive, today.
The wire and connector that connects to the electric choke heater was clipped, so I replaced it. Just to ensure that it was the correct wire, I connected my DMM to it and pulled the C/H fuse. Voltage dropped from 14.3 to around 7 VDC and Choke Warning light illuminated. I reinserted the fuse and read the voltage, again. It stayed at 14.3 VDC with the engine running and the light remained off. It appears that the choke heater is shot and that's probably why the wire was clipped by the previous person that tinkered with this engine. So, I ordered a new choke heater off eBay. It should arrive by Thursday.
The question I now have is this: Should I wait for the choke heater to arrive and install it while the carb is off, or is this something that I can do after the carb has been rebuilt and reinstalled on the engine? (I think I already know what you all will tell me. That is, to wait for the choke heater to arrive and do it with the carb off.) Can the carb be adjusted (TPS voltage and idle mixture) without the choke heater installed? I'm kind of itching to get started with this carb rebuild, but I want to ensure that I don't shoot myself in the foot.
Thanks again for all the help.
10-20-2014, 03:27 PM
#18
Supreme Member
iTrader: (7)
Join Date: May 2004
Location: Lexington, SC
Posts: 5,291
Likes: 0
Received 58 Likes
on
52 Posts
Car: 1987 SC/1985 TA
Engine: 350/vortec/fitech
Transmission: T56
Axle/Gears: 3.27 9-bolt
Re: I need a sanity check before proceeding ...
Choke heater can be installed later.
The factory choke cover is installed with rivets. These will need to be drilled out. The rebuild kit will come with new screws and clips to hold the choke heater on. The screws are self-tapping and it will be easier to go ahead and 'self-tap' them with the carb not installed, so as to get them straight.
Everything else can be adjusted without the choke heater. The choke would have to be completely disengaged anyway...
10-20-2014, 03:38 PM
#19
Member
Thread Starter
Join Date: May 2014
Location: Seattle, WA
Posts: 184
Likes: 0
Received 0 Likes
on
0 Posts
Car: '84 Camaro Z28
Engine: 305 HO
Re: I need a sanity check before proceeding ...
Choke heater can be installed later.
The factory choke cover is installed with rivets. These will need to be drilled out. The rebuild kit will come with new screws and clips to hold the choke heater on. The screws are self-tapping and it will be easier to go ahead and 'self-tap' them with the carb not installed, so as to get them straight.
Everything else can be adjusted without the choke heater. The choke would have to be completely disengaged anyway...
The factory choke cover is installed with rivets. These will need to be drilled out. The rebuild kit will come with new screws and clips to hold the choke heater on. The screws are self-tapping and it will be easier to go ahead and 'self-tap' them with the carb not installed, so as to get them straight.
Everything else can be adjusted without the choke heater. The choke would have to be completely disengaged anyway...
I believe this carb has been rebuilt in the past. The rivots were already drilled and screws were used. Also, the caps that cover the idle mixture adjustment screws have been removed.
Hopefully, I won't run into any snafu's along the way. This entire restoration is beginning to wear me out, somewhat, and my wife is itching to drive it. So am I. lol. I am beginning to see light at end of tunnel, though. I pray that I don't screw this up.
10-22-2014, 06:49 PM
#20
Member
Thread Starter
Join Date: May 2014
Location: Seattle, WA
Posts: 184
Likes: 0
Received 0 Likes
on
0 Posts
Car: '84 Camaro Z28
Engine: 305 HO
Re: I need a sanity check before proceeding ...
I've finished the carb rebuild. I have several questions before I install it back on the intake. Gotta say, I'm feeling a bit of anxiety, right now. I'm half-wired and half-dead because I was up all night cleaning and assembling parts. I do pray this works.
Anyhow, I've attached of couple of pics. One is the choke linkage and the other is a plug next to the lever for the TPS and pump piston.
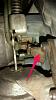
One the choke linkage pic, I show an arrow pointed to the part of the linkage that holds or releases the secondary lockout lever. Question: What causes this part of the linkage to move so it can release the secondary lockout lever? I know I put this all back together exactly the way it was assembled; however, either I'm not getting it about how this works or something isn't right. I can post additional pics if it helps.
The second pic has to do with my second question. How do you adjust the TPS? I've read about an adjustment screw and the need to drill a hole and/or pop a cap to gain access, but I don't see it anywhere. Is the cap with the arrow pointing to it in the pic the one that's removed. It's right next to the lever that pushes down on the pump piston and TPS.
Also, naf, I couldn't have gotten through all this without your carb rebuild writeup. It was a lifesaver as it pointed out a few things that the book fails to mention. Made it a lot easier to reassemble the carb. Kudos!
A couple of other things:
naf, when I checked the number of turns on the MCS adjustment screw, I couldn't really tell if the screw was turning. I used a roll pin gently tapped over the head as you've done in the past. After 4 turns, I tightened it up a bit and put it back on the screw. Then, it turned 1 full turn until it stopped. So, I'm wondering if the initial setting is 1 turn or 5 turns. I set it at 5 on reinstallation. I know this can be adjusted, so I'm not too worried about it.
The idle air bleed screw was only turned out 1/8th of a turn. I set it to 4 like you (naf) said you did yours. I can set it back to 1/8th turn necessary.
Finally, do all the vacuum ports need to be plugged while tuning? Are there any that are actually connected during this process?
I think all I really need at this point is to know how to adjust the TPS and if the choke linkage is correct. I'm sure I'll have other questions.
If I can get all these concerns taken care of, I think I'll be ready to install it and fire it up. Again, I'm feeling a pretty good bit of anxiety about all this.
(Might help if I add some pics. I forgot to do this when I initially wrote this post.)
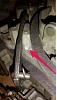
Edit: It occurred to me to re-read the CC Rochester Quadrajet overhaul guide in the Carb forum. I found out that the plug in question for the TPS adjustment was, in fact, the one that needed to be removed to get to the adjustment screw. I got my drill, bit, screw, and a pair of channel locks. Mission accomplished. Plug is out. Now, if everything else continues to go as well ...
Anyhow, I've attached of couple of pics. One is the choke linkage and the other is a plug next to the lever for the TPS and pump piston.
One the choke linkage pic, I show an arrow pointed to the part of the linkage that holds or releases the secondary lockout lever. Question: What causes this part of the linkage to move so it can release the secondary lockout lever? I know I put this all back together exactly the way it was assembled; however, either I'm not getting it about how this works or something isn't right. I can post additional pics if it helps.
The second pic has to do with my second question. How do you adjust the TPS? I've read about an adjustment screw and the need to drill a hole and/or pop a cap to gain access, but I don't see it anywhere. Is the cap with the arrow pointing to it in the pic the one that's removed. It's right next to the lever that pushes down on the pump piston and TPS.
Also, naf, I couldn't have gotten through all this without your carb rebuild writeup. It was a lifesaver as it pointed out a few things that the book fails to mention. Made it a lot easier to reassemble the carb. Kudos!
A couple of other things:
naf, when I checked the number of turns on the MCS adjustment screw, I couldn't really tell if the screw was turning. I used a roll pin gently tapped over the head as you've done in the past. After 4 turns, I tightened it up a bit and put it back on the screw. Then, it turned 1 full turn until it stopped. So, I'm wondering if the initial setting is 1 turn or 5 turns. I set it at 5 on reinstallation. I know this can be adjusted, so I'm not too worried about it.
The idle air bleed screw was only turned out 1/8th of a turn. I set it to 4 like you (naf) said you did yours. I can set it back to 1/8th turn necessary.
Finally, do all the vacuum ports need to be plugged while tuning? Are there any that are actually connected during this process?
I think all I really need at this point is to know how to adjust the TPS and if the choke linkage is correct. I'm sure I'll have other questions.
If I can get all these concerns taken care of, I think I'll be ready to install it and fire it up. Again, I'm feeling a pretty good bit of anxiety about all this.
(Might help if I add some pics. I forgot to do this when I initially wrote this post.)


Edit: It occurred to me to re-read the CC Rochester Quadrajet overhaul guide in the Carb forum. I found out that the plug in question for the TPS adjustment was, in fact, the one that needed to be removed to get to the adjustment screw. I got my drill, bit, screw, and a pair of channel locks. Mission accomplished. Plug is out. Now, if everything else continues to go as well ...
Last edited by mlbinseattle; 10-22-2014 at 10:30 PM. Reason: Added pics, update
10-23-2014, 07:02 AM
#21
Supreme Member
iTrader: (7)
Join Date: May 2004
Location: Lexington, SC
Posts: 5,291
Likes: 0
Received 58 Likes
on
52 Posts
Car: 1987 SC/1985 TA
Engine: 350/vortec/fitech
Transmission: T56
Axle/Gears: 3.27 9-bolt
Re: I need a sanity check before proceeding ...
the secondary lockout lever will drop down when released. note that it's weighted on the large end.
if you didn't disturb the setting for the RICH stop screw (shiny one in the underside of the airhorn) you can set the LEAN stop ( hold down screw for the MCS) so that you get 1/8" of travel for the MCS 'hat'. There are plugs you can take out and tools you can get to do this with the carb assembled, or you can measure it with the airhorn and gasket installed (no need to install booster pump/tps while doing this), remove airhorn, adjust then re-check. You'll probably find that the MCS setting is somewhere between 3 and 4 turns out.
The proper way is to use a gage tool to set the LEAN stop screw THEN adjust the RICH stop screw in the airhorn to get 1/8" of travel. The gage tool can be fashioned from a piece of thin wall tube if needed. I would have to look up the length but I think it's in the carb manual sticky somewhere. It's not a super critical measurement though and you'll be fine using the RICH stop set screw as a reference point as long as you're comfortable it's where it should be. When you get 1/8" of travel and you're between 3 and 4 turns out on the LEAN stop-you can be confident you're good.
It should have been near impossible for your carb to properly adjust the mixture with the IAB 1/8 turn out. 4 is a good starting point. This is, hopefully, the only adjustment you'll need to make to dial in the dwell upon re-install.
Upon re-install you can plug every vacuum line EXCEPT for the hard plastic line that comes out of the harness into the rear of the carb. This line provides the vac signal to the VAC sensor near the brake booster.
I also temporarily cap the accessories vac fitting behind the carb on the intake. This is a common source of vac leaks and a perfect opportunity to check it.
Last edited by naf; 10-24-2014 at 06:53 AM.
10-23-2014, 05:05 PM
#22
Member
Thread Starter
Join Date: May 2014
Location: Seattle, WA
Posts: 184
Likes: 0
Received 0 Likes
on
0 Posts
Car: '84 Camaro Z28
Engine: 305 HO
Re: I need a sanity check before proceeding ...
the secondary lockout lever will drop down when released. note that it's weighted on the large end.
if you didn't disturb the setting for the lean stop screw (shiny one in the underside of the airhorn) you can set the rich stop (MCS) so that you get 1/8" of travel for the MCS 'hat'. There are plugs you can take out and tools you can get to do this with the carb assembled, or you can measure it with the airhorn and gasket installed (no need to install booster pump/tps while doing this), remove airhorn, adjust then re-check. You'll probably find that the MCS setting is somewhere between 3 and 4 turns out.
The proper way is to use a gage tool to set the rich stop screw THEN adjust the lean stop screw in the airhorn to get 1/8" of travel. The gage tool can be fashioned from a piece of thin wall tube if needed. I would have to look up the length but I think it's in the carb manual sticky somewhere. It's not a super critical measurement though and you'll be fine using the lean stop set screw as a reference point as long as you're comfortable it's where it should be. When you get 1/8" of travel and you're between 3 and 4 turns out on the rich stop-you can be confident you're good.
It should have been near impossible for your carb to properly adjust the mixture with the IAB 1/8 turn out. 4 is a good starting point. This is, hopefully, the only adjustment you'll need to make to dial in the dwell upon re-install.
Upon re-install you can plug every vacuum line EXCEPT for the hard plastic line that comes out of the harness into the rear of the carb. This line provides the vac signal to the VAC sensor near the brake booster.
I also temporarily cap the accessories vac fitting behind the carb on the intake. This is a common source of vac leaks and a perfect opportunity to check it.
I've got the carb on the manifold tightened down, gas line and linkage connected, and now, I'm looking for some vacuum plugs. I also need to skin a few wires so I can stick those in the connectors to take readings with the DMM.
I understand the secondary dropout will drop down when released, but the linkage that keeps the secondary dropout locked ... what causes this linkage to move thereby releasing the secondary dropout? Does it move when there's a demand by the engine (e.g. WOT)?
10-23-2014, 11:35 PM
#23
Member
Thread Starter
Join Date: May 2014
Location: Seattle, WA
Posts: 184
Likes: 0
Received 0 Likes
on
0 Posts
Car: '84 Camaro Z28
Engine: 305 HO
Re: I need a sanity check before proceeding ...
Okay, I've made some headway. Spent this afternoon getting the carb on the engine, splicing and crimping a connection to the TPS wires to connect a DMM, and scrounging up plugs and makeshift plugs. (Wife had the truck, and I'm without transportation. I would have ran to the parts house and got some decent plugs, but I just wanted to get this thing running.) The monsoon season has started again in Seattle and it got dark, so, I wasn't able to finish everything.
I set the TPS voltage to .48 VDC and then cranked it. It started right up after a few turns (as soon as it got gas into it, again). Sounds pretty good, too. I still need to connect to the MCS lead and check the dwell to see if the IAB valve needs any adjustment. Of course, I need to tweak the idle mixture adjustment screws. Actually, before I do any of this, I need to check the timing.
For the initial start, it idled fairly smooth. Hoping that the adjustments puts it where it needs to be. Also, it seemed more responsive. After rebuilding a carb for the first time, I'm just happy it cranked up and idled. lol.
10-24-2014, 07:00 AM
#24
Supreme Member
iTrader: (7)
Join Date: May 2004
Location: Lexington, SC
Posts: 5,291
Likes: 0
Received 58 Likes
on
52 Posts
Car: 1987 SC/1985 TA
Engine: 350/vortec/fitech
Transmission: T56
Axle/Gears: 3.27 9-bolt
Re: I need a sanity check before proceeding ...
In my post above I mixed up the lean and rich stop screws, since edited. I do things like that now and again. The rich stop screw is in the airhorn and the bottom of it will be a shiny metal disc a little smaller than a dime. It limits the upward travel of the MCS plunger. Looks like you're fine with all of that though.
The secondary lockout will fall out when the choke no longer applies pressure to it and the throttle lifts up. If the throttle was never opened up the motor would stay on fast idle indefinitely.
You can backprobe the TPS connector with some needles or pins to check voltage on the B and C connector.
Sounds like all is good so far. GL.
10-24-2014, 06:07 PM
#25
Member
Thread Starter
Join Date: May 2014
Location: Seattle, WA
Posts: 184
Likes: 0
Received 0 Likes
on
0 Posts
Car: '84 Camaro Z28
Engine: 305 HO
Re: I need a sanity check before proceeding ...
Well, I discovered a few things, and I think I've learned a few things the hard way. That is, to never assume anything. I decided not to change the MCS because it clicked (sounded) the way it was supposed to. I ASSUMED it was good. When I had the carb apart, I looked at the MCS and saw this small point sticking out that appeared to be the plunger. After all, it's a solenoid, and solenoids have plungers. However, this point ... actually, it was sticking out about maybe 1/4" ... did not move through the solenoid. It appeared to be "frozen" or stuck in place. I found this odd because it didn't look it would work like a typical solenoid, but not knowing jack squat about these carbs, I figured that maybe it was some special design and that it was supposed to be like this. Again, since it "clicked" repeatedly, I assumed it to be working. What I'm thinking now is that the plunger is froze solid inside the solenoid. The solenoid is energizing and deenergizing; therefore, the "clicking", but nothing is happening on the output. The reason I say this is because it doesn't appear that the engine is ever going into closed loop operation.
First thing I did was check the timing. I set it to 6 degrees BTDC with the 4-wire connector to the ECM disconnected.
I ensured all vacuum ports were plugged except for one ... the vac output to the power brake booster. This is the port that I used to connect a pressure gauge.
The hose coming off the bowl vent in the front of the carb and ends up at the charcoal canister was plugged on the canister side and at the canister. This is per Hayne's Rochester Carb manual diagnostic procedure.
I had already ensured that the TPS was set to .48 VDC. I did this after setting the timing and idle speed adjustment.
I had already attempted to check the dwell (after the engine was more than sufficiently hot) at the green diagnostic port near the passenger side blower motor on the firewall. All I got out of this port was a stuck full-scale (60 degrees) indication. (Got the same thing at the MCS lead.)
Per Hayne's, it says to short out the A and B connections on the ALDL port after the engine is started. I did this and allowed the engine to get hot, again. It says to connect a tach, disconnect the MCS connector, short out the MCS lead (I did this directly from the light blue wire at the MCS connector), rev the engine to around 3,000 RPM, unshort the MCS lead, and reconnect the MCS connector to the carb. Hayne's then says that 1 of 2 things will happen: 1) the engine will drop to 300 or below RPM's (I guess the engine basically stalls, or 2) nothing will happen. Apparently, if it drops to or below 300 RPM's, the MCS is okay. If nothing happens, then there's a problem with the MCS. Well, guess what. Nothing happened.
I suppose I reinstalled a faulty MCS. So much for ASSuming. I'll know better the next time ... unless someone can tell me that, in reality, there isn't a plunger that moves through the solenoid.
I know the O2 sensor is good. I checked it during this episode, and it was a constant .9 VDC. When I introduced a major vacuum leak, it dropped down to around .2 VDC. I just changed this thing not that long ago, so I figure it's gotta be good.
Any thoughts? Any of this make sense? Any suggestions? I could use some help.
(Edited) After looking at a pic of the MCS on the Service/Rebuild sticky in the Carb section, the "point" or what I thought was the plunger sticking out is actually on the bottom side of the MCS. The actual plunger is the "hat" that rests on the metering jets. So, it's not what I originally thought. Hey, I'm still learning and trying to figure this all out. It didn't occur to me that the piece that sticks in the MCS and rests on the metering rods is the actual plunger. Slap me stupid. In any case, if this is sticking, it would explain the the initial code 45 before replacing the O2 sensor and the code 44 that I got after changing the O2 sensor. Apparently, the MCS is sticking. Or, the solenoid is weak and not pulling the plunger all the way down.
Last edited by mlbinseattle; 10-24-2014 at 10:04 PM. Reason: Added to post
10-25-2014, 12:48 AM
#26
Member
Thread Starter
Join Date: May 2014
Location: Seattle, WA
Posts: 184
Likes: 0
Received 0 Likes
on
0 Posts
Car: '84 Camaro Z28
Engine: 305 HO
Re: I need a sanity check before proceeding ...
Since the last post, I came up with the bright (well, at least I thought so) idea of seeing if the MCS plunger was actually moving up and down within the solenoid. I took a small diameter (approximately 10" long) pick and stuck it down the vent hole with the ignition in the "on" position. The solenoid was clicking when I did this. I didn't let it rest on the plunger. I just momentarily touched the plunger with the pick to see if there was any movement. There was. So, it seems that the plunger is moving. I'm just wondering if it's now moving the distance it needs to.
Or, maybe there's nothing wrong with the MCS at all and the engine isn't going into closed loop for some other reason. As far as I know, then engine needs to be hot enough for the O2 sensor to work properly, and once this happens, then feedback occurs to the MCS. I figure, with SOME movement of the plunger, there should be some sort of dwell indication when it goes into closed loop.
This is what I know so far:
1) The MCS plunger is moving. How much, I don't know. I should be getting a dwell indication after it goes into closed loop, but apparently, this is never happening.
2) The O2 sensor is working. Verified this by measuring the output which was .9 VDC. When I created a major vacuum leak (lean condition), it dropped to .2 VDC. The other day before I yanked the carb and had everything connected, it was actually fluctuating between .2 and .9 VDC.
3) There is only a single wire temp sender in the gooseneck at the thermostat. This drives the temp guage. I didn't locate or see an actual temp coolant sensor. The wiring diagram shows both. Should I have both? Also, does the ECM need temp data as well as the O2 signal to determine if the engine needs to go into closed loop?
I will check the O2 signal at the ECM to ensure it's getting there. I'll also check for any new codes. Beyond this, I'm at a loss.
10-25-2014, 06:44 AM
#27
Supreme Member
iTrader: (7)
Join Date: May 2004
Location: Lexington, SC
Posts: 5,291
Likes: 0
Received 58 Likes
on
52 Posts
Car: 1987 SC/1985 TA
Engine: 350/vortec/fitech
Transmission: T56
Axle/Gears: 3.27 9-bolt
Re: I need a sanity check before proceeding ...
Sounds like you're good except for a few potential issues.
The CTS at the water neck should be a two wire connector. If the ECM doesn't get a warm reading here it won't go into closed loop. You can confuse the ECM by shorting the leads which sends a 'full hot' signal back.
Make sure the VAC sensor is connected to the rear vac port on the carb. It should be a thin, hard plastic line that comes out of the wiring harness near the dist.
You can measure the travel of the MCS with a small rod through one of the vents. Should still be 1/8".
If your O2 is reading between .2 and .9 it's sending good data. The system is looking for the threshold reading of around .85. It doesn't 'know' whether the mixture is rich or lean, it just knows when it last crossed the threshold between too rich and too lean.
When you first start it the ECM doesn't know whether it's running rich or lean. As it warms up it will do nothing until it sees the O2 voltage change appropriately. It will then start varying dwell as the O2 voltage varies back and forth across the threshold voltage. This is when it begins re-writing the default fuel trim settings with new ones. That's when you'll see the dwell setting waver slightly, maybe +/- 5 degrees or so. You want it to waver like this at idle near 50% to give it the greatest range of adjustment rich/lean.
10-25-2014, 07:11 AM
#28
Supreme Member
iTrader: (7)
Join Date: May 2004
Location: Lexington, SC
Posts: 5,291
Likes: 0
Received 58 Likes
on
52 Posts
Car: 1987 SC/1985 TA
Engine: 350/vortec/fitech
Transmission: T56
Axle/Gears: 3.27 9-bolt
Re: I need a sanity check before proceeding ...
with everything hooked up and warm, start with the idle mixture screws four turns out and the IAB 2 turns out. Turn out the IAB in 1/4 turn increments waiting about a minute/30 seconds between each. Look for the dwell meter to begin responding at each setting. Don't go past 7 turns out. If it doesn't respond within this range (and it normally does for a near stock motor) you can set the idle mixture screws in to 2 turns out and repeat the process with the IAB. Then 1/2 more turn on the mixture screws. In the end you want to be nearest 3-4 turns out on everything.
Ignore anything the dwell meter tells you until it starts wavering.
The dwell should change with changes in TPS/RPM/VAC readings. This is normal and after a power off, these will be the factory default settings. Until the dwell begins to actually respond to O2 readings it is NOT in closed loop. These settings are what the ECM re-writes with O2 data.
10-25-2014, 05:22 PM
#29
Member
Thread Starter
Join Date: May 2014
Location: Seattle, WA
Posts: 184
Likes: 0
Received 0 Likes
on
0 Posts
Car: '84 Camaro Z28
Engine: 305 HO
Re: I need a sanity check before proceeding ...
with everything hooked up and warm, start with the idle mixture screws four turns out and the IAB 2 turns out. Turn out the IAB in 1/4 turn increments waiting about a minute/30 seconds between each. Look for the dwell meter to begin responding at each setting. Don't go past 7 turns out. If it doesn't respond within this range (and it normally does for a near stock motor) you can set the idle mixture screws in to 2 turns out and repeat the process with the IAB. Then 1/2 more turn on the mixture screws. In the end you want to be nearest 3-4 turns out on everything.
Ignore anything the dwell meter tells you until it starts wavering.
The dwell should change with changes in TPS/RPM/VAC readings. This is normal and after a power off, these will be the factory default settings. Until the dwell begins to actually respond to O2 readings it is NOT in closed loop. These settings are what the ECM re-writes with O2 data.
Ignore anything the dwell meter tells you until it starts wavering.
The dwell should change with changes in TPS/RPM/VAC readings. This is normal and after a power off, these will be the factory default settings. Until the dwell begins to actually respond to O2 readings it is NOT in closed loop. These settings are what the ECM re-writes with O2 data.
I found out a few more things, today:
The attached pic is what the gooseneck connection for the thermostat looks like. As you can see, there's a single wire connected to a temp sender which drives the temp guage. The other item that has the two vacuum lines coming off it is the EFE TVS (? ... this is according to the emission hose routing label). Is this setup correct? If not, then what should it look like?
Let me give you a little more history:
Before my wife and I got married, her ex had the engine rebuilt. Apparently, there were a few splice jobs in the wiring. Most of wiring looks correct, but why the wires were spliced to begin with, I can't figure out why unless the mechanic couldn't figure out how to reconnect wiring and got confused. I am not impressed with the work that was done as I've found several other issues that I needed to correct, but that's another story.
Also, the original ECM was stolen from the vehicle at some point in time before I arrived on the scene. Whoever did it knew how to get into the car without doing any damage to it. Anyway, a friend who very much wanted to buy this car from my wife just happened to come across an ECM for her and installed it. Yes, this all sounds sort of questionable, but this is what I was told by my wife. If you ask me, the "friend" was the one who stole it to begin with. I know the person, and again ... another story.
Anyhow, according to the wiring diagram, there should be a temp sender that drives the gauge (and this is the one in the pic ... this one does not connect to the ECM, just the gauge) AND there should be another coolant temp sensor that connects to the ECM on pins 3 and 7. I pulled the ECM and checked the wiring on pins 3 and 7. Sure enough, there were the wires with the correct colors (yellow, pin 3 and black, pin 7). After removing electrical tape that was wrapped around the corrugated plastic conduit for the wiring harness, I found the wires. These are connected to a sensor that is located (screwed into the head) next to the #8 spark plug. I backprobed the wiring, shorted each wire to ground and then together and verified that these are, in fact, the coolant temp sensor wires connected to pins 3 and 7 at the ECM plug. With the wires just connected to the sensor, it reads infinite ohms. I'm thinking that, if this isn't the coolant temp sensor, then what is it?
I'm going to short the wires together with the engine running and warmed up and see what happens.
Let me know if the setup with the thermostat gooseneck is correct and what to do about it. Also, can you tell me what sensor is supposed to be next to the #8 spark plug?
I'm hoping this solves the issue with the engine not going into closed loop. I woke up thinking that I may need to purchase another ECM.
I sincerely do appreciate all the help. This entire ordeal has been one big learning experience.
Last edited by mlbinseattle; 10-25-2014 at 05:23 PM. Reason: Correction
10-26-2014, 01:37 AM
#30
Member
Thread Starter
Join Date: May 2014
Location: Seattle, WA
Posts: 184
Likes: 0
Received 0 Likes
on
0 Posts
Car: '84 Camaro Z28
Engine: 305 HO
Re: I need a sanity check before proceeding ...
Another update:
I shorted the coolant temp sensor wires together as you suggested, naf. Also, when I had the ECM out and checking the wiring for the coolant temp sensor, I'm thinking that the connection on the ECM wiring harness plugs weren't making a great connection because after I reconnected it, things changed.
I reconnected the DMM to the diagnostic plug and set the DMM to the 6 cyl dwell reading. I also ensured the engine was heated sufficiently although I can't tell exactly what the temp was, but the gauge was reading around 220 degrees. I got a dwell indication, this time, but it was only reading around 6-7 degrees. It would go up to around 15 when I opened the throttle. No amount of adjustment to the IAB valve or the idle mixture screws would change the reading. Also, the MCS is working while this is happening. I can hear it clicking, and I did verify that the plunger is moving up and down.
I also checked the O2 sensor, again. This time I checked it with it connected to the ECM. It varied between .2 and .9 VDC back and forth like it was going from a lean to rich to lean condition, etc.
Another thing I noticed is that the only code that was thrown this time around was code 14 which would indicate a faulty temp sensor. This would make sense since I shorted the wires together. No other codes were thrown. In the beginning, before I changed the O2 sensor, I got code 45. Afterwards, it was 13 and 44. This time, 14, but again, I had shorted the wires together.
So, now I'm wondering if I'm getting into the "chasing my tail" area and wondering if there's anything wrong at all. Also, I think I probably need to use an analog dwell meter to check the dwell while attempting to tune the carb. I don't think the digital dwell function is responding the way it needs to. What do you think?
According to Hayne's, if the dwell is fixed below 10 degrees, the carb is responding rich to a lean condition. This would indicate a vacuum leak, somewhere, or possibly the MAP (vacuum) sensor isn't working properly. (If the MAP wasn't working, the ECM should throw a code for that, but there isn't one, so I'm assuming that's okay. Same with the baro sensor.) All the vacuum ports are plugged except for the one that I have the vacuum gauge connected to, so I can't see where a vacuum leak would exist unless it's the intake manifold. Additionally, the O2 sensor swings back and forth which, to me, says that the exhaust is changing from rich to lean back to rich, etc. Finally, no codes are being thrown to show that a rich or lean condition exists. This is why I'm wondering if there is even a problem, now, and all I really need to do is get my hands on an analog dwell meter.
Any thoughts? I'll definitely adjust the carb per your recommendations just as soon as I see a needle swing back and forth.
10-26-2014, 07:40 AM
#31
Supreme Member
iTrader: (7)
Join Date: May 2004
Location: Lexington, SC
Posts: 5,291
Likes: 0
Received 58 Likes
on
52 Posts
Car: 1987 SC/1985 TA
Engine: 350/vortec/fitech
Transmission: T56
Axle/Gears: 3.27 9-bolt
Re: I need a sanity check before proceeding ...
The two wire CTS should be on the water neck. The guage sender should be between #1 and #3 spark plugs and the fan switch should be between #6 and #8 spark plugs. I wouldn't expect your CTS to survive long in the heat wired into the cylinder head. It's not as hard a sensor as the other two.
I've never used a digital dwell meter but I would expect it to work. There have been issues with trying to measure dwell at the MCS, you should always measure at the green lead near the blower. I've also had issues with trying to use a scanner on an 84. It reported dwell but not correctly. Had to fall back to the needle.
When your O2 voltage varies is it only at a certain range of IAB settings? As an indication of closed loop turning the IAB a significant amount should take the carb out of its ability to make mixture adjustments.
During warm up the dwell will be stuck at low dwell readings. I'm also not certain shorting the lead on the CTS will throw a code. It may be the opposite, that running the motor a significant amount of time without a temp signal throws the code. I'll have to check on that.
10-27-2014, 11:01 AM
#33
Member
Thread Starter
Join Date: May 2014
Location: Seattle, WA
Posts: 184
Likes: 0
Received 0 Likes
on
0 Posts
Car: '84 Camaro Z28
Engine: 305 HO
Re: I need a sanity check before proceeding ...
The two wire CTS should be on the water neck. The guage sender should be between #1 and #3 spark plugs and the fan switch should be between #6 and #8 spark plugs. I wouldn't expect your CTS to survive long in the heat wired into the cylinder head. It's not as hard a sensor as the other two.
I've never used a digital dwell meter but I would expect it to work. There have been issues with trying to measure dwell at the MCS, you should always measure at the green lead near the blower. I've also had issues with trying to use a scanner on an 84. It reported dwell but not correctly. Had to fall back to the needle.
When your O2 voltage varies is it only at a certain range of IAB settings? As an indication of closed loop turning the IAB a significant amount should take the carb out of its ability to make mixture adjustments.
During warm up the dwell will be stuck at low dwell readings. I'm also not certain shorting the lead on the CTS will throw a code. It may be the opposite, that running the motor a significant amount of time without a temp signal throws the code. I'll have to check on that.
I've never used a digital dwell meter but I would expect it to work. There have been issues with trying to measure dwell at the MCS, you should always measure at the green lead near the blower. I've also had issues with trying to use a scanner on an 84. It reported dwell but not correctly. Had to fall back to the needle.
When your O2 voltage varies is it only at a certain range of IAB settings? As an indication of closed loop turning the IAB a significant amount should take the carb out of its ability to make mixture adjustments.
During warm up the dwell will be stuck at low dwell readings. I'm also not certain shorting the lead on the CTS will throw a code. It may be the opposite, that running the motor a significant amount of time without a temp signal throws the code. I'll have to check on that.
I don't know if the IAB is even doing what it's supposed to. The original o-rings on it were toast when I pulled it out. Approx 1/2 of each ring was gone and whatever remained was stuck rigid to the valve. There were two o-rings in the kit, and I used those to replace the old rings with. I don't know if these were the right o-rings, but they seemed to fit, so I used those.
Also, I don't know what happened or what I did, but now, I'm getting a dwell indication using the digital dwell function. It swings from around 24 to upwards of close to 40. Most times, it hovers around the 28 - 32 range. I think I figured out the trick to get it to respond. I need to hold the throttle open somewhat for about approx 10 seconds to ensure it's still in closed loop. It does seem that I needed to turn the IAB somewhat to get it into this range, but now, I don't remember how many turns. I do believe it was less than 1 turn in. I have both idle mixture screws turned out 4 turns.
At first, after I reinstalled the carb, it idled fairly smooth right after starting the engine. After it warmed up, it idled erratically ... like it was somewhat starved for air, then it would smooth out. It was real similar to a surge. I know I set the float to the proper height, but I'm going to recheck it. It's still doing this now, but it seems it even does it when it's cold. I'm going to check for vacuum leaks, and I'm also going to check the EGR valve. I'm hoping that I don't have an intake leak. To be honest, on the electrical side of things, I only changed the plugs. Before I started with the carb, it seemed to idle pretty steady. The SP wires appeared to be in relatively good condition. I took a piece of sandpaper and hit the contacts on the inside of the dizzy cap. I would have replaced everything, but I went a little beyond my budget for this thing in the last month. Wires and the rest will have to wait a few weeks. In any case, if I don't find a vacuum leak, then I'm going to suspect that spark plug wires, dizzy cap, coil, and pickup coil. I know I should have had all this done first before even doing anything with the carb, but you know, everything goes back to money.
Thing is, I reconnected all the vacuum hoses and took it for a few spins. First time, it ran like cr*p. 4 barrel never kicked in, and it seemed like it was slow to get up to speed. The timing didn't feel right, so I went back and checked it. Sure enough, it was reading around 8-9 degrees BTDC. I was probably looking at the wrong point on the timing tab when I set it. Anyway, I set it to 5 BTDC. (Spec calls for 6. It was at 0 before I set it the other day.) I also put the TV cable adjustment on the carb back to where it was originally. This time around, the 4 barrel was definitely kicking in, and it would spin the tires from a dead stop. However, when I floor it from a dead stop ... when it hits about 2000 RPM's ... it sounds like it wants to stumble for a second or so ... then takes off, again. I checked twice to see if it was throwing any codes (especially a lean or rich code). It's not. This is why I think it's a vacuum leak, somewhere.
10-27-2014, 11:25 AM
#34
Supreme Member
iTrader: (7)
Join Date: May 2004
Location: Lexington, SC
Posts: 5,291
Likes: 0
Received 58 Likes
on
52 Posts
Car: 1987 SC/1985 TA
Engine: 350/vortec/fitech
Transmission: T56
Axle/Gears: 3.27 9-bolt
Re: I need a sanity check before proceeding ...
Sounds like you got it. IAB within one turn or so of 4 out is near perfect. Count the turns to seat and record them in that notebook you keep in the tool chest of all your maintenance work on the 84.
It's likely the fan switch between 1 and 3. You can ground the lead with the engine in 'run' and it should engage the fan if all works properly. The KS should be in the right block drain plug, although an 84 LG4 will not have one, but L69 will. I would simply swap the CTS from the pass side head to the water neck. The connector can't survive long in the hotter area.
It's also common for the CTS connector to become brittle with age and lose continuity. Inspect it carefully and replace if questionable.
If you're getting 28-32 degrees then you're golden. Having to up the rpms somewhat is a sign that the O2 may not be staying hot enough. Common enough while it's idling but shouldn't happen in normal driving.
It WILL idle a little less steady in closed loop. A response to slight changes in dwell.
A short drive may not be enough time for the ECM to relearn. Once set, give it a few drives around in varying conditions.
If the hesitation is near 3/4 to WOT you may need some adjustment to the air valve tension. There's a writeup here within the tech articles.
If it hesitates off idle it points towards a bad dwell setting or the ECM hasn't relearned yet.
I wouldn't suspect a vac leak if you're getting good dwell readings at idle ESPECIALLY if you're that close to factory settings for the mixture screws and IAB. At low vacuum conditions the leak has the most affect. Some carb cleaner sprayed around may show something.
I wouldn't worry too much though until you replace the cap/rotor and wires. The dist and coil for these large cap HEIs are pretty stout. Inspect the inside of the old cap for gouges and scratches that may indicate excessive play (wobble) in the shaft. If you're good I'd leave the dist be.
I've had good luck with prices at Rock Auto. Except for things with a higher probability of warranty return, I seem to buy an awful lot of crap there.
When the pickup coil fails it will affect the tach, usually causing it to bounce.
Drive it some and report back.
Last edited by naf; 10-27-2014 at 11:28 AM.
10-29-2014, 12:00 AM
#35
Member
Thread Starter
Join Date: May 2014
Location: Seattle, WA
Posts: 184
Likes: 0
Received 0 Likes
on
0 Posts
Car: '84 Camaro Z28
Engine: 305 HO
Re: I need a sanity check before proceeding ...
Yesterday, I more closely inspected the wiring. After digging the wiring out of the corrugated plastic conduits, I discovered a few things. The wiring for the fan switch, CTS, and temp sender had all been cut and spliced with extra wiring so the wiring would reach the sensor locations ... all in the wrong place. Whoever overhauled that engine apparently didn't know where to put the sensors, so they put those where they thought those should go. The CTS was where the fan switch should be (between 6 and 8 spark plugs), the fan switch was where the temp sender should be (between 1 and 3 spark plugs), and temp sender was where the CTS should be (thermostat gooseneck). It was apparent that the wiring had been pulled to different locations, and when the wiring didn't reach, extra wiring was spliced to the existing wiring (except for the temp sender ... it was just pulled up and over ... didn't need any extra wiring for that). I relocated each of these back to the correct locations and re-did the wiring. (I have to wonder what possessed someone to do this in the first place. A "reputable" mechanic was supposed to have overhauled that engine, and this happens? Oh, it gets better, too ...)
While I was re-doing the sensors, I noticed one of the plug wires had some distinct cracks in the insulation. It there was one like that, then there's probably more. I'm sure this is what's causing the miss at idle, and it probably is the main reason that it stumbles somewhat at WOT from a dead stop. This is my next order of business: New plug wires, cap, and rotor.
I took the car for a few spins, then the wife and I took it on a short trip for a family function. It was a 60 mile round trip. Felt like I had to keep my foot on the pedal at times when stopped. Got back home and checked it for codes. There were none.
After the engine warmed up, the idle would get crappy. This had been doing this from the beginning after I reinstalled the carb. Seemed like it wanted to go up to around 1500 RPM's and stay there. Sometimes, it wouldn't stay put. I couldn't figure it out. When it was cold, it idled great. I kept thinking vacuum leak, but it idled great when it was cold. Yesterday, I sprayed some WD-40 around the intake and a few other places but nothing happened. I was thinking the EGR might be going bad, but again, it didn't idle bad when it was cold. This got me thinking about the choke system on the carb. Today, I inspected it real close, and come to find out, I had put the secondary lockout on backwards. Duh. I carefully pulled the choke housing back far enough (ensuring the I didn't pull the shaft out of the carb) to reverse the secondary lockout. While doing this, I bumped into the vacuum line to the EGR valve, and it came off the EGR valve nipple. I attempted to push the hose back on to the nipple, and it wouldn't go on all the way. I was like "WTF"? I looked into the end of the hose, and there was a screw screwed into the hose! I'm still guessing as to why that was put there. If it was to plug the line after the last carb rebuild, then why would they plug the line, there? Anyway, I took the screw out and reconnected the vacuum line to the EGR valve. I took it out for another spin, and I came back very pleased. It now appears to idle MUCH better (around 750 RPM remaining steady). Also, the pickup was MUCH better, too. There was still some stumbling with WOT from a dead stop once the RPM hit about 2000 - 2400 RPM, but it didn't seem as bad. Also, there are still no codes being thrown. Don't know if what I corrected today corrected anything or if the ECM has learned what it needs to. I suspect a combination of both.
Tomorrow, I'm going to check the dwell, again, and I'm also going to record what the IAB and idle mixture screw settings are.
I definitely made some progress, today, but I really want that stumble to disappear. I think I'm just about there. We'll see once I get new plug wires on there.
I'll provide more updates as those become available.
10-30-2014, 07:32 PM
#36
Member
Thread Starter
Join Date: May 2014
Location: Seattle, WA
Posts: 184
Likes: 0
Received 0 Likes
on
0 Posts
Car: '84 Camaro Z28
Engine: 305 HO
Re: I need a sanity check before proceeding ...
And the saga continues ...
Put a new set of plug wires on it, and 95% of the miss cleared right up. Idles great. No more stumbling at WOT from a dead stop. Going to change the rotor and dizzy cap, next.
I still need to adjust the electric coil, somewhat. It's temperamental in the mornings, and it wants to flood if you don't depress the accelerator at least one full pump. Once started, it's good to go. The choke blade is nearly closed ... only opened about 1/8", maybe a little less. I'm going to open it just a little more and see what happens. Setting the choke on the choke housing main mark and the mark on the electric coil isn't working out all that well. It'll get there. Just need to find the sweet spot.
At this point, I'm going to consider the original problem solved and call it a day with this thread.
Thanks to everyone that provided input. Special thanks to naf for all the help and guidance and a superb writeup of doing a quadrajet carb rebuild.

Thread
Thread Starter
Forum
Replies
Last Post