My T56 Swap Thread....
 12-29-2007, 01:03 AM
#51
Supreme Member

iTrader: (12)
Join Date: Aug 2005
Location: M.D
Posts: 1,923
Likes: 0
Received 2 Likes
on
1 Post
Car: 1987 Camaro
Engine: 350 hsr
Transmission: 700R4(blown)
Axle/Gears: 3:73
Re: My T56 Swap Thread....
just read this thread start to finish ....wow iknida wana do a swap but didnt think it was so intense
 12-29-2007, 01:07 AM
#52
Supreme Member
Thread Starter
Join Date: Sep 2005
Location: Ottawa, ONT
Posts: 1,951
Likes: 0
Received 7 Likes
on
7 Posts
Car: 1987 Firebird
Engine: 355
Transmission: T56
Re: My T56 Swap Thread....
I did my research for a couple months, and each time i read a start to finish thread about doing the swap, i felt the same way you do right now.
I was gonna wait to say this till i finished, cuz i havent seen it all yet, BUT im pretty close to the end now. I overlooked the part that my engine was a two peice rear main seal, but other than that hiccup, it was actually REALLY REALLY simple.
I cringe at big tasks like this, and i dont have the worlds best tools, and regardless, everything is going really smooth. I think anyone can do it, the hardest part is getting at bolts that are hard to reach.
Pretty easy, dont let it scare you.
The following users liked this post:
oldcustard (01-25-2021)
12-29-2007, 01:12 AM
#53
Supreme Member
iTrader: (12)
Join Date: Aug 2005
Location: M.D
Posts: 1,923
Likes: 0
Received 2 Likes
on
1 Post
Car: 1987 Camaro
Engine: 350 hsr
Transmission: 700R4(blown)
Axle/Gears: 3:73
Re: My T56 Swap Thread....
this swap has been in my head for some time but im in the procces of saving for head/cam/intake/injectors/fpr(fuel pressure regulator) and all the lil things i need for that swap wich in the end will prly be about 3k. guess after that ill start searchin for parts.....
~edit ~ sent you a pm man
~edit ~ sent you a pm man
Last edited by toxik IROC; 12-29-2007 at 01:16 AM.
12-31-2007, 11:19 AM
#54
Supreme Member
Thread Starter
Join Date: Sep 2005
Location: Ottawa, ONT
Posts: 1,951
Likes: 0
Received 7 Likes
on
7 Posts
Car: 1987 Firebird
Engine: 355
Transmission: T56
Re: My T56 Swap Thread....
Ok, so i got my camera back earlier than expected. No more tryin to explain stuff with long descriptions and funny hand signals!
Im goin out for new years, so ill post what i have and snap some pix when i get back, or possibly tommorow.
Ok to start, the LT1 starter wiring was very easy once i did a little search. There are 2 fat posts, one has a wire going from the post to INSIDE the starter housing itself. THIS post is the ground. It can be left as is because the starter grounds through the block, or it can be connected to the battery negative. The other fat post is the Positive. This is where i transferred all the fat post wires from my old starter. Now im not exactly sure what the little post is, but i only had ONE wire going to ONE little post on the old starter, so i just transferred it over. I think its the solenoid switch. In either case, im glad i took all that bulk and weight out, the mini starter is amazing. (pix to come later).
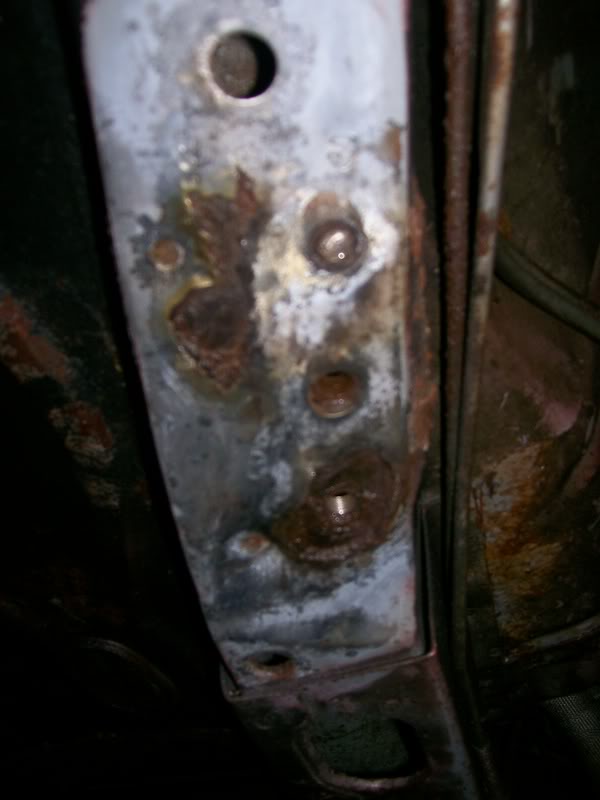
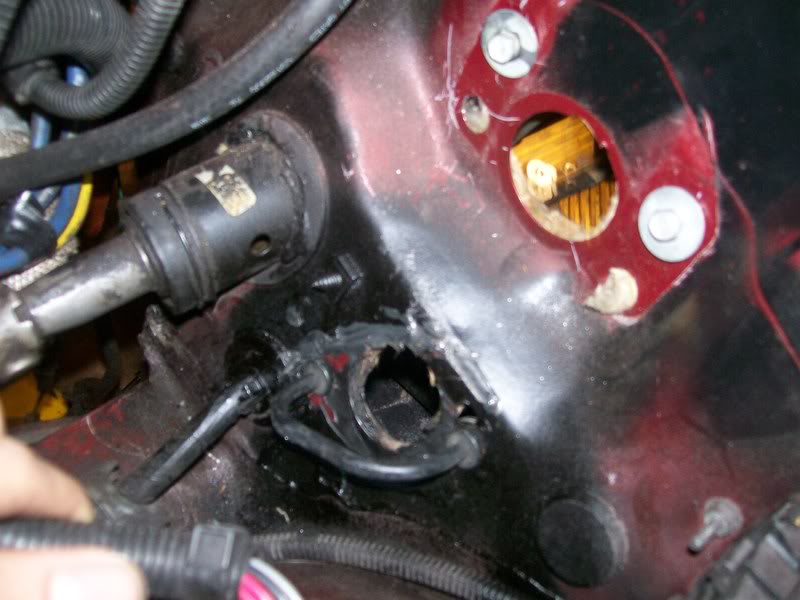
Next off, heres the holes i screwed up on the firewall, i was able to get away with drilling only a third hole instead of relocating all of them. The bracket needs to bend "slightly" to fit. I used a hole saw to do the hole in the middle and dremeleed it to oval. (pix to come later).
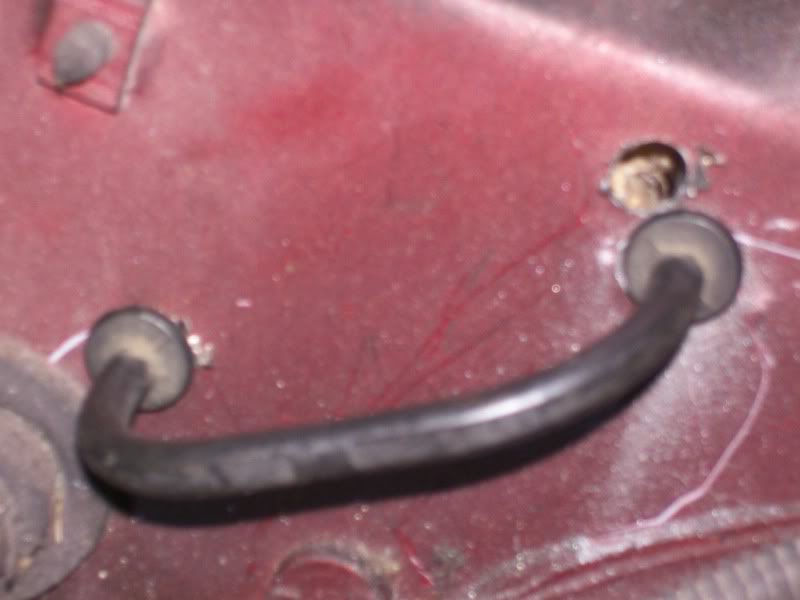
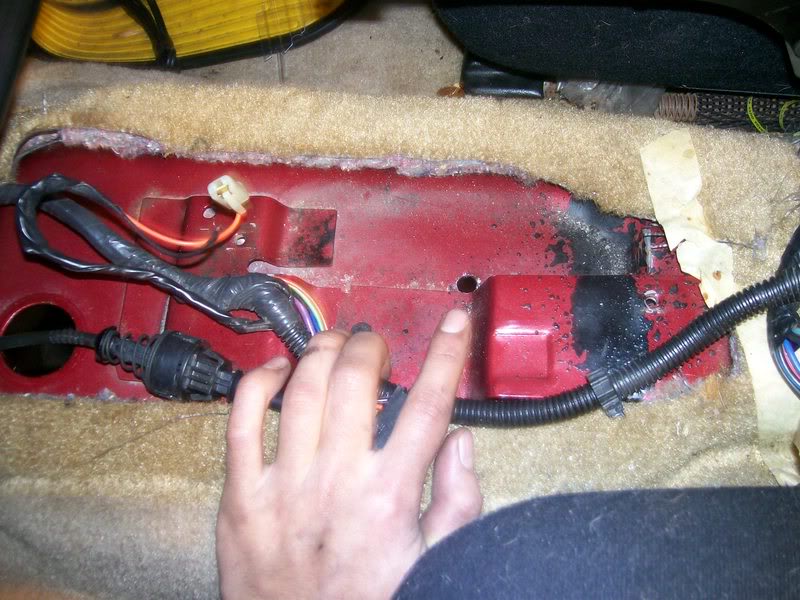
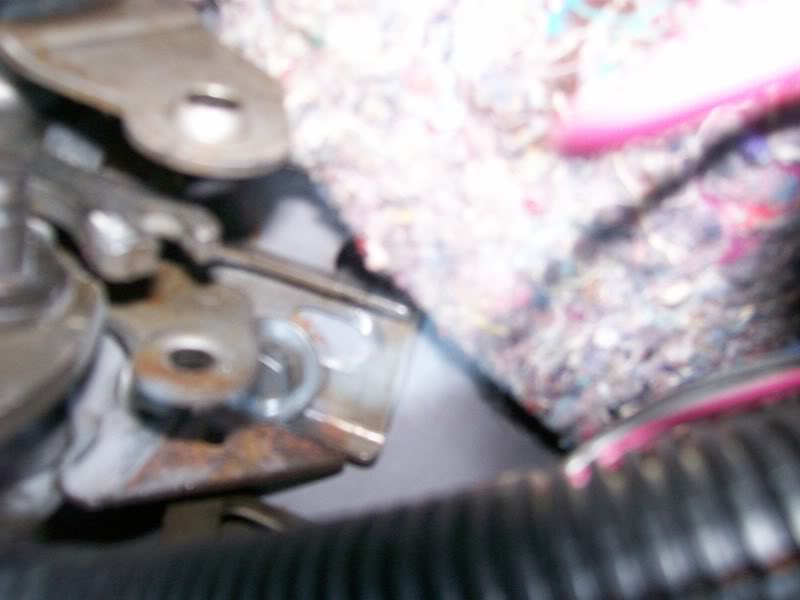
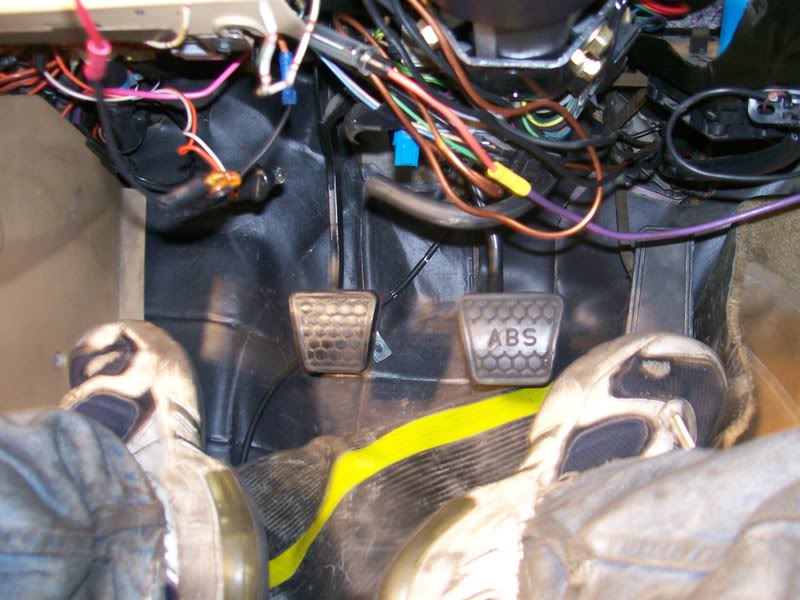
Heres the pedals, this is how i had to drill the upper hole for the bolt to fit. The pedals WERE in, but i hadnt gotten the master cylinder in yet. Its kind of a two person job so a freind is coming to help me. You cant get the master in, with the booster in your way, and the booster is about all that holds the pedals up. So both will need to be suspended while the master goes in, and then the booster will go in last.
I also tapped a third hole for mounting the x-member on each side. The pic doesnt show it, but the rust wasnt as bad as i thought. A couple of bad spots, but the rest is shiny solid metal. Im gonna get some patch work done in the spring.
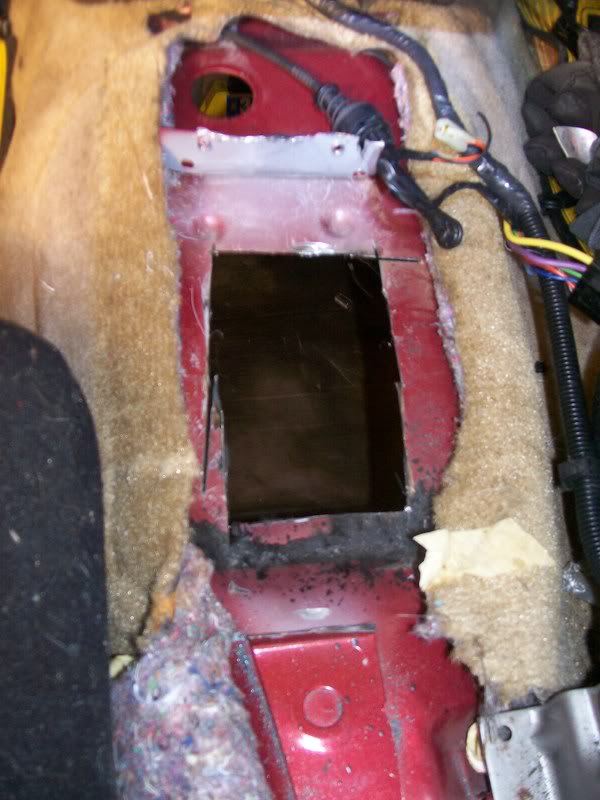
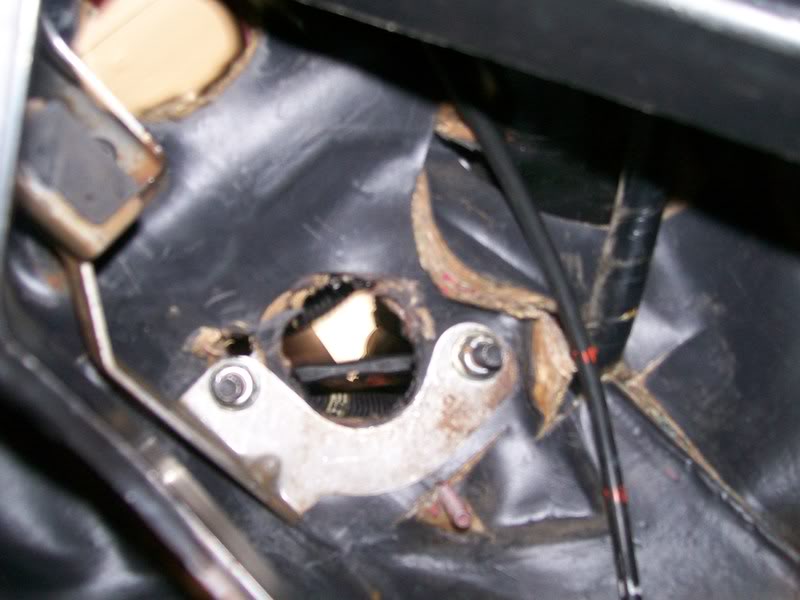
Finally heres the hole i drilled for the shifter. Notice you can kind of see the factory indentation for the T-5 spot, notice the hole isnt quite centered in that template, i had to cut further back.
Ill snap more pix tonight and post when i can. Meanwhile HAPPY NEW YEAR!
Im goin out for new years, so ill post what i have and snap some pix when i get back, or possibly tommorow.
Ok to start, the LT1 starter wiring was very easy once i did a little search. There are 2 fat posts, one has a wire going from the post to INSIDE the starter housing itself. THIS post is the ground. It can be left as is because the starter grounds through the block, or it can be connected to the battery negative. The other fat post is the Positive. This is where i transferred all the fat post wires from my old starter. Now im not exactly sure what the little post is, but i only had ONE wire going to ONE little post on the old starter, so i just transferred it over. I think its the solenoid switch. In either case, im glad i took all that bulk and weight out, the mini starter is amazing. (pix to come later).
Next off, heres the holes i screwed up on the firewall, i was able to get away with drilling only a third hole instead of relocating all of them. The bracket needs to bend "slightly" to fit. I used a hole saw to do the hole in the middle and dremeleed it to oval. (pix to come later).
Heres the pedals, this is how i had to drill the upper hole for the bolt to fit. The pedals WERE in, but i hadnt gotten the master cylinder in yet. Its kind of a two person job so a freind is coming to help me. You cant get the master in, with the booster in your way, and the booster is about all that holds the pedals up. So both will need to be suspended while the master goes in, and then the booster will go in last.
I also tapped a third hole for mounting the x-member on each side. The pic doesnt show it, but the rust wasnt as bad as i thought. A couple of bad spots, but the rest is shiny solid metal. Im gonna get some patch work done in the spring.
Finally heres the hole i drilled for the shifter. Notice you can kind of see the factory indentation for the T-5 spot, notice the hole isnt quite centered in that template, i had to cut further back.
Ill snap more pix tonight and post when i can. Meanwhile HAPPY NEW YEAR!
12-31-2007, 02:11 PM
#55
Supreme Member
iTrader: (5)
Join Date: Sep 2004
Location: Casselberry, FLA
Posts: 2,771
Likes: 0
Received 5 Likes
on
5 Posts
Car: 88 V6 'bird/89TBI bird/85 T/A
Engine: 2.8/TBI/TPI
Transmission: V8 T-5/700R4 x2
Axle/Gears: 3.42 open/2.73 open/ 3.27 9 bolt
Re: My T56 Swap Thread....
Happy new year to you, as well!
Consider me subscribed to this thread...
Consider me subscribed to this thread...
01-01-2008, 12:55 AM
#56
Junior Member

Join Date: Jan 2008
Posts: 3
Likes: 0
Received 0 Likes
on
0 Posts
Re: My T56 Swap Thread....
Got my t-56, got pretty much everything. Someone told me the shifter from my t56 wich is out of a 95 camaro will not work in this swap.. Going into a 91 firebird, said It will be too far back. Is that BS or do i need to hunt down a shifter handle?
01-01-2008, 01:05 AM
#57
Supreme Member
Thread Starter
Join Date: Sep 2005
Location: Ottawa, ONT
Posts: 1,951
Likes: 0
Received 7 Likes
on
7 Posts
Car: 1987 Firebird
Engine: 355
Transmission: T56
Re: My T56 Swap Thread....
Read the tech article about this swap. Theres two availible. One of the first things mentioned is the shifter is not in the same location as the T5. You will have to extend the opening 2" back i beleive. The shifter has nothing to do with it, anyother shifter will do the same thing. Solution is cutting your floor up a bit. No fuss at all.
01-01-2008, 01:58 PM
#58
Junior Member
Join Date: Jan 2008
Posts: 3
Likes: 0
Received 0 Likes
on
0 Posts
Re: My T56 Swap Thread....
Thanks alot, thats what i needed to know. Im new the site, i looked for a FAQ before i asked in the Transmission thread and the engine swap thread a couple other places, guess i didnt think to look in a tech thread.
01-01-2008, 03:53 PM
#59
Junior Member
Join Date: Jan 2008
Posts: 3
Likes: 0
Received 0 Likes
on
0 Posts
Re: My T56 Swap Thread....
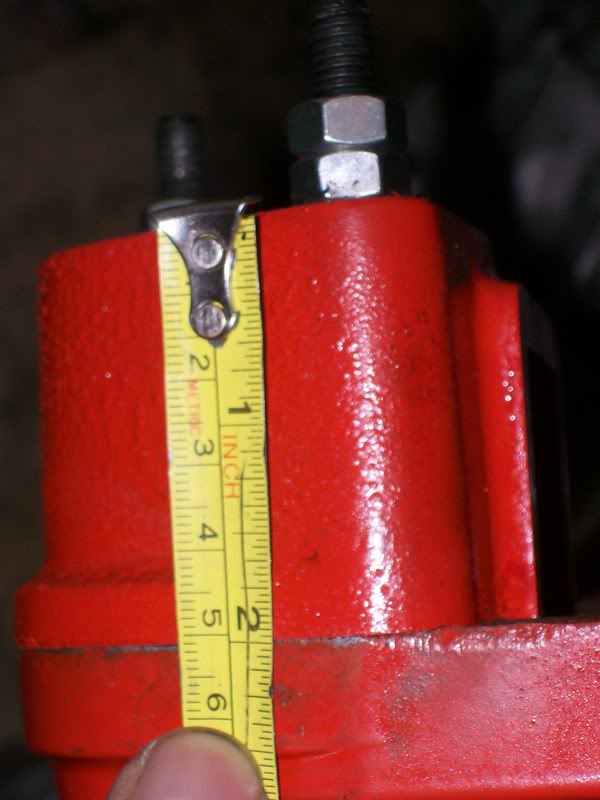
Oh man im cussin now. I just went out to the shop to take an inventory on what ive got and what im gonna need....Im missing something i bets gonna be serious business to try and find. The peice that the slave cylinder bolts too, little peice of aluminum that slides over the two studs on the bell housing. Heres the pic. There is a picture of it in the first picture online170 posted on the first page of this thread. If anyone has any clue where to get it, Or if someone could just tell me how "thick" it is. Anything would be helpful. We have no decent junk yards around here. The one we do have only has pre 90 model cars for the most part and if they do get something newer its ripped apart within a day or two. Took me forever to score the t-56 I got. Anyway, guess im gonna go ebay hunting.
01-01-2008, 07:27 PM
#60
Member
iTrader: (1)

Join Date: Jan 2007
Location: miami fl
Posts: 239
Likes: 0
Received 0 Likes
on
0 Posts
Car: 92 z28
Engine: fast burn 385
Transmission: t56
Axle/Gears: 3.73
Re: My T56 Swap Thread....
i did this swap with my dad at the beginning of 07, but i started with a t5 so i didnt have quite as much cuting to do. if there are any more questions i can try to help, but overall, it wasnt too hard. i had everything ahead of time - flywheel, trans, new clutch, hydraulics, 4th gen pedals, cross member ad attached torque arm. any by the way - the spohn torque arm is really noisy.
01-01-2008, 09:15 PM
#61
Supreme Member
Thread Starter
Join Date: Sep 2005
Location: Ottawa, ONT
Posts: 1,951
Likes: 0
Received 7 Likes
on
7 Posts
Car: 1987 Firebird
Engine: 355
Transmission: T56
Re: My T56 Swap Thread....
First off; CLASSIC, i guess i beat you to it before you sent the PM. Looks like its about 2" long.
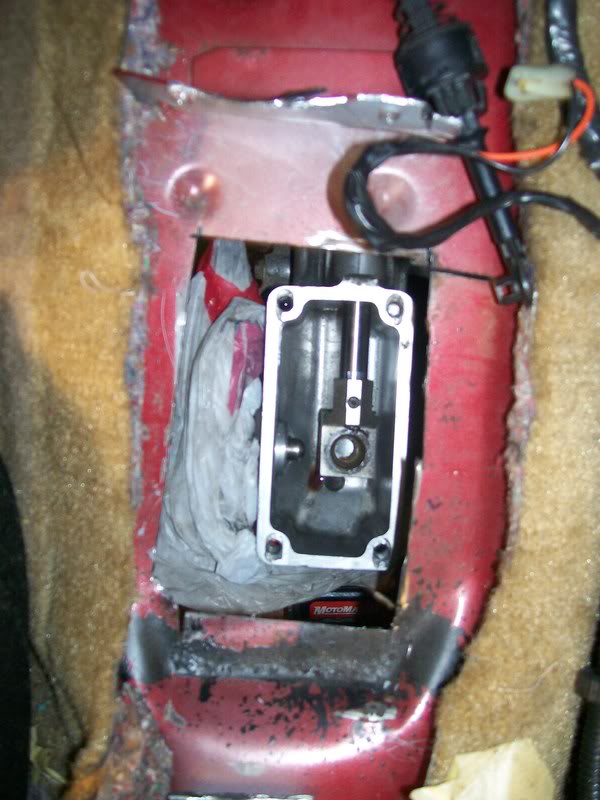
Next up; heres the hole i cut open for the shifter to fit through. This part is REALLY DANGEROUS. I only have a grinder, so the sparks were plenty. First i had to create a "wet towel" wall around the hole, making sure no carpet was exposed. It started melting my cloth seat cover, so i wasnt happy about that. The towels stopped that. Take it slow and easy on this part. It looks very rough, but i cut the minimum amount, as opposed to a big hole, i can smooth it out later.
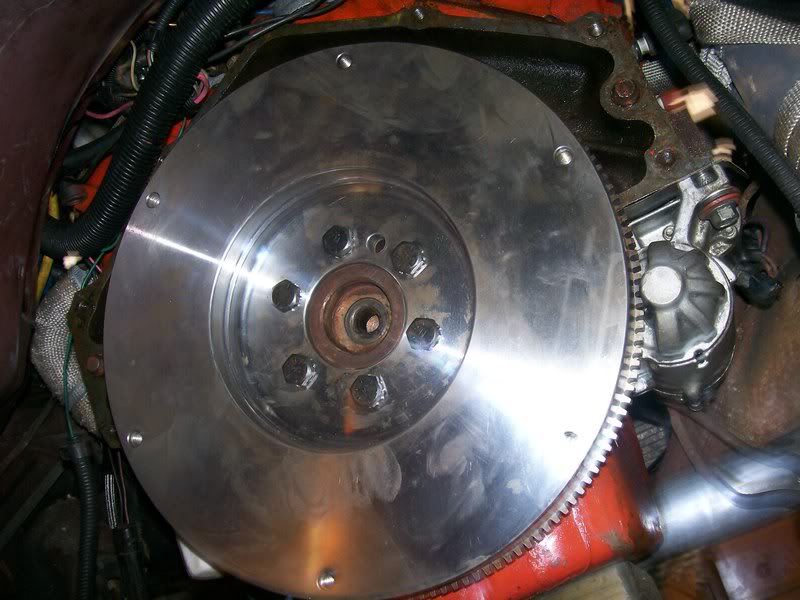
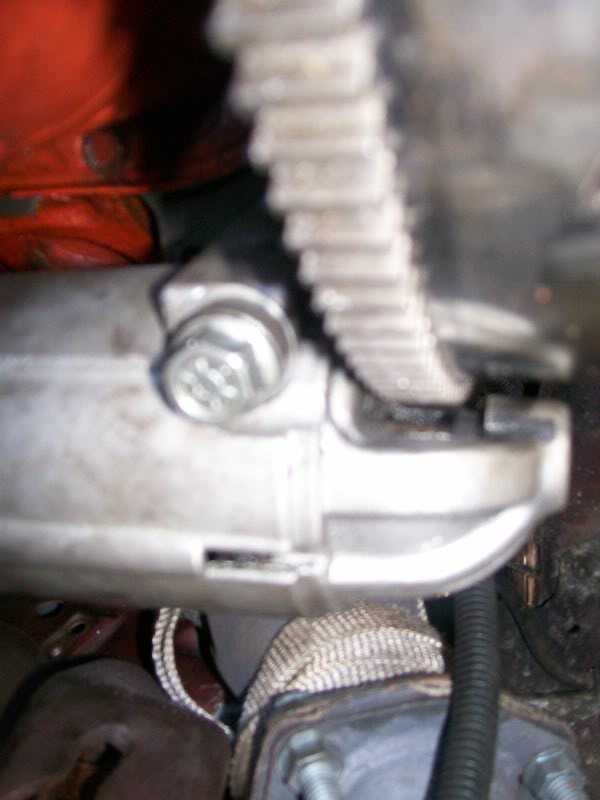
Heres the Starter and flywheel mounted. Note, the early block doesnt have threads going in as deep, and the mounting ear on the starter isnt as big. As a result i had a big gap to fill on the starter bolts. Some washers remedied the situation.
Perfect fit.
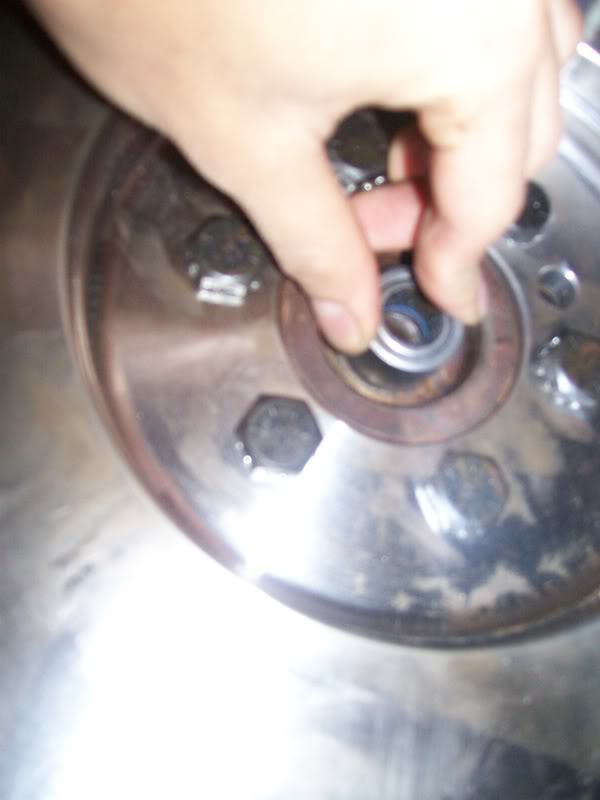
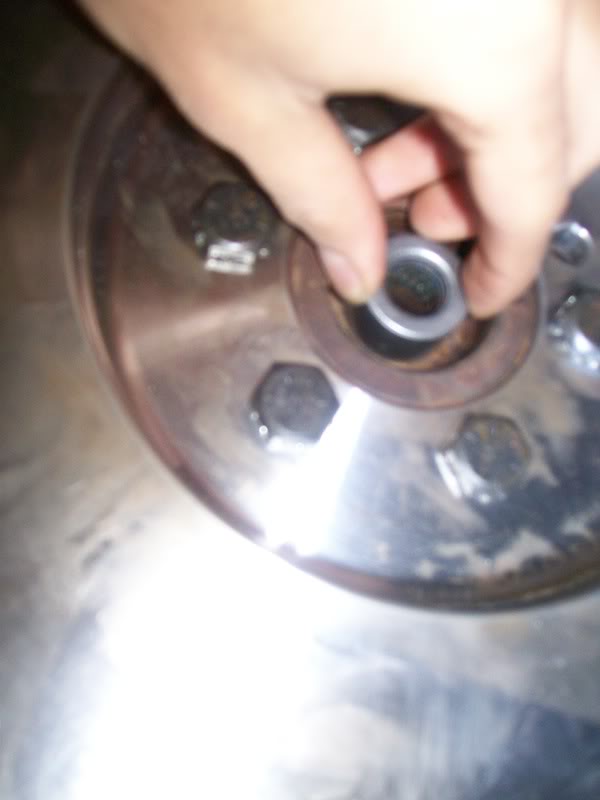
Next up, a question. Did i get the wrong pilot bearing? Isnt it supposed to seat right in there? Also does it go this way (following pic), or this way (pic after that)? One side has a seam, and the other side is flush.
SEAM
NO SEAM
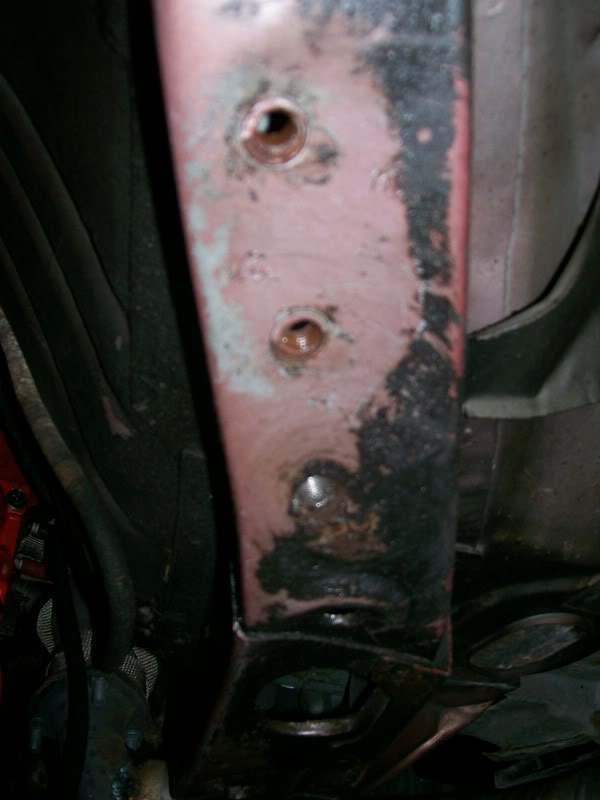
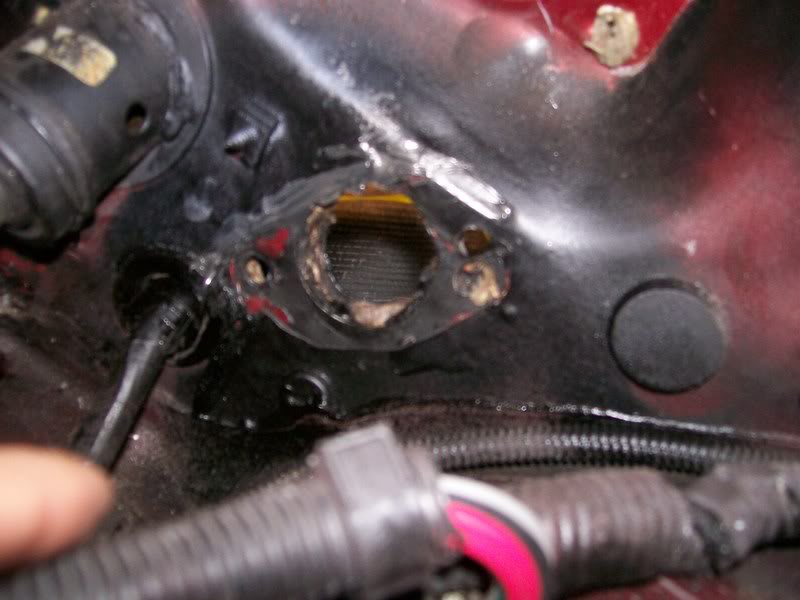
Finally heres the holes i had to cut. It looks really messy because its coated with rubberized undercoat. You can see the oval turned out nice. I will also use this to tell you the sequence i found easiest to mount the pedals.
PROBLEMS
1)First off, once the booster is in, its hard to mount the master.
2)Once the master is in, its hard to mount the pedals.
3)If the booster isnt in, its hard to mount anything.
This is because everything hits eachother. SO heres what i did.
1) Take two bolts, that fit through both the firewall and the booster bolt holes in the pedals, and stick em in the firewall with washers on the upper two booster bolts.
2) Go inside the car, hang the pedals on these two bolts. If the bolt isnt quite on, dont worry, go outside the car, stick your fingers through the BIG booster hole, and grab the pedals, push bolts in, and move pedals around as necessary. (this can also be done from inside by using the BIG hole).
3) Next mount just the U-bolt, and tighten MOST of the way, but not fully.
4) Next mount the top bolt that is annoying.
Now you have the pedals mounted firmly, and they will not move.
5) Remove U-bolt, and put the master in. (pix to come).
6) Replace U-bolt, and tighten it down. (pix to come).
7) Install booster, tighten all 4 bolts. (pix to come).
8) Connect booster rod to pedal, connect master cyl rod to pedal.
DONE!
Next up; heres the hole i cut open for the shifter to fit through. This part is REALLY DANGEROUS. I only have a grinder, so the sparks were plenty. First i had to create a "wet towel" wall around the hole, making sure no carpet was exposed. It started melting my cloth seat cover, so i wasnt happy about that. The towels stopped that. Take it slow and easy on this part. It looks very rough, but i cut the minimum amount, as opposed to a big hole, i can smooth it out later.
Heres the Starter and flywheel mounted. Note, the early block doesnt have threads going in as deep, and the mounting ear on the starter isnt as big. As a result i had a big gap to fill on the starter bolts. Some washers remedied the situation.
Perfect fit.
Next up, a question. Did i get the wrong pilot bearing? Isnt it supposed to seat right in there? Also does it go this way (following pic), or this way (pic after that)? One side has a seam, and the other side is flush.
SEAM
NO SEAM
Finally heres the holes i had to cut. It looks really messy because its coated with rubberized undercoat. You can see the oval turned out nice. I will also use this to tell you the sequence i found easiest to mount the pedals.
PROBLEMS
1)First off, once the booster is in, its hard to mount the master.
2)Once the master is in, its hard to mount the pedals.
3)If the booster isnt in, its hard to mount anything.
This is because everything hits eachother. SO heres what i did.
1) Take two bolts, that fit through both the firewall and the booster bolt holes in the pedals, and stick em in the firewall with washers on the upper two booster bolts.
2) Go inside the car, hang the pedals on these two bolts. If the bolt isnt quite on, dont worry, go outside the car, stick your fingers through the BIG booster hole, and grab the pedals, push bolts in, and move pedals around as necessary. (this can also be done from inside by using the BIG hole).
3) Next mount just the U-bolt, and tighten MOST of the way, but not fully.
4) Next mount the top bolt that is annoying.
Now you have the pedals mounted firmly, and they will not move.
5) Remove U-bolt, and put the master in. (pix to come).
6) Replace U-bolt, and tighten it down. (pix to come).
7) Install booster, tighten all 4 bolts. (pix to come).
8) Connect booster rod to pedal, connect master cyl rod to pedal.
DONE!
01-01-2008, 09:19 PM
#62
Supreme Member
Thread Starter
Join Date: Sep 2005
Location: Ottawa, ONT
Posts: 1,951
Likes: 0
Received 7 Likes
on
7 Posts
Car: 1987 Firebird
Engine: 355
Transmission: T56
Re: My T56 Swap Thread....
Had too many pix in the last thread, but i also used this oppurtunity, to pretend to shift my rumbling v8 for about 10 minutes. How could you resist right? Ive never owned or driven a manual V8 before. I drove a 5.0L rustang once with 5 spd, but that doesnt count  .
.
.
01-01-2008, 10:09 PM
#63
Member
iTrader: (1)
Join Date: Jan 2007
Location: miami fl
Posts: 239
Likes: 0
Received 0 Likes
on
0 Posts
Car: 92 z28
Engine: fast burn 385
Transmission: t56
Axle/Gears: 3.73
Re: My T56 Swap Thread....
the first pic of the bearing is correct, the side with a larger flat area sits against the crank.
and by the way - its a lot easier to put the pedals and booster back in with a 2nd person, if you hadnt figured that out yet
and by the way - its a lot easier to put the pedals and booster back in with a 2nd person, if you hadnt figured that out yet
01-01-2008, 10:16 PM
#64
Supreme Member
Thread Starter
Join Date: Sep 2005
Location: Ottawa, ONT
Posts: 1,951
Likes: 0
Received 7 Likes
on
7 Posts
Car: 1987 Firebird
Engine: 355
Transmission: T56
Re: My T56 Swap Thread....
Actually i HAD figured it out, but when my freind came over to help, the new hole i drilled for the "top bolt" wasnt large enough, so we couldnt do it while he was there. (he was only over for 20 mins).
My dad usually works a lot so hes too busy to help, and my lil 8 year old bro is the next person thats willing to help, and hes not tall enough to reach over the hood, even with a couple milk crates
.But in anycase, if you cant find a second pair of hands, this is the next best thing.
Cheers.
01-02-2008, 10:12 AM
#65
Supreme Member
iTrader: (1)

Join Date: Sep 2005
Posts: 26,040
Received 1,667 Likes
on
1,265 Posts
Car: Yes
Engine: Usually
Transmission: Sometimes
Axle/Gears: Behind me somewhere
Re: My T56 Swap Thread....
Pilot bearing is the same for both styles of crank.
You just knock it in there with a brass drift or something, to where it's just under flush with the surface of the crank. Note that there's a little rubber seal just inside the front of it; you don't want to damage or distort it so that the seal fails to hold the grease in.

You just knock it in there with a brass drift or something, to where it's just under flush with the surface of the crank. Note that there's a little rubber seal just inside the front of it; you don't want to damage or distort it so that the seal fails to hold the grease in.
01-02-2008, 05:53 PM
#66
Supreme Member
Thread Starter
Join Date: Sep 2005
Location: Ottawa, ONT
Posts: 1,951
Likes: 0
Received 7 Likes
on
7 Posts
Car: 1987 Firebird
Engine: 355
Transmission: T56
Re: My T56 Swap Thread....
Sofa,
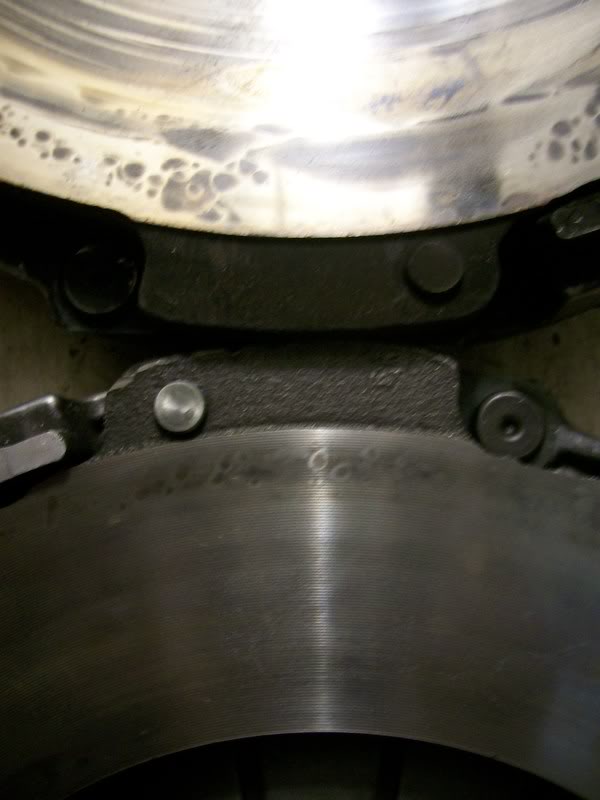
If you look at post #61, pic 3 shows JUSt the flywheel. Notice you see (from the outside, in), the flywheel, the rusty surface of the crank, and a dark grey metallic object in the center of the crank.
http://i111.photobucket.com/albums/n...rd/Pix1123.jpg
If you look at pix 5 and 6 in post 61, you see me holding up the pilot bearing centered on the crank. You only see the flywheel, and the rusty part of the crank, that dark grey part in the middle appears to be the same size as the pilot bearing.
http://i111.photobucket.com/albums/n...rd/Pix1127.jpg
Am i missing something here??? Doesnt look like its gonna fit. Im gonna go into the garage in a minute, just to double check, but thats what i was trying to ask earlier.
01-02-2008, 06:06 PM
#67
Member
iTrader: (2)
Join Date: Oct 2003
Location: Buffalo, NY
Posts: 428
Likes: 0
Received 2 Likes
on
2 Posts
Car: 1987 Camaro IROC-Z28
Engine: TPI 350ci L98
Transmission: T56 - Hurst Shifter
Axle/Gears: BW - 3.70
Re: My T56 Swap Thread....
Obviously it isn't going to fit. The picture you show 1123 already has the pilot bearing installed. I'd say check to see if the existing bearing turns freely. If so, add some greese and you should be okay. Or you could just take the old one out and replace it to be safe. They can be difficult to get out though.
01-02-2008, 06:09 PM
#68
Supreme Member
Thread Starter
Join Date: Sep 2005
Location: Ottawa, ONT
Posts: 1,951
Likes: 0
Received 7 Likes
on
7 Posts
Car: 1987 Firebird
Engine: 355
Transmission: T56
Re: My T56 Swap Thread....
Obviously it isn't going to fit. The picture you show 1123 already has the pilot bearing installed. I'd say check to see if the existing bearing turns freely. If so, add some greese and you should be okay. Or you could just take the old one out and replace it to be safe. They can be difficult to get out though.
In that case, ill just try and remove it, why use an old one when i have a new one?
01-02-2008, 06:19 PM
#69
Supreme Member
iTrader: (1)
Join Date: Sep 2005
Posts: 26,040
Received 1,667 Likes
on
1,265 Posts
Car: Yes
Engine: Usually
Transmission: Sometimes
Axle/Gears: Behind me somewhere
Re: My T56 Swap Thread....
Yeah I missed the other pic, where it shows the bearing (or bushing?) already in there.... sorry.
Use your clutch alignment tool to get the old one out. Pack the cavity behind it COMPLETLY full of grease; put the alignment tool in; and give it a good whack. Keep adding more grease as the bearing/bushing comes out.
Who knows what it's doing there... just hitching a ride, I guess...
Use your clutch alignment tool to get the old one out. Pack the cavity behind it COMPLETLY full of grease; put the alignment tool in; and give it a good whack. Keep adding more grease as the bearing/bushing comes out.
Who knows what it's doing there... just hitching a ride, I guess...
01-02-2008, 06:20 PM
#70
Member
iTrader: (2)
Join Date: Oct 2003
Location: Buffalo, NY
Posts: 428
Likes: 0
Received 2 Likes
on
2 Posts
Car: 1987 Camaro IROC-Z28
Engine: TPI 350ci L98
Transmission: T56 - Hurst Shifter
Axle/Gears: BW - 3.70
Re: My T56 Swap Thread....
Didn't this engine come out of a different car? If so, the other car probably had a manual tranny in it at some point.
If you can get the old one out then great, use the new one. You may want to be carefull not to damage the existing one incase you can't get it out and need to use it.
They make a puller to remove them with. Here is a trick I heard to get these out if you don't have a puller. Find a bolt that is just small enough to fit inside the bearing without getting stuck. Then fill up the hole inside the bearing with greese, as much as you can get in there. Then put the bolt inside the bearing and give it a good hit with a hammer. Add more greese as necessary. The greese should drive the bearing out when you hit the bolt with the hammer.
Edit:
The alignment tool and greese may work even better.
01-02-2008, 06:23 PM
#71
Supreme Member
Thread Starter
Join Date: Sep 2005
Location: Ottawa, ONT
Posts: 1,951
Likes: 0
Received 7 Likes
on
7 Posts
Car: 1987 Firebird
Engine: 355
Transmission: T56
Re: My T56 Swap Thread....
Yea its originally out of a truck, and has been in a malibu or a vega or something. So that probably explains it. Ill try the grease thing carefully!.
Glad you guys told me that, before i tried to remove it with a crow bar
Glad you guys told me that, before i tried to remove it with a crow bar
01-02-2008, 07:10 PM
#72
Member
iTrader: (1)
Join Date: Jan 2007
Location: miami fl
Posts: 239
Likes: 0
Received 0 Likes
on
0 Posts
Car: 92 z28
Engine: fast burn 385
Transmission: t56
Axle/Gears: 3.73
Re: My T56 Swap Thread....
i got a puller for mine and it wouldnt even fit inside the old bearing, so that didnt work. next i went to the parts store and got a tap and screwed it in against the crank. once it bottomed out it started pulling out the old bearing. that worked for me and it only cost like $5
01-02-2008, 08:57 PM
#73
Supreme Member
Thread Starter
Join Date: Sep 2005
Location: Ottawa, ONT
Posts: 1,951
Likes: 0
Received 7 Likes
on
7 Posts
Car: 1987 Firebird
Engine: 355
Transmission: T56
Re: My T56 Swap Thread....
I had a CLOSE look, and it turns out its a bushing. I dont see any races or rollers or anything. I definately would prefer the bearing in there so this one has to come out.
http://www.camaros.org/images/bellho...le_Bearing.jpg
I tried the grease thing, but the alignment tool is too skinny and i dont have a thick enough grease to pack in there. I cant get all the air pockets out so it aint workin for me.
I tried to hammer the bushing IN couple thousanths of an inch to get it "free" but its too soft and the center is getting punched.
So i was thinking of getting getting a puller, but they all seem huge, like 92camaro said. I think im just gonna force a bolt through, until it bottoms out and pushes it through.
Any other bright ideas welcome.
01-05-2008, 08:39 AM
#74
Supreme Member
Thread Starter
Join Date: Sep 2005
Location: Ottawa, ONT
Posts: 1,951
Likes: 0
Received 7 Likes
on
7 Posts
Car: 1987 Firebird
Engine: 355
Transmission: T56
Re: My T56 Swap Thread....
Is it a big deal if im missing the "dowl pin" on the crank? My flywheel is aligned on the crank perfectly and all the holes match, but im missing the dowl pin like shown in sofa's pic. IS this gonna be a problem?
If so, where do i get a dowl pin?
If so, where do i get a dowl pin?
01-05-2008, 09:25 AM
#75
Supreme Member
iTrader: (1)
Join Date: Sep 2005
Posts: 26,040
Received 1,667 Likes
on
1,265 Posts
Car: Yes
Engine: Usually
Transmission: Sometimes
Axle/Gears: Behind me somewhere
Re: My T56 Swap Thread....
No, you don't really "need" the dowel pin. In fact, you don't even "need" to line up those particular holes. But if you do, and you have a vibe problem (highly unlikely), it makes it easier to sort out.
Note that my pic is of a 509 block.... those DO need a dowel pin, because the flywheel is externally balanced.
Note that my pic is of a 509 block.... those DO need a dowel pin, because the flywheel is externally balanced.
01-05-2008, 09:50 AM
#76
Supreme Member
Thread Starter
Join Date: Sep 2005
Location: Ottawa, ONT
Posts: 1,951
Likes: 0
Received 7 Likes
on
7 Posts
Car: 1987 Firebird
Engine: 355
Transmission: T56
Re: My T56 Swap Thread....
Sounds good, i should be done the swap today, my clutch arrived last night so i just gotta assemble everything. Hopefully i can do a test run later today.
01-05-2008, 11:56 AM
#77
Supreme Member
Thread Starter
Join Date: Sep 2005
Location: Ottawa, ONT
Posts: 1,951
Likes: 0
Received 7 Likes
on
7 Posts
Car: 1987 Firebird
Engine: 355
Transmission: T56
Re: My T56 Swap Thread....
Wow, i just realized this is almost at 1000 views. Hopefully this was helpful for people planning to do this in the future!.
Anyways, here we go, i got some more pix.
First off, heres the pix that i couldnt load last time, for intermediate steps in installing the pedal. So continuing from the last post with pix,
You remove the U-bolt and put in the master cylinder, and tighten U-bolt with nuts on the inside.
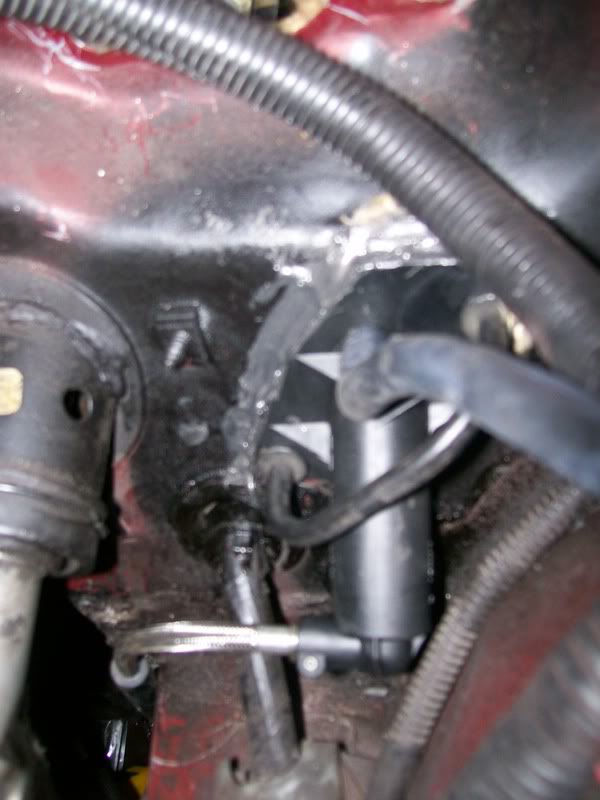
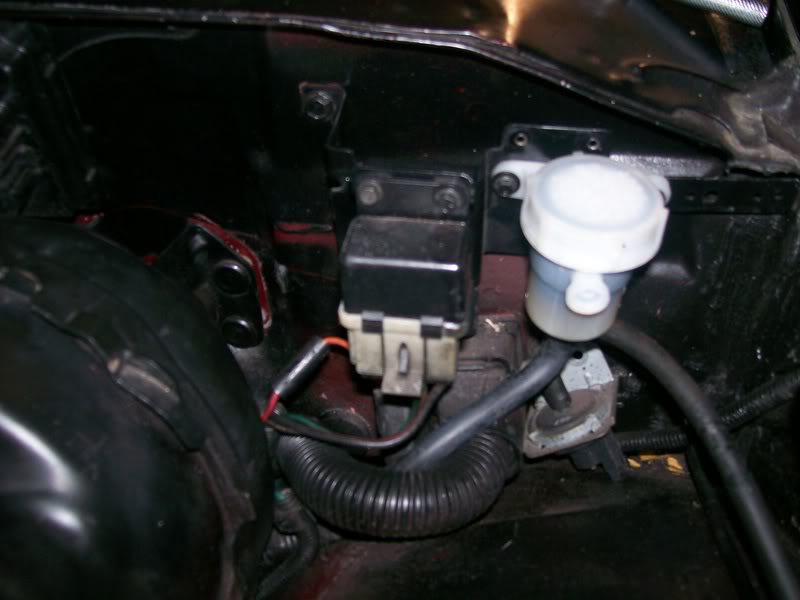
This is where i placed my reservoir, i took that factory bracket off, and drilled two new holes, (dont even need to tap them, the screws go right in). And ill put that cruise control thing on the far side where the empty space is. You can also see the brake booster is now in place. Speaking of which, if you are converting FROM automatic, you will need another retaining clip, to keep the ROD on the clutch pedal, or the ROD on the brake pedal. I need to make a trip to autoparts store for that, if anyone has a specific part number, or a place to buy please let me know.
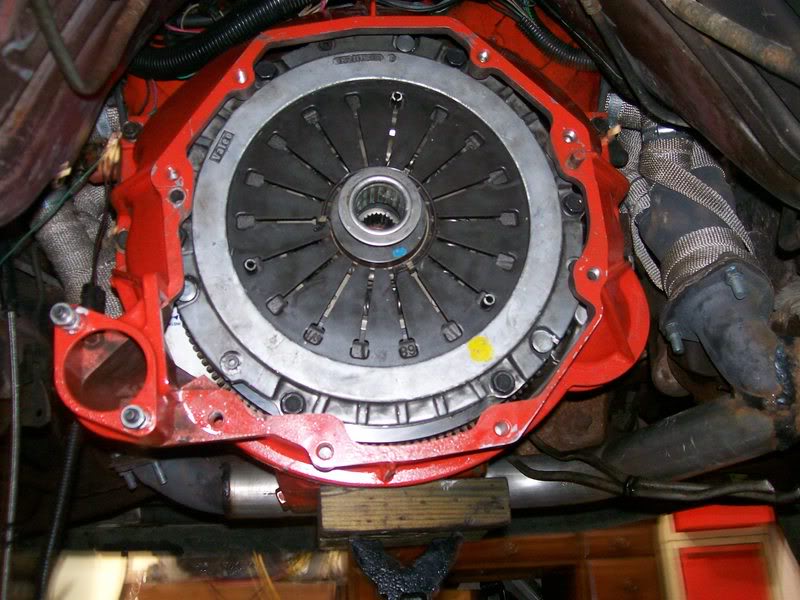
Next up, i got in my new clutch stuff last night. Can you tell which one is new? $100, not a bad deal at all.
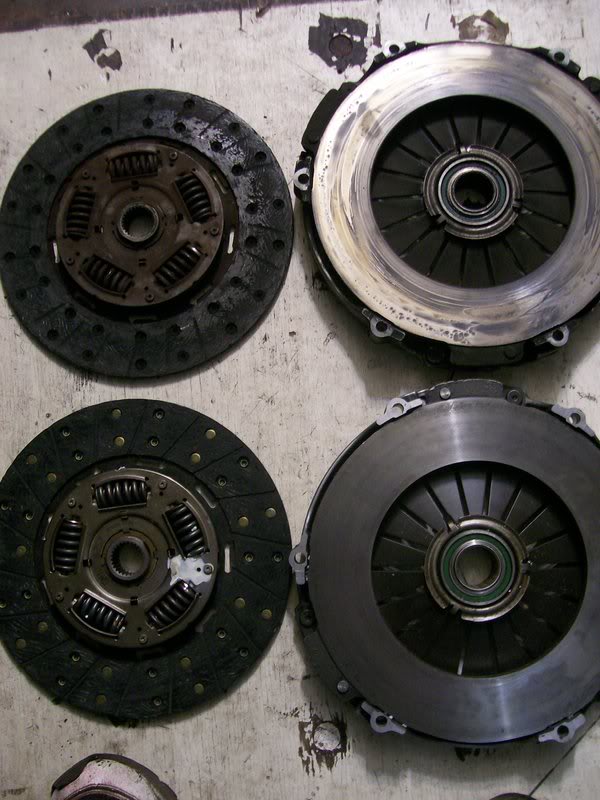
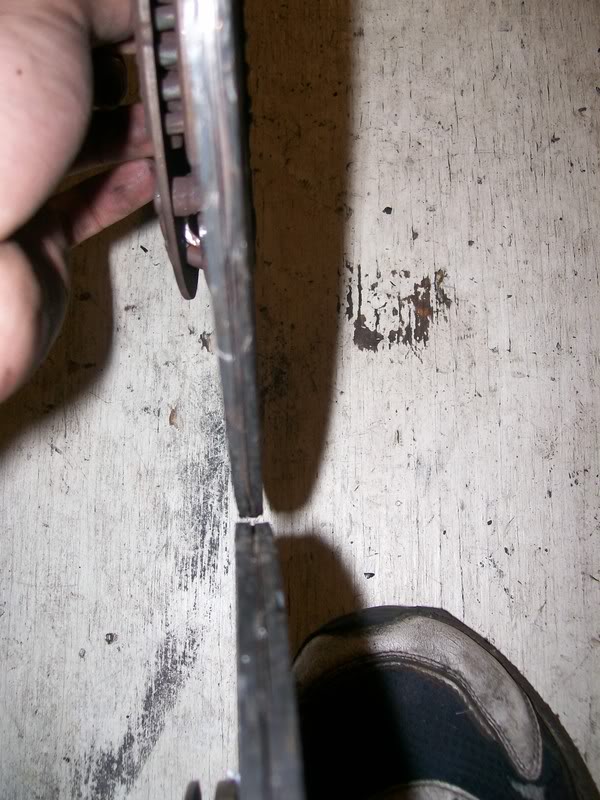
The PP has 500 miles on it, but its still pretty new, you can even see the machine marks still.
The old clutch disc looked pretty bad, but i guess it wasnt THAT bad, if you compare the thickness.
Now if you recall, i was having trouble getting the bushing out. This cost me $6 for a tap i had to purchase. Because it was a bushing, i tapped it with a 5.8 x 18 UNF bolt.
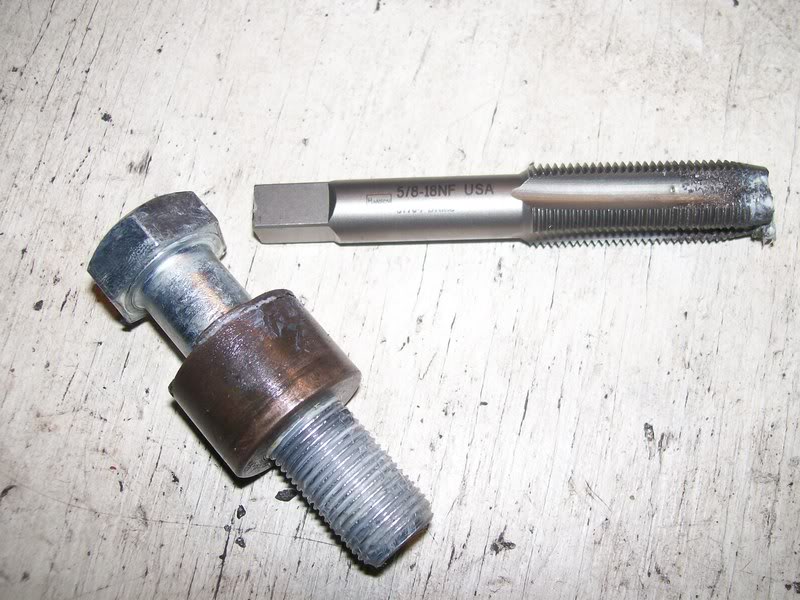
I decided to use an old FINE thread bolt i had laying around, because just incase the threads werent deep enough, it would still have alot of surface contact between bolt and bushing. So i tapped the bushing, packed the back with grease, and just tightened the 2 and 1/2 inch long bolt INTO the threads i just created. When the bolt got far enough, it hit the back of the crank. Since the bolt couldnt go any deeper, the bushing had to come out, the grease helped too.
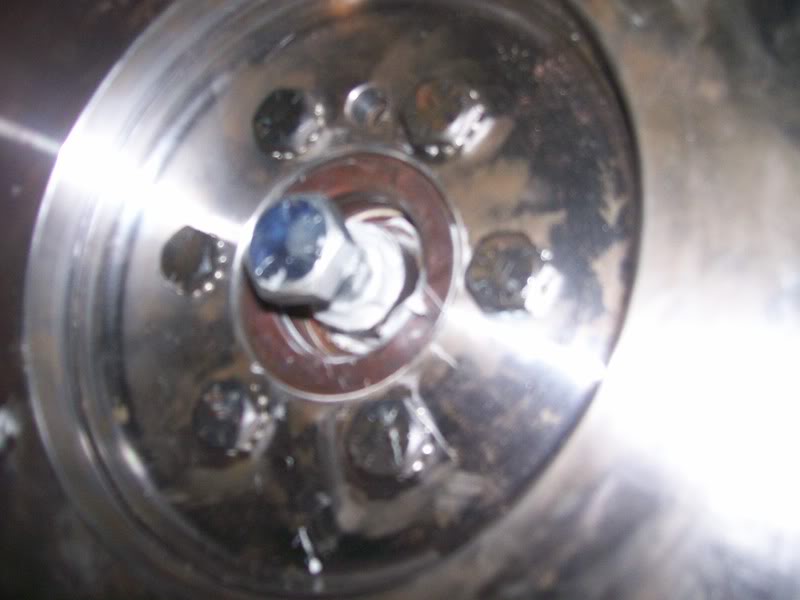
I wiped out all the grease, checked the surfaces, regreased the new pilot bearing, and pressedit into thebore. I used the OLD bushing and bolt, as the surface that was in contact with the pilot bearing, and i hammered on the bolt. It insured i wouldnt damage it. I hammered it in flush with the crank surface.
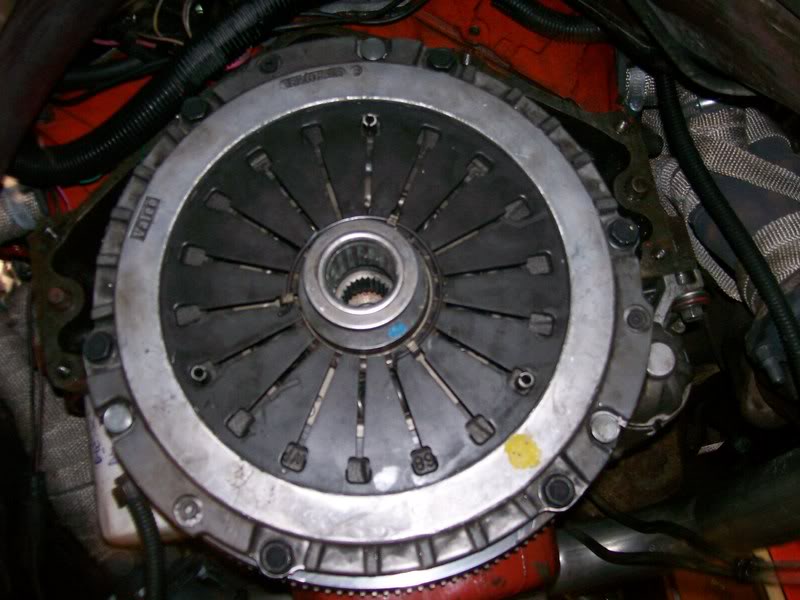
Heres the new clutch setup installed, freshly torqued. Heres everything aligned. MAKE SURE, after everything is torqued, that the alignment tool slides in and out easily. NO WIGGLING SHOULD BE NECESSARY. If it doesnt, re-align, or you wont be having fun when the tranny goes in.
Also i was juggling stuff so i didnt take a pic of this, but someone asked, how do you know which way the clutch disc goes on? If its new, it will clearly say ENGINE SIDE on it. Thats the side that faces the engine. But if you cant see it for some reason, one side of the clutch is completely flat, and the other side has the abrasive part, and the metal part that sticks out. The part that sticks out, is the ENGINE SIDE. Its very hard to assemble the other way around so its not easy to forget.
LUNCH TIME! Will post my progress when i finish the next round of things.
Anyways, here we go, i got some more pix.
First off, heres the pix that i couldnt load last time, for intermediate steps in installing the pedal. So continuing from the last post with pix,
You remove the U-bolt and put in the master cylinder, and tighten U-bolt with nuts on the inside.
This is where i placed my reservoir, i took that factory bracket off, and drilled two new holes, (dont even need to tap them, the screws go right in). And ill put that cruise control thing on the far side where the empty space is. You can also see the brake booster is now in place. Speaking of which, if you are converting FROM automatic, you will need another retaining clip, to keep the ROD on the clutch pedal, or the ROD on the brake pedal. I need to make a trip to autoparts store for that, if anyone has a specific part number, or a place to buy please let me know.
Next up, i got in my new clutch stuff last night. Can you tell which one is new?
$100, not a bad deal at all.The PP has 500 miles on it, but its still pretty new, you can even see the machine marks still.
The old clutch disc looked pretty bad, but i guess it wasnt THAT bad, if you compare the thickness.
Now if you recall, i was having trouble getting the bushing out. This cost me $6 for a tap i had to purchase. Because it was a bushing, i tapped it with a 5.8 x 18 UNF bolt.
I decided to use an old FINE thread bolt i had laying around, because just incase the threads werent deep enough, it would still have alot of surface contact between bolt and bushing. So i tapped the bushing, packed the back with grease, and just tightened the 2 and 1/2 inch long bolt INTO the threads i just created. When the bolt got far enough, it hit the back of the crank. Since the bolt couldnt go any deeper, the bushing had to come out, the grease helped too.
I wiped out all the grease, checked the surfaces, regreased the new pilot bearing, and pressedit into thebore. I used the OLD bushing and bolt, as the surface that was in contact with the pilot bearing, and i hammered on the bolt. It insured i wouldnt damage it. I hammered it in flush with the crank surface.
Heres the new clutch setup installed, freshly torqued. Heres everything aligned. MAKE SURE, after everything is torqued, that the alignment tool slides in and out easily. NO WIGGLING SHOULD BE NECESSARY. If it doesnt, re-align, or you wont be having fun when the tranny goes in.
Also i was juggling stuff so i didnt take a pic of this, but someone asked, how do you know which way the clutch disc goes on? If its new, it will clearly say ENGINE SIDE on it. Thats the side that faces the engine. But if you cant see it for some reason, one side of the clutch is completely flat, and the other side has the abrasive part, and the metal part that sticks out. The part that sticks out, is the ENGINE SIDE. Its very hard to assemble the other way around so its not easy to forget.
LUNCH TIME! Will post my progress when i finish the next round of things.
01-06-2008, 07:34 AM
#78
Supreme Member
Thread Starter
Join Date: Sep 2005
Location: Ottawa, ONT
Posts: 1,951
Likes: 0
Received 7 Likes
on
7 Posts
Car: 1987 Firebird
Engine: 355
Transmission: T56
Re: My T56 Swap Thread....
PROBLEM
How hard is it to push in the clutch pedal?
Im not talking about the clutch itself, but just the pedal and the master cylinder.
When it arrives from TPI parts, the new unit has a zip tie around the slave cylinder, ive taken that off. I had to bend the pedals slightly to put it in, but i dont think the rod is THAT out of line. I loosened the nuts on the u-bolt so if it is misaligned it would re-align itself and push, but it gets "stuck" at the same point.
I didnt think to try and push it in by hand before i installed. Is it possible to push the master rod in by hand before installing?
But anyway, the slave isnt attached to the tranny, its just hanging free, but the master and pedals are installed. I tried to push the pedal in by hand, and the slave moves about 1/8 of an inch and then stops, im not strong enough to push it in the rest of the way. I tried it with my foot, but i dont want to break it by putting too much weight on.
Is this an alignment prob, or am i not pushing hard enough? Its definately firmer than the brake pedal (without vacuum).
Heres what i mean... (excuse the dark video, but you can see the amount that my fingers move, thats as far as i can go) I guess im gonna have to pull it out and make sure it works....
http://s111.photobucket.com/albums/n...nt=Pix1171.flv
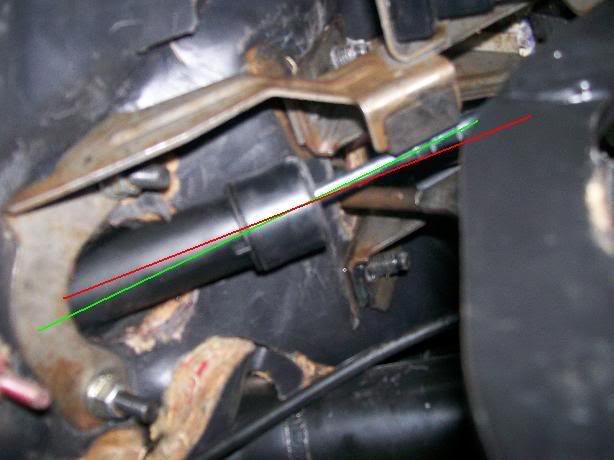
Heres first angle to show you that its slightly out of line.
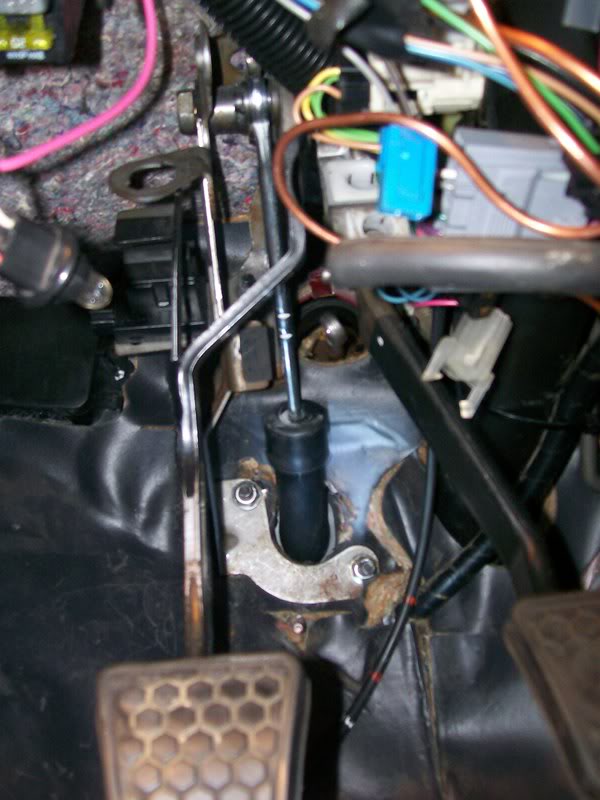
Same angle Edited.

Second angle.
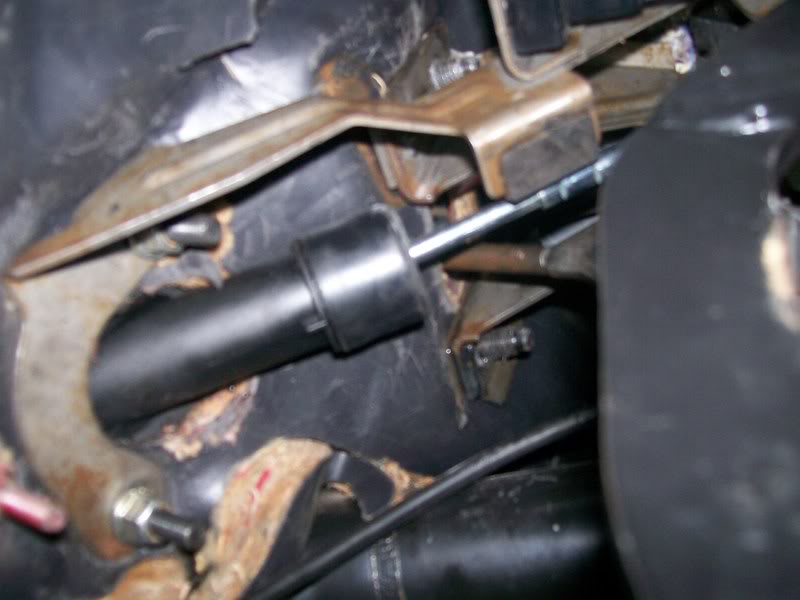
Second angle edited.
How hard is it to push in the clutch pedal?
Im not talking about the clutch itself, but just the pedal and the master cylinder.
When it arrives from TPI parts, the new unit has a zip tie around the slave cylinder, ive taken that off. I had to bend the pedals slightly to put it in, but i dont think the rod is THAT out of line. I loosened the nuts on the u-bolt so if it is misaligned it would re-align itself and push, but it gets "stuck" at the same point.
I didnt think to try and push it in by hand before i installed. Is it possible to push the master rod in by hand before installing?
But anyway, the slave isnt attached to the tranny, its just hanging free, but the master and pedals are installed. I tried to push the pedal in by hand, and the slave moves about 1/8 of an inch and then stops, im not strong enough to push it in the rest of the way. I tried it with my foot, but i dont want to break it by putting too much weight on.
Is this an alignment prob, or am i not pushing hard enough? Its definately firmer than the brake pedal (without vacuum).
Heres what i mean... (excuse the dark video, but you can see the amount that my fingers move, thats as far as i can go) I guess im gonna have to pull it out and make sure it works....
http://s111.photobucket.com/albums/n...nt=Pix1171.flv
Heres first angle to show you that its slightly out of line.
Same angle Edited.
Second angle.
Second angle edited.
Last edited by online170; 01-06-2008 at 08:00 AM.
01-06-2008, 07:59 AM
#79
Member
iTrader: (2)
Join Date: Oct 2003
Location: Buffalo, NY
Posts: 428
Likes: 0
Received 2 Likes
on
2 Posts
Car: 1987 Camaro IROC-Z28
Engine: TPI 350ci L98
Transmission: T56 - Hurst Shifter
Axle/Gears: BW - 3.70
Re: My T56 Swap Thread....
Noooo. Don't do that. If your slave cylinder is just hanging and you push the pedal you'll break the slave. With the plastic cap removed the slave will extend to it's full travel because of the spring inside. If you try to press the pedal the fluid will have no where to go and blow the guts out of the slave.
I don't believe you can compress the master cylinder by hand. Hopefully you didn't get any air into the system by trying this. Check to make sure the reservoir isn't empty.
You'll just have to put it together and trust that it will work.
I don't believe you can compress the master cylinder by hand. Hopefully you didn't get any air into the system by trying this. Check to make sure the reservoir isn't empty.
You'll just have to put it together and trust that it will work.
01-06-2008, 08:02 AM
#80
Supreme Member
Thread Starter
Join Date: Sep 2005
Location: Ottawa, ONT
Posts: 1,951
Likes: 0
Received 7 Likes
on
7 Posts
Car: 1987 Firebird
Engine: 355
Transmission: T56
Re: My T56 Swap Thread....
Ah, thanks for stopping me. Its probably the vacuum thats stopping me then. Ill wait to assemble it then, hopefully it works.
But have a look at those pix, do you think that angle is enough to make a difference?
But have a look at those pix, do you think that angle is enough to make a difference?
01-06-2008, 08:21 AM
#81
Member
iTrader: (2)
Join Date: Oct 2003
Location: Buffalo, NY
Posts: 428
Likes: 0
Received 2 Likes
on
2 Posts
Car: 1987 Camaro IROC-Z28
Engine: TPI 350ci L98
Transmission: T56 - Hurst Shifter
Axle/Gears: BW - 3.70
Re: My T56 Swap Thread....
Hard to tell for the picture but it doesn't look that bad to me. Mine is a bit off as well, about half as much as that and I havn't had any problems.
When I did my swap I tried 4th gen pedals first and the alignment was terrible so I switch to 3rd gen pedals and it was perfect.
When I did my swap I tried 4th gen pedals first and the alignment was terrible so I switch to 3rd gen pedals and it was perfect.
01-06-2008, 08:33 AM
#82
Supreme Member
iTrader: (1)
Join Date: Sep 2005
Posts: 26,040
Received 1,667 Likes
on
1,265 Posts
Car: Yes
Engine: Usually
Transmission: Sometimes
Axle/Gears: Behind me somewhere
Re: My T56 Swap Thread....
The angle is fine, looks comparable to mine or maybe even a bit less... remember, the pedal doesn't even move in a straight line ANYWAY, it moves in an arc; so NO MATTER WHAT, there will be some angle at some point(s) in its travel. It's designed to absorb quite a bit of that.
If it really bothers you, you can bend the firewall where the MC mounts, and take up a certain amount of it. Looks OK to me though.
The clutch pedal will be MUCH harder to push than the brake pedal. But DO NOT push it until the whole thing is hooked up and assembled!! (fork, slave, etc.) You will "pop" the slave cyl. In fact, just to keep it from happening by accident, I learned ... guess how ... NOT to hook the rod to the pedal until EVERYTHING ELSE is in place. I suggest you take yours back off for the time being.
Also, the tie-wrap thing is there to keep the slave from falling apart during assembly. Then the first time you use the clutch, it would have just broken anyway. But it helps keep things together until it's all in place. Should have been just left alone. But it's not a big deal, as long as you don't lose the rod.
01-06-2008, 09:30 AM
#83
Supreme Member
Thread Starter
Join Date: Sep 2005
Location: Ottawa, ONT
Posts: 1,951
Likes: 0
Received 7 Likes
on
7 Posts
Car: 1987 Firebird
Engine: 355
Transmission: T56
Re: My T56 Swap Thread....
Ive had the tie off for a few days now, i hope i didnt put any air in. I put it BACK on, and pushed the pedal a little, and it seems completely different. So ill take the rod off and leave it alone until im ready to assemble.
Im just trying to put the tranny in right now, its not fun to lift the thing. The engine needs to come down a bit and i need to match the angle of the input shaft, and i should be good.
Im just trying to put the tranny in right now, its not fun to lift the thing. The engine needs to come down a bit and i need to match the angle of the input shaft, and i should be good.
01-06-2008, 09:35 AM
#84
Supreme Member
iTrader: (1)
Join Date: Sep 2005
Posts: 26,040
Received 1,667 Likes
on
1,265 Posts
Car: Yes
Engine: Usually
Transmission: Sometimes
Axle/Gears: Behind me somewhere
Re: My T56 Swap Thread....
I found it easiest to install it with 2 floor jacks, both oriented front-to rear of the car (NOT side-to-side); one at the front of the trans with the jack under the engine, and one under the rear of the trans with the jack under the drive shaft tunnel.
01-06-2008, 03:16 PM
#85
Supreme Member
Thread Starter
Join Date: Sep 2005
Location: Ottawa, ONT
Posts: 1,951
Likes: 0
Received 7 Likes
on
7 Posts
Car: 1987 Firebird
Engine: 355
Transmission: T56
Re: My T56 Swap Thread....
Heres the bell housing bolted on and torqued down. Pretty straight forward, you just put the 6 bolts in, use a couple extension and u-joint with a 9/16 or a 14mm socket, and torque her down. MUCH easier without a tranny in the way.
Im still struggling to get the transmission in. Ive been going since 9am this morning, its now 4:20pm. Ive done three attempts, each an hour long, and taken breaks in between, because its really tiring.
Heres the first attempt. I used a single jack. It looks suspended nicely there and balanced, but, DO NOT TRY IT THIS WAY!!!!! I had it fall on me twice. First time i was alone, second time i had my brother help me, both times i luckily looked away, or it would have broken my nose or crushed a jaw or something.
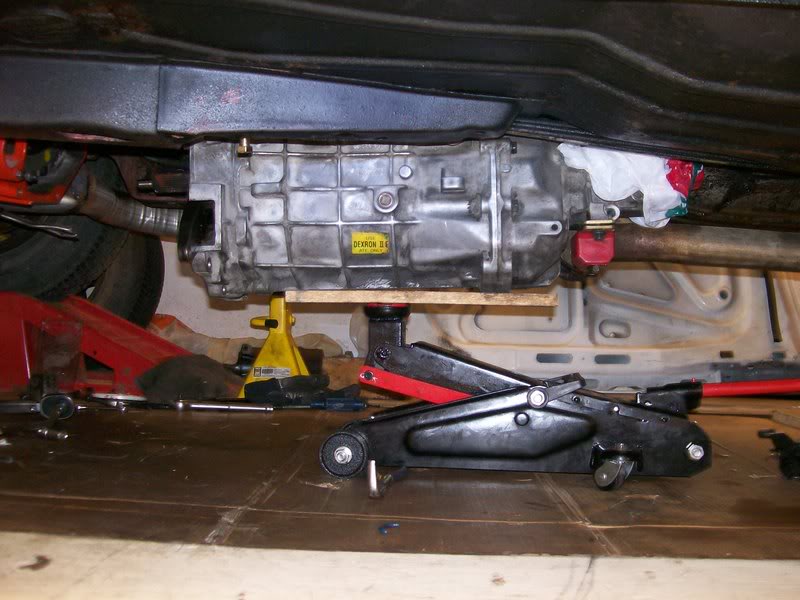
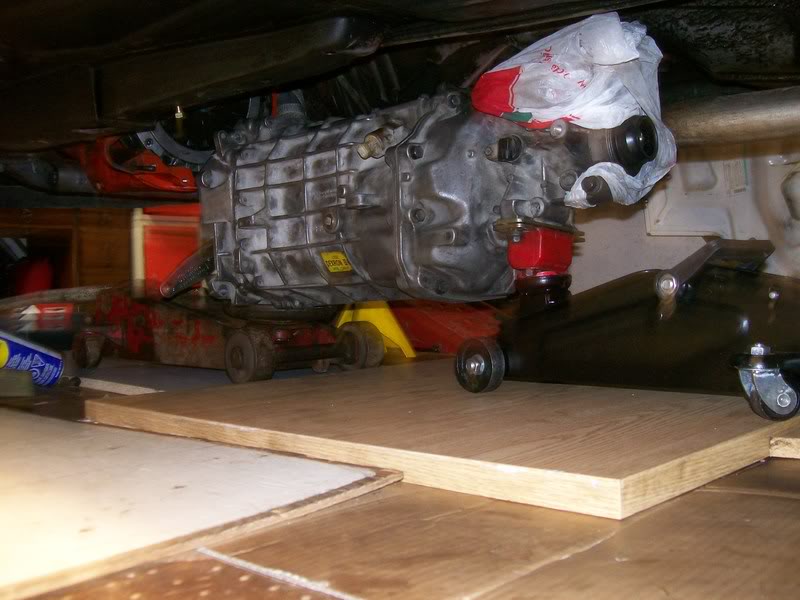
Third attempt, i used two jacks. (the red jack doesnt roll that well, and its really heavy so i was being lazy about using it). I found putting jacks on a flat peice of wood lets you roll them MUCH MUCH easier, and because the surface is slick, you can easily nudge it side to side as well. (they are old tables).
Im getting kind of discouraged cuz i cant even get the teeth in yet. But ill keep trying, one of the problems is, the transmission isnt sitting level (side to side). So that gets worse when the other angle is introduced (front to back). I would say this is the hardest part of the swap.
The reason is, you know how to get it in, but its frustrating cuz theres ONLY one way in. You cant drill a hole, or grind something, or buy something that will just make it slide in! Its tedeous and very tiring. But im gonna keep at it. I HOPE I HOPE i can get it in today.
Im still struggling to get the transmission in. Ive been going since 9am this morning, its now 4:20pm. Ive done three attempts, each an hour long, and taken breaks in between, because its really tiring.
Heres the first attempt. I used a single jack. It looks suspended nicely there and balanced, but, DO NOT TRY IT THIS WAY!!!!! I had it fall on me twice. First time i was alone, second time i had my brother help me, both times i luckily looked away, or it would have broken my nose or crushed a jaw or something.
Third attempt, i used two jacks. (the red jack doesnt roll that well, and its really heavy so i was being lazy about using it). I found putting jacks on a flat peice of wood lets you roll them MUCH MUCH easier, and because the surface is slick, you can easily nudge it side to side as well. (they are old tables).
Im getting kind of discouraged cuz i cant even get the teeth in yet. But ill keep trying, one of the problems is, the transmission isnt sitting level (side to side). So that gets worse when the other angle is introduced (front to back). I would say this is the hardest part of the swap.
The reason is, you know how to get it in, but its frustrating cuz theres ONLY one way in. You cant drill a hole, or grind something, or buy something that will just make it slide in! Its tedeous and very tiring. But im gonna keep at it. I HOPE I HOPE i can get it in today.
Last edited by online170; 01-07-2008 at 01:01 PM.
01-06-2008, 05:38 PM
#86
Member
iTrader: (2)
Join Date: Oct 2003
Location: Buffalo, NY
Posts: 428
Likes: 0
Received 2 Likes
on
2 Posts
Car: 1987 Camaro IROC-Z28
Engine: TPI 350ci L98
Transmission: T56 - Hurst Shifter
Axle/Gears: BW - 3.70
Re: My T56 Swap Thread....
Umm. Supprised you're having trouble. That was probably the easiest part of the swap for me.
I put a board under the tranny, think it was a 2x8. Then I put a small rachet strap around the tranny and board, this kept the tranny from rolling around on the board. Then I put on jack under the board. My jack had a much larger cup, probably between 4-6 inches accross. This made everything very sturdy. I jacked up the tranny and rolled it forward to get the input shaft started. Then I just raised or lower the jack to get the right alignment. I've had my tranny out a few time and I always do the same thing and it's very simple. I can do it by myself with one jack.
I put a board under the tranny, think it was a 2x8. Then I put a small rachet strap around the tranny and board, this kept the tranny from rolling around on the board. Then I put on jack under the board. My jack had a much larger cup, probably between 4-6 inches accross. This made everything very sturdy. I jacked up the tranny and rolled it forward to get the input shaft started. Then I just raised or lower the jack to get the right alignment. I've had my tranny out a few time and I always do the same thing and it's very simple. I can do it by myself with one jack.
01-06-2008, 05:55 PM
#87
Supreme Member
Thread Starter
Join Date: Sep 2005
Location: Ottawa, ONT
Posts: 1,951
Likes: 0
Received 7 Likes
on
7 Posts
Car: 1987 Firebird
Engine: 355
Transmission: T56
Re: My T56 Swap Thread....
Umm. Supprised you're having trouble. That was probably the easiest part of the swap for me.
I put a board under the tranny, think it was a 2x8. Then I put a small rachet strap around the tranny and board, this kept the tranny from rolling around on the board. Then I put on jack under the board. My jack had a much larger cup, probably between 4-6 inches accross. This made everything very sturdy. I jacked up the tranny and rolled it forward to get the input shaft started. Then I just raised or lower the jack to get the right alignment. I've had my tranny out a few time and I always do the same thing and it's very simple. I can do it by myself with one jack.
I put a board under the tranny, think it was a 2x8. Then I put a small rachet strap around the tranny and board, this kept the tranny from rolling around on the board. Then I put on jack under the board. My jack had a much larger cup, probably between 4-6 inches accross. This made everything very sturdy. I jacked up the tranny and rolled it forward to get the input shaft started. Then I just raised or lower the jack to get the right alignment. I've had my tranny out a few time and I always do the same thing and it's very simple. I can do it by myself with one jack.
01-06-2008, 06:48 PM
#88
Supreme Member
iTrader: (14)
Join Date: Aug 2006
Location: Central NJ
Posts: 12,650
Likes: 0
Received 44 Likes
on
42 Posts
Car: 86 Trans Am, 92 Firebird
Engine: 408 sbc, 3.1L of raw power
Transmission: TKO600, T5
Axle/Gears: Moser 9", 3:70 trutac, 3:23 torsion
Re: My T56 Swap Thread....
its one of these things that after a while of fighting with it, you get frustrated, and from there on out, nothing will work. I usually find that if i quit and take a break for a while and calm down, things seem to work smoother. When the trans is going in you may have to rotate the input shaft, or if the trans is in gear, the output shaft, to get it to mesh with the splines of the clutch. Did you put a little bearing grease on the inputshaft splines so help the clutch disc slide during operation? not a lot just a little
01-06-2008, 07:11 PM
#89
Supreme Member
Thread Starter
Join Date: Sep 2005
Location: Ottawa, ONT
Posts: 1,951
Likes: 0
Received 7 Likes
on
7 Posts
Car: 1987 Firebird
Engine: 355
Transmission: T56
Re: My T56 Swap Thread....
Yea i completely agree. When youre frustrated, things break, and nothing gets done. Which i why im leaving it alone for today. I think 4 solid hours of trying to get it in is plenty for one day.
Its all greased, its all aligned, im just not getting it in at the proper angle. I think im being a little too careful, and its hard to tell if the ange im going in at is 100% correct when its actually in there.
Ive got it to go in, just when all the teeth disappear into the throwout bearing, and then it gets stuck. Its greased and ive tried turning but its not working. So tommorow im gonna try something new. See how that goes.
01-06-2008, 09:52 PM
#90
Member
Join Date: Nov 2006
Location: Wyoming
Posts: 405
Likes: 0
Received 0 Likes
on
0 Posts
Car: 92 Chevrolet Camaro RS
Engine: 3.1L V6
Transmission: T-5
Axle/Gears: 3.42
Re: My T56 Swap Thread....

yup not the best option. i did the same when I helped a friend put a 4L60-E in this 4th gen with a floor jack, and I was the one guiding the tranny in place. Scary ****
Did you ding up your oil pan?
Last edited by KBcobra; 01-06-2008 at 09:57 PM.
01-06-2008, 10:07 PM
#91
Member
iTrader: (1)
Join Date: Jan 2007
Location: miami fl
Posts: 239
Likes: 0
Received 0 Likes
on
0 Posts
Car: 92 z28
Engine: fast burn 385
Transmission: t56
Axle/Gears: 3.73
Re: My T56 Swap Thread....
im not much help here. i was lucky enough to have access to a lift and my dad and i just lifted it in from the ground. it is a heavy thing, but it gave us the most control of the situation and worked out well.
nice to see a swap with so much detail, im sure there are a lot of people who appreciate it, i know i would have if i saw this before my swap a year ago
nice to see a swap with so much detail, im sure there are a lot of people who appreciate it, i know i would have if i saw this before my swap a year ago
01-06-2008, 10:12 PM
#92
Member
Join Date: Nov 2006
Location: Wyoming
Posts: 405
Likes: 0
Received 0 Likes
on
0 Posts
Car: 92 Chevrolet Camaro RS
Engine: 3.1L V6
Transmission: T-5
Axle/Gears: 3.42
Re: My T56 Swap Thread....
I forgot the T-56 doesn't have much of an oil pan compared to an auto 
01-07-2008, 12:21 AM
#93
Member
Join Date: May 2005
Location: Alberta, canada
Posts: 449
Likes: 0
Received 1 Like
on
1 Post
Car: 84 Z28
Engine: carb 305
Transmission: T5
Axle/Gears: 3.73
Re: My T56 Swap Thread....
This should be a sticky. Im thinking about doing this swap after my engine gets rebuilt and i get my car painted this spring.
01-07-2008, 11:57 AM
#94
Member

Join Date: Nov 2005
Location: Tampa, FL
Posts: 135
Likes: 0
Received 1 Like
on
1 Post
Car: 1987 IROC Z28
Engine: 427ci
Transmission: TH350
Re: My T56 Swap Thread....
This is a great thread. Thanks for the detailed pics and write up. Quick question for you...
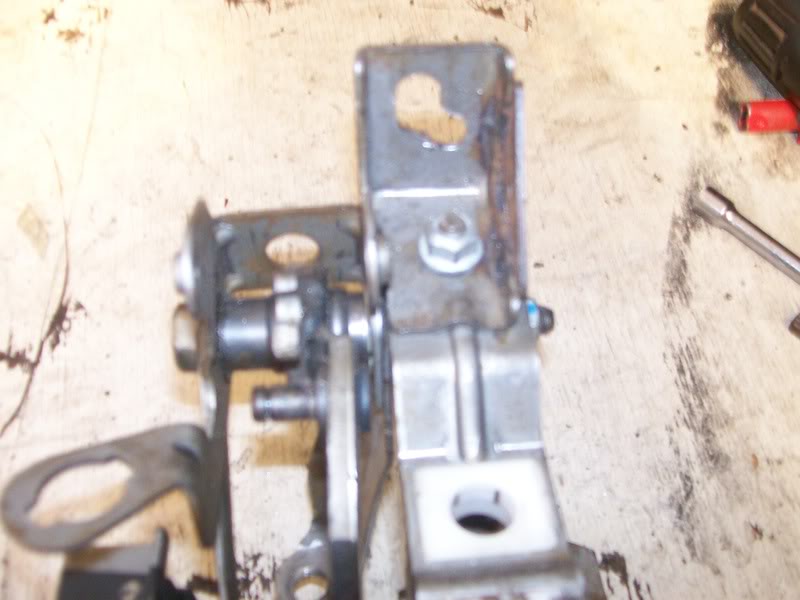
Is the firewall bracket for the clutch hydraulics shown in the pic below part of the bracket for the pedals or is it a separate piece?

Is the firewall bracket for the clutch hydraulics shown in the pic below part of the bracket for the pedals or is it a separate piece?
01-07-2008, 05:24 PM
#95
Supreme Member
Thread Starter
Join Date: Sep 2005
Location: Ottawa, ONT
Posts: 1,951
Likes: 0
Received 7 Likes
on
7 Posts
Car: 1987 Firebird
Engine: 355
Transmission: T56
Re: My T56 Swap Thread....
KCobra, Youre right theres no oil pan. Even so its a tough little thing, but dontw worry, i broke its fall .
Neil, if you go through the thread, you will see the parts by themselves before i started the swap. The pedals come up twice. The 4th gen pedals, have the accelerator, brake and clutch bracket, as well as the master cyl. bracket ALL IN ONE. I had to grind off the accel. bracket, but the rest is one peice.
http://i111.photobucket.com/albums/n...ird/Pix971.jpg
.Neil, if you go through the thread, you will see the parts by themselves before i started the swap. The pedals come up twice. The 4th gen pedals, have the accelerator, brake and clutch bracket, as well as the master cyl. bracket ALL IN ONE. I had to grind off the accel. bracket, but the rest is one peice.
http://i111.photobucket.com/albums/n...ird/Pix971.jpg
01-08-2008, 08:09 AM
#96
Supreme Member
Thread Starter
Join Date: Sep 2005
Location: Ottawa, ONT
Posts: 1,951
Likes: 0
Received 7 Likes
on
7 Posts
Car: 1987 Firebird
Engine: 355
Transmission: T56
Re: My T56 Swap Thread....
QUESTION:
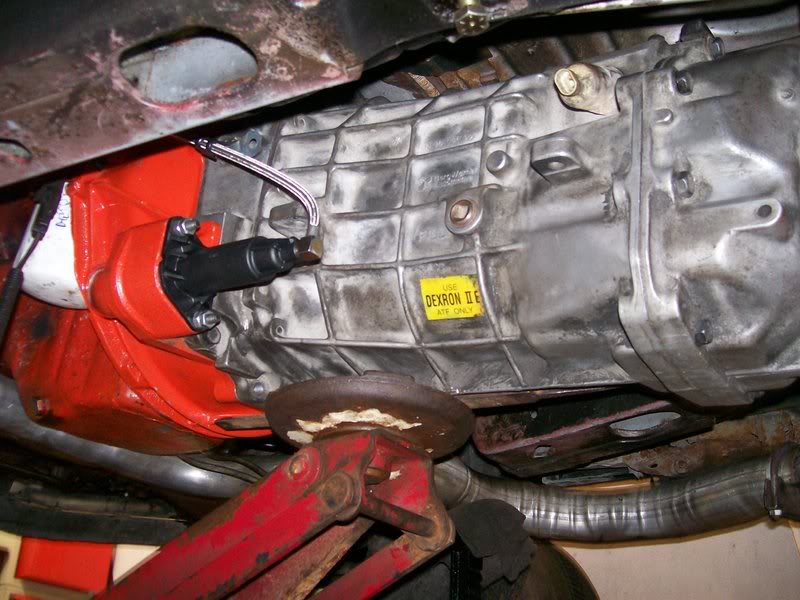
I happened to be laying under the car trying to put the tranny in (still not in yet, but maybe today), and i noticed the sticker said DEXRON II E only....
Ive never heard of II E. I have already bought DEXRON III, will this work ok?
I happened to be laying under the car trying to put the tranny in (still not in yet, but maybe today), and i noticed the sticker said DEXRON II E only....
Ive never heard of II E. I have already bought DEXRON III, will this work ok?
01-08-2008, 09:21 AM
#97
Member
Join Date: Nov 2006
Location: Wyoming
Posts: 405
Likes: 0
Received 0 Likes
on
0 Posts
Car: 92 Chevrolet Camaro RS
Engine: 3.1L V6
Transmission: T-5
Axle/Gears: 3.42
Re: My T56 Swap Thread....
Im curious is it harder to swap from T-5 to T-56 or from 700r4 to T-56??
01-08-2008, 10:07 AM
#98
Member
iTrader: (1)
Join Date: Jan 2007
Location: miami fl
Posts: 239
Likes: 0
Received 0 Likes
on
0 Posts
Car: 92 z28
Engine: fast burn 385
Transmission: t56
Axle/Gears: 3.73
Re: My T56 Swap Thread....
i put dexron III in because if you read the back it says it is a replacement for dexron II E.
as well as swapping from an auto or manual, i would say its easier to go from a 5 speed because there isnt as much cutting to do for the pedals or anything. i went from a 5 speed to a 6 speed and and didnt come into too many problems except from making things too complicated myself.
as well as swapping from an auto or manual, i would say its easier to go from a 5 speed because there isnt as much cutting to do for the pedals or anything. i went from a 5 speed to a 6 speed and and didnt come into too many problems except from making things too complicated myself.
01-08-2008, 03:33 PM
#99
Supreme Member
Thread Starter
Join Date: Sep 2005
Location: Ottawa, ONT
Posts: 1,951
Likes: 0
Received 7 Likes
on
7 Posts
Car: 1987 Firebird
Engine: 355
Transmission: T56
Re: My T56 Swap Thread....
Hey folks, been waiting a LONG time now to post these pix. Just a couple more things to do till im done. SPECIAL THANKS TO SOFAKINGDOM, for recommending the two jack method. DEFINATELY the easiest and safest way to go without a transmission jack. Just make sure atleast one of the jacks has a large cup, like VBMike mentioned earilier.
KCobra, its probably the same amount of work for going from T5-T56 or 700-T56, only change is, with auto you have to cut the firewall holes, and the shifter hole. In manual, you just have to cut the shifter hole.
Anyways. I didnt get to the tranny yesterday, cuz after 8 hours of differential equations, derivatives, C++ programming, and stress analysis, i was a little toast to work on the car.
The REALLY annoying part was though, today it just kinda slid in. I didnt even need any help, like there was never a problem. I had to jiggle a bit to get the dowel pins to go in, but other than that it was smooth.
I tried a bit of a different approach, instead of concentrating on putting the shaft in straight, i was concentrating on lining up the tranny to bell housing bolts. After i got that, i looked through the middle of the slave cylinder mounting studs, and tried to get theh inputshaft parallel, to match the tranny to engine angle. Worked pretty good.
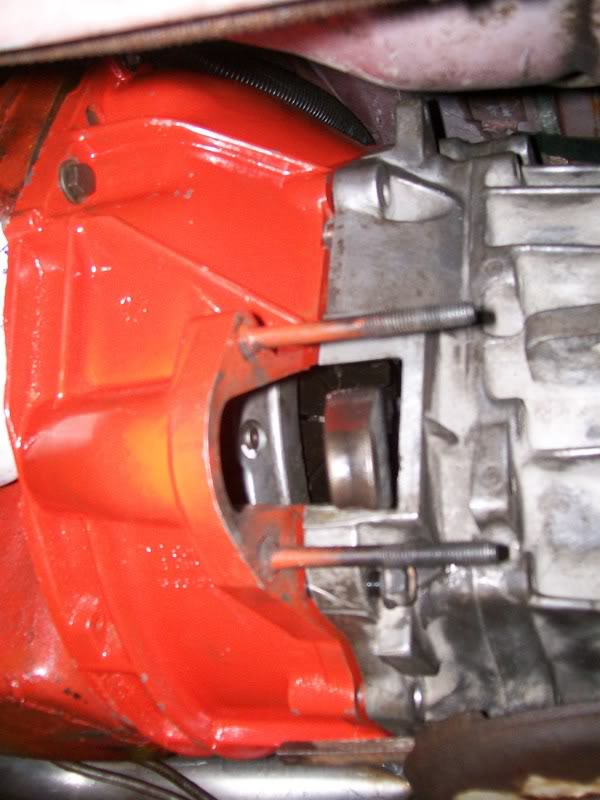
Heres my older bro, putting on a couple bolts to hold the tranny in place.

Heres a close up of the dowel pins, JUST started on, and we tightened it on with the bolts after that. Since we can see this, im gonna use this to say, the fork was kinda tricky to put on. I just pushed it in, but its really a guess if its in the correct spot becasue you cant see anything. I pulled the end i could see, and slid it on, so the other end was closest to the clutch. This ensured it made it onto the throwout bearing. When the slave was mounted, the fork sat flush with the bell housing.
Heres the slave cylinder mounted. I found the hose is VERY VERY EXACTLY JUST the right size. No give or slack in it, i was afraid to break it.
FInally, this is what i was saying earlier. When i cut the hole, i just measured from the bell housing BACK, drilled ONE hole. and use that to cut the square. Problem with that is, when youre under the car, you dont know what STRAIGHT back is. As you can see i drilled the hole, too close to the left. (the transmission isnt fully raised so i can fix it a bit). No matter, i cut as little as possible, so i can just enlarge the hole to fit.
KCobra, its probably the same amount of work for going from T5-T56 or 700-T56, only change is, with auto you have to cut the firewall holes, and the shifter hole. In manual, you just have to cut the shifter hole.
Anyways. I didnt get to the tranny yesterday, cuz after 8 hours of differential equations, derivatives, C++ programming, and stress analysis, i was a little toast to work on the car.
The REALLY annoying part was though, today it just kinda slid in. I didnt even need any help, like there was never a problem. I had to jiggle a bit to get the dowel pins to go in, but other than that it was smooth.
I tried a bit of a different approach, instead of concentrating on putting the shaft in straight, i was concentrating on lining up the tranny to bell housing bolts. After i got that, i looked through the middle of the slave cylinder mounting studs, and tried to get theh inputshaft parallel, to match the tranny to engine angle. Worked pretty good.
Heres my older bro, putting on a couple bolts to hold the tranny in place.
Heres a close up of the dowel pins, JUST started on, and we tightened it on with the bolts after that. Since we can see this, im gonna use this to say, the fork was kinda tricky to put on. I just pushed it in, but its really a guess if its in the correct spot becasue you cant see anything. I pulled the end i could see, and slid it on, so the other end was closest to the clutch. This ensured it made it onto the throwout bearing. When the slave was mounted, the fork sat flush with the bell housing.
Heres the slave cylinder mounted. I found the hose is VERY VERY EXACTLY JUST the right size. No give or slack in it, i was afraid to break it.
FInally, this is what i was saying earlier. When i cut the hole, i just measured from the bell housing BACK, drilled ONE hole. and use that to cut the square. Problem with that is, when youre under the car, you dont know what STRAIGHT back is. As you can see i drilled the hole, too close to the left. (the transmission isnt fully raised so i can fix it a bit). No matter, i cut as little as possible, so i can just enlarge the hole to fit.
Last edited by online170; 01-08-2008 at 03:38 PM.
01-08-2008, 04:47 PM
#100
Supreme Member
iTrader: (14)
Join Date: Aug 2006
Location: Central NJ
Posts: 12,650
Likes: 0
Received 44 Likes
on
42 Posts
Car: 86 Trans Am, 92 Firebird
Engine: 408 sbc, 3.1L of raw power
Transmission: TKO600, T5
Axle/Gears: Moser 9", 3:70 trutac, 3:23 torsion
Re: My T56 Swap Thread....
yea! you gone done dooed it! Funny how after all the aggravation, it just slid right in.