Automatic to T56 swap MADE EASY Tutorial *Pics*
 07-10-2012, 12:21 AM
#1
Supreme Member

Thread Starter
iTrader: (7)
Join Date: Nov 2006
Location: Alamogordo, NM
Posts: 3,740
Likes: 0
Received 9 Likes
on
9 Posts
Car: 88 Formula 350
Engine: 5.7
Transmission: T-56
Axle/Gears: 9" 3.89
Automatic to T56 swap MADE EASY Tutorial *Pics*
Well, to start it off, yank out your Automatic transmission... Then go ahead and remove all the transmission lines, dipstick and such... I got lazy and started cutting it out.
Mounting the Pedals/ Master Slave Cylinder
First thing is first. I started off by mounting the pedals and cutting the hole for it... Remove the old automatic brake pedal. I pulled off the Cruise Control switch and the brake light switch and put them in the 4th gen pedals I used.
Here is where I cut off the gas pedal:

I then mounted the pedals, The bolts are a pain in the ***, I ended up lowing the steering column, and using a long extention and a swivel. The top bolt needs an open end wrench and a ton of patients (possibly a beer).
Once you get them bolted up, make sure the clutch pedal brackets are close to the cut out in the carpet foam. I used them as a guide for the U-bolt... Then start cutting. I used a hole saw and a dremel from there...
Here is a shot of the hole saw size I used along with the cut. I didn't think to push it over to the foam cutout, so I had to clearance the fender a bit because it wouldn't fit. I ended up getting away with drilling new U bolt holes next to the old ones and dremel the hole a little bigger and it worked perfect.
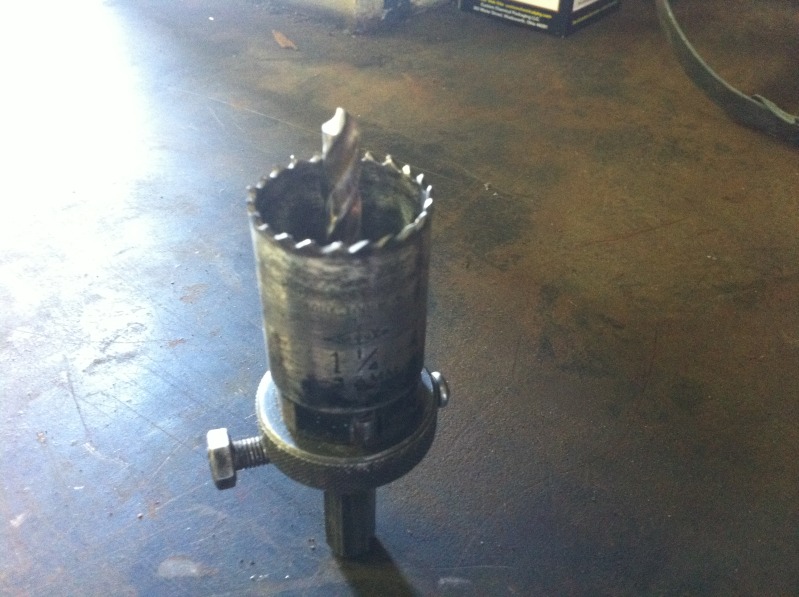
This shot was before I dremelled it into an oval.
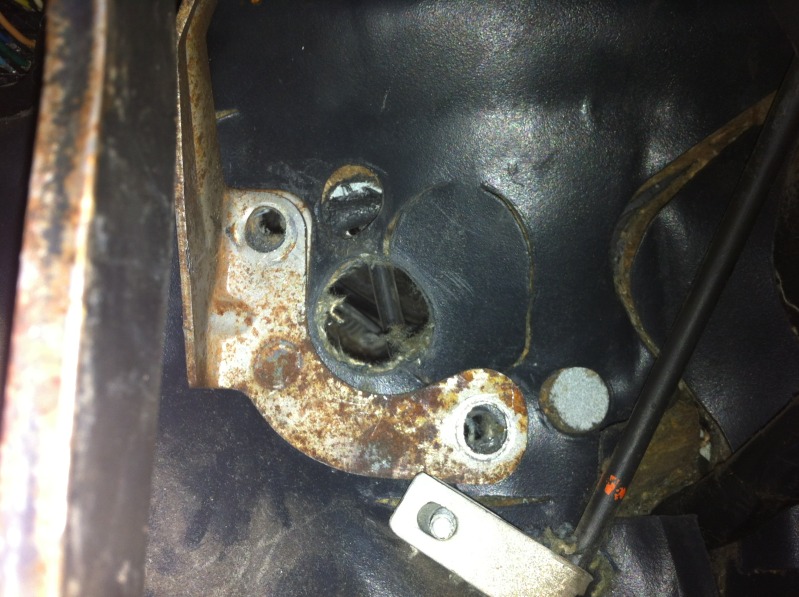
For mounting it, just pull the brake booster out of the way a bit. I messed with it for a few hours before giving in and pulling it. It's really not that hard, just make sure you use the pedals to drill the holes before removing the brake bolts.
Once you get the Slave and Master cylinder in place and bolted up the hard part is pretty much done!
Putting the T56 in!
Now put the bell housing on and the clutch. Here are the torque ratings you need:
Flywheel to crank bolts- 65-70 ft-lbs
Bell housing to block 30-35 ft-lbs
Pressure plate to flywheel 35-40 ft-lbs
T56 to bell housing 40-45 ft-lbs
Putting the transmission in in pretty straight forward. Make sure you get everything put together in straight using the clutch alignment tool...
T56 Crossmember
I used the Spohn mount. It has 6 mounting holes... so you will need to drill, tap, and Heli coil two holes. I read that they are 3/8-16, so I used them, but I quickly figured out that they are actually 10mm. SO USE 10mm HELICOILS!
I now have mix matched bolts... Also, the Spohn crossmember sits extremely low... when I weld my Dyno Don exhaust together, I will definitely be making a new mount.
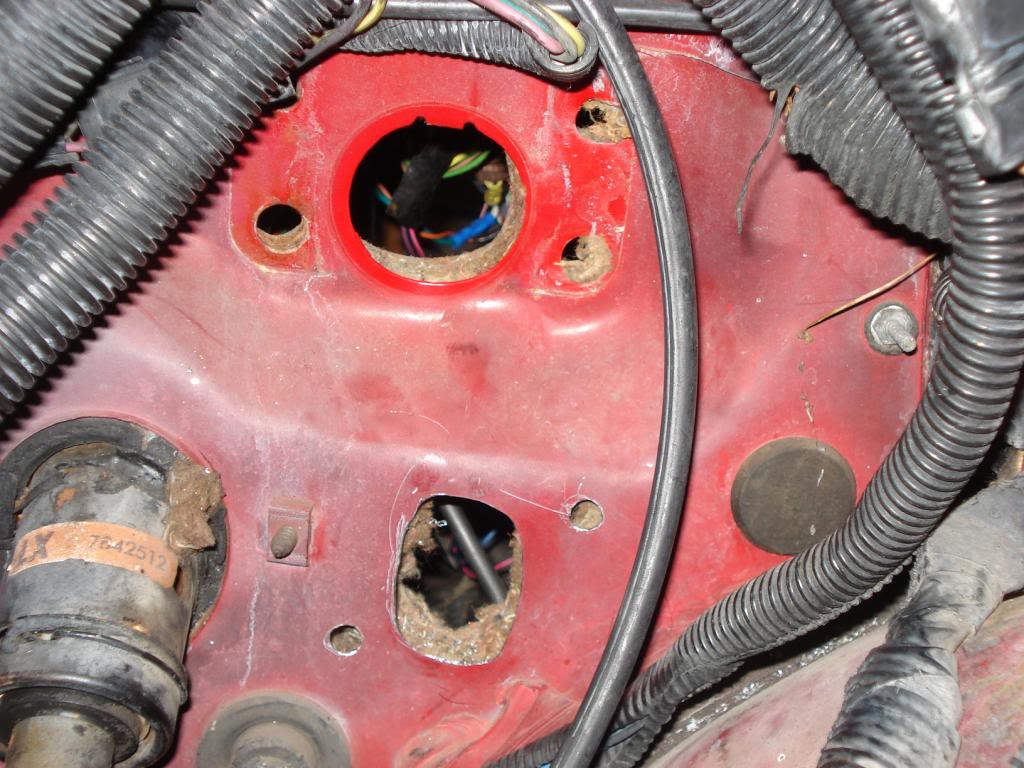
Cutting the Shifter Hole
Well, can't guarantee your hole, but here are my reference shots for you to help guide you as close as I can. My hole isn't perfect, but hopefully my pictures help your turn out better. I had it cut mine bigger and trim it like 3 times...
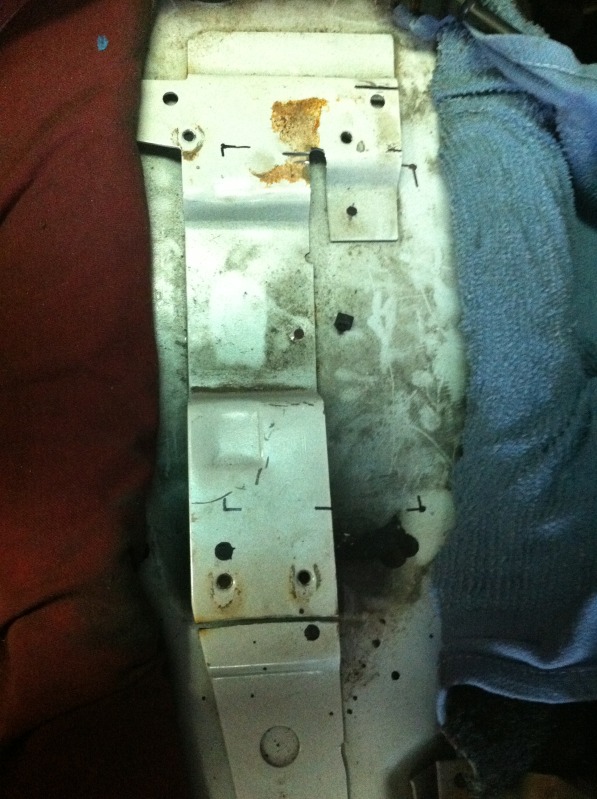
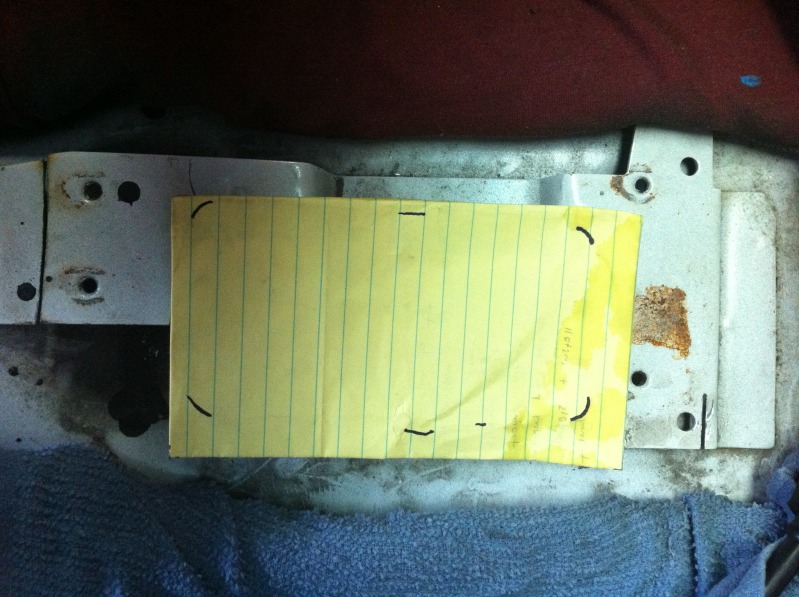
These next 2 shots are without moving the tape measure, so you can see how far back you need to cut...
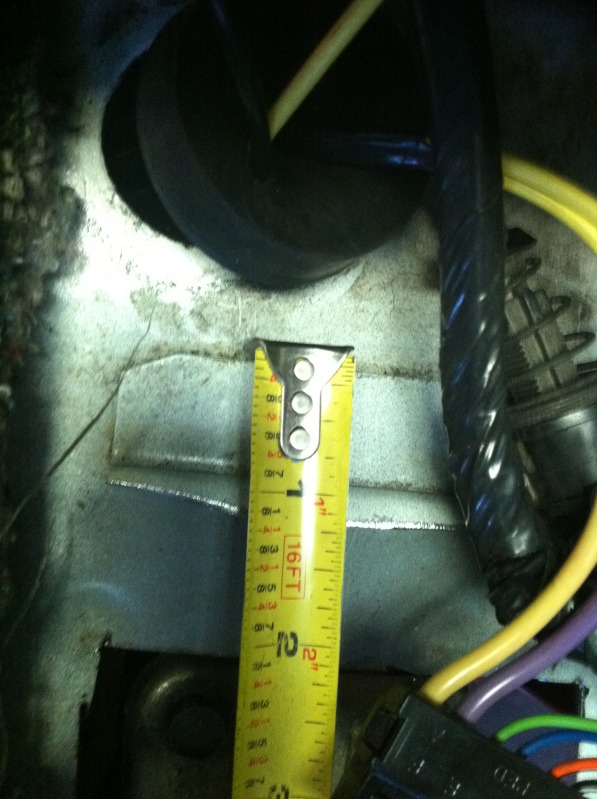
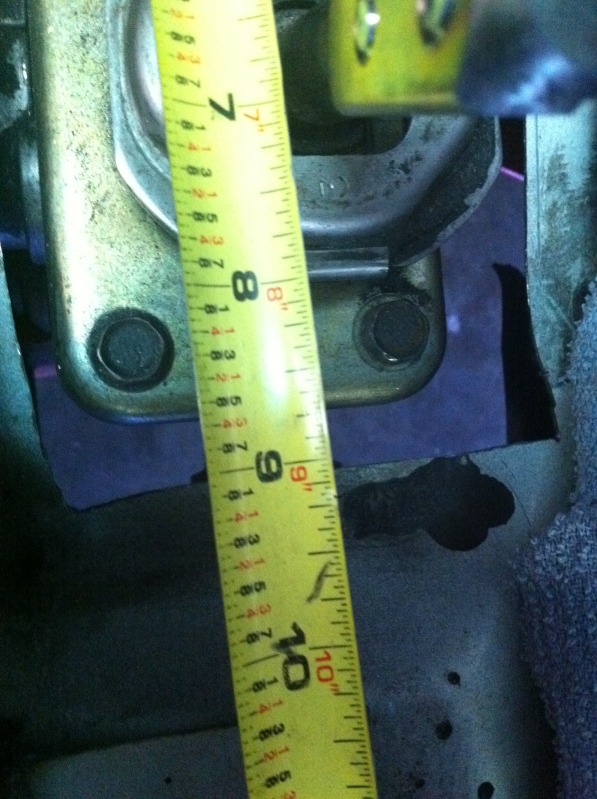
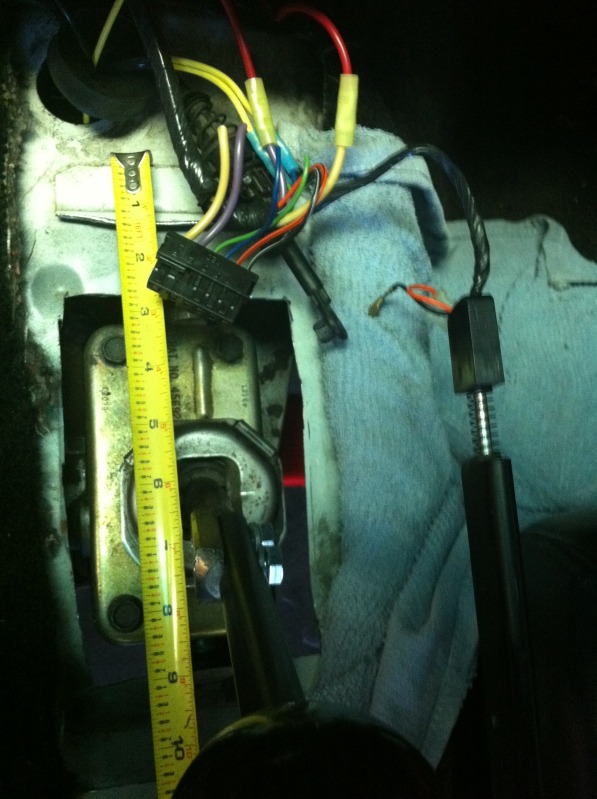
You can really use the dimples as a pretty good guide in these...
Wiring
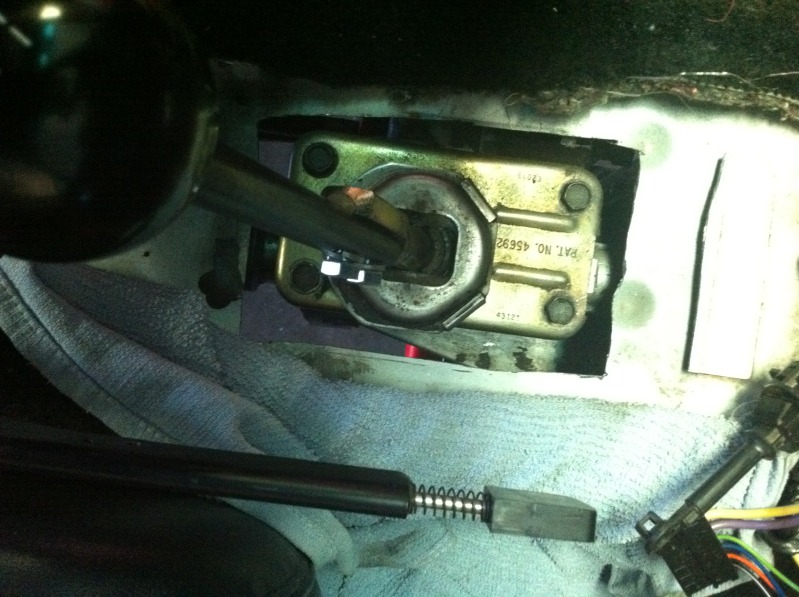
Cut off the connector that hooks up to the Automatic shifter.
While I was doing the wiring, I went ahead and removed the TV cable, and the shifter cable... The cable you see in the shifter cut reference shots I left, if it isn't in the right position the car won't start, so I will eventually figure that out.
Regardless, here is the wiring you need to do using the connector that you cut earlier.
-The top two (biggest wire) Yellow and Purple go to the clutch pedal switch. Just match the colors, this makes it so the clutch has to be pushed in to start the car.
-The next two Blue and Green wires in the harness go to your reverse lights, wire them to the two wire connector on the passenger side of the T56. I was missing the pigtail, so I cut the one that went to the automatic and used it.
-The next two wires Black and Orange, tape up and aren't used. They signal the computer that it's in park and neutral. We want it to think it's in drive all the time.
For the reverse lockout, I cut the far left wire on the brake light switch and spliced a wire into the reverse lockout and then ran another wire to ground. This makes it so you have to apply the brake to disengage the reverse lockout allowing you to put it in reverse. Now, mine was broken, so if you don't want to wire it in, you just have to push to the right and up really hard to get in reverse. Not too big of a deal...
Now go out and enjoy your new T56 ride!
If you have any improvements or other suggestions for what worked for you, please PM me and ill edit/add them. Let's try to keep this pretty uncluttered. This is all stuff that I got from sorting through 2 different threads with like 13 pages... I included pictures that I felt were hard to find/or will be helpful for you. If you have questions, feel free to ask.
Mounting the Pedals/ Master Slave Cylinder
First thing is first. I started off by mounting the pedals and cutting the hole for it... Remove the old automatic brake pedal. I pulled off the Cruise Control switch and the brake light switch and put them in the 4th gen pedals I used.
Here is where I cut off the gas pedal:
I then mounted the pedals, The bolts are a pain in the ***, I ended up lowing the steering column, and using a long extention and a swivel. The top bolt needs an open end wrench and a ton of patients (possibly a beer).
Once you get them bolted up, make sure the clutch pedal brackets are close to the cut out in the carpet foam. I used them as a guide for the U-bolt... Then start cutting. I used a hole saw and a dremel from there...
Here is a shot of the hole saw size I used along with the cut. I didn't think to push it over to the foam cutout, so I had to clearance the fender a bit because it wouldn't fit. I ended up getting away with drilling new U bolt holes next to the old ones and dremel the hole a little bigger and it worked perfect.
This shot was before I dremelled it into an oval.
For mounting it, just pull the brake booster out of the way a bit. I messed with it for a few hours before giving in and pulling it. It's really not that hard, just make sure you use the pedals to drill the holes before removing the brake bolts.
Once you get the Slave and Master cylinder in place and bolted up the hard part is pretty much done!
Putting the T56 in!
Now put the bell housing on and the clutch. Here are the torque ratings you need:
Flywheel to crank bolts- 65-70 ft-lbs
Bell housing to block 30-35 ft-lbs
Pressure plate to flywheel 35-40 ft-lbs
T56 to bell housing 40-45 ft-lbs
Putting the transmission in in pretty straight forward. Make sure you get everything put together in straight using the clutch alignment tool...
T56 Crossmember
I used the Spohn mount. It has 6 mounting holes... so you will need to drill, tap, and Heli coil two holes. I read that they are 3/8-16, so I used them, but I quickly figured out that they are actually 10mm. SO USE 10mm HELICOILS!
I now have mix matched bolts...
Also, the Spohn crossmember sits extremely low... when I weld my Dyno Don exhaust together, I will definitely be making a new mount.Cutting the Shifter Hole
Well, can't guarantee your hole, but here are my reference shots for you to help guide you as close as I can. My hole isn't perfect, but hopefully my pictures help your turn out better. I had it cut mine bigger and trim it like 3 times...
These next 2 shots are without moving the tape measure, so you can see how far back you need to cut...
You can really use the dimples as a pretty good guide in these...
Wiring
Cut off the connector that hooks up to the Automatic shifter.
While I was doing the wiring, I went ahead and removed the TV cable, and the shifter cable... The cable you see in the shifter cut reference shots I left, if it isn't in the right position the car won't start, so I will eventually figure that out.
Regardless, here is the wiring you need to do using the connector that you cut earlier.
-The top two (biggest wire) Yellow and Purple go to the clutch pedal switch. Just match the colors, this makes it so the clutch has to be pushed in to start the car.
-The next two Blue and Green wires in the harness go to your reverse lights, wire them to the two wire connector on the passenger side of the T56. I was missing the pigtail, so I cut the one that went to the automatic and used it.
-The next two wires Black and Orange, tape up and aren't used. They signal the computer that it's in park and neutral. We want it to think it's in drive all the time.
For the reverse lockout, I cut the far left wire on the brake light switch and spliced a wire into the reverse lockout and then ran another wire to ground. This makes it so you have to apply the brake to disengage the reverse lockout allowing you to put it in reverse. Now, mine was broken, so if you don't want to wire it in, you just have to push to the right and up really hard to get in reverse. Not too big of a deal...
Now go out and enjoy your new T56 ride!
If you have any improvements or other suggestions for what worked for you, please PM me and ill edit/add them. Let's try to keep this pretty uncluttered. This is all stuff that I got from sorting through 2 different threads with like 13 pages... I included pictures that I felt were hard to find/or will be helpful for you. If you have questions, feel free to ask.
Last edited by Bullydawg; 11-26-2012 at 06:23 PM.
 11-19-2012, 07:34 PM
#2
Supreme Member
Thread Starter
iTrader: (7)
Join Date: Nov 2006
Location: Alamogordo, NM
Posts: 3,740
Likes: 0
Received 9 Likes
on
9 Posts
Car: 88 Formula 350
Engine: 5.7
Transmission: T-56
Axle/Gears: 9" 3.89
Re: Automatic to T56 swap Tutorial *Pics*
Was asked for a parts breakdown of everything needed. So here we go...
$1400 Shipped (Ls1tech): T56 + Bell housing, Flywheel, Pedals,
$305.10 Shipped (nopi) Competition Clutches Stage 4 Clutch
$105 + shipping (Hawks) T56 Crossmember
$40 (Local) Flywheel Resurfaced
$75 Shipped (TGO) Manual Transmission torque arm mount
$50 Shipped (TGO) Dakota Digital Speed Sensor
$1400 Shipped (Ls1tech): T56 + Bell housing, Flywheel, Pedals,
$305.10 Shipped (nopi) Competition Clutches Stage 4 Clutch
$105 + shipping (Hawks) T56 Crossmember
$40 (Local) Flywheel Resurfaced
$75 Shipped (TGO) Manual Transmission torque arm mount
$50 Shipped (TGO) Dakota Digital Speed Sensor
11-26-2012, 06:21 PM
#3
Junior Member
Join Date: Oct 2009
Location: Nor Cal
Posts: 56
Likes: 0
Received 0 Likes
on
0 Posts
Car: 87 Trans Am
Engine: 305 TPI
Transmission: T5
Axle/Gears: 3.23 posi
Re: Automatic to T56 swap Tutorial *Pics*
This is great, I'm going to use this for my swap in a few months. Looks like you have all the measurements and places to cut. no need to measure twice and cut once this thread has all the figured out. ( I will measure twice just to be safe  )
)
)
11-26-2012, 06:52 PM
#4
Senior Member
Join Date: Apr 2006
Location: CT
Posts: 685
Likes: 0
Received 0 Likes
on
0 Posts
Car: 1988 Iroc
Engine: 5.7L
Transmission: '96 T56, Hurst Shifter, Mech VSS
Axle/Gears: 3.45 9 Bolt
Re: Automatic to T56 swap MADE EASY Tutorial *Pics*
Im starting my swap this weekend. Between this and the other one I think I should have no problem.
Couple questions, why did you not remove the carpet/padding when going to cut the pedal holes, i imagine that extra thickness can mess up the angle of the slave cylinder. Also, why are the holes off so far on the holes you cut and the cutouts on the padding? Is it because you used 4th gen pedals(Im using 3rd gen ones)?
Couple questions, why did you not remove the carpet/padding when going to cut the pedal holes, i imagine that extra thickness can mess up the angle of the slave cylinder. Also, why are the holes off so far on the holes you cut and the cutouts on the padding? Is it because you used 4th gen pedals(Im using 3rd gen ones)?
11-26-2012, 07:29 PM
#5
Supreme Member
Thread Starter
iTrader: (7)
Join Date: Nov 2006
Location: Alamogordo, NM
Posts: 3,740
Likes: 0
Received 9 Likes
on
9 Posts
Car: 88 Formula 350
Engine: 5.7
Transmission: T-56
Axle/Gears: 9" 3.89
Re: Automatic to T56 swap MADE EASY Tutorial *Pics*
I didn't remove the padding because I didn't see any issue with leaving it. The master/slave cylinder mount on the other side of the firewall so the angle isn't affected at all. The U-Bolts go through the pedal brackets on the side with the carpet. I was able to get them plenty tight. They didn't wiggle at all, so I wasn't too worried about it. I would be more worried about getting it mounted straight.
As for the holes... As I mentioned above, use the carpet as a reference. I didn't pay attention and cut the hole where the clutch pedal sat. I should have pushed it over to where the carpet cutout was. By cutting out out a bit further out, I ended up having to do a tiny bit of hammer work in the engine bay. I ended up scooting it over a bit after I dremeled the hole out bigger.
As for the holes... As I mentioned above, use the carpet as a reference. I didn't pay attention and cut the hole where the clutch pedal sat. I should have pushed it over to where the carpet cutout was. By cutting out out a bit further out, I ended up having to do a tiny bit of hammer work in the engine bay. I ended up scooting it over a bit after I dremeled the hole out bigger.
12-11-2012, 05:50 PM
#6
Senior Member
iTrader: (5)

Join Date: Jan 2009
Location: Golden, CO
Posts: 887
Likes: 0
Received 11 Likes
on
9 Posts
Car: 87 IROC
Engine: L31 350
Transmission: T56
Axle/Gears: 4.10 D44
Re: Automatic to T56 swap MADE EASY Tutorial *Pics*
Excellent information. Did you, or are you planning to modify the ECM/chip/programming to match the auto -> manual change?
12-11-2012, 06:01 PM
#7
Supreme Member
iTrader: (6)
Join Date: Aug 2011
Location: San Diego, California For Now
Posts: 2,379
Likes: 0
Received 10 Likes
on
10 Posts
Car: 88 Formula, 90 Iroc RIP, 92 RS Sold
Engine: 305 to 350
Transmission: 700r4
Axle/Gears: 10 Bolt
Re: Automatic to T56 swap MADE EASY Tutorial *Pics*
it can run with auto tune be driveability is better with having a manual tune theres not much difference but the difference is in the idle etc. as auto has more load than a manual so it doesnt hurt you just have better drivability around the city and stop go conditions you just need a chip you can get manual tune from corvette iron headed l98 or adjust 350 tune or get a 305 manual tune and have it mirror a 350 due to more fuel the 350 uses etc etc you can run same ecm
Trending Topics
12-11-2012, 09:02 PM
#8
Supreme Member
Thread Starter
iTrader: (7)
Join Date: Nov 2006
Location: Alamogordo, NM
Posts: 3,740
Likes: 0
Received 9 Likes
on
9 Posts
Car: 88 Formula 350
Engine: 5.7
Transmission: T-56
Axle/Gears: 9" 3.89
Re: Automatic to T56 swap MADE EASY Tutorial *Pics*
I certainly am planning on it. I have an EBL P4 Flash ECU to install next time I am home on leave. This car has way too much done to it and needs a tune.
12-28-2012, 04:22 PM
#9
Senior Member
Join Date: Apr 2006
Location: CT
Posts: 685
Likes: 0
Received 0 Likes
on
0 Posts
Car: 1988 Iroc
Engine: 5.7L
Transmission: '96 T56, Hurst Shifter, Mech VSS
Axle/Gears: 3.45 9 Bolt
Re: Automatic to T56 swap MADE EASY Tutorial *Pics*
Im about to cut the shifter hole for my swap, what did you use to remove the auto shifter bracket and cut the actual shifter hole?
12-28-2012, 04:28 PM
#10
Supreme Member
iTrader: (6)
Join Date: Aug 2011
Location: San Diego, California For Now
Posts: 2,379
Likes: 0
Received 10 Likes
on
10 Posts
Car: 88 Formula, 90 Iroc RIP, 92 RS Sold
Engine: 305 to 350
Transmission: 700r4
Axle/Gears: 10 Bolt
Re: Automatic to T56 swap MADE EASY Tutorial *Pics*
you need to drill out the tack welds thats what holds the bracket to floor plan look at braket and look for the dimples near the corners drill those out i think theres like 4 dont remember.... then you can cut it off you can use some type circler cutter or sawzill... go to homedepot and you can rent tools there for less than 30 or so bucks
12-28-2012, 06:02 PM
#11
Supreme Member
Thread Starter
iTrader: (7)
Join Date: Nov 2006
Location: Alamogordo, NM
Posts: 3,740
Likes: 0
Received 9 Likes
on
9 Posts
Car: 88 Formula 350
Engine: 5.7
Transmission: T-56
Axle/Gears: 9" 3.89
Re: Automatic to T56 swap MADE EASY Tutorial *Pics*
I used a cutoff wheel and just cut it really close. It isn't going to get in the way of anything. In my first cut pictures, you can see where I cut the bracket off. You will still need to drill out a few spot welds though.
The following users liked this post:
91ORANGEZ28 (04-24-2023)
12-28-2012, 06:38 PM
#12
Senior Member
Join Date: Apr 2006
Location: CT
Posts: 685
Likes: 0
Received 0 Likes
on
0 Posts
Car: 1988 Iroc
Engine: 5.7L
Transmission: '96 T56, Hurst Shifter, Mech VSS
Axle/Gears: 3.45 9 Bolt
Re: Automatic to T56 swap MADE EASY Tutorial *Pics*
Thats the problem, I cant see where the spotwelds are, it all looks pretty uniform without any "dimples."
12-28-2012, 06:51 PM
#13
Supreme Member
Thread Starter
iTrader: (7)
Join Date: Nov 2006
Location: Alamogordo, NM
Posts: 3,740
Likes: 0
Received 9 Likes
on
9 Posts
Car: 88 Formula 350
Engine: 5.7
Transmission: T-56
Axle/Gears: 9" 3.89
Re: Automatic to T56 swap MADE EASY Tutorial *Pics*
If I remember correctly, they might be easier to see from under the car... You can see where I drilled my holes in the first picture. There are 2 holes.
12-28-2012, 07:16 PM
#14
Re: Automatic to T56 swap MADE EASY Tutorial *Pics*
you need to drill out the tack welds thats what holds the bracket to floor plan look at braket and look for the dimples near the corners drill those out i think theres like 4 dont remember.... then you can cut it off you can use some type circler cutter or sawzill... go to homedepot and you can rent tools there for less than 30 or so bucks
As for cutting my hole, I did something simliar to you once I drilled out to remove the autobrackets. I used a 1" hole saw at the 4 corners for a smoother cut. I still ended up having to trim a little again on my car.
http://farm9.staticflickr.com/8301/7...4f2b69a7_o.jpg
12-28-2012, 07:22 PM
#15
Supreme Member
Thread Starter
iTrader: (7)
Join Date: Nov 2006
Location: Alamogordo, NM
Posts: 3,740
Likes: 0
Received 9 Likes
on
9 Posts
Car: 88 Formula 350
Engine: 5.7
Transmission: T-56
Axle/Gears: 9" 3.89
Re: Automatic to T56 swap MADE EASY Tutorial *Pics*
I went through and smoothed mine out with a dremel.
01-12-2013, 07:30 PM
#16
Senior Member
Join Date: Apr 2006
Location: CT
Posts: 685
Likes: 0
Received 0 Likes
on
0 Posts
Car: 1988 Iroc
Engine: 5.7L
Transmission: '96 T56, Hurst Shifter, Mech VSS
Axle/Gears: 3.45 9 Bolt
Re: Automatic to T56 swap MADE EASY Tutorial *Pics*
Well got my T56 in today. It went in SOOOO easy! I have a question about the TOB. I have one that has a bit of a point on it. I would assume that points to the inside of the shift fork correct? Also, any tips on getting the for onto the TOB, thats one of my goals for tomorrow.
01-30-2013, 05:04 AM
#17
Senior Member
Join Date: Aug 2010
Location: Lincoln, NE
Posts: 680
Likes: 0
Received 1 Like
on
1 Post
Car: 86 Iroc-Z28
Engine: 5.3
Transmission: 4l60
Re: Automatic to T56 swap MADE EASY Tutorial *Pics*
This is great helped alot to get the hole cut and the wiring done thanks alot man
01-30-2013, 07:53 AM
#18
Supreme Member
Thread Starter
iTrader: (7)
Join Date: Nov 2006
Location: Alamogordo, NM
Posts: 3,740
Likes: 0
Received 9 Likes
on
9 Posts
Car: 88 Formula 350
Engine: 5.7
Transmission: T-56
Axle/Gears: 9" 3.89
Re: Automatic to T56 swap MADE EASY Tutorial *Pics*
Glad I could help!
I'll be home on leave in 2 weeks and will be installing the Dakota speed box, so I'll update it afterwards with the wiring.
I'll be home on leave in 2 weeks and will be installing the Dakota speed box, so I'll update it afterwards with the wiring.
03-02-2013, 09:42 AM
#19
Supreme Member
iTrader: (12)
Join Date: Aug 2005
Location: M.D
Posts: 1,923
Likes: 0
Received 2 Likes
on
1 Post
Car: 1987 Camaro
Engine: 350 hsr
Transmission: 700R4(blown)
Axle/Gears: 3:73
Re: Automatic to T56 swap MADE EASY Tutorial *Pics*
Any updates?
And couple of questions
1. where is the best place to get the 4th gen hydrollics ?
2. what did you guys use for a lower shift boot? how do they install? did it coe from a 4h gen or a 3rd gen?
So far I bought my shifter,4th gen center console,firebird radio pod,dakota digital box,hawks crossmember,4th gen pedals. still need quite abit but its coing along slowly.
03-02-2013, 09:52 AM
#20
Re: Automatic to T56 swap MADE EASY Tutorial *Pics*
Any updates?
And couple of questions
1. where is the best place to get the 4th gen hydrollics ?
2. what did you guys use for a lower shift boot? how do they install? did it coe from a 4h gen or a 3rd gen?
So far I bought my shifter,4th gen center console,firebird radio pod,dakota digital box,hawks crossmember,4th gen pedals. still need quite abit but its coing along slowly.
And couple of questions
1. where is the best place to get the 4th gen hydrollics ?
2. what did you guys use for a lower shift boot? how do they install? did it coe from a 4h gen or a 3rd gen?
So far I bought my shifter,4th gen center console,firebird radio pod,dakota digital box,hawks crossmember,4th gen pedals. still need quite abit but its coing along slowly.
For the lower shift boot? Used to be hard, had to find a NOS or used piece. However Hawks now has re-pro boots which makes our lives 10x easier.
03-02-2013, 10:17 AM
#21
Supreme Member
iTrader: (12)
Join Date: Aug 2005
Location: M.D
Posts: 1,923
Likes: 0
Received 2 Likes
on
1 Post
Car: 1987 Camaro
Engine: 350 hsr
Transmission: 700R4(blown)
Axle/Gears: 3:73
Re: Automatic to T56 swap MADE EASY Tutorial *Pics*
http://www.hawksthirdgenparts.com/pr...roduction.html
and how does it get held down?
Link for the slave set up?
03-02-2013, 10:26 AM
#22
Re: Automatic to T56 swap MADE EASY Tutorial *Pics*
Is this the one you are talking about ?
http://www.hawksthirdgenparts.com/pr...roduction.html
and how does it get held down?
Link for the slave set up?
http://www.hawksthirdgenparts.com/pr...roduction.html
and how does it get held down?
Link for the slave set up?
As for the Rock Auto, drill down through the menus for a 93-97 Chevy Camaro. Its plain as day. Its a Clutch Master/Slave assembly.
You are GOING to have to do research on this. If you haven't even looked then you don't know if the answer to your question is .23 seconds away in a search.
Last edited by Thirdgen89GTA; 03-02-2013 at 10:38 AM.
03-02-2013, 10:28 AM
#23
Supreme Member
Thread Starter
iTrader: (7)
Join Date: Nov 2006
Location: Alamogordo, NM
Posts: 3,740
Likes: 0
Received 9 Likes
on
9 Posts
Car: 88 Formula 350
Engine: 5.7
Transmission: T-56
Axle/Gears: 9" 3.89
Re: Automatic to T56 swap MADE EASY Tutorial *Pics*
I used the 4th gen lower boot and I HIGHLY suggest not going that route. I will probably swap it out for a 3rd gen repro.
Problem with the 4th gen one is it is formed for a 4th gen and has a metal rim around it. I ended up just drilling a couple holes, then hammering the rest of it form for my car.
Problem with the 4th gen one is it is formed for a 4th gen and has a metal rim around it. I ended up just drilling a couple holes, then hammering the rest of it form for my car.
03-02-2013, 10:36 AM
#24
Re: Automatic to T56 swap MADE EASY Tutorial *Pics*
I used the 4th gen lower boot and I HIGHLY suggest not going that route. I will probably swap it out for a 3rd gen repro.
Problem with the 4th gen one is it is formed for a 4th gen and has a metal rim around it. I ended up just drilling a couple holes, then hammering the rest of it form for my car.
Problem with the 4th gen one is it is formed for a 4th gen and has a metal rim around it. I ended up just drilling a couple holes, then hammering the rest of it form for my car.
It took me literally 5 minutes to mount the 4th gen lower boot with a cordless drill, a small appropriately sized drill bit matching the screws you will use.
- Place the transmission in neutral
- Remove the 2 hex head bolts and stick.
- slide the 4th gen boot over the shifter
- locate the boot where you want it and drill 2 holes then put the screws in there to hold it in place.
- Finish the rest of the holes/screws
- re-install the stick and two hex bolts.
03-02-2013, 10:37 AM
#25
Supreme Member
iTrader: (12)
Join Date: Aug 2005
Location: M.D
Posts: 1,923
Likes: 0
Received 2 Likes
on
1 Post
Car: 1987 Camaro
Engine: 350 hsr
Transmission: 700R4(blown)
Axle/Gears: 3:73
Re: Automatic to T56 swap MADE EASY Tutorial *Pics*
I used the 4th gen lower boot and I HIGHLY suggest not going that route. I will probably swap it out for a 3rd gen repro.
Problem with the 4th gen one is it is formed for a 4th gen and has a metal rim around it. I ended up just drilling a couple holes, then hammering the rest of it form for my car.
Problem with the 4th gen one is it is formed for a 4th gen and has a metal rim around it. I ended up just drilling a couple holes, then hammering the rest of it form for my car.
03-02-2013, 11:30 AM
#26
Senior Member
Join Date: Apr 2006
Location: CT
Posts: 685
Likes: 0
Received 0 Likes
on
0 Posts
Car: 1988 Iroc
Engine: 5.7L
Transmission: '96 T56, Hurst Shifter, Mech VSS
Axle/Gears: 3.45 9 Bolt
Re: Automatic to T56 swap MADE EASY Tutorial *Pics*
Any updates?
And couple of questions
1. where is the best place to get the 4th gen hydrollics ?
2. what did you guys use for a lower shift boot? how do they install? did it coe from a 4h gen or a 3rd gen?
So far I bought my shifter,4th gen center console,firebird radio pod,dakota digital box,hawks crossmember,4th gen pedals. still need quite abit but its coing along slowly.
And couple of questions
1. where is the best place to get the 4th gen hydrollics ?
2. what did you guys use for a lower shift boot? how do they install? did it coe from a 4h gen or a 3rd gen?
So far I bought my shifter,4th gen center console,firebird radio pod,dakota digital box,hawks crossmember,4th gen pedals. still need quite abit but its coing along slowly.
I first used a hurst universal shift boot, but it prevented me from getting into 5, 6, r when the console was bolted up. I swapped it out for a 4th gen one and couldnt be happier.
03-17-2013, 11:03 AM
#27
Supreme Member
iTrader: (2)
Join Date: Feb 2006
Location: Sacramento Ca
Posts: 1,262
Likes: 0
Received 0 Likes
on
0 Posts
Car: 86 Trans am, 91 Camaro RS
Engine: 355 Sbc, nothin yet
Transmission: 700r4- both
Re: Automatic to T56 swap MADE EASY Tutorial *Pics*
To add to an already great thread on this swap, Im adding a few pics of my progress so far on the swap. Mine are basically dedicated to the slave cylinder hole cutting and install.
This helped me out HUGE!! I went to pick n pull and found a couple of stick shift cars. this is the gasket from the t56 slave cylinder.
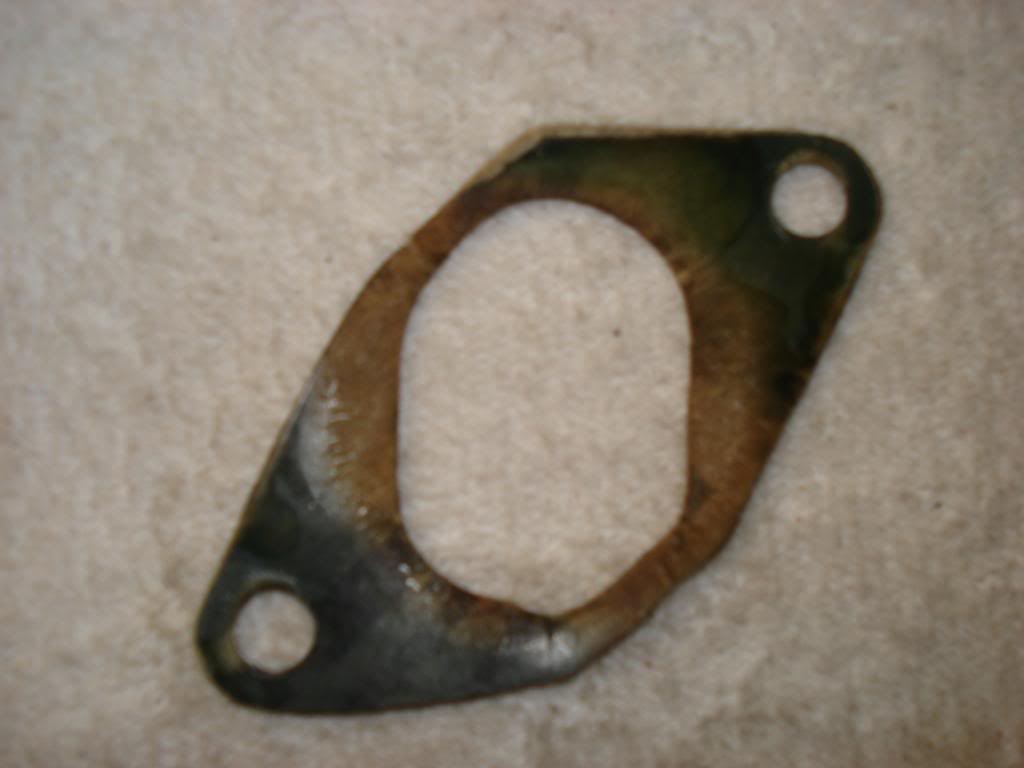
This shot is me mocking up the spot where I was gonna drill my holes. i actually moved it up about 1/4 inch to give it more of a centered look. THE KEY HERE IS TO MAKE SURE THE TOP OF THE GASKET (OR THE SLAVE CYLINDER) IS PARALLEL TO THE CURVATURE THAT GOES UP TO THE BOOSTER MOUNTING
These are VERY necessary!!
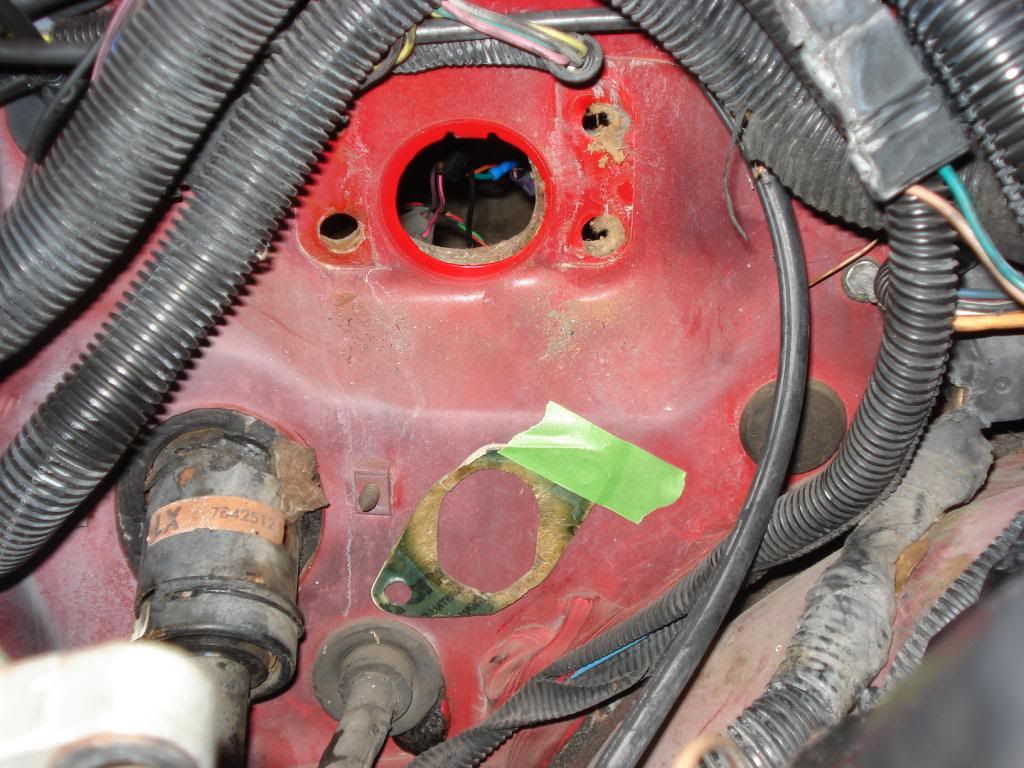
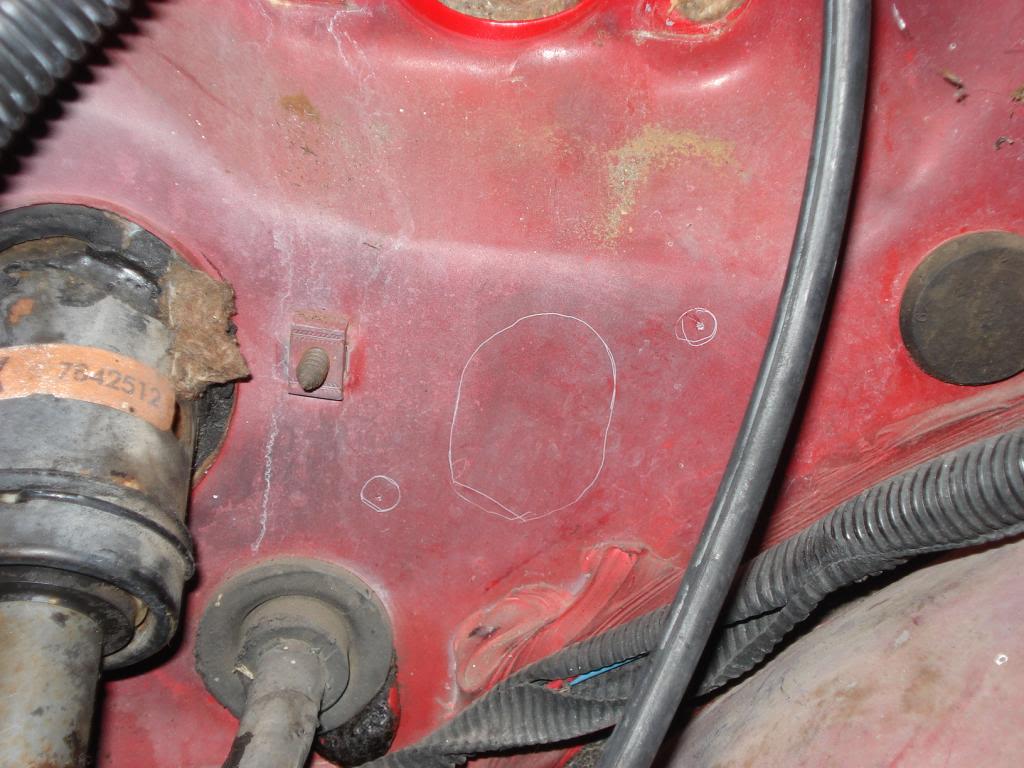
Back to business...... with the gasket taped to the firewall, I scribed an outline of the holes that needed to be drilled
Holes are cut!!! Looks good huh?
I took some basic measurements of the gasket for you guys. Im about to send it to another member. Hoping he pays it forward and sends it along down the line for those who need it.
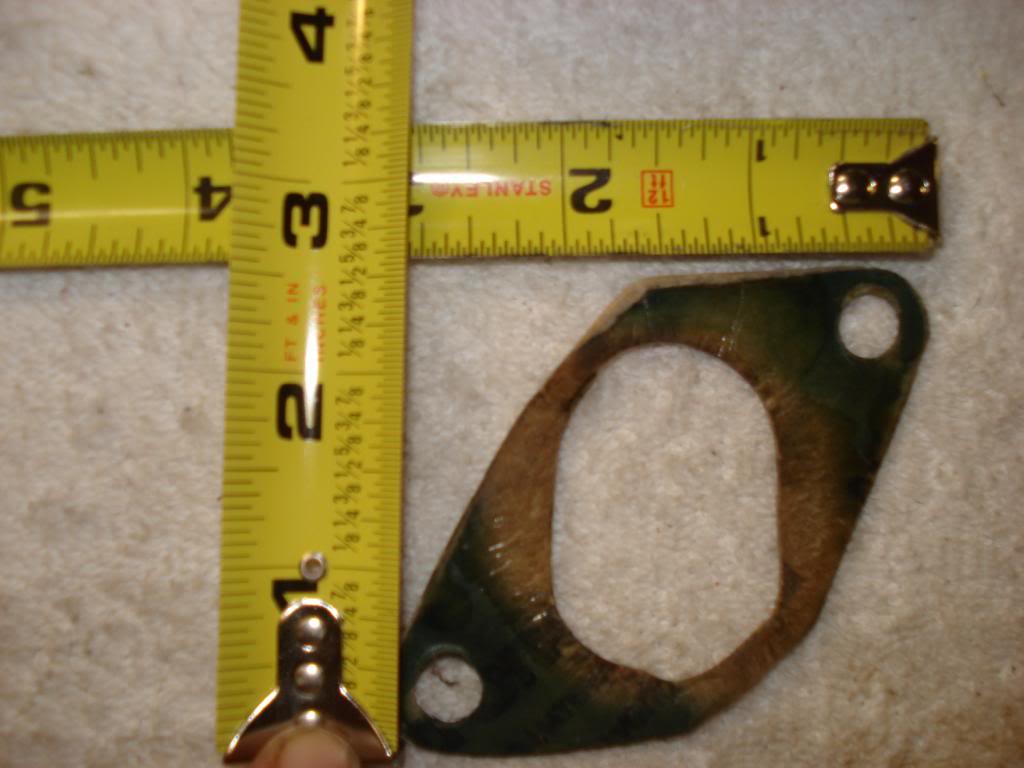
I hope this sheds some light on the location and how to get ur holes drilled straight the FIRST time!!
This helped me out HUGE!! I went to pick n pull and found a couple of stick shift cars. this is the gasket from the t56 slave cylinder.
This shot is me mocking up the spot where I was gonna drill my holes. i actually moved it up about 1/4 inch to give it more of a centered look. THE KEY HERE IS TO MAKE SURE THE TOP OF THE GASKET (OR THE SLAVE CYLINDER) IS PARALLEL TO THE CURVATURE THAT GOES UP TO THE BOOSTER MOUNTING
These are VERY necessary!!
Back to business...... with the gasket taped to the firewall, I scribed an outline of the holes that needed to be drilled
Holes are cut!!! Looks good huh?
I took some basic measurements of the gasket for you guys. Im about to send it to another member. Hoping he pays it forward and sends it along down the line for those who need it.
I hope this sheds some light on the location and how to get ur holes drilled straight the FIRST time!!
Last edited by Copchaser; 03-17-2013 at 11:07 AM.
03-17-2013, 11:33 AM
#28
Member
iTrader: (2)
Join Date: Sep 2010
Location: Buffalo NY
Posts: 297
Likes: 0
Received 0 Likes
on
0 Posts
Car: 1985 Trans AM
Engine: 350 ATK Performance
Transmission: T56
Axle/Gears: Eaton 3.73
Re: Automatic to T56 swap MADE EASY Tutorial *Pics*
Nice write up. I'd like to do this swap. Maybe next winter since I just had my 700 built last spring.
08-11-2014, 08:23 AM
#29
Junior Member

Join Date: Feb 2014
Location: Fox Valley Area, WI
Posts: 1
Likes: 0
Received 0 Likes
on
0 Posts
Car: 91 Camaro T-Top RS
Engine: TBI 350
Transmission: T-5 Manual
Re: Automatic to T56 swap MADE EASY Tutorial *Pics*
Since I already swapped from auto to a T-5 this last summer, I'm most of the way there for this swap.
My questions are as follows:
What bell housing is used?
LT1 T-56?
LT1 clutch?
Can I use my existing flywheel?
My questions are as follows:
What bell housing is used?
LT1 T-56?
LT1 clutch?
Can I use my existing flywheel?
08-18-2014, 07:29 AM
#30
Senior Member
iTrader: (5)
Join Date: Jan 2009
Location: Golden, CO
Posts: 887
Likes: 0
Received 11 Likes
on
9 Posts
Car: 87 IROC
Engine: L31 350
Transmission: T56
Axle/Gears: 4.10 D44
Re: Automatic to T56 swap MADE EASY Tutorial *Pics*
Which version of T56 did you get? Did it come from behind an LT1 or LS1?
LT1... This has a unique low profile pull clutch. It uses a short bell housing. The flywheel has a unique offset (thicker). There is a fork that pulls the throw-out bearing, and uses an external slave.... Use everything from the T-56
LS1... a) use your existing flywheel, clutch, throwout and linkage. Get an adapter plate to mount the trans... maybe, I think. b) Get a McLeod scattershield that does the block to trans adapter-ing, and use as LS style hydraulic throwout bearing. c) Get an LT input shaft and front cover, and use all LT parts.
LT1... This has a unique low profile pull clutch. It uses a short bell housing. The flywheel has a unique offset (thicker). There is a fork that pulls the throw-out bearing, and uses an external slave.... Use everything from the T-56
LS1... a) use your existing flywheel, clutch, throwout and linkage. Get an adapter plate to mount the trans... maybe, I think.
b) Get a McLeod scattershield that does the block to trans adapter-ing, and use as LS style hydraulic throwout bearing. c) Get an LT input shaft and front cover, and use all LT parts.
08-18-2014, 10:06 AM
#31
Supreme Member
iTrader: (6)
Join Date: Aug 2011
Location: San Diego, California For Now
Posts: 2,379
Likes: 0
Received 10 Likes
on
10 Posts
Car: 88 Formula, 90 Iroc RIP, 92 RS Sold
Engine: 305 to 350
Transmission: 700r4
Axle/Gears: 10 Bolt
Re: Automatic to T56 swap MADE EASY Tutorial *Pics*
use LT1 its a direct swap
you can use ls1 but have to swap input shaft and bell housing amoung other stuff back to LT-1 so pretty much easier and less hassle to just get LT1 T56
both are the same except input shafts are different lengths and bellhousing wont bolt up to sbc
you can use ls1 but have to swap input shaft and bell housing amoung other stuff back to LT-1 so pretty much easier and less hassle to just get LT1 T56
both are the same except input shafts are different lengths and bellhousing wont bolt up to sbc
01-22-2015, 09:34 PM
#32
Member
Join Date: Nov 2010
Location: Raleigh
Posts: 162
Likes: 0
Received 0 Likes
on
0 Posts
Car: 1989 Iroc Z 5.7L
Engine: 5.7L
Transmission: T56
Axle/Gears: built 4.10s
Re: Automatic to T56 swap MADE EASY Tutorial *Pics*
So, just pulled my 700R and installed a T56 with a mini-starter 89 TPI. I still need to wire the reverse lights, neutral wires to clutch, and abbott box for mechanical speedometer. I jumpered the neutral wires to start the car so I can test the hydraulics. The starter is cranking over the motor, there is fuel pressure in the rail, need to test spark, but is there something simple I am missing with my T56 swap?
01-22-2015, 09:42 PM
#33
Re: Automatic to T56 swap MADE EASY Tutorial *Pics*
So, just pulled my 700R and installed a T56 with a mini-starter 89 TPI. I still need to wire the reverse lights, neutral wires to clutch, and abbott box for mechanical speedometer. I jumpered the neutral wires to start the car so I can test the hydraulics. The starter is cranking over the motor, there is fuel pressure in the rail, need to test spark, but is there something simple I am missing with my T56 swap?
The Reverse lights won't affect any ECM functions and are part of the body harness.
01-23-2015, 01:51 AM
#34
Member
Re: Automatic to T56 swap MADE EASY Tutorial *Pics*
T56 must be lighter than auto, so is there any change in height?
01-23-2015, 07:42 AM
#35
Senior Member
iTrader: (5)
Join Date: Jan 2009
Location: Golden, CO
Posts: 887
Likes: 0
Received 11 Likes
on
9 Posts
Car: 87 IROC
Engine: L31 350
Transmission: T56
Axle/Gears: 4.10 D44
Re: Automatic to T56 swap MADE EASY Tutorial *Pics*
I found learned this one just by having the shifter unplugged and failing to start.
01-17-2016, 05:56 PM
#36
Junior Member

Join Date: Dec 2015
Posts: 7
Likes: 0
Received 0 Likes
on
0 Posts
Re: Automatic to T56 swap MADE EASY Tutorial *Pics*
So I'm having trouble finding what wires are talked about in my 1989 305 formula firebird, especially the "big" purple and yellow safety switch wires. I posted pics in https://www.thirdgen.org/forums/tran...ml#post5997150 of all I can find as far as wires that might be right. there are yellow and purple wires, and some wires that are bigger than others, but no purple and yellow wires that are also bigger than all the others.
Could the big green wire by the shifter be the equivalent of the big yellow that I'm looking for?
Could the big green wire by the shifter be the equivalent of the big yellow that I'm looking for?
01-17-2016, 05:57 PM
#37
Re: Automatic to T56 swap MADE EASY Tutorial *Pics*
If you tie the purple and green together you will bypass the park/neutral safety.
Those are the same wires you need to route to the clutch starter enable switch if you want to maintain factory safety items.
Those are the same wires you need to route to the clutch starter enable switch if you want to maintain factory safety items.
The following users liked this post:
91ORANGEZ28 (04-24-2023)
01-17-2016, 06:02 PM
#38
Junior Member
Join Date: Dec 2015
Posts: 7
Likes: 0
Received 0 Likes
on
0 Posts
Re: Automatic to T56 swap MADE EASY Tutorial *Pics*
Awesome, thanks. Does it matter how I hook the wires to the clutch starter for it to work? I would think so but maybe not. If it does, do I just try both ways until it works? My chances of getting a 50/50 kind of thing wrong are high lol
Oh, and the thing that's more important than anything right now is: Will a 1989 manual corvette tranny work ok with my 305 1989 firebird? That's all that's available locally
Oh, and the thing that's more important than anything right now is: Will a 1989 manual corvette tranny work ok with my 305 1989 firebird? That's all that's available locally
01-18-2016, 07:23 AM
#40
Senior Member
iTrader: (5)
Join Date: Jan 2009
Location: Golden, CO
Posts: 887
Likes: 0
Received 11 Likes
on
9 Posts
Car: 87 IROC
Engine: L31 350
Transmission: T56
Axle/Gears: 4.10 D44
Re: Automatic to T56 swap MADE EASY Tutorial *Pics*
1) IIRC the Corvette "torque arm" is solidly bolted to the opposite side of the trans... meaning you would have difficulty mounting your torque arm.
2) shifter is likely in a different position. It MAY be close enough to work.
3) The transmount/crossmember is likely in a different spot than LT1 Camaro T56s, so any aftermarket crossmembers may not work as-is... More custom fab.
01-18-2016, 10:29 AM
#41
Member
Join Date: Aug 2013
Location: Milltown, NJ
Posts: 390
Likes: 0
Received 0 Likes
on
0 Posts
Car: 86 iroc, 02 v6 camaro
Engine: 350 HSR, 3800 V6
Transmission: T56, WCT5
Axle/Gears: 9in 4.11 posi, 3.23 LSD
Re: Automatic to T56 swap MADE EASY Tutorial *Pics*
Awesome, thanks. Does it matter how I hook the wires to the clutch starter for it to work? I would think so but maybe not. If it does, do I just try both ways until it works? My chances of getting a 50/50 kind of thing wrong are high lol
Oh, and the thing that's more important than anything right now is: Will a 1989 manual corvette tranny work ok with my 305 1989 firebird? That's all that's available locally
Oh, and the thing that's more important than anything right now is: Will a 1989 manual corvette tranny work ok with my 305 1989 firebird? That's all that's available locally
01-18-2016, 12:30 PM
#42
Junior Member
Join Date: Dec 2015
Posts: 7
Likes: 0
Received 0 Likes
on
0 Posts
Re: Automatic to T56 swap MADE EASY Tutorial *Pics*
Ok so the next question would be would a t56 out of a 2000 LS1 firebird work as easy with my engine as the t56 the guy who posted this thread used? And would the 5.7 LS1 engine bolt in the same place as my 5.0? There's a guy parting out his car near me with all that.
01-18-2016, 12:45 PM
#45
Junior Member
Join Date: Dec 2015
Posts: 7
Likes: 0
Received 0 Likes
on
0 Posts
Re: Automatic to T56 swap MADE EASY Tutorial *Pics*
So I don't go asking a million times, what years firebird/camaro/corvette (if any) work good? Is it only going to be F body years really? Basicly 1980-1992?
 01-25-2016, 06:50 AM
#47
Senior Member
iTrader: (5)
Join Date: Jan 2009
Location: Golden, CO
Posts: 887
Likes: 0
Received 11 Likes
on
9 Posts
Car: 87 IROC
Engine: L31 350
Transmission: T56
Axle/Gears: 4.10 D44
Re: Automatic to T56 swap MADE EASY Tutorial *Pics*
That LS1-T56 WILL work with the LS1. And that swap (LS1 engine) has been done a lot. It is semi-bolt-in, as there is enough aftermarket support that you can buy probably everything to make it a "bolt in".
01-25-2016, 06:58 AM
#48
Re: Automatic to T56 swap MADE EASY Tutorial *Pics*
For 94-97 you need the input shaft and front plate. For 93 you need not only those items but the mainshaft as well. Not cost effective.
01-25-2016, 10:22 AM
#49
Re: Automatic to T56 swap MADE EASY Tutorial *Pics*
93 is also the year that is really expensive to convert to work with an ls1. So expensive that you might as well sell it and buy a 98-02 t56 to begin with.
For 94-97 you need the input shaft and front plate. For 93 you need not only those items but the mainshaft as well. Not cost effective.
For 94-97 you need the input shaft and front plate. For 93 you need not only those items but the mainshaft as well. Not cost effective.
07-04-2016, 04:12 AM
#50
Junior Member
Join Date: May 2011
Location: Arizona
Posts: 86
Likes: 0
Received 1 Like
on
1 Post
Car: 1989 IROC-Z Camaro 'Vert.
Engine: 350, ZZ4 motor
Transmission: TH-700R4
Axle/Gears: 2.73 ... for now.
Re: Automatic to T56 swap MADE EASY Tutorial *Pics*
Hey guys, resurrecting a semi dead thread here but its a great resource and ive got a few questions myself.
Im about to get into the cutting and mounting stage next week for my own t56 swap. My iroc came with the 700r4 and though ive read a few threads on this swap procedure im still unsure where the proper place is to cut mounting holes for the master cylinder and pedals.
Also, does anyone know more info on how to get the VSS from the t56 to convert to the old style that my 89s speedometer has?
Thanks in advance. Im trying to prepare as much as i can.