Follow along as I build and install a Moser Ford 9"
 03-31-2013, 10:07 PM
#1
Member

Thread Starter
Join Date: Dec 2007
Location: Minnesota
Posts: 475
Likes: 0
Received 2 Likes
on
2 Posts
Car: '88 Iroc
Engine: Single turbo Vortec 5.7, Megasquirt
Transmission: Probuilt 700r4 3000 stall Vigilante
Axle/Gears: Moser 9" 3.25 w/True Trac
Follow along as I build and install a Moser Ford 9"
I have decided after blowing the teeth off my pinion gear in my 10 bolt that it was time for an upgrade. After researching the pros and cons of GM 12 bolts vs Ford 9 inchers, I decided to go with the 9".
There was really nothing that stood out to make the decision an easy choice, but the fact that I could set up the third member on a table in my basement sealed the deal. Price-wise there was hardly any difference between either. The 9" will suck up a little extra power than the 12 bolt, but most agree that it will also handle more power through it than a 12 bolt.
A 12 bolt would no doubt probably live forever in my car, being an automatic, plus the "comes on softer than others" nature of my favorite add-on yet - the turbocharger.
I have upgraded plenty of things on my car to be "good enough for my current goals" only to find out a couple years later that I was pushing the limits of them. So the 9" it was.
First I had to decide what exactly I wanted as far as parts while trying to stick to a somewhat "budget build".
I ended up finding a guy on ebay that deals with tons of rear end parts and went with him for my third member parts.
I started out looking at options. Do I buy a complete rear end fully assembled? Or piece it all together? And what parts do I want? What carrier? What size axles? Iron or aluminum case?
I did the math and by building the center section myself could save a couple hundred bucks by sourcing the parts. Me being the - I like to do it all myself type - liked the idea of learning how to setup a 9".
What kind of case?
In the used market, there are plenty of stock Ford 9" iron cases out there.
Regular iron cases- not desirable in a performance application
Nodular iron cases- identified with the "N" cast in them- much stronger
Aftermarket cases- Nodular iron or aluminum.
Aluminum cases obviously have a weight savings vs iron with the trade off of increased cost. Some say they are not as good for street cars- something about when they heat up, the aluminum expands more and can affect the gear mesh. There are plenty of guys running them on street cars and I did not find one complaint about them though.
I decided to stick with an iron case. Many companies make nodular iron cases. Strange, Moser, Yukon, Currie, Ford Racing, and others. I was looking at a cheaper case made by Strange called the S series case. It was around $220, cheaper than most of the conventional shaped cases. They are recommended for up to 600hp or so. Most others were tough to find recommended hp rating for. Strange makes a Pro Iron case that people claim is good for 1200 hp. Yukon's iron case is said to be on par with it.
Bearing sizes: There are 3 common bearing sizes for the carrier side bearings. 2.875", 3.062" and 3.25". When you are looking as cases, most are available in either of these 3 sizes. From what I recall, to run 35 spline axles, the 3.25" bearings are needed. For 31 and 33 spline axles, 3.062 or 3.25 will work. I believe the 2.875" bearings only work with 28 spline axles.
Axle shafts: Four main axles sizes are common. 28, 31, 33 and 35 spline.
28 spline: These were the most common in OEM rear ends in Ford vehicles. From what I remember reading, most had 28 splines while 31 spline axles came stock in Ford's heavier duty applications such as their higher hp muscle cars and trucks. Most people skip right up to at least 31 spline axles when building for performance applications.
31 spline: Most seem to agree that 31 spline axles are sufficient for most applications. As far as a hp rating, that's tough to determine since so many variables play a role such as vehicle weight, etc. There are more carriers available in 31 spline configuration than any others.
33 spline: As far as I know, the only way to run 33 spline axles is with a spool. I haven't seen any differential carriers that accept 33 spline axles.
35 spine: These are the big boys in the street car world. There is a decent amount of options available when running 35 spline axles. I believe there are also 40 spline axles which are frickin huge.
Differential carrier: I won't get into the info about different differential carriers since there is plenty of info all over the place about that topic.
I ran a Detroit True Trac in my 10 bolt and really liked it, so that's what I went with on my 9".
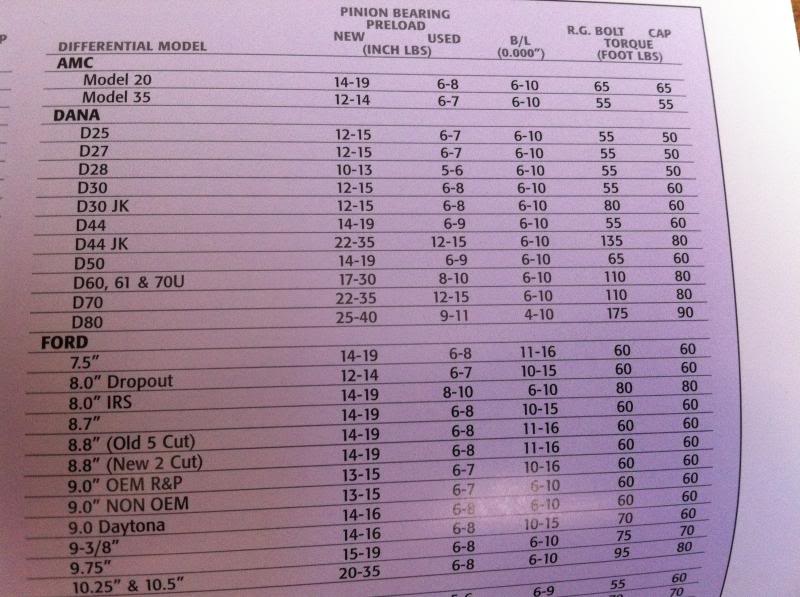
Ring and pinion: I nabbed a used set of 3.25 ratio OEM Ford gears off ebay for $50. I could have gone with plenty of options for gears, but after reading about some people having serious doubts on the quality of a lot of new gear sets out there these days being made overseas, I decided a good old set of 1970-something made in USA Ford gears should work fine. This was the only thing I bought used in my build. I ran a set of used gears on my 10 bolt and they actually ran quieter than the new ones I had in there before, so I no longer had any doubts about used gear sets.
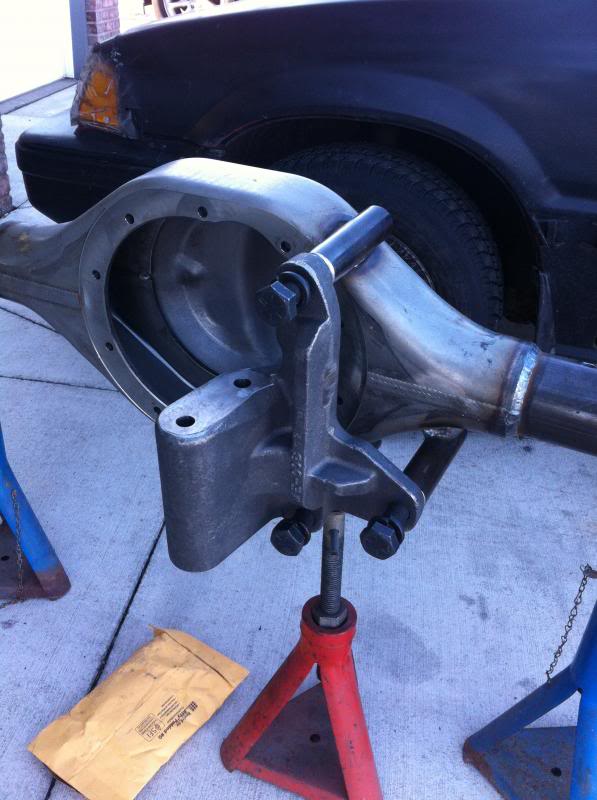
Pinion support: There are 2 main types of pinion supports, OEM style or Daytona style. As far as I know, all the OEM style supports are iron. The difference between them is mainly the size bearings they accept. The pinion support contains 2 tapered roller bearings. The OEM style support contains 2 bearings of equal size. The Daytona supports contains one bearing the same size as the OEM style and one larger bearing. If you buyu a bearing kit, make sure to get one for use with the Daytona support so you get the right size bearings. Daytona supports are available in either iron or aluminum with no real strength advantage that I know of, but the aluminum one's will save a little on weight which is marginal compared to the weight of the entire rear end!
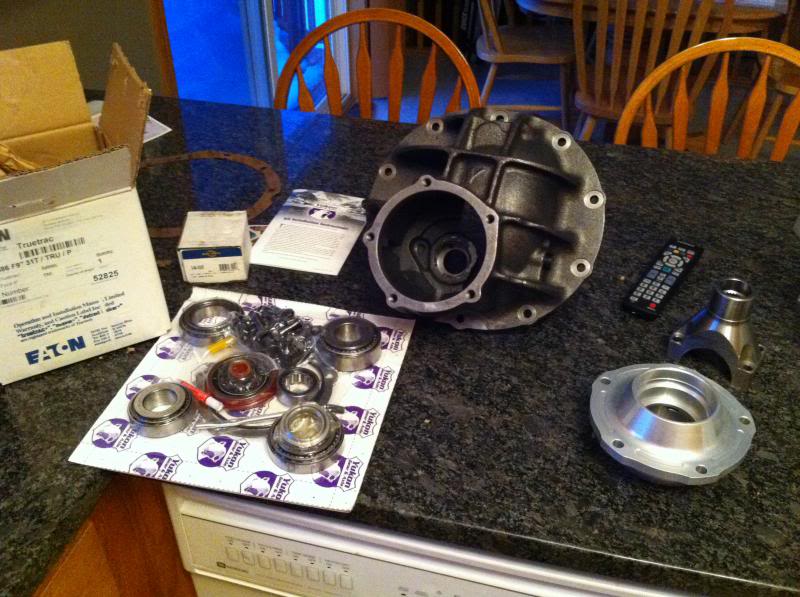
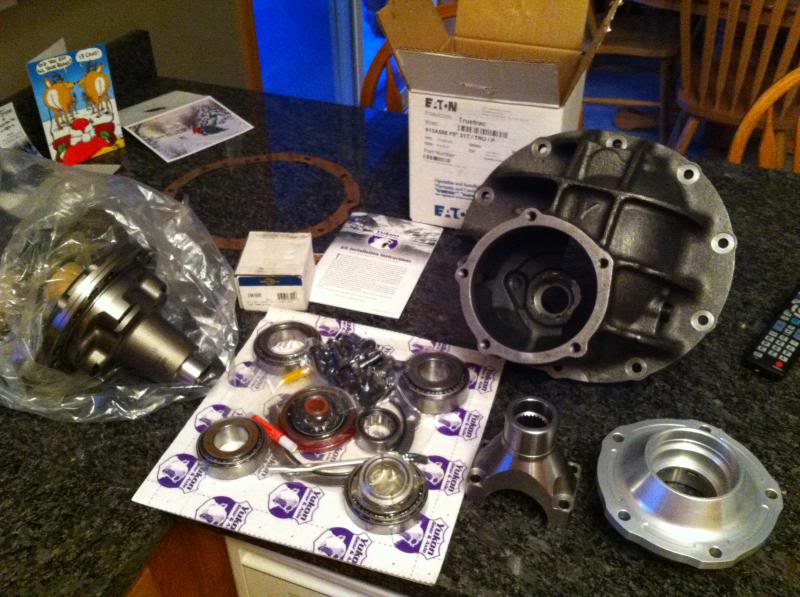
Here's what I ended up going with:
Yukon nodular iron case - accepts 3.062" bearings, 5/8 cap bolts, forged caps
Aluminum Daytona pinion support with oil passage for front bearing
1350 billet steel pinion yoke
Yukon Master Timken Bearing/Install kit
Eaton Detroit True Trac Posi 31 spline
used Ford 3.25 gear set
The total for the items above to build the third member came to about $1040.
Here are some pics of what it all looked like.
There was really nothing that stood out to make the decision an easy choice, but the fact that I could set up the third member on a table in my basement sealed the deal. Price-wise there was hardly any difference between either. The 9" will suck up a little extra power than the 12 bolt, but most agree that it will also handle more power through it than a 12 bolt.
A 12 bolt would no doubt probably live forever in my car, being an automatic, plus the "comes on softer than others" nature of my favorite add-on yet - the turbocharger.
I have upgraded plenty of things on my car to be "good enough for my current goals" only to find out a couple years later that I was pushing the limits of them. So the 9" it was.
First I had to decide what exactly I wanted as far as parts while trying to stick to a somewhat "budget build".
I ended up finding a guy on ebay that deals with tons of rear end parts and went with him for my third member parts.
I started out looking at options. Do I buy a complete rear end fully assembled? Or piece it all together? And what parts do I want? What carrier? What size axles? Iron or aluminum case?
I did the math and by building the center section myself could save a couple hundred bucks by sourcing the parts. Me being the - I like to do it all myself type - liked the idea of learning how to setup a 9".
What kind of case?
In the used market, there are plenty of stock Ford 9" iron cases out there.
Regular iron cases- not desirable in a performance application
Nodular iron cases- identified with the "N" cast in them- much stronger
Aftermarket cases- Nodular iron or aluminum.
Aluminum cases obviously have a weight savings vs iron with the trade off of increased cost. Some say they are not as good for street cars- something about when they heat up, the aluminum expands more and can affect the gear mesh. There are plenty of guys running them on street cars and I did not find one complaint about them though.
I decided to stick with an iron case. Many companies make nodular iron cases. Strange, Moser, Yukon, Currie, Ford Racing, and others. I was looking at a cheaper case made by Strange called the S series case. It was around $220, cheaper than most of the conventional shaped cases. They are recommended for up to 600hp or so. Most others were tough to find recommended hp rating for. Strange makes a Pro Iron case that people claim is good for 1200 hp. Yukon's iron case is said to be on par with it.
Bearing sizes: There are 3 common bearing sizes for the carrier side bearings. 2.875", 3.062" and 3.25". When you are looking as cases, most are available in either of these 3 sizes. From what I recall, to run 35 spline axles, the 3.25" bearings are needed. For 31 and 33 spline axles, 3.062 or 3.25 will work. I believe the 2.875" bearings only work with 28 spline axles.
Axle shafts: Four main axles sizes are common. 28, 31, 33 and 35 spline.
28 spline: These were the most common in OEM rear ends in Ford vehicles. From what I remember reading, most had 28 splines while 31 spline axles came stock in Ford's heavier duty applications such as their higher hp muscle cars and trucks. Most people skip right up to at least 31 spline axles when building for performance applications.
31 spline: Most seem to agree that 31 spline axles are sufficient for most applications. As far as a hp rating, that's tough to determine since so many variables play a role such as vehicle weight, etc. There are more carriers available in 31 spline configuration than any others.
33 spline: As far as I know, the only way to run 33 spline axles is with a spool. I haven't seen any differential carriers that accept 33 spline axles.
35 spine: These are the big boys in the street car world. There is a decent amount of options available when running 35 spline axles. I believe there are also 40 spline axles which are frickin huge.
Differential carrier: I won't get into the info about different differential carriers since there is plenty of info all over the place about that topic.
I ran a Detroit True Trac in my 10 bolt and really liked it, so that's what I went with on my 9".
Ring and pinion: I nabbed a used set of 3.25 ratio OEM Ford gears off ebay for $50. I could have gone with plenty of options for gears, but after reading about some people having serious doubts on the quality of a lot of new gear sets out there these days being made overseas, I decided a good old set of 1970-something made in USA Ford gears should work fine. This was the only thing I bought used in my build. I ran a set of used gears on my 10 bolt and they actually ran quieter than the new ones I had in there before, so I no longer had any doubts about used gear sets.
Pinion support: There are 2 main types of pinion supports, OEM style or Daytona style. As far as I know, all the OEM style supports are iron. The difference between them is mainly the size bearings they accept. The pinion support contains 2 tapered roller bearings. The OEM style support contains 2 bearings of equal size. The Daytona supports contains one bearing the same size as the OEM style and one larger bearing. If you buyu a bearing kit, make sure to get one for use with the Daytona support so you get the right size bearings. Daytona supports are available in either iron or aluminum with no real strength advantage that I know of, but the aluminum one's will save a little on weight which is marginal compared to the weight of the entire rear end!
Here's what I ended up going with:
Yukon nodular iron case - accepts 3.062" bearings, 5/8 cap bolts, forged caps
Aluminum Daytona pinion support with oil passage for front bearing
1350 billet steel pinion yoke
Yukon Master Timken Bearing/Install kit
Eaton Detroit True Trac Posi 31 spline
used Ford 3.25 gear set
The total for the items above to build the third member came to about $1040.
Here are some pics of what it all looked like.
Last edited by vortec350s10; 03-04-2014 at 08:38 PM.
 03-31-2013, 10:13 PM
#2
Supreme Member
Join Date: Sep 2008
Posts: 3,777
Likes: 0
Received 0 Likes
on
0 Posts
Re: Follow along as I build and install a Moser Ford 9"
I'd like to point out 2 things that you over looked. There is a more comon differential bearing size. The most comon is the 2.875 bearing. Also you left out the most comon axle size, which is 28 spline.
03-31-2013, 10:22 PM
#3
Member
Thread Starter
Join Date: Dec 2007
Location: Minnesota
Posts: 475
Likes: 0
Received 2 Likes
on
2 Posts
Car: '88 Iroc
Engine: Single turbo Vortec 5.7, Megasquirt
Transmission: Probuilt 700r4 3000 stall Vigilante
Axle/Gears: Moser 9" 3.25 w/True Trac
Re: Follow along as I build and install a Moser Ford 9"
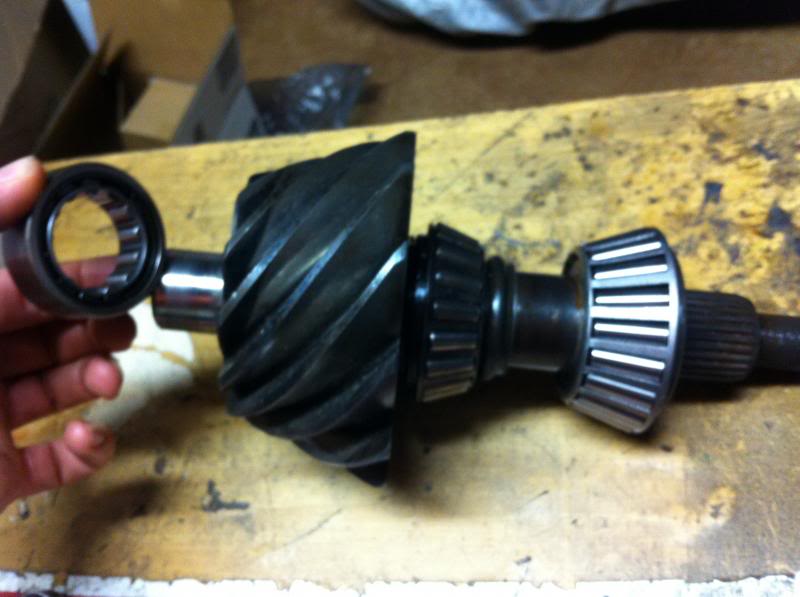
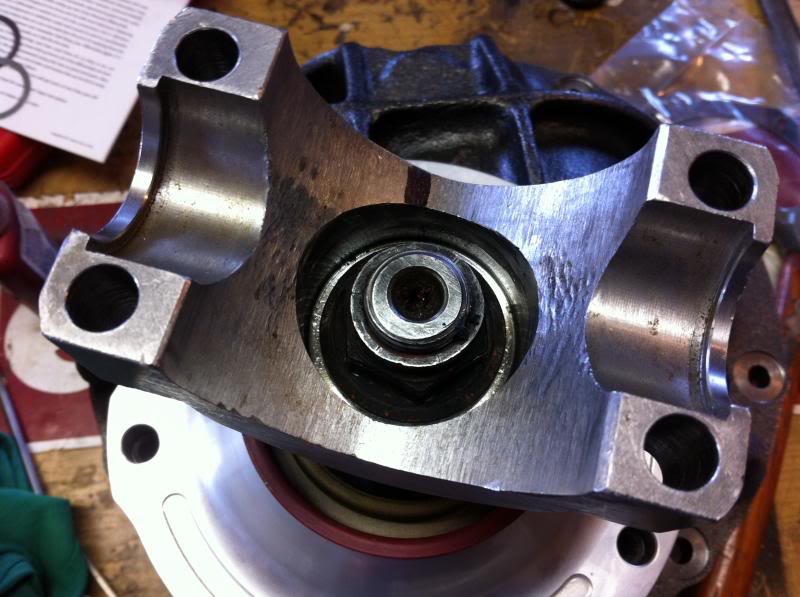
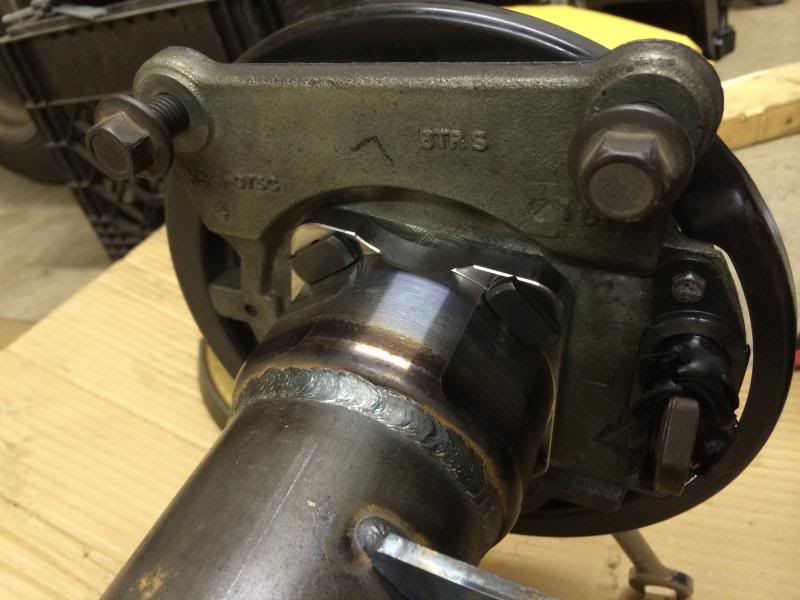
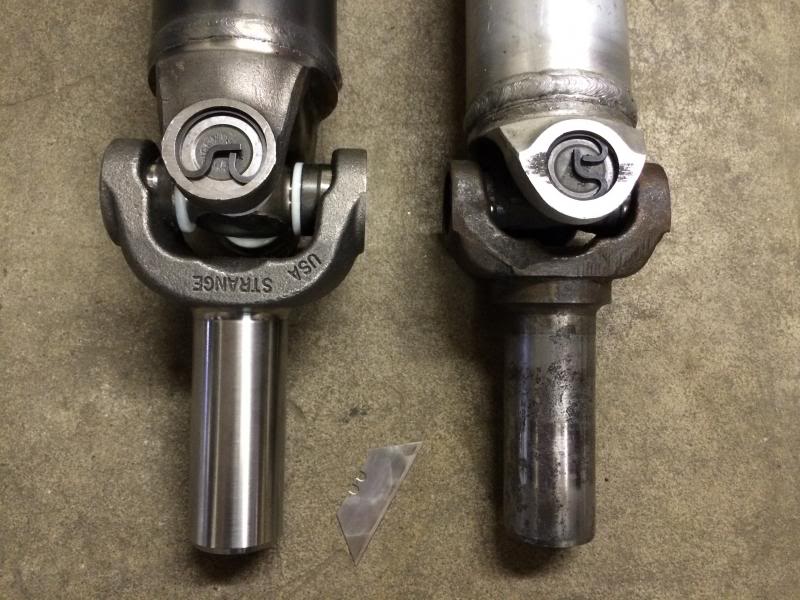
One of the reasons the 9" is so strong is because of how the pinion is supported. You can see here that the pinion is supported by two large bearings as in a 10 or 12 bolt, but also has a third smaller bearing at the "nose" of the pinion gear. The bearing on the far right is the larger one that goes along with the Daytona style support. Or else both of the bearings on the right would be the same size as the smaller one. The new bearing on the right is actually the one that goes up against the pinion gear. The bearing furthest away from the gear remains the same size, regardless of pinion support style.
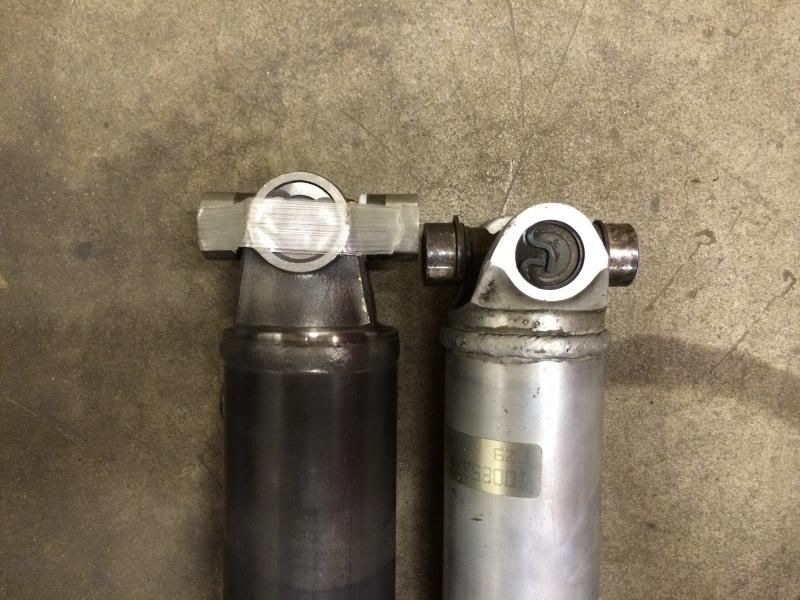
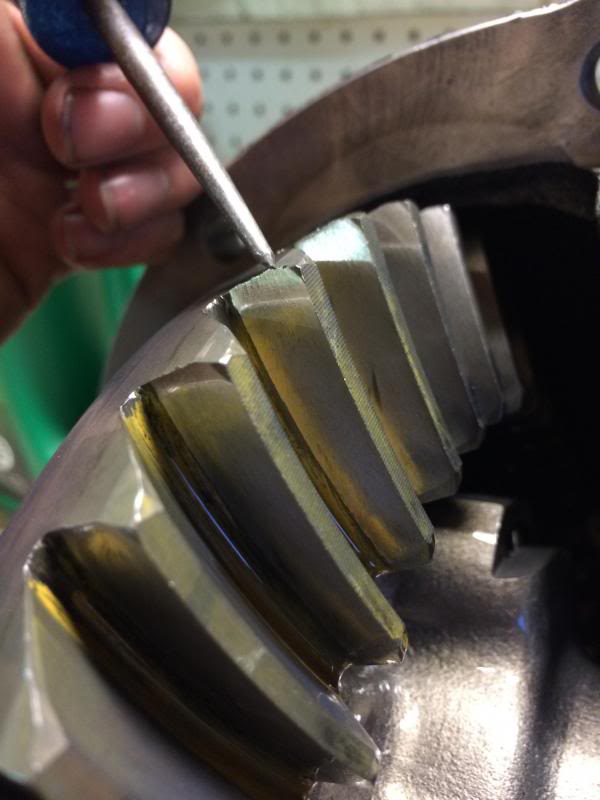
Here is a comparison of the 9" vs 10 bolt pinion gears. The 9" is 3.25 ratio and the 10 bolt pinion is 3.42. My 10 bolt pinion is missing part of it but you still get the idea. A little bit of a difference here......
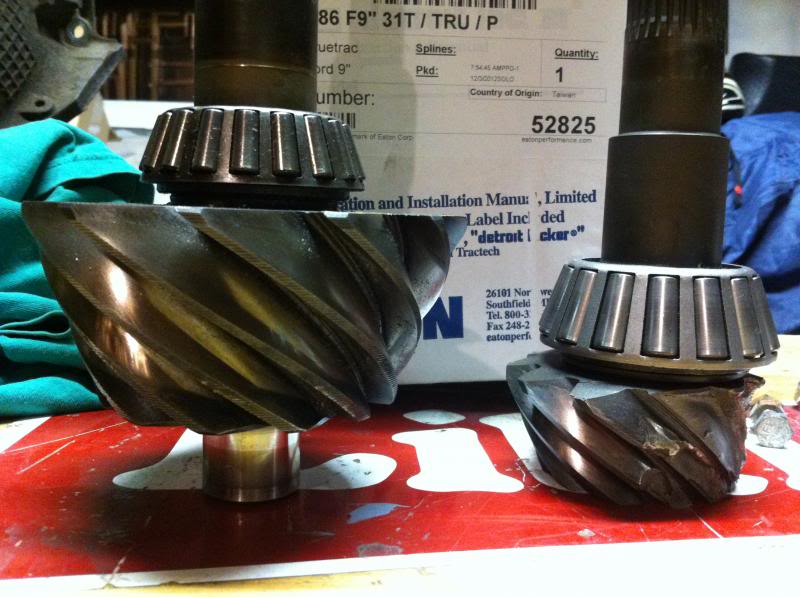
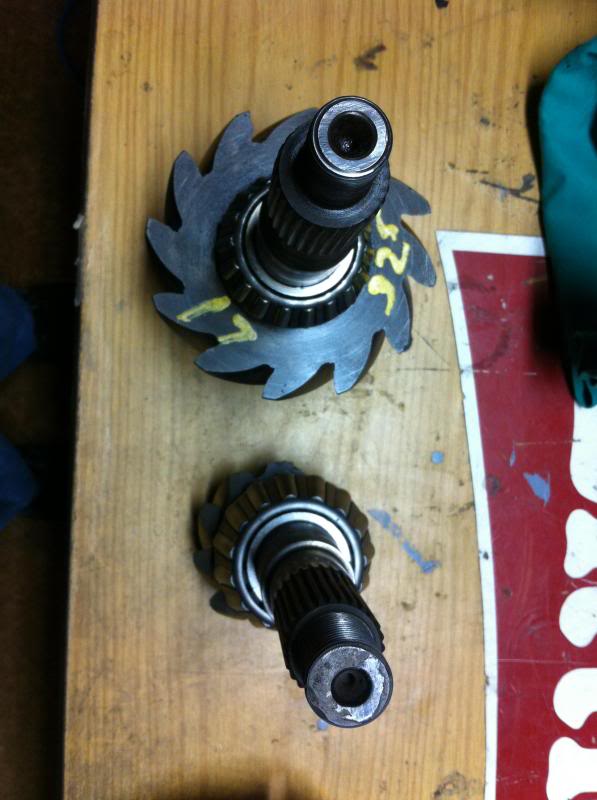
The size of the ring gears is not nearly as significant but still noticeable.
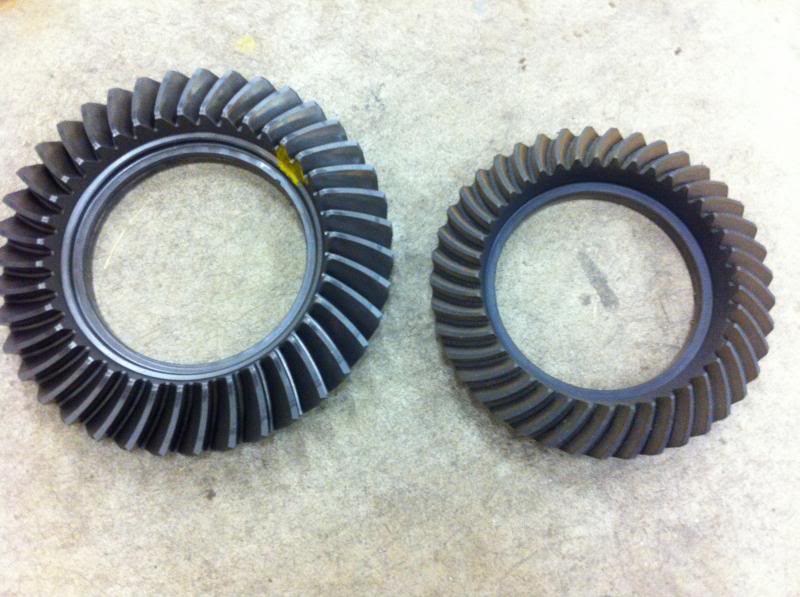
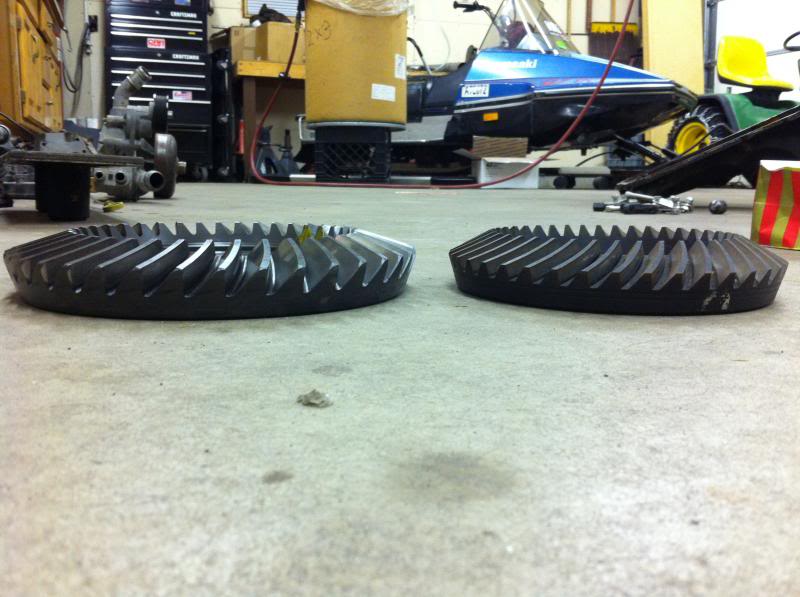
Here is a comparison of the 9" vs 10 bolt pinion gears. The 9" is 3.25 ratio and the 10 bolt pinion is 3.42. My 10 bolt pinion is missing part of it but you still get the idea. A little bit of a difference here......
The size of the ring gears is not nearly as significant but still noticeable.
Last edited by vortec350s10; 04-03-2013 at 06:14 PM.
03-31-2013, 10:28 PM
#4
Member
Thread Starter
Join Date: Dec 2007
Location: Minnesota
Posts: 475
Likes: 0
Received 2 Likes
on
2 Posts
Car: '88 Iroc
Engine: Single turbo Vortec 5.7, Megasquirt
Transmission: Probuilt 700r4 3000 stall Vigilante
Axle/Gears: Moser 9" 3.25 w/True Trac
Re: Follow along as I build and install a Moser Ford 9"
Thanks for pointing that out. I'm sure there will be other things I may overlook as I write this. I'm more or less "winging it" with this write up and mainly addressing the things I dealt with when choosing parts and trying to help other people by putting some of this info together to minimize jumping around to so many separate threads. You helped me out when I was setting up my gears and I definitely value your knowledge and experience when it comes to rear ends! Keep the criticism coming! After all this is just to help other people. I don't want to post any bad information if I can help it!
04-01-2013, 09:26 AM
#5
Supreme Member
Join Date: Sep 2008
Posts: 3,777
Likes: 0
Received 0 Likes
on
0 Posts
Re: Follow along as I build and install a Moser Ford 9"
Let me give you a heads up on the aluminum Daytona pinion housing. It is very hard to press the bearing races in and keep them straight. The races want to get a little sideways and cut into the aluminum. Just be careful when pressing them in and be sure that they seat all the way. Use a .001 feeler gauge to check the back side and see if they are completely seated. You might want to put the races in the freezer for a few hours and put the pinion housing in the oven at about 200 degrees to help get the races in. Be sure to use a little oil on them to help them slide in.
04-03-2013, 05:32 PM
#6
Member
Thread Starter
Join Date: Dec 2007
Location: Minnesota
Posts: 475
Likes: 0
Received 2 Likes
on
2 Posts
Car: '88 Iroc
Engine: Single turbo Vortec 5.7, Megasquirt
Transmission: Probuilt 700r4 3000 stall Vigilante
Axle/Gears: Moser 9" 3.25 w/True Trac
Re: Follow along as I build and install a Moser Ford 9"
Let me give you a heads up on the aluminum Daytona pinion housing. It is very hard to press the bearing races in and keep them straight. The races want to get a little sideways and cut into the aluminum. Just be careful when pressing them in and be sure that they seat all the way. Use a .001 feeler gauge to check the back side and see if they are completely seated. You might want to put the races in the freezer for a few hours and put the pinion housing in the oven at about 200 degrees to help get the races in. Be sure to use a little oil on them to help them slide in.
Last edited by vortec350s10; 04-03-2013 at 05:36 PM.
04-03-2013, 06:09 PM
#7
Member
Thread Starter
Join Date: Dec 2007
Location: Minnesota
Posts: 475
Likes: 0
Received 2 Likes
on
2 Posts
Car: '88 Iroc
Engine: Single turbo Vortec 5.7, Megasquirt
Transmission: Probuilt 700r4 3000 stall Vigilante
Axle/Gears: Moser 9" 3.25 w/True Trac
Re: Follow along as I build and install a Moser Ford 9"
Since I bought a used gear set, there was still an old bearing on the pinion shaft that had to be removed. I carefully cut the bearing cage apart first, allowing the roller bearings and cage to fall off, then dremeled through the race with a small cut-off wheel to remove it.
I could then press the new bearing on in it's place. I forgot all about that the bearing that goes right up against the pinion gear is larger when using the daytona support and accidentally pressed the wrong bearing on. The smaller one I pressed on by accident (which matches the original bearing) is for the other end of the pinion shaft that is closest to the nut. So I had to cut off a new bearing, buy another and then correctly press on the larger daytona sized bearing.
Next I had to setup the pinion bearing preload. My kit came with a solid style spacer with shims instead of a crush sleeve to set the bearing clearances. The solid spacer is better since it does not have a chance of changing like the crush sleeve could. This required many, many times of taking and removing shims until I was very close to the correct preload. My solid spacer with correct shims came in at .508" thick. This gave it about 22 in lbs of "drag" without the seal in place. My instructions spec the Ford 9" bearing preload to be 14-16in lbs with new bearings, but when I set it up I as going off some one elses instructions, so hopefully it's not too tight. Big gear head what do you think?

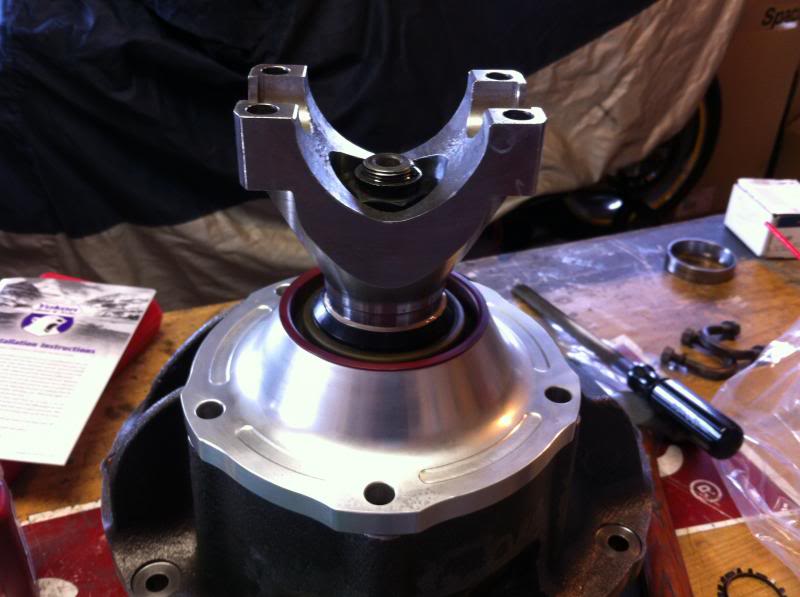
Checking the preload required installing the yoke and tightening the nut fully to ensure all the clearance was taken out of the yoke and bearings. The splines on the new yoke were very tight, and I had to work the yoke on and off a bunch of times to try to loosen it up. I'm not sure if there are any tricks to loosen up tight fitting splines, but I would assume there is a way.
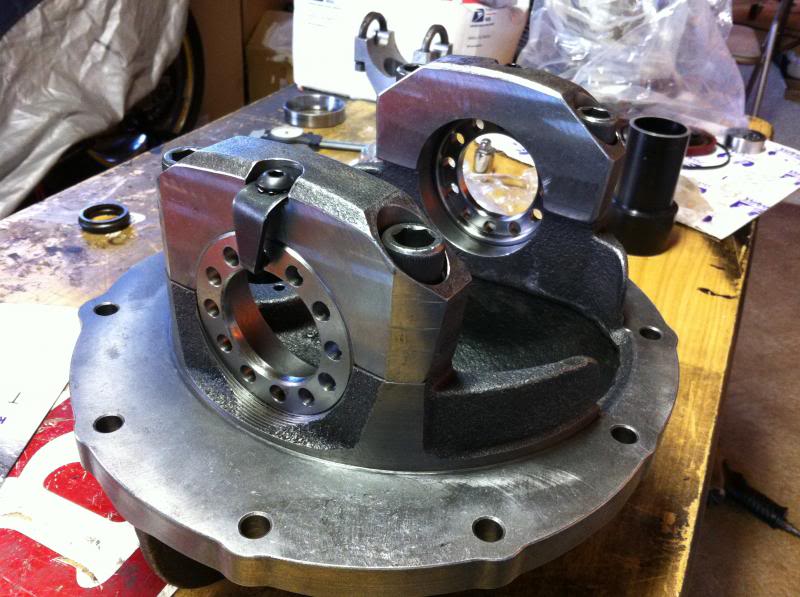
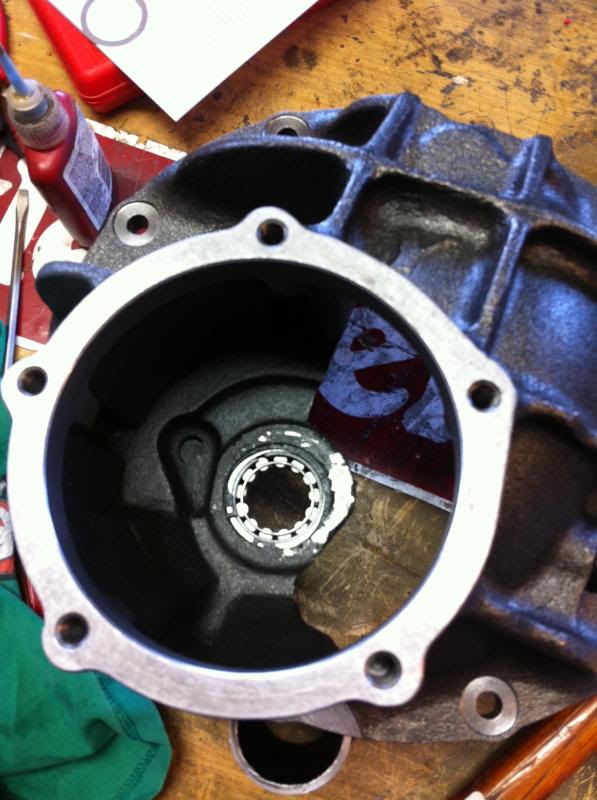
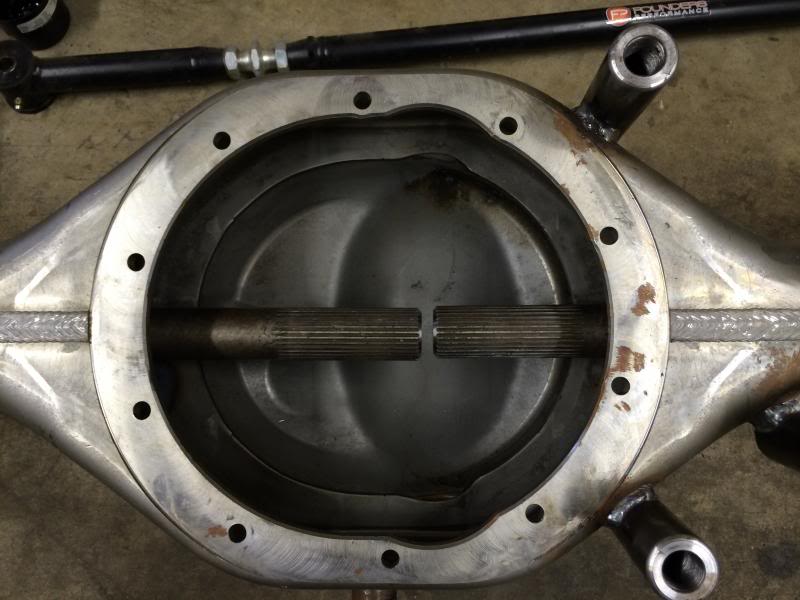
With the pinion assembly completed it was time to move onto the case and differential carrier. Here are a couple more pics of the Yukon nodular iron Pro-N case. This one is for 3.062" bearings.

Next up I installed the small roller bearing that supports the tip of the pinion shaft. It didn't even want to start going in so I cleaned up the edges of the bore with a deburring tool and made sure it was clean. I didn't have a press this time since I was doing the rest of the build in my basement. I made sure I supported the backside of the bearing area of the case so the pressure of the hit was solid and direct on that part of the housing. It took quite a lot of blows before it was fully seated. I heated up the entire case and chilled the bearing but it took so long to get it in, that the temperature differences were short lived. It is retained by a snap ring.
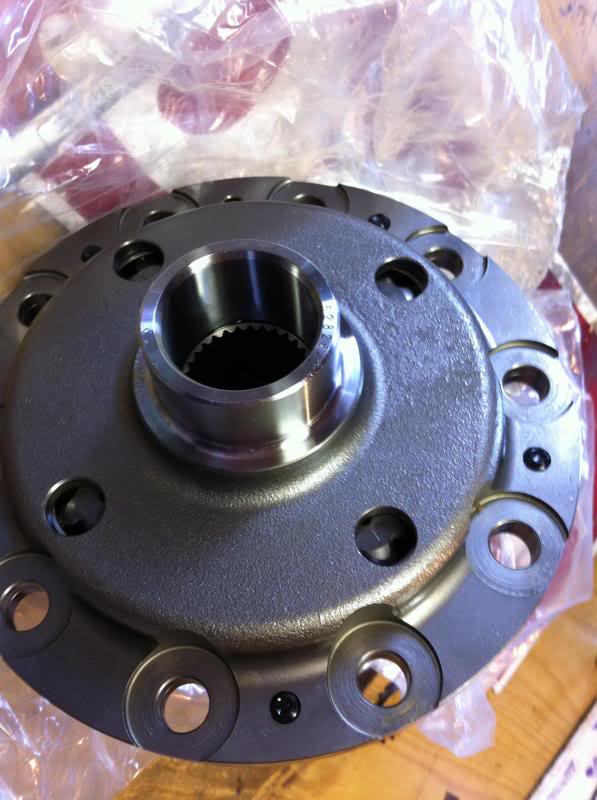
With that installed, I focused on the True Trac carrier. Being new, I didn't have to press any old bearings off which was nice. The new bearings went on very tight as well. I had the carrier in the freezer for a couple hours and they were still very difficult to get on. Keep in mind I wasn't using a press for this, which would be much better. This was before I installed the side bearings.
I could then press the new bearing on in it's place. I forgot all about that the bearing that goes right up against the pinion gear is larger when using the daytona support and accidentally pressed the wrong bearing on. The smaller one I pressed on by accident (which matches the original bearing) is for the other end of the pinion shaft that is closest to the nut. So I had to cut off a new bearing, buy another and then correctly press on the larger daytona sized bearing.
Next I had to setup the pinion bearing preload. My kit came with a solid style spacer with shims instead of a crush sleeve to set the bearing clearances. The solid spacer is better since it does not have a chance of changing like the crush sleeve could. This required many, many times of taking and removing shims until I was very close to the correct preload. My solid spacer with correct shims came in at .508" thick. This gave it about 22 in lbs of "drag" without the seal in place. My instructions spec the Ford 9" bearing preload to be 14-16in lbs with new bearings, but when I set it up I as going off some one elses instructions, so hopefully it's not too tight. Big gear head what do you think?
Checking the preload required installing the yoke and tightening the nut fully to ensure all the clearance was taken out of the yoke and bearings. The splines on the new yoke were very tight, and I had to work the yoke on and off a bunch of times to try to loosen it up. I'm not sure if there are any tricks to loosen up tight fitting splines, but I would assume there is a way.
With the pinion assembly completed it was time to move onto the case and differential carrier. Here are a couple more pics of the Yukon nodular iron Pro-N case. This one is for 3.062" bearings.
Next up I installed the small roller bearing that supports the tip of the pinion shaft. It didn't even want to start going in so I cleaned up the edges of the bore with a deburring tool and made sure it was clean. I didn't have a press this time since I was doing the rest of the build in my basement. I made sure I supported the backside of the bearing area of the case so the pressure of the hit was solid and direct on that part of the housing. It took quite a lot of blows before it was fully seated. I heated up the entire case and chilled the bearing but it took so long to get it in, that the temperature differences were short lived. It is retained by a snap ring.
With that installed, I focused on the True Trac carrier. Being new, I didn't have to press any old bearings off which was nice. The new bearings went on very tight as well. I had the carrier in the freezer for a couple hours and they were still very difficult to get on. Keep in mind I wasn't using a press for this, which would be much better. This was before I installed the side bearings.
Last edited by vortec350s10; 04-03-2013 at 06:16 PM.
Trending Topics
04-03-2013, 06:26 PM
#8
Supreme Member
Join Date: Sep 2008
Posts: 3,777
Likes: 0
Received 0 Likes
on
0 Posts
Re: Follow along as I build and install a Moser Ford 9"
I would have set the bearing preload the same as you did. I think 14 to 16 is not tight enough with the larger Daytona bearing. If it was a standard pinion housing with the smaller bearings then 14 to 16 might have been fine.
I have used lapping compound on the splines of the yoke and pressed the yoke on and off of the pinion a few times to get it to fit better. I've run into a few yokes that were just too tight.
I have used lapping compound on the splines of the yoke and pressed the yoke on and off of the pinion a few times to get it to fit better. I've run into a few yokes that were just too tight.
04-03-2013, 06:41 PM
#9
Member
Thread Starter
Join Date: Dec 2007
Location: Minnesota
Posts: 475
Likes: 0
Received 2 Likes
on
2 Posts
Car: '88 Iroc
Engine: Single turbo Vortec 5.7, Megasquirt
Transmission: Probuilt 700r4 3000 stall Vigilante
Axle/Gears: Moser 9" 3.25 w/True Trac
Re: Follow along as I build and install a Moser Ford 9"
I would have set the bearing preload the same as you did. I think 14 to 16 is not tight enough with the larger Daytona bearing. If it was a standard pinion housing with the smaller bearings then 14 to 16 might have been fine.
I have used lapping compound on the splines of the yoke and pressed the yoke on and off of the pinion a few times to get it to fit better. I've run into a few yokes that were just too tight.
I have used lapping compound on the splines of the yoke and pressed the yoke on and off of the pinion a few times to get it to fit better. I've run into a few yokes that were just too tight.
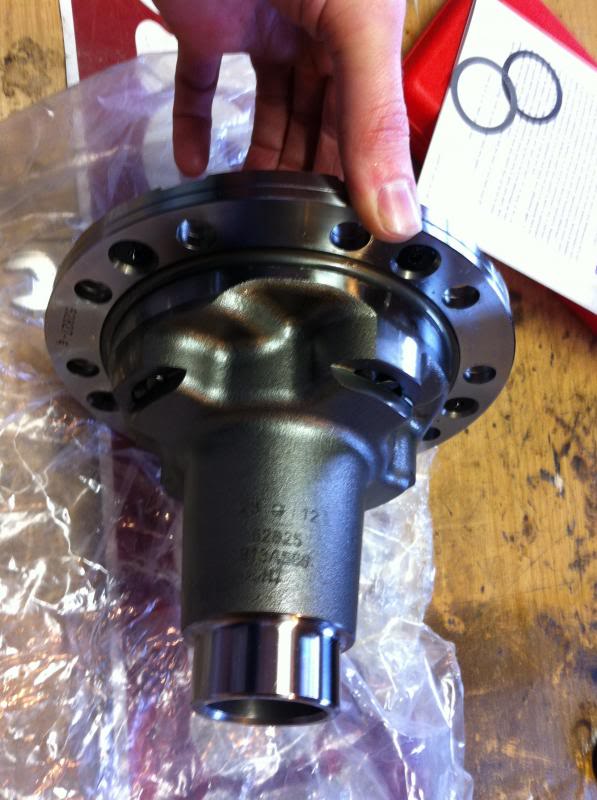
I cleaned up the used ring gear and made sure the backside was perfectly flat with a file. The ring gear fit very tightly around the carrier, I (once again) put the carrier in the freezer to ease my battle. My bearing kit came with 2 sets of different length bolts for attaching the ring gear to the carrier. The shorter ones were the correct length. Well mostly..... Turns out upon a closer look the threads in the ring gear and in fact the holes themselves were not a consistent depth! And this is a OEM Ford gear, odd. So I had to grind down about 3 or 4 of the bolts a few threads to make sure they were tight on the ring gear and not tight 'cause they were bottoming out. I didn't loctite them yet in case the ring gear had to come back off.
These Ford 9 inch's have a cool way to set backlash and carrier bearing preload with the threaded round side adjusters. I like them much better than fighting with shims and trying to jam the carrier in the tight case like on my 10 bolt.
Well enough for now, I'm getting hungry........
Last edited by vortec350s10; 04-03-2013 at 09:02 PM.
04-03-2013, 07:05 PM
#10
Supreme Member
Join Date: Sep 2008
Posts: 3,777
Likes: 0
Received 0 Likes
on
0 Posts
Re: Follow along as I build and install a Moser Ford 9"
Yes, put RTV, thread sealer or some type of sealer on the splines in the YOKE, not on the pinion shaft. Oil will seap out through the splines if there is no sealer in the splines.
04-10-2013, 07:51 PM
#11
Member
Thread Starter
Join Date: Dec 2007
Location: Minnesota
Posts: 475
Likes: 0
Received 2 Likes
on
2 Posts
Car: '88 Iroc
Engine: Single turbo Vortec 5.7, Megasquirt
Transmission: Probuilt 700r4 3000 stall Vigilante
Axle/Gears: Moser 9" 3.25 w/True Trac
Re: Follow along as I build and install a Moser Ford 9"
Now that my pinion setup was complete, I checked out the pinion support to case shims that I had and went with one that was medium thickness as a starting point. Since my gears were used OEM Ford gears, apparently back in the day these gears were lapped together with certain "timing", according to what I read on a couple random forums. What this means is the gears must be meshed together with specific teeth mating each other. There is a yellow paint mark on each gear to mark the timing. I don't remember the number of teeth on each gear, but how it worked out was that with every revolution of the pinion gear, a certain tooth on the pinion would only touch every fourth tooth on the ring gear. In other words, certain teeth on one gear would only ever touch certain teeth on the other.
With the ring gear mounted to the carrier, I cleaned the case where the bearing races sit and backed off the side adjusters on the case. Then I set the carrier with bearings in place. To get the backlash right between gears, the side adjusters can be threaded in or out to move the carrier left or right in relation to the pinion. Then by cranking (squeezing) the adjusters together, that adds carrier bearing preload. Pretty cool. I don't have any pictures of doing the gear setup or checking backlash, but there are plenty of how to write ups and videos on that. I did have another thread with the results of my gear setup which you can go to here:
https://www.thirdgen.org/forums/tran...questions.html
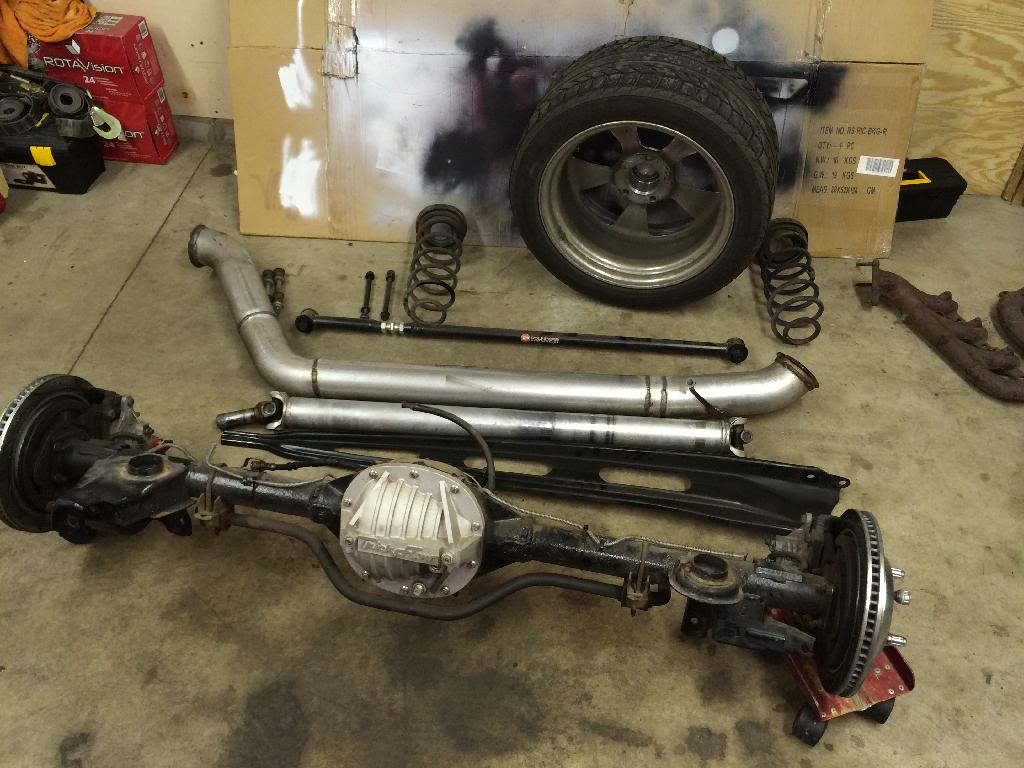
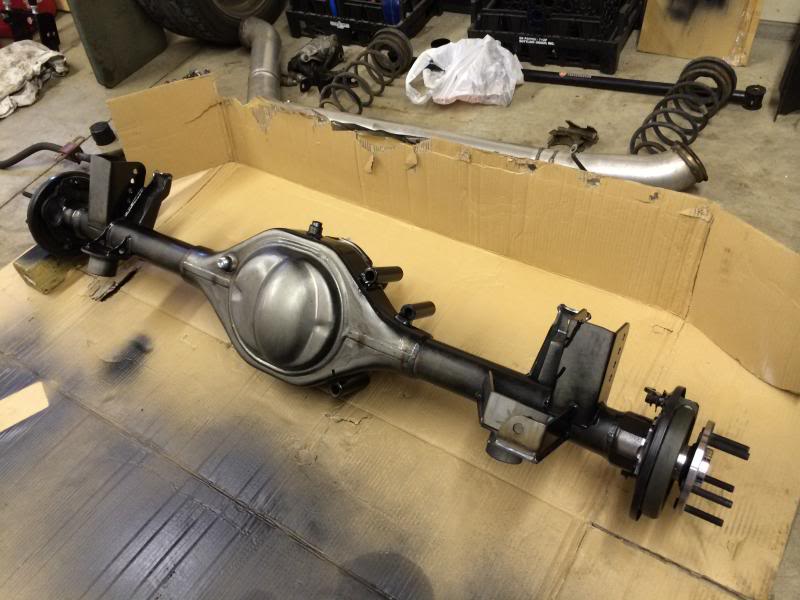
Ok let's get to the next part, the axle housing and axles. I went with a Moser simply because it seemed people had the fewest complaints and overall best fitment and success with Moser. I ordered mine directly from Moser. They have plenty of options when choosing the housing and axle package. I ordered it 1/2 inch narrower than stock because I wanted to get my wheels tucked in just a tad more on either side. My particular list was this:
1982-92 Camaro/Firebird (*Cannot use stock OEM Brakes)
ENTER CUSTOM WIDTH & PINION OFFSET HERE: .5" narrower than stock
SPLINE COUNT: 31 Spline
BOLT PATTERN: 5 x 4 3/4" (GM)
BEARING TYPE: Tapered Roller Bearing (will not work w/93-97 GM F-Body Disc Brakes)
STUD TYPE: 12mm x 2 1/2" GM (.505" Knurl)
BRAKES: Other
ENTER YOUR BRAKE MANUFACTURE AND MODEL NUMBER HERE: '98 - '02 Camaro "LS1" rear disc brakes
ABS & SUSPENSION OPTIONS: None
AVAILABLE HOUSING OPTIONS: None
SPECIAL AXLE FEATURE OPTIONS: None
ADJUSTABLE LOWER CONTROL ARM BRACKETS: 1982-2002 GM Camaro/Firebird LCA Brackets
SWAY BAR MOUNTS: None
POWDER COAT OPTIONS: None
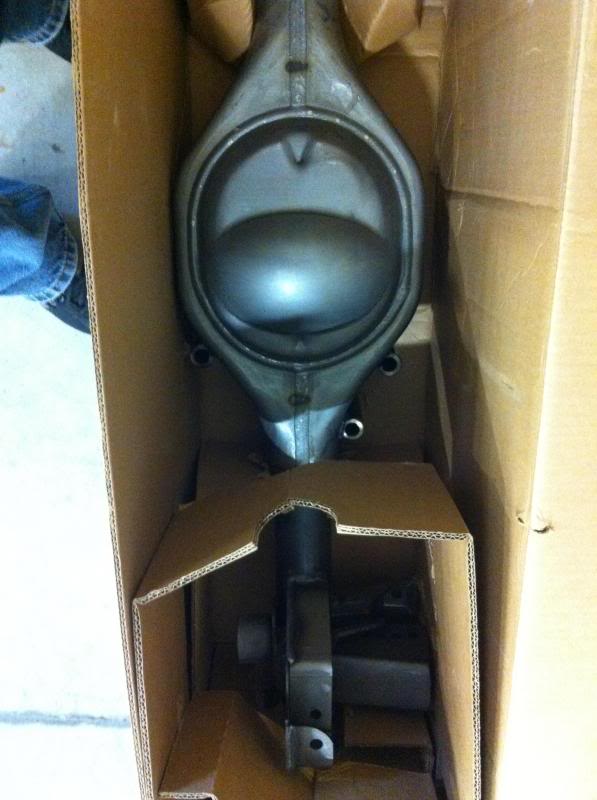
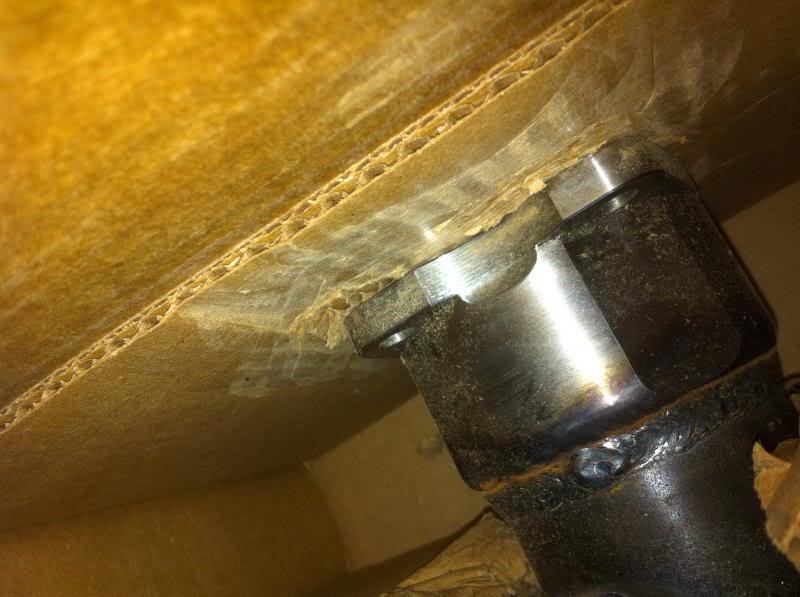
Here are some pictures of how it looked when it first arrived.
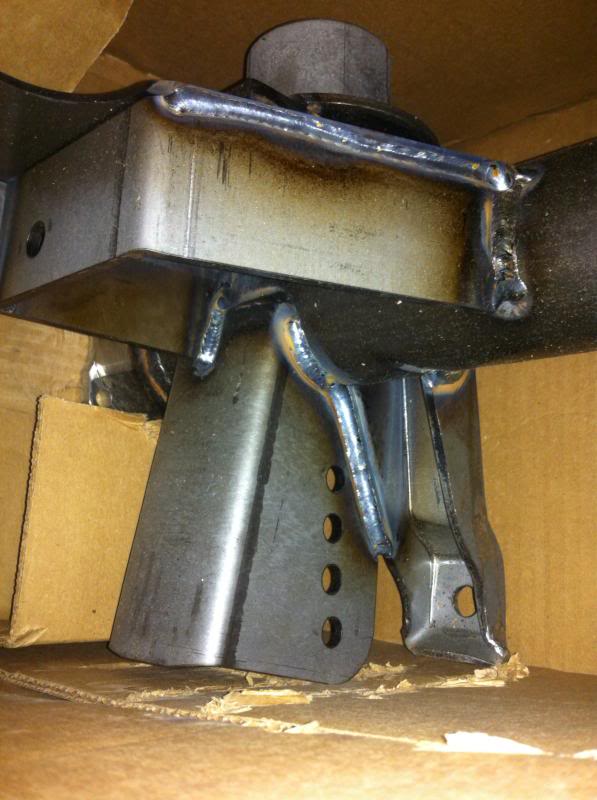
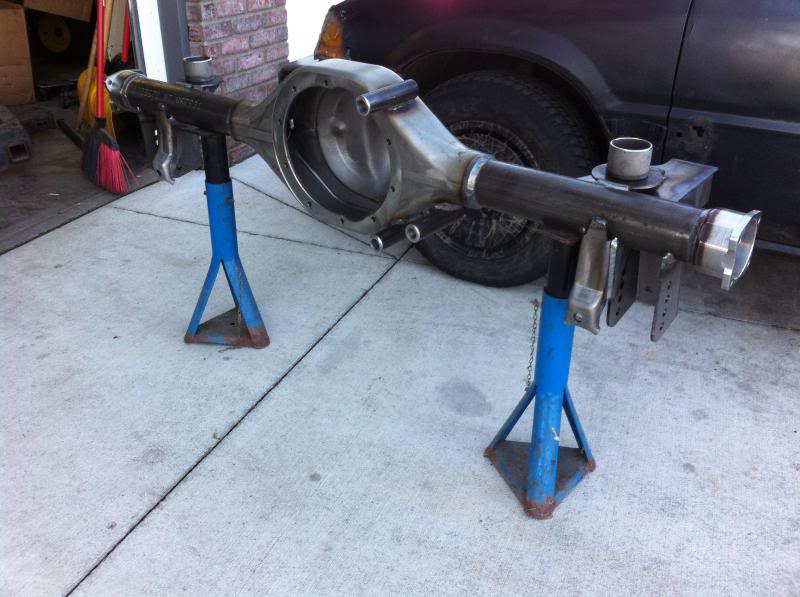
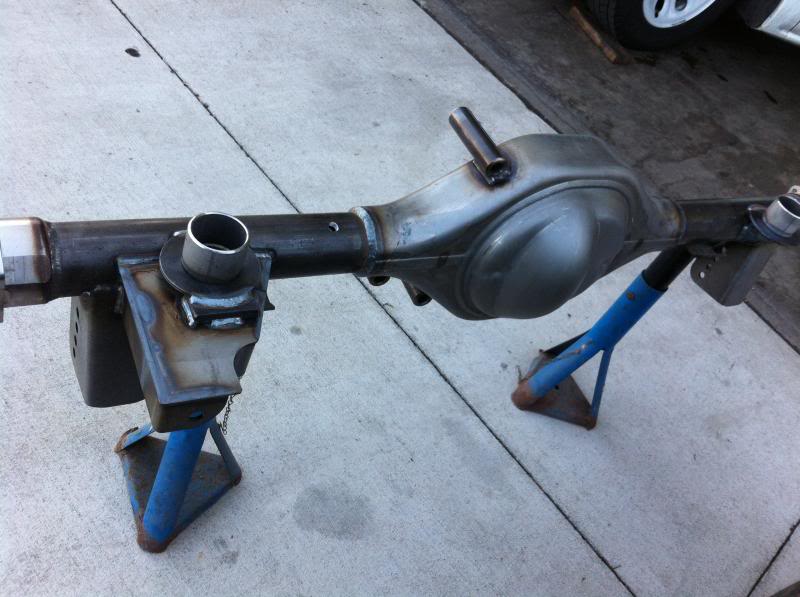
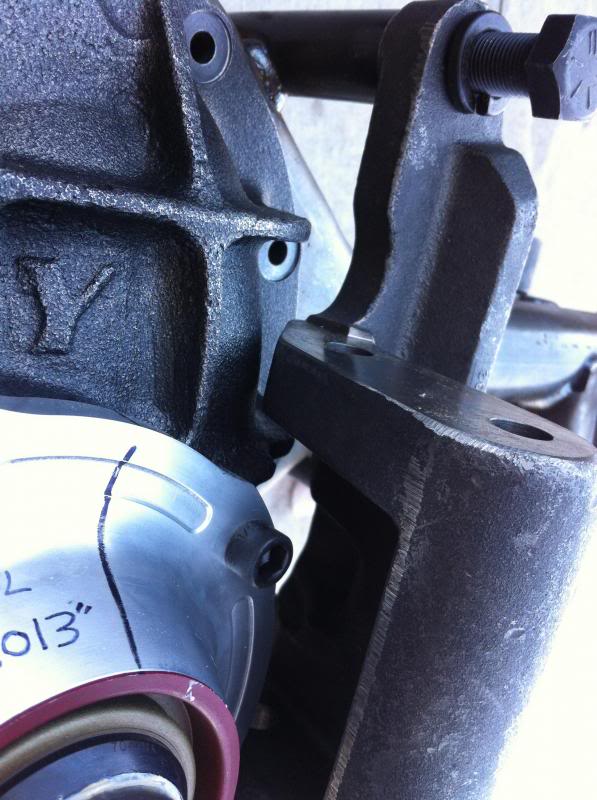
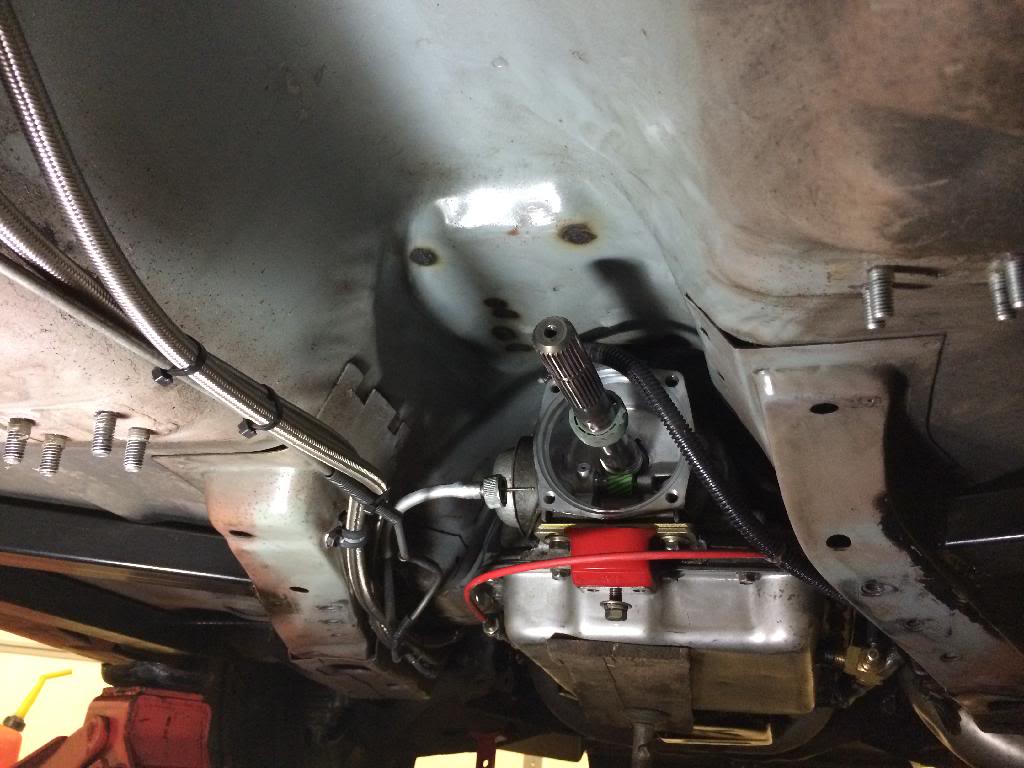
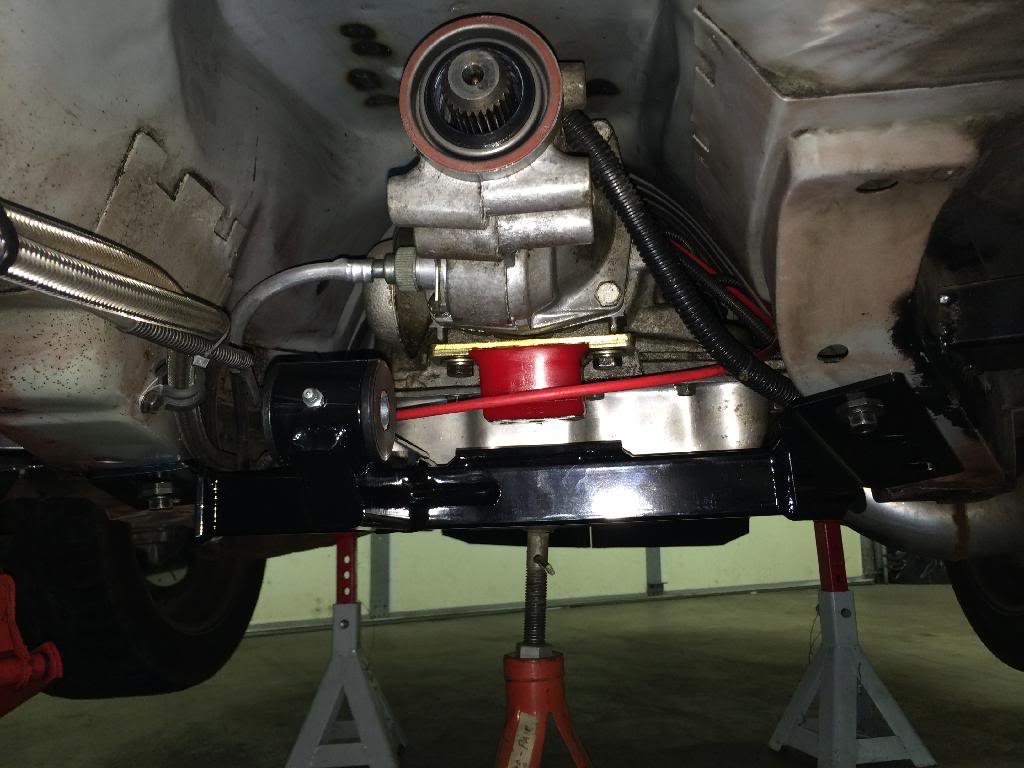
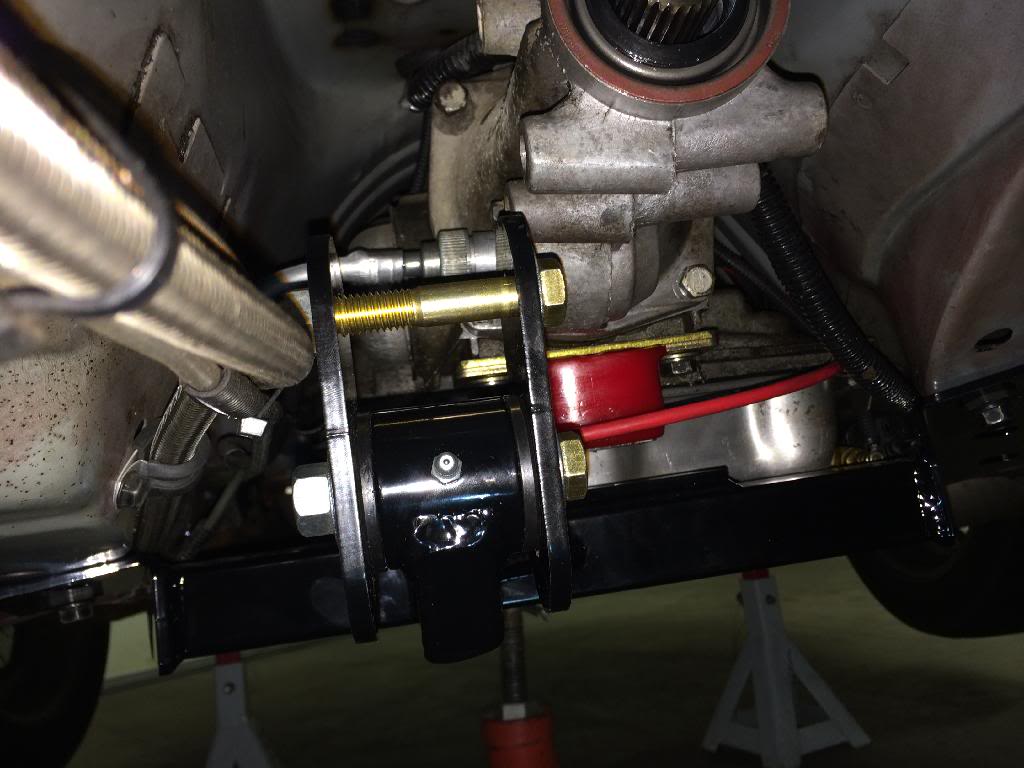
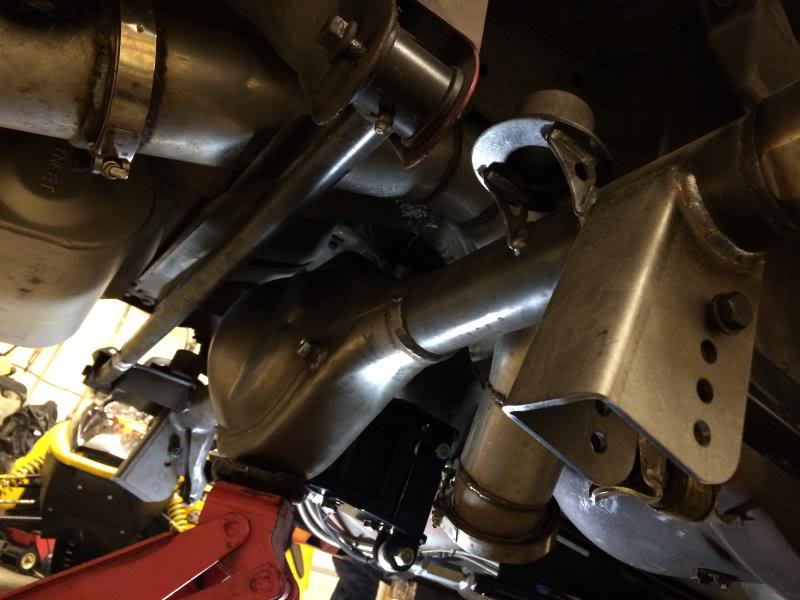
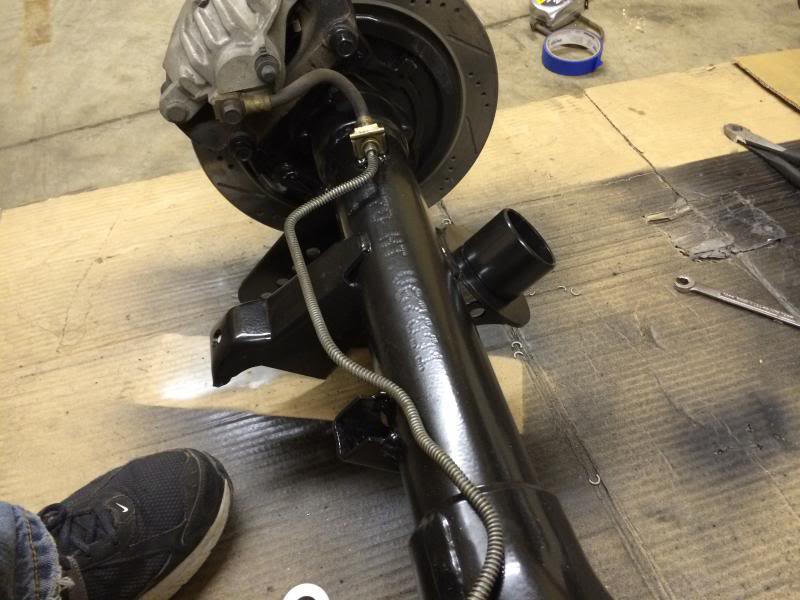
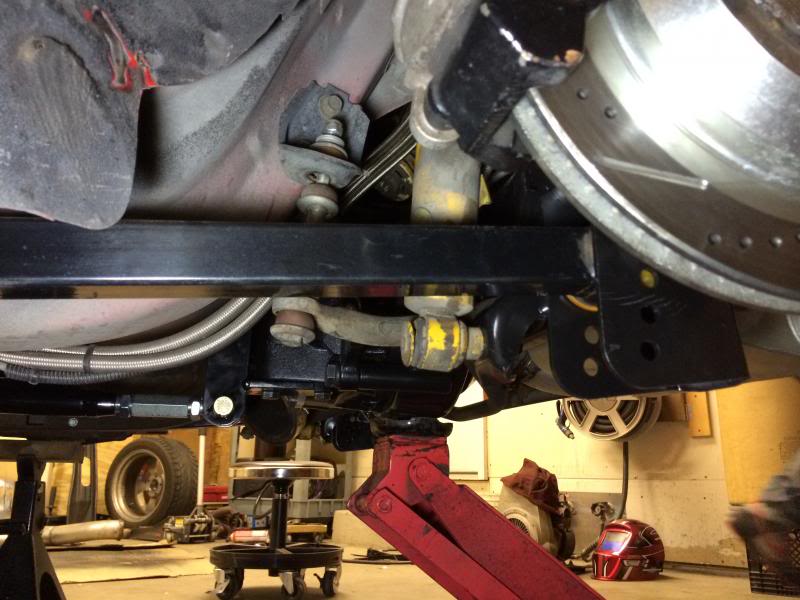
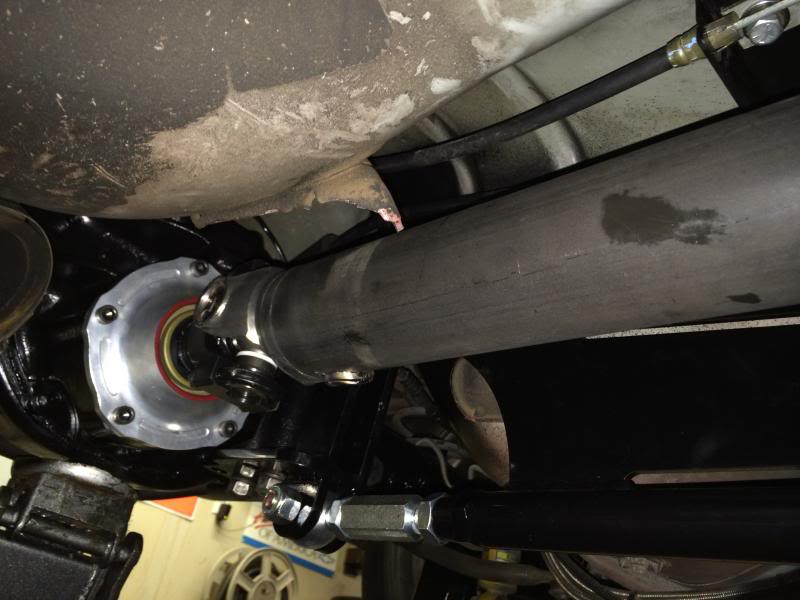
The Yukon third member just barely clears the torque arm mount.
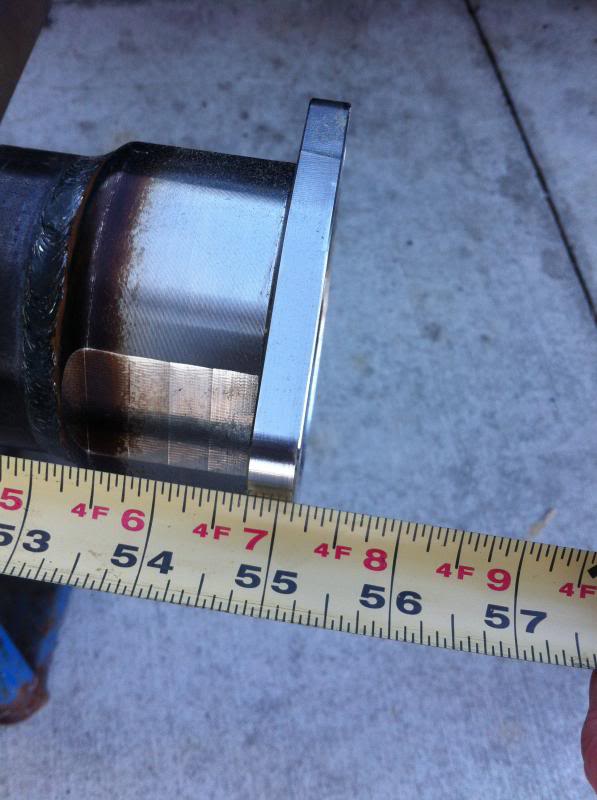
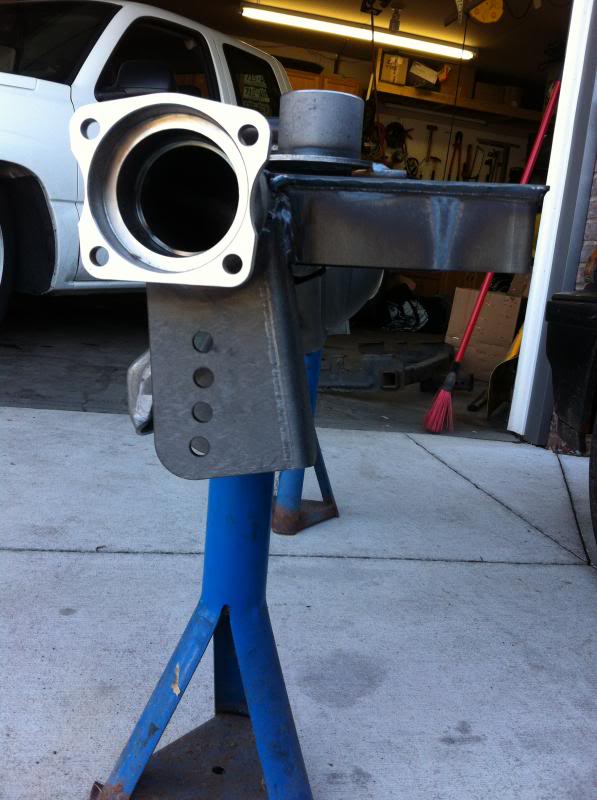
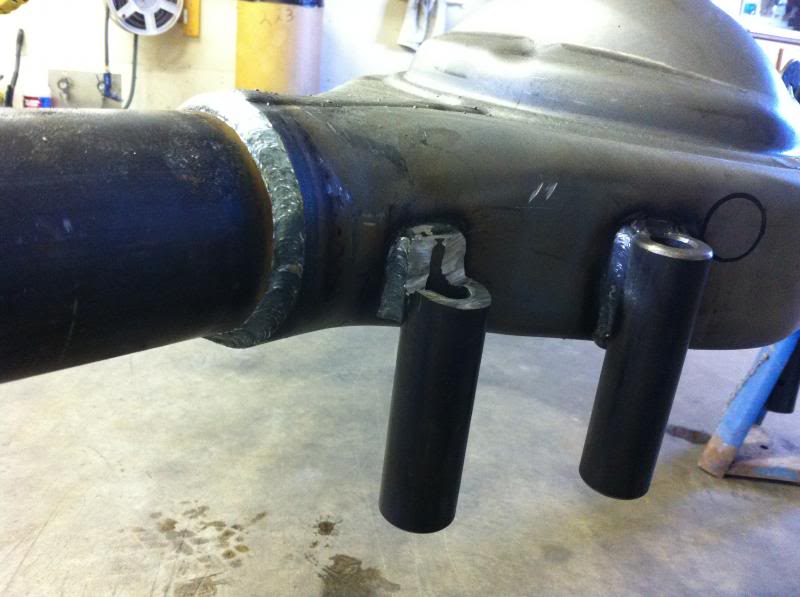
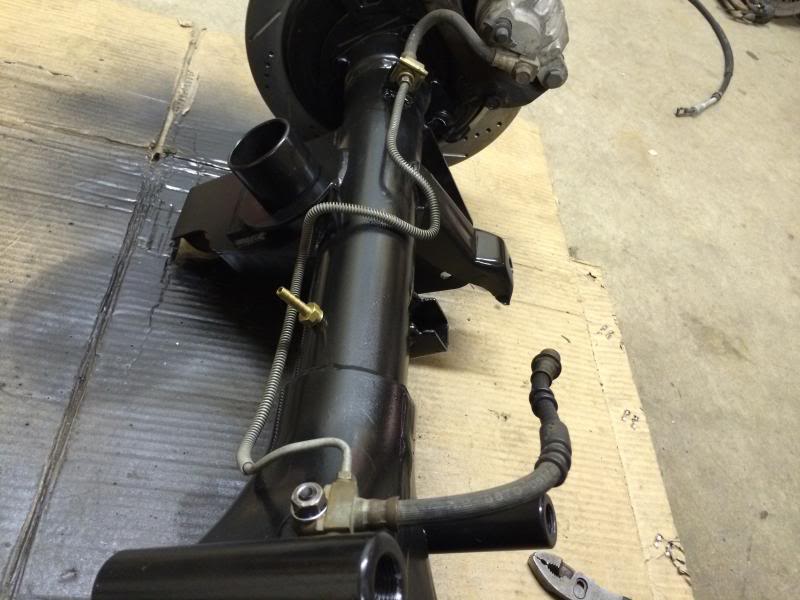
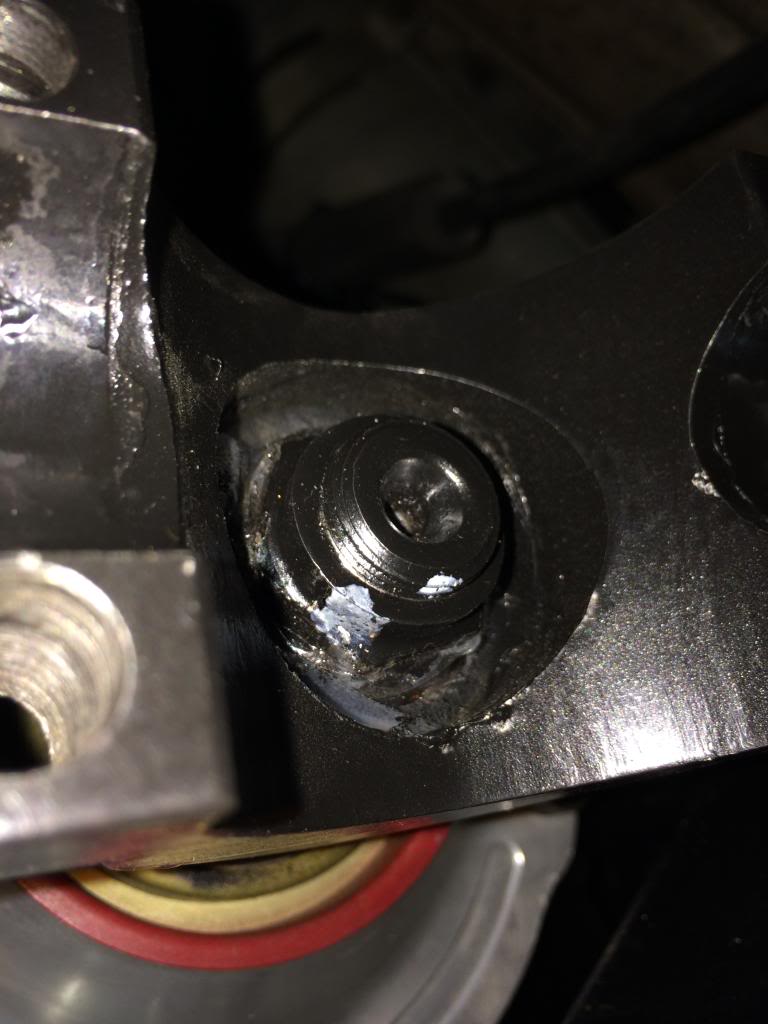
I added a filler plug and drain myself to avoid the $70 extra cost to have them installed. The two bungs with plugs cost me less than $10.
I drilled 1/2" holes and then welded them in place. I centered the drain so I would have good spot to lift with a jack and it won't allow it to slip off with the bung being held in the jack's lift cup.

With the ring gear mounted to the carrier, I cleaned the case where the bearing races sit and backed off the side adjusters on the case. Then I set the carrier with bearings in place. To get the backlash right between gears, the side adjusters can be threaded in or out to move the carrier left or right in relation to the pinion. Then by cranking (squeezing) the adjusters together, that adds carrier bearing preload. Pretty cool. I don't have any pictures of doing the gear setup or checking backlash, but there are plenty of how to write ups and videos on that. I did have another thread with the results of my gear setup which you can go to here:
https://www.thirdgen.org/forums/tran...questions.html
Ok let's get to the next part, the axle housing and axles. I went with a Moser simply because it seemed people had the fewest complaints and overall best fitment and success with Moser. I ordered mine directly from Moser. They have plenty of options when choosing the housing and axle package. I ordered it 1/2 inch narrower than stock because I wanted to get my wheels tucked in just a tad more on either side. My particular list was this:
1982-92 Camaro/Firebird (*Cannot use stock OEM Brakes)
ENTER CUSTOM WIDTH & PINION OFFSET HERE: .5" narrower than stock
SPLINE COUNT: 31 Spline
BOLT PATTERN: 5 x 4 3/4" (GM)
BEARING TYPE: Tapered Roller Bearing (will not work w/93-97 GM F-Body Disc Brakes)
STUD TYPE: 12mm x 2 1/2" GM (.505" Knurl)
BRAKES: Other
ENTER YOUR BRAKE MANUFACTURE AND MODEL NUMBER HERE: '98 - '02 Camaro "LS1" rear disc brakes
ABS & SUSPENSION OPTIONS: None
AVAILABLE HOUSING OPTIONS: None
SPECIAL AXLE FEATURE OPTIONS: None
ADJUSTABLE LOWER CONTROL ARM BRACKETS: 1982-2002 GM Camaro/Firebird LCA Brackets
SWAY BAR MOUNTS: None
POWDER COAT OPTIONS: None
Here are some pictures of how it looked when it first arrived.


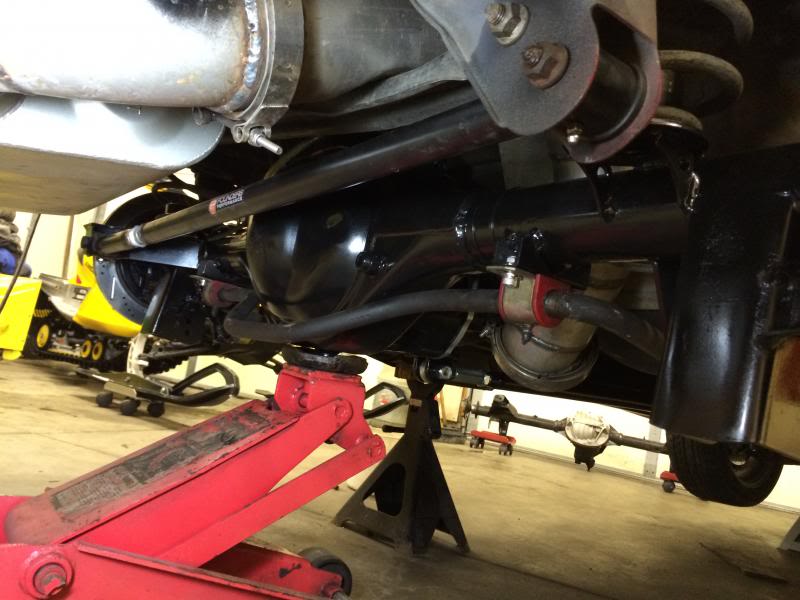
The Yukon third member just barely clears the torque arm mount.

I added a filler plug and drain myself to avoid the $70 extra cost to have them installed. The two bungs with plugs cost me less than $10.
I drilled 1/2" holes and then welded them in place. I centered the drain so I would have good spot to lift with a jack and it won't allow it to slip off with the bung being held in the jack's lift cup.


Last edited by vortec350s10; 03-22-2014 at 06:34 PM. Reason: Added pictures of bare housing
02-24-2014, 10:11 PM
#12
Member
Thread Starter
Join Date: Dec 2007
Location: Minnesota
Posts: 475
Likes: 0
Received 2 Likes
on
2 Posts
Car: '88 Iroc
Engine: Single turbo Vortec 5.7, Megasquirt
Transmission: Probuilt 700r4 3000 stall Vigilante
Axle/Gears: Moser 9" 3.25 w/True Trac
Re: Follow along as I build and install a Moser Ford 9"
Well I am bringing this back from the dead. I have finally got around to getting this rear end installed. The turbo bug had bit again and I spent the last few months turbo-ing my other car while the iroc patiently sat.
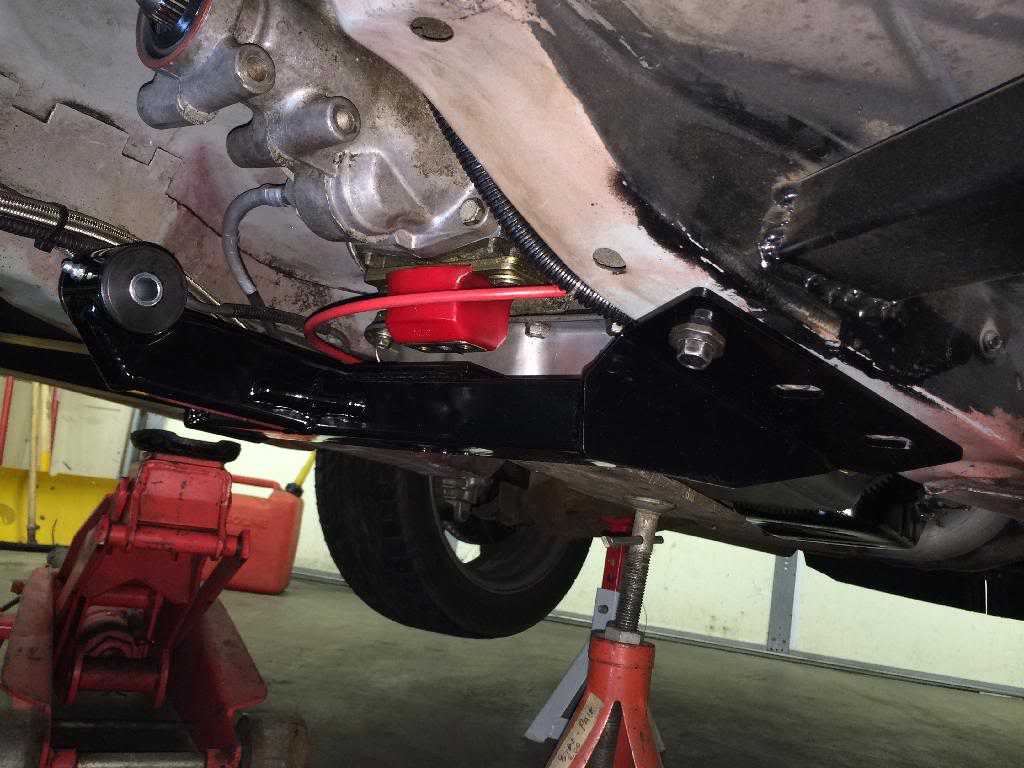
For a torque arm setup, I went with UMI's crossmember mounted adjustable setup with a poly bushing. They also have the option of a spherical bearing one but after reading about rear end noise being transmitted through the car a lot more than a transmission mounted TA I made sure I went with the poly mount to minimize it.
The first thing I can say about the UMI stuff is it is BEEFY. Well I guess anything would be compared to the stamped steel stock parts. Just for kicks I weighed the two setups.
Stock- cross member - 3 lbs torque arm- 11lbs
UMI cross member- 7 lbs torque arm- 25 lbs
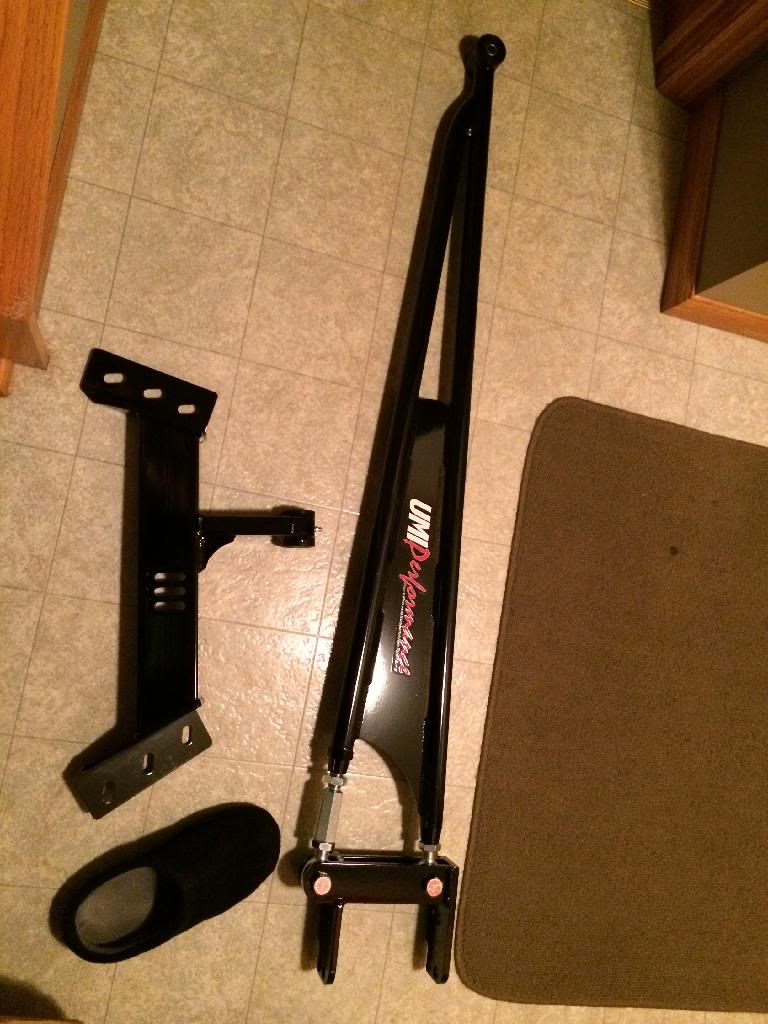
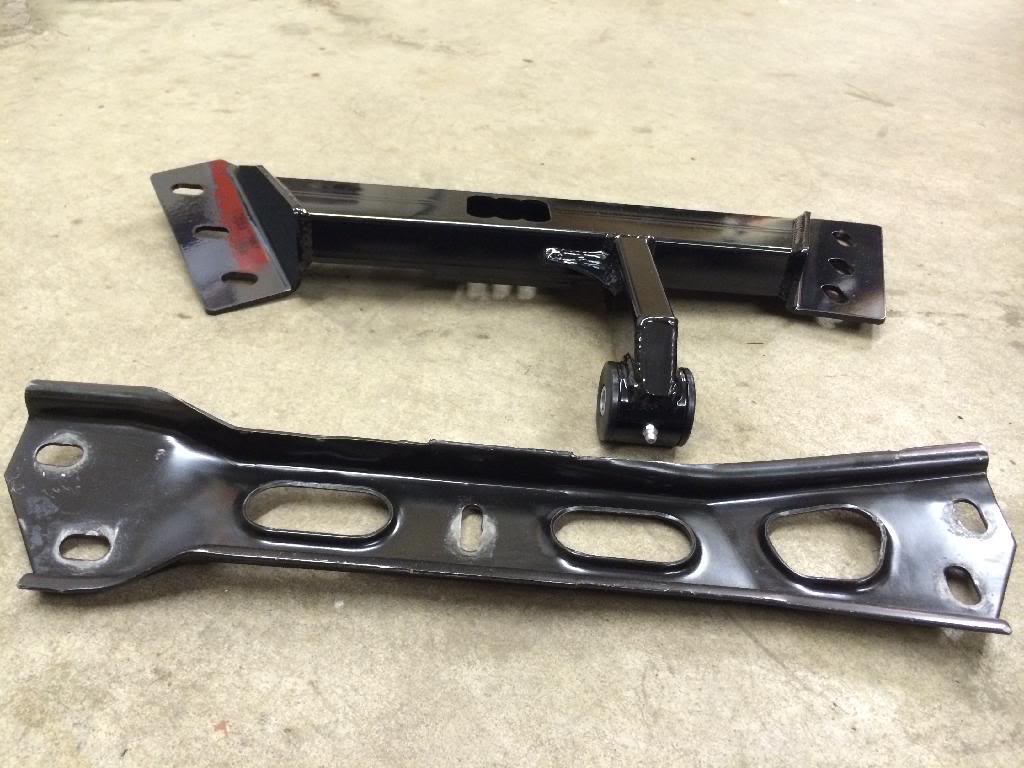
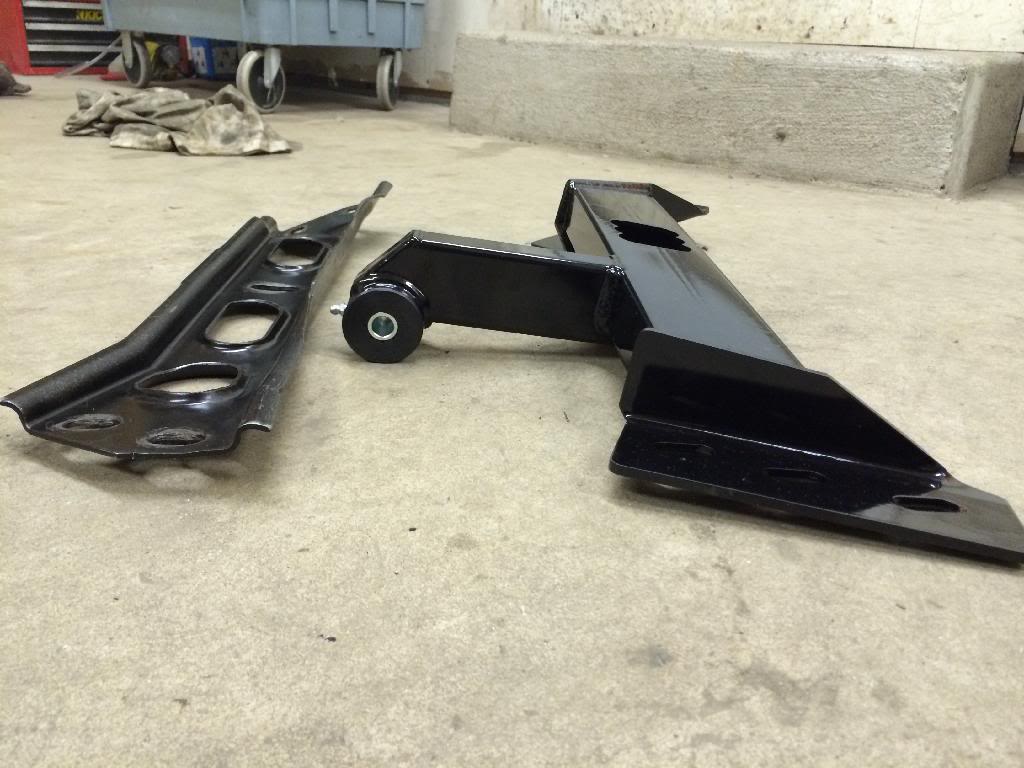
So you gain 18lbs but I doubt I'll ever break any of these parts. For my car which is not a hard launcher it's definitely overkill but it should handle any future power upgrades so what the heck.
For a torque arm setup, I went with UMI's crossmember mounted adjustable setup with a poly bushing. They also have the option of a spherical bearing one but after reading about rear end noise being transmitted through the car a lot more than a transmission mounted TA I made sure I went with the poly mount to minimize it.
The first thing I can say about the UMI stuff is it is BEEFY. Well I guess anything would be compared to the stamped steel stock parts. Just for kicks I weighed the two setups.
Stock- cross member - 3 lbs torque arm- 11lbs
UMI cross member- 7 lbs torque arm- 25 lbs


So you gain 18lbs but I doubt I'll ever break any of these parts. For my car which is not a hard launcher it's definitely overkill but it should handle any future power upgrades so what the heck.
Last edited by vortec350s10; 02-25-2014 at 06:02 PM.
02-25-2014, 06:12 PM
#13
Member
Thread Starter
Join Date: Dec 2007
Location: Minnesota
Posts: 475
Likes: 0
Received 2 Likes
on
2 Posts
Car: '88 Iroc
Engine: Single turbo Vortec 5.7, Megasquirt
Transmission: Probuilt 700r4 3000 stall Vigilante
Axle/Gears: Moser 9" 3.25 w/True Trac
Re: Follow along as I build and install a Moser Ford 9"
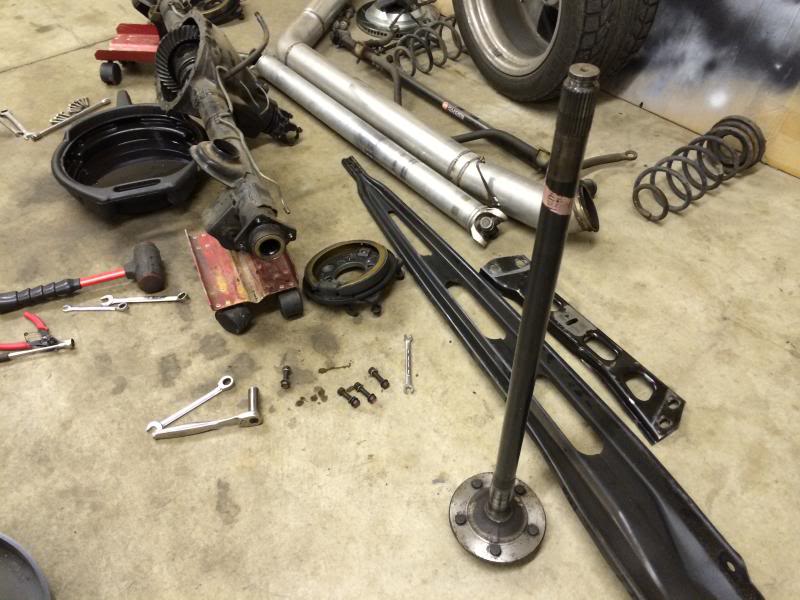
Next I yanked the 10 bolt and all the other stuff in the way.
I had to pull the tail housing off the trans to remove the original torque arm mount. My Jegs driveshaft loop was in the way of the tail housing so that had to come down first.
The next thing was to mock up the new cross member. Notice that the UMI one can use 6 bolts vs 4. There are actually 6 holes in the car, but the front two are not tapped. The surface of where the transmission mount sits on the new cross member is about 3/8" lower than the stock cross member puts it. I'm not sure if this is for some reason or not. But I don't have a lot of clearance with my solid mounted exhaust, turbo, etc so I decided I would space it up some to split the difference in mounting height.


I had to pull the tail housing off the trans to remove the original torque arm mount. My Jegs driveshaft loop was in the way of the tail housing so that had to come down first.

The next thing was to mock up the new cross member. Notice that the UMI one can use 6 bolts vs 4. There are actually 6 holes in the car, but the front two are not tapped. The surface of where the transmission mount sits on the new cross member is about 3/8" lower than the stock cross member puts it. I'm not sure if this is for some reason or not. But I don't have a lot of clearance with my solid mounted exhaust, turbo, etc so I decided I would space it up some to split the difference in mounting height.


 03-03-2014, 09:32 PM
#15
Member
Thread Starter
Join Date: Dec 2007
Location: Minnesota
Posts: 475
Likes: 0
Received 2 Likes
on
2 Posts
Car: '88 Iroc
Engine: Single turbo Vortec 5.7, Megasquirt
Transmission: Probuilt 700r4 3000 stall Vigilante
Axle/Gears: Moser 9" 3.25 w/True Trac
Re: Follow along as I build and install a Moser Ford 9"
I made a rectangle transmission mount spacer from some 3/16" steel and drilled holes into it matching the trans mount. Do I really need to space the transmission up 3/16"? Probably not but it sat 3/8" higher with the old cross member and I don't have a lot of clearances with some of my exhaust and turbo stuff so I wanted to minimize the change in engine/exhaust angle.
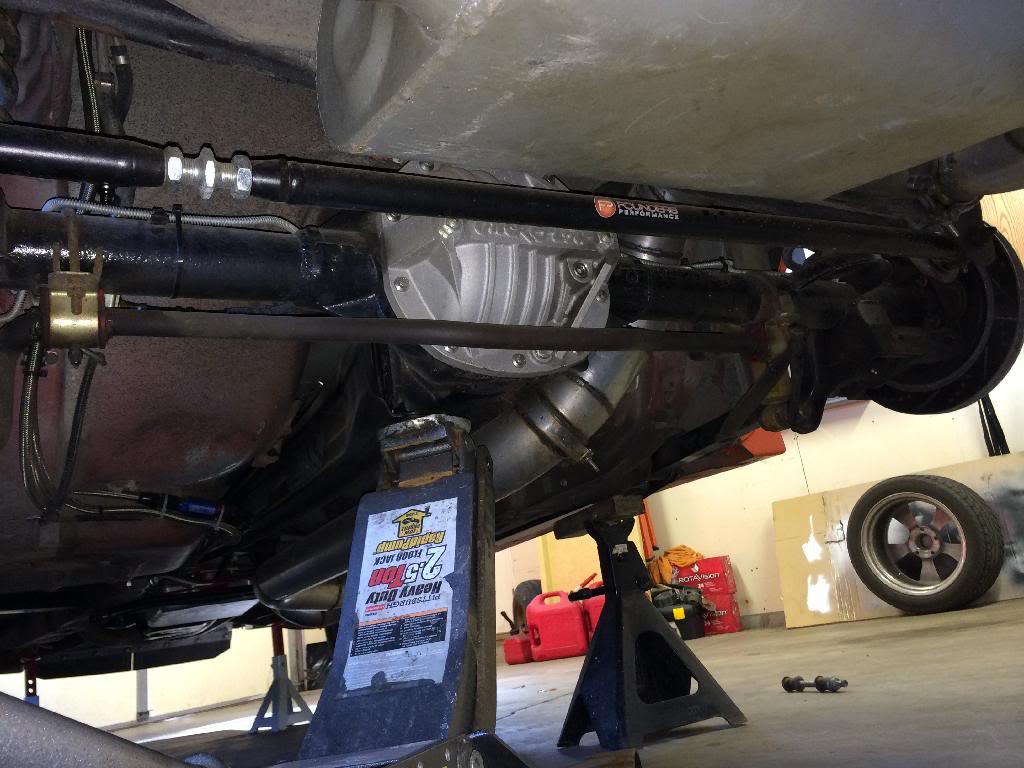
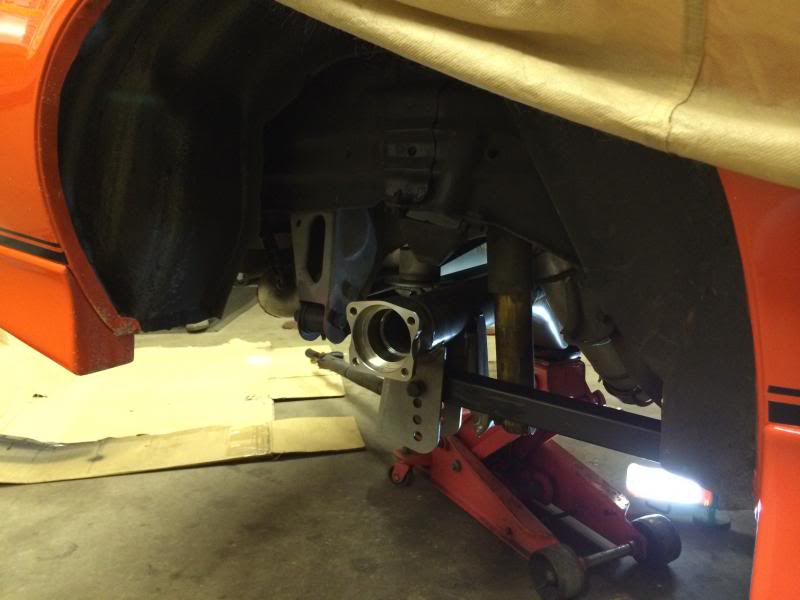
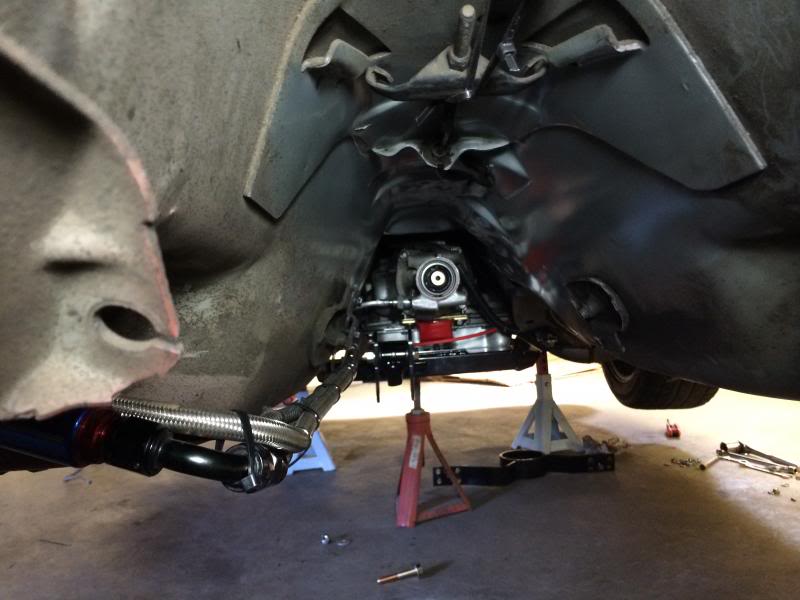
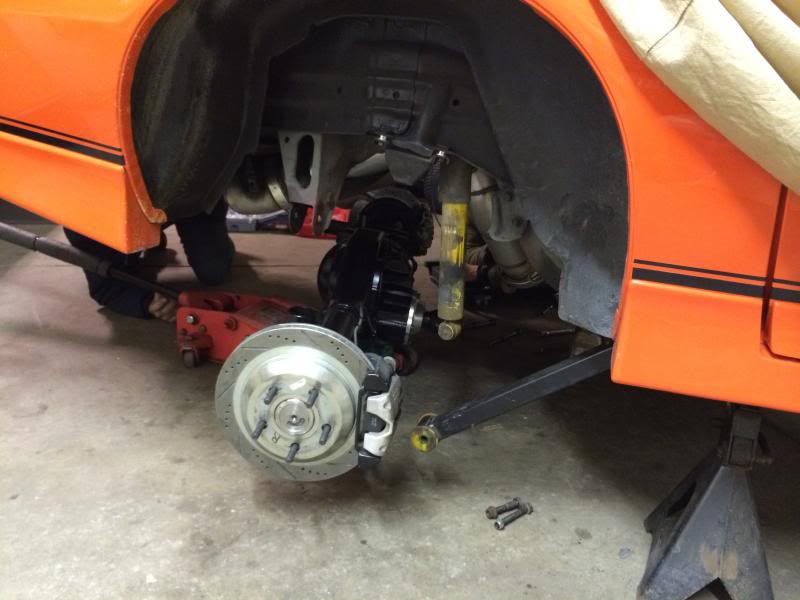
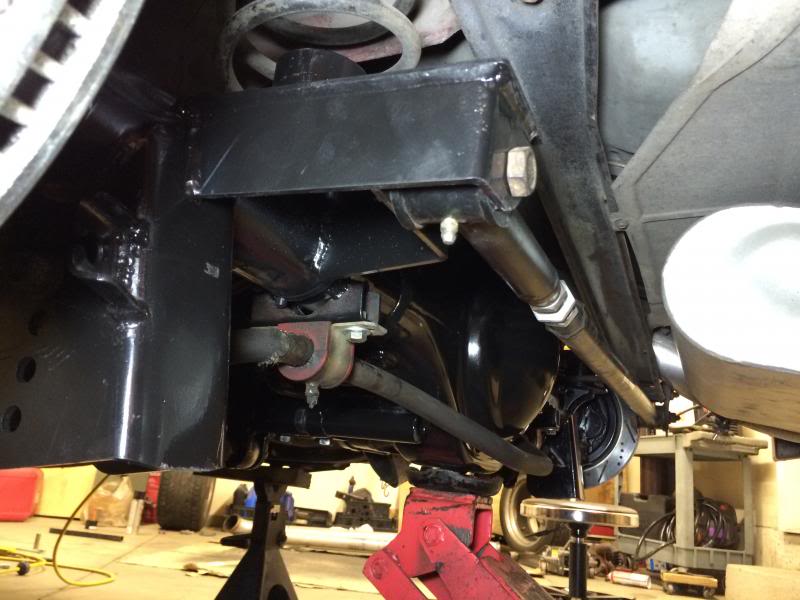
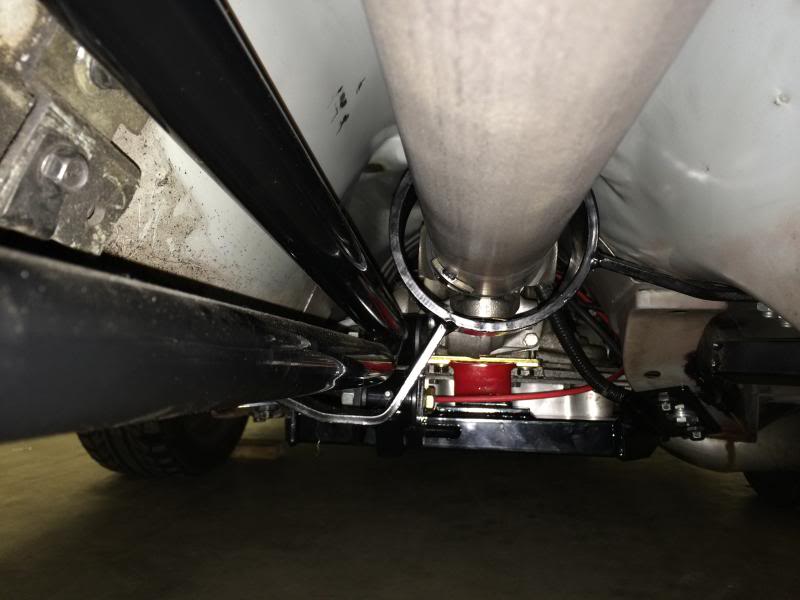
Next step was to mock up the 9" housing in the car. It bolted in fairly well, and everything looked good. I installed the torque arm after the rear was bolted to the LCA's and shocks. There was some sideways binding as the torque arm wanted to go down the center of the driveshaft tunnel instead of along the drivers side where the mount is. There is some play in the torque arm mount where it bolts to the rear end but it still took some sideways leverage to install it into the front mount.
They say the two long bolts that secure the torque arm to the rear end are not quite long enough to use and they are a little on the short side. By omitting one of the two washers the nut still has full thread engagement.
With the mock up complete, I pulled it back out and tore apart the 10 bolt to remove my LS1 rear disc brake brackets. It's kind of a pain to have to pull the axle shafts just to remove the brakes, but that's how it works. Once that was done I started to mock up the axles and brakes on the 9".
Next step was to mock up the 9" housing in the car. It bolted in fairly well, and everything looked good. I installed the torque arm after the rear was bolted to the LCA's and shocks. There was some sideways binding as the torque arm wanted to go down the center of the driveshaft tunnel instead of along the drivers side where the mount is. There is some play in the torque arm mount where it bolts to the rear end but it still took some sideways leverage to install it into the front mount.
They say the two long bolts that secure the torque arm to the rear end are not quite long enough to use and they are a little on the short side. By omitting one of the two washers the nut still has full thread engagement.


With the mock up complete, I pulled it back out and tore apart the 10 bolt to remove my LS1 rear disc brake brackets. It's kind of a pain to have to pull the axle shafts just to remove the brakes, but that's how it works. Once that was done I started to mock up the axles and brakes on the 9".

Last edited by vortec350s10; 03-03-2014 at 10:07 PM.
03-03-2014, 09:58 PM
#16
Member
Thread Starter
Join Date: Dec 2007
Location: Minnesota
Posts: 475
Likes: 0
Received 2 Likes
on
2 Posts
Car: '88 Iroc
Engine: Single turbo Vortec 5.7, Megasquirt
Transmission: Probuilt 700r4 3000 stall Vigilante
Axle/Gears: Moser 9" 3.25 w/True Trac
Re: Follow along as I build and install a Moser Ford 9"
It was a little tricky at first to figure out which axle shaft went on which side since they are about an inch or so different in lengths. The longer one went in the passenger side. It was tricky to mock up the axles in the housing to determine where the rotor would sit in relation to the caliper since I didn't yet have the bearings pressed on the shafts.
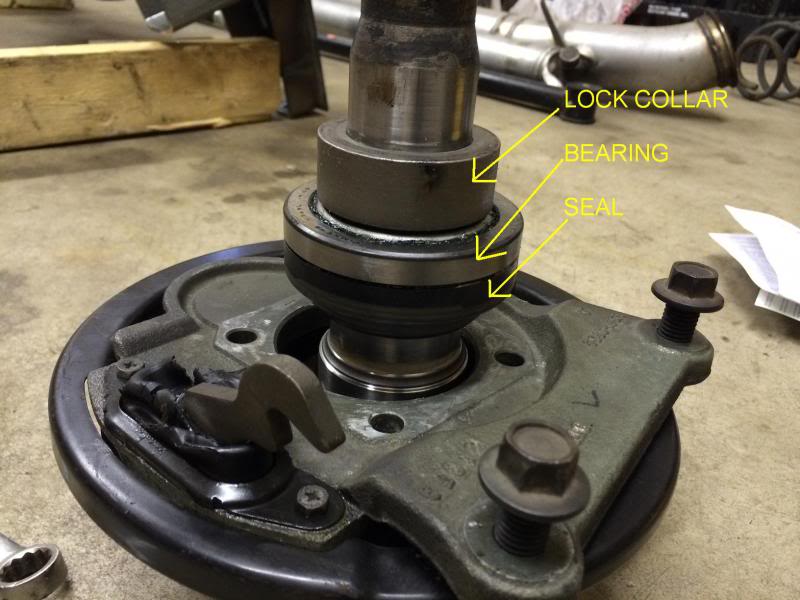
I opted for the tapered roller bearings vs the ball bearings so they came with a different type of axle seal. They are kind of a bell shape and the larger end mates up against the OD of the axle bearing itself when installed with the smaller end facing the wheel and sealing on the axle. The brake backing plate goes on first, then the seal, then the bearing is pressed on, then the locking collar is pressed on last, securing the bearing even more. The paperwork that came with the bearings said the bearing is a .001" interference fit and the lock collar is .004" interference.
My friend who we call "LS Mike" has a press so I stopped over and we pressed on the bearings and collars. I didn't have a lot of grease on the first one and it was really tough. It took all his press could do to get them on. The second axle went way easier. It might have been from the grease or maybe it was just aligned and went on a little more square. Who knows.

Here's how it looks once they are pressed on. I made damn sure I had the correct backing plate on the correct axle!

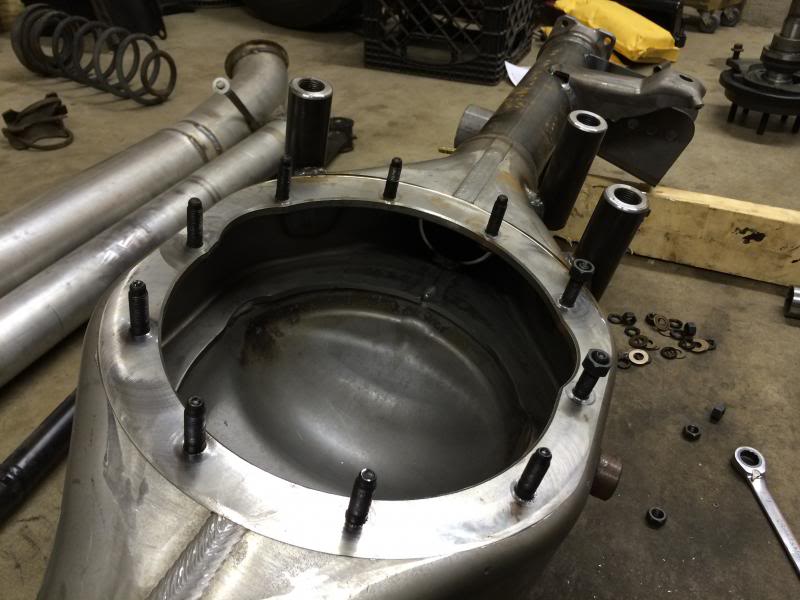
Next I installed the studs for the third member in the housing. The studs are 3/8 -24 thread. I thought I'd be quick and grabbed the impact to put them on. After putting some RTV on the splined part of the studs I pulled them part way through with one of the nuts included and a washer and then a big nut that slipped over the threads as a spacer along with the washer to pull to pull them up the rest of the way. I kind of messed up one of the studs when I had not enough thread engagement before giving 'er with the impact but it was salvageable.
 03-04-2014, 08:35 PM
#17
Member
Thread Starter
Join Date: Dec 2007
Location: Minnesota
Posts: 475
Likes: 0
Received 2 Likes
on
2 Posts
Car: '88 Iroc
Engine: Single turbo Vortec 5.7, Megasquirt
Transmission: Probuilt 700r4 3000 stall Vigilante
Axle/Gears: Moser 9" 3.25 w/True Trac
Re: Follow along as I build and install a Moser Ford 9"
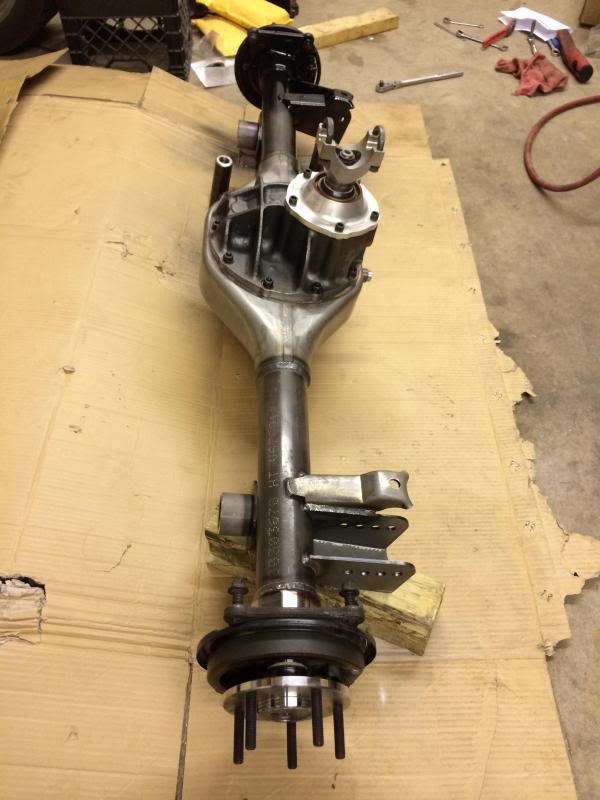
Next I dropped in the third member after laying down the gasket and a skim coat of RTV on both sides. It feels like it weighs the same as the entire 10 bolt rear! Then I slid the axles in after coating the insides of the housing where the axle bearing and seal sit with some RTV. The OD of the seal where it butts up to the bearing doesn't fit real tight so it would almost for sure leak without some RTV.
To install the brake backing plates (and essentially the axles) Moser gives you "T bolts" with nuts to bolt them to the housing ends. My particular axles don't have a hole in the flange to allow straight on access so I removed the E-brake shoes. This gave me enough room to tighten the nuts. The bolts are a little on the short side for this setup, so I omitted the washers and used loctite. The nuts dug a little into the thin sheet metal backing plates, but I figure that should hold them even more. Getting the little phillips/8mm screw back in to hold the clip that holds the shoes was a little tricky but not too bad.
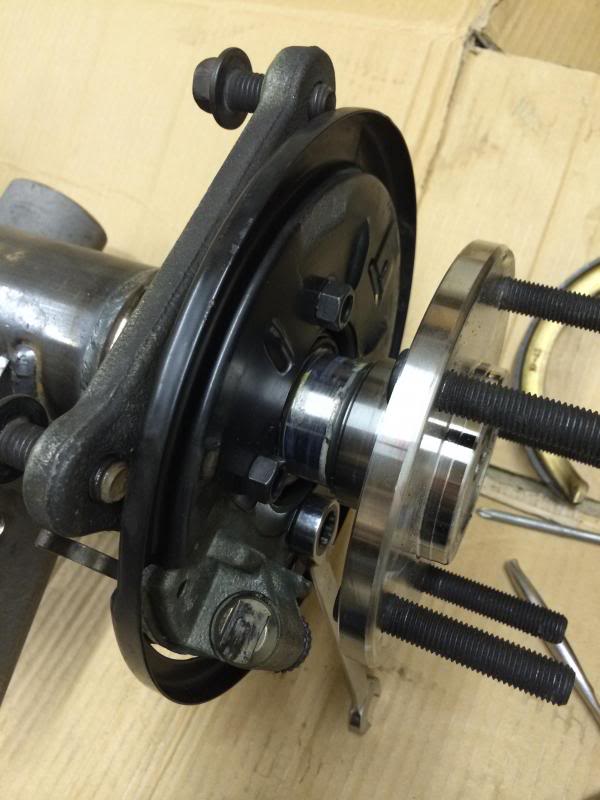
To install the brake backing plates (and essentially the axles) Moser gives you "T bolts" with nuts to bolt them to the housing ends. My particular axles don't have a hole in the flange to allow straight on access so I removed the E-brake shoes. This gave me enough room to tighten the nuts. The bolts are a little on the short side for this setup, so I omitted the washers and used loctite. The nuts dug a little into the thin sheet metal backing plates, but I figure that should hold them even more. Getting the little phillips/8mm screw back in to hold the clip that holds the shoes was a little tricky but not too bad.


 03-22-2014, 06:23 PM
#18
Member
Thread Starter
Join Date: Dec 2007
Location: Minnesota
Posts: 475
Likes: 0
Received 2 Likes
on
2 Posts
Car: '88 Iroc
Engine: Single turbo Vortec 5.7, Megasquirt
Transmission: Probuilt 700r4 3000 stall Vigilante
Axle/Gears: Moser 9" 3.25 w/True Trac
Re: Follow along as I build and install a Moser Ford 9"
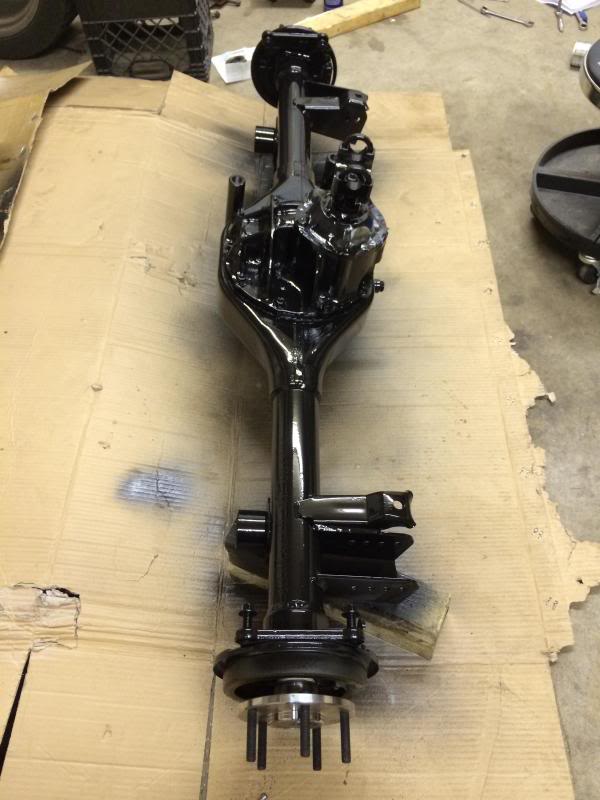
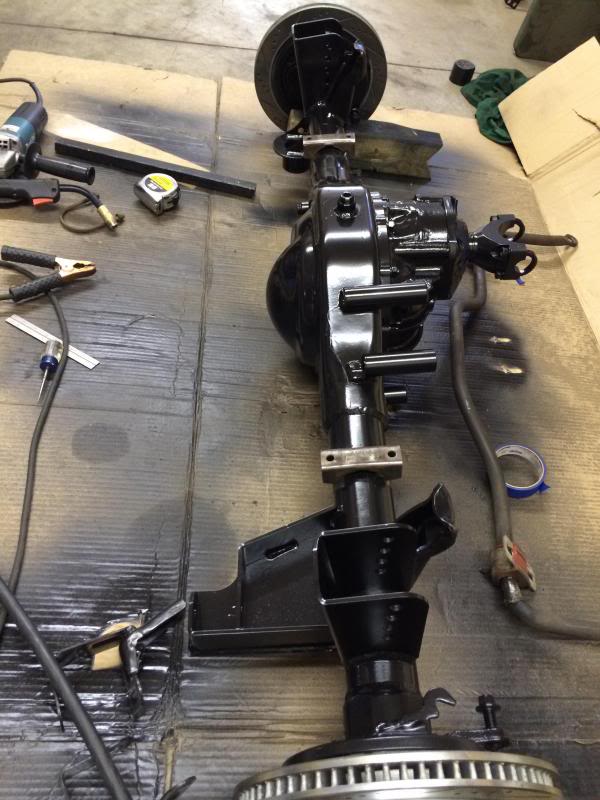
Once I had it assembled, I cleaned the housing and painted it. I've had awesome results with just plain old Rustoleum black enamel so that's once again what I used.
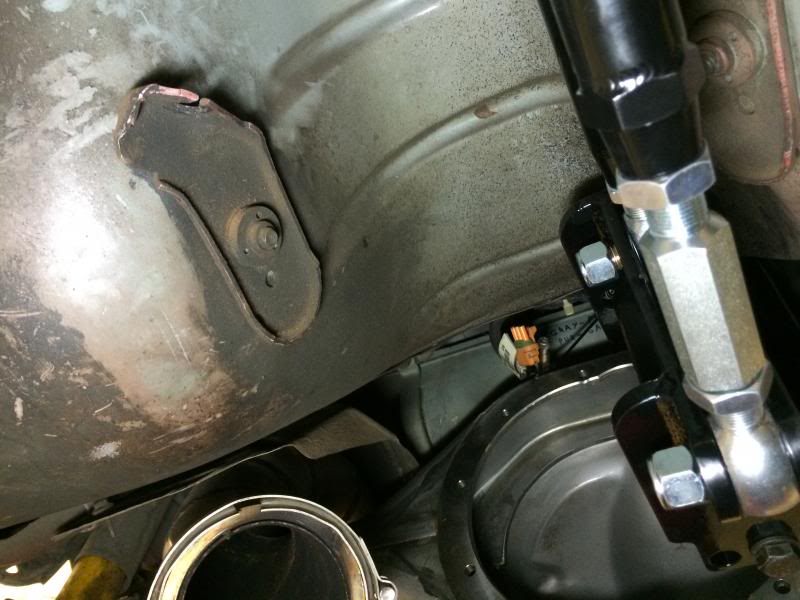
With the rear out of the car and paint drying, I clearanced my floor in the areas I had marked after mock up.
You can see the two areas, both on the left side of the drive shaft tunnel.

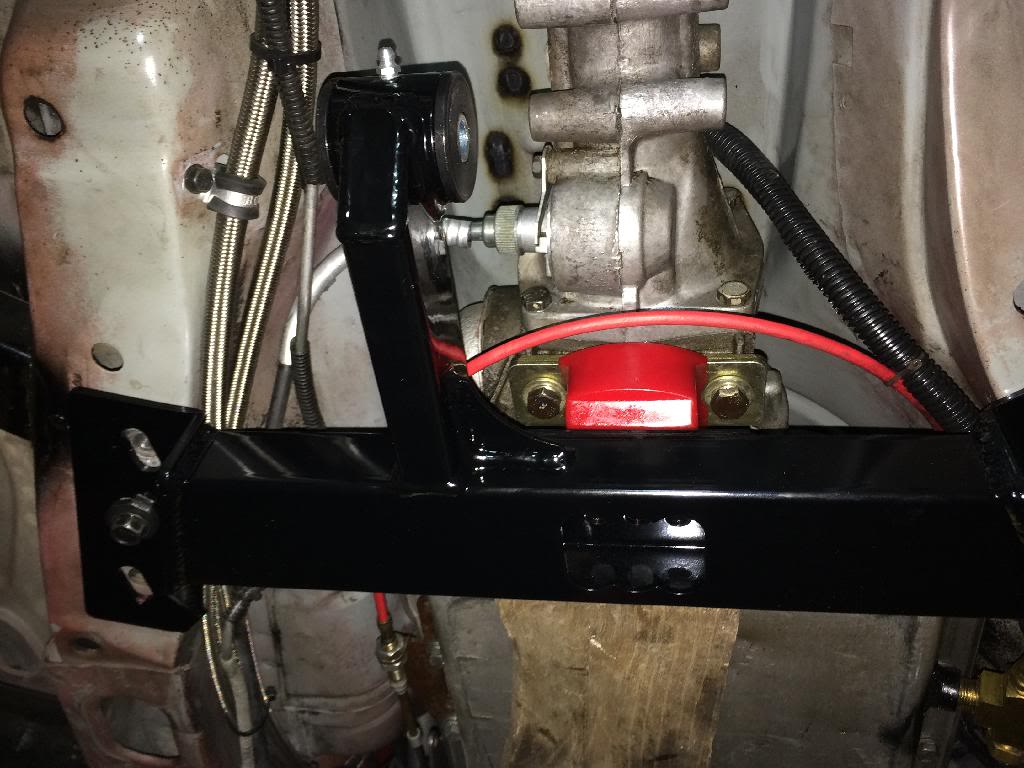
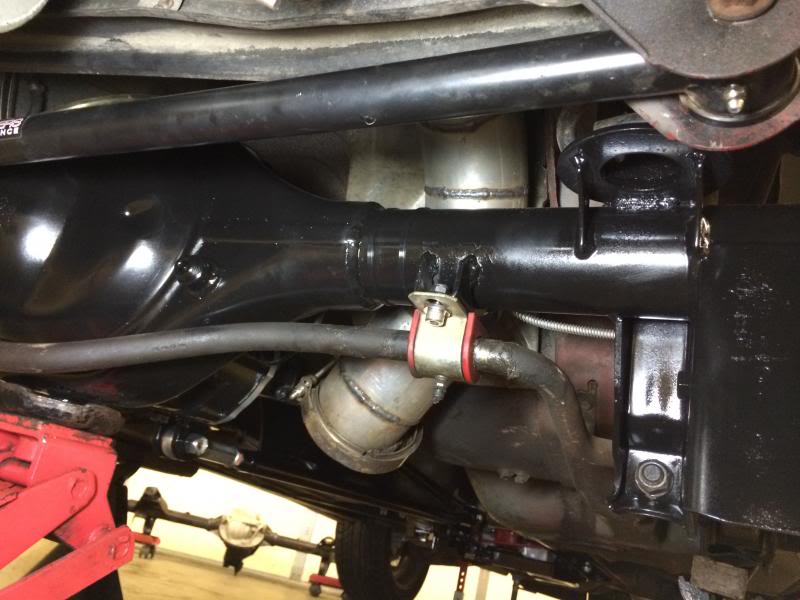
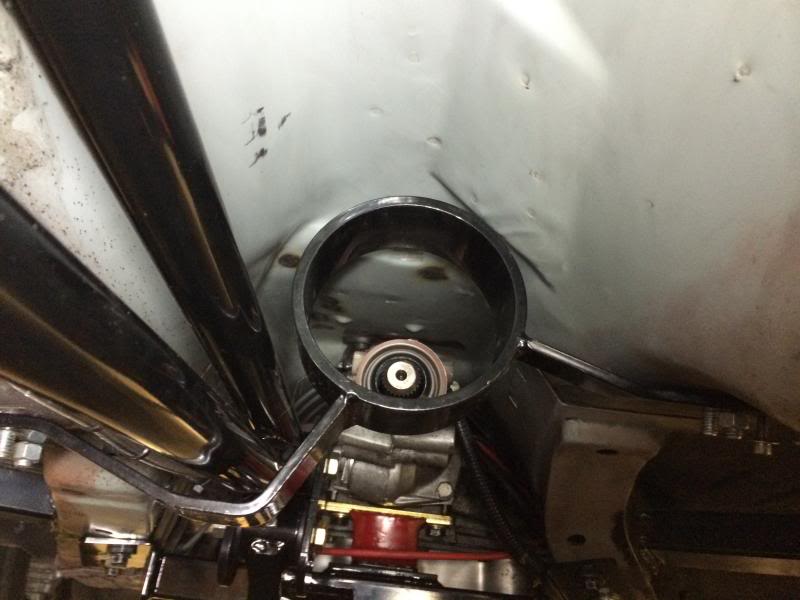
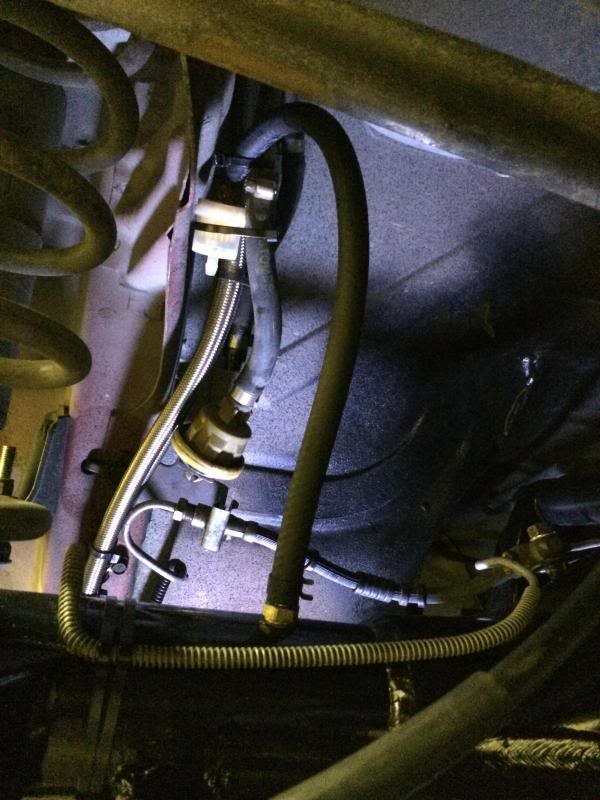
I also had to slightly change my fuel line routing to clear the torque arm.
Then I figured out where to attach my sway bar mounts to the axle housing. I basically just put them right on the very bottom of the axle tubes, and spaced them out evenly from both sides. The sway bar mounts they sell for this rear space the sway bar down a little further, but I still don't think it would clear the pumpkin without cutting out part of the tube like I did. I could have used 3" U bolts but I preferred just to weld them on. Then I don't have to worry about them ever moving and it's just cleaner this way.


With the rear out of the car and paint drying, I clearanced my floor in the areas I had marked after mock up.
You can see the two areas, both on the left side of the drive shaft tunnel.

I also had to slightly change my fuel line routing to clear the torque arm.

Then I figured out where to attach my sway bar mounts to the axle housing. I basically just put them right on the very bottom of the axle tubes, and spaced them out evenly from both sides. The sway bar mounts they sell for this rear space the sway bar down a little further, but I still don't think it would clear the pumpkin without cutting out part of the tube like I did. I could have used 3" U bolts but I preferred just to weld them on. Then I don't have to worry about them ever moving and it's just cleaner this way.


Last edited by vortec350s10; 03-22-2014 at 06:44 PM.
03-22-2014, 06:51 PM
#19
Member
Thread Starter
Join Date: Dec 2007
Location: Minnesota
Posts: 475
Likes: 0
Received 2 Likes
on
2 Posts
Car: '88 Iroc
Engine: Single turbo Vortec 5.7, Megasquirt
Transmission: Probuilt 700r4 3000 stall Vigilante
Axle/Gears: Moser 9" 3.25 w/True Trac
Re: Follow along as I build and install a Moser Ford 9"
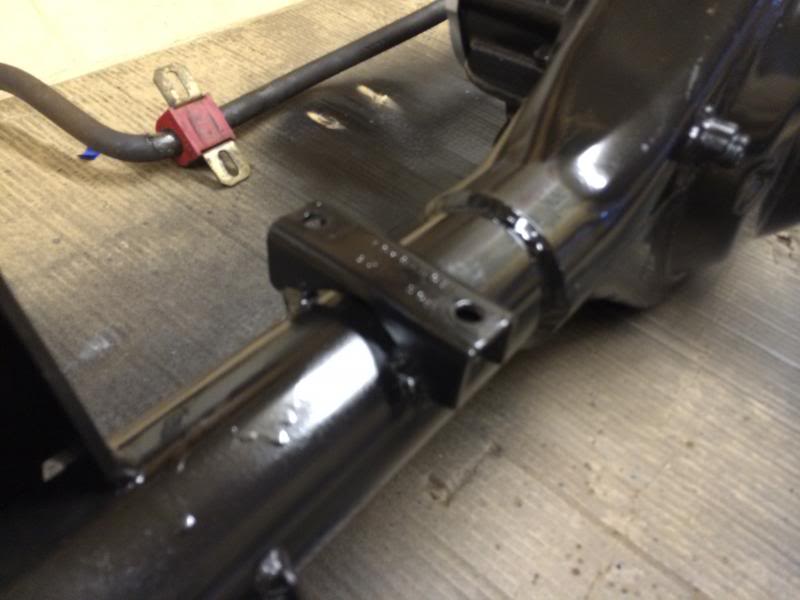
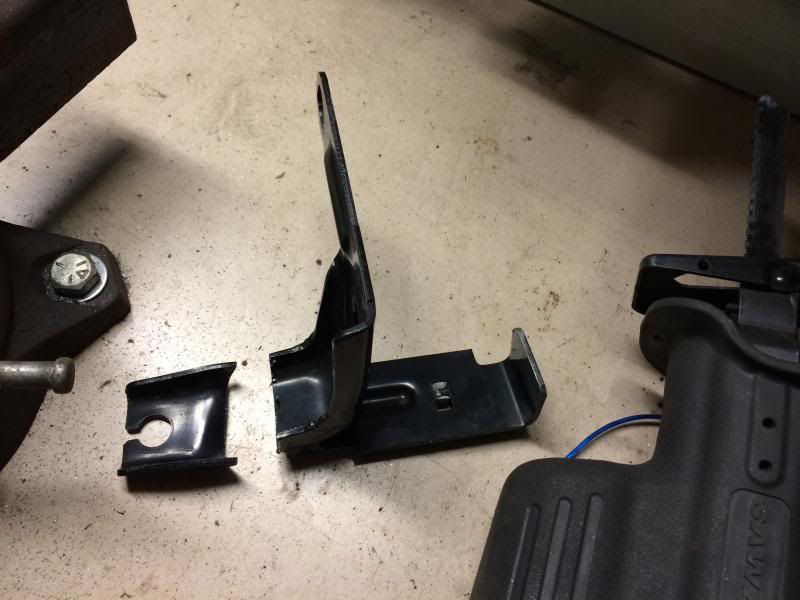
With the sway bar mounts complete, I started figuring out how to make my 4th gen LS1 rear E-brakes functional. I had the cables and everything to make them work on my old rear, I just never got around to installing them. There are 4th gen brackets that I used on my 10 bolt to hold the brake lines on the rear calipers, that also have the bracket for the E brake cables. The 4th gen brackets didn't fit the 9" housing so I ended up cutting the mounting tabs off of them (for the E brake cables and caliper brake line supports) and welded them directly to the housing. I had to cut about an inch off of the e brake cable return springs since they were now closer to the brakes.
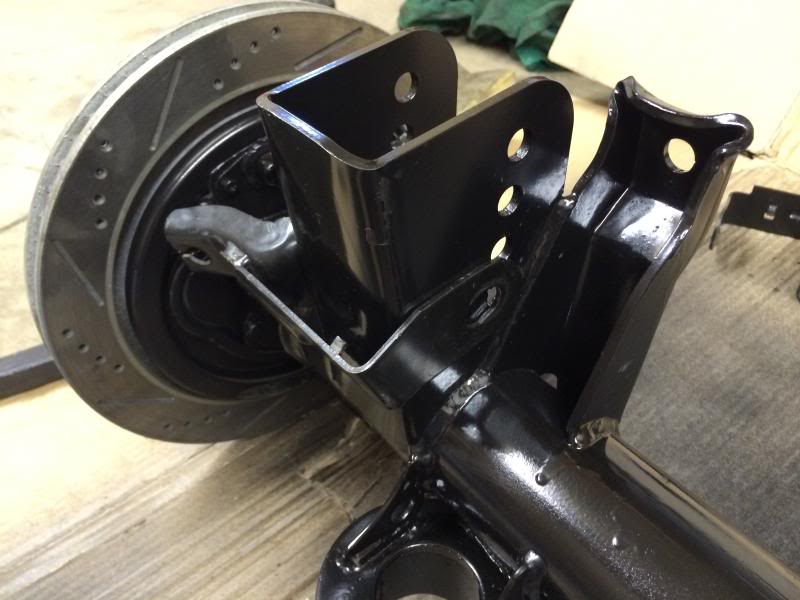
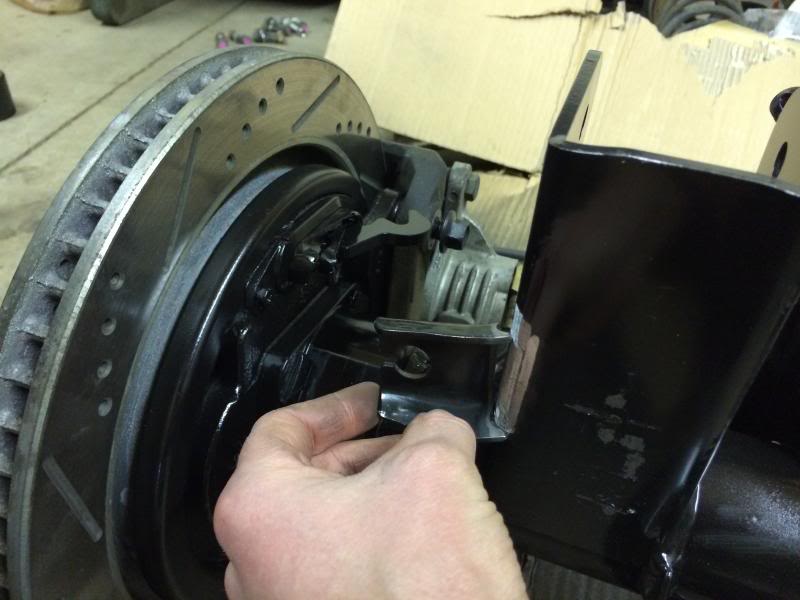
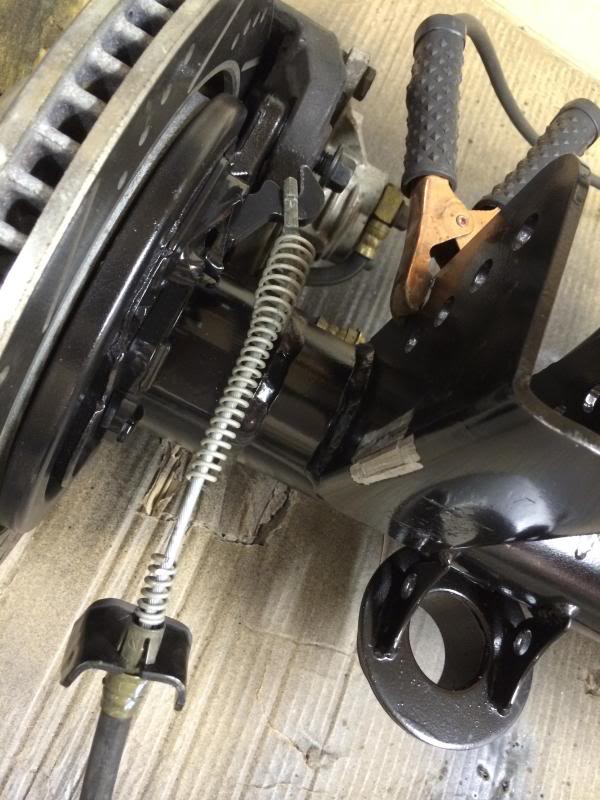
It was important to weld the E brake brackets an equal distance away from the actual brakes to ensure both brakes are pulled evenly, since the only other adjustment left/right is by tightening the drums themselves behind the axle flange.
Next I welded a 5/16" bolt to the housing to mount my stock 3rd gen drum brake brake distribution block.
To make the 4th gen E brake cables work on the car end, I took a piec of angle iron, tapped a 3/8-16 thread into it and bolted it in place above this little tab that protruded from the floor. I drilled holes for the cables to install and had to mill down the mounting surface near the cables to allow the tabs to extend outward from the cables to hold them into the angle iron. I was worried about flex since you can get pretty good leverage on the E brake handle, but I watched underneath while my friend applied the E brake and it was surprisingly very strudy just with one bolt holding it to the tab on the floor. Once I had it tested, I painted it.


It was important to weld the E brake brackets an equal distance away from the actual brakes to ensure both brakes are pulled evenly, since the only other adjustment left/right is by tightening the drums themselves behind the axle flange.
Next I welded a 5/16" bolt to the housing to mount my stock 3rd gen drum brake brake distribution block.

To make the 4th gen E brake cables work on the car end, I took a piec of angle iron, tapped a 3/8-16 thread into it and bolted it in place above this little tab that protruded from the floor. I drilled holes for the cables to install and had to mill down the mounting surface near the cables to allow the tabs to extend outward from the cables to hold them into the angle iron. I was worried about flex since you can get pretty good leverage on the E brake handle, but I watched underneath while my friend applied the E brake and it was surprisingly very strudy just with one bolt holding it to the tab on the floor. Once I had it tested, I painted it.


Last edited by vortec350s10; 03-22-2014 at 07:14 PM.
03-22-2014, 07:00 PM
#20
Member
Thread Starter
Join Date: Dec 2007
Location: Minnesota
Posts: 475
Likes: 0
Received 2 Likes
on
2 Posts
Car: '88 Iroc
Engine: Single turbo Vortec 5.7, Megasquirt
Transmission: Probuilt 700r4 3000 stall Vigilante
Axle/Gears: Moser 9" 3.25 w/True Trac
Re: Follow along as I build and install a Moser Ford 9"
Then I installed my old brake lines. I had to bend them some to make them work, but they turned out alright. Since these lines are for drum brakes they are longer than necessary so I had to add a few bends just to eat up the length.
Next, it was bolted back in the car. The order that worked the best for me was:
LCA's, shocks, torque arm, pan hard, sway bar. The sway bar end links weren't exactly vertical so I took advantage of the slots in the bushing brackets and slid the sway bar back as far as possible on the mounts.
I hope I ended up with enough clearance to avoid this bolt from hitting the floor.
My bump stops came very close to hitting the brake line supports I welded on so I ended up trimming the rubber on them some with a hacksaw.


Next, it was bolted back in the car. The order that worked the best for me was:
LCA's, shocks, torque arm, pan hard, sway bar. The sway bar end links weren't exactly vertical so I took advantage of the slots in the bushing brackets and slid the sway bar back as far as possible on the mounts.


I hope I ended up with enough clearance to avoid this bolt from hitting the floor.


My bump stops came very close to hitting the brake line supports I welded on so I ended up trimming the rubber on them some with a hacksaw.

Last edited by vortec350s10; 03-27-2014 at 04:07 PM.
03-22-2014, 07:08 PM
#21
Member
Thread Starter
Join Date: Dec 2007
Location: Minnesota
Posts: 475
Likes: 0
Received 2 Likes
on
2 Posts
Car: '88 Iroc
Engine: Single turbo Vortec 5.7, Megasquirt
Transmission: Probuilt 700r4 3000 stall Vigilante
Axle/Gears: Moser 9" 3.25 w/True Trac
Re: Follow along as I build and install a Moser Ford 9"
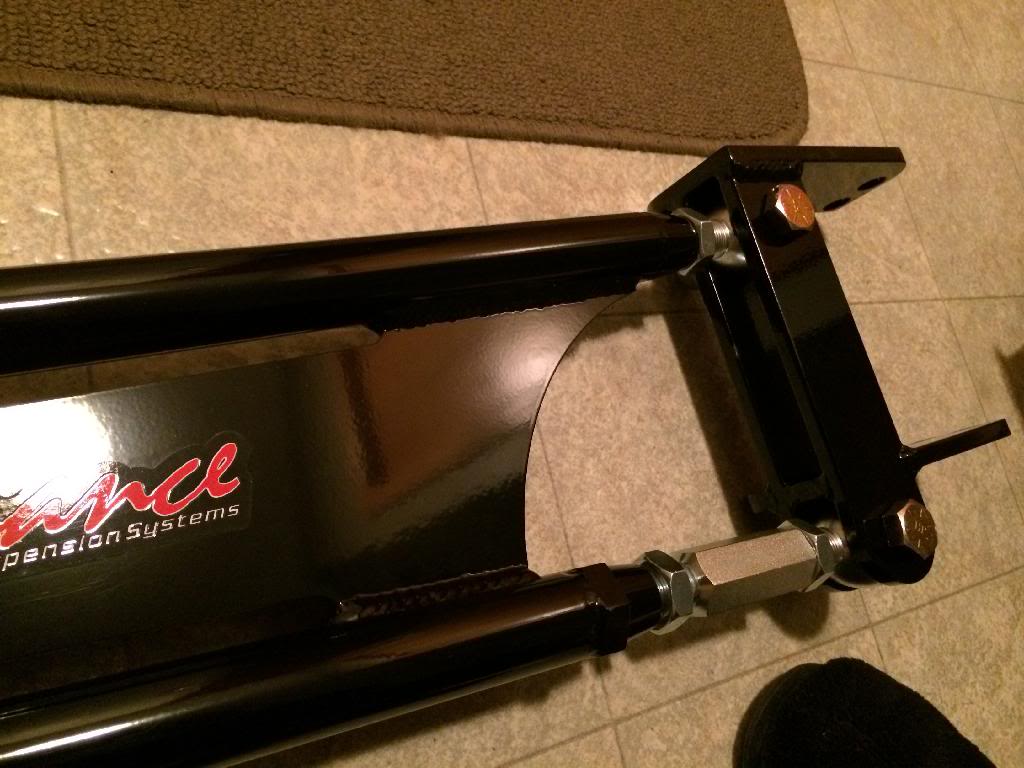
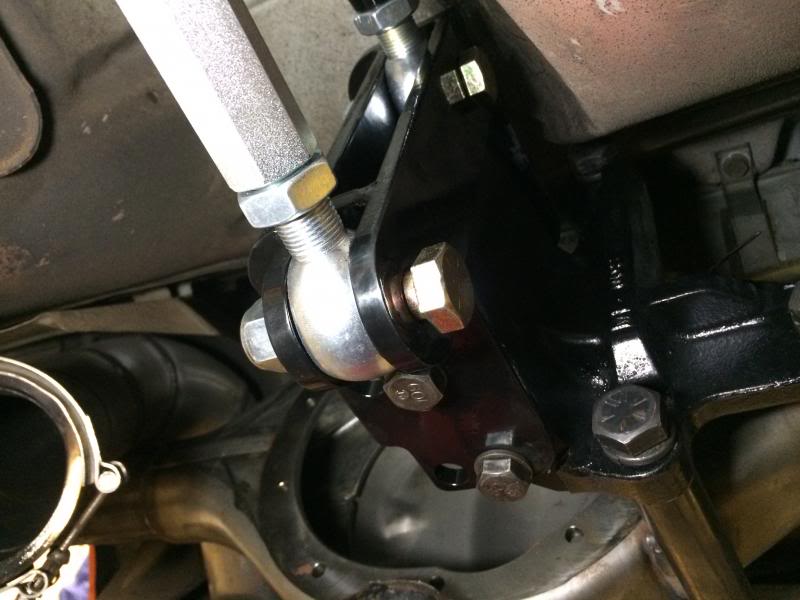
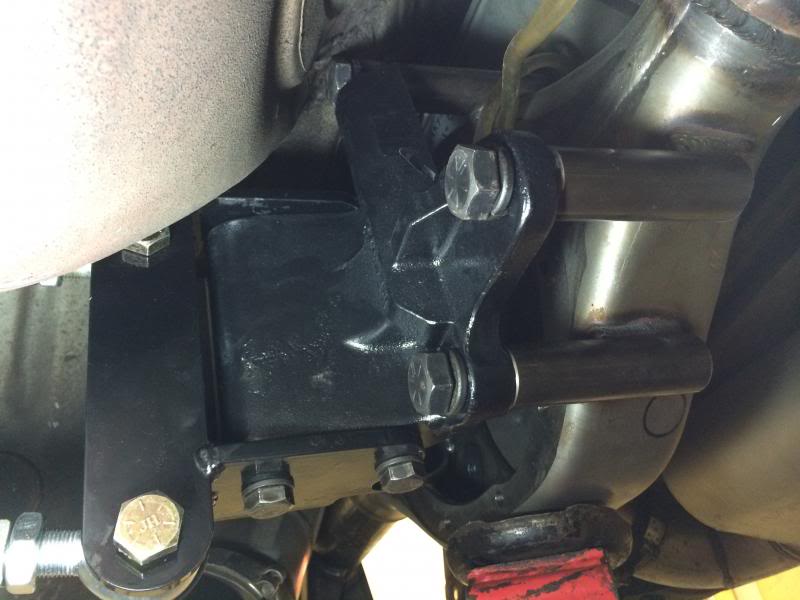
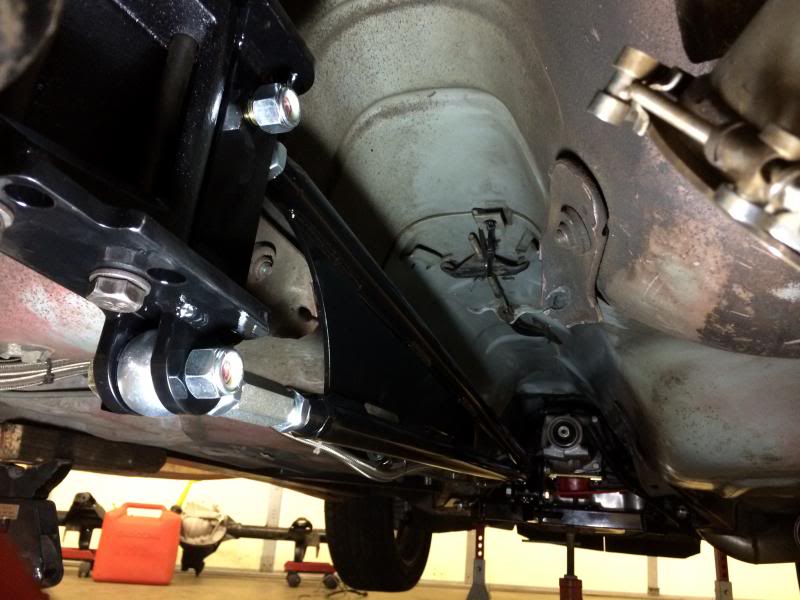
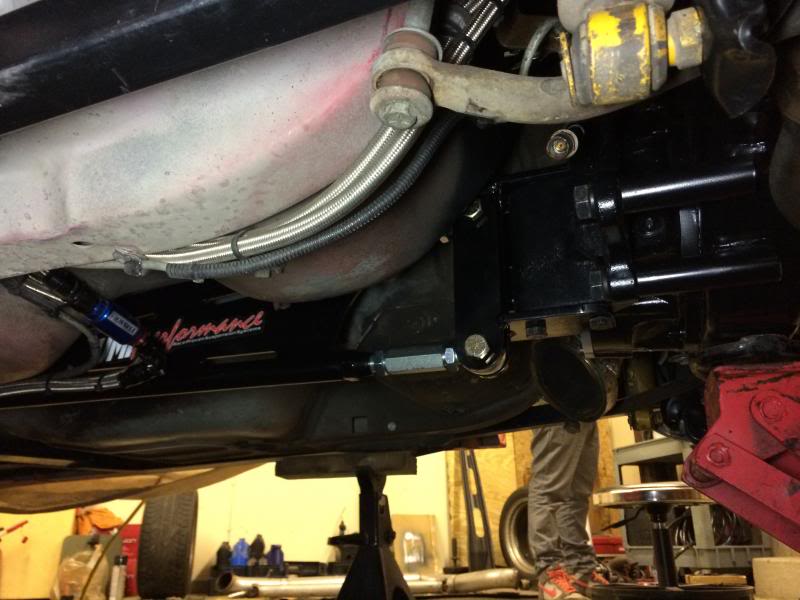
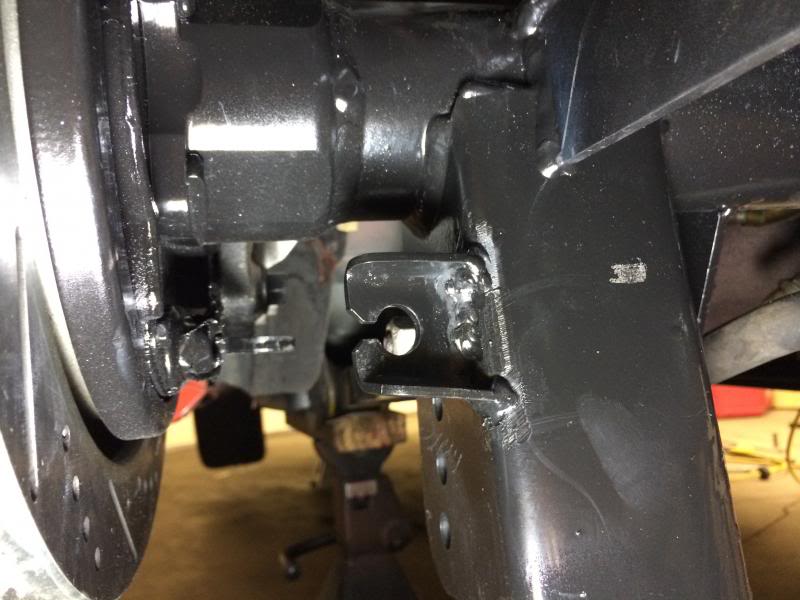
I also had to trim the corner of the UMI torque arm some to get the holes to line up for the two long torque arm bolts. You can kind of see it in the picture. I ended up flipping around the two long torque arm bolts so they re facing down. There wasn't a good way for to get much leverage on the nuts when they were up on top, and this way I can easily re torque them from the bottom if necessary.
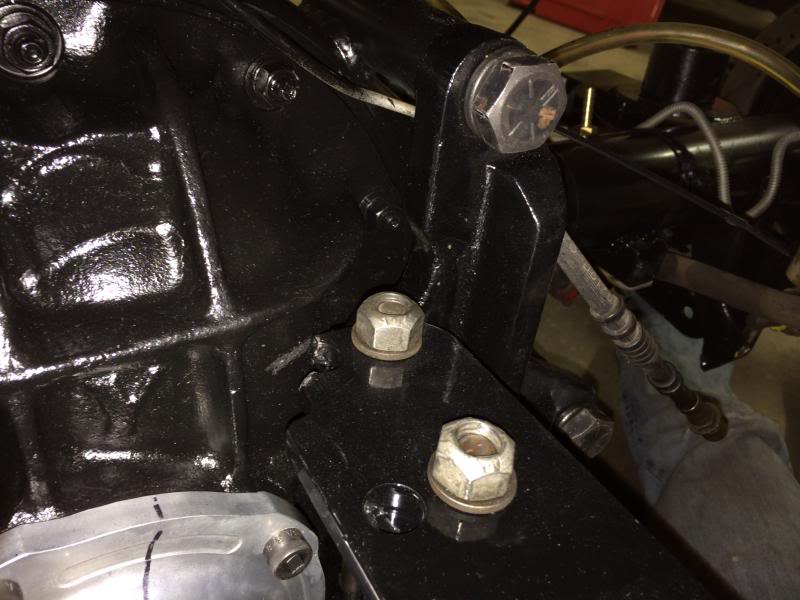
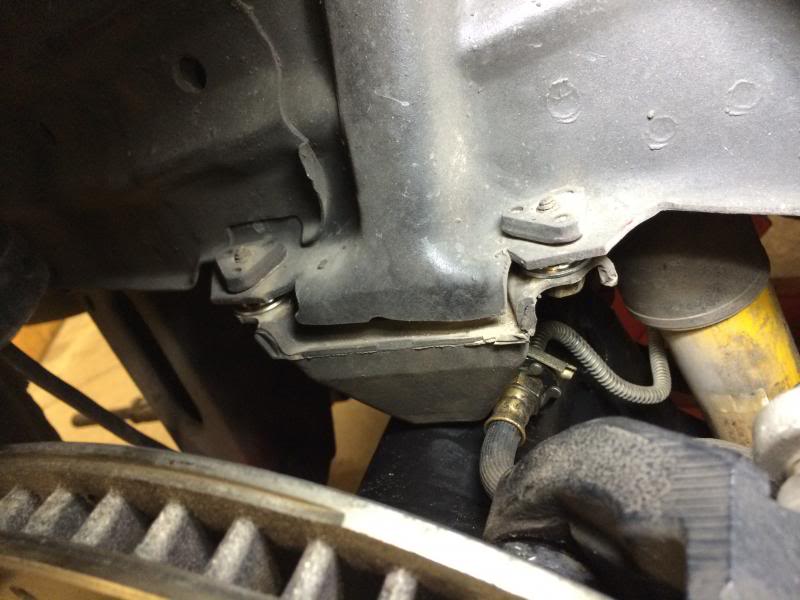
Before tightening up the torque arm pivot bracket bolts, the pivot arms were hitting the tail housing.
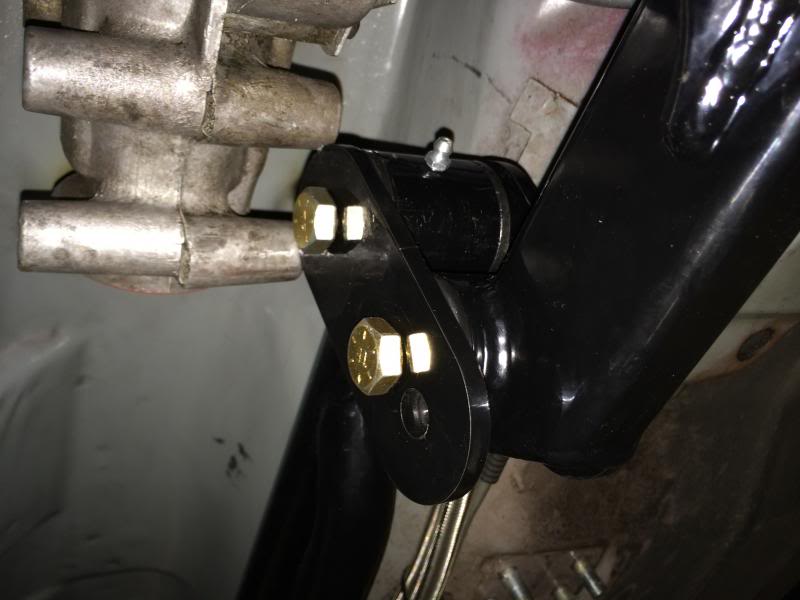
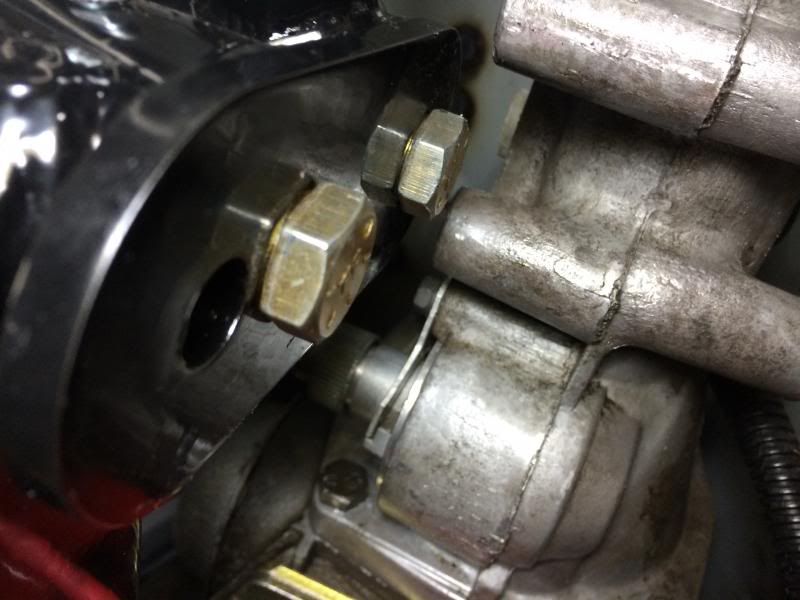
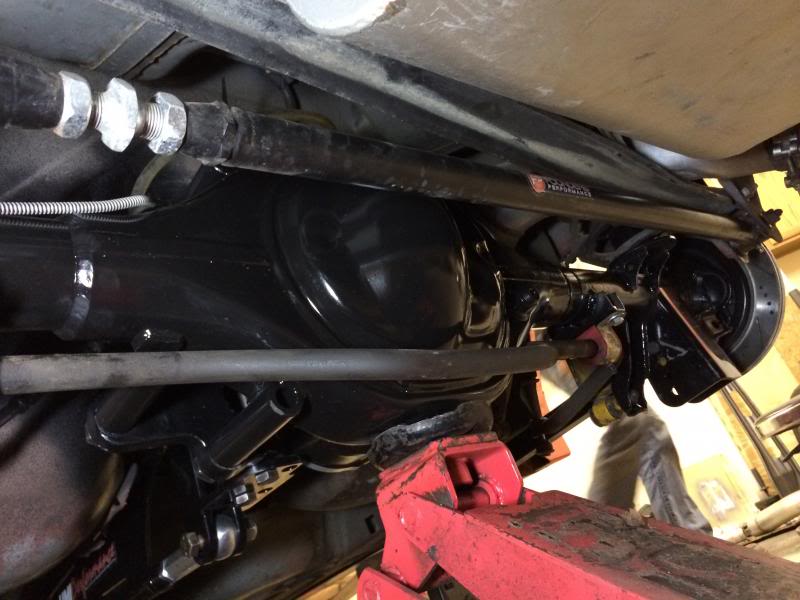
After I tighten them up they squared up and have about a 1/4" of side clearance. I Left everything loose (trans crossmember, trans mount, torque arm) and shoved a pry bar between the torque arm and transmission to maximize this side to side clearance. It isn't as much as I would like, especially since there is now sideways force trying to push the torque arm into the tail housing. If any bolts come loose, it's going to start hitting the tail housing if allowed to shift back over where it wants to be.
With everything tightened up I held my breath in hopes my Jegs drive shaft loop would still fit. It looks like it's going to work great. In this photo the rear end is drooping down as far as it goes and there is still torque arm clearance.
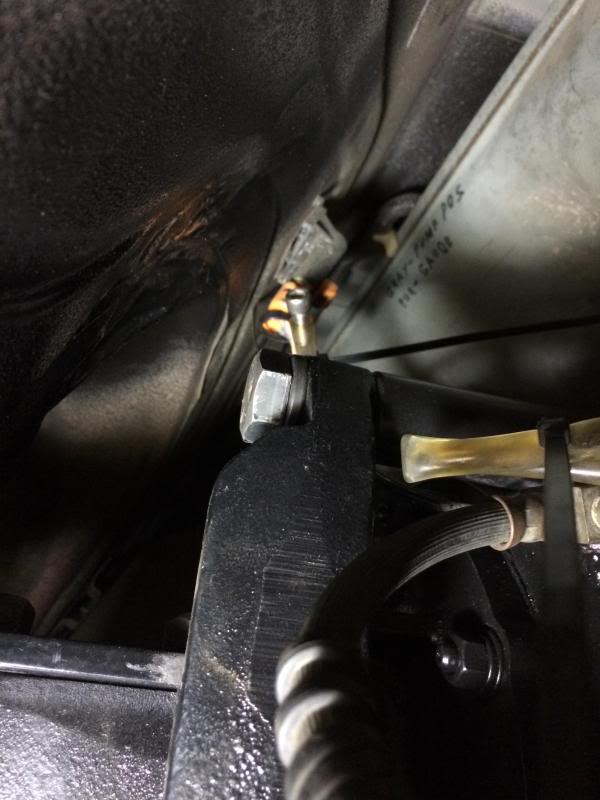
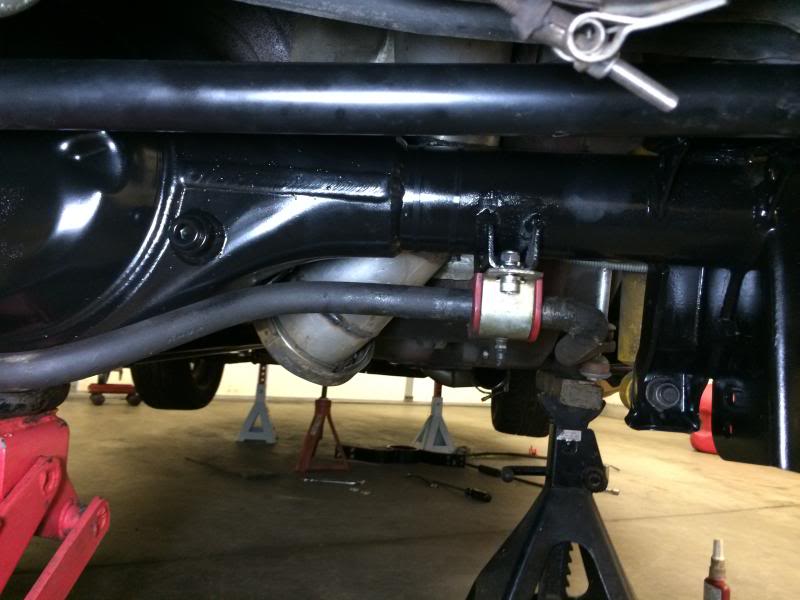
I used a piece of 3/8 rubber fuel line for the vent and attached an inline fuel filter on the end to keep any crap from going into the housing through the vent.
Next I loaded the suspension and measured for a drive shaft. I was on the fence with upgrading from my stock aluminum shaft. With my current set up, it may live, but I thought I might as well just go with a stronger shaft now and be done with it. I ended up ordering one from Spohn for $390 shipped. It's their extreme duty drive shaft which is made of 3" .083" DOM 1430 chrome moly tubing with Spicer 1350 U joints. Spohn claims it is good to about 800hp.
It ended up measuring about 1.5" longer than my stock shaft. I don't remember which yoke I bought for the 9" but there are two different length yokes, a long and a short. So it turns out it my stock shaft would be on the short side anyways if I wanted to try to use it.


Before tightening up the torque arm pivot bracket bolts, the pivot arms were hitting the tail housing.


After I tighten them up they squared up and have about a 1/4" of side clearance. I Left everything loose (trans crossmember, trans mount, torque arm) and shoved a pry bar between the torque arm and transmission to maximize this side to side clearance. It isn't as much as I would like, especially since there is now sideways force trying to push the torque arm into the tail housing. If any bolts come loose, it's going to start hitting the tail housing if allowed to shift back over where it wants to be.
With everything tightened up I held my breath in hopes my Jegs drive shaft loop would still fit. It looks like it's going to work great. In this photo the rear end is drooping down as far as it goes and there is still torque arm clearance.

I used a piece of 3/8 rubber fuel line for the vent and attached an inline fuel filter on the end to keep any crap from going into the housing through the vent.

Next I loaded the suspension and measured for a drive shaft. I was on the fence with upgrading from my stock aluminum shaft. With my current set up, it may live, but I thought I might as well just go with a stronger shaft now and be done with it. I ended up ordering one from Spohn for $390 shipped. It's their extreme duty drive shaft which is made of 3" .083" DOM 1430 chrome moly tubing with Spicer 1350 U joints. Spohn claims it is good to about 800hp.
It ended up measuring about 1.5" longer than my stock shaft. I don't remember which yoke I bought for the 9" but there are two different length yokes, a long and a short. So it turns out it my stock shaft would be on the short side anyways if I wanted to try to use it.
Last edited by vortec350s10; 03-22-2014 at 07:32 PM.
04-10-2014, 08:20 PM
#22
Member
Thread Starter
Join Date: Dec 2007
Location: Minnesota
Posts: 475
Likes: 0
Received 2 Likes
on
2 Posts
Car: '88 Iroc
Engine: Single turbo Vortec 5.7, Megasquirt
Transmission: Probuilt 700r4 3000 stall Vigilante
Axle/Gears: Moser 9" 3.25 w/True Trac
Re: Follow along as I build and install a Moser Ford 9"
Since I opted for the 2.5" long wheel studs, my closed end lug nuts weren't going to work. A quick chop with a hacksaw and they were good to go. No buying new lugs nut for me.
Now my back wheels are 17 x 10's with 5.75" of backspacing. I ordered the housing .5" narrower than stock, bringing the wheels in 1/4" on either side. I noticed with the suspension drooping all the way, the bump stop area was just grazing the wheel lips. I trimmed a little bit of metal off of the bump stop bracket so they can't touch. With the car on the ground at normal ride height, there is plenty of room in the bump stop area so even when the rear shifts around it will be ok. The tightest stop is the inner fender in front of the wheel towards where the LCA comes out.


I expected the drive shaft to be about 1.5" longer than my stock one, but comparing them side by side it is only about .5" longer. I gave Spohn the measurements they request which is:
Measurement A - Back edge of tail housing (where the seal is) to center of rear end yoke (where the U-joint cups go)
Measurement B - Back edge of tail housing to end of transmission output shaft.
In my case, I measured 45.0 for A, and 5/8 for B.
Here's the new shaft next to the old.
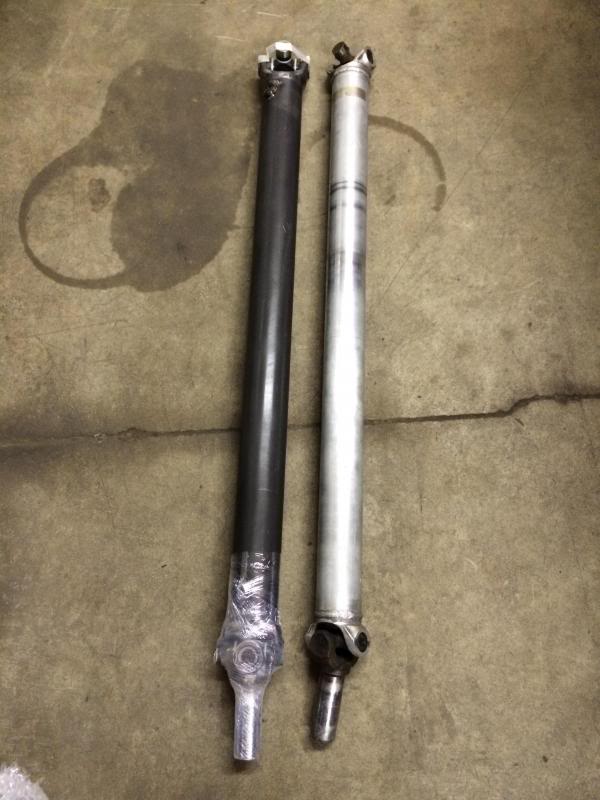
It fit perfect.
To set the pinion angle, I didn't have an angle finder but my iphone worked awesome. I set up the rear end negative 2 degrees from the transmission yoke. So the rear end yoke is facing forward and down 2 degrees down more than the transmission yoke.
I took it for a drive after running it up on stands for a little bit to make sure everything worked.
Works perfect with no gear whine what so ever. Thanks again big gear head for the help with the 3rd member setup! And since I didn't change gears ratios compared to my 10 bolt, the speedo is still correct. You can't tell one bit that it's got a different rear in it.
Time to put the slicks back on and have some fun!

Now my back wheels are 17 x 10's with 5.75" of backspacing. I ordered the housing .5" narrower than stock, bringing the wheels in 1/4" on either side. I noticed with the suspension drooping all the way, the bump stop area was just grazing the wheel lips. I trimmed a little bit of metal off of the bump stop bracket so they can't touch. With the car on the ground at normal ride height, there is plenty of room in the bump stop area so even when the rear shifts around it will be ok. The tightest stop is the inner fender in front of the wheel towards where the LCA comes out.


I expected the drive shaft to be about 1.5" longer than my stock one, but comparing them side by side it is only about .5" longer. I gave Spohn the measurements they request which is:
Measurement A - Back edge of tail housing (where the seal is) to center of rear end yoke (where the U-joint cups go)
Measurement B - Back edge of tail housing to end of transmission output shaft.
In my case, I measured 45.0 for A, and 5/8 for B.
Here's the new shaft next to the old.


It fit perfect.


To set the pinion angle, I didn't have an angle finder but my iphone worked awesome. I set up the rear end negative 2 degrees from the transmission yoke. So the rear end yoke is facing forward and down 2 degrees down more than the transmission yoke.
I took it for a drive after running it up on stands for a little bit to make sure everything worked.
Works perfect with no gear whine what so ever. Thanks again big gear head for the help with the 3rd member setup! And since I didn't change gears ratios compared to my 10 bolt, the speedo is still correct. You can't tell one bit that it's got a different rear in it.
Time to put the slicks back on and have some fun!
04-13-2014, 01:33 AM
#23
Member
Thread Starter
Join Date: Dec 2007
Location: Minnesota
Posts: 475
Likes: 0
Received 2 Likes
on
2 Posts
Car: '88 Iroc
Engine: Single turbo Vortec 5.7, Megasquirt
Transmission: Probuilt 700r4 3000 stall Vigilante
Axle/Gears: Moser 9" 3.25 w/True Trac
Re: Follow along as I build and install a Moser Ford 9"
Just a little update. I drove the car down to a friends house today and ventured away from my neighborhood for the first time this season. I must say there is a lot of road vibrations transmitted through the floor with the new torque arm/cross member setup. Everything feels smooth as far as driveshaft balance and such. I'm actually kind of surprised how much vibration is transmitted into the car now. Every crack in the road the back tires hit, you can feel in the center console and in the floor. It's not too bad, and my car is not that smooth of a car anyways with solid motor mounts and solid mounted exhaust, but it's worth mentioning if you're fussy about stuff like that.
04-13-2014, 07:50 AM
#24
Supreme Member
Re: Follow along as I build and install a Moser Ford 9"
Thanks for the write-up. I've been contemplating an upgrade (or rebuild the D44) and have though about piecing together a rear axle as opposed to buying something complete and shipped to the door.
Do you have a total cost involved?
Do you have a total cost involved?
04-13-2014, 10:35 AM
#25
Member
Thread Starter
Join Date: Dec 2007
Location: Minnesota
Posts: 475
Likes: 0
Received 2 Likes
on
2 Posts
Car: '88 Iroc
Engine: Single turbo Vortec 5.7, Megasquirt
Transmission: Probuilt 700r4 3000 stall Vigilante
Axle/Gears: Moser 9" 3.25 w/True Trac
Re: Follow along as I build and install a Moser Ford 9"
Looking at my earlier post above, I spent $1040 on the 3rd member. The Moser housing with axles package came in around $1100 IIRC, the UMI torque arm setup was $400, and $390 for the driveshaft. So just a few dollars over $3,000. Dang, it adds up! That's $500 more than I paid for my whole car!
05-04-2014, 05:46 PM
#26
Member
Thread Starter
Join Date: Dec 2007
Location: Minnesota
Posts: 475
Likes: 0
Received 2 Likes
on
2 Posts
Car: '88 Iroc
Engine: Single turbo Vortec 5.7, Megasquirt
Transmission: Probuilt 700r4 3000 stall Vigilante
Axle/Gears: Moser 9" 3.25 w/True Trac
Re: Follow along as I build and install a Moser Ford 9"
Well I've got a couple hundred miles on the rear end now. Today it started to whine just slightly, and within 20 miles further, it got louder and louder until it leveled off. It's even slightly louder than my old 10 bolt used to be. It whines when on the throttle, and not only just slight cruising throttle but heavier throttle you can still hear it. Off the gas or engine braking it's quiet. Even at 20mph you can hear it. I don't know what could have moved or changed. The first hundred miles or so, it was dead silent. Anyone heard of noise developing that wasn't there initially? Big Gear Head? Or anybody? Thanks.
05-04-2014, 08:25 PM
#27
Supreme Member
Join Date: Sep 2008
Posts: 3,777
Likes: 0
Received 0 Likes
on
0 Posts
Re: Follow along as I build and install a Moser Ford 9"
Check the pinion nut to see if it's still tight. I didn't see how tight you torqued it. I usually go to 200 foot pounds. If the nut is tight then I would try removing the pinion housing and see if the pinion bearings feel smooth. Sometimes the pinion housing will come out without loosing the backlash.
05-04-2014, 08:31 PM
#28
Member
Thread Starter
Join Date: Dec 2007
Location: Minnesota
Posts: 475
Likes: 0
Received 2 Likes
on
2 Posts
Car: '88 Iroc
Engine: Single turbo Vortec 5.7, Megasquirt
Transmission: Probuilt 700r4 3000 stall Vigilante
Axle/Gears: Moser 9" 3.25 w/True Trac
Re: Follow along as I build and install a Moser Ford 9"
Thanks! Just the guy I hoped would chime in. I'll check it out.
05-04-2014, 09:01 PM
#29
Member
Thread Starter
Join Date: Dec 2007
Location: Minnesota
Posts: 475
Likes: 0
Received 2 Likes
on
2 Posts
Car: '88 Iroc
Engine: Single turbo Vortec 5.7, Megasquirt
Transmission: Probuilt 700r4 3000 stall Vigilante
Axle/Gears: Moser 9" 3.25 w/True Trac
Re: Follow along as I build and install a Moser Ford 9"
Well I'm laying under the car right now as I write this. (Gotta love technology!) I managed to turn the nut with my impact about this much.
Do you think that would be enough to affect the mesh? Should I throw the driveshaft back in and drive it or should I still pull the pinion support out as long as I'm here?

Do you think that would be enough to affect the mesh? Should I throw the driveshaft back in and drive it or should I still pull the pinion support out as long as I'm here?
05-04-2014, 09:05 PM
#30
Member
Thread Starter
Join Date: Dec 2007
Location: Minnesota
Posts: 475
Likes: 0
Received 2 Likes
on
2 Posts
Car: '88 Iroc
Engine: Single turbo Vortec 5.7, Megasquirt
Transmission: Probuilt 700r4 3000 stall Vigilante
Axle/Gears: Moser 9" 3.25 w/True Trac
Re: Follow along as I build and install a Moser Ford 9"
By the way my impact is not the toughest in the world so if it moved the nut a 1/8 of a turn there was no way I had it torqued to 200 ft lbs.
Last edited by vortec350s10; 05-04-2014 at 09:17 PM.
05-05-2014, 06:54 AM
#31
Supreme Member
Join Date: Sep 2008
Posts: 3,777
Likes: 0
Received 0 Likes
on
0 Posts
Re: Follow along as I build and install a Moser Ford 9"
The noise may have been the pinion bearings and not the gears. Give it a try and see how it does. If the noise is still there I wold remove the pinion housing and check the bearings.
05-06-2014, 07:50 PM
#32
Member
Thread Starter
Join Date: Dec 2007
Location: Minnesota
Posts: 475
Likes: 0
Received 2 Likes
on
2 Posts
Car: '88 Iroc
Engine: Single turbo Vortec 5.7, Megasquirt
Transmission: Probuilt 700r4 3000 stall Vigilante
Axle/Gears: Moser 9" 3.25 w/True Trac
Re: Follow along as I build and install a Moser Ford 9"
Well I tightened the nut up to probably 150ft lbs, and took it for a drive. No change. To me it sounds just like typical gear howl. It still seems like it's getting louder. It's bad enough now that I have to do something about it it I'll go crazy.
Here's a clip.
http://youtu.be/d2vFSO6UuCE
Here's a clip.
http://youtu.be/d2vFSO6UuCE
05-09-2014, 09:05 PM
#33
Member
Thread Starter
Join Date: Dec 2007
Location: Minnesota
Posts: 475
Likes: 0
Received 2 Likes
on
2 Posts
Car: '88 Iroc
Engine: Single turbo Vortec 5.7, Megasquirt
Transmission: Probuilt 700r4 3000 stall Vigilante
Axle/Gears: Moser 9" 3.25 w/True Trac
Re: Follow along as I build and install a Moser Ford 9"
Well guys, I decided to try to pull out the pinion gear setup like Big Gear Head suggested. Upon draining the oil I noticed lots of metal shaving in the oil. No real chunks, just fine particles that made the oil glittery. After I noticed that, I decided the whole thing better come out to see how bad the damage is and figure out what happened. It went faster than I expected and went from a driving car to having it on the bench in under 4 hrs.
Here's what I found so far:
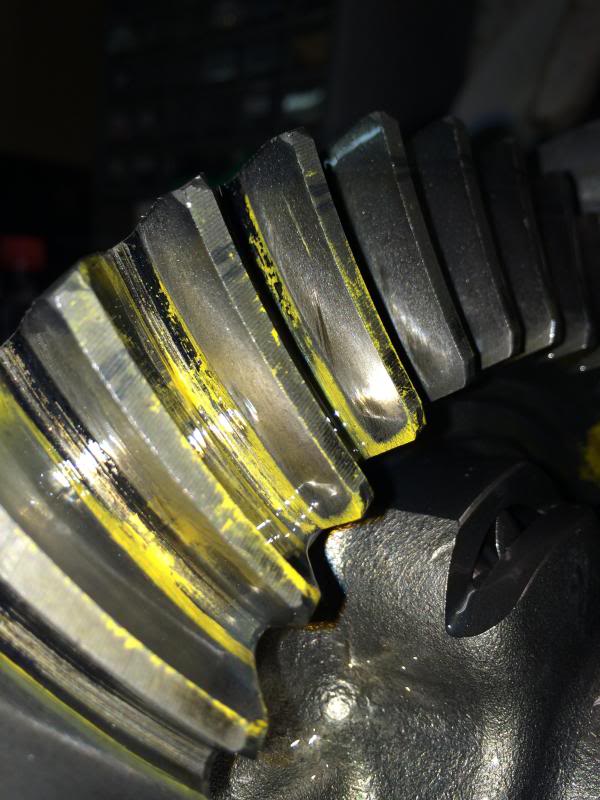
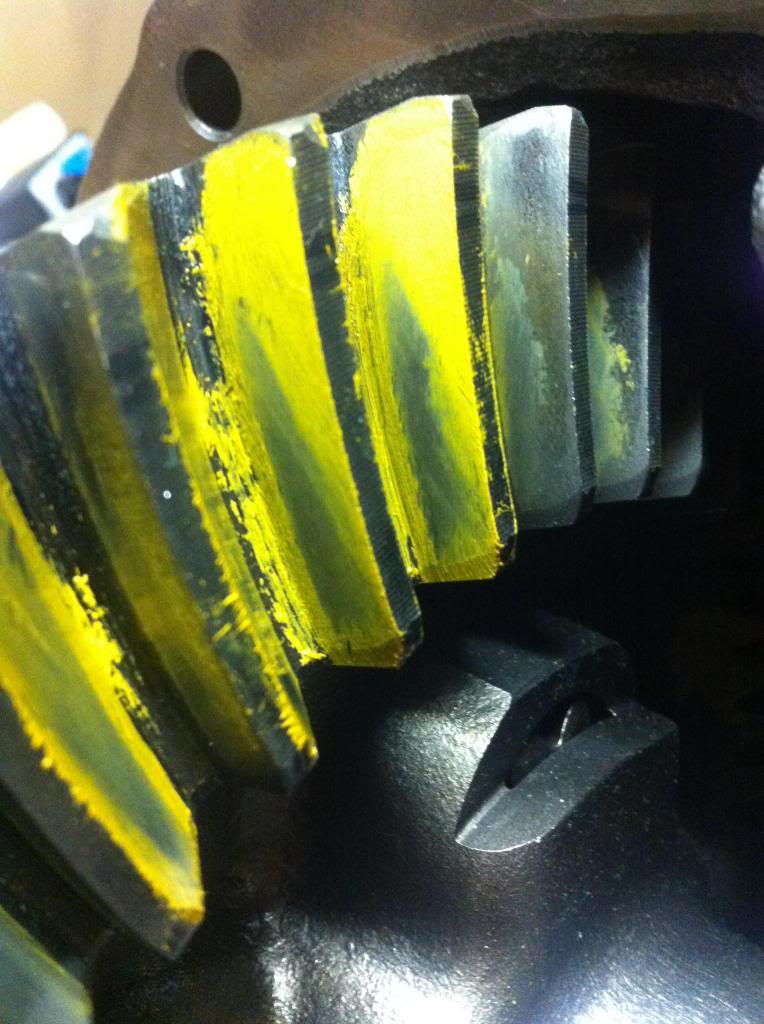
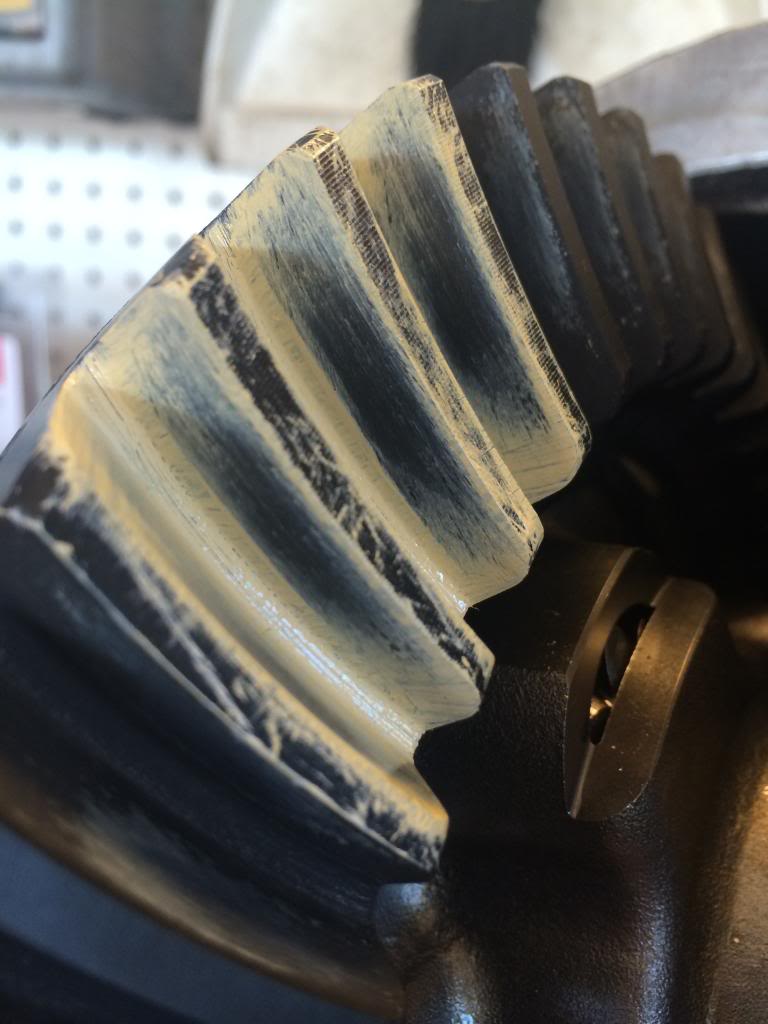
It appears the metal could be from the ring and pinion themselves. I can see the pattern on the drive side pretty well and somehow it shifted and is way to the outside. My guess is the backlash would have to increase or the entire carrier somehow shifted the one direction. It is actually making burrs on the side of the ring gear where the teeth are pushing into the drive side. The pattern on the coast side looks ok. Here is the pattern today vs when I installed it in the car. In the first picture I am pointing at the burrs. I'm done wrenching for the night, I'll measure backlash next and maybe add some compound to really see the pattern.
What do you guys think happened?
NOW:
BEFORE:
Here's what I found so far:
It appears the metal could be from the ring and pinion themselves. I can see the pattern on the drive side pretty well and somehow it shifted and is way to the outside. My guess is the backlash would have to increase or the entire carrier somehow shifted the one direction. It is actually making burrs on the side of the ring gear where the teeth are pushing into the drive side. The pattern on the coast side looks ok. Here is the pattern today vs when I installed it in the car. In the first picture I am pointing at the burrs. I'm done wrenching for the night, I'll measure backlash next and maybe add some compound to really see the pattern.
What do you guys think happened?
NOW:


BEFORE:
 05-09-2014, 09:24 PM
#35
Member
Thread Starter
Join Date: Dec 2007
Location: Minnesota
Posts: 475
Likes: 0
Received 2 Likes
on
2 Posts
Car: '88 Iroc
Engine: Single turbo Vortec 5.7, Megasquirt
Transmission: Probuilt 700r4 3000 stall Vigilante
Axle/Gears: Moser 9" 3.25 w/True Trac
Re: Follow along as I build and install a Moser Ford 9"
So...... Do you think it was always too deep and over time it started to wear the gears funny and develope the noise? I wonder if it's ok to reset the gears and run them again or has the damage been done? They are pretty polished looking now.
Thanks for the help.
Thanks for the help.
05-09-2014, 10:09 PM
#36
Supreme Member
Join Date: Sep 2008
Posts: 3,777
Likes: 0
Received 0 Likes
on
0 Posts
Re: Follow along as I build and install a Moser Ford 9"
Looking at the last picture that you posted the pinion was too deep when you installed it. I don't think you are going to be able to save that gear. It looks too worn to use without noise.
05-14-2014, 09:08 AM
#37
Member
Thread Starter
Join Date: Dec 2007
Location: Minnesota
Posts: 475
Likes: 0
Received 2 Likes
on
2 Posts
Car: '88 Iroc
Engine: Single turbo Vortec 5.7, Megasquirt
Transmission: Probuilt 700r4 3000 stall Vigilante
Axle/Gears: Moser 9" 3.25 w/True Trac
Re: Follow along as I build and install a Moser Ford 9"
Well the advice I got from you guys when I was setting it up was that it was probably as good as it gets pattern wise. I think we were mainly talking about the coast side pattern since this was a used set of gears I was setting up. Oh well, I guess I should have looked at the drive side with more attention instead maybe. The pinion bearings are a little rough so I'll be replacing those as well as the ring and pinion. The carrier bearings feel good still. I don't think they saw much of the metal shavings circulating around in the oil like the pinion bearings did. When I set up the new gears I'm going to make sure I have both patterns as perfect as I can get them and break them in slowly without boost. I want this rear end to be the last one I have to mess with in this car.
05-14-2014, 09:28 AM
#38
Supreme Member
Join Date: Sep 2008
Posts: 3,777
Likes: 0
Received 0 Likes
on
0 Posts
Re: Follow along as I build and install a Moser Ford 9"
Didn't remember that this was a used gear. It's been a while since you did that. In this case the picture that you posted of the drive side doesn't really make much difference because a used gear usually shows a deep pattern on the drive side anyway.
I can't say what went wrong except that used gears are always a greater risk than new gears. With a new gear you can set the pinion depth more accurately because you can read both sides of the tooth.
I can't say what went wrong except that used gears are always a greater risk than new gears. With a new gear you can set the pinion depth more accurately because you can read both sides of the tooth.
05-22-2014, 08:34 PM
#39
Member
Thread Starter
Join Date: Dec 2007
Location: Minnesota
Posts: 475
Likes: 0
Received 2 Likes
on
2 Posts
Car: '88 Iroc
Engine: Single turbo Vortec 5.7, Megasquirt
Transmission: Probuilt 700r4 3000 stall Vigilante
Axle/Gears: Moser 9" 3.25 w/True Trac
Re: Follow along as I build and install a Moser Ford 9"
So I'm setting up my new pinion assembly, I ended up with about 20 in lbs of preload without the seal with the nut torque to about 70ft lbs, when I installed the seal and torqued the nut to 150ft lbs, now I've got about 32 in lbs of resistance. Think this is too much? New seal and bearings with a solid spacer.
05-23-2014, 07:10 AM
#40
Supreme Member
Join Date: Sep 2008
Posts: 3,777
Likes: 0
Received 0 Likes
on
0 Posts
Re: Follow along as I build and install a Moser Ford 9"
That's too much. I torque the nut to 200 foot pounds, but 150 should be fine. Take it apart and add about .001 to the shim. That should get you close to 20 inch pounds of preload. Put some grease on the seal to reduce the drag.
Any time you are settign up the bearing preload with a solid spacer be sure to use the same amount of torque on the nut that you will be using for the final assembly. The problem that you have now is due to you using 70 foot pounds of torque when setting it up instead of 150.
Any time you are settign up the bearing preload with a solid spacer be sure to use the same amount of torque on the nut that you will be using for the final assembly. The problem that you have now is due to you using 70 foot pounds of torque when setting it up instead of 150.
05-23-2014, 08:03 AM
#41
Member
Thread Starter
Join Date: Dec 2007
Location: Minnesota
Posts: 475
Likes: 0
Received 2 Likes
on
2 Posts
Car: '88 Iroc
Engine: Single turbo Vortec 5.7, Megasquirt
Transmission: Probuilt 700r4 3000 stall Vigilante
Axle/Gears: Moser 9" 3.25 w/True Trac
Re: Follow along as I build and install a Moser Ford 9"
Alright, that's kinda what I figured. I'll try to add a little more shim. I didn't think a little more torque on the nut would change it that much but I guess it can!
Thanks.
Thanks.
05-23-2014, 12:03 PM
#42
Member
Thread Starter
Join Date: Dec 2007
Location: Minnesota
Posts: 475
Likes: 0
Received 2 Likes
on
2 Posts
Car: '88 Iroc
Engine: Single turbo Vortec 5.7, Megasquirt
Transmission: Probuilt 700r4 3000 stall Vigilante
Axle/Gears: Moser 9" 3.25 w/True Trac
Re: Follow along as I build and install a Moser Ford 9"
Alright I've got the pinion drag corrected.
Here's my pattern. I think it's pretty close if not there. The Motive gears call for .006-.008" of backlash, mine is between .006 and .007 depending on where on the gear you check. I brought the pinion in a little deeper because my first pattern was hitting high on the teeth in both directions. How does this look? I'm thinking of maybe going a hare deeper with the pinion to bring it slightly deeper in the teeth.
DRIVE SIDE
COAST SIDE
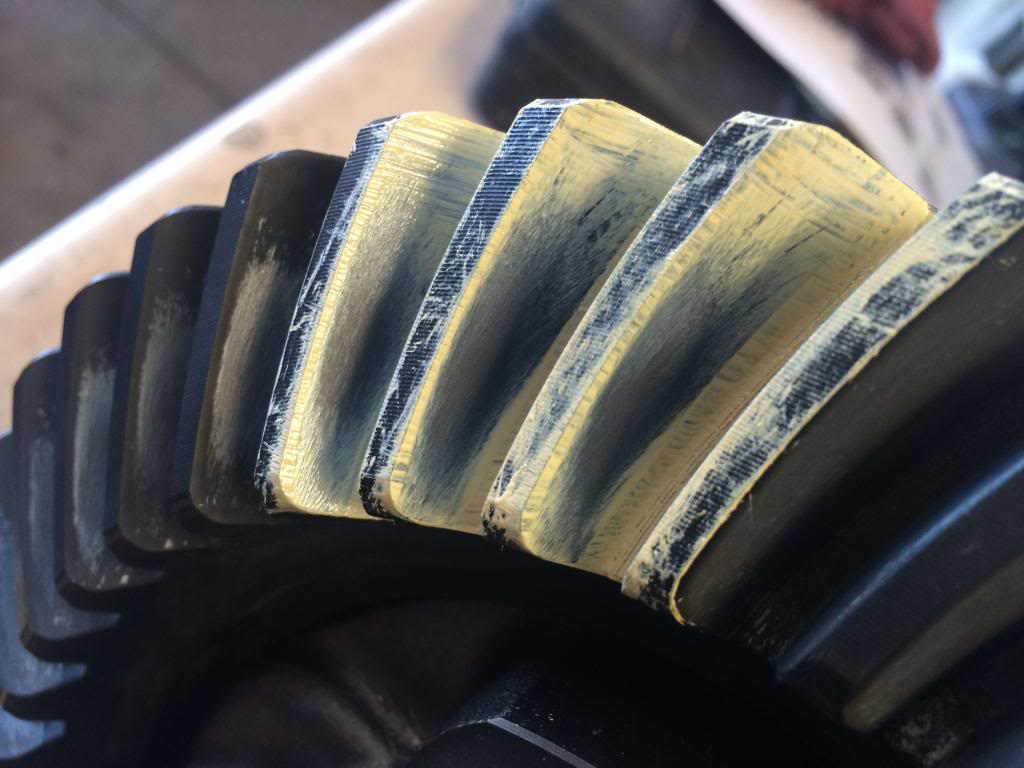
Here's my pattern. I think it's pretty close if not there. The Motive gears call for .006-.008" of backlash, mine is between .006 and .007 depending on where on the gear you check. I brought the pinion in a little deeper because my first pattern was hitting high on the teeth in both directions. How does this look? I'm thinking of maybe going a hare deeper with the pinion to bring it slightly deeper in the teeth.
DRIVE SIDE

COAST SIDE
 05-23-2014, 07:06 PM
#44
Member
Thread Starter
Join Date: Dec 2007
Location: Minnesota
Posts: 475
Likes: 0
Received 2 Likes
on
2 Posts
Car: '88 Iroc
Engine: Single turbo Vortec 5.7, Megasquirt
Transmission: Probuilt 700r4 3000 stall Vigilante
Axle/Gears: Moser 9" 3.25 w/True Trac
Re: Follow along as I build and install a Moser Ford 9"
Well she's back together. Drove it around the block so far. I'm going to break it in easy this time. So far so good! Silent.
06-01-2014, 10:23 PM
#46
Member
Thread Starter
Join Date: Dec 2007
Location: Minnesota
Posts: 475
Likes: 0
Received 2 Likes
on
2 Posts
Car: '88 Iroc
Engine: Single turbo Vortec 5.7, Megasquirt
Transmission: Probuilt 700r4 3000 stall Vigilante
Axle/Gears: Moser 9" 3.25 w/True Trac
Re: Follow along as I build and install a Moser Ford 9"
Just another update, the rear end is still working great. I've put around three or four hundred miles on it already. I changed the oil yesterday and it looked good. No glitter like the last time! I've been driving it pretty easy, and avoided any freeway jaunts and kept each drive to 20 miles or less. I've been monitoring the diff temp with an infrared thermometer and the highest I've seen is about 150. With the last gears that I just replaced, I only checked them once and the rear was at 175, and that was after sitting for 20 mins. I've been progressively getting harder on it, but still avoiding any boost pulls in 1st and 2nd gears. I might be being over cautious but I don't even care, I don't feel like taking this thing apart again anytime soon!
06-30-2014, 09:31 PM
#47
Member
Thread Starter
Join Date: Dec 2007
Location: Minnesota
Posts: 475
Likes: 0
Received 2 Likes
on
2 Posts
Car: '88 Iroc
Engine: Single turbo Vortec 5.7, Megasquirt
Transmission: Probuilt 700r4 3000 stall Vigilante
Axle/Gears: Moser 9" 3.25 w/True Trac
Re: Follow along as I build and install a Moser Ford 9"
Well another update, this one not so good. I have maybe 800 miles or more on the rear with the 2nd set of gears and change the oil at about 300 miles after taking it really easy on it. The oil after 300 miles looked great, no metal. I've been beating on it pretty good but with my street tires that spin all the time for the last 100 miles or so. Today I put on my drag radials for the first time. With the drag radials I did a few launches 0-70 or so, went back to the house, changed my LCA angle and went back out. Did a few more launches and was spinning the tires (aired up at 30psi) and did maybe 4 more runs in maybe 5 minutes time. I suddenly noticed rear end noise again. Got back on the highway cruising, and sure enough, it's howling again. Rear end temp measured 140 when I got home. Pretty much as loud as last time when my gears turned out to be wrecked. Drained the oil, had a little bit of fine glitter in it but not much at all. Pulled the drive shaft, spun the yoke by hand, felt fine. Checked backlash (by feel) in several places on the ring gear, seemed consistent. Tried to tighten the pinion nut. Wouldn't budge. Couldn't wiggle the yoke at all up and down, bearings still seem tight. Put in fresh oil, went around the block, still noisy (of course).
The one thing is that I've always used the same oil. Just the Orielly's brand 80w 90 non synthetic. Could the oil be so bad it's not doing it's job and causing this? That's all I can think of.
The noise this time sounds more like a growl at lower speeds 30-50 and becomes more of the usual howl at 60+.
Did I overheat the gears launching with my stickier tires by doing a few back to back pulls?
Am I that bad with these rears that I can't make them last? What am I doing wrong? So frustrating.
Last edited by vortec350s10; 06-30-2014 at 10:01 PM.
06-30-2014, 11:13 PM
#48
Member
Thread Starter
Join Date: Dec 2007
Location: Minnesota
Posts: 475
Likes: 0
Received 2 Likes
on
2 Posts
Car: '88 Iroc
Engine: Single turbo Vortec 5.7, Megasquirt
Transmission: Probuilt 700r4 3000 stall Vigilante
Axle/Gears: Moser 9" 3.25 w/True Trac
Re: Follow along as I build and install a Moser Ford 9"
Now I have to make a choice.A bunch of us have been planning to go to the track this Wednesday for quite a while and the weather forecast looks perfect. I'm not sure how much more harm I would do to it by continuing to drive on it. I would be driving 2 hrs to the track, making a few passes and hopefully driving back. We are bringing a trailer with us for insurance in case someone needs it to get home. I've got a temp gauge in the rear end so I can monitor if it's getting hot from a bearing or whatever. Since there wasn't much metal in the oil, I wonder what the chances are of severely wrecking something. The ring and pinion are most likely never going to be quiet again, but I really don't have time the next couple weeks to do another rebuild and break in, in time for the other big car event I've been waiting for all summer coming up in a couple weeks.
On the other hand, what if something came loose (although I doubt it) and pulling it out and inspecting might reveal something simple. I donno, just thinking out loud at this point. I wish I could just pull the rear cover and see the gears like a GM rear to better understand what's going on. I might just run it some more and cross my fingers. I'd rather rebuild it later in the season when I can take my time again with break in, whatever that will get me.
On the other hand, what if something came loose (although I doubt it) and pulling it out and inspecting might reveal something simple. I donno, just thinking out loud at this point. I wish I could just pull the rear cover and see the gears like a GM rear to better understand what's going on. I might just run it some more and cross my fingers. I'd rather rebuild it later in the season when I can take my time again with break in, whatever that will get me.
07-01-2014, 07:16 AM
#49
Supreme Member
Join Date: Sep 2008
Posts: 3,777
Likes: 0
Received 0 Likes
on
0 Posts
Re: Follow along as I build and install a Moser Ford 9"
I was going to go back and read through everything to see if you used the same brand of gears both times and if you were using a solid pinion bearing spacer, but it's easier to just ask.
07-01-2014, 12:17 PM
#50
Member
Thread Starter
Join Date: Dec 2007
Location: Minnesota
Posts: 475
Likes: 0
Received 2 Likes
on
2 Posts
Car: '88 Iroc
Engine: Single turbo Vortec 5.7, Megasquirt
Transmission: Probuilt 700r4 3000 stall Vigilante
Axle/Gears: Moser 9" 3.25 w/True Trac
Re: Follow along as I build and install a Moser Ford 9"
The first set of gears were used OEM ford gears. This time new Motives. Solid pinion spacer both times. I replaced the two main pinion bearings with the Motives but left the carrier and nose pinion bearing alone. The two main pinion bearings were cloudy from metal particles on the oil but the carrier bearings looked ok so I left them alone.
The pitch almost sounds more bearing related this time. More of a groan at lower speeds. I couldn't hear much noise on decel, it's just when on the throttle.
The pitch almost sounds more bearing related this time. More of a groan at lower speeds. I couldn't hear much noise on decel, it's just when on the throttle.