How to Install LED’s Into your Dash
By 89 Iroc Z ( 89irocz@team.camaroz28.com )
Terminology:
LED – Light Emitting Diode is a semiconductor device that emits visible light when an electric current passes through it. Most LED’s produce light at a single wavelength. The output from an LED can range from red (at a wavelength of approximately 700 nanometers) to blue-violet (about 400 nanometers).
MCD – A measurement of how bright a LED is. I recommend 3000 or above for a dash.
Resistor – A resistor is an electrical component that limits or regulates the flow of electrical current in an electronic circuit. (has to be used to lower the voltage)
Ohm – The ohm is the standard unit of electrical resistance in the International System of Units
Polarity – Polarity is a term used in electricity, magnetism, and electronic signaling. Suppose there is a constant voltage, also called an electric potential or electromotive force (EMF), between two objects or points. In such a situation, one of the objects or points (poles) has more electrons than the other. The pole with relatively more electrons is said to have negative polarity; the other is assigned positive polarity. If the two poles are connected by a conductive path such as a wire, electrons flow from the negative pole toward the positive pole. This flow of charge carriers constitutes an electric current. In physics, the theoretical direction of current flow is considered to be from positive to negative by convention, opposite to the flow of electrons.
Q and A’s:
Q) Do LED’s burn out?
A) Yes and no, It will take them an extremely long time to burn out but it can happen much faster if there is a voltage spike or you are putting to much power into them. (you should not have any problems with them in your car if you do the resistance calculations right)
Q) How much does high output LED’s cost?
A) Anywhere from 50 cents to 4 dollars each, it depends on what color and MCD you get.
Q) Will this work on a 90-92 Camaro?
A) It seems to work on the 90-92 dashes from what I have heard from others but I have never tried it myself.
Q) Is there any benefit of having white LED’s over "white" stock bulbs?
A) Yes, Stock bulbs produce a yellowish orange color, which does not look good. White LED’s produce pure white light.
Q) Will the stock dash lamp dimmer work with LED’s?
A) No the dimmer will not work; The LED’s will turn off when you turn the knob.
Q) How bright LED’s should I buy?
A) I recommend as a minimum 4000 MCD. If you can not buy LED’s that bright you can put 2 per socket.
Q) Which lead is the positive lead on a LED
A) The positive lead on almost all LED’s is the longer of the 2 leads. Also on most LED’s there is a notch on cathode (negative) side of the LED.
Tools and Skills needed:
– A Few hours
– A Soldering iron and Solder
– A few basic tools like a socket wrench and tourqe heads
– Basic understanding of electronics
Buying the electronics you need:
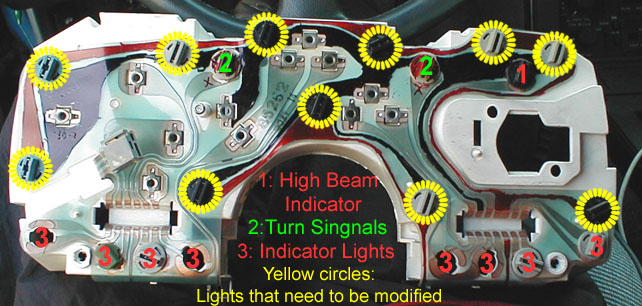
1) You are going to need 11 LED’s for a Camaro (I recommend buying more)
2) You need to pick what color LED’s you want and find a High MCD output LED in that color.
I recommend you buy them from Jameco or Digikey.
I have assembled a list of a few LED’s that would work good:
| Part Number | LED Color | MCD (Brightness) | Typical V@If(mA) | Wavelength (nm) (color) | Price for 1-9 | Price for 10-99 | Tech Docs? | Notes |
| Jameco: | ||||||||
| 197624 | Blue | 10,000@20 mA |
3.5@20 |
470 | $3.19 | $2.89 | no | |
| 183222 | Blue | 3000@20 mA | 5.0@20 | 470 | $3.25 | $2.95 | yes | ## |
| 142893 | White | 3700@20 mA | 3.6@20 | — | $4.49 | $3.95 | yes | |
| 153146 | Yellow | 9300@20 mA | 2.4@20 | 595 | $0.59 | $0.55 | yes | |
| 131895 | Orange | 7000@20 mA | 2.1@20 | 623 | $2.49 | $2.25 | yes | |
| 197683 | Orange-Red | 4650@20 mA | 2.3@20 | 634 | $0.79 | $0.71 | no | |
| 156970 | Red | 2112@20 mA | 1.9@20 | 660 | $0.35 | $0.29 | yes | 45 Deg ** ^ |
When you see something that says "15 deg" or "30 deg" that is the viewing angle. The wider the better because it will spread the light better.
## These are the LED’s I used. They are borderline bright enough. Some areas of the dash are not fully lit. If you choose this LED you may want to put 2 per socket.
** I recommend using 2 LED’s per bulb socket on LED’s below 3000 MCD
^ Wide angle LED, will light dash more evenly
3) Once you selected the LED’s you want you must figure out how much resistance you need in order to run each LED. Use the following equation to find the correct ohm value:
For 1 LED per socket or 2 LED’s wired in parallel:
+V-(V led)
Rs = —————
Iled
Rs = The ohms of resistance needed (the resistance value of the resistor)
+V = Input voltage (About 13.45 volts in my car)
V led = The volts the LED is rated at (mine were 5v)
I LED = The amps the LED uses (mine was .02 or 20mA)
Example:
13.45 – 5
Rs = ————— = 422.5 Ohms
.02
For 2 LED’s per socket wired in series:
+V-(V led)
Rs = —————
Iled + Iled
Example:
13.45 – 5
Rs = ————— = 211.25 Ohms
(.02 +.02)
4) All you need is 1/8 watt resistors. I used 1/4 watt because that’s what I had laying around. If they do not make a resistor in the value you need you can put 2 resistors in series and add the values to get the correct resistance (can be off by up to 15 ohms). For example I made 423 ohms of resistance by wiring a 390 ohm resistor and a 33 ohm resistor in series.
How it’s done:
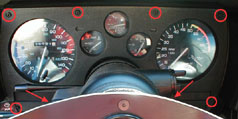
| 1) | Remove the 8 screws holding on the plastic dash cover | |
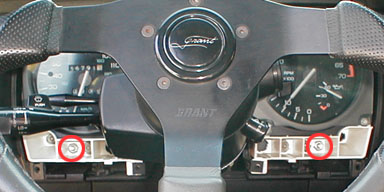
| 2) | Remove the 2 10mm nuts | |
| 3) | Reach your hand behind the dash and squeeze the tab on the speedometer cable to release it. | |
| 4) | For extra brightness I recommend you paint the back of the reflection plate in high gloss white. The reflection plate is that black plate that covers the gauges on the front. The back of this plate is painted a light blue. (sorry I don’t have a picture) | |
| 5) | Remove the gauge cluster (may have to loosen and lower the steering column)
<— This is what is looks like out |
|
| 6) |
|
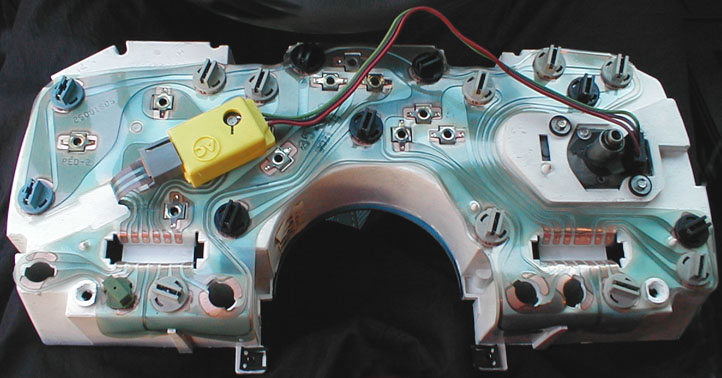
Use 2 different color permanent markers the to label the positive and negative wires on the back of the gauge cluster (LED’s are polarity sensitive) |
| 7) |
|
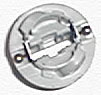
Remove the bulb from the bulb sockets. Start by bending the two contacts from the bulb off the socket with a small flat head screw driver. You can use small needle noise pliers to prey the wires from the bulb off. |
| 8) |
|
Use a small piece of plastic or anything nonconductive to center the LED. |
| 9) | 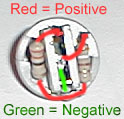   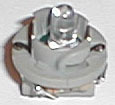 |
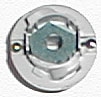
– Stick the LED in the socket – Solder the negative LED to one side (the negative lead is the shorter of the two leads on most LED’s) – If using one resistor attach the positive lead of the LED to the resistor and the other end of the resistor to the other contact on the bulb socket (the contact that the negative is not hooked up to) and solder the joints. – If using 2 resistors do the same as above just wrap the resistors around the socket. <— I had to use 2 resistors |
| 10) | Mark the positive side of the socket with a red permanent marker. | |
| 11) | Put modified bulb sockets back into the gauge cluster. Make sure that the positive side of the bulb socket is matched up with the positive wire on the gauge cluster. | |
| 12) | Put gauge cluster into car and tighten the two bottom 10 mm nuts. | |
| 13) | Test the LED’s by turning on your parking lamps. If some are not working then you probably put the bulb socket in backwards. | |
| 14) | Reassemble dash and enjoy! |


Here is a picture of the completed dash lite up:
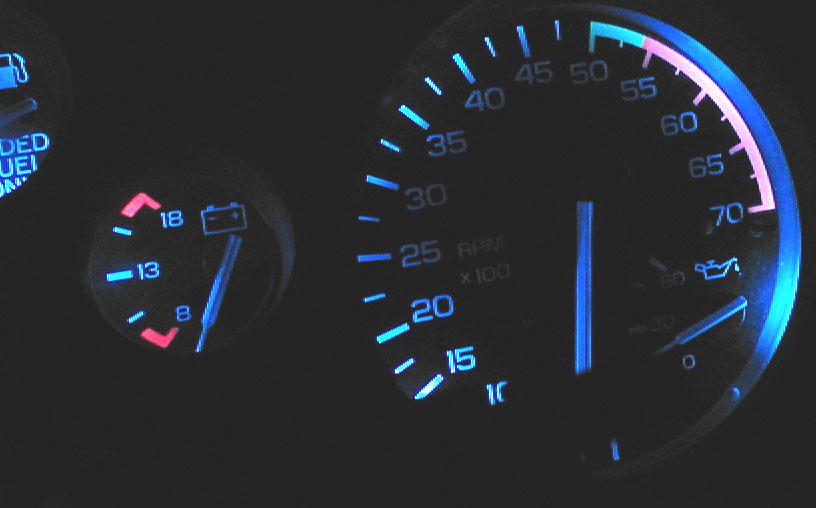
Click on picture for bigger view
NOTE: I only used one 3000MCD LED per socket. If two were used it would be much brighter. I highly recommend using more then 3000 MCD per socket.