Building a wooden body rotisserie (pics)
 06-06-2013, 08:07 PM
#51
Senior Member

Thread Starter
iTrader: (4)
Join Date: Oct 2008
Location: Niles, IL
Posts: 857
Likes: 0
Received 5 Likes
on
4 Posts
Car: '91 LS6/T56/9"
Engine: LS6
Transmission: T56
Axle/Gears: Currie 9"/4.11, detroit truetrac
Re: Building a wooden body rotisserie (pics)
I'm preparing a proper response, but it got deleted. Lots to talk about with that lift.
 06-08-2013, 04:32 PM
#52
Senior Member
Thread Starter
iTrader: (4)
Join Date: Oct 2008
Location: Niles, IL
Posts: 857
Likes: 0
Received 5 Likes
on
4 Posts
Car: '91 LS6/T56/9"
Engine: LS6
Transmission: T56
Axle/Gears: Currie 9"/4.11, detroit truetrac
Re: Building a wooden body rotisserie (pics)
Ok about the lift.........where do I begin??
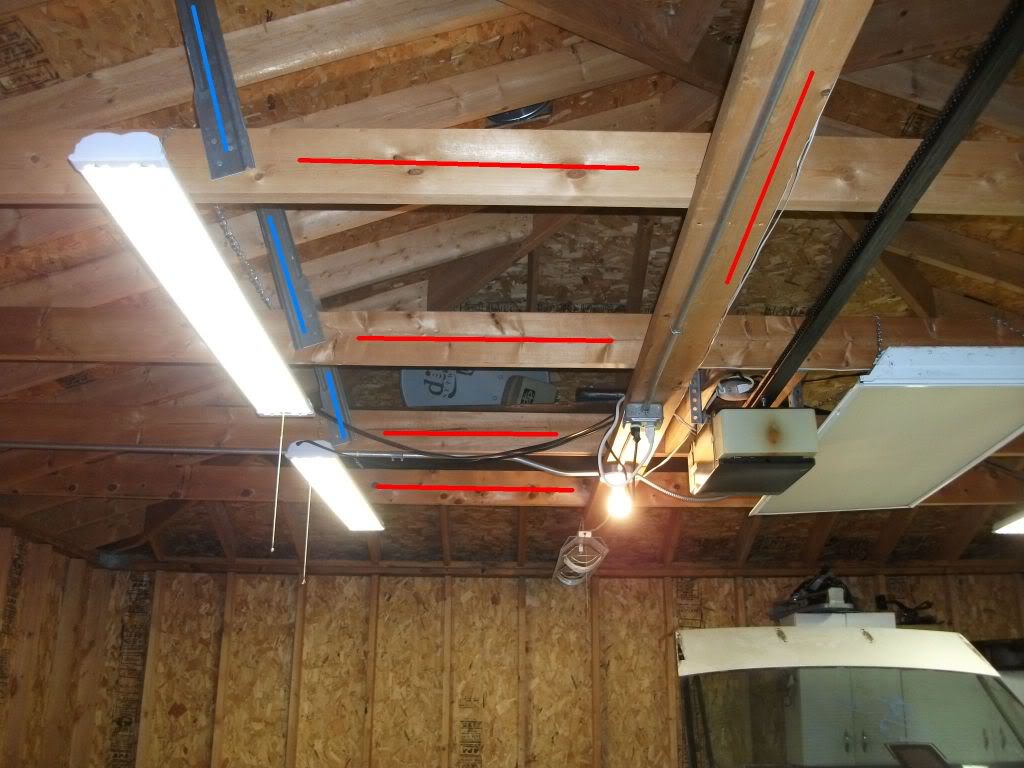
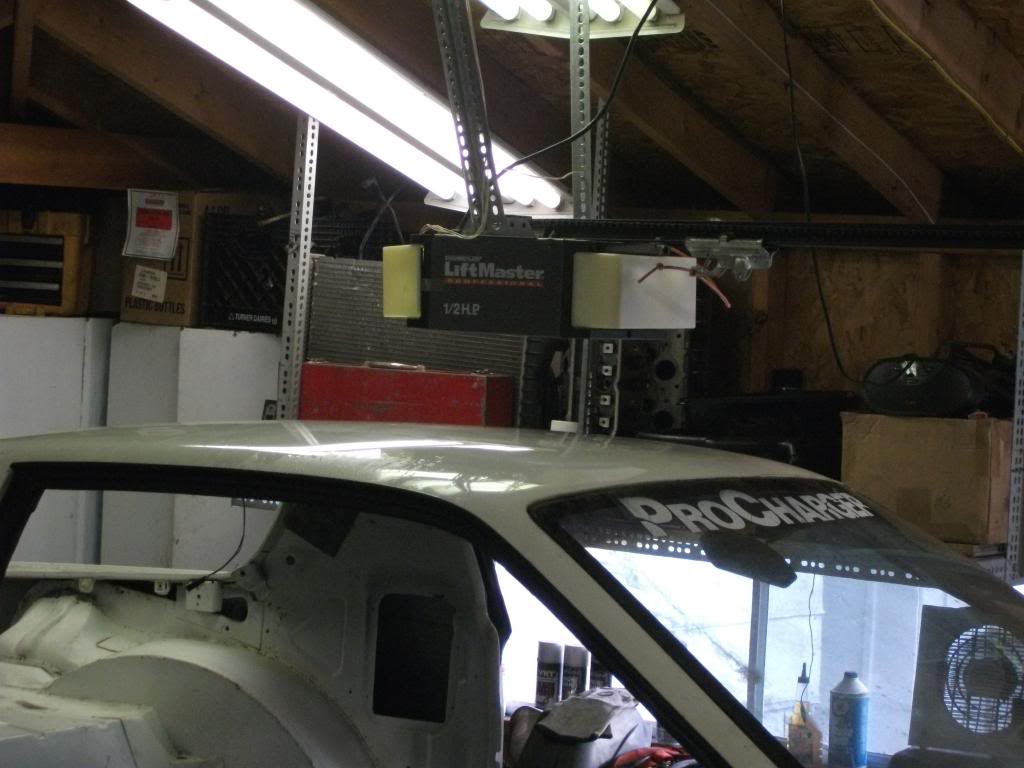
First I had to figure out how to increase left height in my garage before I even bought the lift itself. There were 4 horizontal beams that were limiting overhead space as well as the garage door opener which was right in the middle of the garage.
These are the beams I'm talking about as you walk through the big door and looked up:
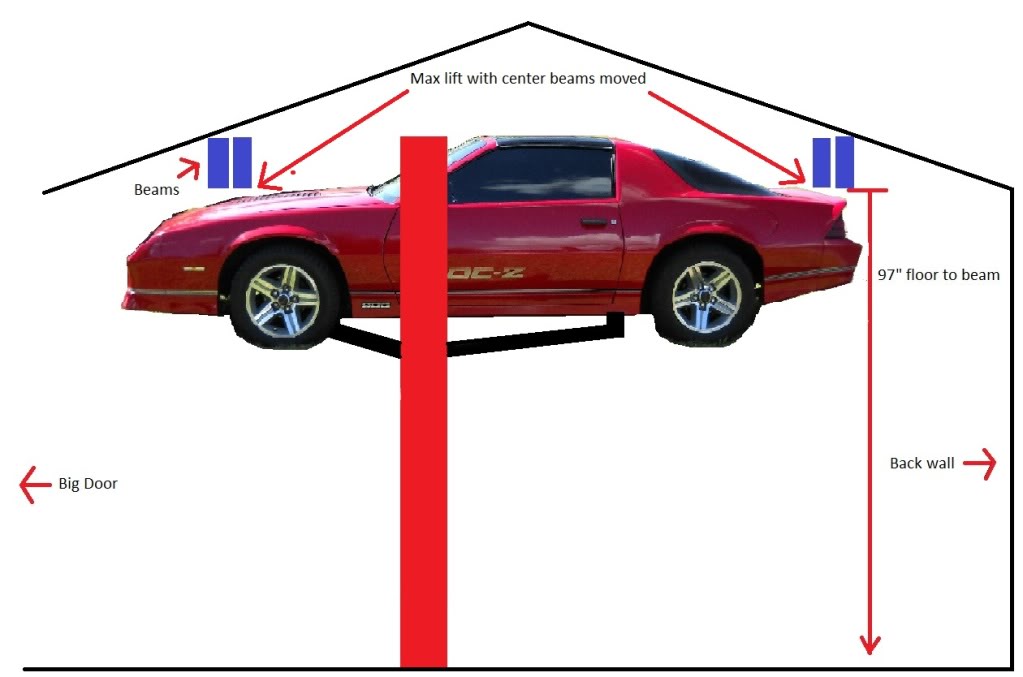
Here was my plan. From this:
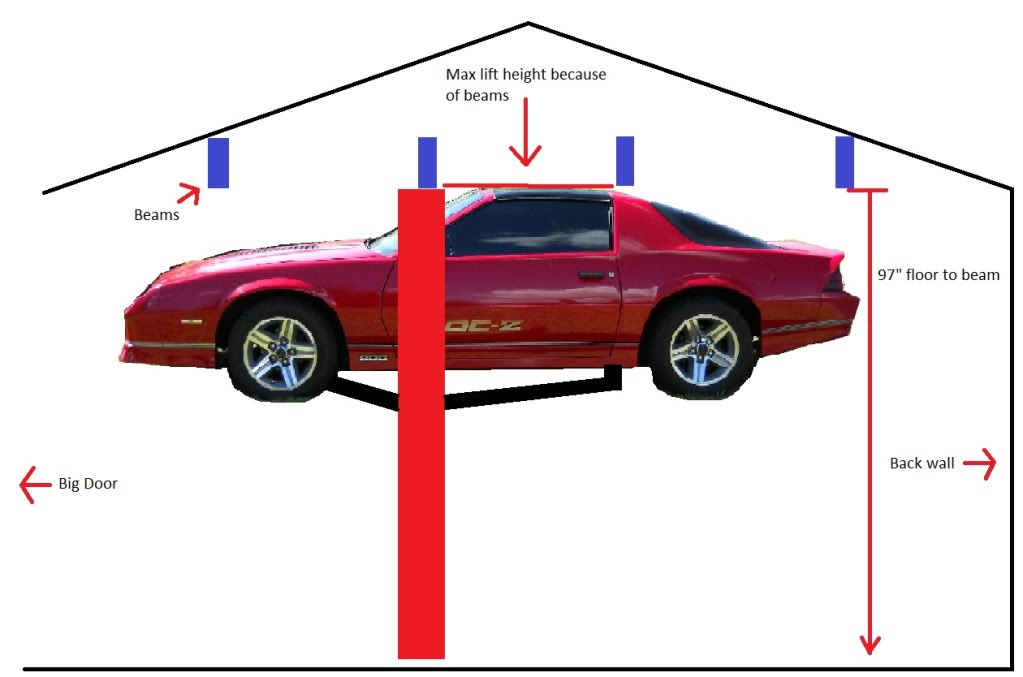
To this:
To solve the door opener, I just moved it over to the furthest opener position on the large door. There's 3 positions a door opener can be installed on my garage door, left, center, and right.
Then I looked for a lift. I initially wanted a 2-post, but when I found the Greg Smith Equipment 4-post I just had to buy it. It's an SS 8,000lb list that comes with large castors so that you can wheel the lift around anywhere you want it. It doesn't need to be bolted down which means I can push it into my driveway and work outside when it's nice out (I have pics of doing exactly that). This is it:
http://www.gregsmithequipment.com/At...rage-Pro-8-000
They have a location in Indianapolis so it was here in 3 days. $2200 shipped.
Then I had to figure out how to get the thing unloaded. It comes as a 18' 1700lb package. So I asked my local Home Depot if they'd unload it for me and they said sure. Here's when it arrived:
(The link is to a photobucket album. Just look around there since this thread is already pic heavy.)
http://s816.photobucket.com/user/rob...?sort=3&page=1
First I had to figure out how to increase left height in my garage before I even bought the lift itself. There were 4 horizontal beams that were limiting overhead space as well as the garage door opener which was right in the middle of the garage.
These are the beams I'm talking about as you walk through the big door and looked up:

Here was my plan. From this:

To this:

To solve the door opener, I just moved it over to the furthest opener position on the large door. There's 3 positions a door opener can be installed on my garage door, left, center, and right.
Then I looked for a lift. I initially wanted a 2-post, but when I found the Greg Smith Equipment 4-post I just had to buy it. It's an SS 8,000lb list that comes with large castors so that you can wheel the lift around anywhere you want it. It doesn't need to be bolted down which means I can push it into my driveway and work outside when it's nice out (I have pics of doing exactly that). This is it:
http://www.gregsmithequipment.com/At...rage-Pro-8-000
They have a location in Indianapolis so it was here in 3 days. $2200 shipped.
Then I had to figure out how to get the thing unloaded. It comes as a 18' 1700lb package. So I asked my local Home Depot if they'd unload it for me and they said sure. Here's when it arrived:
(The link is to a photobucket album. Just look around there since this thread is already pic heavy.)
http://s816.photobucket.com/user/rob...?sort=3&page=1
06-08-2013, 04:55 PM
#53
Supreme Member
Re: Building a wooden body rotisserie (pics)
Great idea and execution... How exactly did you get it ON the rotisserie in the first place?
06-08-2013, 06:31 PM
#54
Senior Member
Re: Building a wooden body rotisserie (pics)
Great plan, love your "Truck" you used to pull your trailer home!
Nicely done illustration too!
Nicely done illustration too!
06-09-2013, 08:14 AM
#55
Re: Building a wooden body rotisserie (pics)
Thanks for the info! I have looked at so many different ones, and this one seems to be the best value... Lucky for me, my garage ceiling is 10 feet high, so I am good to go.
My wife and her partner own a restaurant in a a local strip mall. I am friendly with the man who owns the building, and he has a forklift. So no problem there, either.
Thanks again! Great thread!
My wife and her partner own a restaurant in a a local strip mall. I am friendly with the man who owns the building, and he has a forklift. So no problem there, either.
Thanks again! Great thread!
06-09-2013, 10:40 PM
#56
Senior Member
Thread Starter
iTrader: (4)
Join Date: Oct 2008
Location: Niles, IL
Posts: 857
Likes: 0
Received 5 Likes
on
4 Posts
Car: '91 LS6/T56/9"
Engine: LS6
Transmission: T56
Axle/Gears: Currie 9"/4.11, detroit truetrac
Re: Building a wooden body rotisserie (pics)
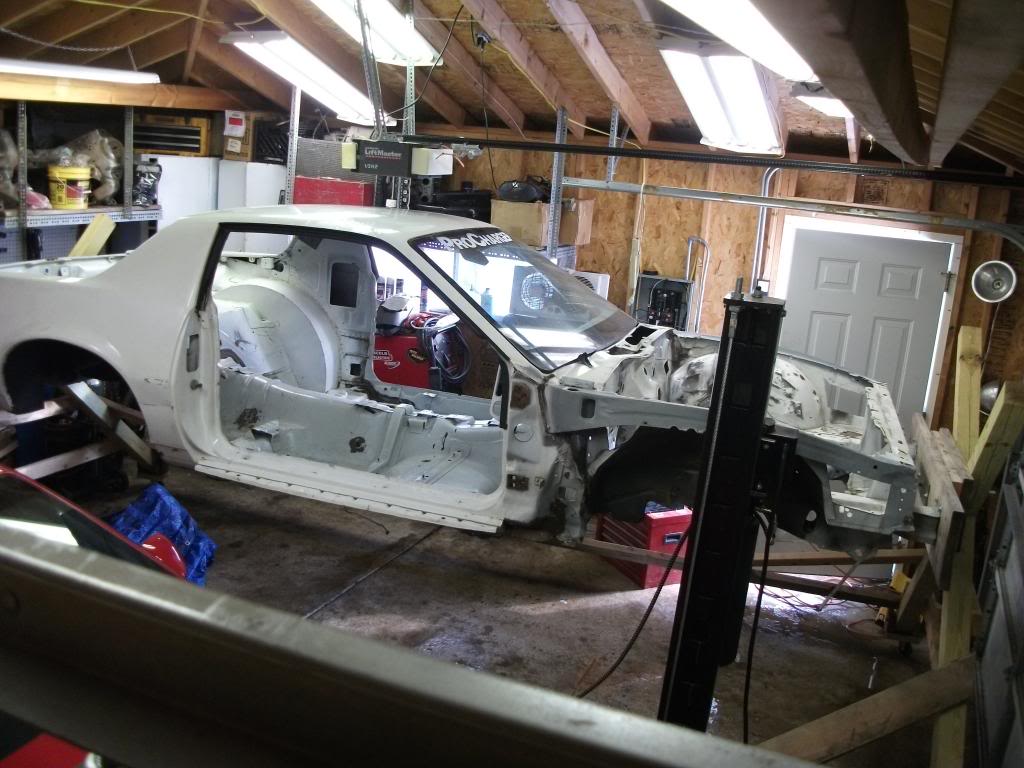
I kept the car on the lift to start. I moved it forward so the front end was hanging off and attached the front X frame. I slowly moved the car forward while the front was supported by the wood X frame of the rotisserie, and the rear was still on the lift. Once the rear of the car got to the front edge of the lift I used my trans jack to support the rear of the car by placing it where the fuel tank usually sits. Then I SLOWLY moved the car forward until the rear was clear of the lift, and attached the rear X frame. From there I added the long 2X6's and cross supports. Doing that solo was intense.
06-09-2013, 10:47 PM
#58
Senior Member
Thread Starter
iTrader: (4)
Join Date: Oct 2008
Location: Niles, IL
Posts: 857
Likes: 0
Received 5 Likes
on
4 Posts
Car: '91 LS6/T56/9"
Engine: LS6
Transmission: T56
Axle/Gears: Currie 9"/4.11, detroit truetrac
Re: Building a wooden body rotisserie (pics)
Thanks for the info! I have looked at so many different ones, and this one seems to be the best value... Lucky for me, my garage ceiling is 10 feet high, so I am good to go.
My wife and her partner own a restaurant in a a local strip mall. I am friendly with the man who owns the building, and he has a forklift. So no problem there, either.
Thanks again! Great thread!
My wife and her partner own a restaurant in a a local strip mall. I am friendly with the man who owns the building, and he has a forklift. So no problem there, either.
Thanks again! Great thread!
I also ran a 100A sub panel and 1" gas line to the garage. Dug a 70'+ trench in the middle of summer, did all the work myself, pulled permits and passed all inspections. Now the garage is heated and has all the power I need.
06-09-2013, 11:02 PM
#59
Senior Member
Thread Starter
iTrader: (4)
Join Date: Oct 2008
Location: Niles, IL
Posts: 857
Likes: 0
Received 5 Likes
on
4 Posts
Car: '91 LS6/T56/9"
Engine: LS6
Transmission: T56
Axle/Gears: Currie 9"/4.11, detroit truetrac
Re: Building a wooden body rotisserie (pics)
Finally got around to actually putting the rotisserie to use.
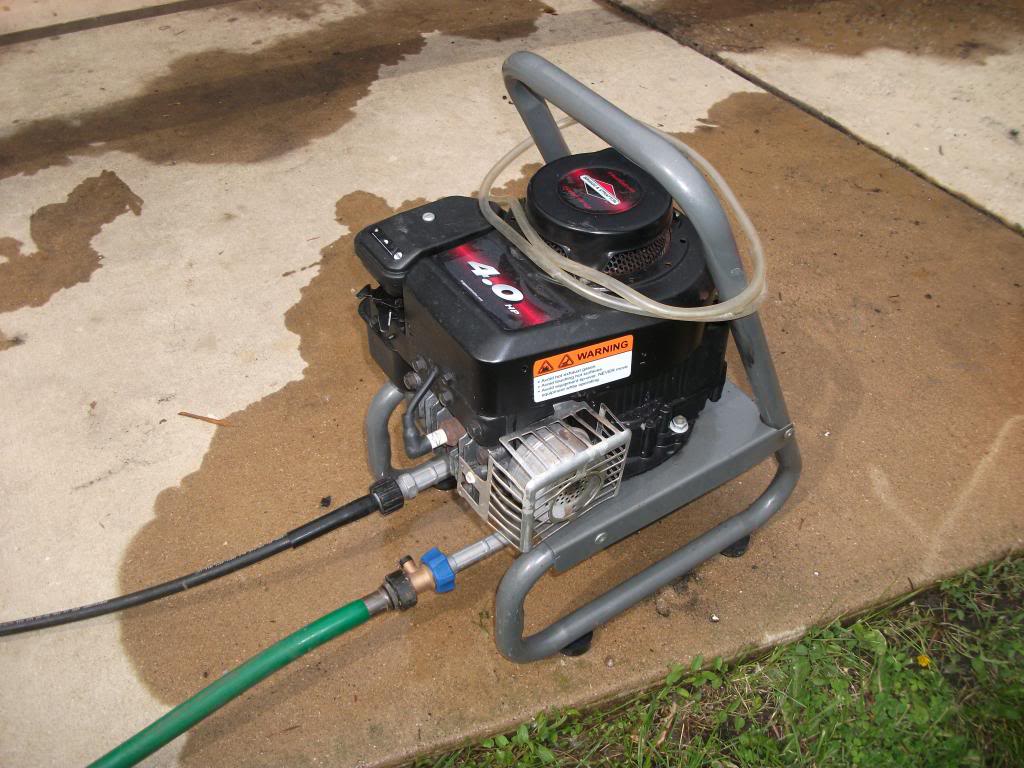
Step one is cleaning. My electric pressure took a crap so I wasn't sure if I wanted to buy another one. Ended up finding a Craftsman 2100psi 4hp Briggs and Stratton for $150. This thing is small but VERY useful. It won't strip your paint off, but it's perfect for home/auto use. Really glad I bought it because it saved me hours of having to wash by hand.
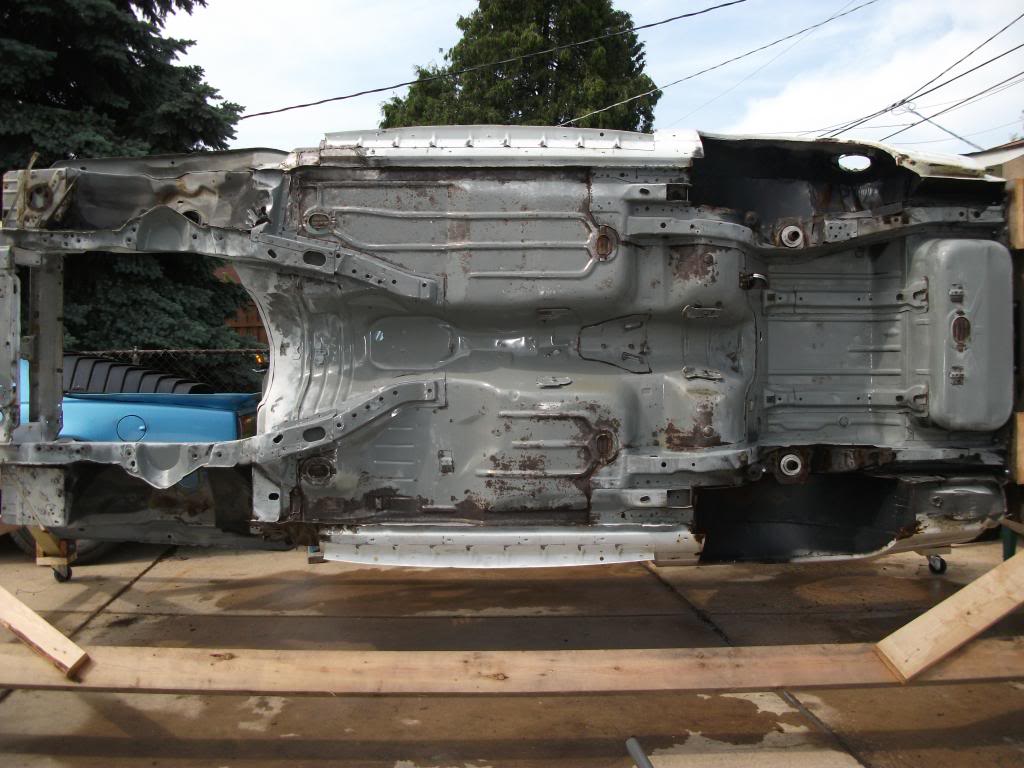
First thing I did was hit everything with engine degreaser for 10 minutes then pressure wash it off. That took care of the thick stuff. Then I used POR15 Marine Clean. WOW, this stuff is awesome. I mixed a 1:1 concentration with water in a spray bottle, and scrubbed it with an abrasive kitchen scrubbie.
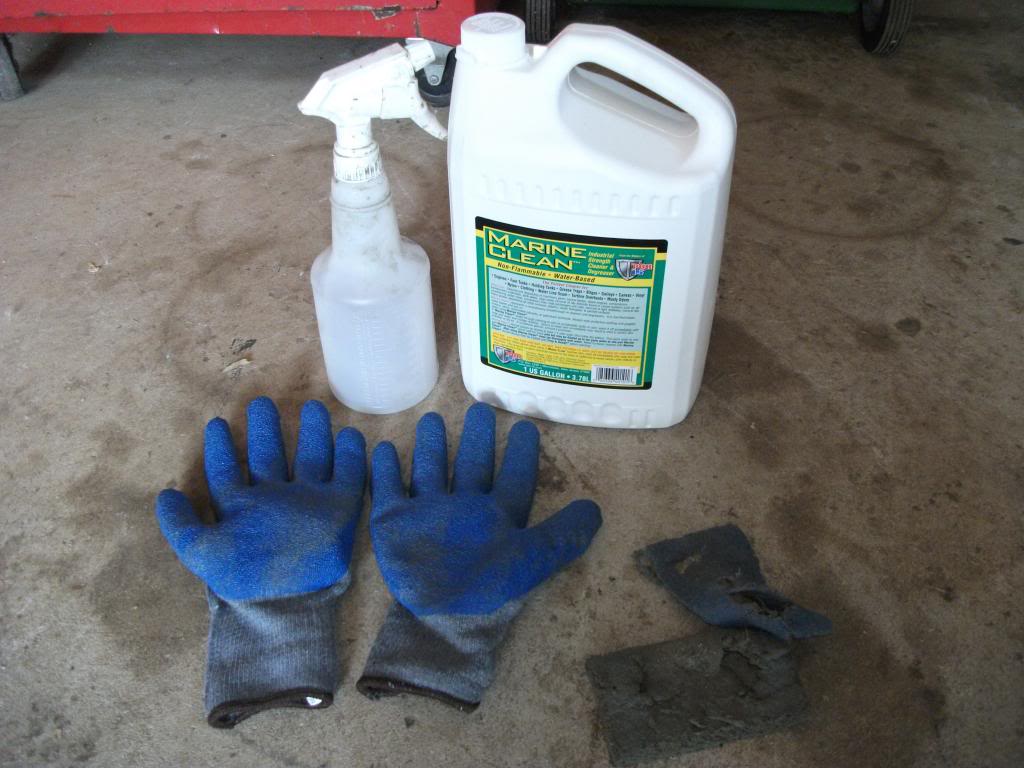
Here's before:
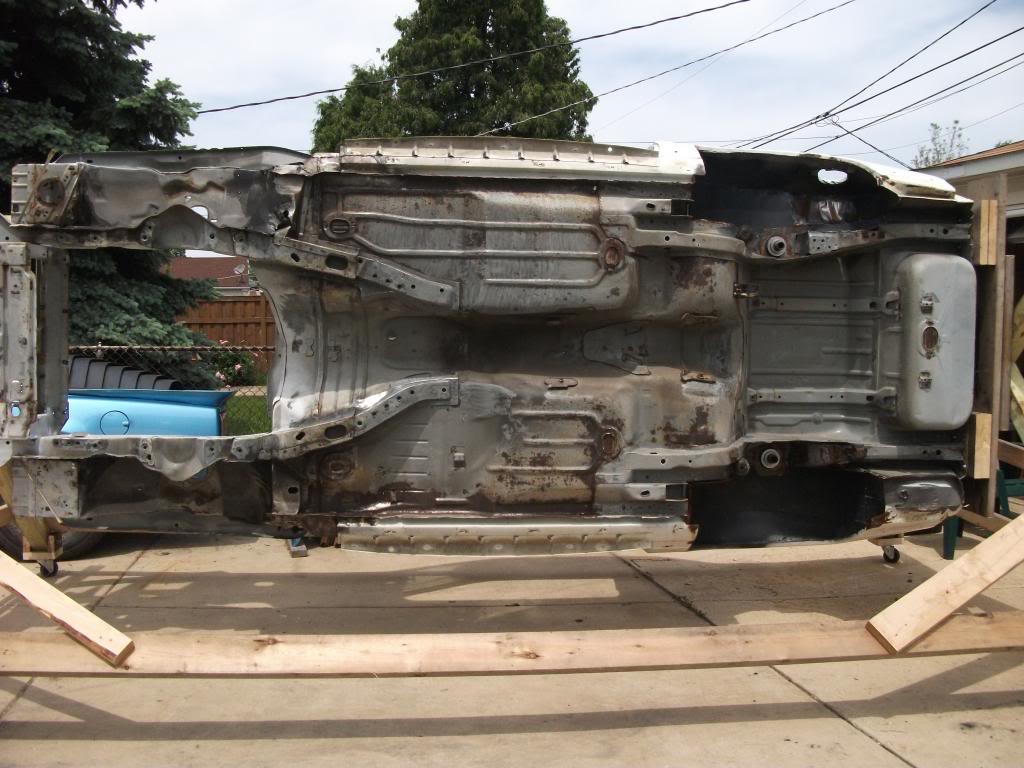
After:
 06-12-2013, 03:30 PM
#60
Senior Member
Thread Starter
iTrader: (4)
Join Date: Oct 2008
Location: Niles, IL
Posts: 857
Likes: 0
Received 5 Likes
on
4 Posts
Car: '91 LS6/T56/9"
Engine: LS6
Transmission: T56
Axle/Gears: Currie 9"/4.11, detroit truetrac
Re: Building a wooden body rotisserie (pics)
The threads got trashed on the rear threaded rod.....I think the lock washer rubbing against it was dropping metal shavings onto the threads, then the nut was smashing those shavings together. So I replaced the rod and am using a nylon lock nut now. Problem solved.
Oh and the rod I'm using is 7/8" not 1" as I mentioned earlier.
Oh and the rod I'm using is 7/8" not 1" as I mentioned earlier.
01-27-2014, 04:06 PM
#61
Senior Member
Thread Starter
iTrader: (4)
Join Date: Oct 2008
Location: Niles, IL
Posts: 857
Likes: 0
Received 5 Likes
on
4 Posts
Car: '91 LS6/T56/9"
Engine: LS6
Transmission: T56
Axle/Gears: Currie 9"/4.11, detroit truetrac
Re: Building a wooden body rotisserie (pics)
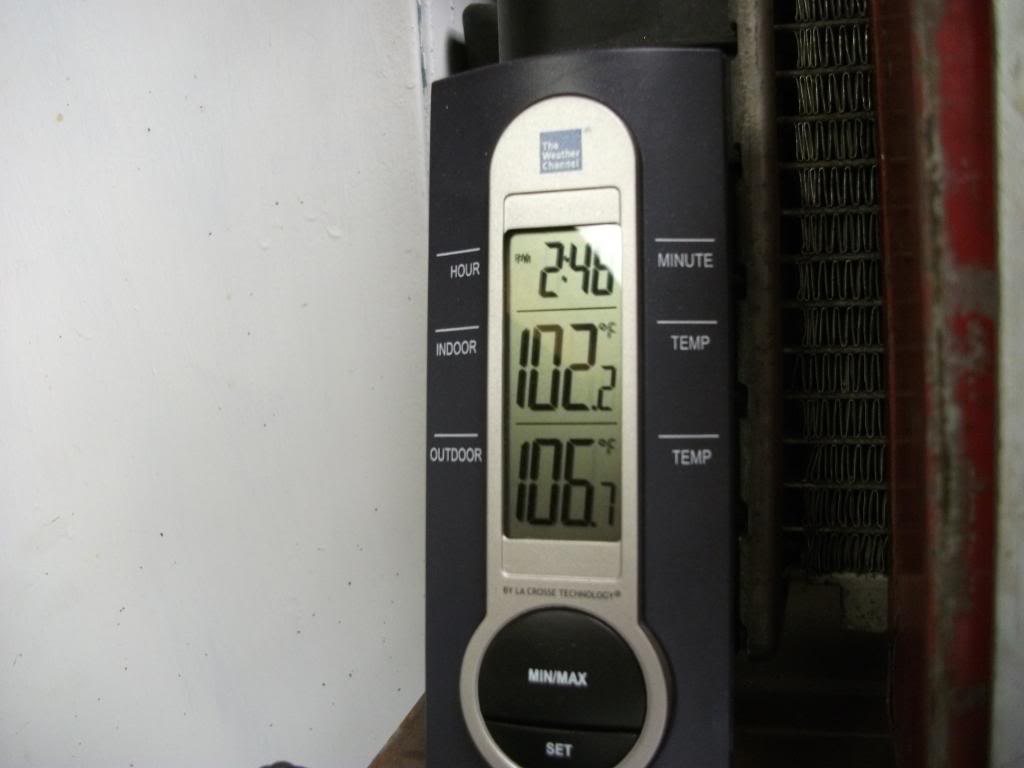
UPDATE: Winter has been brutal in Chicago, and the snow recently burned me.......I was working on another vehicle one night and left it on the lift overnight (leaving the rotisserie camaro outside temporary) Of course it snowed:
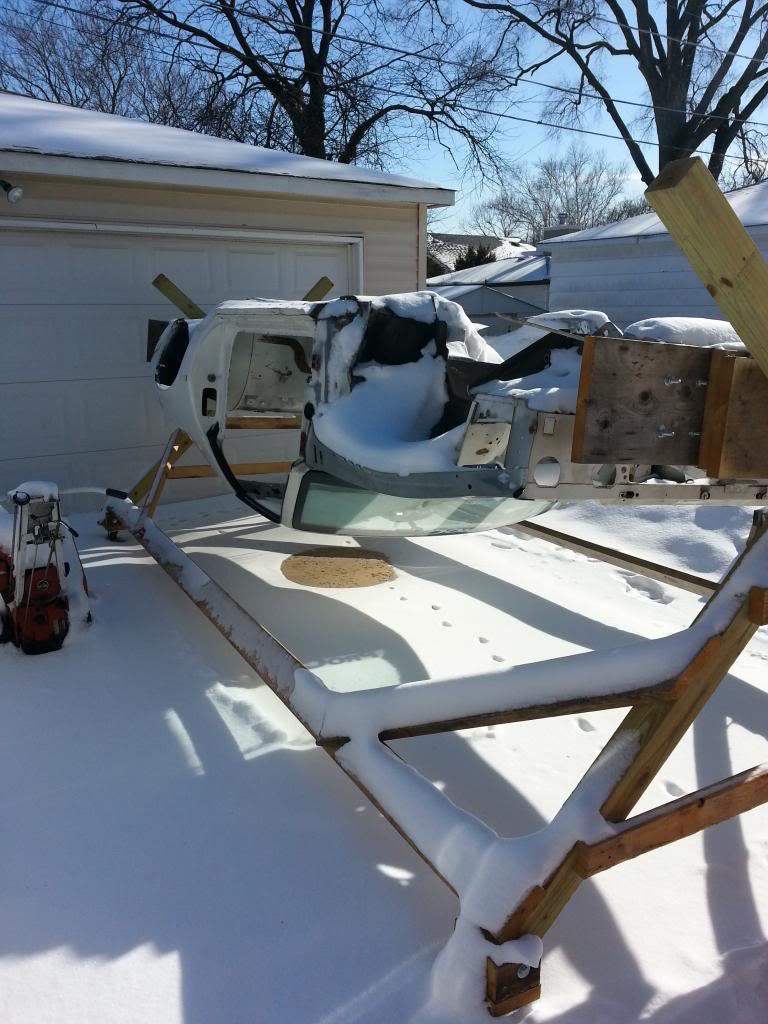
So I knocked off as much snow as possible then pushed it back into the garage and turned up the heat to melt everything. Got it up to 106 degrees in about 45 mins! So it's finally dry again.
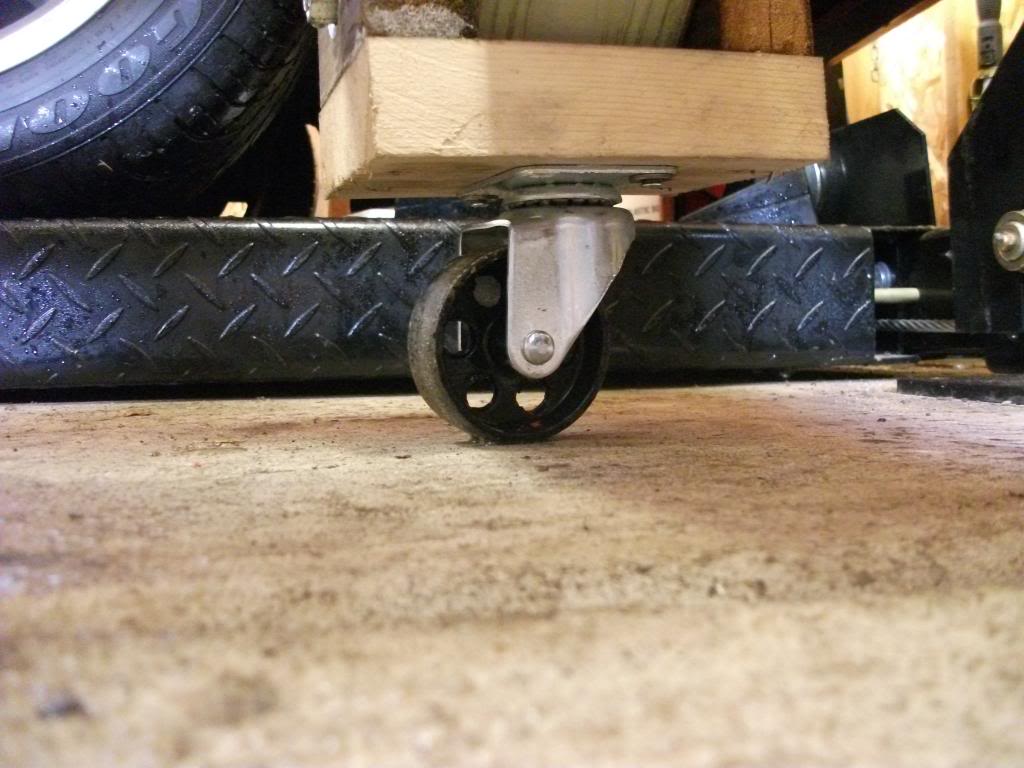
Some good news - I replaced the rubber castors with smaller steel ones making it easier to move around. Also the extra 1-2" now allows me to fully rotate the car in the garage.

So I knocked off as much snow as possible then pushed it back into the garage and turned up the heat to melt everything. Got it up to 106 degrees in about 45 mins! So it's finally dry again.


Some good news - I replaced the rubber castors with smaller steel ones making it easier to move around. Also the extra 1-2" now allows me to fully rotate the car in the garage.
 01-27-2014, 05:25 PM
#62
Junior Member
Join Date: Feb 2011
Posts: 67
Likes: 0
Received 0 Likes
on
0 Posts
Re: Building a wooden body rotisserie (pics)
I kept the car on the lift to start. I moved it forward so the front end was hanging off and attached the front X frame. I slowly moved the car forward while the front was supported by the wood X frame of the rotisserie, and the rear was still on the lift. Once the rear of the car got to the front edge of the lift I used my trans jack to support the rear of the car by placing it where the fuel tank usually sits. Then I SLOWLY moved the car forward until the rear was clear of the lift, and attached the rear X frame. From there I added the long 2X6's and cross supports. Doing that solo was intense.
HAHAHAHAHA GET ER DONE hahaha, you might be a ******* when>>>>>>>lol.
Figured it had to have been done using the car lift.
01-28-2014, 08:21 AM
#63
Senior Member
Thread Starter
iTrader: (4)
Join Date: Oct 2008
Location: Niles, IL
Posts: 857
Likes: 0
Received 5 Likes
on
4 Posts
Car: '91 LS6/T56/9"
Engine: LS6
Transmission: T56
Axle/Gears: Currie 9"/4.11, detroit truetrac
Re: Building a wooden body rotisserie (pics)
A forklift would have been ideal, but I had to work with what I have and the lift worked perfectly. Getting over the cracks in the driveway made me nervous, but it all turned out well and the rotisserie is still working just fine!
01-28-2014, 09:14 AM
#64
Junior Member
Join Date: Feb 2011
Posts: 67
Likes: 0
Received 0 Likes
on
0 Posts
Re: Building a wooden body rotisserie (pics)
My car is a 1982 Z28 with T-tops, I will be replacing the drivers side floor pan along with some minor repairs to the passenger side floorpan and I am looking for suggestions regarding bracing the body to prevent twisting or sagging while in the rotisserie, BTY how's the project coming.
01-31-2014, 02:58 PM
#65
Junior Member

Join Date: Jan 2014
Posts: 1
Likes: 0
Received 0 Likes
on
0 Posts
Re: Building a wooden body rotisserie (pics)
New guy here to the F-Body forum. Don't have an F-Body anymore, but thought you might like to see another version of the "wooden car rotisserie" . Sorry for you purists but it is attached to a 66 Ford Custom 500. Once the car was on its side, I placed car dollies under each corner so that I can push it around. It currently resides outside (in the snow) with a cover over it as I replace some of the rusted trunk floor. Overall the rig is fairly sturdy; it has to be as the body still has all the interior and glass still installed. It takes a couple of big guys and a forklift to ease it over as it gets heavy once passed the "tipping" point.
Tha's all I know for now...
Steve in Flat Rock, MI
Tha's all I know for now...
Steve in Flat Rock, MI
01-31-2014, 03:22 PM
#66
Junior Member
Join Date: Feb 2011
Posts: 67
Likes: 0
Received 0 Likes
on
0 Posts
Re: Building a wooden body rotisserie (pics)
New guy here to the F-Body forum. Don't have an F-Body anymore, but thought you might like to see another version of the "wooden car rotisserie" . Sorry for you purists but it is attached to a 66 Ford Custom 500. Once the car was on its side, I placed car dollies under each corner so that I can push it around. It currently resides outside (in the snow) with a cover over it as I replace some of the rusted trunk floor. Overall the rig is fairly sturdy; it has to be as the body still has all the interior and glass still installed. It takes a couple of big guys and a forklift to ease it over as it gets heavy once passed the "tipping" point.
That's all I know for now...
Steve in Flat Rock, MI
That's all I know for now...
Steve in Flat Rock, MI
 A FORD HERE ON THIRDGEN.ORG
 Just kidding:
that is an interesting design, seen them before but without a lot of the end to end bracing and supports. Only problem for me is my garage isn't wide enough to flip the car from the 4 wheel position to the vertical position and garage door is only maybe 7' so wouldn't be able to do outside and roll back in, needs to rotate like in a rotisserie inside garage for me.
02-02-2014, 09:06 PM
#67
Junior Member
Join Date: Apr 2012
Location: Winnipeg
Posts: 34
Likes: 0
Received 0 Likes
on
0 Posts
Car: 86 Iroc
Engine: 283
Transmission: 700R4
Axle/Gears: 3.73
Re: Building a wooden body rotisserie (pics)
That is very cool. Just keep it away from flammable liquids and open flames. lol. 

Thread
Thread Starter
Forum
Replies
Last Post
Terrell351
Engine/Drivetrain/Suspension Parts for Sale
5
06-13-2021 01:13 PM
auto, body, build, car, iroc, make, making, plans, restoration, rotiss, rotisserie, truck, wood, wooden, woodenopeners