Audio upgrade to compliment interior resto.
 04-04-2014, 03:59 PM
#1
Member
Thread Starter
Join Date: Apr 2010
Location: Royse City, Tx
Posts: 118
Likes: 0
Received 0 Likes
on
0 Posts
Car: 89 IROC-Z
Engine: L98 TPI
Audio upgrade to compliment interior resto.
For my interior restoration see here:
https://www.thirdgen.org/forums/inte...ior-resto.html
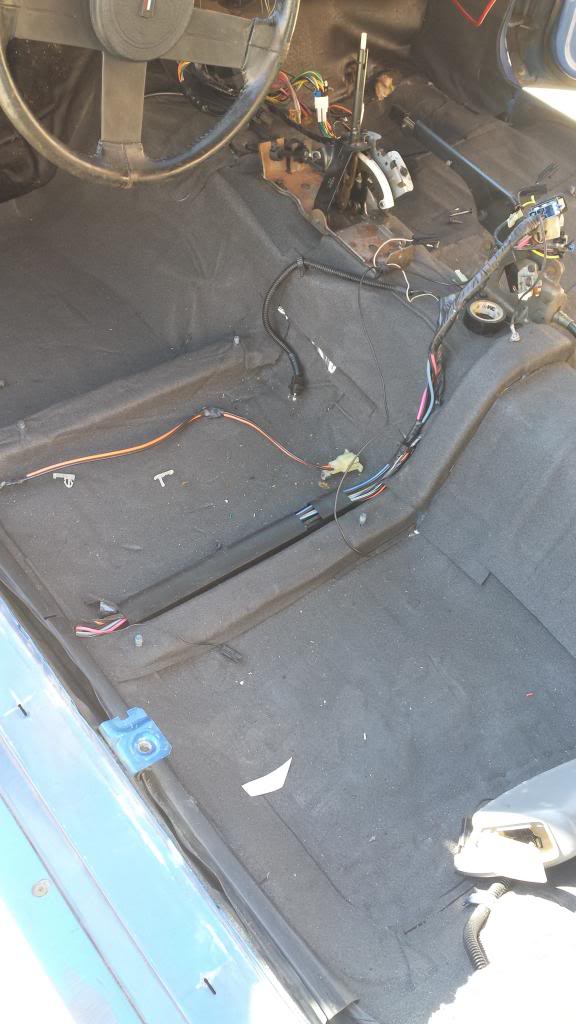
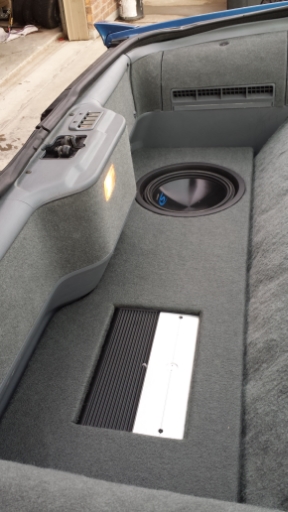
In the process of restoring/upgrading my interior I decided to change out my speakers as well as add a subwoofer.
What sounded like something from the 80's I was surprised to find out the speakers had already been replaced. The 6x9's weren't even attached, no wonder that sounded horrible.
So here is my new set up.
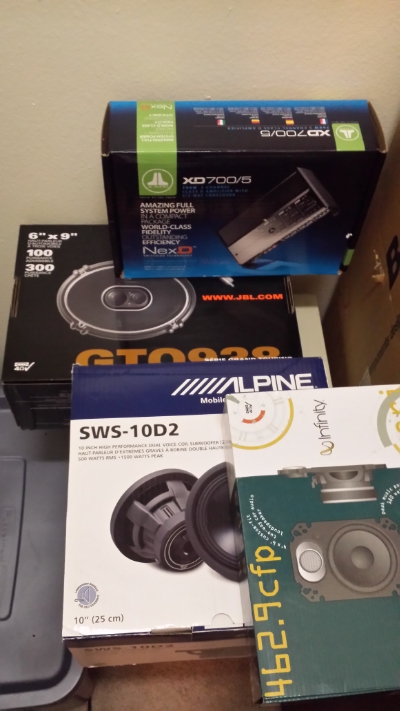
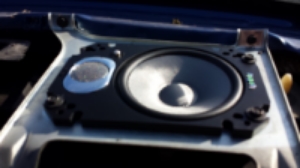
Infinity 4x6 462.9
JBL 6x9 GTO938
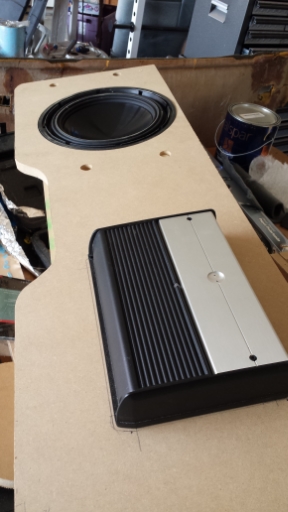
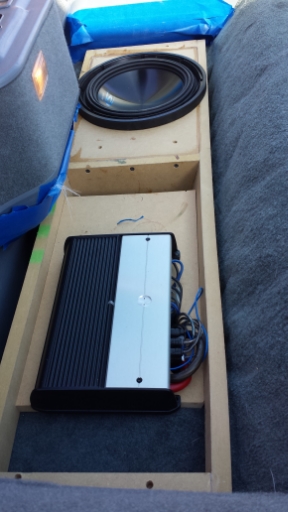
Alpine 10" SWS-10D2
JL Audio XD700/5
I mostly listen to 80's music so one 10 is sufficient for me. Plus since I'm not 17 anymore I really don't care to alert everyone in the city that I'm coming.
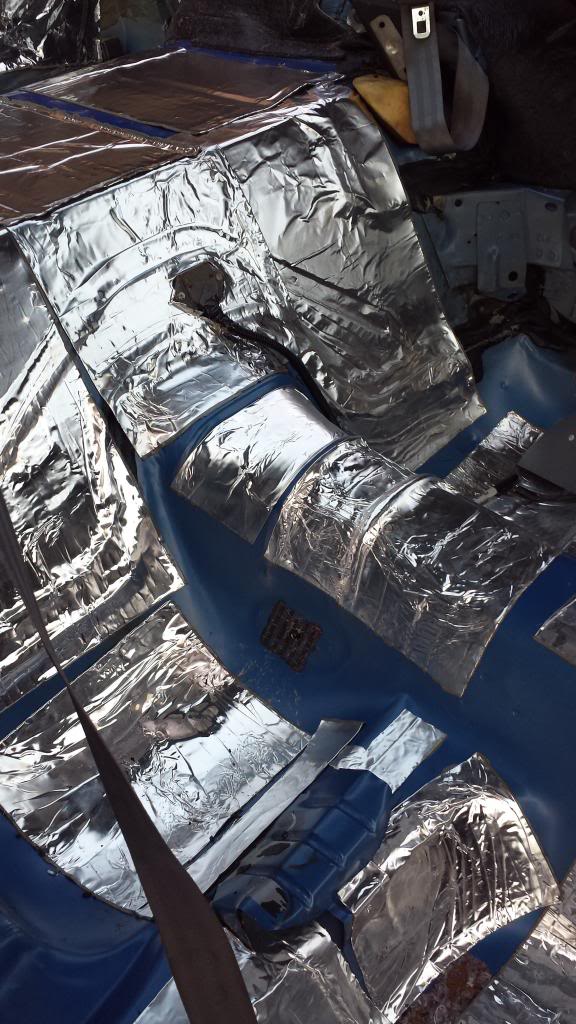
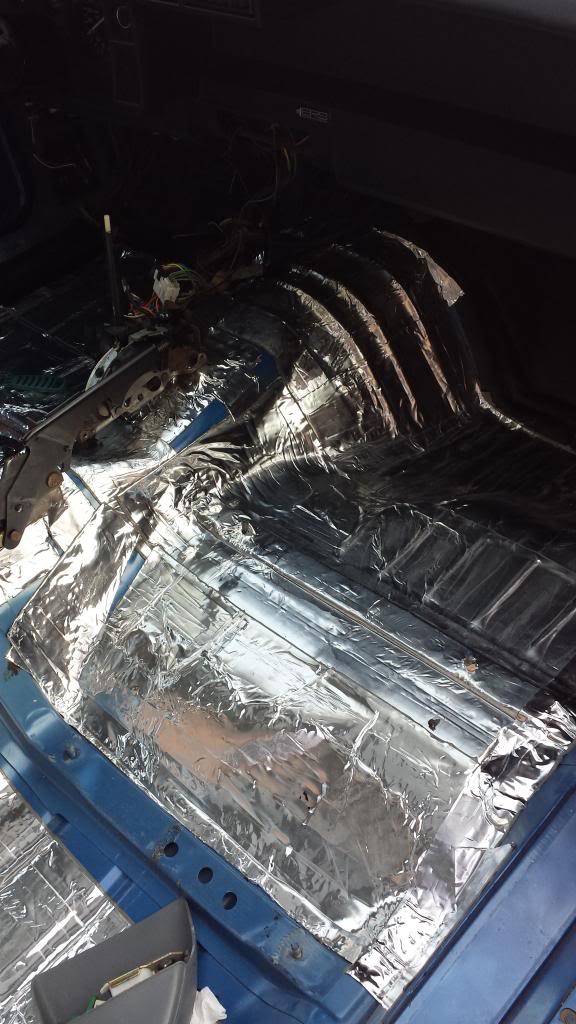
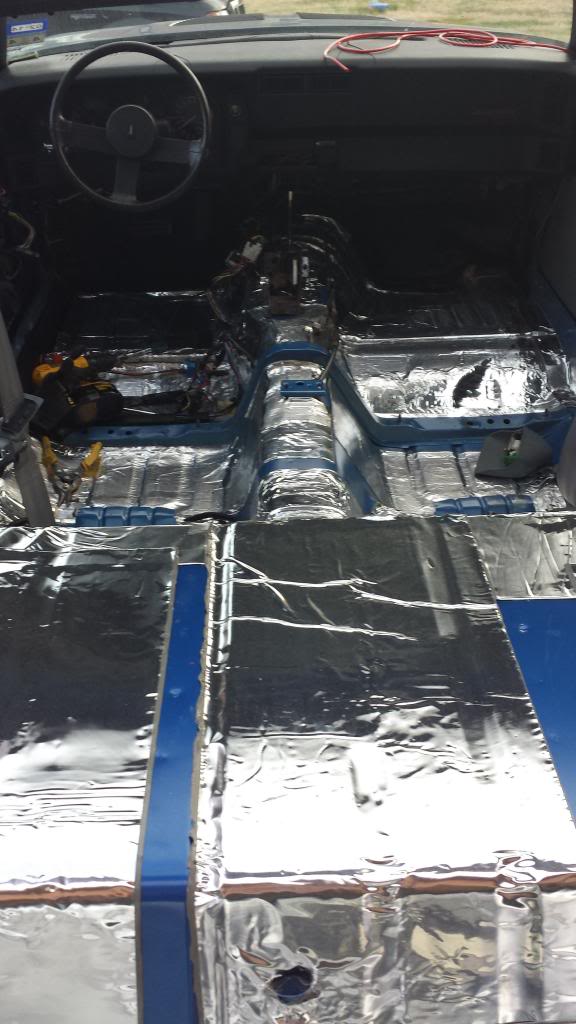
To start I laid down raammat and ensolite over that

Then installed 4x6's
Forgot to take a picture of 6x9's but y'all know what they look like.
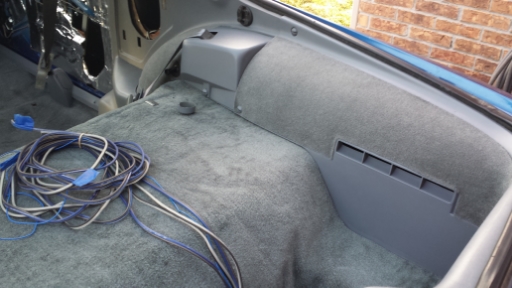
Ran all the wiring to the back, Speaker and rca cables on the driver side, power wire (4 gauge) on the passenger side
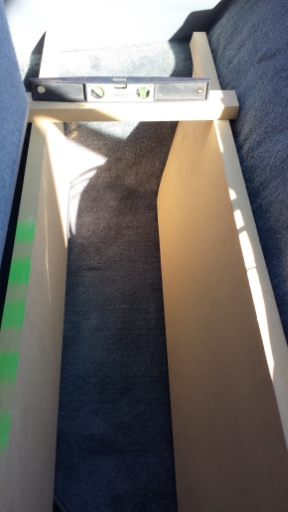
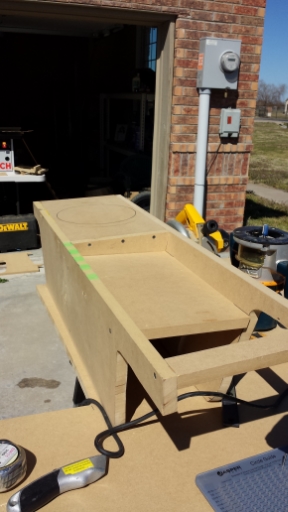
Then I started subwoofer box construction. I wanted to bottom fiberglass so it could maximize space while still being somewhat low.
Perfectly level
Amp rack and sub mount installed


https://www.thirdgen.org/forums/inte...ior-resto.html
In the process of restoring/upgrading my interior I decided to change out my speakers as well as add a subwoofer.
What sounded like something from the 80's I was surprised to find out the speakers had already been replaced. The 6x9's weren't even attached, no wonder that sounded horrible.
So here is my new set up.

Infinity 4x6 462.9
JBL 6x9 GTO938
Alpine 10" SWS-10D2
JL Audio XD700/5
I mostly listen to 80's music so one 10 is sufficient for me. Plus since I'm not 17 anymore I really don't care to alert everyone in the city that I'm coming.
To start I laid down raammat and ensolite over that


Then installed 4x6's

Forgot to take a picture of 6x9's but y'all know what they look like.
Ran all the wiring to the back, Speaker and rca cables on the driver side, power wire (4 gauge) on the passenger side

Then I started subwoofer box construction. I wanted to bottom fiberglass so it could maximize space while still being somewhat low.
Perfectly level

Amp rack and sub mount installed


 04-04-2014, 04:07 PM
#2
Member
Thread Starter
Join Date: Apr 2010
Location: Royse City, Tx
Posts: 118
Likes: 0
Received 0 Likes
on
0 Posts
Car: 89 IROC-Z
Engine: L98 TPI
Re: Audio upgrade to compliment interior resto.
Removed sub mount to fiberglass (first time glassing). Next time I try this I think I will precut and dry fit the fiberglass mat then lay it on wax paper and roll on the resin. That should prevent air bubbles. After resin cured I coated it with duraglas milkshake to strengthen.
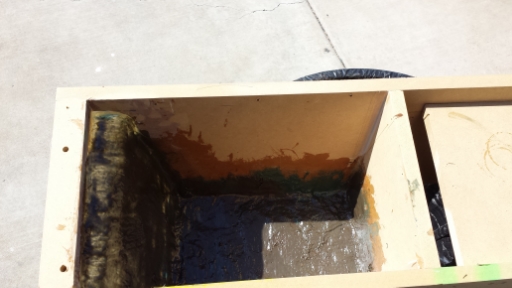
I have a motorized hatch so the box will not fit with a top on so I needed something to be able to attach the top after it had been carpeted. I drilled 3/4" holes stopping about 1/4" before going through the bottom and put in door panel pins. I covered the holes with dowel pieces and glue then sanded smooth once dry.
I had left over resin so I coated part of the top, that's why it looks wet.
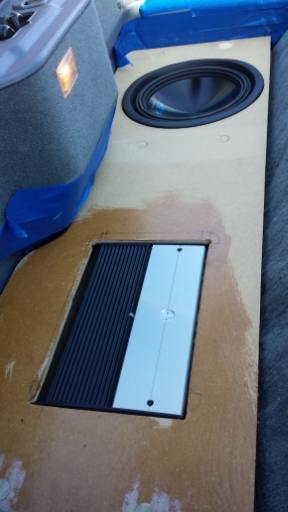
The carpet I used is the same the Thirdgen ranch uses for their replacement carpet kit for the panels. Which I also replaced mine with this so it matches.
I tuned the amp with a multimeter. I plugged in the specs to this website
http://www.sengpielaudio.com/calculator-ohm.htm
Once I had my numbers I leveled everything from the headunit to 0 (loud -off, no bass boost, eq-0, etc.) then turned the volume to 75% of it's max. With all speakers disconnected from the amp (rca's connected) I played a 1khz sound and adjusted front and rear speakers. Then playing a 50hz sound file I adjusted the subwoofer.
Now the sound quality coming from these speakers is 1000 times better than what it was.

I have a motorized hatch so the box will not fit with a top on so I needed something to be able to attach the top after it had been carpeted. I drilled 3/4" holes stopping about 1/4" before going through the bottom and put in door panel pins. I covered the holes with dowel pieces and glue then sanded smooth once dry.


I had left over resin so I coated part of the top, that's why it looks wet.

The carpet I used is the same the Thirdgen ranch uses for their replacement carpet kit for the panels. Which I also replaced mine with this so it matches.

I tuned the amp with a multimeter. I plugged in the specs to this website
http://www.sengpielaudio.com/calculator-ohm.htm
Once I had my numbers I leveled everything from the headunit to 0 (loud -off, no bass boost, eq-0, etc.) then turned the volume to 75% of it's max. With all speakers disconnected from the amp (rca's connected) I played a 1khz sound and adjusted front and rear speakers. Then playing a 50hz sound file I adjusted the subwoofer.
Now the sound quality coming from these speakers is 1000 times better than what it was.
Last edited by dieseldog; 04-14-2014 at 12:26 PM.
 04-12-2014, 07:59 PM
#4


 05-22-2014, 03:37 PM
#6
Senior Member

Re: Audio upgrade to compliment interior resto.
The box looks great. Thinking of just one 12 myself.
05-23-2014, 07:29 AM
#7
Supreme Member
iTrader: (2)

Join Date: Aug 2002
Location: Western NY State
Posts: 1,018
Likes: 0
Received 1 Like
on
1 Post
Car: 87 bird
Engine: enough to break stuff
Transmission: manual th400
Axle/Gears: 4.10
Re: Audio upgrade to compliment interior resto.
one properly powered 10 or 12 is plenty for most people who just want a good sounding system
Trending Topics
05-28-2014, 03:10 PM
#8
Member
Thread Starter
Join Date: Apr 2010
Location: Royse City, Tx
Posts: 118
Likes: 0
Received 0 Likes
on
0 Posts
Car: 89 IROC-Z
Engine: L98 TPI
Re: Audio upgrade to compliment interior resto.
Thanks everyone. System sounds great but with some songs that had heavy bass my front speakers would "pop" or distort. I just ordered bass blockers from crutchfield so I hoping that will take care of my issue.
 05-29-2014, 08:26 AM
#10
Supreme Member
iTrader: (2)
Join Date: Aug 2002
Location: Western NY State
Posts: 1,018
Likes: 0
Received 1 Like
on
1 Post
Car: 87 bird
Engine: enough to break stuff
Transmission: manual th400
Axle/Gears: 4.10
Re: Audio upgrade to compliment interior resto.
most amps or HU's have adjustments for frequency, this is the preferred method because the inline blockers take away power across the whole frequency range. and selectable crossovers like in the amp or HU are much better at not reducing the power at the proper frequency.
05-31-2014, 02:17 PM
#11
Member
Thread Starter
Join Date: Apr 2010
Location: Royse City, Tx
Posts: 118
Likes: 0
Received 0 Likes
on
0 Posts
Car: 89 IROC-Z
Engine: L98 TPI
Re: Audio upgrade to compliment interior resto.
the amp has frequency adjustments and I did set the fronts up to 120hz but it still popped. The HU also has High Pass frequency adjustment but I felt it took away too much low frequencies from the back and sub. I'm sure someone could play with it for awhile and get it right but whenever the battery gets disconnected for whatever reason all the settings from the HU will be lost. I'm just trying to get it right without having to do much HU adjusting. If it's still not where I personally want it to be then I will consider taking it to the "experts".
06-02-2014, 07:10 AM
#12
Supreme Member
iTrader: (2)
Join Date: Aug 2002
Location: Western NY State
Posts: 1,018
Likes: 0
Received 1 Like
on
1 Post
Car: 87 bird
Engine: enough to break stuff
Transmission: manual th400
Axle/Gears: 4.10
Re: Audio upgrade to compliment interior resto.
if your head hu doesnt have separate adjustments for sub/rear/front you will have to leave that alone. you try adjusting the front gain on the amp?

Thread
Thread Starter
Forum
Replies
Last Post
Billy Decker
Engine/Drivetrain/Suspension Wanted
0
09-04-2015 03:46 PM
rudolphschenker
Transmissions and Drivetrain
1
09-04-2015 02:41 AM