re-building a ccc-qjet carburetor
 01-18-2009, 03:57 PM
#1
Supreme Member

Thread Starter
iTrader: (7)

Join Date: May 2004
Location: Lexington, SC
Posts: 5,291
Likes: 0
Received 58 Likes
on
52 Posts
Car: 1987 SC/1985 TA
Engine: 350/vortec/fitech
Transmission: T56
Axle/Gears: 3.27 9-bolt
re-building a ccc-qjet carburetor
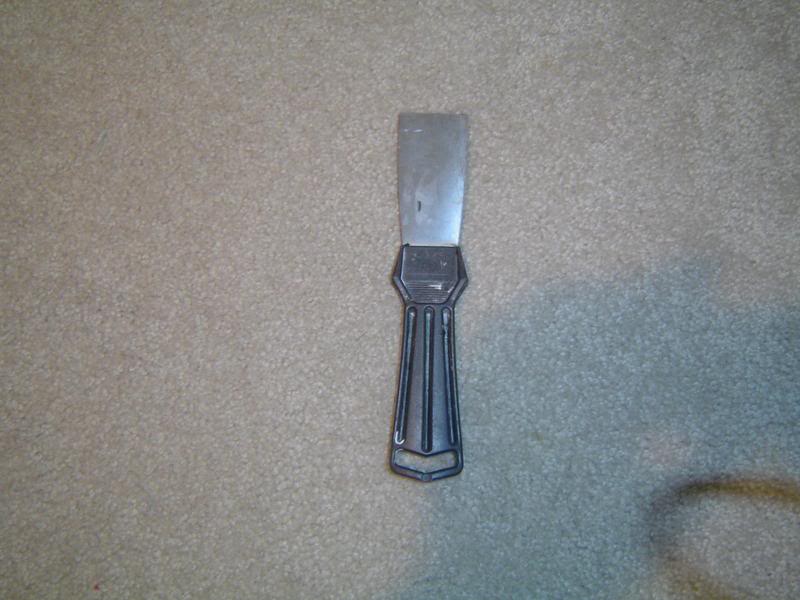
This will outline a typical re-build of a ccc-qjet without using too many of the 'special' tools. I did not remove the plugs for the lean and rich stop screws and instead set MCS travel based on the initial setting of the rich stop (in airhorn) and adjusting the lean stop to get the proper 1/8" of travel. Of course this required temporarily installing and removing the airhorn to make adjustments but not everyone wants to buy 'special' tools they may never need again. The only special tool I used is the carb adjustment tool (shown below) that can be had for around $12. You could get by without one by using a large roll pin tapped onto the idle mixture screws. This tool with its flexible shaft is especially handy when making on-engine adjustments, though.
Total cost was around $20 (carb re-build kit), $25 (new TPS-my old one was bad, your's may be fine), I think $8? (new float), $10 maybe? (gallon can of carb dip-I bought it a long time ago) and $3 for one can of spray carb cleaner (and most of it's left over). I still need to buy a new fuel filter.
Important on disassembly is to count the number of turns out on the lean stop set screw (screw that holds the Mixture Control Solenoid (MCS) down inside the fuel well) so that it can be re-installed to the same setting. I didn't do this in the below rebuild because I was using an airhorn and a main body from different carbs. It's also a good idea to count turns out on the idle mixture screws so they can be reset in original positions.
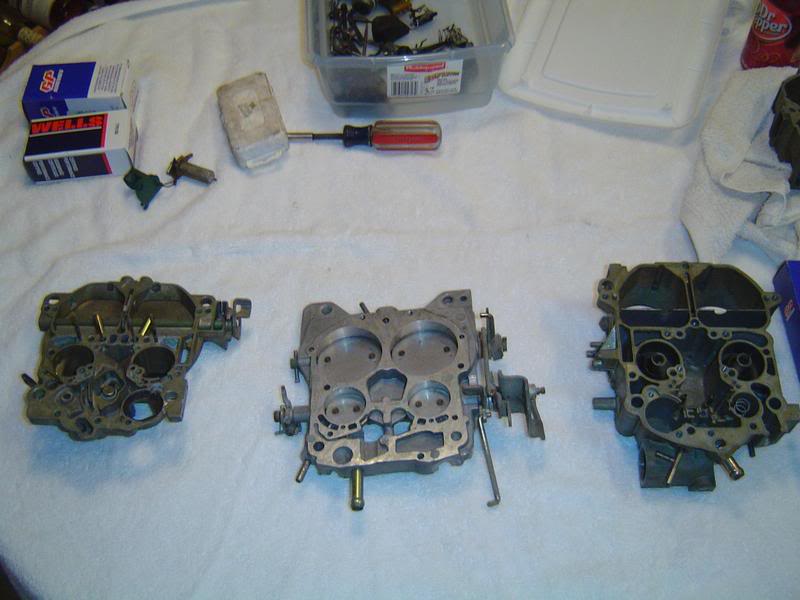
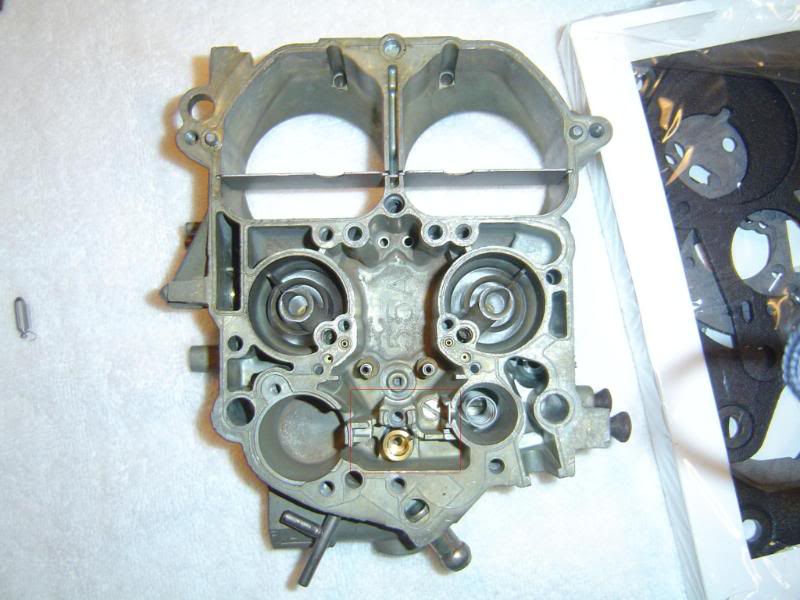
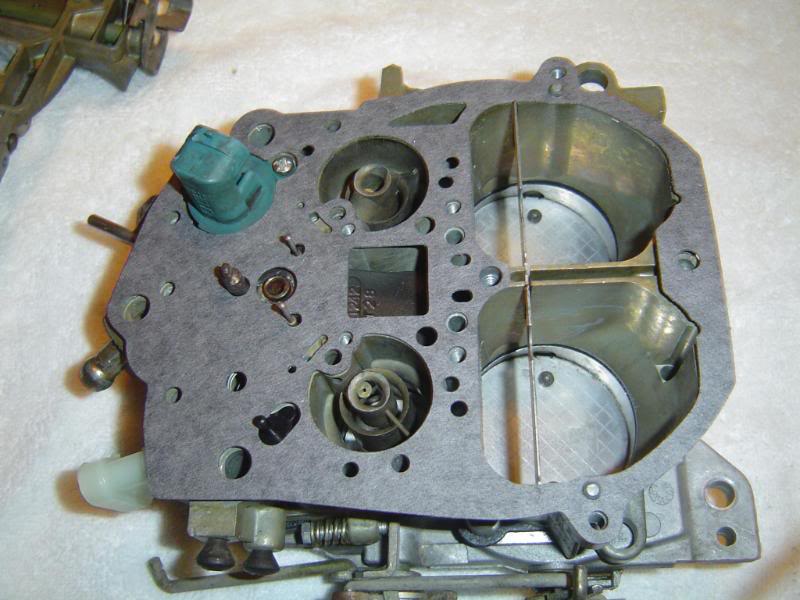
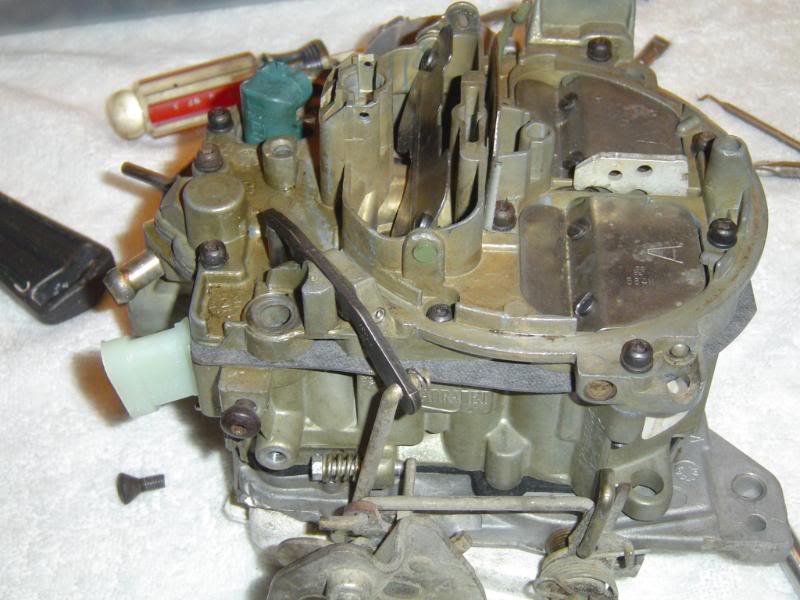
After everything has been taken apart and cleaned thoroughly using carb dip and a spray can of carb cleaner: airhorn, base plate and main body ready for assembly:
After cleaning, the fuel well plugs on the bottom of the main body should be coated with JB Weld epoxy. Otherwise they're a source of fuel leaks over time. This main body was run on one of my vehicles for a few hundred miles so the plug welds are slightly discolored.

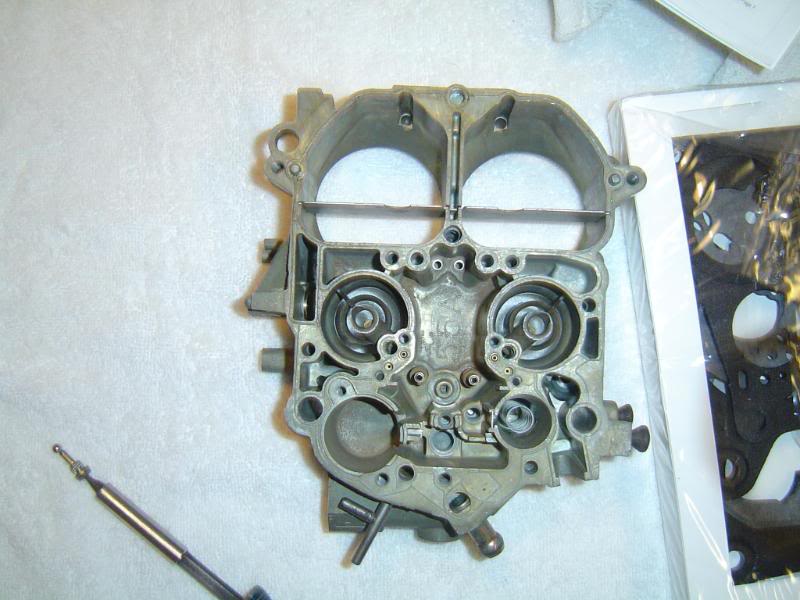
Main body with seat and check ball removed. Note that I did not remove the primary jets (long tubes sticking up in middle) - just sprayed them out good with carb cleaner and some air:
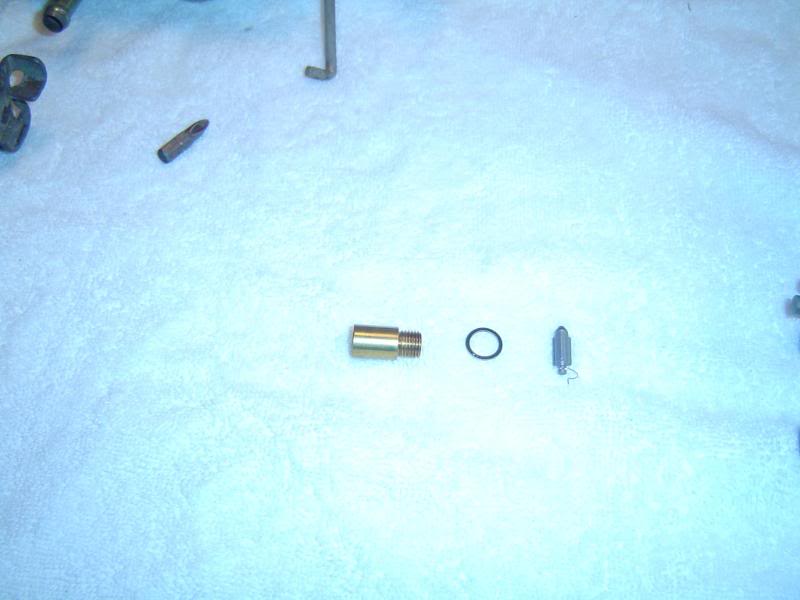
New needle and seat assembly from rebuild kit:
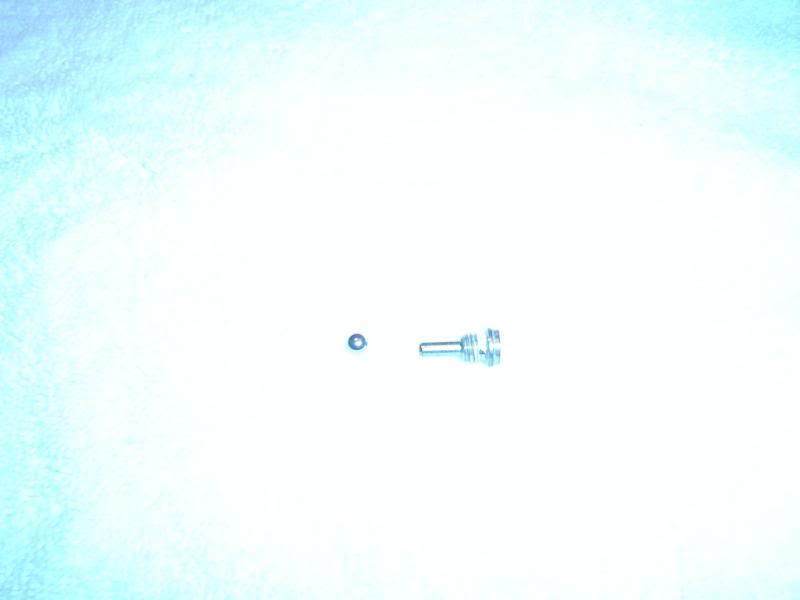
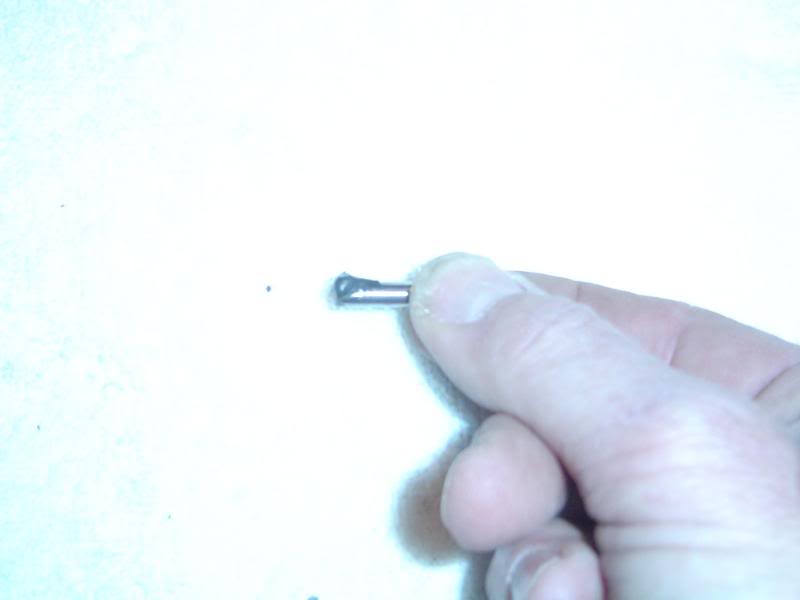
New booster pump check ball from carb kit along with retaining screw for check ball:
Total cost was around $20 (carb re-build kit), $25 (new TPS-my old one was bad, your's may be fine), I think $8? (new float), $10 maybe? (gallon can of carb dip-I bought it a long time ago) and $3 for one can of spray carb cleaner (and most of it's left over). I still need to buy a new fuel filter.
Important on disassembly is to count the number of turns out on the lean stop set screw (screw that holds the Mixture Control Solenoid (MCS) down inside the fuel well) so that it can be re-installed to the same setting. I didn't do this in the below rebuild because I was using an airhorn and a main body from different carbs. It's also a good idea to count turns out on the idle mixture screws so they can be reset in original positions.
After everything has been taken apart and cleaned thoroughly using carb dip and a spray can of carb cleaner: airhorn, base plate and main body ready for assembly:
After cleaning, the fuel well plugs on the bottom of the main body should be coated with JB Weld epoxy. Otherwise they're a source of fuel leaks over time. This main body was run on one of my vehicles for a few hundred miles so the plug welds are slightly discolored.
Main body with seat and check ball removed. Note that I did not remove the primary jets (long tubes sticking up in middle) - just sprayed them out good with carb cleaner and some air:
New needle and seat assembly from rebuild kit:
New booster pump check ball from carb kit along with retaining screw for check ball:
Last edited by naf; 08-05-2014 at 06:06 PM.
 01-18-2009, 04:07 PM
#2
Supreme Member
Thread Starter
iTrader: (7)
Join Date: May 2004
Location: Lexington, SC
Posts: 5,291
Likes: 0
Received 58 Likes
on
52 Posts
Car: 1987 SC/1985 TA
Engine: 350/vortec/fitech
Transmission: T56
Axle/Gears: 3.27 9-bolt
Re: re-building a ccc-qjet carburetor
Install new seat in well along with new washer. Make sure you remove the old washer so you don't stack the new one on top. Use an easy hand with a screw driver to keep from damaging the new brass seat.
Place the new check ball in the passage and install the retaining screw. A magnetic screw driver will hold the retaining screw and ball together as you place them in as shown:

Seat and ball/retaining screw installed:
I installed a new float (about $10 at AZ). There's a little detail in the re-build kit guide that shows the correct position of the needle hanger on the float.

Float installed:
Set float in and lightly hold as shown against the seat. Measure with the ruler included in the kit to get 11/32" between a spot 3/16" from the toe of the float (there's a little line on the float) and the top of the main body. You may have to pull the float out in order to bend it slightly up or down.
Place the new check ball in the passage and install the retaining screw. A magnetic screw driver will hold the retaining screw and ball together as you place them in as shown:
Seat and ball/retaining screw installed:
I installed a new float (about $10 at AZ). There's a little detail in the re-build kit guide that shows the correct position of the needle hanger on the float.
Float installed:
Set float in and lightly hold as shown against the seat. Measure with the ruler included in the kit to get 11/32" between a spot 3/16" from the toe of the float (there's a little line on the float) and the top of the main body. You may have to pull the float out in order to bend it slightly up or down.
Last edited by naf; 01-18-2009 at 06:52 PM.
01-18-2009, 04:17 PM
#3
Supreme Member
Thread Starter
iTrader: (7)
Join Date: May 2004
Location: Lexington, SC
Posts: 5,291
Likes: 0
Received 58 Likes
on
52 Posts
Car: 1987 SC/1985 TA
Engine: 350/vortec/fitech
Transmission: T56
Axle/Gears: 3.27 9-bolt
Re: re-building a ccc-qjet carburetor
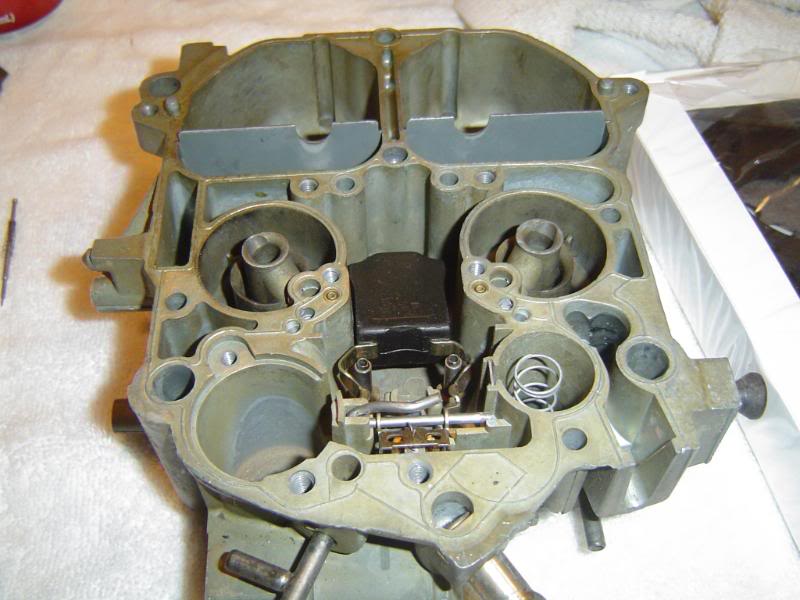
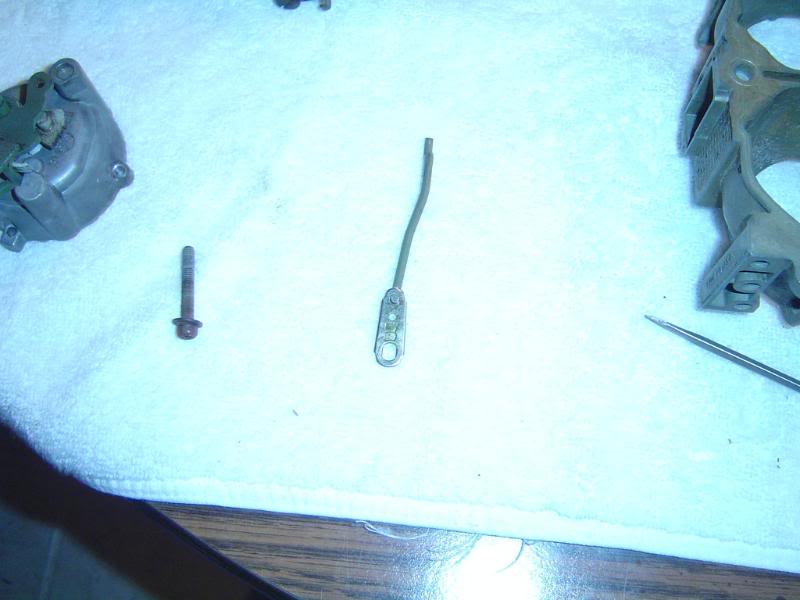
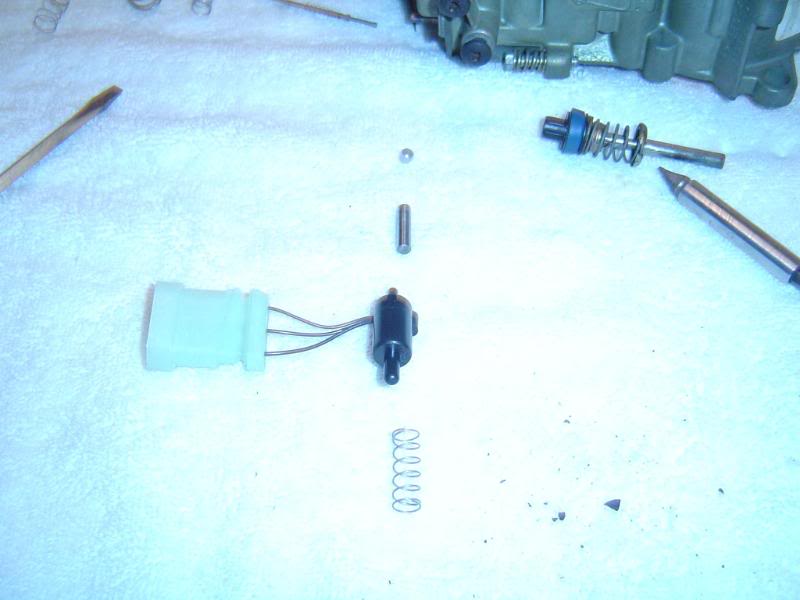
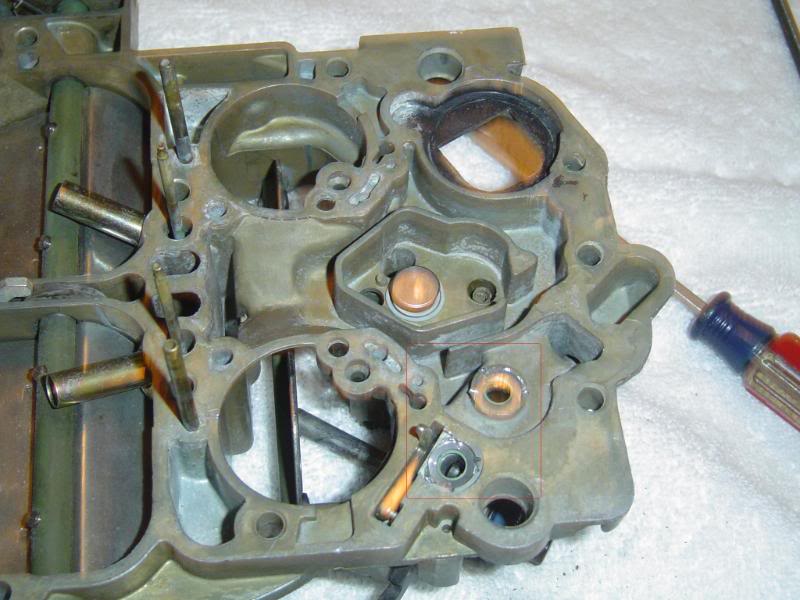
I next installed the mixture control solenoid assembly (MCS). The MCS is held in place with the lean stop screw. It adjusts the depth that the primary rods will dip into the primary jets. The MCS cycles up and down as commanded by the ECM. The more time they spend down (dwell) the leaner the mixture will be. All the parts are shown here in order:
Ready to go in:
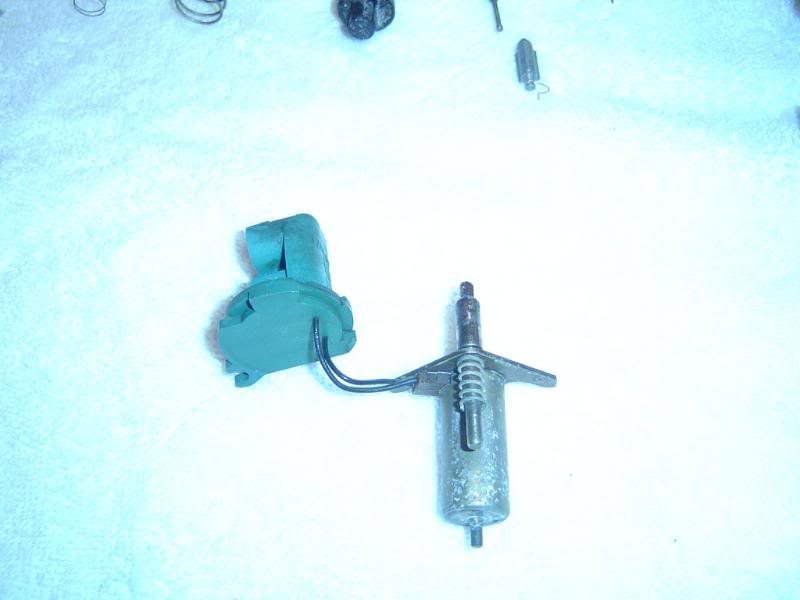
MCS installed. Make sure you've put the fatter spring under the MCS. Because this main body was swapped in I didn't have a count of turns out for the MCS screw. I set it initially at four turns out from lightly seated. I'll check it later. Normally when disassembled I'd count the turns out from seated and re-set to same number of turns. There is a tool available that will allow you to set the MCS in at the proper height from the base. If you've got one, great, if not you'll be fine this way.

MCS electrical connector is held in place with small shiny screw and fuel bowl insert is installed.

Ready to go in:
MCS installed. Make sure you've put the fatter spring under the MCS. Because this main body was swapped in I didn't have a count of turns out for the MCS screw. I set it initially at four turns out from lightly seated. I'll check it later. Normally when disassembled I'd count the turns out from seated and re-set to same number of turns. There is a tool available that will allow you to set the MCS in at the proper height from the base. If you've got one, great, if not you'll be fine this way.
MCS electrical connector is held in place with small shiny screw and fuel bowl insert is installed.
Last edited by naf; 01-18-2009 at 08:07 PM.
01-18-2009, 04:28 PM
#4
Supreme Member
Thread Starter
iTrader: (7)
Join Date: May 2004
Location: Lexington, SC
Posts: 5,291
Likes: 0
Received 58 Likes
on
52 Posts
Car: 1987 SC/1985 TA
Engine: 350/vortec/fitech
Transmission: T56
Axle/Gears: 3.27 9-bolt
Re: re-building a ccc-qjet carburetor
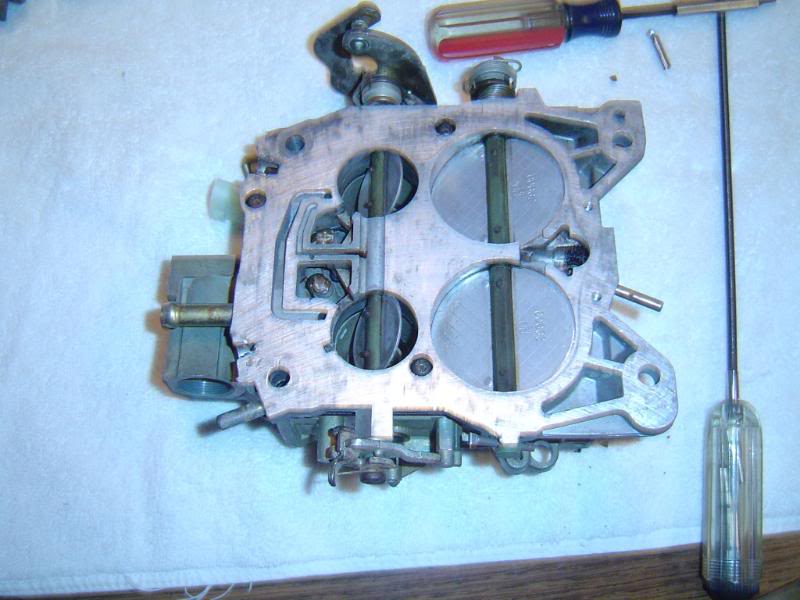
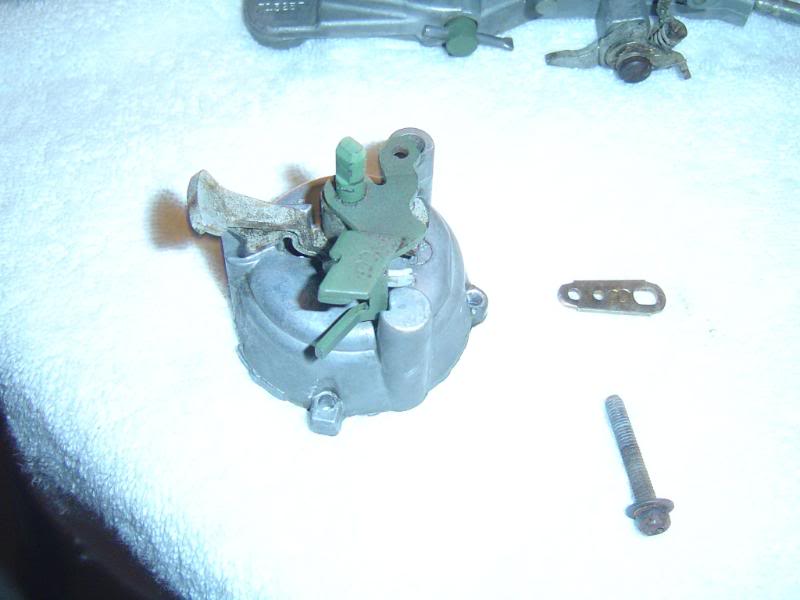
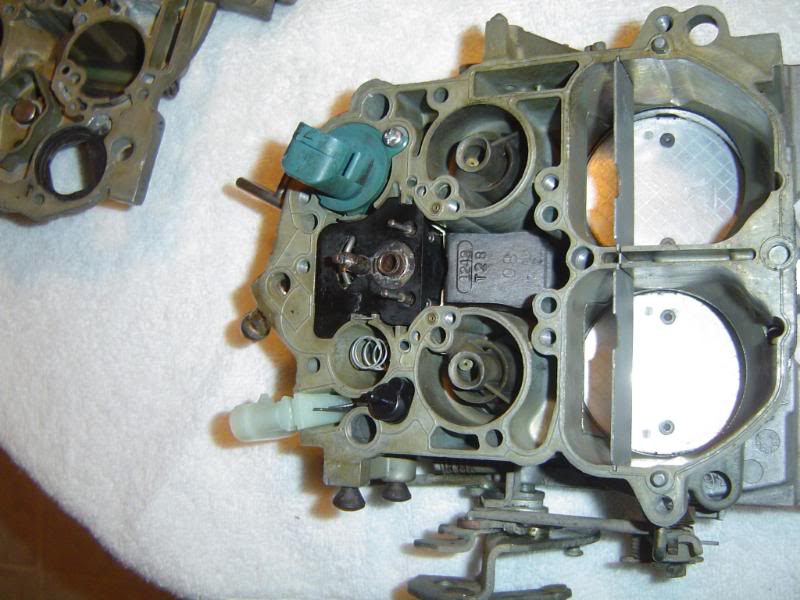
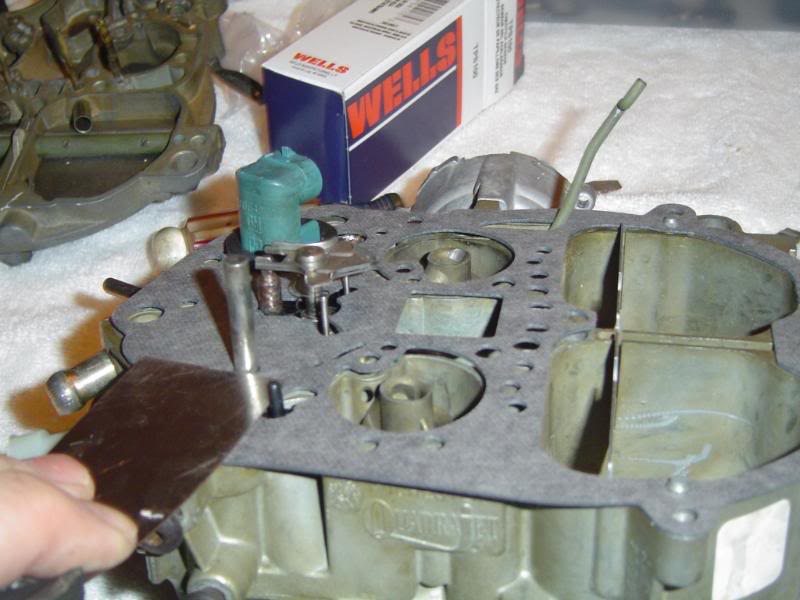
You can do it sooner but here I installed the carb base to the main body with provided gasket. There are three screws. This carb had already had the idle mixture screw tamper proof plugs removed. Not a terribly clean job of it either. I did not remove any of the throttle butterflies or shafts when cleaning the base. Soaked the whole thing in carb dip and made sure everything moved freely.
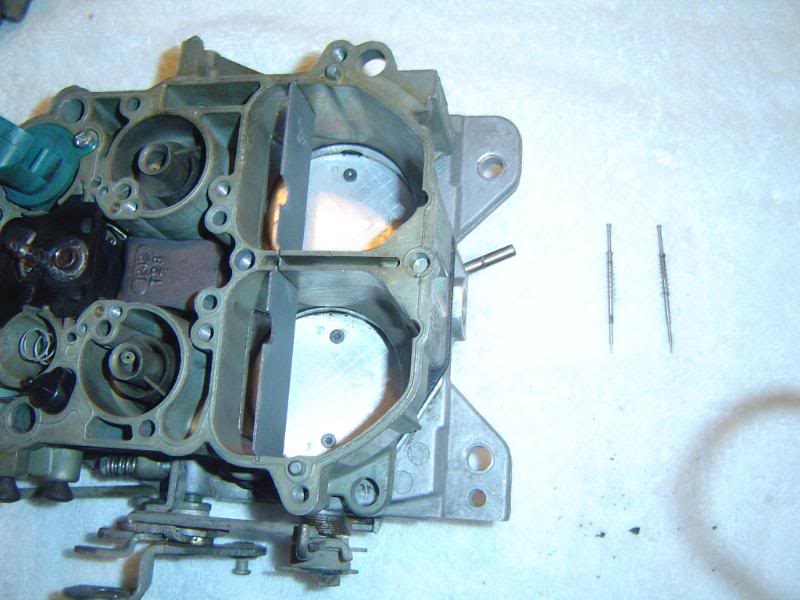
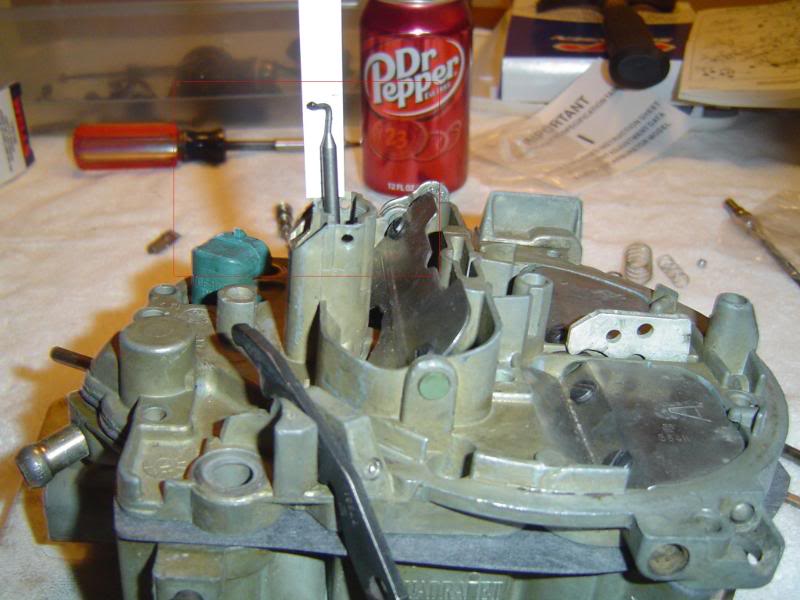
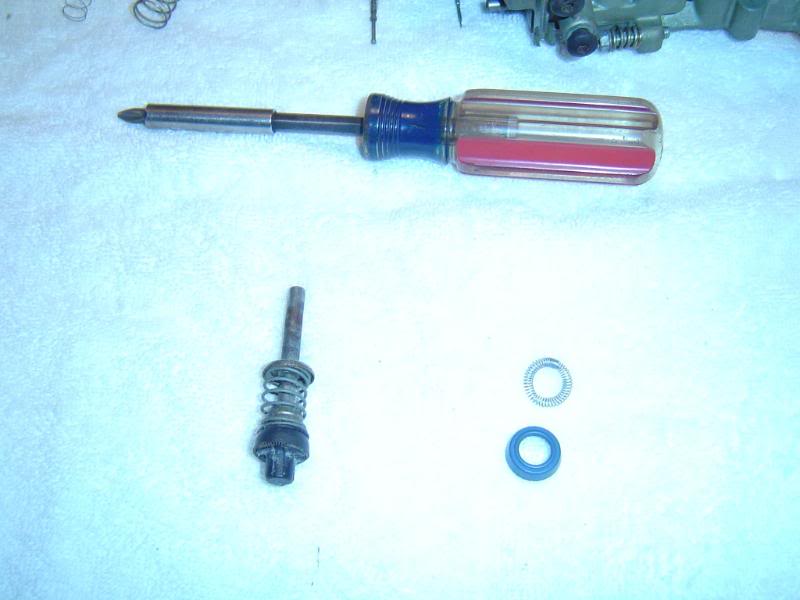
From here I temporarily placed the airhorn gasket on along with the MCS plunger and primary rods to check for travel. Make sure your primary rods and the little springs on them are in good shape. Seen them bent up and damaged before. Primary metering rods:
MCS plunger with spring:
Place primary rods in and make sure they're in the primary jets and that they move freely up and down on their springs.
Place the plunger with spring in position and make sure it, and the primary rods, move up and down freely. This photo includes later install of the booster plunger, etc. so just use it as a guide for proper alignment of MCS plunger.
Last edited by naf; 01-18-2009 at 07:52 PM.
01-18-2009, 04:36 PM
#5
Supreme Member
Thread Starter
iTrader: (7)
Join Date: May 2004
Location: Lexington, SC
Posts: 5,291
Likes: 0
Received 58 Likes
on
52 Posts
Car: 1987 SC/1985 TA
Engine: 350/vortec/fitech
Transmission: T56
Axle/Gears: 3.27 9-bolt
Re: re-building a ccc-qjet carburetor
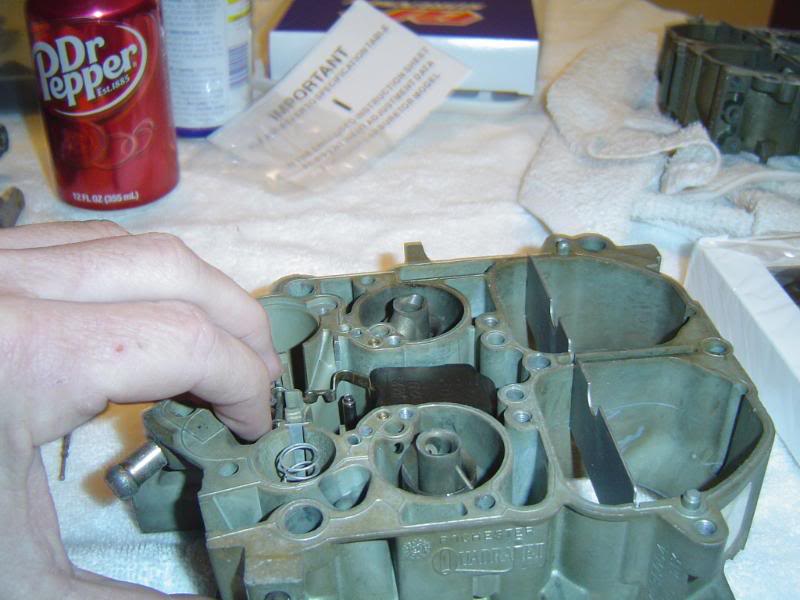
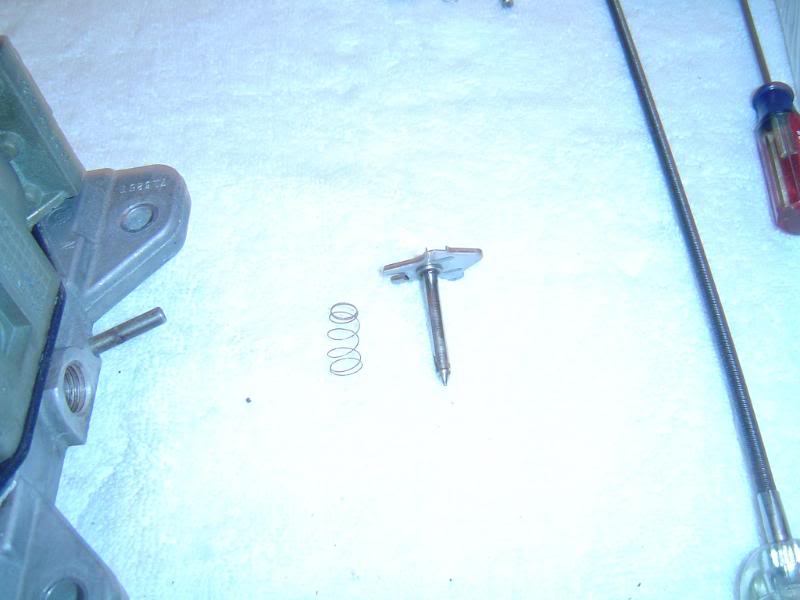
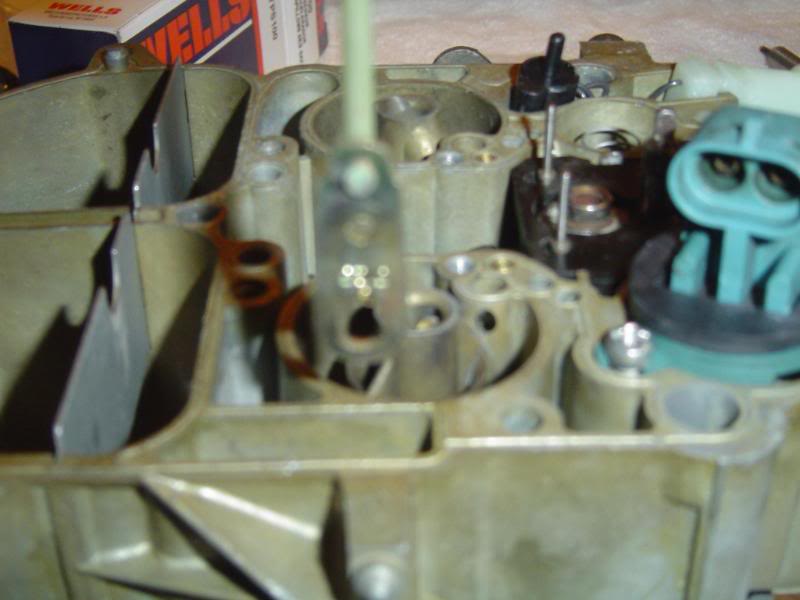
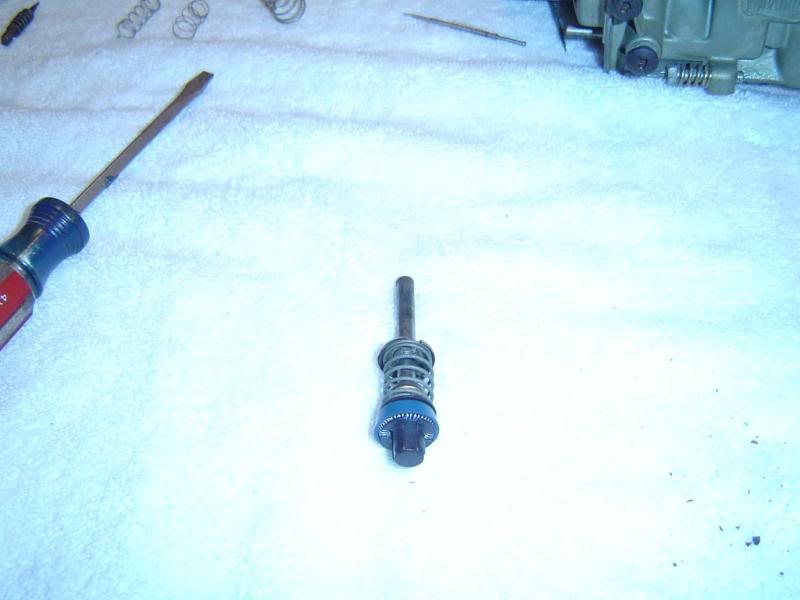
Place the airhorn on top and secure with one or two screws. A tool placed in the IAB opening (I'm using a secondary metering rod) should click the MCS plunger up and down. If it doesn't find out why.
Use the ruler in the kit to measure this travel as shown. Because I did not use the 'special' tool nor count the turns to seat before removing the MCS on tear down I adjusted the MCS up or down to achieve 1/8" of travel from the rich stop screw in the airhorn, which I hadn't touched. I had to go a half turn down to get 1/8" of travel. I removed the airhorn to make these adjustments rather than removing the plug in the airhorn and buying the special tool.
The book method would be to set the height of the MCS to proper specs then adjust the rich stop setting screw in the airhorn to obtain 1/8" of travel. The plugs over both screws can be removed from the airhorn to allow the proper tool to make these adjustments without removing the airhorn. If you don't have the 'tool', no need to remove the plugs.
Install a new choke seal, provided in the kit:
Install the secondary lockout lever:
Install the choke housing while holding the choke rod and lever in the well to engage the choke shaft as you push it through. May take a few tries. Choke rod and housing:
Last edited by naf; 01-18-2009 at 08:12 PM.
01-18-2009, 04:42 PM
#6
Supreme Member
Thread Starter
iTrader: (7)
Join Date: May 2004
Location: Lexington, SC
Posts: 5,291
Likes: 0
Received 58 Likes
on
52 Posts
Car: 1987 SC/1985 TA
Engine: 350/vortec/fitech
Transmission: T56
Axle/Gears: 3.27 9-bolt
Re: re-building a ccc-qjet carburetor
Slipping the choke rod and lever into the well:
Choke housing installed (this pic shows the air horn and pull off installed also which are outlined in later steps):
After installing the choke housing and with the airhorn back off I installed a new TPS. I tested the old one with a digital ohm meter (it was off the vehicle when I got it) and the readings were very erratic, a good sign it was bad. A new TPS cost me $25.
Install TPS with the spring underneath. Make sure that when you press on the plunger the spring keeps the TPS body from moving down. With a used TPS and varnish in the moving parts, plunger friction may overcome the spring pressure. This will cause the TPS body to move down with the plunger and it won't send a proper signal to the ECM while operating. I've had to install a second spring under some of these before. TPS installed:
Kit comes with a new spring and gasket for the booster pump:
Last edited by naf; 01-18-2009 at 08:15 PM.
01-18-2009, 05:00 PM
#7
Supreme Member
Thread Starter
iTrader: (7)
Join Date: May 2004
Location: Lexington, SC
Posts: 5,291
Likes: 0
Received 58 Likes
on
52 Posts
Car: 1987 SC/1985 TA
Engine: 350/vortec/fitech
Transmission: T56
Axle/Gears: 3.27 9-bolt
Re: re-building a ccc-qjet carburetor
After removing the old gasket, work the new one over the back end (top) of the plunger to keep from accidentally breaking one of the tangs on the bottom.
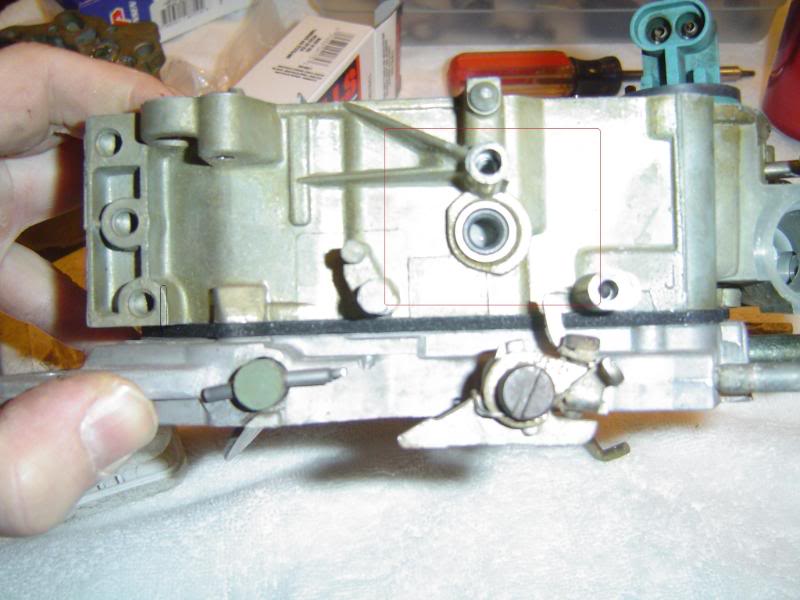
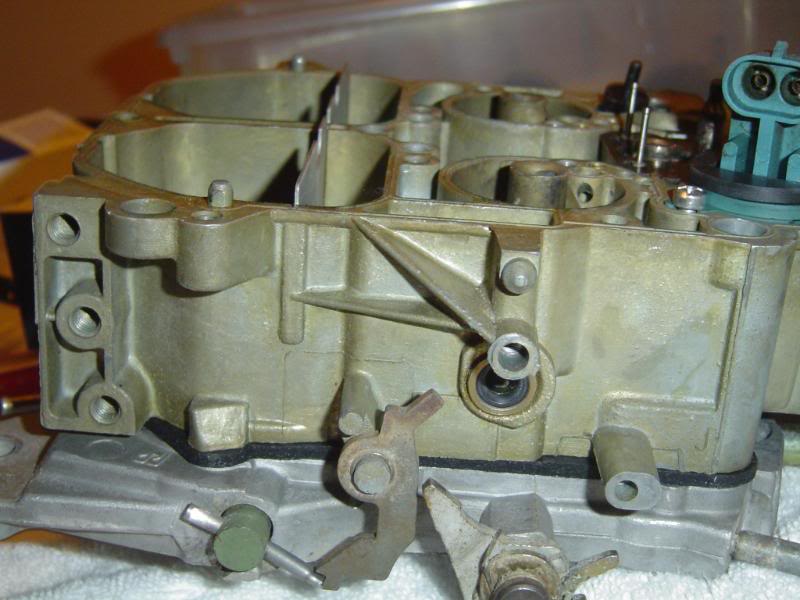
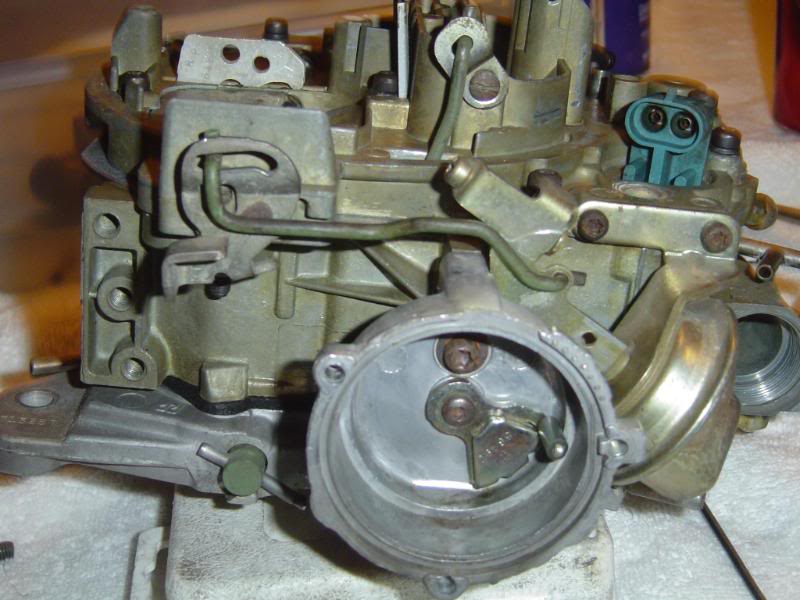
Prep the airhorn, pop out the seals and retainers (little silver washers) for the TPS plunger and booster pump. You may need a small screwdriver to wedge them out. Install the new seals and tap the seal retainers in place with a large screwdriver to seat them. This photo shows the new seals and retainers in place (one is not really clear) it also shows the four tubes installed in the airhorn. A lot of times you'll find one or more loose inside. After cleaning just carefully tap it back into place.
Before installing the airhorn, place a small dab of grease on the TPS plunger and place it in the cavity above the TPS (under the booster pump lever in the airhorn). The dab will hold it in place while the airhorn is installed.
Install the plunger and airhorn using the special airhorn installation tool. Use the tool to hold down the booster pump and TPS while installing the airhorn over its gasket. Air horn tool:
MCS plunger and primary rods re-installed. Little rubber gasket over MCS. Hold down the TPS and booster pump as shown while installing the airhorn. Maneuver the choke rod through its opening, get airhorn in place and slide tool out. Once installed make sure the MCS plunger still moves up and down freely through the IAB well as I did previously when checking its travel. Install all the airhorn screws starting with the two small ones inside the primary throat. The kit includes a sequence for tightening.
Last edited by naf; 02-26-2009 at 05:16 PM.
Trending Topics
01-18-2009, 05:18 PM
#8
Supreme Member
Thread Starter
iTrader: (7)
Join Date: May 2004
Location: Lexington, SC
Posts: 5,291
Likes: 0
Received 58 Likes
on
52 Posts
Car: 1987 SC/1985 TA
Engine: 350/vortec/fitech
Transmission: T56
Axle/Gears: 3.27 9-bolt
Re: re-building a ccc-qjet carburetor
Connect the booster pump actuator rod to the booster pump lever. The kit should have another of those funky little clips:
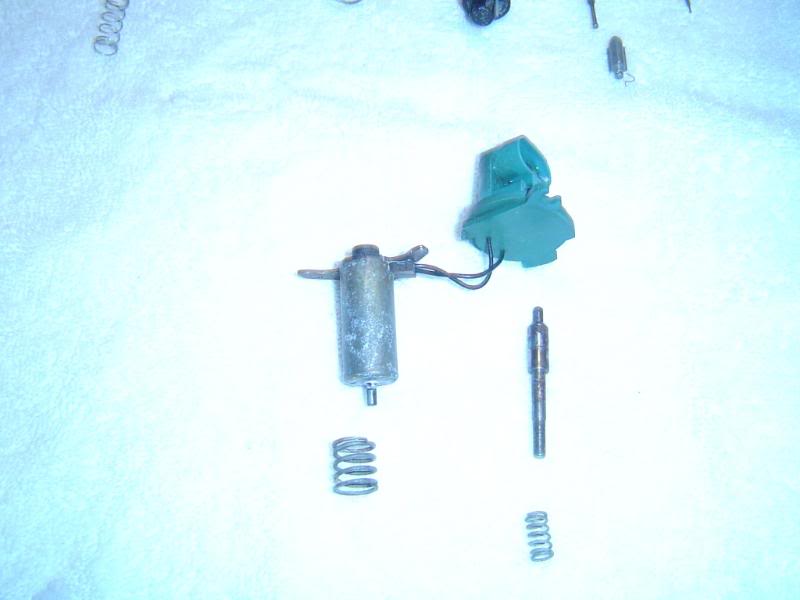
I had to find a replacement vacuum break in my box of carb goodies. The existing one was bad. Check it by pushing in the plunger then covering the vacuum hole at the end of the tube with your finger. The plunger should stay in until you let off your finger. You can also test them with a mity vac. A vacuum source should pull in the plunger.
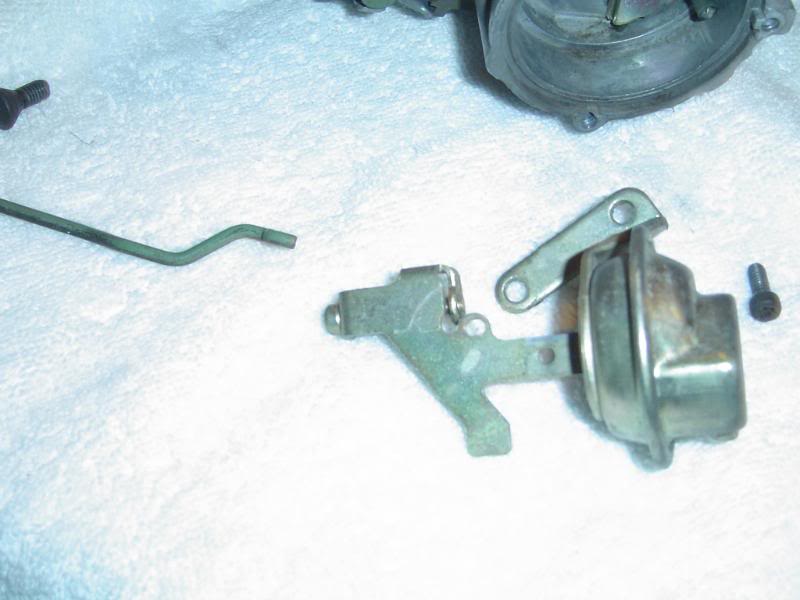
Vacuum break installed along with the connecting rod to the air valve. This rod helps modulate opening of the air valves along with the air valve tension spring.

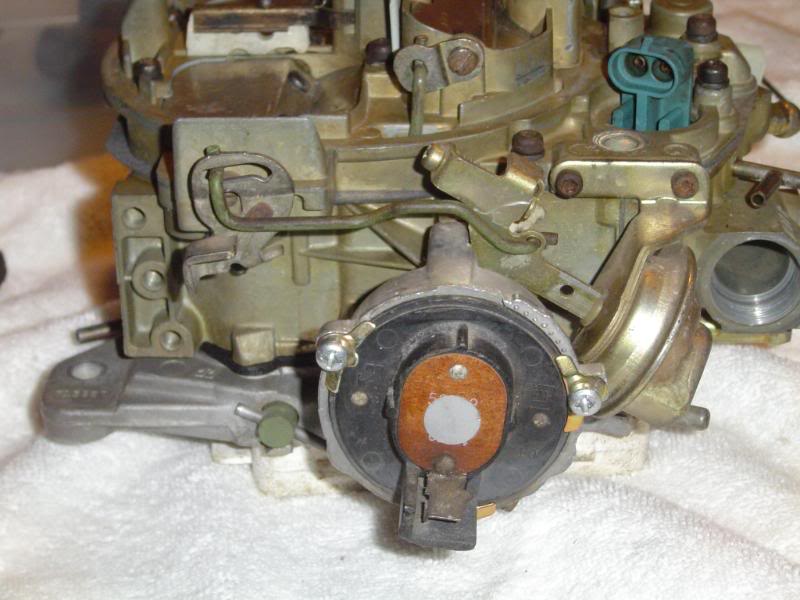
Install the electric choke cover with the supplied screws and retainer clips (3). If the choke cover has never been off before, the factory rivets will have to be drilled out. I pieced this choke assembly together from parts as I pulled the original choke stat off to replace a bad one on another carb. The choke coil should engage the choke shaft lever inside the housing when installed and, when cold, pull the choke blades closed. Also note that I've connected the choke rod to the lever on the choke blades up top.
I had to find a replacement vacuum break in my box of carb goodies. The existing one was bad. Check it by pushing in the plunger then covering the vacuum hole at the end of the tube with your finger. The plunger should stay in until you let off your finger. You can also test them with a mity vac. A vacuum source should pull in the plunger.
Vacuum break installed along with the connecting rod to the air valve. This rod helps modulate opening of the air valves along with the air valve tension spring.
Install the electric choke cover with the supplied screws and retainer clips (3). If the choke cover has never been off before, the factory rivets will have to be drilled out. I pieced this choke assembly together from parts as I pulled the original choke stat off to replace a bad one on another carb. The choke coil should engage the choke shaft lever inside the housing when installed and, when cold, pull the choke blades closed. Also note that I've connected the choke rod to the lever on the choke blades up top.
Last edited by naf; 01-18-2009 at 07:34 PM.
01-18-2009, 07:49 PM
#9
Supreme Member
Thread Starter
iTrader: (7)
Join Date: May 2004
Location: Lexington, SC
Posts: 5,291
Likes: 0
Received 58 Likes
on
52 Posts
Car: 1987 SC/1985 TA
Engine: 350/vortec/fitech
Transmission: T56
Axle/Gears: 3.27 9-bolt
Re: re-building a ccc-qjet carburetor
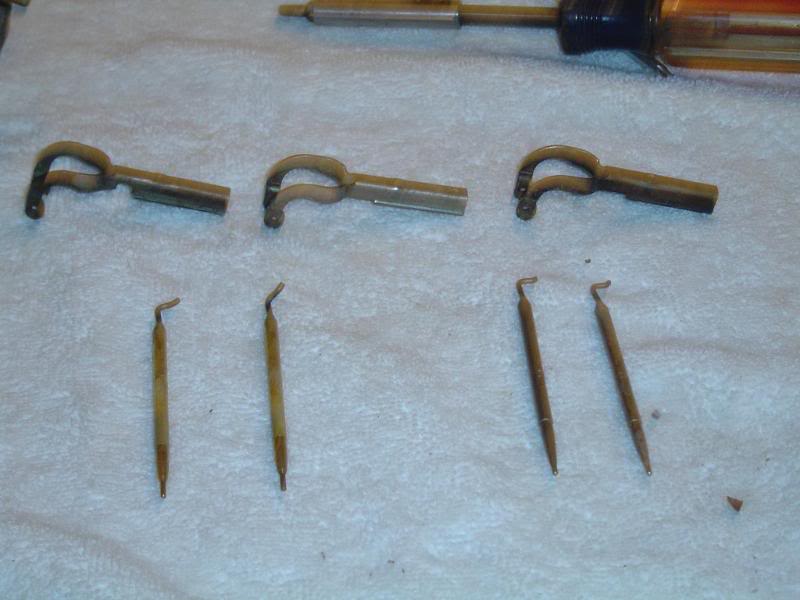
I found three different sets of secondary rods and hangers in my box of carb goodies. Of course, none were particularly desirable. I chose the smallest hanger, I had an "I" a "J" and a "K". The smaller set of rods weren't marked. I'll swap them with something better if I need to later. This motor won't be that hot.
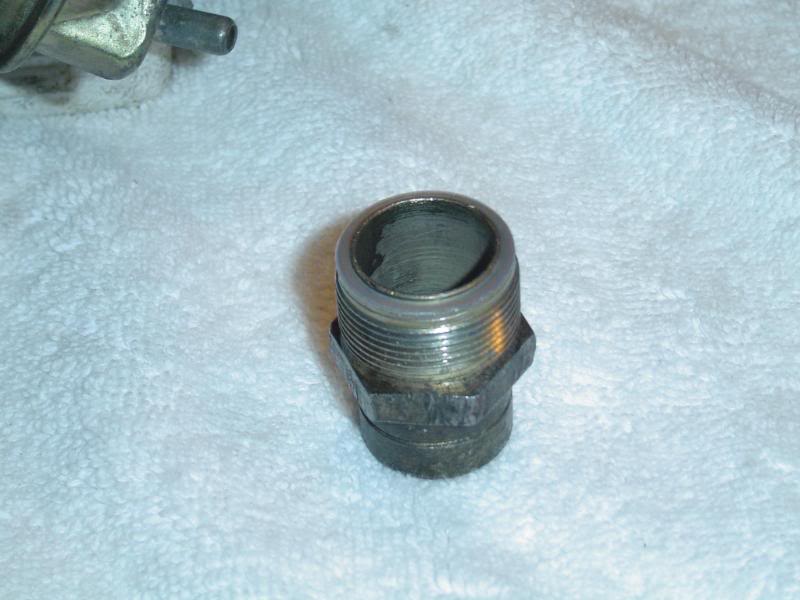
Fuel inlet with little plastic gasket as included in kit. The gasket should seal without the use of teflon tape or any other goop.
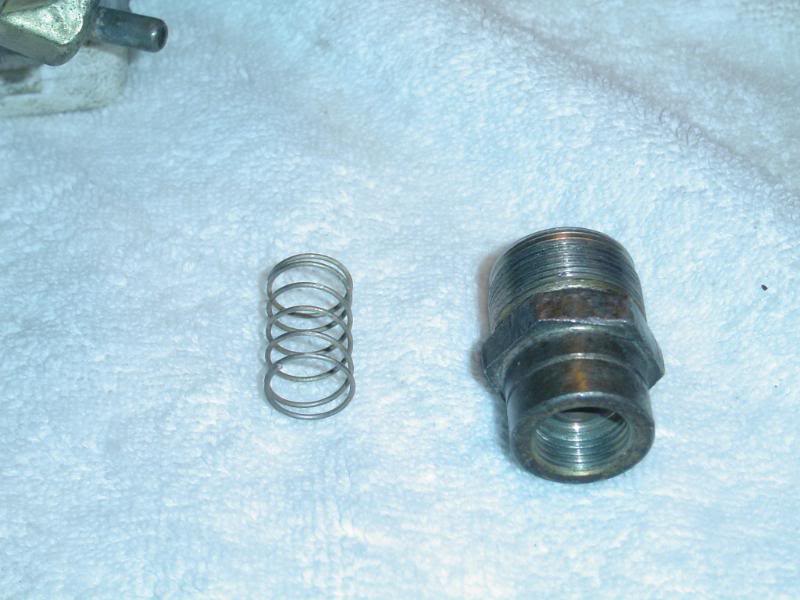
I'll install a filter later as I don't have one on hand. Spring goes in first, then filter.
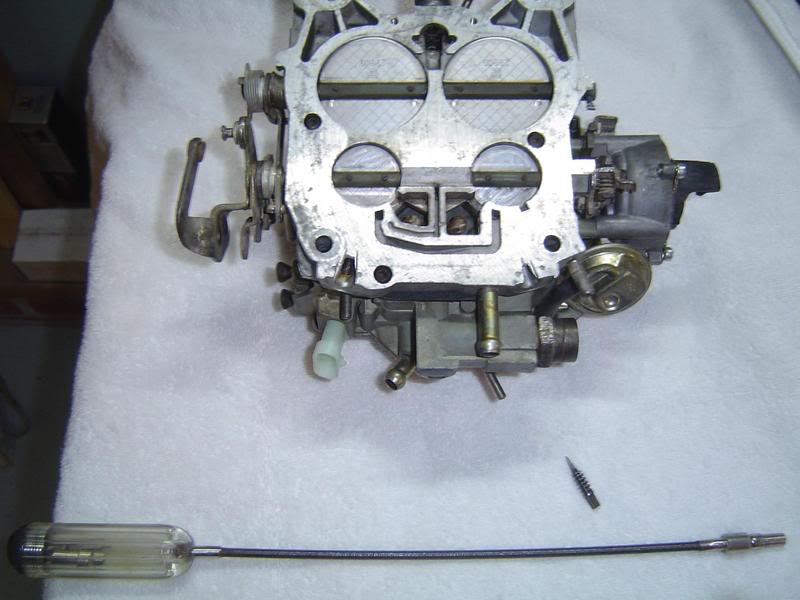
Shown is one idle mixture screw and a carb adjustment tool. I saw one just like it the other day at AZ for $12. I set the mixture screws in 4 turns out from seated. Once on the motor I'll make any other adjustments needed.
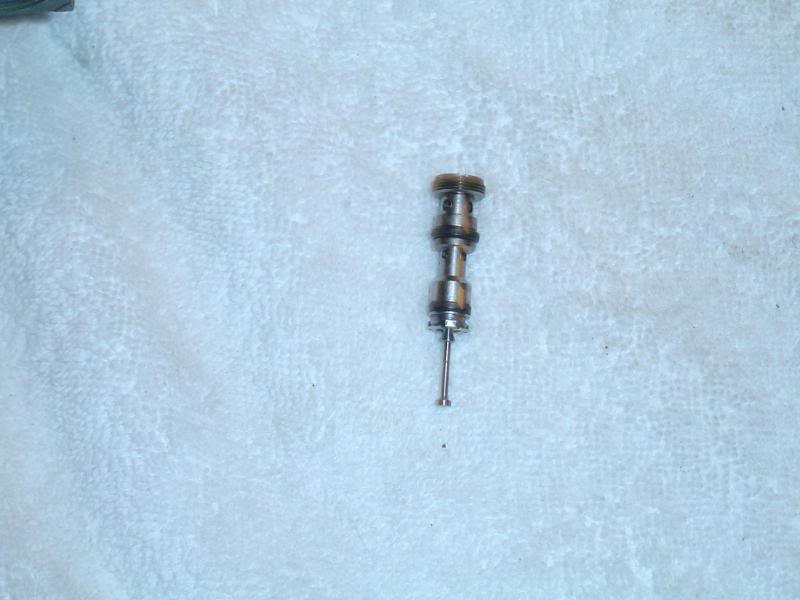
Lastly the IAB screw. Cleaned with new o-rings (not included in kit however). I initially install at four turns out from lightly seated. Adjustment will be later after installed on motor.
With proper travel of the MCS and the idle mixture screws and IAB 4 turns out this should fire up and run and be close to proper adjustment. Later on I'll outline the adjustments for proper dwell and especially the TPS as I've installed a new one.
There's likely something I've left out and/or alternate ways of doing things that I've omitted, or simply don't know. Feel free to add any tips or tricks.
Mike
Fuel inlet with little plastic gasket as included in kit. The gasket should seal without the use of teflon tape or any other goop.
I'll install a filter later as I don't have one on hand. Spring goes in first, then filter.
Shown is one idle mixture screw and a carb adjustment tool. I saw one just like it the other day at AZ for $12. I set the mixture screws in 4 turns out from seated. Once on the motor I'll make any other adjustments needed.
Lastly the IAB screw. Cleaned with new o-rings (not included in kit however). I initially install at four turns out from lightly seated. Adjustment will be later after installed on motor.
With proper travel of the MCS and the idle mixture screws and IAB 4 turns out this should fire up and run and be close to proper adjustment. Later on I'll outline the adjustments for proper dwell and especially the TPS as I've installed a new one.
There's likely something I've left out and/or alternate ways of doing things that I've omitted, or simply don't know. Feel free to add any tips or tricks.
Mike
Last edited by naf; 01-19-2009 at 09:42 AM.
01-18-2009, 07:52 PM
#10
Moderator
Join Date: Jan 2000
Location: Mercedes Norte, Heredia, Costa Rica
Posts: 20,981
Likes: 0
Received 9 Likes
on
8 Posts
Car: 1984 Z28 Hardtop
Engine: 383 Carb
Transmission: 4L60
Axle/Gears: 3.54 Dana 44
Re: re-building a ccc-qjet carburetor
I didn't see anything about seating the new accelerator pump checkball with a punch.
02-24-2009, 10:43 PM
#12
Junior Member

Join Date: Jan 2009
Location: Portland,Oregon
Posts: 44
Likes: 0
Received 0 Likes
on
0 Posts
Car: 1987 camaro
Engine: 5.0 ccc q-jet
Transmission: 700R4
Re: re-building a ccc-qjet carburetor
this is very valuable info for guys that have not rebuilt carbs befor and are learning on the q-jet(like me). thank you very much!! it really helped me keep from getting mixed up and overwhelmed
02-26-2009, 04:32 PM
#13
Member

Join Date: Nov 2005
Posts: 136
Likes: 0
Received 0 Likes
on
0 Posts
Car: 87 firebird
Engine: 305
Transmission: 700r4
Re: re-building a ccc-qjet carburetor
Thanks this will really help alot since I bought the kit. What is the kit number if you dont mind me asking? Just want to make sure its the same. Also my float cover( the black cover that goes over the float) is broken is that in the kit? Still have not opened box.
02-26-2009, 05:02 PM
#14
Supreme Member
Thread Starter
iTrader: (7)
Join Date: May 2004
Location: Lexington, SC
Posts: 5,291
Likes: 0
Received 58 Likes
on
52 Posts
Car: 1987 SC/1985 TA
Engine: 350/vortec/fitech
Transmission: T56
Axle/Gears: 3.27 9-bolt
Re: re-building a ccc-qjet carburetor
Don't have the kit number but they're pretty generic and will fit more than one model. The instruction sheet says it will fit E4ME and E4MC. I've gotten them at NAPA and Autozone.
If you're unable to re-use your float cavity insert let me know and I may have a spare I can send you. No promises, but there may be one in that box over there in the corner of the garage under the work table.
Mike
If you're unable to re-use your float cavity insert let me know and I may have a spare I can send you. No promises, but there may be one in that box over there in the corner of the garage under the work table.
Mike
02-27-2009, 06:44 PM
#15
Junior Member
Join Date: Jan 2009
Location: Portland,Oregon
Posts: 44
Likes: 0
Received 0 Likes
on
0 Posts
Car: 1987 camaro
Engine: 5.0 ccc q-jet
Transmission: 700R4
Re: re-building a ccc-qjet carburetor
hey mike, i also had a broken float cavity insert in my carb, if ino doesnt want it i would love to get it from you. i try'd to piece it back together but no good. the carb. is flooding and i believe it is from that insert. found a couple kit online but they are kinda spendy. if not i guess i will order the " mixture controll solenoid kit" for$54.95 plus $9.95 s.&h. from the carburetor dr. at : www.carburetor.ca if not thanks anyway.
02-28-2009, 08:37 AM
#16
Supreme Member
Thread Starter
iTrader: (7)
Join Date: May 2004
Location: Lexington, SC
Posts: 5,291
Likes: 0
Received 58 Likes
on
52 Posts
Car: 1987 SC/1985 TA
Engine: 350/vortec/fitech
Transmission: T56
Axle/Gears: 3.27 9-bolt
Re: re-building a ccc-qjet carburetor
Let me give INO first dibs. I've only got one right now.
If you can wait a few weeks, however, I can pick another one up next time I go by the local pick and pull. I try to go by every other month or so whether I need to or not.
If you can wait a few weeks, however, I can pick another one up next time I go by the local pick and pull. I try to go by every other month or so whether I need to or not.
02-28-2009, 12:15 PM
#17
Senior Member
iTrader: (1)
Join Date: Sep 2007
Location: Hampton, Virginia
Posts: 596
Likes: 0
Received 1 Like
on
1 Post
Car: 87 Camaro Z-28
Engine: 305 LG4 w/ E4ME carb
Transmission: 700R4
Axle/Gears: 2.73
Re: re-building a ccc-qjet carburetor
hey mike, i also had a broken float cavity insert in my carb, if ino doesnt want it i would love to get it from you. i try'd to piece it back together but no good. the carb. is flooding and i believe it is from that insert. found a couple kit online but they are kinda spendy. if not i guess i will order the " mixture controll solenoid kit" for$54.95 plus $9.95 s.&h. from the carburetor dr. at : www.carburetor.ca if not thanks anyway.
02-28-2009, 05:34 PM
#18
Junior Member
Join Date: Jan 2009
Location: Portland,Oregon
Posts: 44
Likes: 0
Received 0 Likes
on
0 Posts
Car: 1987 camaro
Engine: 5.0 ccc q-jet
Transmission: 700R4
Re: re-building a ccc-qjet carburetor
thanks guys, however i did find a website i could order one from for only $8.00. this is a very hard part to track down new. the web site is:the carburetorfactory.com. these guys seem to have everything. thanks again.
monty
monty
03-01-2009, 03:04 PM
#19
Senior Member
iTrader: (1)
Join Date: Sep 2007
Location: Hampton, Virginia
Posts: 596
Likes: 0
Received 1 Like
on
1 Post
Car: 87 Camaro Z-28
Engine: 305 LG4 w/ E4ME carb
Transmission: 700R4
Axle/Gears: 2.73
Re: re-building a ccc-qjet carburetor
very cool, the carburetorfactory.com is just a couple miles from my uncle. Now I have another reason to go visit him!
here is a link to some general tuning comments; has an interesting idea on cars w/ low vacuum at idle: http://www.carcraft.com/howto/ccrp_0...cks/index.html
here is a link to some general tuning comments; has an interesting idea on cars w/ low vacuum at idle: http://www.carcraft.com/howto/ccrp_0...cks/index.html
Last edited by scooter500; 03-01-2009 at 03:23 PM. Reason: added a link to an article on tuning
01-07-2011, 11:00 AM
#22
Member

Join Date: Aug 2004
Location: Lexington, SC
Posts: 484
Likes: 0
Received 0 Likes
on
0 Posts
Car: 1986 Z28 Camaro
Engine: 350 with .440" lopey cam
Transmission: 6spd T56
Axle/Gears: Detroit Truetrac with 3.73 gears
Re: re-building a ccc-qjet carburetor
I know this post is a couple years old, but if the original poster is around do you happen to still have the pics? They aren't in the posts anymore. I might be attempting a rebuild on one of these carbs, haven't decided yet if I'm going to do it myself or pay expensive labor charges to have someone else do it.
01-07-2011, 02:43 PM
#23
Supreme Member
Thread Starter
iTrader: (7)
Join Date: May 2004
Location: Lexington, SC
Posts: 5,291
Likes: 0
Received 58 Likes
on
52 Posts
Car: 1987 SC/1985 TA
Engine: 350/vortec/fitech
Transmission: T56
Axle/Gears: 3.27 9-bolt
Re: re-building a ccc-qjet carburetor
Weird. They show when I look at it?
This should be a link to the photobucket album:
http://s246.photobucket.com/albums/gg100/naftu/
If you have q's just post them up or start a thread on your build. Do not pay someone else to do it. @hit, you're right down the road from me if you need help...
This should be a link to the photobucket album:
http://s246.photobucket.com/albums/gg100/naftu/
If you have q's just post them up or start a thread on your build. Do not pay someone else to do it. @hit, you're right down the road from me if you need help...
01-07-2011, 05:57 PM
#24
Member
Join Date: Aug 2004
Location: Lexington, SC
Posts: 484
Likes: 0
Received 0 Likes
on
0 Posts
Car: 1986 Z28 Camaro
Engine: 350 with .440" lopey cam
Transmission: 6spd T56
Axle/Gears: Detroit Truetrac with 3.73 gears
Re: re-building a ccc-qjet carburetor
Ahh yeah, they show up now for me at home. Work must've been blocking the site they were hosted on, sorry for the confusion.
And yeah, I noticed you were in Lexington, SC too hehe. I dunno if I'm going to work on it this weekend or wait until next weekend but I think I'll give it a try myself and just post if I run into trouble.
I just looked at the exploded view of these carbs earlier today and got a little intimidated when it showed 515 parts in the thing, lol.
My biggest problem is going to be not recognizing if something needs to be replaced or just cleaned. I'm not a mechanic by any means, I'm a computer programmer and work on my camaro as a hobby lol. I see you replaced your float and tps when you did yours but you knew your TPS was bad, is the float a good thing to replace during a rebuild by default?
Last edited by Steven6282; 01-07-2011 at 06:01 PM.
01-08-2011, 12:21 PM
#25
Senior Member

Join Date: Oct 2010
Location: bellingham WA
Posts: 885
Likes: 0
Received 0 Likes
on
0 Posts
Car: 85 Z28
Engine: 327
Transmission: 700R4
Axle/Gears: 3.23
Re: re-building a ccc-qjet carburetor
Steven. I just did mine. Nevr owned a car with a carb before. Wasn't to bad at all. Take a lot of pics if you need to. Hardest part was getting those smaller rods in. Have to do it gently, as not to bend them. I also took pics of all linkage and lines going in, as well as those pluged off so I knew where it all went. The eploded diagram is very intimidating, but you only take apart about ten percent. Mine seems to work after put on car, I just need to make some adjustments with my idle mixtyre screw. Only took about two hours. Most of time was waiting for parts to get clean
01-09-2011, 04:19 PM
#26
Supreme Member
Thread Starter
iTrader: (7)
Join Date: May 2004
Location: Lexington, SC
Posts: 5,291
Likes: 0
Received 58 Likes
on
52 Posts
Car: 1987 SC/1985 TA
Engine: 350/vortec/fitech
Transmission: T56
Axle/Gears: 3.27 9-bolt
Re: re-building a ccc-qjet carburetor
Been away for the weekend....
The floats a good thing to go ahead and replace.
If you need any help, or any pieces/parts just let me know.
And always record the number of turns to seat for the lean mixture screw (holds the Mixture Control Solenoid (MCS) in) so it can be re-installed to the same position.
The floats a good thing to go ahead and replace.
If you need any help, or any pieces/parts just let me know.
And always record the number of turns to seat for the lean mixture screw (holds the Mixture Control Solenoid (MCS) in) so it can be re-installed to the same position.
03-21-2011, 06:51 PM
#27
Junior Member

Join Date: Mar 2011
Posts: 1
Likes: 0
Received 0 Likes
on
0 Posts
Re: re-building a ccc-qjet carburetor
Just A Quick Thanks To NAF for Putting this post here originally, I've rebuilt a few of the early 70's q-jet's, but never a E4ME, I just got a 86 Monte Carlo SS and it's all original, sat 4 10 years, Runs Awesome Now, You've Saved My Car From Being Hacked, I was that close, until I Found this post! Many Thanks!

08-12-2011, 01:34 PM
#28
Senior Member
Join Date: Sep 2003
Location: Hurlburt Field
Posts: 738
Likes: 0
Received 1 Like
on
1 Post
Car: 84 Z28, '15 Colorado
Engine: L69
Transmission: A4
Axle/Gears: 3.73
Re: re-building a ccc-qjet carburetor
Phenomenal. Absolutely phenomenal! I just rebuilt my E4ME using your guide and the shop manual. I couldn't have done it without your write up. Thank you
Sticky!
Sticky!
05-16-2013, 04:01 PM
#29
Supreme Member
Re: re-building a ccc-qjet carburetor
This is an old thread and a very useful basic guide for rebuilding the factory Q-jet carb. A few things that I would add to help the beginner achieve a successful outcome are as follows: Check the throttle shafts carefully for excessive runout. It is this runout and the air leaks that go with it that will lead to a sticking throttle and/or difficulty setting base idle. A competent carb shop can rebush the throttle shafts to solve this. You can do it yourself if you have the correct reamer for the bushings but I have paid $25 to have it done and find this easier than buying the tool myself. Another point concerning the TPS is to be very carefull on removal and installation of the airhorn not to bind the plastic TPS plunger or you will break it. Finally, be careful tightening the choke housing mounting screw. By overtightening this screw, you can easily warp the housing and cause a sticky choke linkage. The seal that Naf mentioned in this thread is not really a seal at all but rather a bushing and if the housing is damaged from overtightening, the choke shaft binds in this bushing. Once the damage is done, the only solution is to replace the choke housing.
05-17-2013, 06:48 AM
#30
Supreme Member
Thread Starter
iTrader: (7)
Join Date: May 2004
Location: Lexington, SC
Posts: 5,291
Likes: 0
Received 58 Likes
on
52 Posts
Car: 1987 SC/1985 TA
Engine: 350/vortec/fitech
Transmission: T56
Axle/Gears: 3.27 9-bolt
Re: re-building a ccc-qjet carburetor
Thanks for the tips.
Over the last few years I'm finding more qjets with worn out throttle bushings. You can easily check for play in the primary shaft by trying to wiggle it fore and aft WITH the throttle open slightly. When the throttle plate is shut, the butterfly valves will usually hold it tightly.
Over the last few years I'm finding more qjets with worn out throttle bushings. You can easily check for play in the primary shaft by trying to wiggle it fore and aft WITH the throttle open slightly. When the throttle plate is shut, the butterfly valves will usually hold it tightly.
05-21-2013, 11:45 PM
#31
Member
Join Date: Oct 2009
Location: Washington-state
Posts: 369
Likes: 0
Received 0 Likes
on
0 Posts
Car: '96 Camaro-Vsux -- SOLD, '84 Z/28
Engine: 3.8L, 305 SBC
Transmission: 4L60E, T-5
Axle/Gears: 3.08s, 3.23s
Re: re-building a ccc-qjet carburetor
This is an old thread and a very useful basic guide for re..... as follows: Check the throttle shafts carefully for excessive runout. It is this runout and the air leaks that go with it that will lead to a sticking throttle and/or difficulty setting base idle. A competent carb shop can rebush the throttle shafts to solve this. You can do it yourself if you have the correct reamer for the bushings but I have paid $25 to have it done and find this easier than buying the tool myself. Another point ..bushing. Once the damage is done, the only solution is to replace the choke housing.

Thread
Thread Starter
Forum
Replies
Last Post
Darth Mole
Tech / General Engine
2
09-21-2015 09:48 AM
GeneralIesrussi
Tech / General Engine
0
09-03-2015 03:23 AM
accelerator, adjustments, carburetor, ccc, connector, e4mc, e4me, factory, installing, lever, mcs, plugs, pump, qjet, remove, tps