Mini tubb project started


 02-19-2008, 12:31 PM
#154
Supreme Member

iTrader: (5)
Join Date: Jan 2002
Location: Orland Park, IL
Posts: 13,619
Likes: 0
Received 3 Likes
on
3 Posts
Car: 1984 Z28
Engine: SLOW carbed ls
Transmission: TH400 with brake, 8" PTC converter
Axle/Gears: moser 9" 4.11
Re: Mini tubb project started
a full tub should fit close to 15" wide tires, possibly. Right now I have 12.50 tires on there with only slight cutting, I'm sure another 2.5" after a full tub could be possible.

 02-20-2008, 03:12 PM
#158
Supreme Member
iTrader: (5)
Join Date: Jan 2002
Location: Orland Park, IL
Posts: 13,619
Likes: 0
Received 3 Likes
on
3 Posts
Car: 1984 Z28
Engine: SLOW carbed ls
Transmission: TH400 with brake, 8" PTC converter
Axle/Gears: moser 9" 4.11
Re: Mini tubb project started
so it's going in the stock location? stock fuel filler location as well then? I'm guessing that is what the pipe on the end is for.
02-20-2008, 04:56 PM
#159
Supreme Member
Thread Starter
iTrader: (14)
Join Date: Jan 2004
Location: The "D"
Posts: 1,761
Likes: 0
Received 3 Likes
on
3 Posts
Car: A Portly 85 Z28
Engine: 4.530 X 4.250 BBC
Transmission: under rated for this application
Axle/Gears: also under rated
Re: Mini tubb project started
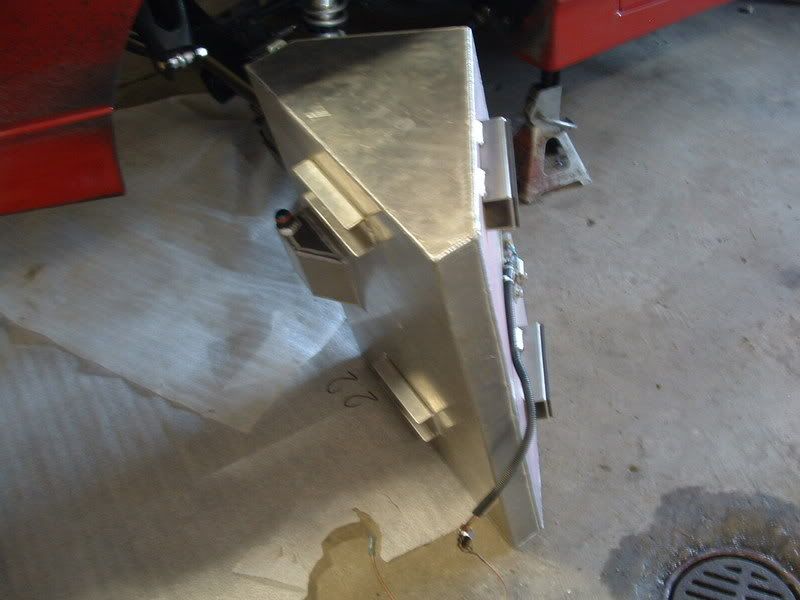
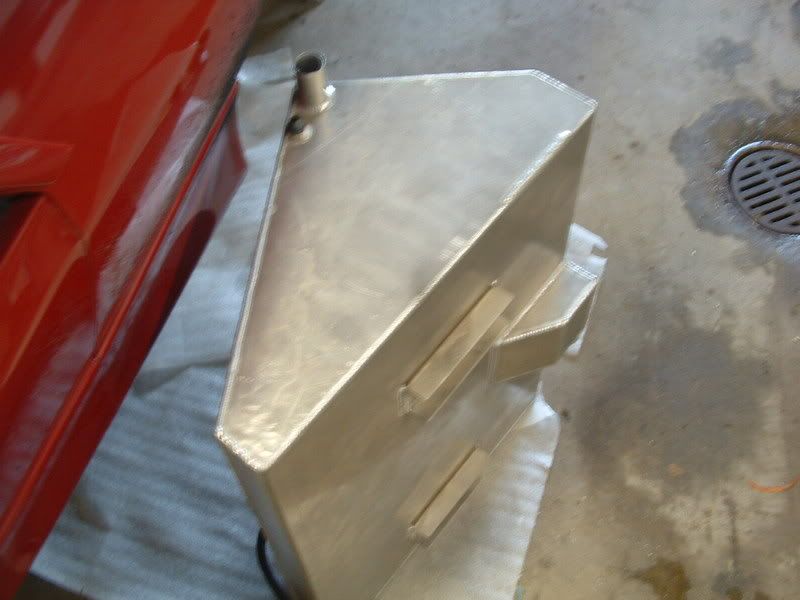
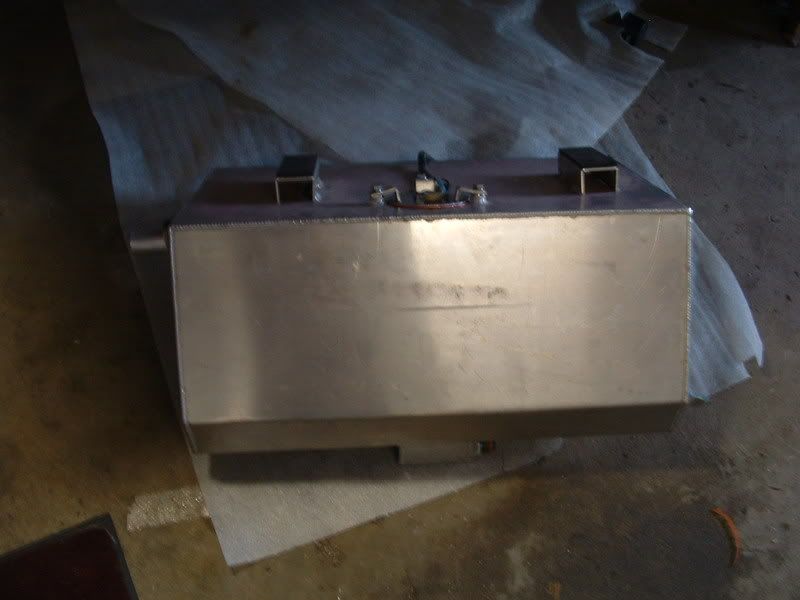
Yep, stock location...it`s for a 4th gen but it`s so close in size if not the same it bolts right in, I`m using the stock straps. The filler neck pipe is in the stock spot, I could use a cut off third gen neck but the fourth gen neck fits the 3rd gen just fine. It`s a bit big for a drag car but I don`t have to worry about firewalls and tanks inside the car, Plus I like to have a little weight over the rear axle.
02-20-2008, 05:01 PM
#160
Supreme Member
iTrader: (5)
Join Date: Jan 2002
Location: Orland Park, IL
Posts: 13,619
Likes: 0
Received 3 Likes
on
3 Posts
Car: 1984 Z28
Engine: SLOW carbed ls
Transmission: TH400 with brake, 8" PTC converter
Axle/Gears: moser 9" 4.11
Re: Mini tubb project started
looks pretty nice, I just sumped my factory tank and called it good. Probably going to have to drop it and drill a hole in the top for the return sometime this spring.
02-23-2008, 07:04 AM
#161
Junior Member

Join Date: Feb 2008
Posts: 19
Likes: 0
Received 0 Likes
on
0 Posts
Re: Mini tubb project started
Who's the jerk that took so long on the axle?  It looks great!! I'm looking forward to seeing what she'll do this summer. I'll be seeing you later this morning..
Mike
It looks great!! I'm looking forward to seeing what she'll do this summer. I'll be seeing you later this morning..Mike
03-13-2008, 10:52 PM
#162
Re: Mini tubb project started
10" rim with 5.5bs will have 4.5" sticking towards the outside of vehicle.
8" rim with 4.5bs will have 3.5" sticking out towards the outside of the vehicle.
Therefore the 8" rim would look tucked 1" more.
Now what I have done is mount a 10" rim with 6.5bs which has the same 3.5" sticking out for the exact same tucked look.
8" rim with 4.5bs will have 3.5" sticking out towards the outside of the vehicle.
Therefore the 8" rim would look tucked 1" more.
Now what I have done is mount a 10" rim with 6.5bs which has the same 3.5" sticking out for the exact same tucked look.
An 8� rim with 4.5�bs will have 4.5� sticking out to the outside of the hub surface (0 offset).
A 10� rim with 5.5�bs will have 5.5� sticking out towards the outside of the hub surface (again, 0 offset).
If you mount the same tire on both those rims the tread will end up in exactly the same place in the wheel well.
03-14-2008, 06:26 AM
#163
Senior Member
iTrader: (3)
Join Date: Apr 2005
Location: Hickory, NC
Posts: 890
Likes: 0
Received 0 Likes
on
0 Posts
Car: 1991 Camaro RS, 1993 Camaro Z-28
Engine: what engine, LT1
Transmission: did it come with one, 4l60
Axle/Gears: They spin (most of the time)
Re: Mini tubb project started
Um, no....xpndbl3 is right
03-14-2008, 06:48 AM
#164
Supreme Member
Thread Starter
iTrader: (14)
Join Date: Jan 2004
Location: The "D"
Posts: 1,761
Likes: 0
Received 3 Likes
on
3 Posts
Car: A Portly 85 Z28
Engine: 4.530 X 4.250 BBC
Transmission: under rated for this application
Axle/Gears: also under rated
Re: Mini tubb project started
Hi Mike!!
I wouldn`t call the guy a jerk
 especially if he had my trans and soon to be new converter sitting in his gargare and the tracks were due to open in a month or less!!!!
Guys I got the plastics back in, fudged the passenger side one pretty good...of course the drivers side came out better less some unexpectable mishaps because of 20* plastic (seems to not be too flexable when frozen
 ) I`ll get a picture or two up in a bit..
03-14-2008, 11:06 AM
) I`ll get a picture or two up in a bit..
03-14-2008, 11:06 AM
#165
Supreme Member
iTrader: (5)
Join Date: Jan 2002
Location: Orland Park, IL
Posts: 13,619
Likes: 0
Received 3 Likes
on
3 Posts
Car: 1984 Z28
Engine: SLOW carbed ls
Transmission: TH400 with brake, 8" PTC converter
Axle/Gears: moser 9" 4.11
Re: Mini tubb project started
Um, no.
An 8� rim with 4.5�bs will have 4.5� sticking out to the outside of the hub surface (0 offset).
A 10� rim with 5.5�bs will have 5.5� sticking out towards the outside of the hub surface (again, 0 offset).
If you mount the same tire on both those rims the tread will end up in exactly the same place in the wheel well.
somewhere your math got wrong. I posted the correct info.
 03-14-2008, 12:17 PM
#166
Supreme Member
Thread Starter
iTrader: (14)
Join Date: Jan 2004
Location: The "D"
Posts: 1,761
Likes: 0
Received 3 Likes
on
3 Posts
Car: A Portly 85 Z28
Engine: 4.530 X 4.250 BBC
Transmission: under rated for this application
Axle/Gears: also under rated
Re: Mini tubb project started
he`s right about one thing...."0" offset on a 4.5
https://www.rsracing.com/tech-wheel.html#backspace
....As I was saying.

disclaimer: *all graphic shots of mis-cut plastic have been edited out to maximize your viewing pleasure*
https://www.rsracing.com/tech-wheel.html#backspace
....As I was saying.
disclaimer: *all graphic shots of mis-cut plastic have been edited out to maximize your viewing pleasure*
03-14-2008, 05:42 PM
#168
Supreme Member
iTrader: (5)
Join Date: Jan 2002
Location: Orland Park, IL
Posts: 13,619
Likes: 0
Received 3 Likes
on
3 Posts
Car: 1984 Z28
Engine: SLOW carbed ls
Transmission: TH400 with brake, 8" PTC converter
Axle/Gears: moser 9" 4.11
Re: Mini tubb project started
very nice, now just get some matching carpet and it'll blend in perfectly.
03-15-2008, 07:29 AM
#170
Supreme Member
Thread Starter
iTrader: (14)
Join Date: Jan 2004
Location: The "D"
Posts: 1,761
Likes: 0
Received 3 Likes
on
3 Posts
Car: A Portly 85 Z28
Engine: 4.530 X 4.250 BBC
Transmission: under rated for this application
Axle/Gears: also under rated
Re: Mini tubb project started
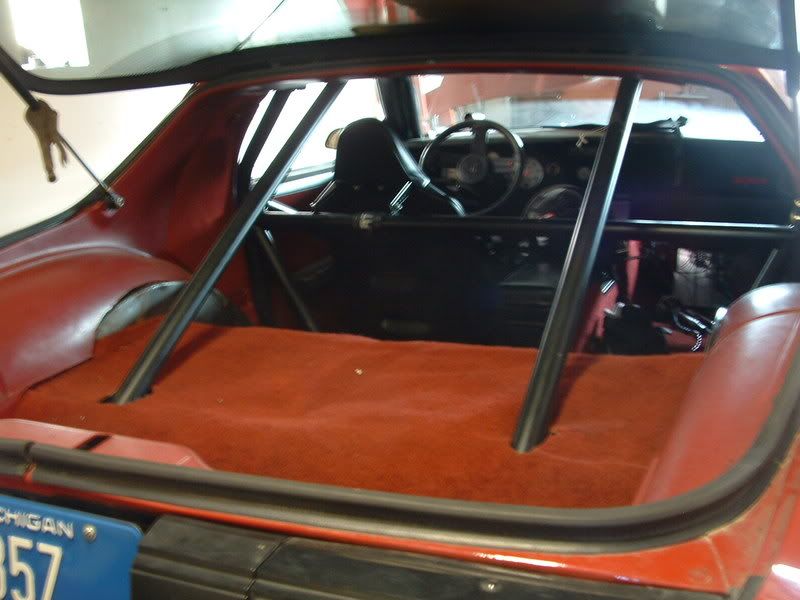
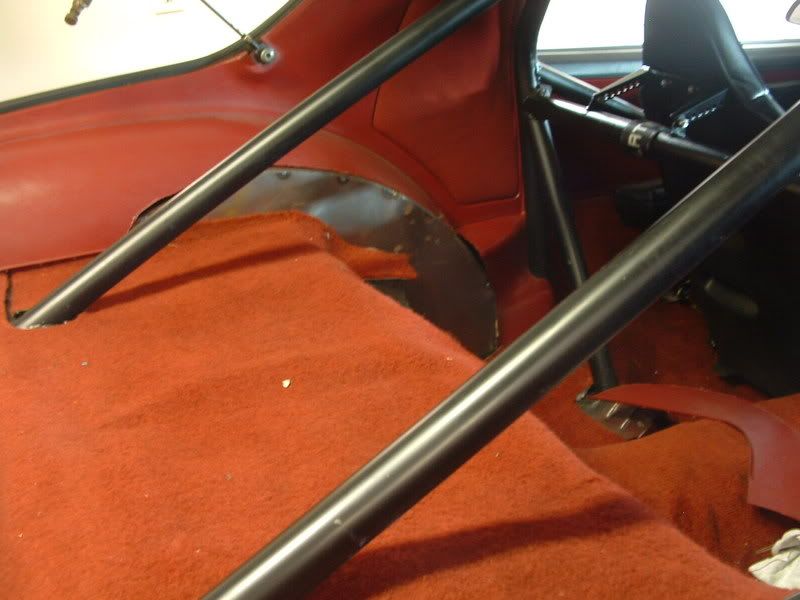
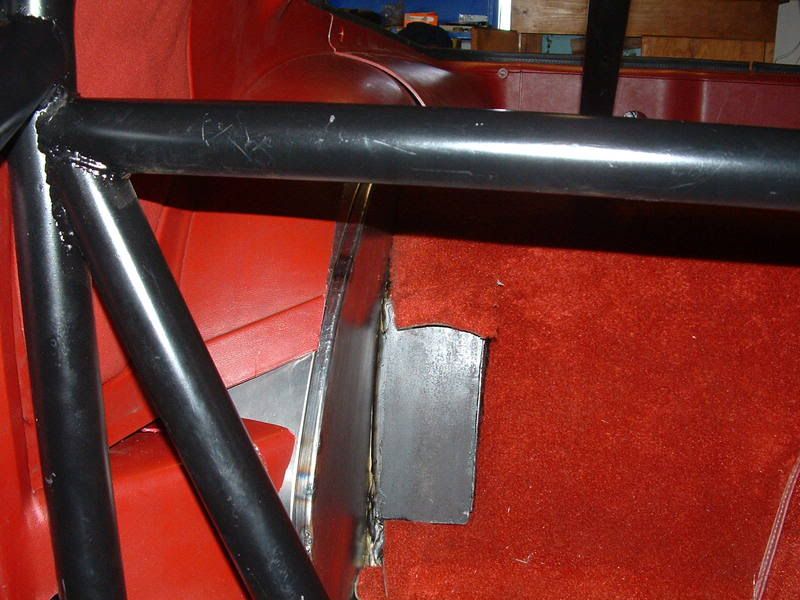
We used a 1/8 to fab the mounts, under the mounts we used a 1/4 thick plate that welded to the oe shock/spring area and it runs to the front of the new perch creating a second layer in the perch itself. This 1/4 piece that straddles both the new perch and the old mounting point has the coil over mounts welded to them. I`m mostly convinced that the mounting point we have created for the shocks is stronger than the stock position that many have used to run coil overs. Will it work?, yes...will it last? time will tell but I `m planning to keep close tabs on the new mounts.
05-14-2008, 05:42 AM
#171
Supreme Member
Thread Starter
iTrader: (14)
Join Date: Jan 2004
Location: The "D"
Posts: 1,761
Likes: 0
Received 3 Likes
on
3 Posts
Car: A Portly 85 Z28
Engine: 4.530 X 4.250 BBC
Transmission: under rated for this application
Axle/Gears: also under rated
Re: Mini tubb project started
few pic`s of it done, it hit the ground last nite finally, it was only one of many projects on the car this year but it all came together, should see the strip here soon after an alignment.
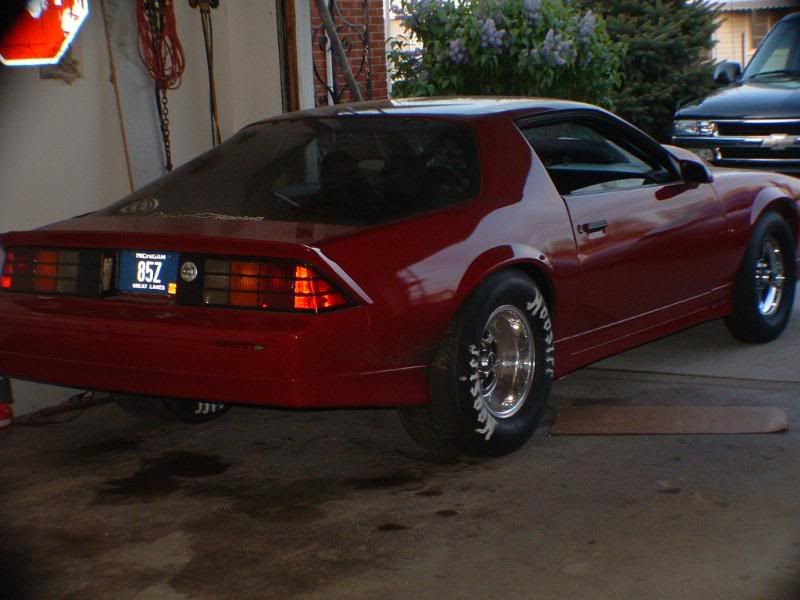
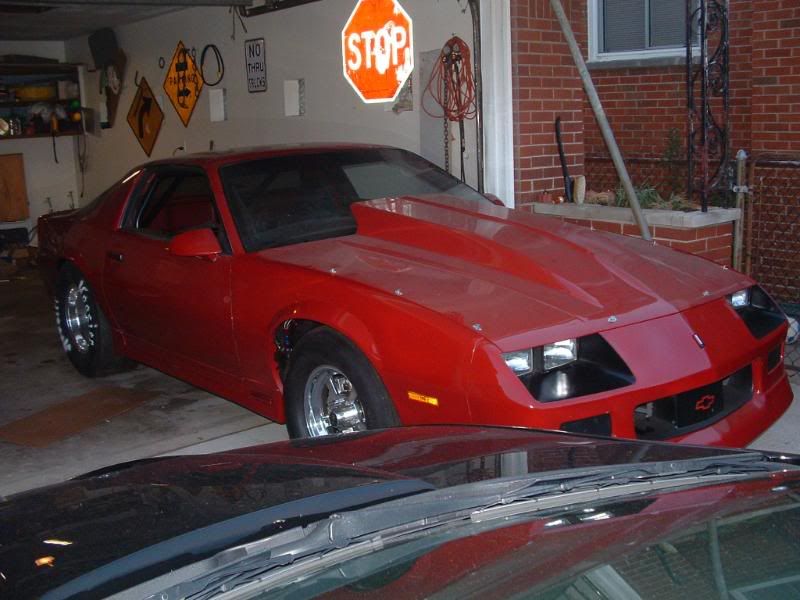
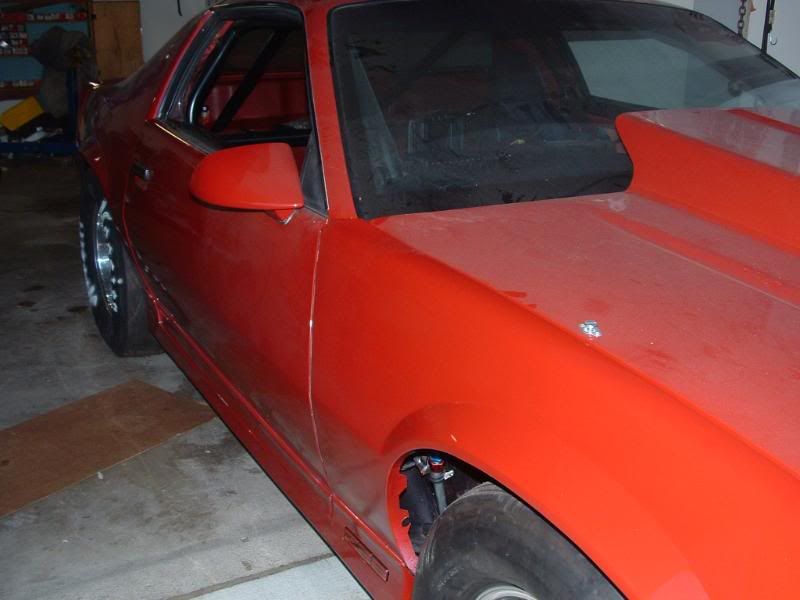
I love the deep dish look and the tires being tucked under the wells like a stocker!!
I love the deep dish look and the tires being tucked under the wells like a stocker!!
05-15-2008, 10:16 PM
#174
Senior Member
iTrader: (5)
Join Date: May 2005
Location: Midwest IL
Posts: 831
Likes: 0
Received 1 Like
on
1 Post
Car: 1984 Z28
Engine: Alky 360
Transmission: TH400, Freakshow 9.5"
Axle/Gears: 9" 4.71
Re: Mini tubb project started
Interested in pics of how you mounted the front tabs for the dzus fasteners???
05-16-2008, 05:51 AM
#175
Supreme Member
Thread Starter
iTrader: (14)
Join Date: Jan 2004
Location: The "D"
Posts: 1,761
Likes: 0
Received 3 Likes
on
3 Posts
Car: A Portly 85 Z28
Engine: 4.530 X 4.250 BBC
Transmission: under rated for this application
Axle/Gears: also under rated
Re: Mini tubb project started
Thanks! They are 28x4.5 moroso DS2`s
Interested in pics of how you mounted the front tabs for the dzus fasteners???
----------
Thanks Matt! How`s the good weather treating you??
Last edited by greezemonkey; 05-16-2008 at 05:53 AM. Reason: Automerged Doublepost
05-17-2008, 12:32 AM
#176
Re: Mini tubb project started
haha...it's ok  with the cooler weather, the 305 went a 12.39 with the only mods real being the fuel system upgrade and the 29x9 hoosiers. i put a 1" spacer under the carb, locked out the timing, and did NO carb tuning and the car went a 12.38 with a DA of nearly 1500ft higher than the previous 12.39. seems to like the carb spacer and locked out timing cause the 12.39 was on a 1.64 60' time, which was fast, but still in the "average" realm. the 12.38 was on a 1.62 60' time and the car had never gotten out of the hole that quickly before.
i got a few more tricks up my sleeve, i'd like to get an msd system with a 3 step module...i think that'll help get outta the hole a little quicker since i'll be flashing the converter off the transbrake.
with the cooler weather, the 305 went a 12.39 with the only mods real being the fuel system upgrade and the 29x9 hoosiers. i put a 1" spacer under the carb, locked out the timing, and did NO carb tuning and the car went a 12.38 with a DA of nearly 1500ft higher than the previous 12.39. seems to like the carb spacer and locked out timing cause the 12.39 was on a 1.64 60' time, which was fast, but still in the "average" realm. the 12.38 was on a 1.62 60' time and the car had never gotten out of the hole that quickly before. i got a few more tricks up my sleeve, i'd like to get an msd system with a 3 step module...i think that'll help get outta the hole a little quicker since i'll be flashing the converter off the transbrake.
05-17-2008, 06:39 AM
#177
Supreme Member
Thread Starter
iTrader: (14)
Join Date: Jan 2004
Location: The "D"
Posts: 1,761
Likes: 0
Received 3 Likes
on
3 Posts
Car: A Portly 85 Z28
Engine: 4.530 X 4.250 BBC
Transmission: under rated for this application
Axle/Gears: also under rated
Re: Mini tubb project started
Your 1.6`s are no joke for a 305! sounds like good progress and tuning, I feel sorry for the competition once you get a bit of HP between the fenders  You have to have a staging limiter for a transbrake or just matt it everytime! I tried with no 2 step...too hard to do with all the other things to worry about while launching.
You have to have a staging limiter for a transbrake or just matt it everytime! I tried with no 2 step...too hard to do with all the other things to worry about while launching.
05-17-2008, 09:16 AM
#178
Re: Mini tubb project started
yeah, right now it's just "stage, hit the button, put foot to floor (tach goes to 4100rpms, right against the converter), and release button". when i was playing with launch rpms on the t-brake (haha, very very difficult) it seemd to like a 3200rpm launch speed. so when i get a msd box and a 3 step module, i'll be able to really tune her in. i think with those things right there, it'll get down in the 1.5x range.
i just wished i could locate a bbc block for not too much (haha, yeah right). i still have those hooker bbc headers and all the stuff i got from you...just no motor
i just wished i could locate a bbc block for not too much (haha, yeah right). i still have those hooker bbc headers and all the stuff i got from you...just no motor
05-17-2008, 03:22 PM
#180
Re: Mini tubb project started
possibly. they are not in bolt on and go condition yet. they need to have a couple of sections of tube replaced on the drivers side header...possibly a collector too. might be able to get rid of the dents by filling them with water and freezing them? i have $150 in them so far...i'd need that plus shipping to justify getting rid of them
05-22-2008, 06:14 PM
#182
Senior Member
Join Date: Mar 2002
Location: Azusa, CA
Posts: 741
Likes: 0
Received 0 Likes
on
0 Posts
Car: 92 Z28 Camaro
Engine: Procharged 406.
Transmission: T-56
Axle/Gears: Moser 9" 4.11 Gears
Re: Mini tubb project started
Any ideas on what can be done with the factory plastic? If i did this I would not want the sheet metal exposed.
05-23-2008, 09:15 AM
#184
Supreme Member
iTrader: (2)
Join Date: Feb 2005
Location: West Warwick RI, postal code: 02893
Posts: 4,337
Received 55 Likes
on
41 Posts
Car: Building LS3, T56 Z28
Engine: LS3
Transmission: T-56
Axle/Gears: Moser/ 4.11
Re: Mini tubb project started
LOL, exactly.
Just cover it all in some kind of matching fabric and call it done.
Drape it over the bare metal with some spray on glue. BAM. interior done.
Then again, the bare metal reminds you what is hiding under there.
Just cover it all in some kind of matching fabric and call it done.
Drape it over the bare metal with some spray on glue. BAM. interior done.
Then again, the bare metal reminds you what is hiding under there.
05-23-2008, 10:58 AM
#185
Senior Member
Join Date: Sep 2000
Location: Annapolis, Maryland
Posts: 885
Likes: 0
Received 1 Like
on
1 Post
Car: 1985 Camaro
Engine: 565 BBC
Transmission: Glide
Axle/Gears: 9 inch/spool/3.70
Re: Mini tubb project started
I have seen a fully tubbed car with the factory plastic peices in. It looked great and the guy said it just took time to get it right. This was a show car, it was at Super Chevy Show at Maple Grove a few years ago. It can be done.
05-23-2008, 01:26 PM
#186
Senior Member
Join Date: Mar 2002
Location: Azusa, CA
Posts: 741
Likes: 0
Received 0 Likes
on
0 Posts
Car: 92 Z28 Camaro
Engine: Procharged 406.
Transmission: T-56
Axle/Gears: Moser 9" 4.11 Gears
Re: Mini tubb project started
For me it would be a major concern having a magazine featured car that shows on a regular basis. With the power I am making and potentially more I feel I am almost forced to do this mod if I want a type of traction and control of the car.
05-23-2008, 05:06 PM
#187
Supreme Member
iTrader: (14)
Join Date: Aug 2006
Location: Central NJ
Posts: 12,650
Likes: 0
Received 44 Likes
on
42 Posts
Car: 86 Trans Am, 92 Firebird
Engine: 408 sbc, 3.1L of raw power
Transmission: TKO600, T5
Axle/Gears: Moser 9", 3:70 trutac, 3:23 torsion
Re: Mini tubb project started
sorry to hijack, but like i said, i will have some update pics hopefully this weekend, or next.
found it
https://www.thirdgen.org/forums/fabr...iberglass.html
Last edited by //<86TA>\\; 05-23-2008 at 07:26 PM. Reason: link
05-24-2008, 06:31 PM
#189
Junior Member

Join Date: Aug 2004
Location: Norwalk, CT
Posts: 43
Likes: 0
Received 0 Likes
on
0 Posts
Car: 88 IROC-Z/05 Silverado ECSB
Engine: 408 LSX
Transmission: 700-R4 reverse pattern/manual valve
Axle/Gears: 9"/4.11
Re: Mini tubb project started
Greezemonkey the car looks awesome! Is that a 4" cowl hood?
05-25-2008, 03:35 PM
#190
Supreme Member
Thread Starter
iTrader: (14)
Join Date: Jan 2004
Location: The "D"
Posts: 1,761
Likes: 0
Received 3 Likes
on
3 Posts
Car: A Portly 85 Z28
Engine: 4.530 X 4.250 BBC
Transmission: under rated for this application
Axle/Gears: also under rated
Re: Mini tubb project started
Thank you! It`s a 4.5 inch
05-27-2008, 07:50 PM
#191
Junior Member
Join Date: Aug 2004
Location: Norwalk, CT
Posts: 43
Likes: 0
Received 0 Likes
on
0 Posts
Car: 88 IROC-Z/05 Silverado ECSB
Engine: 408 LSX
Transmission: 700-R4 reverse pattern/manual valve
Axle/Gears: 9"/4.11
05-29-2008, 05:21 AM
#192
Supreme Member
Thread Starter
iTrader: (14)
Join Date: Jan 2004
Location: The "D"
Posts: 1,761
Likes: 0
Received 3 Likes
on
3 Posts
Car: A Portly 85 Z28
Engine: 4.530 X 4.250 BBC
Transmission: under rated for this application
Axle/Gears: also under rated
Re: Mini tubb project started
Glasstek or glasstech lift off...very light and fit better than the harwood ever did.
05-29-2008, 05:09 PM
#193
Junior Member
Join Date: Aug 2004
Location: Norwalk, CT
Posts: 43
Likes: 0
Received 0 Likes
on
0 Posts
Car: 88 IROC-Z/05 Silverado ECSB
Engine: 408 LSX
Transmission: 700-R4 reverse pattern/manual valve
Axle/Gears: 9"/4.11
Re: Mini tubb project started
Yeah, I noticed it sits flush in the front like the stock hood did. My Harwood has a huge lip in the front and looks like crap. Thanks for the info, I am going to see if they make a bolt on version.
10-06-2008, 12:29 PM
#194
Junior Member
Join Date: Feb 2007
Location: nh
Posts: 67
Likes: 0
Received 1 Like
on
1 Post
Car: 89 formula *sold*
Engine: 305TPI
Transmission: T5
Axle/Gears: 3.45 9 bolt
Re: Mini tubb project started
FYI fellas. I have a CNC plasma table. If anyone wants to send me a template set I can do a run of the rear boxing plates to do a mini tub. I also have the template to box your stock lower a arms for you guys who road race and such. Once I have the deaign in the computer it is easy to cut out a set. or anything else people can think of to cut out. Thanks
10-18-2008, 02:15 PM
#195
Senior Member
iTrader: (1)
Join Date: Jan 2003
Location: New Germany, MN
Posts: 949
Likes: 0
Received 0 Likes
on
0 Posts
Car: 1986 Iroc
Engine: 5.3
Transmission: 4L80E
Axle/Gears: 9 Inch w/ 3.55
Re: Mini tubb project started
I am so doing this to my car. Things I was thinking of changing.
Relocate a fuel cell to the well in the back of the car.
Run an anti roll bar on top of the axle instead of under it.
Relocate a fuel cell to the well in the back of the car.
Run an anti roll bar on top of the axle instead of under it.
10-18-2008, 02:41 PM
#196
Supreme Member
iTrader: (14)
Join Date: Aug 2006
Location: Central NJ
Posts: 12,650
Likes: 0
Received 44 Likes
on
42 Posts
Car: 86 Trans Am, 92 Firebird
Engine: 408 sbc, 3.1L of raw power
Transmission: TKO600, T5
Axle/Gears: Moser 9", 3:70 trutac, 3:23 torsion
Re: Mini tubb project started
anyway,
greezemonkey, i have the same fuel tank and wondering about what i need to do to attach the filler neck? do you have a pic or parts list from what you did?
thanks
10-18-2008, 04:18 PM
#197
Supreme Member
Thread Starter
iTrader: (14)
Join Date: Jan 2004
Location: The "D"
Posts: 1,761
Likes: 0
Received 3 Likes
on
3 Posts
Car: A Portly 85 Z28
Engine: 4.530 X 4.250 BBC
Transmission: under rated for this application
Axle/Gears: also under rated
Re: Mini tubb project started
I used a filler neck from a 98 camaro, I used the stock rubber hose along with it, just needed to trim it by about an inch and a half. I`ll post the pic`s if I have any..good luck with your project!
10-18-2008, 08:20 PM
#198
Supreme Member
iTrader: (14)
Join Date: Aug 2006
Location: Central NJ
Posts: 12,650
Likes: 0
Received 44 Likes
on
42 Posts
Car: 86 Trans Am, 92 Firebird
Engine: 408 sbc, 3.1L of raw power
Transmission: TKO600, T5
Axle/Gears: Moser 9", 3:70 trutac, 3:23 torsion
Re: Mini tubb project started
so the 4th gen filler has a rubber section? hmmm i would like to see the pics if you have, or can get some.
10-19-2008, 06:59 AM
#199
Supreme Member
Thread Starter
iTrader: (14)
Join Date: Jan 2004
Location: The "D"
Posts: 1,761
Likes: 0
Received 3 Likes
on
3 Posts
Car: A Portly 85 Z28
Engine: 4.530 X 4.250 BBC
Transmission: under rated for this application
Axle/Gears: also under rated
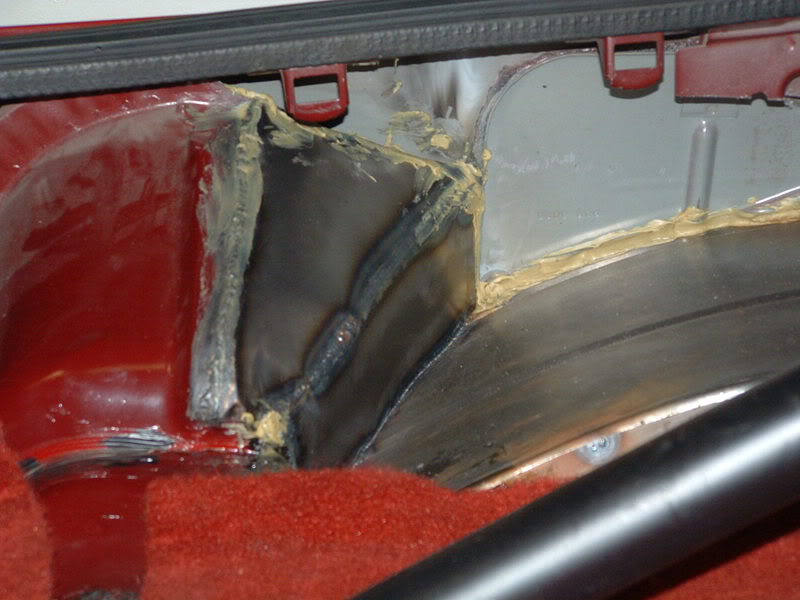
Re: Mini tubb project started
only picture I have of it, it`s where I boxed it in on the top
10-23-2008, 01:10 AM
#200
Junior Member
iTrader: (5)
Join Date: Apr 2007
Location: jacksonville, NC/campbellsville Ky
Posts: 78
Likes: 0
Received 0 Likes
on
0 Posts
Car: 2014 2SS/RS
Engine: LS3
Transmission: TR6060
Axle/Gears: 3.55
Re: Mini tubb project started
Between this thread and another I've been reading on LS1Tech I've started my narrow and Mini tub project. We're starting with a blank 9 inch rear, cutting 10 inches out of it, custom building the bracketry for the spring and control arm mounts.
Right now I have a heavily built stock 10 bolt running a 15x8 with 275 60 -15's.
I'm most likely going to move the front LCA mounts in 2 inches.
I am also going to move the spring mounts inward an inch.
I am going to step up to a 315 50-15 on a 10 inch rim with 4 inches of bs.
I should get a thread started up myself about it.
I still have a lot of measuring and design work before I make the first cut.