Steering column feels like a loose tooth...
 10-12-2003, 04:31 PM
#1
Senior Member
Thread Starter

Join Date: Mar 2002
Location: Dallas, TX
Posts: 594
Likes: 0
Received 0 Likes
on
0 Posts
Car: '89 Chevrolet Camaro IROC-Z
Engine: L98
Transmission: TH-700R4
Axle/Gears: B&W 2.77 Posi
Steering column feels like a loose tooth...
This is in regards to the '89 IROC in the signature...
I'm not really sure what caused this, but my steering wheel has a lot of movement. I'm not talking about "play" with regards to the way that turning the wheel affects the front tires (although it does have some play, that's a different issue). I mean that it's loose in that I can physically pull the whole wheel upward nearly an inch, and I can also wiggle the whole thing from left to right about an inch or so. The blinker/windshield wiper controls also move with the wheel, so it's probably the whole column that's loose. Also, I've recently noticed that, whenever I turn the wheel a full rotation or so and then come back to center, there's a sound like a marble or something falling on plastic coming from the inside of the wheel.
Something tells me that this will probably be an expensive and/or time-consuming repair, but I'm just curious as to what it will take to stiffen this thing up.
Any ideas?
Thanks!
 10-12-2003, 08:50 PM
#2
Member

Join Date: Jan 2003
Location: Lexington, SC
Posts: 153
Likes: 0
Received 0 Likes
on
0 Posts
Car: 88 TBI Formula, 98 LS1 TA, 77 400 T
I had the same problem. There are four bolts behind the tilt mechanism that are loose. Problem is you have to disassemble the column from the steering wheel past the tilt mechanism to get to them. Look in the technical articles on this board, I believe that there is one addressing this.
By the way It is not hard, not even a pain, just time consuming the first time you do it and you will need a steering wheel puller, lock plate tool, and tilt steering pin puller. I got my tilt steering pin puller at Pep Boys for $10. Some times they can be elusive in parts stores. Don't spend a lot for this thing, unless you are a mechanic for a living you will probably do this once or twice in your life.
By the way It is not hard, not even a pain, just time consuming the first time you do it and you will need a steering wheel puller, lock plate tool, and tilt steering pin puller. I got my tilt steering pin puller at Pep Boys for $10. Some times they can be elusive in parts stores. Don't spend a lot for this thing, unless you are a mechanic for a living you will probably do this once or twice in your life.
Last edited by ershealy; 10-12-2003 at 08:58 PM.
10-13-2003, 05:52 AM
#3
TGO Supporter


a deep e8 ( i think) socket makes it a lot easier too, not that you need a deep socket but the design of the socket makes it a lot easier. cost around 10 dollars from snap on 
10-13-2003, 07:32 AM
#4
Member

Join Date: Oct 2003
Location: ME.
Posts: 352
Likes: 0
Received 0 Likes
on
0 Posts
Car: 1991 Z-28
Engine: TPI
Transmission: 5-speed Rear:3.73
carefull on the signal switch...it will come apart but sometimes its a bitch,but it is an easy job to tighten the bolts and it will be good as new,make sure you dont put it off.....I know a guy that had one of the bolts actualy come out of its threads and lock his steering wheel 

10-16-2003, 12:25 AM
#5
Junior Member

Join Date: Oct 2002
Location: Spanaway WA
Posts: 49
Likes: 0
Received 0 Likes
on
0 Posts
Car: 88 IROC-Z28
Engine: 5.7 L TPI
Transmission: TH700-R4
How do you pull all the crap off
I am having the loose tooth problem with my steering wheel how exactly do you pull all the crap that covers it up off. I have gotten the steering wheel off using the puller but I haven't been able to see anything else to take off after that.
10-16-2003, 06:23 AM
#6
Member
Join Date: Oct 2003
Location: ME.
Posts: 352
Likes: 0
Received 0 Likes
on
0 Posts
Car: 1991 Z-28
Engine: TPI
Transmission: 5-speed Rear:3.73
Originally posted by jl2152
I am having the loose tooth problem with my steering wheel how exactly do you pull all the crap that covers it up off. I have gotten the steering wheel off using the puller but I haven't been able to see anything else to take off after that.
I am having the loose tooth problem with my steering wheel how exactly do you pull all the crap that covers it up off. I have gotten the steering wheel off using the puller but I haven't been able to see anything else to take off after that.
10-19-2003, 07:06 AM
#7
Your car will be a little easier if there is no VATS wiring and SIR coil/wiring/gas bag. If you have VATS, there are only two more wires that need to be handled. With SIR, you have an entire additional procedure to remove and reassemble the system. You really should have a service manual in hand for that procedure.
Start by centering the steering wheel, so that the wheel can be replaced in exactly the same position on the shaft easily. The steering shaft is both marked and keyed, but centering the wheel makes the job easier to "eyeball", and keeps the turn signal cancelling cam out of the way in later steps.
Next, remove the hazard flasher **** on the lower right side of the steering column. There should be a small (#0) Phillips screw holding the **** in place. Find the release clip or bolts for the horn sounder pad and remove it. As the pad is removed from the wheel, unplug the horn wire from the connector on the pad. Remove the horn sounder wire and the insulator that guides the wire through the steering wheel. The insulating sleeve needs to be pushed inward slightly, twisted � turn anticlockwise, and removed from the wheel. There is a light spring in the sleeve, so make sure all the parts are removed together.
Remove the safety clip from the steering shaft, then remove the nut. You might have to have an assistant help hold the wheel while you turn the nut loose. Install the bolts from your steering wheel puller into the tapped holes in the wheel, and turn the puller screw to release the wheel from the steering shaft.
Depress the notched wheel locking plate and remove the locking ring located at the center of the plate. There is a special tool for holding the wheel locking plate while the snap ring is removed, and it will be worth the $15.00 you'll pay for it. It can be done without the tool, but it is an exercise in frustration unless you are an octopus. I've done it several times using the "Armstrong" method, now I have the tool and use the "Brainstrong" method instead.

When the wheel locking plate is removed, you can look at the left lower side of the turn signal switch and see a pan head Phillips screw that hold the turn signal lever in place. Remove this screw and plate, then move the lever out of the way. There are three more pan head screws that hold the turn signal/hazard lamp switch to the upper column. Remove those and lift the turn signal switch out of the way. You may need to feed some extra wire from under the column to allow the switch to clear the steering shaft and move out of the way completely.
Once the turn signal/hazard switch base is out of the way, you should see another pan head screw on the upper right side of the column. This screw holds the lock cylinder in place. Before you remove the lock cylinder, make sure you hold the plastic/metal foil contact assembly in place so you don't lose it down the column when the lock is removed. This switch assembly is what actuates the key warning buzzer/chime. If you have VATS, there should be an additional pair of wires to unplug and feed down along the column.
Remove the column tilt release lever by unscrewing it. Set it nearby since you will need to reinstall it after the upper bowl trim jacket is removed. Remove the turn signal / multifunction lever shaft by carefully pulling it out of the switch. Unplug the cruise control wire harness (if equipped). Remove the remaining upper bowl trim screws and lift the upper bowl off the column. Find the column tilt release lever and thread it back in hand tight for now.
Remove the upper steering shaft bearing nut and retainer clip. Remove the upper bearing set. Remove the actuator rod link from the rack/sector that operates with the lock cylinder. Disconnect the link from the clip in the lower column.
Remove the balance spring cap with a #2 or larger Phillips driver or larger square drive. This will allow the upper column fall to the lowest tilt position.
Remove the pivot pins from either side of the upper column using an 8-32 screw and nuts as a puller. Assemble the parts as shown, fully bottoming the screw by hand (to get the maximum thread bearing strength), then back it off a turn or two in case the bolt snaps later. Once the screw thread is set, run the nut down with a wrench to jack the pivot pin out of the column die casting. It the screw snaps, there should be adequate material to back it out by hand (which is why you didn't bottom it out to begin with). Usually, the pin will pull easily once it starts moving and deforms the stakes that were retaining it.
Once the pins are removed, operate the column tilt release lever and remove the upper column half. Note the routing of the ignition switch linkage rod(s) when you remove the upper column half. Tilt the upper stub shaft and universal joint to allow the joint to be separated.
At this point, you should be viewing the top of the lower column half and four Torx cap screws. Remove these screws one at a time, clean the threads, and apply a light coating of LocTite 242 or an equivalent medium strength removable thread locker. Tighten the bolts by hand until all four are reinstalled. Torque these bolts to 180 in/lb.
Reassemble the upper column half in reverse order. Take time to clean and grease all the moving parts so you can have another ten years of reliable operation. Every moving part, including the turn signal switch and cancelling cam, should be cleaned and lubricated with white lithium grease.
When assembly is complete, torque the steering wheel nut to 35 ft/lb. There are already enough loose nuts behind steering wheels on our roadways....
There is a possibility that some of the pan head screws are Torx instead of Phillips. I believe this was more common on 1985 and later cars, but yours may have them as well.
There is also a very remote possibility that your car has an inflatable restraint, in which case you'll need to disconnect the battery and insulate all connections before you start. You should also have a service manual to detail the proper procedure for removing and re-centering the triggering coil and pickup for the SIR. You don't want to have that done incorrectly. Come to think of it, a manual is a good idea, anyway.
Start by centering the steering wheel, so that the wheel can be replaced in exactly the same position on the shaft easily. The steering shaft is both marked and keyed, but centering the wheel makes the job easier to "eyeball", and keeps the turn signal cancelling cam out of the way in later steps.
Next, remove the hazard flasher **** on the lower right side of the steering column. There should be a small (#0) Phillips screw holding the **** in place. Find the release clip or bolts for the horn sounder pad and remove it. As the pad is removed from the wheel, unplug the horn wire from the connector on the pad. Remove the horn sounder wire and the insulator that guides the wire through the steering wheel. The insulating sleeve needs to be pushed inward slightly, twisted � turn anticlockwise, and removed from the wheel. There is a light spring in the sleeve, so make sure all the parts are removed together.
Remove the safety clip from the steering shaft, then remove the nut. You might have to have an assistant help hold the wheel while you turn the nut loose. Install the bolts from your steering wheel puller into the tapped holes in the wheel, and turn the puller screw to release the wheel from the steering shaft.
Depress the notched wheel locking plate and remove the locking ring located at the center of the plate. There is a special tool for holding the wheel locking plate while the snap ring is removed, and it will be worth the $15.00 you'll pay for it. It can be done without the tool, but it is an exercise in frustration unless you are an octopus. I've done it several times using the "Armstrong" method, now I have the tool and use the "Brainstrong" method instead.
When the wheel locking plate is removed, you can look at the left lower side of the turn signal switch and see a pan head Phillips screw that hold the turn signal lever in place. Remove this screw and plate, then move the lever out of the way. There are three more pan head screws that hold the turn signal/hazard lamp switch to the upper column. Remove those and lift the turn signal switch out of the way. You may need to feed some extra wire from under the column to allow the switch to clear the steering shaft and move out of the way completely.
Once the turn signal/hazard switch base is out of the way, you should see another pan head screw on the upper right side of the column. This screw holds the lock cylinder in place. Before you remove the lock cylinder, make sure you hold the plastic/metal foil contact assembly in place so you don't lose it down the column when the lock is removed. This switch assembly is what actuates the key warning buzzer/chime. If you have VATS, there should be an additional pair of wires to unplug and feed down along the column.
Remove the column tilt release lever by unscrewing it. Set it nearby since you will need to reinstall it after the upper bowl trim jacket is removed. Remove the turn signal / multifunction lever shaft by carefully pulling it out of the switch. Unplug the cruise control wire harness (if equipped). Remove the remaining upper bowl trim screws and lift the upper bowl off the column. Find the column tilt release lever and thread it back in hand tight for now.
Remove the upper steering shaft bearing nut and retainer clip. Remove the upper bearing set. Remove the actuator rod link from the rack/sector that operates with the lock cylinder. Disconnect the link from the clip in the lower column.
Remove the balance spring cap with a #2 or larger Phillips driver or larger square drive. This will allow the upper column fall to the lowest tilt position.
Remove the pivot pins from either side of the upper column using an 8-32 screw and nuts as a puller. Assemble the parts as shown, fully bottoming the screw by hand (to get the maximum thread bearing strength), then back it off a turn or two in case the bolt snaps later. Once the screw thread is set, run the nut down with a wrench to jack the pivot pin out of the column die casting. It the screw snaps, there should be adequate material to back it out by hand (which is why you didn't bottom it out to begin with). Usually, the pin will pull easily once it starts moving and deforms the stakes that were retaining it.
Once the pins are removed, operate the column tilt release lever and remove the upper column half. Note the routing of the ignition switch linkage rod(s) when you remove the upper column half. Tilt the upper stub shaft and universal joint to allow the joint to be separated.
At this point, you should be viewing the top of the lower column half and four Torx cap screws. Remove these screws one at a time, clean the threads, and apply a light coating of LocTite 242 or an equivalent medium strength removable thread locker. Tighten the bolts by hand until all four are reinstalled. Torque these bolts to 180 in/lb.
Reassemble the upper column half in reverse order. Take time to clean and grease all the moving parts so you can have another ten years of reliable operation. Every moving part, including the turn signal switch and cancelling cam, should be cleaned and lubricated with white lithium grease.
When assembly is complete, torque the steering wheel nut to 35 ft/lb. There are already enough loose nuts behind steering wheels on our roadways....
There is a possibility that some of the pan head screws are Torx instead of Phillips. I believe this was more common on 1985 and later cars, but yours may have them as well.
There is also a very remote possibility that your car has an inflatable restraint, in which case you'll need to disconnect the battery and insulate all connections before you start. You should also have a service manual to detail the proper procedure for removing and re-centering the triggering coil and pickup for the SIR. You don't want to have that done incorrectly. Come to think of it, a manual is a good idea, anyway.
Last edited by Vader; 03-30-2018 at 07:00 AM. Reason: Updated links
The following users liked this post:
TWON_3rdGEN (12-25-2019)
Trending Topics

 06-01-2006, 09:33 PM
#10
The following users liked this post:
TWON_3rdGEN (12-25-2019)
07-01-2006, 12:57 AM
#11
Senior Member

Join Date: Jan 2005
Location: Port Angeles, Wa
Posts: 783
Likes: 0
Received 0 Likes
on
0 Posts
Car: 1983 Camaro Z28
Engine: 584
Transmission: TSI Glide
Axle/Gears: Quick performance 9 inch
Looks like I know what ill be doing this weekend thanks for the great post! ;-)
12-02-2006, 11:15 AM
#13
Junior Member

Join Date: Apr 2003
Location: Fl
Posts: 5
Likes: 0
Received 0 Likes
on
0 Posts
Ok, I just finished tearing it down.
Tightened the 4 torx bolts and have it back to the point where I reinstall the ignition cylinder.
When I started the project I was following the Haynes manual (worthless crap) so I didn't realize I would need the tilt pin extractor. I had my windows down, so I pushed it back together enough to turn the key and get the windows to go up.
The next day I bought a pin extractor. I've got it back together and now I can't get the ignition to work. I took it apart without a key in it but now the ignition cylinder won't slide in unless I have a key in it.
So I put a key in, slide the cylinder in and install the bolt for the ignition, and now I can't get the key out, and I have no power (lights and horn work) and the key doesn't spring back from the start position.
Any help would be appreciated.
12-04-2006, 02:48 PM
#14
Senior Member
iTrader: (1)
Join Date: Jun 2006
Location: Oviedo,Florida
Posts: 692
Likes: 0
Received 1 Like
on
1 Post
Car: 86' Trans am
Engine: 85 LG4-non cc carb(building a 350)
Transmission: Rebuilt 700R4,vette servo,2200stall
Axle/Gears: 2.73 Posi
mine the same way its about to fall off i got like 3 inch play
i got like 3 inch play
12-07-2006, 10:06 PM
#15
Junior Member

Join Date: Mar 2006
Posts: 29
Likes: 0
Received 0 Likes
on
0 Posts
when i got my '84 the steering column felt like it was just resting in there so i had to get one from a salvage yard(surprisingly not junk)for $60 and threw that bad boy in there in about two hours. all thats to it.
12-09-2006, 09:34 AM
#16
Ok, I just finished tearing it down.
Tightened the 4 torx bolts and have it back to the point where I reinstall the ignition cylinder.
When I started the project I was following the Haynes manual (worthless crap) so I didn't realize I would need the tilt pin extractor. I had my windows down, so I pushed it back together enough to turn the key and get the windows to go up.
The next day I bought a pin extractor. I've got it back together and now I can't get the ignition to work. I took it apart without a key in it but now the ignition cylinder won't slide in unless I have a key in it.
So I put a key in, slide the cylinder in and install the bolt for the ignition, and now I can't get the key out, and I have no power (lights and horn work) and the key doesn't spring back from the start position.
Any help would be appreciated.
Tightened the 4 torx bolts and have it back to the point where I reinstall the ignition cylinder.
When I started the project I was following the Haynes manual (worthless crap) so I didn't realize I would need the tilt pin extractor. I had my windows down, so I pushed it back together enough to turn the key and get the windows to go up.
The next day I bought a pin extractor. I've got it back together and now I can't get the ignition to work. I took it apart without a key in it but now the ignition cylinder won't slide in unless I have a key in it.
So I put a key in, slide the cylinder in and install the bolt for the ignition, and now I can't get the key out, and I have no power (lights and horn work) and the key doesn't spring back from the start position.
Any help would be appreciated.
12-11-2006, 09:28 PM
#17
Member
Join Date: Jan 2006
Location: Poland, Europe
Posts: 199
Likes: 0
Received 0 Likes
on
0 Posts
Car: Firebird 88
Engine: 406
Transmission: th400
Axle/Gears: 3.50
I came to the point that you see on a pictures and Im stuck..
Nothing can be unscrew or moved, please help :P


Nothing can be unscrew or moved, please help :P
The following users liked this post:
TWON_3rdGEN (12-25-2019)
12-15-2006, 07:55 PM
#20
Supreme Member
iTrader: (1)

Join Date: May 2004
Location: houston
Posts: 2,262
Likes: 0
Received 0 Likes
on
0 Posts
Car: 83 POS monte carlo 2015 chevy P/U
Engine: 92 5.7 tpi 5.3
Transmission: 700r4 6L60E
Axle/Gears: 2.42 too high
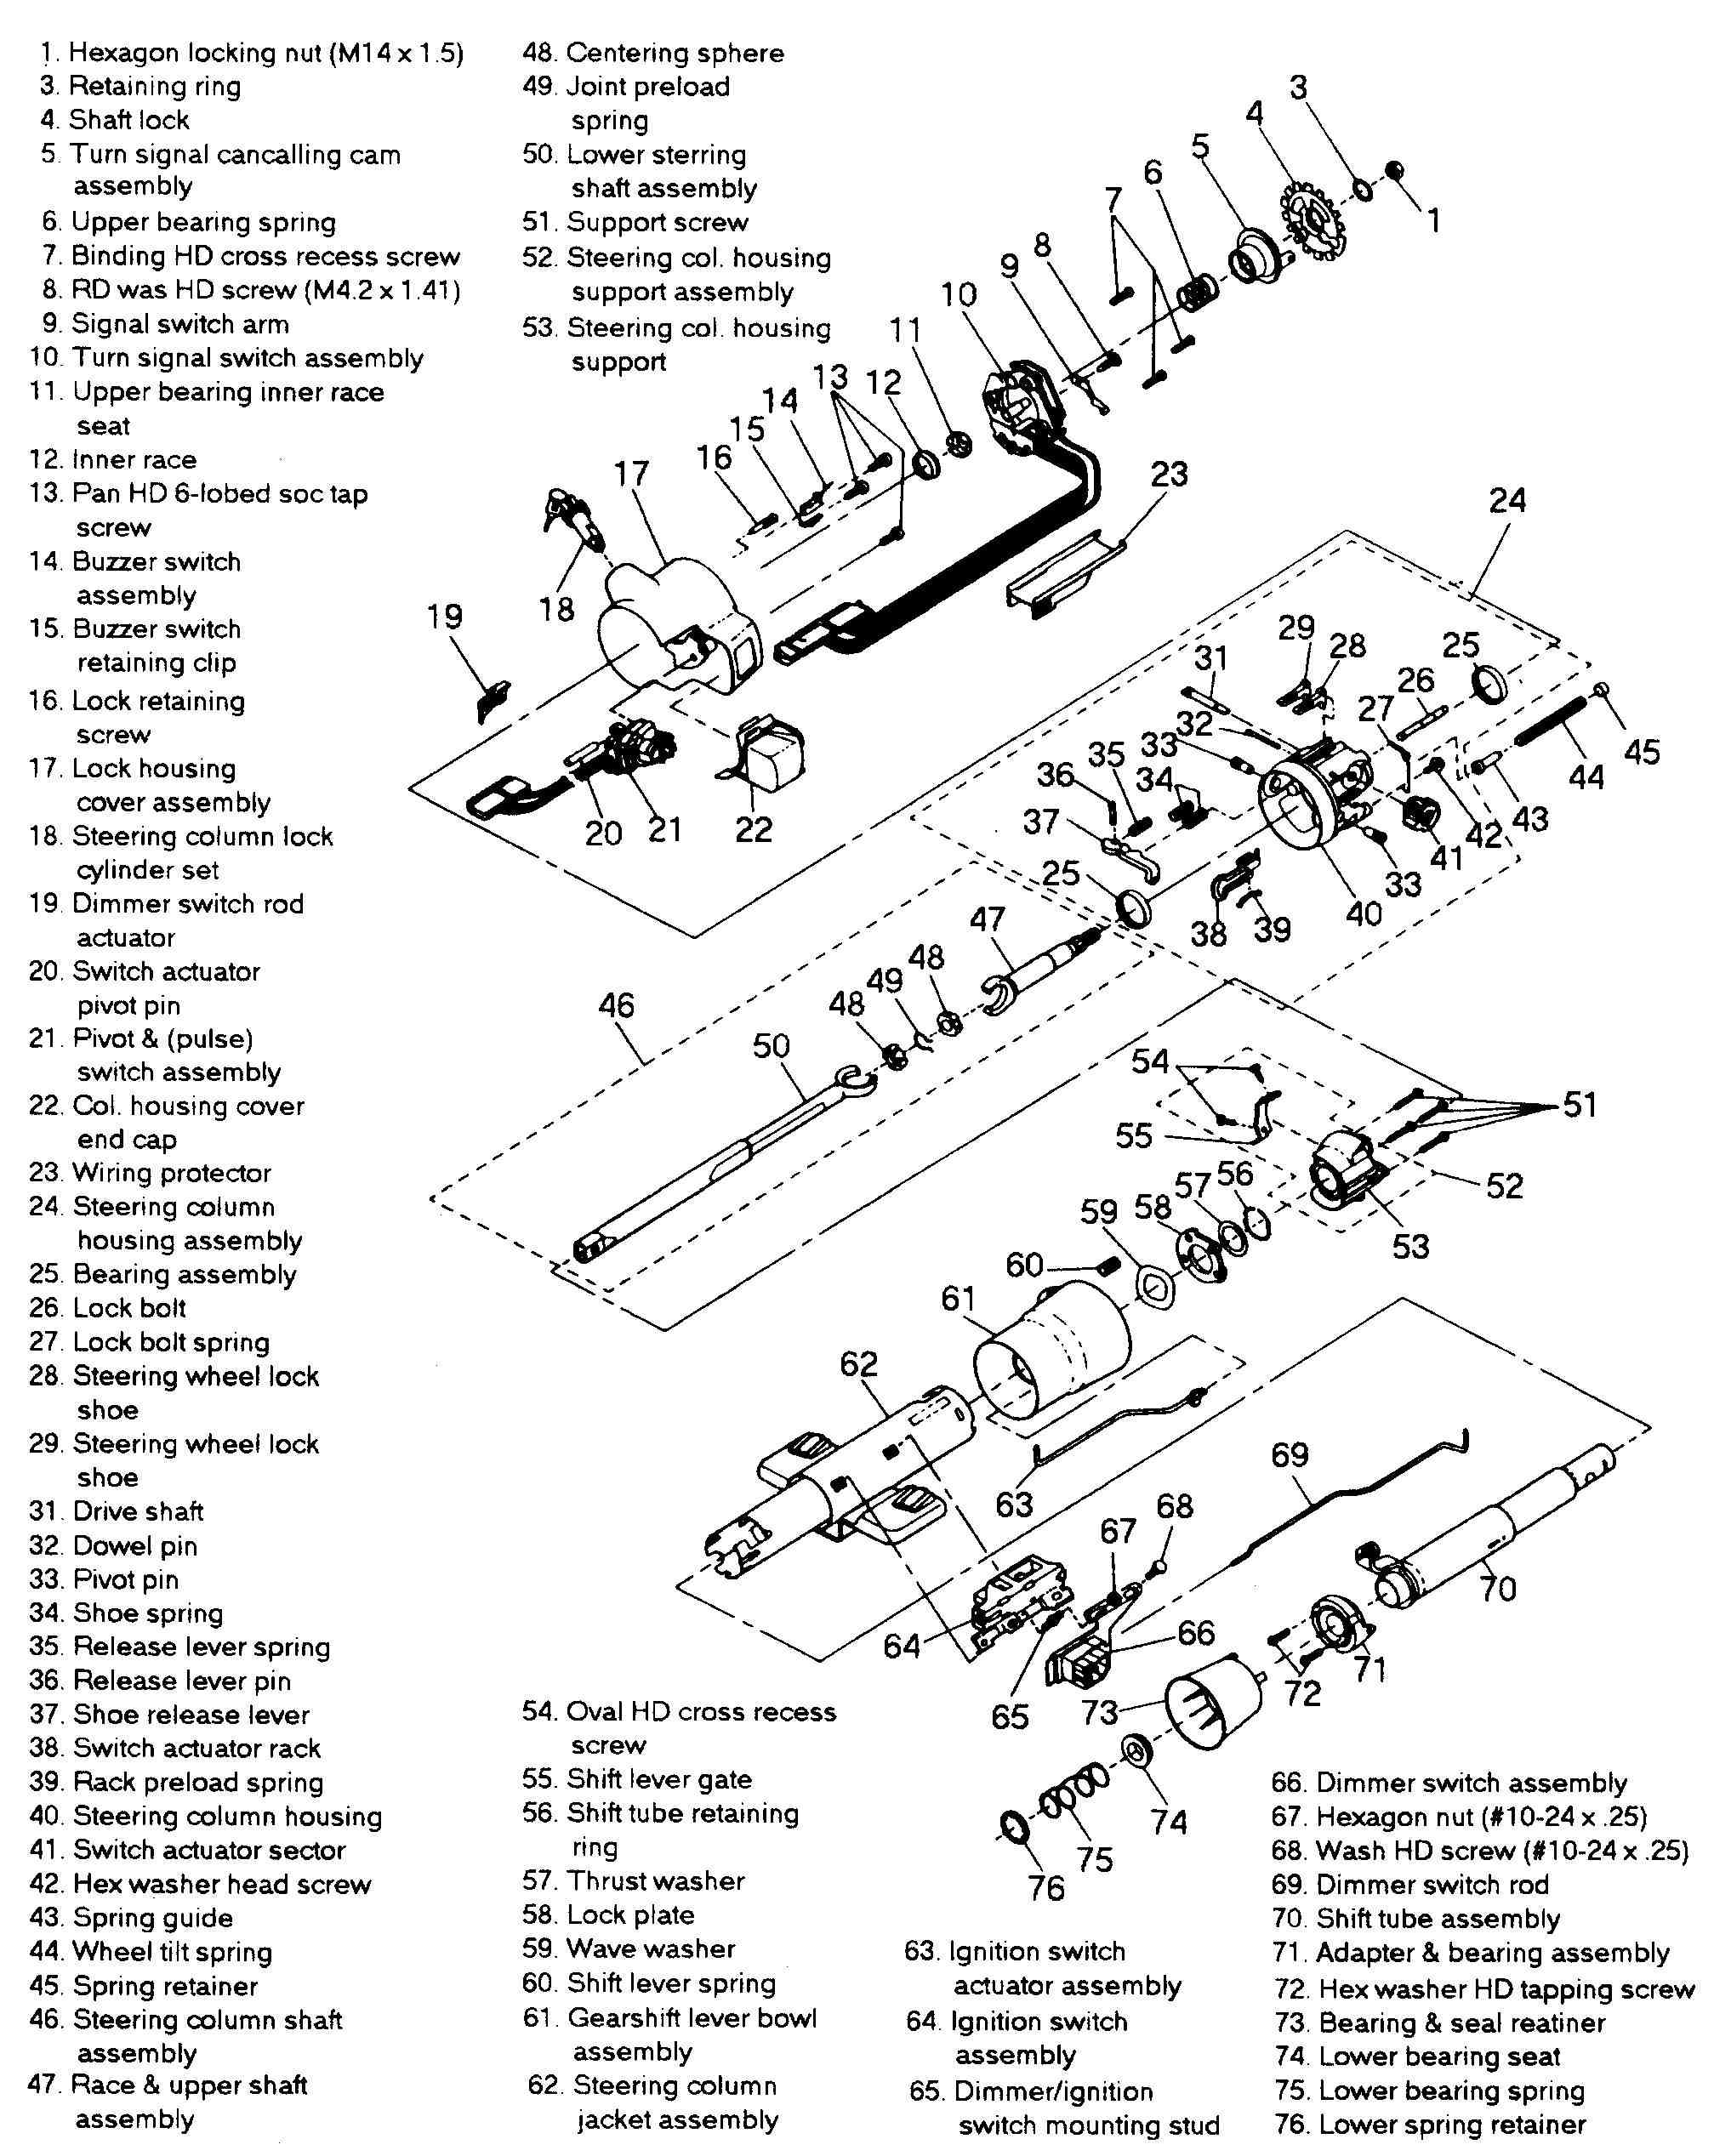
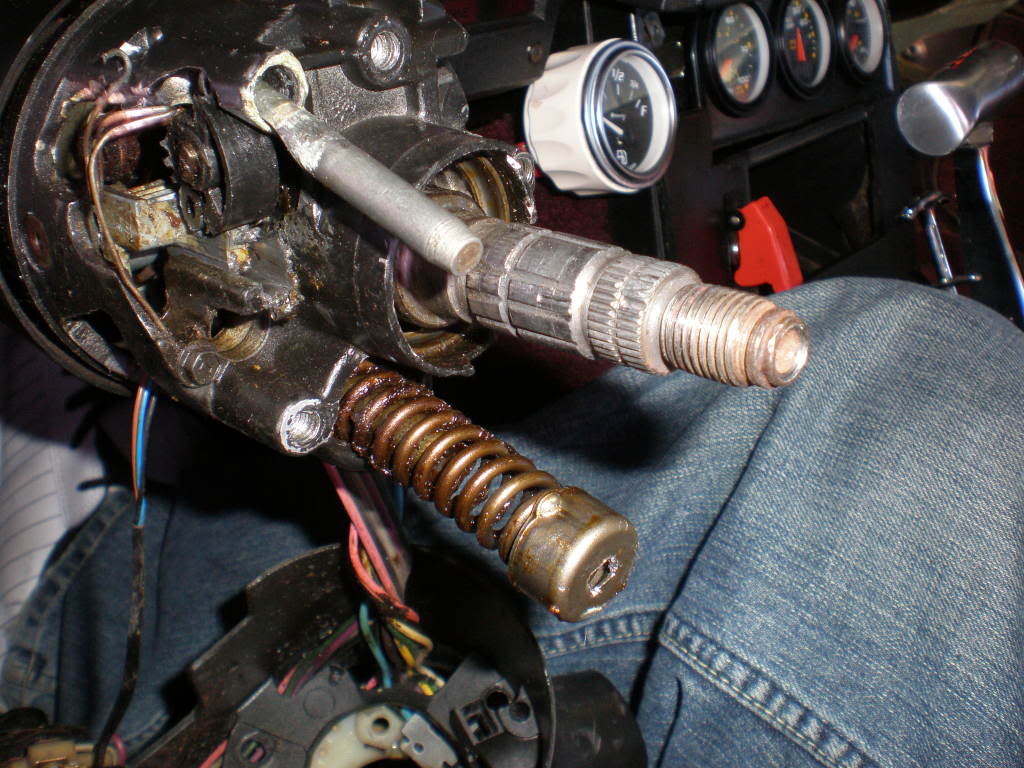
Morit, you have to remove the spring cap & pivot pins Vader mentioned in this part of his post,
"Remove the balance spring cap with a #2 or larger Phillips driver or larger square drive. This will allow the upper column fall to the lowest tilt position.
Remove the pivot pins from either side of the upper column using an 8-32 screw and nuts as a puller."
here is your pictures with those items shown.
there are 2 pivot pins to remove, the second one is on the other side.
12-16-2006, 03:19 AM
#21
Member
Join Date: Jan 2006
Location: Poland, Europe
Posts: 199
Likes: 0
Received 0 Likes
on
0 Posts
Car: Firebird 88
Engine: 406
Transmission: th400
Axle/Gears: 3.50
Ok, I done it.. But one screw is lost, one is broken..
And the two others are so much lose :P
I bought a new column...
And the two others are so much lose :P
I bought a new column...
12-30-2006, 09:38 AM
#22
Member
Join Date: Jan 2006
Location: Poland, Europe
Posts: 199
Likes: 0
Received 0 Likes
on
0 Posts
Car: Firebird 88
Engine: 406
Transmission: th400
Axle/Gears: 3.50
OK, biiig problem. My column (bought from 86 Trans Am GTA - mine is firebird 88) is about an inch shorter at the place where you connect it to the gear box..
Dont really know what to do now
Dont really know what to do now
12-30-2006, 08:01 PM
#24
Member
Join Date: Jan 2006
Location: Poland, Europe
Posts: 199
Likes: 0
Received 0 Likes
on
0 Posts
Car: Firebird 88
Engine: 406
Transmission: th400
Axle/Gears: 3.50
Yeah I did bolt it to firewall.. I dont know why is that.. It looks like the very end of shaft sticks longer from the old column then from the new one..
EDIT: Is there any way that I could have shorten the column shaft? Or the intermediate shaft that is connected to the grear box? (i have disconnected it first while trying to put the column and it together becouse it was so tight I could have not done it and I ended with sanding the column shaft afterwards ) I have used prette much power first.. Maybe I have bend the firewall? Help, I have no ideas :P
EDIT: Is there any way that I could have shorten the column shaft? Or the intermediate shaft that is connected to the grear box? (i have disconnected it first while trying to put the column and it together becouse it was so tight I could have not done it and I ended with sanding the column shaft afterwards
) I have used prette much power first.. Maybe I have bend the firewall? Help, I have no ideas :P Last edited by Morit; 12-31-2006 at 05:18 PM.
06-13-2007, 01:32 AM
#25
Supreme Member
iTrader: (1)
Join Date: May 2004
Location: houston
Posts: 2,262
Likes: 0
Received 0 Likes
on
0 Posts
Car: 83 POS monte carlo 2015 chevy P/U
Engine: 92 5.7 tpi 5.3
Transmission: 700r4 6L60E
Axle/Gears: 2.42 too high
Re: Steering column feels like a loose tooth...
Morit, did you get it figured out?
if not, the shaft between the steering column & the gear box is collapsible.
it does this in case your in an accident.
you can make it longer by sliding it apart, it may slid easily, or it may be hard.
if it comes apart, there is a piece that will fall out, its a slightly curved spring that fits into a slot on the inner shaft. the outter ends go against the inner shaft. put a little grease on it & slid it back together. if you leave the spring out, it will be loose & rattle.
10-08-2007, 04:32 PM
#26
Junior Member
Join Date: Sep 2007
Location: Julian, N.C.
Posts: 4
Likes: 0
Received 0 Likes
on
0 Posts
Car: 84 Z/28
Engine: 350
Re: Steering column feels like a loose tooth...
Thanks Vader, This is just what I was looking for. I never had a tilt column apart or any idea how they worked. I fixed mine and the Z drives like a new ride. Iv'e got alot of stuff to do to it. So I'll be reading this forum over and over to find all I need. Thanks again Third Gen. too for the forum. Tom
10-15-2007, 06:37 PM
#27
Senior Member
Join Date: Oct 2007
Location: Chicago
Posts: 339
Likes: 0
Received 0 Likes
on
0 Posts
Car: 1999 Jeep Grand Cherokee
Engine: 4.7l PowerTech V8
Re: Steering column feels like a loose tooth...
omg thanks alot guys this is a huge help. i thought my steering column was busted and i would have to replace it.
10-20-2007, 01:44 PM
#28
Junior Member

Join Date: Oct 2004
Posts: 22
Likes: 0
Received 0 Likes
on
0 Posts
Re: Steering column feels like a loose tooth...
Ok, I am knee deep in this now... Im having the following problems:
1. I cant seem to get the keylock cylinder out. Im not exactly sure why. Whats even more anoying is I know I replaced this once before and I cant remember how I did it.
2. I cant seem to figure out how the turn signal switch comes out...
3... Instructions say to remove the tilt lever.. well it does not seem to unscrew... ? Ive even tried using pliers to get it loose....
10-21-2007, 01:32 PM
#29
Junior Member
Join Date: Oct 2004
Posts: 22
Likes: 0
Received 0 Likes
on
0 Posts
Re: Steering column feels like a loose tooth...
Ok, I am rappidly loosing my patients with this thing. I did manage to get the ignition switch out, as well as the tilt leaver etc. Im at the point now where Im supposed to remove the pivot pins. The damn screw broke off in side the pin... so now what? while I wait for an answer Im gonna head up to pull apart and see if I cant just find a new column to put in...
10-21-2007, 03:34 PM
#30
Junior Member

Join Date: Oct 2007
Posts: 1
Likes: 0
Received 0 Likes
on
0 Posts
Re: Steering column feels like a loose tooth...
Ok I'm also trying to get the 4 bolts tightened on my 89 buick century. I am all the way down to the point where I'm supposed to be able to pull the bearing housing off (I'm assuming the bearing housing is the whole metal thing that is in front of me past the lock ring and all that) I have the pins pulled.. the ignition thing out. the tilt lever will not unscrew for me though.. and I have all the stuff in front out like the lock ring thing.. the plastic part behind it.. and all the screws except the one holding the lock spring on out.
I can't get it to pull out. Also a bit further back in the guide there's mention of 4 1/2" bolts to take out after the two 13mm bolts under the column... I could never find those.
Any help would be appreciated.
Amadon
I can't get it to pull out. Also a bit further back in the guide there's mention of 4 1/2" bolts to take out after the two 13mm bolts under the column... I could never find those.
Any help would be appreciated.
Amadon
10-21-2007, 08:10 PM
#31
Member
Join Date: May 2006
Location: west jordan,UtT
Posts: 172
Likes: 0
Received 0 Likes
on
0 Posts
Car: 91 RS, t-topped, man trans.
Engine: 350cid 350Hp crate motor
Transmission: t5 with new stock clutch and parts
Axle/Gears: 3.08 stock -RS
Re: Steering column feels like a loose tooth...
This thread is right on time!!!!!!!!!!!!!!!!!!!
I got the loose tooth action goin' on too. aLSO I ONLY GET one postion on my tilt selection. sux
 This helps alot!
I got the loose tooth action goin' on too. aLSO I ONLY GET one postion on my tilt selection. sux
This helps alot!
10-21-2007, 11:05 PM
#32
Junior Member
Join Date: Oct 2004
Posts: 22
Likes: 0
Received 0 Likes
on
0 Posts
Re: Steering column feels like a loose tooth...
Ok, sorry this is going a little off topic sort of but Im not sure how to start a new thread here. Long story short as I said earlier I gave up on trying to repair this issue and went to a salage yard and got a column out of a camaro. While attempting to remove the column out of the trans-am, we could not get it to seperate with out disconecting the whole thing from the gear box. We pulled out out and low and behold half of the whole thing needs to be replaced. The part in question goes between the column and the gear box and has a Ujoint with a rubber boot on it. What exactly is that part called and does anyone know where I can get one other than a salvage yard. I figure if Im going to replace something like that I might as well get something new with lots of years of life left as opposed to some unknown from a yard.
thanks in advance.
thanks in advance.
10-21-2007, 11:12 PM
#33
Member
Join Date: Aug 2007
Location: maryland
Posts: 206
Likes: 0
Received 0 Likes
on
0 Posts
Car: 91 maro
Engine: 350
Transmission: 700r4
Axle/Gears: 373 locker
Re: Steering column feels like a loose tooth...
its not only them bolts.there are two pins that slid in to each side of the colume one right behind the tilt u need to slide the plastic cover back and drive those pins in or take them out and check holes if worn get new pins.
02-03-2008, 01:41 AM
#34
Junior Member

Join Date: Jan 2008
Location: Mtn Home AFB. Idaho
Posts: 23
Likes: 0
Received 0 Likes
on
0 Posts
Re: Steering column feels like a loose tooth...
so i have a related problem. started the car to move into the garage and work on, now i cant turn the car off.... key will not turn. had to pull power wire from HEI to kill the car. i see that a cable is connected to the shifter so park is identified, it makes an audible click in park. any ideas before i tear into it?
02-04-2008, 05:32 PM
#35
Supreme Member
Re: Steering column feels like a loose tooth...
grab a hold of the column housing with both hands right in front of the dash below the tilt and turn signal parts area of the column
and turn it counter clockwise the same direction as if you were shifting a column shifter into park
try that
may need to adjust the shift cable
if this doesnt end up helping or being the cause
then it may be the lock switch actuator rod broken or out of place
and turn it counter clockwise the same direction as if you were shifting a column shifter into park
try that
may need to adjust the shift cable
if this doesnt end up helping or being the cause
then it may be the lock switch actuator rod broken or out of place
Last edited by Randy82WS7; 02-04-2008 at 05:40 PM.
02-07-2008, 07:51 PM
#37
Senior Member
iTrader: (4)
Join Date: May 2006
Location: Beloeil, Quebec
Posts: 704
Likes: 0
Received 2 Likes
on
2 Posts
Car: IROC-Z
Engine: LSx
Transmission: T56
Axle/Gears: Fabbed 9"
Re: Steering column feels like a loose tooth...
I just tackled that project today. Tightened all the screws etc. What I dont understand is I have a big loose in the upper shaft when the lock ring is depressed (or not). I noticed the bearing on the upper shaft looks funny... like its splitting up? Its hard to describe. Before I take it appart one more time, can any of you column gurus help me out?
Here is a video describing what Im talking about.
http://www.youtube.com/watch?v=MAx74QPsNKo
Here is a video describing what Im talking about.
http://www.youtube.com/watch?v=MAx74QPsNKo
The following users liked this post:
TWON_3rdGEN (12-25-2019)
 02-08-2008, 02:03 PM
#39
Senior Member
iTrader: (4)
Join Date: May 2006
Location: Beloeil, Quebec
Posts: 704
Likes: 0
Received 2 Likes
on
2 Posts
Car: IROC-Z
Engine: LSx
Transmission: T56
Axle/Gears: Fabbed 9"
Re: Steering column feels like a loose tooth...
Anyone have a guess on whats up with mine? Guess Im gonna start to put it appart, again.
02-08-2008, 04:47 PM
#40
Senior Member
iTrader: (4)
Join Date: May 2006
Location: Beloeil, Quebec
Posts: 704
Likes: 0
Received 2 Likes
on
2 Posts
Car: IROC-Z
Engine: LSx
Transmission: T56
Axle/Gears: Fabbed 9"
Re: Steering column feels like a loose tooth...
Found the problem! The piece that holds the bearing together wasnt seated proprely! Woot. Talk about nice and tight!
The following users liked this post:
TWON_3rdGEN (12-25-2019)
The following users liked this post:
TWON_3rdGEN (12-25-2019)
04-23-2008, 01:13 AM
#43
Member
Re: Steering column feels like a loose tooth...
I'm in the middle of doing it now. I'm taking pictures at almost every step, so if anyone wants them let me know or I'll try to get them online with a link. Should have them in the next few days.
06-19-2008, 12:28 AM
#44
Junior Member

Join Date: Jun 2008
Posts: 1
Likes: 0
Received 0 Likes
on
0 Posts
Re: Steering column feels like a loose tooth...
Just got a camaro aqbout a week ago, and the slide that engages the switch to actually start the car broke in the column. I got it out, but I can't seem to get the new one on. Do I just need to remove the retainer and the bearing so I can pull out the "bracket" that holds the lock cylinder out, then slide the new one on and rerverse it all back on?
12-02-2008, 05:11 PM
#46
Junior Member

Join Date: Sep 2007
Posts: 48
Likes: 0
Received 0 Likes
on
0 Posts
Car: 82 Z28
Engine: 327
Transmission: TH350
Re: Steering column feels like a loose tooth...
Ok, so I'm having a few issue's while I'm trying to fix this puppy.
First off, I lowered my column so I could feed the wires up the column for more slack, and some of the ***** from ( I assume, as the upper was still intact) my lower bearing, were falling all over the place.
Does this mean the bearing is completely messed and I need a new column, or can I just repack the bearings and be fine?
I'm currently at the step where it says;
"Remove the actuator rod link from the rack/sector that operates with the lock cylinder. Disconnect the link from the clip in the lower column."
I'm not sure how to actually remove these, and if I really need to?
Here's a picture of my current status (spring is out), and I don't know how to get the linkage rod out...
12-03-2008, 09:32 AM
#47
Senior Member
iTrader: (1)
Join Date: Sep 2007
Location: Wichita, ks
Posts: 273
Likes: 0
Received 0 Likes
on
0 Posts
Car: 84 frankenstein Z28
Engine: 350
Transmission: 700R4
Axle/Gears: 3.73
Re: Steering column feels like a loose tooth...
"Depress the notched wheel locking plate and remove the locking ring located at the center of the plate. There is a special tool for holding the wheel locking plate while the snap ring is removed, and it will be worth the $15.00 you'll pay for it. It can be done without the tool, but it is an exercise in frustration unless you are an octopus. I've done it several times using the "Armstrong" method, now I have the tool and use the "Brainstrong" method instead. "
Does anyone have a picture of this "wheel locking plate" tool? I figured it would helpful to have a picture along when going to the auto part store instead of just trying to explain it.
12-03-2008, 09:39 AM
#48
Supreme Member
iTrader: (7)

Join Date: May 2004
Location: Lexington, SC
Posts: 5,291
Likes: 0
Received 58 Likes
on
52 Posts
Car: 1987 SC/1985 TA
Engine: 350/vortec/fitech
Transmission: T56
Axle/Gears: 3.27 9-bolt
Re: Steering column feels like a loose tooth...
Autozone will have one to 'rent'. I don't have a picture but they list it as a lockplate removal tool, I think. They usually have a little chart with pictures of the tools available for loan.
12-03-2008, 11:34 AM
#49
Senior Member
iTrader: (1)
Join Date: Sep 2007
Location: Wichita, ks
Posts: 273
Likes: 0
Received 0 Likes
on
0 Posts
Car: 84 frankenstein Z28
Engine: 350
Transmission: 700R4
Axle/Gears: 3.73
Re: Steering column feels like a loose tooth...

Cool, thanks for the proper name of the tool. Knowing I can rent it makes it all the better.
11-05-2009, 12:26 AM
#50
Junior Member

Join Date: Mar 2009
Location: Las Vegas ,Nv.
Posts: 23
Likes: 0
Received 0 Likes
on
0 Posts
Car: 1 day...a 1990 Rs...
Engine: 3.1 Lt V-6
Transmission: auto
Axle/Gears: yes
Re: Steering column feels like a loose tooth...
i bought mine with this prob. DON'T IGNORE IT ! my wheel came off in my lap, shorted-out my VATS module, and has been sitting for 1-1/2 years while i replace the column and try to fool the anti-theft. i got it started tonight for the first time.WooHoo!
food for thaught my friends.
get those bolts tightened.It's very common 'cause people use the wheel to get in and out.
food for thaught my friends.
get those bolts tightened.It's very common 'cause people use the wheel to get in and out.

