my LS1 install engine compt extras
 07-24-2007, 01:40 PM
#1
Supreme Member

Thread Starter
Join Date: Mar 2004
Location: In the Garage
Posts: 2,519
Likes: 0
Received 4 Likes
on
3 Posts
Car: Camaro
Engine: 6.2L
Transmission: T56
my LS1 install engine compt extras
Just a little follow up explanation of how my install came out with accompanied pics so you guys who are curious can see how i did it as there are some things different than others. Attached is a pic with colored arrows and below is the description of what they are;
Red arrow is a fourth gen stock LS1 fuse/relay box year unknown but they are all the same from what I gather.
- This is my main power source and feeds the entire car. I used everything from an LS1 for the engine. Starter cables and all. Fourth gens come with two of these boxes side by side and one is pretty much for the engine and the other is for the chassis. I decided to emulate that by using my stock third gen fuse box as my chassis circuits seeing as they all worked fine and add in only the engine box from the fourth gen harness to supply the engine and fuel system. Note my car was a factory carb so this made even more sense as I had to add fuel circuits too. The best part is all the wires are of factory quality and the colors match the PCM wiring so it made connecting them easier ( there is some overlap on colors for some reason so be careful ). I ran one 10 awg+ wire from this box to feed my stock fuse box under dash box. I used an LS1 fuel tank as well with stock pump but wired with the Hotwire mod so it gets direct power via the fuse box and only triggered by not routed through the PCM.
Green arrow is the trunk line that takes all the wiring from the added fuse box to under the dash where I mounted the PCM. It goes through a hole under the heater box and if you look carefully there is a heat shield for it beside the header as a safe guard as it is close to the headers and I wanted to avoid problems.
Yellow arrow is my ground block. Every single factory ground from the engine harness, PCM, or my factory third gen fuse block goes here. Its a 3/8" stainless bolt and all my connections are soldered to good quality eyes. Any that did not reach I extended thinking that this way if I have any troubles finding the "bad ground" its dead easy. Ground problems are almost ALWAYS the source of electrical gremlins in automobiles due to the floating ground system they use. I also added many new grounds to and from the engine/chassis/trans/battery etc they are all over the place so I dont have to rely on the fasteners to carry the ground. Cant have too many grounds wire doesn't weigh much and its an easy way to avoid mystery problems later on. Trust me you will forget where all those wires go after a year or two.
Blue arrow is what I did to vent the steam tube from the heads. I bypassed it from the TB altogether and tigged on a small nipple to this stainless tubing I had. Its very thin wall stuff ( sheet metal ) so it weighs as little or less than the hose. I cant recall the alloy but its hard stainless so tough as snot. I have a bunch of this too if any of y'all want one let me know.
The second pic is a close up view of the stock LS1 fuse/relay box opened with the cover beside so you can see whats in there and how slick it is. I have one spare circuit which is the slot with no fuse in it and two spare relays in there in case i have troubles I am prepared. The BIG fuses are for 1. the LS1 fuse box power supply 2. the power feed for the stock third gen fuse box 3. is for my amplifier/sub box which has an 8awg cable running to the rear of the hatch. All nice and neat inside one box thats OEM rated and easy to access. Plus I have eliminated the factory fuseable links by replacing them with these replaceable easy access ones. Nothing in my car is not fused right there so its a very safe set up. The one marked "etc" with a 20 amp fuse is actually my fuel pump fuse for whatever reason it was in the second LS1 fuse block even though the relay was in this one so I moved it over. The 25 amp in the top right corner is for my cooling fans and for these I used my stock third gen relay.
Oh yeah Its not two boxes in the pic its just the lid off this one laying beside so you can see the labels as the other fuses do correspond to what the lid says.
I have other threads already posted up in days gone by of all the other mods I have done but if you have any questions ask away
Last edited by cam-; 07-26-2007 at 07:59 AM.
 11-01-2008, 08:44 PM
#2
Member
Join Date: May 2007
Location: Albuquerque
Posts: 335
Likes: 0
Received 1 Like
on
1 Post
Car: 1989 IROC-Z28 Camaro
Engine: 403 LSX
Transmission: TH400
Axle/Gears: Moser 9" 3.25's
Re: my LS1 install engine compt extras
That's so clean! Mad props to your clean, factory looking setup!!
Just a quick question, I know this thread is old as ***** but, how did you connect your engine harness to the fusebox? or was it already connected like that??
Just a quick question, I know this thread is old as ***** but, how did you connect your engine harness to the fusebox? or was it already connected like that??
11-02-2008, 08:32 AM
#3
Supreme Member
Thread Starter
Join Date: Mar 2004
Location: In the Garage
Posts: 2,519
Likes: 0
Received 4 Likes
on
3 Posts
Car: Camaro
Engine: 6.2L
Transmission: T56
Re: my LS1 install engine compt extras
Hmm I thought I explained that above but let me try and clarify. Right beside the battery there is my LS1 fuse/relay box which I added this is from a 99LS1 donor car. The +bat cable hooks up to this just as it would in a fourth gen and that fuse/relay box powers my engine, PCM, fuel, cooling fans, A/C etc. Everything to do with the LS1 engine gets its power from that box.
I still use the stock third gen fuse box thats under the dash below the brake booster to run the chassis circuits like headlights, power windows, interior lights etc.
I still use the stock third gen fuse box thats under the dash below the brake booster to run the chassis circuits like headlights, power windows, interior lights etc.
11-02-2008, 03:42 PM
#4
Member
Join Date: May 2007
Location: Albuquerque
Posts: 335
Likes: 0
Received 1 Like
on
1 Post
Car: 1989 IROC-Z28 Camaro
Engine: 403 LSX
Transmission: TH400
Axle/Gears: Moser 9" 3.25's
Re: my LS1 install engine compt extras
Yea I understand what it does, I ment to ask you exactly how is it integrated to your harness? Did you have to cut and splice every wire into the fuse box? Or are there quick disconnects or something? Just trying to get an Idea of how hard it would be to do this...
11-03-2008, 03:12 AM
#5
Member
iTrader: (6)
Join Date: Oct 2006
Location: WA
Posts: 320
Likes: 0
Received 0 Likes
on
0 Posts
Car: 1989 Camaro Iroc-Z
Engine: 305 TPI (LB9)
Transmission: 700R4
Axle/Gears: 2.77 posi
Re: my LS1 install engine compt extras
I have a truck harness for my swap, but I don't want the massive truck junction/fuse box...
11-03-2008, 04:10 AM
#6
Supreme Member
Thread Starter
Join Date: Mar 2004
Location: In the Garage
Posts: 2,519
Likes: 0
Received 4 Likes
on
3 Posts
Car: Camaro
Engine: 6.2L
Transmission: T56
Re: my LS1 install engine compt extras
Ahh I see I can explain. With LS1 engine harnesses there are 5 plugs that come off the back of the engine harness plus the two PCM plugs that feed the entire operation. My engine is a 99 so I was thinking was if I bought the same year/model correct fuse boxes with the wiring and relays intact with the female plugs still hooked up all I would have to do was literally plug them in to my engine and just power up the new box and I'd be rockin. Sounded sensible and simple enough so thats initially what I did. To get the harness I posted a "wanted 99 chassis harness" post up in the parts wanted section over at Ls1tech and got a response within hours and had what i wanted underway from a board sponsor over there. After reading all the titles for the different circuits on the two boxes I realized I only needed the one as the other was primarily for chassis circuits.
So after studying the two boxes I realized I could easily eliminate one box ( chassis one ) and instead of using the 5 plugs to mate to the engine harness I would just solder the wires needed instead to both save space and clutter. The wire colors did match up nicely as well so it was pretty easy to do it this way. Then all I had to do was add +bat to the fuse box and run one +bat circuit over to my stock third gen box under the booster which i did and that took care of the rest of the car I just left all the other stock circuits intact they are just along for the ride now but do nothing.
Wiring is hard to explain up front and you'll never plan it all out in your head ahead of time. Just label everything and get everything plugged in and laid out in front of you and it will start to make a lot more sense.
Last edited by cam-; 11-03-2008 at 11:56 AM.
11-03-2008, 10:25 AM
#7
Re: my LS1 install engine compt extras
It'll scare you at first... then become less and less intimidating once you start ditching things that you dont need, and cleaning things up. It'll make perfect sense once your done. Not only that, but you'll be able to trouble shoot future elec. problems because you'll know that harness inside and out.
Ide like to consolidate my fuse blocks... I just left both boxes in place. But now that I want to stick my air filter further over by the fender, Ide like to make one box, and re-mount it.
J.
Trending Topics
11-03-2008, 11:21 AM
#8
Supreme Member
Thread Starter
Join Date: Mar 2004
Location: In the Garage
Posts: 2,519
Likes: 0
Received 4 Likes
on
3 Posts
Car: Camaro
Engine: 6.2L
Transmission: T56
Re: my LS1 install engine compt extras
Ide like to consolidate my fuse blocks... I just left both boxes in place. But now that I want to stick my air filter further over by the fender, Ide like to make one box, and re-mount it.
J.
J.
Last edited by cam-; 11-03-2008 at 11:52 AM.
11-03-2008, 11:28 AM
#9
Supreme Member
Thread Starter
Join Date: Mar 2004
Location: In the Garage
Posts: 2,519
Likes: 0
Received 4 Likes
on
3 Posts
Car: Camaro
Engine: 6.2L
Transmission: T56
Re: my LS1 install engine compt extras
I have a truck harness for my swap, but I don't want the massive truck junction/fuse box...
11-03-2008, 11:47 AM
#10
Member
Join Date: May 2007
Location: Albuquerque
Posts: 335
Likes: 0
Received 1 Like
on
1 Post
Car: 1989 IROC-Z28 Camaro
Engine: 403 LSX
Transmission: TH400
Axle/Gears: Moser 9" 3.25's
Re: my LS1 install engine compt extras
Awesome That's what I needed to know. Thanks for your help!!!!
11-03-2008, 11:59 AM
#11
Supreme Member
Thread Starter
Join Date: Mar 2004
Location: In the Garage
Posts: 2,519
Likes: 0
Received 4 Likes
on
3 Posts
Car: Camaro
Engine: 6.2L
Transmission: T56
Re: my LS1 install engine compt extras
No problem ask away if you need any more help or if any other swappers get into this thread and want to bring it back from the dead to further discuss ideas post away I'll do what I can for you as will others as well. Good luck
P.S. TT84Z5SPD I just edited and added a few clarifying elements to the posts above so have a re-read it should be clearer now
P.S. TT84Z5SPD I just edited and added a few clarifying elements to the posts above so have a re-read it should be clearer now
11-03-2008, 12:24 PM
#12
Junior Member

Join Date: Mar 2008
Location: Charlotte, NC
Posts: 99
Likes: 0
Received 0 Likes
on
0 Posts
Car: 86 IROC
Engine: LS6
Transmission: 4L60E
Axle/Gears: 3.08
Re: my LS1 install engine compt extras
Did you have to do anything special on the heater box for clearance? If so can you get some close-ups
11-03-2008, 12:32 PM
#13
Supreme Member
Thread Starter
Join Date: Mar 2004
Location: In the Garage
Posts: 2,519
Likes: 0
Received 4 Likes
on
3 Posts
Car: Camaro
Engine: 6.2L
Transmission: T56
Re: my LS1 install engine compt extras
No I didnt mod the HVAC box at all to clear the wiring running underneath but it is VERY tight there and the wire looms are compressed by the HVAC box sitting on top of them so I wrapped them very well with harness tape, that black flexi conduit stuff, and used a good grommet on the firewall. I have no pics nr could I get any really its so tight under there I couldnt get a pic of anything anyways but check this link out below ( which is also in the main wiring section of the sticky now
https://www.thirdgen.org/forums/ltx-...ight=pcm+under
https://www.thirdgen.org/forums/ltx-...ight=pcm+under
Last edited by cam-; 11-03-2008 at 12:53 PM.
11-03-2008, 06:12 PM
#14
Member
iTrader: (6)
Join Date: Oct 2006
Location: WA
Posts: 320
Likes: 0
Received 0 Likes
on
0 Posts
Car: 1989 Camaro Iroc-Z
Engine: 305 TPI (LB9)
Transmission: 700R4
Axle/Gears: 2.77 posi
Re: my LS1 install engine compt extras
I'm not certain if all the truck sensors are compatible with f-body PCM's and they all used drive by wire throttle bodys. Also depending on your engines year you need to determine what reluctor wheel count your engine/PCM operates on and you'll need to use a harness and PCM to suit that respectively. Either that or completely swap over to an LS1 f-body 24tooth reluctor and sensors/harness etc. These are the main reasons I comment in the sticky that for the "first swap" its so much easier to start with an F-body LS1 as the accessories all fit nicely and the harness is clean and easy( relative easy ) to swap in cleanly plus theres lots of support from guys here and over at Tech on how to do exactly that. Sheldon made a nice harness up using a hybrid LS truck/cavalier fuse box but IIRC he has an underhood mounted PCM which was something I definitely didnt want.
I have a '99 Corvette PCM that I will be getting reflashed to a truck OS. My motor is an '01 with cable throttle (in the earlier years of the GENIII vortec I think DBW was only used on models with TCS).
As far as wiring goes, I think I am fairly competent. For that matter, I actually kind of like it. I just want to get away with it without spending very much money at all
 . And for now, I am not overly concerned with performance or appearance. I will focus (heavily) on all that once I get a steady income.
Thanks for all your guys' help. Now all I need to do is find a 4th gen fuse box for $30 or less. It's amazing how rare LS1 4th gens seem to be around here on the street and in junkyards. Thanks again!
04-29-2013, 12:21 PM
#15
Junior Member

Join Date: Jul 2012
Location: St. Louis Mo
Posts: 13
Likes: 0
Received 0 Likes
on
0 Posts
Re: my LS1 install engine compt extras
Hey sorry to bump this, but Im curious about this set up. Did you eliminate the need to intergrate the ls1 harness to c100 or c207 with this set up?
04-29-2013, 12:49 PM
#16
Supreme Member
Thread Starter
Join Date: Mar 2004
Location: In the Garage
Posts: 2,519
Likes: 0
Received 4 Likes
on
3 Posts
Car: Camaro
Engine: 6.2L
Transmission: T56
Re: my LS1 install engine compt extras
Yes. Im not a fan of harness integration ( using factory third gen fuses/relays ) for running anything to do with the engine itself, its all old, possibly not up to snuff, and why bother with all that hassle? Its more work to integrate than it is to isolate like this what I've done here where I ran all new relays, fuses etc. for the engine itself so when im done its simply add 12V+ to the engine box in pic attached and away you go. Its much easier to do that way for more reasons than I can list.
The only things I use from the third gen harness that "integrate" into my swap harness is the purple ign switch feed to starter, One feed from bat to C100 to power the car, and then the gauge feeds. Thats it
You can see pics of how I wired up the L92 I have in the car now with tucked harness in this thread here
https://www.thirdgen.org/forums/ltx-...-l92-swap.html
04-29-2013, 01:10 PM
#18
Supreme Member
Thread Starter
Join Date: Mar 2004
Location: In the Garage
Posts: 2,519
Likes: 0
Received 4 Likes
on
3 Posts
Car: Camaro
Engine: 6.2L
Transmission: T56
Re: my LS1 install engine compt extras
Thanks. After youve done a few it really starts to be more obvious that this is the best methodology. The best way to go is strip down the harness like Pocket shows in his threads and isolate each connector free from the rest of the spaghetti. Then with the engine in the car ( or even on an engine stand ) simply plug them in and route them in the direction you want to mount the ECM at and using small zip ties simply keep adding each sensor feed as you go, over and over with bare wire feeds. Some might need to be lengthened, some will need shortening, but this way its nice and neat and most of all SERVICEABLE. I should also note that on the L92 harness nothing is hard wired into the car itself. I have every feed to and from the fuse box and ECM wired into metri-pak connectors so I can simply unplug and remove as need be without untangling the harness from the engine and draping over fender etc. Very service friendly now
08-21-2016, 09:18 PM
#19
Junior Member
iTrader: (1)
Join Date: Jul 2013
Location: Newburgh, IN
Posts: 77
Likes: 0
Received 0 Likes
on
0 Posts
Car: 89 Formula WS6
Engine: LQ4 h/c/i
Transmission: TH-FO-HUNNIT
Axle/Gears: 3.73
Re: my LS1 install engine compt extras
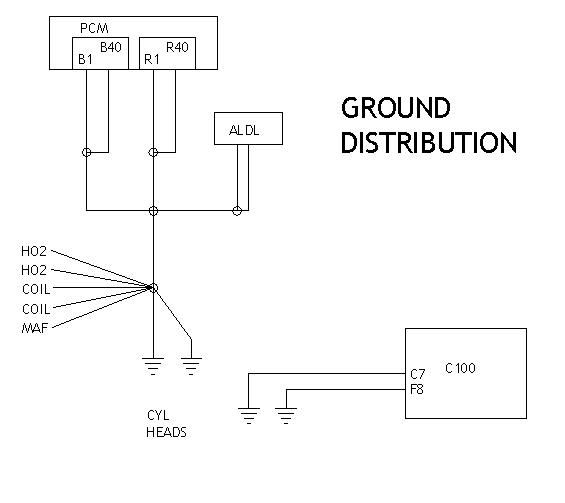
Hey sorry to revive this thread again but I'm about 75% of the way through converting my LS harness to stand alone but I seem to have made a mistake along the way and in the LT1swap's guide I thought he said to "snip all of the ground splices out" and I accidentally didn't tape them all up that went to that splice so I am just wondering if anyone would happen to remember all of the grounds that were in these splices and a question for Cam- in specific: What all sensors/grounds did you tie into your one ground bolt? I am in a real predicament here because I'm not exactly sure what I need to ground (besides the main PCM ground wires that come from the connectors)... If anyone has advice it would be SOOO appreciated!! I look forward to hearing back from anyone, Jeremy.
 08-22-2016, 07:34 PM
#21
Junior Member
iTrader: (1)
Join Date: Jul 2013
Location: Newburgh, IN
Posts: 77
Likes: 0
Received 0 Likes
on
0 Posts
Car: 89 Formula WS6
Engine: LQ4 h/c/i
Transmission: TH-FO-HUNNIT
Axle/Gears: 3.73
Re: my LS1 install engine compt extras
Awesome thank you SOOO much!! That is exactly what I was looking for. I really appreciate it man.
08-23-2016, 09:24 AM
#22
Supreme Member
iTrader: (1)
Join Date: Feb 2003
Location: Marietta, GA
Posts: 2,024
Likes: 0
Received 1 Like
on
1 Post
Car: 92 Z28
Engine: LS1
Transmission: T56
Axle/Gears: 3.73 10 bolt
Re: my LS1 install engine compt extras
NP, this thread covers most of the additional harness stuff if you get lost.
https://www.thirdgen.org/forums/ltx-...formation.html
https://www.thirdgen.org/forums/ltx-...formation.html
11-27-2016, 10:28 AM
#24
Junior Member
iTrader: (1)
Join Date: Jul 2013
Location: Newburgh, IN
Posts: 77
Likes: 0
Received 0 Likes
on
0 Posts
Car: 89 Formula WS6
Engine: LQ4 h/c/i
Transmission: TH-FO-HUNNIT
Axle/Gears: 3.73
Re: my LS1 install engine compt extras
Hey guys, another question for you all... At the C100 connector, there is a thick pink wire (89, pin F4 judging from the diagram. I am not by my car currently), is this the wire that connects to the battery that provides the voltage for the ignition hot circuit or does this connect to something else to provide something else ignition hot? And if it is the latter, what wire do you connect to the battery to provide the main ignition B+ source? Thanks
11-27-2016, 12:04 PM
#25
COTM Editor
iTrader: (22)
Join Date: Mar 2001
Posts: 9,886
Likes: 0
Received 1,852 Likes
on
1,268 Posts
Car: '89 Firebird
Engine: 7.0L
Transmission: T56
Re: my LS1 install engine compt extras
The 12 gauge PINK wire (pin F4) is the old ignition coil power supply. Be aware that it is not fused at the fuse panel, but instead is connected to the main 12V power supply through the key switch. If something on that large Pink wire shorts then it is going to blow one of the main fusible links and take down a lot of stuff in the car.
11-27-2016, 12:38 PM
#26
Junior Member
iTrader: (1)
Join Date: Jul 2013
Location: Newburgh, IN
Posts: 77
Likes: 0
Received 0 Likes
on
0 Posts
Car: 89 Formula WS6
Engine: LQ4 h/c/i
Transmission: TH-FO-HUNNIT
Axle/Gears: 3.73
Re: my LS1 install engine compt extras
The 12 gauge PINK wire (pin F4) is the old ignition coil power supply. Be aware that it is not fused at the fuse panel, but instead is connected to the main 12V power supply through the key switch. If something on that large Pink wire shorts then it is going to blow one of the main fusible links and take down a lot of stuff in the car.
11-27-2016, 01:18 PM
#27
COTM Editor
iTrader: (22)
Join Date: Mar 2001
Posts: 9,886
Likes: 0
Received 1,852 Likes
on
1,268 Posts
Car: '89 Firebird
Engine: 7.0L
Transmission: T56
Re: my LS1 install engine compt extras
Yes.
You can figure these things out easily by doing a voltage test with battery hooked up, or continuity test if no battery is hooked up to the car. Check continuity from the main power distribution post, turn the key switch, and viola! you will see continuity.
You can figure these things out easily by doing a voltage test with battery hooked up, or continuity test if no battery is hooked up to the car. Check continuity from the main power distribution post, turn the key switch, and viola! you will see continuity.
11-27-2016, 01:38 PM
#28
Junior Member
iTrader: (1)
Join Date: Jul 2013
Location: Newburgh, IN
Posts: 77
Likes: 0
Received 0 Likes
on
0 Posts
Car: 89 Formula WS6
Engine: LQ4 h/c/i
Transmission: TH-FO-HUNNIT
Axle/Gears: 3.73
Re: my LS1 install engine compt extras
Yeah I'm trying to save up for a new one cuz my Fluke got stolen while I was at school or else I would.. sorry about that
11-27-2016, 03:55 PM
#29
COTM Editor
iTrader: (22)
Join Date: Mar 2001
Posts: 9,886
Likes: 0
Received 1,852 Likes
on
1,268 Posts
Car: '89 Firebird
Engine: 7.0L
Transmission: T56
Re: my LS1 install engine compt extras
I have a $5K portable o-scope at work. I own a $30 multimeter at home because the car is just a 12V DC system.

Thread
Thread Starter
Forum
Replies
Last Post

