Here we go again. Swap #2 has begun. LOTS of pics...
 04-18-2008, 07:34 PM
#1
Here we go again. Swap #2 has begun. LOTS of pics...
Hey everyone. Most of you that frequent the conversion forum know me and my car. You know I like to ***** it out any chance I get. And I like posting pictures. SO...that being said, today I started the swap process once again.
My 87 is all busted up, and the 86 I just got is begging for a make over. Its getting EVERYTHING from the 87. As long as everyone is interested, I plan to take some pictures as I go. Its going to go fast... The motor will be out tomorrow, and I just started around 1 today. All I have left to do is unhook some wiring, and brake lines...and its time to drop it.
ALSO... if anyone has any requests for pictures, please post up. If its something that ILl get to, Ill take some detailed pictures. If Im past that point..tough luck. So make sure you post up early
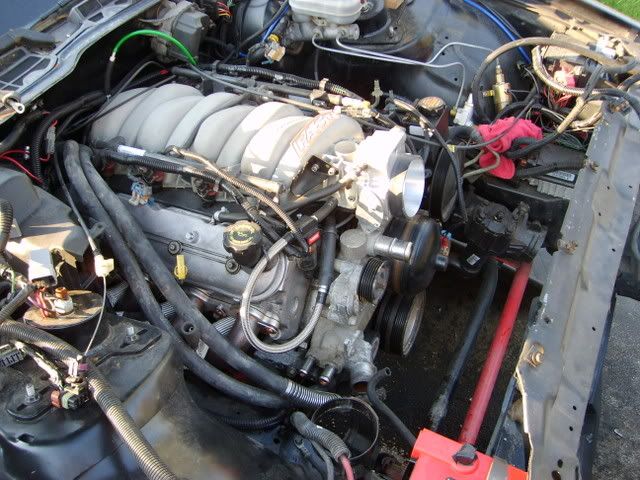
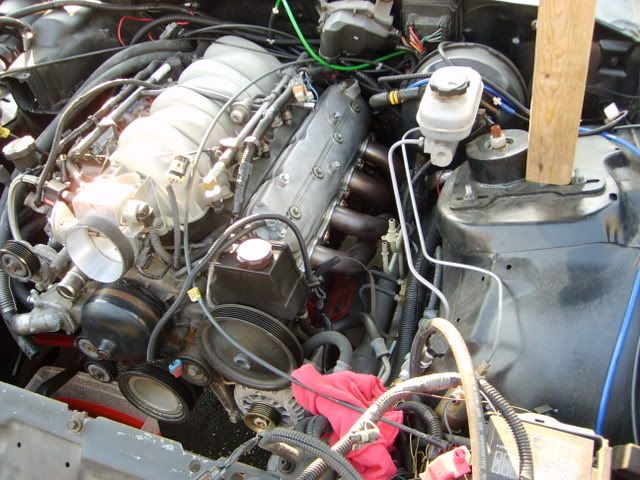
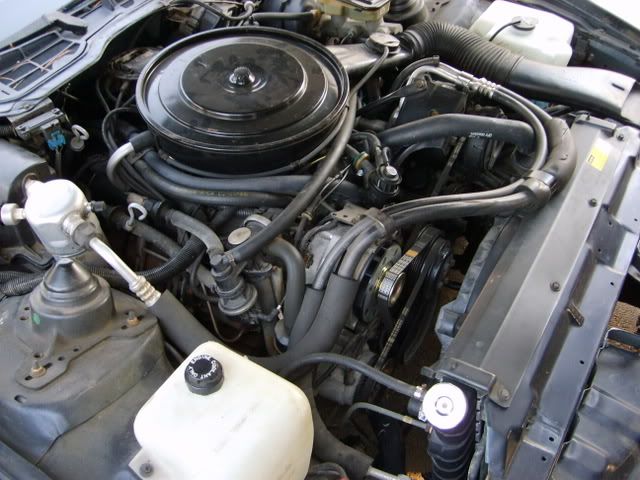
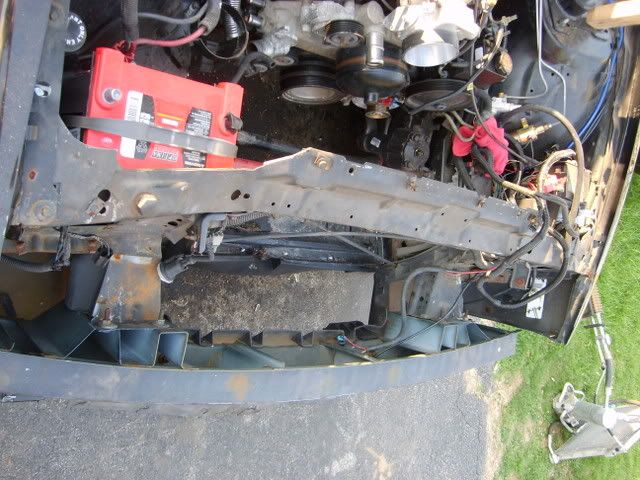
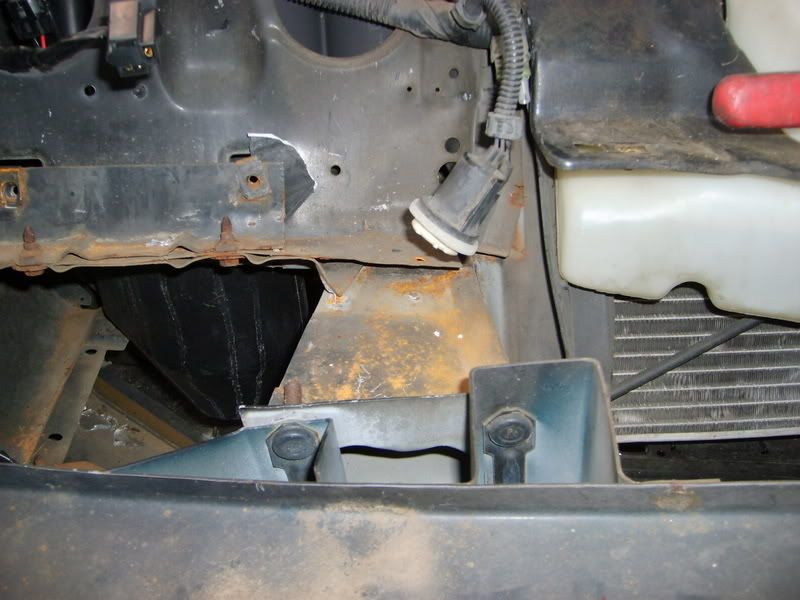
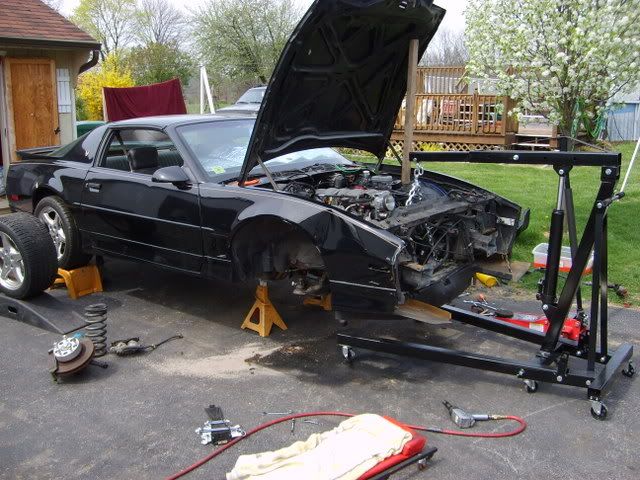
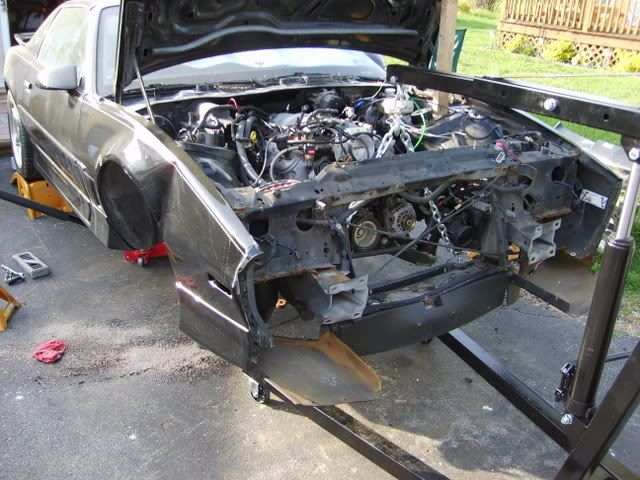
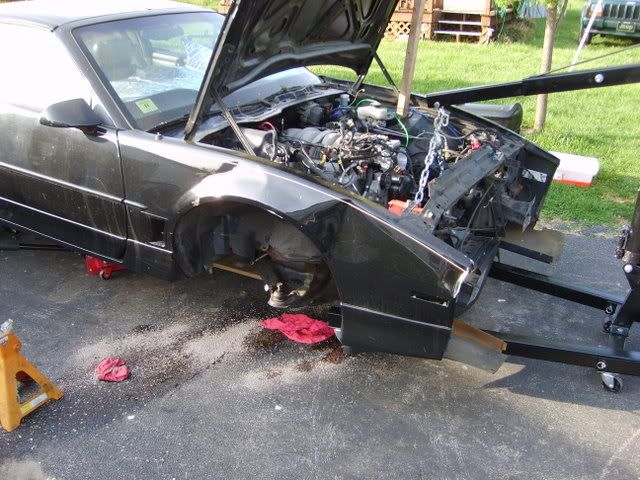
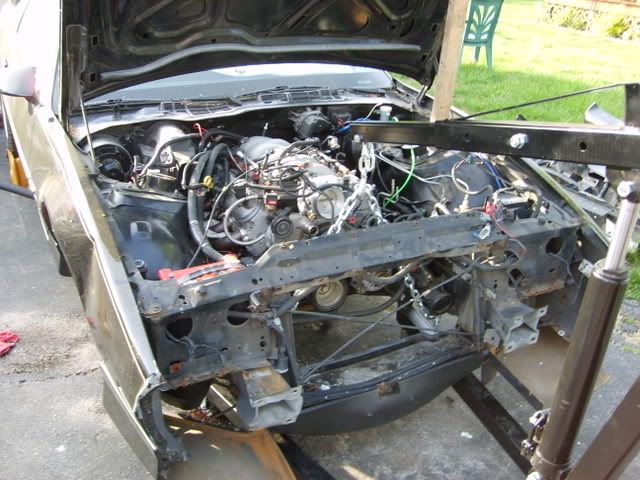
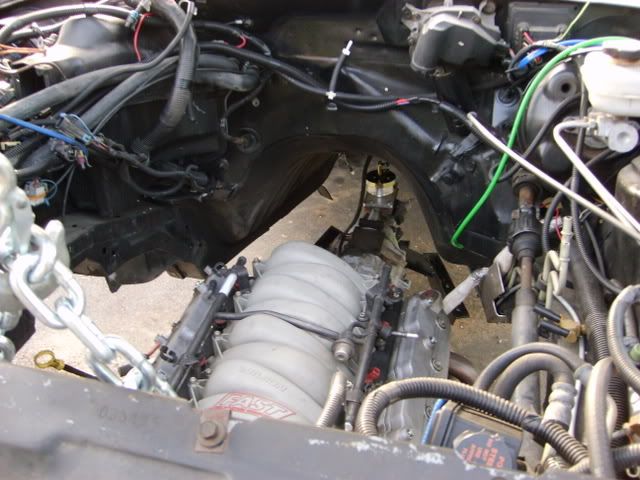
Here are a few shots of where I am today. Man....things got filthy from sitting in the yard. Poor car
OH..and check this out. I was ticked that ide have to open my A/C system since I just had it charged... But when I started looking at it, I realized what I left myself able to do. Worked awesome...
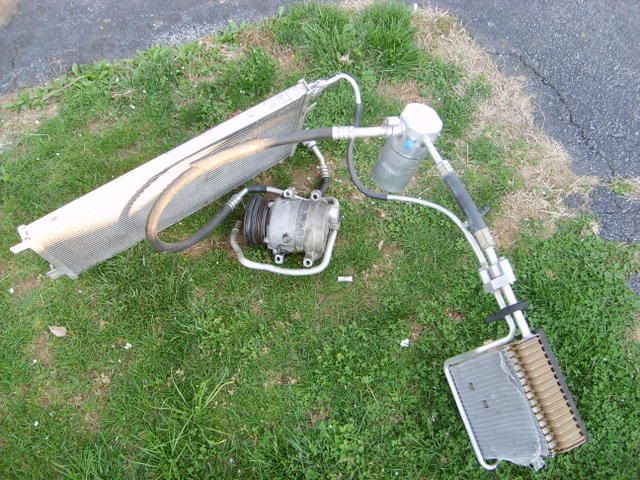
100% unopened and very easy to remove/replace. Love it when something like that happens by accident. haha
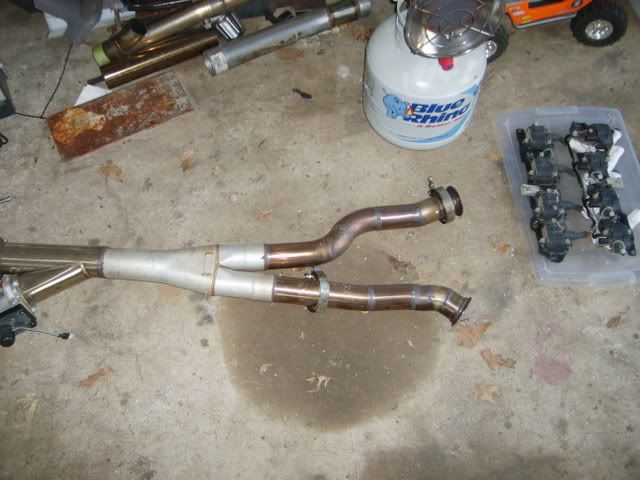
Thats it for now guys/gals. Tomorrow Ill take some updated pictures of where Im at. I need to figure out if anyone wants the body of my car when Im done. Also the LG4 that Im pulling for the 86. Here is whats coming out of the 86...
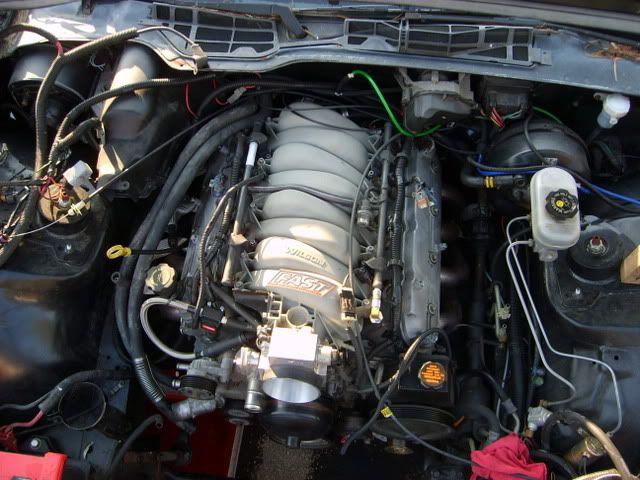
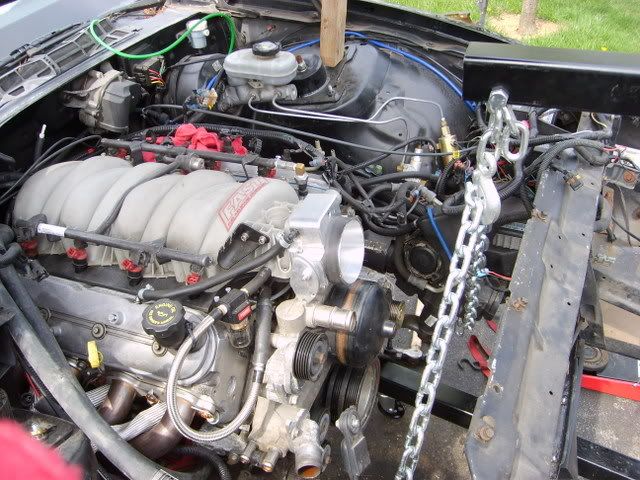
Fairly clean, 40k mile motor.
Like I said, any questions, pic requests, etc etc...let me know! If you guys are sick of seeing my junk, let me know and Ill keep the pics to a minimum
Justin
My 87 is all busted up, and the 86 I just got is begging for a make over. Its getting EVERYTHING from the 87. As long as everyone is interested, I plan to take some pictures as I go. Its going to go fast... The motor will be out tomorrow, and I just started around 1 today. All I have left to do is unhook some wiring, and brake lines...and its time to drop it.
ALSO... if anyone has any requests for pictures, please post up. If its something that ILl get to, Ill take some detailed pictures. If Im past that point..tough luck. So make sure you post up early
Here are a few shots of where I am today. Man....things got filthy from sitting in the yard. Poor car
OH..and check this out. I was ticked that ide have to open my A/C system since I just had it charged... But when I started looking at it, I realized what I left myself able to do. Worked awesome...
100% unopened and very easy to remove/replace. Love it when something like that happens by accident. haha
Thats it for now guys/gals. Tomorrow Ill take some updated pictures of where Im at. I need to figure out if anyone wants the body of my car when Im done. Also the LG4 that Im pulling for the 86. Here is whats coming out of the 86...
Fairly clean, 40k mile motor.
Like I said, any questions, pic requests, etc etc...let me know! If you guys are sick of seeing my junk, let me know and Ill keep the pics to a minimum
Justin
 04-18-2008, 07:39 PM
#2
Senior Member

iTrader: (4)
Join Date: May 2006
Location: Beloeil, Quebec
Posts: 704
Likes: 0
Received 2 Likes
on
2 Posts
Car: IROC-Z
Engine: LSx
Transmission: T56
Axle/Gears: Fabbed 9"
Re: Here we go again. Swap #2 has begun. LOTS of pics...
Sweet! Im the 1st to post to this excellent thread. What was the problem with the 87? That 86 sure looks clean man. Any car pics? Oh and what you did with the A/C is awesome! lol
04-18-2008, 07:47 PM
#3
Supreme Member
iTrader: (12)
Join Date: Aug 2005
Location: M.D
Posts: 1,923
Likes: 0
Received 2 Likes
on
1 Post
Car: 1987 Camaro
Engine: 350 hsr
Transmission: 700R4(blown)
Axle/Gears: 3:73
Re: Here we go again. Swap #2 has begun. LOTS of pics...
1st is the worst! second is the best to extened the post!
04-18-2008, 07:48 PM
#4
Member

Join Date: Mar 2005
Location: London, Ontario
Posts: 368
Likes: 0
Received 0 Likes
on
0 Posts
Car: 1991 Camaro RS
Engine: LS1
Transmission: T56
Axle/Gears: Tru-Track posi/Moser axles/4.10
Re: Here we go again. Swap #2 has begun. LOTS of pics...
Excellent work Justin. Im going to keep following this
04-18-2008, 08:09 PM
#5
Re: Here we go again. Swap #2 has begun. LOTS of pics...
Haha...wow! Wasnt expecting responses already. Let see..Im hoping this time around I can re-do the things I wished I did differently on the 87. Going to make it alittle cleaner, make things fit better (pan clearance, clutch master cylinder,etc). Like a second chance...
Here is whats wrong with my baby...the 87.
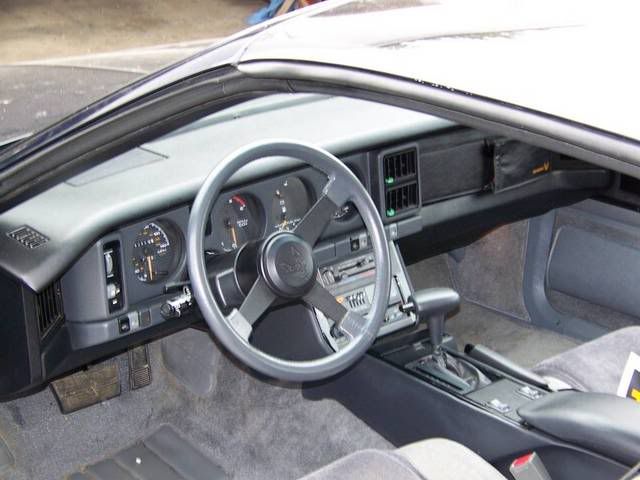
Its really not too bad, but I just couldnt bring myself to mess with it any longer. Time to move on. The rest of the car is nice. Interior isnt bad. Just didnt feel like pulling the chassis and doing all that work.
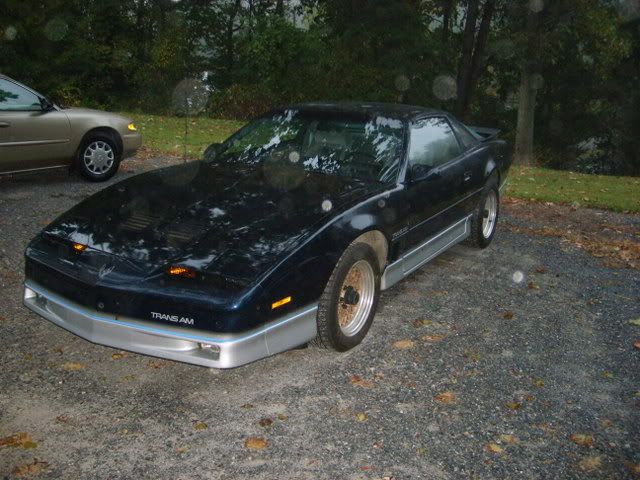
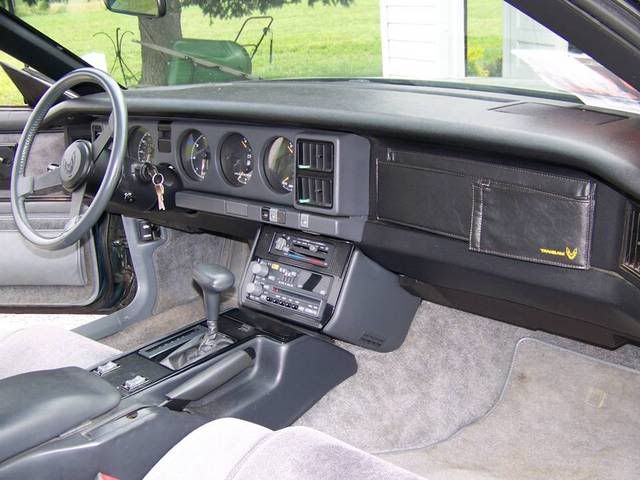
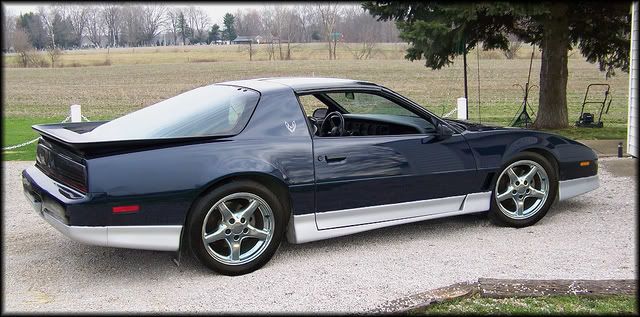
And...here are some crappy shots of the 86 exterior. It has my gold lace WS6 wheels on it, but came with salad shooters. 40k miles, garage kept, orig paint, original everything. SUPER clean inside. Which was the selling point honestly.

Alittle photoshop action of what it will look like when Im finished.
It WILL be black again...or some variant of black. Not that I dont like the blue/silver, but I loved the black car. Thinking maybe graphite metallic even.
Seriously..if I get too pic happy, let me know. I uploaded them small so they dont show up super huge on the screen atleast..hah.
J.
Here is whats wrong with my baby...the 87.
Its really not too bad, but I just couldnt bring myself to mess with it any longer. Time to move on. The rest of the car is nice. Interior isnt bad. Just didnt feel like pulling the chassis and doing all that work.
And...here are some crappy shots of the 86 exterior. It has my gold lace WS6 wheels on it, but came with salad shooters. 40k miles, garage kept, orig paint, original everything. SUPER clean inside. Which was the selling point honestly.
Alittle photoshop action of what it will look like when Im finished.
It WILL be black again...or some variant of black. Not that I dont like the blue/silver, but I loved the black car. Thinking maybe graphite metallic even.
Seriously..if I get too pic happy, let me know. I uploaded them small so they dont show up super huge on the screen atleast..hah.
J.
04-18-2008, 08:32 PM
#6
Supreme Member
iTrader: (12)
Join Date: Aug 2005
Location: M.D
Posts: 1,923
Likes: 0
Received 2 Likes
on
1 Post
Car: 1987 Camaro
Engine: 350 hsr
Transmission: 700R4(blown)
Axle/Gears: 3:73
Re: Here we go again. Swap #2 has begun. LOTS of pics...
the more pics the better! i love the treads with the billions of pics with detailed descriptions and step-by-step. and all that good stuff.
04-18-2008, 09:14 PM
#7
Supreme Member
iTrader: (2)
Join Date: Feb 2006
Location: 39.84N 105.11W
Posts: 1,547
Likes: 0
Received 0 Likes
on
0 Posts
Car: '89 Trans Am GTA
Engine: WAS 350 - now L92 (alum. 378/6.2L)
Transmission: WAS 700R4, now a built T56
Axle/Gears: 3.27 9-bolt
Re: Here we go again. Swap #2 has begun. LOTS of pics...
Wow, the car that you're swapping into is flat gorgeous man...  Honestly, I don't think I'd be in a big hurry to paint that one!
Oh, and since you asked (& since I'm just *getting ready* to start my own swap) - I'd like pics of EVERYTHING, from every conceivable angle...
That's not too much to ask, is it??
(Yeah, I'm just yankin' your chain...)
Honestly, I don't think I'd be in a big hurry to paint that one!Oh, and since you asked (& since I'm just *getting ready* to start my own swap) - I'd like pics of EVERYTHING, from every conceivable angle...
That's not too much to ask, is it??
(Yeah, I'm just yankin' your chain...)
Trending Topics
04-18-2008, 09:32 PM
#8
Senior Member
iTrader: (2)
Join Date: Jul 1999
Location: St. Louis
Posts: 875
Likes: 0
Received 1 Like
on
1 Post
Car: RS
Engine: LS1
Transmission: T56
Axle/Gears: 9" for the ladies
Re: Here we go again. Swap #2 has begun. LOTS of pics...

pics of wiring, and any issues you had putting in the clutch master cylinder
I'd like it all in 3d, something like solidworks would be fine.
And if you could have it by tomorrow 6am that would be great.
 04-19-2008, 01:41 AM
#9
Re: Here we go again. Swap #2 has begun. LOTS of pics...
LOL... I do have an idea for the clutch master cylinder. I NEVER got that sucker lined up 100% like I wanted. Such a pain... Im using 4th gen pedals. The plan I have also includes reinforcing the firewall, because I had a ton of flex in mine after I cut the holes for the master cylinder. But, basically instead of making the master fit to the brackets on the pedals, Im going to make the pedals match the bracket. Im going to get the cylinder rod lined up with the pedal throw, then make everything match it. Instead of the other way around. Should make my throw straighter and keep my master cylinder from eating itself. Gonna get a remote bleeder and new slave for the trans as well...
My plans were to go with a new cam, and a new clutch. But I might put a hold on that for now. Not totally sure yet. But with as fast as things are moving, I gotta decide soon.
What you guys cant see in the 86's paint, is all the orange peel. Its terrible. First year for clear coat...and they pretty much blasted it on without much attention. Tons of peel in the rear panels. Im going to try to smooth it out with some cut/buff...but we'll see. Color looks great when wet and in the sun, but crappy at all other times.
Thanks for the interest! Ill definetly take pictures as I go. Unless someone has specific requests, most likely the pictures will just be at the end of each day during wrap up. Just get into the groove of working, and forget to take pics usually.
J.
04-19-2008, 08:23 AM
#10
Supreme Member
Join Date: Mar 2004
Location: In the Garage
Posts: 2,519
Likes: 0
Received 4 Likes
on
3 Posts
Car: Camaro
Engine: 6.2L
Transmission: T56
Re: Here we go again. Swap #2 has begun. LOTS of pics...
I NEVER got that sucker lined up 100% like I wanted. Such a pain... Im using 4th gen pedals. The plan I have also includes reinforcing the firewall, because I had a ton of flex in mine after I cut the holes for the master cylinder.
The reason I say to go with the stockers is they have these support braces that bolt around the pedals and to the firewall. They make the entire assembly very rigid eliminating any and all flex. If you can take a look at a bone stock T5 pedal assembly and I guarantee you'll have an "AHA" moment.
Anyways as always I got my 2 nickels of input but good luck with the swap and enjoy the build.
04-19-2008, 08:50 AM
#11
Re: Here we go again. Swap #2 has begun. LOTS of pics...
Cam, your two nickels are usually a good investment! So do the thirdgen pedals have more supports than the 4th gen? My pedals right now have a bracket that goes down to the firewall, but Im suspecting that the 3rd gen set has better support?
So I dont need to re-weld that peg on the pedals to make the throw geometry correct? I have an adjustable master cylinder, so if its just a matter of throw length, I can fix that wth the adjustment. I just need the thing to push in straight and not at an angle so my stinking seals dont get worn out again. Ill totally give a 3rd gen set a try if its really the way to go.. I just gotta find a set thats not bent up and has all that pieces.
Really the only reason I went with 4th gen pedals is that i had the donor car sitting there. But the donor car was a T56 swap car. So the pedals could be bent up and screwy anyway.
Thanks for the 10 cents!
J.
Last edited by ghettocruiser; 04-19-2008 at 11:39 AM.
04-19-2008, 10:41 AM
#12
Supreme Member

Join Date: Jan 2001
Location: Pittsburgh, PA
Posts: 1,374
Likes: 0
Received 1 Like
on
1 Post
Car: 06 SRM M6 GTO, 98 Grand Prix GTP
Re: Here we go again. Swap #2 has begun. LOTS of pics...
more pics the merrier man! I for one am excited to see how this car turns out, I was wondering when you were gonna get to it. Your old car was badass, I know this one will turn out the same! Subscribing!
04-19-2008, 07:55 PM
#13
Senior Member
iTrader: (4)
Join Date: May 2006
Location: Beloeil, Quebec
Posts: 704
Likes: 0
Received 2 Likes
on
2 Posts
Car: IROC-Z
Engine: LSx
Transmission: T56
Axle/Gears: Fabbed 9"
Re: Here we go again. Swap #2 has begun. LOTS of pics...
Another vote for the 3rd gen pedals here. They fit perfect... you just have to make little spacer to fill the gap @ the attachement point. Im using 4th gen master and 3rd gen pedals. I can get you pics if you want.
04-19-2008, 09:23 PM
#14
Senior Member
iTrader: (2)
Join Date: Jul 1999
Location: St. Louis
Posts: 875
Likes: 0
Received 1 Like
on
1 Post
Car: RS
Engine: LS1
Transmission: T56
Axle/Gears: 9" for the ladies
Re: Here we go again. Swap #2 has begun. LOTS of pics...
well all I have are 4th gen pedals so I guess that's what I am using.
If someone has pics of both assemblies then I'll at least know if I need to weld reenforcements on to the 4th gen ones.
If someone has pics of both assemblies then I'll at least know if I need to weld reenforcements on to the 4th gen ones.
04-20-2008, 08:36 AM
#15
Supreme Member
Join Date: Mar 2004
Location: In the Garage
Posts: 2,519
Likes: 0
Received 4 Likes
on
3 Posts
Car: Camaro
Engine: 6.2L
Transmission: T56
Re: Here we go again. Swap #2 has begun. LOTS of pics...
I bought a set of fourth gen pedals to use after reading all the "danger Will Robinson" threads about using third gen pedals.
Then I start reading over on LS1tech and all the other swappers ( first gen Camaros etc. ) cant use fourth gen pedals so the standard opinion from all those guys was the piston on the master cyl has to displace 7/8" minimum to 15/16" maximum to shove enough fluid through the slave for proper operation.
I was already running a t56 from an LT1 car so I had a Pulp Fiction moment and took a black magic marker and I marked all over the piston of the LT1 master and pumped the hell out of it. The marker was wiped clean off the rod travel and I measured it with a vernier caliper and it was 7/8" exactly. So I thought what the heck try these pedals first and if for whatever reason its no good then I could put the 4th gen pedals in because I was trying to save time and I liked these little support brackets. All said and done aside from the master cyl bushing being a different size than the pin on the pedals they work perfectly.
Anyways I dont see the same kind of support brackets on the 4th gen pedals I have. It doesn't mean there is none I just dont have em. But on my third gen pedals theres two nicely bent odd shaped u bolt brackets on the inside of the firewall that bolt up to the steering column area and a long u bolt that goes through them and over the master from the engine compt side that hold the master in nice and tight. All the load goes into these brackets and the firewall is only along for the ride. A bit tricky to explain I hope that makes sense. Once you see it its obvious
04-20-2008, 11:55 AM
#16
Re: Here we go again. Swap #2 has begun. LOTS of pics...
Thanks again for the input fellas. My 4th gen pedals have a bracket that goes on the inside of the firewall, that the master cylinder bolts go through. But its still leaving quite a bit of flex in the firewall. So maybe ill go the 3rd gen route. I just have to find a set that is complete with all the bolts and what not to go with it. Maybe a trip to the junk yard is in order.
As I said, I have an adjustable master...So if I need alittle more throw, I can get it because its adjusted all the way short right now. So Im going to see what I can find.
Progress slowed a bit yesterday. Ill post some pictures later. But it was 85...and about 99 on my driveway. Took it out of me pretty quick. Plus I had to change the exhaust manifold on my moms Jeep. A nice little side project that decided to pop up....
Motor is still in, but is ready to come out now. Just need to unbolt it more or less. Front suspension is out, driveshaft, torque arm, etc etc. Today's weather is kinda sketchy, so Im not sure how much Im going to get done. Ide like to hit it hard....but dont want to get caught in a downpour. Ill report back tonight with pictures and all.
Thanks again!
J.

 04-20-2008, 07:05 PM
#18
Senior Member
iTrader: (4)
Join Date: May 2006
Location: Beloeil, Quebec
Posts: 704
Likes: 0
Received 2 Likes
on
2 Posts
Car: IROC-Z
Engine: LSx
Transmission: T56
Axle/Gears: Fabbed 9"
Re: Here we go again. Swap #2 has begun. LOTS of pics...
Good to see you back at it. As for this issue I think the cats meow here is to use the stock third gen pedals. I know there was lots of talk way back about the pin location and throw not being enough blah blah but the only real issue is the bushing size needs to be bored out exactly right to fit snugly and then the third gen pedals work great! I've got a full season on mine and many track passes with no issue.
The reason I say to go with the stockers is they have these support braces that bolt around the pedals and to the firewall. They make the entire assembly very rigid eliminating any and all flex. If you can take a look at a bone stock T5 pedal assembly and I guarantee you'll have an "AHA" moment.
Anyways as always I got my 2 nickels of input but good luck with the swap and enjoy the build.
 04-21-2008, 12:45 AM
#19
Supreme Member
iTrader: (2)
Join Date: Feb 2006
Location: 39.84N 105.11W
Posts: 1,547
Likes: 0
Received 0 Likes
on
0 Posts
Car: '89 Trans Am GTA
Engine: WAS 350 - now L92 (alum. 378/6.2L)
Transmission: WAS 700R4, now a built T56
Axle/Gears: 3.27 9-bolt
Re: Here we go again. Swap #2 has begun. LOTS of pics...
I took pictures of my 3rdgen pedal set today, will likely post them in the morning...
04-21-2008, 08:30 AM
#20
Member
iTrader: (1)
Join Date: Jan 2001
Location: Republic of Texas
Posts: 222
Likes: 0
Received 0 Likes
on
0 Posts
Engine: LS2
Transmission: T56
Axle/Gears: Moser Ford-9, 3.50
Re: Here we go again. Swap #2 has begun. LOTS of pics...
I can't wait to see the finished car! The new car looks great too, that's gonna be a sweet ride.
04-21-2008, 09:26 AM
#21
Re: Here we go again. Swap #2 has begun. LOTS of pics...
Yeah Im excited. The new car is so tight and quiet and unmolested. The only mod to it is the addition of a magnetic reed switch for the ignition. Other than that, none of the wires have been tampered with, nothing. Its all 100% original. Has a CD player...but from an early GM car. Even has the original unpainted spoiler in great shape...and the little air deflectors under the rockers that Ive only seen twice since being into 3rd gens. Not a spec of rust...just plenty of that GM waxy sealant under the hood. Which probably accounts for some of the rustlessness.
Im trying to figure out how exactly to clean my motor more. Its got that weird white corrosion that alum gets. Plus I think I need some new gaskets because I have some oil film on the bottom of the motor. But Im trying to keep things nice and clean this time. I spent more time fabbing last time, and not enough time refining things.
Thanks for all the feedback fellas. I looked at my pictures from sunday, and for some reason they are all crap. Only one or two made it... so here they are. Hard to see whats done. But front suspension/steering is gone, tq arm, power steering, shifter, more wiring etc etc is all away. My SFC's will hopefully be in this week if UMI ships them today. So work will start picking up on the blue one as well.
The rest of the pics were garbage.
J.
04-21-2008, 12:36 PM
#22
Member
iTrader: (1)
Join Date: Jan 2001
Location: Republic of Texas
Posts: 222
Likes: 0
Received 0 Likes
on
0 Posts
Engine: LS2
Transmission: T56
Axle/Gears: Moser Ford-9, 3.50
Re: Here we go again. Swap #2 has begun. LOTS of pics...
Try using a mild cleaner (maybe wheel cleaner) and a wire brush to clean the block.
When I built my aluminum interior trim pieces, I used oven cleaner to remove the natural oxidation; but I sanded it afterward, so that may have removed any staining from the cleaner.
When I built my aluminum interior trim pieces, I used oven cleaner to remove the natural oxidation; but I sanded it afterward, so that may have removed any staining from the cleaner.
04-21-2008, 05:55 PM
#23
Supreme Member
Join Date: Jan 2001
Location: Pittsburgh, PA
Posts: 1,374
Likes: 0
Received 1 Like
on
1 Post
Car: 06 SRM M6 GTO, 98 Grand Prix GTP
Re: Here we go again. Swap #2 has begun. LOTS of pics...
wow, so you're having ALOT of fun there. It looks kinda like my garage when I was piecing together my bird from the old one, what a mess. i kinda wish I would be a little cleaner as well, I just kinda got stuff together made sure it fit and slapped it together. Now I'm like, damn, why didnt I paint that, or how'd I get grease there, or where'd that oil come from!

04-23-2008, 10:32 PM
#24
Re: Here we go again. Swap #2 has begun. LOTS of pics...
I'm using thirdgen pedals, what size does the bushing have to be??? That is a stumbling point for me right now. Otherwise the pedals have gone realativly smoothly. I'll probably have to find another clip too. Had one for the brake, but I only had the one.
BTW, what have you guys done for throttle cable? I got a 4th gen (ls1) but, though it fits, it seems to be too long or something, I don't seem to be able to get WOT at the motor.
04-24-2008, 01:40 AM
#25
Member
iTrader: (5)
Join Date: May 2006
Location: Hattiesburg, MS
Posts: 478
Likes: 0
Received 0 Likes
on
0 Posts
Car: 1987 Camaro Z28
Engine: 5.3L
Transmission: 4L60E
Axle/Gears: 3.42LSD
Re: Here we go again. Swap #2 has begun. LOTS of pics...
I'm using thirdgen pedals, what size does the bushing have to be??? That is a stumbling point for me right now. Otherwise the pedals have gone realativly smoothly. I'll probably have to find another clip too. Had one for the brake, but I only had the one.
BTW, what have you guys done for throttle cable? I got a 4th gen (ls1) but, though it fits, it seems to be too long or something, I don't seem to be able to get WOT at the motor.
BTW, what have you guys done for throttle cable? I got a 4th gen (ls1) but, though it fits, it seems to be too long or something, I don't seem to be able to get WOT at the motor.
04-24-2008, 07:10 AM
#26
Re: Here we go again. Swap #2 has begun. LOTS of pics...
I tied a knot in the cable after pulling it through the pedal arm...then I used a small zip tie to get it a tad shorter...
Sorry for no updates everyone. Ive keep getting pulled away from the car. Im waiting on my SFCs...not sure when UMI is going to ship them. Seeing as how we are both in PA, I figured Ide have them this week. Then I had to fix my mom's jeep... Then I had to deal with my old jeep because Im taking it for one last off roading trip before I sell it. Just one thing after another.
But today Im thinking about dropping the motor the rest of the way. I want to order a new slave and a remote bleeder because now is the best time to deal with clutch stuff. Once the motor is out of the 87, Im pretty much at a stand still until I get my SFCs on. Then gut the 86... I kind of have a plan for how I want things to go...but we'll see.
The 86's engine bay needs to be cleaned, it has that waxy sealer all over it. Then Im spraying some nice semi gloss black in there. Gonna try to make it alittle nicer this time around by using an actual spray gun and cleaning things better.
Ill update you guys soon with some pics...
J.
04-24-2008, 08:00 AM
#27
Supreme Member
Join Date: Mar 2004
Location: In the Garage
Posts: 2,519
Likes: 0
Received 4 Likes
on
3 Posts
Car: Camaro
Engine: 6.2L
Transmission: T56
Re: Here we go again. Swap #2 has begun. LOTS of pics...
I'm using thirdgen pedals, what size does the bushing have to be??? That is a stumbling point for me right now. Otherwise the pedals have gone realativly smoothly. I'll probably have to find another clip too. Had one for the brake, but I only had the one.
I know it sounds like a pita to do this and it somewhat was but i thought reaming it out would have gone lickity split at first but the flexy aspect foiled me somewhat. Of course you could simply cut the stock third gen pin off and weld on a new one in the same spot that fits the fourth gen master which is what I would have done had the pedals not already been installed in the car. I had so little time to work on this project so I wasn't about to add anymore work than absolutely nec hence leaving the third gen pedals in place to begin with. I had confidence they were going to work okay though because i had already run an LT1 t56 for years prior to the LS1 swap.
BTW, what have you guys done for throttle cable? I got a 4th gen (ls1) but, though it fits, it seems to be too long or something, I don't seem to be able to get WOT at the motor.
take your gas pedal and bend it back enough to where the cable is pulled wot when the pedal hits the floor. don't bend it too far it will break the cable. I just took mine off and clamped it in a vise and bent it down until I got it where I wanted it.
 Exactly what I did it took all of three seconds to do with a short piece of pipe slid over the pedal arm
04-24-2008, 07:43 PM
Exactly what I did it took all of three seconds to do with a short piece of pipe slid over the pedal arm
04-24-2008, 07:43 PM
#29
UPDATE!!!
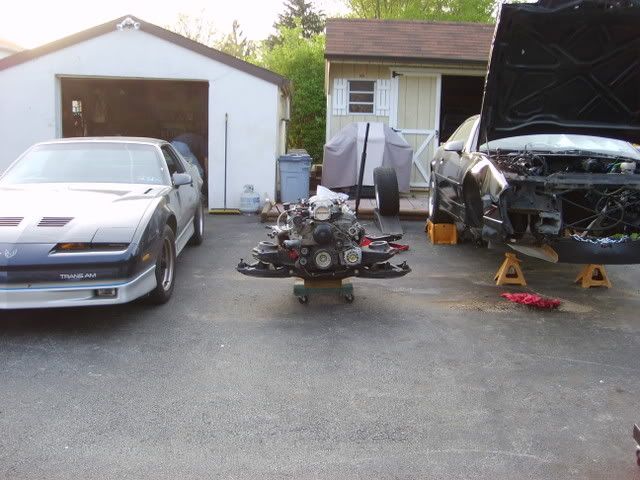
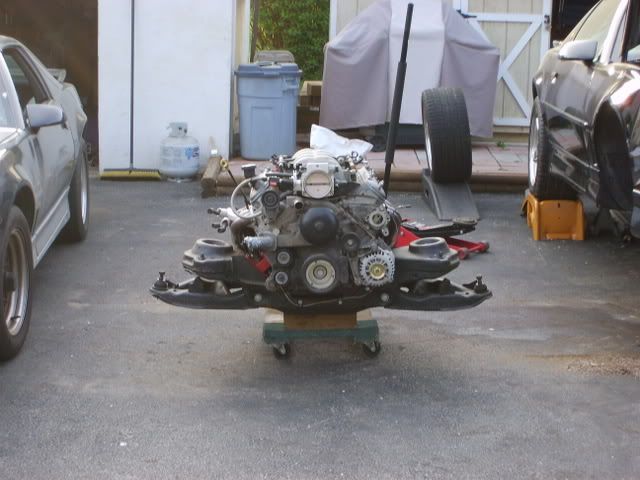
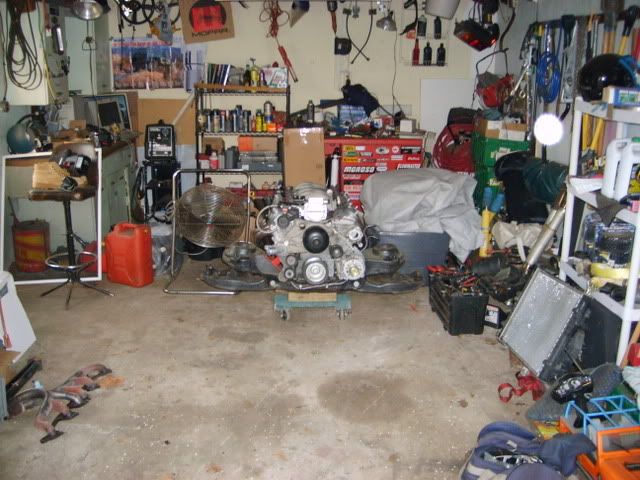
Well, finally got to get some work done tonight. Got the motor pulled, and some odds and ends taken care of. Im basically at a small standstill right now. I ordered some UMI subframe connectors for the 86 last saturday, and I was hoping they would have been in by now. But I havent gotten any response back from them on when they'd ship...hopefully they come soon.
I want to get the SFCs on the 86, then get the engine bay gutted, cleaned, and painted. Then start to move things from the 87's engine bay over to the 86. That way I dont have things laying all over the place from the 87. Ill just remove/replace..then put the motor in.
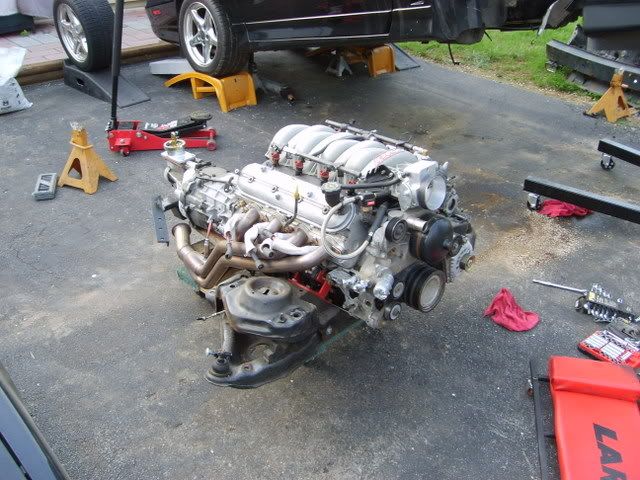
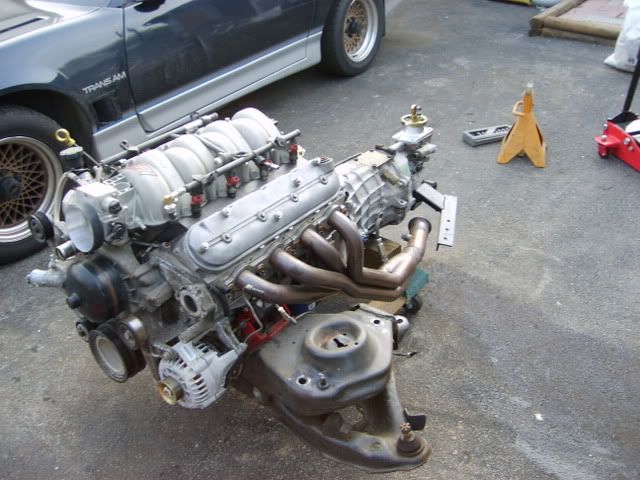
Anyway. Here are the pictures. Not really much to look at. Came out smooth as usual.
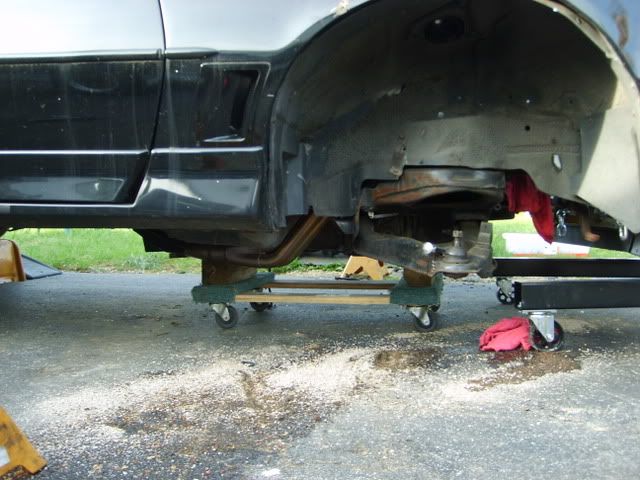
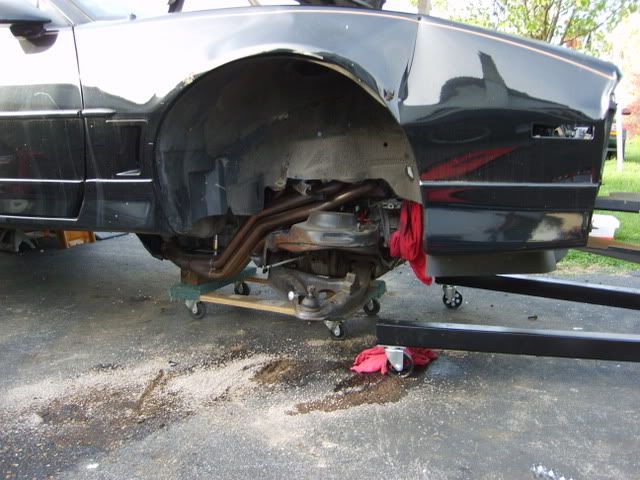

I want to get the SFCs on the 86, then get the engine bay gutted, cleaned, and painted. Then start to move things from the 87's engine bay over to the 86. That way I dont have things laying all over the place from the 87. Ill just remove/replace..then put the motor in.
Anyway. Here are the pictures. Not really much to look at. Came out smooth as usual.
 04-24-2008, 09:30 PM
#31
Supreme Member
Join Date: Jan 2001
Location: Pittsburgh, PA
Posts: 1,374
Likes: 0
Received 1 Like
on
1 Post
Car: 06 SRM M6 GTO, 98 Grand Prix GTP
Re: Here we go again. Swap #2 has begun. LOTS of pics...
wow J, you make it look so easy! So, is it going under the new car as well, or over?
04-24-2008, 09:43 PM
#32
Re: Here we go again. Swap #2 has begun. LOTS of pics...
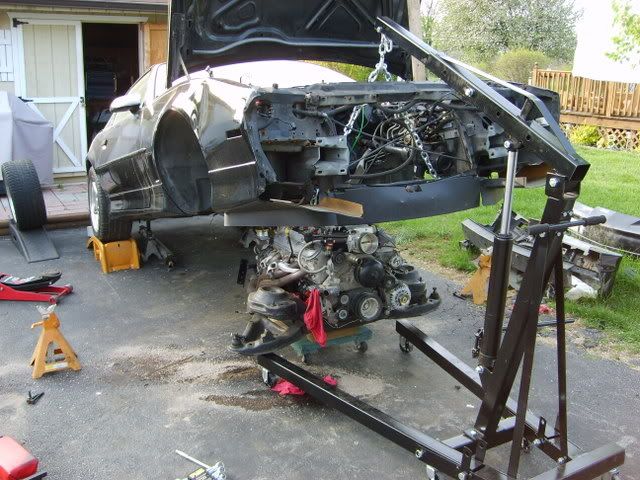
Thats because it is easy Always under...Ill never remove/replace an f-body motor from the top. Maybe not never....but from the bottom is my preference. Since the suspension is getting transferred over, it only made sense. The front of the 87 is so light right now, you and I could lift it up higher than it is in the pics without issue. I did it with a buddy last time to have someone else adjust jack stands.
J.
Always under...Ill never remove/replace an f-body motor from the top. Maybe not never....but from the bottom is my preference. Since the suspension is getting transferred over, it only made sense. The front of the 87 is so light right now, you and I could lift it up higher than it is in the pics without issue. I did it with a buddy last time to have someone else adjust jack stands. J.
04-24-2008, 09:49 PM
#33
Re: Here we go again. Swap #2 has begun. LOTS of pics...
I dont know the exact size off the top of my head but I can tell you how I did it. Those bushings are made out of a damn tough and flexible plastic and the fourth gen pin is much smaller in diameter than the third gen pin but its a LOT wider. So I took the fourth gen bushing and held it by hand over the drill press with a bit that was the same size as the third gen pin ( A reamer is best but I didnt have one that size ). Being that the bushing is flexible it actually flexed out around the drill bit and shrunk down afterwards so I ended up using a fairly substantially larger drill bit as a ream and I just took my time measuring the fit against the pedal pin along the way until it was just right. Then I used a flap disk on an angle grinder and shaved the thickness CAREFULLY down to the same width as the stock third gen bushing and thats it.
I know it sounds like a pita to do this and it somewhat was but i thought reaming it out would have gone lickity split at first but the flexy aspect foiled me somewhat.
I know it sounds like a pita to do this and it somewhat was but i thought reaming it out would have gone lickity split at first but the flexy aspect foiled me somewhat.

Justin, WOW!! you are definatly going faster than me. You wouldn't want to make a trip out to NW Detroit suburbs would you??
 Just out of curiosity, what are you putting the chains on to lift the car??? Is one side under the steering box? That might be the way to go from now on!
Sorry about the thread jack
04-24-2008, 11:06 PM
#35
Re: Here we go again. Swap #2 has begun. LOTS of pics...
V6canvas: The chain is bolted to the sway bar mounts. I wanted to bolt to my chassis horns like I did on the donor car since the bumper is off, but mine are so hosed I was afraid they'd rip. But its also where Ill be lifting/lowering the 86 as well. Seems like the best location. Works great. Like I said you are really only lifting up the car without the motor/trans. You are only lifting the car with motor/trans for a brief moment when you need to get it back on the jack stands and level.
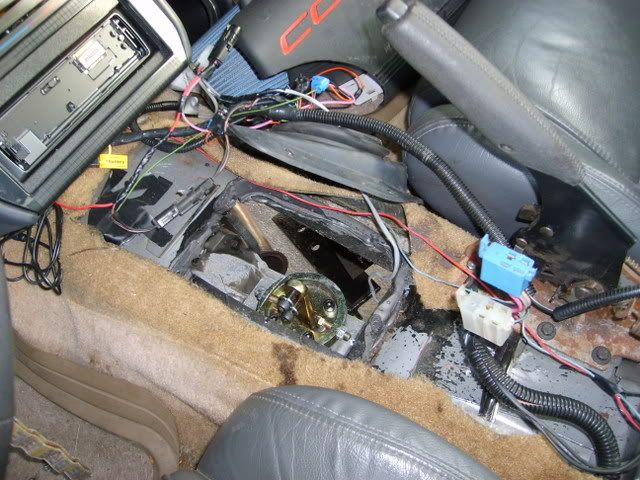
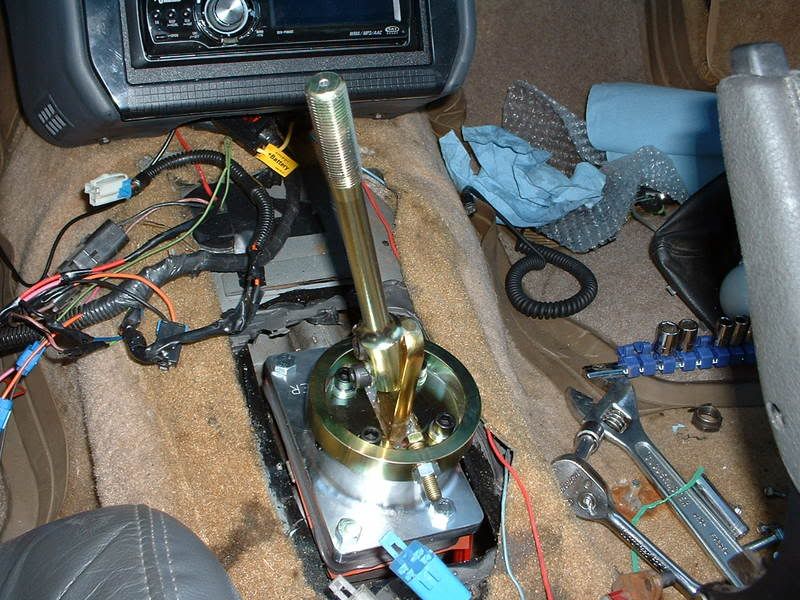
five7kid: Thats the size that I made it. Its a tad too long. I cut too far forward and needed to trim. But its not too bad. The way I did it the first time was to bolt the motor and trans up without the shifter (with the shifter opening wrapped and sealed), then I used a long punch to make a dimple from underneith at each corner of the "shifter box". Then, from the top, I cut using the dimples as guides. I figured then it would be right on no matter what...it was close atleast. haha. On the 86, Im just going to measure since I know where it will sit. Here is a picture of the shifter in the hole so you can see how the hole actually lookes. Its decieving in the picture because the trans is about 10 inches below the hole.
See how its too long towards the front? The rest is good...
J.
04-25-2008, 07:25 AM
#36
Supreme Member
Join Date: Sep 2005
Location: Ottawa, ONT
Posts: 1,951
Likes: 0
Received 7 Likes
on
7 Posts
Car: 1987 Firebird
Engine: 355
Transmission: T56
Re: Here we go again. Swap #2 has begun. LOTS of pics...
Thats quite the picture!! However, i have a complaint. Not as many pictures as promised
....Keep em coming, and i agree you make it look very easy! I guess it helps if youve done it before. Im actually itching to see pix of how you will tackle the wiring in the new car. I know you said you will try and add a bit more finesse to it. But im always at an endless quest to clean up my engine bay, because for some reason the hoses, and wires just dont go away.....
Keep up the progress, and try not to start something new while waiting for the SFCs....
04-25-2008, 07:52 AM
#37
Re: Here we go again. Swap #2 has begun. LOTS of pics...
Hahah... Yeah things just sort of slowed down. Not many pictures, because not much to see I guess. Once I get moving on the 86 Ill have more pictures and what not. Not sure what Im doing about wiring. Last time when I put the motor in, I had the wiring all hooked up to the motor. When I dropped it, I left the wiring in the car. I think Im going to go back to having the wiring hooked up. Just easier. I gotta try to keep the wiring off the dang headers. I found some melted wire loom in a bunch of spots. No melted wires, but I dont want it to get that far. maybe some heat sheathing would help... Ill figure it out.
I still need a set of pedals too. not turning up much there. The ones on ebay are like over 100 bucks shipped... If thats how much they are, then so be it I guess.
J.
I still need a set of pedals too. not turning up much there. The ones on ebay are like over 100 bucks shipped... If thats how much they are, then so be it I guess.
J.
04-25-2008, 11:44 AM
#38
Moderator
iTrader: (14)
Join Date: Mar 2000
Location: Littleton, CO USA
Posts: 43,169
Likes: 0
Received 35 Likes
on
34 Posts
Car: 82 Berlinetta/57 Bel Air
Engine: LS1/LQ4
Transmission: 4L60E/4L80E
Axle/Gears: 12B-3.73/9"-3.89
I'm extremely lazy, and don't want to stab the eng/trans twice, but I suppose that's the way it will have to be. I have gotten the stock auto shifter brackets removed, but that's as far as I've gotten with that.
04-25-2008, 12:01 PM
#39
Re: Here we go again. Swap #2 has begun. LOTS of pics...
You dont have to remove the engine and trans then. What I did was shove a bunch of news paper into the shifter opening, then some tin foil, then wrapped it with tape. Put the motor and trans in and get it all bolted down. Then, using something long (punch, screw driver, etc), go up from the bottom and put a dimple at each corner of the shifter base. If the trans is hitting the tunnel, which it shouldnt be, just lower it down enough to use a cut off wheel. The tunnel is pretty thin, so its easy to cut. Then just connector your dimples. That'll get you pretty close. You need to go about a 1/4-1/2 bigger than your marked out opening. As long as you cover the shifter opening well, you wont have to worry about stuff getting into it.
J.
J.
04-25-2008, 03:12 PM
#40
Moderator
iTrader: (14)
Join Date: Mar 2000
Location: Littleton, CO USA
Posts: 43,169
Likes: 0
Received 35 Likes
on
34 Posts
Car: 82 Berlinetta/57 Bel Air
Engine: LS1/LQ4
Transmission: 4L60E/4L80E
Axle/Gears: 12B-3.73/9"-3.89
That sounds better than anything else I've heard.
Appreciate you accommodating my hijack. . .
Appreciate you accommodating my hijack. . .
04-25-2008, 04:02 PM
#41
Re: Here we go again. Swap #2 has begun. LOTS of pics...
Haha no problem man... I kinda figured there would be questions/tech stuff mixed in with my pics. Most people that look at this will just breeze down for pictures anyway.
In my opinion, cutting the shifter hole like I did is not only easy, but you cant put the hole in the wrong spot really. I cut my hole alittle big, because I marked it in the dark. haha. Thats what impatience got me. But if your trans is sitting where its supposed to be, you KNOW where the hole has to be. I was going to use measurements, but figured every car/swap is alittle different. So I did it this way.
J.
04-25-2008, 07:39 PM
#42
Re: Here we go again. Swap #2 has begun. LOTS of pics...
Yea, I did my hole that way too. I even got the pro 5.0 too
Just curious, did you seal up the hole in any way?? so you don't get dirt /noise coming up through there to the underside of the console.
Just curious, did you seal up the hole in any way?? so you don't get dirt /noise coming up through there to the underside of the console.
04-26-2008, 12:31 AM
#43
Re: Here we go again. Swap #2 has begun. LOTS of pics...
Oh yeah...most definetly sealed the hole up around the shifter. I used the 4th gen rubber boot...because it was there. Doesnt really fit the contour of the tunnel 100%, but close enough. I cut the top to fit around the head of the pro 5.0, and fit snuggly under the screw stops on the shifter. Then I used some black RTV and just gobbed it all the way around. Some self drilling/tapping screws holds it all in place. You could use 3rd gen boot too. There is a site that sells them....I cant remember it off the top of my head, but if I do, Ill post it. They sell all kinds of used 3rd gen parts at decent prices...
J.
J.
04-26-2008, 10:09 AM
#44
Supreme Member
Join Date: Sep 2005
Location: Ottawa, ONT
Posts: 1,951
Likes: 0
Received 7 Likes
on
7 Posts
Car: 1987 Firebird
Engine: 355
Transmission: T56
Re: Here we go again. Swap #2 has begun. LOTS of pics...
Oh yeah...most definetly sealed the hole up around the shifter. I used the 4th gen rubber boot...because it was there. Doesnt really fit the contour of the tunnel 100%, but close enough. I cut the top to fit around the head of the pro 5.0, and fit snuggly under the screw stops on the shifter. Then I used some black RTV and just gobbed it all the way around. Some self drilling/tapping screws holds it all in place. You could use 3rd gen boot too. There is a site that sells them....I cant remember it off the top of my head, but if I do, Ill post it. They sell all kinds of used 3rd gen parts at decent prices...
J.
J.
THeres only like 5 holes to keep the 4th gen boot in place, so i drilled about 5 more holes, in the huge spaces along it. Works well, i think i got a good seal out of it.
04-28-2008, 01:16 PM
#45
Moderator
iTrader: (14)
Join Date: Mar 2000
Location: Littleton, CO USA
Posts: 43,169
Likes: 0
Received 35 Likes
on
34 Posts
Car: 82 Berlinetta/57 Bel Air
Engine: LS1/LQ4
Transmission: 4L60E/4L80E
Axle/Gears: 12B-3.73/9"-3.89
That helps a lot. My LS1/T56 was a remote purchase, so I don't have access to the donor car. Plus, I don't have any experience with 3rd gen manual cars. So, I didn't know if there was a lower boot (have seen vague references to same), figured there must be, but thought I'd use a universal shifter boot if I had to.
If a 3rd gen lower boot works, I'll look into getting one of those before cutting the hole. After marking with the punch, the boot could be used as a template.
I hear what you're saying about the tunnel being thin metal. I drilled out the spot welds for the auto shifter bracket, and all but one or two punched through the tunnel after going through the bracket before I could pull the drill back. I was surprised it was that thin - the bracket was much thicker gage.
04-28-2008, 08:46 PM
#46
Supreme Member
iTrader: (2)
Join Date: Feb 2006
Location: 39.84N 105.11W
Posts: 1,547
Likes: 0
Received 0 Likes
on
0 Posts
Car: '89 Trans Am GTA
Engine: WAS 350 - now L92 (alum. 378/6.2L)
Transmission: WAS 700R4, now a built T56
Axle/Gears: 3.27 9-bolt
Re: UPDATE!!!
Originally Posted by ghettocruiser
Anyway. Here are the pictures. Not really much to look at. Came out smooth as usual.
Do you think it would be possible for you to throw a tape measure in there, & measure how far back your cut is from the inside of the firewall?
I know that we'd need to add another inch or so, but it sure would be cool to have a good, "ballpark" idea of where we should start cutting...
Thanks.
04-28-2008, 08:50 PM
#47
Supreme Member

Join Date: Dec 1999
Location: Calgary
Posts: 1,934
Likes: 0
Received 1 Like
on
1 Post
Car: 89 Formula
Engine: 350
Transmission: TH 700R4
Axle/Gears: 3.27
Re: Here we go again. Swap #2 has begun. LOTS of pics...
nice project you have!
Really like the photoshop you did with the 4th gen rims! I'd leave it dark blue BUT even black with silver GFX woulds look SHARP!
(your leaving GFX silver....right?)
Really like the photoshop you did with the 4th gen rims! I'd leave it dark blue BUT even black with silver GFX woulds look SHARP!
(your leaving GFX silver....right?)
04-28-2008, 10:00 PM
#48
Re: Here we go again. Swap #2 has begun. LOTS of pics...
871LEIroc: The GFX will remain silver until Im sure which way I want to go with the car. Im not a HUGE fan of the two tone, but its growning on me. I want to get that sticker of o fthere, and see how it looks then. Should be ok though.
V8Rumble: Sure man! Thats why I started the thread! Anyone that wants pics or measurements or anything...just ask away! Im not sure if I can measure from the firewall...only because I wont be removing all the radio pod stuff and all. But Ill get some good measurements that you can use. If I can sneak the tape back there, Ill get it from the firewall though.
Only thing is...you might have to wait a day or so. Im in the middle of a bunch of crap right now. Dealing with some personal issues, which hopefully after tomorrow will be resolved. I havent even touched the car since the motor was out. Finally got ahold of UMI, and my SFCs are shipping tomorrow..... Slightly longer than I thought they would have taken, but oh well. If it doesnt rain wednesday, Ill be putting those on, and Ill grab the measurement for you.
J.
04-30-2008, 04:29 PM
#49
Re: Here we go again. Swap #2 has begun. LOTS of pics...
v8rumble: I took a measurement for ya. I went off the auto shifter bracket, since that should be pretty constant. Or close enough.
My hole is 1.75" back from the front most part of the bracket. Then, its 9" from the bracket to the back of the hole. And its 4" wide. So the hole should be around 4x7.25.
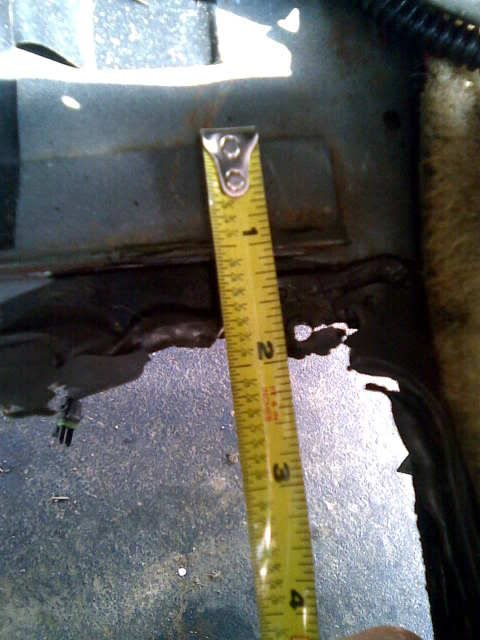
Just dont take that to gospel...still do some measuring and what not. like I said, I made the hole in a hurry and I know I could have done it cleaner. This time around, Im making the hole small, and then folding the edges under to make it more rigid and finished off looking.
Anyway...Im getting ticked. UMI still hasnt shipped my SFCs. Been since the 19th. Called monday, was told they'd ship tuesday. Emailed today since they didnt ship, and was told they were shipping today. Its 5:30, and I dont see a shipping update, and I havent gotten a tracking number email. So I can only assume that they didnt go out yet again. These things better be worth it, because they are holding me up right now.
J.
My hole is 1.75" back from the front most part of the bracket. Then, its 9" from the bracket to the back of the hole. And its 4" wide. So the hole should be around 4x7.25.
Just dont take that to gospel...still do some measuring and what not. like I said, I made the hole in a hurry and I know I could have done it cleaner. This time around, Im making the hole small, and then folding the edges under to make it more rigid and finished off looking.
Anyway...Im getting ticked. UMI still hasnt shipped my SFCs. Been since the 19th. Called monday, was told they'd ship tuesday. Emailed today since they didnt ship, and was told they were shipping today. Its 5:30, and I dont see a shipping update, and I havent gotten a tracking number email. So I can only assume that they didnt go out yet again. These things better be worth it, because they are holding me up right now.
J.
04-30-2008, 05:42 PM
#50
Supreme Member
Join Date: Jan 2001
Location: Pittsburgh, PA
Posts: 1,374
Likes: 0
Received 1 Like
on
1 Post
Car: 06 SRM M6 GTO, 98 Grand Prix GTP
Re: Here we go again. Swap #2 has begun. LOTS of pics...
they are worth it. i didnt really have alot of communication with them either, but when they showed up at the door, I forgot all about that. 