LS1 harness - revisited
 03-14-2010, 09:57 PM
#1
Supreme Member

Thread Starter
iTrader: (24)
Join Date: Jun 2005
Location: NC
Posts: 7,890
Likes: 0
Received 58 Likes
on
42 Posts
Car: 92 Firebird
Engine: Supercharged 6.0
Transmission: T56
Axle/Gears: 8.8 3.73
LS1 harness - revisited
This is an abridged overview of a plug and play harness from beginning to end. Hopefully it will clear up some of the repetitive questions I get concerning the wiring
This took about 16 hours to build. Plan for a weekend of work at the minimum, longer if this is your first time messing with wiring. Label everything, this is very important. You may know all about that 'green wire' being the fuel pump relay call wire, but try to remember that an hour later in the sea of spaghetti. Next, use the smallest labels you can read. Wiring snags and tangles up on everything. Its a fact of life, use smaller labels to minimize the frustration
Engine bay automotive wire uses a TXL jacket. When building a harness, you cannot use the cheap junk you see in Advance auto or whatever. It will melt and all sorts of electrical gremlins will pop up. Shorts are very difficult to troubleshoot and even harder to locate, especially with the sheer complexity of modern engine control harnesses. 95% of the wiring is 18 and 20ga. To minimize expenses, buying one 100' roll of 18ga will be plenty enough to build one harness. Using a size larger than necessary wont hurt function, but do not use a wire too small for the job
Next, connect all of your ground circuits together with runner wires. This is a failsafe for a poor ground. If a ring terminal vibrates loose/breaks, the runner wire will prevent the major headache you would be troubleshooting. When you are done, dont forget the ground straps from the engine to K-member and K-member to chassis. One is sufficient, but multiple offers greater insurance especially since 3rd gens are getting older and more of the chassis is rusty, promoting poor contacts
Finally, before beginning, READ AND KNOW what you're getting into. Research is free and knowing what to expect will minimize time spent on this already tedious job. Make and update a notebook or computer folder. You need to know what the connectors look like, names, how a relay works, how to remove a harness from the car, find the C100/C207 pinout for your year, know if your stock fuseblock is sufficient to support the new engine or not, what to do with your speedo, what options you will use, where your PCM will be located, what type of HO2 you will need/use, how to use a power distribution block, how to wire the battery/alt cables, which wire the starter solenoid wire is and that it really is just one big fat wire, which relays are called by 12v and which are called by ground, etc
Bookmark wiring build threads, even ones not specific to your engine. Procedures for building harnesses are the same regardless of engine type/make. You may pick up neat tips/tricks to make your build/install just that much better
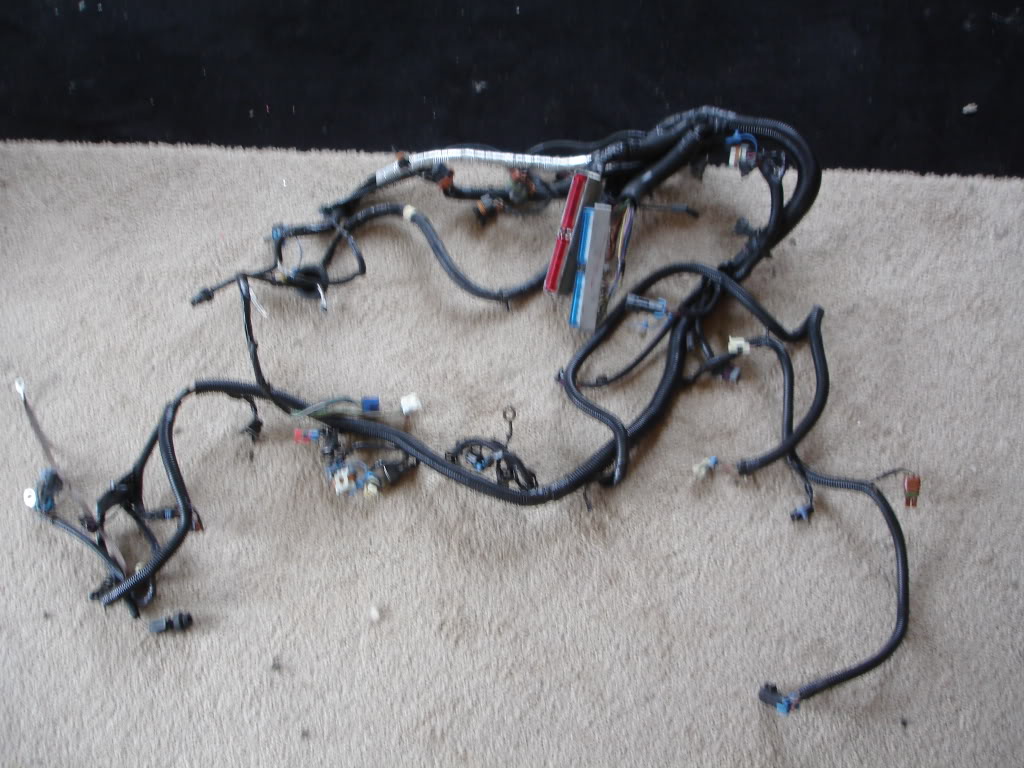
Lets get started. The objective today is to put a LS1/6 spd harness into a 89 GTA. 3rd gen pinouts are collected, the LS1 PCM pinout and basic harness diagram are printed off. Here is a 2000 harness strait from the 4th gen
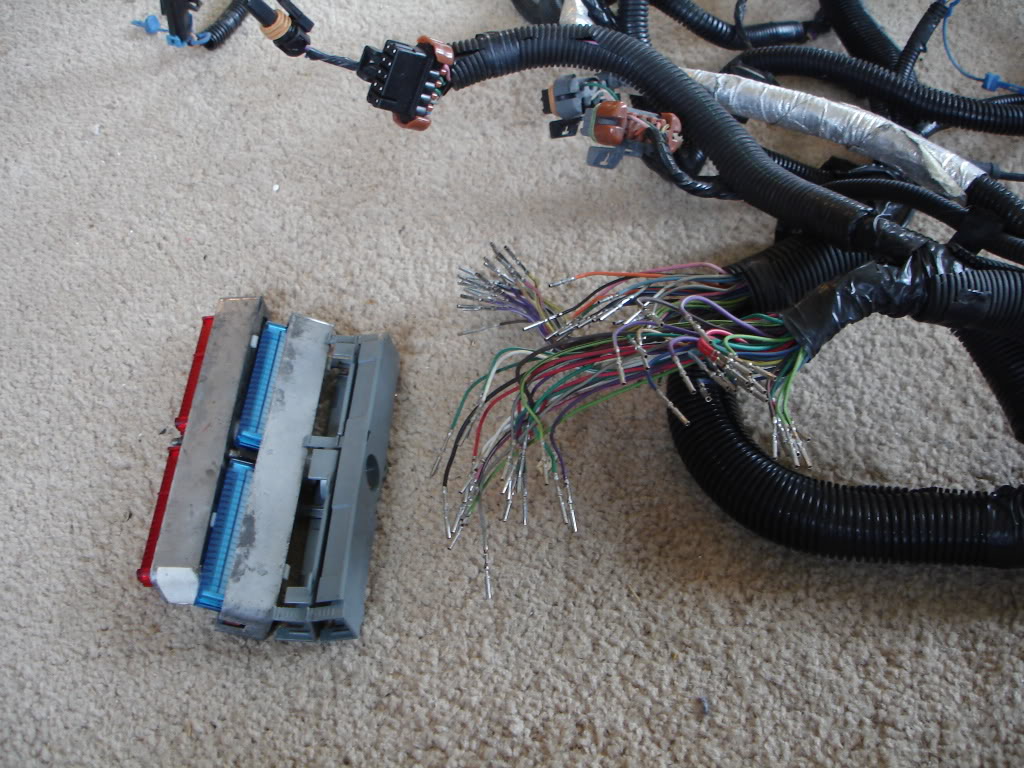
As before, start by removing the PCM connectors. Use a small thin tool to press the tabs locking the colored faces on. Once they pop off, pinch and pull the gray backing covers off. They are prone to breaking. To remove the terminals, use your fingernail or a thin tool (knife or pick work well) to pull the white plastic 'fingers' back slightly. With the tab pulled, push the terminal out the direction of the wire
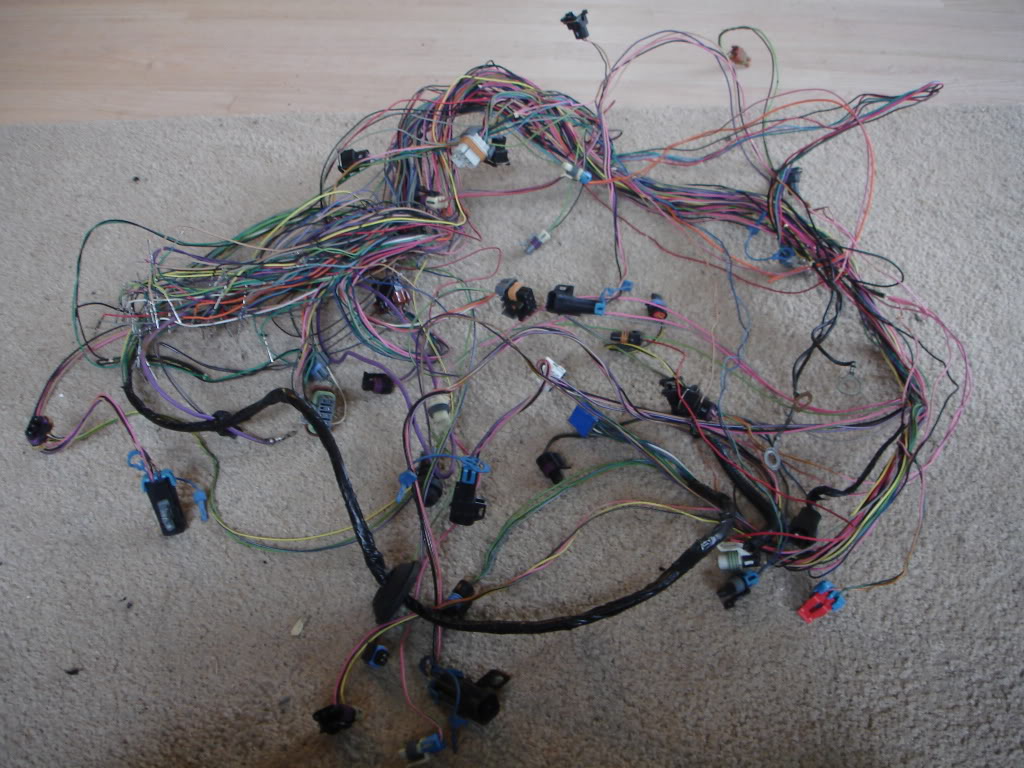
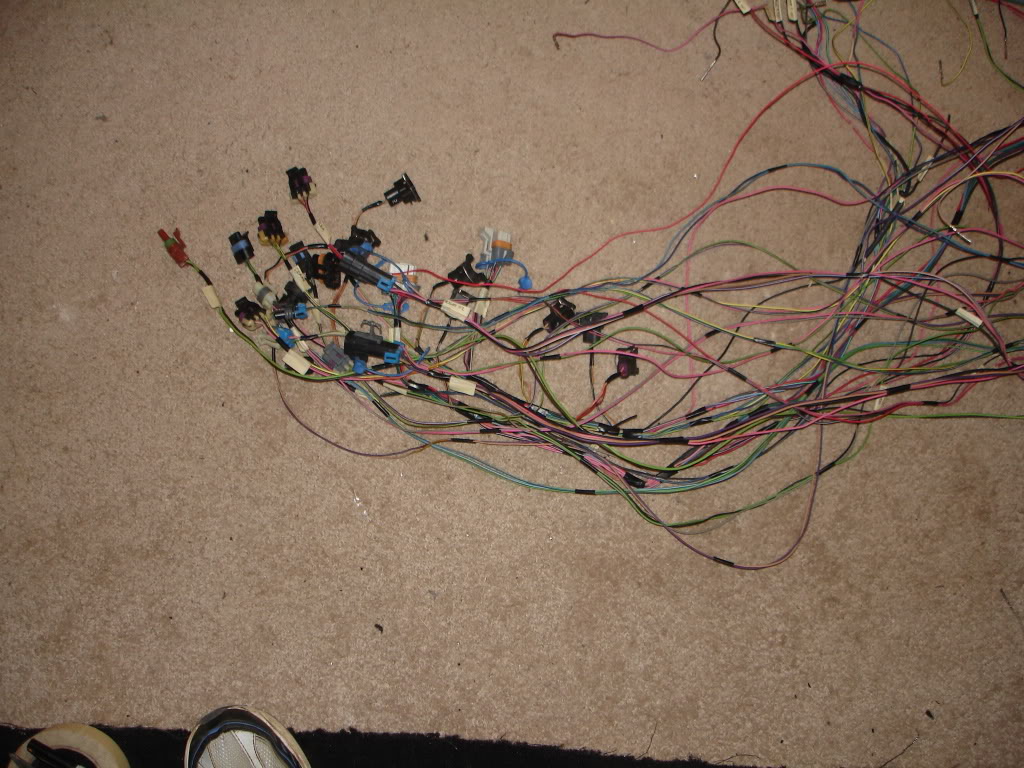
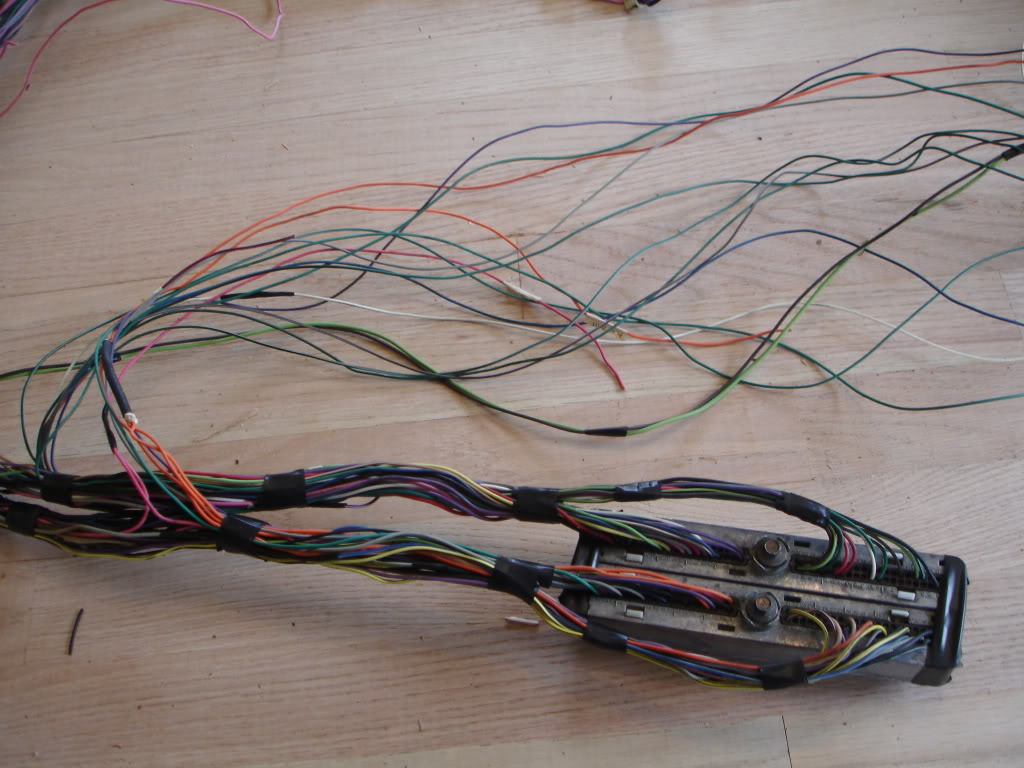
Now remove all the tape/loom
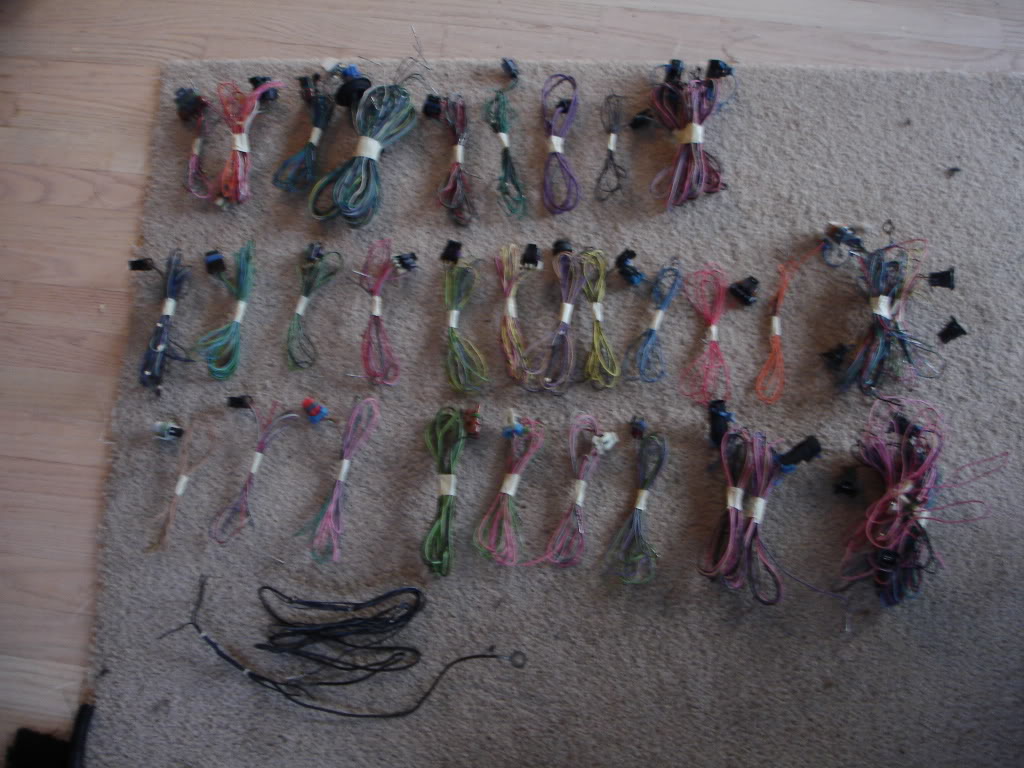
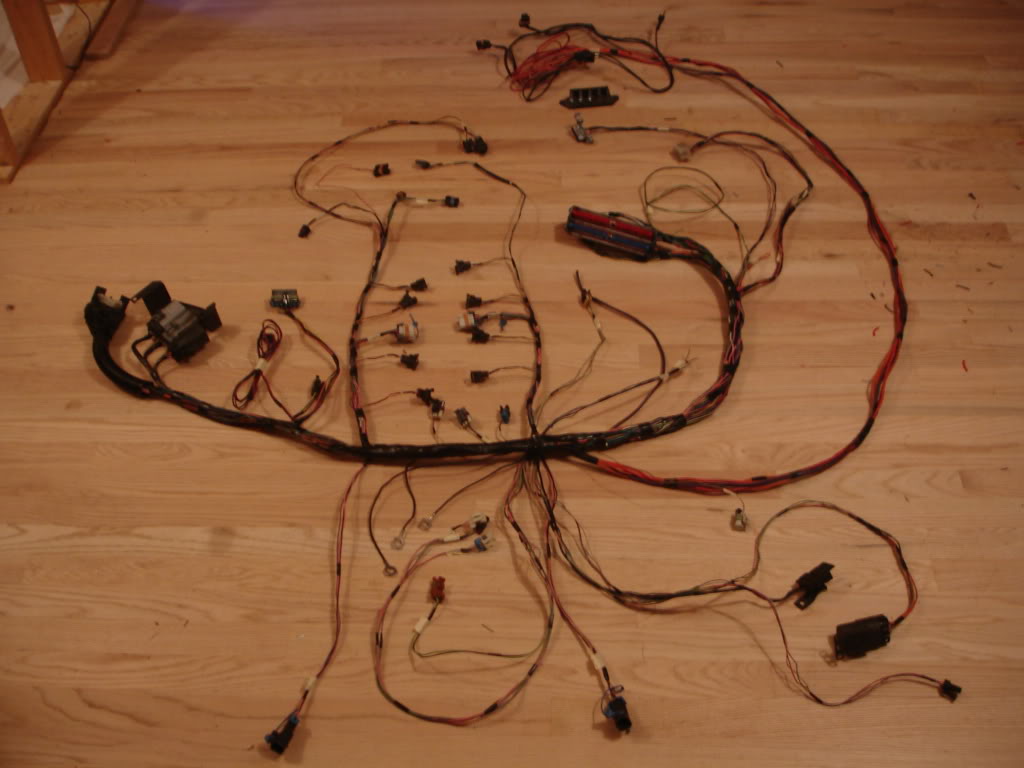
Completely disassembled. As before, the entire top row is not reused
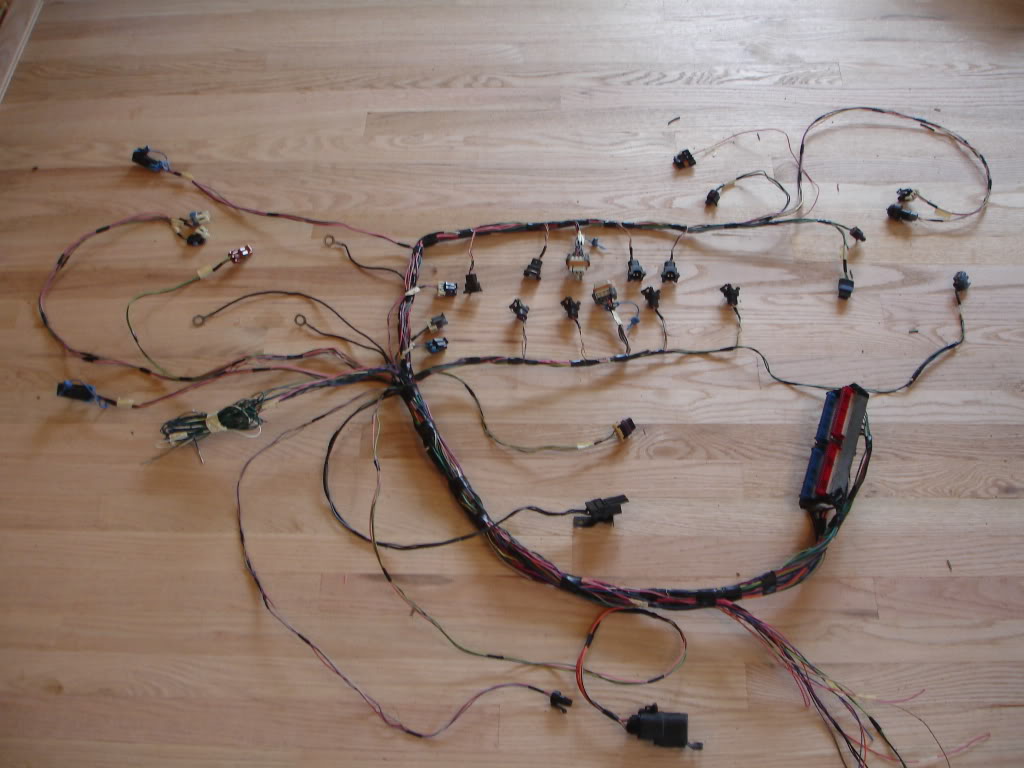
Individual circuits bound together with electrical tape, ends labeled and connectors labeled
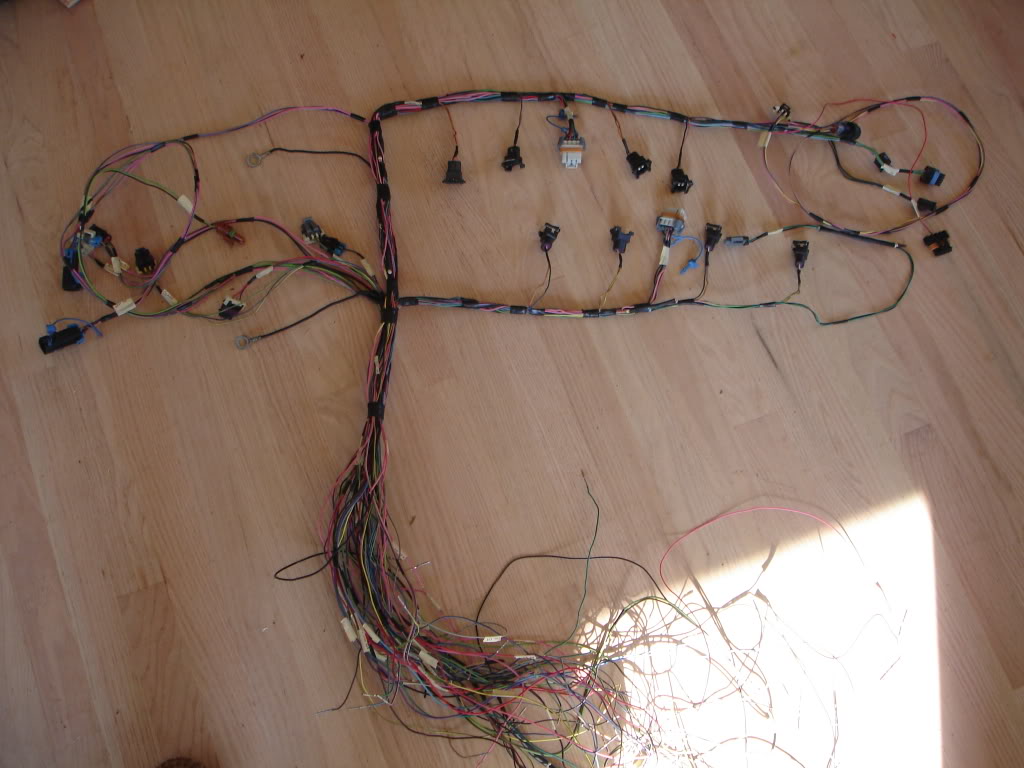
All connectors mocked up to the engine and bound together with tape. Notice the common 12v IGN and ground wires are pulled from the bundles

All IGN and ground wires reconnected and routed to their final destinations
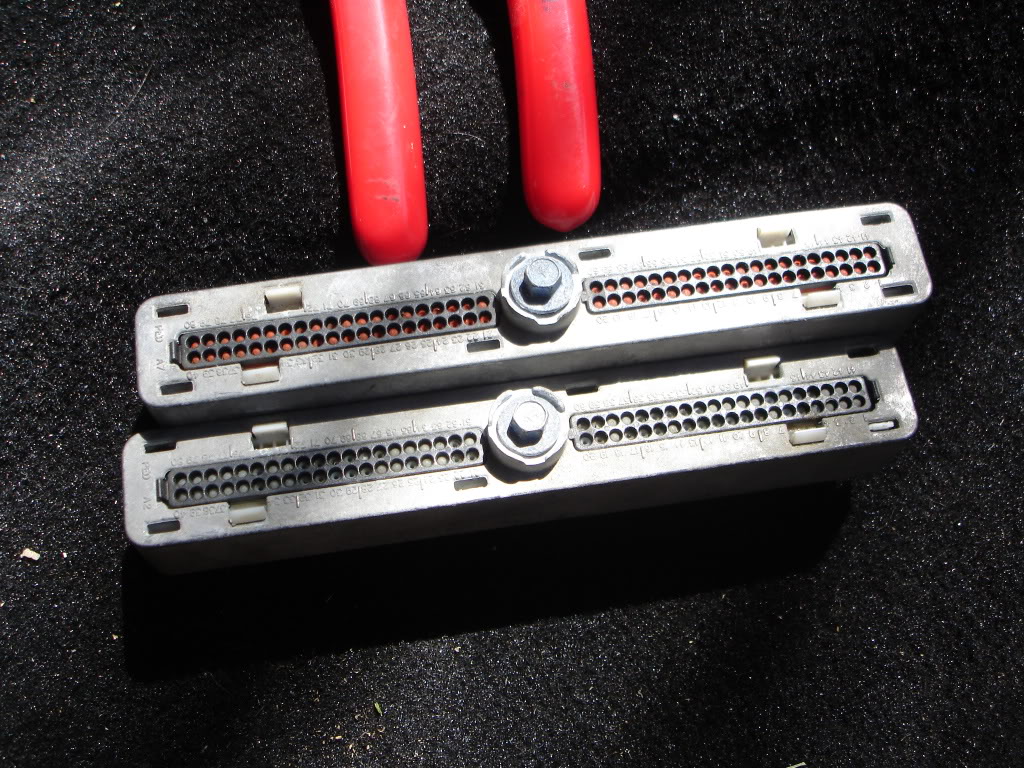
PCM location must be chosen now. This harness will be routed through a hole under the HVAC box. I began with the driver side coil wires at stock length. This gives a perfect harness length to fit under the dash and have some spare length to orient the PCM however it fits best. Take a minute to look over your PCM connectors. Wires used are different for each, and its a bear to force small wires through the rubber seals. To make it easier for the folks building the harness in the factory, the rubber seals were colored to match the connector and punched with exactly enough holes for the harness. Notice the red/blue color combo. If you ignore this and get them backwards, your fingers will be bleeding before you get all of the terminals installed fully
This took about 16 hours to build. Plan for a weekend of work at the minimum, longer if this is your first time messing with wiring. Label everything, this is very important. You may know all about that 'green wire' being the fuel pump relay call wire, but try to remember that an hour later in the sea of spaghetti. Next, use the smallest labels you can read. Wiring snags and tangles up on everything. Its a fact of life, use smaller labels to minimize the frustration
Engine bay automotive wire uses a TXL jacket. When building a harness, you cannot use the cheap junk you see in Advance auto or whatever. It will melt and all sorts of electrical gremlins will pop up. Shorts are very difficult to troubleshoot and even harder to locate, especially with the sheer complexity of modern engine control harnesses. 95% of the wiring is 18 and 20ga. To minimize expenses, buying one 100' roll of 18ga will be plenty enough to build one harness. Using a size larger than necessary wont hurt function, but do not use a wire too small for the job
Next, connect all of your ground circuits together with runner wires. This is a failsafe for a poor ground. If a ring terminal vibrates loose/breaks, the runner wire will prevent the major headache you would be troubleshooting. When you are done, dont forget the ground straps from the engine to K-member and K-member to chassis. One is sufficient, but multiple offers greater insurance especially since 3rd gens are getting older and more of the chassis is rusty, promoting poor contacts
Finally, before beginning, READ AND KNOW what you're getting into. Research is free and knowing what to expect will minimize time spent on this already tedious job. Make and update a notebook or computer folder. You need to know what the connectors look like, names, how a relay works, how to remove a harness from the car, find the C100/C207 pinout for your year, know if your stock fuseblock is sufficient to support the new engine or not, what to do with your speedo, what options you will use, where your PCM will be located, what type of HO2 you will need/use, how to use a power distribution block, how to wire the battery/alt cables, which wire the starter solenoid wire is and that it really is just one big fat wire, which relays are called by 12v and which are called by ground, etc
Bookmark wiring build threads, even ones not specific to your engine. Procedures for building harnesses are the same regardless of engine type/make. You may pick up neat tips/tricks to make your build/install just that much better
Lets get started. The objective today is to put a LS1/6 spd harness into a 89 GTA. 3rd gen pinouts are collected, the LS1 PCM pinout and basic harness diagram are printed off. Here is a 2000 harness strait from the 4th gen
As before, start by removing the PCM connectors. Use a small thin tool to press the tabs locking the colored faces on. Once they pop off, pinch and pull the gray backing covers off. They are prone to breaking. To remove the terminals, use your fingernail or a thin tool (knife or pick work well) to pull the white plastic 'fingers' back slightly. With the tab pulled, push the terminal out the direction of the wire
Now remove all the tape/loom
Completely disassembled. As before, the entire top row is not reused
Individual circuits bound together with electrical tape, ends labeled and connectors labeled
All connectors mocked up to the engine and bound together with tape. Notice the common 12v IGN and ground wires are pulled from the bundles
All IGN and ground wires reconnected and routed to their final destinations
PCM location must be chosen now. This harness will be routed through a hole under the HVAC box. I began with the driver side coil wires at stock length. This gives a perfect harness length to fit under the dash and have some spare length to orient the PCM however it fits best. Take a minute to look over your PCM connectors. Wires used are different for each, and its a bear to force small wires through the rubber seals. To make it easier for the folks building the harness in the factory, the rubber seals were colored to match the connector and punched with exactly enough holes for the harness. Notice the red/blue color combo. If you ignore this and get them backwards, your fingers will be bleeding before you get all of the terminals installed fully
 03-14-2010, 09:58 PM
#2
Supreme Member
Thread Starter
iTrader: (24)
Join Date: Jun 2005
Location: NC
Posts: 7,890
Likes: 0
Received 58 Likes
on
42 Posts
Car: 92 Firebird
Engine: Supercharged 6.0
Transmission: T56
Axle/Gears: 8.8 3.73
Re: LS1 harness - revisited
Continue installing terminals, lengthening/trimming to fit as you go. Do one PCM connector at a time for the best results. Red side is finished
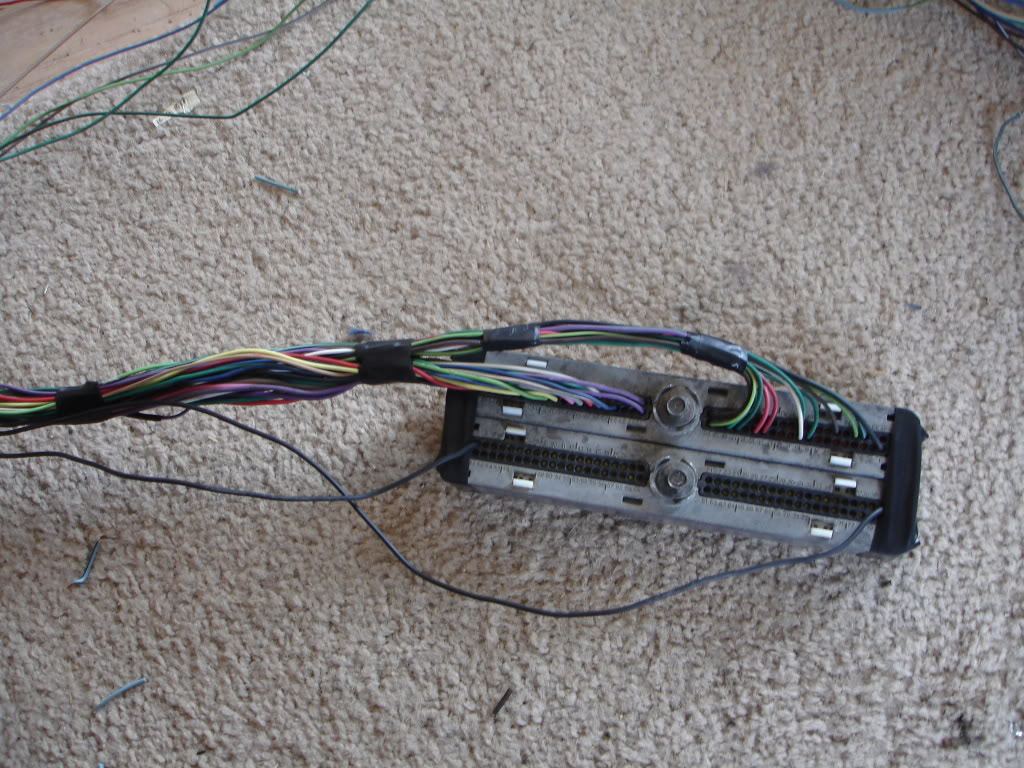
Blue side finished. Note the jumble of wires above the connectors. These are the various hookups at the C100/C207/relays
The basic swap harness is finished. I generally trim the splices to one neat length, but since the 3rd gen harness will be attached shortly, I left them long
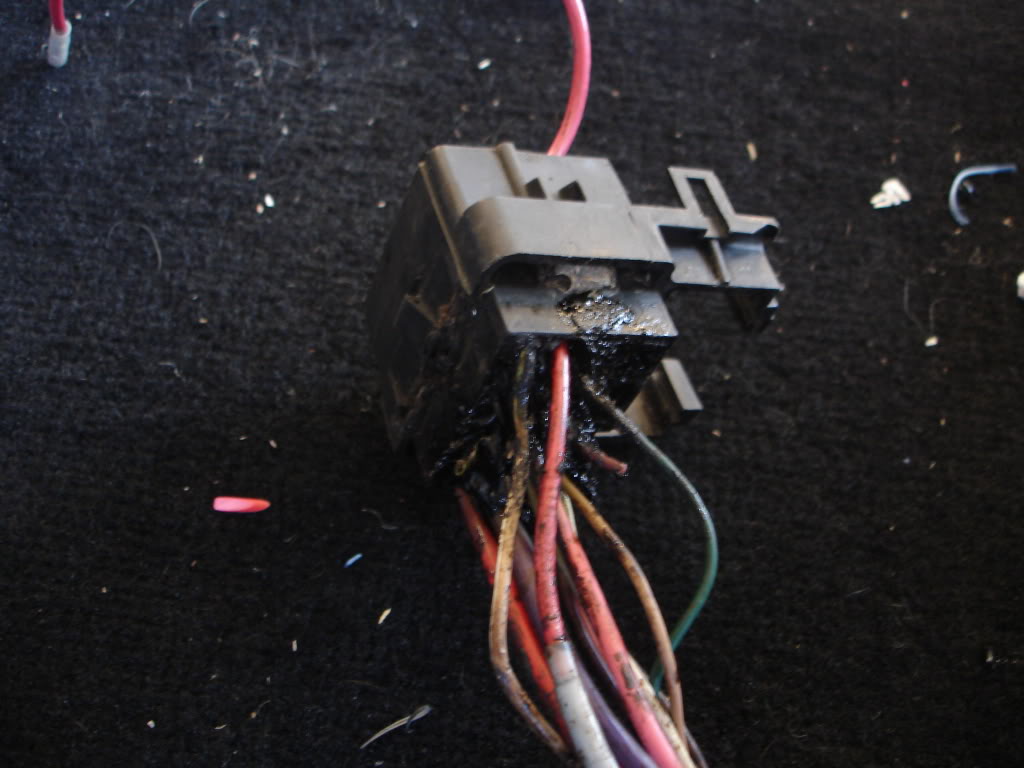
Move onto the 3rd gen harness and remove the old EFI part. I get alot of PMs from people worried their C100 is too far gone. Usually its just fine. This one is not so lucky. Notice the two wires trimmed way too short to splice onto and the power cable drilled through the C100. There is no reason what-so ever to trim the wires that short, even if they wont be reused. Simply trim them to 12-14" and wrap some tape over the ends. A finished swap will have 4 unused wires TOPS (VSS Yel, VSS Ppl, Emiss common pnk/blk, brake sw ppl). 4 wires isnt going to burst the loom open so stop cutting them back. Trim and tuck
This is the replacement 3rd gen harness already prepped and ready to attach
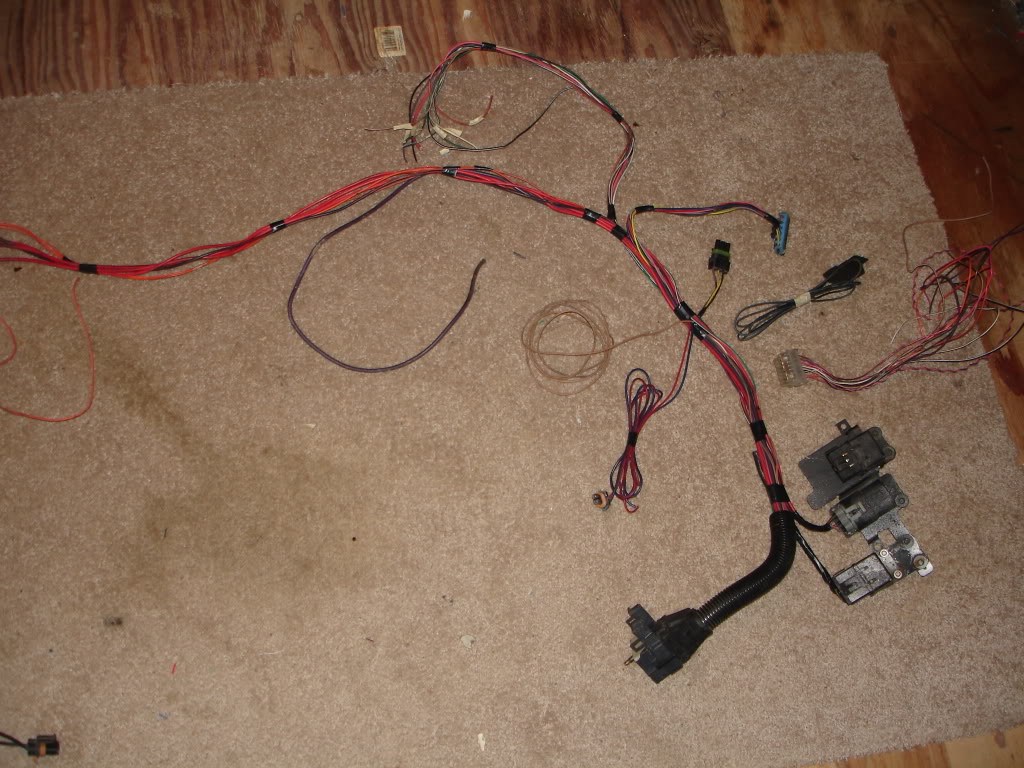
Where to attach the harnesses together (old pic)
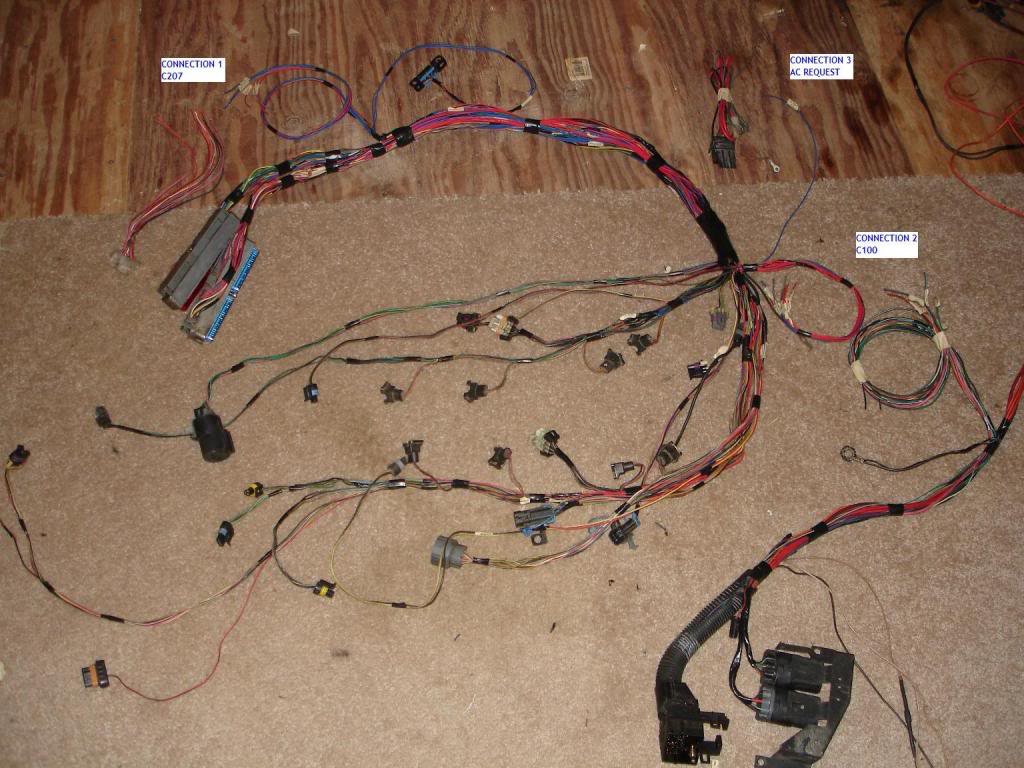
Attached. Notice the power cables off to the right were lengthened several feet to be able to route behind the fender and meet up at a power dist block near the battery. There is nothing stopping you from mounting these to the starter lug like the 3rd gen originally had. I never do. The power dist block is from a late model S10. They also have a small cover to make it pretty. This block is a very convenient method to gang all of the power wires, the alt output cable, and the battery recharge cable at a single location
How it should look when you're done
Blue side finished. Note the jumble of wires above the connectors. These are the various hookups at the C100/C207/relays
The basic swap harness is finished. I generally trim the splices to one neat length, but since the 3rd gen harness will be attached shortly, I left them long
Move onto the 3rd gen harness and remove the old EFI part. I get alot of PMs from people worried their C100 is too far gone. Usually its just fine. This one is not so lucky. Notice the two wires trimmed way too short to splice onto and the power cable drilled through the C100. There is no reason what-so ever to trim the wires that short, even if they wont be reused. Simply trim them to 12-14" and wrap some tape over the ends. A finished swap will have 4 unused wires TOPS (VSS Yel, VSS Ppl, Emiss common pnk/blk, brake sw ppl). 4 wires isnt going to burst the loom open so stop cutting them back. Trim and tuck
This is the replacement 3rd gen harness already prepped and ready to attach
Where to attach the harnesses together (old pic)
Attached. Notice the power cables off to the right were lengthened several feet to be able to route behind the fender and meet up at a power dist block near the battery. There is nothing stopping you from mounting these to the starter lug like the 3rd gen originally had. I never do. The power dist block is from a late model S10. They also have a small cover to make it pretty. This block is a very convenient method to gang all of the power wires, the alt output cable, and the battery recharge cable at a single location
How it should look when you're done
03-14-2010, 10:48 PM
#3
Supreme Member
Re: LS1 harness - revisited
Sticky?

Same principles apply to almost any engine swap wiring job yes?
Same principles apply to almost any engine swap wiring job yes?

 03-14-2010, 10:57 PM
#5
Supreme Member
Thread Starter
iTrader: (24)
Join Date: Jun 2005
Location: NC
Posts: 7,890
Likes: 0
Received 58 Likes
on
42 Posts
Car: 92 Firebird
Engine: Supercharged 6.0
Transmission: T56
Axle/Gears: 8.8 3.73
Re: LS1 harness - revisited
Same principles apply to almost any engine swap wiring job yes?
feel free to do mine for me
03-14-2010, 11:20 PM
#7
Member
iTrader: (8)
Join Date: Aug 2002
Location: jackson miss
Posts: 138
Likes: 0
Received 0 Likes
on
0 Posts
Re: LS1 harness - revisited
Well im not to ashamed to say that was my c100. I had trimmed it before pockets original post and had one too many cold ones and got tired of the spaghetti.  dummy!!
The odd thing was the power wire drilled through the connector . I have owned the car since 1993 and have olnly taken it into service or repair once to the dealership in 1994 for a bad ecm . I have done engine swaps in it before but this is the first i have noticed it .
dummy!!The odd thing was the power wire drilled through the connector . I have owned the car since 1993 and have olnly taken it into service or repair once to the dealership in 1994 for a bad ecm . I have done engine swaps in it before but this is the first i have noticed it .
Trending Topics
03-15-2010, 09:27 AM
#9
Supreme Member
Thread Starter
iTrader: (24)
Join Date: Jun 2005
Location: NC
Posts: 7,890
Likes: 0
Received 58 Likes
on
42 Posts
Car: 92 Firebird
Engine: Supercharged 6.0
Transmission: T56
Axle/Gears: 8.8 3.73
Re: LS1 harness - revisited
Yes, unfortunately they often create new questions. Its a hard fact of life that simple things get complicated so quickly
Its astounding the number of people who think wiring cant be that bad and have a go at it without knowing how to read a simple diagram. Trouble with a complex schematic is understandable, a fan relay diagram is not. Its generally those same people who think asking about 'that pink wire' is specific enough for anyone to know exactly what wire they're talking about or use terms like "relay on the left" like placement of a universal object makes any difference on function
Its astounding the number of people who think wiring cant be that bad and have a go at it without knowing how to read a simple diagram. Trouble with a complex schematic is understandable, a fan relay diagram is not. Its generally those same people who think asking about 'that pink wire' is specific enough for anyone to know exactly what wire they're talking about or use terms like "relay on the left" like placement of a universal object makes any difference on function
03-15-2010, 10:06 AM
#10
Moderator
iTrader: (14)
Join Date: Mar 2000
Location: Littleton, CO USA
Posts: 43,169
Likes: 0
Received 35 Likes
on
34 Posts
Car: 82 Berlinetta/57 Bel Air
Engine: LS1/LQ4
Transmission: 4L60E/4L80E
Axle/Gears: 12B-3.73/9"-3.89
The other side of that coin is being so intimidated at the thought of messing with wiring that the swap project never gets started.
Speaking of pink wires, yesterday I connected the 12 volt instrument panel lead to the chassis fuel level wire, twice, even though I had all the wires labeled. But, both being pink, working in a cramped space, in a hurry. . .
Speaking of pink wires, yesterday I connected the 12 volt instrument panel lead to the chassis fuel level wire, twice, even though I had all the wires labeled. But, both being pink, working in a cramped space, in a hurry. . .
03-15-2010, 11:27 AM
#11
Supreme Member
Thread Starter
iTrader: (24)
Join Date: Jun 2005
Location: NC
Posts: 7,890
Likes: 0
Received 58 Likes
on
42 Posts
Car: 92 Firebird
Engine: Supercharged 6.0
Transmission: T56
Axle/Gears: 8.8 3.73
Re: LS1 harness - revisited
It happens, thats the reason to double check your work. Know colors dont always correspond to function. A good example is the cam sensor low reference wire. Generally, a low ref or ground would be black, blk/wht or purple. For the cam sensor its pink/blk
Other problems come from working poor lighting. Brown wires look black and pink, yellow, tan, white wires look the same. Using old/dirty wiring compounds the problems because pink wires fade tan, and lt green/ppl wires fade to lt blue

Other problems come from working poor lighting. Brown wires look black and pink, yellow, tan, white wires look the same. Using old/dirty wiring compounds the problems because pink wires fade tan, and lt green/ppl wires fade to lt blue
03-15-2010, 05:27 PM
#12
Member
iTrader: (5)
Join Date: May 2009
Location: Washington D.C.
Posts: 496
Likes: 0
Received 0 Likes
on
0 Posts
Car: 1985 Z28
Engine: LT1
Transmission: T56
Axle/Gears: fourth gen 3.42
Re: LS1 harness - revisited
this makes me rather unhappy that i used cheap wire to extend all my pcm connections. Maybe ill heat wrap everything just in case.
thanks as always Pocket, hope i havent been too annoying. after being around a while i realize how repetitive it gets
thanks as always Pocket, hope i havent been too annoying. after being around a while i realize how repetitive it gets
03-19-2010, 08:35 PM
#13
Member
iTrader: (1)

Join Date: Dec 2002
Location: Poconos, Pa
Posts: 287
Received 0 Likes
on
0 Posts
Car: 1984 Firebird
Engine: LT1
Transmission: T5
Axle/Gears: 3.42's
Re: LS1 harness - revisited
I hate not starting a new thread for this, but... Those of us with earlier cars, don't have injection fuses. For example, my 84 came with a 2.8 carb V6. I now have a LT1 in it. I currently runs fine, and the person that modified my harness said that my current fuses should be enough... but I want it to be right... what do you reconmend?
Thanks!
Thanks!
03-19-2010, 09:21 PM
#14
Supreme Member
iTrader: (2)

Join Date: Aug 2001
Location: Peoria, IL USA
Posts: 1,081
Likes: 0
Received 2 Likes
on
2 Posts
Car: 91 GTA
Engine: 377ci
Transmission: T56
Axle/Gears: QP Ford 9" 3.70s
Re: LS1 harness - revisited
Pocket, extremely nice job. I am an electrical engineer for a big construction equipment company and part of my job involves designing harnesses, and your methods and workmanship are on par with an OEM solution.
I have also participated in 50+ fuel injection conversions (Including an 89 Countach) and about 5 or 6 LSX swaps. I Your work is very nice. As for the fellow with fuse block concerns. My friends and I have found the fuse blocks out of the 94 and later GM trucks works pretty well and if you can mange to pull two of them with most of the harness intact it will give you plenty of circuits for power distribution. Some really good stuff can be found on heavy construction equipment. Both of these solutions will live under the hood and make wiring simple.
I have also participated in 50+ fuel injection conversions (Including an 89 Countach) and about 5 or 6 LSX swaps. I Your work is very nice. As for the fellow with fuse block concerns. My friends and I have found the fuse blocks out of the 94 and later GM trucks works pretty well and if you can mange to pull two of them with most of the harness intact it will give you plenty of circuits for power distribution. Some really good stuff can be found on heavy construction equipment. Both of these solutions will live under the hood and make wiring simple.
03-19-2010, 11:27 PM
#15
Supreme Member
Thread Starter
iTrader: (24)
Join Date: Jun 2005
Location: NC
Posts: 7,890
Likes: 0
Received 58 Likes
on
42 Posts
Car: 92 Firebird
Engine: Supercharged 6.0
Transmission: T56
Axle/Gears: 8.8 3.73
Re: LS1 harness - revisited
Thanks. Im knee deep in school for mech engineering and seem to be doing more electrical stuff, both in and out of class. Not sure how that came to be
I frequently get asked why carb cars require a separate fuseblock to make the engine harness full stand alone. Fuses and relays is the answer. Your 84 will not have a fuel pump relay, nor any electric fan relays. You will not have an INJ 1, INJ 2, fuel pump, fan(s), ECM/PCM (batt constant) fuses. You WILL have multiple fuse slots that are now unused. I dont like reassigning fuses to new tasks because often the size, routing, and function changed. A small fuseblock/relay center specific to the engine solves all of those problems, reducing the necessary inputs from the old harness to one single 12v IGN
Reusing an OEM EFI fuseblock is perfectly acceptable. I tend to shy away from truck anything because they are often ginormous and look terrible in a tight 3rd gen bay. FWD econo car and Northstar Cadillacs give excellent electrical pieces in addition to being my main source of replacement connectors
Ideally, youd build your own fuseblock with as many features as you need and nothing more. I dont have any pictures of that, but this site does with PNs
http://www.lt1swap.com/fuseblock_obd2port.html
kthxbai has a great example of what it should look like in his swap thread
https://www.thirdgen.org/forums/ltx-...wap-lt1-5.html
I hate not starting a new thread for this, but... Those of us with earlier cars, don't have injection fuses. For example, my 84 came with a 2.8 carb V6. I now have a LT1 in it. I currently runs fine, and the person that modified my harness said that my current fuses should be enough... but I want it to be right... what do you reconmend?
Reusing an OEM EFI fuseblock is perfectly acceptable. I tend to shy away from truck anything because they are often ginormous and look terrible in a tight 3rd gen bay. FWD econo car and Northstar Cadillacs give excellent electrical pieces in addition to being my main source of replacement connectors
Ideally, youd build your own fuseblock with as many features as you need and nothing more. I dont have any pictures of that, but this site does with PNs
http://www.lt1swap.com/fuseblock_obd2port.html
kthxbai has a great example of what it should look like in his swap thread
https://www.thirdgen.org/forums/ltx-...wap-lt1-5.html
03-20-2010, 09:19 AM
#16
Supreme Member
iTrader: (2)
Join Date: Aug 2001
Location: Peoria, IL USA
Posts: 1,081
Likes: 0
Received 2 Likes
on
2 Posts
Car: 91 GTA
Engine: 377ci
Transmission: T56
Axle/Gears: QP Ford 9" 3.70s
Re: LS1 harness - revisited
Well you can do what I did. I went and got a ME degree, but as the electrical stuff I did got to be more and more, I got a Minor in electrical. It really opened the door on jobs. Quite honestly there seems to be many more electrical jobs than mechanical jobs. THe majority of them also span both ME and EE. Such as harnessing.
The only thing I would be leary with, when selecting a power distribution center, is its ability to withstand the enviroment and amperage that is going to be applied to it.
The only thing I would be leary with, when selecting a power distribution center, is its ability to withstand the enviroment and amperage that is going to be applied to it.
03-20-2010, 09:34 AM
#17
Supreme Member
Thread Starter
iTrader: (24)
Join Date: Jun 2005
Location: NC
Posts: 7,890
Likes: 0
Received 58 Likes
on
42 Posts
Car: 92 Firebird
Engine: Supercharged 6.0
Transmission: T56
Axle/Gears: 8.8 3.73
Re: LS1 harness - revisited
At the end of this semester Ill have my math minor in the bag. Ill have to think about the EE part
The aftermarket fuseblock/relay center uses the same non-weather proof connections as a stock engine bay mounted fuseblock. Ive never had a problem with them, nor heard of an issue. The block can be moved inside near the PCM if concerns still exist
The aftermarket fuseblock/relay center uses the same non-weather proof connections as a stock engine bay mounted fuseblock. Ive never had a problem with them, nor heard of an issue. The block can be moved inside near the PCM if concerns still exist
03-20-2010, 09:53 AM
#18
Supreme Member
iTrader: (2)
Join Date: Aug 2001
Location: Peoria, IL USA
Posts: 1,081
Likes: 0
Received 2 Likes
on
2 Posts
Car: 91 GTA
Engine: 377ci
Transmission: T56
Axle/Gears: QP Ford 9" 3.70s
Re: LS1 harness - revisited
Most of the aftermarket blocks are fine. It is not the sealing that concerns me or have experienced failures. It is heat and UV. Delphi went on the cheap with some of their power distribution panels and used a material from Dupont called Kraston. THis material outgasses and breaks down when temps get beyond 80C. Most aftermarket and underhood fuseblocks use a Nylon dirivative that holds up much better. Many of the aftermarket stuff you see comes from Bussman and Littlefuse. Actually if you look on Painless's site they are using the 94 truck blocks as one of their aftermarket solutions. The capped block that painless offers are actually fro Bussman and they are a dirivative of what my company developed with them for our heavey equipment.
03-20-2010, 01:20 PM
#19
Supreme Member
Thread Starter
iTrader: (24)
Join Date: Jun 2005
Location: NC
Posts: 7,890
Likes: 0
Received 58 Likes
on
42 Posts
Car: 92 Firebird
Engine: Supercharged 6.0
Transmission: T56
Axle/Gears: 8.8 3.73
Re: LS1 harness - revisited
Interesting. Guess Ill be moving the fuse blocks under the dash by default in the future
10-18-2015, 07:39 PM
#20
Member
Join Date: Dec 2007
Location: mattoon illinois
Posts: 199
Likes: 0
Received 0 Likes
on
0 Posts
Car: 92camaro,86 camaro
Engine: 355
Transmission: 700r4
Re: LS1 harness - revisited
im doing my ls swap using a truck harness and after taking all wires apart i dont have the OB11 port how can i attach it back?
11-07-2015, 01:00 PM
#21
Supreme Member
Thread Starter
iTrader: (24)
Join Date: Jun 2005
Location: NC
Posts: 7,890
Likes: 0
Received 58 Likes
on
42 Posts
Car: 92 Firebird
Engine: Supercharged 6.0
Transmission: T56
Axle/Gears: 8.8 3.73
Re: LS1 harness - revisited
Find one in a JY and splice it on. I dont know of any OEM LSx harness that has an ALDL attached
11-18-2015, 04:23 AM
#22
Member
iTrader: (1)
Join Date: Feb 2009
Location: Charleston, SC
Posts: 130
Likes: 0
Received 0 Likes
on
0 Posts
Re: LS1 harness - revisited
As for the color coding of wires, I always hated it. Find the brown and yellow wire and the black and white wire. Wait, they both look brownish/yellow or faded black/nasty yellow?
LOL... I hate aviation wireing, but at times I love it. Usually all the same color, but well labeled in writing on it.
LOL... I hate aviation wireing, but at times I love it. Usually all the same color, but well labeled in writing on it.
11-19-2015, 06:09 AM
#23
Supreme Member
Thread Starter
iTrader: (24)
Join Date: Jun 2005
Location: NC
Posts: 7,890
Likes: 0
Received 58 Likes
on
42 Posts
Car: 92 Firebird
Engine: Supercharged 6.0
Transmission: T56
Axle/Gears: 8.8 3.73
Re: LS1 harness - revisited
Pink, red and white all fade to white
Light green and light blue fade to light blue
Makes deciphering schematics challenging as wiring ages
Light green and light blue fade to light blue
Makes deciphering schematics challenging as wiring ages

Thread
Thread Starter
Forum
Replies
Last Post
dbrochard
Engine/Drivetrain/Suspension Parts for Sale
6
09-19-2015 08:13 PM
gczj13
Engine/Drivetrain/Suspension Wanted
1
09-18-2015 01:09 PM
Billy Decker
Engine/Drivetrain/Suspension Wanted
0
09-04-2015 03:46 PM