My 1986 Z-28 build thread *PIC HEAVY*
 04-03-2012, 04:06 PM
#51
Senior Member

Thread Starter
iTrader: (1)

Join Date: Sep 2006
Location: Canada
Posts: 962
Likes: 0
Received 13 Likes
on
10 Posts
Car: 1979 Malibu
Engine: Blown LSx
Transmission: T56 Magnum
Axle/Gears: 9"/wavetrac/35's/3.70
Re: My 1986 IROC build thread *PIC HEAVY*
I was wondering when someone was going to actually post lol, was thinking I was wasting my time posting lol


 04-08-2012, 07:34 PM
#56
Senior Member
Thread Starter
iTrader: (1)
Join Date: Sep 2006
Location: Canada
Posts: 962
Likes: 0
Received 13 Likes
on
10 Posts
Car: 1979 Malibu
Engine: Blown LSx
Transmission: T56 Magnum
Axle/Gears: 9"/wavetrac/35's/3.70
Re: My 1986 IROC build thread *PIC HEAVY*
Another update!
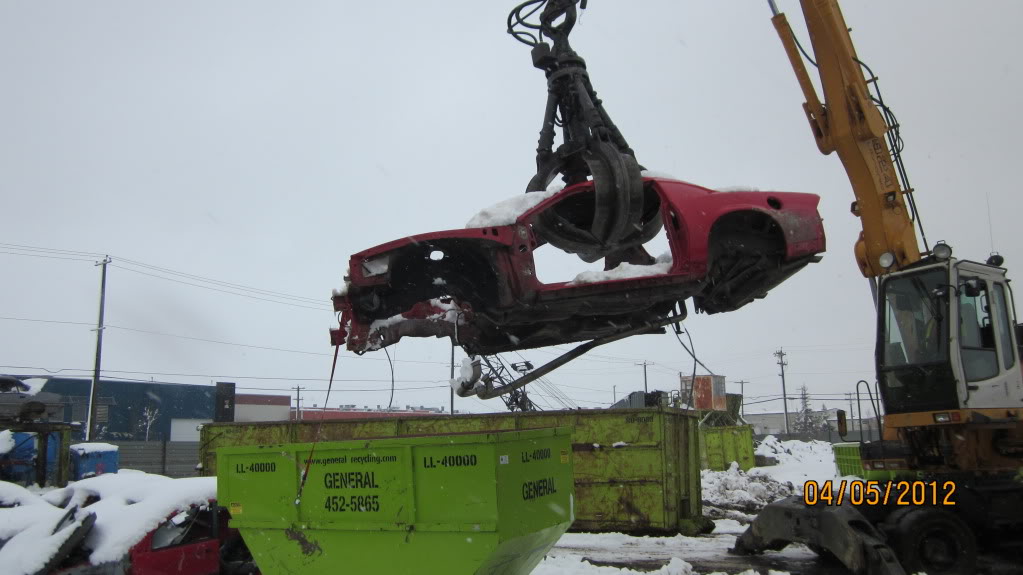
As most of you know, I parted out my 1991 z28 because of accident damage, but up until now I still had the car. I needed the room at home so on Thursday it went to camaro heaven...
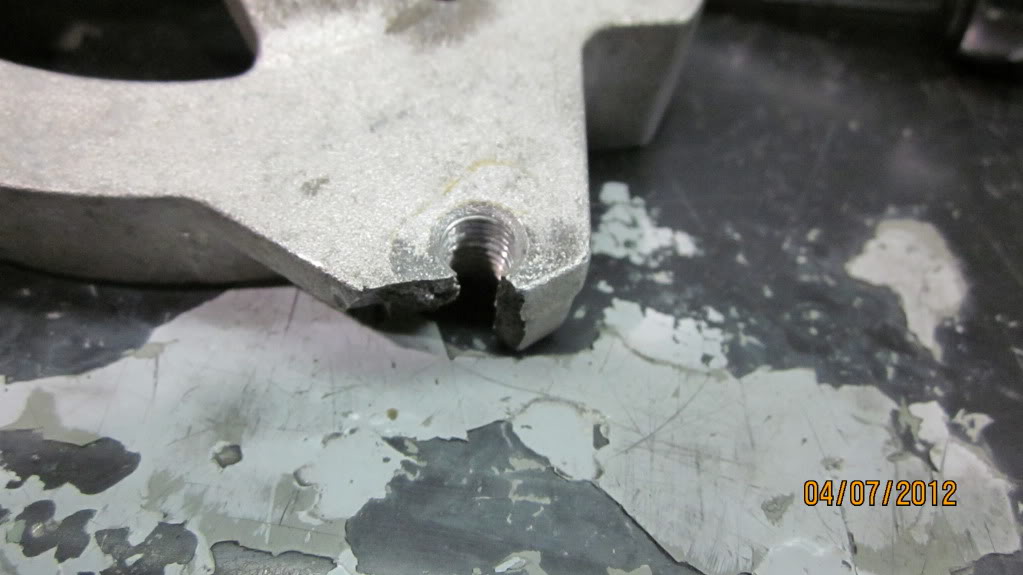
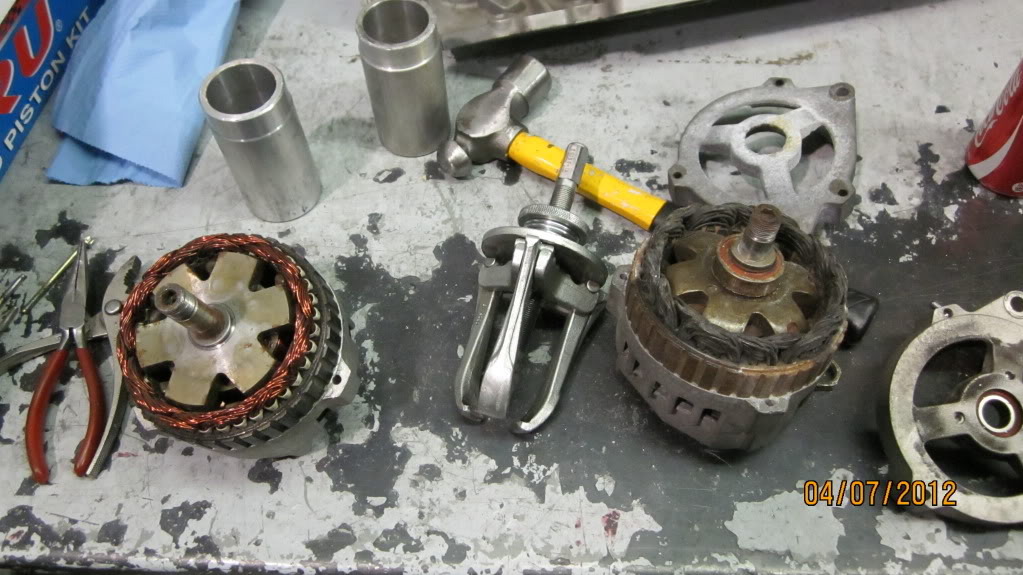
Saturday I took my powermaster 140 alternator apart to replace the front half of the case due to a broken off mounting ear.
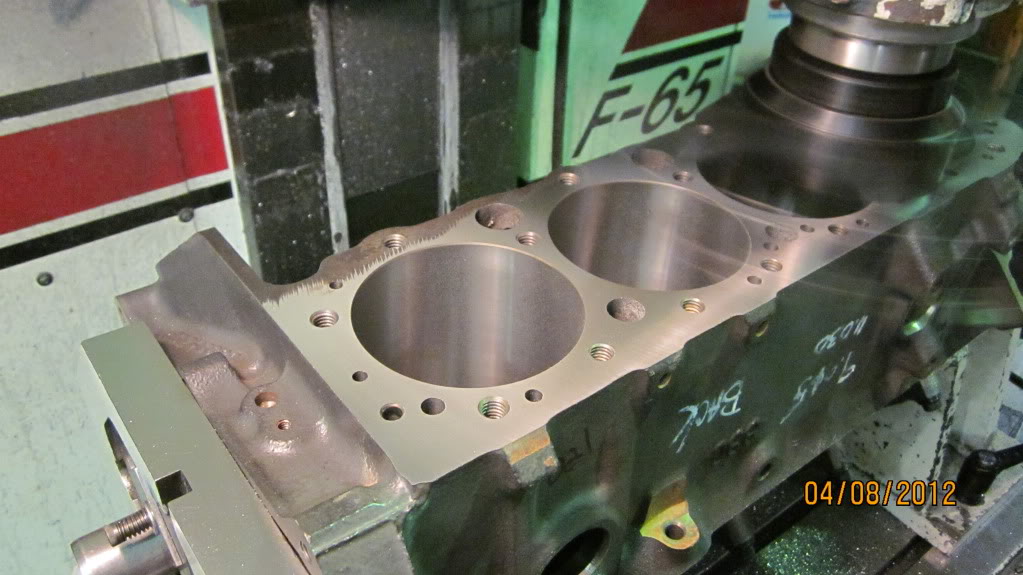
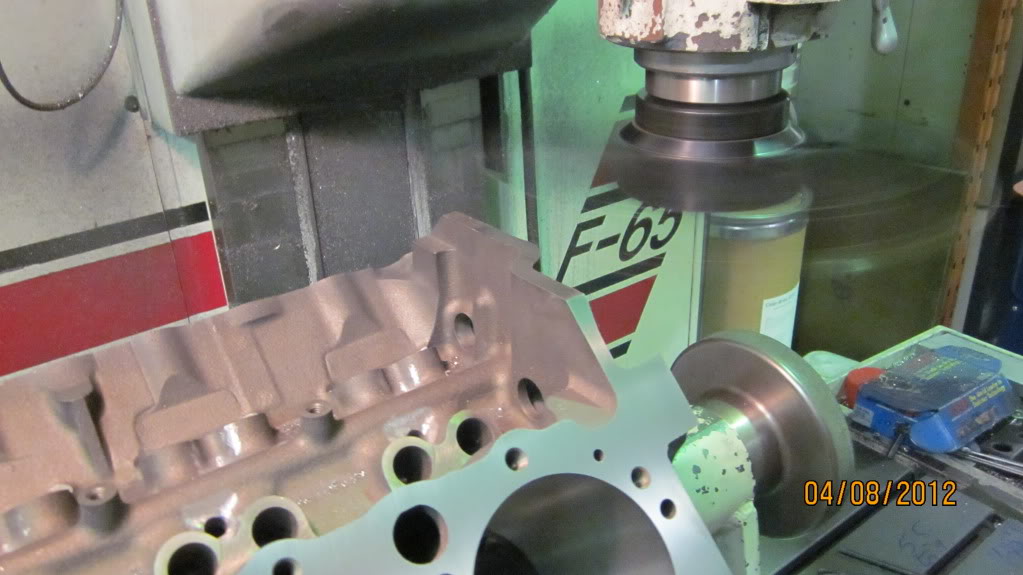
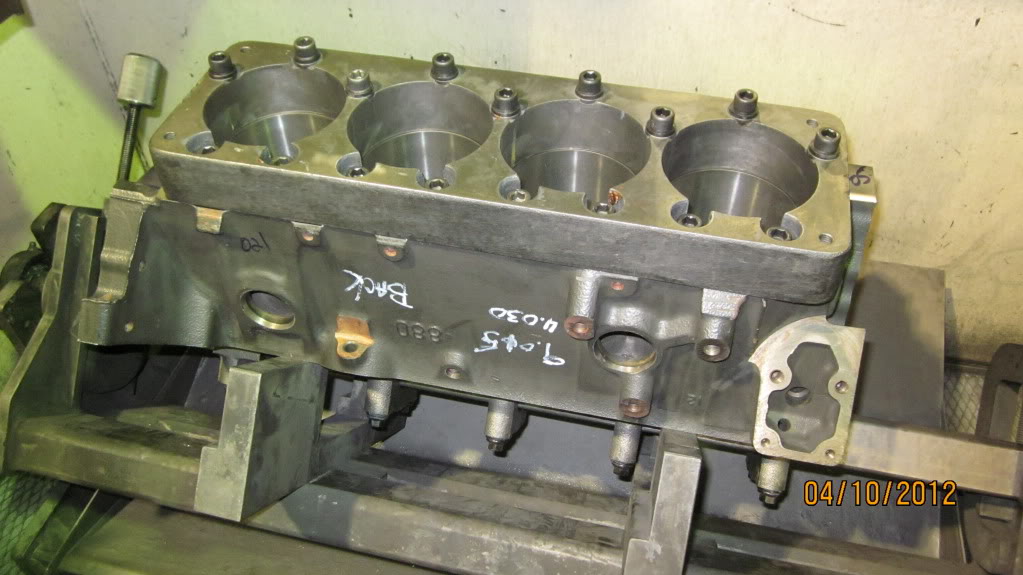
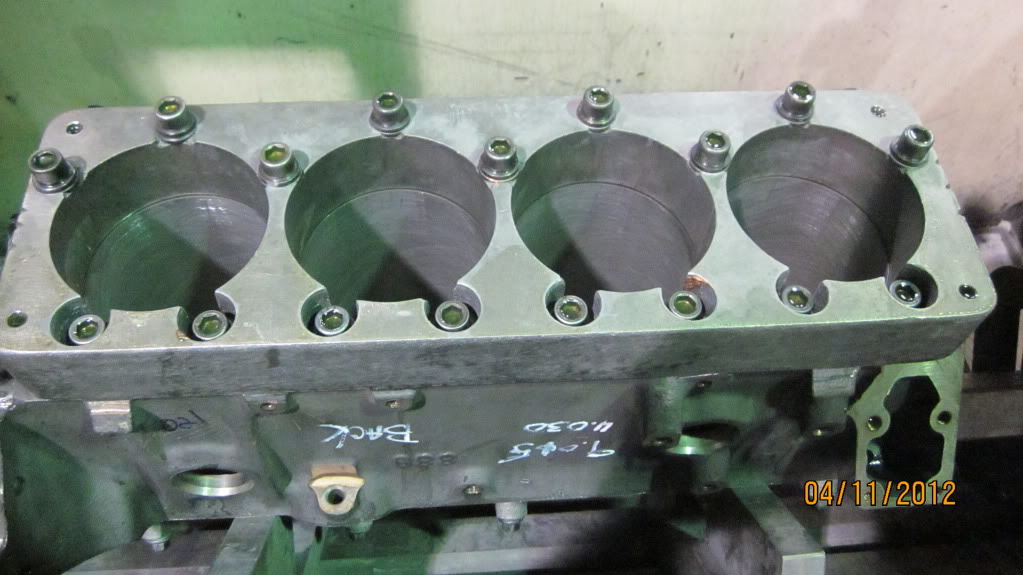
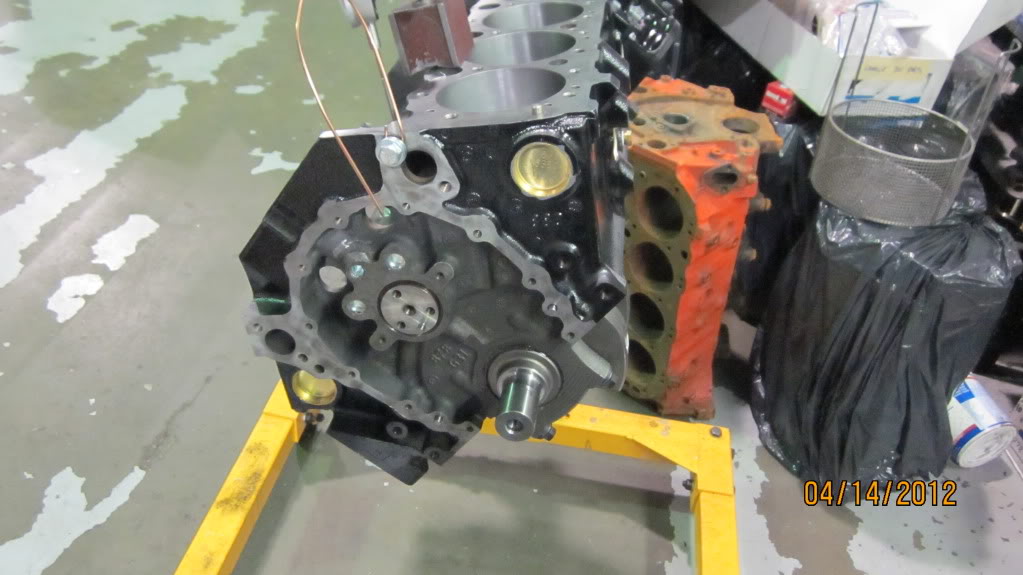
Today I finally got going on the block machine work.
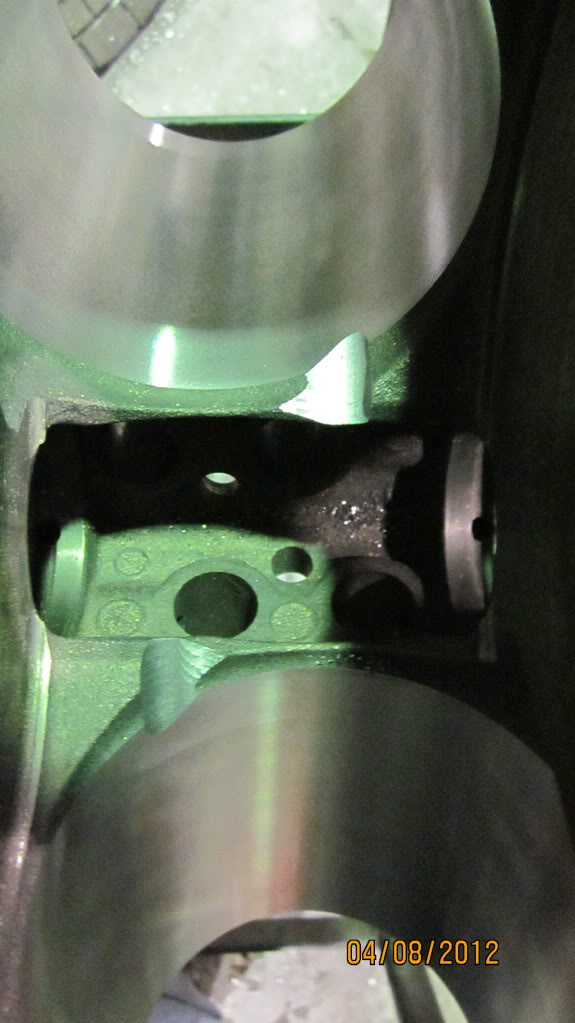
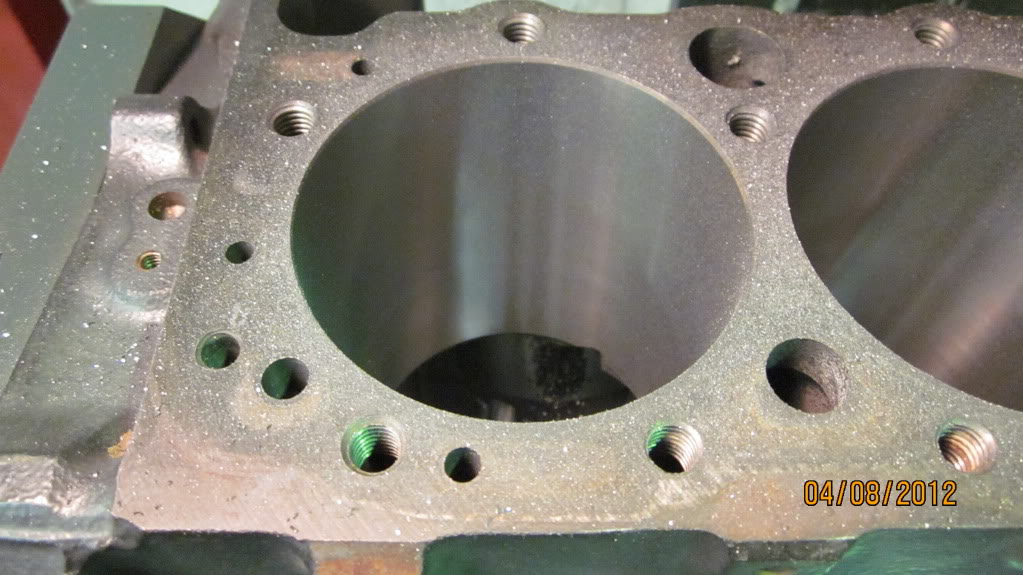
Notched the bottom of the cylinders for connecting rod clearance.
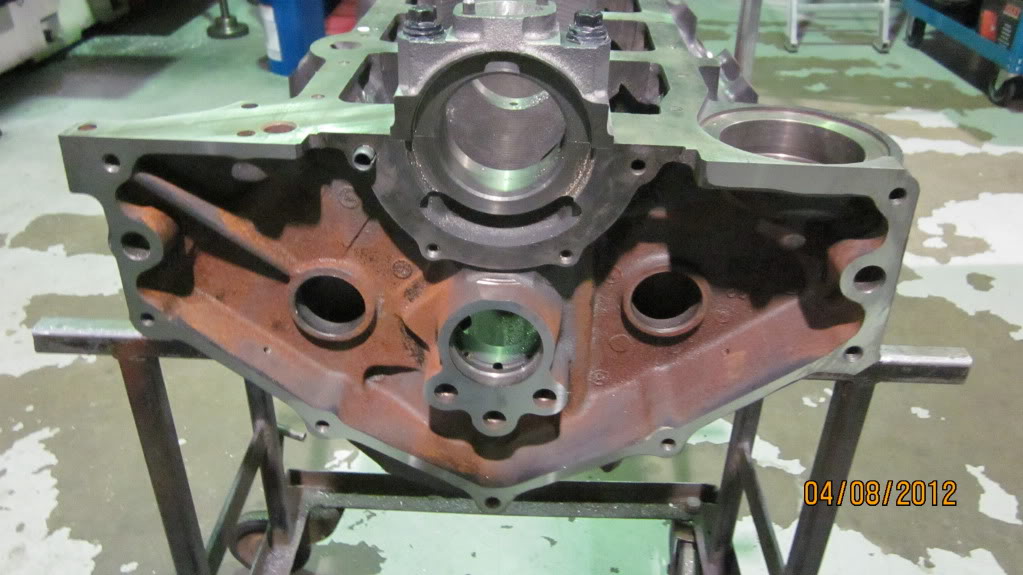
Decked the back of the block true to the mainline, this way the deck will true aswell.
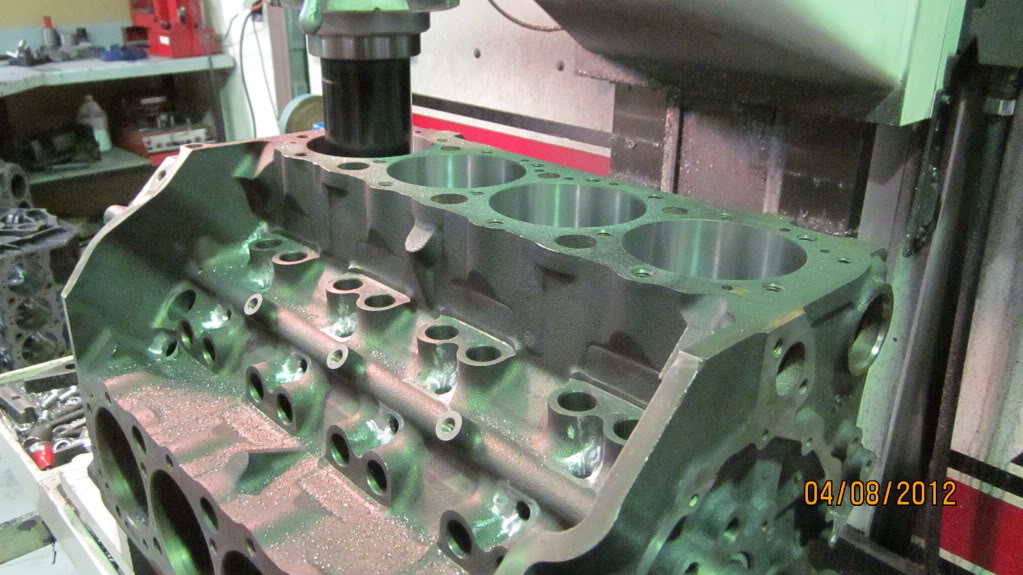
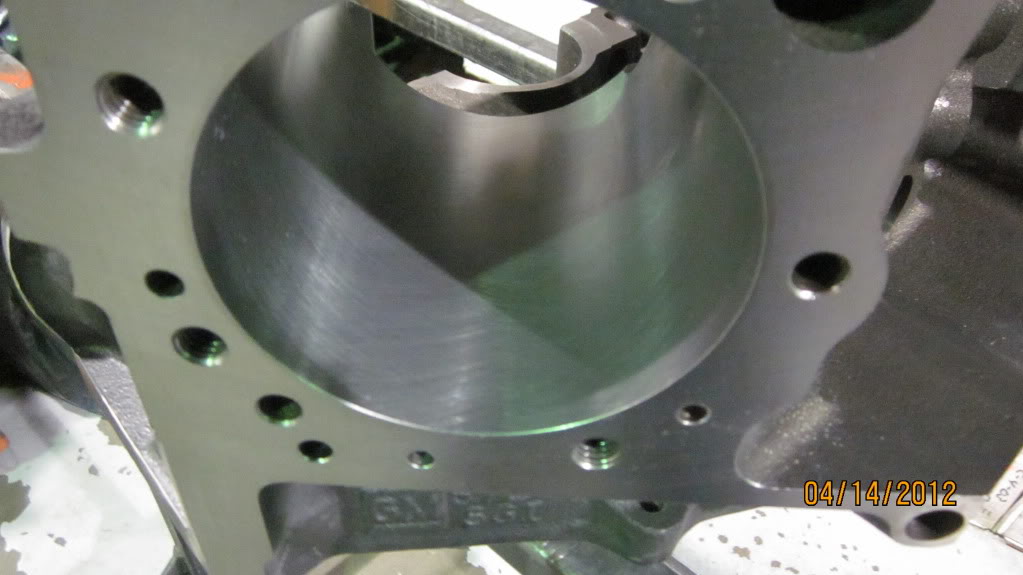
Rough bored the block to 4.025"
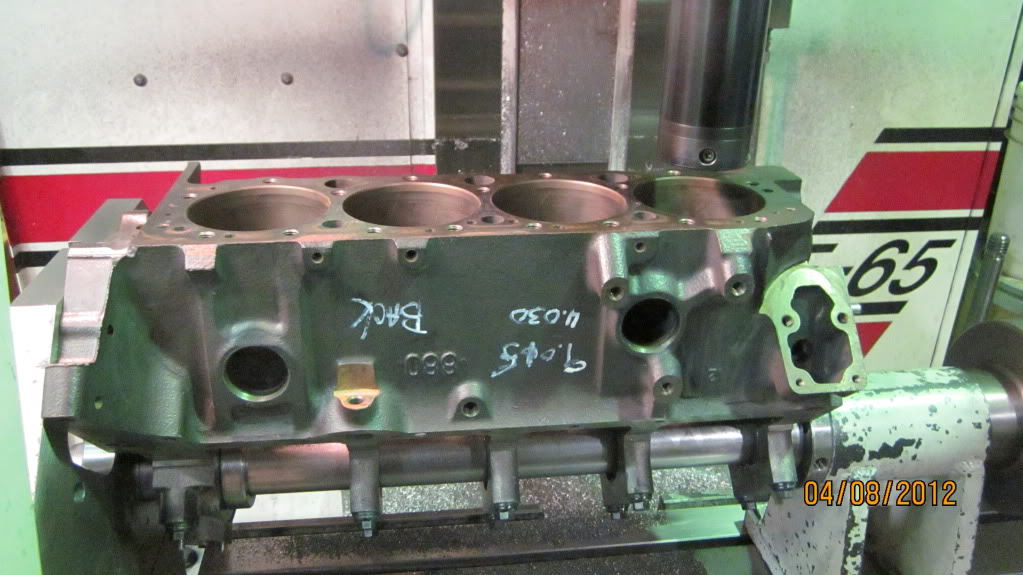
The factory decks on this block were absolutely HORRIBLE. thankfully they cleaned in the 0.021" I removed from them

As most of you know, I parted out my 1991 z28 because of accident damage, but up until now I still had the car. I needed the room at home so on Thursday it went to camaro heaven...
Saturday I took my powermaster 140 alternator apart to replace the front half of the case due to a broken off mounting ear.
Today I finally got going on the block machine work.
Notched the bottom of the cylinders for connecting rod clearance.
Decked the back of the block true to the mainline, this way the deck will true aswell.
Rough bored the block to 4.025"
The factory decks on this block were absolutely HORRIBLE. thankfully they cleaned in the 0.021" I removed from them
04-08-2012, 07:41 PM
#57
Senior Member
Thread Starter
iTrader: (1)
Join Date: Sep 2006
Location: Canada
Posts: 962
Likes: 0
Received 13 Likes
on
10 Posts
Car: 1979 Malibu
Engine: Blown LSx
Transmission: T56 Magnum
Axle/Gears: 9"/wavetrac/35's/3.70
Re: My 1986 IROC build thread *PIC HEAVY*
More pics...
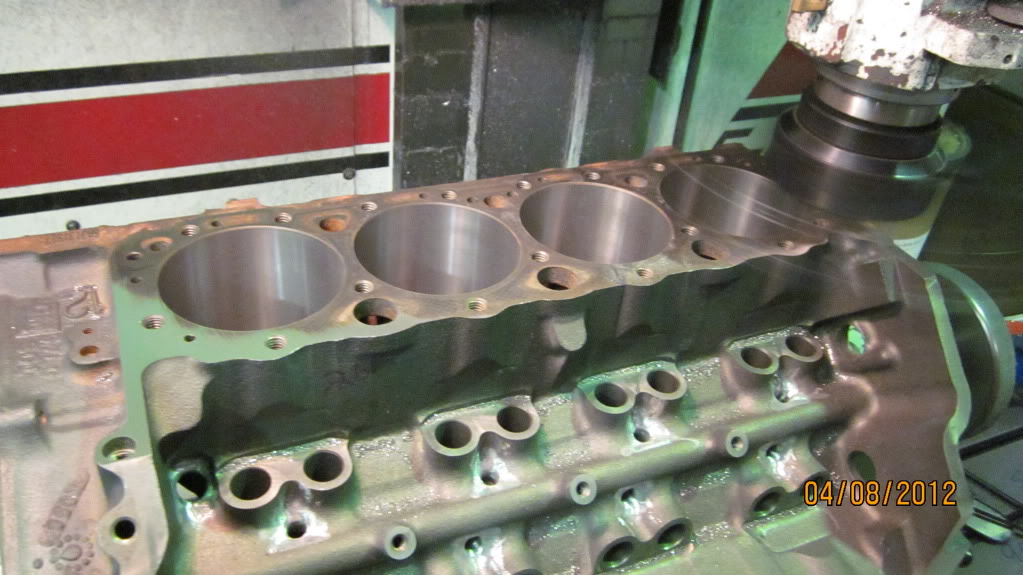
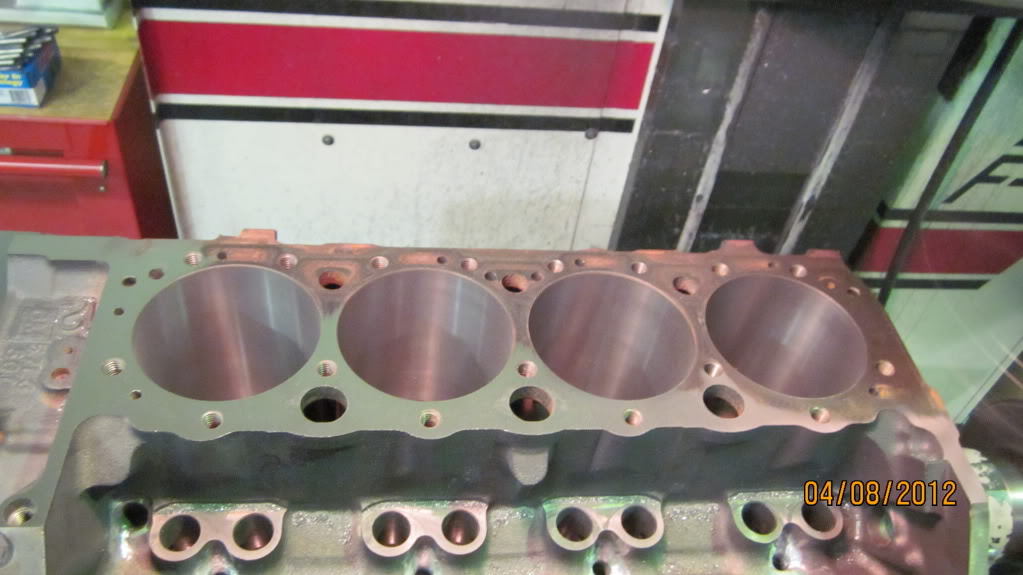
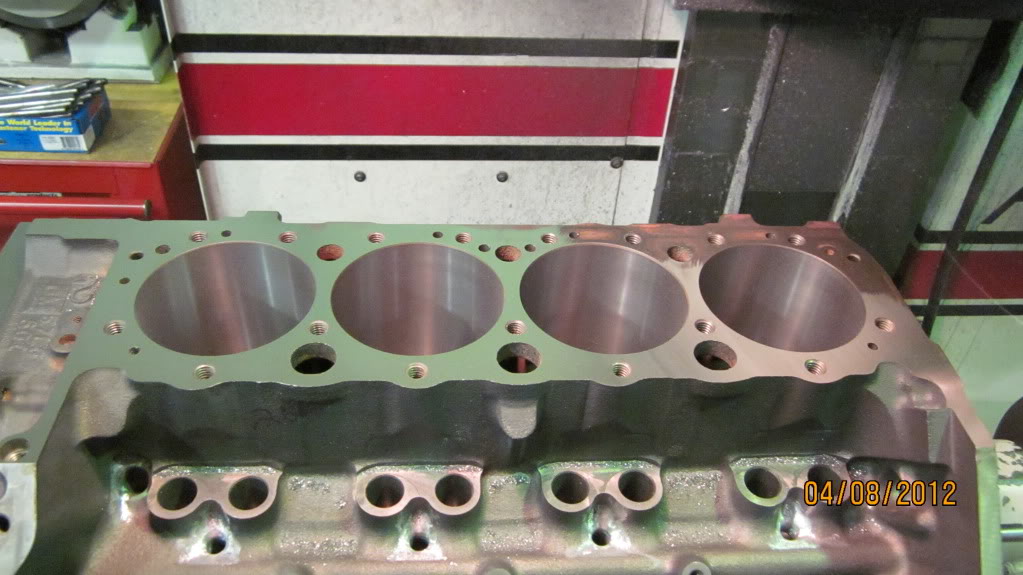
Also surfaced the china walls..
All done!
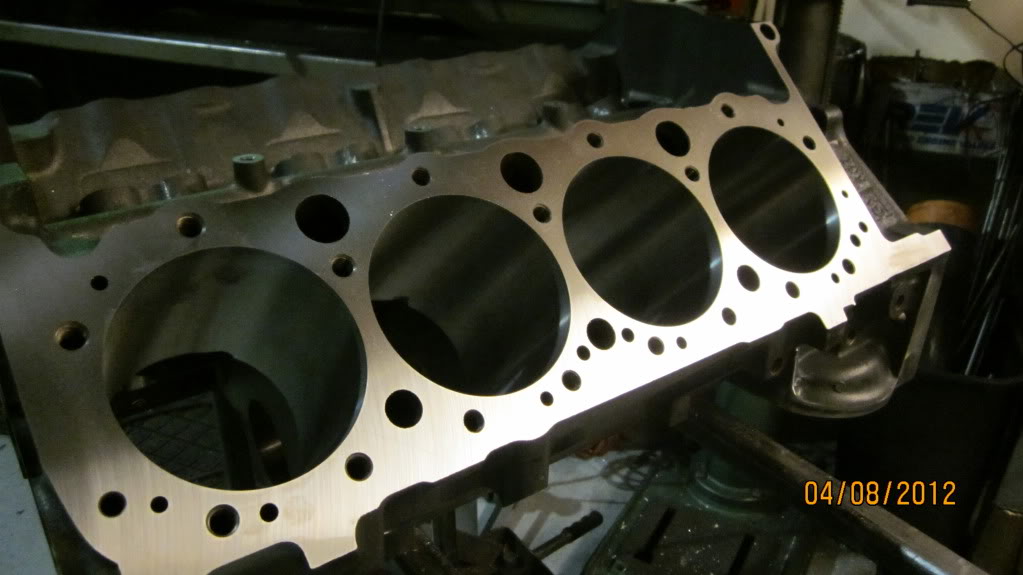
Took some time to clean up some of the nasty casting flash all over the block...
Tommorow I will bolt up the torque plate and hone the cylinders to size on our Rottler HP-6A diamond hone, and then I can wash it and start putting it together!!!!!!
Also surfaced the china walls..
All done!
Took some time to clean up some of the nasty casting flash all over the block...
Tommorow I will bolt up the torque plate and hone the cylinders to size on our Rottler HP-6A diamond hone, and then I can wash it and start putting it together!!!!!!
04-09-2012, 11:41 AM
#58
Senior Member
Thread Starter
iTrader: (1)
Join Date: Sep 2006
Location: Canada
Posts: 962
Likes: 0
Received 13 Likes
on
10 Posts
Car: 1979 Malibu
Engine: Blown LSx
Transmission: T56 Magnum
Axle/Gears: 9"/wavetrac/35's/3.70
Re: My 1986 IROC build thread *PIC HEAVY*
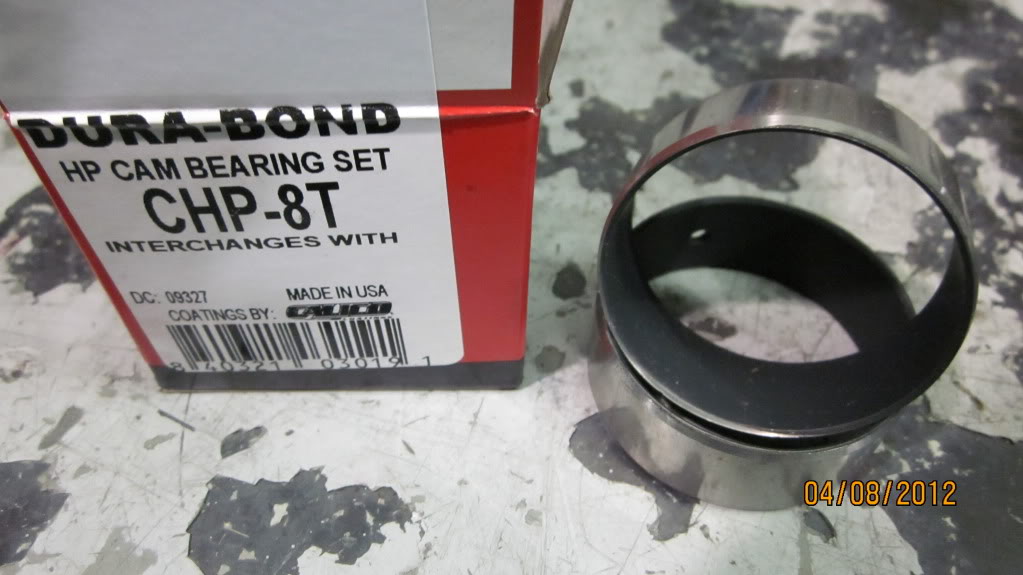
Well after last nights update I decided to go back to work. Raided our ARP bolt collection and found some polished stainless 12pt ARP bolts for my accesory brackets and pulleys. Also ordered a set of Durabond teflon coated cam bearings.

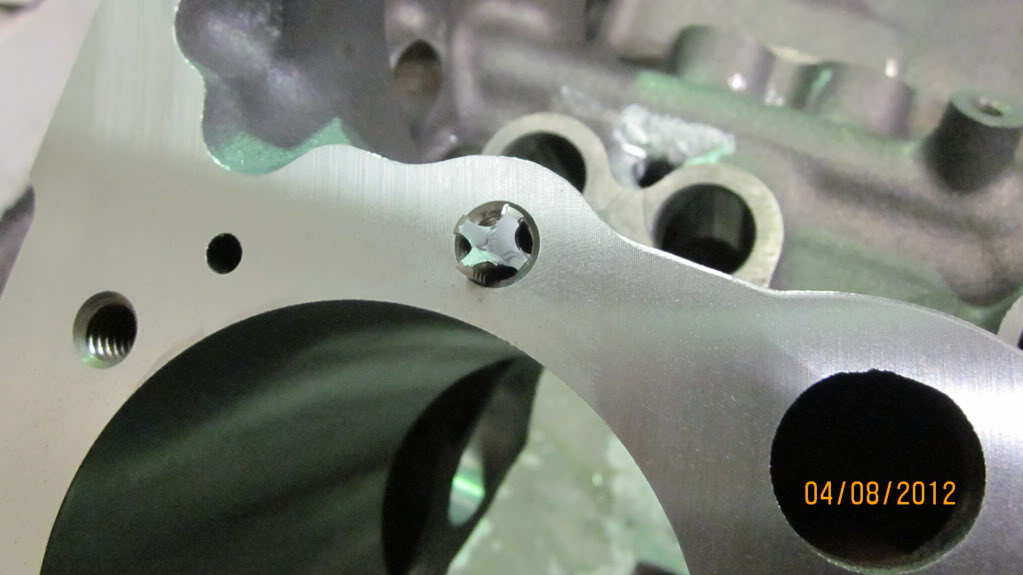
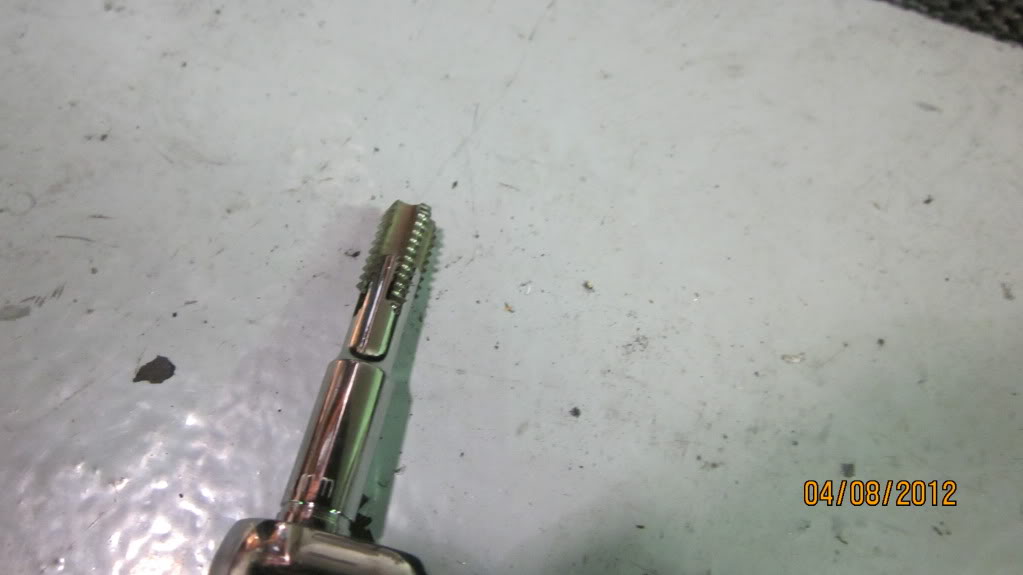
Then I decided to chase the head bolt threads in the block... which was going great until the tap broke on the second hole...
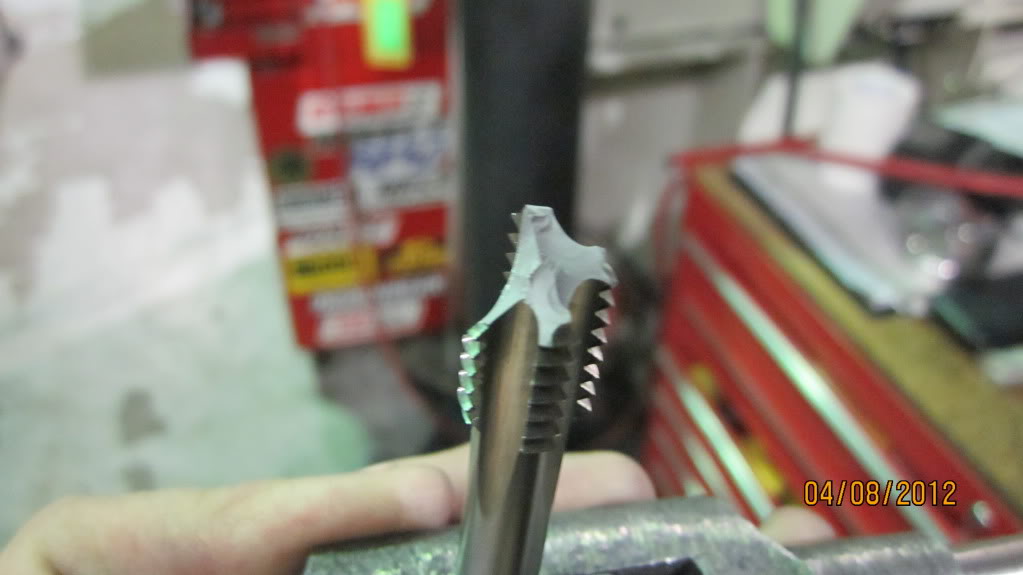
So I built my own tap extractor out of a 6mm socket. worked great! more to come tonight!
Then I decided to chase the head bolt threads in the block... which was going great until the tap broke on the second hole...
So I built my own tap extractor out of a 6mm socket. worked great! more to come tonight!
04-09-2012, 11:23 PM
#59
Senior Member
Thread Starter
iTrader: (1)
Join Date: Sep 2006
Location: Canada
Posts: 962
Likes: 0
Received 13 Likes
on
10 Posts
Car: 1979 Malibu
Engine: Blown LSx
Transmission: T56 Magnum
Axle/Gears: 9"/wavetrac/35's/3.70
Re: My 1986 IROC build thread *PIC HEAVY*
More parts and progress tonight!
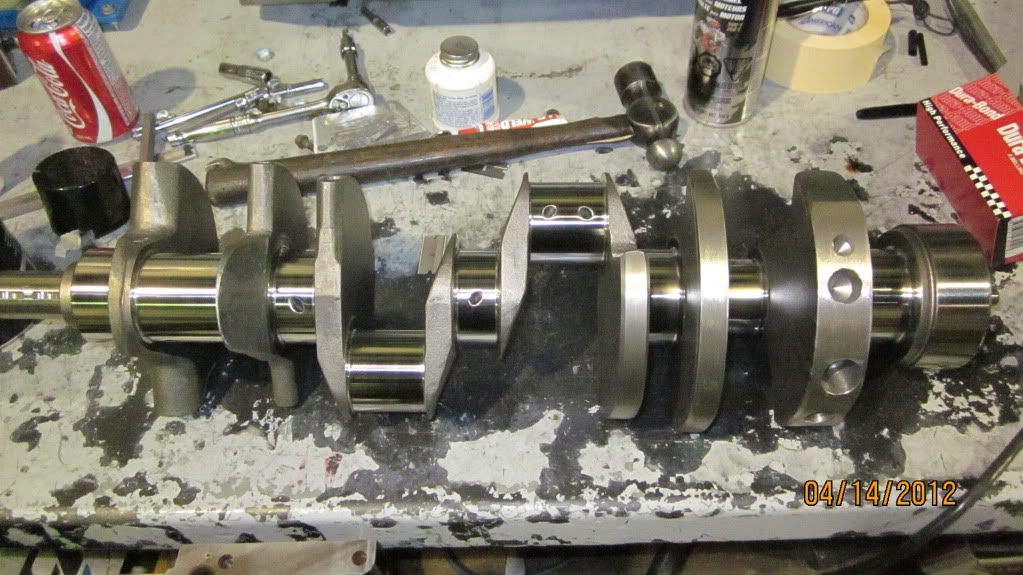
Scat 9000 3.75" stroke crank.
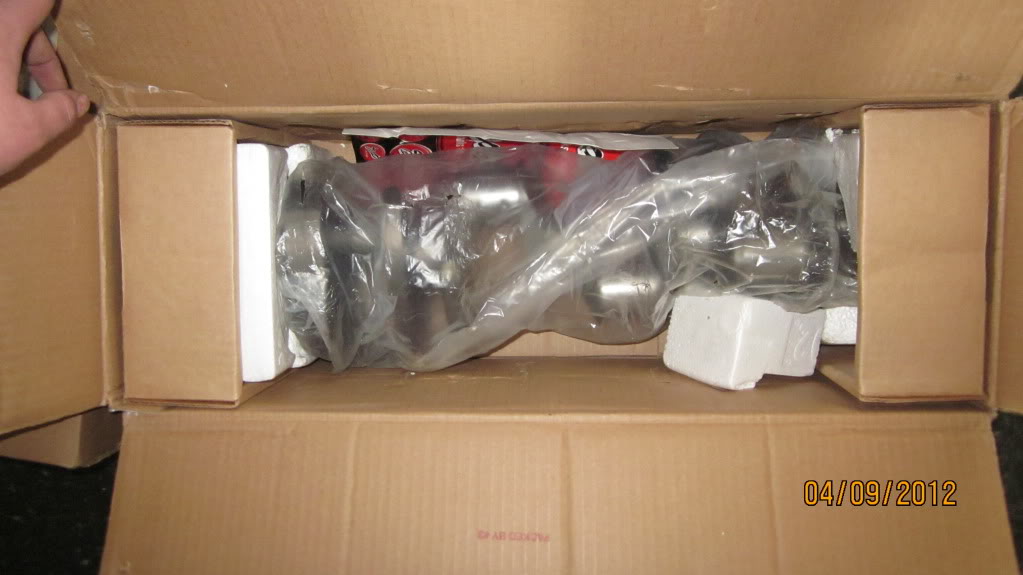
Centerforce dual friction clutch.
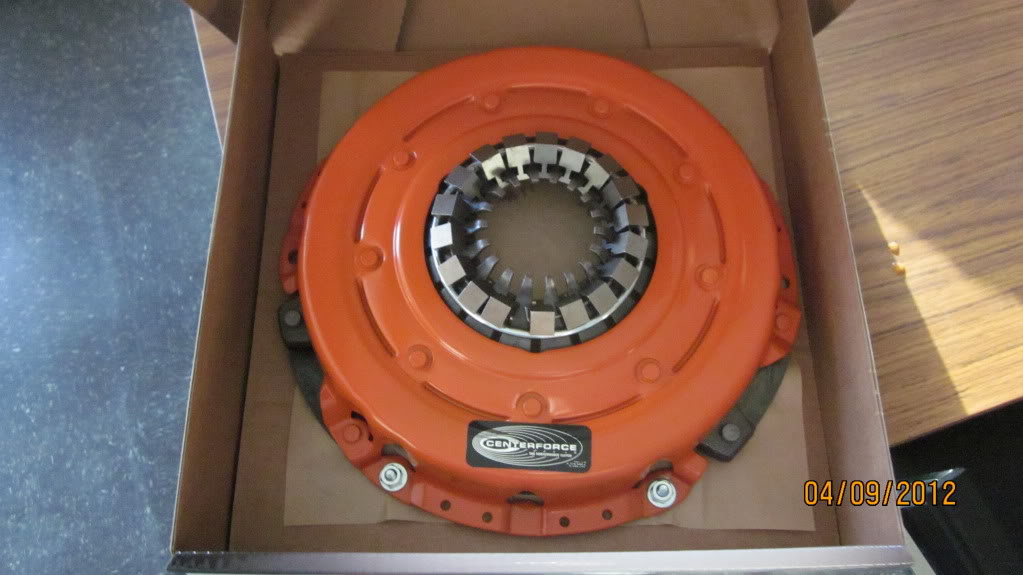
Autometer phantom series elec speedo and tach.
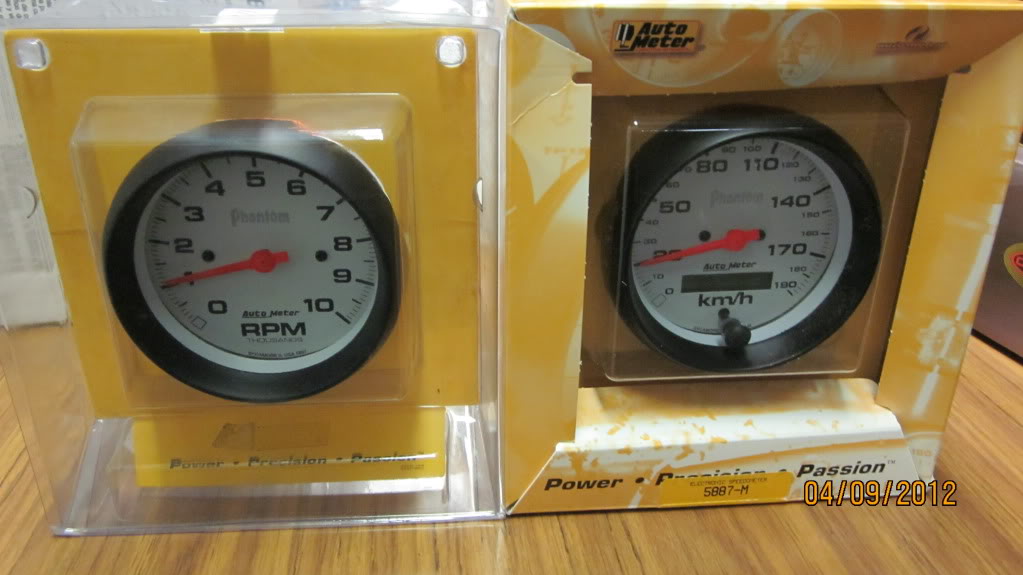
Power steering pump and pressure hose
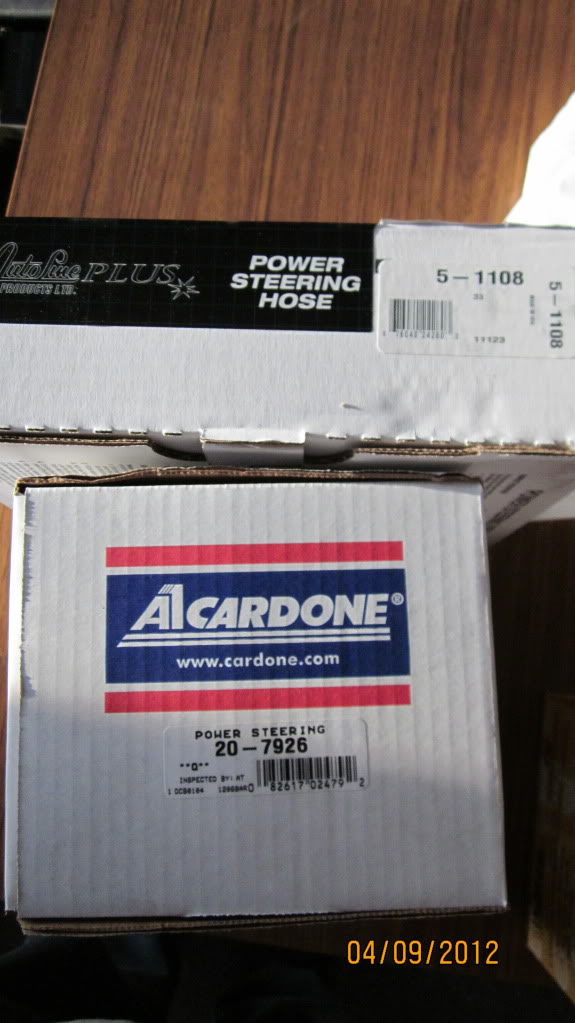
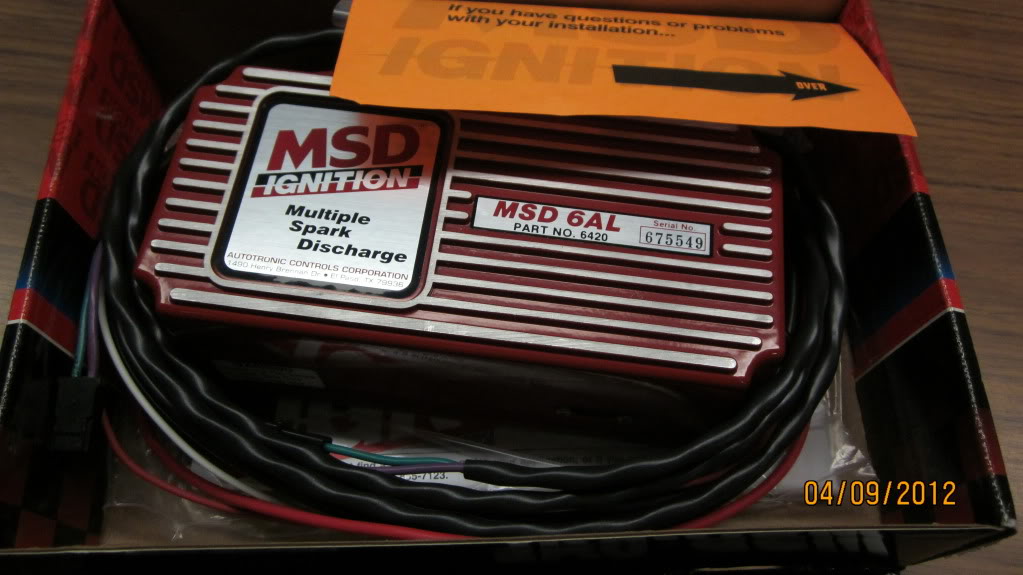
MSD 6AL ignition box.
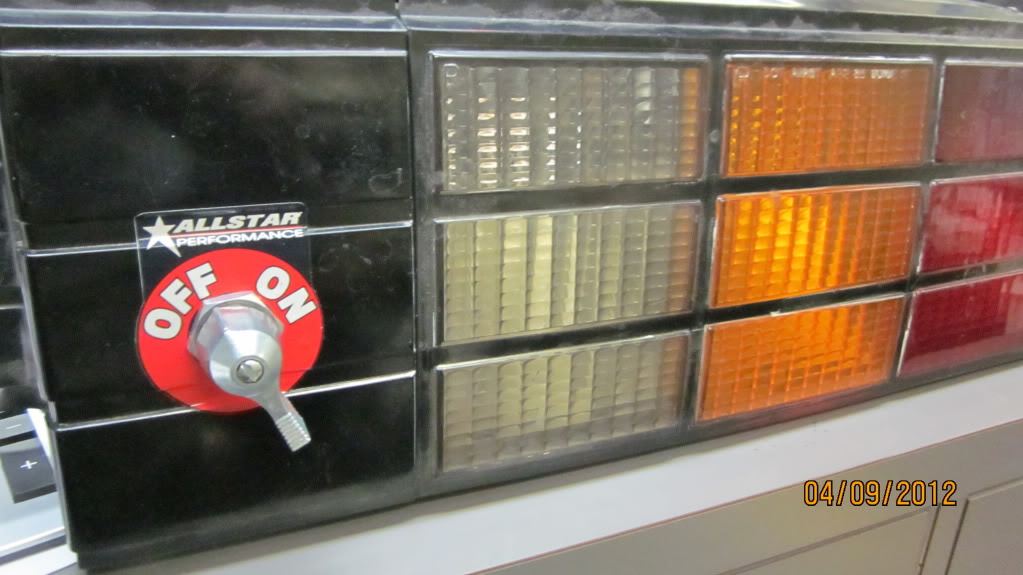
Also mounted my battery disconnect switch. Turned out pretty nice IMO
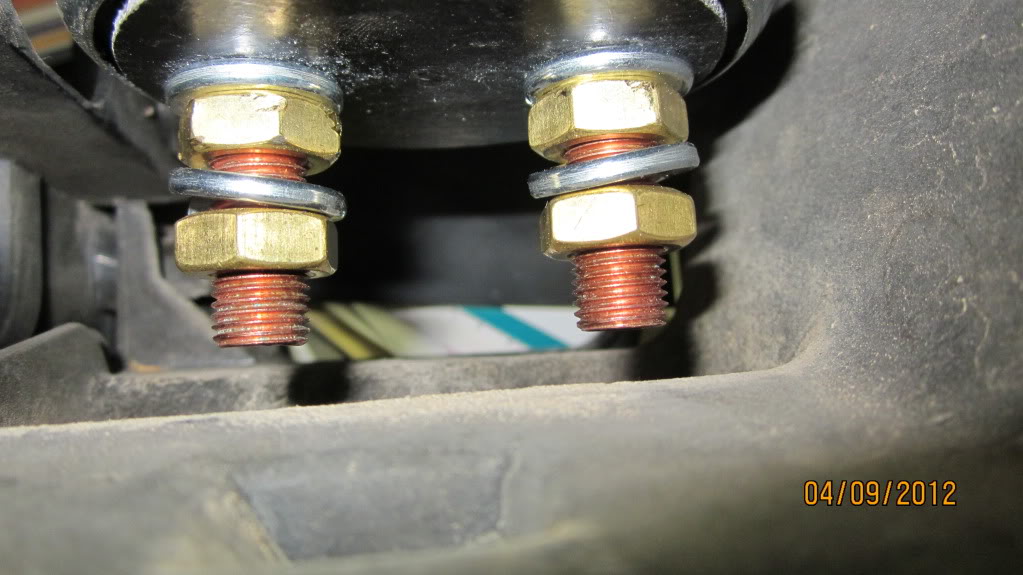
Plenty of clearance...
Should be getting more parts tommorow!
Scat 9000 3.75" stroke crank.
Centerforce dual friction clutch.
Autometer phantom series elec speedo and tach.
Power steering pump and pressure hose
MSD 6AL ignition box.
Also mounted my battery disconnect switch. Turned out pretty nice IMO
Plenty of clearance...
Should be getting more parts tommorow!
04-10-2012, 02:17 PM
#60
Senior Member
Thread Starter
iTrader: (1)
Join Date: Sep 2006
Location: Canada
Posts: 962
Likes: 0
Received 13 Likes
on
10 Posts
Car: 1979 Malibu
Engine: Blown LSx
Transmission: T56 Magnum
Axle/Gears: 9"/wavetrac/35's/3.70
Re: My 1986 IROC build thread *PIC HEAVY*
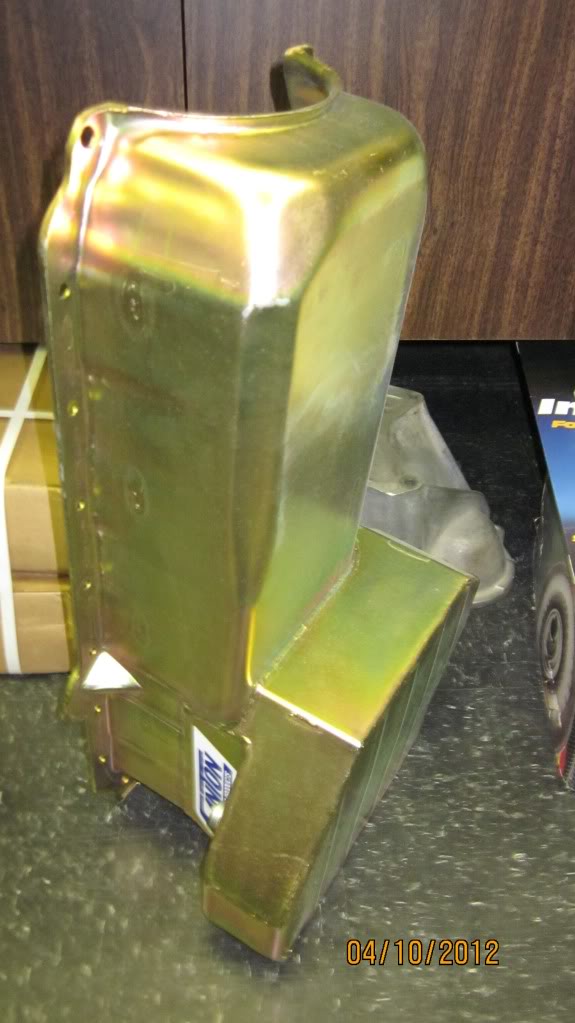
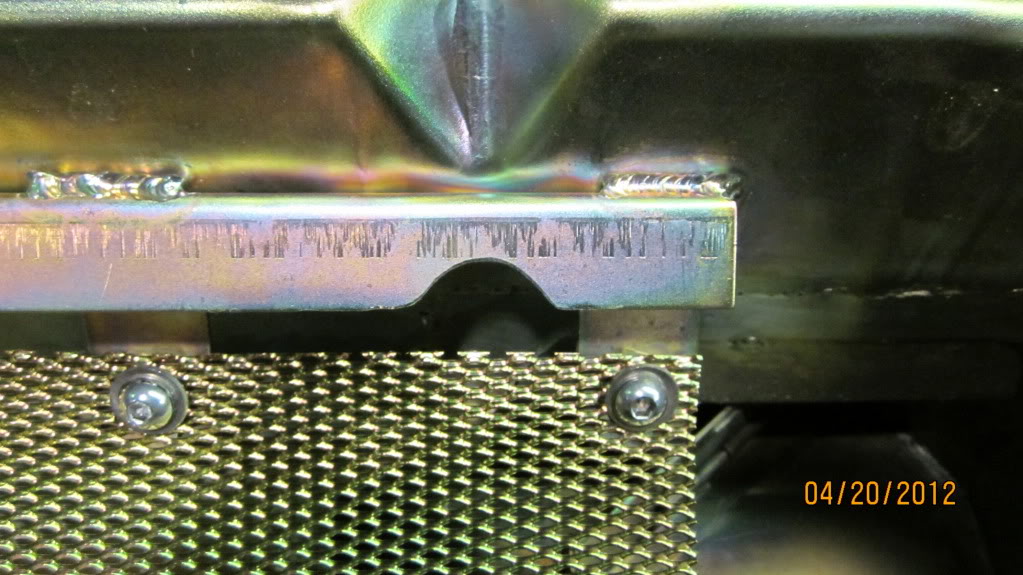
Got my new Canton road race oil pan today, was going to run the moroso pan, but didnt want to go through the hassle of notching my stock k-member. Another 300$ out the door....

04-10-2012, 11:15 PM
#61
Member

Join Date: Jan 2012
Location: Milwaukee
Posts: 294
Likes: 0
Received 0 Likes
on
0 Posts
Car: 1984 Z28
Engine: Vortec 350, hotcam
Transmission: T56
Axle/Gears: 3.73
Re: My 1986 IROC build thread *PIC HEAVY*
Very impressive build! Can I ask how did you like working in a speed shop right after high school? I want to do the same thing. Also what the purpose of the battery disconnect switch? I've never seen one before
04-11-2012, 12:18 AM
#62
Senior Member
Thread Starter
iTrader: (1)
Join Date: Sep 2006
Location: Canada
Posts: 962
Likes: 0
Received 13 Likes
on
10 Posts
Car: 1979 Malibu
Engine: Blown LSx
Transmission: T56 Magnum
Axle/Gears: 9"/wavetrac/35's/3.70
Re: My 1986 IROC build thread *PIC HEAVY*
The battery disconnect switch is required by most racing sanctioning bodies require them when the battery has been relocated to the rear of the car. Its so the vehicle can be shut off in the event off an accident.
04-11-2012, 12:21 AM
#63
Senior Member
Thread Starter
iTrader: (1)
Join Date: Sep 2006
Location: Canada
Posts: 962
Likes: 0
Received 13 Likes
on
10 Posts
Car: 1979 Malibu
Engine: Blown LSx
Transmission: T56 Magnum
Axle/Gears: 9"/wavetrac/35's/3.70
Re: My 1986 IROC build thread *PIC HEAVY*
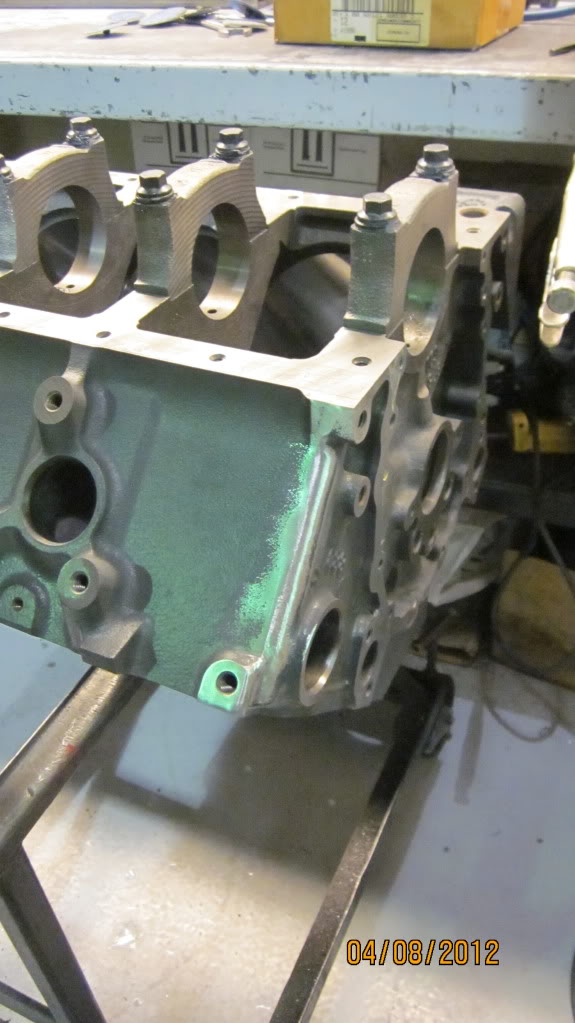
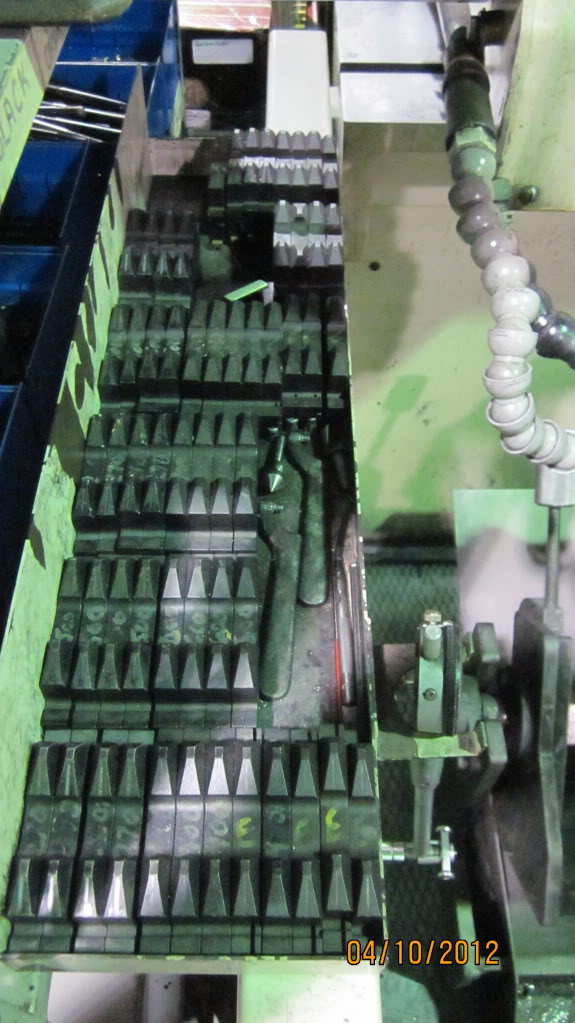
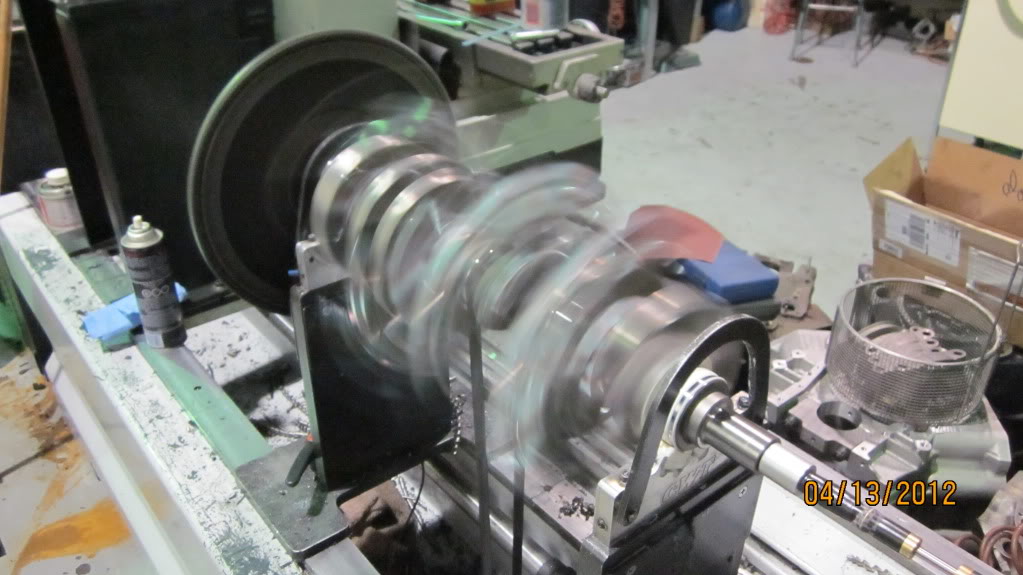
Got a bit more done tonight, had to take off right after work to pull the Hemi out of the funny car, but came back and had enough time to get the block in the hone and bolt the torque plate on. Tomorrow morning I plan on coming in early to hone it.

Honing diamonds!
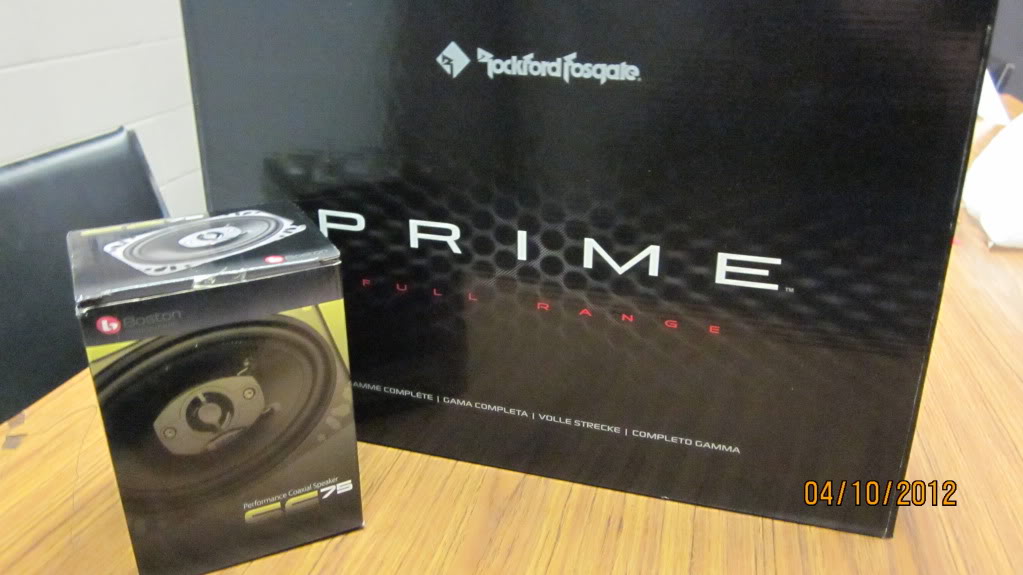
More Parts!! Speakers are boston acoustics 4x6's and rockford 6x9's
Honing diamonds!
More Parts!! Speakers are boston acoustics 4x6's and rockford 6x9's
04-12-2012, 04:36 PM
#64
Senior Member
Thread Starter
iTrader: (1)
Join Date: Sep 2006
Location: Canada
Posts: 962
Likes: 0
Received 13 Likes
on
10 Posts
Car: 1979 Malibu
Engine: Blown LSx
Transmission: T56 Magnum
Axle/Gears: 9"/wavetrac/35's/3.70
Re: My 1986 IROC build thread *PIC HEAVY*
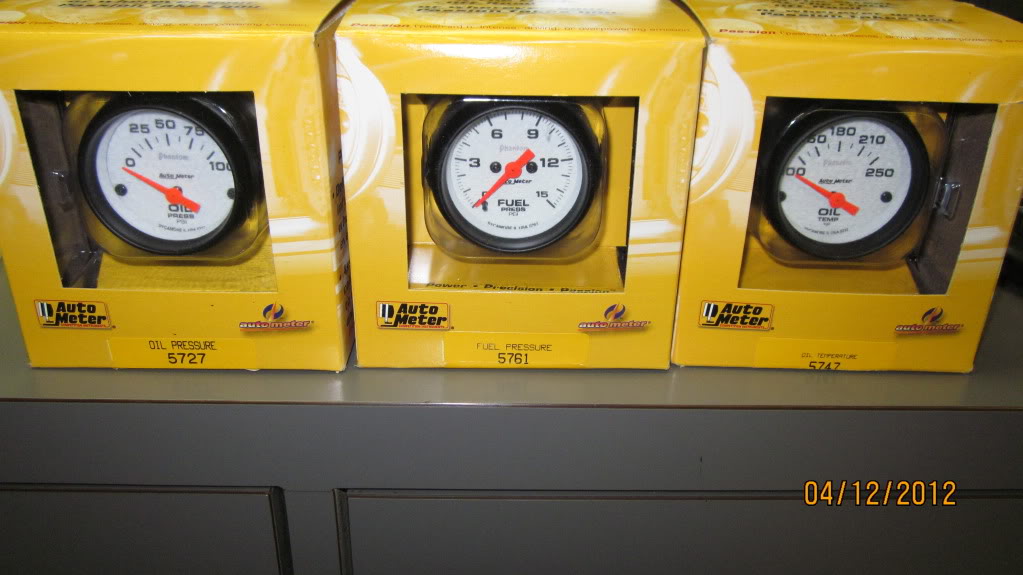
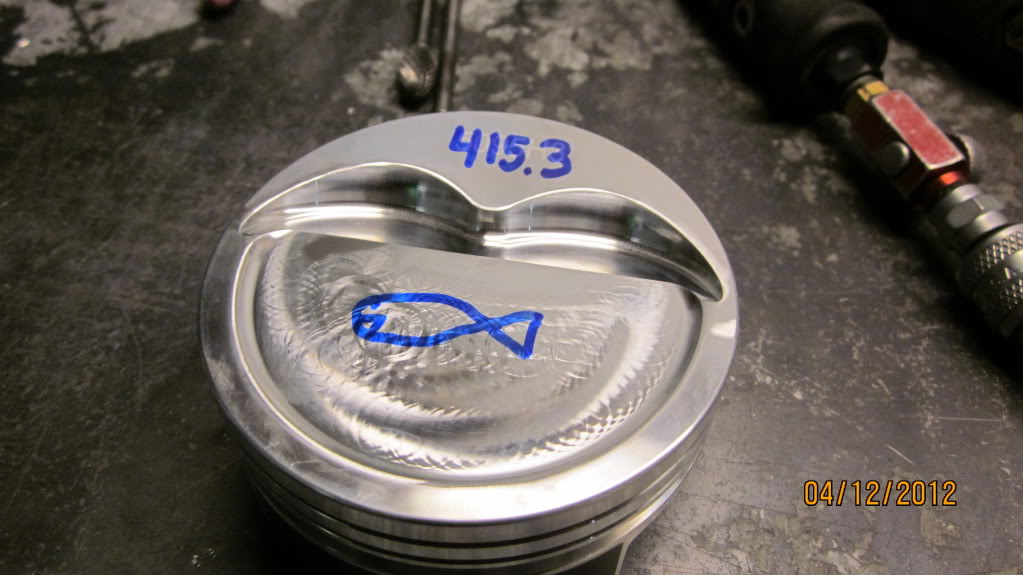
Got one side of the block honed this AM, also got my new pistons yesterday. I trusted someone at the swap meet and got lied to, he told me they were a 13cc dished piston, but thruthfully they were a 20cc dish. So another 650$ later I had another set of pistons to get the CR I wanted... Also got the rest of my autometer gauges, a elec oil temp, oil psi, and fuel PSI.

04-12-2012, 11:58 PM
#65
Senior Member
Thread Starter
iTrader: (1)
Join Date: Sep 2006
Location: Canada
Posts: 962
Likes: 0
Received 13 Likes
on
10 Posts
Car: 1979 Malibu
Engine: Blown LSx
Transmission: T56 Magnum
Axle/Gears: 9"/wavetrac/35's/3.70
Re: My 1986 IROC build thread *PIC HEAVY*
Got a little bit more done tonight. If I keep making decent progress like this I should be able to meet my goal of driving the car June 1st. Honed the other side of the block, Now I just gotta do a little bit of cleanup work at the bottom of the cylinders and I can final wash the block.

Measuring the radial depth of the piston ring grooves to make sure the supplied rings are correct

Pistons and pins all weighed out
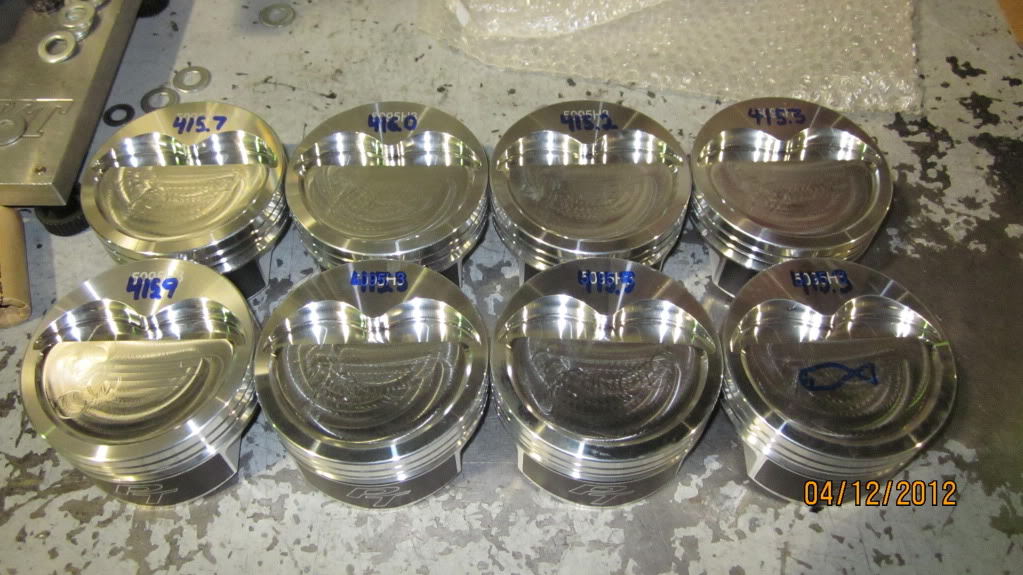
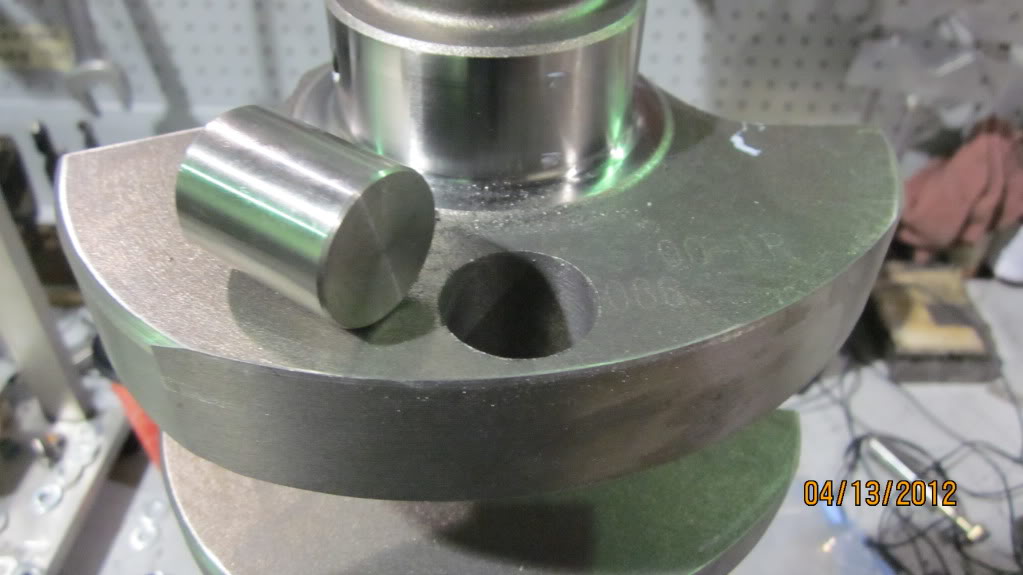
New 383 bobweight card!
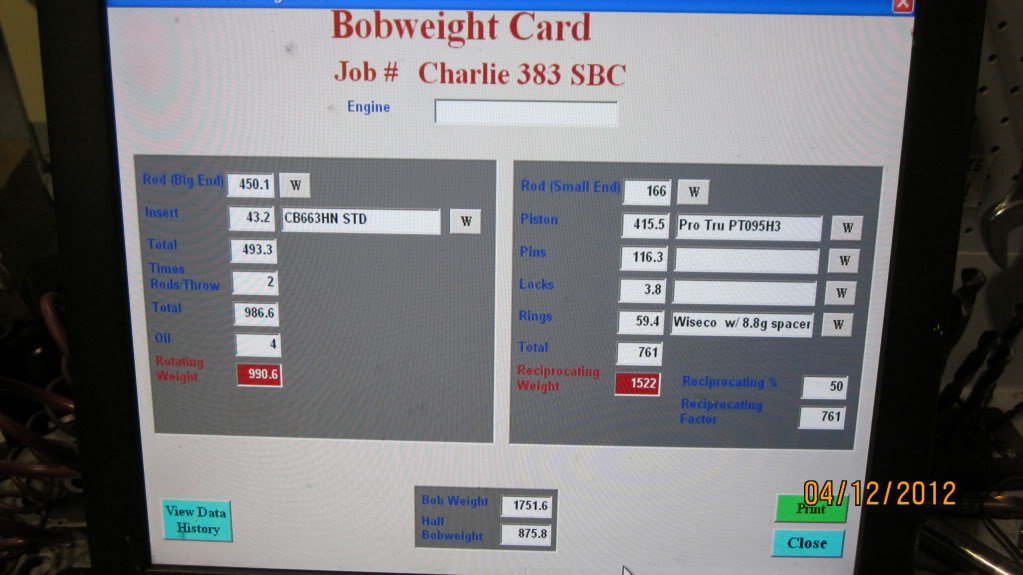
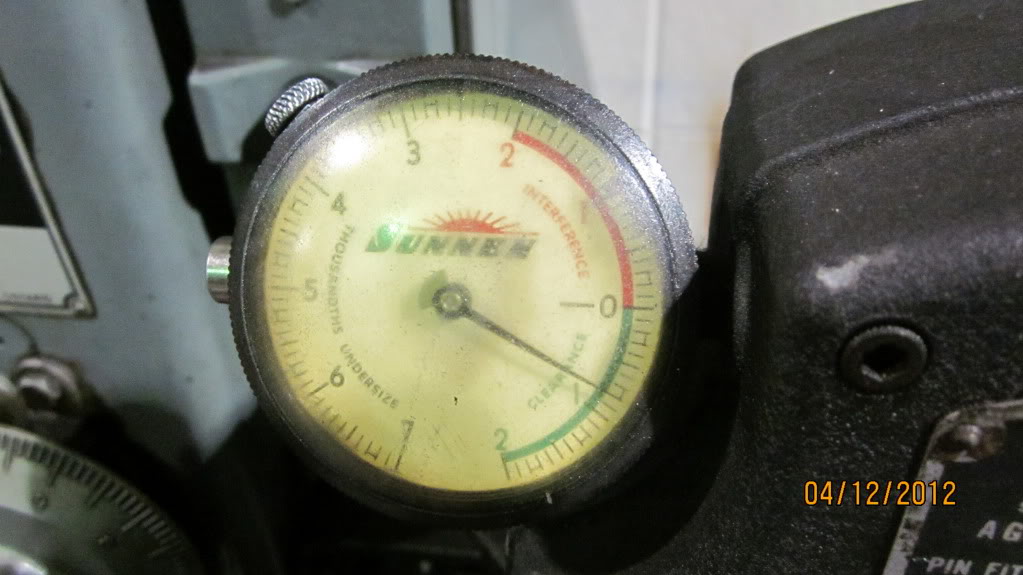
Checking the pinbore clearance on the new pistons... 0.0008" is were I always want my .927" pin clearance.
And finally I detailed the pistons to remove any sharp edges.
Measuring the radial depth of the piston ring grooves to make sure the supplied rings are correct
Pistons and pins all weighed out
New 383 bobweight card!
Checking the pinbore clearance on the new pistons... 0.0008" is were I always want my .927" pin clearance.
And finally I detailed the pistons to remove any sharp edges.
04-14-2012, 05:00 PM
#66
Junior Member

Join Date: Mar 2012
Location: Rochester, NH
Posts: 7
Likes: 0
Received 0 Likes
on
0 Posts
Car: 1983 Camaro Z28
Engine: 383 Stroker
Transmission: T-5
Re: My 1986 IROC build thread *PIC HEAVY*
I absolutely love this whole project, keep it up and good luck meeting your goal! 
04-15-2012, 01:57 AM
#67
Senior Member
Thread Starter
iTrader: (1)
Join Date: Sep 2006
Location: Canada
Posts: 962
Likes: 0
Received 13 Likes
on
10 Posts
Car: 1979 Malibu
Engine: Blown LSx
Transmission: T56 Magnum
Axle/Gears: 9"/wavetrac/35's/3.70
Re: My 1986 IROC build thread *PIC HEAVY*
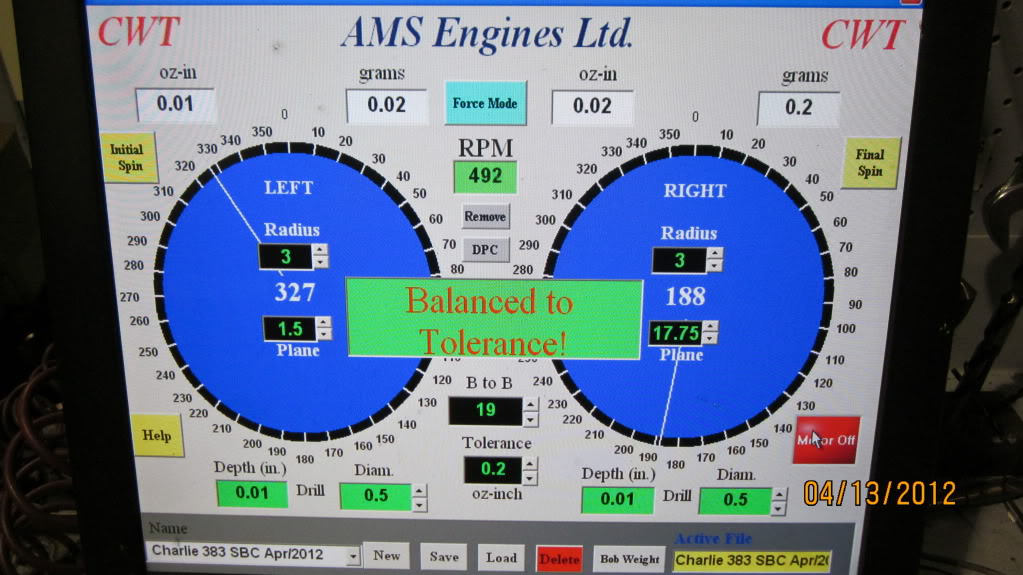
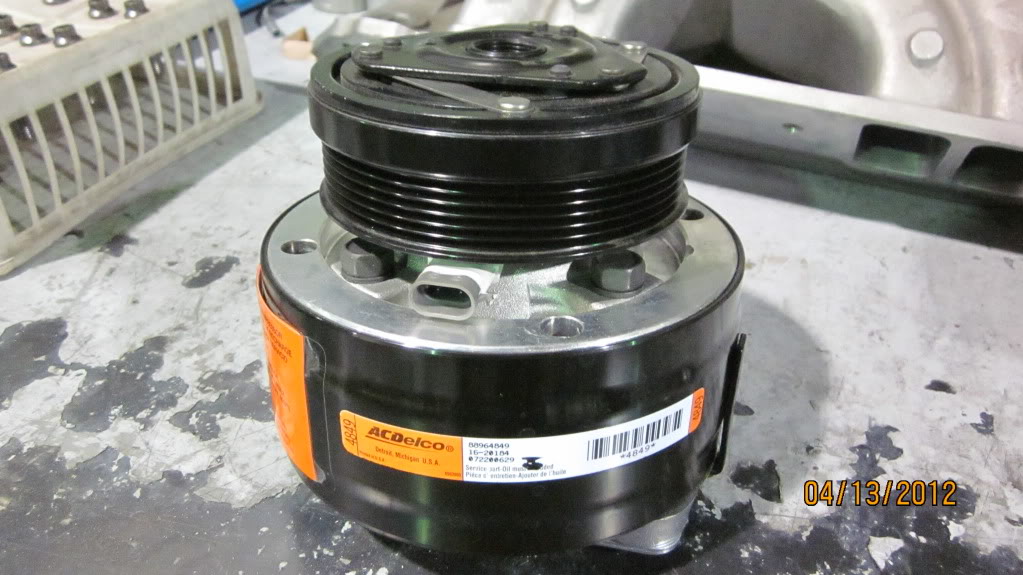
Got alot done in the past 2 days, hoping to have the shortblock done tomorrrow and have the engine on the dyno in the next 2 weeks. Starting last night by balancing the new 383 crank.
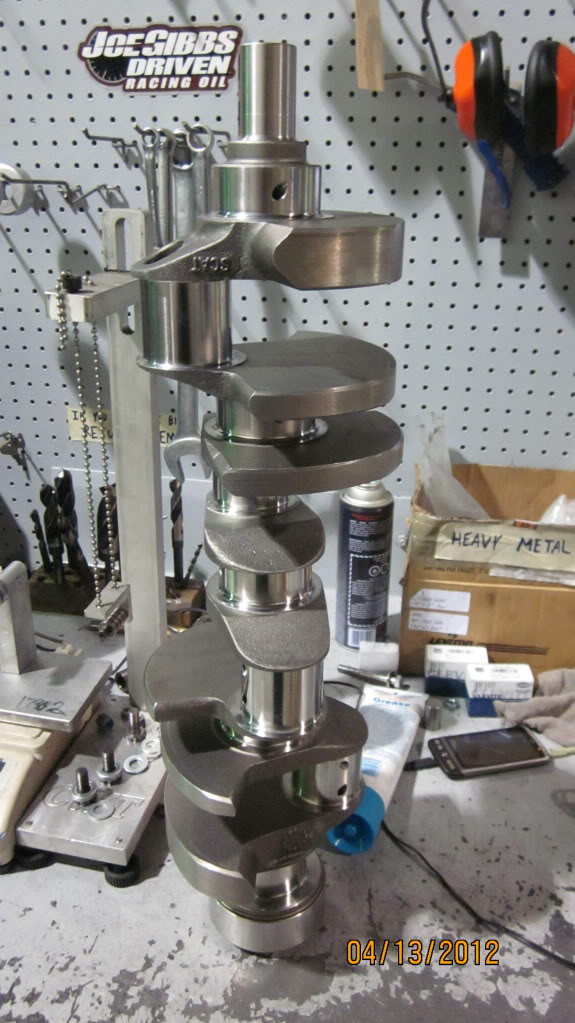

Ended up having to install a slug of mallory in the front of the crank, other then that, it was pretty straight forward...
Also picked up a brand new AC Delco A/C compressor for 100$
Ended up having to install a slug of mallory in the front of the crank, other then that, it was pretty straight forward...
Also picked up a brand new AC Delco A/C compressor for 100$
04-15-2012, 02:09 AM
#68
Senior Member
Thread Starter
iTrader: (1)
Join Date: Sep 2006
Location: Canada
Posts: 962
Likes: 0
Received 13 Likes
on
10 Posts
Car: 1979 Malibu
Engine: Blown LSx
Transmission: T56 Magnum
Axle/Gears: 9"/wavetrac/35's/3.70
Re: My 1986 IROC build thread *PIC HEAVY*
Pulled my block out of the hone and gave it one more inspection and the final washed it for assembly.

Installed the oil plugs and dowels...
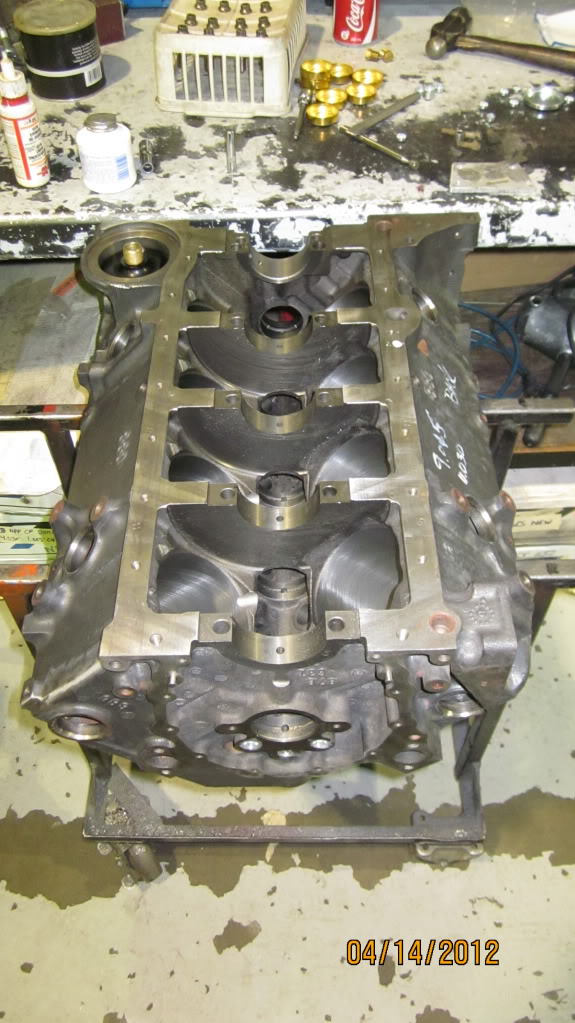
Thats where I called it a night. Came back this morning after picking up some gloss black engine paint and got the frost plugs and cam bearings installed after giving it a fresh coat of paint.
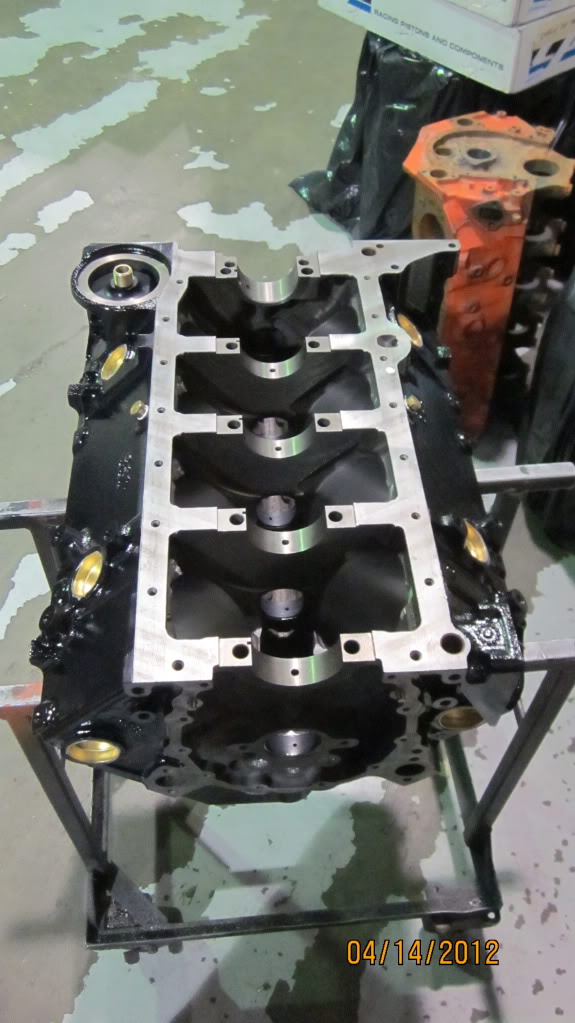
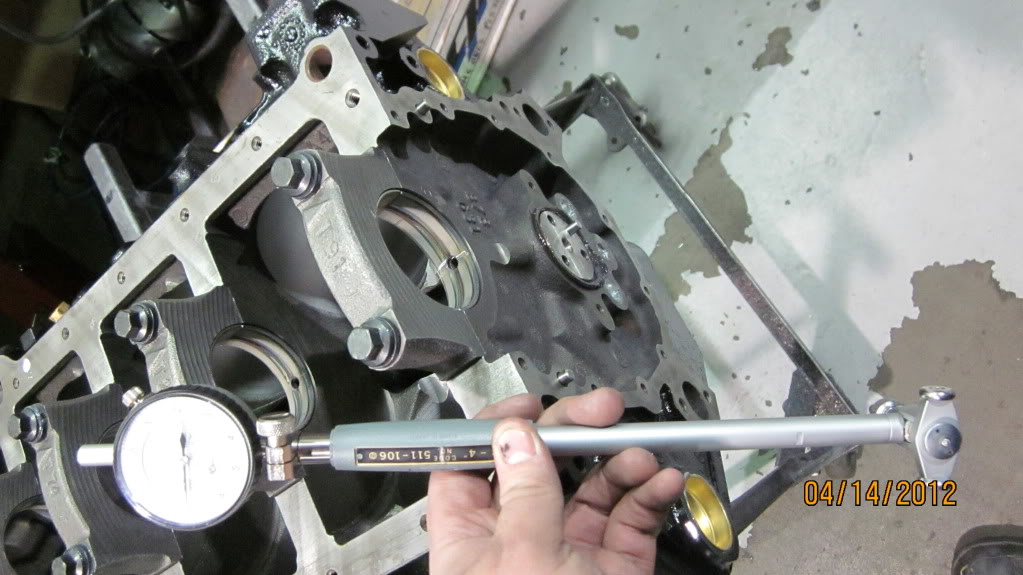
Next I started checking my bearing clearances
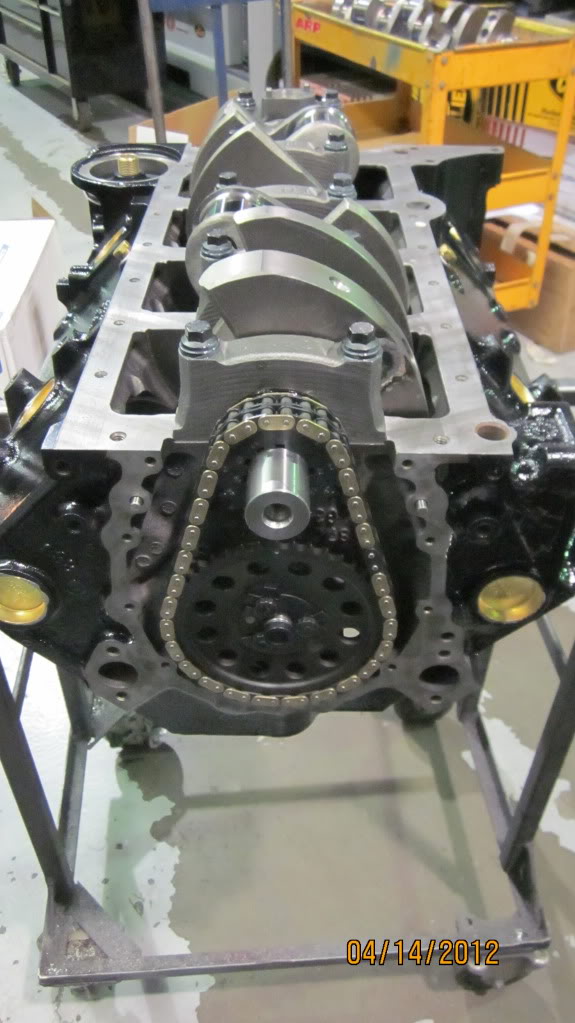
Crank and cam, in place. w/ a Progear billet timing set
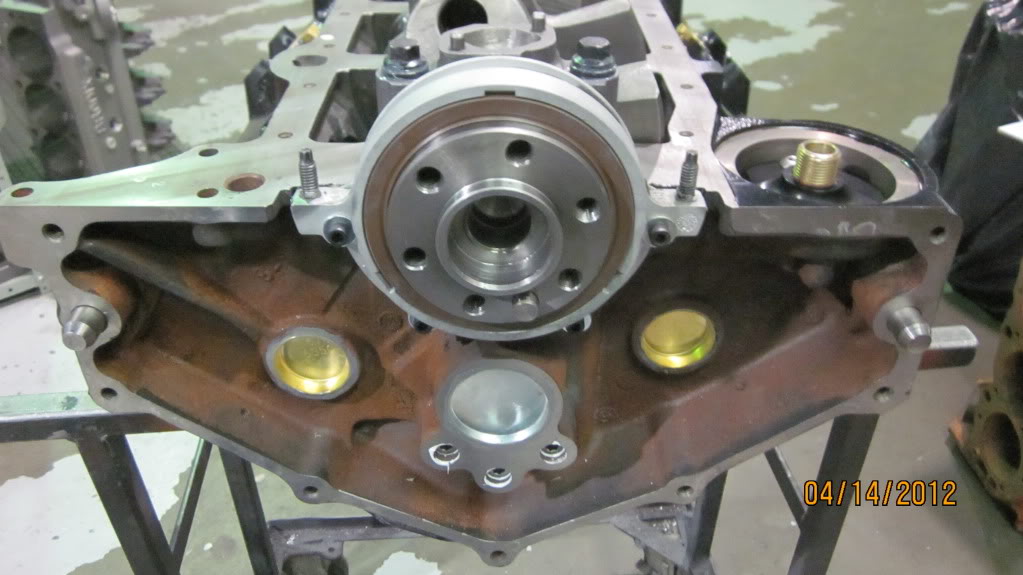
Rear seal installed
Degreeing the camshaft

Had to advance it 2 degrees..
Installed the oil plugs and dowels...
Thats where I called it a night. Came back this morning after picking up some gloss black engine paint and got the frost plugs and cam bearings installed after giving it a fresh coat of paint.
Next I started checking my bearing clearances
Crank and cam, in place. w/ a Progear billet timing set
Rear seal installed
Degreeing the camshaft
Had to advance it 2 degrees..
Last edited by 1986Z28OWNER; 04-15-2012 at 02:13 AM.
04-15-2012, 02:18 AM
#69
Senior Member
Thread Starter
iTrader: (1)
Join Date: Sep 2006
Location: Canada
Posts: 962
Likes: 0
Received 13 Likes
on
10 Posts
Car: 1979 Malibu
Engine: Blown LSx
Transmission: T56 Magnum
Axle/Gears: 9"/wavetrac/35's/3.70
Re: My 1986 IROC build thread *PIC HEAVY*
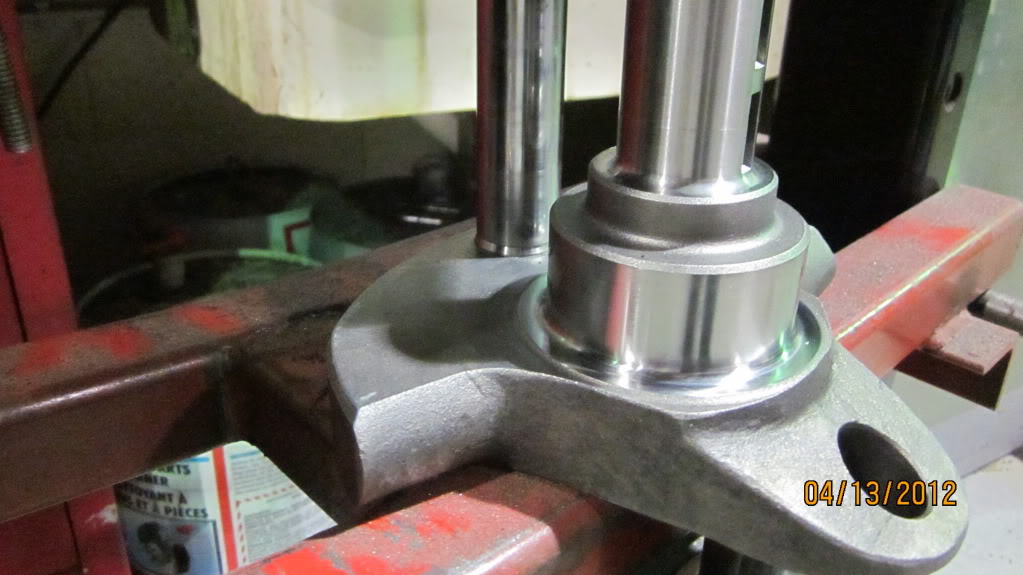
Checking rod bearing clearance.
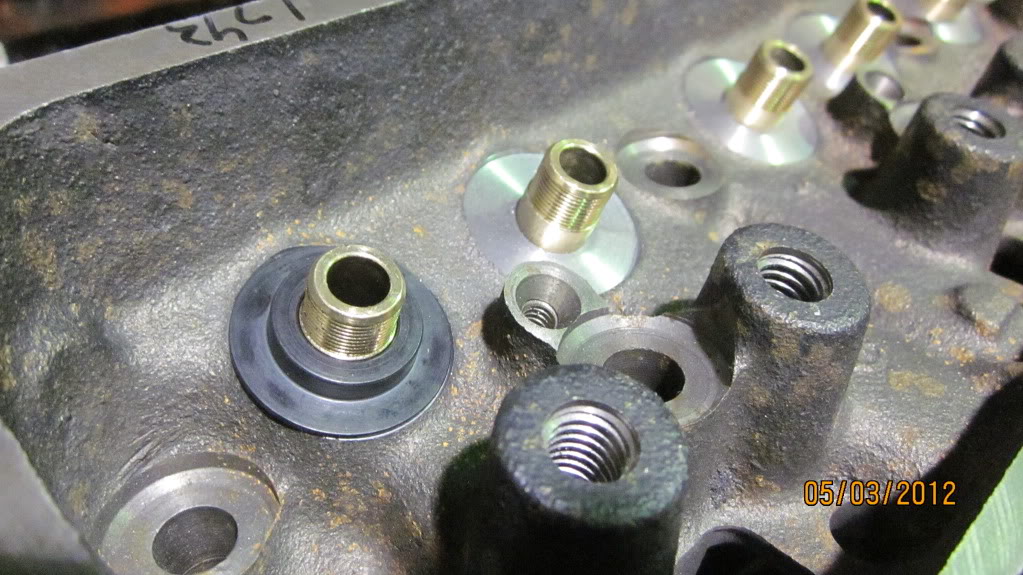
The heads have also been tapped for screw in studs now, just gotta mill the faces of them....

More to come tomorrow...
The heads have also been tapped for screw in studs now, just gotta mill the faces of them....
More to come tomorrow...
04-16-2012, 04:20 PM
#71
Junior Member
Join Date: Mar 2012
Location: Rochester, NH
Posts: 7
Likes: 0
Received 0 Likes
on
0 Posts
Car: 1983 Camaro Z28
Engine: 383 Stroker
Transmission: T-5
Re: My 1986 IROC build thread *PIC HEAVY*
That is looking great, after reading how you're doing all of this someone offered to sell me a 350 outta a '71 camaro for $100 so i'm thinking i kinda wanna do about the same to mine now haha.
04-17-2012, 12:02 PM
#73
Senior Member
Thread Starter
iTrader: (1)
Join Date: Sep 2006
Location: Canada
Posts: 962
Likes: 0
Received 13 Likes
on
10 Posts
Car: 1979 Malibu
Engine: Blown LSx
Transmission: T56 Magnum
Axle/Gears: 9"/wavetrac/35's/3.70
Re: My 1986 IROC build thread *PIC HEAVY*
Thanks guys, I got busy on sunday and its probaly going to be thursday before I get another chance to get going on this thing again. I also changed my mind on the desired bearing clearance I wanted. Originally I set them all to 0.0028-0.003" but I am goign to change them to 0.0024"-0.0025". Heads should be done in the next week or 2 and I have a goal of dynoing the engine in the first week or two of may. I ordered a Covans classic dash panel for the autmeter gauges, I should also be starting on the bodywork soon aswell. More updates to come.
04-19-2012, 11:03 AM
#75
Senior Member
Thread Starter
iTrader: (1)
Join Date: Sep 2006
Location: Canada
Posts: 962
Likes: 0
Received 13 Likes
on
10 Posts
Car: 1979 Malibu
Engine: Blown LSx
Transmission: T56 Magnum
Axle/Gears: 9"/wavetrac/35's/3.70
Re: My 1986 IROC build thread *PIC HEAVY*
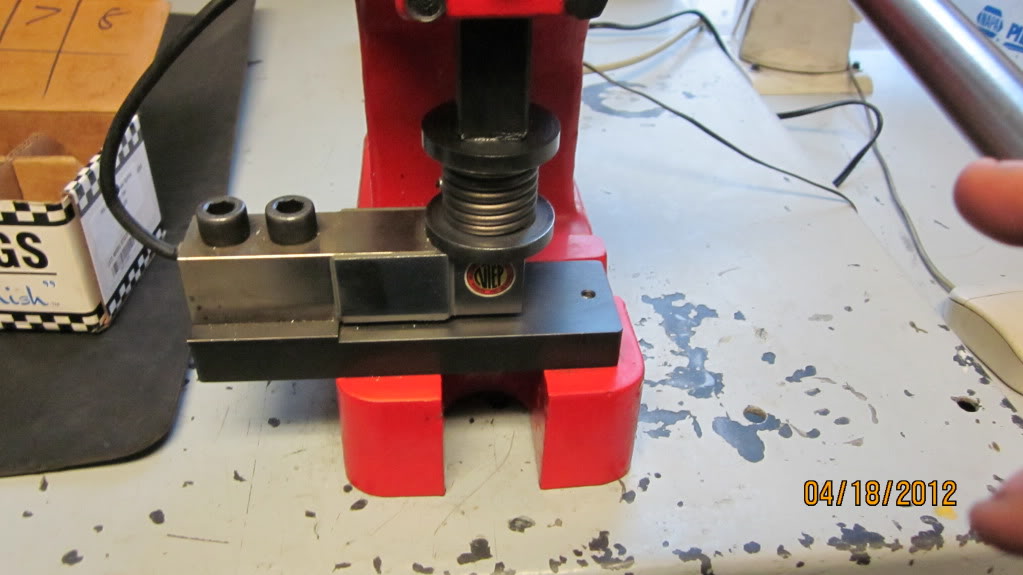
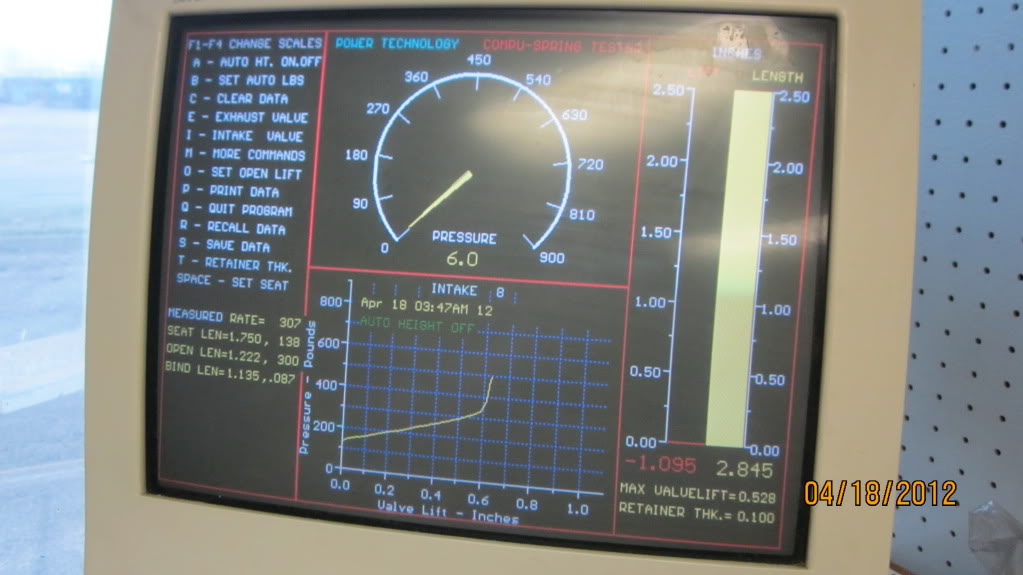
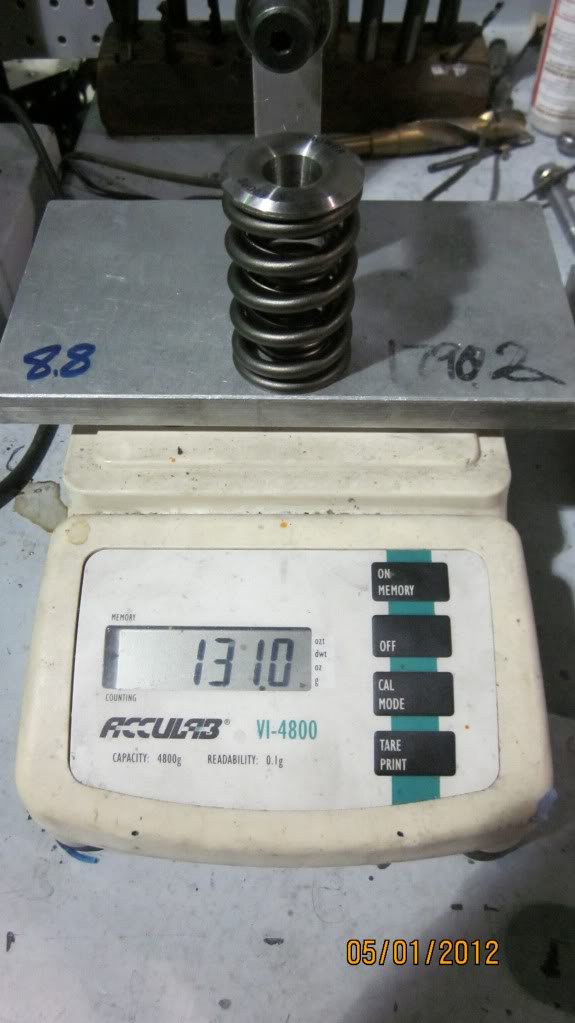
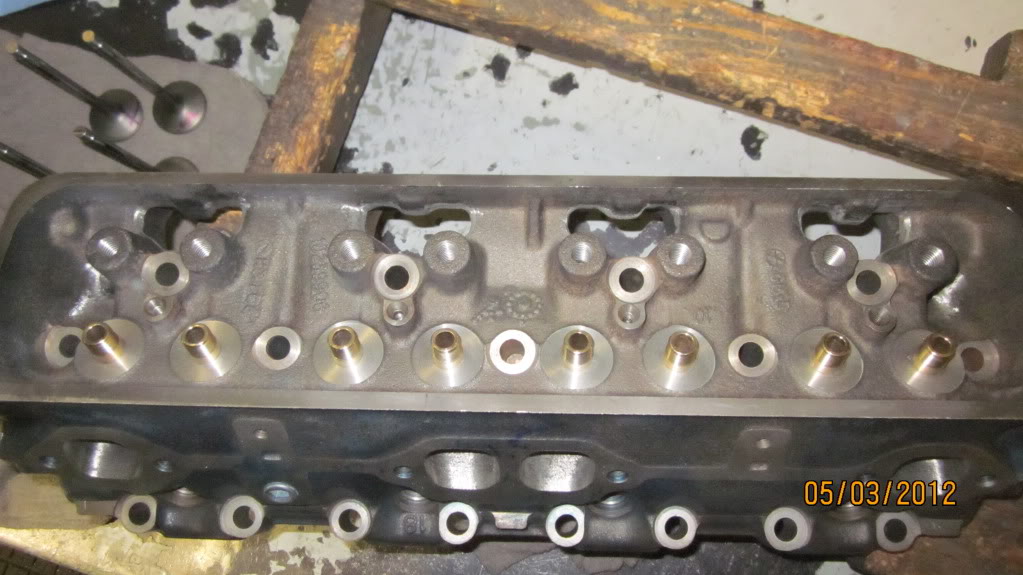
My cylinder head guy got the exhaust valve job cut to I was finally able to figure out an installed height, Tested the valve springs, had a variance in pressure of 4 lb's, both on the seat and open. Also received my Covans classic dash panel for my autometer gauges. Tonight I will be working on the engine again.
04-21-2012, 01:32 AM
#78
Senior Member
Thread Starter
iTrader: (1)
Join Date: Sep 2006
Location: Canada
Posts: 962
Likes: 0
Received 13 Likes
on
10 Posts
Car: 1979 Malibu
Engine: Blown LSx
Transmission: T56 Magnum
Axle/Gears: 9"/wavetrac/35's/3.70
Re: My 1986 IROC build thread *PIC HEAVY*
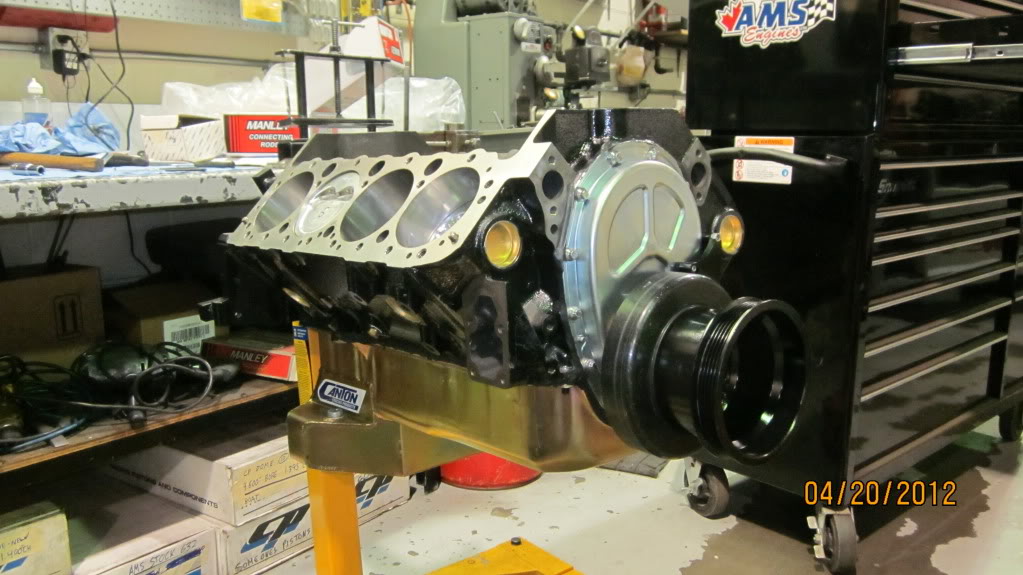
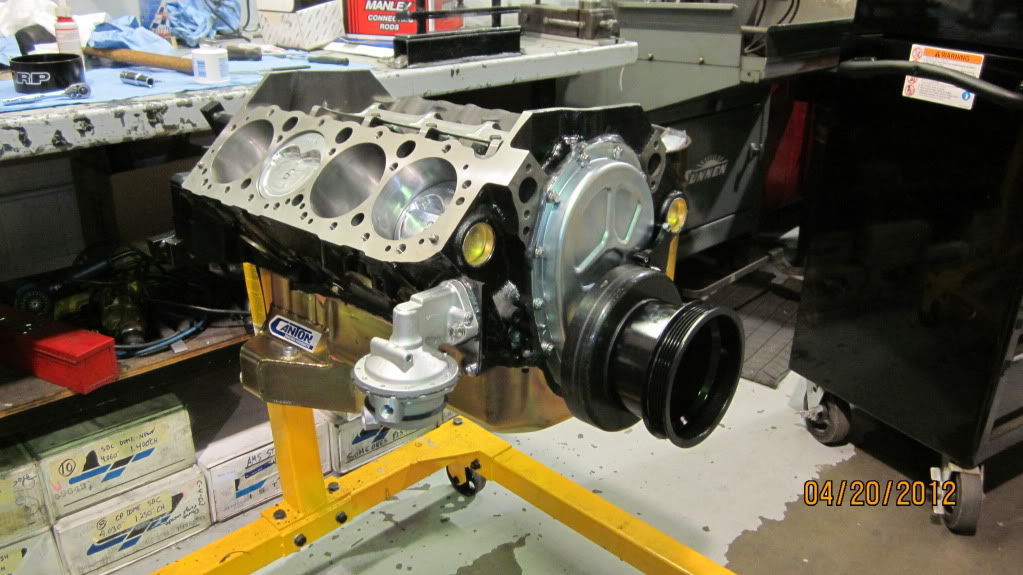
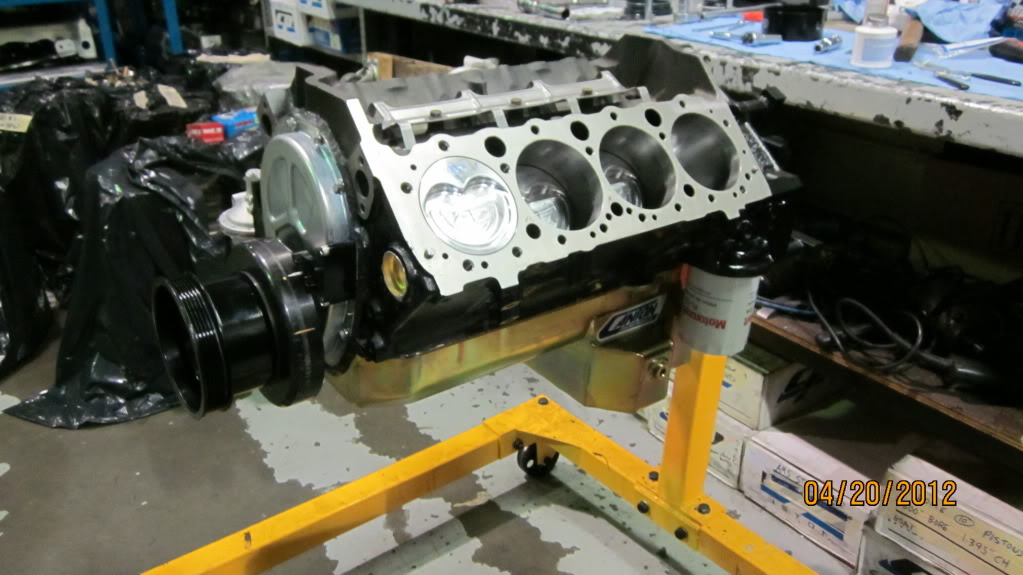
Got the shortblock done tonight, need the heads to go any further, hoping to have them done for next weekend, but im not sure...
Started off the night by bolting on the timing cover, balancer and timing pointer, also set true TDC on the billet adj. pointer. Then I started filing the rings. The rings included witht he Wiseco pistons were garbage. the top gap out of the box was 0.025" and the second was 0.026". Luckily I had a set of Mahle standard tension rings.
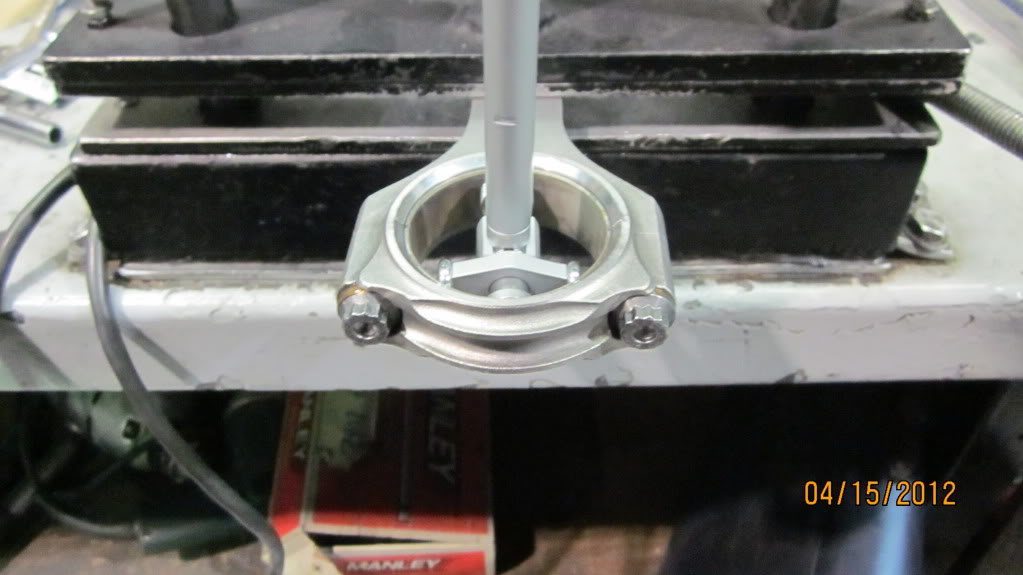
Next I assembled the rods and pistons and installed them...
All in!

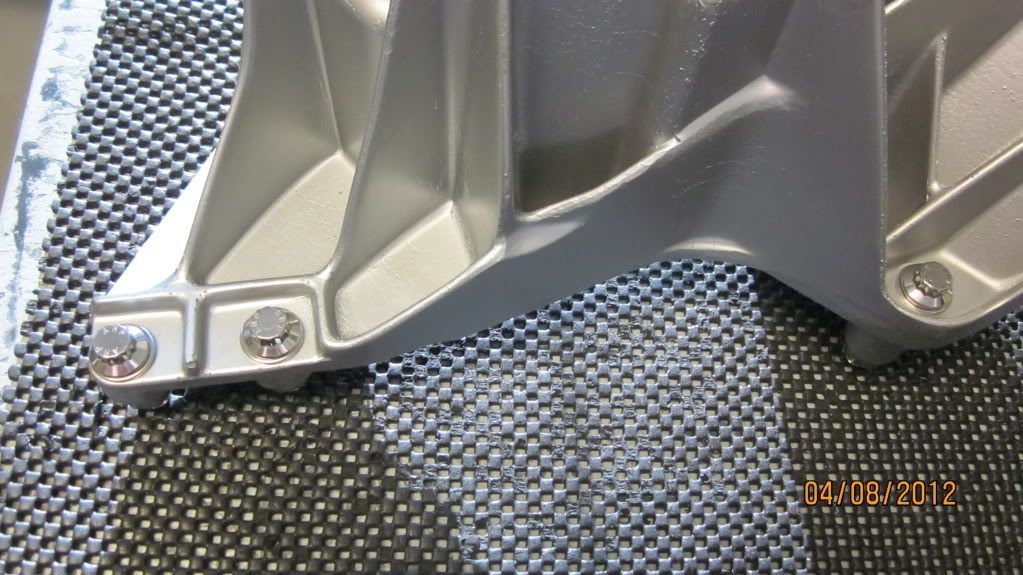
Next I check rotatinf clearance on the pan. The only clearancing I had to do was for my Lokar dipstick..
Oil pan on!
All done for the night...
Started off the night by bolting on the timing cover, balancer and timing pointer, also set true TDC on the billet adj. pointer. Then I started filing the rings. The rings included witht he Wiseco pistons were garbage. the top gap out of the box was 0.025" and the second was 0.026". Luckily I had a set of Mahle standard tension rings.
Next I assembled the rods and pistons and installed them...
All in!
Next I check rotatinf clearance on the pan. The only clearancing I had to do was for my Lokar dipstick..
Oil pan on!
All done for the night...
04-24-2012, 09:41 PM
#80
Senior Member
iTrader: (1)

Join Date: Apr 2011
Location: Pennsylvania
Posts: 714
Likes: 0
Received 1 Like
on
1 Post
Car: '91 Camaro RS
Engine: Carb'd 383
Transmission: Built T5
Axle/Gears: 3.73 Posi
Re: My 1986 IROC build thread *PIC HEAVY*
Great thread, the only thing I hate about these fast moving threads is how jealous it makes me when I have to wait so long in between parts coming haha
04-27-2012, 07:23 PM
#82
Senior Member
Join Date: Jul 2011
Location: FL
Posts: 834
Likes: 0
Received 0 Likes
on
0 Posts
Engine: 355 Super Charged
Transmission: B&M Streetfighter
Axle/Gears: 4th gen 342
Re: My 1986 IROC build thread *PIC HEAVY*
This is the way to build a motor, all tollerences and clearences double checked; every thing balanced, great job
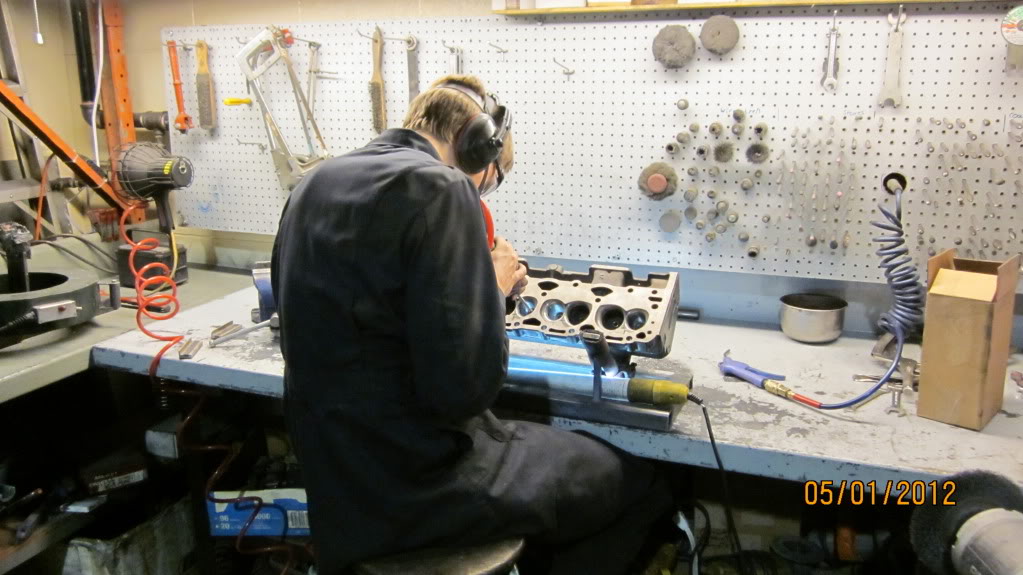
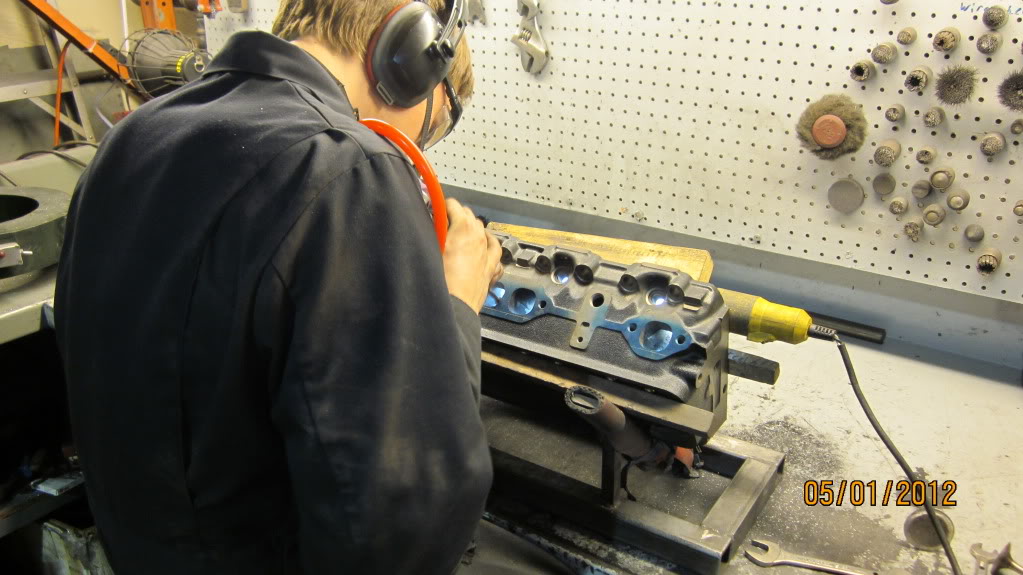
05-01-2012, 04:10 PM
#84
Senior Member
Thread Starter
iTrader: (1)
Join Date: Sep 2006
Location: Canada
Posts: 962
Likes: 0
Received 13 Likes
on
10 Posts
Car: 1979 Malibu
Engine: Blown LSx
Transmission: T56 Magnum
Axle/Gears: 9"/wavetrac/35's/3.70
Re: My 1986 IROC build thread *PIC HEAVY*
Finally got more accomplished last night, not alot, but something...
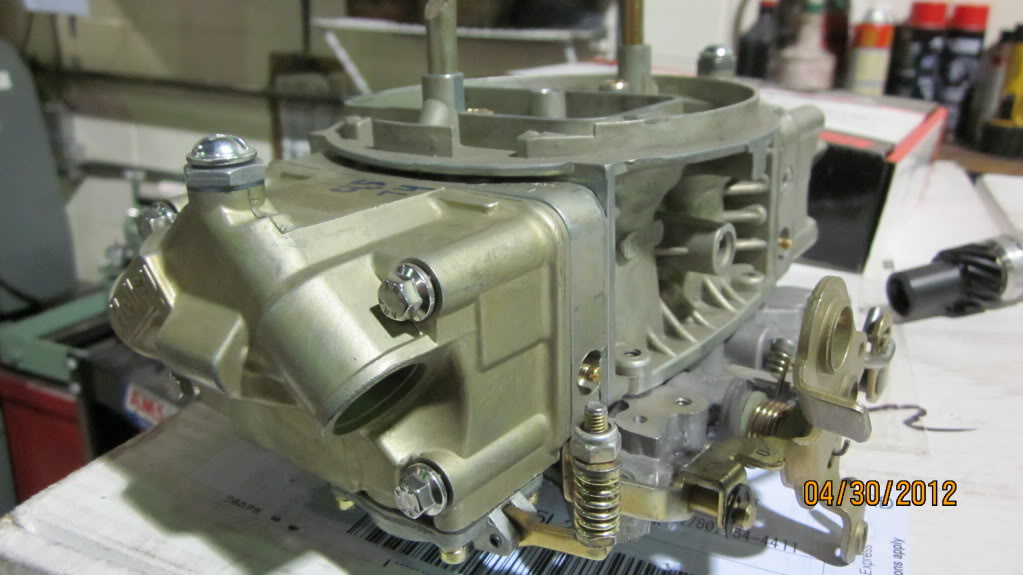
Made some changes to the carb as per the reccomendation from john at AED. knock down the jetting and installed a 4.5" PV in the rear. Also installed some ARP stainless float bowl screws.
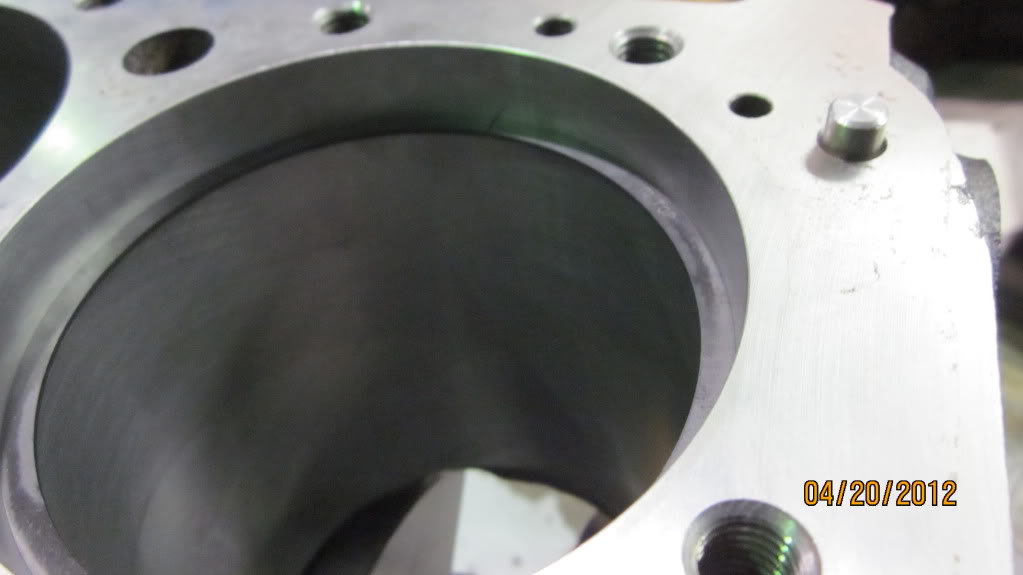
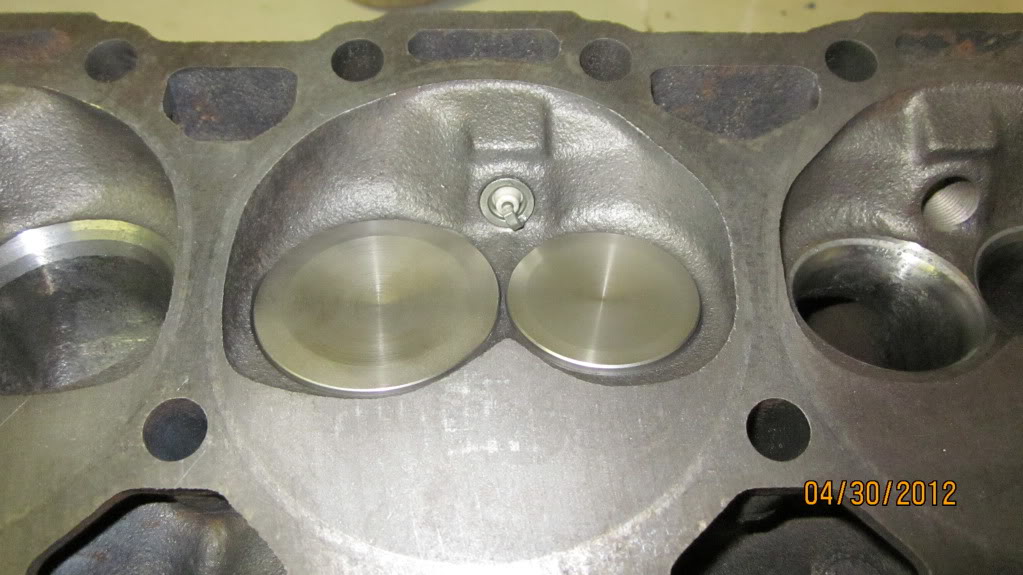
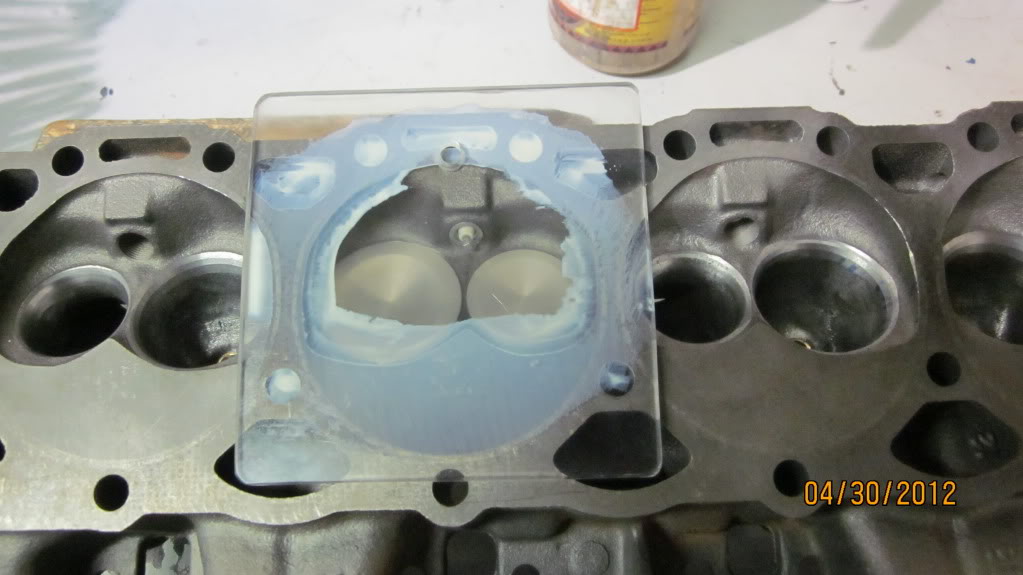
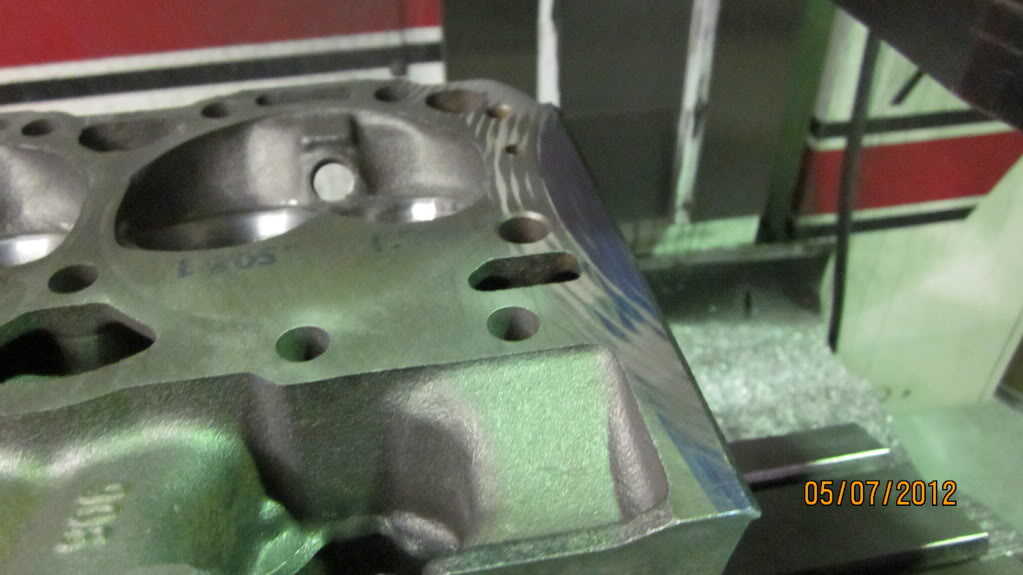
Also CC'd the chambers to get an idea where I was sitting with my compression ratio before we surface the heads. Came in at 61.2/61.4cc's which left my compression at 10.3:1.
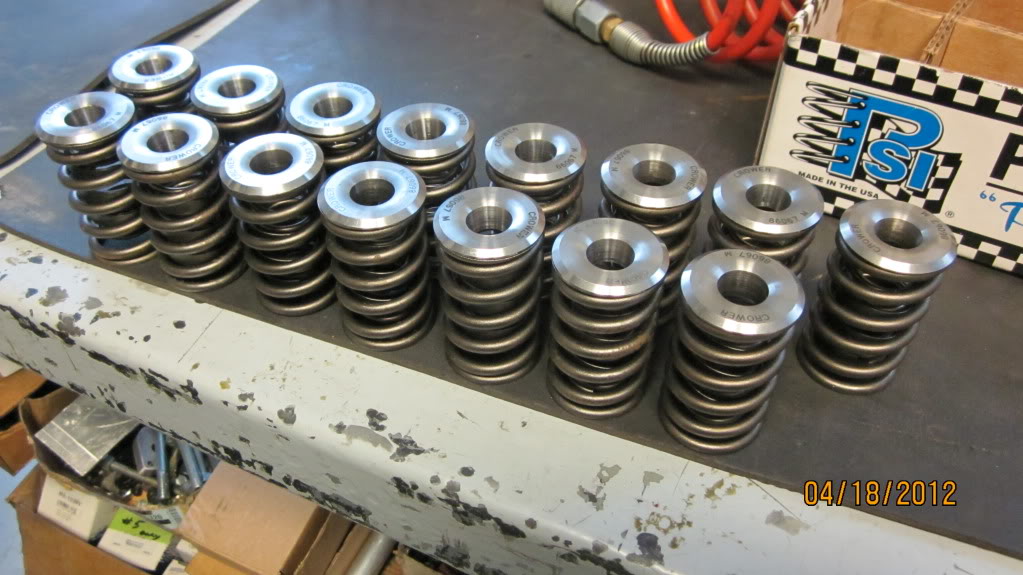
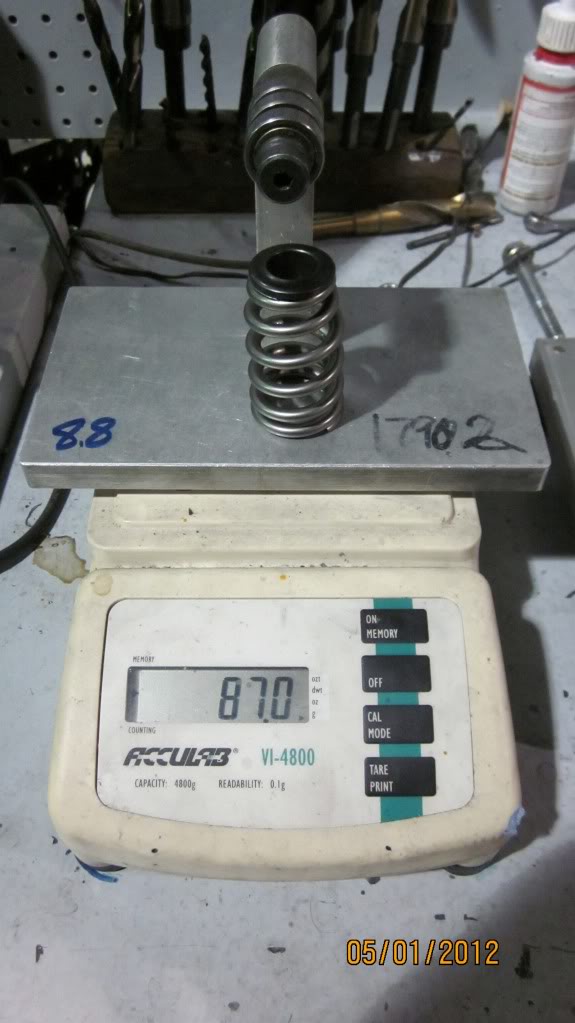
I also got a smokin deal on a set of Crower 1.6 7/16" stud steel roller rockers, which meant I had to change my valve springs, went to a comp cams 26918-16 beehive with a steel retainer, PPP keepers and locators.
More to come tonight!
Made some changes to the carb as per the reccomendation from john at AED. knock down the jetting and installed a 4.5" PV in the rear. Also installed some ARP stainless float bowl screws.
Also CC'd the chambers to get an idea where I was sitting with my compression ratio before we surface the heads. Came in at 61.2/61.4cc's which left my compression at 10.3:1.
I also got a smokin deal on a set of Crower 1.6 7/16" stud steel roller rockers, which meant I had to change my valve springs, went to a comp cams 26918-16 beehive with a steel retainer, PPP keepers and locators.
More to come tonight!
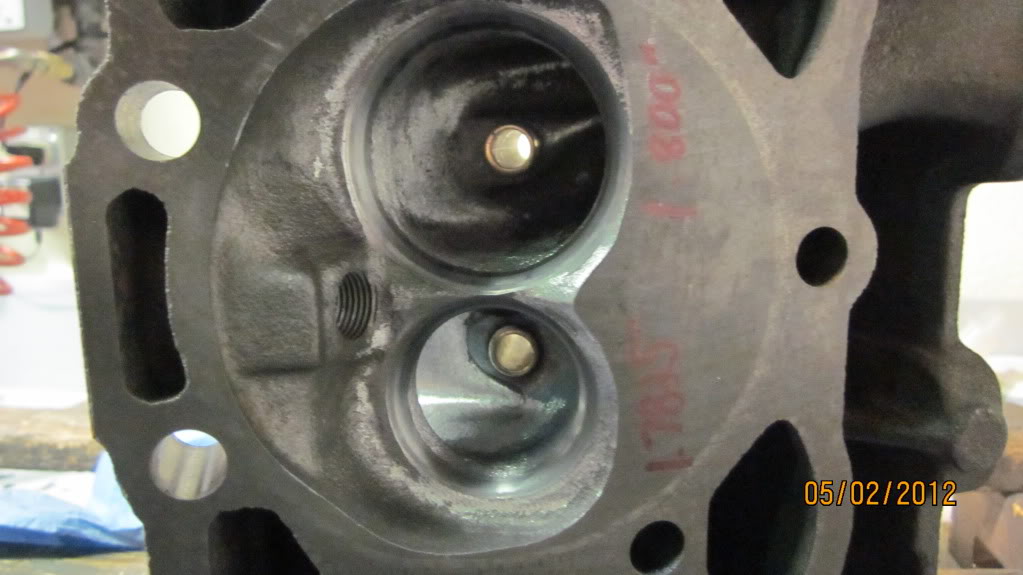
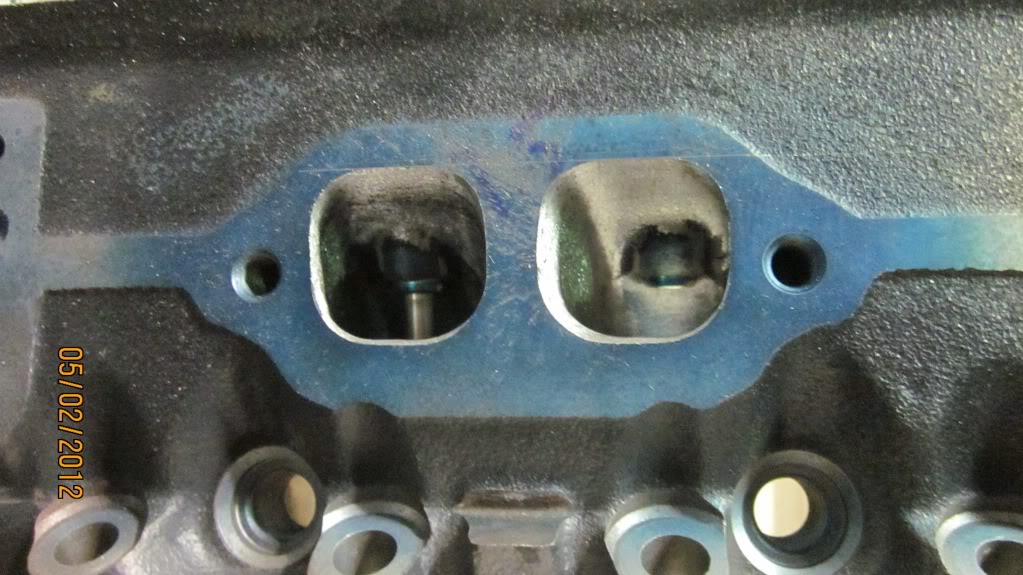
05-02-2012, 12:42 PM
#85
Senior Member
Thread Starter
iTrader: (1)
Join Date: Sep 2006
Location: Canada
Posts: 962
Likes: 0
Received 13 Likes
on
10 Posts
Car: 1979 Malibu
Engine: Blown LSx
Transmission: T56 Magnum
Axle/Gears: 9"/wavetrac/35's/3.70
Re: My 1986 IROC build thread *PIC HEAVY*
Another update...
Compared the weights of the new vs. old valve spring/retainers. New ones are 44grams lighter!
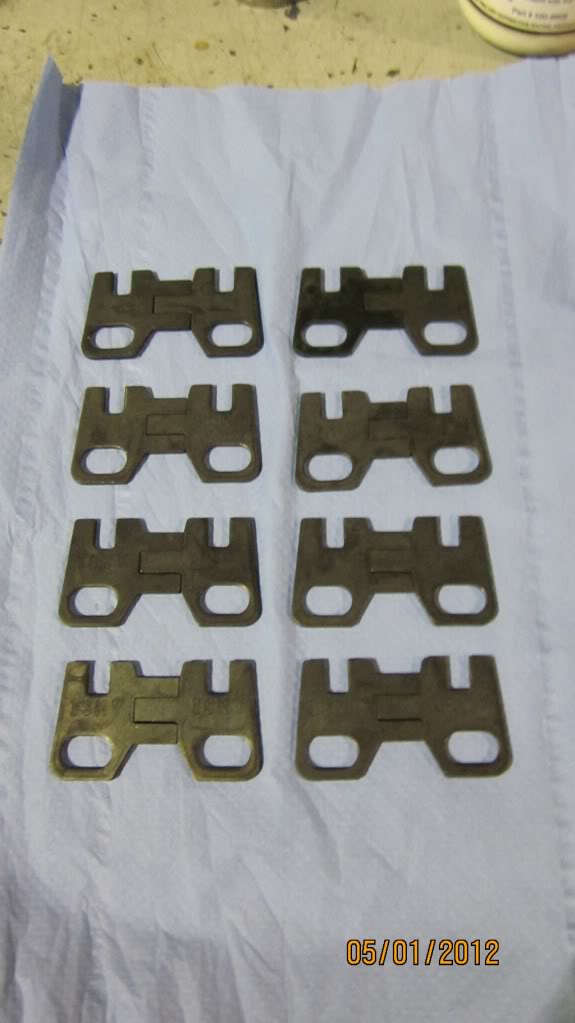
Also got a set of ISKY adjustable guideplates to have better control of where the rocker arm tip is going to sit.
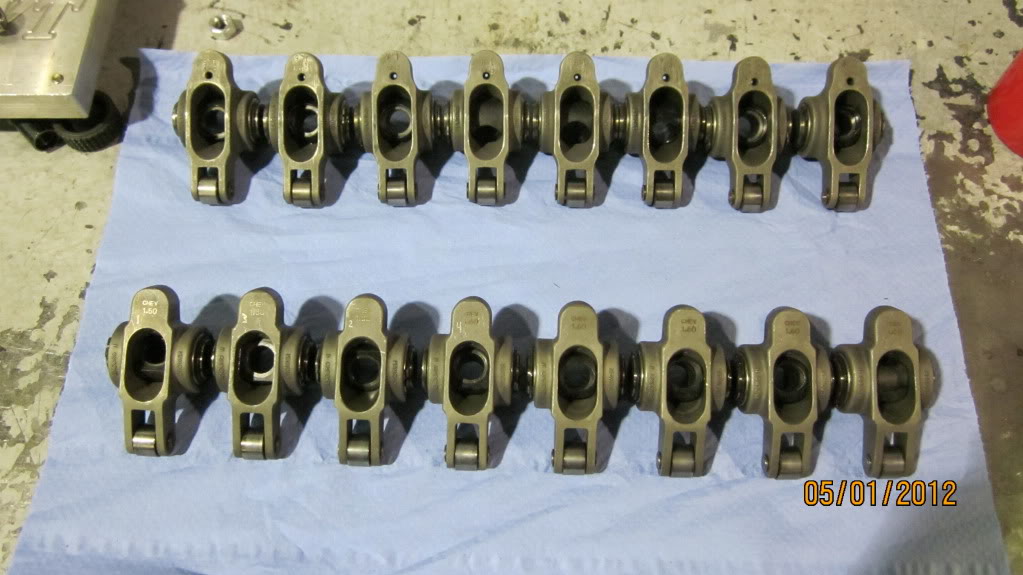
Crower stainless body 1.6 ratio 7/16" stud rocker arms.
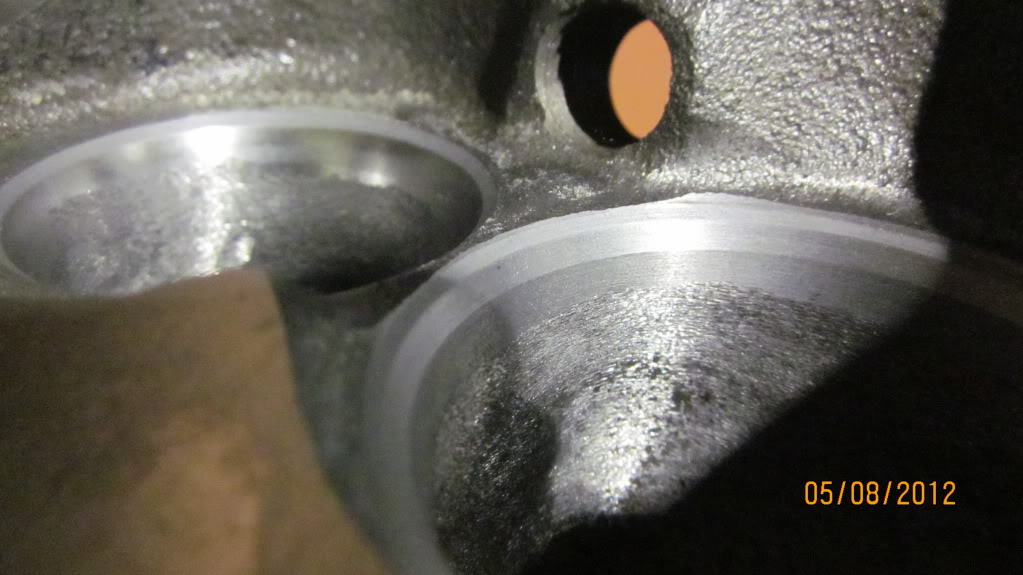
My head guy also finished up the porting, there is just some very minor cleanup left to do now.
We raised the roof of the exhaust ports aprox. 0.075" and opened up the port around the guide.
Compared the weights of the new vs. old valve spring/retainers. New ones are 44grams lighter!
Also got a set of ISKY adjustable guideplates to have better control of where the rocker arm tip is going to sit.
Crower stainless body 1.6 ratio 7/16" stud rocker arms.
My head guy also finished up the porting, there is just some very minor cleanup left to do now.
We raised the roof of the exhaust ports aprox. 0.075" and opened up the port around the guide.
05-04-2012, 12:52 AM
#87
Senior Member
Thread Starter
iTrader: (1)
Join Date: Sep 2006
Location: Canada
Posts: 962
Likes: 0
Received 13 Likes
on
10 Posts
Car: 1979 Malibu
Engine: Blown LSx
Transmission: T56 Magnum
Axle/Gears: 9"/wavetrac/35's/3.70
Re: My 1986 IROC build thread *PIC HEAVY*
Another update.
Random shot after I bolted up the water pump.
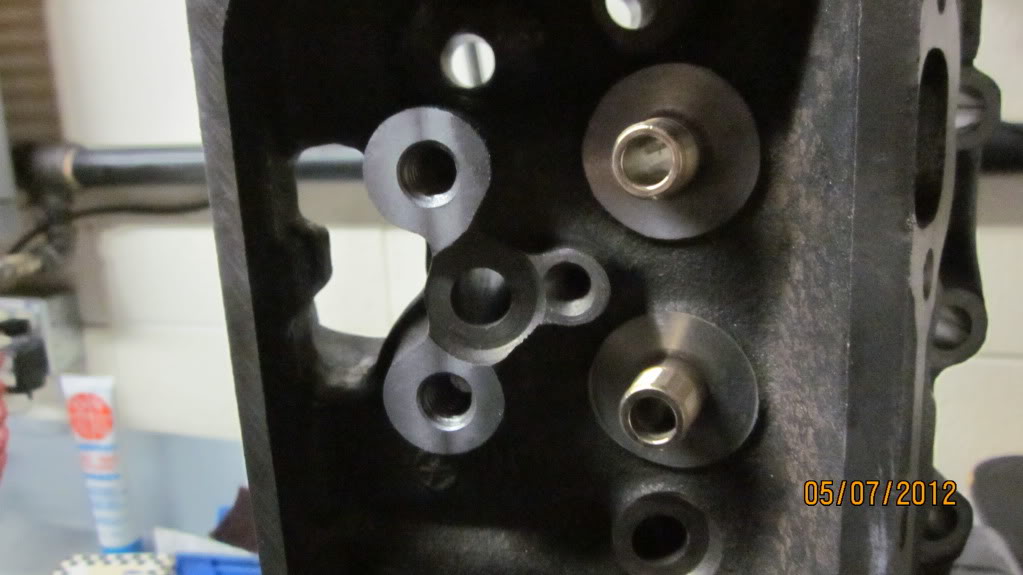
Cut the spring pockets to a 1.350" OD to fit my PPP locators and comp beehive springs.

Since Im going to try and put a 3/8" pushrod in this engine I ground out a bunch of meat in the pushrod area which ate up alot of time...
Random shot after I bolted up the water pump.
Cut the spring pockets to a 1.350" OD to fit my PPP locators and comp beehive springs.
Since Im going to try and put a 3/8" pushrod in this engine I ground out a bunch of meat in the pushrod area which ate up alot of time...
05-08-2012, 11:08 AM
#89
Senior Member
Thread Starter
iTrader: (1)
Join Date: Sep 2006
Location: Canada
Posts: 962
Likes: 0
Received 13 Likes
on
10 Posts
Car: 1979 Malibu
Engine: Blown LSx
Transmission: T56 Magnum
Axle/Gears: 9"/wavetrac/35's/3.70
Re: My 1986 IROC build thread *PIC HEAVY*
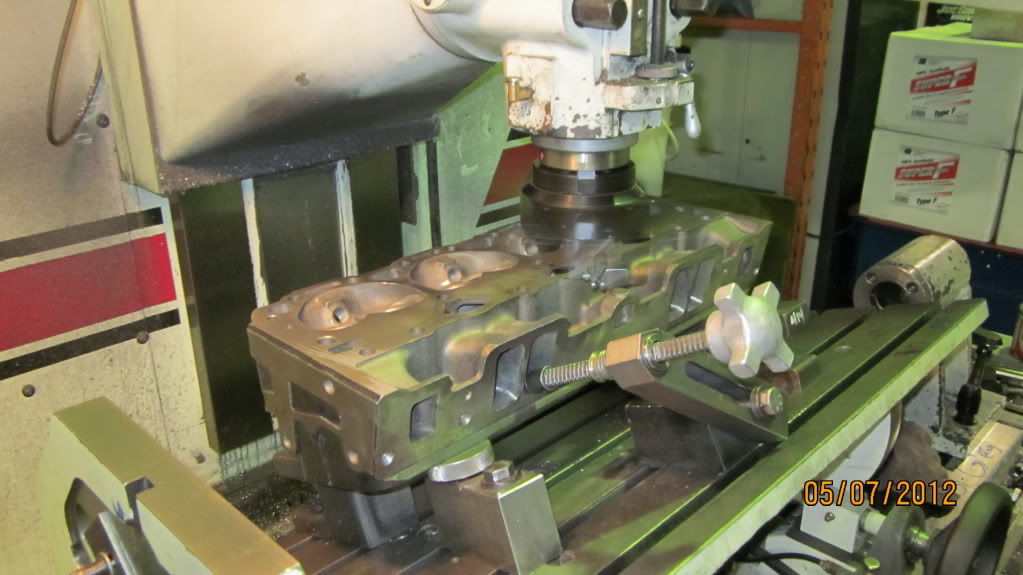
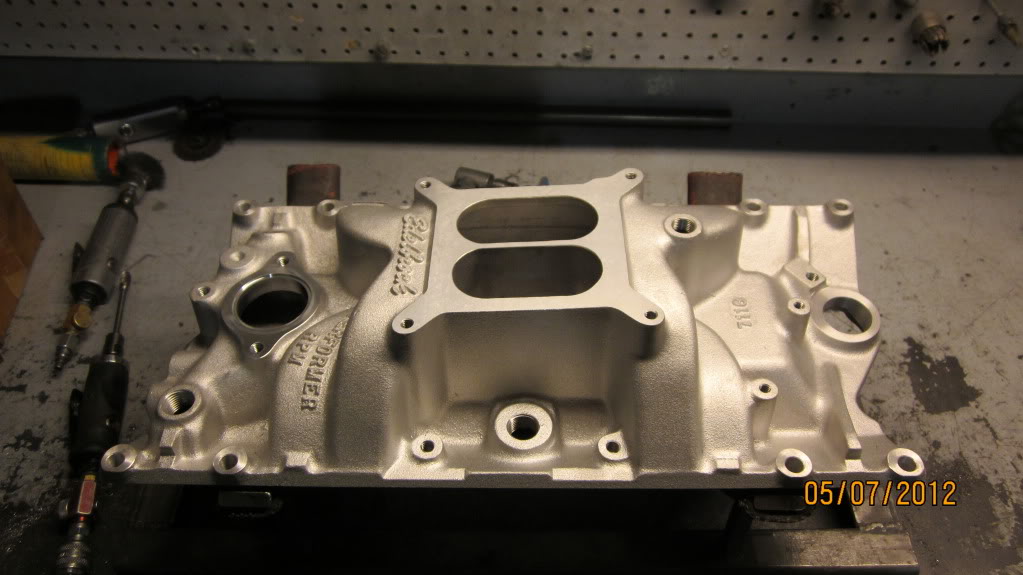
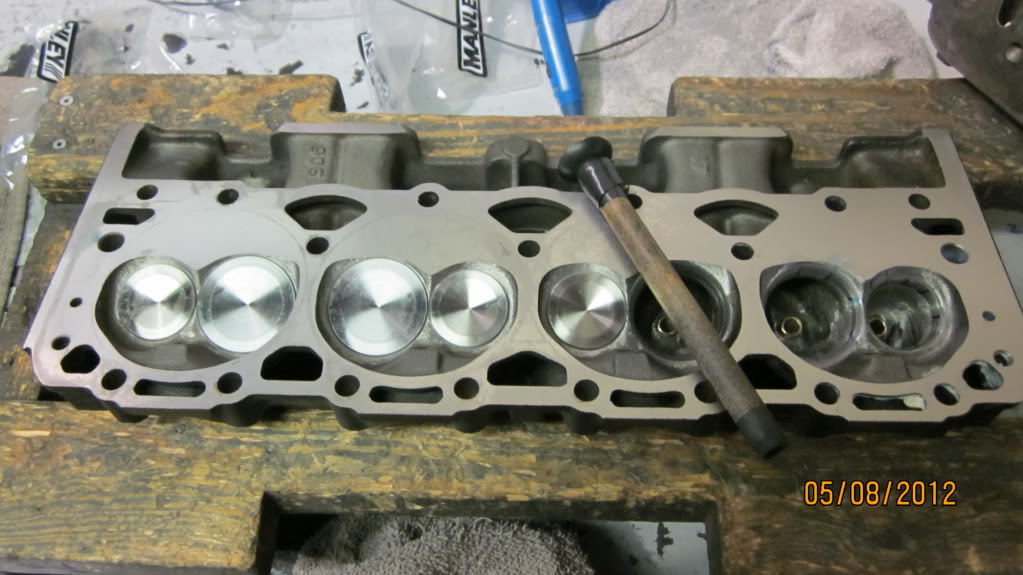
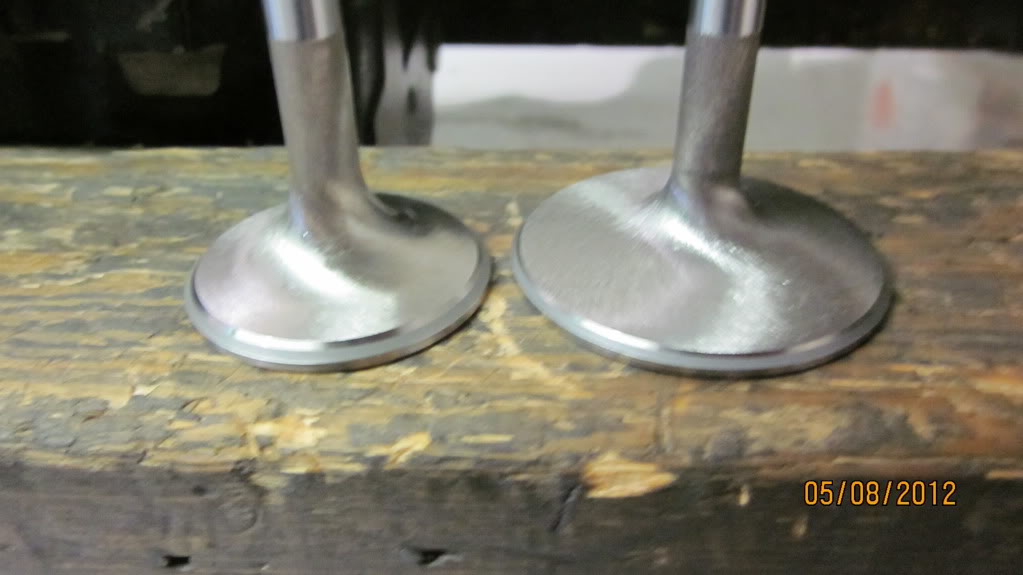
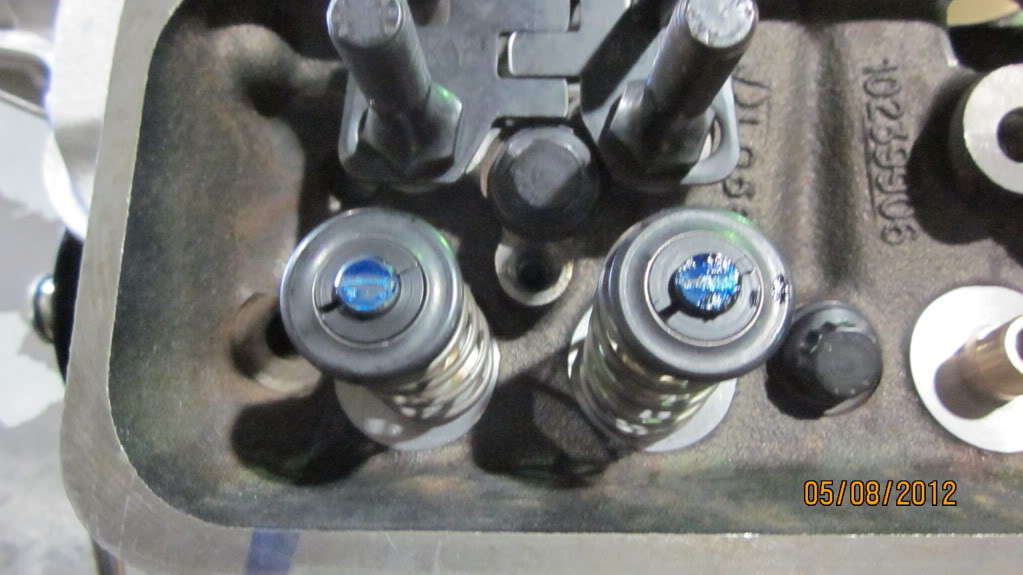
Got the heads sufaced last night, took 0.006" to clean them up. Also milled .400" off the rocker stud bosses. Just waiting on the +0.100" longer valves(didnt have enough installed height...) then I cal lap the valves, set my guide clearances and do my mock assembly to figure out PR length and piston to vavle. Then the rest of the engine can go together and get dynoed!

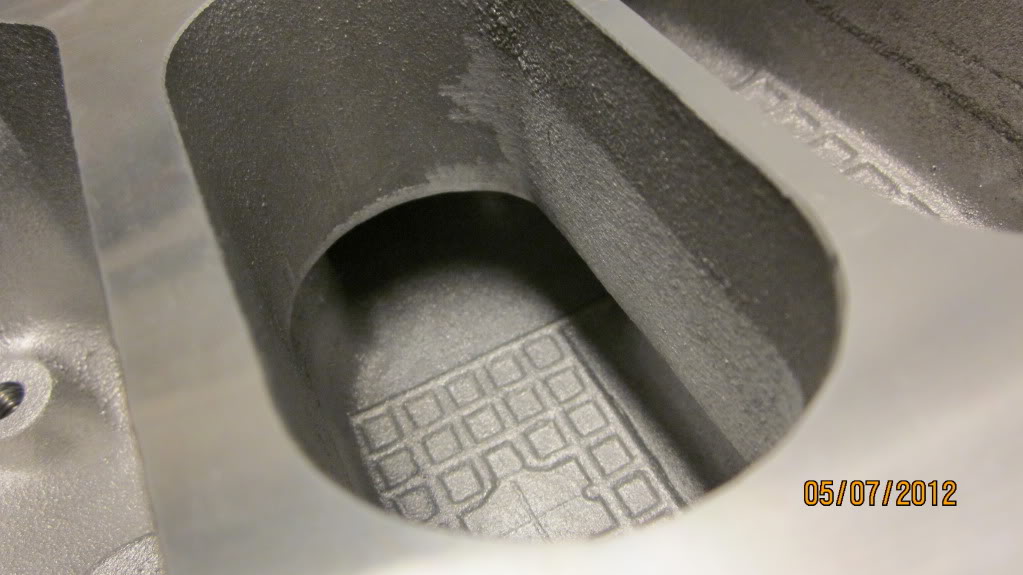
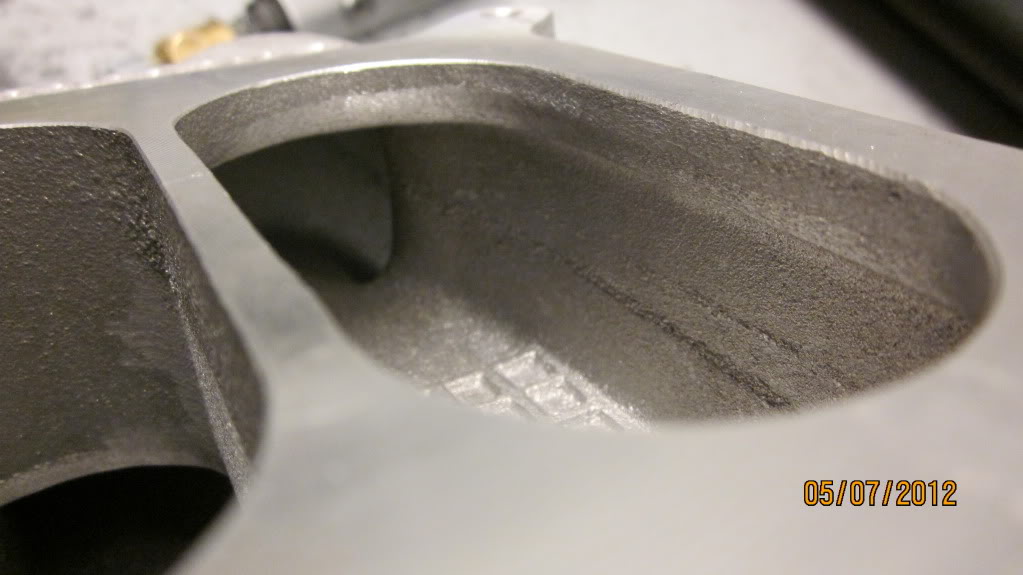
Also did some minor porting/cleanup on the Perf RPM intake.
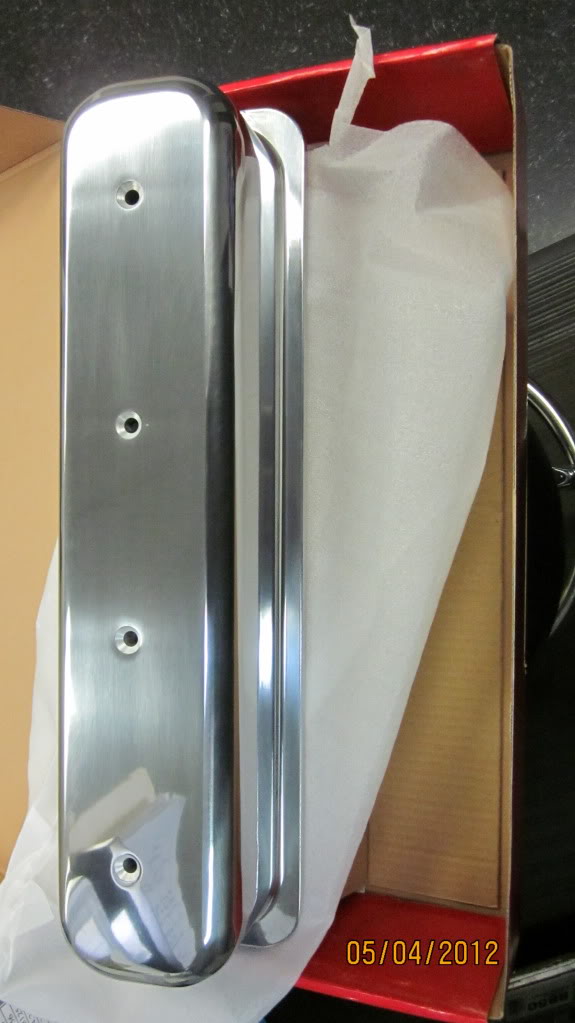
New polished aluminum valve covers
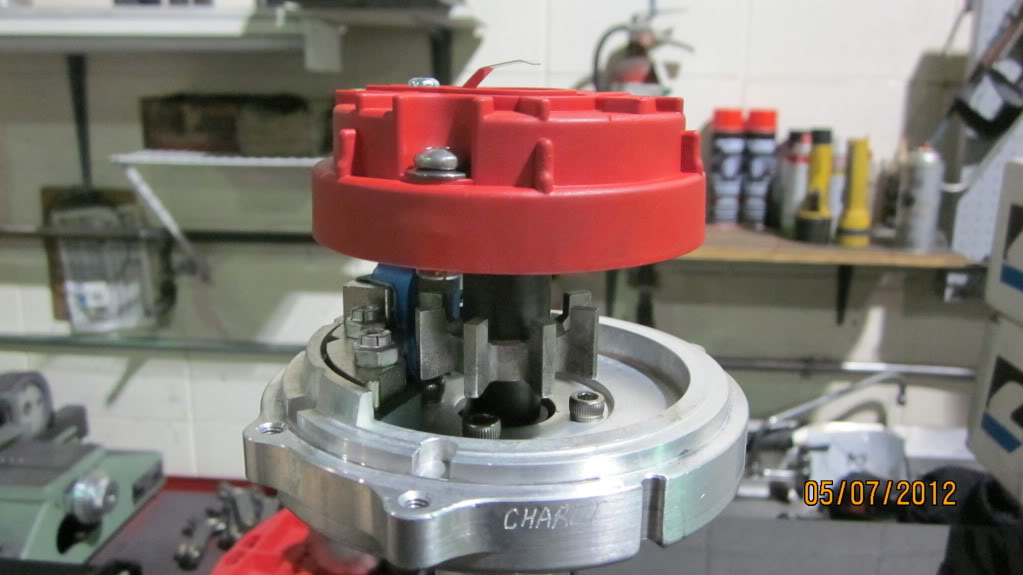
Also took a bunch of old MSD dist's and made one new one, had to put a new pickup into it and a cap and rotor, but its ready to go now!

More to come!
Also did some minor porting/cleanup on the Perf RPM intake.
New polished aluminum valve covers
Also took a bunch of old MSD dist's and made one new one, had to put a new pickup into it and a cap and rotor, but its ready to go now!
More to come!
05-09-2012, 11:49 PM
#90
Senior Member

Join Date: Feb 2008
Location: annapolis MD
Posts: 805
Likes: 0
Received 0 Likes
on
0 Posts
Car: 1986 IROC-Z28
Re: My 1986 IROC build thread *PIC HEAVY*
damn photobucket....try using another site to host your pics...I use www.imgur.com a lot, it's great
05-10-2012, 11:31 AM
#91
Senior Member
Thread Starter
iTrader: (1)
Join Date: Sep 2006
Location: Canada
Posts: 962
Likes: 0
Received 13 Likes
on
10 Posts
Car: 1979 Malibu
Engine: Blown LSx
Transmission: T56 Magnum
Axle/Gears: 9"/wavetrac/35's/3.70
Re: My 1986 IROC build thread *PIC HEAVY*
damn photobucket....try using another site to host your pics...I use www.imgur.com a lot, it's great
05-10-2012, 11:45 AM
#92
Senior Member
Thread Starter
iTrader: (1)
Join Date: Sep 2006
Location: Canada
Posts: 962
Likes: 0
Received 13 Likes
on
10 Posts
Car: 1979 Malibu
Engine: Blown LSx
Transmission: T56 Magnum
Axle/Gears: 9"/wavetrac/35's/3.70
Re: My 1986 IROC build thread *PIC HEAVY*
Tuesday night i got a fair bit accomplished, started by mounting all the gauges in the covans panel, going to wire them up soon.

Next I lapped in the new Manley stainless valves
Then I did my mock assembly, brow clearance was good, so I figured out my pushrod lengths (7.300") and then checked my piston to valve. I had over .140" PTV clearance on both the intake and exhaust. I didnt have room for a 3/8" pushrod so I ordered a set of Manton 5/16" x 0.118" wall pushrods.
05-10-2012, 11:54 AM
#93
Want a title? Post!

Join Date: Apr 2012
Location: Bradford,MA
Posts: 0
Likes: 0
Received 0 Likes
on
0 Posts
Car: 1986 IROC-Z
Engine: 5.7L TPI
Axle/Gears: 3.43
Re: My 1986 Z28
wow man u should have kept the original motor the way it was looks good mine used to look like that im new to the site currently restoring a 86 iroc-z myself yours is gona be nice when your done
05-10-2012, 12:14 PM
#94
Senior Member
Thread Starter
iTrader: (1)
Join Date: Sep 2006
Location: Canada
Posts: 962
Likes: 0
Received 13 Likes
on
10 Posts
Car: 1979 Malibu
Engine: Blown LSx
Transmission: T56 Magnum
Axle/Gears: 9"/wavetrac/35's/3.70
Re: My 1986 IROC build thread *PIC HEAVY*
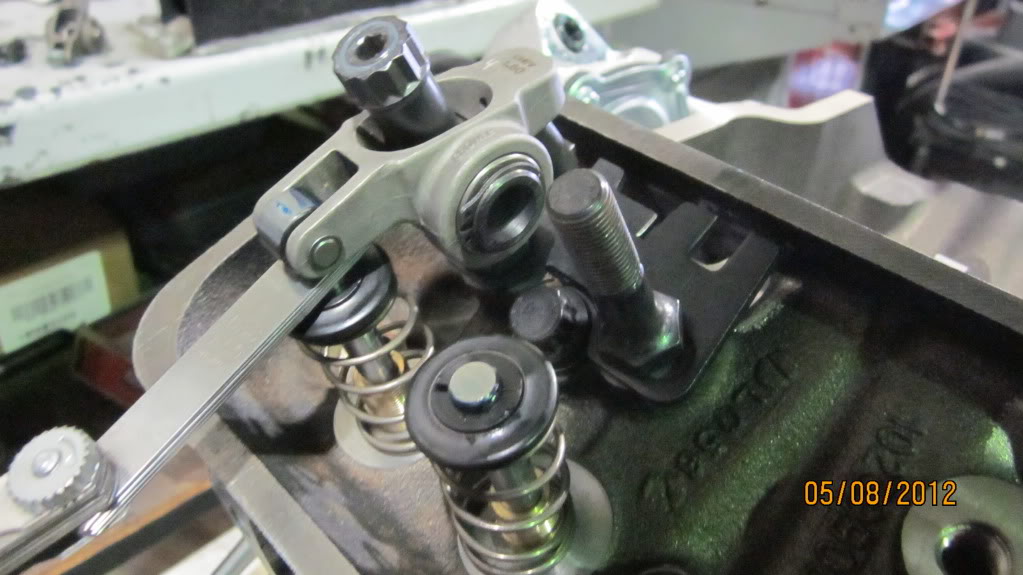
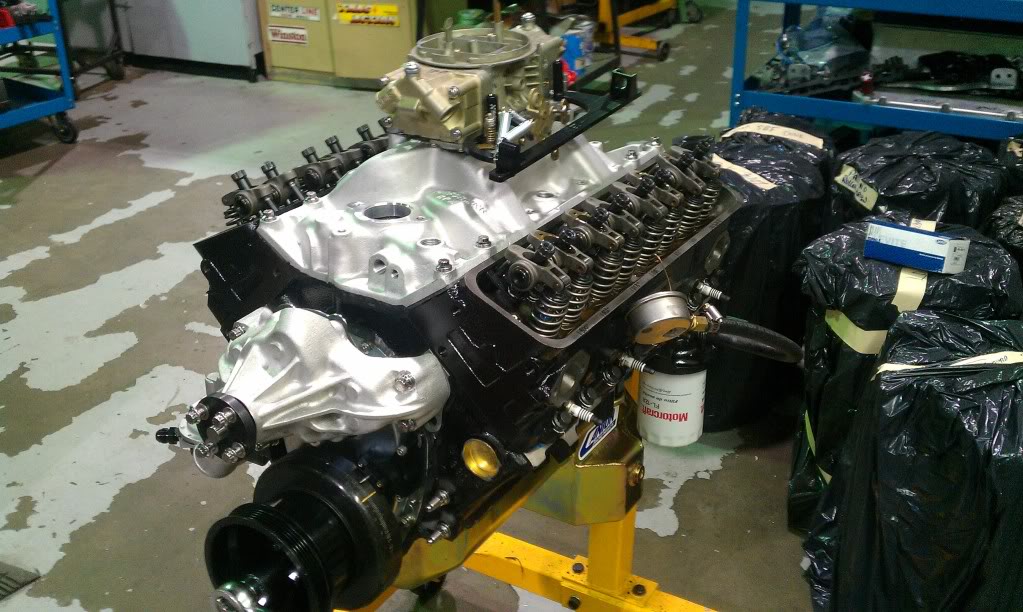
Last night I finally got to put the heads together, and got them on the engine. Also got all the adj. guideplates trimmed and fitted and got the rocker arms sitting nicely over the tip of the valve. Il probaly put the intake on friday and I should have pushrods next monday. I should be ready to dyno next weekend!

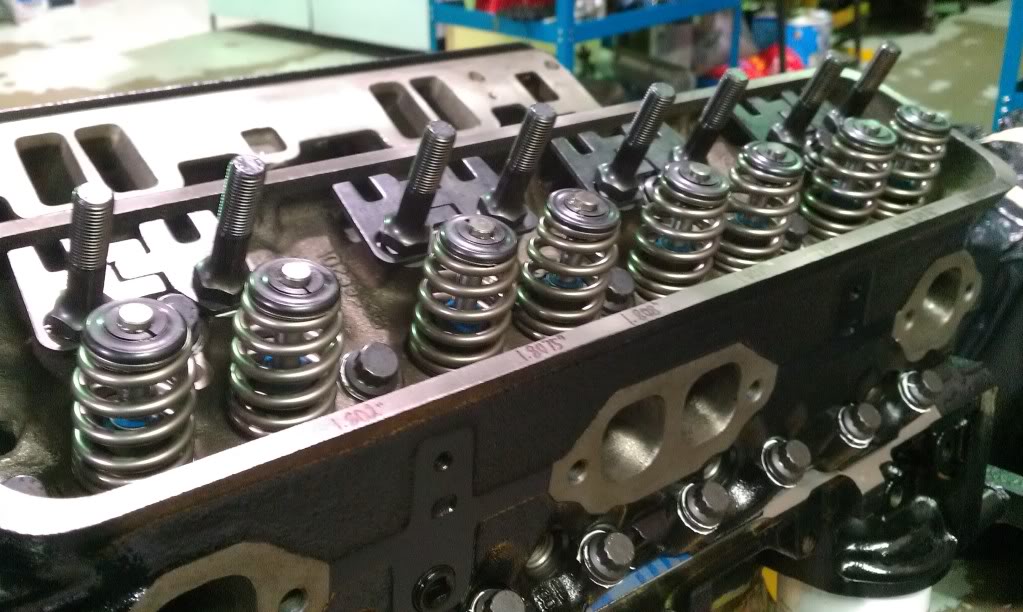
Checking port alignment...

Checking port alignment...
05-10-2012, 12:24 PM
#96
Junior Member

Join Date: Sep 2011
Location: Houston, Texas
Posts: 58
Likes: 0
Received 0 Likes
on
0 Posts
Car: 1986 Camaro
Engine: LS6
Transmission: Tick Stage 2 T56
Axle/Gears: Moser 12 Bolt
Re: My 1986 IROC build thread *PIC HEAVY*
Look at all the shiny! Love it! Such a quick build. Mine is taking for ever...
05-13-2012, 08:33 PM
#97
Senior Member
Thread Starter
iTrader: (1)
Join Date: Sep 2006
Location: Canada
Posts: 962
Likes: 0
Received 13 Likes
on
10 Posts
Car: 1979 Malibu
Engine: Blown LSx
Transmission: T56 Magnum
Axle/Gears: 9"/wavetrac/35's/3.70
Re: My 1986 IROC build thread *PIC HEAVY*
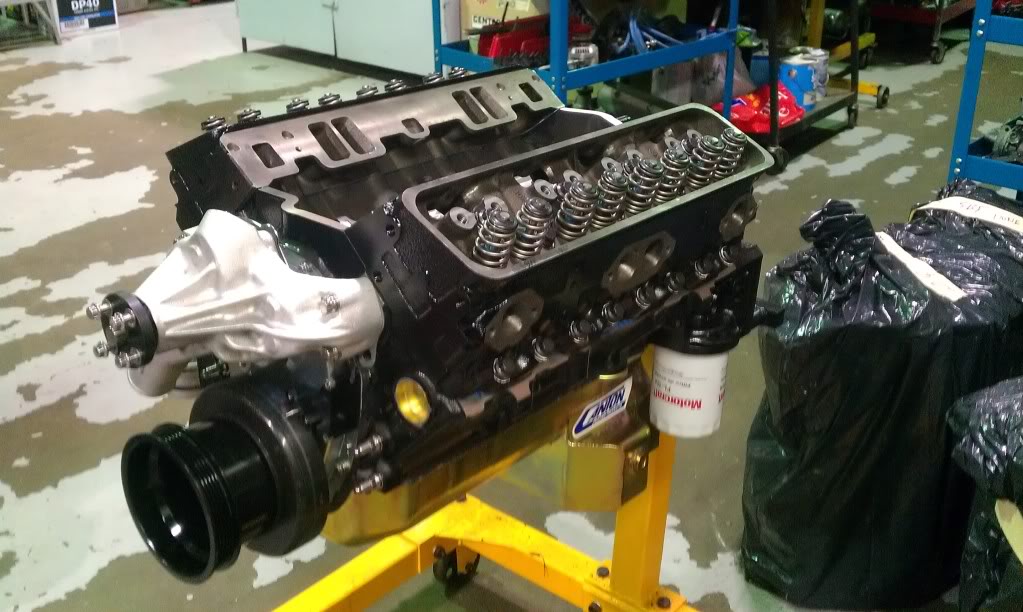
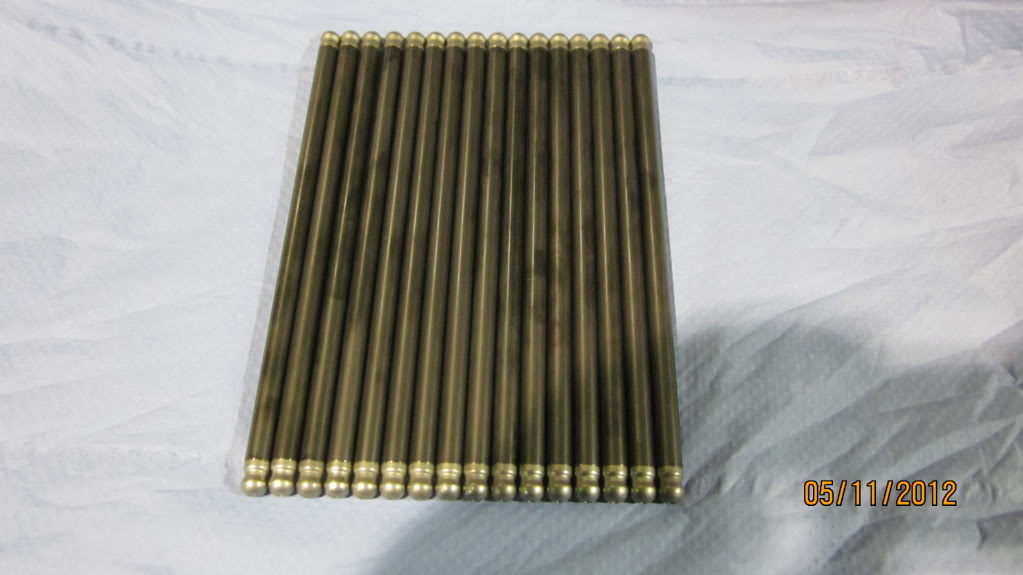
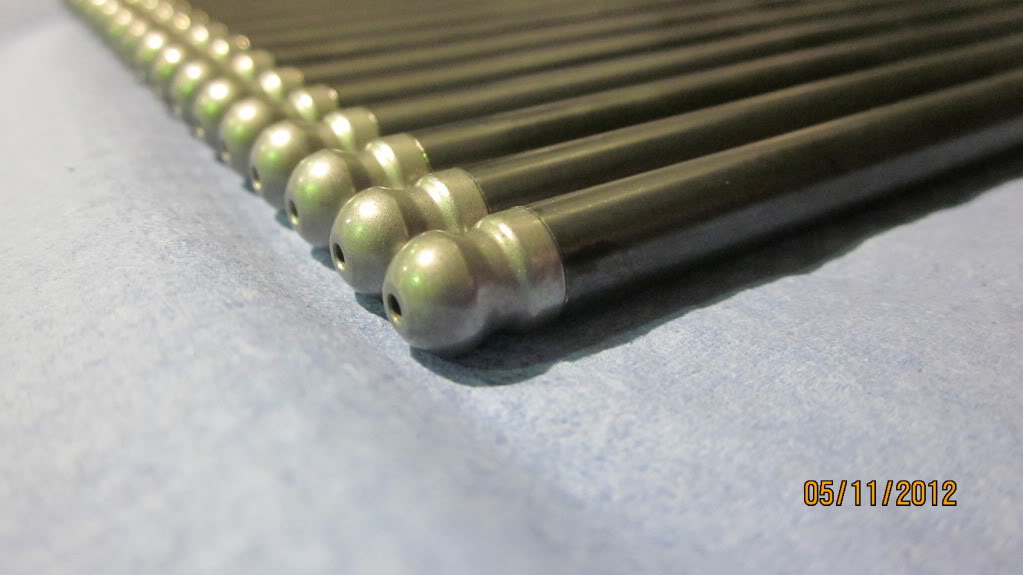
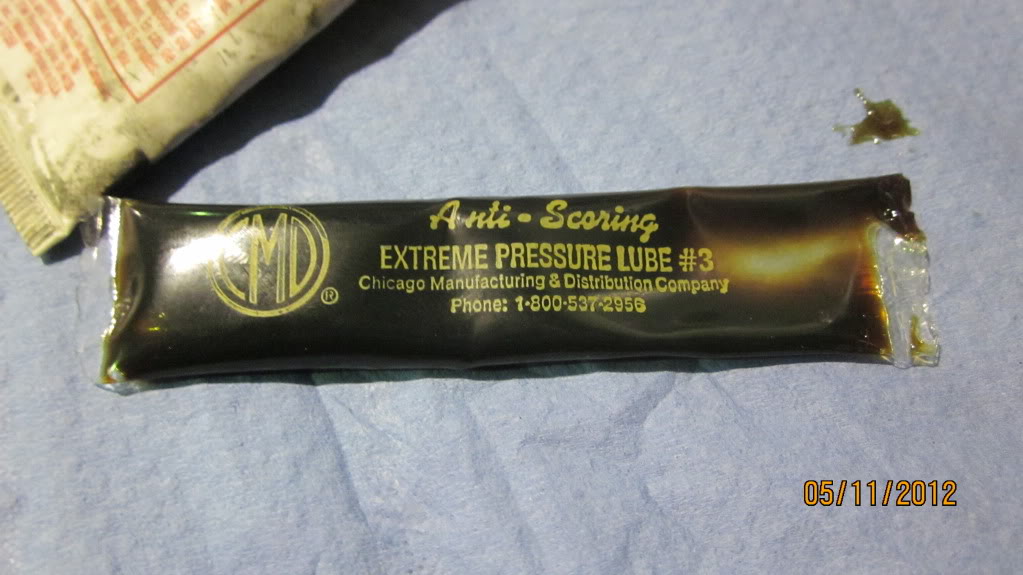
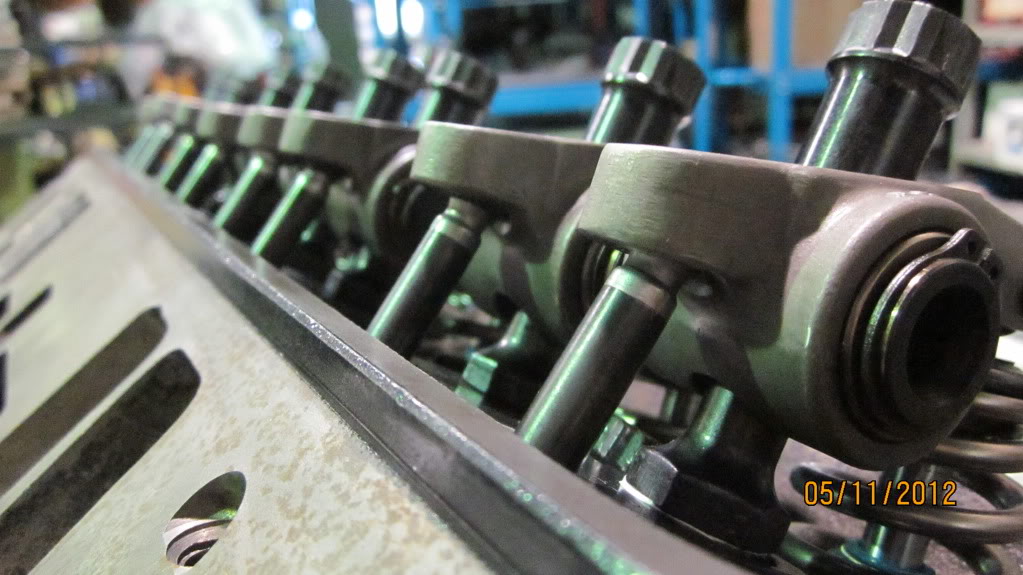
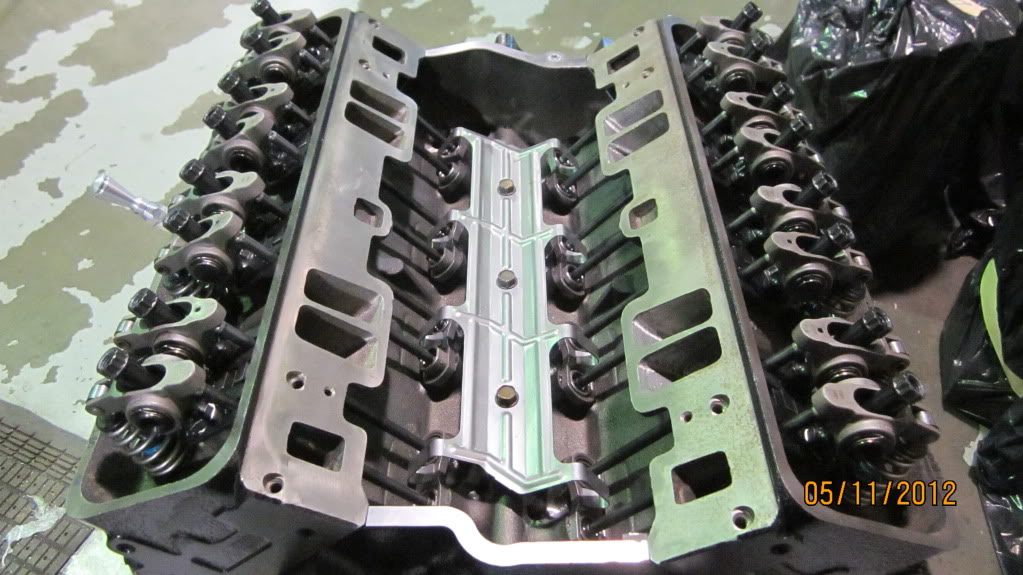
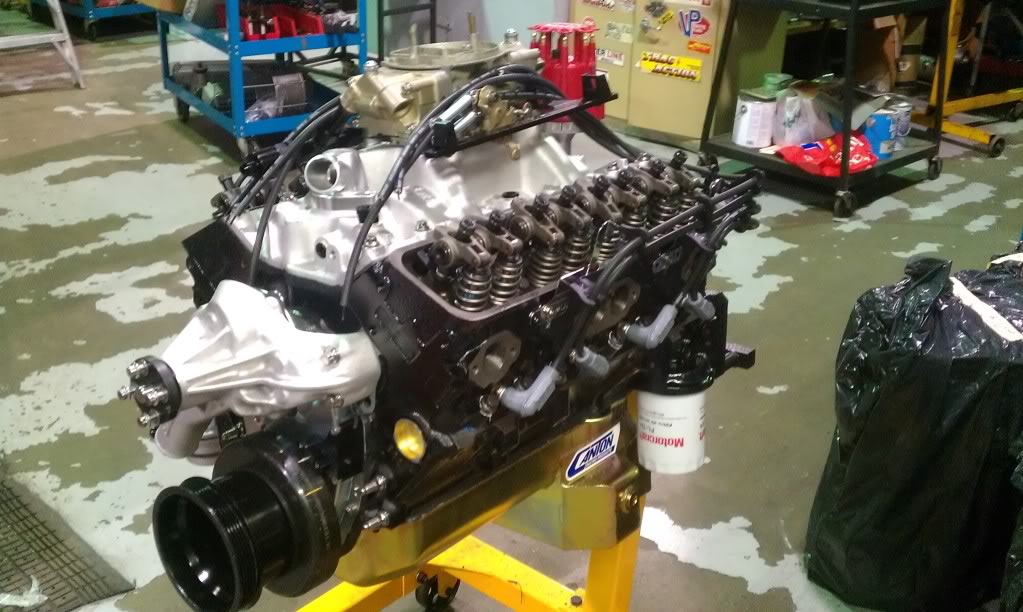
So my pushrods arrived on Friday rather than Monday, whcih gave me something to do this weekend. So Friday night I got to installing them.
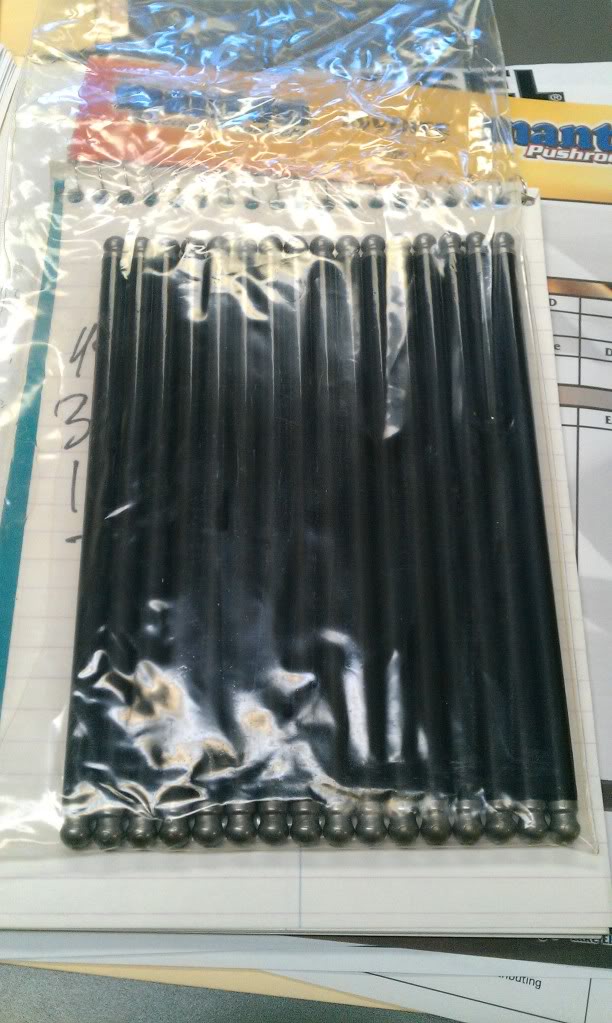
First thing I did was give them a good cleaning. Then I proceded to lube the tips of the pushrods and valve tips w/ EP-3 lube. This helps on initial startup. The pushrods themselves are Manton 5/16" 0.118" wall, 7.300" long.
All In!
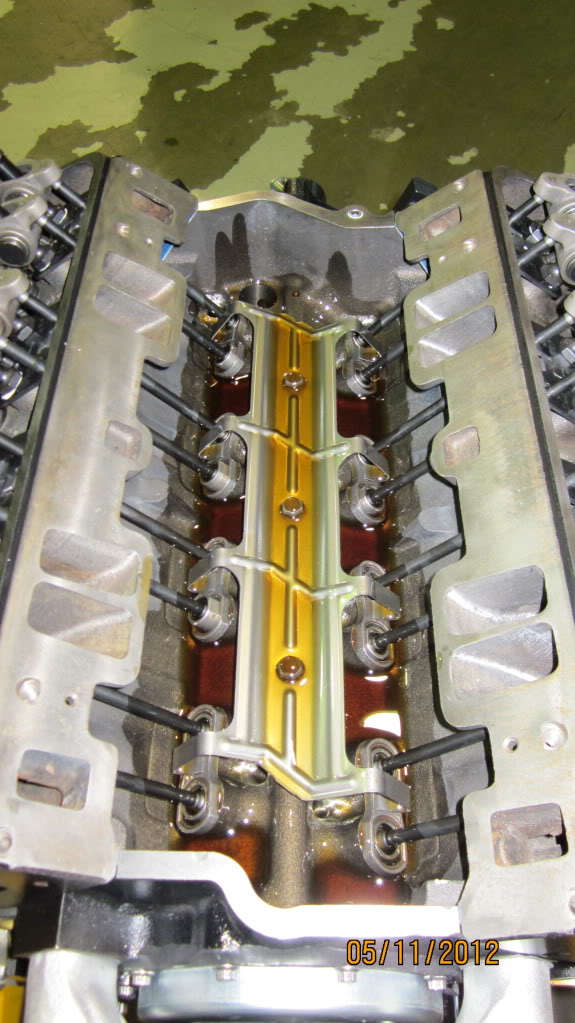
Next I dumped in 7L of Joe Gibbs breakin oil.
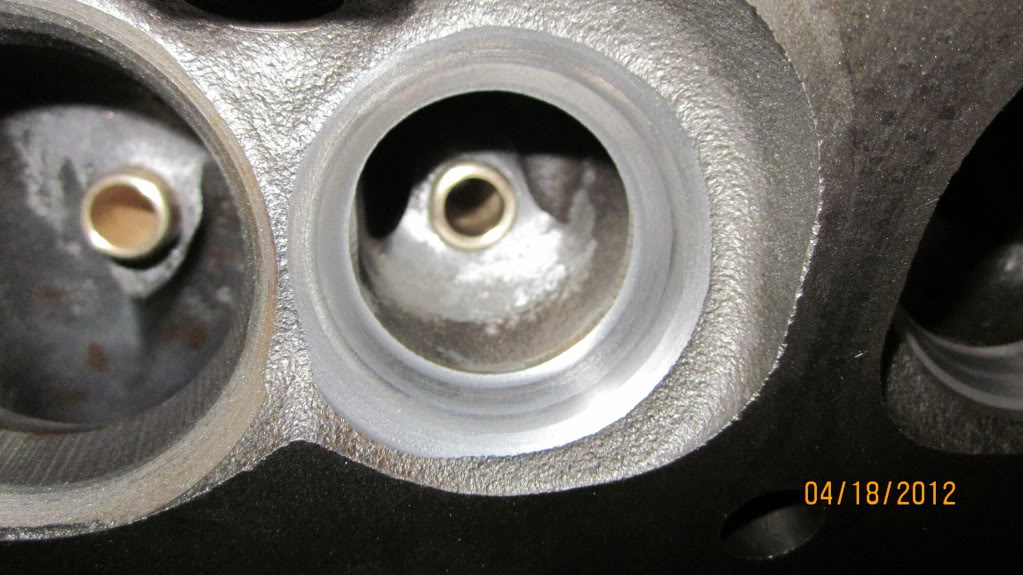
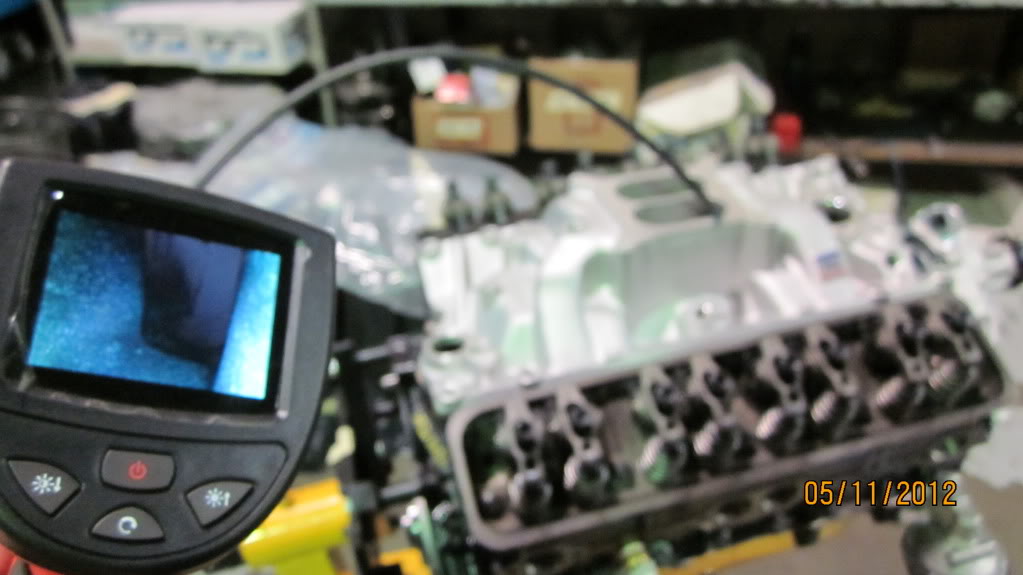
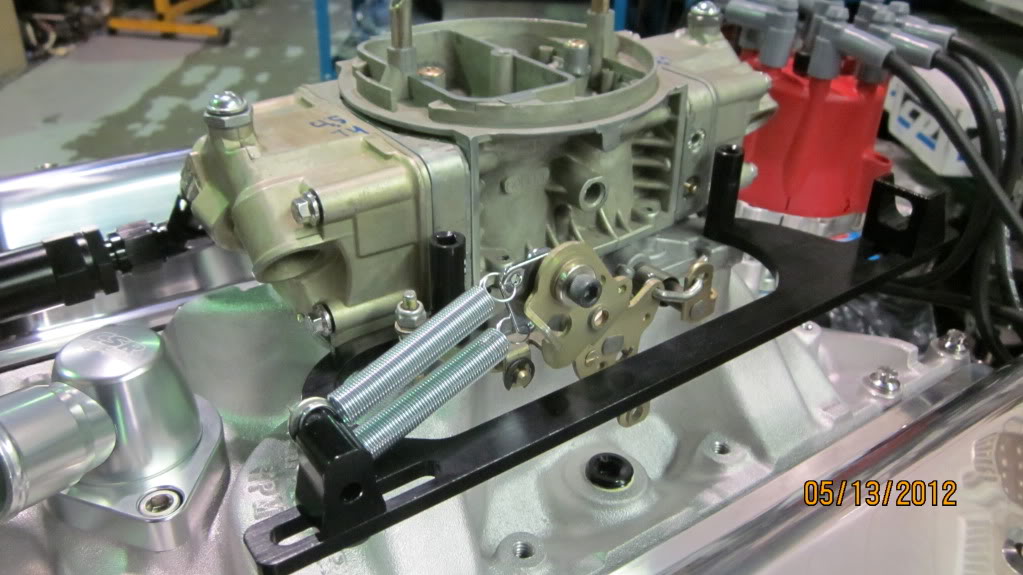
Next I dropped the intake on and checked my port alignment using a flexible camera...
The ports lined up nice so I proceded to seal up the intake. After that I primed it, had oil to all 16 rockers in about 15 seconds and had 60psi oil pressure.
First thing I did was give them a good cleaning. Then I proceded to lube the tips of the pushrods and valve tips w/ EP-3 lube. This helps on initial startup. The pushrods themselves are Manton 5/16" 0.118" wall, 7.300" long.
All In!
Next I dumped in 7L of Joe Gibbs breakin oil.
Next I dropped the intake on and checked my port alignment using a flexible camera...
The ports lined up nice so I proceded to seal up the intake. After that I primed it, had oil to all 16 rockers in about 15 seconds and had 60psi oil pressure.
05-13-2012, 08:41 PM
#98
Senior Member
Thread Starter
iTrader: (1)
Join Date: Sep 2006
Location: Canada
Posts: 962
Likes: 0
Received 13 Likes
on
10 Posts
Car: 1979 Malibu
Engine: Blown LSx
Transmission: T56 Magnum
Axle/Gears: 9"/wavetrac/35's/3.70
Re: My 1986 IROC build thread *PIC HEAVY*
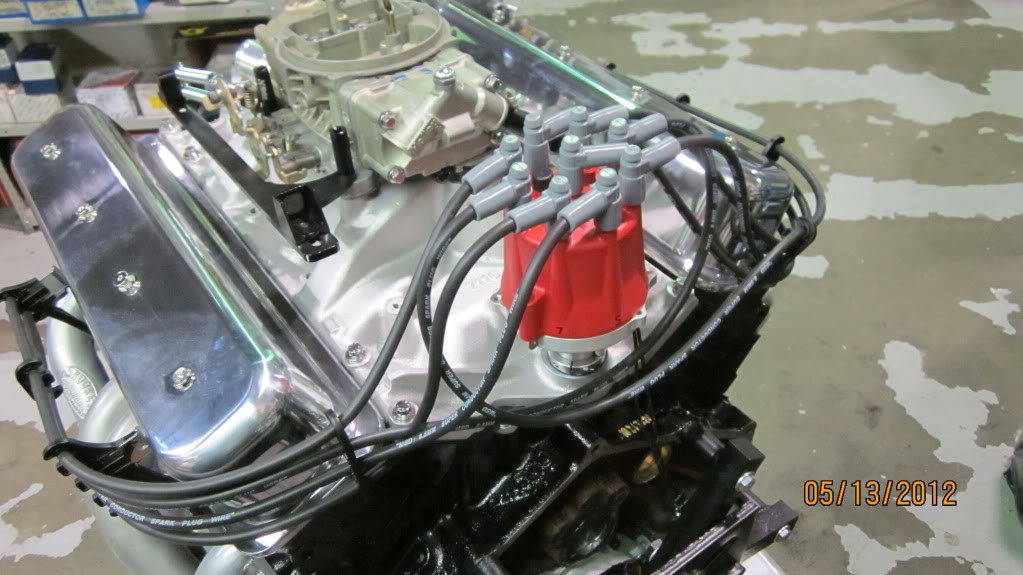
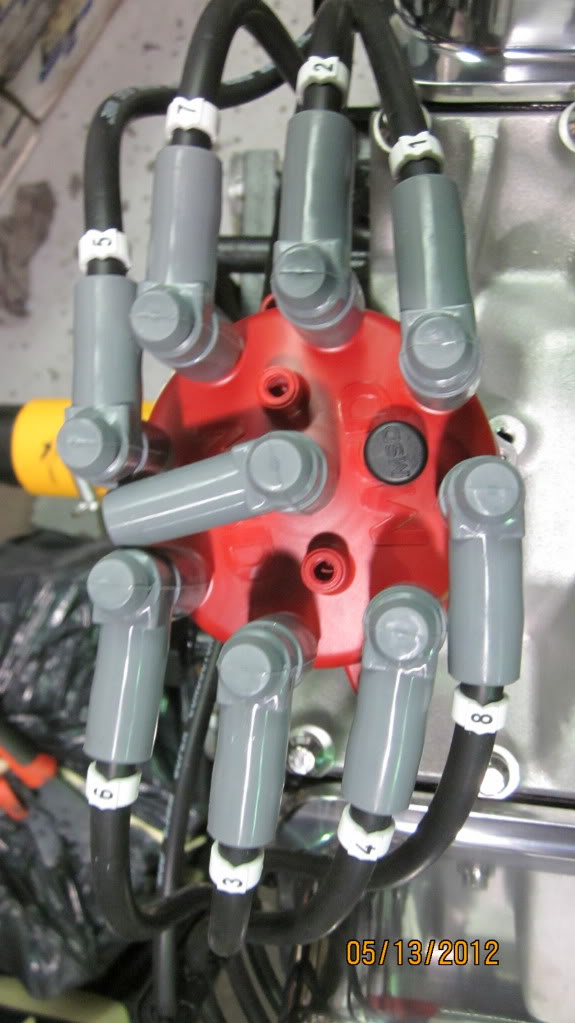
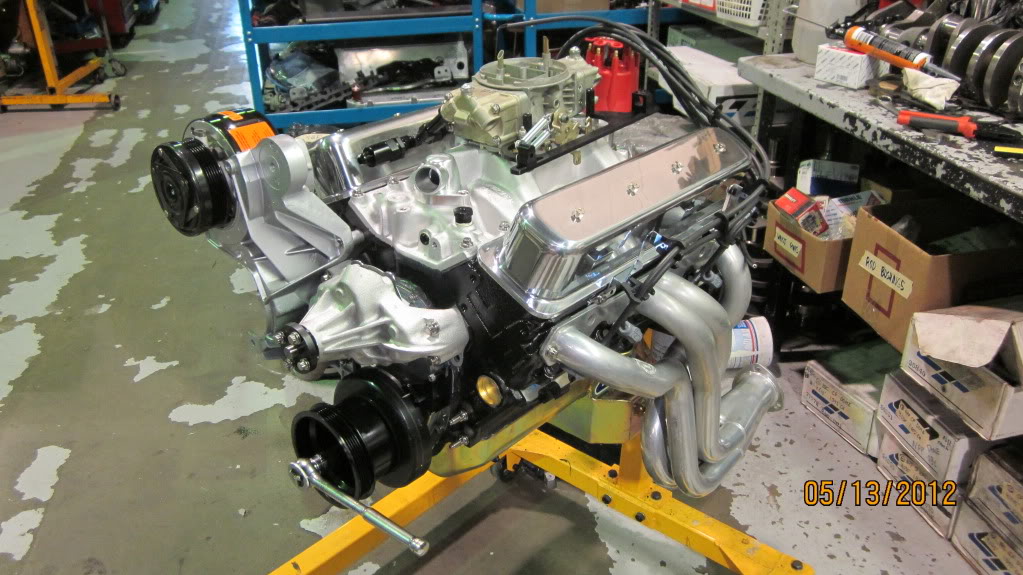
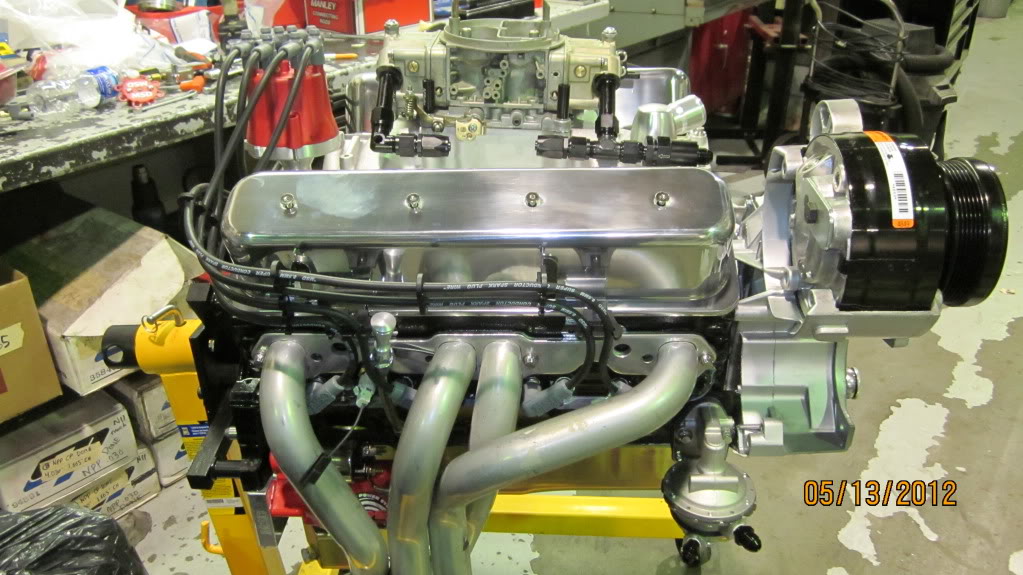
Dist installed, starting to make plug wires.
I was unsure of plug boot clearance so I bolted up the headers. Also threw the valve covers on to keep any potential crap out of the engine.
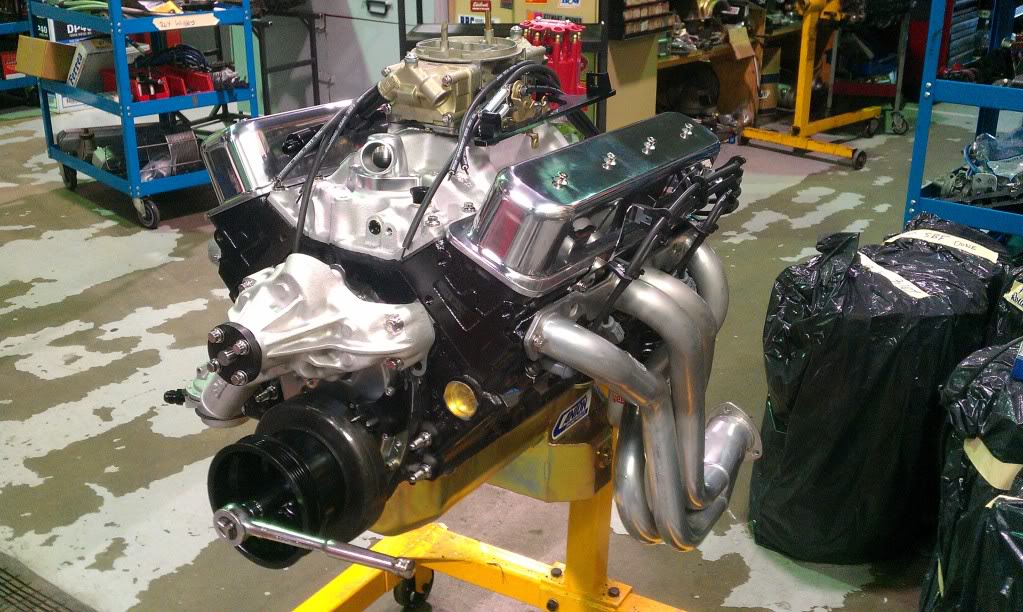
All Done.
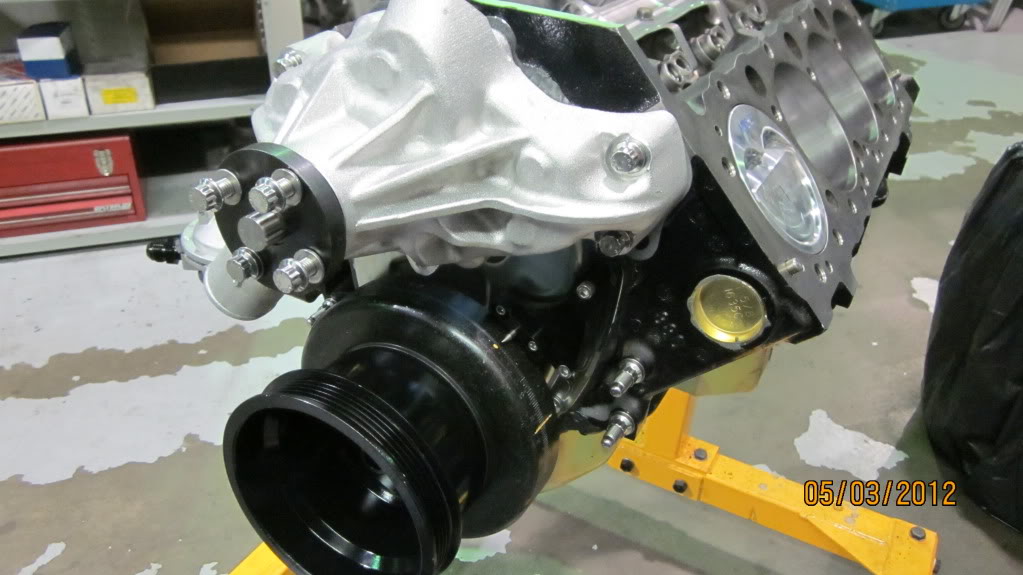
Bolted up the passenger side AC bracket to figure out fuel line routing and that about where I called it a day.
I was unsure of plug boot clearance so I bolted up the headers. Also threw the valve covers on to keep any potential crap out of the engine.
All Done.
Bolted up the passenger side AC bracket to figure out fuel line routing and that about where I called it a day.
05-13-2012, 10:11 PM
#99
Supreme Member
Join Date: Jan 2011
Location: Lynden WA
Posts: 1,929
Likes: 0
Received 7 Likes
on
7 Posts
Car: 84 Trans Am, 84 Fiero, 86 944
Engine: 5.0, 2.5, 2.5
Transmission: 5spd
Re: My 1986 IROC build thread *PIC HEAVY*
what kind of oil filter is that? it looks like it says motorcraft, if it does shame on you all that money in the engine and that cheapo oil filter
05-13-2012, 10:19 PM
#100
Supreme Member
iTrader: (2)
Join Date: Mar 2002
Location: West Houston, Tx.
Posts: 1,029
Likes: 0
Received 1 Like
on
1 Post
Car: 1991 Z28
Engine: 355 TPI
Transmission: 700r4
Axle/Gears: 9 bolt disc / 3:27
Re: My 1986 IROC build thread *PIC HEAVY*
that machine looks like shes coming together nicely bro... keep up the good work...