LS1 harness: Start to finish
 10-05-2009, 01:03 AM
#1
Supreme Member

Thread Starter
iTrader: (24)
Join Date: Jun 2005
Location: NC
Posts: 7,877
Likes: 0
Received 58 Likes
on
42 Posts
Car: 92 Firebird
Engine: Supercharged 6.0
Transmission: T56
Axle/Gears: 8.8 3.73
LS1 harness: Start to finish
This thread is a general how-to for building a custom LS1 swap harness. For this to work you still need to have your 3rd gen engine harness cut down to essentially IGN and gauges
Read about it here:
https://www.thirdgen.org/forums/ltx-...p-3rd-gen.html
Now, lets talk about harness selection
You dont have to match your year harness to your year engine. Most of the differences you will be re-doing or replacing. Yes, you can even use the dreaded 98 harness on your 99+ engine/PCM. You also dont have to match the trans type to your engine as the connectors that change between the two are common in junkyards and just as easy to swap out in the harness. All pinouts in this article relate to the 99+ PCMs with a T56 on a 90-92 3rd gen
For broken connector replacement try sourcing a S10 vortec 4.3 harness in a local junk yard. All but about 4 connectors interchange freely and the PCM terminals are the same. If you are super cheap and do not want to buy a 4th gen or 4.8/5.3 truck harness this is a viable option as LS1 style harnesses generally go from $150-250. A pieced together S10 harness with outsourced missing conenctors can be assembled for under $50
This thread will NOT be going over LS1 fuseblocks, dashes or anything other than a plain jane LS1 in 3rd gen swap. A thread covering those maybe in the works for later, but not at this time
For individual circuits, refer here or LS1tech
http://chevythunder.com/
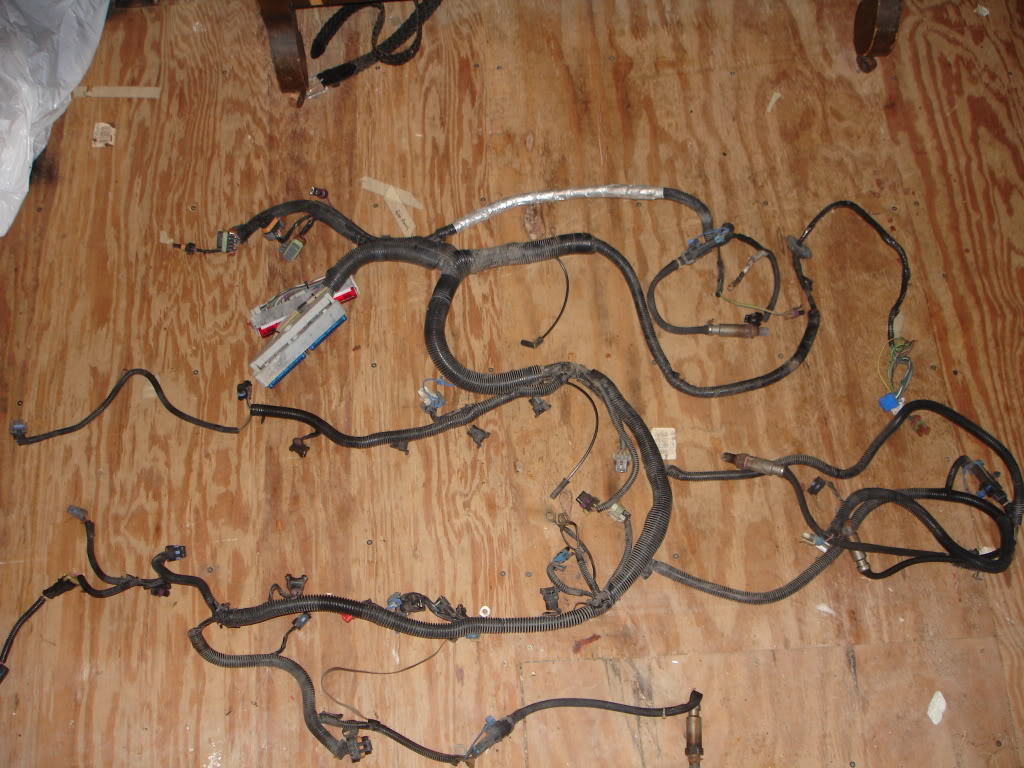
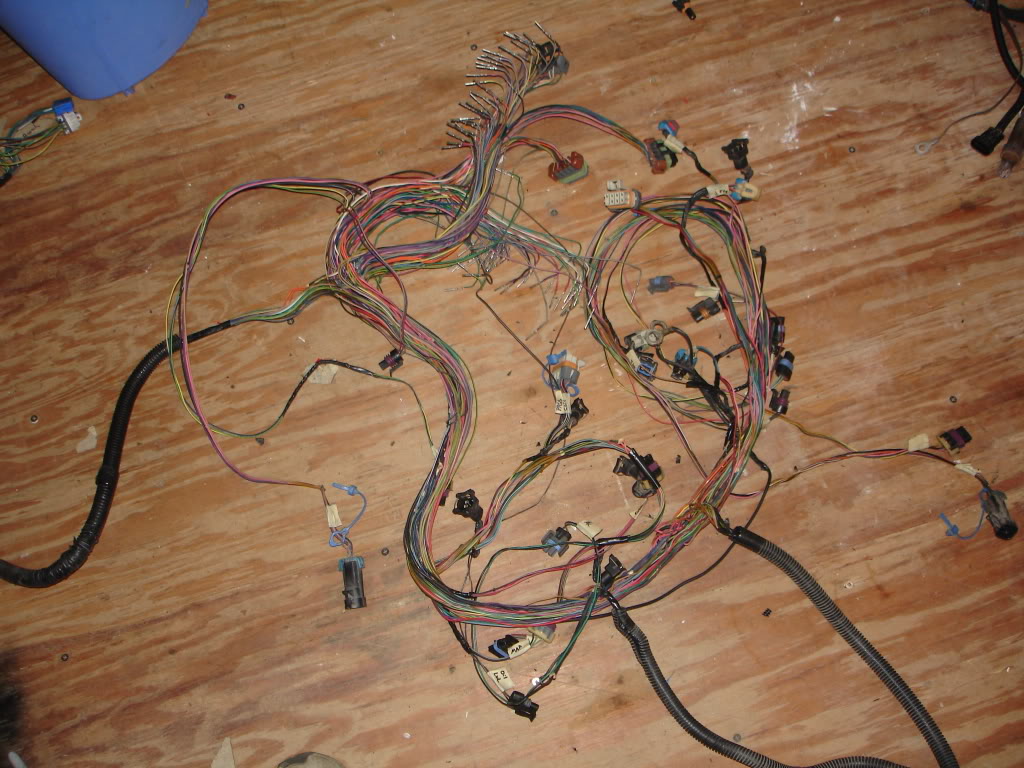
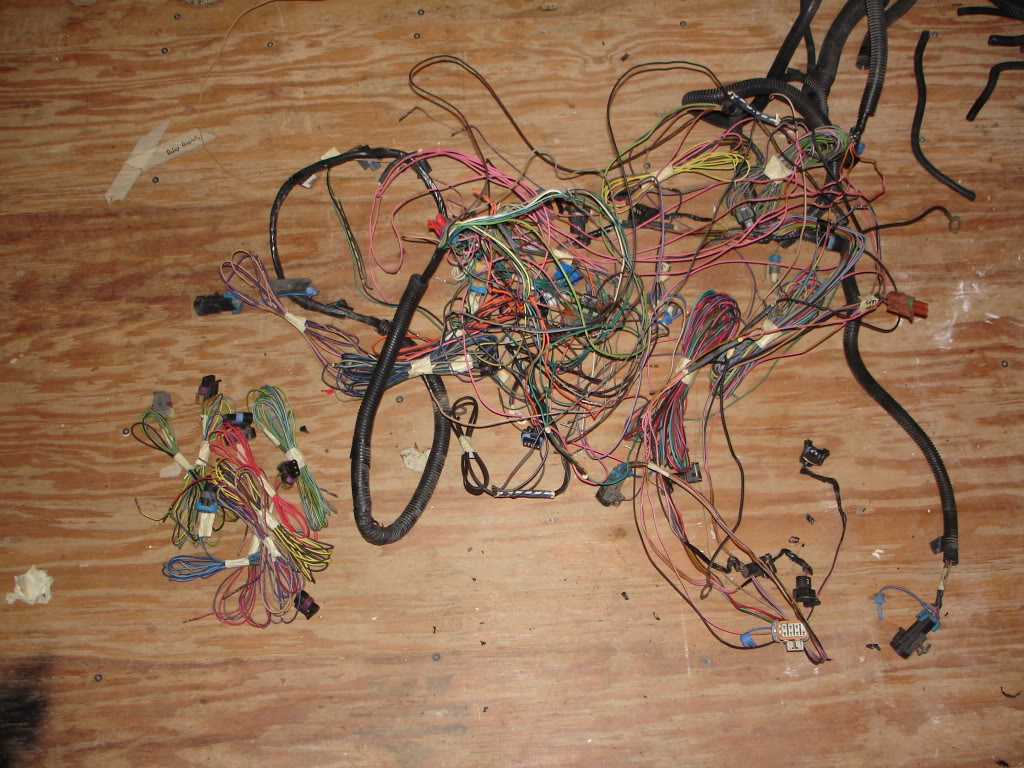
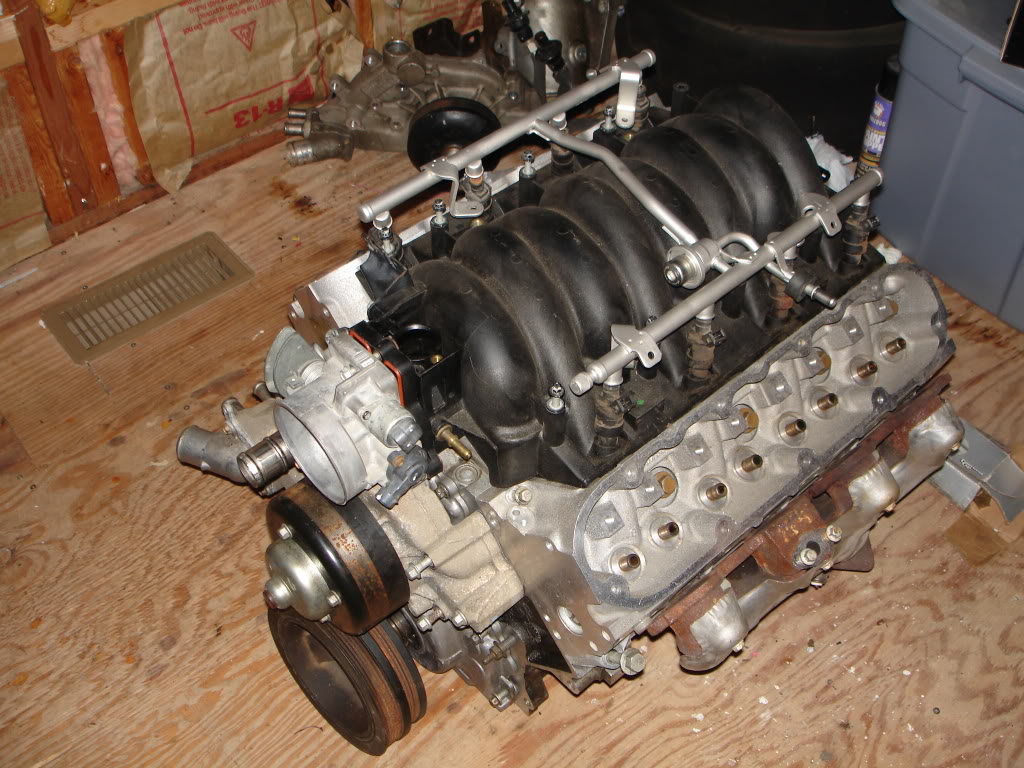
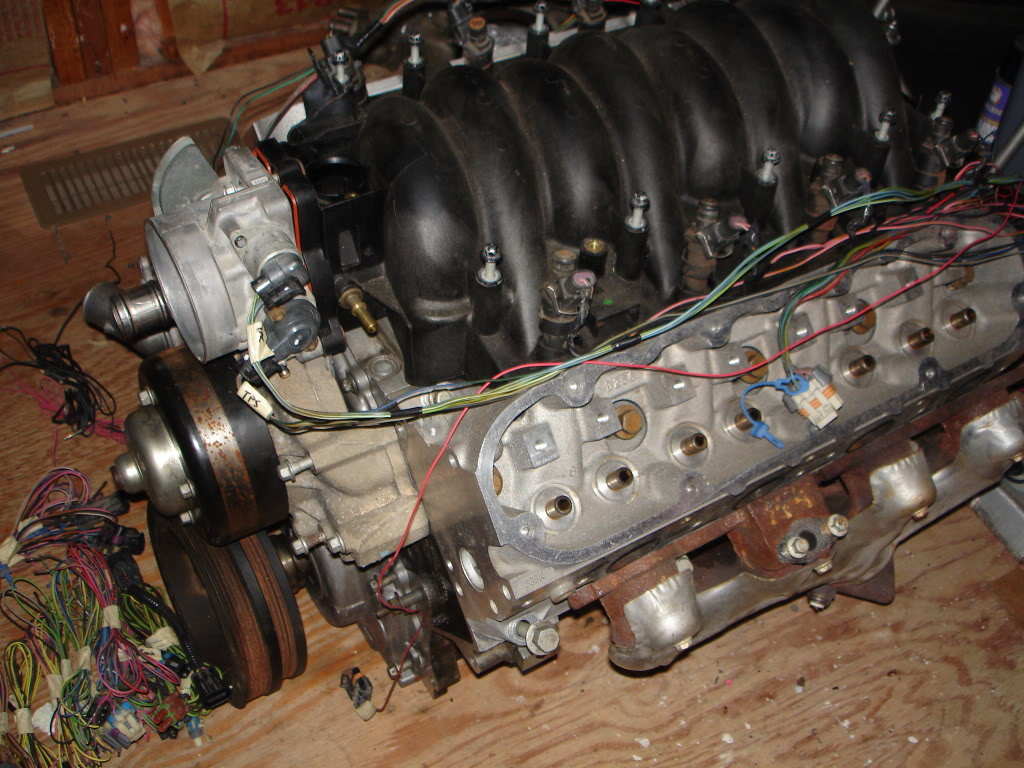
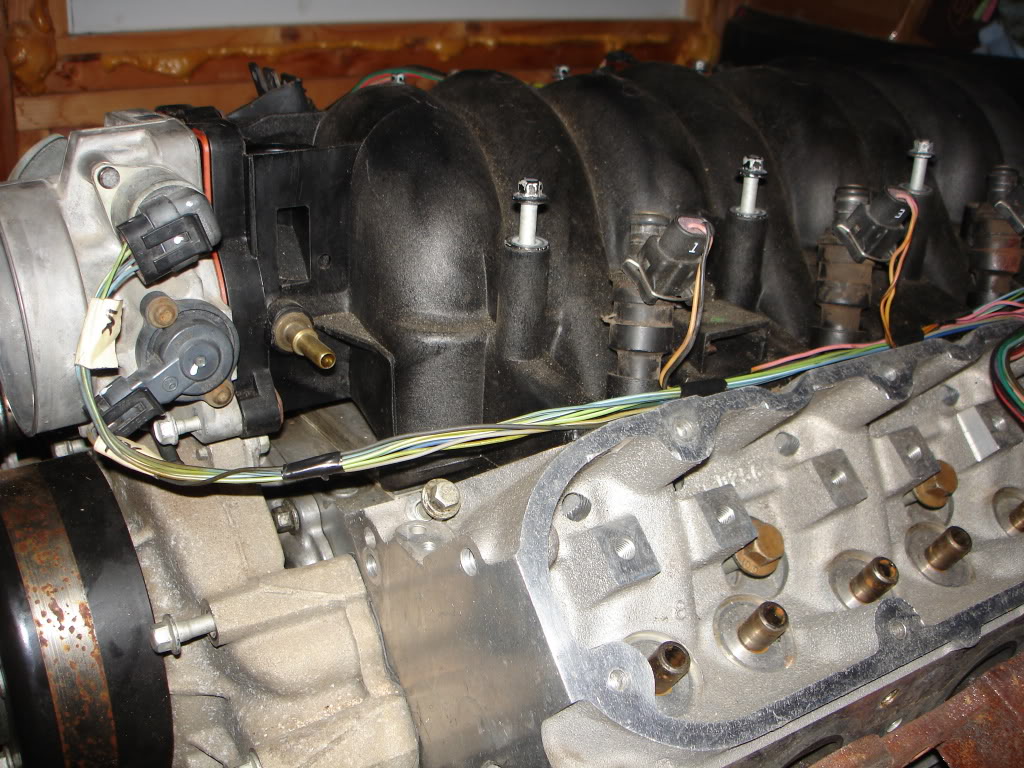
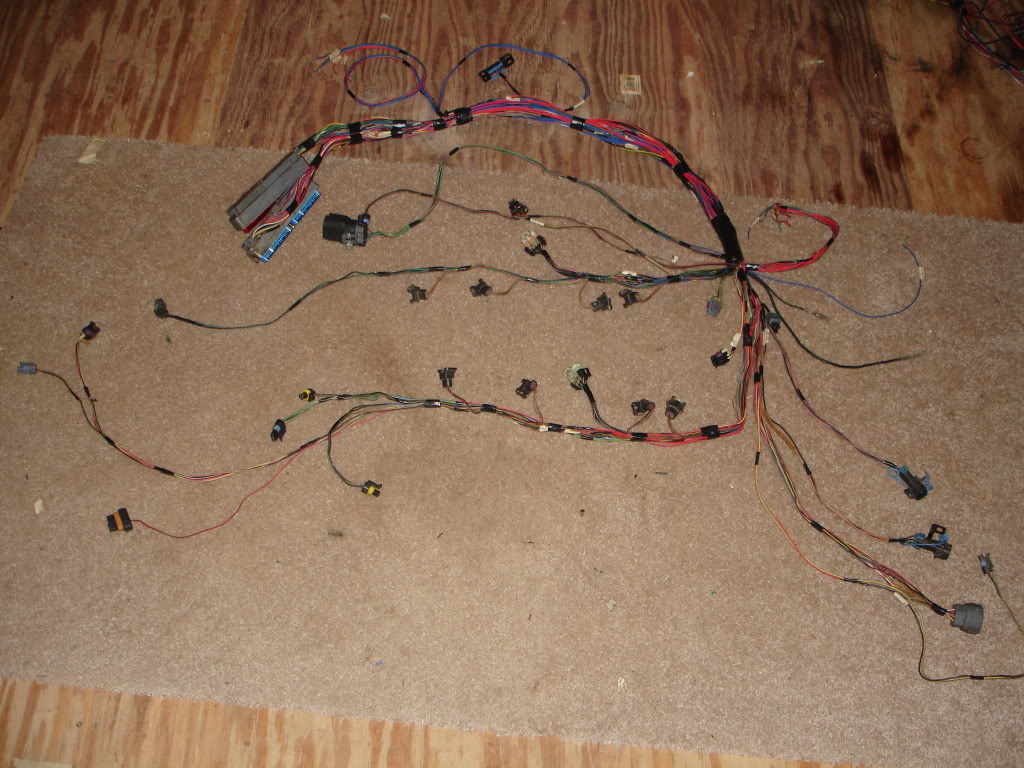
Back to the job, this is a LS1 harness fresh from a 4th gen
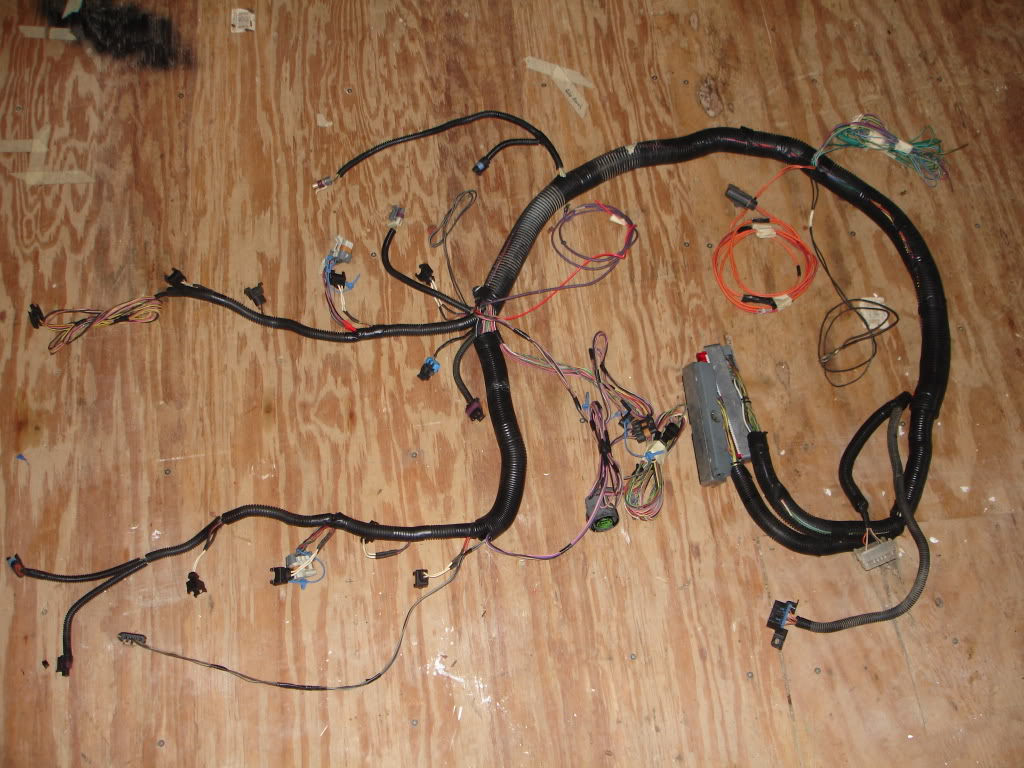
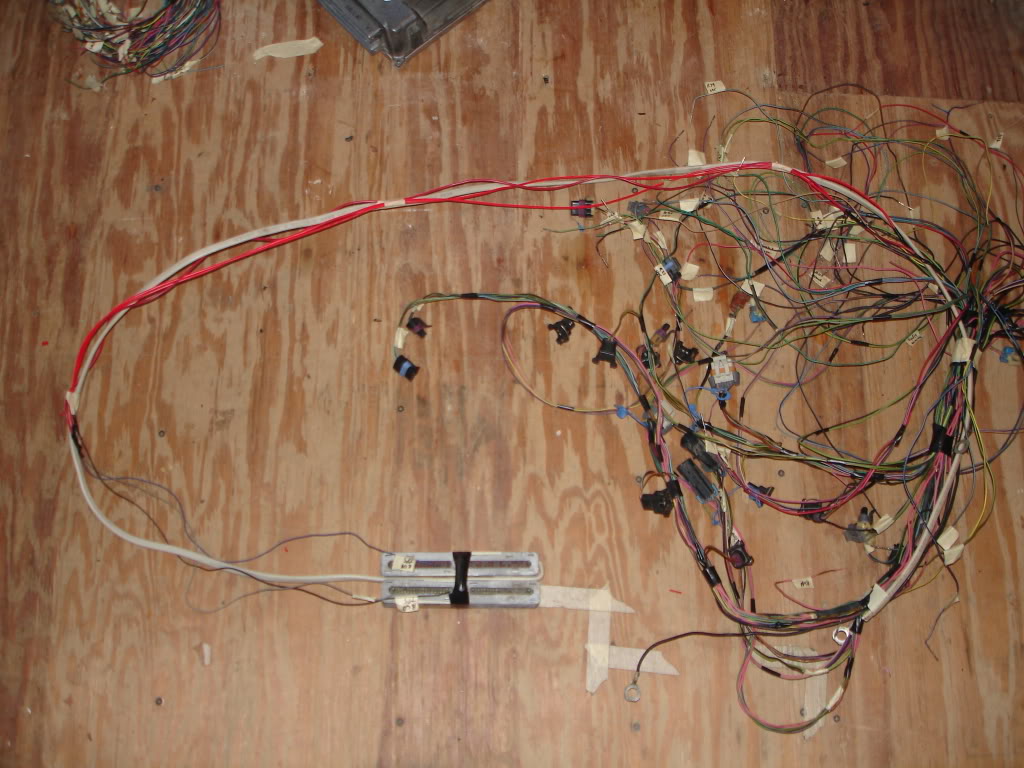
This is what you're turning it into. Notice the handful of coiled individual wires. These are all the conenctions to the original harness or the power distribution block
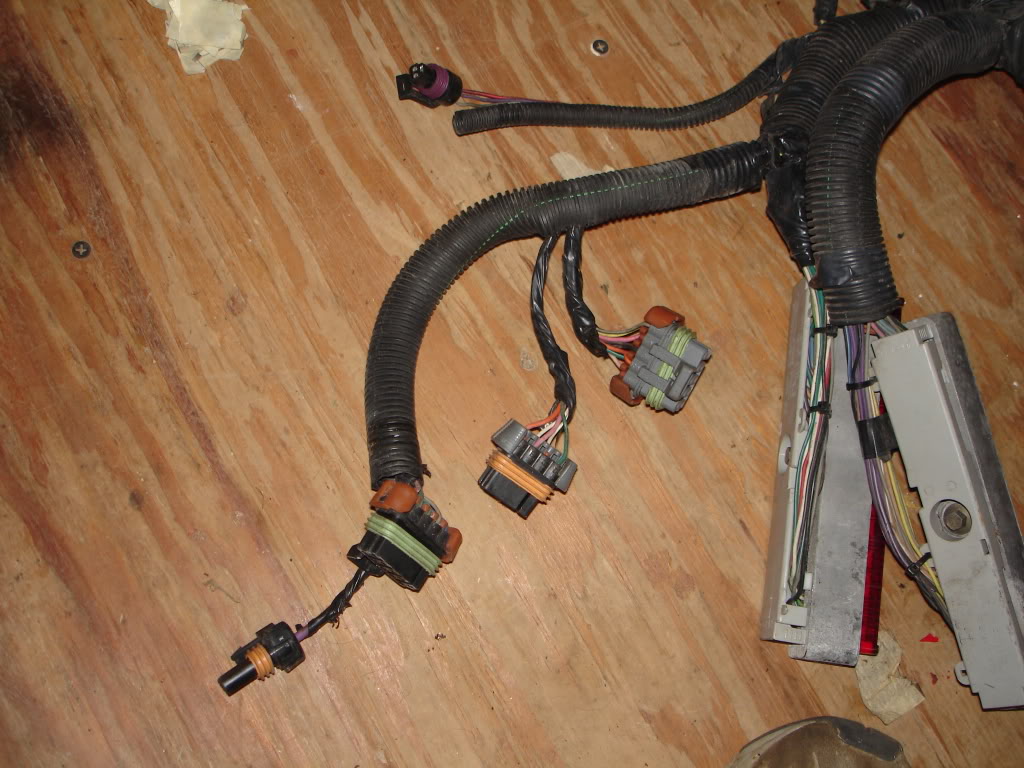
One final word before we get started. Whenever someone talks about the "3 wire hook up," they are talking about these connectors: C100, C101, C105
An exerpt from this article on the subject
http://www.ls1tech.com/forums/conver...swap-faqs.html
Now, down to business. Start by labeling every single connector. If you dont know what one's function is, look it up
Now remove the covers and de-pin both PCM connectors. Some of the pins you will never reuse, others will be easier to lengthen/shorten with them removed. This also fixes any issues with the 98 harness as the pinouts differ greatly

Read about it here:
https://www.thirdgen.org/forums/ltx-...p-3rd-gen.html
Now, lets talk about harness selection
You dont have to match your year harness to your year engine. Most of the differences you will be re-doing or replacing. Yes, you can even use the dreaded 98 harness on your 99+ engine/PCM. You also dont have to match the trans type to your engine as the connectors that change between the two are common in junkyards and just as easy to swap out in the harness. All pinouts in this article relate to the 99+ PCMs with a T56 on a 90-92 3rd gen
For broken connector replacement try sourcing a S10 vortec 4.3 harness in a local junk yard. All but about 4 connectors interchange freely and the PCM terminals are the same. If you are super cheap and do not want to buy a 4th gen or 4.8/5.3 truck harness this is a viable option as LS1 style harnesses generally go from $150-250. A pieced together S10 harness with outsourced missing conenctors can be assembled for under $50
This thread will NOT be going over LS1 fuseblocks, dashes or anything other than a plain jane LS1 in 3rd gen swap. A thread covering those maybe in the works for later, but not at this time
For individual circuits, refer here or LS1tech
http://chevythunder.com/
Back to the job, this is a LS1 harness fresh from a 4th gen
This is what you're turning it into. Notice the handful of coiled individual wires. These are all the conenctions to the original harness or the power distribution block
One final word before we get started. Whenever someone talks about the "3 wire hook up," they are talking about these connectors: C100, C101, C105
An exerpt from this article on the subject
http://www.ls1tech.com/forums/conver...swap-faqs.html
when you get a pullout that has the harness on the car, everything is connected except:
3 connectors that were underhood. (named C100,C101,C105)
2 connectors that used to connect under the dash (220,230)
so these 5 connectors are the ONLY wires we're worred about.
in a nutshell... give ignition power to the pink wires, constant power to the orange ones, take off VATS, and it runs.
the other wires you hook up are just gauge wires, reverse lights, ect.... nothing hard.
its ALMOST a stand alone harness already... only diff is it will have a couple extra wires left after its hooked up.. not a big deal..
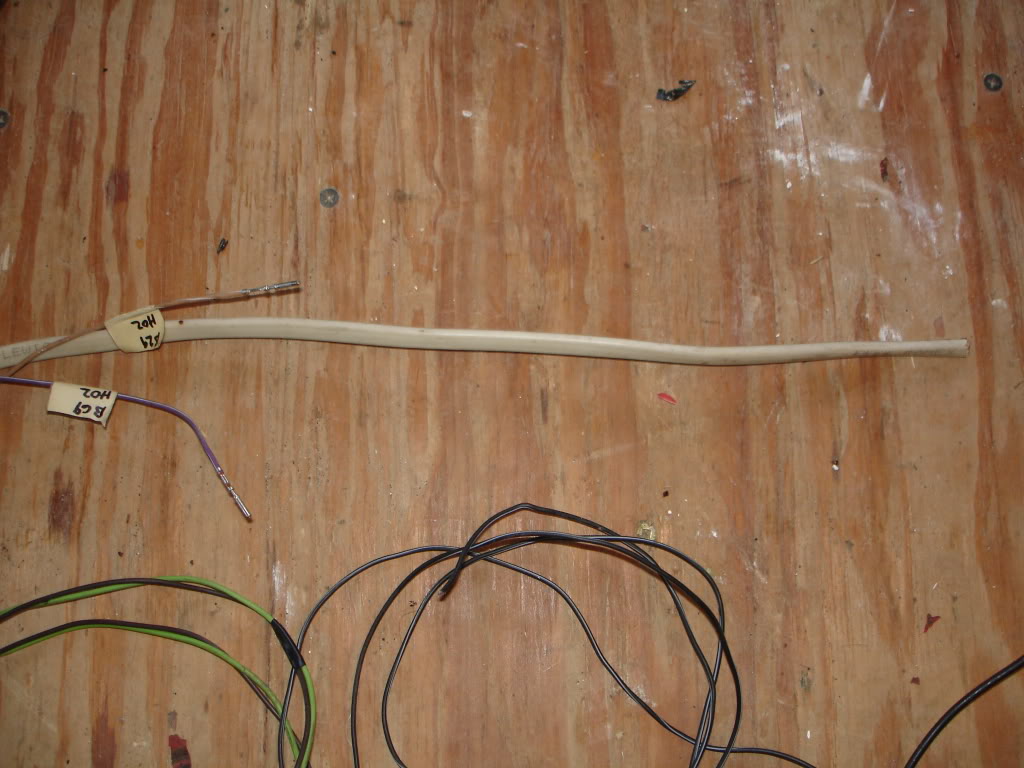
theres one more wire not listed there.. its a thick purple wire that goes to the starter.
when it gets +12v, the starter turns the motor over.
3 connectors that were underhood. (named C100,C101,C105)
2 connectors that used to connect under the dash (220,230)
so these 5 connectors are the ONLY wires we're worred about.
in a nutshell... give ignition power to the pink wires, constant power to the orange ones, take off VATS, and it runs.
the other wires you hook up are just gauge wires, reverse lights, ect.... nothing hard.
its ALMOST a stand alone harness already... only diff is it will have a couple extra wires left after its hooked up.. not a big deal..
theres one more wire not listed there.. its a thick purple wire that goes to the starter.
when it gets +12v, the starter turns the motor over.
Now, down to business. Start by labeling every single connector. If you dont know what one's function is, look it up
Now remove the covers and de-pin both PCM connectors. Some of the pins you will never reuse, others will be easier to lengthen/shorten with them removed. This also fixes any issues with the 98 harness as the pinouts differ greatly
 10-05-2009, 01:05 AM
#2
Supreme Member
Thread Starter
iTrader: (24)
Join Date: Jun 2005
Location: NC
Posts: 7,877
Likes: 0
Received 58 Likes
on
42 Posts
Car: 92 Firebird
Engine: Supercharged 6.0
Transmission: T56
Axle/Gears: 8.8 3.73
Re: LS1 harness: Start to finish
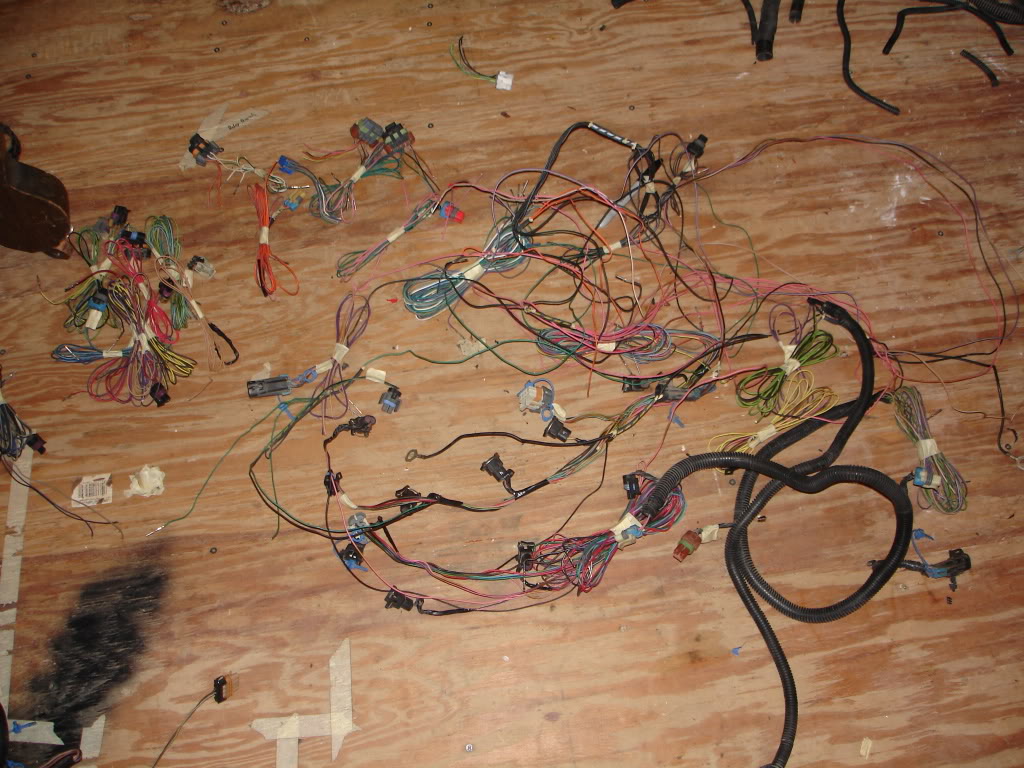
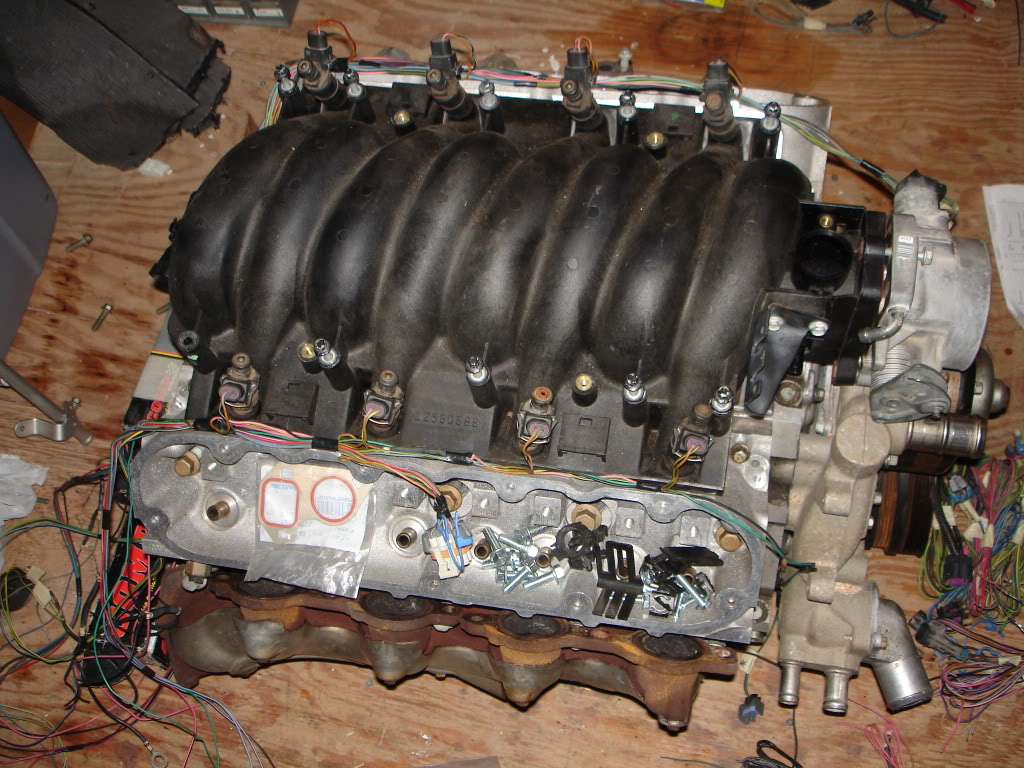
Remove the loom and tape. I left the trans wiring loomed as it pretty much isnt changed even with the new layout
Begin to coil up the connectors. Some wires should nearly be free just by removing the loom. Other you will have to unravel completely. No cutting yet
Eventually you will run out of loose connectors and the remaining pile of spaghetti will be continuous. Now is the time to get your snippers. Start by removing the C100, C101, C105 and the under dash connectors. You will not be reusing these in any way unless you are repairing a 4th gen harness so cut these close and throw them away. Once that is done several more connectors will come off but the mess isnt separate yet. Now its time to start cutting commons. Unlike with the 3rd gen commons, most of these are reused as is easier to solder single wires together than 4-5 wires into one connection. There is one main IGN (pink) common that runs pretty much everything thats not injectors or coils related. The injectors and coils have their own common on each bank. DO NOT CUT THE INJECTOR/COIL COMMON OUT, NOR THE LONG PINK WIRE THAT WENT TO THE DASH CONNECTOR. These will have to be immediately resoldered in the exact same place so cutting them would be adding uncessecary complexity to an already overwhelming job. There should be 2 ground commons each with a ring that attaches to the rear of a cyl head. If the car had traction control, the IAT low ref wire (purple) will be attached. Remove the traction side of this. Oddly enough the TPS had all 3 wires spliced and ran to the dash connector in addition to the PCM. You need only the PCM side and the splices can be cut out when the wires are lengthened
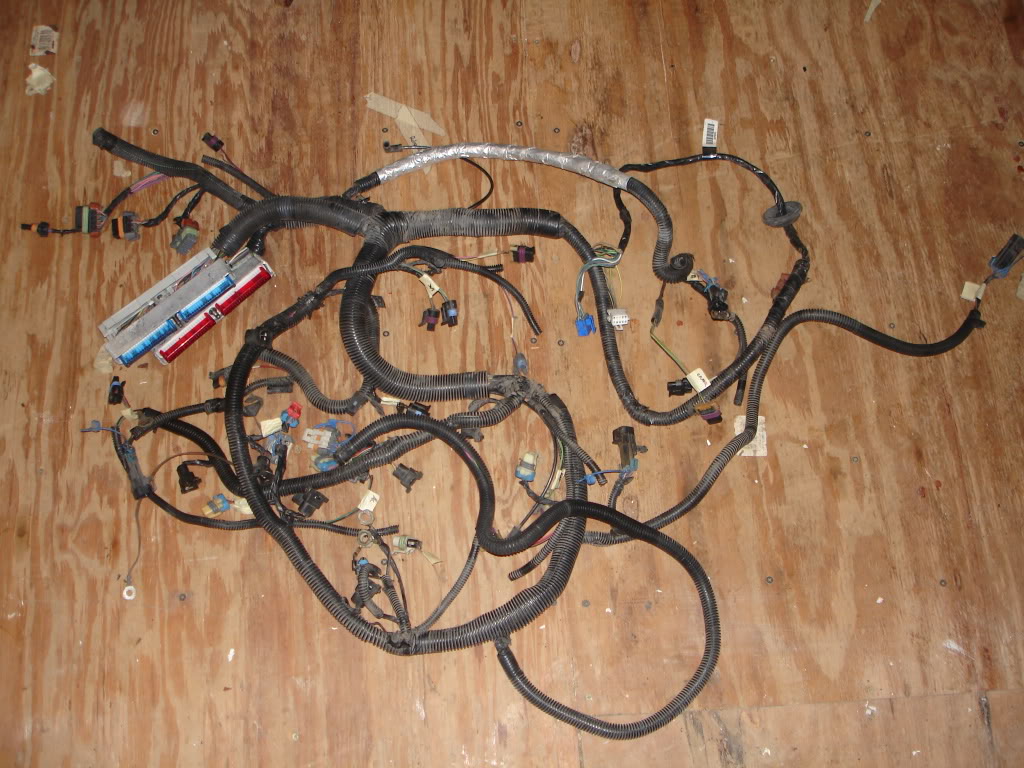
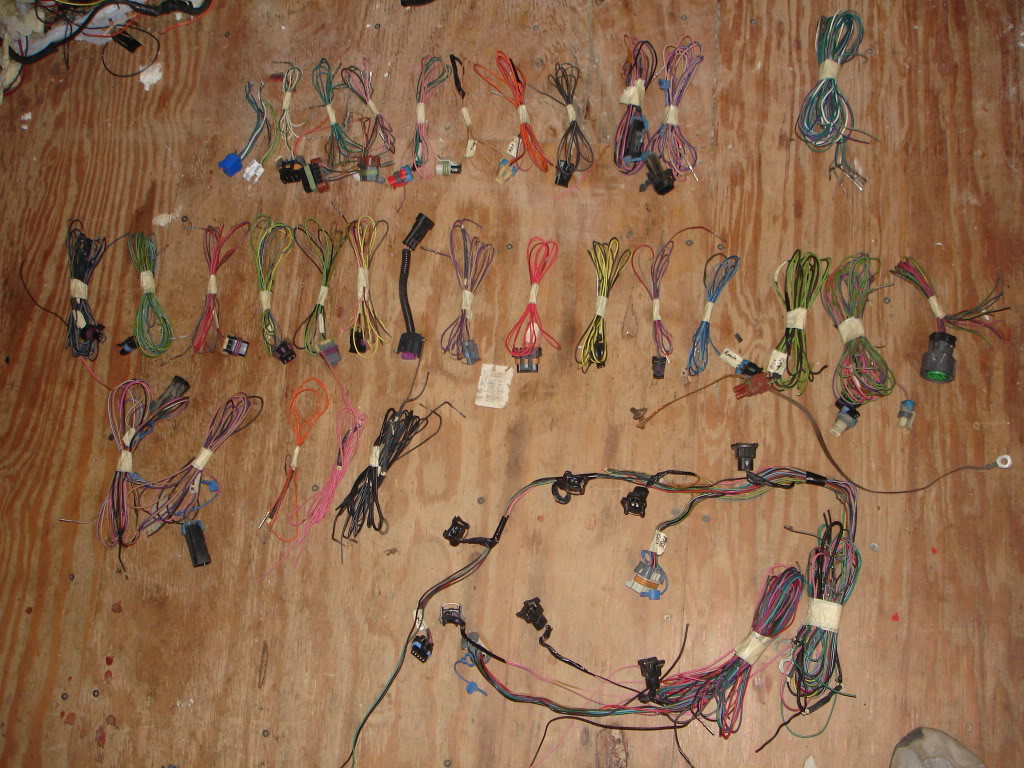
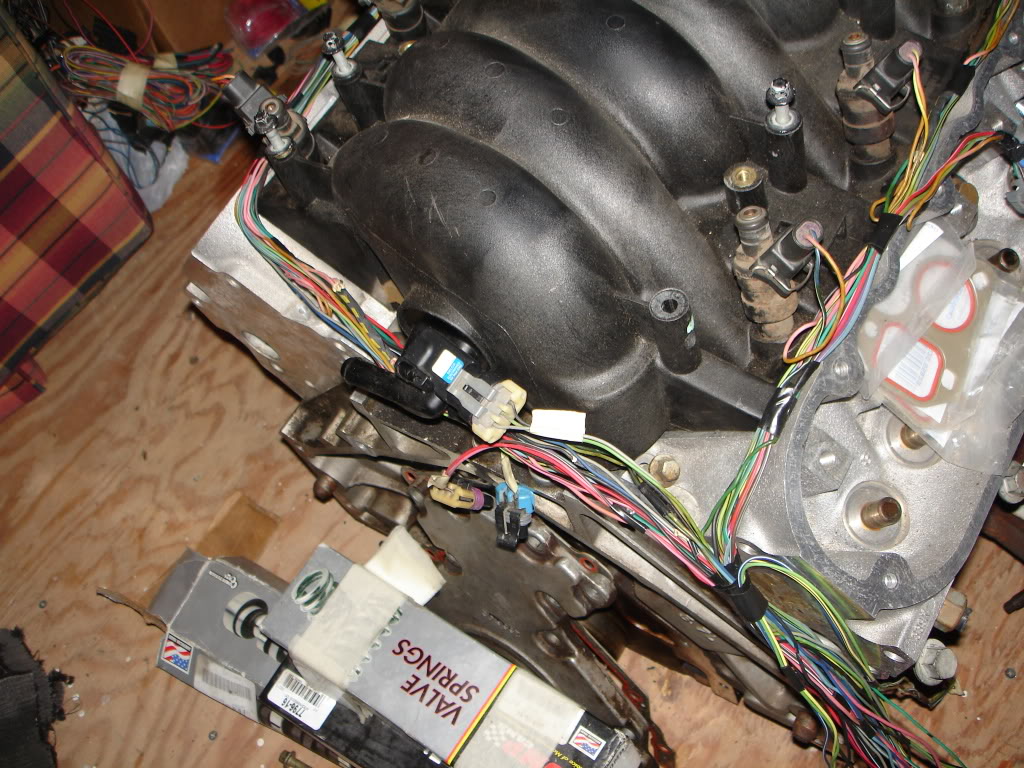
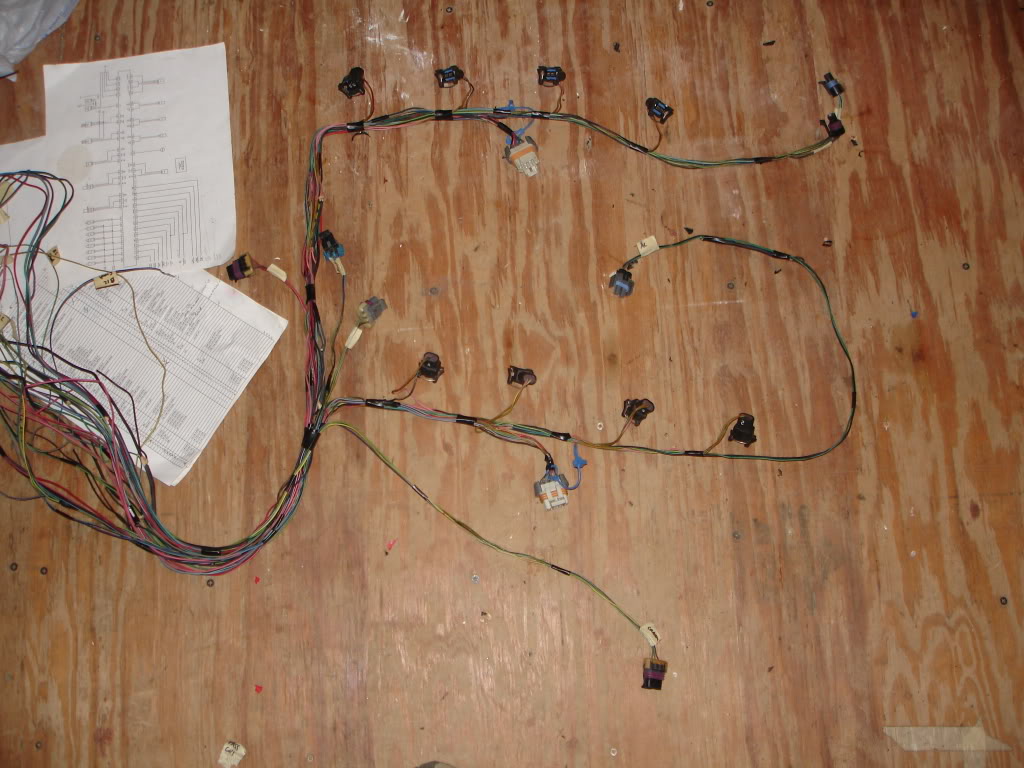
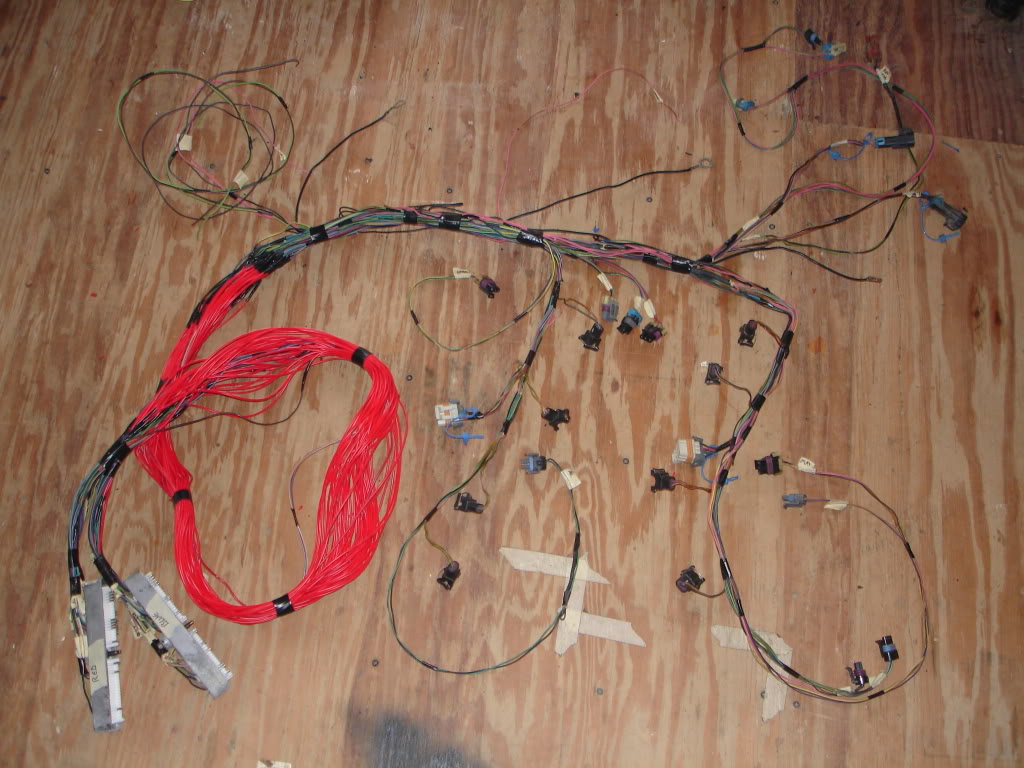
When you are done your harness should look like this
Top row:
Dash connector, dash connector, C100, C101, C105, EVAP, Oil pressure sender, AIR, vent solenoid, rear HO2, rear HO2, group of loose wires with the PCM terminals
Middle row:
TPS, IAC, CAM, Crank, MAP, MAF, 3 wire MAF to 5 wire MAF adapter(not stock), IAC, ALT(fbody single wire), CTS(99-02 style), traction control, knock, rev lights(T56), VSS/CAGS/Rev lockout(T56), 4L60E trans
Bottom row:
Front HO2, front HO2, 2 PCM terminals spliced into one orange wire(will save time later), IGN common, GRD common x2
Upper mass is the pass side INJ/coil group with the AC compressor clutch connector still attached
Lower mass is the drivers side INJ/coil group
For this particular swap, the entire top row will not be reused
Now, get a mockup engine
Begin to coil up the connectors. Some wires should nearly be free just by removing the loom. Other you will have to unravel completely. No cutting yet
Eventually you will run out of loose connectors and the remaining pile of spaghetti will be continuous. Now is the time to get your snippers. Start by removing the C100, C101, C105 and the under dash connectors. You will not be reusing these in any way unless you are repairing a 4th gen harness so cut these close and throw them away. Once that is done several more connectors will come off but the mess isnt separate yet. Now its time to start cutting commons. Unlike with the 3rd gen commons, most of these are reused as is easier to solder single wires together than 4-5 wires into one connection. There is one main IGN (pink) common that runs pretty much everything thats not injectors or coils related. The injectors and coils have their own common on each bank. DO NOT CUT THE INJECTOR/COIL COMMON OUT, NOR THE LONG PINK WIRE THAT WENT TO THE DASH CONNECTOR. These will have to be immediately resoldered in the exact same place so cutting them would be adding uncessecary complexity to an already overwhelming job. There should be 2 ground commons each with a ring that attaches to the rear of a cyl head. If the car had traction control, the IAT low ref wire (purple) will be attached. Remove the traction side of this. Oddly enough the TPS had all 3 wires spliced and ran to the dash connector in addition to the PCM. You need only the PCM side and the splices can be cut out when the wires are lengthened
When you are done your harness should look like this
Top row:
Dash connector, dash connector, C100, C101, C105, EVAP, Oil pressure sender, AIR, vent solenoid, rear HO2, rear HO2, group of loose wires with the PCM terminals
Middle row:
TPS, IAC, CAM, Crank, MAP, MAF, 3 wire MAF to 5 wire MAF adapter(not stock), IAC, ALT(fbody single wire), CTS(99-02 style), traction control, knock, rev lights(T56), VSS/CAGS/Rev lockout(T56), 4L60E trans
Bottom row:
Front HO2, front HO2, 2 PCM terminals spliced into one orange wire(will save time later), IGN common, GRD common x2
Upper mass is the pass side INJ/coil group with the AC compressor clutch connector still attached
Lower mass is the drivers side INJ/coil group
For this particular swap, the entire top row will not be reused
Now, get a mockup engine
10-05-2009, 01:07 AM
#3
Supreme Member
Thread Starter
iTrader: (24)
Join Date: Jun 2005
Location: NC
Posts: 7,877
Likes: 0
Received 58 Likes
on
42 Posts
Car: 92 Firebird
Engine: Supercharged 6.0
Transmission: T56
Axle/Gears: 8.8 3.73
Re: LS1 harness: Start to finish
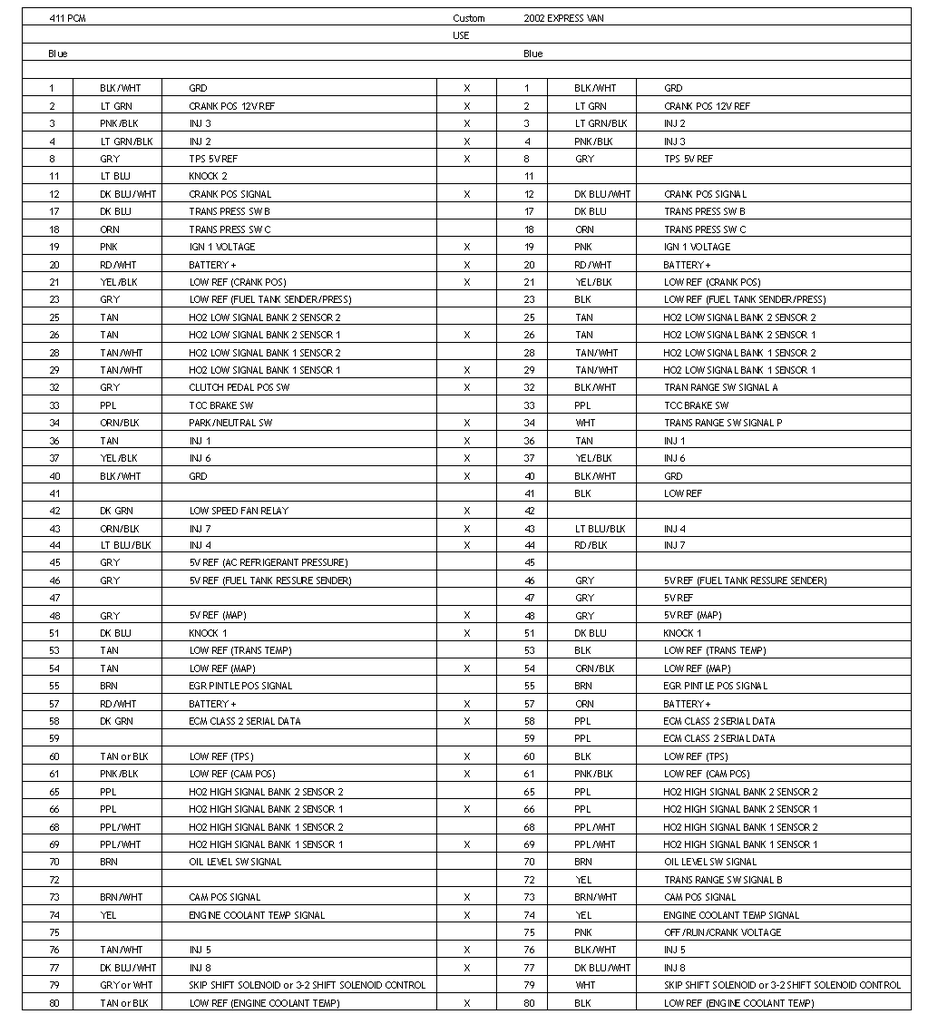
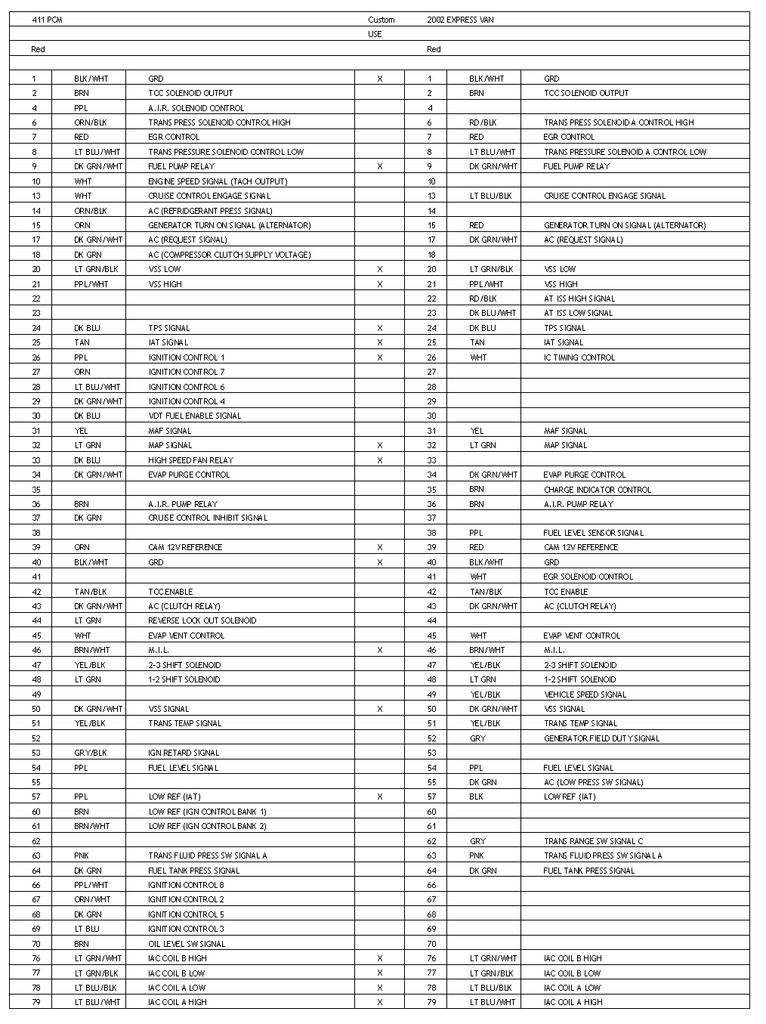
Using these pinouts, label each wire for every connector. I like to wrap the wires every 6-8" to cut down on tangles. Label the PCM connector and pin assignment as well as the connector name incase you mix the pin up. There are up to 160 pins and thats alot to get mixed up
The pinouts were recycled from my 0411 swap so ignore the Express van side. Also, Blue is C1 and Red C2. This gets confusing so my pin assignments are labeled by color rather than C1/C2 Ex: R9 = Red pin 9, B42 = Blue pin 42. Some colors changed over the years. For a specific year/model breakdown resort to LS1tech or chevythunder
Drape the wire groups over the engine and plug 'em up. You should get a general feel for the shape of the end harness
Once the routing is decided, bind the groups together with electrical tape. Ensure no connector is pulled taught and has plenty of length
10-05-2009, 01:10 AM
#4
Supreme Member
Thread Starter
iTrader: (24)
Join Date: Jun 2005
Location: NC
Posts: 7,877
Likes: 0
Received 58 Likes
on
42 Posts
Car: 92 Firebird
Engine: Supercharged 6.0
Transmission: T56
Axle/Gears: 8.8 3.73
Re: LS1 harness: Start to finish
Continuing on the pass side
CAM, MAP, Crank, knock added in and the sides bound together with tape
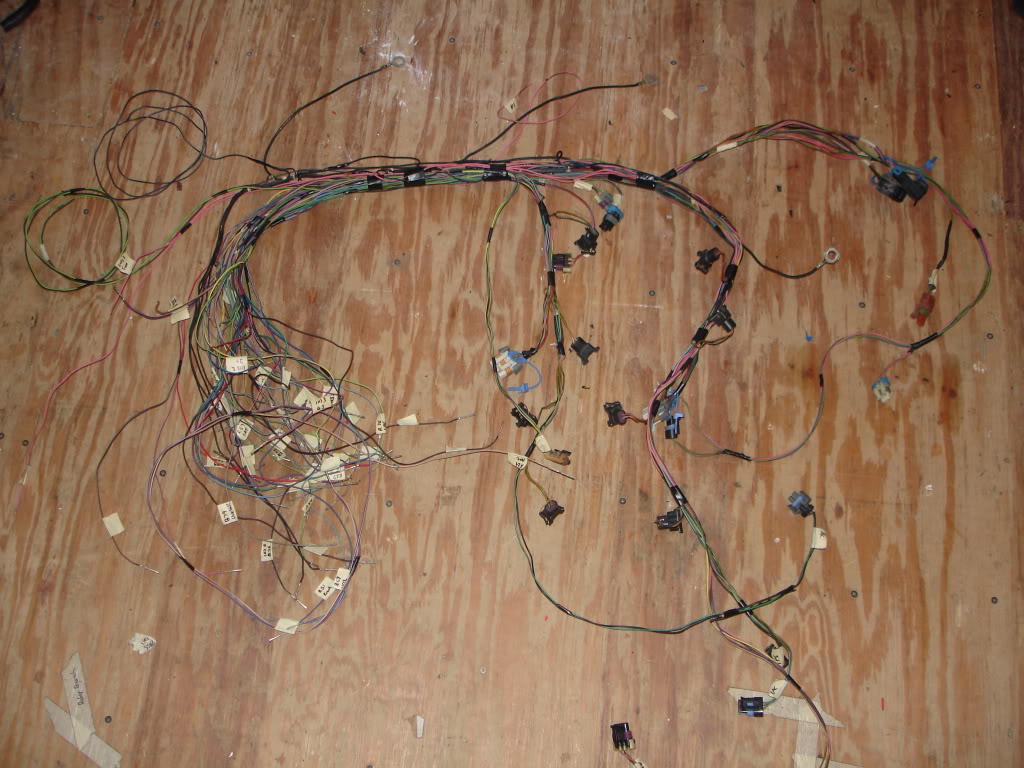
Pulled back off it should be very neat and tight with the huge mess pointing to wherever you are mounting your PCM
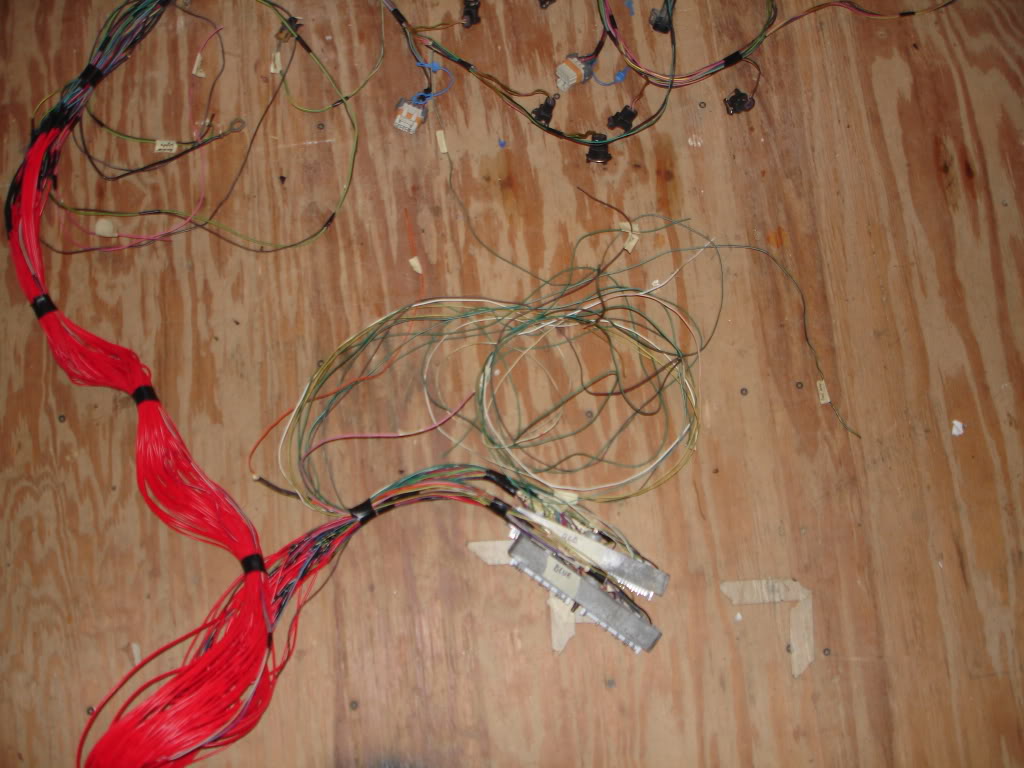
Once all of the connectors are fitted and bound to the harness it should look like this. Pull all of the cut commons out of the bundle. The next step is to reconnect them
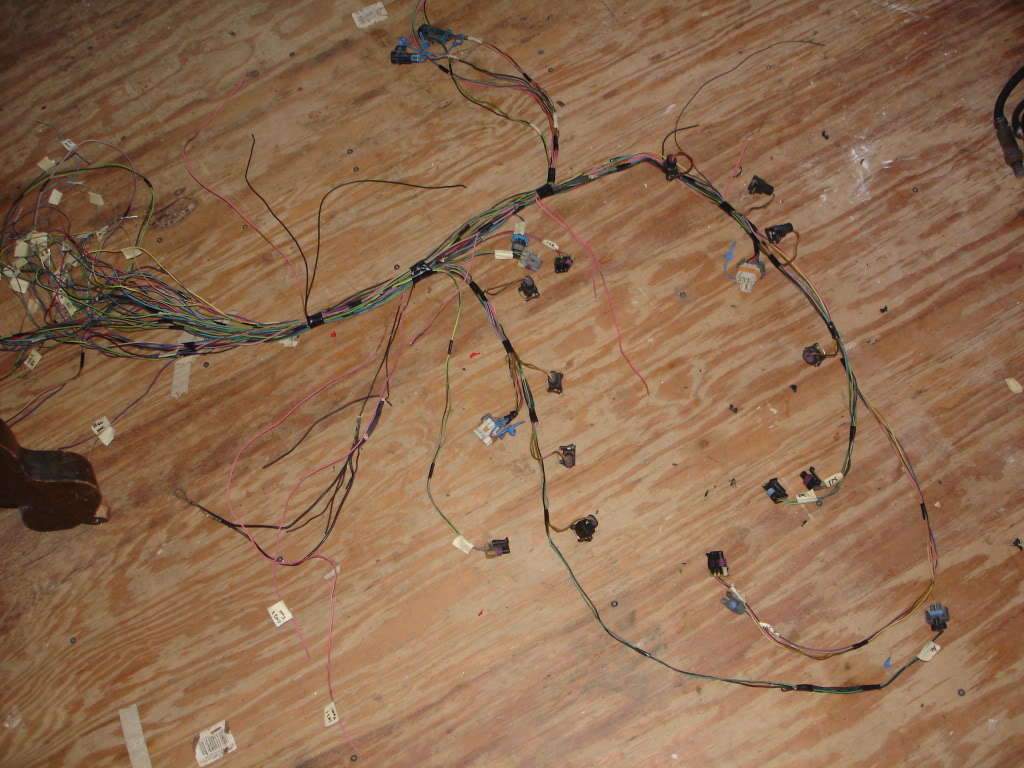
Break out the soldering iron and connect the IGN commons back in and then the grounds. Be sure to have a runner wire between each of the ground commons connecting them as a failsafe to a bad solder or broken wire. Factory had just about every common fused individually. This isnt necessary, all you need are PCM, INJ1, INJ2 all are ran through the C207 and fused at the stock 3rd gen fuseblock. You can fuse the MAF, HO2s, and trans solenoids if you like but you will have to find places for each. An easy one is the emissions common wire from the 3rd gen harness. Since emissions are gone(for this swap) its an open slot and i like to put the HO2s on there. It would behoove you to double check your work as you go with a multimeter. Setting it to resistance shows two things: continuity and resistance across the joint. Factory wires with crimped on terminals are usually between .6-.9 ohms depending on size and length. Try to keep the new solders under 1.4 ohms since most of the sensors are read off of returned resistance in the PCM
Notice the IGN lead up top. This will be connected to the old heavy pnk from the 3rd gen harnes. You should have 3 ground rings. I like to put one on each cyl head and one to the framerail. You should have one long runner grd left thats not connected to anything, do not cut it off. It will be used on the ALDL
From the big mess, all should have a PCM connector attached except for a few. Starting top middle going counter clockwise: main IGN, grd runner wire, backup lights(manual trans only), INJ1 and INJ2 pnk's
CAM, MAP, Crank, knock added in and the sides bound together with tape
Pulled back off it should be very neat and tight with the huge mess pointing to wherever you are mounting your PCM
Once all of the connectors are fitted and bound to the harness it should look like this. Pull all of the cut commons out of the bundle. The next step is to reconnect them
Break out the soldering iron and connect the IGN commons back in and then the grounds. Be sure to have a runner wire between each of the ground commons connecting them as a failsafe to a bad solder or broken wire. Factory had just about every common fused individually. This isnt necessary, all you need are PCM, INJ1, INJ2 all are ran through the C207 and fused at the stock 3rd gen fuseblock. You can fuse the MAF, HO2s, and trans solenoids if you like but you will have to find places for each. An easy one is the emissions common wire from the 3rd gen harness. Since emissions are gone(for this swap) its an open slot and i like to put the HO2s on there. It would behoove you to double check your work as you go with a multimeter. Setting it to resistance shows two things: continuity and resistance across the joint. Factory wires with crimped on terminals are usually between .6-.9 ohms depending on size and length. Try to keep the new solders under 1.4 ohms since most of the sensors are read off of returned resistance in the PCM
Notice the IGN lead up top. This will be connected to the old heavy pnk from the 3rd gen harnes. You should have 3 ground rings. I like to put one on each cyl head and one to the framerail. You should have one long runner grd left thats not connected to anything, do not cut it off. It will be used on the ALDL
From the big mess, all should have a PCM connector attached except for a few. Starting top middle going counter clockwise: main IGN, grd runner wire, backup lights(manual trans only), INJ1 and INJ2 pnk's
10-05-2009, 01:12 AM
#5
Supreme Member
Thread Starter
iTrader: (24)
Join Date: Jun 2005
Location: NC
Posts: 7,877
Likes: 0
Received 58 Likes
on
42 Posts
Car: 92 Firebird
Engine: Supercharged 6.0
Transmission: T56
Axle/Gears: 8.8 3.73
Re: LS1 harness: Start to finish
he engine does not have to be in the car for the necessary lengths to be measured. This can be approximated by using a common point on the old engine and the new engine. I use the vacuum T on the rear of the LS1 intake as its along the engine centerline and very close to the same on the SBC/V6 distributor. Use a hose/cable to mock the route of the wires to get a length measurement for the PCM location. I used a piece of Romex house wire
This is the stock routing for the harness. Notice how it winds around the HVAC box for no good reason. Routing over top of the blower motor is more direct and IMHO looks better
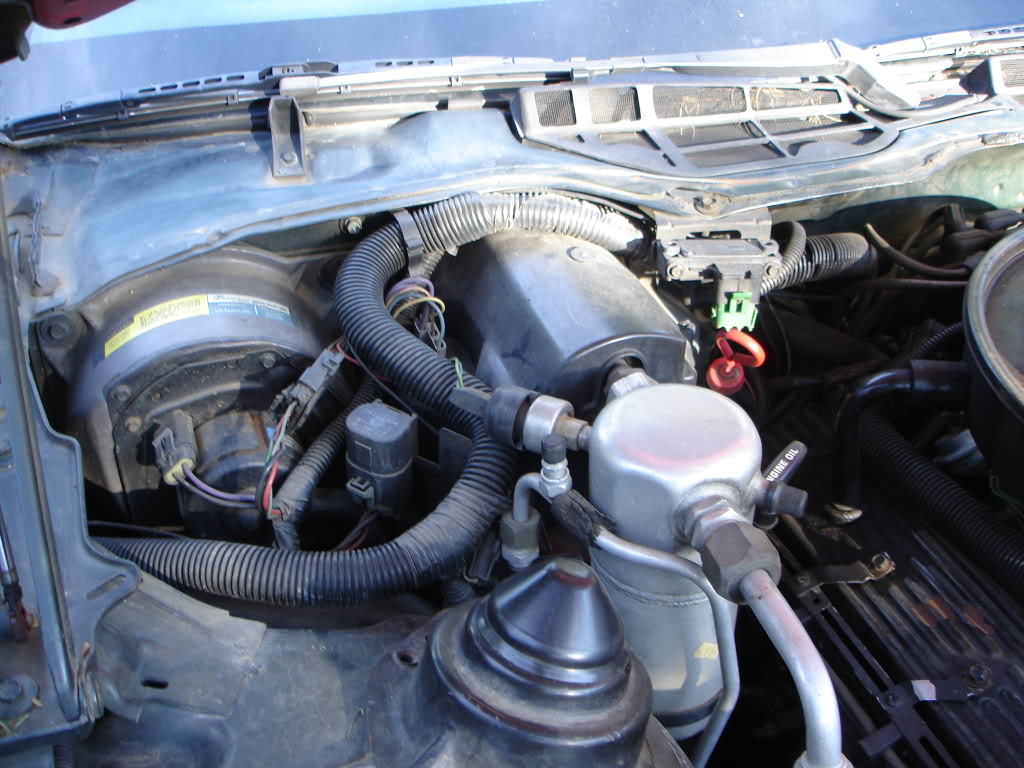
Finding centerline of the engine and routing the Romex
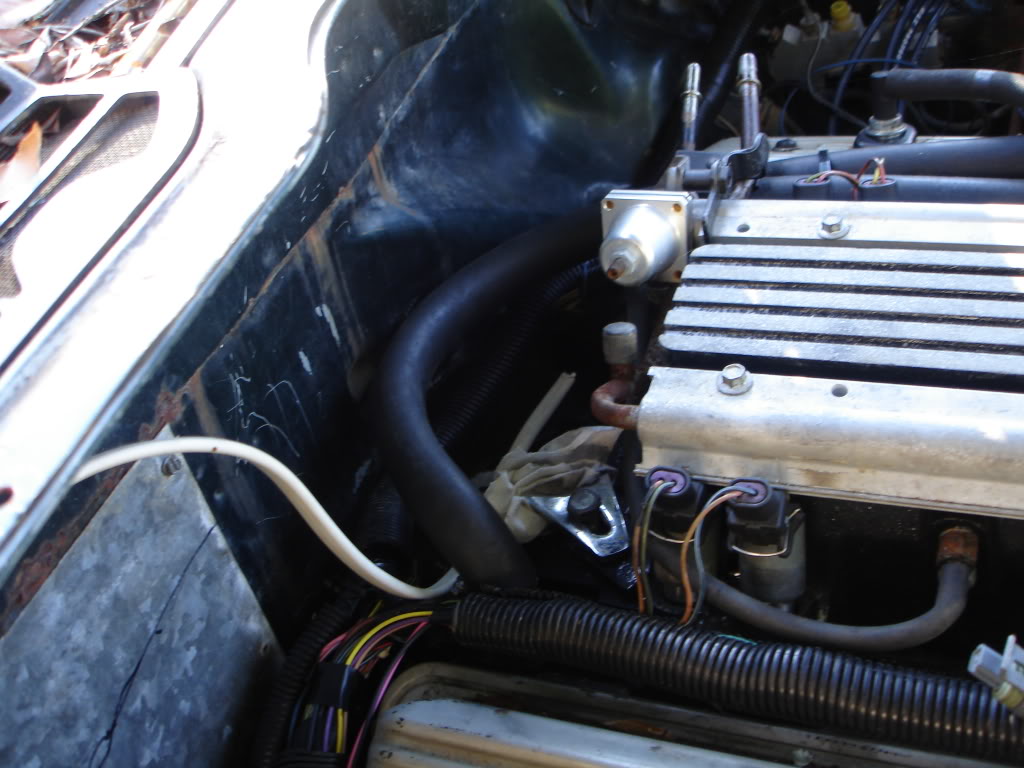
Along the top of the firewall

Though the upper hole, looped into the factory harness clip and through the fender hole into the chassis
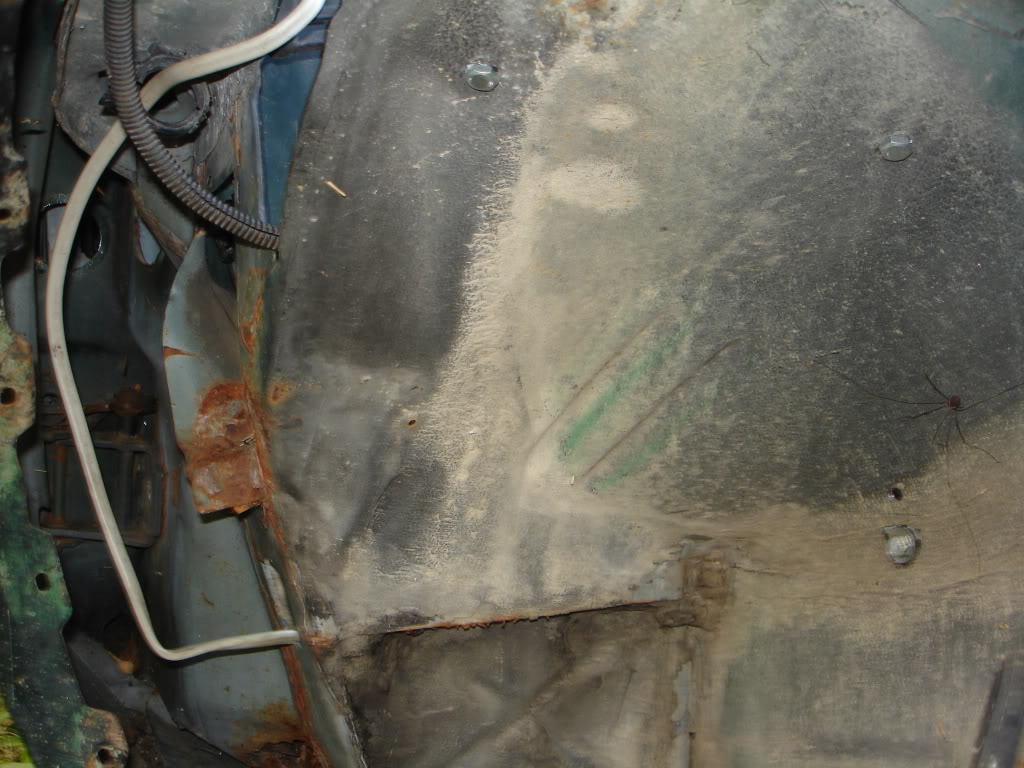
From the interior, I like to run the PCM connectors up to the trans tunnel for that extra few inches to orient the PCM under the dash
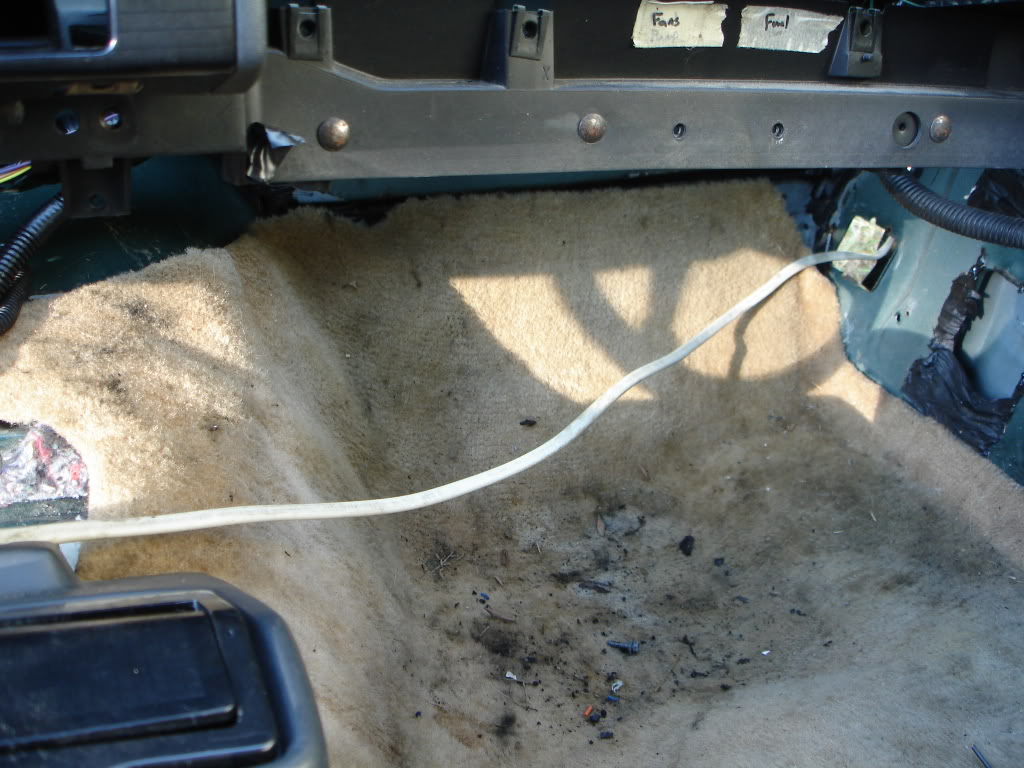
This is the stock routing for the harness. Notice how it winds around the HVAC box for no good reason. Routing over top of the blower motor is more direct and IMHO looks better
Finding centerline of the engine and routing the Romex
Along the top of the firewall
Though the upper hole, looped into the factory harness clip and through the fender hole into the chassis
From the interior, I like to run the PCM connectors up to the trans tunnel for that extra few inches to orient the PCM under the dash
10-05-2009, 01:15 AM
#6
Supreme Member
Thread Starter
iTrader: (24)
Join Date: Jun 2005
Location: NC
Posts: 7,877
Likes: 0
Received 58 Likes
on
42 Posts
Car: 92 Firebird
Engine: Supercharged 6.0
Transmission: T56
Axle/Gears: 8.8 3.73
Re: LS1 harness: Start to finish
Back to the harness, bind the measuring cable to the harness at centerline. I set the trans/HO2 connectors to center previously so theres no reason not to do it again
All of the wires will need atleast SOME length added. Here are the longest two and even they need about a foot
Check each wire as you lengthen/shorten it and fix problems as they arise. Going back to redo something is very irritating. It would be a good idea to print off a copy of the PCM pinouts, mark off the wires not used and check each pin as you finish install them
Starting
Finished with all of the engine connectors
Now, the harness still isnt done as several non engine wires must still be added. If you have been keeping a running tally of the remaining pins this should be relatively easy
Add in the org battery wires salvaged from the beginning, IGN lead (dont connect it to any IGN common), tach, P/N lead, relay leads, seral data (ALDL), MIL, speedo output and cruise(if used)
10-05-2009, 01:18 AM
#7
Supreme Member
Thread Starter
iTrader: (24)
Join Date: Jun 2005
Location: NC
Posts: 7,877
Likes: 0
Received 58 Likes
on
42 Posts
Car: 92 Firebird
Engine: Supercharged 6.0
Transmission: T56
Axle/Gears: 8.8 3.73
Re: LS1 harness: Start to finish
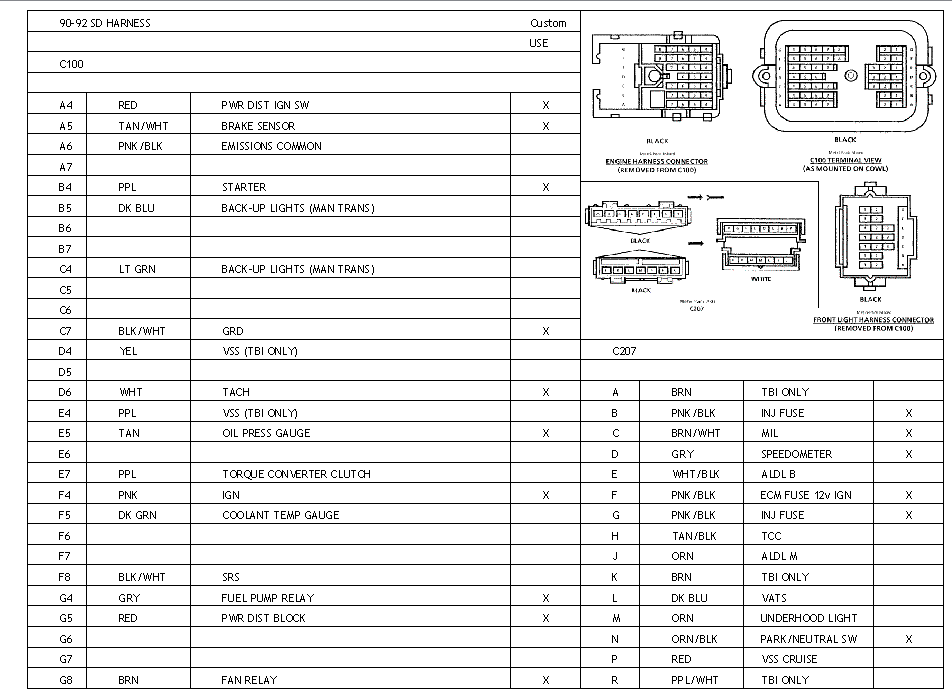
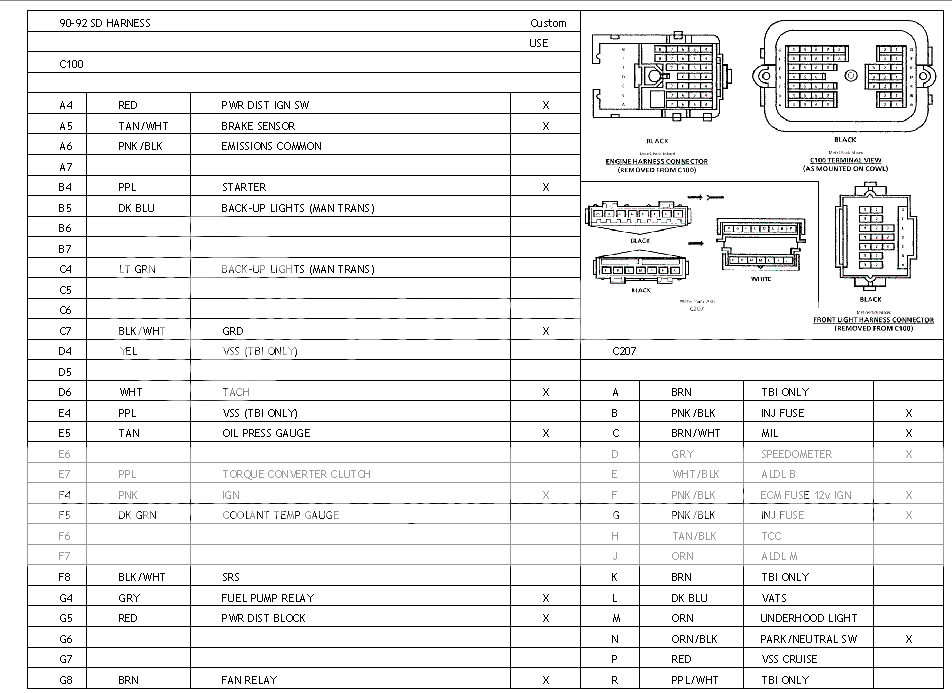
Look up your particular C100/C207 pinout for your year 3rd gen. Here is the 90-92
C100 Connections:
Tach to R10
TCC to B33 (4L60E only)
IGN to whatever IGN commons are left on the LS1 harness that are not fused
There should only be one from your IGN common
C207 connections.
B to bank 1 INJ/Coil IGN wire (PNK)
C to R46
D to R50
F to B19
G to bank 2 INJ/Coil IGN wire (PNK)
N to B32 and B34
Depending on the tune the PCM will not allow the engine to start unless either B32 or B34 is grounded. Which is arbitrary but not having it grounded will be difficult to trace. Ground both and dont worry about it anymore
Finish up the remaining wire leads from the PCM
Relays: if using stock 3rd gen units, the dk grn/wht wire is grounded(fans) or given 12v(fuel pump) for the relays to enable
Fans go to either or both B42 and R33. One PCM pin can control both fans, or the PCM can control each fan independently even at different turn on temps if used separately. The tune can set each's turn on temp
Fuel connects to R9
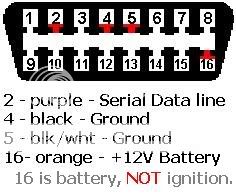
ALDL must be upgraded from the stock OBDI to OBDII. This can be had from any OBDII GM car. The stock OBDI ALDL does not have to be removed, just be aware it will no longer function
Pinout
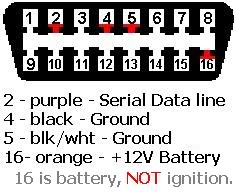
Serial data goes to B58
Splice the battery power to the PCM battery common and attach the runner ground wire from before
VATS must be disabled both in the PCM tune and in the 3rd gen dash harness wiring. Both are quite simple. Locate the starter kill relay behind the drivers kick panel and connect the two heavy wires at the relay. Depending on year, engine and trans type the colors will vary. One wire will ALWAYS be yellow, and the second either dark green or tan/wht
That should wrap up the harness. Loom it and install. Have fun
C100 Connections:
Tach to R10
TCC to B33 (4L60E only)
IGN to whatever IGN commons are left on the LS1 harness that are not fused
There should only be one from your IGN common
C207 connections.
B to bank 1 INJ/Coil IGN wire (PNK)
C to R46
D to R50
F to B19
G to bank 2 INJ/Coil IGN wire (PNK)
N to B32 and B34
Depending on the tune the PCM will not allow the engine to start unless either B32 or B34 is grounded. Which is arbitrary but not having it grounded will be difficult to trace. Ground both and dont worry about it anymore
Finish up the remaining wire leads from the PCM
Relays: if using stock 3rd gen units, the dk grn/wht wire is grounded(fans) or given 12v(fuel pump) for the relays to enable
Fans go to either or both B42 and R33. One PCM pin can control both fans, or the PCM can control each fan independently even at different turn on temps if used separately. The tune can set each's turn on temp
Fuel connects to R9
ALDL must be upgraded from the stock OBDI to OBDII. This can be had from any OBDII GM car. The stock OBDI ALDL does not have to be removed, just be aware it will no longer function
Pinout
Serial data goes to B58
Splice the battery power to the PCM battery common and attach the runner ground wire from before
VATS must be disabled both in the PCM tune and in the 3rd gen dash harness wiring. Both are quite simple. Locate the starter kill relay behind the drivers kick panel and connect the two heavy wires at the relay. Depending on year, engine and trans type the colors will vary. One wire will ALWAYS be yellow, and the second either dark green or tan/wht
That should wrap up the harness. Loom it and install. Have fun
Last edited by Pocket; 11-05-2009 at 06:28 PM. Reason: TCC pin error
Trending Topics
10-06-2009, 08:36 AM
#8
Supreme Member
iTrader: (4)
Join Date: Mar 2009
Location: Pepperell, MA
Posts: 3,079
Likes: 0
Received 3 Likes
on
3 Posts
Car: 1987 Trans Am
Engine: LQ9/L92
Transmission: 4L60E
Re: LS1 harness: Start to finish

I don't know what a lot of us would do without ya on this electrical stuff. Subscribing for when my harness arrives.
 10-06-2009, 11:34 AM
#11
Supreme Member
iTrader: (2)
Join Date: Feb 2006
Location: 39.84N 105.11W
Posts: 1,547
Likes: 0
Received 0 Likes
on
0 Posts
Car: '89 Trans Am GTA
Engine: WAS 350 - now L92 (alum. 378/6.2L)
Transmission: WAS 700R4, now a built T56
Axle/Gears: 3.27 9-bolt
Re: LS1 harness: Start to finish
OUT-Freakin'-STANDING! Thanks Pocket!! 
10-06-2009, 11:41 AM
#12
Supreme Member
iTrader: (30)
Join Date: Sep 2005
Location: O'Fallon, MO
Posts: 6,258
Likes: 0
Received 4 Likes
on
4 Posts
Car: 1991 Z28 convertible built 3/1/1990
Engine: Cammed 6.0L LSX
Transmission: T56
Axle/Gears: custom Ford 8.8", 4.10 gears
Re: LS1 harness: Start to finish
Jon (Pocket) is THE MAN. 
Yes, I'm the lucky duck that got a flippin' sweet harness out of this tech article. Thanks again Jon. Oh, and for anyone that may do business with Jon in the future, he is an excellent person to do business with, I highly recommend him.
Yes, I'm the lucky duck that got a flippin' sweet harness out of this tech article. Thanks again Jon.
Oh, and for anyone that may do business with Jon in the future, he is an excellent person to do business with, I highly recommend him.
10-06-2009, 01:42 PM
#14
Senior Member
Join Date: Aug 2006
Location: Ontario, Canada
Posts: 807
Likes: 0
Received 2 Likes
on
2 Posts
Car: 1991 Trans Am GTA
Engine: LSX (swapping)
Transmission: 4L60E (swapping)
Axle/Gears: 2.73 Posi 10 Bolt
Re: LS1 harness: Start to finish
I am already next in line lol.
10-06-2009, 02:04 PM
#15
Re: LS1 harness: Start to finish
This should be stickied up top. I like how he even went into details on how to extend the wires. Tips like to remove the pcm connectors for easy sorting etc.
1st class.
where is five7kid to sticky this thread.
1st class.
where is five7kid to sticky this thread.
11-22-2009, 07:36 PM
#17
Supreme Member
Thread Starter
iTrader: (24)
Join Date: Jun 2005
Location: NC
Posts: 7,877
Likes: 0
Received 58 Likes
on
42 Posts
Car: 92 Firebird
Engine: Supercharged 6.0
Transmission: T56
Axle/Gears: 8.8 3.73
Re: LS1 harness: Start to finish
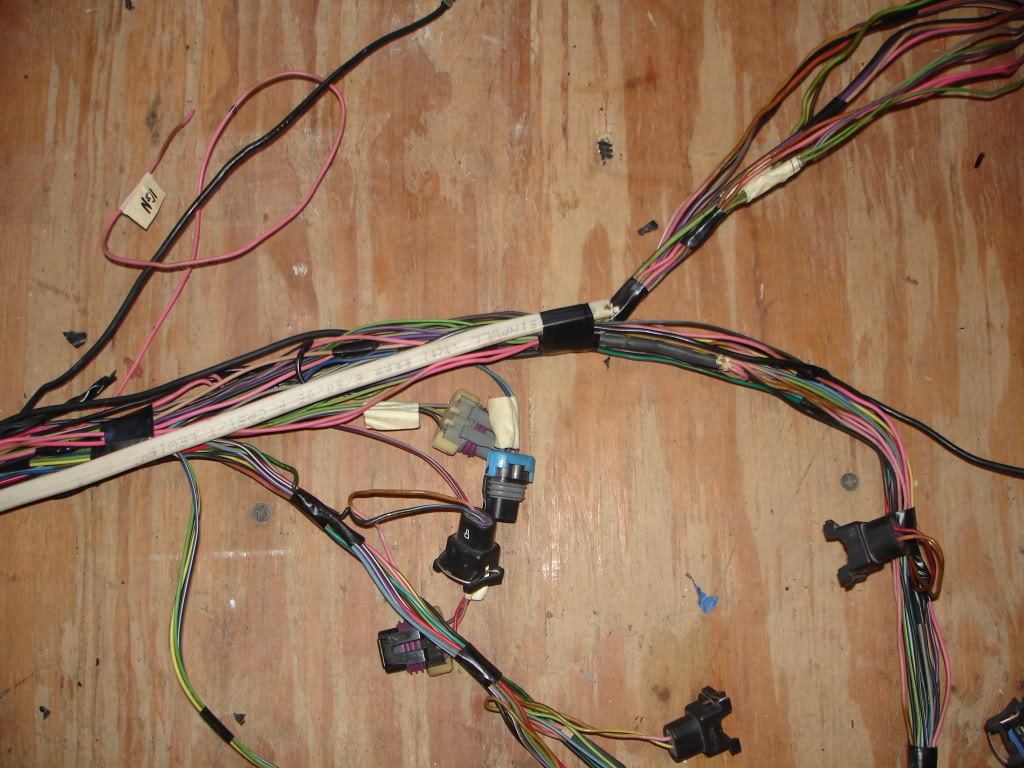
Not sure why I didnt add this in with the build thread
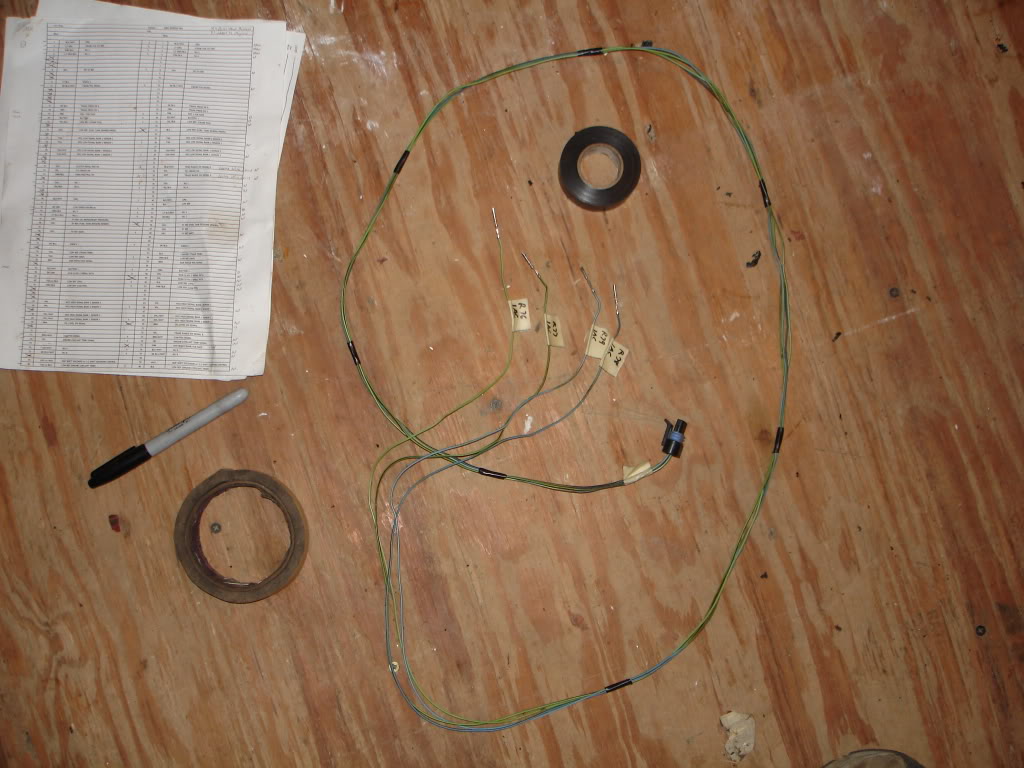
This is how the harness should look prior to looming
This was a 4L60E/AC harness designed for an engine bay mounted PCM or to be routed under the HVAC box and mounted under the dash
3 connections to the 3rd gen harness
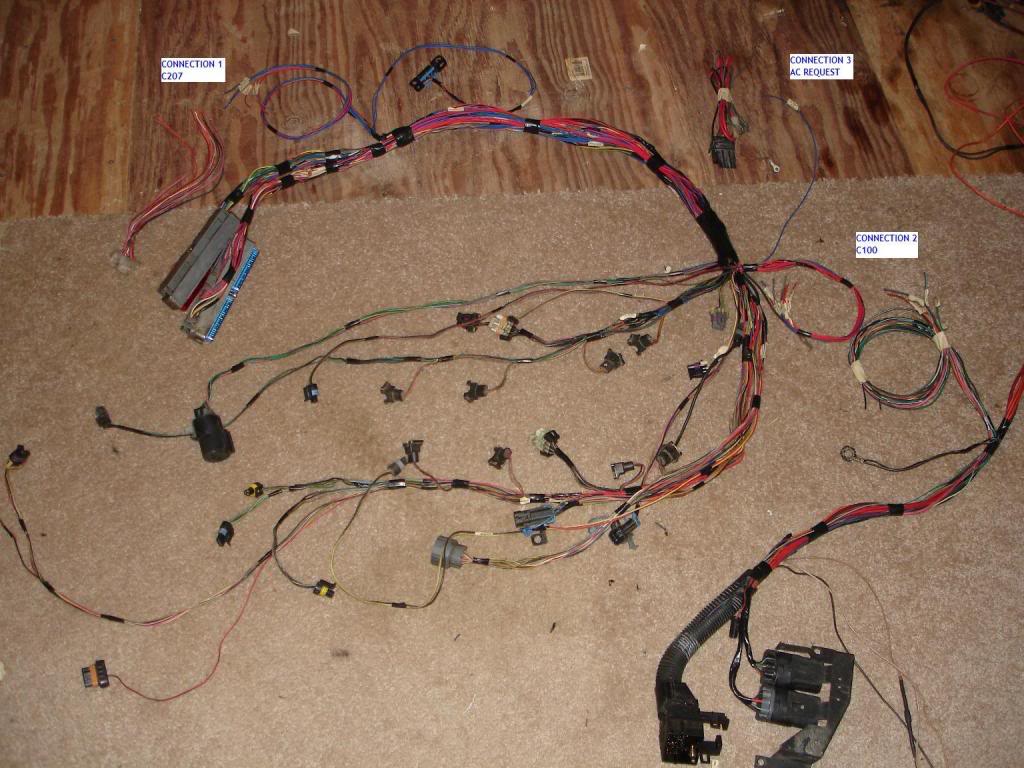
#3 is only used for swaps with AC
This is how the harness should look prior to looming
This was a 4L60E/AC harness designed for an engine bay mounted PCM or to be routed under the HVAC box and mounted under the dash
3 connections to the 3rd gen harness
#3 is only used for swaps with AC
11-23-2009, 01:30 PM
#18
Supreme Member
iTrader: (1)
Join Date: Jun 2006
Location: Guelph, Ontario
Posts: 1,067
Likes: 0
Received 0 Likes
on
0 Posts
Car: 89 IROC/05 RX8
Engine: LS1/LS1
Transmission: T56/T56
Axle/Gears: 3.42 GM/3.55 8.8
Re: LS1 harness: Start to finish
Looks good pocket!
Interesting the way you removed every wire individually. I like it.
Im working on building a brand new harness from scratch for my dad's 70 Firebird w/ the 6.0L.
I know alot of people dislike the wiring, but i personally like doin the wiring. Its time consuming, but its always something that makes or breaks the look of the engine bay.
 02-25-2010, 04:21 PM
#20
Supreme Member
Join Date: Mar 2004
Location: In the Garage
Posts: 2,519
Likes: 0
Received 4 Likes
on
3 Posts
Car: Camaro
Engine: 6.2L
Transmission: T56
Re: LS1 harness: Start to finish
Hey Pocket what tool are you using for pin removal? I have one too many gashes on my thumb.. heck i have a cavity where I shoved a screwdriver right through it once re-pinning a Mach 1 sled years ago. See pic for proof ( look at the groove its healed now this was years ago )
Last edited by cam-; 09-20-2013 at 12:32 PM.
02-25-2010, 04:55 PM
#21
Supreme Member
Thread Starter
iTrader: (24)
Join Date: Jun 2005
Location: NC
Posts: 7,877
Likes: 0
Received 58 Likes
on
42 Posts
Car: 92 Firebird
Engine: Supercharged 6.0
Transmission: T56
Axle/Gears: 8.8 3.73
Re: LS1 harness: Start to finish
I use a common solder pick, but no tool is actually required to depin the PCM terminals. Pop the cover off and youll see little plastic fingers holding the bottom ring of the terminal. Bend the finger back and push the terminal down through the connector. Easy peasy
I use the flat end of the pick on the plastic because my fingers start to hurt after about 20 terminals, and theres up to 160 to mess with
Your L92 uses a different PCM that Ive never seen before. I have no idea whats needed for it. LTx/LSx/SBC vortec all used the easy to remove terminals
I use the flat end of the pick on the plastic because my fingers start to hurt after about 20 terminals, and theres up to 160 to mess with
Your L92 uses a different PCM that Ive never seen before. I have no idea whats needed for it. LTx/LSx/SBC vortec all used the easy to remove terminals
02-25-2010, 05:03 PM
#22
Supreme Member
Join Date: Mar 2004
Location: In the Garage
Posts: 2,519
Likes: 0
Received 4 Likes
on
3 Posts
Car: Camaro
Engine: 6.2L
Transmission: T56
Re: LS1 harness: Start to finish
Yeah e38 PCM for this swap and I havent even popped the covers off yet so I dont know what the terminals look like. My friend here does VW swaps and has a nifty little tool kit with all the harness terminal tools and crimpers and the like. I wondered if you had something like that plus I thought it would be helpful info for the sticky hence my post. I have a few small snap on screwdrivers that work nicely but when you slip... see pic above hahaha
02-25-2010, 06:21 PM
#23
Supreme Member
Thread Starter
iTrader: (24)
Join Date: Jun 2005
Location: NC
Posts: 7,877
Likes: 0
Received 58 Likes
on
42 Posts
Car: 92 Firebird
Engine: Supercharged 6.0
Transmission: T56
Axle/Gears: 8.8 3.73
Re: LS1 harness: Start to finish
Post pics of the new PCM connectors and whatever method works out for you. Ive been asked a few times about it, but never actually went through with anything
Someone will want to know about them
Someone will want to know about them
05-09-2010, 10:20 PM
#24
Junior Member

Join Date: Nov 2009
Location: new orleans
Posts: 4
Likes: 0
Received 0 Likes
on
0 Posts
Car: 1991 Z-28
Transmission: 700r4
Re: LS1 harness: Start to finish
now i just pulled out my 2003 4.8l v-8 out of a 1500 z71 with every inch of wire with it as well as the computers, i'm wondering what programing clitchs am i going to have when i put it all in my '91 camero?
could anyone help me out?
could anyone help me out?

 05-10-2010, 09:01 AM
#27
Supreme Member
iTrader: (4)
Join Date: Mar 2009
Location: Pepperell, MA
Posts: 3,079
Likes: 0
Received 3 Likes
on
3 Posts
Car: 1987 Trans Am
Engine: LQ9/L92
Transmission: 4L60E
Re: LS1 harness: Start to finish
also believe a lot of guys have switched the programs over from the truck to the LS1 program for usability and tuning options, but it will mean a bit of repinning on the harness as well. a bit of a daunting task, but may be worth the payoff later
05-10-2010, 09:14 AM
#28
05-10-2010, 11:24 AM
#29
Supreme Member
Thread Starter
iTrader: (24)
Join Date: Jun 2005
Location: NC
Posts: 7,877
Likes: 0
Received 58 Likes
on
42 Posts
Car: 92 Firebird
Engine: Supercharged 6.0
Transmission: T56
Axle/Gears: 8.8 3.73
Re: LS1 harness: Start to finish
4.8s are indeed less powerful than the 5.3, but when you look at them they still outperform any of the TPIs installed in 3rd gens so itll be a benefit. 5.3's are massively common though, so you may want to pick up a cheap long block and use the 4.8 stuff to complete it then resell/part out the 4.8
Truck pinouts were very similar to the 99-02 Fbody pinout in this thread for most of the common early years. Once DBW became standard with the blue/green PCMs the pin outs started to get specific. I really doesnt matter what your pinout is to begin with, only what you end with and having it match your PCM. Since the goal of this thread is to set your own pinout, you only have to worry about picking a PCM
In the end you should not be able to tell the difference in a Fbody LSx harness and a truck LSx swap harness
Thanks Ramair
05-10-2010, 05:48 PM
#30
Junior Member
Join Date: Nov 2009
Location: new orleans
Posts: 4
Likes: 0
Received 0 Likes
on
0 Posts
Car: 1991 Z-28
Transmission: 700r4
Re: LS1 harness: Start to finish
now do i just go find a ls1 computer,or do i re-program the trucks?
i'm really new to this all,and i'm really wondering did i bite off more than i can chew?
on the top of this thread is basicaly the pin lay out that i need?
i'm really new to this all,and i'm really wondering did i bite off more than i can chew?
on the top of this thread is basicaly the pin lay out that i need?
05-10-2010, 07:48 PM
#31
Supreme Member
Thread Starter
iTrader: (24)
Join Date: Jun 2005
Location: NC
Posts: 7,877
Likes: 0
Received 58 Likes
on
42 Posts
Car: 92 Firebird
Engine: Supercharged 6.0
Transmission: T56
Axle/Gears: 8.8 3.73
Re: LS1 harness: Start to finish
If the harness connectors from the truck are red/blue then yes. If they are blue/green you need a different PCM
05-18-2010, 02:33 PM
#32
Junior Member

Join Date: Jul 2006
Posts: 3
Likes: 0
Received 0 Likes
on
0 Posts
Re: LS1 harness: Start to finish
Yours will be a blue / green one, you'll need a blue / red one
05-28-2010, 07:31 AM
#33
Member
Re: LS1 harness: Start to finish
I spent about three hours last night studying the Helms for my '86. My C100 is a little different according to the pinout in the manual but not much. I could not find a pinout for the C207 other than the graphic that shows the connector face and pin IDs. According to the circuit diagrams though the '86 C207 is quite different than later years. I am going to have Excel my own pinout for later reference. I'll also post what I come up with and the '86 C100 pinout at that time.
Mike
Mike
Look up your particular C100/C207 pinout for your year 3rd gen. Here is the 90-92
C100 Connections:
Tach to R10
TCC to B33 (4L60E only)
IGN to whatever IGN commons are left on the LS1 harness that are not fused
There should only be one from your IGN common
C207 connections.
B to bank 1 INJ/Coil IGN wire (PNK)
C to R46
D to R50
F to B19
G to bank 2 INJ/Coil IGN wire (PNK)
N to B32 and B34
Depending on the tune the PCM will not allow the engine to start unless either B32 or B34 is grounded. Which is arbitrary but not having it grounded will be difficult to trace. Ground both and dont worry about it anymore
Finish up the remaining wire leads from the PCM
Relays: if using stock 3rd gen units, the dk grn/wht wire is grounded(fans) or given 12v(fuel pump) for the relays to enable
Fans go to either or both B42 and R33. One PCM pin can control both fans, or the PCM can control each fan independently even at different turn on temps if used separately. The tune can set each's turn on temp
Fuel connects to R9
ALDL must be upgraded from the stock OBDI to OBDII. This can be had from any OBDII GM car. The stock OBDI ALDL does not have to be removed, just be aware it will no longer function
Pinout
Serial data goes to B58
Splice the battery power to the PCM battery common and attach the runner ground wire from before
VATS must be disabled both in the PCM tune and in the 3rd gen dash harness wiring. Both are quite simple. Locate the starter kill relay behind the drivers kick panel and connect the two heavy wires at the relay. Depending on year, engine and trans type the colors will vary. One wire will ALWAYS be yellow, and the second either dark green or tan/wht
That should wrap up the harness. Loom it and install. Have fun
05-28-2010, 07:39 AM
#34
Supreme Member
Thread Starter
iTrader: (24)
Join Date: Jun 2005
Location: NC
Posts: 7,877
Likes: 0
Received 58 Likes
on
42 Posts
Car: 92 Firebird
Engine: Supercharged 6.0
Transmission: T56
Axle/Gears: 8.8 3.73
Re: LS1 harness: Start to finish
http://www.fbodyrescue.com/forum/vie....php?f=34&t=78
Use a meter to trace the necessary pins for the C207 before disassembling the harness. Another route is to search each helms wiring diagram for the inline connector symbol -<<- followed by the connector name and pin assignment. Once each wire is identified you can strip the harness and attach the C207
Use a meter to trace the necessary pins for the C207 before disassembling the harness. Another route is to search each helms wiring diagram for the inline connector symbol -<<- followed by the connector name and pin assignment. Once each wire is identified you can strip the harness and attach the C207
05-28-2010, 11:21 AM
#35
Member
Re: LS1 harness: Start to finish
http://www.fbodyrescue.com/forum/vie....php?f=34&t=78
Use a meter to trace the necessary pins for the C207 before disassembling the harness. Another route is to search each helms wiring diagram for the inline connector symbol -<<- followed by the connector name and pin assignment. Once each wire is identified you can strip the harness and attach the C207
Use a meter to trace the necessary pins for the C207 before disassembling the harness. Another route is to search each helms wiring diagram for the inline connector symbol -<<- followed by the connector name and pin assignment. Once each wire is identified you can strip the harness and attach the C207
Thanks for the link. It will be helpfull.
12-23-2010, 04:42 PM
#36
Senior Member
iTrader: (8)

Join Date: Sep 2010
Location: Cincinnati, Ohio
Posts: 732
Likes: 0
Received 0 Likes
on
0 Posts
Car: '89 GTA
Engine: 5.7L LS1
Transmission: 4L60E
Axle/Gears: 9 bolt 3.27
Re: LS1 harness: Start to finish
This didn't seem incredibly clear to me. So if your IAT low ref wire(ppl) is grounded then you should remove it completely?
12-23-2010, 05:34 PM
#37
Supreme Member
Thread Starter
iTrader: (24)
Join Date: Jun 2005
Location: NC
Posts: 7,877
Likes: 0
Received 58 Likes
on
42 Posts
Car: 92 Firebird
Engine: Supercharged 6.0
Transmission: T56
Axle/Gears: 8.8 3.73
Re: LS1 harness: Start to finish
Low ref is return ground signal for a PCM. If a sensor doesnt ground through the PCM, it will code unless its turned off. IAT for example, cannot be turned off as its a critical function
You dont ground them directly. Sorry for the confusing wording, I meant just for the unused leg of the circuit to get cut out. That way the only thing left is the IAT low strait to the PCM, no tees
You dont ground them directly. Sorry for the confusing wording, I meant just for the unused leg of the circuit to get cut out. That way the only thing left is the IAT low strait to the PCM, no tees
12-23-2010, 05:52 PM
#38
Senior Member
iTrader: (8)
Join Date: Sep 2010
Location: Cincinnati, Ohio
Posts: 732
Likes: 0
Received 0 Likes
on
0 Posts
Car: '89 GTA
Engine: 5.7L LS1
Transmission: 4L60E
Axle/Gears: 9 bolt 3.27
Re: LS1 harness: Start to finish
Ok I had no idea that plug was for the cars traction control, now your wording makes sense. Sorry but I'm still learning the newer stuff. Thanks Pocket.
03-26-2011, 01:32 PM
#39
Member

Join Date: Mar 2002
Location: RI
Posts: 213
Likes: 0
Received 1 Like
on
1 Post
Car: 1991 Trans Am
Engine: 5.3L
Transmission: auto
Re: LS1 harness: Start to finish
R53 - spark/ignition retard signal
Probably a stupid question. I've read that this is for the traction control. Since I'm not using TC, I just skip this wire?
Probably a stupid question. I've read that this is for the traction control. Since I'm not using TC, I just skip this wire?
04-27-2011, 09:08 AM
#41
Supreme Member

Join Date: Jun 2001
Location: Charleston, SC
Posts: 9,550
Likes: 0
Received 2 Likes
on
2 Posts
Car: 91 Camaro Vert
Engine: 02 LS1, HX40
Transmission: 2002 LS1 M6
Re: LS1 harness: Start to finish
lol, looking up something related, I noticed this thread.
thats my post quoted from when I posted it on LS1tech. lol.
thats my post quoted from when I posted it on LS1tech. lol.
05-19-2011, 08:31 PM
#42
Member
Re: LS1 harness: Start to finish
Are you willing to build harnesses for $$$? I don't trust myself considering only thing I know about electric is that it hurts.
05-19-2011, 08:52 PM
#43
06-15-2011, 07:42 PM
#44
Junior Member

Join Date: Feb 2011
Posts: 49
Likes: 0
Received 0 Likes
on
0 Posts
Re: LS1 harness: Start to finish
i have a couple questions... what does HO2 stand for, and also, if using the truck harness, can you use truck injectors on an ls1 intake. i don't wanna buy new injectors...
06-15-2011, 07:49 PM
#45
Supreme Member
Thread Starter
iTrader: (24)
Join Date: Jun 2005
Location: NC
Posts: 7,877
Likes: 0
Received 58 Likes
on
42 Posts
Car: 92 Firebird
Engine: Supercharged 6.0
Transmission: T56
Axle/Gears: 8.8 3.73
Re: LS1 harness: Start to finish
Heated Oxygen sensor
Truck injectors can be used on a car intake if you use the truck fuel rails. Beware they're big and look goofy on the intake. The crossover looks like a bread basket handle. LS1 injectors are cheap as in <$50, why not use them and a stock car rail?
Truck injectors can be used on a car intake if you use the truck fuel rails. Beware they're big and look goofy on the intake. The crossover looks like a bread basket handle. LS1 injectors are cheap as in <$50, why not use them and a stock car rail?
06-15-2011, 07:52 PM
#46
Senior Member
iTrader: (8)
Join Date: Sep 2010
Location: Cincinnati, Ohio
Posts: 732
Likes: 0
Received 0 Likes
on
0 Posts
Car: '89 GTA
Engine: 5.7L LS1
Transmission: 4L60E
Axle/Gears: 9 bolt 3.27
Re: LS1 harness: Start to finish
But that handle does make removing the intake a breeze.

06-15-2011, 07:53 PM
#47
Junior Member
Join Date: Feb 2011
Posts: 49
Likes: 0
Received 0 Likes
on
0 Posts
Re: LS1 harness: Start to finish
less then $50 each?
ill probably buy car injectors then, i figured id be looking at a small loan to get 8 of them. lol! the car injectors use the same plug as truck injectors tho right?
ill probably buy car injectors then, i figured id be looking at a small loan to get 8 of them. lol! the car injectors use the same plug as truck injectors tho right?
06-15-2011, 08:39 PM
#48
Supreme Member
Thread Starter
iTrader: (24)
Join Date: Jun 2005
Location: NC
Posts: 7,877
Likes: 0
Received 58 Likes
on
42 Posts
Car: 92 Firebird
Engine: Supercharged 6.0
Transmission: T56
Axle/Gears: 8.8 3.73
Re: LS1 harness: Start to finish
Used sets sell for $40-50 on LS1tech commonly. Not sure what they fetch new individually
Different connector, uses the same thing your V6/TPI used. Go to the JY and grab a set of 8 from random cars
Different connector, uses the same thing your V6/TPI used. Go to the JY and grab a set of 8 from random cars
06-19-2011, 12:53 AM
#49
Junior Member
Join Date: Feb 2011
Posts: 49
Likes: 0
Received 0 Likes
on
0 Posts
Re: LS1 harness: Start to finish
an idea i had, for those of us that are new to some of these plugs, i know i've never seen some of them, could someone provide close up pictures of each plug? and a short description of that the sensor does?

