How to: Tighten tilt steering w/pictures
 03-29-2009, 11:35 PM
#1
Junior Member
Thread Starter

Join Date: Mar 2009
Location: Nashville, TN
Posts: 45
Likes: 0
Received 1 Like
on
1 Post
Car: 2012 GMC Sierra SLT Z71
Engine: LC9 5.3L
Transmission: 6L90
Axle/Gears: 3.08
How to: Tighten tilt steering w/pictures
This is a picture tutorial on how to fix the wobbly tilt steering problem. There is a really good step by step write up in the tech articles that I used while fixing my steering.
https://www.thirdgen.org/steeringcolumn
I decided to do this write up because I ran into a few things not explained in the other write ups and a picture is worth a thousand words.
The most important thing about this whole project is DON’T DROP ANYTHING DOWN THE STEERING COLUMN. It’s a black abyss and you’ll never get it back. Ok, not really but it’s a pain in the butt! If you think there’s a chance you may drop a screw when you remove it, use a magnet to catch it as you unscrew it.
Step 1: Remove steering wheel using steering wheel puller.
- Remove horn pad
- Remove nut retainer clip
- Remove steering wheel nut
- Use steering wheel puller to remove wheel. (This is the only special tool you really need if you have an assistant.)
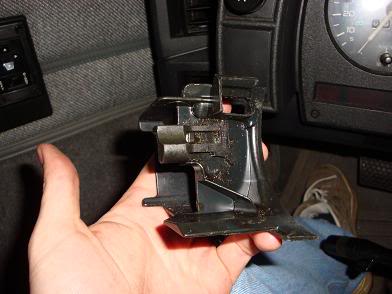
Step 2: Remove lock plate cover.
- This is just a plastic cover, use a flat head screw driver to pry the holding tabs.
Step 3: Remove lock plate with depressing tool
- I didn't have one of these and it was 11:00 pm when I started this job so I couldn't get one. Improvise.
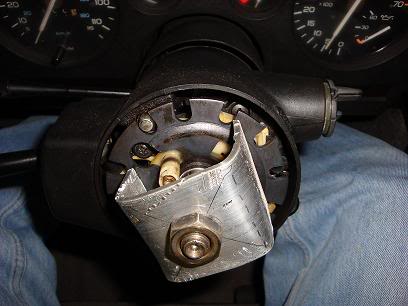
I had some aluminum flat stock in the garage, a couple of vise grips and a step bit. Bend aluminum, drill hole, trim “legs” for proper length. I just used the steering wheel nut to compress the lock plate.
If you have an assistant available you can just have them hold the lock plate down while you work on getting the little snap ring/circlip, whatever you want to call it, off.
No matter how you compress the lock plate be careful once you get the clip off so the lock plate doesn’t fly off in it you in the face.
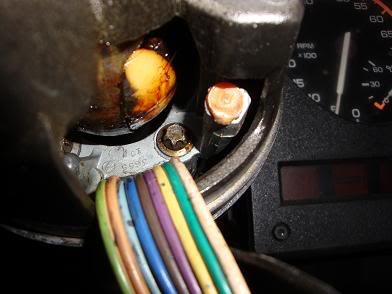
- Remove the plastic horn switch retainer thing (white plastic doughnut with a post)
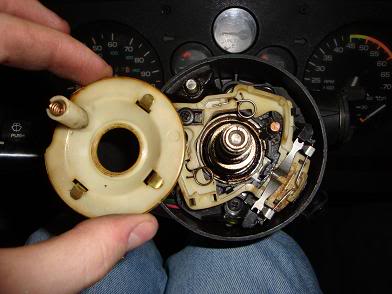
Step 4: Remove hazard light switch. -Just take the Philips screw out of the center. (don’t loose the two pieces of the switch or the spring)
Step 5: Remove 3 philips screws from the turn signal switch.
-You may have to move the turn signal to the right or left position to access all the screws. (use your magnet if you are clumsy to avoid dropping a screw down the steering column)
-You may have to remove the metal arm that connects the turn signal lever to the turn signal switch. It’s one screw and then pull the arm out.
https://www.thirdgen.org/steeringcolumn
I decided to do this write up because I ran into a few things not explained in the other write ups and a picture is worth a thousand words.
The most important thing about this whole project is DON’T DROP ANYTHING DOWN THE STEERING COLUMN. It’s a black abyss and you’ll never get it back. Ok, not really but it’s a pain in the butt! If you think there’s a chance you may drop a screw when you remove it, use a magnet to catch it as you unscrew it.
Step 1: Remove steering wheel using steering wheel puller.
- Remove horn pad
- Remove nut retainer clip
- Remove steering wheel nut
- Use steering wheel puller to remove wheel. (This is the only special tool you really need if you have an assistant.)
Step 2: Remove lock plate cover.
- This is just a plastic cover, use a flat head screw driver to pry the holding tabs.
Step 3: Remove lock plate with depressing tool
- I didn't have one of these and it was 11:00 pm when I started this job so I couldn't get one. Improvise.
I had some aluminum flat stock in the garage, a couple of vise grips and a step bit. Bend aluminum, drill hole, trim “legs” for proper length. I just used the steering wheel nut to compress the lock plate.
If you have an assistant available you can just have them hold the lock plate down while you work on getting the little snap ring/circlip, whatever you want to call it, off.
No matter how you compress the lock plate be careful once you get the clip off so the lock plate doesn’t fly off in it you in the face.
- Remove the plastic horn switch retainer thing (white plastic doughnut with a post)
Step 4: Remove hazard light switch. -Just take the Philips screw out of the center. (don’t loose the two pieces of the switch or the spring)
Step 5: Remove 3 philips screws from the turn signal switch.
-You may have to move the turn signal to the right or left position to access all the screws. (use your magnet if you are clumsy to avoid dropping a screw down the steering column)
-You may have to remove the metal arm that connects the turn signal lever to the turn signal switch. It’s one screw and then pull the arm out.
Last edited by JamesC; 07-03-2010 at 06:53 AM. Reason: Inserted a link
 03-29-2009, 11:50 PM
#2
Junior Member
Thread Starter
Join Date: Mar 2009
Location: Nashville, TN
Posts: 45
Likes: 0
Received 1 Like
on
1 Post
Car: 2012 GMC Sierra SLT Z71
Engine: LC9 5.3L
Transmission: 6L90
Axle/Gears: 3.08
Re: How to: Tighten tilt steering w/pictures
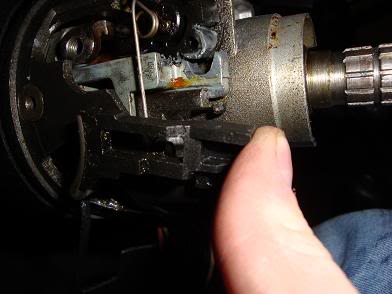
-Pull the turn signal switch over the steering spindle and let it hang out of the way. (you may need to remove the bottom panel under the dash to get some more slack in the wires. I didn’t but you might.)
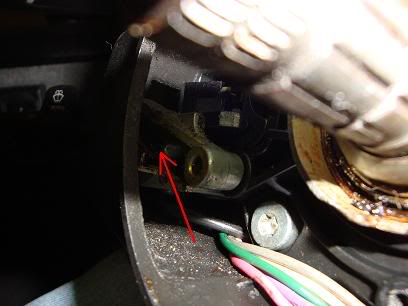
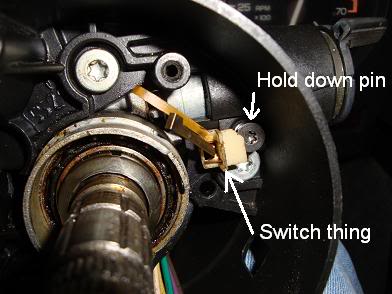
-Remove the ignition hold down pin. As you loosen the hold down pin the screw head will hit the plastic switch to the left and start to pull that out as well. You can just grab that switch and pull it out of its square hole.
-Remove the 3 torx bolts from the turn signal housing.
-Unscrew the tilt lever.
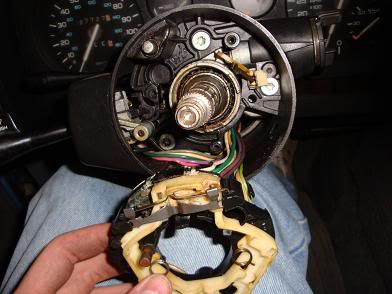
-Pull the steering column cover over the steering column. This is kind of tricky and takes some stretching of the wires but it will slide over the column. Don’t worry if the plastic part behind the turn signal lever falls apart when you remove the column cover, this is part of the dimmer switch actuator and goes back together pretty easy.
-Remove the ignition hold down pin. As you loosen the hold down pin the screw head will hit the plastic switch to the left and start to pull that out as well. You can just grab that switch and pull it out of its square hole.
-Remove the 3 torx bolts from the turn signal housing.
-Unscrew the tilt lever.
-Pull the steering column cover over the steering column. This is kind of tricky and takes some stretching of the wires but it will slide over the column. Don’t worry if the plastic part behind the turn signal lever falls apart when you remove the column cover, this is part of the dimmer switch actuator and goes back together pretty easy.
03-30-2009, 12:01 AM
#3
Junior Member
Thread Starter
Join Date: Mar 2009
Location: Nashville, TN
Posts: 45
Likes: 0
Received 1 Like
on
1 Post
Car: 2012 GMC Sierra SLT Z71
Engine: LC9 5.3L
Transmission: 6L90
Axle/Gears: 3.08
Re: How to: Tighten tilt steering w/pictures
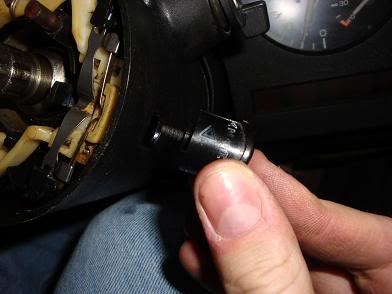
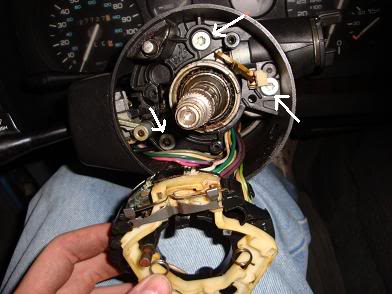
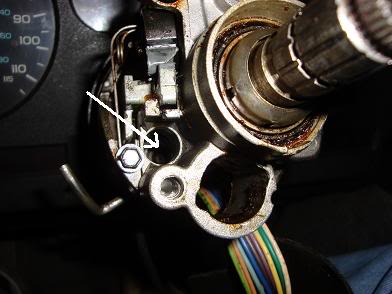
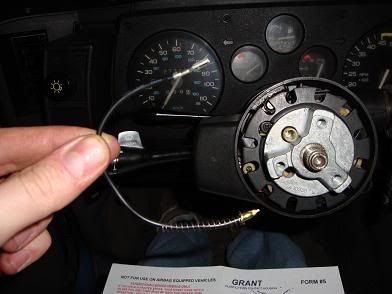
-Remove the big spring lock using a large Philips screw driver. Push it in using the screw driver and turn it counter-clockwise and remove it and the spring. (It’ll be all greasy, don’t get it on your interior)
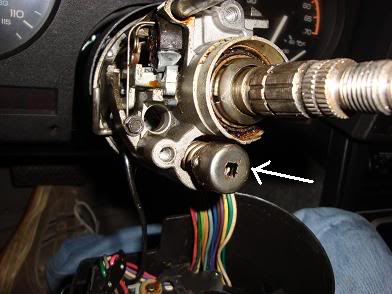
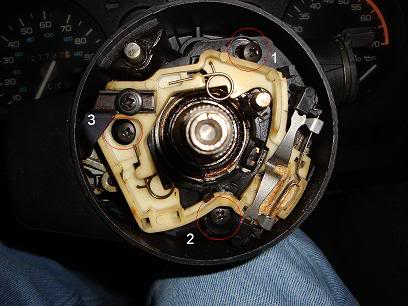
-Now the tech article will tell you to use a tilt steering pin puller to pull the pins and gain access to the 4 bolts that we need to tighten. I didn’t have one of these pullers and it was getting late and I needed the car back together that night. I found that you can get at the bottom 2 bolts without taking the tilt steering apart. The bolts are inverse torx head bolts but you can use a �” six sided socket if you don’t have an inverse torx socket. I used a long �” drive wobble extension to access the two bottom bolts. Mine was so bad that one of the bolts had actually fallen out and was just lying loose in there.
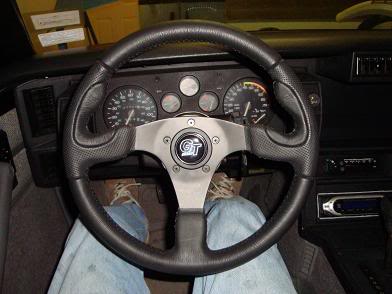
-Now just put everything back together in reverse order. If you are going to install a Grant steering wheel, continue below.
-Install the plastic horn switch ring and the steering wheel mount included with the Grant installation kit.
-Install the included horn switch wire.
-Assemble the steering wheel and hook up the horn wire(s) according to the instructions.
Sit back and check out your new steering wheel.
-Now the tech article will tell you to use a tilt steering pin puller to pull the pins and gain access to the 4 bolts that we need to tighten. I didn’t have one of these pullers and it was getting late and I needed the car back together that night. I found that you can get at the bottom 2 bolts without taking the tilt steering apart. The bolts are inverse torx head bolts but you can use a �” six sided socket if you don’t have an inverse torx socket. I used a long �” drive wobble extension to access the two bottom bolts. Mine was so bad that one of the bolts had actually fallen out and was just lying loose in there.
-Now just put everything back together in reverse order. If you are going to install a Grant steering wheel, continue below.
-Install the plastic horn switch ring and the steering wheel mount included with the Grant installation kit.
-Install the included horn switch wire.
-Assemble the steering wheel and hook up the horn wire(s) according to the instructions.
Sit back and check out your new steering wheel.
The following users liked this post:
TWON_3rdGEN (11-24-2019)
03-30-2009, 11:02 PM
#4
Supreme Member

iTrader: (7)
Join Date: Jun 2008
Location: Minnesota
Posts: 1,468
Likes: 0
Received 0 Likes
on
0 Posts
Car: 89 IROC-Z
Engine: 370 LSX, LS3 Top End
Transmission: Built T-56
Axle/Gears: 9" Aluminum Center 3.89's
Re: How to: Tighten tilt steering w/pictures
THANK YOU KIND SIR!!!! Pictures are worth a million plus words. I think a little revising with proper words would make this a new tech article. It better become a Sticky!! (JT should handle this) Thanks for taking the time to do this sled.
03-31-2009, 10:39 PM
#5
Member
Re: How to: Tighten tilt steering w/pictures
Excellent write up, I went the lazy way and paid a steering column shop to do it but I'm sure this will help many. Later.
04-01-2009, 09:54 PM
#6
Supreme Member
Join Date: Nov 2007
Location: IL
Posts: 1,092
Likes: 0
Received 1 Like
on
1 Post
Car: 88 IROC, 76 Malibu Classic
Engine: 350 TPI, 350
Transmission: 700R4, 4-speed
Axle/Gears: 10 bolt ????
Re: How to: Tighten tilt steering w/pictures
what is the wobbly tilt steering problem this fixes? I have tilt steering and sometimes the steering wobbles if I put enough force on it. Is it the same thing only worse?
04-01-2009, 09:59 PM
#7
Member
Re: How to: Tighten tilt steering w/pictures
It's a loose steering column at the tilt hinge. It gets loose side to side and up and down but not in and out and when it gets severe it can turn off the car when you turn. Later.
Trending Topics
04-01-2009, 10:06 PM
#8
Supreme Member
Join Date: Nov 2007
Location: IL
Posts: 1,092
Likes: 0
Received 1 Like
on
1 Post
Car: 88 IROC, 76 Malibu Classic
Engine: 350 TPI, 350
Transmission: 700R4, 4-speed
Axle/Gears: 10 bolt ????
Re: How to: Tighten tilt steering w/pictures
right, the up and down movement was what I was talking about. if you pull down on the wheel hard enough it'll slip out of place. other than that it seems fine. just gotta be careful not to be too mean.
04-24-2009, 01:04 PM
#9
Junior Member
Join Date: Jun 2007
Posts: 15
Likes: 0
Received 0 Likes
on
0 Posts
Re: How to: Tighten tilt steering w/pictures
this is probably the best directions for tightening the tilt steering ive found. i just did everything but my ignition isnt lining up as before. ive played with the gears on the left hand side of the column with no luck. Any ideas??
Thanks
Thanks
05-03-2009, 03:50 PM
#10
Junior Member
iTrader: (2)

Join Date: Sep 2008
Location: MASS
Posts: 89
Likes: 0
Received 0 Likes
on
0 Posts
Car: 87 Camaro
Engine: 5.7 350 TPI
Transmission: T5
Axle/Gears: 3.42
Re: How to: Tighten tilt steering w/pictures
used this post yesterday and it was very helpful. had my laptop in the passenger seat and followed the steps with no problem. great post and much appreciated for making the job easier. this should be made a sticky.
Thanks again
Thanks again
08-02-2009, 04:24 AM
#11
Senior Member
Join Date: May 2008
Location: SF bay area
Posts: 722
Likes: 0
Received 0 Likes
on
0 Posts
Car: 86 Camaro iroc-z28
Engine: 305 TPI
Transmission: 700R4
Axle/Gears: 3.42 Posi
Re: How to: Tighten tilt steering w/pictures
i already have a Grant steering wheel installed. so what steps would be bypassed in this situation? also the bolts your were talking about that need to be tightened. is there any way to prevent them from ever getting loose again. perhaps thread locker?
08-02-2009, 07:49 AM
#12
Member
iTrader: (1)

Join Date: Mar 2002
Location: Indiana, PA
Posts: 198
Likes: 0
Received 1 Like
on
1 Post
Car: 86 IROC
Engine: SC'ed 350
Transmission: 700R4
Axle/Gears: 4.11 12bolt
Re: How to: Tighten tilt steering w/pictures
My tilt lever is welded on so when I tried to unscrew it, I ripped the plastic coating off. It didn't need to come off in my case anyway. Wish I knew that before I screwed it up.
08-03-2009, 12:25 AM
#13
Junior Member
Thread Starter
Join Date: Mar 2009
Location: Nashville, TN
Posts: 45
Likes: 0
Received 1 Like
on
1 Post
Car: 2012 GMC Sierra SLT Z71
Engine: LC9 5.3L
Transmission: 6L90
Axle/Gears: 3.08
Re: How to: Tighten tilt steering w/pictures
Yeah you should be able to use some loc-tite just make sure you use blue or one of the ones that doesn't require heat or special tools to remove in case you ever need to take it apart.
Don't take all the bolts out at once!!! If you do you'll drop the plate off the back and then you're screwed. Just take on bolt out and loc-tite it then put it back and repeat.
Last edited by sled_fiend; 08-03-2009 at 12:28 AM.
08-03-2009, 12:52 PM
#15
Junior Member
Thread Starter
Join Date: Mar 2009
Location: Nashville, TN
Posts: 45
Likes: 0
Received 1 Like
on
1 Post
Car: 2012 GMC Sierra SLT Z71
Engine: LC9 5.3L
Transmission: 6L90
Axle/Gears: 3.08
Re: How to: Tighten tilt steering w/pictures
Very nice write up. I passed up a couple of 90-92 Camaros looking for an 89 because I didn't want the airbag steering wheel. Nice to know you can swap it out if you want to.
Good job on the tilt pin removal. I didn't go that far with mine so between the two of these writes ups folks should have all the pictures and perspectives they need.

Good job on the tilt pin removal. I didn't go that far with mine so between the two of these writes ups folks should have all the pictures and perspectives they need.
06-11-2010, 12:03 AM
#16
Member
iTrader: (1)
Join Date: Nov 2007
Location: Surrey, BC, Canada
Posts: 312
Likes: 0
Received 4 Likes
on
2 Posts
Car: 1991 Z28 Convertible
Engine: 305 TPI
Transmission: 5-speed
Axle/Gears: 10 bolt, 3.08
Re: How to: Tighten tilt steering w/pictures
hell of a long process and finicky. Damn I wish it was easier.
06-30-2010, 10:02 PM
#17
Senior Member
Join Date: May 2008
Location: SF bay area
Posts: 722
Likes: 0
Received 0 Likes
on
0 Posts
Car: 86 Camaro iroc-z28
Engine: 305 TPI
Transmission: 700R4
Axle/Gears: 3.42 Posi
Re: How to: Tighten tilt steering w/pictures
i just did this today. ran into problem after problem.
1. previous owner installed grant steering wheel himself and used the wrong thread pitch screws for the metal bracket behind the steering wheel. 2 of the 3 i took out snapped and im left looking for a new piece
2. ball bearings popped out of the little plastic cage once fully dissassembled. complete mess. ball bearing went everywhere. and i couldnt manage to get them all in the cage to put it together.
3. the turn signal is alittle finicky if you dont do it in the correct order, first the ignition cylinder, then the turn signal arm, then screw in the turn signal plastic mechanism and lastly the hazard. if you do it any other way youll never get that little arm bracket in.
08-06-2010, 12:28 PM
#18
Re: How to: Tighten tilt steering w/pictures
I had this happen and I used an old bicycle for bearings still workin perfectly
08-06-2010, 12:30 PM
#19
08-06-2010, 09:04 PM
#20
Junior Member
iTrader: (3)

Join Date: Jul 2010
Location: Tampa, Florida
Posts: 68
Likes: 0
Received 0 Likes
on
0 Posts
Car: '86 IROC-Z & '13 2SS/RS
Engine: LB9 TPI
Transmission: 700R4
Axle/Gears: 3.23
Re: How to: Tighten tilt steering w/pictures
I wish I would have read this one before the other one I saw on here (fiero instructions). After getting stuck....and not getting the pivot pins out (snapped off a screw in it, LOL)...I just tightened the two torx that I could get to and it solved the problem!! I did end up using this thread for the reinstallation - much better pictures! I am in love with this forum!!! You guys rock!!!
10-22-2010, 06:25 PM
#21
Junior Member

Join Date: Oct 2010
Posts: 1
Likes: 0
Received 0 Likes
on
0 Posts
Re: How to: Tighten tilt steering w/pictures
I wish I would have read this one before the other one I saw on here (fiero instructions). After getting stuck....and not getting the pivot pins out (snapped off a screw in it, LOL)...I just tightened the two torx that I could get to and it solved the problem!! I did end up using this thread for the reinstallation - much better pictures! I am in love with this forum!!! You guys rock!!!
I found a screw of about an inch or so in length which fit into the pin (which has fine threads by the way.) I tried to just pull on it but as it did not come out with moderate force, I removed it and made (assembled) a puller tool.
I placed a correct fitting nut on the screw, followed by a washer, and then a socket (from my socket set
 )
) I then screwed this into the pin. Next I tightened the nut down onto the washer and socket, ...which pulled the pin into the socket (chosen to be big enough for the pin to go into of course.)
Pulling these to pins allowed me to remove the part and gain access to all four screws. All of them were loose but the top ones were the worse. I cleaned them and used red thread sealant as I replaced them and tightened them down.
I wanted to say how easy this last step was because the original author stopped short of this step and only tightened two of the four bolts. I'm not sure why this sub thread author had a problem (breaking off his puller screw) but perhaps he simply tried to keep turning after he seated the screw into the pin and sheared it off. Again, I could not pull it by hand so a puller was needed, but it only takes a screw, a nut, a washer and a hollow spacer (a socket, or even a washer bent to form a square U shape) to get around this without spending money ow wasting time.
Now all I have to do is figure out how it all goes back together!


Last edited by fdavies; 10-22-2010 at 06:29 PM. Reason: Punctuation
12-31-2010, 07:55 AM
#23
Junior Member

Join Date: Oct 2010
Posts: 57
Likes: 0
Received 0 Likes
on
0 Posts
Re: How to: Tighten tilt steering w/pictures
Wow damn am I glad I found this thread 
I'm going through the same issue right now: Tilt is screwed up. I went about removing the entire steering column and I did it blind (no write up, Chiltons... nothing).
Anyway, I'm at the point where I just need to get to the 4 screws that hold the tilt on.
I also need to find the bearing that goes right behind the steering wheel. Mine fell to pieces the instant the column was removed.
01-15-2011, 12:50 PM
#24
Junior Member

Join Date: Oct 2010
Posts: 1
Likes: 0
Received 0 Likes
on
0 Posts
Re: How to: Tighten tilt steering w/pictures
stripped my trans am gta column the other day as my coulumn can be pulled down to the seven oclock position.
much to my dismay the bolts wer tight. what else can it be
much to my dismay the bolts wer tight. what else can it be
02-10-2011, 10:40 PM
#25
Junior Member
iTrader: (2)

Join Date: Nov 2010
Location: Virginia
Posts: 67
Likes: 0
Received 0 Likes
on
0 Posts
Car: 1992 Firebird
Engine: 3.1l
Re: How to: Tighten tilt steering w/pictures
Might want to add to remove the locking nut thing for airbag cars. I didn't know about that and damn near broke my column trying to get that coil cover thingy off. I'll post pics tomorrow if you'd like
03-19-2011, 09:24 PM
#26
Junior Member

Join Date: Nov 2010
Posts: 17
Likes: 0
Received 0 Likes
on
0 Posts
Re: How to: Tighten tilt steering w/pictures
Awesome thread. Did this to my sons 92 gta today...thought it was the torx screws....they were kind of loose but found out one of the pins on the sides was missing. Made one with a steel rod and put it on the passenger side but the one on the drivers side popped back out.....seems to be ovaled out. Any suggestions short of getting a new column or new hardware?
06-24-2011, 08:37 PM
#27
Senior Member
Join Date: May 2009
Location: Riverside (Wood Crest) , CA
Posts: 727
Likes: 0
Received 0 Likes
on
0 Posts
Car: 1988 Pontiac trans am
Engine: 305
Transmission: 700R4
Re: How to: Tighten tilt steering w/pictures
I'm having trouble removing my ignition lock, it doesn't have a torx screw how can I remove this, I have read 3 how to 's and all there are xamaros with the little torx screw
06-26-2011, 11:18 PM
#28
Junior Member
Thread Starter
Join Date: Mar 2009
Location: Nashville, TN
Posts: 45
Likes: 0
Received 1 Like
on
1 Post
Car: 2012 GMC Sierra SLT Z71
Engine: LC9 5.3L
Transmission: 6L90
Axle/Gears: 3.08
Re: How to: Tighten tilt steering w/pictures
Are you talking about the "hold down pin" identified in the picture in the tutorial above? Can you post a picture of situation so we can look at it? Similar to this:

06-27-2011, 01:44 AM
#29
Senior Member
Join Date: May 2009
Location: Riverside (Wood Crest) , CA
Posts: 727
Likes: 0
Received 0 Likes
on
0 Posts
Car: 1988 Pontiac trans am
Engine: 305
Transmission: 700R4
Re: How to: Tighten tilt steering w/pictures
Yes the hold down pin, my unit doesn't have the torx screw, if you look. At my last thread I started, I posted a pi tire of what my steering column looks like
06-27-2011, 08:16 AM
#30
Junior Member
Thread Starter
Join Date: Mar 2009
Location: Nashville, TN
Posts: 45
Likes: 0
Received 1 Like
on
1 Post
Car: 2012 GMC Sierra SLT Z71
Engine: LC9 5.3L
Transmission: 6L90
Axle/Gears: 3.08
Re: How to: Tighten tilt steering w/pictures
Looking at the picture you posted it looks like your hold down pin has been removed and your ignition cylinder is actually in a different position that the one in my photos above (possibly rotated and pulled out slightly). If I remember right you need to put the key in the ignition and turn it to the off position and then the cylinder should pull right out. Without the key I don't think the cylinder will come out though.
06-27-2011, 05:06 PM
#31
Senior Member
Join Date: May 2009
Location: Riverside (Wood Crest) , CA
Posts: 727
Likes: 0
Received 0 Likes
on
0 Posts
Car: 1988 Pontiac trans am
Engine: 305
Transmission: 700R4
Re: How to: Tighten tilt steering w/pictures
Well, I pulled hard on the ignition lock Cylinder, I pulled so hard that the chrome metal part came off, still no success, is there supposed yo be threads on the plastic housing for the lock pin?
06-28-2011, 10:10 AM
#32
Junior Member
Thread Starter
Join Date: Mar 2009
Location: Nashville, TN
Posts: 45
Likes: 0
Received 1 Like
on
1 Post
Car: 2012 GMC Sierra SLT Z71
Engine: LC9 5.3L
Transmission: 6L90
Axle/Gears: 3.08
Re: How to: Tighten tilt steering w/pictures
Wow. That doesn't sound right.
I don't remember how the hole was treaded. If memory serves the pin threaded very course near the torx head (like it would thread into the plastic) then steps down in diameter to a smooth straight pin that goes into a semi circular groove cut across the lock cylinder.
When I took mine apart i just put the key in the ignition and turned it to the correct position and it pulled right out with almost no effort. My Chilton manual says to turn the key to the RUN position to remove the cylinder. Sorry, I thought it was OFF.
10-17-2011, 09:16 PM
#35
Junior Member

Join Date: Oct 2011
Location: Cocoa,FL
Posts: 4
Likes: 0
Received 0 Likes
on
0 Posts
Car: 1987 Sport Coupe
Engine: 305 carb
Re: How to: Tighten tilt steering w/pictures
New member here, Just wanted to say thanks Sled and Matthufham, I referenced both of your posts and got everything apart today, just needed a ignition tumbler replaced but after pulling on the the wheel and jimmying the key the tilt became really wobbly which tightening the two bottom bolts totally cured it, thinking about going a little further in to check the top bolts and pondering the locktite option. Thanks for all the photos, made the first time in easier!
11-15-2011, 01:57 PM
#36
Senior Member

Join Date: Jun 2011
Location: Detroit, MI
Posts: 939
Likes: 0
Received 0 Likes
on
0 Posts
Car: 1987 IROC-Z red t-top
Engine: Nothing much
Transmission: I wish t56
Axle/Gears: 9bolt 3.27 4sale
Re: How to: Tighten tilt steering w/pictures
I have all the right tools but the pin puller my bolts fell out too and I can't line it up I had the tool for the locking plate tool
12-03-2011, 12:17 AM
#38
Supreme Member
iTrader: (3)
Join Date: Jul 2011
Location: Katy TEXAS (West Houston)
Posts: 1,826
Likes: 0
Received 0 Likes
on
0 Posts
Car: 1992 Camaro RS
Engine: 5.0 TBI L03 V8
Transmission: Rebuilt 700R4 W/ Corvette shift kit
Axle/Gears: 2:73 open
Re: How to: Tighten tilt steering w/pictures
Sweet. I'll need this post for future reference.
01-10-2012, 12:44 AM
#39
Junior Member

Join Date: Mar 2011
Location: Auckland. New Zealand.
Posts: 9
Likes: 0
Received 0 Likes
on
0 Posts
Car: Bright Blue IROC 350tpi.
Engine: 350 tpi
Transmission: lazy auto.
Axle/Gears: factory option posi disc.
Re: How to: Tighten tilt steering w/pictures
superb write-up and pictures...I would not have attempted this without this advice and instructions... now the job is done and its beautiful...
"just like a brand-new-bought one" as they say. thanks.
"just like a brand-new-bought one" as they say. thanks.
02-28-2012, 08:45 AM
#41
Senior Member
Join Date: Mar 2011
Location: Colorado Springs
Posts: 578
Likes: 0
Received 1 Like
on
1 Post
Car: 91 firebird Formula 350
Engine: 350 TPI
Transmission: N/A, working on a t5 swap
Axle/Gears: 3.73 posi
Re: How to: Tighten tilt steering w/pictures
@ coach_b, Hey, if you figure out an answer to that, I'm all ears. I haven't been able to find anything yet, short of getting a new column. I'll let you know if I find anything out though.
04-02-2012, 03:56 PM
#42
Senior Member
Join Date: Jun 2011
Location: Detroit, MI
Posts: 939
Likes: 0
Received 0 Likes
on
0 Posts
Car: 1987 IROC-Z red t-top
Engine: Nothing much
Transmission: I wish t56
Axle/Gears: 9bolt 3.27 4sale
Re: How to: Tighten tilt steering w/pictures
I took the pins out to get all 4 its real ugly
04-15-2012, 03:36 PM
#43
Member

Join Date: Jan 2008
Location: East Central IL
Posts: 147
Received 0 Likes
on
0 Posts
Car: 1985 Sport Coupe
Engine: 305
Transmission: 700R4
Axle/Gears: 3.08
Re: How to: Tighten tilt steering w/pictures
i once heard this would work for a early 90's gm truck. is the shifter going to be in the way?
08-05-2012, 04:29 PM
#44
Junior Member

Join Date: Aug 2012
Posts: 1
Likes: 0
Received 0 Likes
on
0 Posts
Re: How to: Tighten tilt steering w/pictures
I knew my column was bad... and yes. when i got it all the way down to the 4 torx bolts, they were all the way out and the metal ring that they screw into fell and is kinda cocked in there. I can see it. but I hope I don't have to try to coat hanger this thing so I can get the bolts started.... got me that far, thanks for the posts,
Well, I had to pull the shaft out to get farther down, to do that I had to drop the column after disconnecting it by the firewall, there's a spring and clip at the bottom of the shaft that held it in. Well, needless to say, I have a mess. Now it just has to go back together.
Well, I had to pull the shaft out to get farther down, to do that I had to drop the column after disconnecting it by the firewall, there's a spring and clip at the bottom of the shaft that held it in. Well, needless to say, I have a mess. Now it just has to go back together.
Last edited by Kevin Bosley; 08-05-2012 at 07:55 PM. Reason: Latest
09-20-2012, 05:40 PM
#45
Junior Member

Join Date: Aug 2012
Location: Boston
Posts: 38
Likes: 0
Received 0 Likes
on
0 Posts
Car: 1986 TA
Engine: 5.0 lg4 carb
Transmission: 700r4 auto
Axle/Gears: 2.73
Re: How to: Tighten tilt steering w/pictures
In 4th pic down part #2 of this post , the plastic piece behind the blinker switch. I DONT have that piece in my 86 ta lg4 auto.
My car was stolen Before I bought it. My high beam rod connects to Nothing! Is that plastic piece what that rod connects????
Thanks any help would be great can't get Sticker for Safty no high beams
My car was stolen Before I bought it. My high beam rod connects to Nothing! Is that plastic piece what that rod connects????
Thanks any help would be great can't get Sticker for Safty no high beams
10-02-2012, 08:55 AM
#46
Junior Member

Join Date: Oct 2012
Posts: 2
Likes: 0
Received 0 Likes
on
0 Posts
Re: How to: Tighten tilt steering w/pictures
Hey there sled_fiend, Helping my son with his 96 buick. I just put a "ignition switch kit" in there since he's having intermitten starting problems. (already did the starter). The photos in the second post are excellent and the column assembly is the same as the Buick's. However, for the life of me I cannot figure out how the little black plastic linkage piece (dimmer) fits into tilt/turn lever housing. It just so happens the one photo is a little dark.
Any chance perhaps explaining or posting a brighter photo of this assembly? HELP!
Thanks.
Man, I'd sure appreciate it.
Any chance perhaps explaining or posting a brighter photo of this assembly? HELP!
Thanks.
Man, I'd sure appreciate it.
12-09-2012, 11:11 PM
#47
Supreme Member
iTrader: (10)
Join Date: Sep 2000
Location: Moorpark, CA
Posts: 2,376
Likes: 0
Received 138 Likes
on
98 Posts
Car: '91 GTA, '92 T/A Convertible
Engine: GTA: 350 w/Vortec heads, T/A: 305
Transmission: Pro-built 700R4
Axle/Gears: GTA: 3.27, T/A: 2.73
Re: How to: Tighten tilt steering w/pictures
Does anyone have an extra one of those "switch thing" that is shown in the picture above? I am in desperate need of one. Or at the very least, the correct part number for it.
 12-10-2012, 02:52 PM
#48
Junior Member
Join Date: Mar 2011
Location: Auckland. New Zealand.
Posts: 9
Likes: 0
Received 0 Likes
on
0 Posts
Car: Bright Blue IROC 350tpi.
Engine: 350 tpi
Transmission: lazy auto.
Axle/Gears: factory option posi disc.
Re: How to: Tighten tilt steering w/pictures
yep heres one in my back pocket... lol... problem is Im in New Zealand !.
try Hawkes, I get bits sent way down here, they are really good.
good luck.
try Hawkes, I get bits sent way down here, they are really good.
good luck.