10 bolt axle gear install by the numbers (pic heavy)
 11-23-2010, 11:05 AM
#1
Member
Thread Starter
iTrader: (2)

Join Date: Nov 2009
Location: Hubert, NC
Posts: 436
Likes: 0
Received 0 Likes
on
0 Posts
Car: 83 Z28
Engine: F-body LT1 swap
Transmission: T-56 swap
Axle/Gears: 10 bolt w/ 28 spl posi, 4.10, disks
10 bolt axle gear install by the numbers (pic heavy)
Ok, let me make a statement (or two) first.
I do not have all the answers so I welcome constructive input from other people who have actually installed gears (sorry opinions and “my buddy does it this way” don’t count).
Also, there are many ways to install gears. So if you have another method that does not mean my method is wrong; it just means we learned from different people. This would be a good time to add content, not blast someone for doing it differently.
Buy some stock in brake cleaner, it is your best friend in getting parts clean and keeping them clean. I usually use about 5-6 cans on an axle depending on how clean it and its parts are to start. If you have bearing damage and metal everywhere, double that. Use disposable lint free rags. I personally like the blue Scott towels you can get just about anywhere. 1 roll should do it (2 makes it safe). Make sure you have a clean area to lay out your clean parts. Separate your caps and shims into a left and right side (Left being the driver side of the axle, right being the passenger side). This will help with assembly and helps keep things coordianted when making changes.
Get a quality installation kit. It is a really, really good idea to go ahead and replace all of the bearings now. Edit: I used a Ratech kit, but was not happy with the kit, myself and two other members have said this kit sucks. Move on to a better install kit from Yukon, Precision Gear, Moser, or Richmond Gear. You will get more complete kits and usually better bearings.
Here are the important specification:
-Ring gear torque: 65ftlbs
-Carrier cap bolts: 55-60ftlbs
-Backlash: .006 - .010
-Pinion preload: 12 – 15inlbs
-Cross pin bolt: 29ftlbs (I usually take a hammer and tap it tight. That has always worked for me)
This site has a good explanation on pattern reading, and what changes do to the pattern. Read up on this before beginning and while reading patterns to help you make shim change decisions.
http://www.drivetrain.com/parts_catalog/ring_and_pinions/ring_and_pinion_installation_instructions.html
Ok, I am going to list the basic and some optional tools you have to have, or at least have access to. You can pick a lot of this up at harbor freight on the cheap.
The below are must have items:
-Bearing splitter (several sizes for different bearings)
-Brass drifts (Really only need a small one and large one)
-Brass hammer (Heft here is key)
-Dead blow hammer (I used a 2.5 lbs version)
-Ball peen hammer (I used a 16oz and 32oz)
-Selection of steel punches (Cheapies are fine, but a long one about 8 to 10 inches works great for getting the races out of the housing)
-Seal and race driver (Aluminum material, not steel)
-Axle/bearing puller (you can rent this from Advance Auto)
-1/2" breaker bar with cheater pipe (I use a 4 foot black lead pipe)
-Yoke holder (Can be bought, made, or a large pipe wrench)
-Dial caliper (I use a digital because it is easier to read)
-Vice (You have to secure the carrier to torque the ring gear bolts)
-Press with press plates (You can take it somewhere to have it done, but adjustments on pinion depth will suck because you will probably have to do it a few times)
-Dial indicator with magnetic adjustable base (Must have for checking back lash and case spreading)
-Inch pounds torque wrench (dial type, not click)
-Foot pounds torque wrench (Click or whatever you have, just needs to be able to do all the torque values for the install)
-Assorted sockets and ratchets (1 �” for the yoke nut)
-Assorted wrenches (must have a 6 point 5/16” wrench or shallow socket for the cross pin bolt, a 12 point will probably strip it out) Edit: Drew said you can also apply a little heat to the carrier to warm it up, that will free the factory loctite and allow easy romoval of the bolt.
-2 pry bars
-Gasket scraper
-Brushes (Brass, stainless, and tooth)
The below items are optional:
-1/2” Impact (This is useful for disassembly, some also say you can use it to partially crush the crush sleeve, but I don’t recommend that)
-Bearing puller kit (like the one from Yukon or Randy’s Ring and Pinion). This removes bearing by grabbing the cage on both sides. I have only ever messed one bearing cage doing it this way and it was a used bearing. Makes removing bearing to make shim adjustments so easy.
-Case spreader. This makes it easy to get the carrier in and out of the housing, just make sure you never exceed .015 or you can damage the housing. All you do is set up your dial indicator on one side of the housing, make the dial indicator parallel with the axle tubes resting on the opposite side of the magnetic base and set it on zero before beginning.
-Pinion depth gauge. This is the one tool I don’t have (used to have one but loaned it to a friend and never got it back) and it makes setting pinion depth so easy by only doing it once. All you have to worry about is setting back lash. Caution, there is math involved!
Ok, I think I have covered all of that well enough, on to the install:
Last edited by supr_fly03; 11-23-2010 at 11:47 PM. Reason: Add to cross pin bolt removal
 11-23-2010, 11:05 AM
#2
Member
Thread Starter
iTrader: (2)
Join Date: Nov 2009
Location: Hubert, NC
Posts: 436
Likes: 0
Received 0 Likes
on
0 Posts
Car: 83 Z28
Engine: F-body LT1 swap
Transmission: T-56 swap
Axle/Gears: 10 bolt w/ 28 spl posi, 4.10, disks
Re: 10 bolt axle gear install by the numbers (pic heavy)
Step 1: Disassemble everything
-Remove the axles https://www.thirdgen.org/forums/transmissions-drivetrain/493071-tips-tricks-installing-axles.html
-Mark the carrier caps. Edit: Big Gear Head said to only mark the right cap. See his post #14 for a better explination.
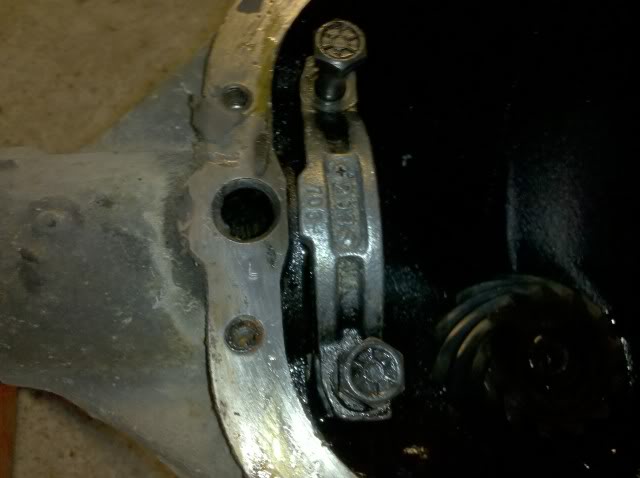
-Remove the carrier. Loosen the cap bolts, use the bolts to wiggle the caps back and forth till they come out. With no case spreader you can do this with 2 pry bars on the carrier or the ring gear bolts. I prefer the latter. DON’T PRY ON THE RING GEAR IT SELF! (Unless it is garbage) Take the carrier shims and place them with the corresponding cap so you don’t forget which came from where. (I also use a sharpie to write the shim size and location on the shim after cleaning)
-Remove the yoke nut with an impact and then the yoke with a dead blow hammer. GM sometimes used sealant on the splines and you have to move onto a brass hammer, or use a nut on the pinion and beat the pinion out (thus removing the yoke).
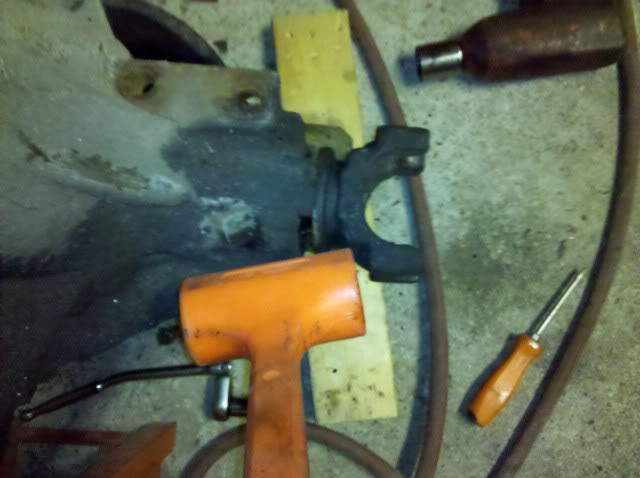
-Remove the pinion. Some come out rather easy, some take more forceful hits. I always use my brass hammer for this; it just ensures no damage is done to the threads. Also, be ready to catch the pinion as it comes out the back (have a rag in your hand or you can pay in blood)
-Use a pry bar to remove the axle seals.
-Use a slide hammer with bearing attachment to remove the axle bearings (Refer to the thread link above)
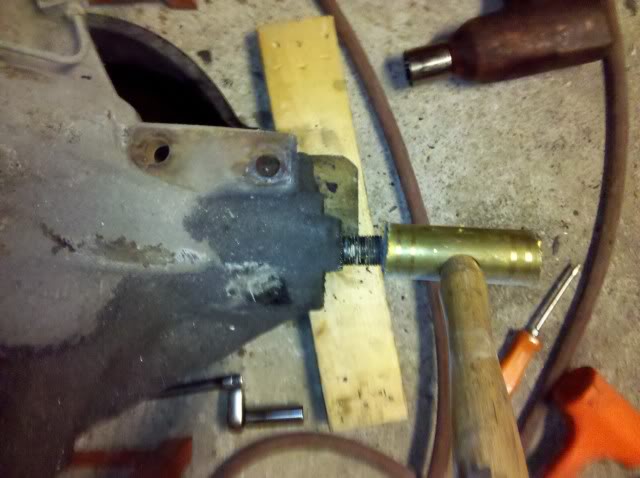
-I use a pipe to knock the front pinion bearing and seal out at the same time. That is the easiest way to get them out.
-Then use a long punch and hammer and get behind the pinion bearing races using the notches in the case to knock them out. Work the race on both sides (there are two nothces on each race) until it falls out. Repeat for the other side.
Now the axle is completely disassembled and dirty, let’s move on.
-Remove the axles https://www.thirdgen.org/forums/transmissions-drivetrain/493071-tips-tricks-installing-axles.html
-Mark the carrier caps. Edit: Big Gear Head said to only mark the right cap. See his post #14 for a better explination.
-Remove the carrier. Loosen the cap bolts, use the bolts to wiggle the caps back and forth till they come out. With no case spreader you can do this with 2 pry bars on the carrier or the ring gear bolts. I prefer the latter. DON’T PRY ON THE RING GEAR IT SELF! (Unless it is garbage) Take the carrier shims and place them with the corresponding cap so you don’t forget which came from where. (I also use a sharpie to write the shim size and location on the shim after cleaning)
-Remove the yoke nut with an impact and then the yoke with a dead blow hammer. GM sometimes used sealant on the splines and you have to move onto a brass hammer, or use a nut on the pinion and beat the pinion out (thus removing the yoke).
-Remove the pinion. Some come out rather easy, some take more forceful hits. I always use my brass hammer for this; it just ensures no damage is done to the threads. Also, be ready to catch the pinion as it comes out the back (have a rag in your hand or you can pay in blood)
-Use a pry bar to remove the axle seals.
-Use a slide hammer with bearing attachment to remove the axle bearings (Refer to the thread link above)
-I use a pipe to knock the front pinion bearing and seal out at the same time. That is the easiest way to get them out.
-Then use a long punch and hammer and get behind the pinion bearing races using the notches in the case to knock them out. Work the race on both sides (there are two nothces on each race) until it falls out. Repeat for the other side.
Now the axle is completely disassembled and dirty, let’s move on.
Last edited by supr_fly03; 11-23-2010 at 01:15 PM.
11-23-2010, 11:06 AM
#3
Member
Thread Starter
iTrader: (2)
Join Date: Nov 2009
Location: Hubert, NC
Posts: 436
Likes: 0
Received 0 Likes
on
0 Posts
Car: 83 Z28
Engine: F-body LT1 swap
Transmission: T-56 swap
Axle/Gears: 10 bolt w/ 28 spl posi, 4.10, disks
Re: 10 bolt axle gear install by the numbers (pic heavy)
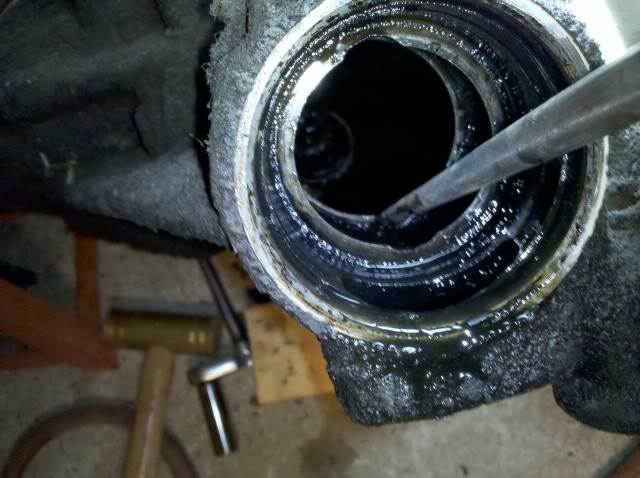
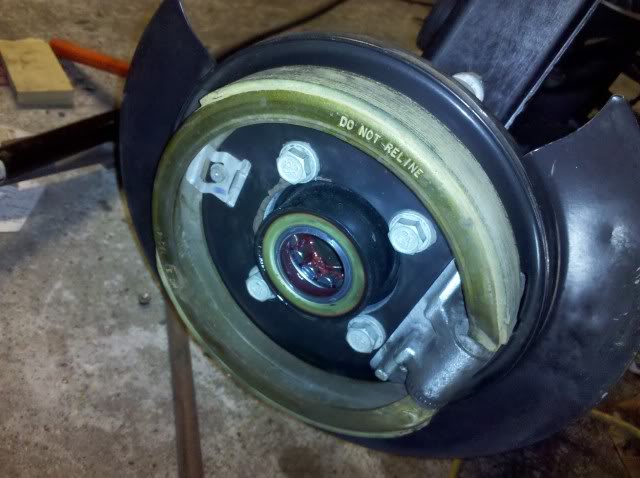
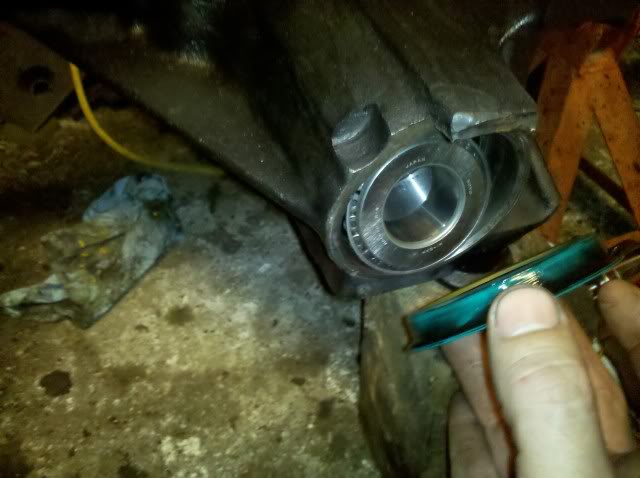
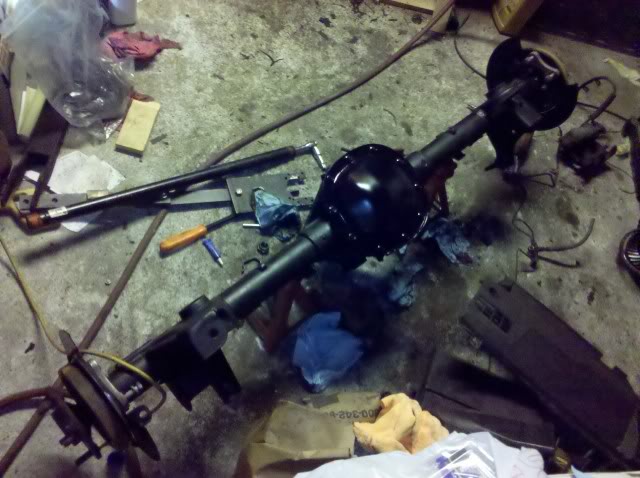
Step 2: Clean and inspect everything. There is no such thing as too clean when doing gears.
-I use liberal amounts of brake cleaner and various brushes, rags, scrapers, flat heads, and extentions to clean the gear, carrier, housing inside, housing outside, and the tubes.
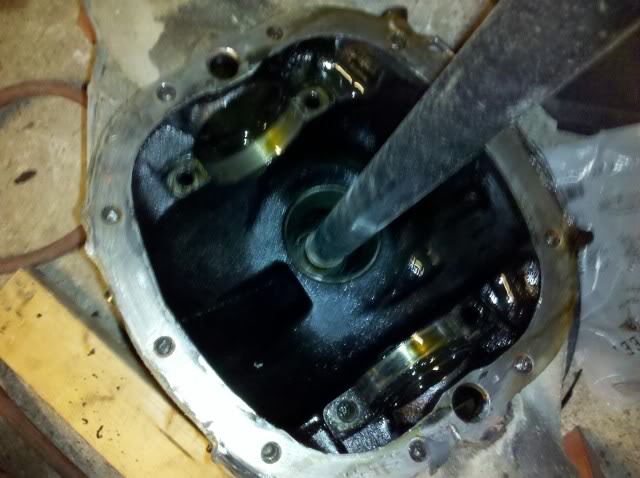
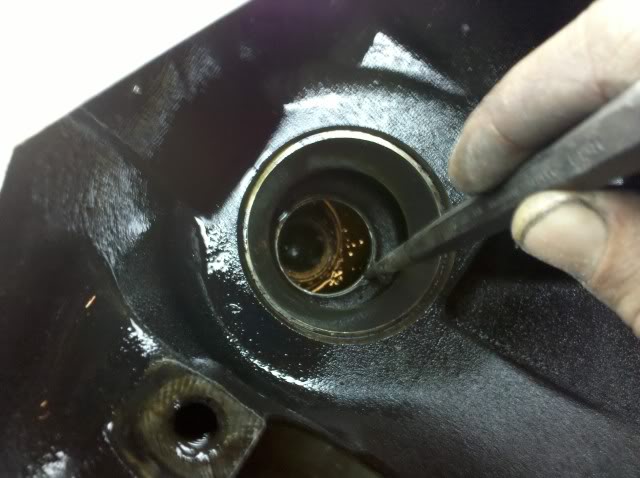
-One important area is the axle tubes, most people dont get in there good and there is a bunch of stuff that dosent get out and will contaminate your new bearings and gears. I use brake clean to spray down into the tubes.
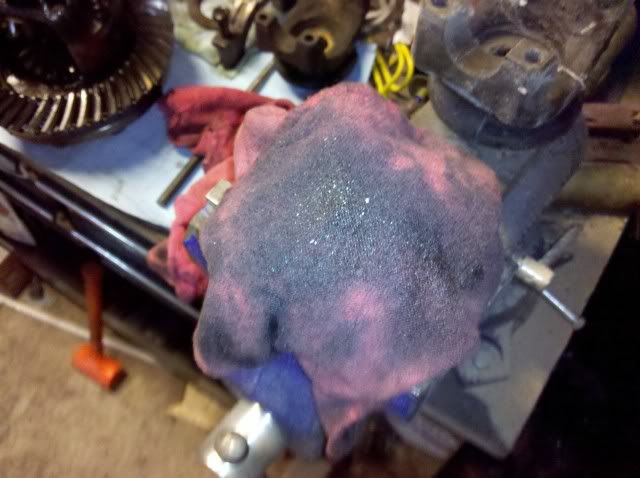
-I follow this up by stuffing a rag into the tube soaked with brake cleaner and I punch it through using a long extension (I have a long one for tranny bolts that works great for this)
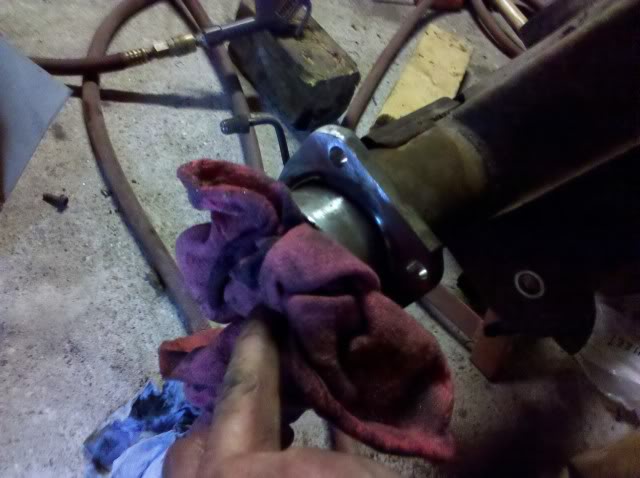
-This is why it is important! I did this three times before I stopped getting metal slivers on the rag.
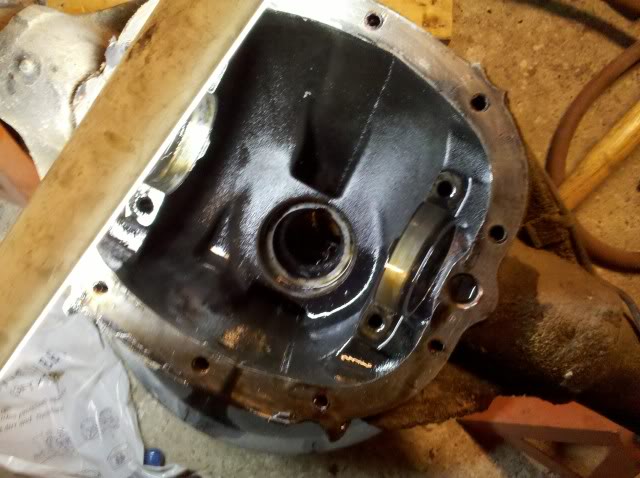
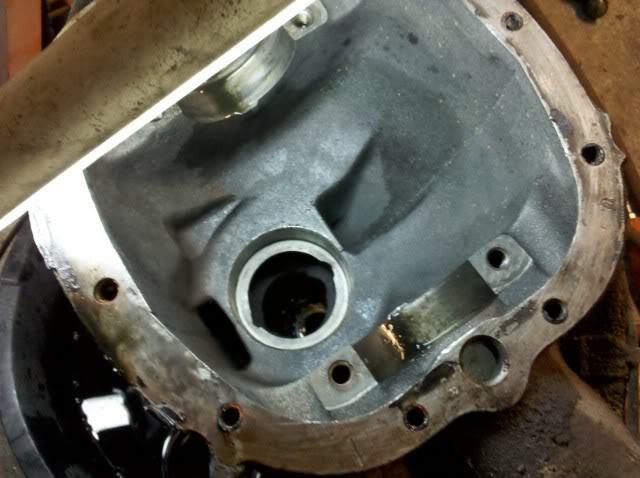
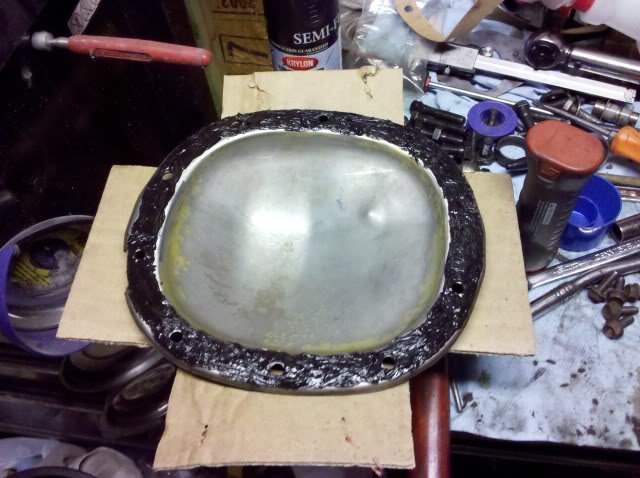
-When done your housing should look like this. Very clean.
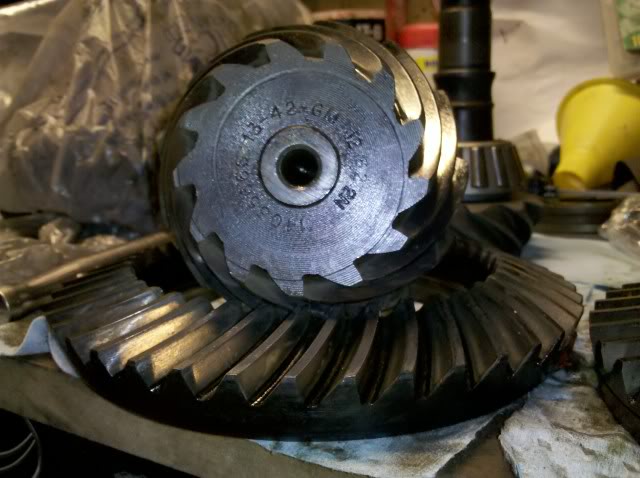
-Ok now we are going to clean and inspect the gears, carrier, cross pin, spiders, axles, and yoke. Look for abnormal wear, gouges on the gears, spun bearings, excessive wear on the spiders, check the axles for bearing wear (any pitting means replacement), look for spun bearings on the carrier and pinion, and check your yoke to make sure you don�t have a grove in it from the old seal. If you found broke or worn out stuff, replace it now.
-I use liberal amounts of brake cleaner and various brushes, rags, scrapers, flat heads, and extentions to clean the gear, carrier, housing inside, housing outside, and the tubes.
-One important area is the axle tubes, most people dont get in there good and there is a bunch of stuff that dosent get out and will contaminate your new bearings and gears. I use brake clean to spray down into the tubes.
-I follow this up by stuffing a rag into the tube soaked with brake cleaner and I punch it through using a long extension (I have a long one for tranny bolts that works great for this)
-This is why it is important! I did this three times before I stopped getting metal slivers on the rag.
-When done your housing should look like this. Very clean.
-Ok now we are going to clean and inspect the gears, carrier, cross pin, spiders, axles, and yoke. Look for abnormal wear, gouges on the gears, spun bearings, excessive wear on the spiders, check the axles for bearing wear (any pitting means replacement), look for spun bearings on the carrier and pinion, and check your yoke to make sure you don�t have a grove in it from the old seal. If you found broke or worn out stuff, replace it now.
11-23-2010, 11:06 AM
#4
Member
Thread Starter
iTrader: (2)
Join Date: Nov 2009
Location: Hubert, NC
Posts: 436
Likes: 0
Received 0 Likes
on
0 Posts
Car: 83 Z28
Engine: F-body LT1 swap
Transmission: T-56 swap
Axle/Gears: 10 bolt w/ 28 spl posi, 4.10, disks
Re: 10 bolt axle gear install by the numbers (pic heavy)
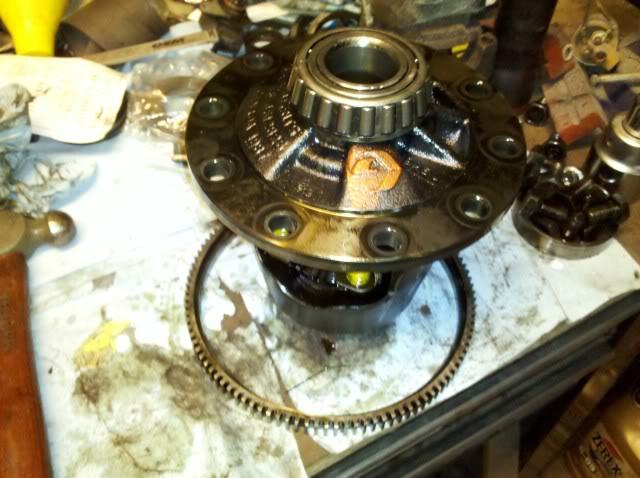
Step 3: Remove all bearings and gears from the carrier and pinion.
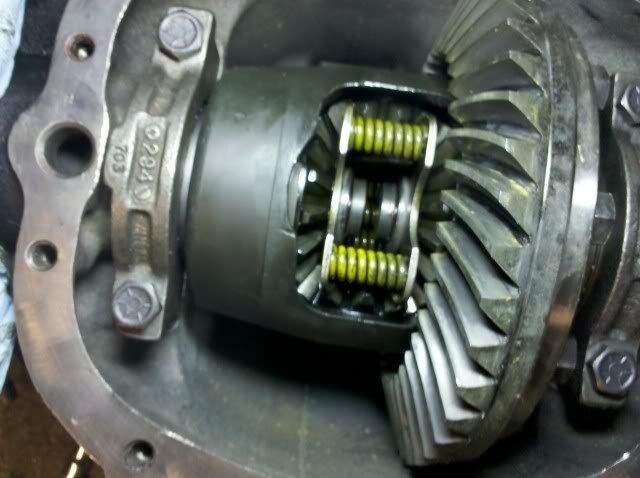
-Pull all the bearings off of the carrier and pinion. I have a puller kit from Yukon gears that is wonderful. The second picture shows how it works. It removes bearings without damaging them from the carriers and the pinions. You can also use a bearing splitter but that most often will damage the bearings or the cages.
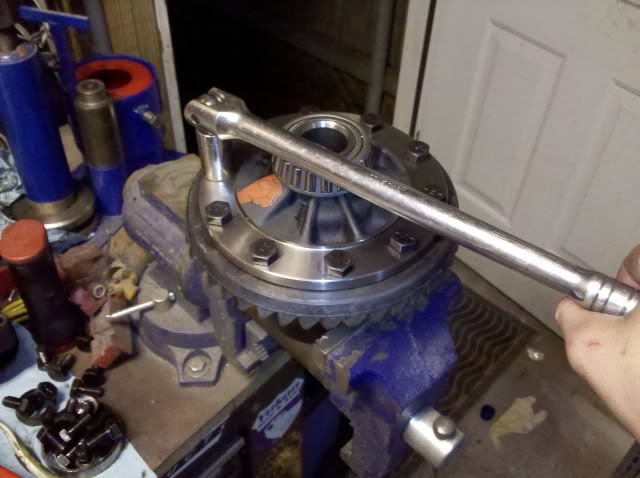
-I use bolts threaded into the ring gear and a hammer to gently knock the ring gear off the carrier by hitting the head of the bolts and rotating around in a pattern like torquing lug nuts.
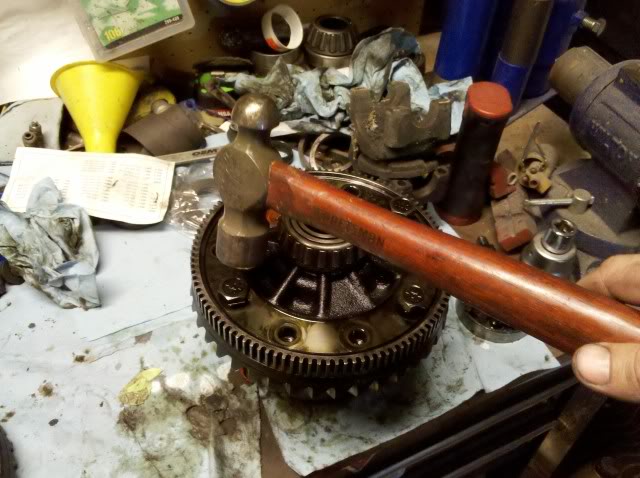
-Remember the bolts are left hand thread, if you try and lefty loosy them they will break off in the ring gear!
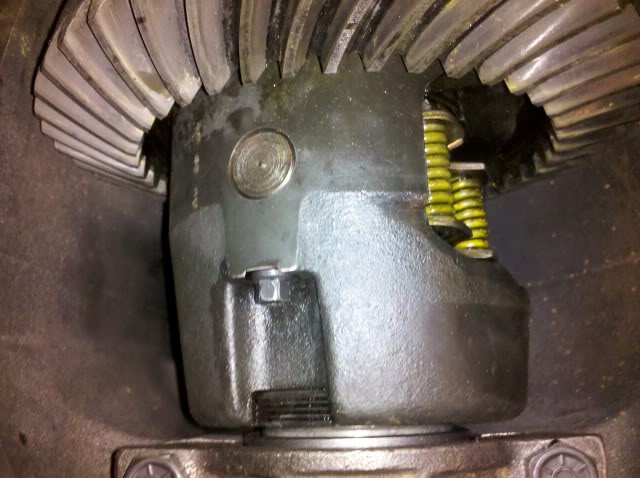
-I then removed the ABS ring cause I am not going to need it in my 3rd gen. Just make sure you take it off towards the ring gear side like shown. Just a few taps with the brass hammer should free it.
-Pull all the bearings off of the carrier and pinion. I have a puller kit from Yukon gears that is wonderful. The second picture shows how it works. It removes bearings without damaging them from the carriers and the pinions. You can also use a bearing splitter but that most often will damage the bearings or the cages.
-I use bolts threaded into the ring gear and a hammer to gently knock the ring gear off the carrier by hitting the head of the bolts and rotating around in a pattern like torquing lug nuts.
-Remember the bolts are left hand thread, if you try and lefty loosy them they will break off in the ring gear!
-I then removed the ABS ring cause I am not going to need it in my 3rd gen. Just make sure you take it off towards the ring gear side like shown. Just a few taps with the brass hammer should free it.
11-23-2010, 11:07 AM
#5
Member
Thread Starter
iTrader: (2)
Join Date: Nov 2009
Location: Hubert, NC
Posts: 436
Likes: 0
Received 0 Likes
on
0 Posts
Car: 83 Z28
Engine: F-body LT1 swap
Transmission: T-56 swap
Axle/Gears: 10 bolt w/ 28 spl posi, 4.10, disks
Re: 10 bolt axle gear install by the numbers (pic heavy)
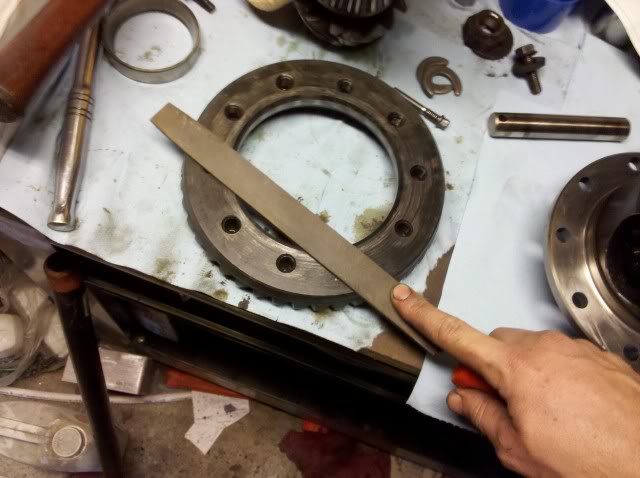
Step 4: Prep for reassembly.
-Measure all of your old shims and build new shim packs based off of them. Get as close as possible to the ones you took off. Keep your carrier shims separated from left and right. (As a side note I have many 10 bolt carrier shims lying around and prefer to use those over shim packs) You can also get the high speed shim packs that fit together on a holder and make it much easier to shim the carrier without damaging your shims.
-Next, take a long flat file and make sure the ring gear and carrier have no burrs or high spots on them. Flat is extremely important, runout + ring gear = bad! (Clean off your metal shavings before proceeding)
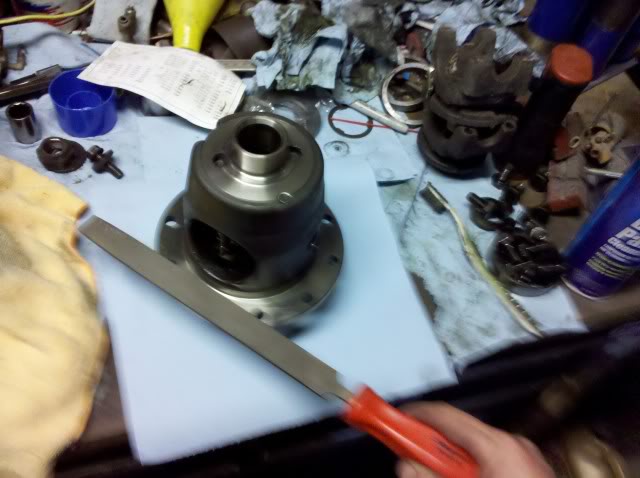
-Place the carrier into a vice (or something similar) and torque the carrier bolts to 65ftlbs. (Put a dab of red Loctite on them and remember, torque to the left!) Torque them in a star pattern. If you use the bolts to pull the ring gear onto the carrier, make sure you only tighten the bolts a quarter turn at a time until all the bolts are snug, then start torquing sequence.
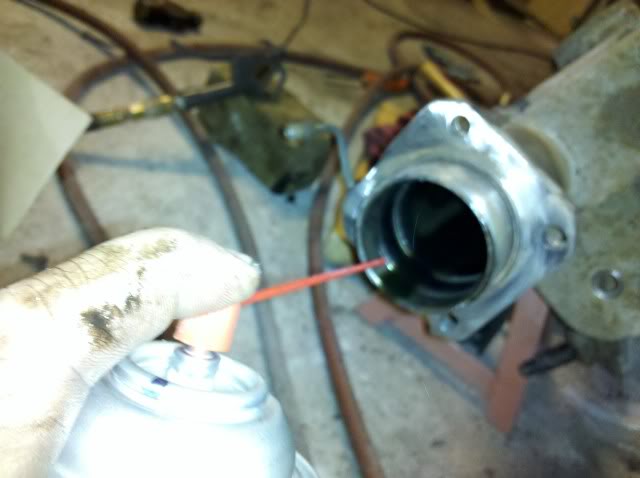
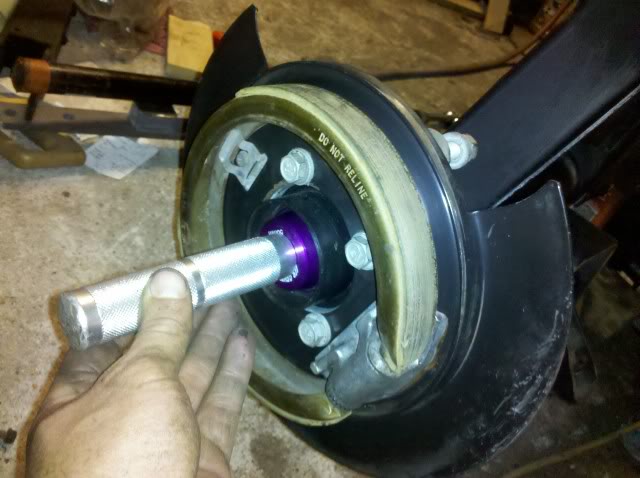
-Install the pinion races into the housing. Make sure you use an aluminum bearing and race driver (not a steel set), or at the very least a brass drift! Also, before knocking them in the holes, check for burrs left from driving the old races out. I found the easiest way to take care of this is by using a steel punch and knocking the burrs back into place. If not you will have pinion bearing issues down the road, or your pinion depth will change on you as the burr gets knocked back down.
-Next you can install the axle bearings and seals. I always put a little grease on the seal lip and a little on the axle bearing.
-Measure all of your old shims and build new shim packs based off of them. Get as close as possible to the ones you took off. Keep your carrier shims separated from left and right. (As a side note I have many 10 bolt carrier shims lying around and prefer to use those over shim packs) You can also get the high speed shim packs that fit together on a holder and make it much easier to shim the carrier without damaging your shims.
-Next, take a long flat file and make sure the ring gear and carrier have no burrs or high spots on them. Flat is extremely important, runout + ring gear = bad! (Clean off your metal shavings before proceeding)
-Place the carrier into a vice (or something similar) and torque the carrier bolts to 65ftlbs. (Put a dab of red Loctite on them and remember, torque to the left!) Torque them in a star pattern. If you use the bolts to pull the ring gear onto the carrier, make sure you only tighten the bolts a quarter turn at a time until all the bolts are snug, then start torquing sequence.
-Install the pinion races into the housing. Make sure you use an aluminum bearing and race driver (not a steel set), or at the very least a brass drift! Also, before knocking them in the holes, check for burrs left from driving the old races out. I found the easiest way to take care of this is by using a steel punch and knocking the burrs back into place. If not you will have pinion bearing issues down the road, or your pinion depth will change on you as the burr gets knocked back down.
-Next you can install the axle bearings and seals. I always put a little grease on the seal lip and a little on the axle bearing.
Last edited by supr_fly03; 11-23-2010 at 11:31 PM. Reason: Fix ring gear data
11-23-2010, 11:07 AM
#6
Member
Thread Starter
iTrader: (2)
Join Date: Nov 2009
Location: Hubert, NC
Posts: 436
Likes: 0
Received 0 Likes
on
0 Posts
Car: 83 Z28
Engine: F-body LT1 swap
Transmission: T-56 swap
Axle/Gears: 10 bolt w/ 28 spl posi, 4.10, disks
Re: 10 bolt axle gear install by the numbers (pic heavy)
Step 4: Prep for reassembly. (cont)
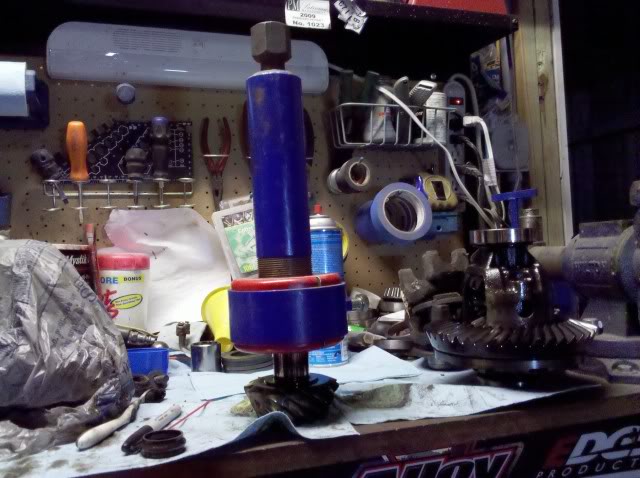
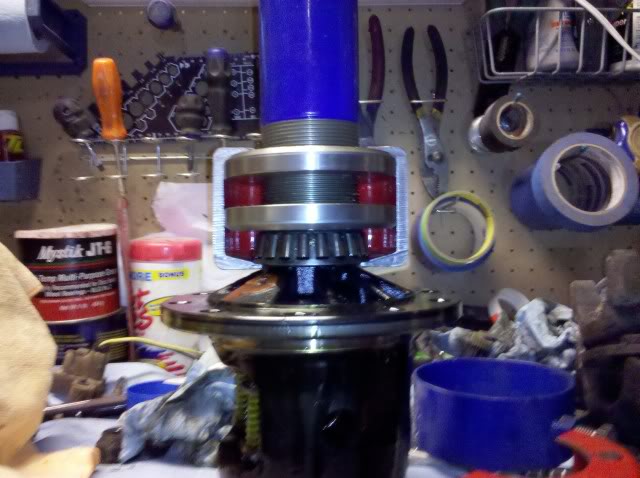
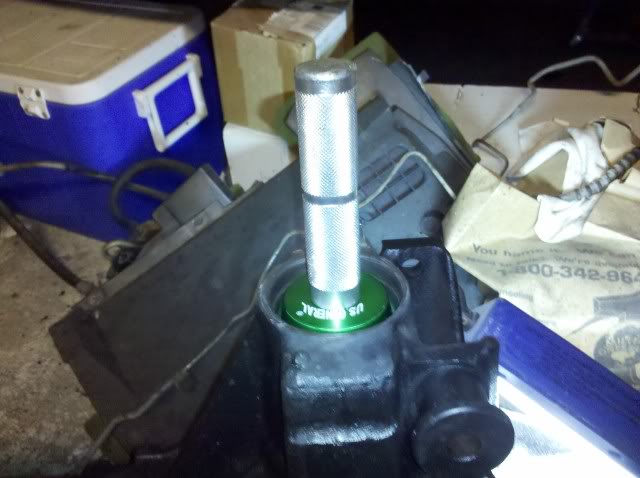
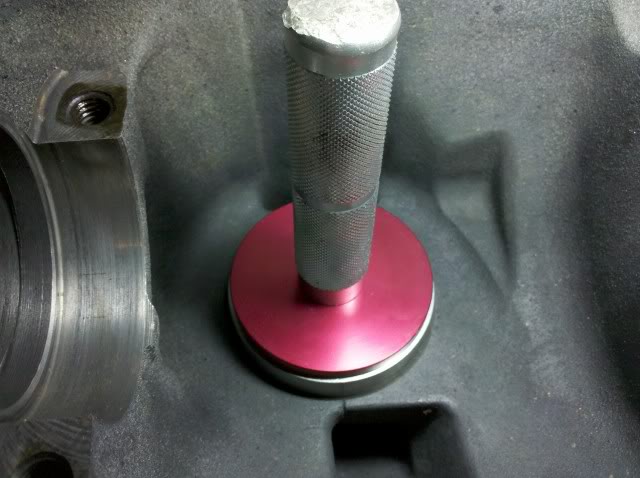
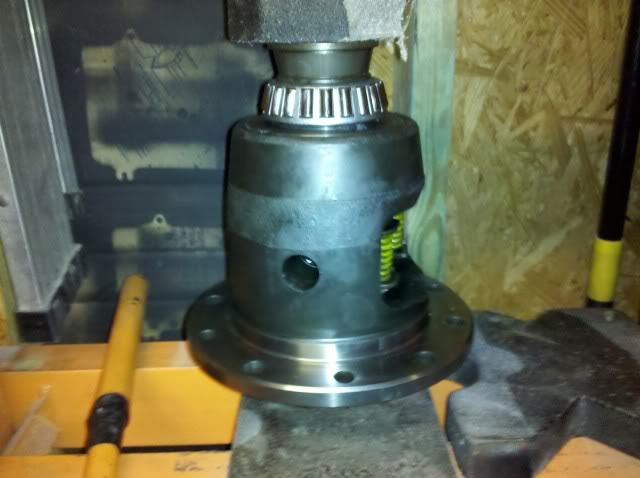
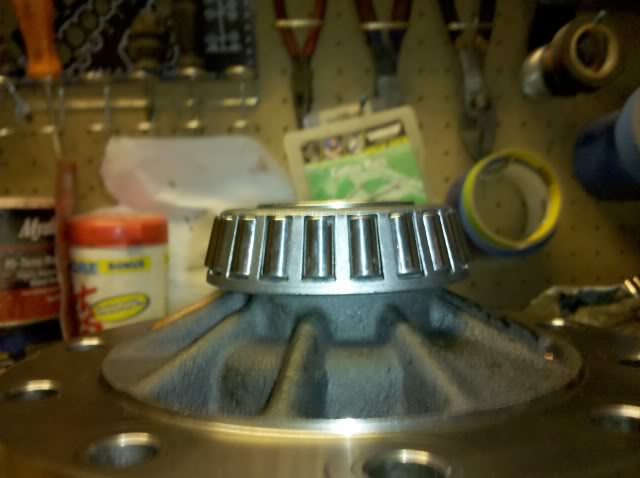
-Now I put the pinion shims on followed by the pinion bearing. Slap it in the press but once it hits the bottom, I always give it one last pump to make sure the bearing is fully seated. You will need a pipe to press it on like this, or you can flip it upside down, but you will need something to press on the race itself and not the cage! (You can use an old pinion race flipped upside down with the cage cut off)

-Next press on the carrier bearings. like the pinion bearings, you must use another race or something similar to press on the race and not the cage. Also note that the bearing race will sit below the top of the carrier. I suggest you use an old race flipped upside down to make sure the bearing is fully seated on the carrier.
-At this point all of your prep work should be done; we are now ready to do the initial assembly everything.
-Now I put the pinion shims on followed by the pinion bearing. Slap it in the press but once it hits the bottom, I always give it one last pump to make sure the bearing is fully seated. You will need a pipe to press it on like this, or you can flip it upside down, but you will need something to press on the race itself and not the cage! (You can use an old pinion race flipped upside down with the cage cut off)
-Next press on the carrier bearings. like the pinion bearings, you must use another race or something similar to press on the race and not the cage. Also note that the bearing race will sit below the top of the carrier. I suggest you use an old race flipped upside down to make sure the bearing is fully seated on the carrier.
-At this point all of your prep work should be done; we are now ready to do the initial assembly everything.
11-23-2010, 11:08 AM
#7
Member
Thread Starter
iTrader: (2)
Join Date: Nov 2009
Location: Hubert, NC
Posts: 436
Likes: 0
Received 0 Likes
on
0 Posts
Car: 83 Z28
Engine: F-body LT1 swap
Transmission: T-56 swap
Axle/Gears: 10 bolt w/ 28 spl posi, 4.10, disks
Re: 10 bolt axle gear install by the numbers (pic heavy)
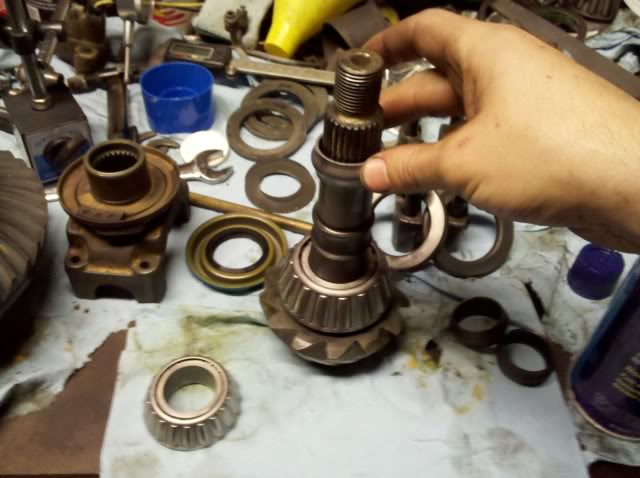
Step 5: Assembly
-First thing, put the pinion gear into the housing (from the back) followed by the front pinion bearing, yoke, hardened washer, and the original nut. We are going to save the new nut for final assembly and the crush sleeve is not needed for initial setup. You will need something to hold the yoke (yoke holding tool or large pipe wrench) and a long breaker bar with cheater pipe for later. Tighten the pinion nut up until all the slack is taken out and snug a little. (The pinion will no longer have any end play)
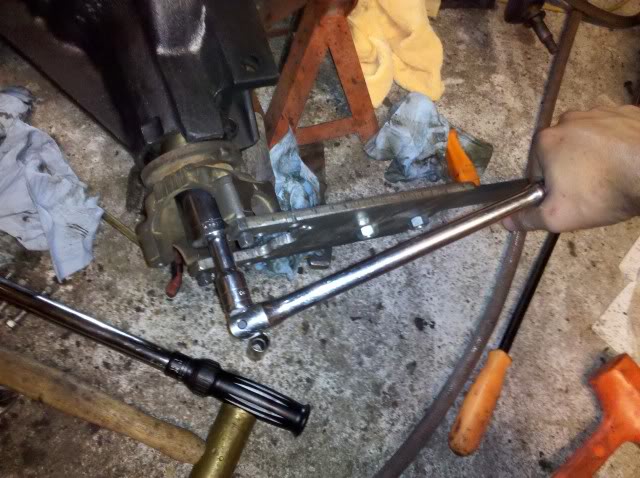
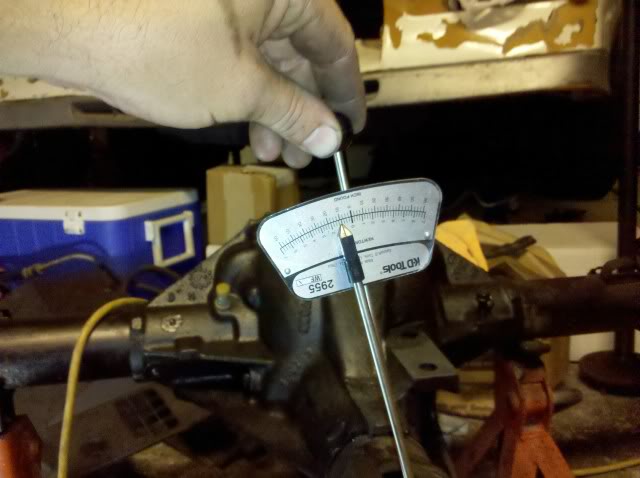
-Now we can put the inch pounds torque wrench on it and measure preload. Preload should be between 12 and 15 inlbs. You must always preload the pinion bearing when setting up, or changing anything.
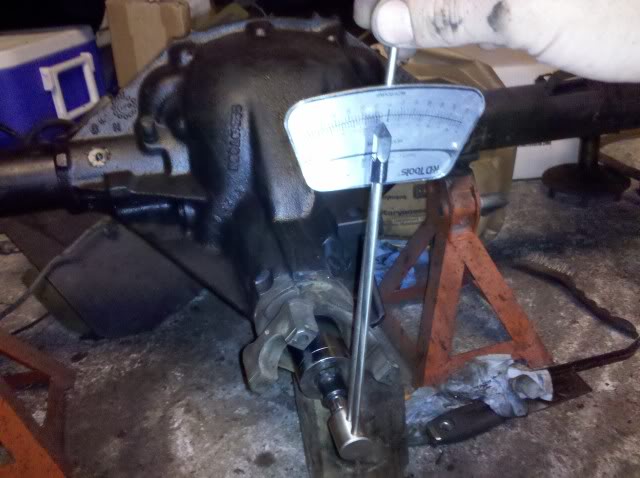
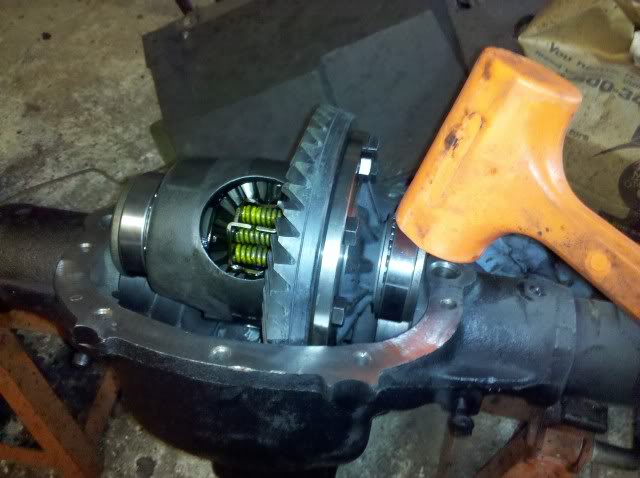
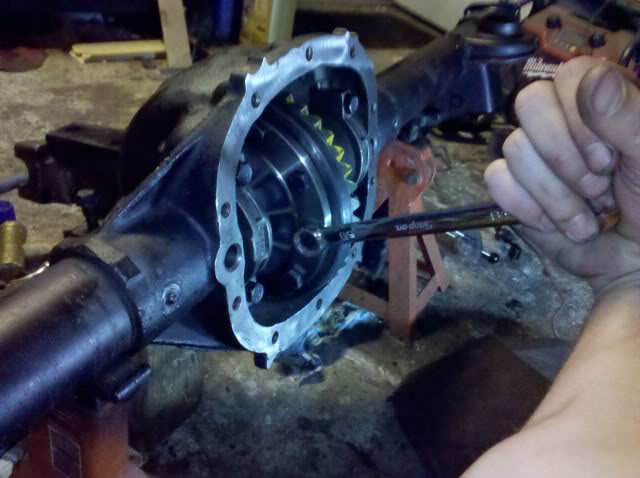
-Now we move onto installation of the carrier. Now Big Gear Head has a different way of doing it, the way I do it when working with a basket case setup (empty housing and boxes of new parts), in that he puts small shims on the bolt side of the carrier and spaces it over until desired backlash is achieved. This method is works great but I usually just use the factory shims in the same spots to see what the setup is initially. Now if you do it my way and the carrier has no backlash remove the carrier immidately! Do not try and rotate it or torque down the caps! Damage to the gearset will occur. I usually use my case spreader, but my pins dont fit in the holes of 10 bolts, so I use a deadblow hammer to seat the carrier.
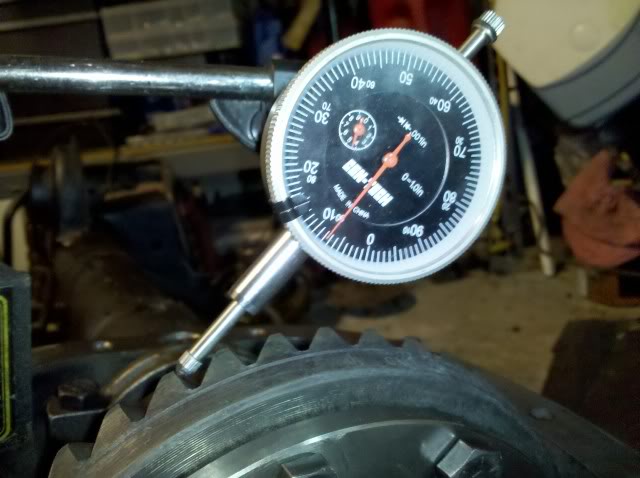
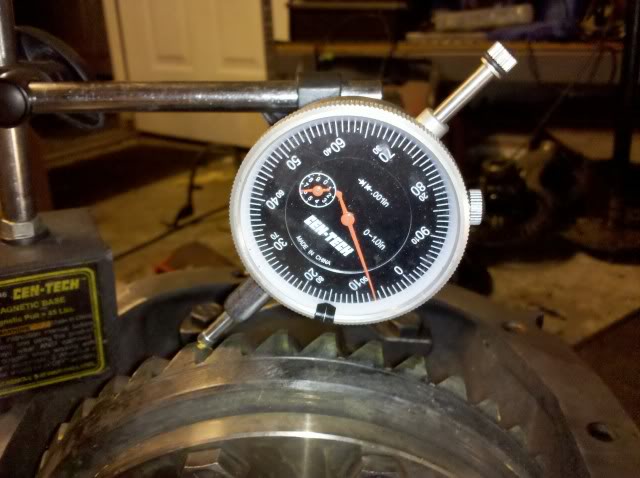
-Now that the carrier is seated and you have back lash (meaning you can rock the carrier back and forth and hear the ting on one side and a ting on the other), torque the caps to 55-60ftlbs.
-Check the back lash before moving on. The spec is .006 to .010. At .006, mine was in the ball park. It is in the specified range, but close to the limit. I will probably make a carrier adjustment.
-First thing, put the pinion gear into the housing (from the back) followed by the front pinion bearing, yoke, hardened washer, and the original nut. We are going to save the new nut for final assembly and the crush sleeve is not needed for initial setup. You will need something to hold the yoke (yoke holding tool or large pipe wrench) and a long breaker bar with cheater pipe for later. Tighten the pinion nut up until all the slack is taken out and snug a little. (The pinion will no longer have any end play)
-Now we can put the inch pounds torque wrench on it and measure preload. Preload should be between 12 and 15 inlbs. You must always preload the pinion bearing when setting up, or changing anything.
-Now we move onto installation of the carrier. Now Big Gear Head has a different way of doing it, the way I do it when working with a basket case setup (empty housing and boxes of new parts), in that he puts small shims on the bolt side of the carrier and spaces it over until desired backlash is achieved. This method is works great but I usually just use the factory shims in the same spots to see what the setup is initially. Now if you do it my way and the carrier has no backlash remove the carrier immidately! Do not try and rotate it or torque down the caps! Damage to the gearset will occur. I usually use my case spreader, but my pins dont fit in the holes of 10 bolts, so I use a deadblow hammer to seat the carrier.
-Now that the carrier is seated and you have back lash (meaning you can rock the carrier back and forth and hear the ting on one side and a ting on the other), torque the caps to 55-60ftlbs.
-Check the back lash before moving on. The spec is .006 to .010. At .006, mine was in the ball park. It is in the specified range, but close to the limit. I will probably make a carrier adjustment.
Trending Topics
11-23-2010, 11:09 AM
#8
Member
Thread Starter
iTrader: (2)
Join Date: Nov 2009
Location: Hubert, NC
Posts: 436
Likes: 0
Received 0 Likes
on
0 Posts
Car: 83 Z28
Engine: F-body LT1 swap
Transmission: T-56 swap
Axle/Gears: 10 bolt w/ 28 spl posi, 4.10, disks
Re: 10 bolt axle gear install by the numbers (pic heavy)
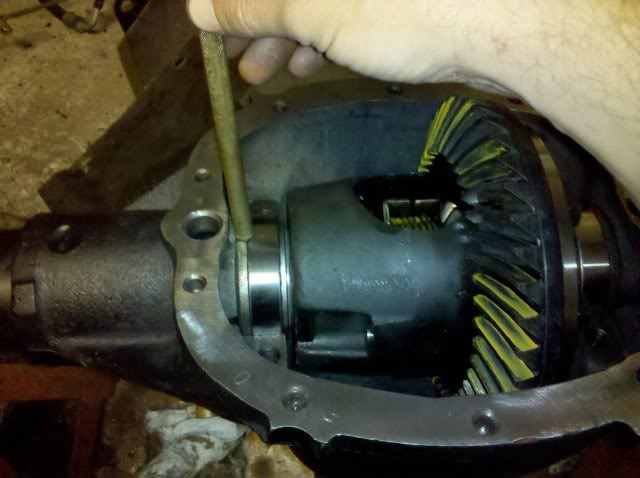
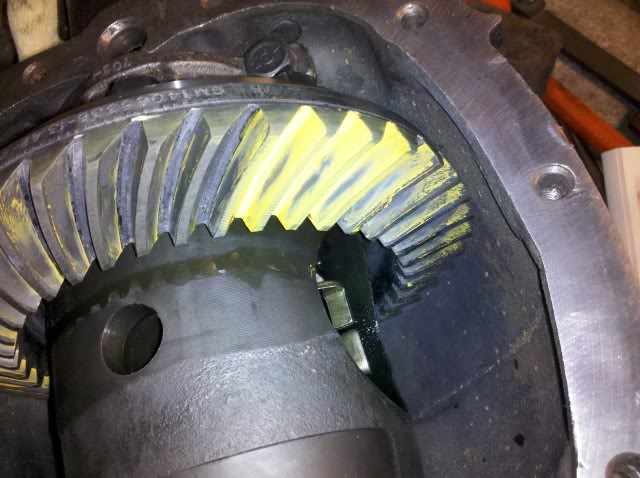
Step 5: Reading the pattern.
-If setting up used gears, the drive side may be worn so pay more attention to the coast side as it will usually give you a good pattern. (Unless you are doing a high pinion axle, then it is the opposite)
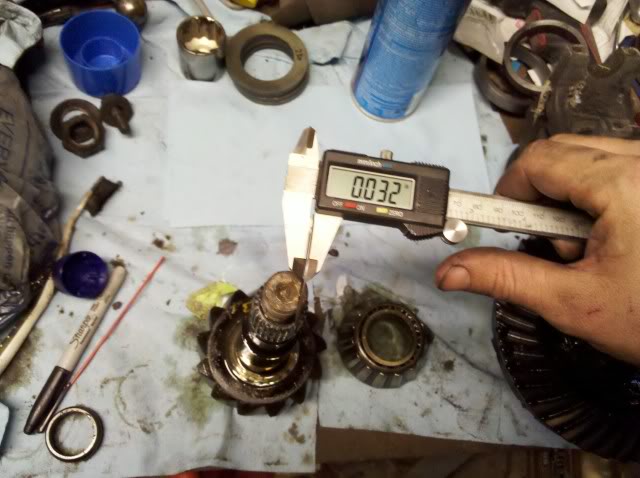
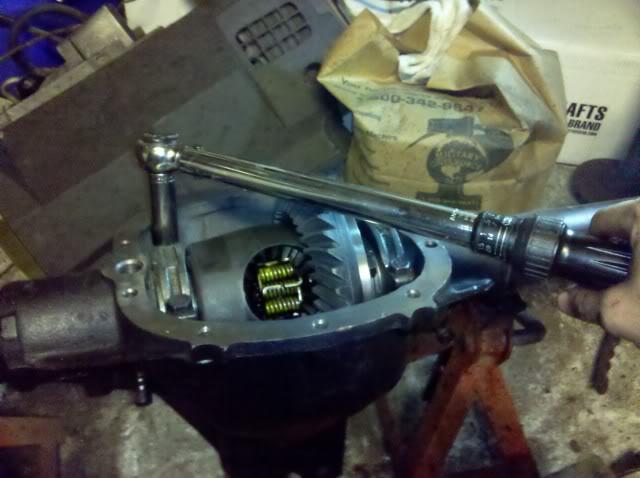
-Now take the brush and gear marking compound and spread it on 3 to 4 teeth. Rotate the ring gear 2 or 3 times in each direction and take a look at your pattern. Big Gear Head suggested rotating the carrier with a wrench to obtain the pattern and it worked quite well (thanks). The pattern on my gears indicates the pinion is too close to the ring gear. It has a half moon shape facing down low on the tooth (flank).
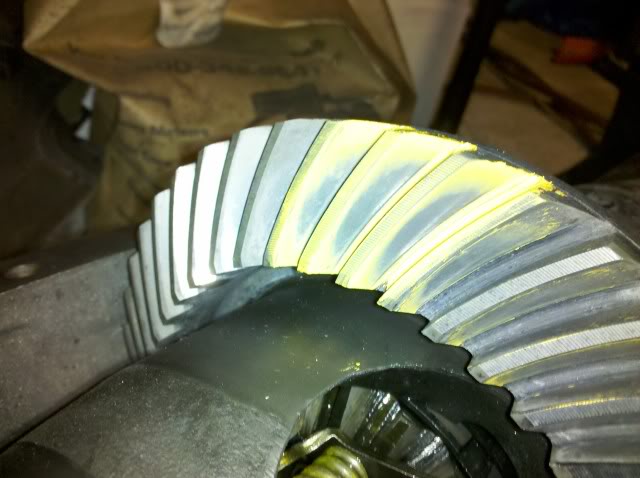
-I changed the pinion bearing shim by going down in shim size (moving the pinion away from the ring gear), don�t be afraid to make bold shim adjustments in a case like this. .005 is a good move. I could only go .002 at a time (I dont care for the shims in the Ratech kit I got). I went from a .032 to a .028 and ran the pattern again.
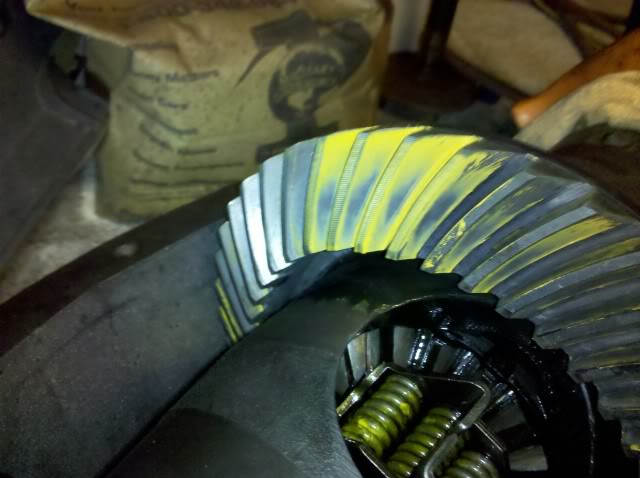
-As you can see, the pattern is acceptable, but remember, we are seeking perfection in doing gears and not settling for sub-par patterns. The pinion is a smidge too close and my backlash was still tight at .006 so I moved .002 from the ring gear side (right) to the bolt side of the carrier (left). I also went down .002 on the pinion shim to .026 and ran the pattern again.
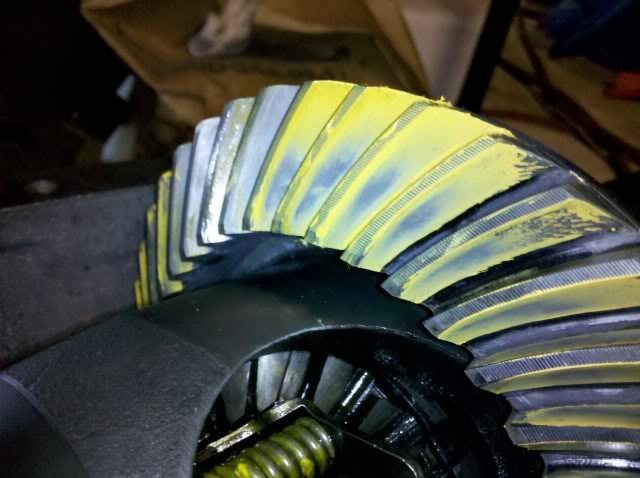

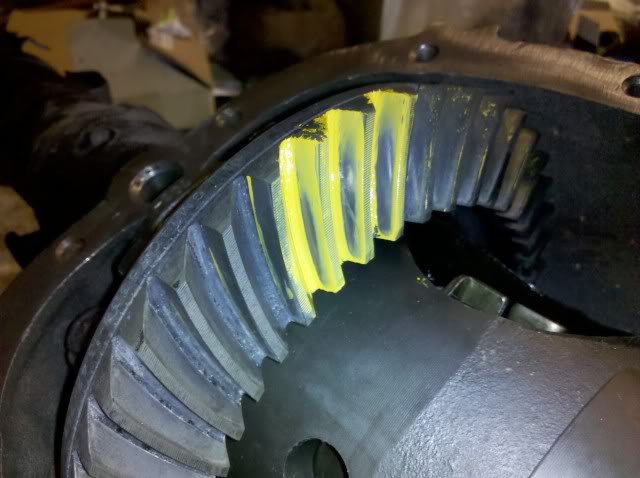
-Now I have a good pattern. Look for even fading all around the bald spot, this indicates a good centered pattern. I had good patterns on the drive and coast side. My back spacing went to .007 which I like better.
-If setting up used gears, the drive side may be worn so pay more attention to the coast side as it will usually give you a good pattern. (Unless you are doing a high pinion axle, then it is the opposite)
-Now take the brush and gear marking compound and spread it on 3 to 4 teeth. Rotate the ring gear 2 or 3 times in each direction and take a look at your pattern. Big Gear Head suggested rotating the carrier with a wrench to obtain the pattern and it worked quite well (thanks). The pattern on my gears indicates the pinion is too close to the ring gear. It has a half moon shape facing down low on the tooth (flank).
-I changed the pinion bearing shim by going down in shim size (moving the pinion away from the ring gear), don�t be afraid to make bold shim adjustments in a case like this. .005 is a good move. I could only go .002 at a time (I dont care for the shims in the Ratech kit I got). I went from a .032 to a .028 and ran the pattern again.
-As you can see, the pattern is acceptable, but remember, we are seeking perfection in doing gears and not settling for sub-par patterns. The pinion is a smidge too close and my backlash was still tight at .006 so I moved .002 from the ring gear side (right) to the bolt side of the carrier (left). I also went down .002 on the pinion shim to .026 and ran the pattern again.
-Now I have a good pattern. Look for even fading all around the bald spot, this indicates a good centered pattern. I had good patterns on the drive and coast side. My back spacing went to .007 which I like better.
11-23-2010, 11:09 AM
#9
Member
Thread Starter
iTrader: (2)
Join Date: Nov 2009
Location: Hubert, NC
Posts: 436
Likes: 0
Received 0 Likes
on
0 Posts
Car: 83 Z28
Engine: F-body LT1 swap
Transmission: T-56 swap
Axle/Gears: 10 bolt w/ 28 spl posi, 4.10, disks
Re: 10 bolt axle gear install by the numbers (pic heavy)
Step 6: Final assembly.
-Now we have to remove everything again. I clean everything and remove the gear marking compound. I heard this is not neccasary but I do it anyways. I wipe down all the bearing races, bearings, clean out the case again and wipe some grease on the pinion seal. I also put a little RTV on the outside of the seal (helps keep away the leak monster).
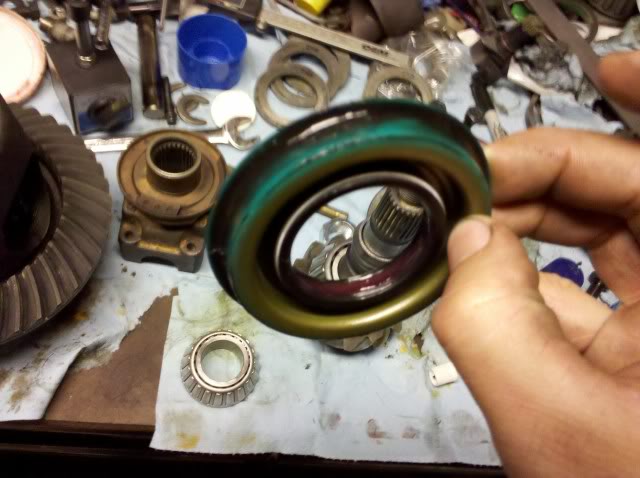
-Now you can put the small bearing in the housing first, then install the seal.
-Get the pinion and put the new crush sleeve on it.
-Put the pinion in the housing and slip the yoke (put some RTV on the yoke splines, not the pinion splines), washer, and new nut (dab some red Loctite on it) on the front.
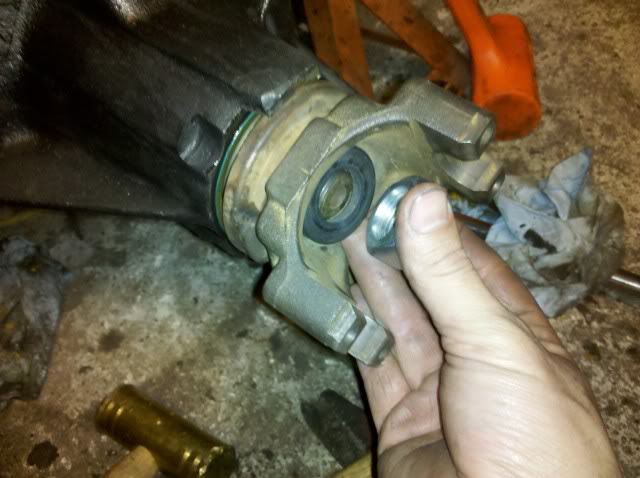
-This time take the slack up on the pinion bearing bringing it to zero preload. CAUTION, tightening the nut just a 1/16 of a turn from zero preload will take the pre load from 0 inlbs, to 30 inlbs. Nudge it, then check it. If it take you 12 tries to get the correct value, it is better than having to run to the part store to try and find another crush sleeve. If you make it to 12 inlbs, leave it. Trust me. Remember, you will be checking the torque while rotating the pinion, this is why you must use this type of torque wrench and not a click type. It wont work.
-Now all you have to do is slip the cleaned up axles in and place the C-clips on them. Once you got a clip on, slid the axle back out to seat the C-clip.
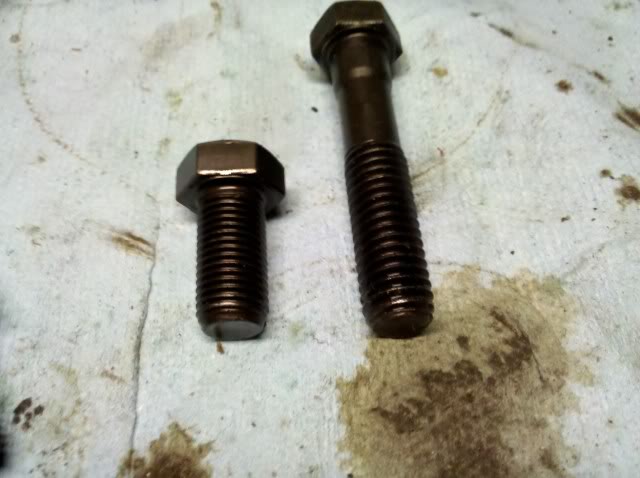
-Then put the center pin in, followed by a new cross pin bolt (highly recommended, you can pick it up at GM) with a little thread locker on it.
-Slap some RTV on the cover and let it sit for a few minutes, then bolt it up. (Don’t use a gasket unless you like wasting gear oil, because you will have to drop the cover when it starts leaking.
-Now we have to remove everything again. I clean everything and remove the gear marking compound. I heard this is not neccasary but I do it anyways. I wipe down all the bearing races, bearings, clean out the case again and wipe some grease on the pinion seal. I also put a little RTV on the outside of the seal (helps keep away the leak monster).
-Now you can put the small bearing in the housing first, then install the seal.
-Get the pinion and put the new crush sleeve on it.
-Put the pinion in the housing and slip the yoke (put some RTV on the yoke splines, not the pinion splines), washer, and new nut (dab some red Loctite on it) on the front.
-This time take the slack up on the pinion bearing bringing it to zero preload. CAUTION, tightening the nut just a 1/16 of a turn from zero preload will take the pre load from 0 inlbs, to 30 inlbs. Nudge it, then check it. If it take you 12 tries to get the correct value, it is better than having to run to the part store to try and find another crush sleeve. If you make it to 12 inlbs, leave it. Trust me. Remember, you will be checking the torque while rotating the pinion, this is why you must use this type of torque wrench and not a click type. It wont work.
-Now all you have to do is slip the cleaned up axles in and place the C-clips on them. Once you got a clip on, slid the axle back out to seat the C-clip.
-Then put the center pin in, followed by a new cross pin bolt (highly recommended, you can pick it up at GM) with a little thread locker on it.
-Slap some RTV on the cover and let it sit for a few minutes, then bolt it up. (Don’t use a gasket unless you like wasting gear oil, because you will have to drop the cover when it starts leaking.
Last edited by supr_fly03; 11-23-2010 at 12:47 PM. Reason: Added suggestion by Big Gear Head.
11-23-2010, 11:10 AM
#10
Member
Thread Starter
iTrader: (2)
Join Date: Nov 2009
Location: Hubert, NC
Posts: 436
Likes: 0
Received 0 Likes
on
0 Posts
Car: 83 Z28
Engine: F-body LT1 swap
Transmission: T-56 swap
Axle/Gears: 10 bolt w/ 28 spl posi, 4.10, disks
Re: 10 bolt axle gear install by the numbers (pic heavy)
Step 7: Buttoning it all up.
-All you have to do now is fill with your choice of gear oil (I used Mobile 1 syn) and add GM additive if needed. Hope this helps you all out there and takes some mystery out of setting up gears.
-Last but not least, you must break in new gears! Drive 15 miles or so (about 20 min) to get the first heat cycle into the gears, no constant speed here use varied speeds. Then you MUST let the differential cool completely! Drive the first 500 miles easy, no constant highway speeds, before hammering on it. Change the gear oil after the first 500 miles. This will remove any metal particles or phosphorus coating that has come from the new gear set (brake clean works good here too, just concentrate on the housing and not the carrier or gears and let dry)
If you have any questions let me know!
11-23-2010, 12:26 PM
#11
Supreme Member
Join Date: Sep 2008
Posts: 3,777
Likes: 0
Received 0 Likes
on
0 Posts
Re: 10 bolt axle gear install by the numbers (pic heavy)
Very good. I don't completely agree with everything, but like you said above, that doesn't make your way wrong. When I get a little more time I will add a few suggestions, but not changes.
One thing that I feel needs to be mentioned is that there should be some sealer inside the yoke to keep oil from seaping out through the splines. I always smear some RTV sealant into the splines in the yoke before installing it. DO NOT smear any sealant on the splines of the pinion shaft. If you do the yoke will push it into the outer pinion beairng. ONLY put sealant in the yoke.
I also use red Loctite on the pinion nut for the final assembly. I've had pinion nuts back off before. The Loctite is just extra insurance.
That bearing puller is very nice and makes this job much easier. I've had one for many years, before Yukon offered them. They are expensive and someone who is only going to do one rear end doesn't need to spend that much money on one, but if you are going to do very many rear ends I recommend that you get one of these.
I try to get people to get a good installation kit. The Ratech kits are junk and there are much better kits out there. A good installation kit makes things go much easier.
Last edited by big gear head; 11-23-2010 at 12:37 PM.
11-23-2010, 12:27 PM
#12
Re: 10 bolt axle gear install by the numbers (pic heavy)
I rebuilt the 8.8 in my Mustang last summer, slightly different, but the design is pretty much the same. You covered almost everything, I only have a couple things to add.
-To get the cross shaft bolt out, just heat the carrier just below the head of the bolt with a propane torch. That will soften the thread locker. It doesn't have to get red hot or anything crazy, just heat it for about 30 seconds and the cross pin bolt will turn out with the cheapest chinese 12pt socket.
-I didn't have room to store a shop press, so I took my pinion gear and carrier to the local machine shop and paid the $30 to have them remove the old bearings and install the new carrier bearings.
-To make setup easy (no pressing the pinion gear on/off to set pinion depth) I used a sanding drum on a Dremel to open up the inside diameter of the old pinion bearing until it was a SNUG slip fit on the pinion gear.
-I also modified the old pinion nut to make setup easy. The stock pinion nut on the F#$d is a locking nut, I'd assume the GM rear is the same. I cut off the tapered snout and ran it off/on the old pinion gear a few times with the impact to kill the thread locker. For final assembly after I was happy with the gear pattern, I used the new nut from the kit.
-When I was happy with my pinion depth (pinion shim) I warmed up the new pinion bearing to expand it, and slipped it on the pinion gear.
-Likewise, I froze the bearing races overnight in the freezer to contract them slightly before popping them back in the housing.
-To remove the axle bearings, I picked up a length of black iron pipe and knocked the bearings out from the opposite side with a mini-sledge.
-I didn't use any bearing/seal drivers, just old seals/bearing shells and wood blocks. Obviously the correct tool would do the job better, but when the budget is tight...
I also used a Ratech kit. I was really annoyed with the supplied shims. Even the thickest shims were so soft they couldn't be driven into place without deforming. The pinion flange holding tool I got from them also was a POS. The Ratech stuff got the job done, but it wasn't really high quality.
Differentials aren't nearly as hard to deal with as the reputation they get on various forums, but it does take some mildly expensive tools that most people aren't going to have. Worse yet it takes some time, as it's subjective. It has to be eyeballed and understood. A lot of people on here could get in all kinds of trouble trying to get it done. If a person is only ever going to do it once, they might be further ahead to have a reputable shop do the job for them.
11-23-2010, 12:43 PM
#13
Member
Thread Starter
iTrader: (2)
Join Date: Nov 2009
Location: Hubert, NC
Posts: 436
Likes: 0
Received 0 Likes
on
0 Posts
Car: 83 Z28
Engine: F-body LT1 swap
Transmission: T-56 swap
Axle/Gears: 10 bolt w/ 28 spl posi, 4.10, disks
Re: 10 bolt axle gear install by the numbers (pic heavy)
Thanks for the input. I welcome new methods as I can always improve my own abilities that way.
Big Gear Head, I look forward to your input. I know there are several ways to get to the same end goal. Oh and I totally forgot to put sealant on my yoke, but there was still some factory gunk in the yoke splines, so maybe that will work.
Drew, I do have setup bearings for other axles like the dana 30, 44, and 60. I do those pretty often for myself and friends. Makes setup much easier and faster. You also bring up a lot of points for those that do not have all the tools that I do. Heating the ring gear in the oven is also a much better way to get the ring gear on the carrier.
I was definately not happy with the Ratech stuff. I will go back to Yukon or Precision Gear. I always get good bearings and lots of shims with those.
11-23-2010, 12:55 PM
#14
Supreme Member
Join Date: Sep 2008
Posts: 3,777
Likes: 0
Received 0 Likes
on
0 Posts
Re: 10 bolt axle gear install by the numbers (pic heavy)
One other thing that comes to mind, I only mark the right bearing cap. If you mark the right cap then you automaticly know that the cap without a mark goes on the left. The left cap carries more load than the right cap, and putting a punch mark on a cap can cause a stress riser, which can lead to a crack. If a cap is going to break it will be the left one.

11-23-2010, 01:16 PM
#15
Member
Thread Starter
iTrader: (2)
Join Date: Nov 2009
Location: Hubert, NC
Posts: 436
Likes: 0
Received 0 Likes
on
0 Posts
Car: 83 Z28
Engine: F-body LT1 swap
Transmission: T-56 swap
Axle/Gears: 10 bolt w/ 28 spl posi, 4.10, disks
Re: 10 bolt axle gear install by the numbers (pic heavy)
Thanks again, for any of you that provide better ways or reasons why to do things a certain way, I will change my posts to reflect the better methods and give credit where it is due.
12-04-2010, 03:37 PM
#18
Supreme Member

iTrader: (3)
Join Date: Jun 2007
Location: Pennsylvania
Posts: 2,359
Likes: 0
Received 5 Likes
on
5 Posts
Car: 1992 Camaro RS
Engine: Rebuilt 350 going in after paint
Transmission: WCT5, 7k & counting behind the 350
Axle/Gears: 4thgen disc rear w/ 3.73 Posi
Re: 10 bolt axle gear install by the numbers (pic heavy)
Thought I'd ask this here instead of my thread(which you've been most helpful on, thanks!) so that other people attempting this can have all the answers in one place.
When using a synthetic gear oil like you suggested, do you need to add GM's limited slip additive? I'll be using a GM 4thgen posi unit in my rear.
When using a synthetic gear oil like you suggested, do you need to add GM's limited slip additive? I'll be using a GM 4thgen posi unit in my rear.
12-04-2010, 05:28 PM
#19

Re: 10 bolt axle gear install by the numbers (pic heavy)
Thought I'd ask this here instead of my thread(which you've been most helpful on, thanks!) so that other people attempting this can have all the answers in one place.
When using a synthetic gear oil like you suggested, do you need to add GM's limited slip additive? I'll be using a GM 4thgen posi unit in my rear.
When using a synthetic gear oil like you suggested, do you need to add GM's limited slip additive? I'll be using a GM 4thgen posi unit in my rear.
If it's a 98 Torsen, maybe.
Any other, I would.
12-04-2010, 05:32 PM
#20
Member
Thread Starter
iTrader: (2)
Join Date: Nov 2009
Location: Hubert, NC
Posts: 436
Likes: 0
Received 0 Likes
on
0 Posts
Car: 83 Z28
Engine: F-body LT1 swap
Transmission: T-56 swap
Axle/Gears: 10 bolt w/ 28 spl posi, 4.10, disks
Re: 10 bolt axle gear install by the numbers (pic heavy)
Thought I'd ask this here instead of my thread(which you've been most helpful on, thanks!) so that other people attempting this can have all the answers in one place.
When using a synthetic gear oil like you suggested, do you need to add GM's limited slip additive? I'll be using a GM 4thgen posi unit in my rear.
When using a synthetic gear oil like you suggested, do you need to add GM's limited slip additive? I'll be using a GM 4thgen posi unit in my rear.
As far as syn gear oil, some oil makers say you may be able to run without an additive. I however say it is better to go ahead and put it in anyways. Chattering clutch packs are no fun. I put some ford racing additive I had instead of the gm stuff. I heard they both are about the same. I don't recommend the stuff you can find on the shelf at your local parts store.
So to clairify, when dealing with clutch style LS diffs just put in GM or Ford LS additive and don't wait for chatter reguardless of gear oil type.
If you still have chatter just add one more bottle of LS additive.
If I am off base here I am sure Big Gear Head will give the better scoop.
12-04-2010, 06:06 PM
#21
Member

Join Date: Mar 2008
Location: Lakewood, California
Posts: 375
Likes: 0
Received 0 Likes
on
0 Posts
Car: 1992 Camaro RS 25th Anniversary
Engine: Stock 305 TBI, LT1 soon.
Transmission: V6 NWC T5 by choice
Axle/Gears: Zexel Torsen LSD with 3.23's
Re: 10 bolt axle gear install by the numbers (pic heavy)
The stench of gear oil is something you will never forget. The Fords are worse IMO.
12-04-2010, 10:16 PM
#22
Re: 10 bolt axle gear install by the numbers (pic heavy)
For example, note the rather huge but easy to miss LS on this Mobil 1 bottle? The LS is for Limited Slip.

And yes, the Ford limited slip additive is the skunkiest oil on earth. You can smell it from across the room in a sealed bottle complete with an unpunctured foil seal.
12-04-2010, 10:17 PM
#23
Supreme Member
Join Date: Sep 2008
Posts: 3,777
Likes: 0
Received 0 Likes
on
0 Posts
Re: 10 bolt axle gear install by the numbers (pic heavy)
I've used Amsoil Severe Gear synthetic oil in most of the rear ends that I have built for about 13 years. Clutch plate type differentials like the Eaton Posi and Traction Lock are fine with this oil and no additive. The Auburn requires GM or Ford additive, many time 2 bottles. The least amount of additive you can use the better the clutches will hold. Too much additive will allow the clutches to slip too easy and you might be spinning one tire again. Don't use additive with the Governor Lock.
Last edited by big gear head; 12-04-2010 at 10:21 PM.
12-04-2010, 10:30 PM
#24
Re: 10 bolt axle gear install by the numbers (pic heavy)
So do 7.5" 10 bolts have the problem with the pinion shaft bolt sheering off? I don't know if I've ever seen anyone here mention it, but I had that problem with my F@$D and it seemed pretty common from what I found researching how to fix it.

I got my stub out with a small rare earth magnet superglued on a small stick.

They also make tools to drill the pin and remove it with an easy out, and I read that people had luck backing them out with a scratch awl when there were still threads on the stub. Mine broke past the threads, so it pulled right out with the magnet.
I got my stub out with a small rare earth magnet superglued on a small stick.
They also make tools to drill the pin and remove it with an easy out, and I read that people had luck backing them out with a scratch awl when there were still threads on the stub. Mine broke past the threads, so it pulled right out with the magnet.
12-04-2010, 10:59 PM
#25
Supreme Member
Join Date: Sep 2008
Posts: 3,777
Likes: 0
Received 0 Likes
on
0 Posts
Re: 10 bolt axle gear install by the numbers (pic heavy)
Yes, the 7.5 and 8.5 rear ends suffer from this same problem. They also use the very same bolt as the 8.8. Here is some information on that. http://www.nastyz28.com/forum/showthread.php?t=107063
12-06-2010, 09:04 PM
#26
Member
Thread Starter
iTrader: (2)
Join Date: Nov 2009
Location: Hubert, NC
Posts: 436
Likes: 0
Received 0 Likes
on
0 Posts
Car: 83 Z28
Engine: F-body LT1 swap
Transmission: T-56 swap
Axle/Gears: 10 bolt w/ 28 spl posi, 4.10, disks
Re: 10 bolt axle gear install by the numbers (pic heavy)
Are the mods going to make this a sticky?


 STICKY
03-09-2012, 03:47 PM
STICKY
03-09-2012, 03:47 PM
#29
Junior Member

Join Date: Mar 2012
Posts: 3
Likes: 0
Received 0 Likes
on
0 Posts
Re: 10 bolt axle gear install by the numbers (pic heavy)
Why I think this is going to be very helpful, what I want to know is are the steps basically the same for upgrading your rear end. I want to change my rear end from a 3.23 to a 4.10 which means I have to change the carrier. If the steps are basically the same, I plan to tackle this myself. Just wanted to make sure before I jump into this and regret it
03-09-2012, 08:08 PM
#31
Member
iTrader: (1)

Join Date: Dec 2008
Location: Wisconsin
Posts: 131
Likes: 0
Received 0 Likes
on
0 Posts
Car: 88 and 02 Camaro's
Engine: L96 (LS) and LS-1
Transmission: auto, 6 speed
Axle/Gears: 3.42 gears for both
Re: 10 bolt axle gear install by the numbers (pic heavy)
So do 7.5" 10 bolts have the problem with the pinion shaft bolt sheering off? I don't know if I've ever seen anyone here mention it, but I had that problem with my F@$D and it seemed pretty common from what I found researching how to fix it.
I got my stub out with a small rare earth magnet superglued on a small stick.
They also make tools to drill the pin and remove it with an easy out, and I read that people had luck backing them out with a scratch awl when there were still threads on the stub. Mine broke past the threads, so it pulled right out with the magnet.
03-10-2012, 09:19 AM
#32
Junior Member
Join Date: Mar 2012
Posts: 3
Likes: 0
Received 0 Likes
on
0 Posts
Re: 10 bolt axle gear install by the numbers (pic heavy)
because I apparently listened to someone who gave me some bad advice. That is good to know and saves me a little money that i didn't really want to spend. thanks for that info.
03-12-2012, 03:43 PM
#33
Senior Member
iTrader: (4)
Join Date: Oct 2008
Location: Niles, IL
Posts: 857
Likes: 0
Received 5 Likes
on
4 Posts
Car: '91 LS6/T56/9"
Engine: LS6
Transmission: T56
Axle/Gears: Currie 9"/4.11, detroit truetrac
Re: 10 bolt axle gear install by the numbers (pic heavy)
In step 5 when setting pinion preload, what is being used in place of the crush sleeve, and how do you know it will replicate the same pinion depth as the crush sleeve will in final assembly?
03-12-2012, 05:08 PM
#34
Supreme Member
Join Date: Sep 2008
Posts: 3,777
Likes: 0
Received 0 Likes
on
0 Posts
Re: 10 bolt axle gear install by the numbers (pic heavy)
You don't use anything in place of the crush spacer. All you want to do is set the bearing preload correctly each time. It makes no difference if the spacer is in place or not. As long as the preload is set the same each time then the pattern will be accurate. When you add the spacer on the final assembly it will be the same as long as the preload is set the same.

Thread
Thread Starter
Forum
Replies
Last Post
hectre13
Engine/Drivetrain/Suspension Parts for Sale
2
12-11-2023 08:14 AM
hectre13
Engine/Drivetrain/Suspension Parts for Sale
7
08-26-2015 08:17 AM
red90IROCls1
Transmissions and Drivetrain
10
08-25-2015 06:56 AM

