Steering Box Rebuild, Rag Joint and Pit Arm
 06-13-2008, 12:48 AM
#1
Senior Member

Thread Starter
Join Date: Feb 2004
Location: Isla del Encanto, P.R.
Posts: 608
Likes: 0
Received 3 Likes
on
2 Posts
Car: GTA
Engine: Bone Stock 350ci HSR T-76 Turbo
Transmission: T56 6-speed
Axle/Gears: Stock
Steering Box Rebuild, Rag Joint and Pit Arm
Hello to everyone!
I did my steering box rebuild and took some pictures while doing it, so I thought I should share it with everyone.
The complete rebuild and rag joint replacement will take about 4-6 hours if you have all the tools.
Here's what you need:
Procedure:
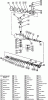
1) Remove the pit arm, but first make a mark on the pit arm and shaft for re-installing purposes, do not use some magic marker, use a small file and make a good mark.
2) Next place some news paper on the floor right below the steering box and remove the steering hoses, remember to mark each one. Some fluid is going to be spilled so that's the purpose of the news paper.
3) Slide the plastic cover that covers the steering shaft and remove the bolt that holds the rag joint into the steering box.
4) Use some WD-40 and spray it ove the steering shaft slide shaft, near the joint below the master cylinder.
5) Remove the bolt that hold together the steering shaft slide shaft with the shaft coming from the firewall.
6) With a large screw driver or pry bar separate the rag joint from the steering box.
7)Remove the steering box and the steering shaft.
I did my steering box rebuild and took some pictures while doing it, so I thought I should share it with everyone.
The complete rebuild and rag joint replacement will take about 4-6 hours if you have all the tools.
Here's what you need:
Procedure:
1) Remove the pit arm, but first make a mark on the pit arm and shaft for re-installing purposes, do not use some magic marker, use a small file and make a good mark.
2) Next place some news paper on the floor right below the steering box and remove the steering hoses, remember to mark each one. Some fluid is going to be spilled so that's the purpose of the news paper.
3) Slide the plastic cover that covers the steering shaft and remove the bolt that holds the rag joint into the steering box.
4) Use some WD-40 and spray it ove the steering shaft slide shaft, near the joint below the master cylinder.
5) Remove the bolt that hold together the steering shaft slide shaft with the shaft coming from the firewall.
6) With a large screw driver or pry bar separate the rag joint from the steering box.
7)Remove the steering box and the steering shaft.
Last edited by BBSDesigns; 06-13-2008 at 01:19 PM.
 06-13-2008, 12:53 AM
#2
Senior Member
Thread Starter
Join Date: Feb 2004
Location: Isla del Encanto, P.R.
Posts: 608
Likes: 0
Received 3 Likes
on
2 Posts
Car: GTA
Engine: Bone Stock 350ci HSR T-76 Turbo
Transmission: T56 6-speed
Axle/Gears: Stock
Re: Steering Box Rebuild, Rag Joint and Pit Arm
Now that you have those two parts, lets concentrate on the rag joint replacement.
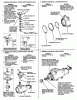
1) First: FORGET ABOUT RAG JOINT ELIMINATORS I did change that on my GTA and the binding it created contributed to a leak on the steering box, main reason for the steering box rebuild. Rag joint eliminators will create dead spots since it takes away the articulate joint that the rag joint provides.
2) Mark the position of the joints with a file also and then remove the rivets with the cutting wheel. Be carefull not to damage the parts to be reused or yourself! You will need the hammer and a rounded punch tool to remove the rivets from the joints.
3) Clean all parts and lubricate the slide shaft with some WD-40 and place aside until re-install.
Steering Box Rebuild
1) With the steering box in hand rotate the shaft with your hand from side to side while pointing the two couplers where the hoses attach upside down to a cath container. This will cause all the fluid to be sprayed into the catch container. Try to do it as much as possible to remove all the unwanted fluid trapped inside the box.
2) Once you have removed all the fluid or mostly, remove the lock nut on top of the box.
3) Remove the four bolts that hold the box's top cover.
4) Using the hex wrench that fits propperly on the adjusting bolt remove the cover while you screw-down the adj. bolt. You will notice that the cover will go up.
06-13-2008, 01:10 AM
#3
Senior Member
Thread Starter
Join Date: Feb 2004
Location: Isla del Encanto, P.R.
Posts: 608
Likes: 0
Received 3 Likes
on
2 Posts
Car: GTA
Engine: Bone Stock 350ci HSR T-76 Turbo
Transmission: T56 6-speed
Axle/Gears: Stock
Re: Steering Box Rebuild, Rag Joint and Pit Arm
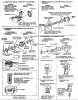
5) Remove the shaft using a rubber mallet.
6) Remove the spring wire that hold the front cover.
7) Turning the shaft carefully!! Push the cover outward. Try not to go all the way only what is necessary to remove the cover.
8) Keep turning the shaft until the rack piston is out. BE CAREFULL NOT DROP THE BALL BEARINGS!!!! The are a total of 24 *****.
9) Clean the rack piston completely, replace the seals and set aside.
06-13-2008, 01:13 AM
#4
Senior Member
Thread Starter
Join Date: Feb 2004
Location: Isla del Encanto, P.R.
Posts: 608
Likes: 0
Received 3 Likes
on
2 Posts
Car: GTA
Engine: Bone Stock 350ci HSR T-76 Turbo
Transmission: T56 6-speed
Axle/Gears: Stock
Re: Steering Box Rebuild, Rag Joint and Pit Arm
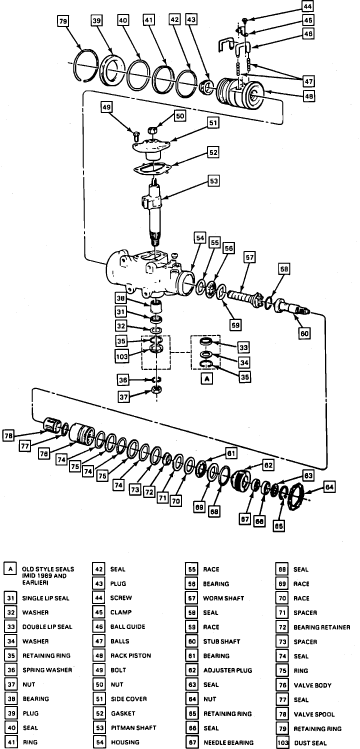
Rack Piston
06-13-2008, 01:15 AM
#5
Senior Member
Thread Starter
Join Date: Feb 2004
Location: Isla del Encanto, P.R.
Posts: 608
Likes: 0
Received 3 Likes
on
2 Posts
Car: GTA
Engine: Bone Stock 350ci HSR T-76 Turbo
Transmission: T56 6-speed
Axle/Gears: Stock
Re: Steering Box Rebuild, Rag Joint and Pit Arm
Rack Piston #2
06-13-2008, 01:23 AM
#6
Senior Member
Thread Starter
Join Date: Feb 2004
Location: Isla del Encanto, P.R.
Posts: 608
Likes: 0
Received 3 Likes
on
2 Posts
Car: GTA
Engine: Bone Stock 350ci HSR T-76 Turbo
Transmission: T56 6-speed
Axle/Gears: Stock
Re: Steering Box Rebuild, Rag Joint and Pit Arm
Remember to clean all parts that you remove and DO NOT DISCART ANY OLD SEAL YET, YOU MIGHT NEED IT!!!
10) Now is time to remove the large lock nut, but first, yes, mark it's position.
11) Remove the large nut and the cylinder.
12) From the threaded part of the cylinder replace the roller bearing and the two seals. You will need the snap ring toll for that
13) Replace the seals on the pump. Be carefull and please notice how all parts interlock before you dismantle anything!!!!
Trending Topics
06-13-2008, 01:39 AM
#9
Senior Member
Thread Starter
Join Date: Feb 2004
Location: Isla del Encanto, P.R.
Posts: 608
Likes: 0
Received 3 Likes
on
2 Posts
Car: GTA
Engine: Bone Stock 350ci HSR T-76 Turbo
Transmission: T56 6-speed
Axle/Gears: Stock
Re: Steering Box Rebuild, Rag Joint and Pit Arm
Ok here is the step that you guys or gals I want you to take your time.
First of all. my camera is a piece of sh_t, and I didnt notice that the pics I took where off focus until I reviewed later, so try no to go blind while you look at them.
Remember that I told you to please keep an eye on how parts interlock one with each other? Ok The pump has one worm shaft which is the one that turns the rack piston. The Stub shaft and the O-ring valve body with body.
The O-ring body interlocks with the stub shaft via a small dowel. Also please keep in mind the thrust bearing and washers.
14) When replacing the seals on the pump do it in order form the farthest first then to the closer to the edge of the cylinder.
Last edited by BBSDesigns; 09-11-2013 at 11:58 AM.
06-13-2008, 02:00 AM
#11
Senior Member
Thread Starter
Join Date: Feb 2004
Location: Isla del Encanto, P.R.
Posts: 608
Likes: 0
Received 3 Likes
on
2 Posts
Car: GTA
Engine: Bone Stock 350ci HSR T-76 Turbo
Transmission: T56 6-speed
Axle/Gears: Stock
Re: Steering Box Rebuild, Rag Joint and Pit Arm
15) Once you replaced all the seals and partially assembled the pump and set it aside its time work on the seal and bearing replacement of the main shaft. Remove the snap ring and remove the seals along with the roller bearing and replace.
16)Re-install the complete pump assembly carefully. Be sure that all o-rings are positioned correctly in place and that everything is as when you remove it. Just hand tight the threaded body for now. Be sure to leave it very loose
17) Install the rack piston. Be sure that thera are no ball bearings inside!!!
18) Install the ball bearings, this is the trick part
Once the rack piston is inside the box place the box flat on the table. With the rack on it's centered position you will start putting each ball thru hole on the rack piston to your left side. Be sure that the ***** run towards the right side. Use the pick to push the down, but always make sure that they run to the right side. The idea is that when you install the tube carrier in shape of an "U" all the ***** run thur the worm shaft and thru the "U" carrier. If the ***** are outside the that zone I honestly don want to even know what could happen. Notice that the carrier tube has to "stops" on each end to prevent the ***** of getting out of the ball bearing "zone".
06-13-2008, 02:06 AM
#12
Senior Member
Thread Starter
Join Date: Feb 2004
Location: Isla del Encanto, P.R.
Posts: 608
Likes: 0
Received 3 Likes
on
2 Posts
Car: GTA
Engine: Bone Stock 350ci HSR T-76 Turbo
Transmission: T56 6-speed
Axle/Gears: Stock
Re: Steering Box Rebuild, Rag Joint and Pit Arm
Ball Bearing Zone
06-13-2008, 02:15 AM
#13
Senior Member
Thread Starter
Join Date: Feb 2004
Location: Isla del Encanto, P.R.
Posts: 608
Likes: 0
Received 3 Likes
on
2 Posts
Car: GTA
Engine: Bone Stock 350ci HSR T-76 Turbo
Transmission: T56 6-speed
Axle/Gears: Stock
Re: Steering Box Rebuild, Rag Joint and Pit Arm
19) Once you have pushed the ball bearing to zone area ONLY, fill the "U" carrier tube with the remaining ***** which should be 7-8 ***** and put some grease on each end so that the ***** will not fall from the tube. Join the tube with some masking tape.
20) With all the ***** in the "zone" place the tube as gentle and as fast as you can on its position and put the metal strap on with the screws. Use some thread locker there.
21) Hand tight the threaded body on the pump side. This will avoid the rack, due to its weight to unscrew from the box and spill all the ***** out.
22) Reinstall the main shaft put the top cover.
23) Reinstall the front cover, make sure that you change the large o-ring and put the new spring wire.
06-13-2008, 02:17 AM
#14
Senior Member
Thread Starter
Join Date: Feb 2004
Location: Isla del Encanto, P.R.
Posts: 608
Likes: 0
Received 3 Likes
on
2 Posts
Car: GTA
Engine: Bone Stock 350ci HSR T-76 Turbo
Transmission: T56 6-speed
Axle/Gears: Stock
Re: Steering Box Rebuild, Rag Joint and Pit Arm
Assembly
06-13-2008, 02:23 AM
#15
Senior Member
Thread Starter
Join Date: Feb 2004
Location: Isla del Encanto, P.R.
Posts: 608
Likes: 0
Received 3 Likes
on
2 Posts
Car: GTA
Engine: Bone Stock 350ci HSR T-76 Turbo
Transmission: T56 6-speed
Axle/Gears: Stock
Re: Steering Box Rebuild, Rag Joint and Pit Arm
Assembly#2
24) I adjusted the complete box by feel only, did not trust my torque wrench on this one.
What I did is first tightened the threaded body until I got to the mark I left. Then adjusted until I felt no lash on the thrust bearing from the pump. Then tightened the large lock nut.
25) For the main shaft I did it the same way but this time I turned the steering shaft simultaneously until no lash was felt. Then torqued the lock nut.
26) Re-install on vehicle and enjoy your new 2008 steering box!
Hope this will a lot of people!
06-13-2008, 11:31 AM
#16
Supreme Member
iTrader: (1)
Join Date: Jul 2004
Location: Calgary, AB, Canada
Posts: 10,763
Likes: 0
Received 4 Likes
on
4 Posts
Car: 1982 Trans-Am
Engine: 355 w/ ported 416s
Transmission: T10, hurst shifter
Axle/Gears: 10 bolt, true-trac, 3.73
Re: Steering Box Rebuild, Rag Joint and Pit Arm
Excellent!
Now I'm just skipping that drama and buying the $280 steering box new But are you sure it was a 1 1/4" socket to remove the big nut on the underside, and therefore the pitman arm?
I have a 1 1/4" and it didn't quite fit, tried a 1 3/8" and was too big. I was going to go buy a 1 5/16" (or is this metric?) but should I just try hammering on my 1 1/4" Just thought i'd check, since you've done it most recently.
Now I'm just skipping that drama and buying the $280 steering box new
But are you sure it was a 1 1/4" socket to remove the big nut on the underside, and therefore the pitman arm?I have a 1 1/4" and it didn't quite fit, tried a 1 3/8" and was too big. I was going to go buy a 1 5/16" (or is this metric?) but should I just try hammering on my 1 1/4" Just thought i'd check, since you've done it most recently.
06-13-2008, 01:18 PM
#17
Senior Member
Thread Starter
Join Date: Feb 2004
Location: Isla del Encanto, P.R.
Posts: 608
Likes: 0
Received 3 Likes
on
2 Posts
Car: GTA
Engine: Bone Stock 350ci HSR T-76 Turbo
Transmission: T56 6-speed
Axle/Gears: Stock
Re: Steering Box Rebuild, Rag Joint and Pit Arm
Excellent!
Now I'm just skipping that drama and buying the $280 steering box new But are you sure it was a 1 1/4" socket to remove the big nut on the underside, and therefore the pitman arm?
I have a 1 1/4" and it didn't quite fit, tried a 1 3/8" and was too big. I was going to go buy a 1 5/16" (or is this metric?) but should I just try hammering on my 1 1/4" Just thought i'd check, since you've done it most recently.
Now I'm just skipping that drama and buying the $280 steering box new
But are you sure it was a 1 1/4" socket to remove the big nut on the underside, and therefore the pitman arm?I have a 1 1/4" and it didn't quite fit, tried a 1 3/8" and was too big. I was going to go buy a 1 5/16" (or is this metric?) but should I just try hammering on my 1 1/4" Just thought i'd check, since you've done it most recently.
You are completely right, is a 1 5/16" socket. I will correct the information. No is not metric. The nearest metric size that will fit is 35mm and it has some play, perfect for striping nuts!
Last edited by BBSDesigns; 09-11-2013 at 11:57 AM.
06-19-2008, 06:21 PM
#18
Senior Member
iTrader: (3)
Join Date: Jun 2008
Location: Houston TX
Posts: 703
Likes: 0
Received 0 Likes
on
0 Posts
Car: 1992 Rs
Engine: 305 TBI
Transmission: 5-Speed
Axle/Gears: 3.08
Re: Steering Box Rebuild, Rag Joint and Pit Arm
Has anyone ever taken off the steering box off of a 90-92 'maro? It has the airbags and I'm wondering how to disconnect them
06-19-2008, 09:54 PM
#20
Supreme Member
iTrader: (1)
Join Date: Feb 2000
Location: Norfolk, VA. USA
Posts: 7,964
Likes: 0
Received 3 Likes
on
3 Posts
Car: 86 Trans Am, 88 Formula
Engine: 95LT4, 305TPI
Transmission: T56, T5
Re: Steering Box Rebuild, Rag Joint and Pit Arm
great write up. I am thinking about doing this as well since I don't really want to spend almost $300 for a new box.
I just put a new pair of tires up front today and want to get an alignment, so I guess I should go ahead and attempt the rebuild.
when are you going to rebuild your power steering pump? hint, hint
I just put a new pair of tires up front today and want to get an alignment, so I guess I should go ahead and attempt the rebuild.
when are you going to rebuild your power steering pump? hint, hint
06-19-2008, 11:37 PM
#21
Senior Member
iTrader: (1)
Join Date: Jan 2003
Location: New Germany, MN
Posts: 949
Likes: 0
Received 0 Likes
on
0 Posts
Car: 1986 Iroc
Engine: 5.3
Transmission: 4L80E
Axle/Gears: 9 Inch w/ 3.55
Re: Steering Box Rebuild, Rag Joint and Pit Arm
Just an FYI there is a good way to elminate the rag joint cheaply and correctly. Replace it with a universal joint. I have a steering shaft made from a camaro shaft and an astro van shaft. I personally didn't make it. There was someone on the board that figured it out and made me one. But it is a vary economical way to elminate the rag joint.
06-21-2008, 02:22 AM
#22
Member
iTrader: (9)
Join Date: Nov 2002
Location: Detroit Suburbs
Posts: 439
Likes: 0
Received 0 Likes
on
0 Posts
Car: 87 IROC
Engine: 5.3L
Transmission: Jerico
Axle/Gears: Aluminum 8.6 w/ T2R
Re: Steering Box Rebuild, Rag Joint and Pit Arm
Just curious, where did you get your eliminator from and was it just a solid aluminum disk? I had problems with the Unbalanced Engineering rag joint elim. Steering effort went up 10x and I pulled it off before I got any leaks.
06-21-2008, 09:02 PM
#23
Senior Member
Thread Starter
Join Date: Feb 2004
Location: Isla del Encanto, P.R.
Posts: 608
Likes: 0
Received 3 Likes
on
2 Posts
Car: GTA
Engine: Bone Stock 350ci HSR T-76 Turbo
Transmission: T56 6-speed
Axle/Gears: Stock
Re: Steering Box Rebuild, Rag Joint and Pit Arm
My steering also felt more hard to steer, plus the "flat spots" that where felt. The steering wont return to its neutral position also.
I did the rebuild new rag joint and now the steering is perfect, no need for a solid joint. The whole thing cost me about $45.00 including the fluid and I got to keep my high ratio gear box!
Last edited by BBSDesigns; 09-11-2013 at 11:59 AM.
06-22-2008, 11:17 AM
#24
Supreme Member
iTrader: (4)

Join Date: Aug 2005
Location: louisville, ky
Posts: 1,366
Likes: 0
Received 0 Likes
on
0 Posts
Axle/Gears: '01 3.42 10 bolt
Re: Steering Box Rebuild, Rag Joint and Pit Arm
maybe i got lucky but i like my rag joint eliminator. steering effort is the same as with the factory rag joint, no play, and better steering response.
BTW, that is a good write-up on the box rebuild. did mine recently but didn't have a camera and wished i had something like this article. i agree with Kris.....it should be a sticky.
BTW, that is a good write-up on the box rebuild. did mine recently but didn't have a camera and wished i had something like this article. i agree with Kris.....it should be a sticky.
06-22-2008, 01:22 PM
#25
Supreme Member

Join Date: Sep 2003
Location: Western Maryland
Posts: 1,407
Likes: 0
Received 1 Like
on
1 Post
Car: 82z28
Engine: 406
Transmission: th350
Axle/Gears: 3.23
Re: Steering Box Rebuild, Rag Joint and Pit Arm
maybe i got lucky but i like my rag joint eliminator. steering effort is the same as with the factory rag joint, no play, and better steering response.
BTW, that is a good write-up on the box rebuild. did mine recently but didn't have a camera and wished i had something like this article. i agree with Kris.....it should be a sticky.
BTW, that is a good write-up on the box rebuild. did mine recently but didn't have a camera and wished i had something like this article. i agree with Kris.....it should be a sticky.
request posted here
https://www.thirdgen.org/forums/prob...h-article.html
Last edited by blyth18md; 06-22-2008 at 01:25 PM.
02-02-2009, 06:19 PM
#26
Member
iTrader: (1)
Join Date: Oct 2008
Location: Bucks County, PA
Posts: 436
Received 0 Likes
on
0 Posts
Car: 1991 RS
Engine: 383 stroker
Transmission: 700R4
Axle/Gears: 3.23 posi
Re: Steering Box Rebuild, Rag Joint and Pit Arm
Do the ball bearings just fall out or can you prevent that or not take them out at all? I just started this rebuild and I'm kinda concerned about adjusting it right when I put it back together. Thanks
02-02-2009, 07:21 PM
#27
Supreme Member
iTrader: (2)
Join Date: Mar 2005
Location: East Tennesse
Posts: 2,820
Likes: 0
Received 3 Likes
on
3 Posts
Car: 1991 RS Camaro
Engine: L03 (want LS1)
Transmission: 700R-4 (and T56)
Axle/Gears: 4th Gen 3.23 posi
Re: Steering Box Rebuild, Rag Joint and Pit Arm
Has this eliminated the slop in the steering? I have fairly new components in the whole steering assembly, and it's still sloppy. Did this fix yours?
02-02-2009, 08:32 PM
#28
Senior Member
Thread Starter
Join Date: Feb 2004
Location: Isla del Encanto, P.R.
Posts: 608
Likes: 0
Received 3 Likes
on
2 Posts
Car: GTA
Engine: Bone Stock 350ci HSR T-76 Turbo
Transmission: T56 6-speed
Axle/Gears: Stock
Re: Steering Box Rebuild, Rag Joint and Pit Arm
My GTA has a complete rebuild front end and this was the only part that was not worked on. When I did this it completely remove the sloppiness. I did need to re-adjust the box after a while of use, meaning that the "on the bench" adjustment was not enough.
02-02-2009, 10:05 PM
#29
Supreme Member
iTrader: (2)
Join Date: Mar 2005
Location: East Tennesse
Posts: 2,820
Likes: 0
Received 3 Likes
on
3 Posts
Car: 1991 RS Camaro
Engine: L03 (want LS1)
Transmission: 700R-4 (and T56)
Axle/Gears: 4th Gen 3.23 posi
Re: Steering Box Rebuild, Rag Joint and Pit Arm
I'm in the same boat. My car has new (well, less than 4 years old) struts, strut mounts, ball joints, inner/out tie rod ends, sway bar bushings, etc and I've checked the rag joint for wear. Still, the slop persists. I'm going to pull the WS6 box off my parts car and rebuild it, then install it on the car RS.
02-02-2009, 10:35 PM
#30
Member
iTrader: (1)
Join Date: Oct 2008
Location: Bucks County, PA
Posts: 436
Received 0 Likes
on
0 Posts
Car: 1991 RS
Engine: 383 stroker
Transmission: 700R4
Axle/Gears: 3.23 posi
Re: Steering Box Rebuild, Rag Joint and Pit Arm
I just started and ordered the part from autozone...$40.00 shipped. It's pretty straight forward so far, just watch how everything fits together as you pull it apart (lots of wd-40 to loosen 21 year old bolts). I recommend heating up the pitman arm nut with a torch. Looks like the hardest part will be adjusting it when you throw it back together. good luck
02-03-2009, 09:26 AM
#32
Re: Steering Box Rebuild, Rag Joint and Pit Arm
I'm in the same boat. My car has new (well, less than 4 years old) struts, strut mounts, ball joints, inner/out tie rod ends, sway bar bushings, etc and I've checked the rag joint for wear. Still, the slop persists. I'm going to pull the WS6 box off my parts car and rebuild it, then install it on the car RS.
If your RS came with the optional 16" wheels, it already has the Z28 quick ratio steering box (XH stamped).
If your parts car came with 16" wheels, the steering box will be the same, but if it came with 15" wheels, it has the WS stamped box. The differences are the XH box has 32* of travel and requires a little more effort than the WS box, which has 35* travel. But both the XH and WS box's are 12.7:1 ratio.
Here is a breakdown of all the steering box's available in Camaro's
� �WS� � 1982-1992 Camaro � 12.7:1 ratio (just like your Z/28, this may be the box that you Z originally had. Looks like this came with cars that originally came with 15 in wheels, it has 35* of travel)
� �XH� � 1985-1992 Camaro � 12.7:1 ratio (this box was also installed on Z/28�s and other high performance Camaros with 16in whells, it has slightly more steering effort required than the WS box.), has 32* of travel
� �WN� � 1982-1985 Camaro � 14.1 ratio
� �WP� � 1982-1985 Camaro � 13:1-15:1 variable ratio (used in Berlinetta�s, least steering effort required of all third gen. Camaro steering boxes)
� �JL� � 1986-1992 Camaro � 14.1 ratio (base Camaro steering box)
02-03-2009, 11:37 AM
#33
Supreme Member
iTrader: (2)
Join Date: Mar 2005
Location: East Tennesse
Posts: 2,820
Likes: 0
Received 3 Likes
on
3 Posts
Car: 1991 RS Camaro
Engine: L03 (want LS1)
Transmission: 700R-4 (and T56)
Axle/Gears: 4th Gen 3.23 posi
Re: Steering Box Rebuild, Rag Joint and Pit Arm
Both my parts car and my car have 16 inch wheels. The parts car is a 91 WS6 Formula and my car is a 91 RS Camaro w/ F41. Some genious painted the box (and everything else in the engine bay) on the Formy before I got it. From the information you provided, I'm assuming the steering box will be XH box in both cars?
02-03-2009, 06:00 PM
#35
Member
iTrader: (1)
Join Date: Oct 2008
Location: Bucks County, PA
Posts: 436
Received 0 Likes
on
0 Posts
Car: 1991 RS
Engine: 383 stroker
Transmission: 700R4
Axle/Gears: 3.23 posi
Re: Steering Box Rebuild, Rag Joint and Pit Arm
Wher's the stamp located? I have the box I'm rebuilding which I'm told came out of an 87 iroc and my car is a 91 RS although I don't know if it origionally came with 16" wheels. I see a "Z" on both boxes but none of the other numbers have a WS or XH in them.
02-04-2009, 02:22 PM
#37
Member
iTrader: (1)
Join Date: Oct 2008
Location: Bucks County, PA
Posts: 436
Received 0 Likes
on
0 Posts
Car: 1991 RS
Engine: 383 stroker
Transmission: 700R4
Axle/Gears: 3.23 posi
Re: Steering Box Rebuild, Rag Joint and Pit Arm
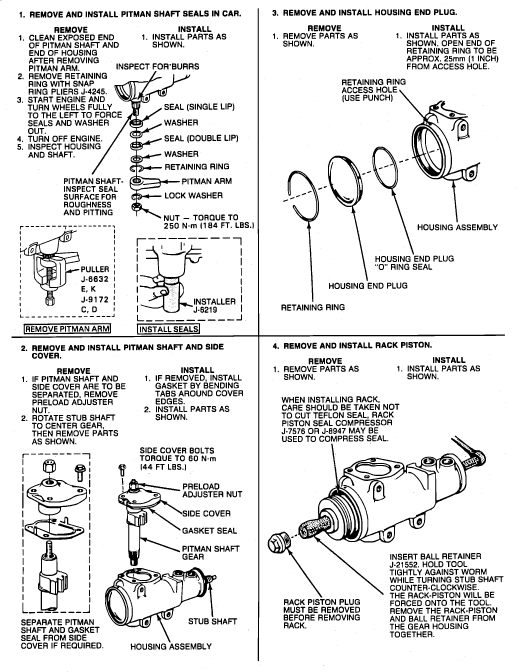
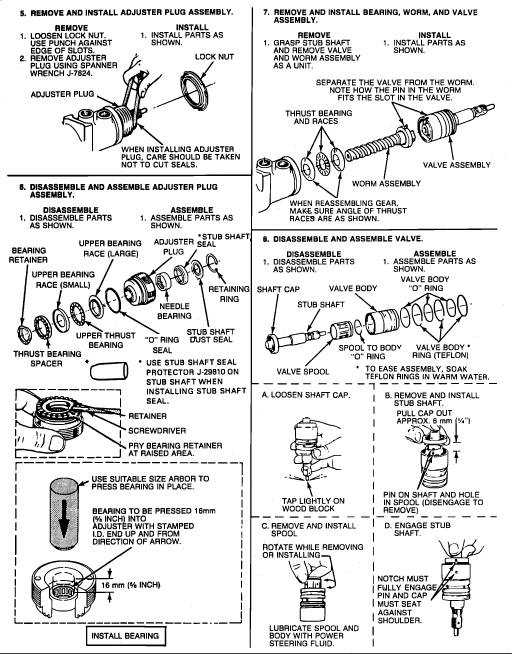
Here are some useful diagrams I found. Unfortunately, they're hard to read when you zoom in. I got them from alldatadiy.com. One diagram states that you should remove the plug from the front of the rack piston and insert a ball retainer (part# j-21552) before removing the rack piston and then remove them together. One thing I found was that the ***** inside the rack piston are supposed to be black and silver, one being smaller than the other and they are supposed to be installed alternately so as to keep the proper bearing preload.
Last edited by jb3829; 02-04-2009 at 02:42 PM. Reason: more explanation
02-20-2009, 03:03 PM
#38
Member
iTrader: (1)
Join Date: Oct 2008
Location: Bucks County, PA
Posts: 436
Received 0 Likes
on
0 Posts
Car: 1991 RS
Engine: 383 stroker
Transmission: 700R4
Axle/Gears: 3.23 posi
Re: Steering Box Rebuild, Rag Joint and Pit Arm
The spec sheet on Alldatadiy.com says to tighten the main shaft until it bottoms out and then mark the location against the housing. Now back it off a 1/2" and make another mark. Tighten the lock nut without allowing the shaft to move. After you've tightened the top cover, back out the adjuster bolt til it stops and tighten one full turn. Take a torque reading on the main shaft. Now, tighten the adjuster nut until the torque reading on the main shaft is 6-11 ft/lbs more than the first. Last, tighten the lock nut on the adjuster and don't allow the adjuster to move. Done.
Last edited by jb3829; 02-20-2009 at 03:04 PM. Reason: spelling
02-20-2009, 05:24 PM
#39
Senior Member
Join Date: Apr 2002
Location: Deer Park, N.Y.
Posts: 514
Likes: 0
Received 0 Likes
on
0 Posts
Car: 1983 z-28/SFC/bilsteins/adj.arms
Engine: 355sbc/Demon650dp/hedmanheaders/
Transmission: t-5, alum DS
Axle/Gears: 3.42 torsen posi, baer discs
Re: Steering Box Rebuild, Rag Joint and Pit Arm
Also, don't forget to use some 400 grit or fine emery cloth to polish the pittman shaft where it rubs on the seals. It will probably be rusty and have some pitting due to the water present at the seals and washers due to the heat cycles of the pump fluid. It's important to polish this as well as you can because the pitting, if left alone, will cut up the new seals and set-up a new leak!
05-11-2009, 03:27 PM
#40
Member
iTrader: (1)
Join Date: Oct 2008
Location: Bucks County, PA
Posts: 436
Received 0 Likes
on
0 Posts
Car: 1991 RS
Engine: 383 stroker
Transmission: 700R4
Axle/Gears: 3.23 posi
Re: Steering Box Rebuild, Rag Joint and Pit Arm
I FINALLY installed the rebuilt box with new moog steering links, fresh fluid and had it aligned. WOW what a difference! No more slop and nice road feel. My mechanic had to pull the pitman arm off and realign it but well worth $30 and about 6 hours to rebuild it.
06-01-2009, 06:52 PM
#41
Junior Member

Join Date: Jul 2008
Location: PA
Posts: 16
Likes: 0
Received 0 Likes
on
0 Posts
Car: 89 Formula
Engine: 305 TPI
Transmission: T5
Axle/Gears: Borg Warner 3.45
Re: Steering Box Rebuild, Rag Joint and Pit Arm
Where can i get the replacement rubber for the rag joint?
Carquest didn't have a listing for it.
Carquest didn't have a listing for it.
06-01-2009, 07:00 PM
#42
Supreme Member
iTrader: (2)
Join Date: Mar 2005
Location: East Tennesse
Posts: 2,820
Likes: 0
Received 3 Likes
on
3 Posts
Car: 1991 RS Camaro
Engine: L03 (want LS1)
Transmission: 700R-4 (and T56)
Axle/Gears: 4th Gen 3.23 posi
Re: Steering Box Rebuild, Rag Joint and Pit Arm
Help! section at Advance is where I got mine, I think. Just don't know where I put it after that lol.
06-01-2009, 07:19 PM
#43
Junior Member
Join Date: Jul 2008
Location: PA
Posts: 16
Likes: 0
Received 0 Likes
on
0 Posts
Car: 89 Formula
Engine: 305 TPI
Transmission: T5
Axle/Gears: Borg Warner 3.45
Re: Steering Box Rebuild, Rag Joint and Pit Arm
Is it just a piece of rubber? It looks like the factory one has a fiber mesh in it. The one in the picture looks like polyurathane.
 Help section
06-07-2009, 06:21 PM
Help section
06-07-2009, 06:21 PM
#45
Junior Member
Join Date: Jul 2008
Location: PA
Posts: 16
Likes: 0
Received 0 Likes
on
0 Posts
Car: 89 Formula
Engine: 305 TPI
Transmission: T5
Axle/Gears: Borg Warner 3.45
Re: Steering Box Rebuild, Rag Joint and Pit Arm
Did you install it? Did it fit correctly? There was only one at my local advance and it said it was for a ford.
(The rag joint i mean.)
(The rag joint i mean.)
Last edited by formula310tpi; 06-07-2009 at 06:43 PM.
06-07-2009, 06:40 PM
#46
Supreme Member
iTrader: (14)
Join Date: Aug 2006
Location: Central NJ
Posts: 12,650
Likes: 0
Received 44 Likes
on
42 Posts
Car: 86 Trans Am, 92 Firebird
Engine: 408 sbc, 3.1L of raw power
Transmission: TKO600, T5
Axle/Gears: Moser 9", 3:70 trutac, 3:23 torsion
Re: Steering Box Rebuild, Rag Joint and Pit Arm
the nut holding the pitman arm to the box is 33mm. Its a little difficult to find it.
the pitman arm only goes on 1 way, so as long as you don't rotate the input shaft, you cant screw it up.
just clearing that up.
good writeup, this should be a sticky/tech article
the pitman arm only goes on 1 way, so as long as you don't rotate the input shaft, you cant screw it up.
just clearing that up.
good writeup, this should be a sticky/tech article
07-19-2009, 11:29 AM
#48
Member
Re: Steering Box Rebuild, Rag Joint and Pit Arm
15) Once you replaced all the seals and partially assembled the pump and set it aside its time work on the seal and bearing replacement of the main shaft. Remove the snap ring and remove the seals along with the roller bearing and replace.
16)Re-install the complete pump assembly carefully. Be sure that all o-rings are positioned correctly in place and that everything is as when you remove it. Just hand tight the threaded body for now. Be sure to leave it very loose
17) Install the rack piston. Be sure that thera are no ball bearings inside!!!
18) Install the ball bearings, this is the trick part
Once the rack piston is inside the box place the box flat on the table. With the rack on it's centered position you will start putting each ball thru hole on the rack piston to your left side. Be sure that the ***** run towards the right side. Use the pick to push the down, but always make sure that they run to the right side. The idea is that when you install the tube carrier in shape of an "U" all the ***** run thur the worm shaft and thru the "U" carrier. If the ***** are outside the that zone I honestly don want to even know what could happen. Notice that the carrier tube has to "stops" on each end to prevent the ***** of getting out of the ball bearing "zone".
16)Re-install the complete pump assembly carefully. Be sure that all o-rings are positioned correctly in place and that everything is as when you remove it. Just hand tight the threaded body for now. Be sure to leave it very loose
17) Install the rack piston. Be sure that thera are no ball bearings inside!!!
18) Install the ball bearings, this is the trick part
Once the rack piston is inside the box place the box flat on the table. With the rack on it's centered position you will start putting each ball thru hole on the rack piston to your left side. Be sure that the ***** run towards the right side. Use the pick to push the down, but always make sure that they run to the right side. The idea is that when you install the tube carrier in shape of an "U" all the ***** run thur the worm shaft and thru the "U" carrier. If the ***** are outside the that zone I honestly don want to even know what could happen. Notice that the carrier tube has to "stops" on each end to prevent the ***** of getting out of the ball bearing "zone".
07-21-2009, 11:07 PM
#49
Member
iTrader: (1)
Join Date: Oct 2008
Location: Bucks County, PA
Posts: 436
Received 0 Likes
on
0 Posts
Car: 1991 RS
Engine: 383 stroker
Transmission: 700R4
Axle/Gears: 3.23 posi
Re: Steering Box Rebuild, Rag Joint and Pit Arm
I'm having a problem with the snap ring above the pitman arm holding the pitman shaft seal in place.....I keep blowing out the seal,,,,,,any thoughts?
07-22-2009, 06:40 AM
#50
Member
Re: Steering Box Rebuild, Rag Joint and Pit Arm
When I installed the new snap ring that came with my kit it seemed odd that it fit loose in the groove. Then later I noticed a second ring still in the bag. I removed the first ring and compared it to the second and found the second one was a larger size than the first. After installation the second one fit nice and snug as they are supposed to. There are evidently slight variations between all the years of gears that this kit services.