My Dart "Little M" 409 Build….
 04-06-2014, 08:04 AM
#251
Supreme Member

Re: My Dart "Little M" 409 Build….
Back-set trunion are used to correct valve train geometry.
When you get into setting the rocker arm angles and contact pattern on the valve tip, you may find, after selecting the pushrod length that gives the narrowest sweep across the valve tip, that the contact is very close to the edge of the valve. The rocker tip will not be pushing directly down the centre of the valve stem and thus imparts an excessive side load on the valve guide. The distance between the rocker pivot (trunion axis) and the valve stem will have to be increased. Enter the backset trunion roller rocker.
There are a lot of variables that determine what the correct pushrod length will be. Among them are, block deck, heads, valve stem height, rocker arm style, lifter seat height, etc.
Here's a link to a thread I started for another forum member.
https://www.thirdgen.org/forums/tech...nclusions.html
I think it does a fairly good job of helping to visualize what's involved. In this case, a decision was made by the builder to use a less than ideal length pushrod as the narrowest sweep pushed the contact point very close to the valve tip edge.
In my case, due to the .100" taller valves used, the ideal sweep (as in narrow) was achieved with a 7.45" pushrod. This put the contact well into the last third of the valve tip. A backset trunion rocker is used to "pull" the contact back towards the centre.
(By the way, your guide plates will have to be adjusted before any lifter preload is applied or you'll never move them.)
Last edited by skinny z; 04-06-2014 at 08:16 AM.
 04-06-2014, 09:43 AM
#252
Member

Join Date: Mar 2013
Location: gladstone
Posts: 325
Likes: 0
Received 0 Likes
on
0 Posts
Car: 72 nova/ 90 camaro rs,04 suburban
Engine: blown 327/ 355/306/355/5.3
Transmission: muncie 4 speed/T5/powerglide,4l80e
Axle/Gears: 342/411/456/ moser axles
Re: My Dart "Little M" 409 Build….
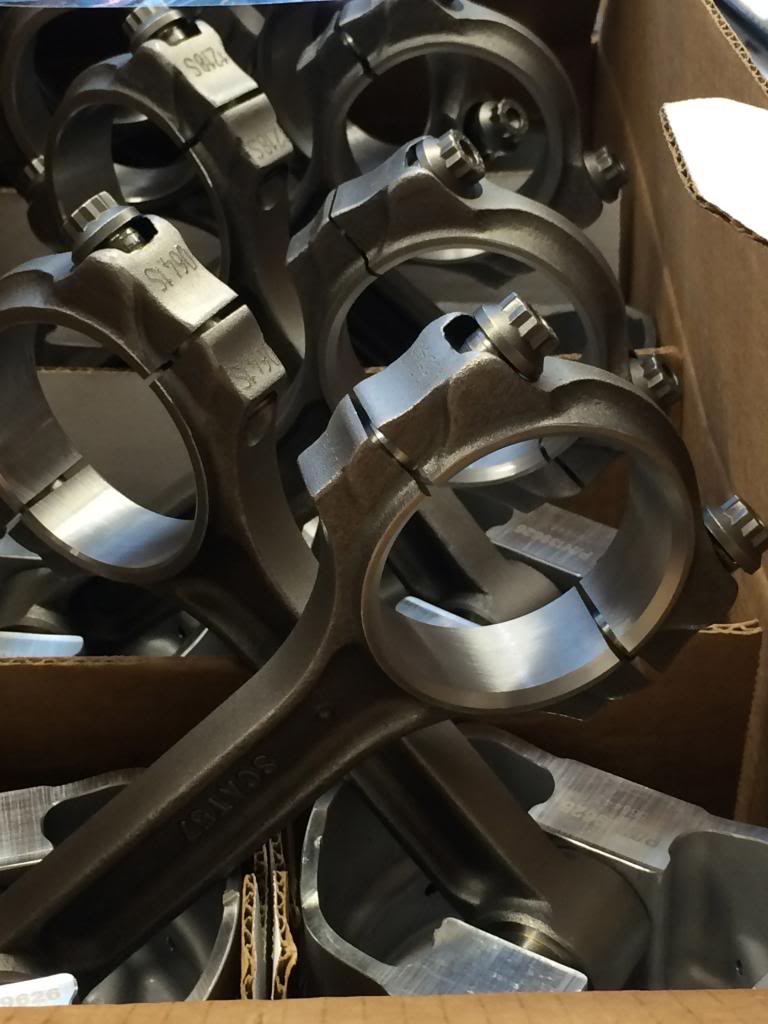
May I ask why you are using I beam rods, not H beam rods, H beam rods are so much stronger and will be good for 10 lbs + of boost with your blower.
04-07-2014, 12:05 AM
#253
Member
Re: My Dart "Little M" 409 Build….

Brian
04-07-2014, 05:24 PM
#254
Supreme Member
Thread Starter
iTrader: (4)
Join Date: Oct 1999
Location: GO PACK GO
Posts: 4,211
Likes: 0
Received 2 Likes
on
2 Posts
Car: 83Z28 HO
Engine: Magnacharged Dart Little M 408
Transmission: G Force 5 speed
Axle/Gears: Moser 9" w/Detroit Trutrac
Re: My Dart "Little M" 409 Build….
Well -
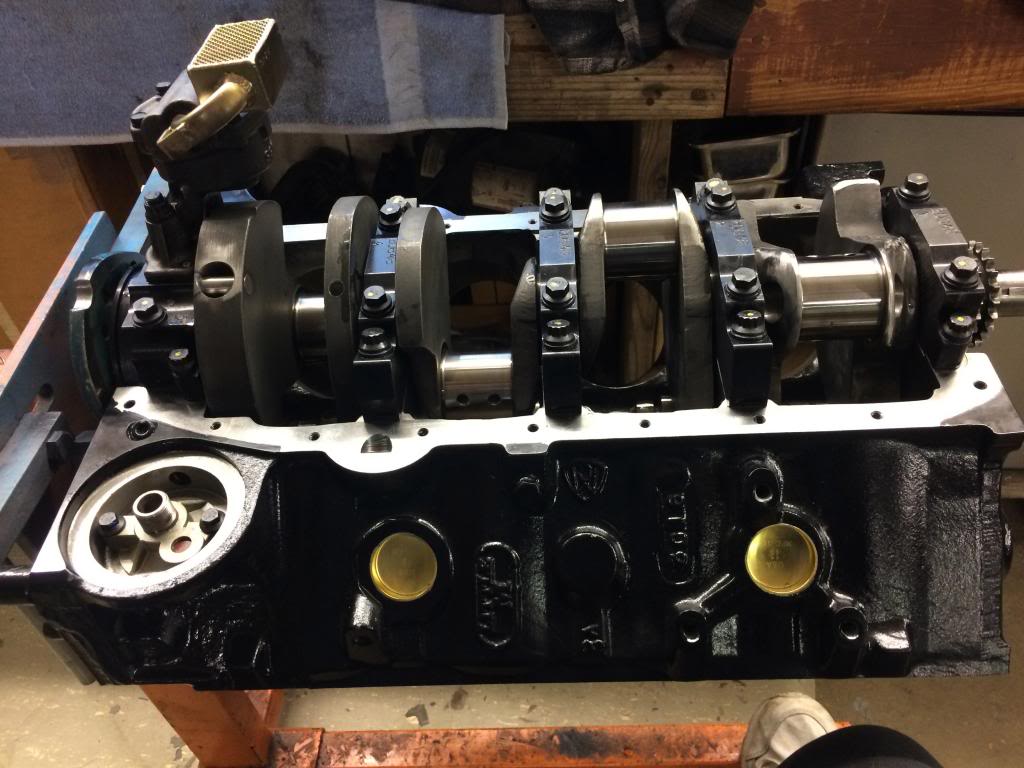
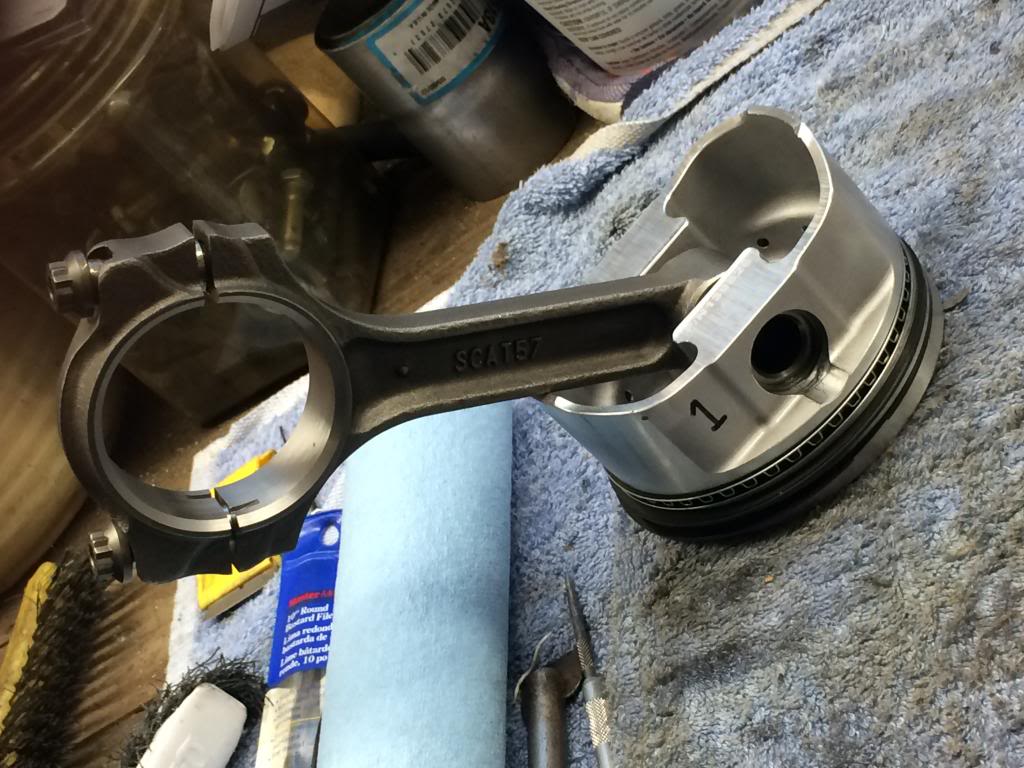
I picked of my newly balanced crank shaft, new rods and pistons up from the shop today. Already have it all in the block! Gonna wait and triple check all my torques, and get some plasti-gage to do a quick check on the rod bearings.
They should be fine, but it never hurts to make sure…if all good I'll torque those. Then it's reinstalling the timing chain and cover. Then I'll be back where I was 2 weeks ago!! :roll eyes:


 04-07-2014, 08:20 PM
#257
Supreme Member
Thread Starter
iTrader: (4)
Join Date: Oct 1999
Location: GO PACK GO
Posts: 4,211
Likes: 0
Received 2 Likes
on
2 Posts
Car: 83Z28 HO
Engine: Magnacharged Dart Little M 408
Transmission: G Force 5 speed
Axle/Gears: Moser 9" w/Detroit Trutrac
Re: My Dart "Little M" 409 Build….
I always use good filters....I see no advantage in plugging up the bypass if I change oil on a regular basis. I'm not running a high volume or pressure pump. Unless...it something that should be done due to priority oiling setup.
I will run a screen however for the initial startup. Doubt I'll find a thing in it, but cheap insurance.
I will run a screen however for the initial startup. Doubt I'll find a thing in it, but cheap insurance.
04-07-2014, 08:33 PM
#258
Member

Join Date: Jan 2014
Posts: 170
Likes: 0
Received 0 Likes
on
0 Posts
Re: My Dart "Little M" 409 Build….
I always use good filters....I see no advantage in plugging up the bypass if I change oil on a regular basis. I'm not running a high volume or pressure pump. Unless...it something that should be done due to priority oiling setup.
I will run a screen however for the initial startup. Doubt I'll find a thing in it, but cheap insurance.
I will run a screen however for the initial startup. Doubt I'll find a thing in it, but cheap insurance.
Believe me just running cold oil that bypass is open and if your running a 20/50 oil its bypassing oil.
04-08-2014, 07:53 AM
#259
Supreme Member
Re: My Dart "Little M" 409 Build….
PM sent.
04-08-2014, 12:08 PM
#260
Supreme Member
Thread Starter
iTrader: (4)
Join Date: Oct 1999
Location: GO PACK GO
Posts: 4,211
Likes: 0
Received 2 Likes
on
2 Posts
Car: 83Z28 HO
Engine: Magnacharged Dart Little M 408
Transmission: G Force 5 speed
Axle/Gears: Moser 9" w/Detroit Trutrac
Re: My Dart "Little M" 409 Build….
A little progress...
Did a quick check of all the rod bearing clearances, and all are exactly as they was when it was assembled with the prior rods. Between .002-.003 clearance. - - Right where they should be!
Threw some locktite on the timing chain bolts and installed the chain/sprockets.
-the cam was degreed when the engine was assembled prior, so it's right back where it was (dot-to-dot). I also use the nifty plate with the tabs that get bent up on the bolt flats for extra insurance that the sprocket is going no where...
I'll do a check on rod side play, and if that looks good, you can stick a fork in this bottom end...it's done!
04-13-2014, 01:16 PM
#261
Supreme Member
Thread Starter
iTrader: (4)
Join Date: Oct 1999
Location: GO PACK GO
Posts: 4,211
Likes: 0
Received 2 Likes
on
2 Posts
Car: 83Z28 HO
Engine: Magnacharged Dart Little M 408
Transmission: G Force 5 speed
Axle/Gears: Moser 9" w/Detroit Trutrac
Re: My Dart "Little M" 409 Build….
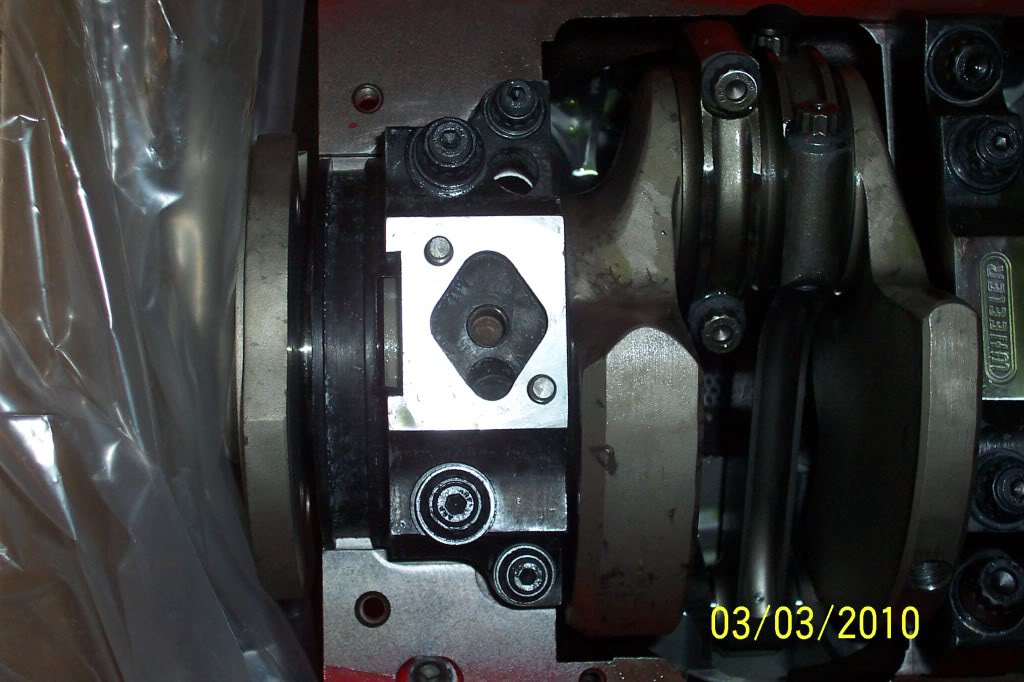
OK - I ended up indeed sticking a fork in the bottom end…it's done. You can probably see where one of the two weights were installed during the re-balance of the rotating assembly on the counterweight next to the oil pump. This is the same huge counterweight that gave me a fit and hit the Canton oil pan….Canton still has my pan BTW…
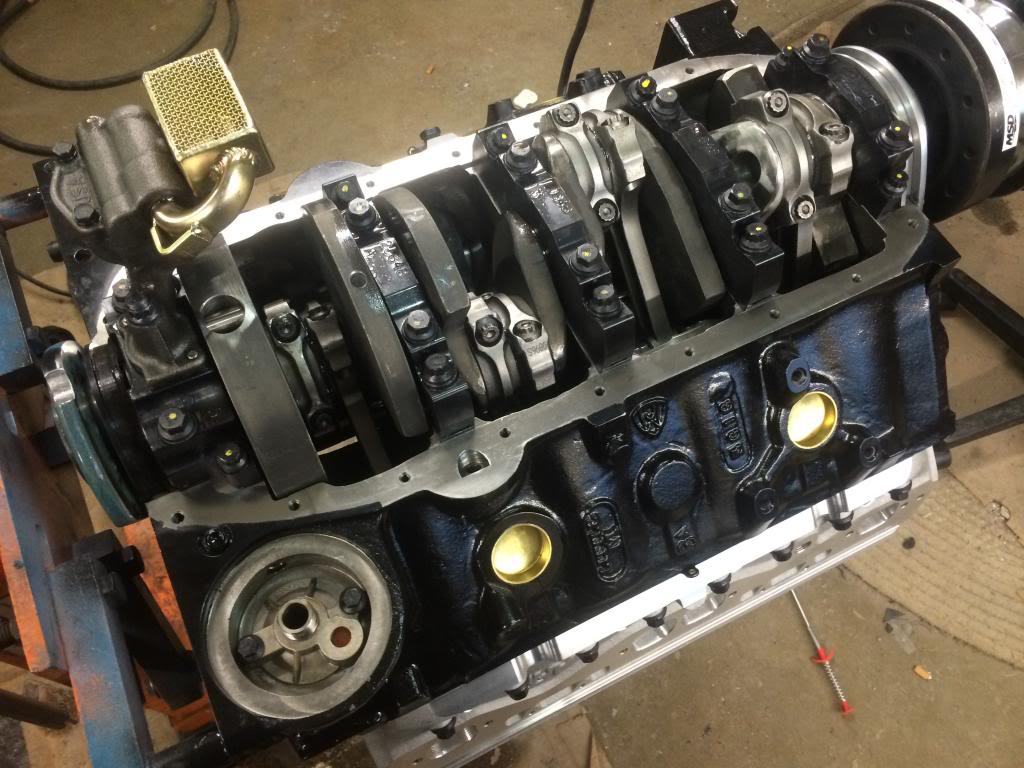
I installed one head, and the other I used my old composite gasket that's very close to compressed thickness of .040"….the MLS gaskets I'm using now have a compressed thickness of .039". Then I installed a checking spring and one of my old pushrods which is 7.300" long. an adjustable pushrod.
I gave the engine a cycle by hand and looked at the mark on the valve stem tip. Looks almost dead center…maybe just the slightest bit towards the intake, but fairly narrow. Then I installed a adjustable pus rod and tried different lengths ranging from 7.200" to 7.350"….only thing it did was move the mark either towards the exhaust or intake side, but the width of the mark on the valve tip appeared to be about the same width. I'm sticking with my original 7.300" .080 walled Comp push rods. I don't see a real need to change it up.

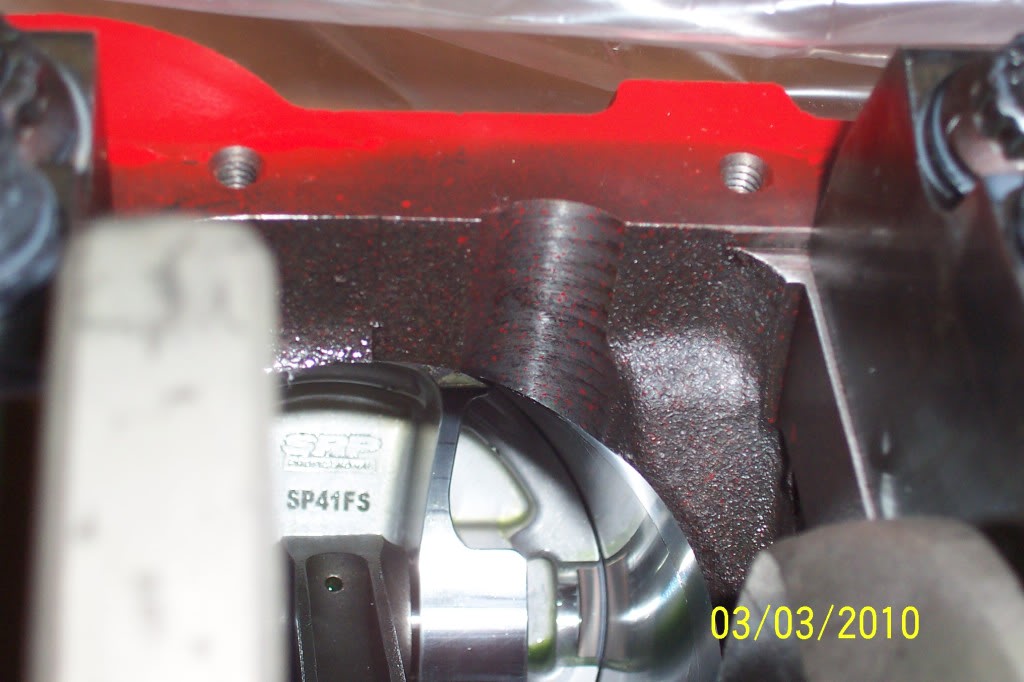
So I went ahead and installed the timing chain cover again along with my crank balancer that I had the extra 1/4 keyway cut into. The key is a perfect fit in the broach, but it was able to slide back and forth in the groove. I didn't want the key to vibrate it's way forward and fall out in the area between the pulley and the end of the crank shaft, so I decided to do what we do at work to steam turbines and gas turbines when we install balance weights and we don't want them to work their way out…it's called "peening".
I just took a center punch along the very end of the keyway groove and whack the punch with a hammer. It distorts the end of the keyway groove just enough so the key can't back itself out. In the pic, you can see the center punch marks…
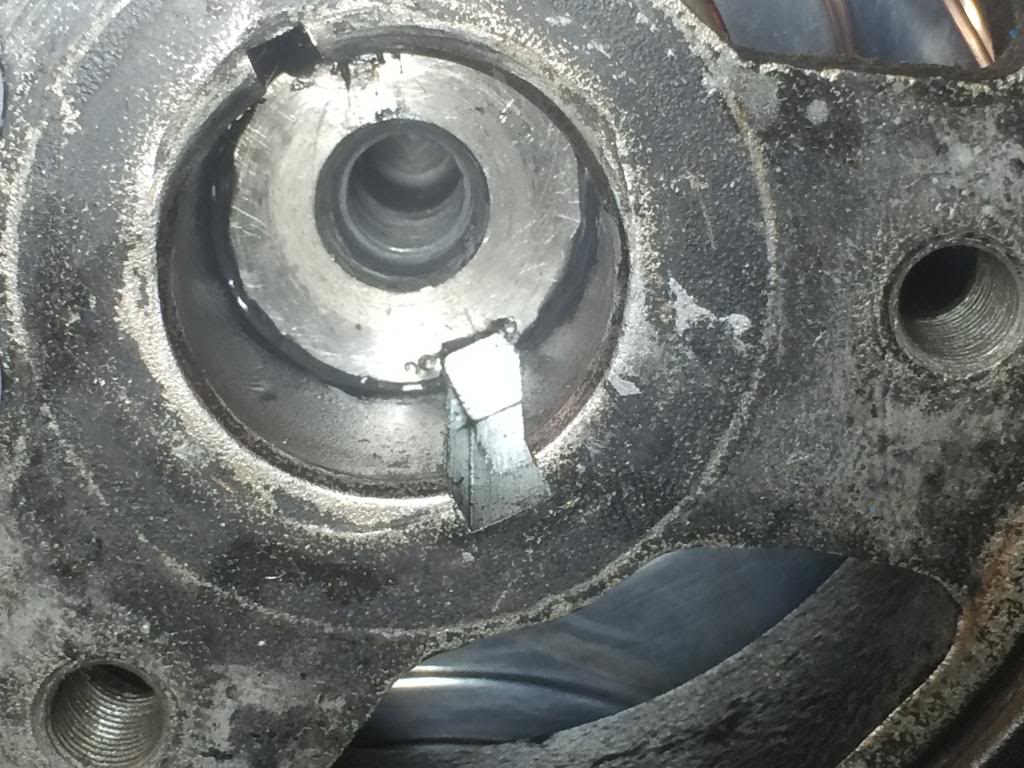
So now the heads are on with the new MLS gaskets and torqued down. I've went through a re-checked the torque 3 times! One after about an hour after the initial torque ( I got an additional 1/2 turn on most of the bolts!!) -and one after it sat overnight. All are holding tight at 70 ft. lbs.
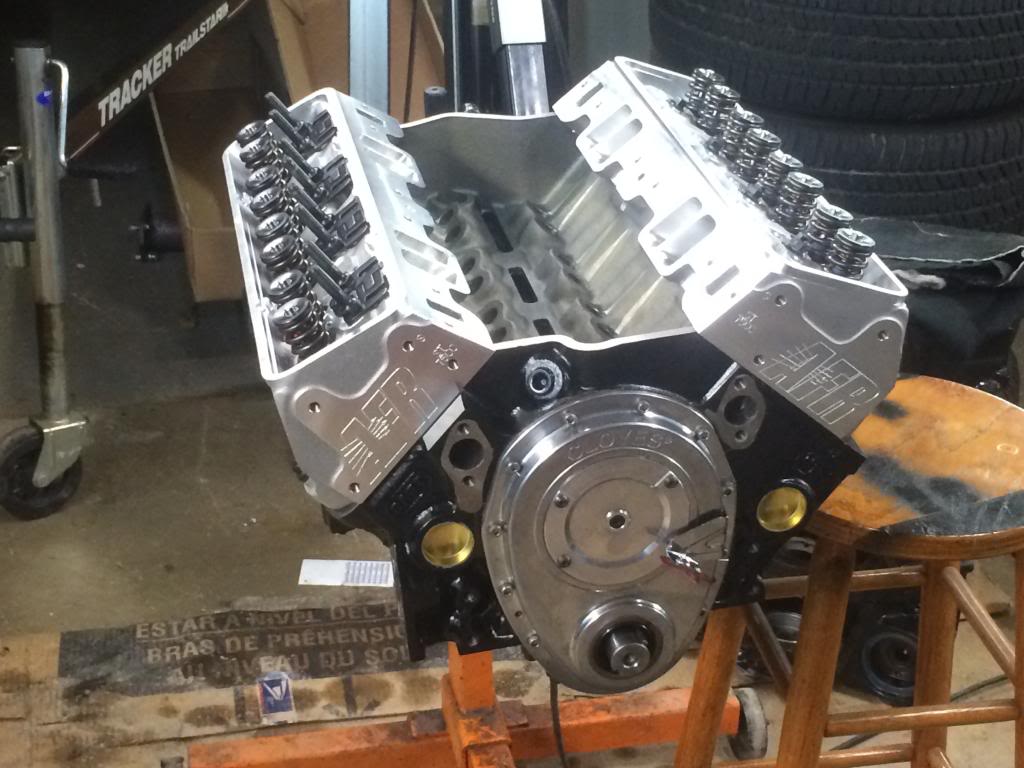
I decided to go ahead and install my belt pulleys on the crank. I installed them loosely since they have to come off for engine install….and so I can bolt up my crank rotating tool….
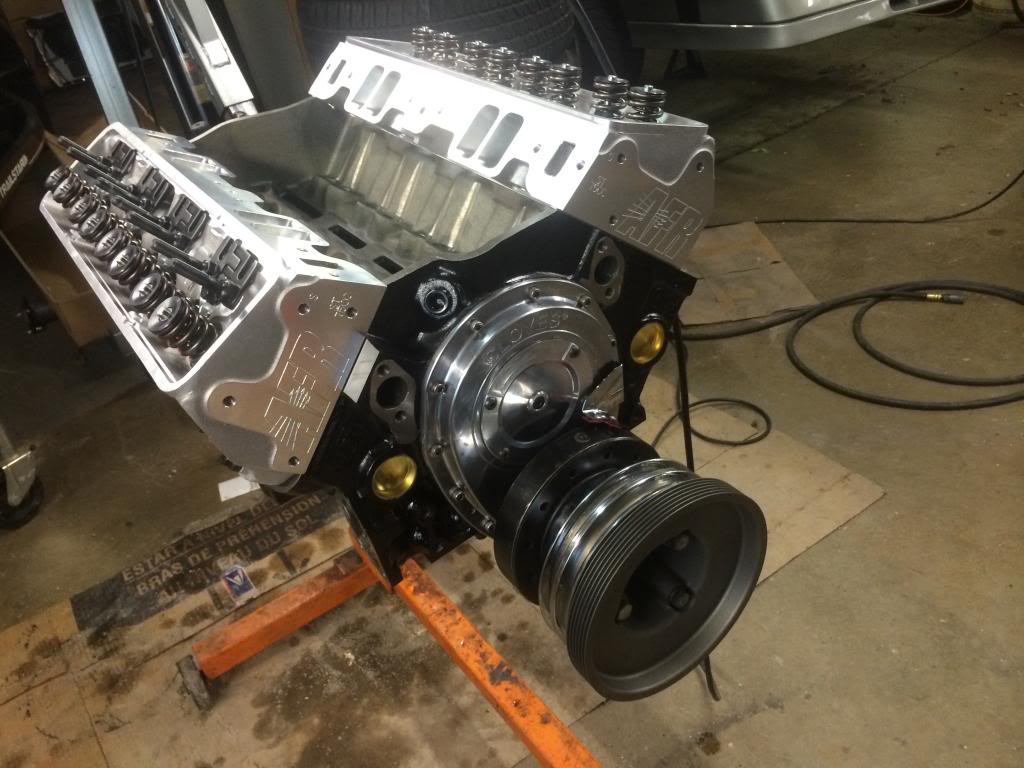

I installed one head, and the other I used my old composite gasket that's very close to compressed thickness of .040"….the MLS gaskets I'm using now have a compressed thickness of .039". Then I installed a checking spring and one of my old pushrods which is 7.300" long. an adjustable pushrod.
I gave the engine a cycle by hand and looked at the mark on the valve stem tip. Looks almost dead center…maybe just the slightest bit towards the intake, but fairly narrow. Then I installed a adjustable pus rod and tried different lengths ranging from 7.200" to 7.350"….only thing it did was move the mark either towards the exhaust or intake side, but the width of the mark on the valve tip appeared to be about the same width. I'm sticking with my original 7.300" .080 walled Comp push rods. I don't see a real need to change it up.

So I went ahead and installed the timing chain cover again along with my crank balancer that I had the extra 1/4 keyway cut into. The key is a perfect fit in the broach, but it was able to slide back and forth in the groove. I didn't want the key to vibrate it's way forward and fall out in the area between the pulley and the end of the crank shaft, so I decided to do what we do at work to steam turbines and gas turbines when we install balance weights and we don't want them to work their way out…it's called "peening".
I just took a center punch along the very end of the keyway groove and whack the punch with a hammer. It distorts the end of the keyway groove just enough so the key can't back itself out. In the pic, you can see the center punch marks…

So now the heads are on with the new MLS gaskets and torqued down. I've went through a re-checked the torque 3 times! One after about an hour after the initial torque ( I got an additional 1/2 turn on most of the bolts!!) -and one after it sat overnight. All are holding tight at 70 ft. lbs.

I decided to go ahead and install my belt pulleys on the crank. I installed them loosely since they have to come off for engine install….and so I can bolt up my crank rotating tool….
 04-13-2014, 01:53 PM
#262
Member
Re: My Dart "Little M" 409 Build….
Looking fantastic!!
04-13-2014, 03:28 PM
#263
Supreme Member
Thread Starter
iTrader: (4)
Join Date: Oct 1999
Location: GO PACK GO
Posts: 4,211
Likes: 0
Received 2 Likes
on
2 Posts
Car: 83Z28 HO
Engine: Magnacharged Dart Little M 408
Transmission: G Force 5 speed
Axle/Gears: Moser 9" w/Detroit Trutrac
Re: My Dart "Little M" 409 Build….
Thanks Brian!…you mean you don't see anything wrong or have anything else I overlooked or should do??
I'm just kidding…I do appreciate the advice and expertise I've gotten so far!
I must have turned that engine by hand about 30 rotations and checking the pattern on the valve stem to determine if I had the right length pushrods. I wasn't sure if my OEM block had been decked in the past, or what-not…but I do know this one had been decked. Also I have a small base circle cam.
Depending on what you read, and where you read it about checking pushrod length, most all say small base circle cams and decking a block has an effect on pus rod length. I certainly can see how it would, but from what I see, if there's any change at all, it's rather minimal.
Skinny has a good write up about using a mid-lift method, but I'll admit I settled for a pattern that appears fairly centered on the valve tip and narrow.
I would have never imagined my build would be held up by an oil pan…but it appears it will. Well that, and the fact that I work 12 hour rotating shifts doesn't help either..
I told myself that I'm not going to rush this build to try and make it with the Camaro to this year's Hot Rod Power fest….I just can't justify driving a car cross country that hasn't been tried and proven. Unless everything falls together during my next stretch off work, I'll be taking the other car….
04-13-2014, 05:26 PM
#264
Member
Re: My Dart "Little M" 409 Build….
Your welcome! Your pattern looks pretty good as far as I can tell.... we usually use either a red or black Sharpie and color the complete valve tip, the install the rocker and adjustable pushrod, and adjust lash to zero and turn the engine over several rotations. Take the rocker off and check the pattern, we try to keep it as narrow and as centered as we can get it. We've used grease to check pattern also, but find the Sharpie works better for us, as the pattern is more clear to see.
04-13-2014, 05:42 PM
#265
Supreme Member
Re: My Dart "Little M" 409 Build….
I installed one head, and the other I used my old composite gasket that's very close to compressed thickness of .040"….the MLS gaskets I'm using now have a compressed thickness of .039". Then I installed a checking spring and one of my old pushrods which is 7.300" long. an adjustable pushrod.
I gave the engine a cycle by hand and looked at the mark on the valve stem tip. Looks almost dead center…maybe just the slightest bit towards the intake, but fairly narrow. Then I installed a adjustable pus rod and tried different lengths ranging from 7.200" to 7.350"….only thing it did was move the mark either towards the exhaust or intake side, but the width of the mark on the valve tip appeared to be about the same width. I'm sticking with my original 7.300" .080 walled Comp push rods. I don't see a real need to change it up.
I gave the engine a cycle by hand and looked at the mark on the valve stem tip. Looks almost dead center…maybe just the slightest bit towards the intake, but fairly narrow. Then I installed a adjustable pus rod and tried different lengths ranging from 7.200" to 7.350"….only thing it did was move the mark either towards the exhaust or intake side, but the width of the mark on the valve tip appeared to be about the same width. I'm sticking with my original 7.300" .080 walled Comp push rods. I don't see a real need to change it up.
The mid lift method you mentioned when done correctly will always produce the narrowest sweep. Narrow sweep trumps a centred pattern but it may take a real whack of different parts to get both.
You and I might have touched on the roller tip being canted on the valve tip. It looks a little like that in your pattern. It may be impossible to get the rocker tip square to the valve tip and have it centred. Adjustable guide plates can make this worse and also make it better depending on what you start with. I've corrected for off centre by rotating the rocker with the guide plate only to produce the canted pattern.
04-13-2014, 07:01 PM
#266
Supreme Member
Thread Starter
iTrader: (4)
Join Date: Oct 1999
Location: GO PACK GO
Posts: 4,211
Likes: 0
Received 2 Likes
on
2 Posts
Car: 83Z28 HO
Engine: Magnacharged Dart Little M 408
Transmission: G Force 5 speed
Axle/Gears: Moser 9" w/Detroit Trutrac
Re: My Dart "Little M" 409 Build….
Your welcome! Your pattern looks pretty good as far as I can tell.... we usually use either a red or black Sharpie and color the complete valve tip, the install the rocker and adjustable pushrod, and adjust lash to zero and turn the engine over several rotations. Take the rocker off and check the pattern, we try to keep it as narrow and as centered as we can get it. We've used grease to check pattern also, but find the Sharpie works better for us, as the pattern is more clear to see.
You may want to double check that with the spring that you'll be using. The pattern can be misleading with just the force of a checking spring working on it. You might be surprised at the difference. Of couse if you're running a hydraulic lifter it means you have to rig up a solid duplicate to keep the lifter collapsing out of the equation. Sometimes that can be difficult. The pushrod seat height has to be the same and some hydraulics can't be disassembled without destroying them.
The mid lift method you mentioned when done correctly will always produce the narrowest sweep. Narrow sweep trumps a centred pattern but it may take a real whack of different parts to get both.
You and I might have touched on the roller tip being canted on the valve tip. It looks a little like that in your pattern. It may be impossible to get the rocker tip square to the valve tip and have it centred. Adjustable guide plates can make this worse and also make it better depending on what you start with. I've corrected for off centre by rotating the rocker with the guide plate only to produce the canted pattern.
I finally figured out that I was putting the machinists dye on too thick. Once I lightened it up a bit, it worked great...and the narrow line was so much clearer....but I obviously didn't think to take a picture of it. The pattern was a little screwy in the above pic because I used too much dye and as I was taking the poly nut off the stud, I let the roller move on the valve tip a little. I use the Comp checking springs I've had for years, and I preload the lifter about 1/2 turn. Observing the lifter plunger as the rocker was pushing on the valve tip, it didn't Seem to compress at all.
Last edited by Confuzed1; 04-13-2014 at 07:05 PM.
04-13-2014, 08:03 PM
#267
Supreme Member
Re: My Dart "Little M" 409 Build….
Actually I posted a crappy picture....as I said, I checked it numerous times and I got a much clearer pattern as I went along. I tried using a Sharpie actually, and I couldn't get it to work right.
I finally figured out that I was putting the machinists dye on too thick. Once I lightened it up a bit, it worked great...and the narrow line was so much clearer....but I obviously didn't think to take a picture of it. The pattern was a little screwy in the above pic because I used too much dye and as I was taking the poly nut off the stud, I let the roller move on the valve tip a little. I use the Comp checking springs I've had for years, and I preload the lifter about 1/2 turn. Observing the lifter plunger as the rocker was pushing on the valve tip, it didn't Seem to compress at all.
I finally figured out that I was putting the machinists dye on too thick. Once I lightened it up a bit, it worked great...and the narrow line was so much clearer....but I obviously didn't think to take a picture of it. The pattern was a little screwy in the above pic because I used too much dye and as I was taking the poly nut off the stud, I let the roller move on the valve tip a little. I use the Comp checking springs I've had for years, and I preload the lifter about 1/2 turn. Observing the lifter plunger as the rocker was pushing on the valve tip, it didn't Seem to compress at all.
Not to split hairs though. If you have the smallest sweep and it ends up near the centre, then you're off to the races. No pun intended.
I'm curious as to how your adjustable plates work out. That AFR has them as part of their package looks promising for good results there. I have to look at this twisted valve deal more closely to see if my guide plates are making it worse.
04-14-2014, 05:05 PM
#268
Supreme Member
Thread Starter
iTrader: (4)
Join Date: Oct 1999
Location: GO PACK GO
Posts: 4,211
Likes: 0
Received 2 Likes
on
2 Posts
Car: 83Z28 HO
Engine: Magnacharged Dart Little M 408
Transmission: G Force 5 speed
Axle/Gears: Moser 9" w/Detroit Trutrac
Re: My Dart "Little M" 409 Build….
As far as checking pushrod length with the regular springs…
It would definitely compress the lifter plunger since these seem to be some fairly stiff springs! Of course, I ordered them that way. And there's no easy solution I know of to make a solid type roller with one of these retro-lifters.
So the best I can really do with what I have is to use the checking springs like I did. From what I've read, 7.300" springs are a pretty standard length for a retro-roller setup…but I always double check anyway. I didn't see any signs of unusual valve guide wear when I used the same pushrods with the Dart IE heads. But again, even though I'm using the same cam, the block and heads changed - which is mainly why I checked.
04-14-2014, 06:38 PM
#269
Supreme Member
Re: My Dart "Little M" 409 Build….
Retrofitting one of the COMP link-bar style lifters is impossible without destroying the link assembly so we're forced to find an equivalvent in a solid. I'm not even sure that's possible so we're kind of stuck that way. I've had repeatable results by priming the engine and putting some pressure in the lifters. (I know that'd be tough for you to do considering Canton still has your pan) Even then, as you rotate through the cam motion you can see a dial indicator gradually losing lift if you stop in mid cycle.
I used the mid lift method when checking mine, as opposed to checking only the valve tip pattern, and the checking springs are ideal for that. I think you mentioned the thread that one of the other forum members and I put together. It's entirely possible to get perfect VGT without so much as rotating the engine as well. Your total valve lift and some measurments are all that's needed.
The 7.3" "standard" length is really misleading. Unless "they're" referring to a bone stock uncut engine and the only change made is a camshaft, (this includes the stamped OEM rockers), then "they" have no way of knowing what the length should be. Comp has a disclaimer saying that this has to be checked or else but folks think that 7.3" is it and off they go. This isn't to say that 7.3" isn't right. It appears so in your case and it can be in many others. Interestingly, even tracing the various stackups that change the requirements, (deck height, valve length, lifter, etc, etc.) and trying to do the math backwards doesn't work. With all of my variables inserted, the calculation says I need a 7.2". Proper VGT required a 7.45".
04-17-2014, 04:02 PM
#270
Supreme Member
Thread Starter
iTrader: (4)
Join Date: Oct 1999
Location: GO PACK GO
Posts: 4,211
Likes: 0
Received 2 Likes
on
2 Posts
Car: 83Z28 HO
Engine: Magnacharged Dart Little M 408
Transmission: G Force 5 speed
Axle/Gears: Moser 9" w/Detroit Trutrac
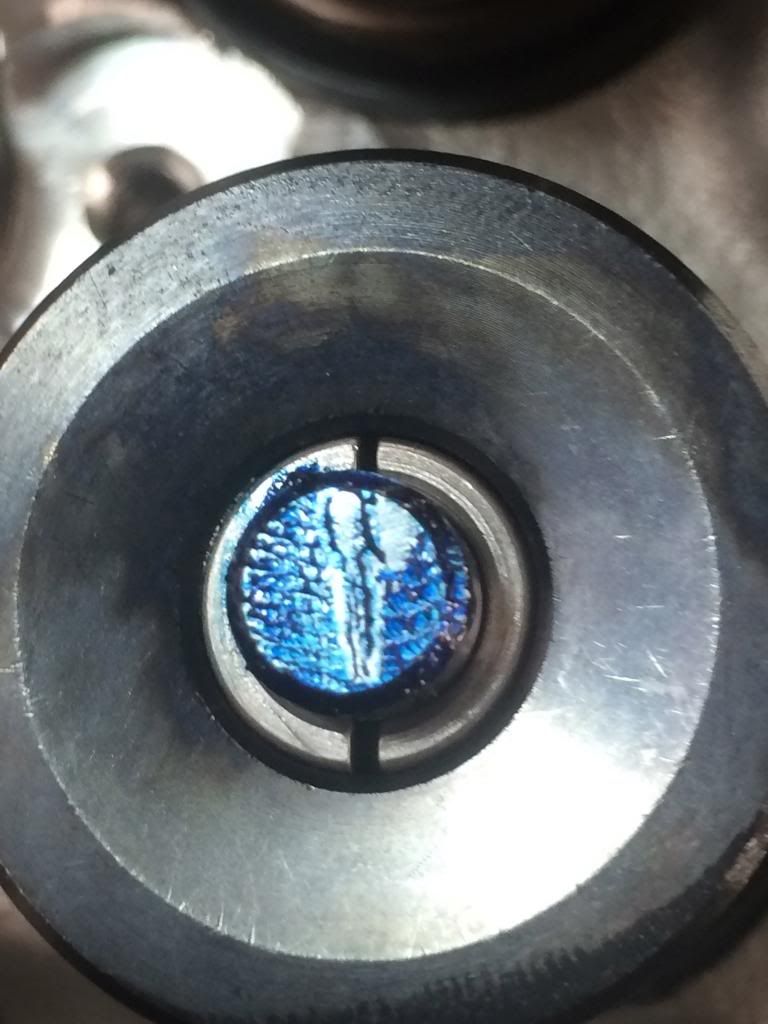
Since I had a bit less than 1/2 the day off between my day/night shifts, I decided to do one more pushrod length test. This test was using the regular (not test) springs.
First pic is with the 7.3 regular pushrods
Second pic is using the adjustable pushrod set at 7.250
Third pic is set at 7.350
Last pic I set the adjustable at 7.4
I was able to see the pattern very clearly with full spring pressure, but the test wasn't ideal since I used a set of my retro roller hydraulic lifters.
I must say, I didn't see any of the patterns get really any narrower on any length. It just shifted where the pattern rode on the valve stem. I think I'm safe with the 7.3's...
04-17-2014, 04:19 PM
#271
Member
Re: My Dart "Little M" 409 Build….
That 7.350" looks perfect to me..... but dont sweat it, you'll be fine with your 7.300" I believe.
04-17-2014, 04:27 PM
#272
Supreme Member
Thread Starter
iTrader: (4)
Join Date: Oct 1999
Location: GO PACK GO
Posts: 4,211
Likes: 0
Received 2 Likes
on
2 Posts
Car: 83Z28 HO
Engine: Magnacharged Dart Little M 408
Transmission: G Force 5 speed
Axle/Gears: Moser 9" w/Detroit Trutrac
Re: My Dart "Little M" 409 Build….
BTW, as for my Canton oil pan…I had to email them back since I hadn't heard anything. Someone else emailed me back. Turns out "Bob", the guy that's been pretty darn helpful, has been off for a few days and they don't know when he'll be back. -Just my luck. But they said they'd check on it.
That was 2 days ago. So…I had to email them again…this time I let them know that this oil pan id holding up the rest of my build. I want to have the pan installed when I assemble the valve train because that's when I like to slather everything in STP…and I don't want it all over my garage floor.
Of course, it's done and ready to ship out. Only 30 buckc for them to mod it….and another 18 bucks to ship it to my house! Just another thing that's gonna be more expensive than it should... And of course, I missed today's outgoing shipments, so it'll be shipped tomorrow.
-Good thing my next day off ain't till wednesday!")
That was 2 days ago. So…I had to email them again…this time I let them know that this oil pan id holding up the rest of my build. I want to have the pan installed when I assemble the valve train because that's when I like to slather everything in STP…and I don't want it all over my garage floor.
Of course, it's done and ready to ship out. Only 30 buckc for them to mod it….and another 18 bucks to ship it to my house! Just another thing that's gonna be more expensive than it should...
And of course, I missed today's outgoing shipments, so it'll be shipped tomorrow. -Good thing my next day off ain't till wednesday!
04-17-2014, 04:52 PM
#274
Member
Join Date: Mar 2013
Location: gladstone
Posts: 325
Likes: 0
Received 0 Likes
on
0 Posts
Car: 72 nova/ 90 camaro rs,04 suburban
Engine: blown 327/ 355/306/355/5.3
Transmission: muncie 4 speed/T5/powerglide,4l80e
Axle/Gears: 342/411/456/ moser axles
Re: My Dart "Little M" 409 Build….
looking good!
04-17-2014, 05:15 PM
#275
Supreme Member
Re: My Dart "Little M" 409 Build….
Since I had a bit less than 1/2 the day off between my day/night shifts, I decided to do one more pushrod length test. This test was using the regular (not test) springs.
First pic is with the 7.3 regular pushrods
Second pic is using the adjustable pushrod set at 7.250
Third pic is set at 7.350
Last pic I set the adjustable at 7.4
I was able to see the pattern very clearly with full spring pressure, but the test wasn't ideal since I used a set of my retro roller hydraulic lifters.
I must say, I didn't see any of the patterns get really any narrower on any length. It just shifted where the pattern rode on the valve stem. I think I'm safe with the 7.3's...
First pic is with the 7.3 regular pushrods
Second pic is using the adjustable pushrod set at 7.250
Third pic is set at 7.350
Last pic I set the adjustable at 7.4
I was able to see the pattern very clearly with full spring pressure, but the test wasn't ideal since I used a set of my retro roller hydraulic lifters.
I must say, I didn't see any of the patterns get really any narrower on any length. It just shifted where the pattern rode on the valve stem. I think I'm safe with the 7.3's...
Just a note on using the full springs with the hydraulic lifters. Not all of the cam information is passed along to the rocker tip and as a result your sweeps will be narrower. (Less lift equals less sweep)
The other thing that the taller valve does can be seen in your patterns too. Particularly the 7.4. The taller valve needs a longer pushrod and the longer pushrod moves the rocker up higher on the stud. Because the stud and the valve are angled towards each other, the pattern tends to get pushed off towards the exhaust side of the valve. Unfortunately, (not necessarily so in your case), most people tend to stop when the pattern gets close to the edge and opt for a more centred, albeit wider pattern. That's the wrong move.
The question I can't find a definitive answer to is at what point do you stop? All the books and papers I've read demand that the narrowest pattern is, above all else, what the target is. One article suggests that anything within .030" of the valve tip edge is to be avoided. That often means selecting a pushrod that's too short for the job.
For what it's worth my patterns look the best at 7.4" stick however I get closer to the edge than you. So much so that I've ordered the backset trunion rockers from Crower that correct that problem. I've been down the valve guide path before and I don't want to go back. Ever.
Just a little info for you and anybody else: proper valve train geometry for a cam of about .580" lift will produce a pattern that is less than .030".
Last edited by skinny z; 04-17-2014 at 05:32 PM.
04-17-2014, 05:28 PM
#276
Supreme Member
Re: My Dart "Little M" 409 Build….
Taking pictures at zero, mid and max lift allow you to see what the geometry is. It works very well.
Attached are pics from three tests. All at mid lift. It's easy to see how the rocker comes into "square" as the pushrod gets longer. It also produced the narrowest sweep.
The first picture is a 7.15". The second is 7.3" while the last is 7.45".
04-17-2014, 05:29 PM
#277
Member
Re: My Dart "Little M" 409 Build….
Not at all trying to stir the pot here, but in my opinion, a pushrod pattern that is not center on the valve tip results in side loading the valve guides, resulting in rapid valve guide wear. We would never run a pattern like the 7.4" pattern...you can clearly see the pushrod is simply too long for the application, that's my opinion anyway. With the cam on the back side of the lobe, you want the rocker to sit on the first 1/3 of the valve tip(towards the intake)..... and at full lift you want the rocker to be on the last 1/3 of the valve tip (towards exhaust). At mid lift, this will put the rocker right in the center of the valve tip and produce a nice even load on the valve tip.... This is how we have always set them up....
04-17-2014, 05:41 PM
#278
Supreme Member
Re: My Dart "Little M" 409 Build….
Unfortunately that's not the way it works.
The rocker tip will be inboard of the centre line of the valve at zero lift as you state. At mid lift, the rocker tip will have made it's full advancement across the valve tip and at full lift will have returned to where it was a zero lift. It see saws back and forth across the valve tip because the rocker moves in an arc. Check out the picture in post #275. You can see that the rocker tip is furthest to the left in the picture. If the pushrod is too long or too short, then the rocker tip moves further in one direction than the other. That's where the excessive valve guide loading comes from and that's illustrated by excesive sweep or motion across the valve tip.
The other thing you mention is true and that's the side loading of valve guide with a pattern that too much towards the edge. However, all indicators are that the amount of loading that results from this is less than the loading that comes from having an excessive sweep. It's sort of trade off but one has more weight than the other. Where I'm stuck is at what point do you say ok, that's enough? Too close to the edge is obviously not good but poor geometry (and excessive seep) is less obvious but worse.
What's more, if you're not setting up your valve train this way, you're not getting full value from your cam. Information is lost because of the inefficient angles involved in poor geometry.
Here's an excellent paper on the whole deal. It's a bit of a read and some of the intro is only background stuff but it really puts a light on the what's going on.
http://www.aera.org/ep/downloads/ep1...2010_20-30.pdf
Last edited by skinny z; 04-17-2014 at 05:59 PM.
04-17-2014, 05:55 PM
#279
Member
Re: My Dart "Little M" 409 Build….
Your right Skinny.... brain quit working for a second there....sorry about that .... i do believe he will still be fine with his 7.300 he already has though....
.... i do believe he will still be fine with his 7.300 he already has though....
04-17-2014, 06:11 PM
#280
Supreme Member
Re: My Dart "Little M" 409 Build….
That's just it. He could be. But we can all see that the 7.4 produces the narrowest pattern. That tells us there's room for improvement in the geometry. But I know exactly what the thoughts are. That pattern is getting very close to the edge of the valve. So what do we do?
If this were my engine, I'd probably end up doing exactly what I AM doing. Coughing up 600 bucks for a set of backset rockers. This will "pull" the contact point away from the valve centreline because the backset physically moves the rocker away from the valve.
I'll post up when I'm setting things up.
I've attached a picture of the pattern I got when I opted to go for a centred contact over a narrow one. The contact is very wide but dead centre. That arrangement, after about 6000 miles, pushed my valve guides to the limit of being servicable. I won't make that mistake again.

Last edited by skinny z; 04-17-2014 at 07:19 PM.
04-17-2014, 07:26 PM
#281
Supreme Member
Re: My Dart "Little M" 409 Build….
I put a LOT of miles on my engine. Tens of thousands and I do it in a short time. Longevity to me is the key and if it takes having to re-engineer part of the valvetrain (which is what a shaft setup does) then I'll do it.
I've attached my pattern at 7.45". Nice and thin but too damn close to the edge and now I'm stuck. The pictures show that 7.4 is best angle-wise but my accuracy marking up the pictures is questionable.
Anyway, I just wanted to set that straight.
 04-17-2014, 07:51 PM
#282
Re: My Dart "Little M" 409 Build….
if cantan added anything to your oil pan. it will be spray painted gold now.
and even the canton decals will be burned from the welding and have gold over spray on them...just so ya know...this is how i got a pan back from them 2 years ago..
they do not re zink pans after working on them...i had my plater redo my pan. and i did the rest of the oil return mods...
my pan was for a 4" stroke. only thing that was bugging me. was i was thinking the crank scraper was hitting the crank... it turned out to be the pan gasket. had to shape it like the block. with the rod cutouts.
427...ya i got one.
and even the canton decals will be burned from the welding and have gold over spray on them...just so ya know...this is how i got a pan back from them 2 years ago..
they do not re zink pans after working on them...i had my plater redo my pan. and i did the rest of the oil return mods...
my pan was for a 4" stroke. only thing that was bugging me. was i was thinking the crank scraper was hitting the crank... it turned out to be the pan gasket. had to shape it like the block. with the rod cutouts.


427...ya i got one.
Last edited by articwhiteZ; 04-17-2014 at 08:07 PM.
04-17-2014, 08:33 PM
#283
Supreme Member
Thread Starter
iTrader: (4)
Join Date: Oct 1999
Location: GO PACK GO
Posts: 4,211
Likes: 0
Received 2 Likes
on
2 Posts
Car: 83Z28 HO
Engine: Magnacharged Dart Little M 408
Transmission: G Force 5 speed
Axle/Gears: Moser 9" w/Detroit Trutrac
Re: My Dart "Little M" 409 Build….
if cantan added anything to your oil pan. it will be spray painted gold now.
and even the canton decals will be burned from the welding and have gold over spray on them...just so ya know...this is how i got a pan back from them 2 years ago..
they do not re zink pans after working on them...i had my plater redo my pan. and i did the rest of the oil return mods...
my pan was for a 4" stroke. only thing that was bugging me. was i was thinking the crank scraper was hitting the crank... it turned out to be the pan gasket. had to shape it like the block. with the rod cutouts.)
....just thought it was kinda neat!
 . But as far as the oil pan goes....I'll take a quick pic of what it looks like when I get it back from Canton...
Kinda sucks that they don't re-zinc the darn thing...after all, I bought it that way! If it looked like crap when I looked at it before I bought it, I would have bought another brand....but that's the way these aftermarket companies roll sometimes unless you get the top-notch stuff, but in that case you've really already paid for them to re coat the thing. I might end up just painting the thing black if it looks crappy....better than rust I suppose!
When I had the pan installed, the only contact I noticed was what I sent it in for...but I'll make double sure before I drop this engine in I assure you!
 04-18-2014, 07:14 PM
#284
Supreme Member
Thread Starter
iTrader: (4)
Join Date: Oct 1999
Location: GO PACK GO
Posts: 4,211
Likes: 0
Received 2 Likes
on
2 Posts
Car: 83Z28 HO
Engine: Magnacharged Dart Little M 408
Transmission: G Force 5 speed
Axle/Gears: Moser 9" w/Detroit Trutrac
Update- I decided to go ahead and install all the guide plates rocker studs, etc and finish assembling the valve train. There's definitely some offset to the rockers in certain laces. I adjusted the guide plates as best I could to correct it, but it'll never be perfect.
I can only compensate the best I can since it places a few of the pushrods at a slight angle. I set the lash on each rocker a little over 3/4 turn at base circle. Gotta say, these Harland Sharps are nice and all, but their anodized gold coating sure does come off easy if a wrench scrapes along it!
I figure I'll continue with as much as I can without the oil pan. I have my old oil pan in place with a couple bolts in it for now. I need to look for better exhaust gaskets...the ones Dyno Don says to use with his shorty headers are more of a "D" port gasket whereas the AFR ports are more square...
04-18-2014, 07:57 PM
#285
Member
Re: My Dart "Little M" 409 Build….
Awesome!! check out RemFlex gaskets for the exhaust gaskets to Se what they offer....best header gaskets on the planet... Nice and thick and seal extremely well... won't every have a problem with them burning out..... dad runs them on his Magnuson truck....never a problem at all with them... we just use the Ultra Copper permatex on our race car, no gaskets....with excellent results, but I would run gaskets on a street driver....
Brian
check out RemFlex gaskets for the exhaust gaskets to Se what they offer....best header gaskets on the planet... Nice and thick and seal extremely well... won't every have a problem with them burning out..... dad runs them on his Magnuson truck....never a problem at all with them... we just use the Ultra Copper permatex on our race car, no gaskets....with excellent results, but I would run gaskets on a street driver....Brian
04-18-2014, 11:06 PM
#286
Supreme Member
Thread Starter
iTrader: (4)
Join Date: Oct 1999
Location: GO PACK GO
Posts: 4,211
Likes: 0
Received 2 Likes
on
2 Posts
Car: 83Z28 HO
Engine: Magnacharged Dart Little M 408
Transmission: G Force 5 speed
Axle/Gears: Moser 9" w/Detroit Trutrac
These are the exhaust gaskets I was using:
http://www.jegs.com/webapp/wcs/store...&storeId=10001
I still have the aluminum plates. They are graphite similar to the gaskets you recommended Brian. I'll double check the port size to see if what I have will match better with these AFR's than how they matched with the Dart IE's (They didn't very well)
04-19-2014, 10:48 AM
#287
Re: My Dart "Little M" 409 Build….
Just for the heck of it, I just looked at what my engine would be with my current setup...but change to a 4" stroke....I'd have a 436!!! :-). And to top it off, it would be at a pump gas friendly 9.5:1 compression ratio to boot! But I can only imagine the amount of block clearancing it takes for a 4" stroke crank....at least I have a small base circle cam already...
....just thought it was kinda neat!. But as far as the oil pan goes....I'll take a quick pic of what it looks like when I get it back from Canton...
Kinda sucks that they don't re-zinc the darn thing...after all, I bought it that way! If it looked like crap when I looked at it before I bought it, I would have bought another brand....but that's the way these aftermarket companies roll sometimes unless you get the top-notch stuff, but in that case you've really already paid for them to re coat the thing. I might end up just painting the thing black if it looks crappy....better than rust I suppose!
When I had the pan installed, the only contact I noticed was what I sent it in for...but I'll make double sure before I drop this engine in I assure you!
....just thought it was kinda neat!
. But as far as the oil pan goes....I'll take a quick pic of what it looks like when I get it back from Canton...Kinda sucks that they don't re-zinc the darn thing...after all, I bought it that way! If it looked like crap when I looked at it before I bought it, I would have bought another brand....but that's the way these aftermarket companies roll sometimes unless you get the top-notch stuff, but in that case you've really already paid for them to re coat the thing. I might end up just painting the thing black if it looks crappy....better than rust I suppose!
When I had the pan installed, the only contact I noticed was what I sent it in for...but I'll make double sure before I drop this engine in I assure you!
this is a street car...

had nick at canton send me decals/stickers to redo the pan..looks good now..with all the welding flash removed from under the gold paint..then cleaned smooth and re zinked...lol it's now my $400 pan...
Last edited by articwhiteZ; 04-19-2014 at 10:54 AM.
04-19-2014, 06:52 PM
#288
Supreme Member
Thread Starter
iTrader: (4)
Join Date: Oct 1999
Location: GO PACK GO
Posts: 4,211
Likes: 0
Received 2 Likes
on
2 Posts
Car: 83Z28 HO
Engine: Magnacharged Dart Little M 408
Transmission: G Force 5 speed
Axle/Gears: Moser 9" w/Detroit Trutrac
small base circle cam ...yep also in mine..but im not over 650 lift. this is a street car... had nick at canton send me decals/stickers to redo the pan..looks good now..with all the welding flash removed from under the gold paint..then cleaned smooth and re zinked...lol it's now my $400 pan...
had nick at canton send me decals/stickers to redo the pan..looks good now..with all the welding flash removed from under the gold paint..then cleaned smooth and re zinked...lol it's now my $400 pan...Arctic, I don't have over .650 lift either!! And you know mine is a "street car" too. I think you're just getting a free shot on me if I didn't know better!
04-20-2014, 06:44 PM
#289
Supreme Member
Thread Starter
iTrader: (4)
Join Date: Oct 1999
Location: GO PACK GO
Posts: 4,211
Likes: 0
Received 2 Likes
on
2 Posts
Car: 83Z28 HO
Engine: Magnacharged Dart Little M 408
Transmission: G Force 5 speed
Axle/Gears: Moser 9" w/Detroit Trutrac
Question.....
I'm getting ready to order spark plugs. The manual for my blower says I should run a plug that's 1-2 steps colder than normal.
I can't seem to find an accurate heat range chart for Accel "C" groove plugs. I'm thinking these would be a step colder though:
http://m.summitracing.com/parts/acc-0414s-4
Look right to you guys??
04-20-2014, 11:44 PM
#290
Supreme Member
iTrader: (5)
Join Date: Jan 2002
Location: Orland Park, IL
Posts: 13,619
Likes: 0
Received 3 Likes
on
3 Posts
Car: 1984 Z28
Engine: SLOW carbed ls
Transmission: TH400 with brake, 8" PTC converter
Axle/Gears: moser 9" 4.11
Re: My Dart "Little M" 409 Build….
Call afr with your combo but I would be going with a ngk br7ef personally. Not sure a ngk tr6 would be boost friendly. Avoid accell plugs imo.
04-21-2014, 12:21 AM
#291
Supreme Member
Thread Starter
iTrader: (4)
Join Date: Oct 1999
Location: GO PACK GO
Posts: 4,211
Likes: 0
Received 2 Likes
on
2 Posts
Car: 83Z28 HO
Engine: Magnacharged Dart Little M 408
Transmission: G Force 5 speed
Axle/Gears: Moser 9" w/Detroit Trutrac
I've used all the brands at one time or another....
04-21-2014, 05:30 AM
#292
Member
iTrader: (2)

Join Date: Nov 2009
Location: Hubert, NC
Posts: 436
Likes: 0
Received 0 Likes
on
0 Posts
Car: 83 Z28
Engine: F-body LT1 swap
Transmission: T-56 swap
Axle/Gears: 10 bolt w/ 28 spl posi, 4.10, disks
Re: My Dart "Little M" 409 Build….
I personally have had a lot of problems with accel plugs too, thought I would need them for header clearance but I run full size NGK's with no issues and my dyno don headers. Usually it was a fouling problem and it has been on several motors. My LT1 heads are angle plugs so I dont know if that make a difference or not for clearance issues cause I aint got none.
I am a little jealous with all the badass cars you guys own though. Makes me want to head and cam my LT1 and tune it for north of 400 rwhp.
Hey confused1, what wheels are you running? I like the look of your car with them since we have the same gen of ground effects except mine will be white when I am done with it.
04-21-2014, 07:23 PM
#293
Supreme Member
Thread Starter
iTrader: (4)
Join Date: Oct 1999
Location: GO PACK GO
Posts: 4,211
Likes: 0
Received 2 Likes
on
2 Posts
Car: 83Z28 HO
Engine: Magnacharged Dart Little M 408
Transmission: G Force 5 speed
Axle/Gears: Moser 9" w/Detroit Trutrac
I personally have had a lot of problems with accel plugs too, thought I would need them for header clearance but I run full size NGK's with no issues and my dyno don headers. Usually it was a fouling problem and it has been on several motors. My LT1 heads are angle plugs so I dont know if that make a difference or not for clearance issues cause I aint got none. I am a little jealous with all the badass cars you guys own though. Makes me want to head and cam my LT1 and tune it for north of 400 rwhp. Hey confused1, what wheels are you running? I like the look of your car with them since we have the same gen of ground effects except mine will be white when I am done with it.
Angle plug heads always seem to be an issue with header clearance. That's why I bought straight plug AFR's....I just don't want the hassle of burning plug boots etc...
Anyways, I'll look at the NGK plugs more...
BTW, the wheels are MB Old Schools...
04-22-2014, 06:40 AM
#294
Member
iTrader: (2)
Join Date: Nov 2009
Location: Hubert, NC
Posts: 436
Likes: 0
Received 0 Likes
on
0 Posts
Car: 83 Z28
Engine: F-body LT1 swap
Transmission: T-56 swap
Axle/Gears: 10 bolt w/ 28 spl posi, 4.10, disks
Re: My Dart "Little M" 409 Build….
Yeah it was always a fouling issue. I am guessing the engine was too rich or the plugs I used were too cold. Oh well.
I dont know what the difference is with plug location and angle between my LT1 Fbody heads and what you ran, but I was pretty sure I read that you were gonna run dyno don headers which is what I run and I have good clearance. I dont know if that is due to me routing under the headers or not. the plug wires are MSD's with angle boots to the factory opti and I took a lot of care to route them very good and protect them from corners and exhaust. Been on the road for a few years now and never had a problem.
I dont know what the difference is with plug location and angle between my LT1 Fbody heads and what you ran, but I was pretty sure I read that you were gonna run dyno don headers which is what I run and I have good clearance. I dont know if that is due to me routing under the headers or not. the plug wires are MSD's with angle boots to the factory opti and I took a lot of care to route them very good and protect them from corners and exhaust. Been on the road for a few years now and never had a problem.
04-22-2014, 11:42 PM
#295
Supreme Member
Thread Starter
iTrader: (4)
Join Date: Oct 1999
Location: GO PACK GO
Posts: 4,211
Likes: 0
Received 2 Likes
on
2 Posts
Car: 83Z28 HO
Engine: Magnacharged Dart Little M 408
Transmission: G Force 5 speed
Axle/Gears: Moser 9" w/Detroit Trutrac
Re: My Dart "Little M" 409 Build….
Well, I decided on NGK 4644 "V-Power" plugs: http://www.summitracing.com/parts/ngk-4644/overview/
I've ran them before, and they worked fine. Also a bunch cheaper than the Accel's too!
xpndbl ....I tried the number you gave me, but those are taper seat plugs...can't use those. The others in the thread above are the same heat range of 7.
I know choosing plugs seems kinda petty to most, but on a blown engine if you pick the wrong heat range they'll carbon up quickly since I run my A/F ratio a little on the rich side at 12:1...to keep it safe.
I'm hoping to have this engine build finished, installed and maybe fired up in the next couple of weeks!
04-23-2014, 04:32 AM
#296
Supreme Member
iTrader: (5)
Join Date: Jan 2002
Location: Orland Park, IL
Posts: 13,619
Likes: 0
Received 3 Likes
on
3 Posts
Car: 1984 Z28
Engine: SLOW carbed ls
Transmission: TH400 with brake, 8" PTC converter
Axle/Gears: moser 9" 4.11
Re: My Dart "Little M" 409 Build….
You sure those heads don't take tapered seat plugs? Maybe I ordered the last setvof afr heads that way then.
04-23-2014, 02:16 PM
#297
Supreme Member
Thread Starter
iTrader: (4)
Join Date: Oct 1999
Location: GO PACK GO
Posts: 4,211
Likes: 0
Received 2 Likes
on
2 Posts
Car: 83Z28 HO
Engine: Magnacharged Dart Little M 408
Transmission: G Force 5 speed
Axle/Gears: Moser 9" w/Detroit Trutrac
Engine is slowly coming along. Funny....couldn't have timed it better if I tried. Oil pan just showed up from UPS. They didn't do anything elaborate at all. Looks like they just took a ball peen hammer to it!
I offered to just do the same thing myself but I didn't want them voiding my warranty. Oh well...67 bucks later....
04-24-2014, 11:09 AM
#298
Supreme Member
Thread Starter
iTrader: (4)
Join Date: Oct 1999
Location: GO PACK GO
Posts: 4,211
Likes: 0
Received 2 Likes
on
2 Posts
Car: 83Z28 HO
Engine: Magnacharged Dart Little M 408
Transmission: G Force 5 speed
Axle/Gears: Moser 9" w/Detroit Trutrac
Couple more pics...
Oil pan on, had to use 1 Allen head bolt where it had to be clearanced as usual.
Oil pan on, had to use 1 Allen head bolt where it had to be clearanced as usual.
04-25-2014, 05:08 AM
#299
04-25-2014, 06:48 AM
#300
Member
Join Date: Mar 2013
Location: gladstone
Posts: 325
Likes: 0
Received 0 Likes
on
0 Posts
Car: 72 nova/ 90 camaro rs,04 suburban
Engine: blown 327/ 355/306/355/5.3
Transmission: muncie 4 speed/T5/powerglide,4l80e
Axle/Gears: 342/411/456/ moser axles
Re: My Dart "Little M" 409 Build….
looks good