4th gen door panel teaser..
 01-06-2005, 07:58 PM
#1
Senior Member

Thread Starter
iTrader: (2)
Join Date: Oct 1999
Location: Hattiesburg, MS, USA
Posts: 893
Likes: 0
Received 0 Likes
on
0 Posts
Car: 1992 Jade Green---Trans Am Converti
Engine: LS1
Transmission: T56
4th gen door panel teaser..
Figured I would throw some teaser pics out there, since it may be a while before I finish it. I got this far and wrecked the car. The car is stripped down and about to go to the body shop..
There seems to be a lot of different ideas out there on how to do this. I think mine turned out pretty good. I'm still using three of the stock clips on the back, got the 4th gen handles working, and have no gap between the glass and the inner seal.
It took a lot of work and cutting on the door to get this far. I've got to change out the screws for color matched flat top screws and dye the panels as they are a little scratched up.. I'll get back into it after the paint is done.
Full door:
 01-06-2005, 08:00 PM
#3
Senior Member
Thread Starter
iTrader: (2)
Join Date: Oct 1999
Location: Hattiesburg, MS, USA
Posts: 893
Likes: 0
Received 0 Likes
on
0 Posts
Car: 1992 Jade Green---Trans Am Converti
Engine: LS1
Transmission: T56
Solution to A pillar.. The fabric covered insert is really black, the flash makes it look grey.

 01-06-2005, 08:41 PM
#6
Senior Member
Thread Starter
iTrader: (2)
Join Date: Oct 1999
Location: Hattiesburg, MS, USA
Posts: 893
Likes: 0
Received 0 Likes
on
0 Posts
Car: 1992 Jade Green---Trans Am Converti
Engine: LS1
Transmission: T56
Yup,
Stock color was tan, and I'm sticking with it. Green with a tan top and tan/grey interior.
Kevin D.
Stock color was tan, and I'm sticking with it. Green with a tan top and tan/grey interior.
Kevin D.
01-06-2005, 10:31 PM
#7
Member

Join Date: Aug 2001
Location: Dallas, Tx
Posts: 483
Likes: 0
Received 0 Likes
on
0 Posts
Car: 88 Trans Am
Engine: lt1 intaked 355 makin 277 on 25 psi of fuel pressure and stock timing :)
Transmission: A4 stock... that moved a mobile dyno a foot shifting into 2nd :)
what did u have 2 do to get the door panels to fit right with no gap?
Trending Topics

 01-07-2005, 12:53 PM
#11
Senior Member

Join Date: Nov 2002
Location: Orange County, CA
Posts: 645
Likes: 0
Received 1 Like
on
1 Post
Car: 86 TA
Engine: 305 TPI
Transmission: 700R4 - 2200 stall
Axle/Gears: 3.42 posi
what color interior panels are people using with the charcoal 4th gen dash/door panels??
 01-07-2005, 08:35 PM
#15
Senior Member
Thread Starter
iTrader: (2)
Join Date: Oct 1999
Location: Hattiesburg, MS, USA
Posts: 893
Likes: 0
Received 0 Likes
on
0 Posts
Car: 1992 Jade Green---Trans Am Converti
Engine: LS1
Transmission: T56
Ok, here's goes..
86Iroc:
To get it to fit with no gap you have to make a commitment that you are going to make them work. If you go in trying to keep everything for the 3rd gen panels to still work, they'll never look stock. Rip all the arm rest mounts off and the stock door handle, they just get in the way
There's two problems with the panels, they are taller in the rear than they are in the front, and they recess into the door stock. No gap means you will have cut off the rear 2 or 3 tabs that hold the 3rd gen upper black trim plate on and then hammer down the back half of the verticle seam flat to the door. That will let it sit flat even with the outer sweep.
The upper rear of the 4th gen panels curve in. You could cut these of the panel, but I didn't see a way to make it look like I didn't cut it. So I pulled the upper corner of the door seal off and cut away the metal behind it. The 4th gen panel pushes the seal past where it used to stop but still let its form around the panel. I cut a tad too much, but some touch up paint on the rough edge and it would take a lot to find it.
Dubya:
Hard? It's deceiving. You can throw the panel on temporarily and think it won't be a problem at all. The closer to stock you want it look, the harder it gets. Once you do the above and get the panel to sit even with the outer sweep, two screws in the back and two in the front keep the edges flush with the metal on the door. There's no way to get the panel flush on the bottom. I've got a trip up my sleeve for that, where you would have to get under the door to notice.
The 4 small screws just hold it flush, I would not use them to hold the panel to the door. You can center punch all the 4th gen screw holes and use all those stock locations to secure the panel.
The door lock and handle was actually the easy part. Once the panel is secure, install the switch plate and handle cover. Center punch and drill the hole for the screw holding the handle cover on. Measure from this hole on a 4th gen door to where the 4th gen handle had it's rivit. Mount the 4th gen handle at the same measurements and it's a perfect fit. Bend and cut the rods to fit and your done.
Camaroguy & 84camaro:
I'm in south Mississippi. Come over anytime and I'll be glad to help.
Diggler:
I'd imagine I would paint to match or go with black. I'm going to attempt a full swap: kick panels, door sills, AND the rear sections.. I'll attempt, but I am glad the 3rd gen tan is the same as the 4th gen tan!
Ken:
I started on the panels. I didn't want to do the dash and then be .5" off on the allignment with the doors. So I'm doing the doors and will then line up the dash to them.
I got the one door 90% finished and went to show it off. On the way back home I missed a turn and wound up in some trees.. Insurance was REALLY nice to me and the car is stripped down and going to the body shop on Monday. After a complete stripping and complete repaint (allong with a RA1 hood!), I'll be back 100% into the interior.
Burnout:
About the only thing I didn't cover above is the upper front. The doors won't even close without cutting that section. You have to cut down the panel quite a bit. Completely remove where it curves back into the door. Plus cut a little more so nothing squeeks from rubbing.
You will have a big gaping hole to the back side of the panel. I got some door guard molding and formed it around the cut edge. I picked up a "lumbar support" foam pillow that matched the curvature of the panel perfectly. I cut and shaped it to fill in the hole when its fully expanded and then spray glued the fabric that was on the pillow onto my 'shape'.
Once dry, squish the foam small and shove it into the hole. Once it expands back out it fills it in really nice. It's the only part that doesn't look stock, but I'm satisfied with it's looks (and I'm ****). You would have to stand over the mirror and look down to really notice it.
To all:
I had a really crappy year and I'm glad it's 2005! Besides the wreck, we got broken into a week before I started the panel and my digital camera got stolen. I've got all my insurance checks in (and my new camera), so I promise as I get back into the interior I will have a full step-by-step guide with high resolution photos for the other panel and everything else I do!
Thanks again for the complements. Makes it worth doing sometimes.
Kevin D.
01-07-2005, 09:07 PM
#17
Senior Member
Thread Starter
iTrader: (2)
Join Date: Oct 1999
Location: Hattiesburg, MS, USA
Posts: 893
Likes: 0
Received 0 Likes
on
0 Posts
Car: 1992 Jade Green---Trans Am Converti
Engine: LS1
Transmission: T56
Originally posted by crazy3rdgen
pretty neat.. it still dont look like a perfect fit to me
pretty neat.. it still dont look like a perfect fit to me
Thanks,
Kevin D.
01-07-2005, 09:09 PM
#18
Senior Member

Join Date: Sep 2004
Location: Laguna Beach, Ca
Posts: 532
Likes: 0
Received 0 Likes
on
0 Posts
Car: Gutted 92' RS TRACK ONLY / '86 Mustang gt 'vert / 1982 Yamiaha xs400 Cafe Racer
Engine: L03; TBI is IT! / 5.0HO (306) SFI / 400cc air cooled twin
Transmission: 700-r4 / WCT5/ 6-speed close ratio
Fit and finish looks fine.
01-07-2005, 09:42 PM
#19
Supreme Member
iTrader: (1)

Join Date: Feb 2004
Location: Long Neck, De
Posts: 1,963
Likes: 0
Received 0 Likes
on
0 Posts
Car: 2002 SS
Engine: Ls1
Transmission: T56
Axle/Gears: 3:42 posi
sure kevin.. seem pretty smart to put that on nice and have a name SHROOM haha jp but heres what i think in the pics.. why's it come up like that to the piller?? looks ca ca. then just that minor part where it dont go striaght it curves in then back out..
is there anyway to fix this and are you doing with a 4th gen dash too
is there anyway to fix this and are you doing with a 4th gen dash too
01-07-2005, 10:50 PM
#21
Senior Member
Thread Starter
iTrader: (2)
Join Date: Oct 1999
Location: Hattiesburg, MS, USA
Posts: 893
Likes: 0
Received 0 Likes
on
0 Posts
Car: 1992 Jade Green---Trans Am Converti
Engine: LS1
Transmission: T56
Well, the back side is how the door panel comes on a 4th gen. I wanted to cut the panel as little as possible, and to try and keep the cuts to less seen areas. The picture was a little too small to see the details, but it actually flows with the door pretty well. It doesn't flare out at the top and bottom, but rather has a steep angle, a less steep angle, and then a straight section. The most steep angle matches the stock door seal angle, the less steep angle moves the trim X distance from the outside of the door, and then the straight section is parallel the same X distance all the way down the door. With the door closed the bubbled out section perfectly matches the rear quarter trim.. I think it's more of the picture no doing it justice.
As far as the upper right section.. Well, eh.. What can I say.. It has to be cut to clear the a-pillar frame. The fabric is black not gray, and the position you have to be in to see that much of it in the pic isn't a normal position you would be in. Honestly I'm not happy with it either, but it beats hacking the panel up and leaving it open. Since I have to clean up and dye the panels anyway (age and a few drill and dremel oops marks) I might fiberglass in new sections and make it a whole unit again.
Here's a better pic of the back edge, red lines indicate the three angles.
01-07-2005, 11:24 PM
#22
Supreme Member
iTrader: (1)
Join Date: Aug 2004
Location: Calgary, AB
Posts: 1,989
Likes: 0
Received 0 Likes
on
0 Posts
Car: 1993 Nissan 240sx
Engine: Turbo KA24DE
Transmission: 5 spd
Axle/Gears: 4.08 VLSD
How does the back of the door panel match up with the b pillar? I'd imagine there's a gap?
01-07-2005, 11:57 PM
#23
Senior Member
Thread Starter
iTrader: (2)
Join Date: Oct 1999
Location: Hattiesburg, MS, USA
Posts: 893
Likes: 0
Received 0 Likes
on
0 Posts
Car: 1992 Jade Green---Trans Am Converti
Engine: LS1
Transmission: T56
Originally posted by 305q_ta86
How does the back of the door panel match up with the b pillar? I'd imagine there's a gap?
How does the back of the door panel match up with the b pillar? I'd imagine there's a gap?
 01-08-2005, 01:01 AM
#24

i like it
hey man looks pretty sweet. very nice fabrication work. sorry to hear about your wreck and getting broken into. it can only get better from now on is how you should look at it. wish the best for you. keep up the good work and keep us posted.
-Ryan-
-Ryan-
01-08-2005, 04:18 AM
#25
Member
iTrader: (2)

Join Date: Sep 1999
Location: Canada
Posts: 384
Likes: 0
Received 2 Likes
on
2 Posts
Car: 92 quasar gta
Engine: Nothing
Transmission: Nothing
Axle/Gears: 4.11s
man anyone that would criticize that is nuts.. that looks amazing.. i went through a bit of this trying to fit on a panel and its gonna go a bit nicer from the tips ive got here. esp how you did the part that leads into the dash.. i got mine to fit without cutting but there is no room at all so i think the hacks gotta come out... i know theres gonna be a gap down by the speaker no matter how much i took off that area in the panel but i might take the fiberglass and build it up there
01-08-2005, 04:31 AM
#26
Supreme Member

Join Date: Nov 2004
Location: Connecticut
Posts: 1,344
Likes: 0
Received 0 Likes
on
0 Posts
Car: 86 IROC w/Danko bodykit, 1988 iroc vert, 1989 k1500 pickup 6" lift and 35" tires, 2002 chevy tahoe z71
Engine: 383 stealth ram, 305 tpi, 350 tbi, 5.3l
Transmission: T56, 700r4, 700r4, 4l460
hey shr00m are you planning any trips to connecticut in the near future, i would like that mod done to mine also
01-08-2005, 09:17 AM
#27
Supreme Member
iTrader: (1)
Join Date: Aug 2004
Location: Calgary, AB
Posts: 1,989
Likes: 0
Received 0 Likes
on
0 Posts
Car: 1993 Nissan 240sx
Engine: Turbo KA24DE
Transmission: 5 spd
Axle/Gears: 4.08 VLSD
Originally posted by smokefan
hey shr00m are you planning any trips to connecticut in the near future, i would like that mod done to mine also
hey shr00m are you planning any trips to connecticut in the near future, i would like that mod done to mine also
 01-09-2005, 07:43 PM
#29
Supreme Member
iTrader: (1)
Join Date: Feb 2004
Location: Long Neck, De
Posts: 1,963
Likes: 0
Received 0 Likes
on
0 Posts
Car: 2002 SS
Engine: Ls1
Transmission: T56
Axle/Gears: 3:42 posi
yeah shroom i get what you mean... that part where it goes up that your not happy with when you said
"I might fiberglass in new sections and make it a whole unit again. "
I think you should cut that part out then fiberglass it so it looks perfect.. what do you think about that? it might be difficult but well worth it if your **** like me lol.. everythings gotta be perfect in my eyes i cant stand me doin sumtin little and not thinken its the best it could be.. all in all it looks killer and awsome! keep it up

 01-10-2005, 01:59 PM
#32
Senior Member

Join Date: May 2003
Location: Iowa
Posts: 565
Likes: 0
Received 0 Likes
on
0 Posts
Car: 88 IROC-Z
Engine: 350+
Transmission: Wishin Manual
hey anyone wana come to iowa and do that for me
Did ya ever say how much it was to do all that? And do they come in black?
Did ya ever say how much it was to do all that? And do they come in black?
01-10-2005, 02:45 PM
#33
Supreme Member
iTrader: (1)
Join Date: Mar 2001
Location: Chesterfield, Indiana
Posts: 4,226
Likes: 0
Received 5 Likes
on
4 Posts
Car: 1991 Z28 Camaro
Engine: 5.7
Transmission: Jasper 700R4 Stage II
Axle/Gears: 3.23 For Now
damn I wish I could get a set of those door panels installed in my car...they would like great with the SS seats..
01-10-2005, 06:32 PM
#34
Senior Member
Thread Starter
iTrader: (2)
Join Date: Oct 1999
Location: Hattiesburg, MS, USA
Posts: 893
Likes: 0
Received 0 Likes
on
0 Posts
Car: 1992 Jade Green---Trans Am Converti
Engine: LS1
Transmission: T56
Originally posted by stalin05
hey anyone wana come to iowa and do that for me
Did ya ever say how much it was to do all that? And do they come in black?
hey anyone wana come to iowa and do that for me
Did ya ever say how much it was to do all that? And do they come in black?

How much? Technically free.. I bought a 93 Trans Am with a blown head gasket for $3000 shipped. Got the T56, complete interior, disc rear, and some BMR suspension stuff. Gutted and sold the rest and made about $3200 from it. You have to really gut a car to get that much money back!

I guess if you follow the whole "how much is my spare time worth" theory, about $200..
Kevin D.
01-10-2005, 09:15 PM
#36
Senior Member
Thread Starter
iTrader: (2)
Join Date: Oct 1999
Location: Hattiesburg, MS, USA
Posts: 893
Likes: 0
Received 0 Likes
on
0 Posts
Car: 1992 Jade Green---Trans Am Converti
Engine: LS1
Transmission: T56
Originally posted by Spdfrk1990
Wait but the body was wrecked b4 also right?
Wait but the body was wrecked b4 also right?
Kevin D.
01-11-2005, 09:45 PM
#38
Senior Member
Thread Starter
iTrader: (2)
Join Date: Oct 1999
Location: Hattiesburg, MS, USA
Posts: 893
Likes: 0
Received 0 Likes
on
0 Posts
Car: 1992 Jade Green---Trans Am Converti
Engine: LS1
Transmission: T56
Few pics of the cutting and shaping needed.. Last one's untill it gets back from the body shop.

And door handle.. FYI, the way I shortened the lock rod will NOT work.. It hits the window roller. I'll probably bend it up and down instead of into the door.

And door handle.. FYI, the way I shortened the lock rod will NOT work.. It hits the window roller. I'll probably bend it up and down instead of into the door.
01-12-2005, 01:34 AM
#39
Member

Join Date: Aug 2003
Location: The Cheese Head State - GO PACKERS!
Posts: 459
Likes: 0
Received 0 Likes
on
0 Posts
Car: 86 "Ram Air" IROC
Engine: 305 5.Slow
Transmission: 700R4
Wow that looks fabulous, i'd love to have a set of black/red ones installed like that in my car, i'd pay hella moola for it!
01-12-2005, 08:49 AM
#40
Supreme Member

Join Date: Mar 2000
Location: St. Louis, MO
Posts: 2,028
Likes: 0
Received 0 Likes
on
0 Posts
Car: 85' Firebird (Project), 92' RS
Engine: 2.8L, LS1
Transmission: 700R4, 4L60E
Axle/Gears: 3.42 Open , 10 Bolt (ukn)
hey kevin, did u get a chance to test fit the dash? when i was installing my 4th gen dash, i had an extra door panel that i slammed in place on the passenger side so i could get the spacing right for mounting the dash in place. With the passenger door closed, the dash and door panel lined up perfectly. But here's the problem, i had to remove the plastic from the rear of the door so things would close nice. IF material was removed the from the front of the door, and the door was pushed further up, i'd think that the lines that go between the doors and the dash would be interrupted, and as a result, the dash would sit further out than the door panels.
For everyone else out there that doesn't know, 4th gen dashes and panels are setup for a "flowing" design, one piece flows into the next, in the same way that a 4th gen console moves directly into the dash, and the dash goes out into the door panels, giving you an f-18 cockpit feel of being placed right in the middle of the action. Thats my concern is that those lines may not line up....
so i guess i'm curious if you had been able to fix that, as there was about oh, 3 inches maybe that was removed from the rear of the panel to get things to fit flush originally on mine, then i'd assume you'd remove a good portino from the front, but for the rear to simply slide in like that, they'd have to be slid forward the necessary 3 inches which i removed, on the contrary, there's a pretty good chance that i didn't see something that you've done or thought out already which you'll have to clarify for me.
by the way, good job, just about the best looking door panels i've seen yet.
01-12-2005, 05:52 PM
#41
Senior Member
Thread Starter
iTrader: (2)
Join Date: Oct 1999
Location: Hattiesburg, MS, USA
Posts: 893
Likes: 0
Received 0 Likes
on
0 Posts
Car: 1992 Jade Green---Trans Am Converti
Engine: LS1
Transmission: T56
I've haven't made it to the dash yet. Since it always seems like the doors are the sore spots, I wanted to start there and then line the dash up to them. You points make me ponder...
Chances are it won't flow like it needs to, but with the doors in I might be able to modify the dash mounting more than normal and gain an inch or two. Looking at some pics and the panels, the passenger door is the only one that has the same shape door to dash. The driver's side panel is flat.
Since I'm staying with the tan panels and gray dash it will be so high contrast where they meet that it might not be noticeable. As with all other bridges, I'll cross that one too.
Good luck with your panels, I may have a few questions for you on the dash part.. I've got a 92 & 93 helms, so at least the electrical part is covered..
Kevin D.
01-12-2005, 07:40 PM
#42
Supreme Member
Join Date: Mar 2000
Location: St. Louis, MO
Posts: 2,028
Likes: 0
Received 0 Likes
on
0 Posts
Car: 85' Firebird (Project), 92' RS
Engine: 2.8L, LS1
Transmission: 700R4, 4L60E
Axle/Gears: 3.42 Open , 10 Bolt (ukn)
good job on the helms, i had to get by with a early 4th gen haynes (yuk) but this board really helped me out on some of the wiring woes, just need to finish my project...all in due time. The dash issues probably won't be overly difficult to overcome. From the factory the dash uses plastic mounting studs which are lined in aluminum or brass, these mount to the firewall, the "bad" part is they're plastic, over coming them isn't going to be a simple chop, but at the same time, i trust ur fabrication skills, and think you can probably beat that one. The lower mounts are simple, and on the frame, much like the 3rd gen units, using those should be a "no brainer" (redrill, bend if necessary, shape to fit, or tach weld new, etc, all ur choice.) Then the steering shaft bolt holes might need to be lenghtend so they'll line up, also a no biggie, and so on. Hit me up if you have some snags, and make sure to post on ur progress, interested in seeing this one finish up.
05-13-2006, 06:02 PM
#43
Junior Member

Join Date: May 2006
Location: Culiacan, Sinaloa, Mexico
Posts: 9
Likes: 0
Received 0 Likes
on
0 Posts
Car: camaro 96 Z/28, Camaro 85 Z/28 Lt1
Engine: LT1
Transmission: 4L60E
Axle/Gears: stock 4th gen 3:23 both cars
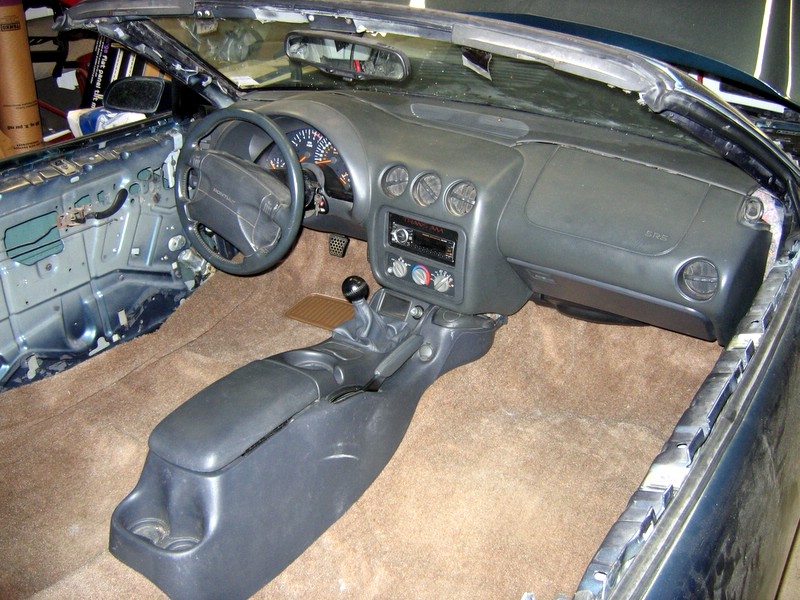
hi. this is my first post..
I came here searching a way for doing this swap, I own a 1985 Z28, Lt1.
already installed 4th gen dash, steering column/wheel, and seats.. and a friend is parting a 96 z28, I thing I'll get the center console AND door panels and try to install them..
thanks.
_____________________________________
here is a pic of the dash, and the engine..
05-13-2006, 06:07 PM
#44
Senior Member
Thread Starter
iTrader: (2)
Join Date: Oct 1999
Location: Hattiesburg, MS, USA
Posts: 893
Likes: 0
Received 0 Likes
on
0 Posts
Car: 1992 Jade Green---Trans Am Converti
Engine: LS1
Transmission: T56
OMG, this thread is over a year old and I still haven't finished the car... I feel really bad right now..
Good job on the dash, I like what you did with the 'extra' radio pod. Is that an LCD?
Kevin D.
Good job on the dash, I like what you did with the 'extra' radio pod. Is that an LCD?
Kevin D.
05-13-2006, 06:18 PM
#45
Junior Member
Join Date: May 2006
Location: Culiacan, Sinaloa, Mexico
Posts: 9
Likes: 0
Received 0 Likes
on
0 Posts
Car: camaro 96 Z/28, Camaro 85 Z/28 Lt1
Engine: LT1
Transmission: 4L60E
Axle/Gears: stock 4th gen 3:23 both cars
Originally Posted by shr00m
OMG, this thread is over a year old and I still haven't finished the car... I feel really bad right now..
Good job on the dash, I like what you did with the 'extra' radio pod. Is that an LCD?
Kevin D.
Good job on the dash, I like what you did with the 'extra' radio pod. Is that an LCD?
Kevin D.
well, then it was just a cover, the idea was to move radio up and touchscreen at the lower pod plug to a "hidden laptop", but if the 4th gen console gets in the car, then no screen for me..
right now the car is in pieces ready for paint
thanks for your reply...
 05-15-2006, 10:35 PM
#47
Supreme Member
Join Date: Apr 2004
Location: MN
Posts: 2,139
Likes: 0
Received 0 Likes
on
0 Posts
Car: 1986 Camaro SC (Supercool)
Engine: one composed of various metals
I want to tackle this project this summer...those pics are great inspiration, and to anyone who didnt know the mod was done - I would doubt they'd notice the minor misfits/angles
awesome job
awesome job
05-15-2006, 11:52 PM
#48
Senior Member
Thread Starter
iTrader: (2)
Join Date: Oct 1999
Location: Hattiesburg, MS, USA
Posts: 893
Likes: 0
Received 0 Likes
on
0 Posts
Car: 1992 Jade Green---Trans Am Converti
Engine: LS1
Transmission: T56
Originally Posted by JL_Audio_RS
any mor progres on the dash or door panels
I've had a few things come up like a wreck, LS1, etc. You can follow all the progress here:
http://www.ms-fbodies.com/jade_ta.htm
Kevin D.
05-17-2006, 11:33 AM
#49
Supreme Member
Join Date: Apr 2004
Location: MN
Posts: 2,139
Likes: 0
Received 0 Likes
on
0 Posts
Car: 1986 Camaro SC (Supercool)
Engine: one composed of various metals
Originally Posted by shr00m
Panels, no. Dash, yes.
I've had a few things come up like a wreck, LS1, etc. You can follow all the progress here:
http://www.ms-fbodies.com/jade_ta.htm
Kevin D.
I've had a few things come up like a wreck, LS1, etc. You can follow all the progress here:
http://www.ms-fbodies.com/jade_ta.htm
Kevin D.
people seem to differ on which year dash to use. Ive seen some people say that the lt1 dashes are easier than the ls1....any truth to that....is it the fit, or the wiring that's the issue?...Im getting ready to buy so I wanna get the right thing
 05-17-2006, 06:07 PM
#50
Senior Member
Thread Starter
iTrader: (2)
Join Date: Oct 1999
Location: Hattiesburg, MS, USA
Posts: 893
Likes: 0
Received 0 Likes
on
0 Posts
Car: 1992 Jade Green---Trans Am Converti
Engine: LS1
Transmission: T56
Originally Posted by Camaroguy18
people seem to differ on which year dash to use. Ive seen some people say that the lt1 dashes are easier than the ls1....any truth to that....is it the fit, or the wiring that's the issue?...Im getting ready to buy so I wanna get the right thing
AC, radio, lighting, etc all wire in the same 93-02.
Kevin D.

