
window motor replacement... easier than you may think

Thread Starter
Supreme Member
iTrader: (1)
Joined: Jun 2009
Posts: 1,777
Likes: 0
From: Central Connecticut
Car: 91 Trans Am 'vert
Engine: LB9
Transmission: T5
Axle/Gears: 3.45 9 bolt
window motor replacement... easier than you may think
Hey guys, I know that this topic has been covered possibly hundreds of times, but I just wanted to throw in my  . I replaced the driver's side window motor on my 91 T/A today and it was pretty easy. I used the instructions in this thread:
https://www.thirdgen.org/forums/body...tall-easy.html
Only difference is that I didn't touch the two big silver rivets that he said to remove.
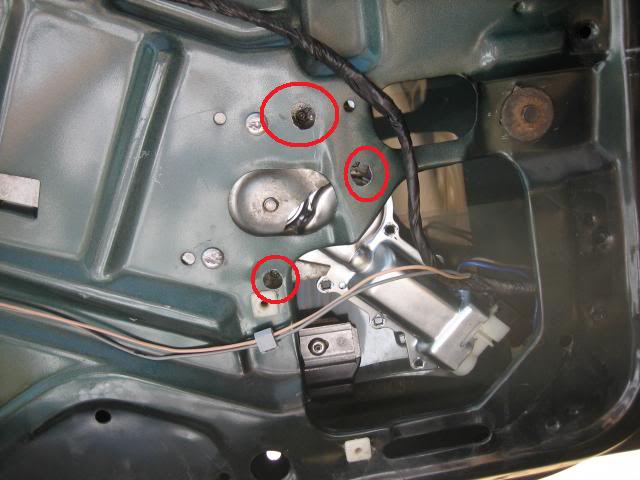
3 holes and the motor pops out, the window didn't even come crashing down (although someone was holding it just in case). Use a big bit to open up the sheet metal to see what you're drilling in the locations I marked in the photo below, then take a smaller bit to drill the rivets out... just make sure the holes are about the same size as the ones on the new motor. Then just attach the new motor with the appropriate size nuts and bolts. I didn't even have to use the mount my new motor came with. It seems very solid so I don't see any reason why it should fail too quickly.
Oh and my window was all the way up during this... better idea to keep it up there to avoid hitting the glass with the drill.
The only reason that the rivets I said to leave alone are hacked up in this picture is because we were gonna remove them all but then we decided to try the 3 other ones first.
Oh and...
Please save the flaming... this is for those who don't mind taking a few minor shortcuts.
. I replaced the driver's side window motor on my 91 T/A today and it was pretty easy. I used the instructions in this thread:https://www.thirdgen.org/forums/body...tall-easy.html
Only difference is that I didn't touch the two big silver rivets that he said to remove.
3 holes and the motor pops out, the window didn't even come crashing down (although someone was holding it just in case). Use a big bit to open up the sheet metal to see what you're drilling in the locations I marked in the photo below, then take a smaller bit to drill the rivets out... just make sure the holes are about the same size as the ones on the new motor. Then just attach the new motor with the appropriate size nuts and bolts. I didn't even have to use the mount my new motor came with. It seems very solid so I don't see any reason why it should fail too quickly.
Oh and my window was all the way up during this... better idea to keep it up there to avoid hitting the glass with the drill.
The only reason that the rivets I said to leave alone are hacked up in this picture is because we were gonna remove them all but then we decided to try the 3 other ones first.
Oh and...
Please save the flaming... this is for those who don't mind taking a few minor shortcuts.

Joined: Nov 2005
Posts: 2,346
Likes: 1
From: Naples, FL
Car: 91 RS Camaro, 75 L82 Corvette
Engine: LO3, 383 Stroker
Transmission: 700R4, TH400
Axle/Gears: 4th gen 3.23 posi/LS1 discs, stock
Re: window motor replacement... easier than you may think
I did the same thing on both doors. Drivers side was dead, and when I put the new motor it. It was much faster than the passenger window. So I just replaced that one too. I didn't mess with the rivits either, just drilled the 3 holes. Apparently both motors had been replaced by a PO. Cause both motors were held in place by nuts and bolts, not rivits.

Thread
Thread Starter
Forum
Replies
Last Post
1992 Trans Am
History / Originality
27
May 10, 2023 07:19 PM