Home brew road racer


 08-14-2016, 11:00 AM
#502

Re: Home brew road racer
84Z28dude, thanks for checking out my insanity.
Still working on the wiring. Fuel pump relay, daytime driving lights, and made a wiring harness for the gauge cluster that terminates into a 6 wire weather pack connector. With all the extra GM wiring I have on hand I was able to match the OE wire colors for the gauges and various dash lights. This should make it easier to trouble shoot down the line. Will wire the other side of connector to day and also make weather pack connector for rear stop-turn-tailights (I accidentally cut the wires from the factory plug on the main body harness).
No pics but did crank engine a little to test start circuits. No fluids in trans or diff so can't start engine yet. Why does GM synchromesh trans oil have to cost $18.00/qt????? I'm on a tight budget here!!!!
Heading back out to the garage to do what I can. Thanks to everyone for following along and the comments and ideas.
08-18-2016, 09:38 PM
#503
Re: Home brew road racer
Well wiring is near 100% finished. The fuel pump relay is not completely wired up but thats OK since I don't want it running yet. here are a few pics.
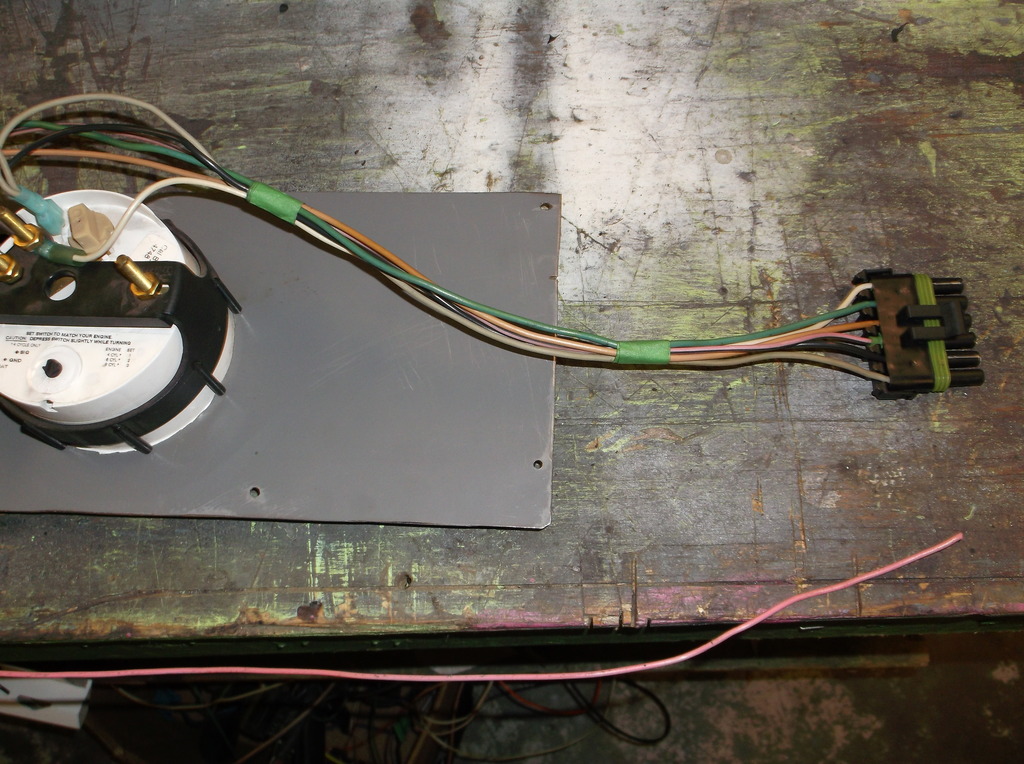
Dash harness, all wiring follows factory wire colors.
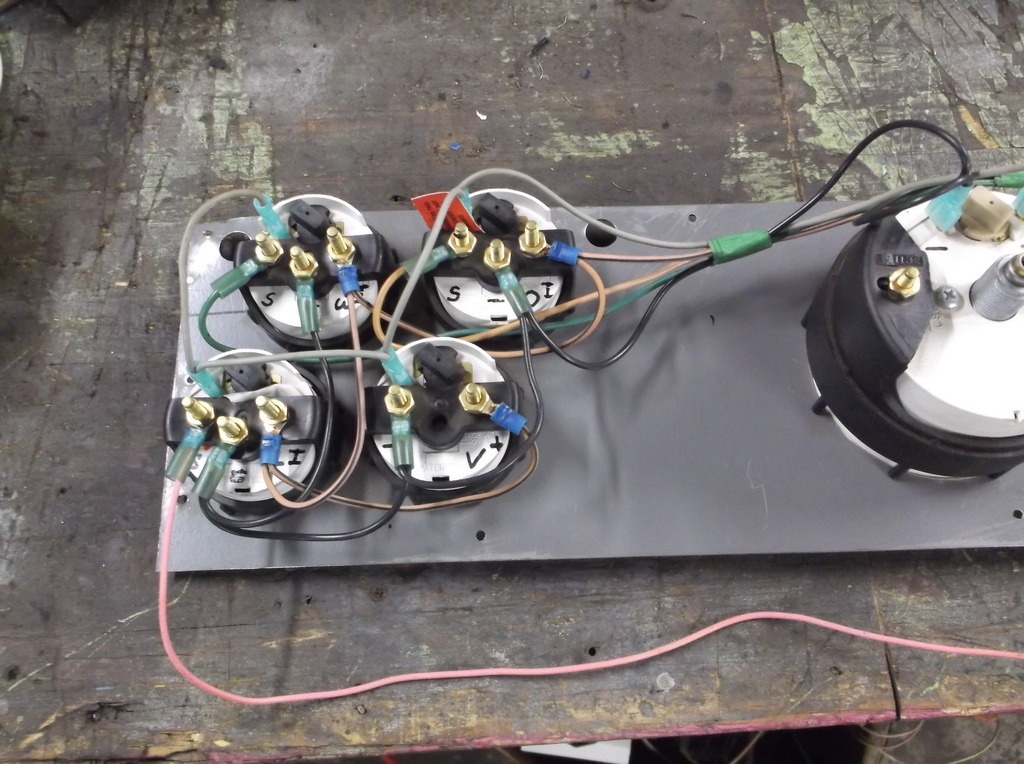
The single pink wire is for fuel gauge. This will be incorporated into a second harness that will include all of the indicator lights.
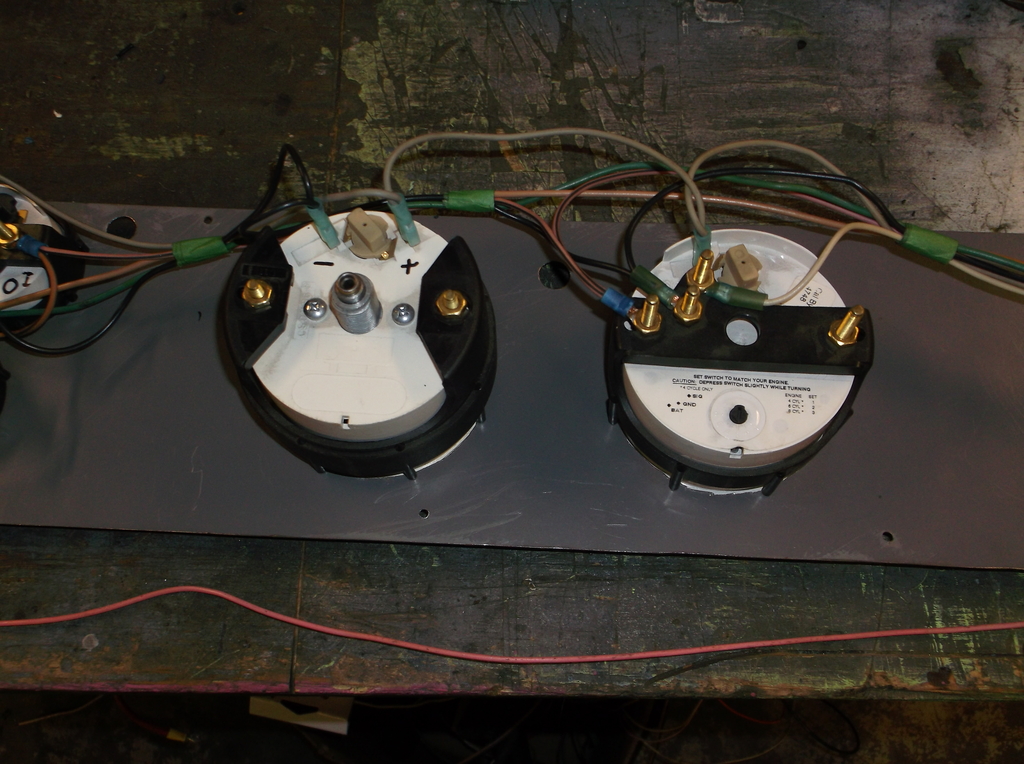
The gauges are a Cal Custom set that I picked up off the Summit Racing scratch and dent tables. They said "made in America" on the box. The small gauges had stickers on them showing they were made by a company called Faria Instruments. Never heard of them so googled. Turns out they are real big in marine, military, and industrial gauges so I imagine they are pretty good quality.
This is the first 3rd gen I have owned that still had the factory wiring in it so I am not sure if what I have is common or not. The wiring harness that runs along the drivers door to the rear of the car for the rear lights is not like rest of the wiring in the car. The outer covering on the wires has a metallic coloring to it and the wire itself is a single strand of silver metal, not multi strands of copper. If I didn't know better I would say that the single strand is SILVER wire. Anybody else ever come across this????
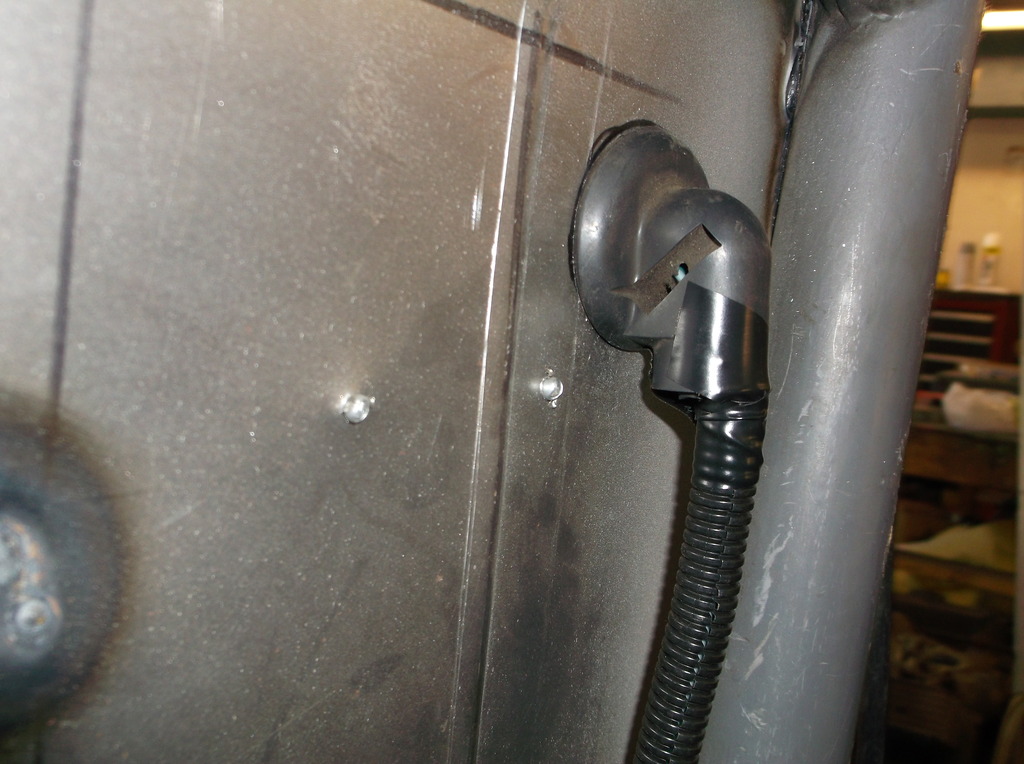
I used the 90 degree firewall grommet from the A/C harness to route my rear light harness through the rear firewall behind the driver's seat.
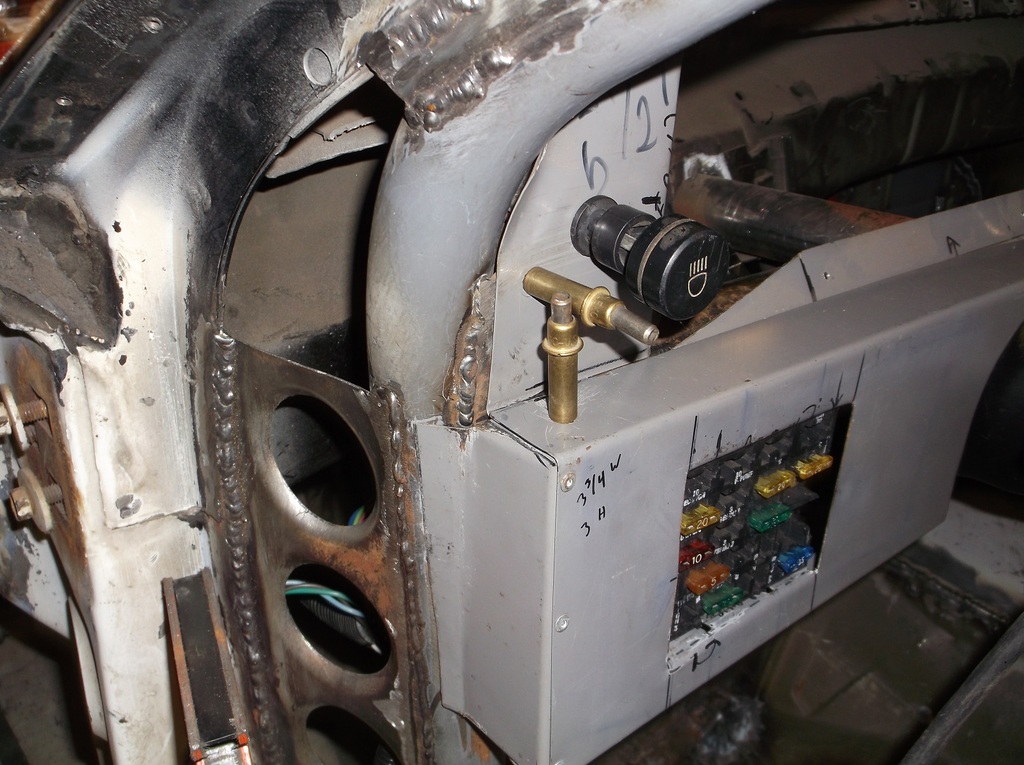
I hate laying on my back looking under the dash to check/change a fuse so I mounted the OE panel into the lower left dash face.
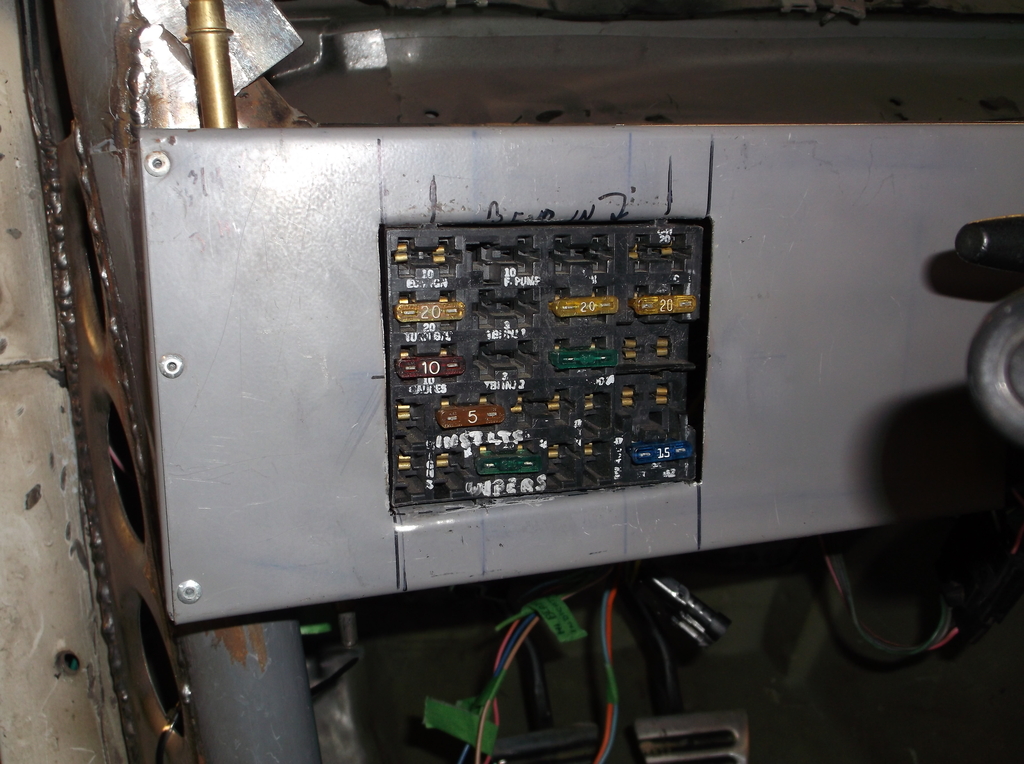
Not as pretty as one of the aftermarket fuse blocks but the price was right. Maybe I will make a cover for it???
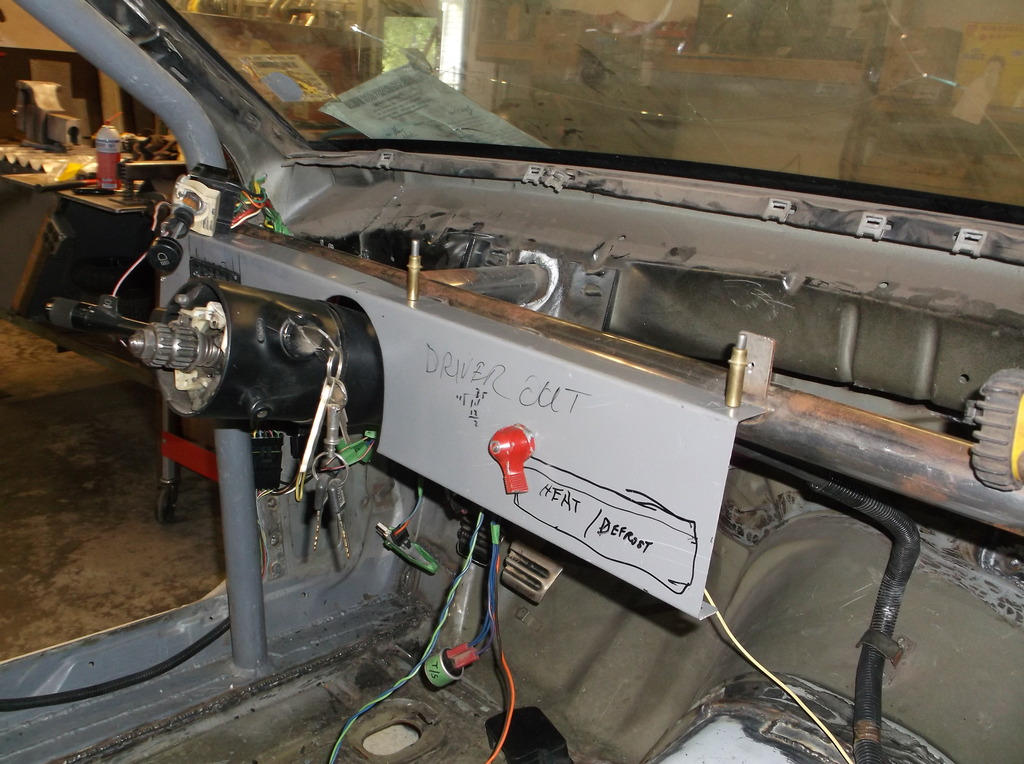
Battery cutoff switch mounted in dash above shifter.
I wired the low beams to work as daytime running lights that would come on with the ignition switch in the run position. There are times when you may want to run the engine with the lights off. To do this I ran the low beam lights through a relay. Power in was taken from the A/C circuit off the back of the fuse box and wired to the normally closed terminal #87a. The tan wire for the low beams was cut from the dimmer switch and attached to the output terminal #30. To power the relay I spliced into the power wire used for #87a and attached to terminal #86. For the ground side of the coil, terminal #85 I wired into the white wire on the back of the headlight switch. This circuit is used to manually turn on the dome and interior lights by turning the **** on the headlight switch counterclockwise till it "clicks". This action grounds the white wire and so grounds the coil circuit switching the contacts from normally closed terminal 87a to normally open terminal 87. This effectively opens the circuit and turns off the low beams.
Dash harness, all wiring follows factory wire colors.

The single pink wire is for fuel gauge. This will be incorporated into a second harness that will include all of the indicator lights.


The gauges are a Cal Custom set that I picked up off the Summit Racing scratch and dent tables. They said "made in America" on the box. The small gauges had stickers on them showing they were made by a company called Faria Instruments. Never heard of them so googled. Turns out they are real big in marine, military, and industrial gauges so I imagine they are pretty good quality.
This is the first 3rd gen I have owned that still had the factory wiring in it so I am not sure if what I have is common or not. The wiring harness that runs along the drivers door to the rear of the car for the rear lights is not like rest of the wiring in the car. The outer covering on the wires has a metallic coloring to it and the wire itself is a single strand of silver metal, not multi strands of copper. If I didn't know better I would say that the single strand is SILVER wire. Anybody else ever come across this????
I used the 90 degree firewall grommet from the A/C harness to route my rear light harness through the rear firewall behind the driver's seat.

I hate laying on my back looking under the dash to check/change a fuse so I mounted the OE panel into the lower left dash face.

Not as pretty as one of the aftermarket fuse blocks but the price was right. Maybe I will make a cover for it???
Battery cutoff switch mounted in dash above shifter.

I wired the low beams to work as daytime running lights that would come on with the ignition switch in the run position. There are times when you may want to run the engine with the lights off. To do this I ran the low beam lights through a relay. Power in was taken from the A/C circuit off the back of the fuse box and wired to the normally closed terminal #87a. The tan wire for the low beams was cut from the dimmer switch and attached to the output terminal #30. To power the relay I spliced into the power wire used for #87a and attached to terminal #86. For the ground side of the coil, terminal #85 I wired into the white wire on the back of the headlight switch. This circuit is used to manually turn on the dome and interior lights by turning the **** on the headlight switch counterclockwise till it "clicks". This action grounds the white wire and so grounds the coil circuit switching the contacts from normally closed terminal 87a to normally open terminal 87. This effectively opens the circuit and turns off the low beams.
09-08-2016, 08:17 PM
#504
Re: Home brew road racer
wiring all done now. mounted headlight switch in near stock location.
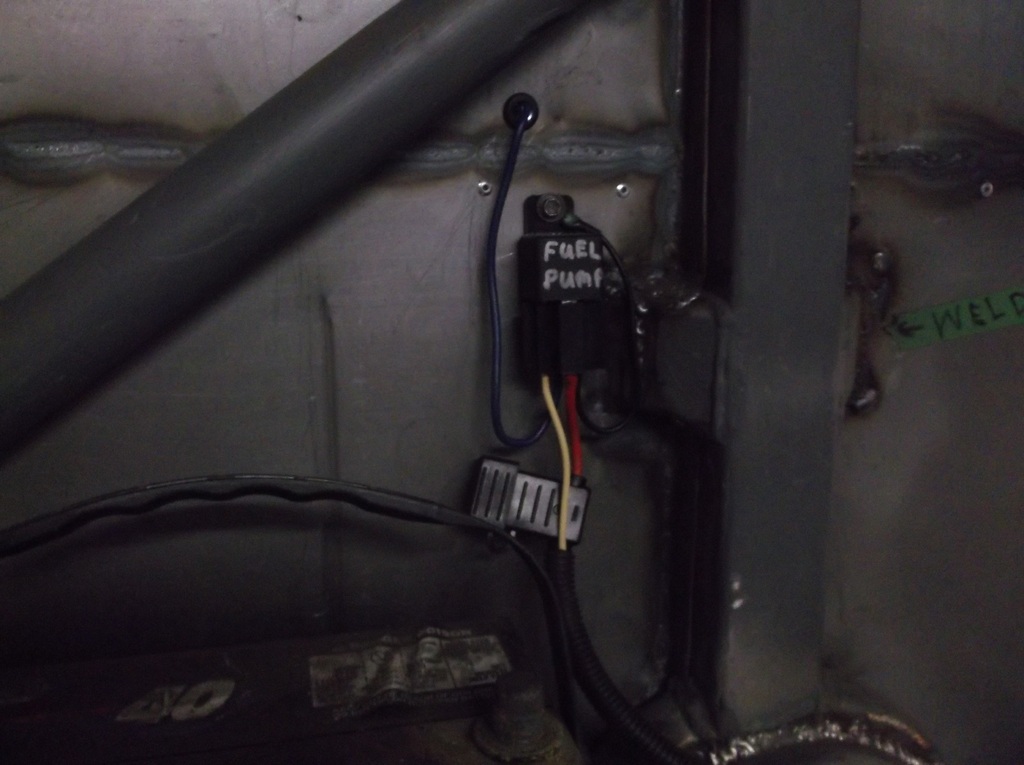
fuel pump wired in. it will run from ignition switch or the switch panel behind left headlight. relay is mounted on rear firewall behind passenger seat.
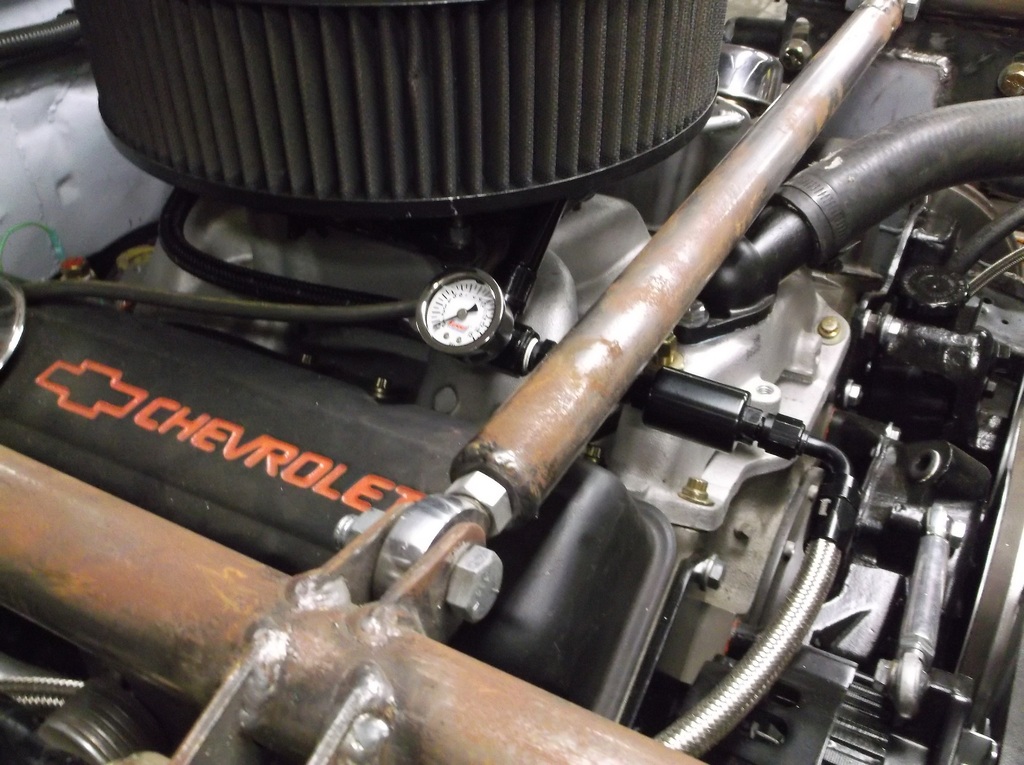
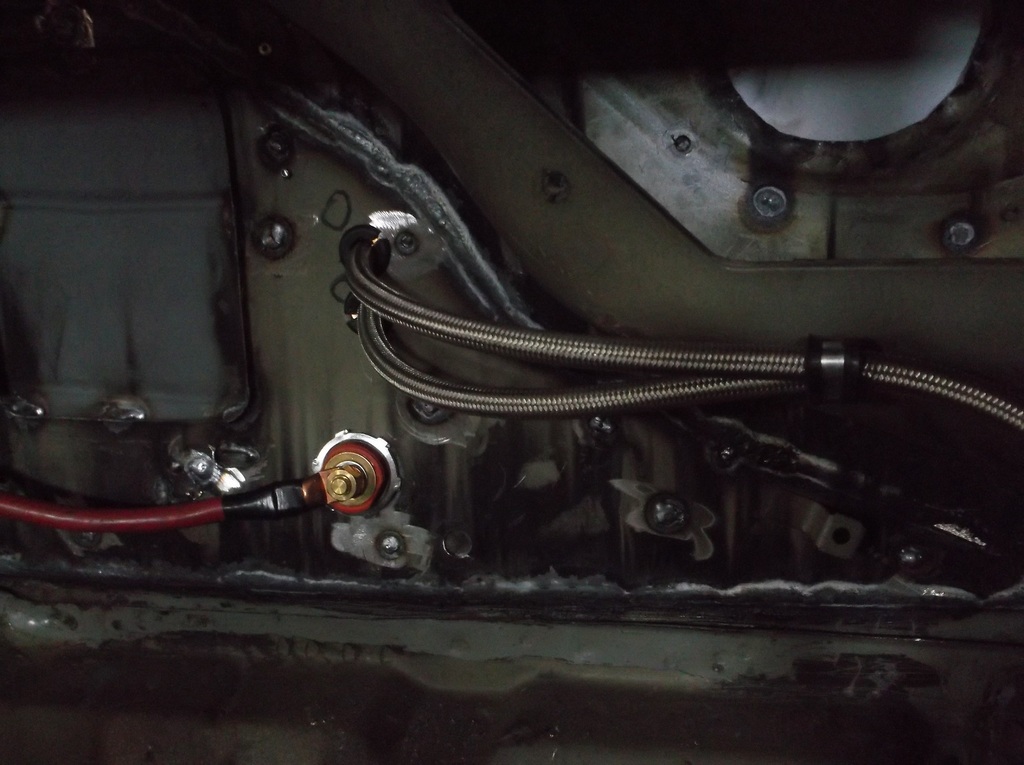
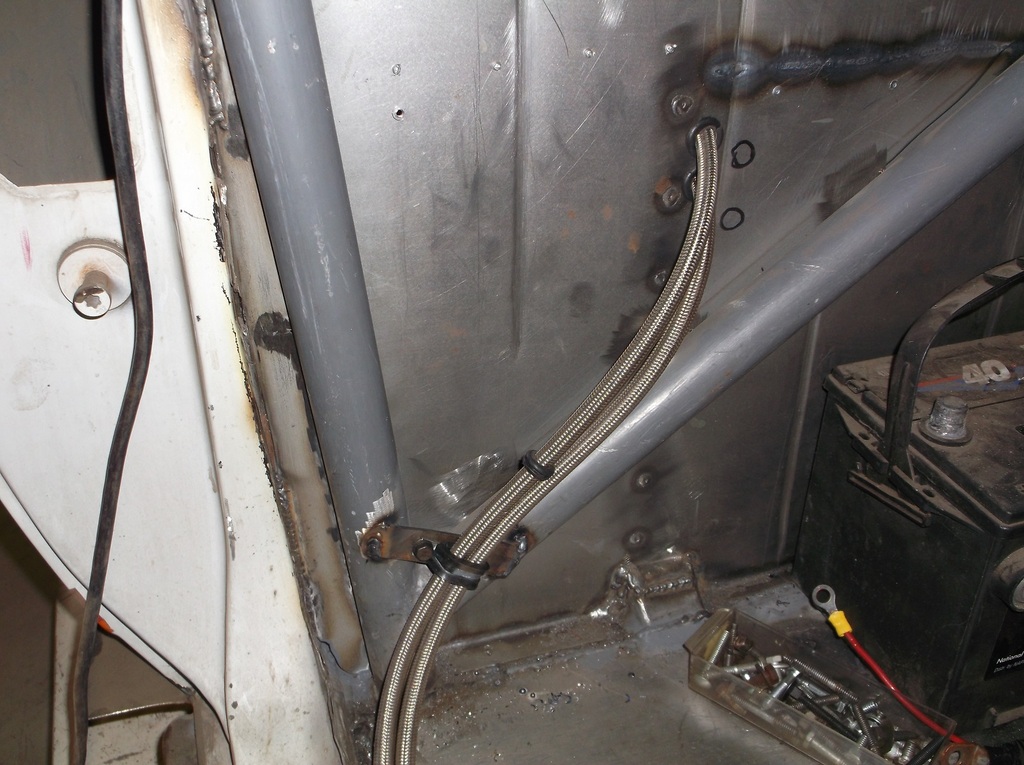
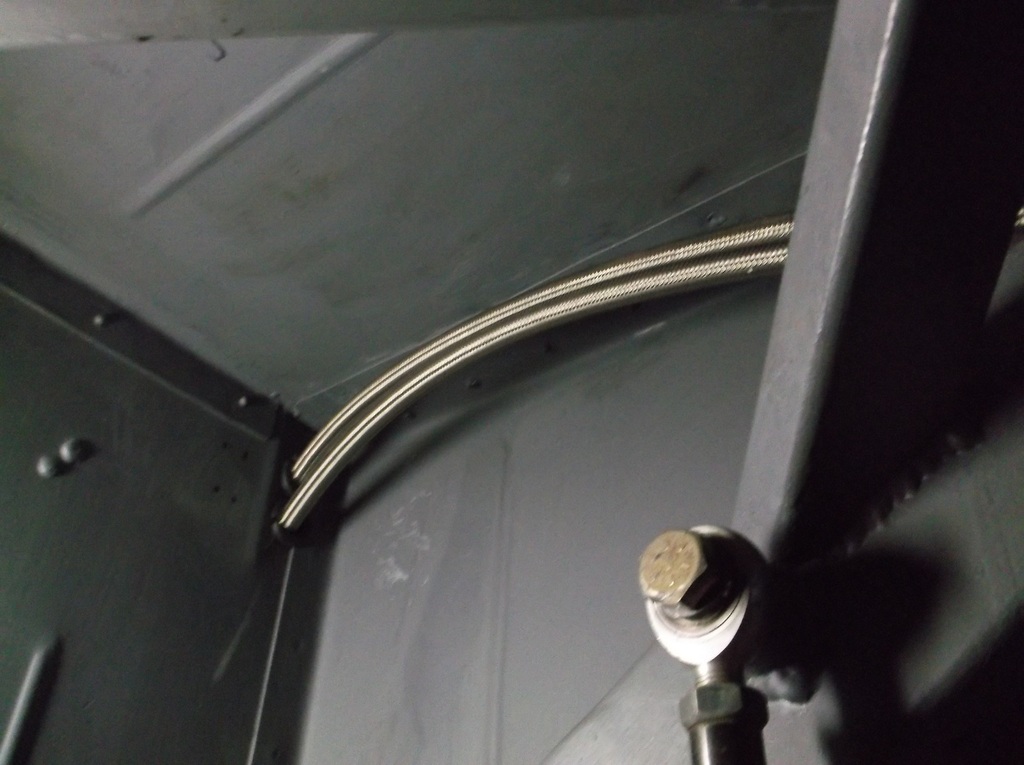
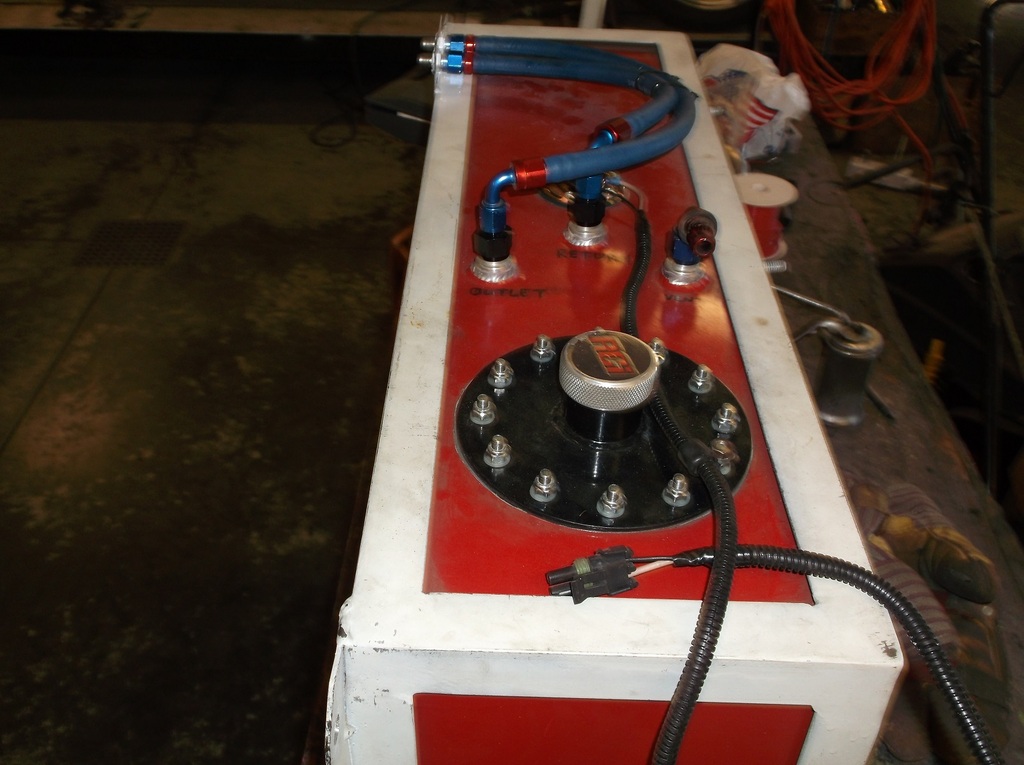
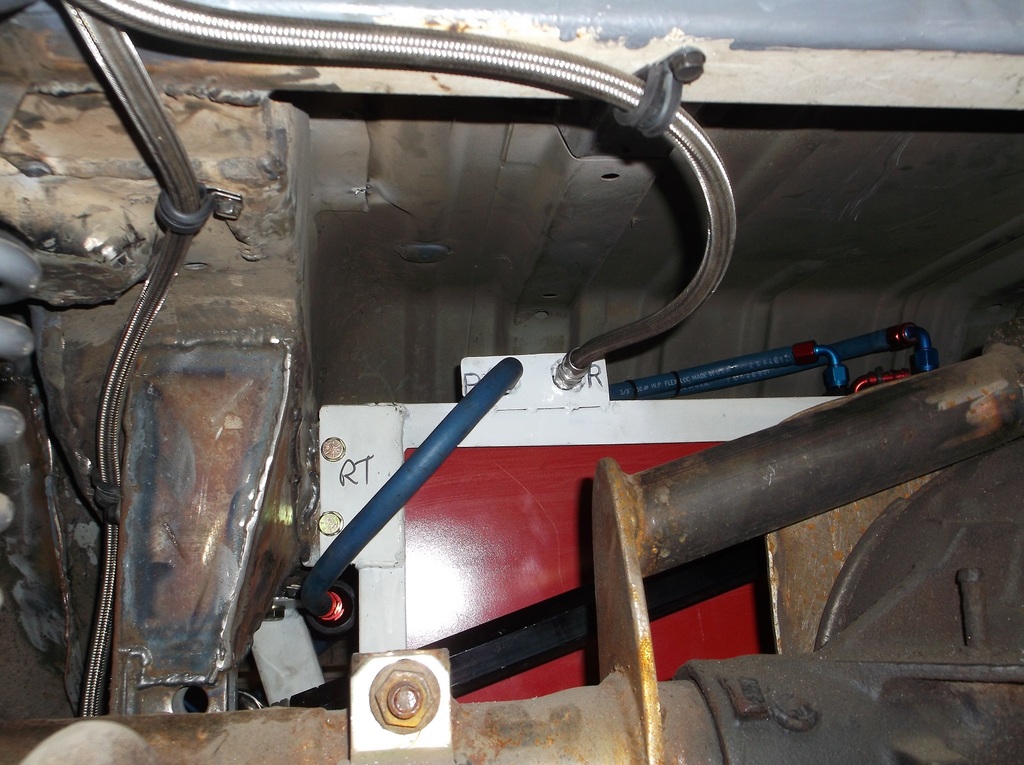
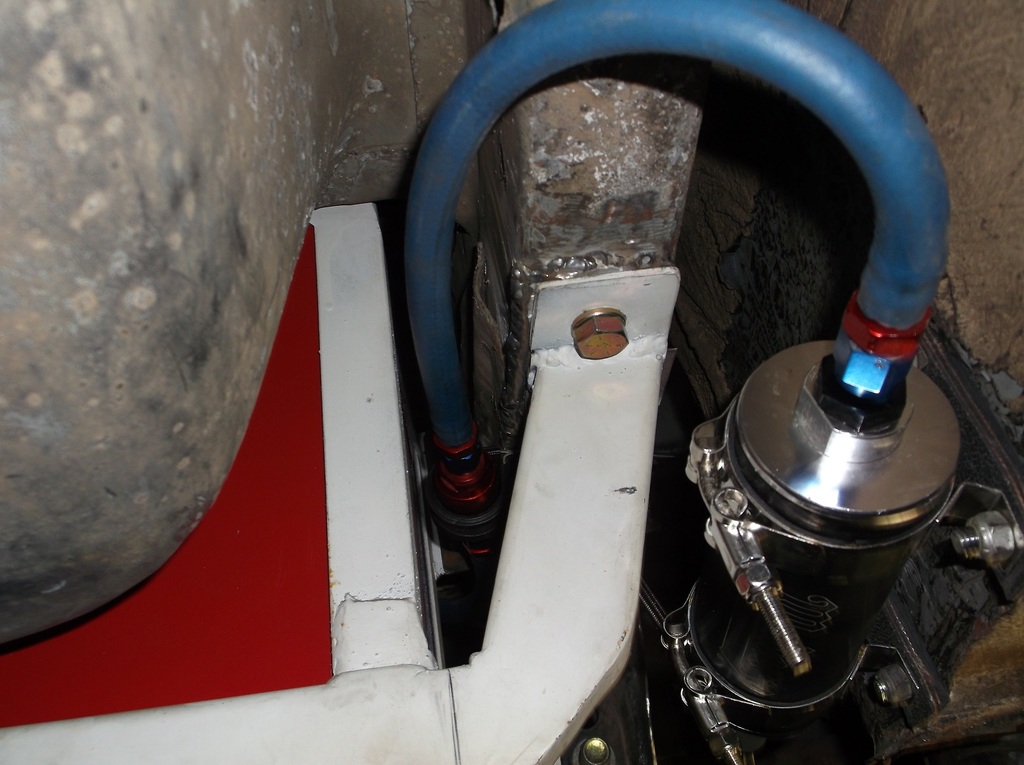
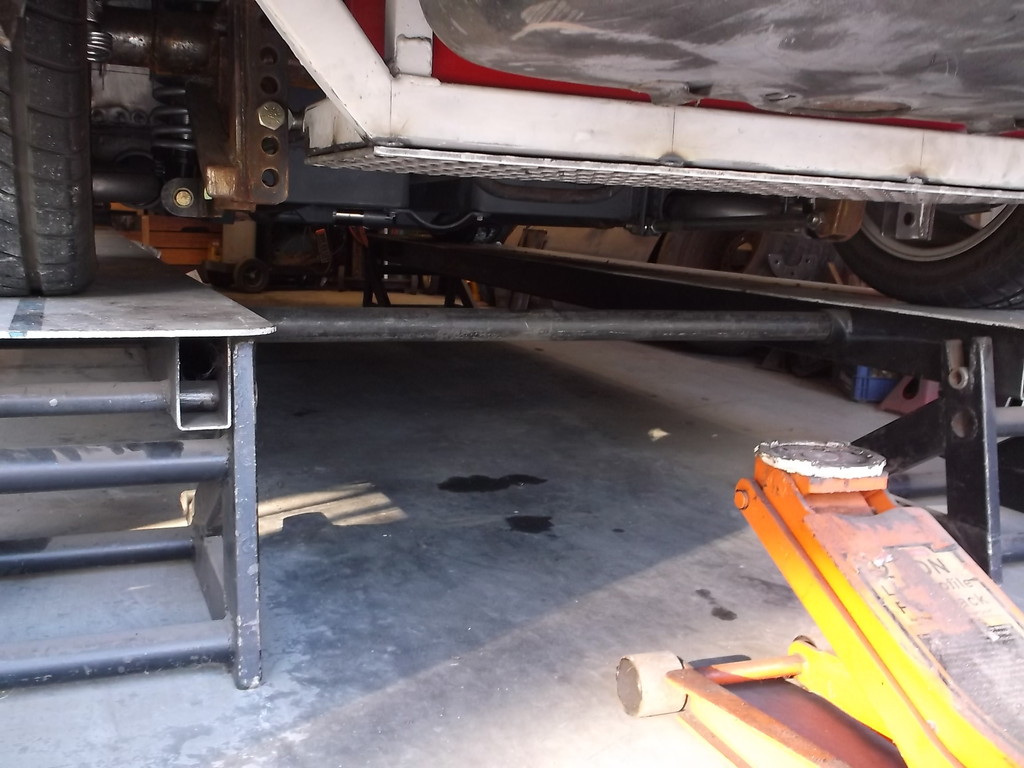
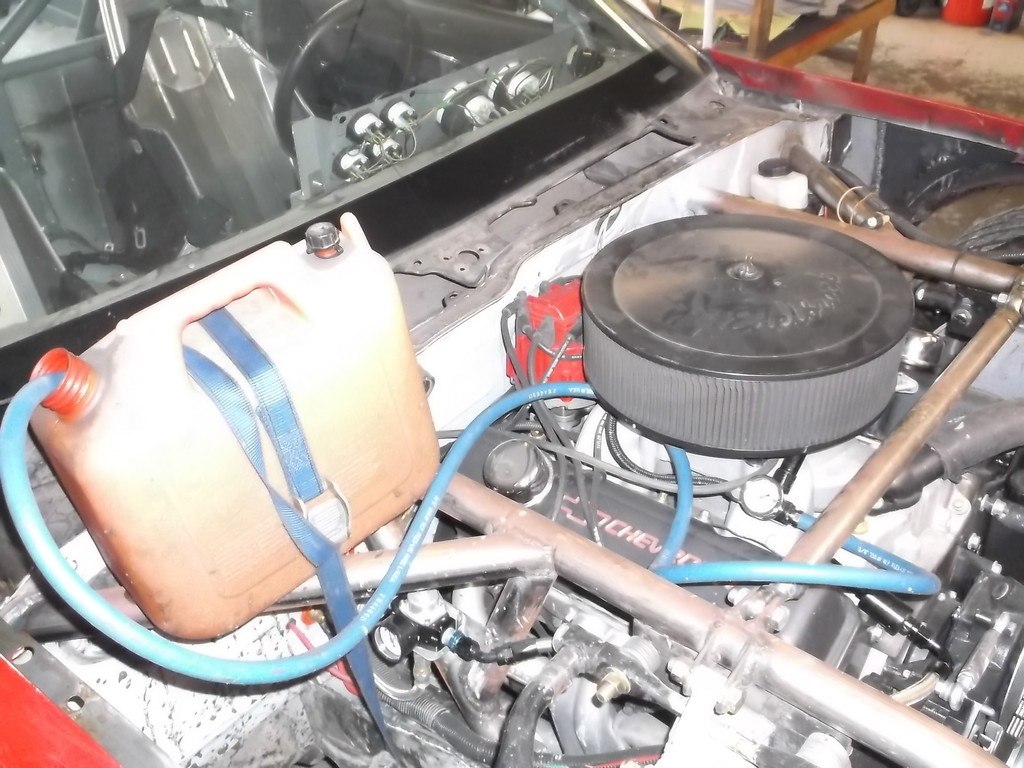
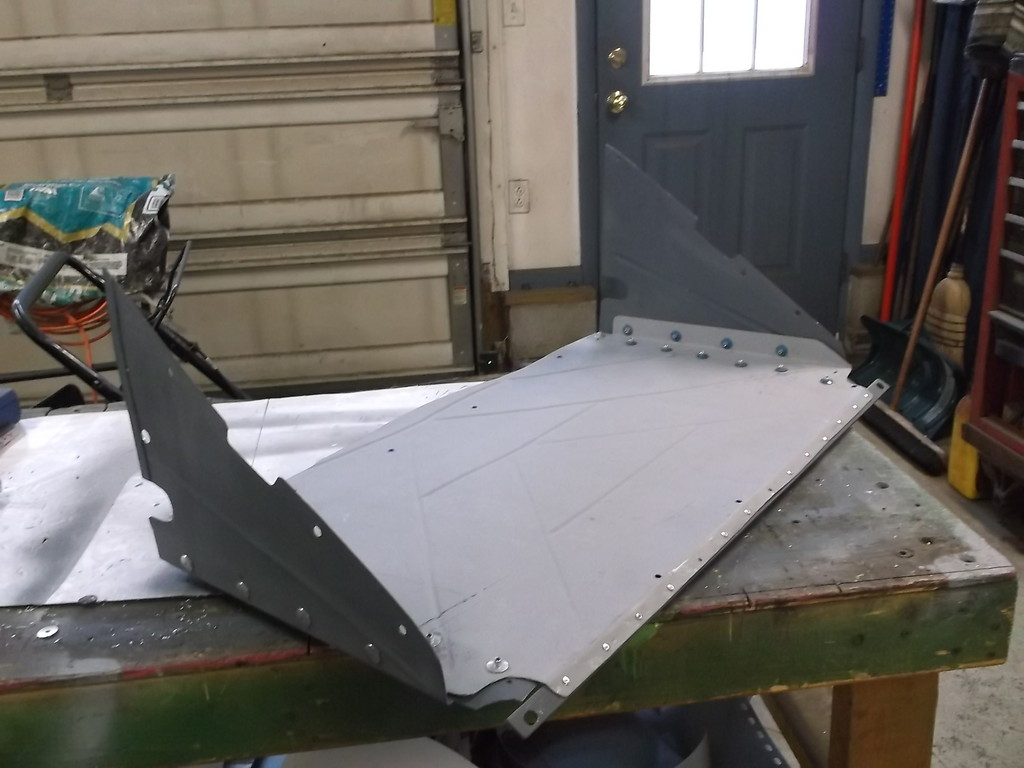
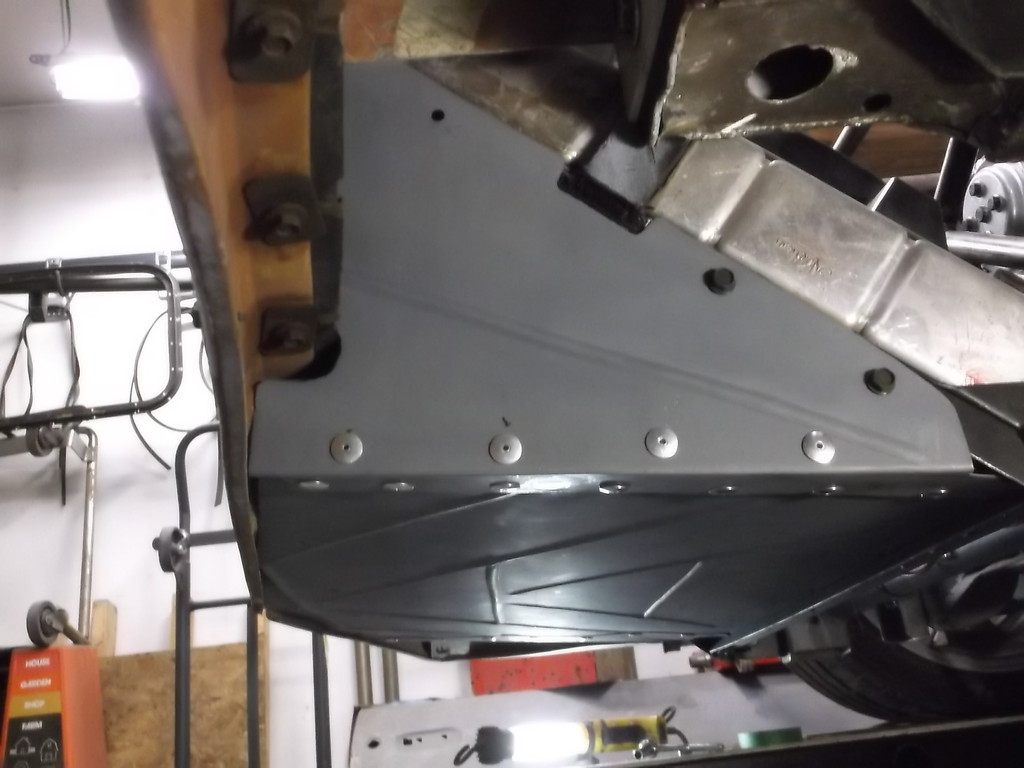
Fuel system is all plumbed in. I wanted to do it all in -8 braided teflon hose (PTFE) but because money is tight we used what was available. Main pressure and return lines are -6 ptfe hose donated by a local third gen owner. All plumbing at the tank and pump is -6 push-lock hose, and hose from regulator to carb is -6 rubber lined braided stainless. Both fuel filters are 40 micron. Fuel lines are routed through interior due to lack of room under car. Also main lines pass through front and rear firewalls by use of grommets and not bulkhead connectors. Doing this cut out 12 additional fittings.
under hood:
regulator and firewall pass through
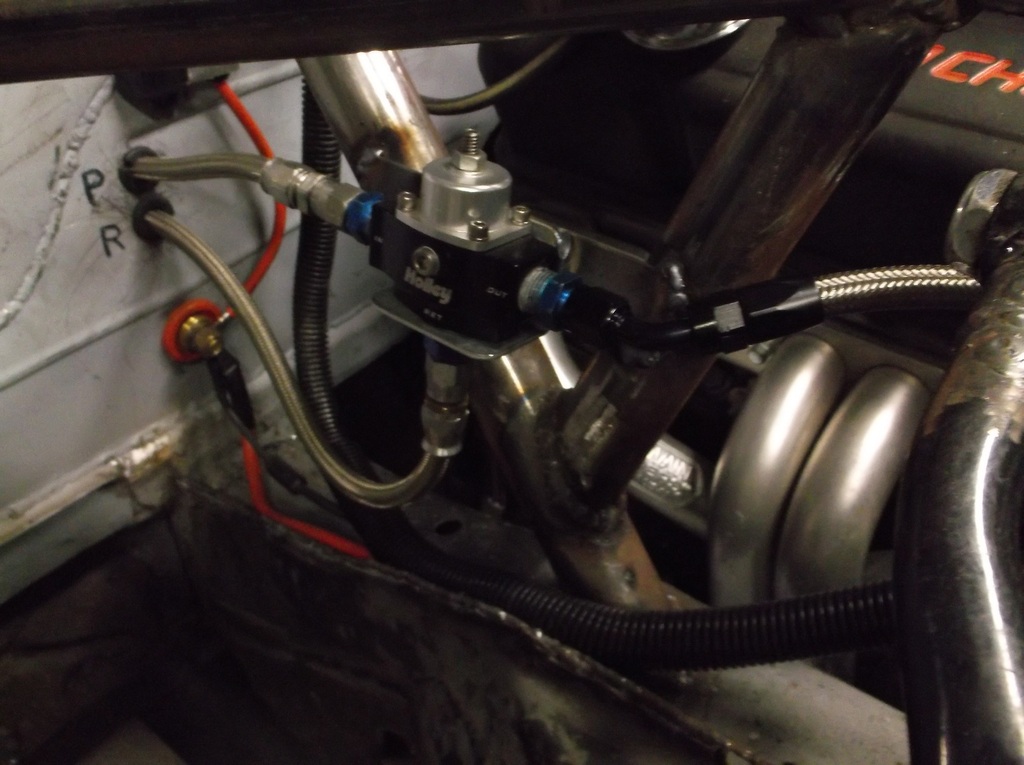
regulator to carb routing
interior view front firewall pass through.
fuel lines run along floor at door pinch weld.
rear firewall pass through
view from under car
Fuel cell is plumbed so that the pump feed line and return line can be removed from front of tank. Much easier than trying to attach/detach from top of tank.

Pump is mounted to outside of spare tire well between well and fuel cell.
Not to clear but this is filter before pump and is mounted to frame rail.
The fuel cell can be removed without disturbing pump or filter, or having to move or remove any suspension or exhaust parts. Try that with a stock tank.

fuel pump wired in. it will run from ignition switch or the switch panel behind left headlight. relay is mounted on rear firewall behind passenger seat.

Fuel system is all plumbed in. I wanted to do it all in -8 braided teflon hose (PTFE) but because money is tight we used what was available. Main pressure and return lines are -6 ptfe hose donated by a local third gen owner. All plumbing at the tank and pump is -6 push-lock hose, and hose from regulator to carb is -6 rubber lined braided stainless. Both fuel filters are 40 micron. Fuel lines are routed through interior due to lack of room under car. Also main lines pass through front and rear firewalls by use of grommets and not bulkhead connectors. Doing this cut out 12 additional fittings.
under hood:
regulator and firewall pass through

regulator to carb routing

interior view front firewall pass through.

fuel lines run along floor at door pinch weld.
rear firewall pass through

view from under car

Fuel cell is plumbed so that the pump feed line and return line can be removed from front of tank. Much easier than trying to attach/detach from top of tank.


Pump is mounted to outside of spare tire well between well and fuel cell.

Not to clear but this is filter before pump and is mounted to frame rail.

The fuel cell can be removed without disturbing pump or filter, or having to move or remove any suspension or exhaust parts. Try that with a stock tank.
09-08-2016, 08:25 PM
#505
Supreme Member

iTrader: (11)

Join Date: Sep 1999
Location: NJ
Posts: 4,345
Received 298 Likes
on
234 Posts
Car: 92 Firebird
Engine: 4.8 LR4
Transmission: T56
Axle/Gears: 3.45 9 Bolt
Re: Home brew road racer
Don't you need to have the fuel lines sectioned off from the passenger compartment for most race sanctioning bodies?
09-08-2016, 10:14 PM
#506
Re: Home brew road racer
Ok, we got great news and a little bad news. The great news is that the engine starts and runs well. It sounds fantastic!!!! Also I got the hydraulic clutch bled out and can shift through the gears and make the rear tires spin. Yes, I am grinning ear to ear!!
But it didn't go very smooth at first. Last night I did a bolt check front to rear on the car going over every suspension and drive train fastener. I even double checked the hose clamps and P/S hose fittings. The radiator has been full for a couple weeks now and also the P/S reservoir. I had extra coolant on hand and as well as P/S fluid to top them off once the systems had bled out.
So what could go wrong? Apparently a lot by looking at the mess on my garage floor.
1. Shortly after the engine started I had P/S fluid leaking at the rack. I checked the hose fittings but not the hard lines. Tightened the hard line fittings and refilled reservoir.
2. restarted engine, raised idle to 2200 rpm and started looking for any leaks or other problems. I noticed that the upper radiator hose seemed to have a lot of pressure in it. I thought it might be because of the 24psi rad cap I am using. A few minutes later the hose popped off one of my stainless tubing splices and dumped very hot water all over the garage floor. Thank goodness the hose was pointing down.
I squeegeed the floor, double clamped the hose, slowly refilled the radiator and restarted the engine with the radiator cap off this time. In a very short time the engine started to push large quantities of water out of the remote filler and if water wasn't spewing out steam was. To make matters worse the electric fan turned on and sprayed the water all over the engine compartment. I kept trying to dribble in some water hoping that the trapped air was out and I could refill the system but it just kept pushing more water out.
I shut the engine off, and squeegeed the floor again. I wiped down the engine compartment, the fenders and windshield. Convinced there was trapped air in the cooling system I removed the 1/2" pipe plug in the intake manifold next to the thermostat housing. Again, and very slowly, I refilled the cooling system with water until it started to run out of the hole in the intake.
Oh, did I mention that I have no running water in my garage and had to go outside during a thunderstorm to refill my water jugs? This IS fun right???
Anyway refilling the system with the pipe plug out I was sure that bled out all the air, EXCEPT, that is how I filled the cooling system the first time. I restarted the engine, let it run a few minutes and just like "Old Faithful" I had a steaming geyser again. Kill the engine, squeegee the floor again, think, think think.
The radiator is leaned forward at about a 45 degree angle with the top just about as high as the shaft of the water pump. with the radiator so low and the remote fill and the pipe plug in the intake so much higher I ASUMED that any air in the radiator would naturally bleed out as the system filled. After looking at the radiator for a few minutes I realized that the water going in the radiator wasn't filling the radiator but running down inside the left tank, across through the core and out the lower hose to the water pump and in to the engine block. As the block filled the level in the radiator rose as well, but filling from the bottom up it was trapping a large amount of air in the top half of the core.
This radiator has a 1/4" pipe plug near the top of the right hand tank. I removed that and filled the radiator again until water trickled out. I put the plug back in and continued filling the cooling system with the pipe plug from the intake manifold removed. I added water slowly till water trickled from the port in the intake. I reinstalled the plug and added water until it just reached the remote fill. I put the cap on loose and restarted the engine.
Finally no more eruptions. I removed the cap and water was flowing quickly through the upper hose. I let it run several more minutes like that and then put the cap on tight.
3. The engine is running, the water is circulating and the electric fan is running. All looks good so I turn my attention to bleeding the P/S pump and rack. I reach inside the car, grab the wheel and just barely start to turn it and WOOSH!!!! power steering fluid is spraying everywhere. I shut the car off and take a look. All hoses are intact, all fittings are tight. So whats leaking. Turns out that the pressure and return hoses were reversed on the rack. The ports aren't marked so I referred to a 4th gen shop manual that I have to determine the locations. I guess you can't believe everything you read. Swapped the hoses, sprayed down the front left side of engine compartment with brake cleaner, and refilled the P/S.
4. Engine is running, coolant is circulating, fan is running and p/s is good. It is very hot and muggy outside, 88* with a 96* heat index. The car is idling at 1000 rpm and I am setting the timing. I notice the fan has switched from low speed to high speed. I get the initial timing set and notice the fan is turning much slower. I check the temp gauge and its at 235. I shut the car off and check the fuse for the fan. Its blown. I replace the fuse. Because the engine is so hot I restart it, turn the idle up to about 1500 rpm and ground the high speed sensor wire with a jumper wire. The fan is blowing like crazy and the temps start to come down. And just like that the fan slows down. Another blown 30 amp fuse.
I replace the fuse with a 30 amp circuit breaker and it goes out in a couple minutes. I replaced the circuit breaker with a heavy gauge jumper wire as I just wanted to get the engine cooled down. Restart the engine and fan is running full speed. within a few minutes though the alternator belt starts to squeal and there are a few wisp of smoke. The draw from the fan on high is causing the water and oil soaked v-belt to slip! I shut the engine down and called it a day.
I think the fan blowing the fuse is because the 12ga wiring and smallish ATO fuse are too small and cause resistance that eventually burn out the fuse. The fuse didn't blow out when the high speed circuit first kicked on when the amp draw was the highest but several minutes of run time later. I am going to replace it with a MAXI fuse similar to the one I used at the firewall to feed the fuse box and ignition.
So even though my garage floor is a slippery mess and the front of the car has been oiled down and pressure washed, and my fancy fan setup doesn't work right it was still a good day. Next up is mounting the rear brakes and plumbing the brake system. Once that is done I should be able to finally drive it off the ramps and out of the garage
09-09-2016, 10:58 AM
#508
Re: Home brew road racer
Per 2013 SCCA rule book "9.3.28. FUEL, OIL, AND WATER LINES
All fuel, oil, and water lines, including gauge and vent lines, that pass
into or through the driver/passenger compartment, shall be of steel tube
or metal braided hoses or bulkheaded. The driver shall not be exposed to
header tanks"
Also I have seen many SCCA, NASA and even NASCAR vehicles with the fuel lines run through the passenger compartment. NASCAR requires that the lines run through a metal conduit for an extra layer of protection. Where my lines run along the door opening they will be covered by a stainless steel cover that will be integrated into some custom door sill plates.
09-09-2016, 11:06 AM
#509
Re: Home brew road racer
84Z28dude, thanks for following along and reading that very long post. I really think putting in the MAXI fuse holder in place of the ATO fuse holder will solve the problem. The wire size of the ATO is just too small and also the filament int the ATO fuse is too small as well. Like mentioned in the post the fuse didn't "pop" when the high speed circuit turned on but blew out after several minutes of running so amp draw isn't the problem, resistance and heat are.
I picked up the fuse holder this morning and will install later today and we will see how it goes.
I picked up the fuse holder this morning and will install later today and we will see how it goes.

 09-21-2016, 12:22 PM
#512
Re: Home brew road racer
Tex, I appreciate you and all the other TGO members for following my build and and the interest and anticipation of seeing it on the ground and on the street. You wanting to see it completed helps keep me motivated to finish it after 6 long years. I am plumbing the brakes now and once that is done I can safely take it down off the ramps and move it around outside. I will have to reinstall the doors to get a good idea of how the car will look when finally finished and also to get some accurate readings when I scale the car. I will have to recruit a couple of buddies to help get those 95lb behemoths back on the car.
On a good note changing out the fuse holder for the electric fan to a MAXI fuse cured the problem of the fuse blowing. The standard ATO fuse holder had 12ga wire and the MAXI fuse uses 8ga. Same 30 amp rated fuse and fan has run for over 45 minutes with no problem.
On a bad note the stator windings in my 140 amp Powermaster alternator shorted out. That was what was causing the belt to slip. It is being repaired now and should be back on the car by the weekend. I am not sure if the problem was caused by it getting a little wet when I had the air lock problem with the radiator or not. Most of the water puked out in front and to the left side of the motor. Very little water sprayed on the right side where the alternator was mounted. Oh well, its getting fixed and hopefully I won't have anymore problems with it.
Thanks for following along and I will post pictures and a startup video as soon as I can.
Dave
09-21-2016, 01:00 PM
#513
Re: Home brew road racer
It is not often that members post about personal issues here. I think all of us that followed BlackTopKing's extensive build thread appreciated him sharing a little of the personal struggles he faced while building the car and his determination to overcome them.
Early Last year I found myself in a similar situation. A seemingly common sinus infection ended up aggravating a major nerve in my head and has caused me to have a severe, unrelenting headache since. Between the pain and the drugs used to treat it I was no longer able to perform my job duties and had to quit working. I have been home ever since as the severity of the headaches force me to lie down during the day a few days every week.
Getting out to work on the car is hard as is concentrating on what I am doing when I am out there. Continuing progress on the car and wanting to see it finished is one of my main sources of motivation right now and the interest all of you show in my progress helps keep me going.
I often think of BTK's struggles and his determination to fight through them. In some of the lasts post I read from him he had gotten a promotion, relocated and sold the Warbird. He said things were finally looking better and we all hope his good fortunes continue. I too will keep pushing on with the hope that things will get better.
Again, thanks for following along.
Dave
09-21-2016, 05:01 PM
#514
Supreme Member
iTrader: (11)
Join Date: Sep 1999
Location: NJ
Posts: 4,345
Received 298 Likes
on
234 Posts
Car: 92 Firebird
Engine: 4.8 LR4
Transmission: T56
Axle/Gears: 3.45 9 Bolt
Re: Home brew road racer
Good luck with your sinus issue. I know it's no fun doing anything, much less working on projects, when you don't fell right
09-26-2016, 11:45 AM
#515
Re: Home brew road racer
Scooter, thank you for your concern. The sinus issue is minor compared to the aggravated trigeminal nerve. Going to see about a procedure called "peripheral nerve block", where they inject a numbing agent directly in to the nerve. Its a little risky but I have pretty much run out of options.
09-26-2016, 01:53 PM
#516
Re: Home brew road racer
I got the alternator back after the electrical shop replaced the rectifier and ran the car again. Everything was working fine until I triggered the high speed circuit on the cooling fan. Blew the alternator again! @#!&%!!!.
After doing some research on the web I found a wiring schematic of the fan circuit for a 1999 Grand Marquis. The low speed side runs off a 30 amp fuse and relay BUT the high speed side runs through a 50 amp fuse and relay. Even though I am not blowing the 30 amp maxi fuse when running the fan on high I have to think the Volvo fan controller, which is rated at 30 amps for both low and High speeds, is creating a large amount of resistance in the high speed circuit. I think this is causing the amp draw on the alternator to go through the roof.
I do have a video of the engine running and the exhaust sound but the file size if ginormous (really big). I cut it down in a video editor app but still way to large to post here. Any tips to resize so I can post would be appreciated.
10-04-2016, 11:01 AM
#518
Re: Home brew road racer
Thanks for the suggestion. Please excuse the wandering camera views as I was more focused on getting the exhaust audio. The dash video is showing oil pressure at 40psi and temp is 175*. The fan is running on low speed. You can also see in engine pis that there is no alternator belt.
Here is video link. https://www.youtube.com/channel/UCeu...pLF0iYnRv6wavw
Here is video link. https://www.youtube.com/channel/UCeu...pLF0iYnRv6wavw
10-04-2016, 11:09 AM
#519
Re: Home brew road racer
Another update. No pics but I did get the brakes all plumbed and bled out. Except for a working alternator the car should be driveable. I may take it for a spin around the neighborhood this weekend running on a freshly charged battery. I'll get the alternator repaired again next week and the fans rewired with the proper size relays.
I can't believe I just said I was making plans to drive the car this weekend. That will be a milestone!!!!! Even if it is just a couple laps around the block to check brake, steering and clutch function I'll be stoked.
I can't believe I just said I was making plans to drive the car this weekend. That will be a milestone!!!!! Even if it is just a couple laps around the block to check brake, steering and clutch function I'll be stoked.
10-10-2016, 03:21 PM
#520
Re: Home brew road racer
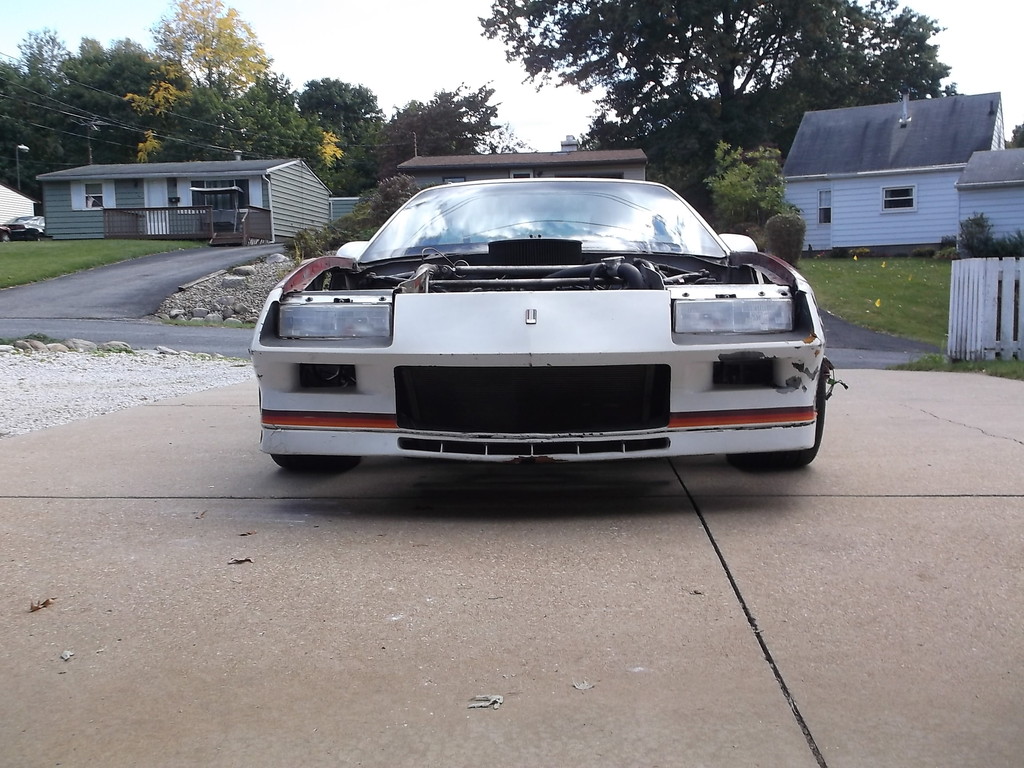
IT LIVES!!!!!!!!
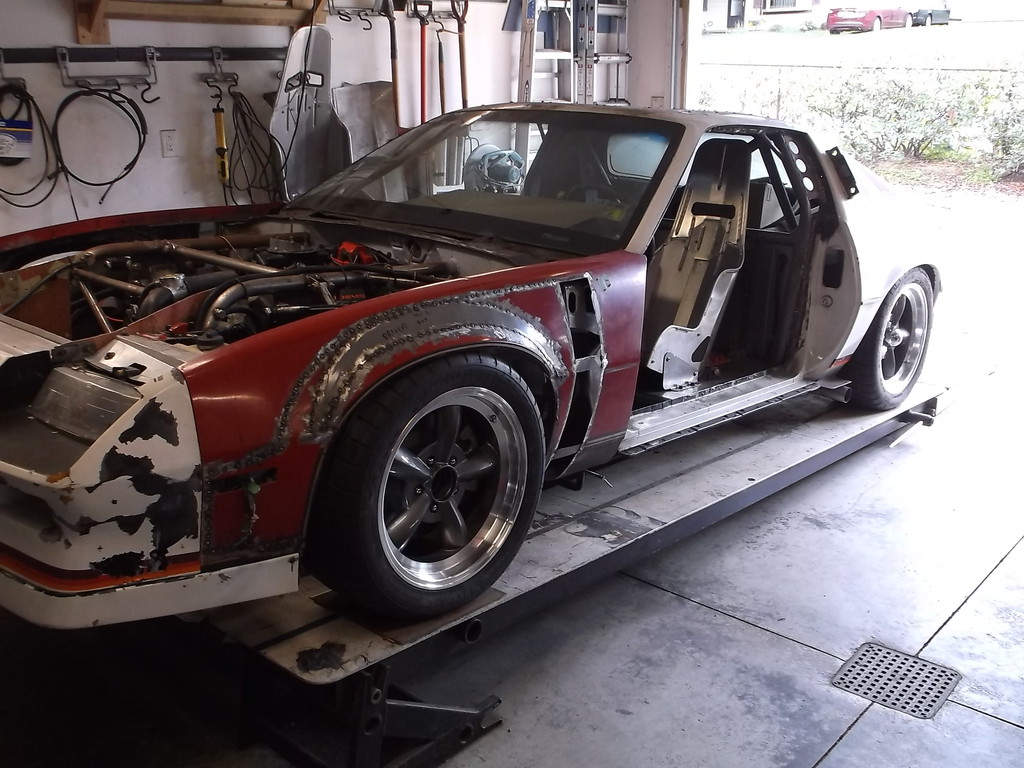
I think for the first time in this build thread I have predicted the car would come down off the ramps on a certain day or weekend and it actually happened. Yesterday, for the first time in nearly 6 years my Camaro left the garage and did it under its own power. What a sense of accomplishment it was to have the engine roar to life, the trans slip into reverse and with a little throttle and clutch, move the car out into the driveway. It is certainly no finished project by far but a giant leap forward and a big boost in my moral and motivation.
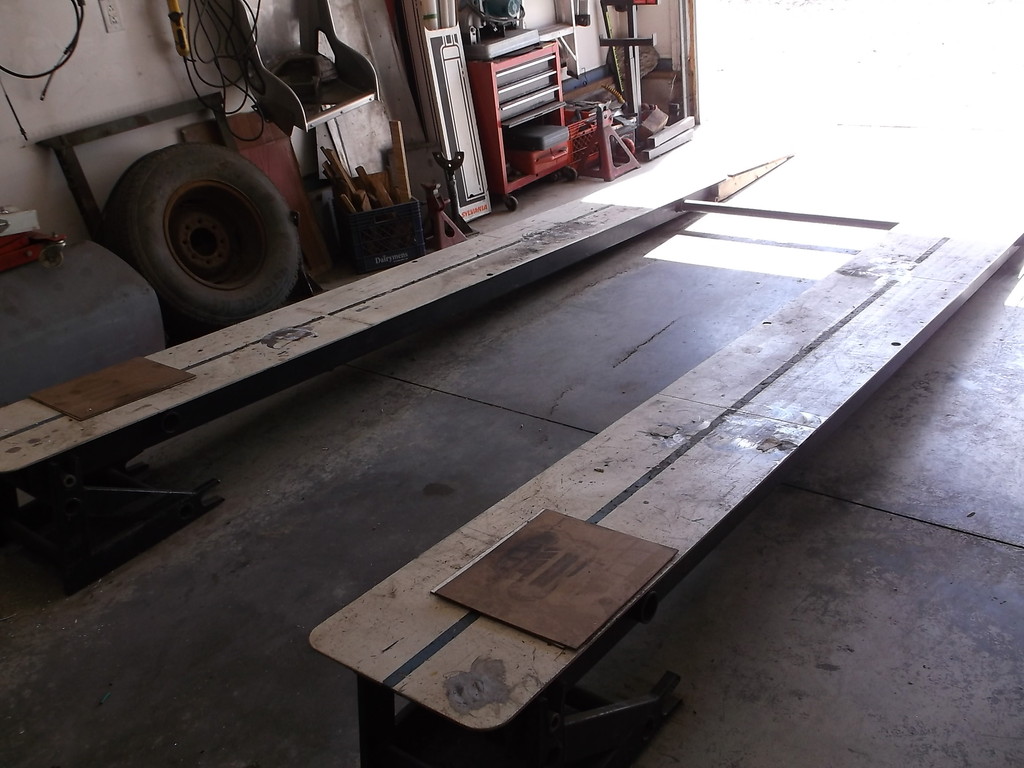
1st I had to get it off the ramps. I insert a lift bar into both ramps and raise the rear of the ramps high enough to remove the triangular stands.
Lower the back half of the ramps to the floor and slide in some wooden ramp extensions.
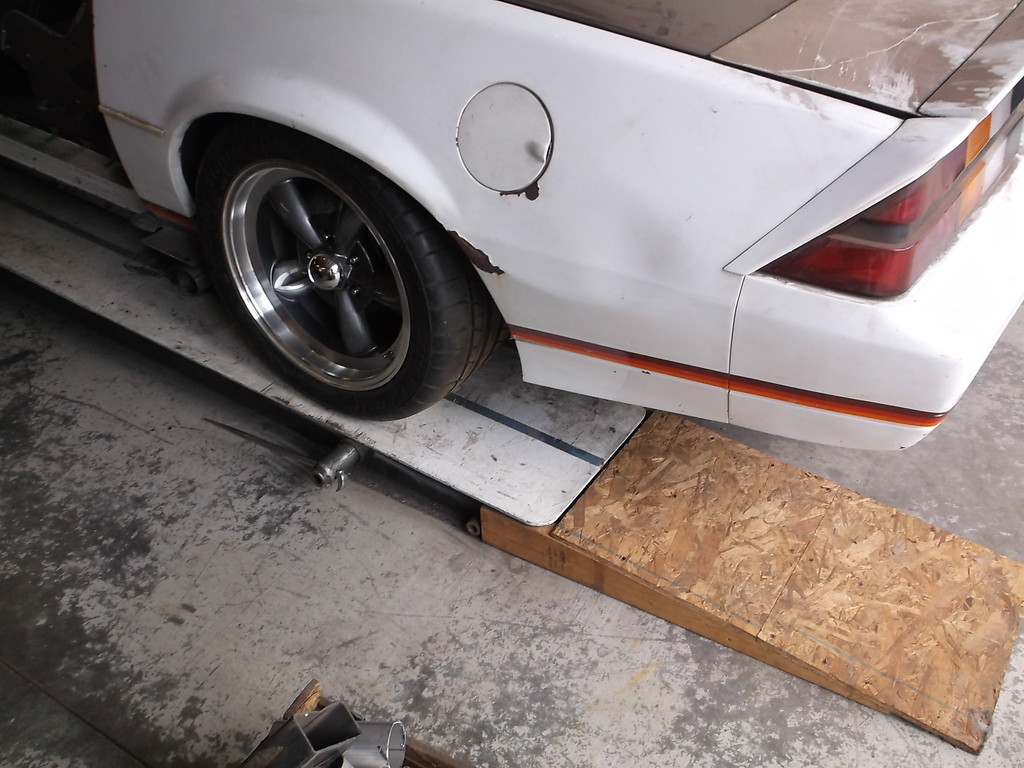
...and drive the car off. Actually it coasted down and out of the garage.
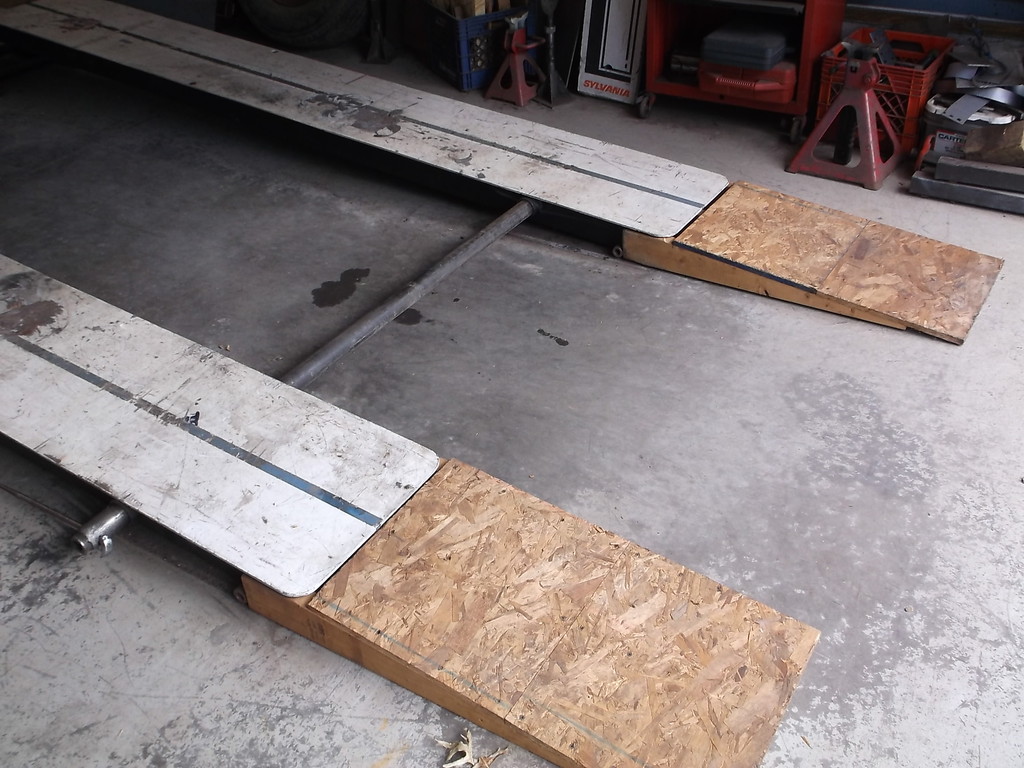
The ramps are only at a 4.5 degree angle so even a car with very low ground clearance can get on and off without scraping the spoiler/splitter.
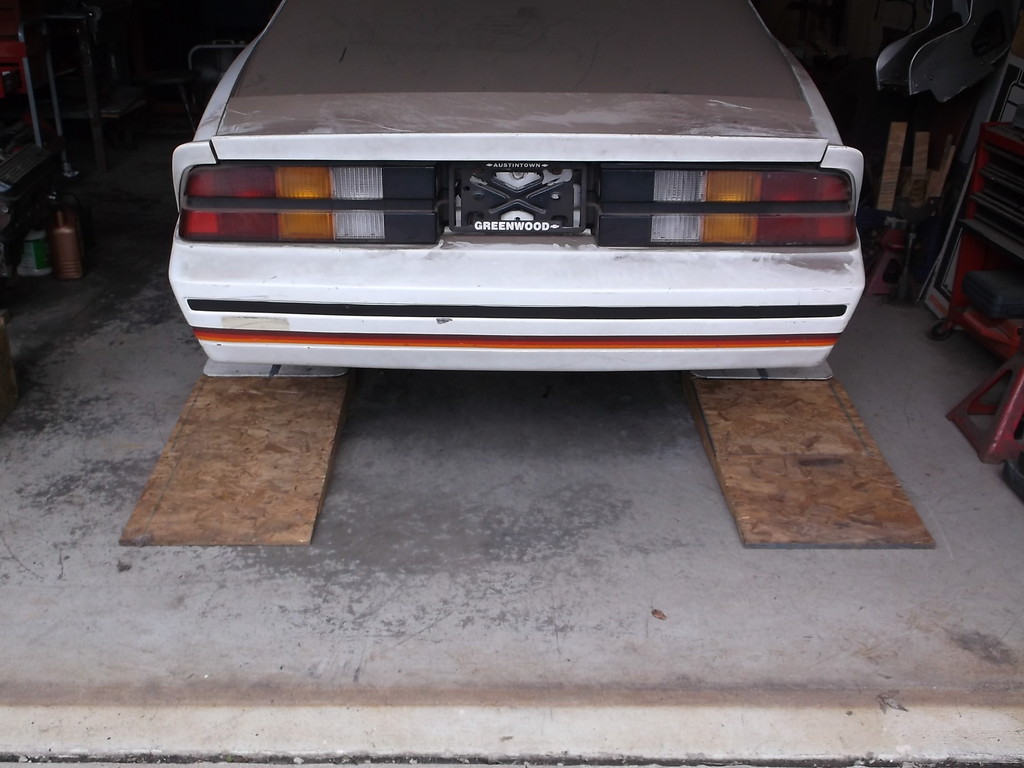
Out in the driveway. I was having some friends come and help install the doors and had to get the heavy accumulation of dirt off the back of the car.
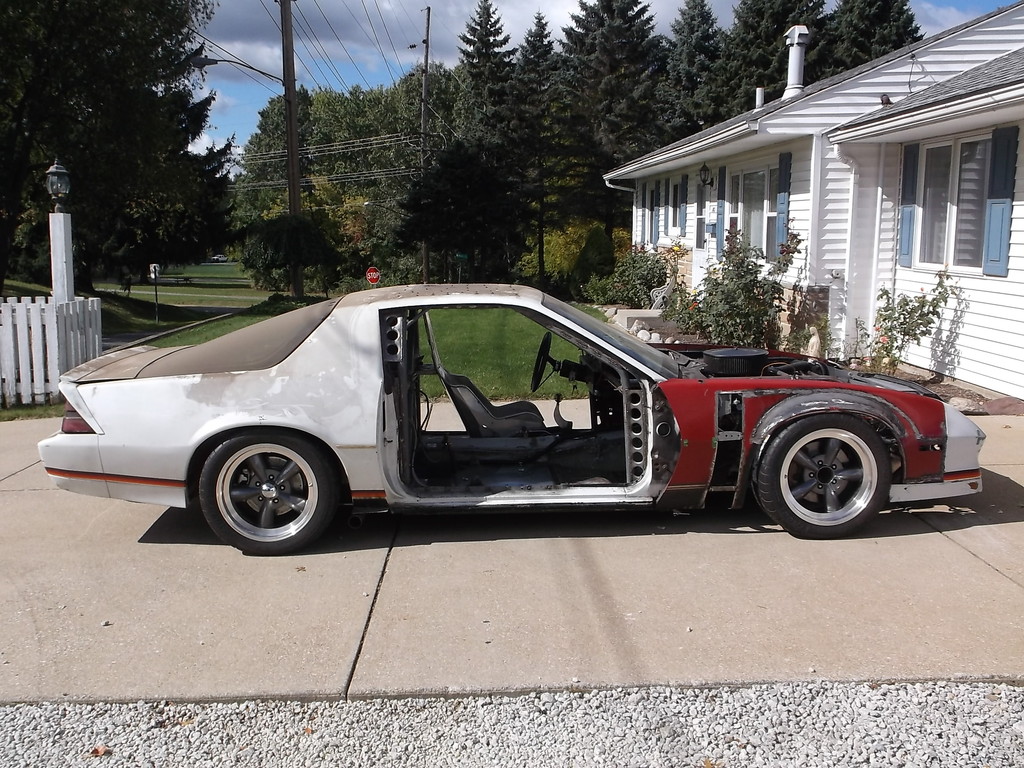
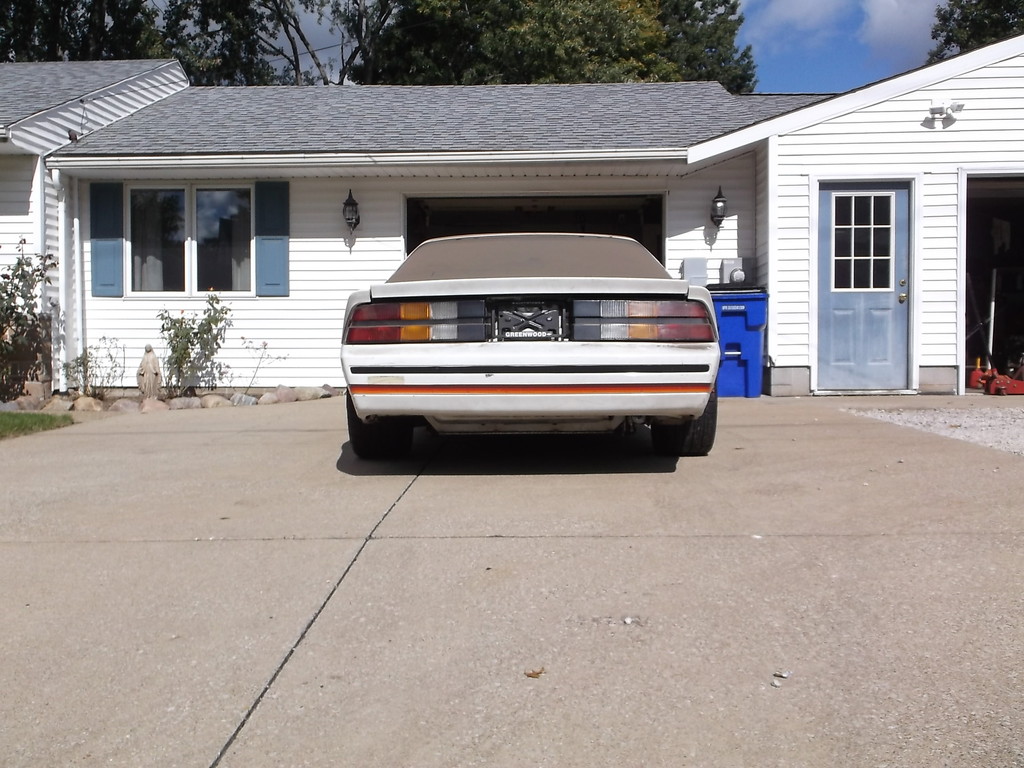
The car came out of the garage to the right in the picture above and all the turning back and forth to get it on the cement driveway really helped settle the suspension. The ground clearance on the ramps had been 5" front/6" rear but was now 3 3/4" f and 4 1/4" r.
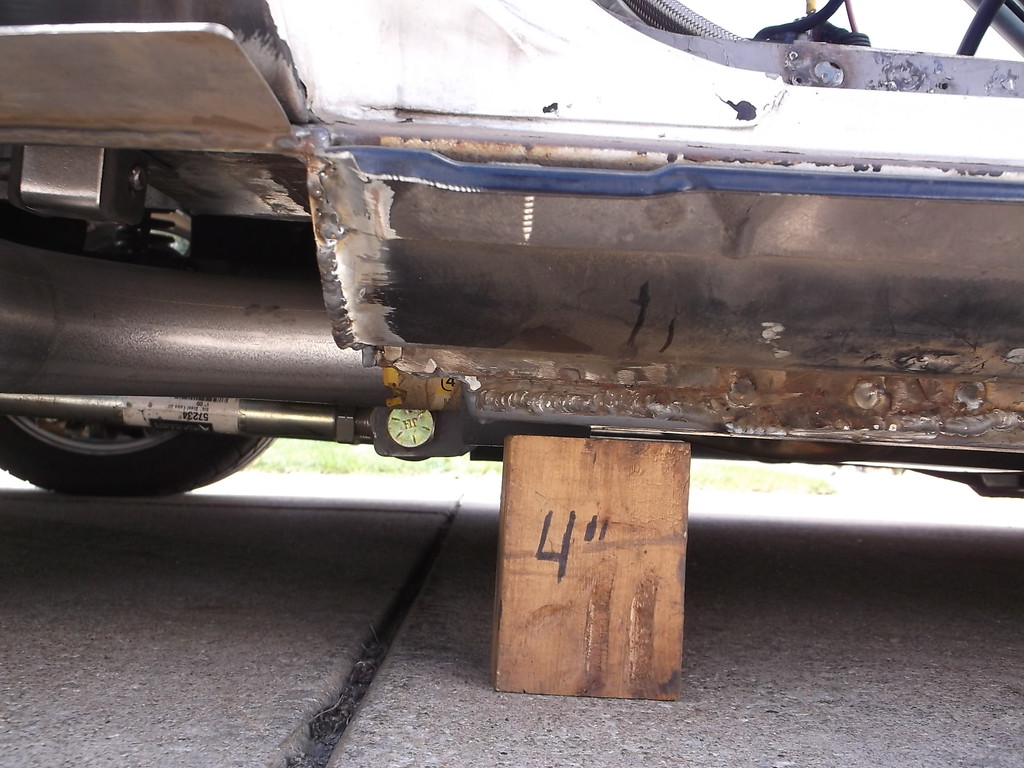
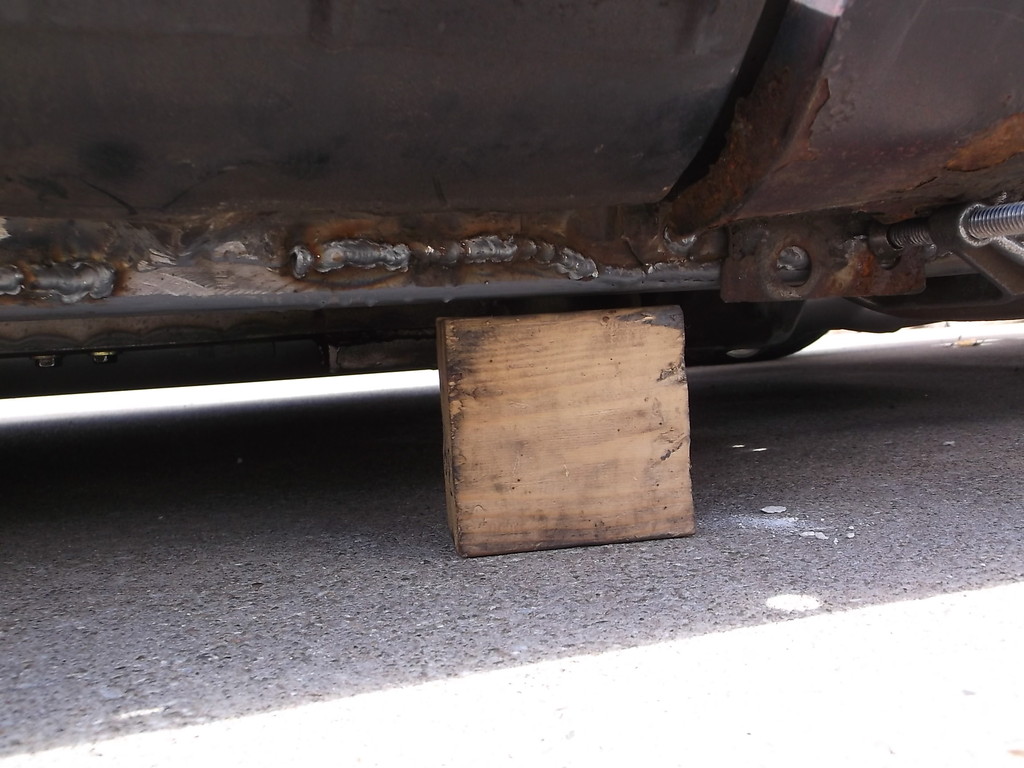
Still nothing under the car was close to dragging on the ground!
I think for the first time in this build thread I have predicted the car would come down off the ramps on a certain day or weekend and it actually happened. Yesterday, for the first time in nearly 6 years my Camaro left the garage and did it under its own power. What a sense of accomplishment it was to have the engine roar to life, the trans slip into reverse and with a little throttle and clutch, move the car out into the driveway. It is certainly no finished project by far but a giant leap forward and a big boost in my moral and motivation.
1st I had to get it off the ramps. I insert a lift bar into both ramps and raise the rear of the ramps high enough to remove the triangular stands.

Lower the back half of the ramps to the floor and slide in some wooden ramp extensions.


...and drive the car off. Actually it coasted down and out of the garage.
The ramps are only at a 4.5 degree angle so even a car with very low ground clearance can get on and off without scraping the spoiler/splitter.


Out in the driveway. I was having some friends come and help install the doors and had to get the heavy accumulation of dirt off the back of the car.


The car came out of the garage to the right in the picture above and all the turning back and forth to get it on the cement driveway really helped settle the suspension. The ground clearance on the ramps had been 5" front/6" rear but was now 3 3/4" f and 4 1/4" r.


Still nothing under the car was close to dragging on the ground!
10-10-2016, 04:21 PM
#521
Re: Home brew road racer
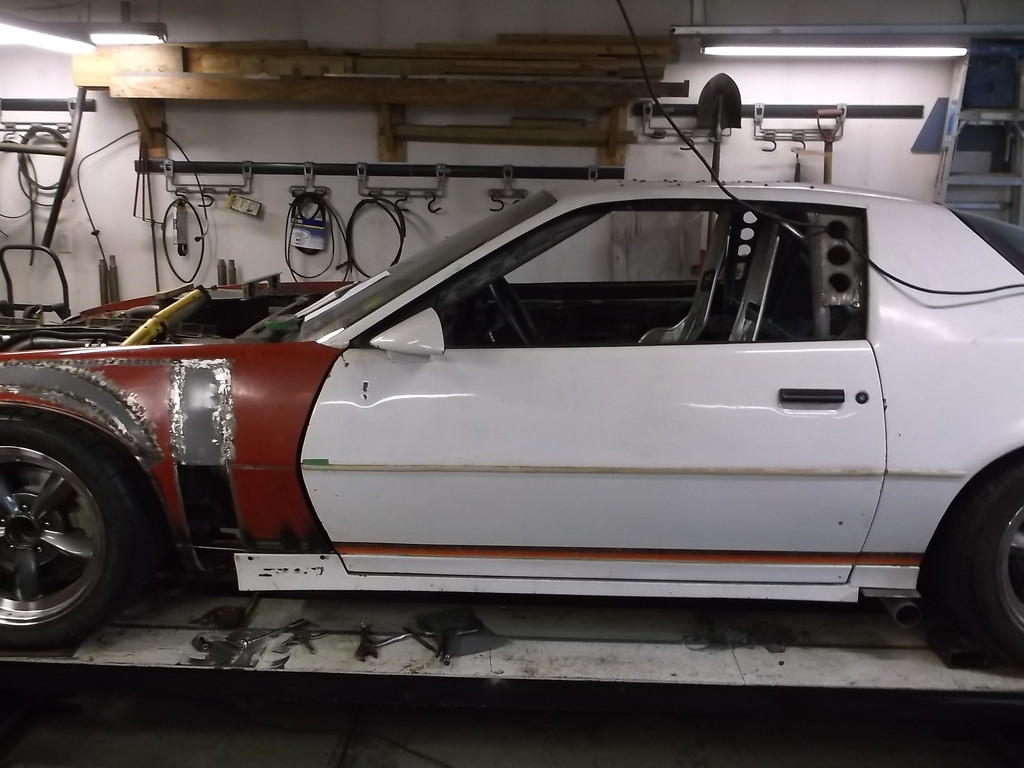
So fellow 3rd gen owner Devan and my neighbor Craig came over and with the use of the engine hoist we got the doors on. It is starting to look like a car again.
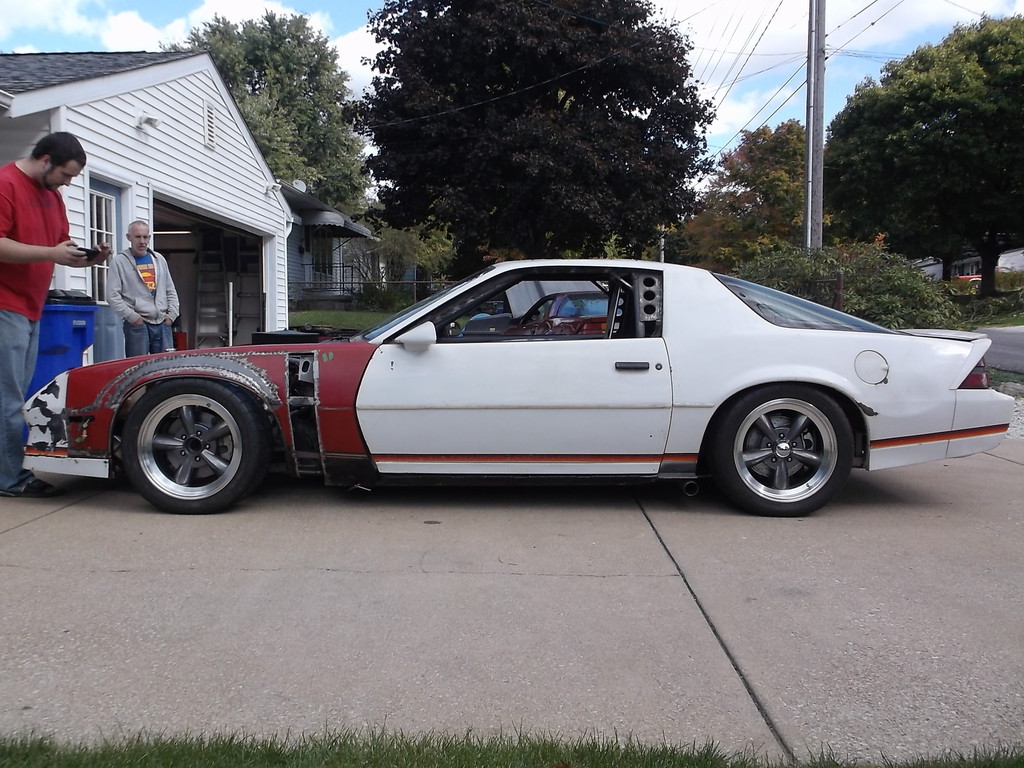
Devan is the big guy in the red shirt. He is about 6'3". Still the roofline looks very low. I placed a 4' level on the high spot of the roof and Devon measured it out at 47 1/4". when I reset the ride height car should be right about 48" tall.

I couldn't wait to get it out on the street. I bolted in the passenger seat and told Craig to hop in. I backed out onto the street and after getting it pointed straight I rapped the throttle pretty hard. The rear of the car squatted down quite a bit, the tires spun, car turned half sideways and then took off like a rocket! I backed out of it several houses down and made it to the end of the street. A short (and slow) drive around the block got me set up for a return run. Another hard whack on the throttle and again the rear squatted down and took off. Much straighter this time.
Devon recorded what he could from the driveway and posted it to you tube. He only has the car leaving and not the return run but you can see the car squat and here the exhaust .
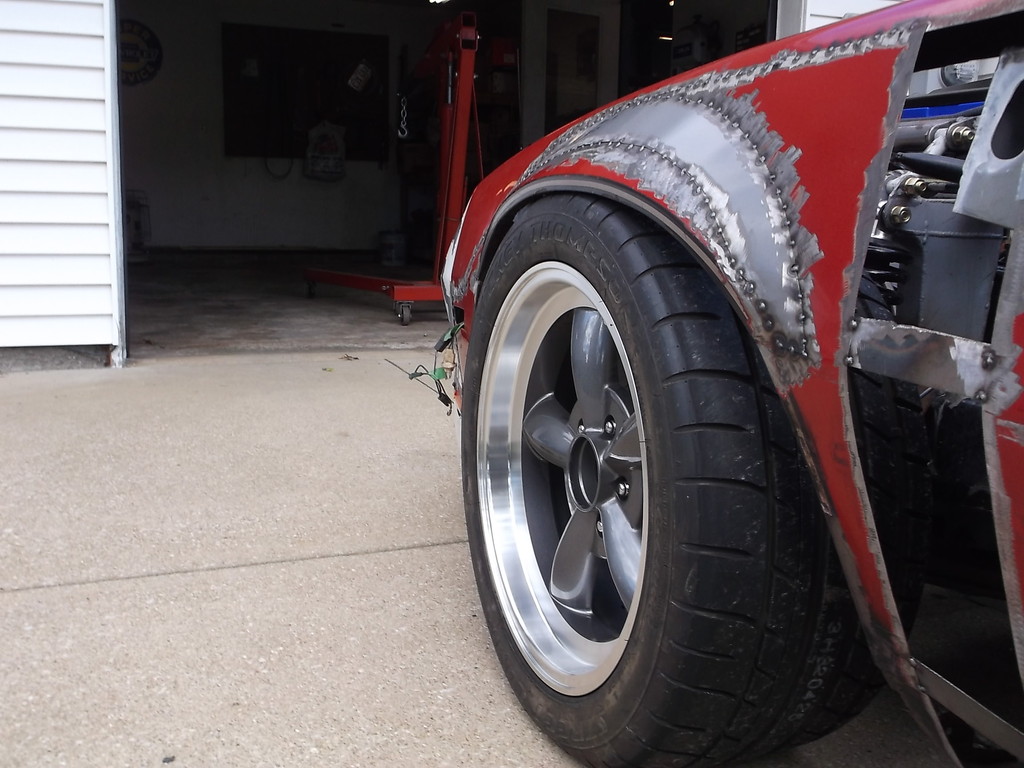
With the suspension settled and the rear squatting so much the right rear wheel lip came into contact with the tire and chewed up the upper part of the sidewall pretty good. It didn't cut or hurt the tire but its not very pretty. The left front also rubbed some so a few nicks on that tire too. Oh well it was worth the satisfaction of having it out on the road even if it was for only 5 minutes or so.
Other than the low ride height and the tire rub the car did really well. No leaks, the steering seems to work well and the brakes and clutch felt pretty normal. I was worried about a hard brake pedal but it felt so normal I didn't even think about it having manual breaks.
One more thing concerning the cooling fan... I replaced the Volvo fan controller with two 30 amp relays and one 70 amp relay. One of the thirty amp relays powers the low speed fan and the other is used to switch between the low and high relays. The two 30 amp relays are powered through a single inline 30 amp fuse and the high speed relay is powered by the 50 amp maxi fuse with 8 gauge lead wires. If anyone is interested I could draw up a schematic to show how to wire this up. It would work for most of the Ford/Mercury single, two speed fans (not dual fans).
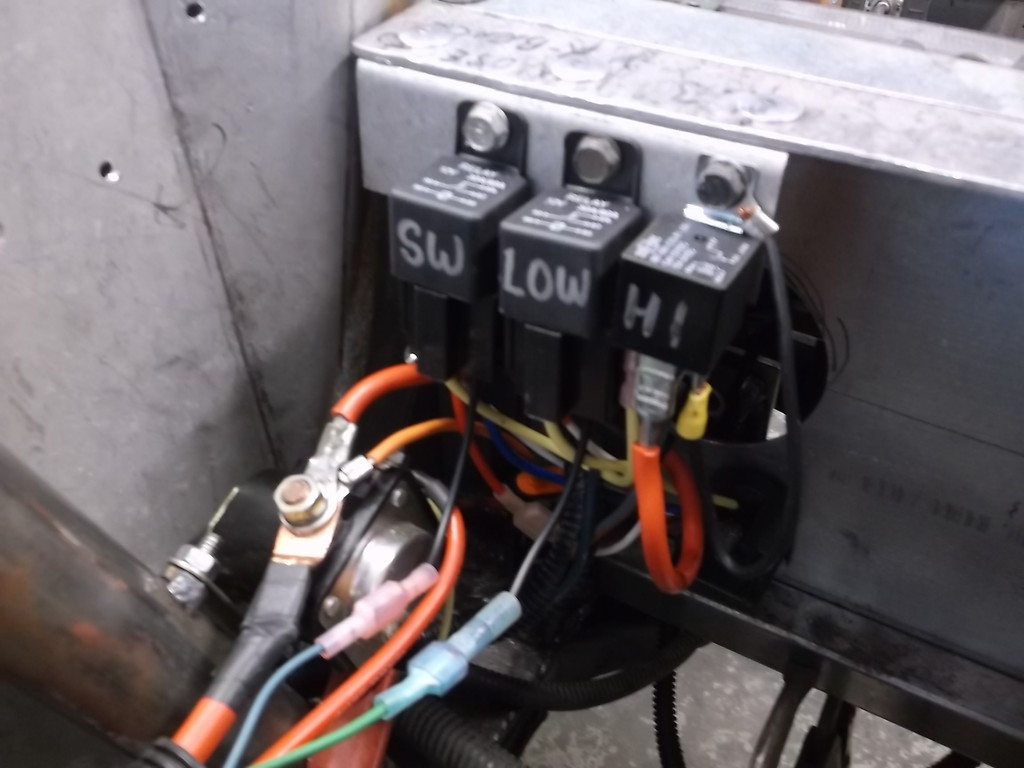
The switching relay turns off the low speed and turns on the high speed.

Devan is the big guy in the red shirt. He is about 6'3". Still the roofline looks very low. I placed a 4' level on the high spot of the roof and Devon measured it out at 47 1/4". when I reset the ride height car should be right about 48" tall.


I couldn't wait to get it out on the street. I bolted in the passenger seat and told Craig to hop in. I backed out onto the street and after getting it pointed straight I rapped the throttle pretty hard. The rear of the car squatted down quite a bit, the tires spun, car turned half sideways and then took off like a rocket! I backed out of it several houses down and made it to the end of the street. A short (and slow) drive around the block got me set up for a return run. Another hard whack on the throttle and again the rear squatted down and took off. Much straighter this time.
Devon recorded what he could from the driveway and posted it to you tube. He only has the car leaving and not the return run but you can see the car squat and here the exhaust .
With the suspension settled and the rear squatting so much the right rear wheel lip came into contact with the tire and chewed up the upper part of the sidewall pretty good. It didn't cut or hurt the tire but its not very pretty. The left front also rubbed some so a few nicks on that tire too. Oh well it was worth the satisfaction of having it out on the road even if it was for only 5 minutes or so.
Other than the low ride height and the tire rub the car did really well. No leaks, the steering seems to work well and the brakes and clutch felt pretty normal. I was worried about a hard brake pedal but it felt so normal I didn't even think about it having manual breaks.
One more thing concerning the cooling fan... I replaced the Volvo fan controller with two 30 amp relays and one 70 amp relay. One of the thirty amp relays powers the low speed fan and the other is used to switch between the low and high relays. The two 30 amp relays are powered through a single inline 30 amp fuse and the high speed relay is powered by the 50 amp maxi fuse with 8 gauge lead wires. If anyone is interested I could draw up a schematic to show how to wire this up. It would work for most of the Ford/Mercury single, two speed fans (not dual fans).

The switching relay turns off the low speed and turns on the high speed.
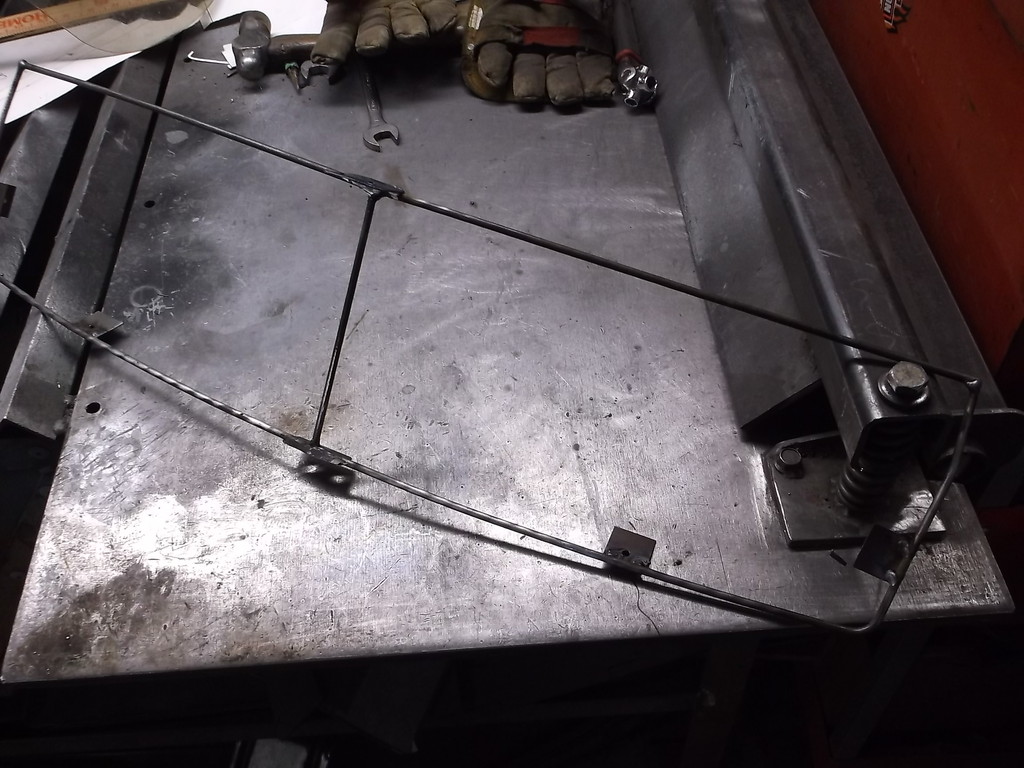
Last edited by 83RDRACR; 10-11-2016 at 04:31 PM. Reason: added pic of relays
10-11-2016, 04:27 PM
#524
Re: Home brew road racer
Scooter and 84Z28dude, thank you. It has been a long time coming.
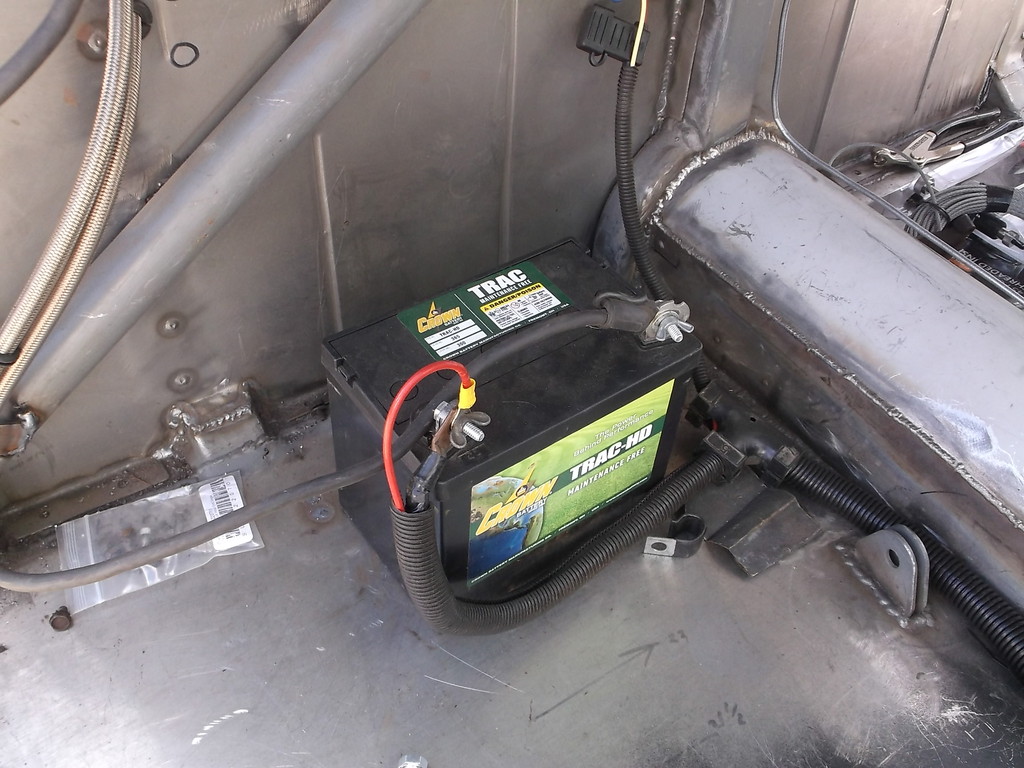
I forgot to mention in the previous post, I don't have a dedicated battery for the Z yet so I have been borrowing the one from my truck when I need to start the engine. If I am just doing electrical work I use an extra lawn tractor battery. In my excitement to get the car out of the garage I forgot to switch out the batteries. To my surprise the little 300 cca battery turned over a tight, 10.3:1 engine. If you listen to the video of the car starting in the driveway you can hear it grunt a little before the engine cranks.
I have the car back on the ramps and reset the ride height and centered the rear axle under the car. I will still have to roll all of the fender lips to keep from cutting into the sidewalls when the body rolls.
I am going to get the car on the scales in the next few days and see if my moving the front wheels forward 5" made a significant change in the front to rear weight distribution. At the beginning of this build thread, before I tore into the car, it weighed 3208lbs (no driver and minimal gas) with a perfect 60/40 split (1900f/1308r). I'm also curious as to the total weight. I put a lot of steel into this car but also removed a lot of weight. If I can keep the car at 3200 or less with a better weight distribution then I will have met my goals.
I forgot to mention in the previous post, I don't have a dedicated battery for the Z yet so I have been borrowing the one from my truck when I need to start the engine. If I am just doing electrical work I use an extra lawn tractor battery. In my excitement to get the car out of the garage I forgot to switch out the batteries. To my surprise the little 300 cca battery turned over a tight, 10.3:1 engine. If you listen to the video of the car starting in the driveway you can hear it grunt a little before the engine cranks.

I have the car back on the ramps and reset the ride height and centered the rear axle under the car. I will still have to roll all of the fender lips to keep from cutting into the sidewalls when the body rolls.
I am going to get the car on the scales in the next few days and see if my moving the front wheels forward 5" made a significant change in the front to rear weight distribution. At the beginning of this build thread, before I tore into the car, it weighed 3208lbs (no driver and minimal gas) with a perfect 60/40 split (1900f/1308r). I'm also curious as to the total weight. I put a lot of steel into this car but also removed a lot of weight. If I can keep the car at 3200 or less with a better weight distribution then I will have met my goals.
10-12-2016, 07:39 PM
#526
Re: Home brew road racer
tvc 15, thanks for the props. I am really pleased with the exhaust tone, it has more of a growl to it both at idle and under power. Before I get on about my car I have to ask how yours is doing. Any autox or track days in it? How do you like the R&P with the modified steering arms?
I put the car on the scales this afternoon and was very pleased with the numbers. With the addition of the 6" cowl hood and a full size battery and no driver, total weight was 3161lbs or about 47lbs lighter than what it weighed stock. Front weight was 1648 or 52.2% and rear was 1513 or 47.8%. When planning out this build I figured the best weight distribution I could attain was 52/48 but thought 56/44 was more realistic.
A quick side note; The battery I used to scale the car with weighs about 38lbs. I placed it behind the passenger seat where I planned to install it permanently. The car scaled at 53/47. I moved the battery back to the spare tire well and it improved the weight distribution to the numbers posted above. So moving the battery from the very front of the car to the very rear of the car is probably the best bang for the buck in terms of weight redistribution. I will be mounting the battery in the trunk.
Left and right side weights came out very close as well with left side at 1563 (49.4%) and right side at 1599 (50.5%). The separate front wheel weights were almost identical and on the rear the right side was heavy by about 30lbs (battery in the spare tire well?) which is good as it will offset some of the driver weight.
There is still a lot to do before the car is road worthy and much of that is on the front half of the car so the car will get heavier and most of the weight will be added to the front. I can offset most of the added weight by gutting out the doors and keep the total weight down. I am hopping to get them down to the 50lb range so that would be a 90lb savings. I will need to install door bars for side impact protection and the hybrid nascar style I have in mind will add 20 to 25lbs per side. I think when all is done the car will weigh around 3300 and have a 53/47 or 54/46 weight distribution. I can live with that.
10-12-2016, 09:45 PM
#527
Member

Join Date: Oct 2011
Location: Black Hills
Posts: 226
Likes: 0
Received 0 Likes
on
0 Posts
Car: 88 rs
Engine: ls1
Transmission: t56
Axle/Gears: moser 4:10
Re: Home brew road racer
My car steers very well with the R&P and shortened spindles. Something I didn't state on my R&P build was I also made the spindles pro ackerman. So now the inside tire turns tighter, but by doing that even with only 52% front weight the first thing to go is the tail. I think with better steering I need to be closer to 50-50. So I am starting a new car that will be more purpose built for the track. It will have major engine set back and some more hard core parts. Keep up the good work with yours, You're almost there.
10-16-2016, 12:02 PM
#528
Re: Home brew road racer
tvc 15, no offense but if you can't get the handling figured out on a car with 52/48 weight bias, I don't think you could make it work with a 50/50 car. Look at all the third gens that handle really well that still have close to stock weight distribution (60/40 or 58/42). It is all about balancing what grip you have, front to rear.
I am no expert at chassis tuning but due have some experience at it through my short track stock car racing. Some of the usual fixes for a loose rear condition is lighter rear sway bar and /or lighter rear springs. Or looking at the front you can go larger sway bar and/or higher rate springs. Shock valving and phb height are big factors as well. More test and tune, trial and error should get it more balanced. You didn't say if it is loose in or loose out, but loose in could be caused by something as simple as too much rear brake bias.
Anyway, it is great that you have been able to go out and actually drive and enjoy your car. I hope to be there next summer. I just reread your build thread and once more am in awe of your craftsmanship and fab skills.
Dave
The following users liked this post:
Tidan (05-18-2020)
10-17-2016, 07:53 PM
#529
Member
Join Date: Oct 2011
Location: Black Hills
Posts: 226
Likes: 0
Received 0 Likes
on
0 Posts
Car: 88 rs
Engine: ls1
Transmission: t56
Axle/Gears: moser 4:10
Re: Home brew road racer
You are correct about those fix's, and I have changed many things. In auto cross I have went with no rear sway bar, but it needs one for the track. I have tried many combos of springs, front and rear. On the track the car is faster than I am so I don't know what I'm complaining about. I would like to have someone with some racing experience drive it.
Last edited by tvc 15; 10-27-2016 at 11:55 PM.
10-28-2016, 07:14 PM
#531
Re: Home brew road racer
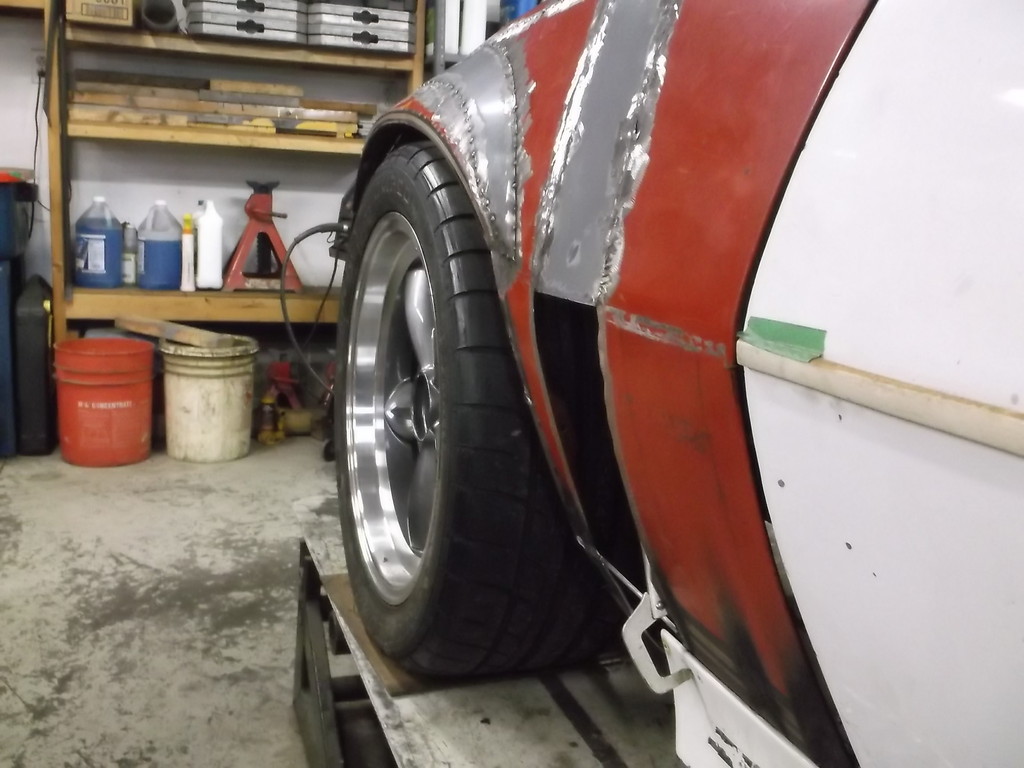
Tex, thanks again. I have been pondering what to do with the fenders as I want to vent engine compartment heat and under hood air out the side rather than the top of the hood. I did not want to put vents into the side of the fender and make the car look vetteish, but since the opening is already there I have had to give it a second look.
something like this....an aftermarket vent for 5th gen camaros
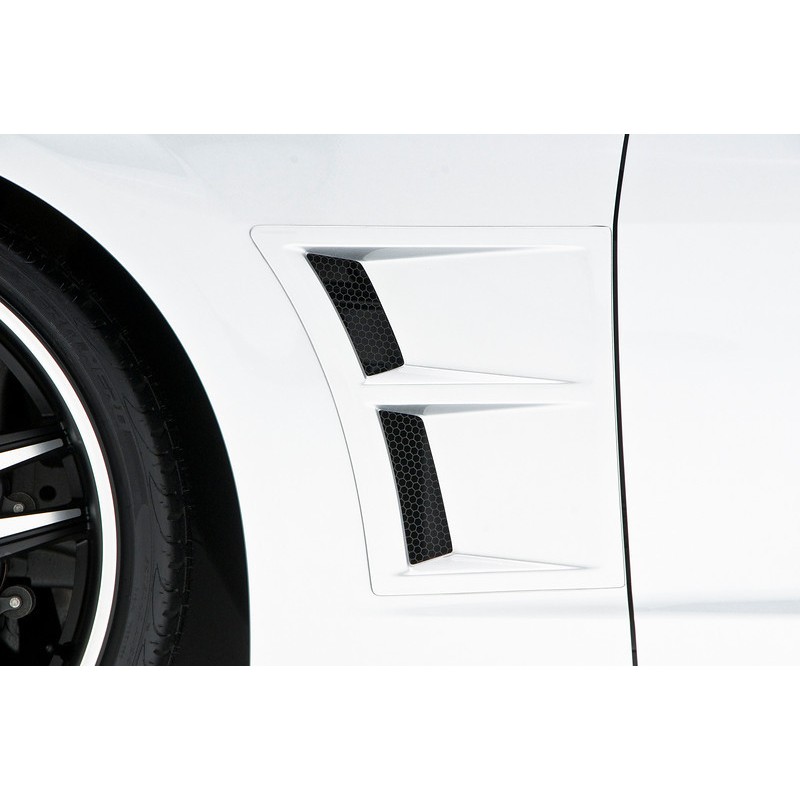
or cheap and simple...used side vents from 80-82 vette. These are about 2/3 the height of the camaro vent.
My preference would be to pull out the bottom half of the fender, behind the tire, and below the belt line, to be inline with the outer edge of fender flare. This would leave about a 3" gap between rear edge of fender and the inner "A" pillar below the belt line and just ahead of the door. A simple wire screen could cover the gap to keep tire and road debris from flying out. I think this type of vent would have a larger area to vent more air out and have a cleaner less cluttered appearance in the sideview.
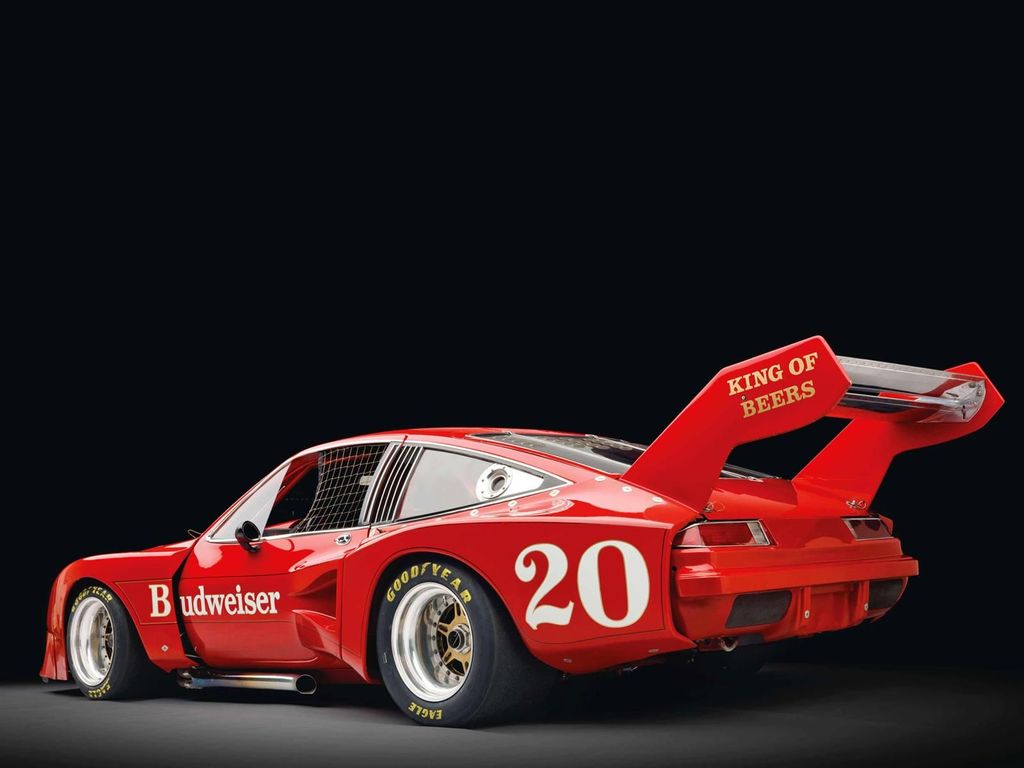
kind of like this IMSA Monza wide body, but a poor man's version
you guys let me know what you think as I have not decided yet.
something like this....an aftermarket vent for 5th gen camaros

or cheap and simple...used side vents from 80-82 vette. These are about 2/3 the height of the camaro vent.


My preference would be to pull out the bottom half of the fender, behind the tire, and below the belt line, to be inline with the outer edge of fender flare. This would leave about a 3" gap between rear edge of fender and the inner "A" pillar below the belt line and just ahead of the door. A simple wire screen could cover the gap to keep tire and road debris from flying out. I think this type of vent would have a larger area to vent more air out and have a cleaner less cluttered appearance in the sideview.
kind of like this IMSA Monza wide body, but a poor man's version

you guys let me know what you think as I have not decided yet.
10-29-2016, 06:51 PM
#532
Re: Home brew road racer
Keep the lower opening below the center door strip and back up the opening with a piece of metal that curves in to mask the hole but allows air flow. If you could mimic the curve of the front lower door and the wheel opening, I think it would blend well. It could be functional If the pressure is right at that point The Monza looks tough. Like your work.
11-10-2016, 05:39 PM
#533
Re: Home brew road racer
Tex, after pulling the bottom of the fender out, ala wide body, I decided it would make much more work to blend in with the OE gfx. I will keep the opening in the side of the fender but not sure of final location. I think it will be back more to the door.
I tied the spliced fender together using 3/16 rod I scarfed from some political yard signs. Gotta love election time. Anyway you can see that the back of the fender is close to original curve and matches up to the side gfx. The gfx will have to be extended.
3/16 wire welded to inside of fender.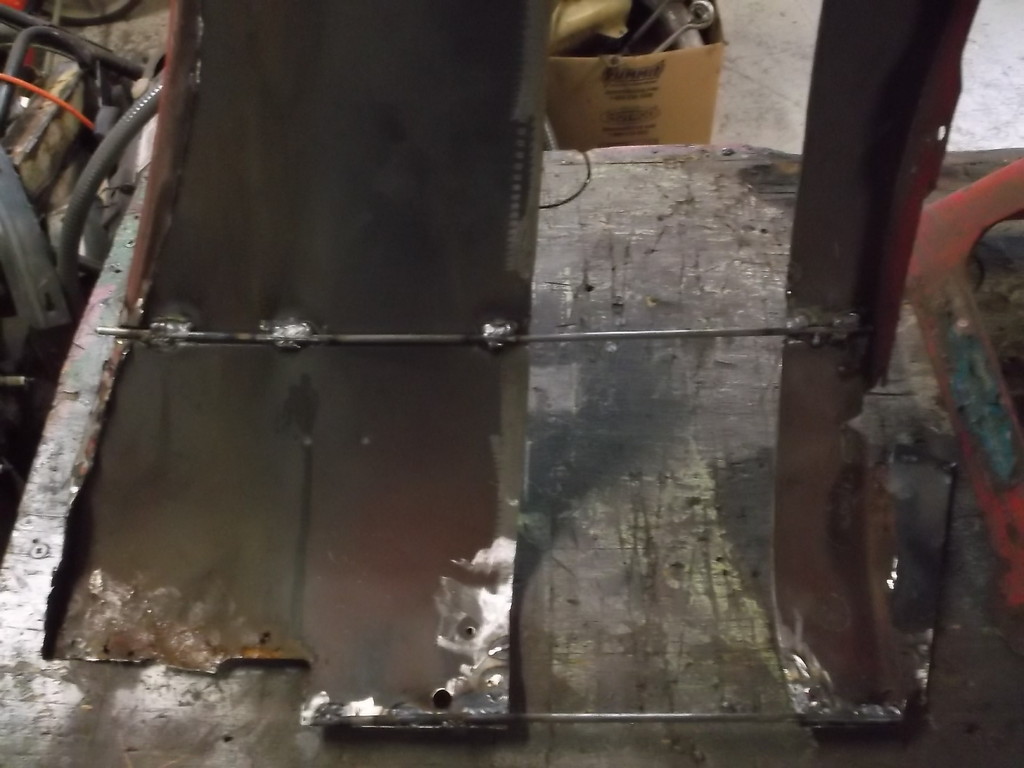
also used wire to make bracket to secure bottom o fender.

shape of front fender looking from rear.
And looking from front
fender and gfx match up.
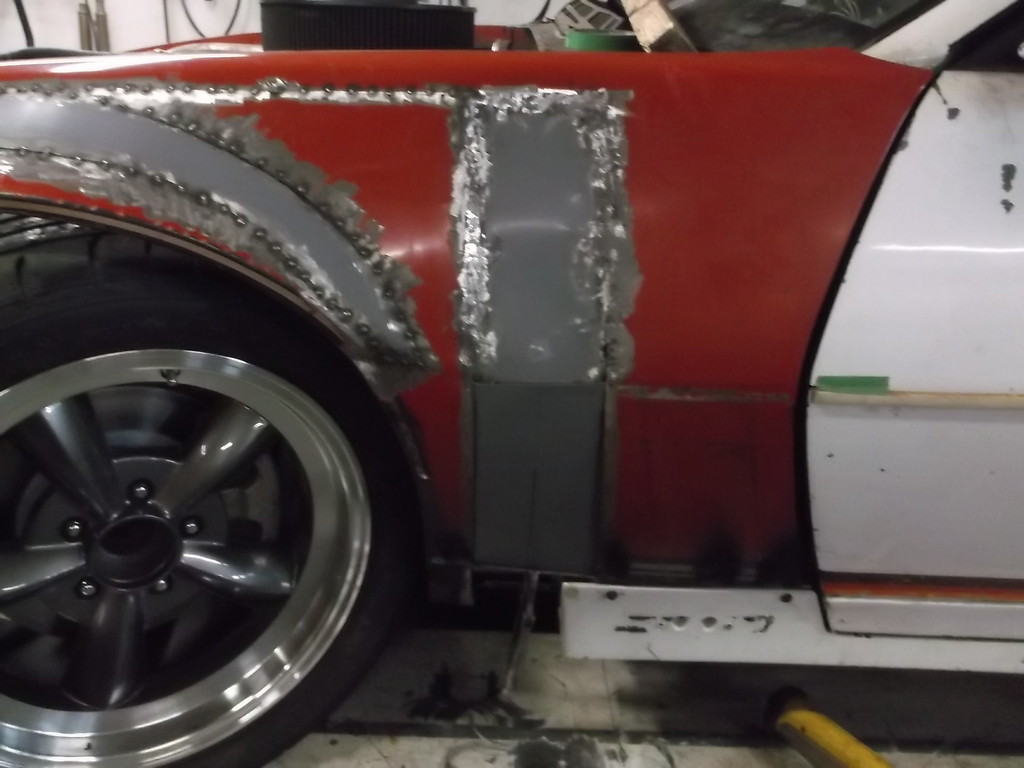
Also made upper and lower struts to hold front half of fender in position.
3/8 rod with 5/16 stud welded to one end. This bolts to 18ga bracket welded to inside of fender.
Other side of rod just slips into bracket on front cage strut bar.
Bottom rod is made from the OE cross bars in front of radiator. Bolts to lower radiator mount and OE hole at bottom of fender.
I tied the spliced fender together using 3/16 rod I scarfed from some political yard signs. Gotta love election time. Anyway you can see that the back of the fender is close to original curve and matches up to the side gfx. The gfx will have to be extended.
3/16 wire welded to inside of fender.

also used wire to make bracket to secure bottom o fender.

shape of front fender looking from rear.

And looking from front

fender and gfx match up.

Also made upper and lower struts to hold front half of fender in position.
3/8 rod with 5/16 stud welded to one end. This bolts to 18ga bracket welded to inside of fender.

Other side of rod just slips into bracket on front cage strut bar.

Bottom rod is made from the OE cross bars in front of radiator. Bolts to lower radiator mount and OE hole at bottom of fender.

 11-20-2016, 12:19 PM
#534
Re: Home brew road racer
worked a little more on the front fender mounts and gfx. Both fenders now secure and gfx fitted around exhaust.
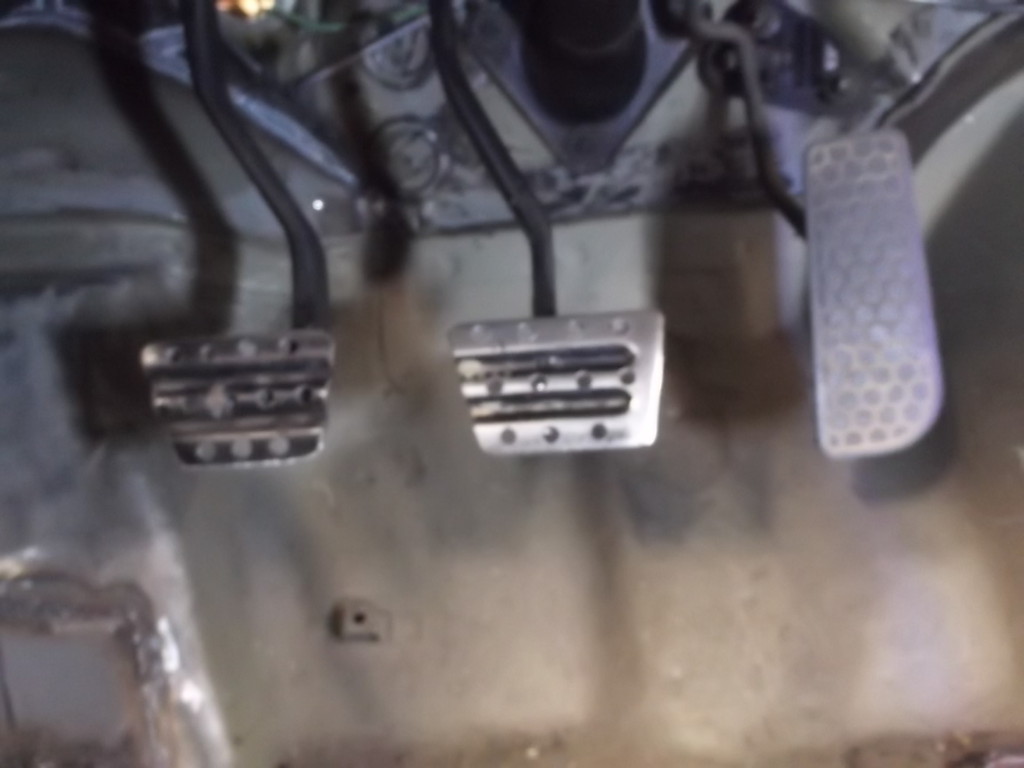
When I switched to manual brakes and clutch I set the pedals to far back to remount brake light switch as pedals stopped at end of switch retainer. The fix was to weld a 12mx1.25 nut to back of bracket. While the pedals and bracket were down for that I took opportunity to move clutch pedal pad 3/4" to left for more separation from brake pedal. Also drilled holes into both pads to enhance grip since no rubber pads on pedals.
relocated pedal pad
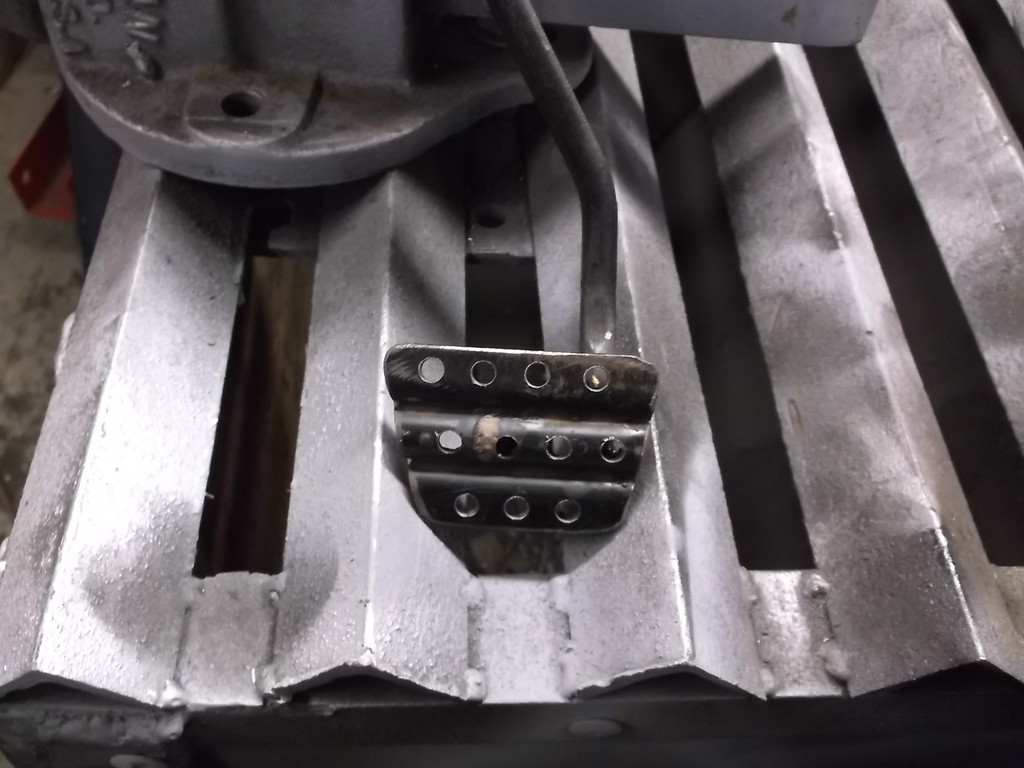
Added reinforcement to prevent any possibility of pad bending or twisting.
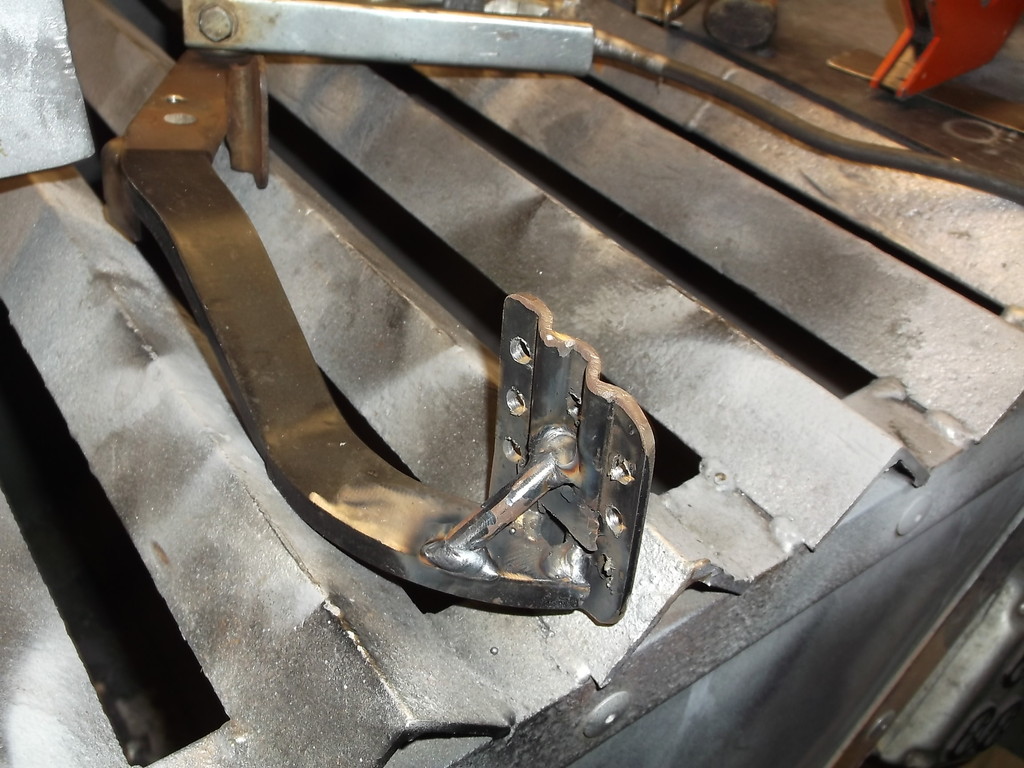
pedals remounted
I also rolled the inner lip on the rear wheel openings. I used my cutting torch to heat the lip a few inches at a time and rolled it back with a heavy ball peen hammer. It did burn the paint on the outside of the fender but car is getting repainted this winter. I was able to keep the roll pretty uniform so inner lip is not wavy looking. This gained about 1/2 to 5/8 per side.
I also got real license plates and legal registration and insurance on the car. ow if I can catch some warm, dry weather in the next couple weeks I can put some miles on it to find any problems before tearing it down for paint.


When I switched to manual brakes and clutch I set the pedals to far back to remount brake light switch as pedals stopped at end of switch retainer. The fix was to weld a 12mx1.25 nut to back of bracket. While the pedals and bracket were down for that I took opportunity to move clutch pedal pad 3/4" to left for more separation from brake pedal. Also drilled holes into both pads to enhance grip since no rubber pads on pedals.
relocated pedal pad

Added reinforcement to prevent any possibility of pad bending or twisting.

pedals remounted

I also rolled the inner lip on the rear wheel openings. I used my cutting torch to heat the lip a few inches at a time and rolled it back with a heavy ball peen hammer. It did burn the paint on the outside of the fender but car is getting repainted this winter. I was able to keep the roll pretty uniform so inner lip is not wavy looking. This gained about 1/2 to 5/8 per side.
I also got real license plates and legal registration and insurance on the car. ow if I can catch some warm, dry weather in the next couple weeks I can put some miles on it to find any problems before tearing it down for paint.
11-28-2016, 08:10 PM
#535
Re: Home brew road racer
Yesterday weather was cool 45* sunny and dry so I ventured out on the road again. I discovered a problem in my fuel system setup. My Mallory/Aeromotive fuel pump seems to require a large amount of fuel on the supply side. The pump has an -8 inlet and a -6 outlet. I plumbed both ends with -6 hose and fittings. The inlet had a 40 micron prefilter with the small, stainless steel mesh, disc filter.
The engine stalled while idling in the driveway while I was letting it get up to temp. After a few checks I decided the prefilter was clogged. I cleaned the filter, reassembled and everything seemed OK. I took a drive down some back country roads wanting to check out steering, brakes, clutch and suspension. Everything was going well for the first mile or so and then I noticed a slight bucking in third gear. Within the next mile the car stalled pulling a slight hill. I was able to get off the road and pull the screen out of the filter housing. With the screen out of the filter the engine pulls like a freight train and can easily break the tires loose in 2nd and 3rd gear.
Doing more research on the web Aeromotive states that this pump and most other Aeromotive pumps require a 100 micron, large capacity prefilter due to the high suction capability of the pump. I need to get the car out for at least one more shake down run hopefully lasting an hour or so. I will leave the prefilter screen out for this as I am pretty confident the fuel supply is very clean. I will however re-plumb the supply side fuel lines to -8 and a high capacity 100 micron prefilter.
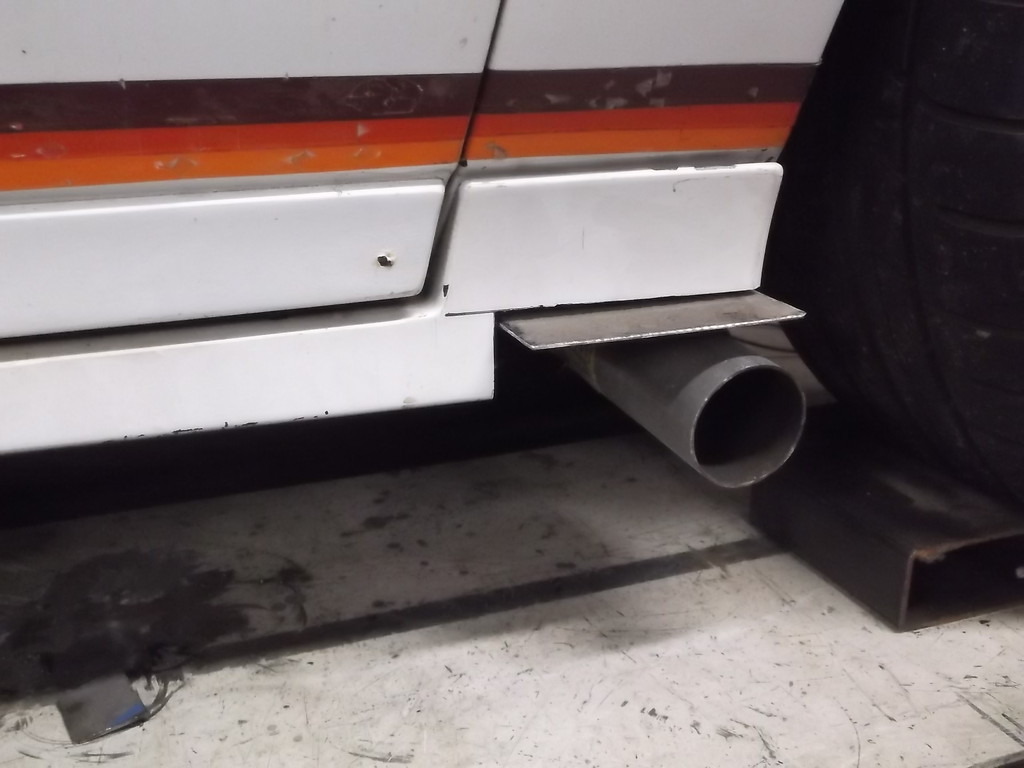
On a good note the car performed quite well. Although I didn't push the car hard (except for a few straight line bursts) all systems performed well. It does not feel like I am driving a cobbled up mass of parts. The system I was most concerned about, the steering, seems quite normal. It has the feel of an OEM rack and pinion, not too light or heavy. The manual brakes are not even noticable, requiring about the same effort as factory power brakes. The clutch pedal is firm but is easy to engage and releases quickly. Even though it was a cool afternoon the engine temp got high enough to kick on the low speed fan so that seems to be working ok as well. Even the ride quality is very good. I was expecting it to be harsh because of the hiem joints and coilovers. Only real complaint is the exhaust. The side exit exhaust gives the driver and passenger a very LOUD reminder that there is something under the hood!
The engine stalled while idling in the driveway while I was letting it get up to temp. After a few checks I decided the prefilter was clogged. I cleaned the filter, reassembled and everything seemed OK. I took a drive down some back country roads wanting to check out steering, brakes, clutch and suspension. Everything was going well for the first mile or so and then I noticed a slight bucking in third gear. Within the next mile the car stalled pulling a slight hill. I was able to get off the road and pull the screen out of the filter housing. With the screen out of the filter the engine pulls like a freight train and can easily break the tires loose in 2nd and 3rd gear.
Doing more research on the web Aeromotive states that this pump and most other Aeromotive pumps require a 100 micron, large capacity prefilter due to the high suction capability of the pump. I need to get the car out for at least one more shake down run hopefully lasting an hour or so. I will leave the prefilter screen out for this as I am pretty confident the fuel supply is very clean. I will however re-plumb the supply side fuel lines to -8 and a high capacity 100 micron prefilter.
On a good note the car performed quite well. Although I didn't push the car hard (except for a few straight line bursts) all systems performed well. It does not feel like I am driving a cobbled up mass of parts. The system I was most concerned about, the steering, seems quite normal. It has the feel of an OEM rack and pinion, not too light or heavy. The manual brakes are not even noticable, requiring about the same effort as factory power brakes. The clutch pedal is firm but is easy to engage and releases quickly. Even though it was a cool afternoon the engine temp got high enough to kick on the low speed fan so that seems to be working ok as well. Even the ride quality is very good. I was expecting it to be harsh because of the hiem joints and coilovers. Only real complaint is the exhaust. The side exit exhaust gives the driver and passenger a very LOUD reminder that there is something under the hood!
12-01-2016, 12:18 PM
#536
Re: Home brew road racer
Ok, I am getting a little ticked off at myself now. I took the car back out yesterday hoping to get a few miles on it. I did nothing else to the fuel system as it seemed to run fine with the screen removed from the prefilter housing. After stopping to put a few more gallos in the tank I set off to drive on some of the lesser traveled township roads near my home. A little over one mile from the gas station the car bucked a little and the engine quit. I was able to coast off the side of the road. A quick check of the fuel pressure gauge with the pump running showed zero at the bypass regulator and the carb.
Luckily I was not far from a friends house and he let me use his car to drive home and get a few things to allow me to drive the Z home. A 2 gallon gas can, a length of hose, and a ratchet strap and I had a temporary fix McGyver would be proud of.
I am going to go a more simple route and use a Carter P4070 pump inplace of the Aeromotive pump. This will allow me to retain all of my current plumbing. There are a few warm, dry days in next weeks weather forecast. I'll get the fuel system squared away and try putting some more miles on the car.
Kind of sad that the car ran better on this siphon feed setup than the high volume Aeromotive pump.
Luckily I was not far from a friends house and he let me use his car to drive home and get a few things to allow me to drive the Z home. A 2 gallon gas can, a length of hose, and a ratchet strap and I had a temporary fix McGyver would be proud of.

I am going to go a more simple route and use a Carter P4070 pump inplace of the Aeromotive pump. This will allow me to retain all of my current plumbing. There are a few warm, dry days in next weeks weather forecast. I'll get the fuel system squared away and try putting some more miles on the car.
Kind of sad that the car ran better on this siphon feed setup than the high volume Aeromotive pump.
Last edited by 83RDRACR; 12-01-2016 at 12:21 PM. Reason: added additional info
12-01-2016, 07:46 PM
#537
Member
Join Date: Oct 2011
Location: Black Hills
Posts: 226
Likes: 0
Received 0 Likes
on
0 Posts
Car: 88 rs
Engine: ls1
Transmission: t56
Axle/Gears: moser 4:10
Re: Home brew road racer
I've never seen that system in the Summit catalog. The only thing I hate more than fuel problems are electrical. Keep your chin up Dave.
The only thing I hate more than fuel problems are electrical. Keep your chin up Dave. Last edited by tvc 15; 12-04-2016 at 09:27 AM.
12-07-2016, 01:47 PM
#538
Re: Home brew road racer
TVC they are kind of the same when trouble shooting. You have to figure out where you have " juice" and where you dont and then determine what would be the most likely cause and go from there. If it were only that easy!!!!
Anyway I replaced the big Aeromotive pump with the Carter P4070. I closed off the return side of the regulator by running the adjustment screw down until it just bottomed out. The pump is self regulated at 6psi and with 72gph it supplies plenty of fuel for this carb motor.
I took the car out on Monday. The weather was a brisk 36* but dry. I was able to drive the back country roads for about an hour with no real problems. Again, the car runs, drives, feels like a production car and not like a compilation of mismatched parts. My biggest concern was my heavily modified steering rack and rack mount. They seem to work fine, with no indication that it is not OEM steering, just firmer and quicker!
I did manage however to break the steering on the way home. Nothing mechanical, but had fluid spewing out the input shaft after a hard, low speed, left turn. I probably damaged the pressure seals when I first plumbed the rack and hooked up the hoses backwards. That blew the fluid out the shaft the instant the wheel came off center. So now I will have to reseal the spool valve in the rack.
For now I think I can call my build a success. All of my major modifications seem to have worked out as planned and I reached my goal of greatly improving the cars weight distribution. Now I'll start tearing the car back apart for bodywork and paint. I have been making a list of all the minor things that need to be finished or corrected while it is disassembled. Hopefully come late spring the car will be back together and I can start to tweak and tune the suspension and maybe get some autox or track time in.
With track time on my mind I will be looking for 17x11 ZR1 style wheels with 7.5 to 8" bs or an 18 x 10.5 with 7.5 bs to mount some 315 sticky track tires to. I want to run all 4 tires and wheels the same.
Thanks again to everyone that has followed along over the course of the last 6 years. Your interest in the build has kept me motivated to see the project through.
Dave
12-07-2016, 01:57 PM
#539
Re: Home brew road racer
12-07-2016, 03:50 PM
#540
Supreme Member
iTrader: (2)
Join Date: Feb 2005
Location: West Warwick RI, postal code: 02893
Posts: 4,337
Received 55 Likes
on
41 Posts
Car: Building LS3, T56 Z28
Engine: LS3
Transmission: T-56
Axle/Gears: Moser/ 4.11
Re: Home brew road racer
I have some 17x11 C4 GS gunmetal rims, but the fronts are only 9.5" wide  .
.
I have Nitto 555Rs on the back and some Dunlop tires on the front. Good tread.
Selling due to going up to C7 Z06 size.
. I have Nitto 555Rs on the back and some Dunlop tires on the front. Good tread.
Selling due to going up to C7 Z06 size.
12-18-2016, 01:04 PM
#541
Re: Home brew road racer
Dennis, I appreciate the offer and would consider it but really have no need for the 9.5 wide fronts or the 555R drag radials. Also you are 620 miles away.
I am working on the front grille and radiator ducting now and will post pics of that soon. I am trying to take care of little projects before the body work starts.
Dave
I am working on the front grille and radiator ducting now and will post pics of that soon. I am trying to take care of little projects before the body work starts.
Dave
12-21-2016, 08:21 PM
#542
Re: Home brew road racer
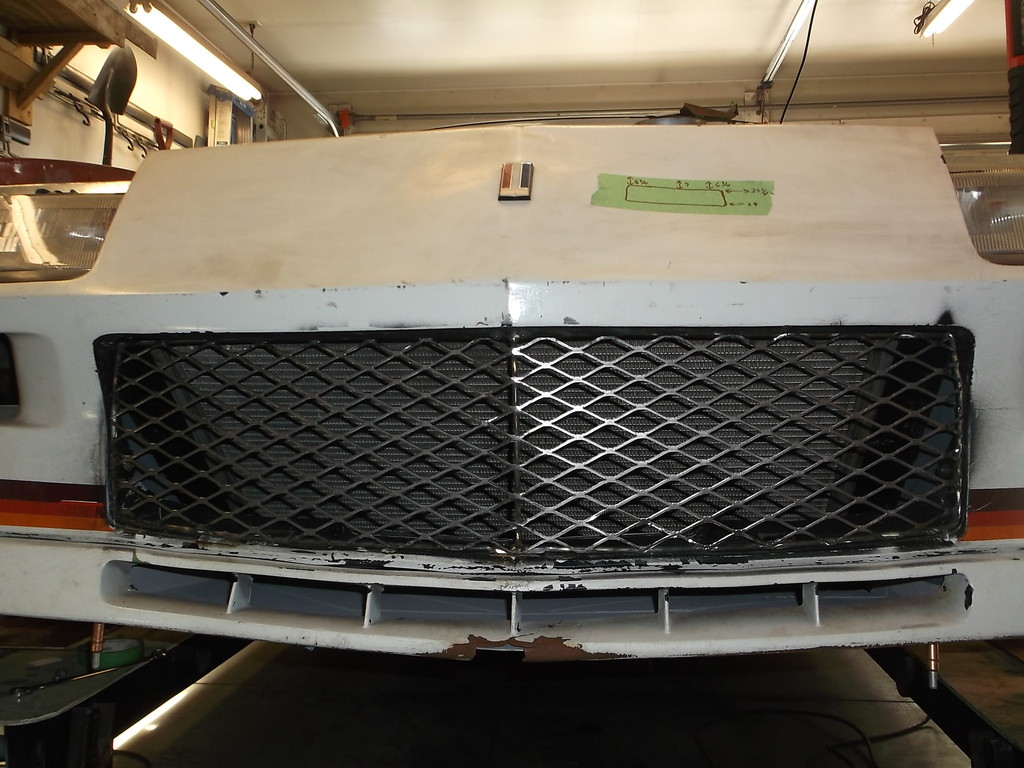
grille and front duct work done now. I used some of the 3/16 rod to make a frame for the grille.
Diamond steel mesh for grille
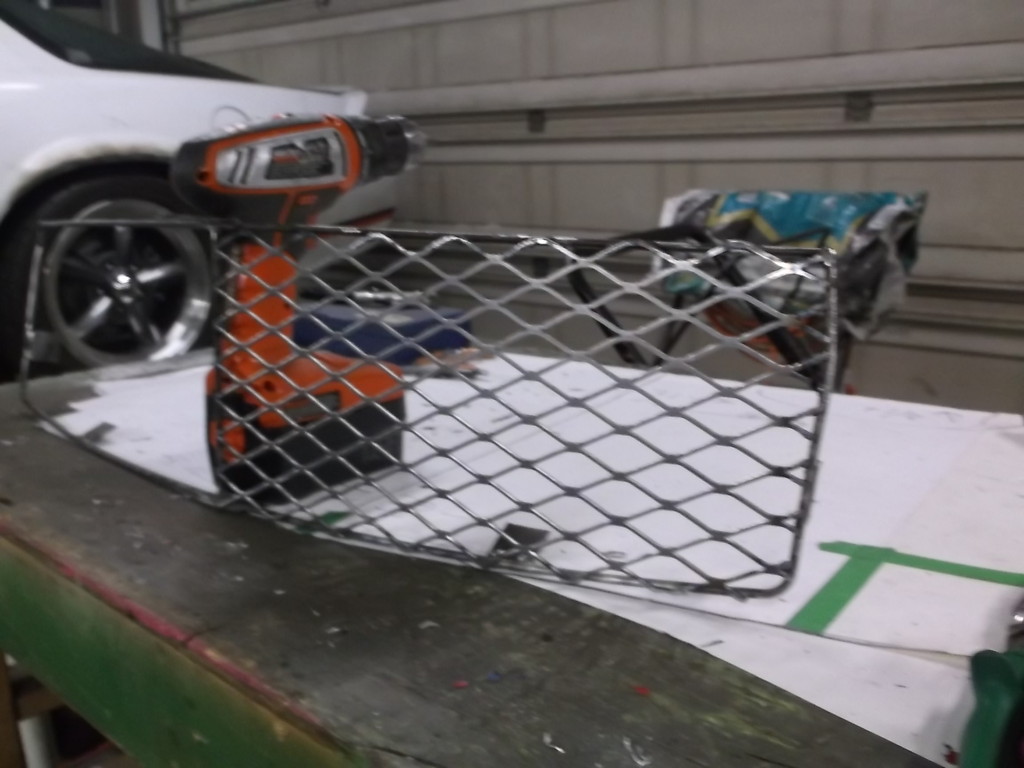
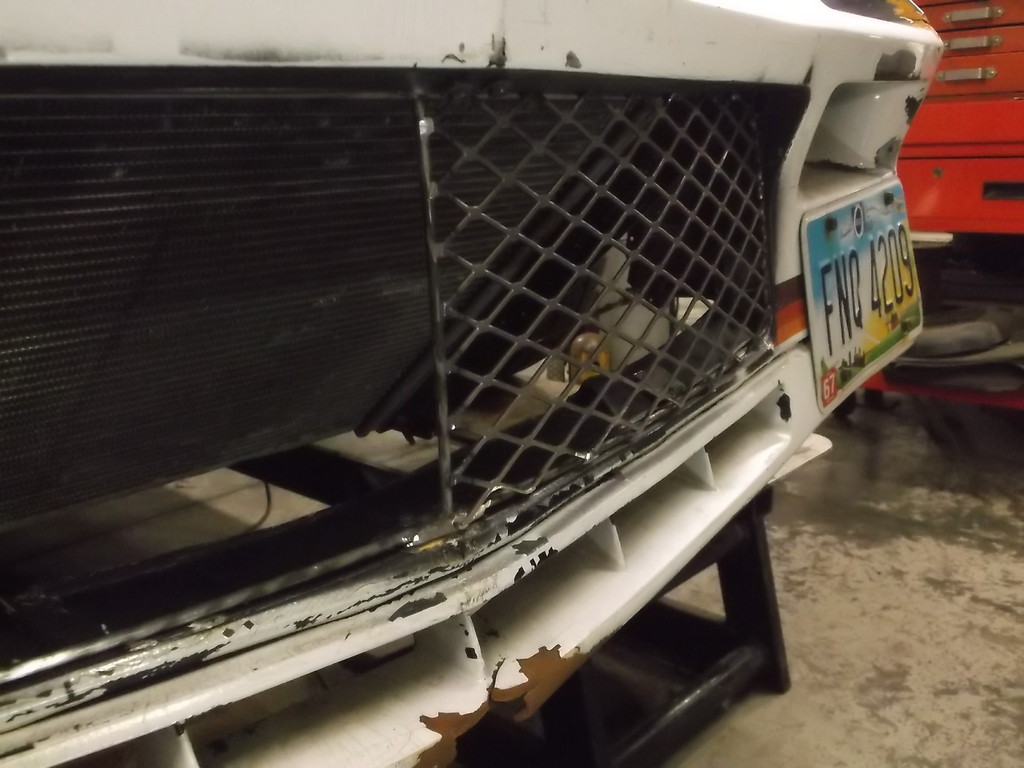
Duct work is made from .032 aluminum.
side panels
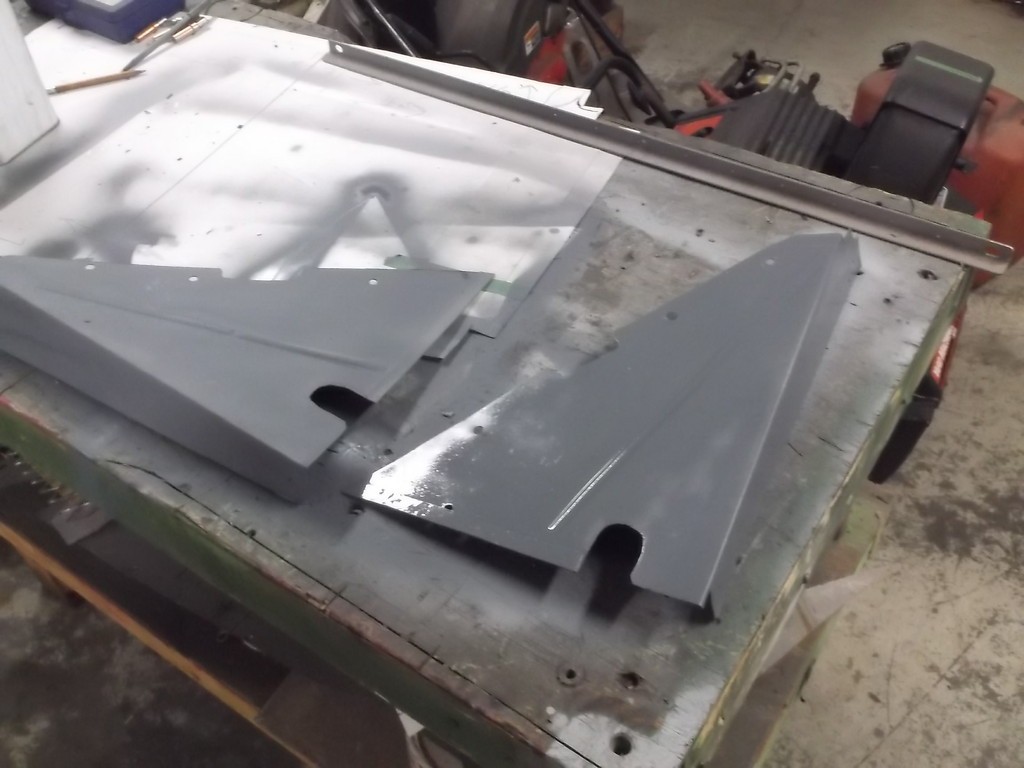
bottom panel
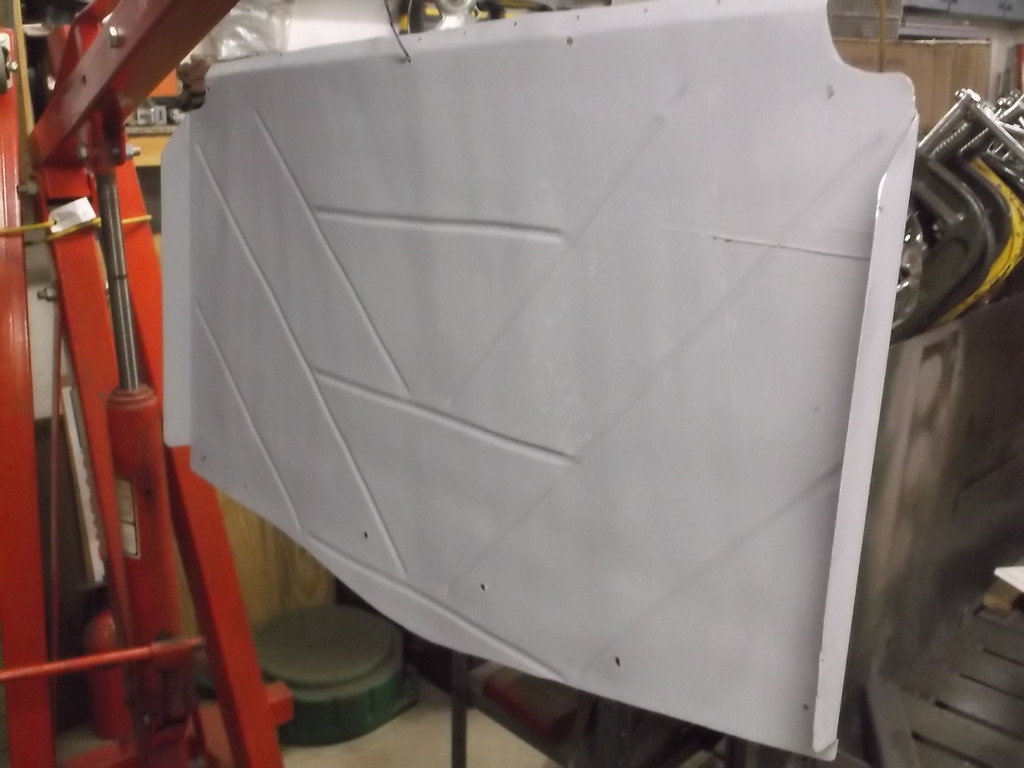
assembled
and in the car.
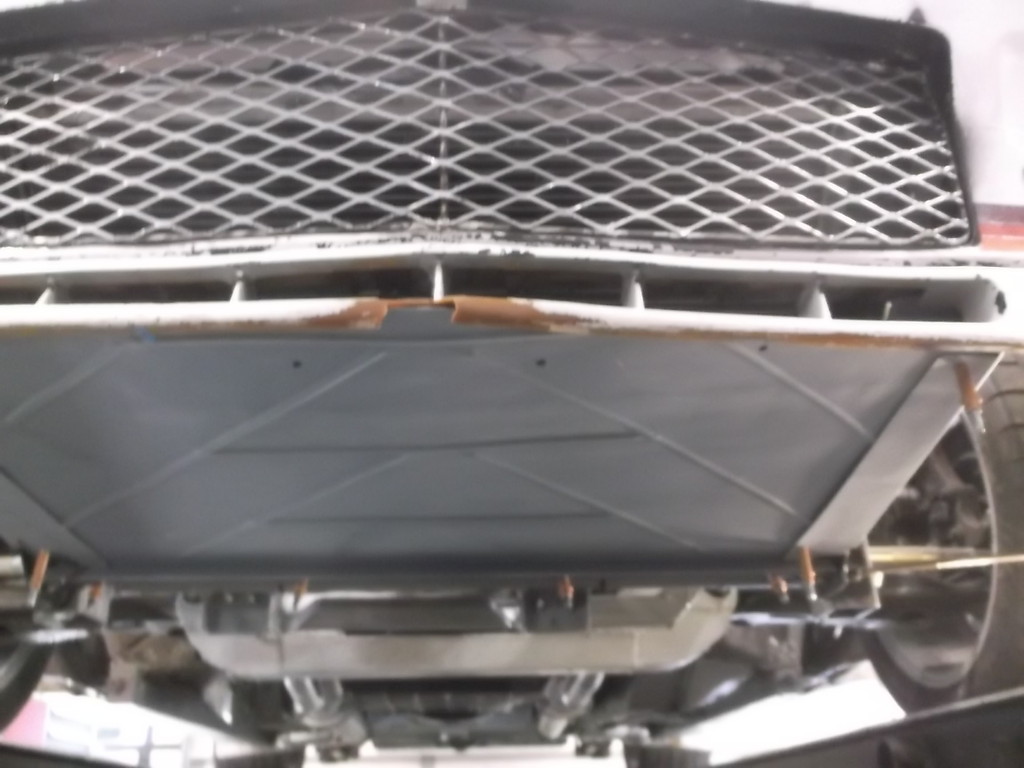
The duct work encloses the main grille opening as well as the lower vents and forces all incoming air through the radiator core. Total grille area w/vents is about 230 sq.in. but diamond mesh blocks almost 30% of main grille so total open area is about 180 sq.in.
looking through the grille. You can see a small gap at bottom rear. This was made to let water and any road wash drain out.

Also added battery mount in spare tire well.

Diamond steel mesh for grille


Duct work is made from .032 aluminum.
side panels

bottom panel

assembled

and in the car.


The duct work encloses the main grille opening as well as the lower vents and forces all incoming air through the radiator core. Total grille area w/vents is about 230 sq.in. but diamond mesh blocks almost 30% of main grille so total open area is about 180 sq.in.
looking through the grille. You can see a small gap at bottom rear. This was made to let water and any road wash drain out.

Also added battery mount in spare tire well.


 01-21-2017, 10:53 AM
#545
Re: Home brew road racer
To everyone that has followed my madness over the last 6 years I want to say thank you. I am going g to have to put the project on hold for a few months due to health issues. I was hospitalized a few weeks ago and diagnosed with stage 3 colon cancer. I am home now and recovering well from surgery. I start chemo in a few weeks.
I am hoping to continue to work on the car during chemo therapy and use the car as motivation to overcome the cancer. I ask that you keep me in your thoughts and prayers.
Thanks again for following my build and providing inspiration and motivation to see the project completed. It will get finished.
Dave
01-21-2017, 11:18 AM
#546

Re: Home brew road racer
Dave, amazing job! Congrats on finally getting it out on the road. Saw the video. Been following this awesome build for years... I remember when I first got my build back on the ground after a long two years and took it around the block... such a great feeling! Cant wait to see you finish it up.
01-21-2017, 11:19 AM
#547
Member
Re: Home brew road racer
To everyone that has followed my madness over the last 6 years I want to say thank you. I am going g to have to put the project on hold for a few months due to health issues. I was hospitalized a few weeks ago and diagnosed with stage 3 colon cancer. I am home now and recovering well from surgery. I start chemo in a few weeks.
I am hoping to continue to work on the car during chemo therapy and use the car as motivation to overcome the cancer. I ask that you keep me in your thoughts and prayers.
Thanks again for following my build and providing inspiration and motivation to see the project completed. It will get finished.
Dave
I am hoping to continue to work on the car during chemo therapy and use the car as motivation to overcome the cancer. I ask that you keep me in your thoughts and prayers.
Thanks again for following my build and providing inspiration and motivation to see the project completed. It will get finished.
Dave
My mom just got cleared of pancreatic cancer after a 2 year battle.
FIGHT ON!!!
02-05-2017, 10:24 PM
#549
Re: Home brew road racer
Tex, thank you and everyone at tgo that has thought of me. I just celebrated my birthday with family and friends. Was a great time. Looking for an even bigger celebration next year when doc tells me I am cancer free.
I don't know if this is kosher and the moderators are free to delete. Since this is the first of the year l will have to pay out for all the medical insurance deductibles and copays. This will amount to almost 1/3 of my 2017 net income. To offset some of this my family setup a Gofundme account. If anyone would like to make a donation just type in David Arrington OH in the search box.
I have never borrowed money from family or friends so I am a little embarrassed about all this. Not having to worry about how to pay the bills would take a lot of stress off my wife and I.
thanks again to everyone. God bless.
David
02-06-2017, 10:43 AM
#550
Re: Home brew road racer
I'm sorry to hear about the diagnosis. I wish you all the best. I've been following this build since the day you started it and I look forward to seeing you finish this project.