When you click on links to various merchants on this site and make a purchase, this can result in this site earning a commission. Affiliate programs and affiliations include, but are not limited to, the eBay Partner Network.
Re: Long time coming AKA My 91 Z28 Vert build thread
holy smokes! this took me a few hours to go through all the pages. I can not believe that I never saw this whole thread. was captivated following along with the build and all the metal work you did. then page 13, after the first drive and car show, I was thrown a 180 when i saw about the fire. wow. did not expect that. like you said, live and learn. I am sure you will have the interior reworked bu the springtime. best of luck. very nice project from page 1-current. keep it up
Re: Long time coming AKA My 91 Z28 Vert build thread
Originally Posted by IROCZman15
holy smokes! this took me a few hours to go through all the pages. I can not believe that I never saw this whole thread. was captivated following along with the build and all the metal work you did. then page 13, after the first drive and car show, I was thrown a 180 when i saw about the fire. wow. did not expect that. like you said, live and learn. I am sure you will have the interior reworked bu the springtime. best of luck. very nice project from page 1-current. keep it up
Thanks for saying so. My wife says if something else happens I'm not allowed to rebuild it again.
Re: Long time coming AKA My 91 Z28 Vert build thread
I wanted to post a quick project that I had recently done. I saw an ad for one of the underhood/shop light LED work lights before Christmas. I think it was on sale for $50 or something. They're neat and I almost bought one when I remembered that when I replaced the old school fluorescent 4' tubes in my garage with LED bulbs they were a direct wire, no ballast needed. So I went to Lowe's and fro $7 I bought a 4' LED tube, a Christmas tree extension cord with an on/off switch and a set of the white plastic stud covers for a toilet.
I cut the female receptacle from the extension cord and stripped the wires and then slipped them through a hole I had drilled in the top of the plastic toilet screw cover.
The LED tubes being direct wire have a hot or live and a neutral terminal on one side that is almost always labeled while the other side is there just to afix the tube to the holder. I wrapped the stripped ends around the tube's terminals and went about soldering them on. I used my 100/140 watt soldering gun to do this. You have to work quickly or else you could burn/melt the tube's cap. My gun is supposed to be up to temp in 6 seconds so I held the trigger for 12 secs melted a little puddle of solder on the tip and then touched it to the tube's prong. As soon as the solder flowed into the wire I added a little more and stopped. Nothing melted and the wire doesn't twist or move.
You can glob some hot glue around the connections to make it more secure and safe. The extension cord I choose has a built in fuse (6 amps) so in case one of the ends touches the other the fuse will blow preventing (another ) fire. Slide the toilet screw cap down and tape it in place with electrical tape.
To allow it to hang from something I cut a wire hanger into two pieces, curled the ends in a ball and ran tape around the entire length to prevent it from allowing a current to pass and to prevent it from scratching whatever it hangs from. Then I wrapped it around the tube and made a hook. So now I have an awesome worklight.
Re: Long time coming AKA My 91 Z28 Vert build thread
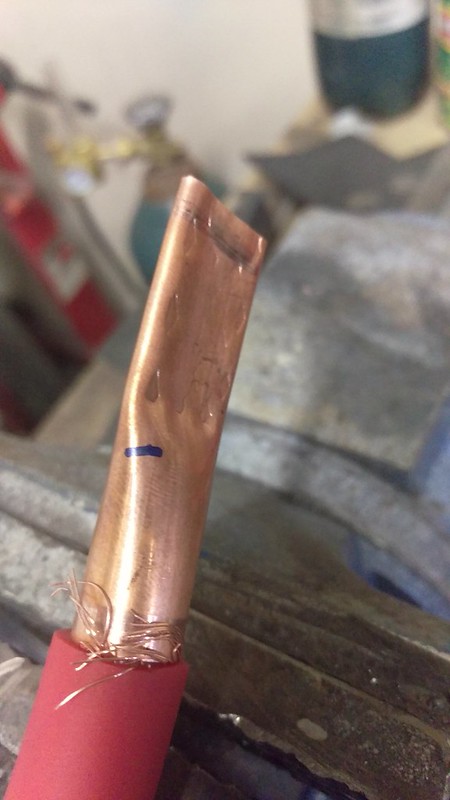
While I'm at it I'll post a few pictures of how I make my cable ends because if you buy them at a parts store you'll be paying close to $5 for a pair. Ouch. Anyway, head out to your hardware store and grab short length of a thicker walled copper tube that has about the same id as the od of the bare stripped cable you are using. Bring a length of the stripped wire or a caliper or just buy a couple different sizes.
When you get home strip the cable to a sufficient length if you haven't already and make a mark on the side of the copper tube that shows how far inside the tube the wire will reach. Then based on the gauge of the wire add a distance of about 1/2 the id to allow the pipe to crimp down without wanting to push the wire out. Then add another inch for a mounting tab and cut the tube. After thoroughly deburing the tube put the cable back in and clamp the pipe in a vise at the mark that is just past the length inside the tube that the wire will reach. Tighten the vise to smash the wall together.
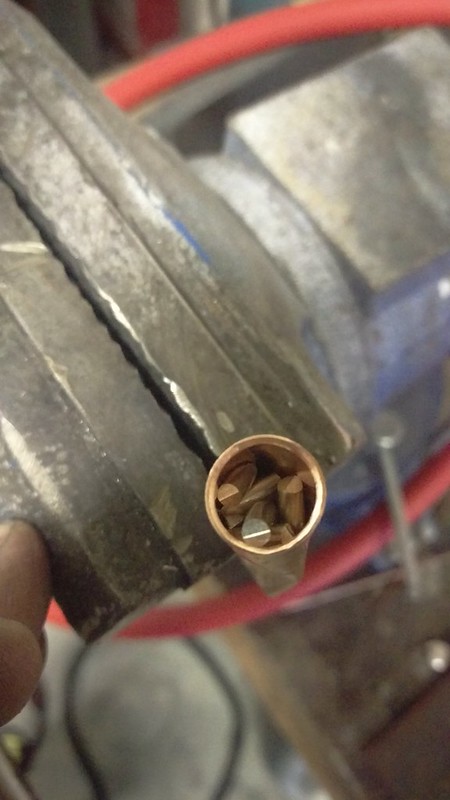
Then give it a few whacks with a hammer to flatten it out some more. Put the end back into the vise and fill it up with a bunch of cut up solder chunks. Grab the torch and heat up the copper till the solder melts. Slowly dip the cable into the lug, if you jam it in solder will splatter out or just flash freeze. The solder needs to be able to wick up the strands.
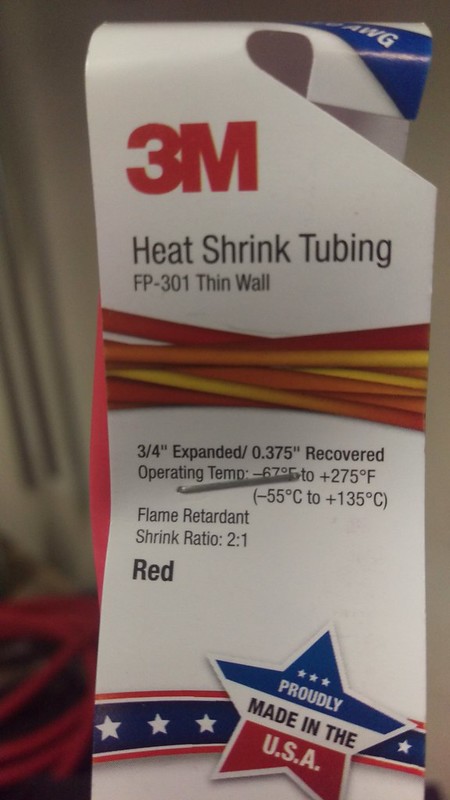
Once the end is soldered I use some 3M heatshrink to cover it all up. In the past I've used electrical tape (again 3M) and sometimes the tape stays forever and other times it begins to unravel an hour later.
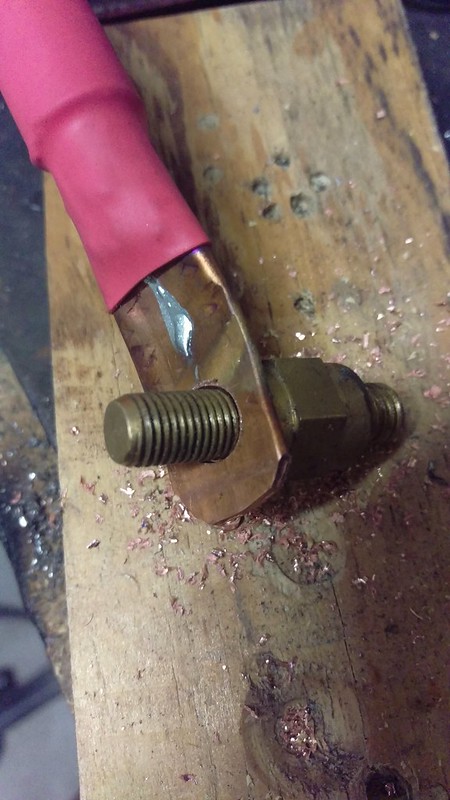
All that's left now is to drill a hole slightly larger than your bolt!
Re: Long time coming AKA My 91 Z28 Vert build thread
Originally Posted by dennisbernal91z
Excellent tip. Will 100% be doing this when I make my grounding cables. Thanks for taking the time to write it up.
Just make sure you get the thickest copper tubing you can get. The guy at the hardware store told me there were two different wall thicknesses, the thinner walled stuff was for refrigeration and the thicker for normal pipes. Something along those lines.
Re: Long time coming AKA My 91 Z28 Vert build thread
Finished the cabin and body wiring last night (well except for the horn but that's easy). All that's left now is to wire in the MegaSquirt, Wideband O2 and power for the coolant fans, headlights and fuel pump. That may take a while because all the wires are burned and clumped together so I can't just say "this wire goes to connector 1 spot 17" cut out out the burned portion and wire in the new connector. Anyway, enough complaining about an issue that was my fault.
This is how I ended up wiring the reverse lockout for the T56:
I had read that some guys doing T56 retrofits will simply wire the reverse lock out to be powered by the brake light's power but I was hesitant to do it that way so I wired it with a 5 terminal relay. Somewhat complicated and in hindsight I probably would have been fine to just replace all the standard bulbs with LED bulbs (they only draw 1/10 of an amp at most) to free up some juice and then used the third brake light circuit. O well.
The brake switch is the same for a manual and automatic car. On an automatic car their is a connector used (that the manual car doesn't use) for the torque converter. It is +12V with the key on and receives power from the gauge circuit. When the brake pedal is not pressed +12V flows through the switch and when you press the pedal down there is an absence of +12V. So I wired the 5 terminal relay in a reverse fashion so that when +12V is applied (key on) the power is going to a terminal that is not used and when +12V is removed I have +12V going to the reverse lockout. The power supply for the relay is also switched so the relay is not always energized.
Re: Long time coming AKA My 91 Z28 Vert build thread
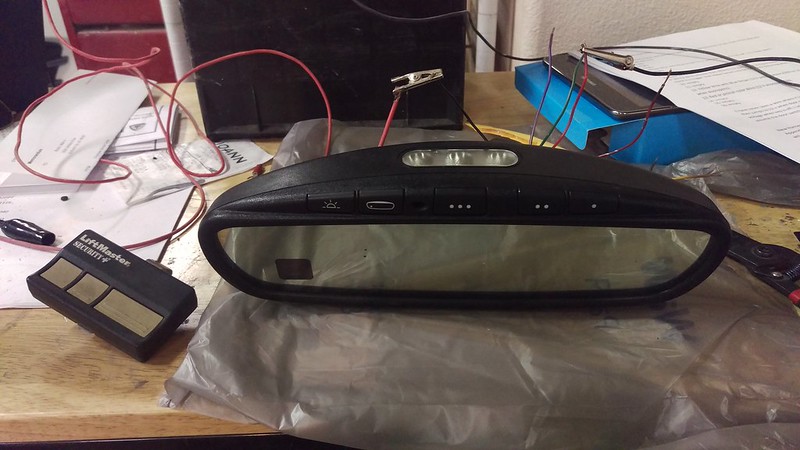
I also have the Auto-Dimming homelink mirror wired in, here is the schematic:
If you don't recall, the mirror is from a Chrysler vehicle. Many vehicle manufacturers make homelink mirrors now but most don't also have a built in map light. With this mirror the map light turns on when the doors open up just like the stock mirror.
The yellow and red/blue wires are for the temp sensor that I don't have yet. I made one small change and that was to power the auto-dimming circuit (purple/white, blue/red) off of the instrument illumination circuit. The inst ill circuit is small and uses a 5 amp fuse but I have all led in place of the typical bulbs and the mirror only draws 0.22 amps. So totally safe. When I turn the headlights on it receives power and turns on the auto-dimming ability. The homelink circuit however is tied into the map light circuit on this mirror which means that you can open a garage door with no key. Kind of a security issue if you park outside your garage but I think everyone realizes by now that this is a garage queen.
Re: Long time coming AKA My 91 Z28 Vert build thread
The cabin wiring harness that I pulled was from an automatic transmission Fbody and I discovered that all of the wiring harnesses must start life as a wiring harness for an automatic and then they add in the circuits for the manual transmission. My other two manual transmission cabin harnesses' had the wiring for an automatic transmissions shifter connector and torque converter connector for the brake pedal. Both connectors were wrapped in that same interior padding that is on the back of some panels and then electrical tape over them. This and the other automatic transmission harness had none of the wiring for a manual and since I have a manual I had to change it. Here is the wiring diagram for the automatic shifter connector:
I removed the connector and ran the Dark Blue and Light Green wires (probably 16 gauge) to the reverse connector of the T56, reverse lights work perfect. The Dark Green (or Yellow) and Purple wires (10 gauge) are routed to the clutch switch and that switch works opposite of the brake pedal switch, the power flows from the green (or yellow) wire through the switch to the purple wire when the clutch pedal is pressed. The Black wire is now turned into an extra ground or in my case I just used it for the ground of the reverse lockout. The orange wire is not used.
Re: Long time coming AKA My 91 Z28 Vert build thread
Just finished reading through the entire thing and amazing work and attention to detail. A lot of the work I need to do for my car you have shown here. I am sure I will be using your post as a reference for me. Mainly old abandoned wires from an alarm that was installed by the previous owner. Also read through the slow window issue you mentioned which I would love to address as well. Again amazing job and thanks for the commitment to documenting your progress here.
Re: Long time coming AKA My 91 Z28 Vert build thread
Originally Posted by ybelikeu
Just finished reading through the entire thing and amazing work and attention to detail. A lot of the work I need to do for my car you have shown here. I am sure I will be using your post as a reference for me. Mainly old abandoned wires from an alarm that was installed by the previous owner. Also read through the slow window issue you mentioned which I would love to address as well. Again amazing job and thanks for the commitment to documenting your progress here.
Thanks. Let me know if there is something that need info or help with figuring out.
Re: Long time coming AKA My 91 Z28 Vert build thread
Still have to add in the power circuits for the coolant fans and headlights but for the most part this is what my wiring looks like:
I have the 0 gauge (1/0) power wire coming in on the bottom right of the copper block. The starter wire is a 2 gauge on the top left side, it's secured with those cable clamps and a stock wire harness retainer clip. The power for the stock fuse box power wires are on the top, I don't know why I ran those power wires (or the power side mirrors wires) in that stock wire reatianer that is just below the windshield. I'm thinking of running them with the rest of the wires along the bottom of the dash like you see in the pic. The bottom row wires on the copper block are for the fuses and relays in the two relay boxes I added.
Each relay box has two relays for a window and another for the door popper. This one also has the relay for the T56 reverse lockout and another for an extra fused power outlet. The remaining fuse spot is for an extra +12V hot outlet.
This is the box that has the relays for the other door, I have two extra spots for relays and 3 fuse spots left.
This is just more of a close up of the extra outlets I wired in. The four yellow wires on the right are switched power sources. The far right can put out a total of 20 amps (they share the same 20 amp fuse) and their neighbors can put out a total of 30 amps (they share the same 30 amp fuse). The two blue wires on the left are the stock fog light power so they both share a hot 20 amp fuse and the wires on the left of the blue share a 30 amp fuse.
Worth mentioning: The far two yellow wires giving switched power come from the stock fuse panel from what was the SRS circuit and the neighboring yellow wires is from the switched power circuit that I added in. There is a resting voltage difference of ~0.3 amps with the stock circuit having the slightly lower voltage. That stock SRS circuit uses the stock length and gauge of wire. Voltage drop is very real in these cars, I've read that the fuel pump suffers the greatest voltage drop and it's common for the LS swaps to remove the stock 16 or 14 gauge power wire for a 12 gauge or necked down 10 gauge.
Re: Long time coming AKA My 91 Z28 Vert build thread
Wow, I just spent a few hours reading this entire thread. What an excellent example of vision, dedication and craftsmanship! I've seen your posts in other threads but didn't realize the extent of your build. Nor did I know that the car caught fire! That was an unexpected twist! Glad you were able to work things out and maintain focus so you can persevere!
Thank you for your extensive write ups and willingness to share info as well. Definitely what this site is supposed to be about!
That said, please see my question and comment below!
Originally Posted by Tibo
I finished those side B pillar trim caps that the top goes through. I fiberglassed the sides and then slapped body filler on the top to smooth it out. I decided to try the sprayable bedliner after so many members had reported it's uncanny ability to mimic the look of the stock textured items like the dashboard and other interior plastics. I was skeptical but wow(!) this looks and feels original now! I'm very impressed, so impressed that I will probably spray the dash (not the dashboard though).
Can you provide additional detail on how you did these? Mine are both cracked and starting to fall apart and I'm having trouble finding a decent pair for replacements.
Originally Posted by Tibo
Sebring convertible mirror? Plan to update mine with the same one.
Re: Long time coming AKA My 91 Z28 Vert build thread
Originally Posted by Ed1LE
Wow, I just spent a few hours reading this entire thread. What an excellent example of vision, dedication and craftsmanship! I've seen your posts in other threads but didn't realize the extent of your build. Nor did I know that the car caught fire! That was an unexpected twist! Glad you were able to work things out and maintain focus so you can persevere!
Thank you for your extensive write ups and willingness to share info as well. Definitely what this site is supposed to be about!
That said, please see my question and comment below!
Can you provide additional detail on how you did these? Mine are both cracked and starting to fall apart and I'm having trouble finding a decent pair for replacements.
Sebring convertible mirror? Plan to update mine with the same one.
Thanks Ed. I understand and believe, as it sounds you do, that this site is about sharing knowledge (and feedback) so I enjoy posting what I've done so that others can do it too. Sometimes what I do isn't the textbook approach and could be improved upon so I'm always OK with constructive criticism or a member trying it, doing it differently and being able to do it better. Over half of the ideas that I've used for this build were copies of other members, I owe a big thanks to those guys and I hope other guys can then take my ideas and methods for their project.
The rear view mirror is from either a 2003 or 2004 Chrysler Sebring hardtop, two door. The convertible may have used them also and I assume other chrysler cars used them. From my research it seems that this style of mirror is made by a company called GenTex. They make mirrors for many companies in just about any configuration. This site sells them new and shows the features they may have: http://shop.autodimmingmirrors.com/Store.htm
Another website with a bunch of useful info on them: http://www.scoobymods.com/showthread...nfo-8819.html?
You can also find homelink mirrors in GM vehicles but they all have that onstar button. They are also in Mazda and Hyundai, Toyota and Ford. I think the Junkyard crowd knows these mirrors go for ~$100 on eBay so they take them. I came across numerous cars in Junkyards that had the mirror removed and the GenTex Homelink plug there.
I still don't have the pin out accurate and I need to change my posted schematic. I'll repost it. I think the two wires I thought were for the temp sensor, one was for the revese switch (turn the auto dim off in reverse) and the other was for the audio microphone possible.
For the caps of the convertible's B pillar it was pretty straight forward. For fixing a crack I took a dremel and ground a V groove into both sides of the crack and then scuffed up the back side of the cap. I laid down probably two sheets of fiberglass matt on the inside of the cap and let it dry. Once dry I filled the visible side of the crack with plastic body filler and let that dry. Sanded it smooth and shot it with the bedliner. I think the finish is identical but the texture of the bedliner isn't quite as smooth. The texture issue could probably be fixed it you wanted to lightly sand it with some scotch bright and then spray a single coat of plastic paint. I've found if you spray the plastidip can from a distance you also end up with a similar effect. So Plastidip instead of truck bed liner may be an option.
Re: Long time coming AKA My 91 Z28 Vert build thread
I've been scrolling through this post and I am impressed. Both with the incredible work and craftsmanship you have demonstrated and especially that you have taken the time to document it for the rest of us. Thank you. Then I came to the part of the interior fire and my heart sank. I've built and restored a lot of cars and I know what it takes in time and effort so I really felt for you. I just want to encourage you to keep up the restoration process. I know it will be worth the effort and we are all rooting for you and looking forward to the final product.
Also, sharing your experience with the insurance aspect of the fire was important. Here's the deal. our cars are many times worth a lot more than their book values. I too keep up with my receipts, but even then there is no value put on the countless hours spent on customization project. The recommendation of specialty insurance is probably one of the most important topics we should consider. I probably have well over $25k in my car and it would probably cost more than that to replace it. Not to mention what it means to me personally. Thanks again.
Last edited by antman89iroc; 02-18-2018 at 04:03 PM.
Reason: Insurance comments
Re: Long time coming AKA My 91 Z28 Vert build thread
Haven't had many substantial updates for a while because I've been working massive amounts of overtime for the last 2 months. 66-78 hours per week coupled with having a family and having what the wife refers to as "more important things to do than the Camaro." Anyway, This coming week is my last week of crazy overtime and then I will be able to devote much more time to the car.
I was able to get the new carpet in the car. I ordered it from Rock Auto and while the carpet itself seems to be good quality I had ordered the carpet with the cut outs and I received a carpet with no cutouts. So I had to spend a ton of time (days with the sparse amount of free time I've had) shifting and making incremental cuts to the carpet to get it to fit. I had never put in an aftermarket carpet and it was surprising how much work it was but it's in and it feels and looks nice.
I had also been wrestling with how to mount the MegaSquirt ecm. On my last Camaro I had it mounted in the stock ecm location but that requires the vent's ducting to be intact. Previously I had it mounted to the inside of kick panel above the passenger's feet. It worked and you couldn't see it and it was easily accessible but I was't very thrilled about it. This time around I am relocating the front speakers from a dash mounted 4x6 to a center console mounted 6" so I have the stock passenger 4x6 spot vacant. I made a bracket for mounting the ecm.
Re: Long time coming AKA My 91 Z28 Vert build thread
Installed the new cob led lights and discovered that on nearly all of the lights the contacts were too shallow. Comparing them to an old style bulb proved this. So on the new led lights I had to build up the contacts with some solder. Not hard, heat up the contact and then slowly add in solder while pulling away so the solder builds up instead of out. It's the same concept if you've built up an area with filler rod while TIG welding. The red light I built up and the amber light is how they came. Before there was a slight play, if you pushed the light in it would light up but you could pull it out just a hair and it would lose connection. All is good now. Cheap Chinese quality meets American ingenuity.
Re: Long time coming AKA My 91 Z28 Vert build thread
Small update about the led bulbs. The bulb used for the tail light and brake light so it is an 1157/2057 dual filament. I checked all of the bulbs on a separate battery with a spare bulb socket and all the LED bulbs worked. I installed the dual usage bulb on the car and it would not work. I thought it was the socket so I replaced the socket and it still did not work. I tested the socket for power and ground at the socket's terminals and I had power and ground. Put the bulb in and it wouldn't work. Put the original incandescent bulb in and it worked fine. WTF. Took the bulb out and tested it in my spare connector hooked up to another battery and the bulb would work fine. At that point I noticed the LED bulb was hot. Then I vaguely remembered reading about grounds that might ground through an unused power wire. Checked the terminal that would feed power for the brake lights (receives +12v when used) and sure enough it would switch to ground when the tail lights were turned on. I sat around and read some LED articles dealing with retrofits and it turns out the solution is not buy a cheap chinese LED that doesn't use an internal Diode or to just wire a diode in line. I had some diodes lying around that were 1 amp rated and the bulb only pulls 0.25 amps so I soldered it in and it works perfect now. Only downside is I can't go back to incadescant with this 1 amp diode since that side of an incandescent would draw about 2 amps or so.
Re: Long time coming AKA My 91 Z28 Vert build thread
Working on the center console some. This time around I wanted to relocate the front speakers to the sides of the front of the center console. With the ducting, heater/AC and CD player removed that whole are was just an open space. Relocating the speakers also allowed me to use any 6" rounds so I'll have four 6" rounds of the same make and model, should sound pretty uniform.
So to start with this is what the inside of the front of the center console looks like
The bracket for the heater is held in with some 7mm screws and then I used a heat gun with a thicker scraper to remove the ductwork that was glued to the inside of the center console.
I traced the outline of one of the sides of the console and then traced the speaker cut out and mounting screw holes onto that. Placed it onto the center console and traced. I then moved the template to the other side to make it a mirror image.
I used a router bit to route out the circle and then mounted the speaker
This coming week I will be lengthening the old bracket that I removed and mounting it further back with rivets. I don't want to leave the sides real flimsy as they are now.
If the Kenwoods sound horrible I will pony up for a better speaker.
Re: Long time coming AKA My 91 Z28 Vert build thread
I also worked on the upholstery for the center console. This time around I wanted to use French seams. Had I really been thinking I would have switched the thread to white. Anyway, I traced the sides of the center console as well as the rear section where the ash tray is. To do a french seam you put the two outside/visible sides together so only the insides of the fabric are visible. Sew like normal and here is the seam, nothing special.
When that is sewn I use some contact adhesive to stick the excess fabric back onto itself.
Re: Long time coming AKA My 91 Z28 Vert build thread
Worked on the center console some more and it seems to be installed. I used 3/16" padding between the console and the leather. Here is a back shot showing the french seams.
It really doesn't look impressive in pictures but sitting in the car or looking at it from outside it looks great. Much better than that stock carpet that was glued to it. In this picture the sides/bottom are bolted down but the top is not bolted down.
Re: Long time coming AKA My 91 Z28 Vert build thread
The speakers are mounted and hooked up. I didn't reuse the bar and am debating if it really needs it. Some time I'll turn the music up reallllly loud and if the sides they are mounted in vibrates I'll add that brace back. Otherwise it's pretty sturdy wedged into the carpet.
Shouldn't be an issue with the speaker cover being too close to my knee while driving.
Doesn't look like the speaker magnets will be close enough to the tablet to cause any issue
I also bought another USB charging port and mounted it in the same location as before.
Re: Long time coming AKA My 91 Z28 Vert build thread
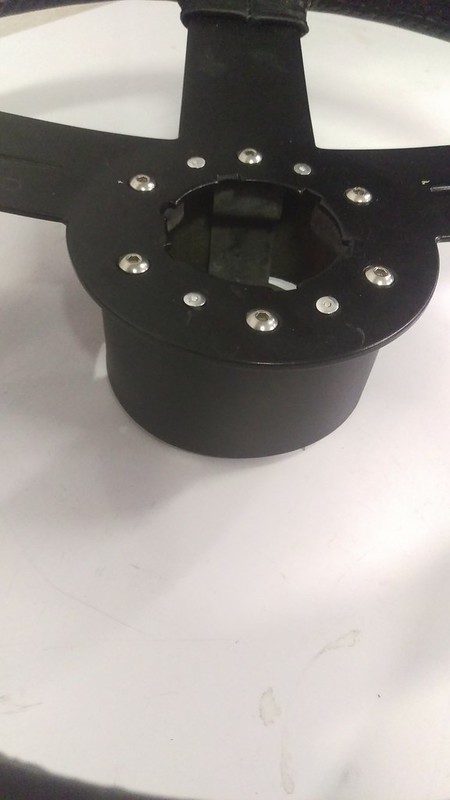
For the interior this time around I was able to get a recovered original IROC steering wheel. Unfortunately when the wheel got to me the steering wheel adapter cover was cracked-useable-but cracked. Later on my 17 mo old daughter broke it (shattered it) when my wife let her in the garage to go visit daddy. It seems to be an out of production part. I was able to make a file in 123d Design and have a friend print it.
For drilling the holes I had to make sure everything was centered so I measured the ID of everything and divided in half to get the radius and then made a circle template with a compass to line everything up.
Sanded it and painted it and it looks completely stock.
Re: Long time coming AKA My 91 Z28 Vert build thread
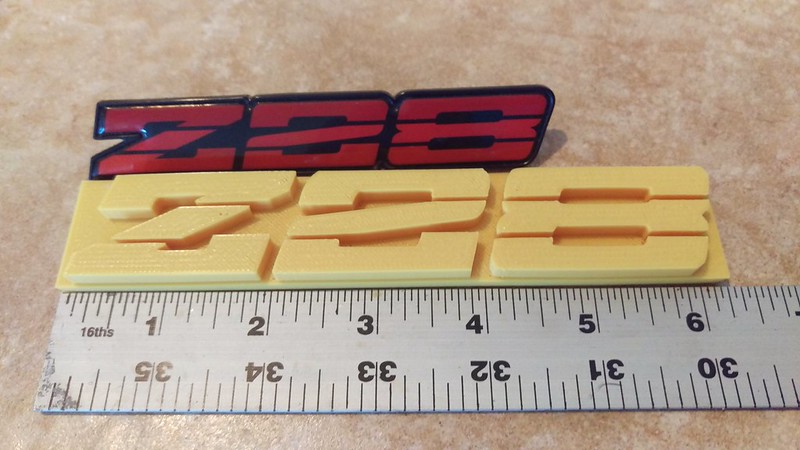
My friend also printed the dash emblem I made. I like it but I'm worried about the UV resistance of this plastic. It seems to have warped slightly after I primed it when I put it in the sun to dry.
If anyone wants either of these files let me know.
Re: Long time coming AKA My 91 Z28 Vert build thread
Originally Posted by Tibo
It really doesn't look impressive in pictures but sitting in the car or looking at it from outside it looks great. Much better than that stock carpet that was glued to it. In this picture the sides/bottom are bolted down but the top is not bolted down.
Coulda fooled me, I'm impressed! Mine I guess being an RS doesn't even have the carpet. That looks really good wrapped in leather. Might have to add that to my eventual to-do list.
For the USB chargers, I know some phones don't like the 1amp chargers. They do have some dual 2.1amp in that style if needbe.
What did you model the 3D files in? I have an AutoCAD model for a ashtray replacement that holds a USB and 12V charger, but can't get it to convert to something 3D printable.
Re: Long time coming AKA My 91 Z28 Vert build thread
Originally Posted by GMan 3MT
Coulda fooled me, I'm impressed! Mine I guess being an RS doesn't even have the carpet. That looks really good wrapped in leather. Might have to add that to my eventual to-do list.
It's really easy to do. You don't have to do a seam on the rear either. If you do sew a seam you can get away with only buying a yard of fabric, otherwise you would need to buy almost 3 yards to make it a continuous wrap. Only other advice about it is to use the thin padding like I did or you will see the rivets and anything else. Also use a good contact adhesive to secure the vinyl/leather in place. Sprayable glues are only good for fabric to fabric or fabric to foam, They are abysmal for fabric or foam to plastic.
Originally Posted by GMan 3MT
For the USB chargers, I know some phones don't like the 1amp chargers. They do have some dual 2.1amp in that style if needbe.
My last two smart phones needed more than 1 amp but there is the 2.1 amp outlet below. I also have a hardwired in USB charger that is for the tablet which is another 2.1 amps.
Originally Posted by GMan 3MT
What did you model the 3D files in? I have an AutoCAD model for a ashtray replacement that holds a USB and 12V charger, but can't get it to convert to something 3D printable.
Autodesk 123d Design is what I used. Is it the file format that is giving you the issue? You should have the ability to convert the file to the format the printer is asking for.
PS I'd love to see the file for the usb ashtray piece, that's a great idea. I have a spare top I could swap to.
Re: Long time coming AKA My 91 Z28 Vert build thread
Originally Posted by robguitargod1
I love the leather on the center console. Hows the interior recovery going?
I'm going to be finishing the pleats for the top of the door panels tonight. I'm hoping I can have the new door panels finished by next weekend. I will need to make the bottom section, make a new template for the backing to attach to the car and then glue the upholstered material to that backing. I'm using corrugated plastic again. I have to also make new seat mounts for the new seats. I think other than that the hard, time consuming work of the interior will be done. Should just be bolting stuff back in. O and I have to go through the PASSkey modules to find out what resistors work with what modules. but that will be easy. I removed the windshield, I'll make a post about that..... I can start the repainting of the windshield frame now.
Re: Long time coming AKA My 91 Z28 Vert build thread
Actually I took a Detour from fixing fire damage to updating the headlights. I've always been looking for the next great option in lighting for our cars. I've had the clear reflector housings with the replaceable bulbs for a while, they are adequate for city driving but abysmal for urban driving. It's no wonder people were always hitting deer. I had read about the BMW headlight housing swap but that is not appealing to me. Also researched cutting apart the clear housing and installing the mini projector housing and running HIDs but have been leary on if I had enough space behind my headlight to do it. Some of the guys I follow on YouTube had done reviews on or built cars with the newer style CREE LED headlights in the popular older styles. I decided to give it a try.
Although they are listed as a 4x6 they are NOT a direct bolt in, there is significant clearencing that you have to do to the rear headlight frame bracketry. The back of the LED unit is fatter than the typical 4x6 housing so you have to cut away the back of the housing with a pair of tin snips. This is what you are left with:
The unit's lens is also is a little longer than stock.
Stock:
Re: Long time coming AKA My 91 Z28 Vert build thread
Here is a shot with the headlights on, brights off. The Passenger side has one headlight on and the driver's side had both headlights on:
This is with just the single passenger side headlight on:
This is with both driver's side headlights on, there is a considerable amount more light thrown to the periphery:
The pictures don't look too impressive but I can't assure you it is a huge difference in person! The bright mode on the new LED units blow the old headlights out of the water. No comparison.
I also had to repolish the headlight buckets since my son scratched them with a wood screw that was lying on the floor.
I love patting myself on the back with how good of a job I think I did on the paint.
Re: Long time coming AKA My 91 Z28 Vert build thread
Originally Posted by robguitargod1
I was all for the LED's you mentioned until I saw the price! For me maaaaybe in the future, but right now I just want to drive!
So what other headlight options are there?
But they are sooooo bright. I opened up the pull through garage door and turned the headlights on last night, these things a crazy bright! I have to post a picture of these things at night. Well worth the money if they last longer than the OE Silverstars. I was able to find all four for $160.
As far as other options there are this style:
I wouldn't run that as a headlight though, they throw off so much periphery light which will just blind/**** off oncoming motorists and give you glare everywhere they can reach.
You could also use the clear housings and buy these:
You have to disassemble the housing and cut up the back of the housing and then find a spot for the HID wiring to go, unless you went LED. Either case I'm not sure if I have enough space behind my headlights for them to work.
Re: Long time coming AKA My 91 Z28 Vert build thread
bright yes but that light pattern looks aweful, you likely would have been better off with a cheap ebay retrofit for the price of those with twice the results.
Re: Long time coming AKA My 91 Z28 Vert build thread
Originally Posted by tylercamaro
bright yes but that light pattern looks aweful,
I'll need you to expand on that. These LED threw less light to the periphery than the stock OE lights and the clear housings that I had. What would be better with the retrofit HID or LED projectors? and remember that I said I didn't think that they would fit length wise in the space I have available.
Re: Long time coming AKA My 91 Z28 Vert build thread
i ended up with mini h1s in my truck and mocked a set in my trans am with pop ups, space was tight but i got there. what i mean by bright with an aweful pattern based on the picture it seems just like a majority of other LEDS they just scatter light. i didnt see the link but are these heatsink equipped? thats of some importance here too. All in all a retrofit isnt gonna blind oncoming (wether you care or not) and youll project so much better with a clean cutoff and a wider span, instead of the light bouncing around everywhere till it escaped the housing in whatever direction.
off topic my tahoe has full on morimoto HIDs with built in relay harness with stock headlights. they are bright as hell, insanely bright, but have no focus. My truck with the retrofits have $40 phillips racing HIRs in them, are less intense in brightness but have such better and further focus than my expesive HID setup.
The swapped LEDs in my thirdgen had no comparison to either until i put an LED projector in them, i think i spent 50 bucks on them on ebay just to try them.based on the architecture i doubt they are true projectors for an LED. they are currently in a buddys car since his is running otherwise id load a pic.
Re: Long time coming AKA My 91 Z28 Vert build thread
Originally Posted by tylercamaro
i ended up with mini h1s in my truck and mocked a set in my trans am with pop ups, they are currently in a buddys car since his is running otherwise id load a pic.
I'd be interested in seeing any of the sets you've done. Not doubting or anything, it just seems hard to find a picture of this done to lights our style.
Re: Long time coming AKA My 91 Z28 Vert build thread
i dont have any pictures of the build but i can try to remember to ask my buddy to get some at his earliest convenience. it was alot of measuring, i notched the core a little bit to get it to sit happily but it wasnt all that bad. my battery was still on the drivers side and the smog stuff on the pass side. i have pics of my truck though. not that it matters, but in essence that people use the 90-98 truck headlights in these might be of some use.
Re: Long time coming AKA My 91 Z28 Vert build thread
Originally Posted by tylercamaro
i didnt see the link but are these heatsink equipped? thats of some importance here too.
They do have a large heatsink, it's the reason that I had to cut off the entire back portion of the metal headlamp bracket. I did not alter the fiberglass headlight and bumper support.
Re: Long time coming AKA My 91 Z28 Vert build thread
Finished the Passenger side's door panel, mostly. I just have to glue on the foam to the back of the white half. With the sewing machine I have it is much easier to sew the two halves together without the bottom having the foam already affixed. Had I had an actual industrial upholstery sewing machine (which new costs as much a MIG welder) I could do it without an issue and do it much faster.
Re: Long time coming AKA My 91 Z28 Vert build thread
Originally Posted by Tibo
They do have a large heatsink, it's the reason that I had to cut off the entire back portion of the metal headlamp bracket. I did not alter the fiberglass headlight and bumper support.
the bracket i can see but the fiberglass support i think would clear just fine with both setups as well
Re: Long time coming AKA My 91 Z28 Vert build thread
Started working on a new center console lid. A reproduction piece is $150 but I already had the means to make one from scratch so I thought I'd give it a shot.
Here is just a picture of what the center console compartment area looks like. It has a ridge to keep the lid centered and a lip that the lid rests on.
I had a bunch of 7/16" thick plywood laying around so I cut out and routed a piece that goes around the ridge and sits on the lip.
Then I made another piece that would be the top of the lid. It's the same dimensions as the lip.
Then I sanded everything flush and routed all the edges. To make sure it's weatherproof I covered it in a layer of Fiberglass resin. I just started sanding it in the picture
I'll finish sanding this and then cover it in a layer of foam and sew the upholstery cover together. Maybe I'll get it done tonight.
Re: Long time coming AKA My 91 Z28 Vert build thread
Right on. Love this sort of thing. I plan to do similar stuff. I think I may relocate the E-brake as well to make some more room and "smooth" things out.
Re: Long time coming AKA My 91 Z28 Vert build thread
Originally Posted by dennisbernal91z
Right on. Love this sort of thing. I plan to do similar stuff. I think I may relocate the E-brake as well to make some more room and "smooth" things out.
Can't wait to see your updates!
The arm mechanism that actuates the cable would be easy to relocate. Just moving the mounting bracket and cutting a new hole. I'm still skeptical on if you'll feel it's going to be worth your time. Do you have any sketches?
The best way to do this as far as strength vs weight vs weatherproof would be to wrap the compartment and center console in plastic wrap and make a mold with expanding foam. Cut that to shape of the lid and then fiberglass it and upholster it.
The fiberglass resin and hardener I used for the lid were both two years old, maybe three and they took forever to harden. I'm talking two days in the sun to fully cure. Needless to say I tossed that old stuff and will buy some new stuff for the next project.
The back lip of the lid I had to remove because it wouldn't allow the lid to open once the hinge was attached.
Re: Long time coming AKA My 91 Z28 Vert build thread
Originally Posted by Tibo
I also worked on the upholstery for the center console. This time around I wanted to use French seams.
Good Choice!
I used Aircraft grade foam (density) on the lid as I put a lot of weight on it getting in and out (probably why the vinyl cracked in the first place).
Re: Long time coming AKA My 91 Z28 Vert build thread
Did you upholster it yourself?
Do you have any other pictures of it?
I'm not familiar with Aircraft foam, did you source it locally or from online?
Did you use the factory piece and just recover it or make your own lid? I'm not a Firebird guy so I can't tell.
Re: Long time coming AKA My 91 Z28 Vert build thread
Originally Posted by Tibo
Did you upholster it yourself?
Do you have any other pictures of it?
I'm not familiar with Aircraft foam, did you source it locally or from online?
Did you use the factory piece and just recover it or make your own lid? I'm not a Firebird guy so I can't tell.
Had a local guy do the rear seats to match and the lid. Did the door panels myself. When I purchased the Corbeau seats, I ordered additional leather to re-upholster the backs and any accents I might want to "tie in."
Aircraft foam is denser and lightweight - so I can put more weight on it with my elbow and it won't deform or condense leaving the leather cover "loose."
Re-used factory bottom portion of lid (and the factory hinges)- screwed and adhesive to upper plywood piece, then foam and leather cover.
Re: Long time coming AKA My 91 Z28 Vert build thread
It looks good. I had gotten a quote from a local boat/automotive upholstery shop to redo my rear seats in a black fabric and they estimated $500
I found a guy through word of mouth now that operates out of his garage and I am going to talk to him about reupholstering the rear to match my front seats-- just like you did.
 01-11-2018, 10:58 AM


 ) fire. Slide the toilet screw cap down and tape it in place with electrical tape.