When you click on links to various merchants on this site and make a purchase, this can result in this site earning a commission. Affiliate programs and affiliations include, but are not limited to, the eBay Partner Network.
Re: Long time coming AKA My 91 Z28 Vert build thread
Originally Posted by robguitargod1
Bring her by and use my lift to pull the transmission!
I'm hoping I can get the car high enough to use my new transmission jack I bought just for the T56.
I remember that picture you sent me of all the snow
I was driving at 9pm last night with the top down and the windows halfway up only wearing a jacket and a Santa hat and I was warm enough.
Re: Long time coming AKA My 91 Z28 Vert build thread
The snow is just about gone, but it could snow in April around here!
Just remember to drain the fluid because you will be flipping out when you tip the trans back to remove it and fluid pours right on your head.
When refilling just pout the fluid into the shifter hole BUT make sure you have your driveshaft installed or the fluid will out out of the tail housing. Or install a spare driveshaft yoke.
Re: Long time coming AKA My 91 Z28 Vert build thread
Originally Posted by robguitargod1
The snow is just about gone, but it could snow in April around here!
Just remember to drain the fluid because you will be flipping out when you tip the trans back to remove it and fluid pours right on your head.
When refilling just pout the fluid into the shifter hole BUT make sure you have your driveshaft installed or the fluid will out out of the tail housing. Or install a spare driveshaft yoke.
You probably know all that, just a reminder.
Thanks, I may end up calling you if when i pull it the input shaft is really loose or for the throw out bearing which gave me trouble last time.
I'm also paying a little extra for a solid metal clutch spline alignment tool, the plastic one was too wiggle and as a result of it (again from what I've read) in the past I've had to use the bolts of the bellhousing to tighten everything together and I hear that gouges the pilot bearing and shortens it's life.
Re: Long time coming AKA My 91 Z28 Vert build thread
The cheaper one is listed for a V6, the other the LT1.
I have a needle bearing style GM pilot bearing without issue. The last major part for me to purchase is an LS7 clutch. I'm currently using the stock clutch that came on the donor car years ago.
Never had an issue with plastic alignment tools. One thing that helps is to clean the alignment dowel pins on the bellhousing and put a little grease on them just to make sure they're not preventing you from seating the input shaft.
Even doing that I've had to use the bellhousing bolts to fully seat the transmission more often than not. IF you have to do that turning the bolts should be nearly effortless, otherwise you have an alignment problem. Rotate the input shaft a little and try again.
Re: Long time coming AKA My 91 Z28 Vert build thread
Originally Posted by 91ls1t56
Tibo, have thought about bellhousing alignment? What is the history of your engine block, was it ever aligned bored/honed?
The block was aligned bored and when the new sleeve was put it it was also align honed. The block was fully machined and prepped, done right for a power adder. There was a time when I was really wanting to do a Procharger so the cylinders' deck surface is even machined for O rings.
Re: Long time coming AKA My 91 Z28 Vert build thread
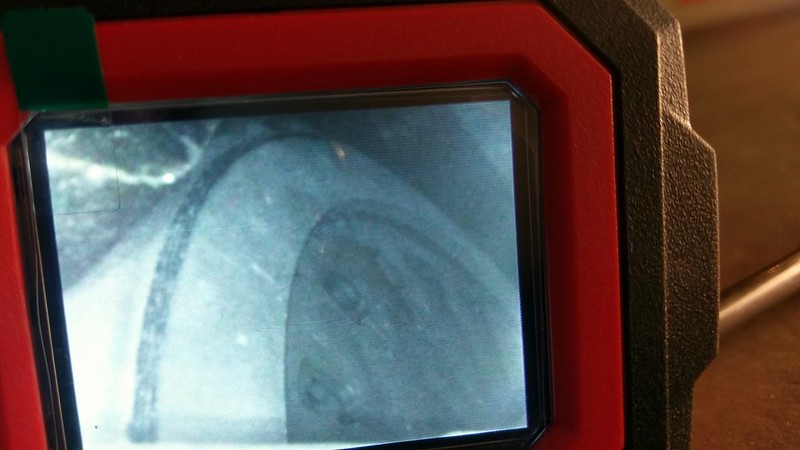
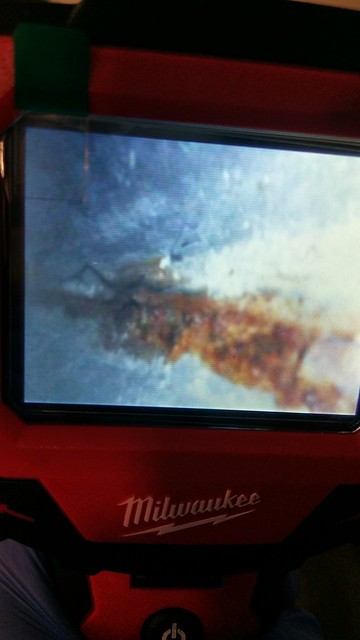
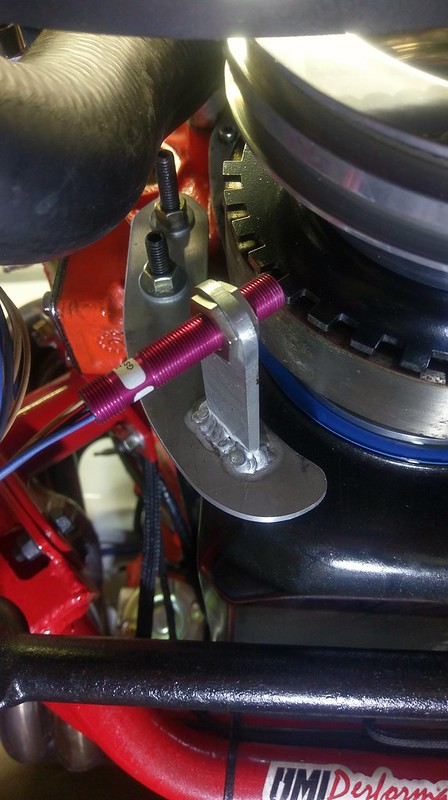
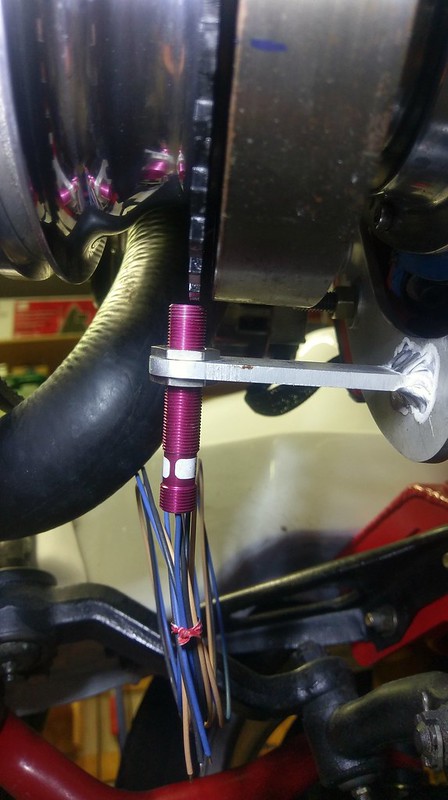
I sent a message to JMD about what I was experiencing with the transmission and it seems like he sent me in the right direction. He told me to pop off the slave cylinder and it's spacer and inspect with I could of the pressure plate for some type of metal to metal contact or a bent clutch fork. Right he was. These pictures are from my Milwaukee bore scope. In this first one you can see a stripe of bright silver along the outer edge of the pressure plate. It seems that the clutch fork was contacting that spot. I think the strange impact noise was when the fork was contacting the pressure plate and a bolt would come along and make that characteristic impacting wrench noise.
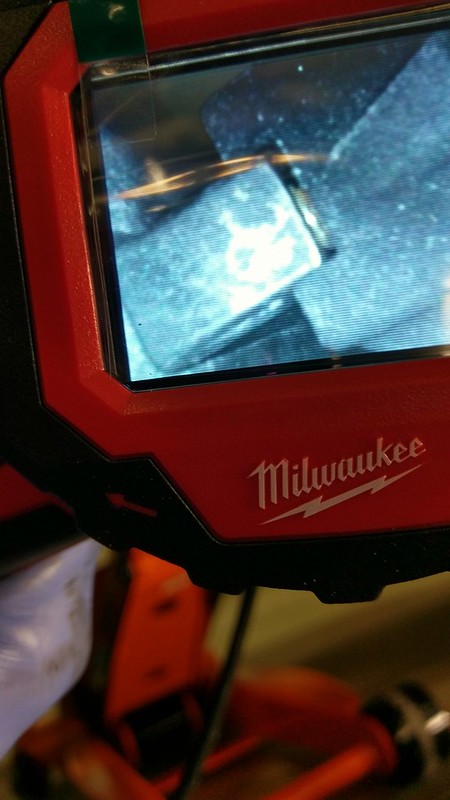
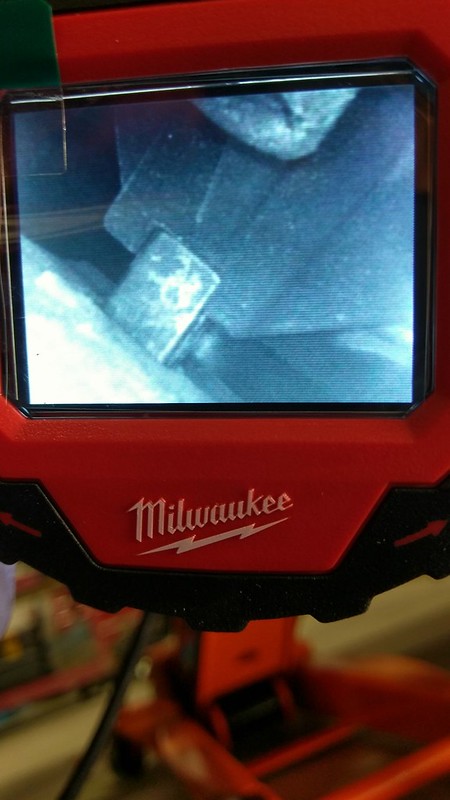
The next two pictures were taken on the backside of the clutch fork. So the back of the clutch fork is seen on the left side. There is a bolt that crosses through the clutch fork perpendicularly and secures the clutch fork to the aluminum housing and it looks like that bolt might be loose. You can see a thread or two of that bolt in the top picture and in the bottom picture I pushed the fork back and closed the gap.
I think the clutch fork might have somewhat popped off so I moved it back on and I'll start it up tonight to see if it starts making the same noise(s).
Re: Long time coming AKA My 91 Z28 Vert build thread
So i tried moving the clutch fork in a little and that didn't cure it. I know it was a very long shot. I also tried reaching a wrench onto the through bolt that holds the clutch fork but it didn't work. It looks like the transmission has to come out.
Re: Long time coming AKA My 91 Z28 Vert build thread
You've got this.
I am glad you caught the actual problem before further (thread or casting) damage occurred.
Happy Everything to you and yours.
Re: Long time coming AKA My 91 Z28 Vert build thread
Originally Posted by jmd
You've got this.
I am glad you caught the actual problem before further (thread or casting) damage occurred.
Happy Everything to you and yours.
Well, you were right again. I went out Christmas night after everyone was asleep and had my own Christmas miracle--I was able to get the bolt tightened up without pulling the transmission. Although it took me not 1, not 2 but 3 (!) different open end wrenches. I used an extended wrench that had almost no angle on the jaws, a open end that could ratchet and a normal open end wrench that I made into an extended wrench which had a 20-30� angle on the jaws. I didn't have much room to turn the bolt head before the wrench handle would hit a side so I had to make one turn with one wrench and the net turn with the other wrench and once in a while throw in the third wrench for a turn. Very tedious but it saved me a lot of work. I did not attempt to put loctite on the threads and it is probably only torqued to 20 ft/lbs at best so we will see how long it stays in place. Hopefully as long as needed.
Re: Long time coming AKA My 91 Z28 Vert build thread
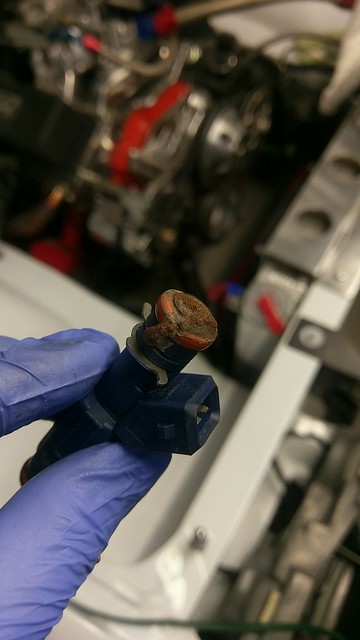
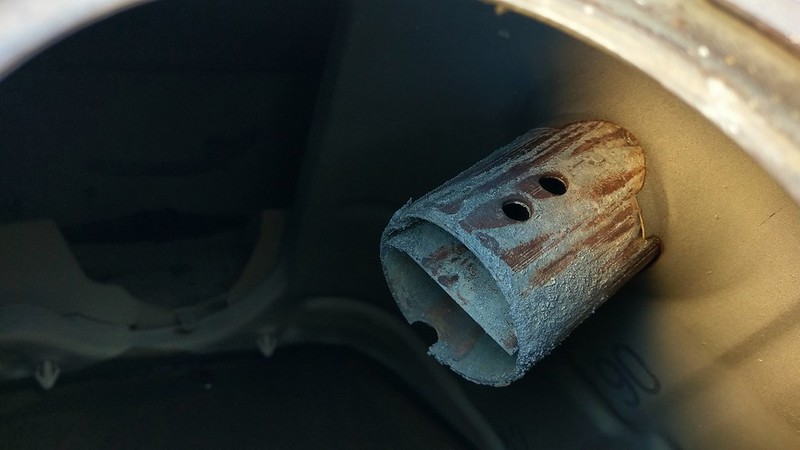
For the last 2-3 weeks I've been dealing with an issue that I thought was ignition related. The car would stall out at random times like spark was being cut and later would stall under any load. The MAP reading were all inline so the MAP sensor wasn't the problem. The fuel pressure was perfect so there shouldn't have been an issue with the fuel pump or fuel filter and the resistance of the injectors all matched each other. All of my grounds were good and tight without corrosion. Car started up normally and would idle fine so it shouldn't have been anything mechanical. I tested out ignition parts one after the other and they seemed to check out as functioning. I then threw a grenade at the situation and put in my spare OEM distributor with a new Ignition control module and my spare ignition coil, same issue was still happening. I pulled the plugs to check for their resistance in case they had been cooked or something and discovered that some were sooty black (pig rich) and some were light tan (very lean). OK, so the problem must be injectors, maybe some were stuck........
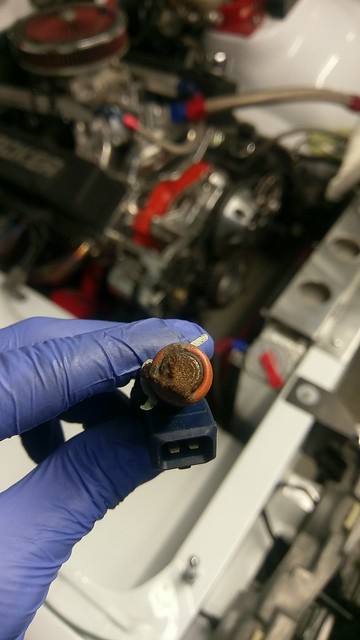
That was the first one I pulled which was also by far the worst! The goop was magnetic so most likely rust in the tank, The filter baskets on at least four of the injectors were either completely full or partially full. I had been using a 30 micron fuel filter and this stuff went right through. I stuck the bore scope down the fuel tank filler neck and saw multiple rust spots and thin trails.
I pulled the fuel tank and discovered quite a mess inside. The inside was covered with that algae stuff from the bacteria that eat the Ethanol and there was corrosion on the inside end of the fuel filler neck. I read some articles on the bacterial growth and it seems I had been doing a few things wrong. When you fill up you always want to fill the tank completely, When the the car is going to sit for more than 2 weeks you should use a fuel stabilizer and the tank should be full. I went ahead and bought a Spectra brand fuel tank instead of going with an LS tank. I didn't want to buy a new fuel pump and worry fiddle with converting it's lines and the stock tank until today has worked just fine for me. So I am just waiting for the new tank to arrive along with a 10 micron fuel filter.
Re: Long time coming AKA My 91 Z28 Vert build thread
Holy cow - thanks for posting, that is really amazing....
I've read how these newer blends of fuel have a very short "shelf life" but this is solid proof of that - good luck, nice car too
Re: Long time coming AKA My 91 Z28 Vert build thread
Originally Posted by BizJetTech
Holy cow - thanks for posting, that is really amazing....
I've read how these newer blends of fuel have a very short "shelf life" but this is solid proof of that - good luck, nice car too
Ill post a picture of the algae on the inside of the tank later. I think all of the stations around me use a 10% added Ethanol blend. I'm going to have to run a bottle almost every month with as infrequently as I drive this.
Re: Long time coming AKA My 91 Z28 Vert build thread
So my plan is to drop and clean my tank today even before reading this. Car has been down for a year and a half. New engine going in and just want to get the old fuel out, replace the filter, and shoot some brake clean through the line. I did convert to a plastic LS tank though. The tank pops in and out no problem and I have pulled it to clean it out before. I have never seen anything like what you are showing us and hopefully I won't. Is you new tank metal, an exact replacement I assume. We have 10% here also, I will let you know if I find a tank full of yuck.
Re: Long time coming AKA My 91 Z28 Vert build thread
Originally Posted by 91ls1t56
So my plan is to drop and clean my tank today even before reading this. Car has been down for a year and a half. New engine going in and just want to get the old fuel out, replace the filter, and shoot some brake clean through the line. I did convert to a plastic LS tank though. The tank pops in and out no problem and I have pulled it to clean it out before. I have never seen anything like what you are showing us and hopefully I won't. Is you new tank metal, an exact replacement I assume. We have 10% here also, I will let you know if I find a tank full of yuck.
New tank is metal, yes. I've read that the Spectra brand tank that I bought are hit or miss, some fit perfect and others have the filler neck at the wrong angle or possibly in the wrong location. If it doesn't fit like stock I'll most likely return it defective so I have my shipping refunded and then run an LS plastic tank. I know with the plastic tanks they are a hair lighter but also they won't corrode.
You may not see any growth on the inside of your tank. If the articles I've read are correct my problem was that I've never had the tank completely full (because I've never taken it to a gas station) and I've never used Fuel Stabilizer when the car would sit for 1-2 months or more without being driven.
Question: With your LS tank do you still have to contort the tank all different directions to remove it because of the filler neck or can you just drop it down and back since the neck is basically a radiator hose?
Re: Long time coming AKA My 91 Z28 Vert build thread
The filler neck is rubber like a radiator hose, had to be trimmed 1.5 inches or so. If it is empty the tank just pops in and out because of the soft filler neck. I recall having 1/4 tank when parking it. We have a high of 5� today, I think that would be the biggest inhibitor of bacterial growth. Perhaps you purchased contaminated fuel.
Re: Long time coming AKA My 91 Z28 Vert build thread
Nothing, nothing at all here. About a 1/4 tank sitting for a year and a half. It smelled old like varnish, but nothing like you have pictured. You mentioned filling the tank completely, what is accomplished by that? Is it the vapors eating away at the top of your tank or any part not submerged in fuel?
Re: Long time coming AKA My 91 Z28 Vert build thread
Originally Posted by 91ls1t56
Nothing, nothing at all here. About a 1/4 tank sitting for a year and a half. It smelled old like varnish, but nothing like you have pictured. You mentioned filling the tank completely, what is accomplished by that? Is it the vapors eating away at the top of your tank or any part not submerged in fuel?
IMO, condensation forms on the exposed metal areas of a partially filled fuel tank that sits (unused) for long periods of time, causing corrosion to form
on the inner portion of the fuel tank
Re: Long time coming AKA My 91 Z28 Vert build thread
That does make sense. I know that ethanol is corrosive and could compound that problem. Do you folks in warmer climates see that more often, that amount of crap in fuel tanks?
Re: Long time coming AKA My 91 Z28 Vert build thread
Originally Posted by Tibo
Question: With your LS tank do you still have to contort the tank all different directions to remove it because of the filler neck or can you just drop it down and back since the neck is basically a radiator hose?
The limp noodle filler neck makes it possible to drop the tank fairly easily without removing the rear end. I still have to rotate it a bit, but nothing like the steel tank. When I first removed the metal tank from my '92, it came out easier than the one in my '86. What I later discovered was someone hacked up the hole in the '92 that the filler neck goes thru. Basically, someone had made two cuts extending the size of the hole down. Since I have to run a stock tank (or fuel cell) in my '86 racecar, I made similar cuts on that car. I also have a trap door in that car, but none in the '92 since the '92 has the LS1 tank.
Re: Long time coming AKA My 91 Z28 Vert build thread
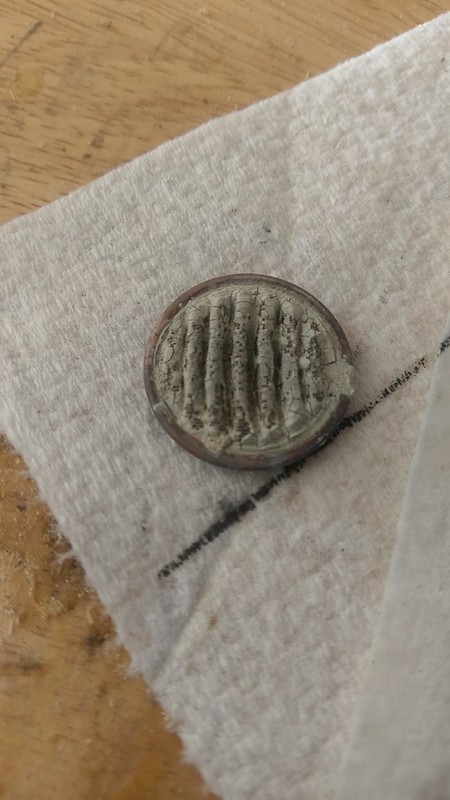
Here is what the 30 micron fuel filter looked like after the gas evaporated.
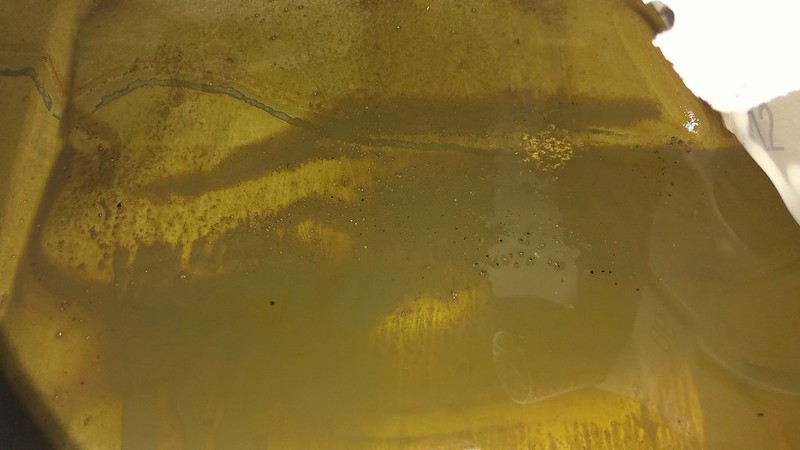
Here is the sludge on the inside of the tank once most of the gas was out. I cleaned the inside of the tank out by hand 2 years ago, so this isn't 25 years worth of crud and goop. The specks that you see are corrosion from the end of the fuel filler neck that dropped down when i touched it.
And this is the fuel filler neck with all its corrosion
Re: Long time coming AKA My 91 Z28 Vert build thread
Originally Posted by 91ls1t56
It looks like it is just the filler neck itself that is deteriorating, the rest of the inside of the tank is good ?
I thought I was seeing lines of rust where the seams were. I read about refurbishing tanks with acids and then coating them with whatever magic paint but in the end a new tank is only $150 for a stock metal reproduction and is a sure thing whereas refurbishing it could be iffy. I bought the Spectra brand tank. It is made in Canada and is the 90-92 style with the baffles so I thought it would be a good tank. WRONG! This tank looks identical when they are laying next to each other and identical on the inside but they very just enough to ruin it. The filler neck is the correct angle and is welded in the right spot but it was welded with an incorrect clocking so the final position of the filler neck is off by about 2". That means I had to cut up my fuel filler neck panel. The driver's side of the tank is also slightly fatter dimensionally, it's the girth that's the issue. On the passenger side the strap bolted up perfectly but the drivers strap wouldn't fit at all. I had to hammer on the tank seams and sides with mallets to get the tank to fit. The only reason I kept the tank is because I had already painted the thing and I was worried about exchanging it for a tank with the same problems. Had I had the time to go to a junk yard and pull an LS plastic tank I gladly would have but I won't have time for that for another 2-3 weeks. My advice is if you have to replace the stock gas tank to get a plastic LS tank. When I take the trip to pull an 8.8 rear end I'll also pull a plastic LS tank and keep it for the next rainy day.
Re: Long time coming AKA My 91 Z28 Vert build thread
Originally Posted by Tibo
I thought I was seeing lines of rust where the seams were. I read about refurbishing tanks with acids and then coating them with whatever magic paint but in the end a new tank is only $150 for a stock metal reproduction and is a sure thing whereas refurbishing it could be iffy. I bought the Spectra brand tank. It is made in Canada and is the 90-92 style with the baffles so I thought it would be a good tank. WRONG! This tank looks identical when they are laying next to each other and identical on the inside but they very just enough to ruin it. The filler neck is the correct angle and is welded in the right spot but it was welded with an incorrect clocking so the final position of the filler neck is off by about 2". That means I had to cut up my fuel filler neck panel. The driver's side of the tank is also slightly fatter dimensionally, it's the girth that's the issue. On the passenger side the strap bolted up perfectly but the drivers strap wouldn't fit at all. I had to hammer on the tank seams and sides with mallets to get the tank to fit. The only reason I kept the tank is because I had already painted the thing and I was worried about exchanging it for a tank with the same problems. Had I had the time to go to a junk yard and pull an LS plastic tank I gladly would have but I won't have time for that for another 2-3 weeks. My advice is if you have to replace the stock gas tank to get a plastic LS tank. When I take the trip to pull an 8.8 rear end I'll also pull a plastic LS tank and keep it for the next rainy day.
What year/model plastic LS tank fits a third gen and how much engineering needs to be done to make it work/fit??
Re: Long time coming AKA My 91 Z28 Vert build thread
Originally Posted by BizJetTech
What year/model plastic LS tank fits a third gen and how much engineering needs to be done to make it work/fit??
There are some good threads that I've read recently but it bolts into the car as normal. The fuel filler neck is rubber and you have to drill a small hole for a sheet metal screw for it's bracket. The fuel lines if, if you do not have them complete to the fuel filter would need a russell connector. The fuel pump/sending unit are different so I think the exterior connector is different.
Re: Long time coming AKA My 91 Z28 Vert build thread
I spent the last month of free time trying to fix an ignition issue which was the fault of the Ignition Control Module (ICM). The problem has been a random misfire and/or an ignition cutout. The problem began with my MSD ICM began circling the drain, it would misfire at RPMs above 4K and then a little later 3K. I went to O'Reilly auto parts and bought a name brand ignition control module, a Standard motor products LX340. I came home and installed it and found out it was dead right out of the box as the engine wouldn't start at all. I put the dying MSD back on and it started up. Returned to O'Reilly and they didn't have another LX340 so they exchanged it for some cash back and they gave me the less expensive MasterPro module. Came home and put that on and it ran fine for about 10 miles before it also began circling the drain with a random misfire. I went to AutoZone now and picked up a Wells brand ICM and installed that. As soon as the engine reached operating temperature the Wells brand ICM began misfiring so badly that the engine wouldn't even idle without dying, forget about just driving down the street.
I had been using the "lesser" quality ICMs because it seems that you can search and find good and bad stories of any brand. You can find articles about AC Delco no longer producing their own products and how their quality on older products is sub-par. You can find articles about how company A makes automotive electronic components for company B, C and D. Not to mention that it's 2019 and the price of electronics have dropped like a rock, I can buy a decent laptop for $500 so the cost of a simple ICM should no longer be what it was.
So being wary of dropping another $40-60 on an ICM I found and bought two NOS AC Delco ICMs and I installed one of them. Camaro runs like a champ again! Not only that but it runs better than I remembered. The MSD ICM must have been on the way out for a while because I've had to retune the fueling table as well as the cranking and afterstart tables. The engine starts up amazingly fast now, I'm talking usually one second of cranking with two seconds cranking max. Without the random misfire the idle speed went up so much that I've had to subtract timing at idle and slightly close the throttle blades idle position. The engine is also pulling more vacuum at idle, about 5kPa more now.
I've since gone back to the autoparts stores and returned the ICMs and paid the difference to upgrade to AC Delco. Even though the car is running very well at the moment I've decided it's time to move away from a distributor based ignition and all it's issues. I'll be switching over to a distributor-less style ignition that uses the individual LS style coils, a crank trigger and a wasted spark ignition schedule.
Re: Long time coming AKA My 91 Z28 Vert build thread
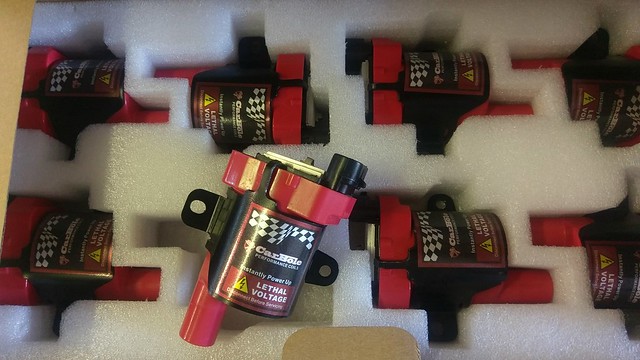
I'm going to use ignition coils from an LS engine and I decided on the D585 style ignition coil that has the visible heat sink. These coils were found on early 2000 model years LS truck engines. I searched for which coil style was the better to use and I couldn't find any clear cut winner, some said the D585 coils were the best choice and others said the square body with epoxy (green epoxy was it?). So I ended up making my choice based off of looks and mounting abilities. I found a complete set of aftermarket coils
I looked over the specs and their operating RPM range even in a wasted spark ignition extends way past the rpm limits of my engine. I found a couple reviews of this set of coils on the LS sites and the most negative reviews of them were only saying that at upper RPMs when under moderate amounts of boost they become inadequate. They should work just fine for my engine.
Re: Long time coming AKA My 91 Z28 Vert build thread
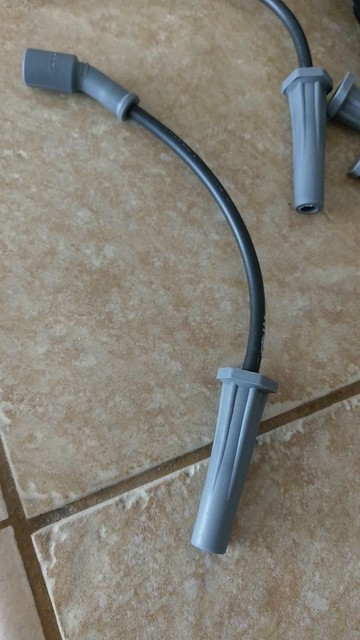
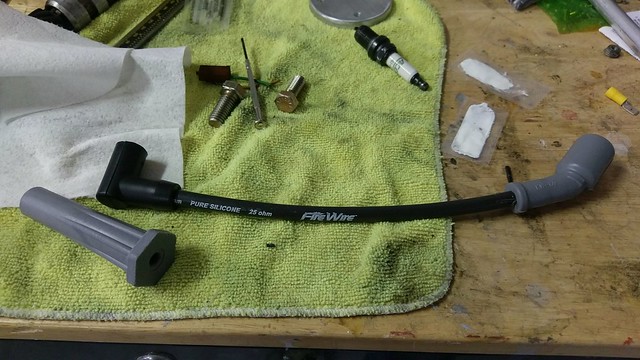
Finding spark plug wires was not a straight forward task. RobGuitarGod measured his LS wires for me and they are ~8.5". I read that the truck wires were a little longer so I measured them and found they were 13" which would work out well for mounting the coils onto the valve covers. I couldn't find a single set of LS spark plug wires that had 135� boots for LS coils on one end and typical 90� hei boots commonly found on distributor based ignitions on the other end. The closest thing I found was for a set of MSD cut to fit wire kit at $170, that's ridiculous. https://www.summitracing.com/parts/msd-32073/overview/
I thought the best solution would be to buy a set of LS truck wires and change the ends out to the style that I needed. I went with a set of FAST 25 ohm (25 ohm, wow!) Fire Wire. https://www.summitracing.com/parts/f...2420/overview/
and a set of 90� hei spark plug boot terminals. https://www.summitracing.com/parts/tay-46055
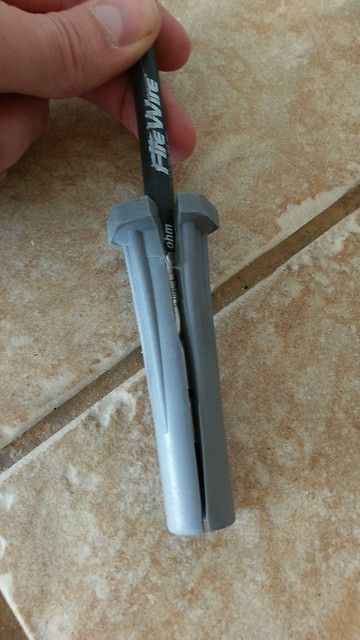
I then went about changing out the spark plug boots. Here's what you start with:
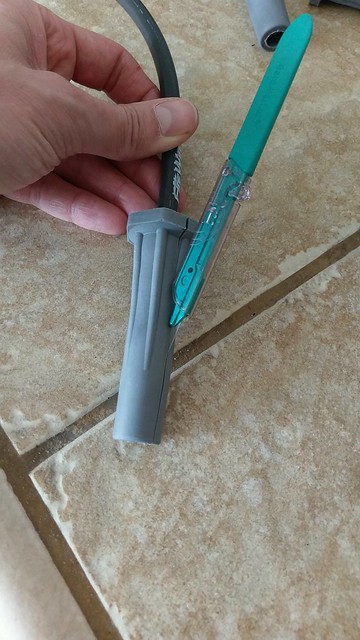
You have to remove the boot and I was worried about tearing one of the ends off and fraying the wire end (I need to preserve every bit of length I can) so I opted to grab a scalpel from work and carefully cut open the boot.
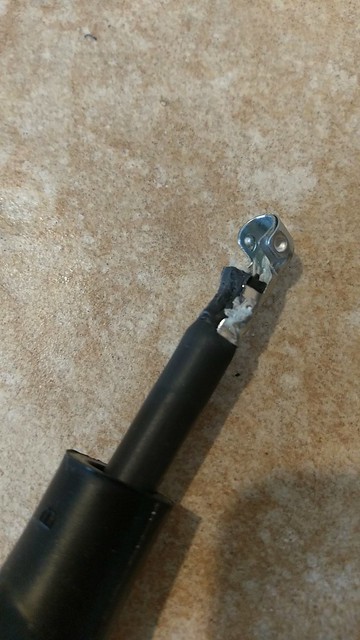
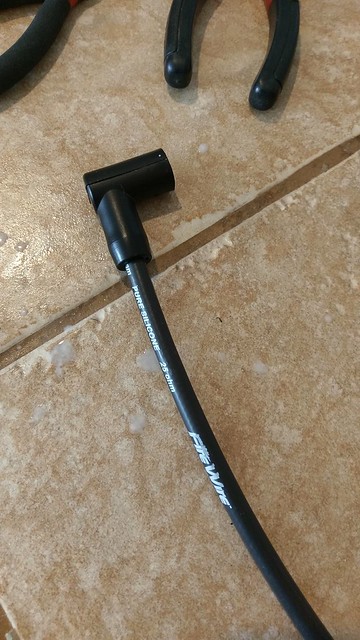
The boot just pulls off then and you are left with the crimped metal. I found the easiest way to get the wire through the new spark plug boot was to leave this 180� end on and push it through the spark plug boot and then just to pull the boot down. Much easier than crimping on the new end and trying to slide that into the new boot. You can see I have the 180� terminal already slid through the boot in the picture below
Again I needed to keep all of the length I could so simply cutting off the existing terminal wasn't an option. What worked best was to hold the terminal with pliers and then use a flat blade screwdriver to open one side of the crimp so I could pull the wire out.
Crimp on the new terminal and slide the boot up and over it
Re: Long time coming AKA My 91 Z28 Vert build thread
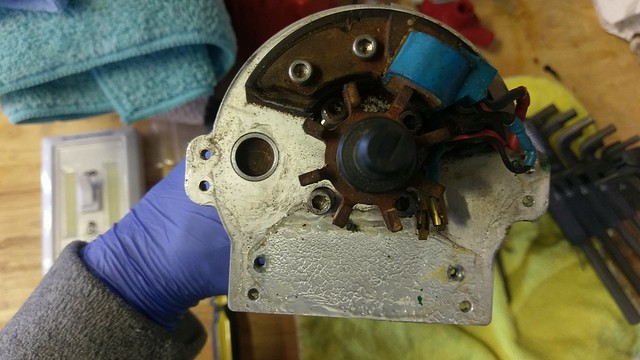
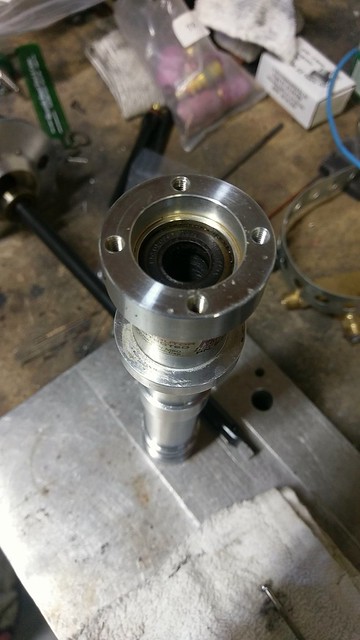
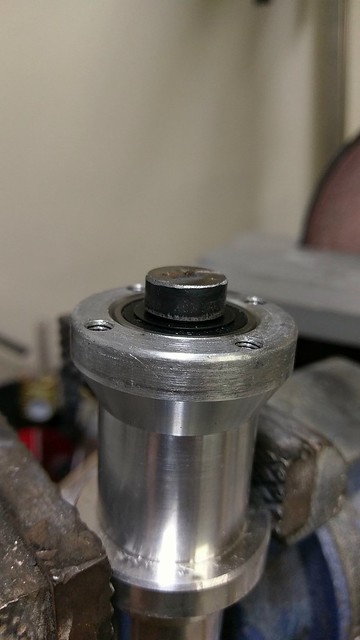
I took me a bit of investigating and tinkering to decide what to do with the distributor since I still need something there to turn the oil pump. Of course you can buy a little stubby distributor drive from MSD/Summit/Jegs/Milodon but they are asking at least $158 (https://www.summitracing.com/parts/sum-850103) and that seems stupid when you can buy the entire ready-to-run distributor for that. The distributor in the pics looks similar to an disassembled distributor so I went about taking mine apart and figuring out how to make my own oil plug.
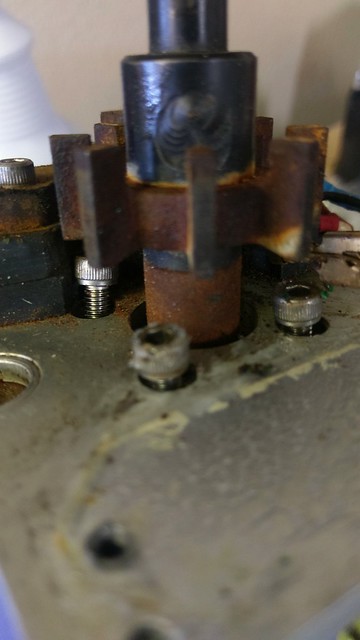
So this is my MSD 8366 distributor with the ignition control module removed. It looks different from a stock GM distributor because it uses a different style pickup. The top plate comes off when you remove the 4 allen head bolts that are sunken in below the arms of the pickup assembly.
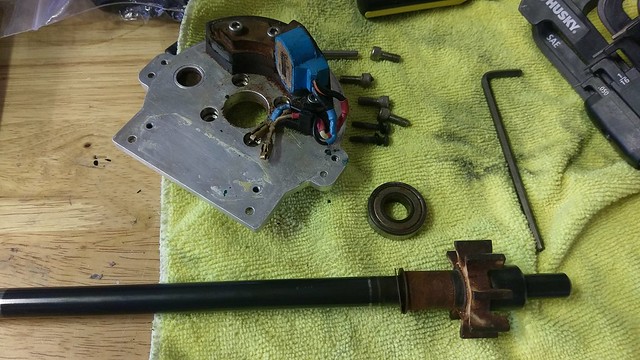
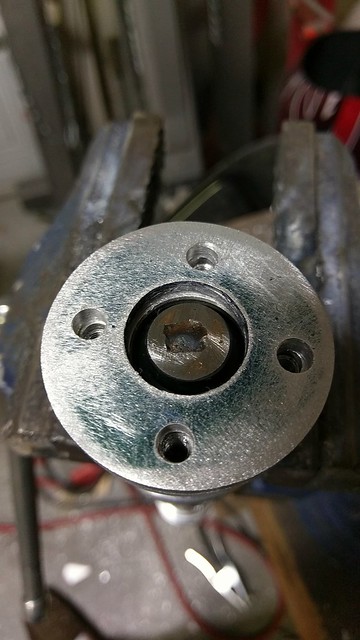
With the 4 bolts removed (and of course the roll pin for the distributor gear) you can pull the aluminum housing apart and with a small amount of pressure, slide the bearing down the shaft.
This is what you're left with
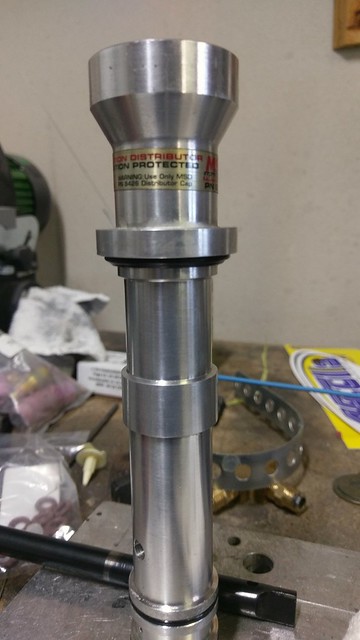
At this point I could see how you would make your own oil plug distributor so I bolted the MSD distributor back together and purchased a Proform billet aluminum distributor from eBay. I thought it would be better to buy an inexpensive Proform distributor and sell the MSD still have over $100 left over.
Re: Long time coming AKA My 91 Z28 Vert build thread
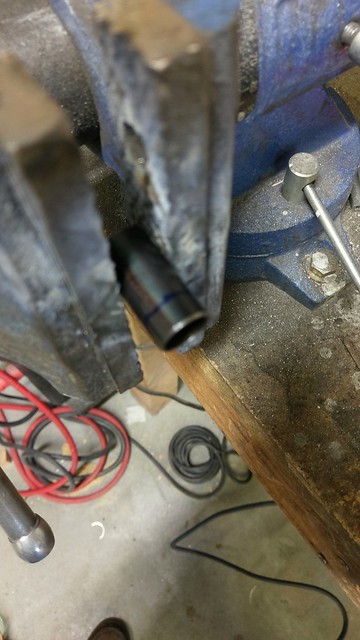
One of the differences between the Proform and MSD distributors was that the MSD had the shaft's collar welded in place to the shaft whereas the Procomp was free to spin. This meant that instead of just cutting the shaft and putting it back in I would have to cut the spacer and shaft and weld them together. When the distributor shaft is removed there is a sunken in area between the bearing and the bottom of the housing, I just measured this distance and used cut the shaft and spacer at that length.
I threw the spacer in the vice and cut it, It and the shaft would be ground down after welding so I wasn't to concerned about it having a slight angle.
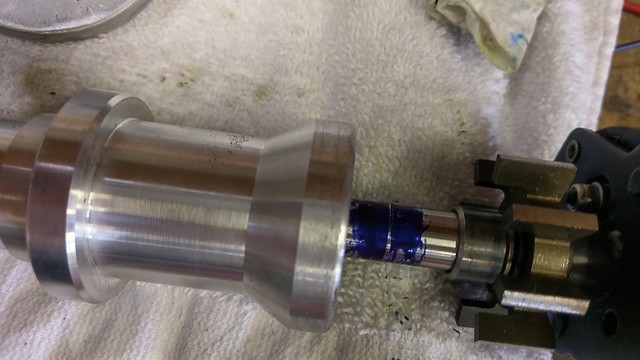
I painted the shaft with some machinist's blue (Dykem Blue) assembled the lower portion of the distributor and made a mark of where to cut the shaft.
I purposely cut the spacer slightly longer than the shaft because it would be easier for me to TIG weld that way
Welded and ground perpendicular with my big stationary disc sander.
Re: Long time coming AKA My 91 Z28 Vert build thread
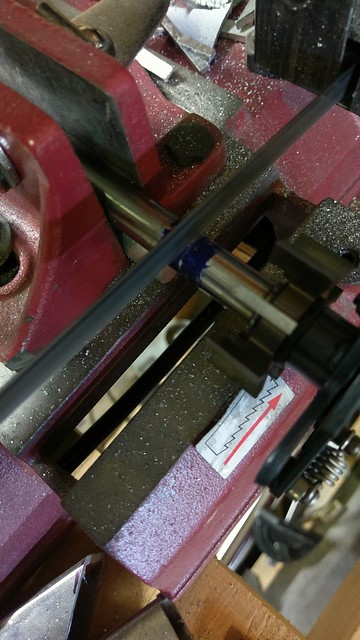
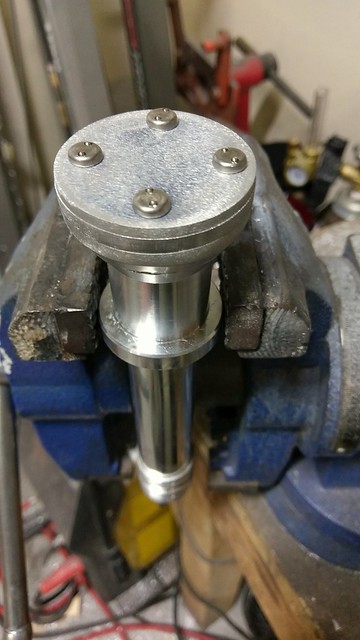
With that part out of the way I just needed to cut down the base. I used a vertical bandsaw for this and it worked but it really made me wish I had a mill. I'll probably sell my drill press and buy a mill drill when we move next.
Then I made a metal disc to act as a spacer and allow shimming the shaft and gear if needed.
and a cover
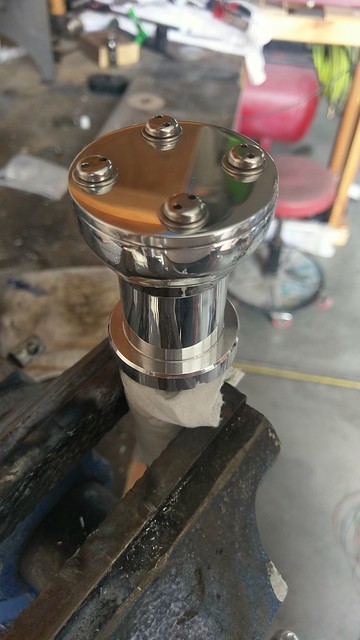
Then finish it off with a nice polish to complete your distributor oil plug for $48. I used the stainless snake eye fasteners just because I've had them lying around for ten years and had yet to use them. They seem to look better than an allen head or phillips fastener.
Re: Long time coming AKA My 91 Z28 Vert build thread
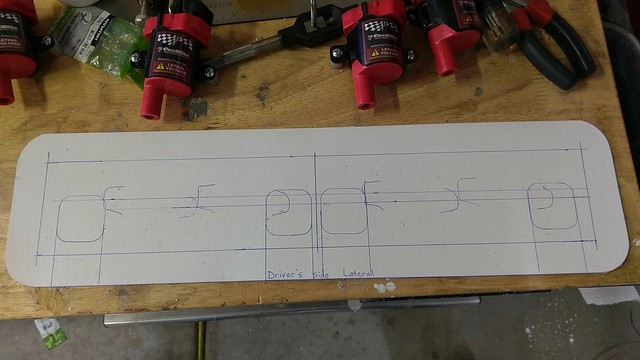
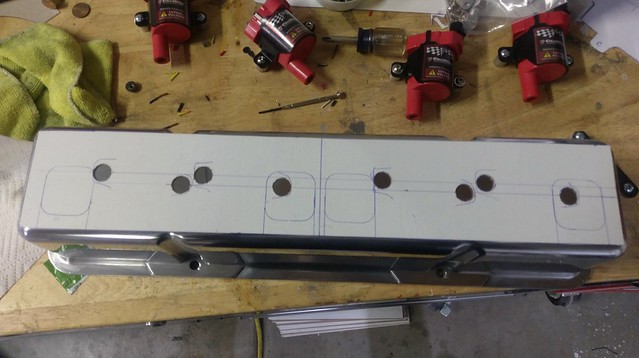
I spent some time making a template for mounting the ignition coils. Its nothing special. I traced the valve cover onto some cardboard and then traced on the flat raised portion of the valve cover. Found and marked the center and then I took an exhaust gasket and traced that on to show me the location of the primary tubes because I want the wires to be centered between the front two and rear two cylinders.
Then just finding and tracing the location for the ignition coils. I'm more interested in keeping the wires away from the tubes than I am with a perfectly uniform appearance of the coils on top of the valve covers.
For mounting the coils I looked into some LS ignition coil brackets for the SBC but I don't like the looks of them. They just look like too much of a compromise. https://www.eficonnection.com/home/p...l-bracket-d585
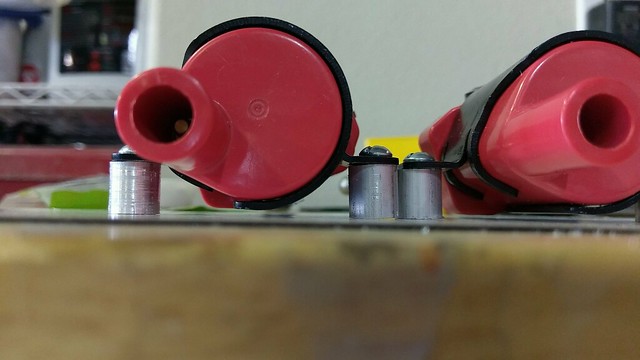
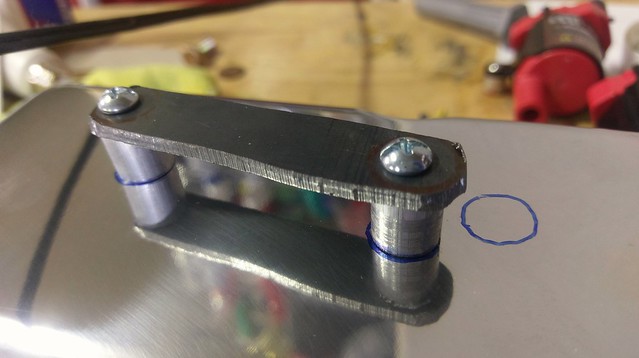
So my solution was to cut some 1/2" OD aluminum rod, drill it and tap it for 10-24 bolts. They are just long enough to allow 1/8" clearance between the valve cover and ignition coil.
Re: Long time coming AKA My 91 Z28 Vert build thread
I was able to weld up the driver's side valve cover's ignition coil mounts and wire the coils. I bought unassembled ignition coil connector metripacks so I could run the MegaSquirt wires straight into the connector otherwise it would have been a Gm color to a different colored wire for my MegaSquirt wire harness.
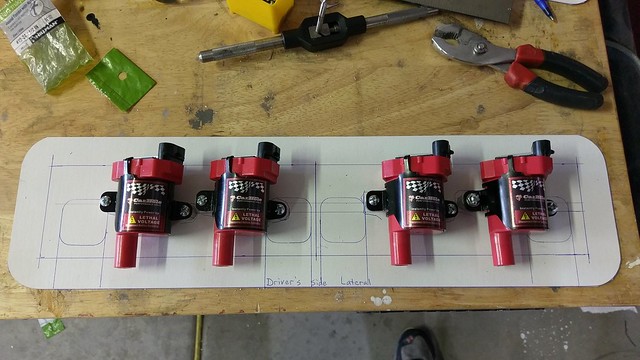
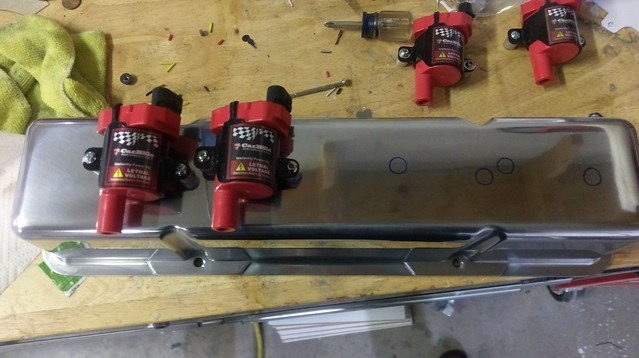
I cut out my template and placed it on the valve cover to made sure everything passed that smell test. Looked fine.
I was nervous about the high frequency start, AC current or heat ruining the coils during welding so I made this nifty little bracket to hold the mounts in place while I welded them.
I used a scalpel again to cut out the holes where the standoffs would go and then used a permanent marker to trace the locations onto the valve cover.
Trial fit before welding
Bracket in place
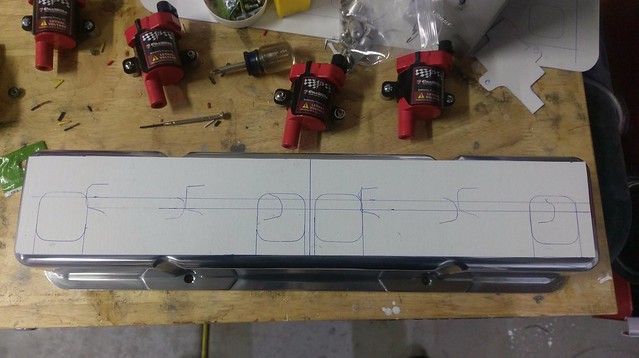
Standoffs spot welded in place and coils still look right on for placement.
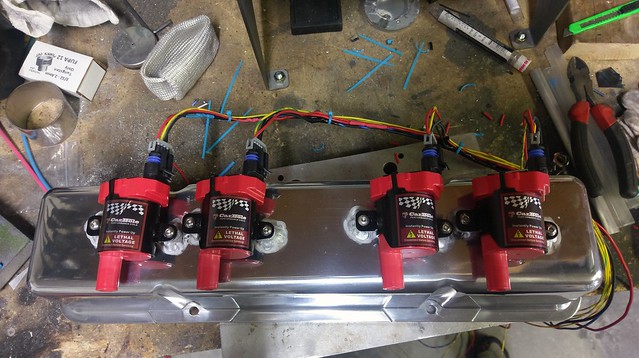
All the coils in place and wired up. I wired all the coils to use the same reference ground, power ground and power wire to simplify wiring. The welds look OK, not great. I have a tough time welding in a 1/2" circle without starting and stopping which leads me to the larger welds. I'll order some more loom and do the other valve cover next week.
Re: Long time coming AKA My 91 Z28 Vert build thread
10 A's for effort, looking good. My personal opinion, not to criticize your work at all. I never did like the valve cover mounted coils on the LS engines from an aesthetic point of view. Just curious if gave any thought to mounting them on the frame rails. Perhaps 4 set of 2 in order to keep the wires the same length. Also the LT1 optispark wires have the same coil connector, but it is straight, not 135�/45�.
Re: Long time coming AKA My 91 Z28 Vert build thread
Originally Posted by 91ls1t56
10 A's for effort, looking good. My personal opinion, not to criticize your work at all. I never did like the valve cover mounted coils on the LS engines from an aesthetic point of view. Just curious if gave any thought to mounting them on the frame rails. Perhaps 4 set of 2 in order to keep the wires the same length. Also the LT1 optispark wires have the same coil connector, but it is straight, not 135�/45�.
I don't take any offense, we all have our ideas of what we like best. I went with the coils on the covers because it had the least amount of negatives for me. I can't really bring myself to drill holes into my frame rails or firewall or cover up the firewall with ignition coils after all the work I put into the engine bay. With the coils on the cover it was the shortest distance to each plug and it would result in all the wires being uniform length. They would also be a stock length so if I burned a boot I could just buy a stock truck wire. I did see one guy do the conversion make this bracket and I really considered it too.
I came across a couple other ideas: There is the Ford EDIS conversion which would use 2 ignition coils with each having four terminals. I saw one person mount them in the distributor region and I've seen people mount them to the firewall. There are also ignition coil brackets and relocation harnesses for the LS coils to remote mount them to the firewall. I also came across some fabricated sheet metal beauty covers that go over the coils on the valve covers, I think they were for LT1 engines but easily adaptable. I also thought about doing 4 ignition coils with each having two terminals like the 90s GM 4 and 6 cylinder engines used but I couldn't find any "smart" or logic coils that had two terminals. I also considered mounting the coils inside the dash and running them through the firewall.
Re: Long time coming AKA My 91 Z28 Vert build thread
Injured Police Officers Foundation car show in Vegas this past Sunday.
200 mile round trip and not a single hiccup from the car. With that over I'll be taking the car down for my ignition system swap
Re: Long time coming AKA My 91 Z28 Vert build thread
I welded in the -6AN bung for the PCV system and I wasn't happy with the polish job that the valve covers came with so I re-polished them. Bolted the ignition coils on and set the valve cover in place. The passenger side I still have to weld in the oil fill hole.
Re: Long time coming AKA My 91 Z28 Vert build thread
I got the crankshaft pulley back from my friend. We decided the easiest way for mounting the toothed wheel would be to machine the aluminum crankshaft pulley down while keeping the center lip intact to keep it hub-centric. Machining the pulley lets me not have to use spacers on the water pump, alternator and power steering pump to preserve belt alignment. I repolished the pulley while it was off.
Re: Long time coming AKA My 91 Z28 Vert build thread
I also am taking the time to redo my PCV system. I'm more or less returning it back to the GM OEM style instead of the hot rod style with the chrome breather on one cover and a pcv valve to the other cover. The little chrome breathers drip oil under heavy throttle/high load conditions and you're constantly wiping them off. So I welded a -6AN bung onto each valve cover and am using some leftover braided hose and some 90� hose ends. To connect the hose to the air clearer base like the OEM TBI style I had an extra fitting that was lying around that was -6AN on on side and 1/4" NPT on the other. Drilled a hole through the air cleaner base and then just cut the end off of a Female 1/4"NPT fitting to turn it into a nut. I think it will work and looks great for a PCV setup!
Re: Long time coming AKA My 91 Z28 Vert build thread
For the PCV valve I settled on a PCV valve for a 2000's ish dodge 3.0L. It's a straight PCV valve and uses a 1/8" NPT threaded end and a barbed end so it would hide easily behind my intake. I also thought about using a pcv valve from a 2003 Dodge Neon SRT (would have worked out better) since they use a 3/8" NPT and are 90� but I don't think I could have gotten an open end wrench on it to tighten.
So I just bought a 1/8" NPT to 3/8" NPT adapter/bushing and screwwed it into the back of the plenum.
I also welded (from the underside) the oil fill hole for the passenger side valve cover. Seems to be coming together nicely.
Re: Long time coming AKA My 91 Z28 Vert build thread
I finished making the crankshaft position sensor bracket also. It's 3/16" Aluminum I had laying around. I thought about buying a premade bracket but it turns out that they are all outrageously priced and some of them wanted you to buy them as a kit with their toothed wheel and sensor.
I bought my sensor from DiyAutoTune for $53 https://www.diyautotune.com/product/...sition-sensor/
But this sensor from MSD that I found afterwards (https://www.summitracing.com/parts/msd-2348) would also have worked and I actually like it better since the sensor has a hex end on one end and is shorter and came with a weather pack connector whereas I had to use my own.
The toothed wheel I used also came from DIYAutoTune and was $29 https://www.diyautotune.com/product/...heel-no-slots/
The aluminum I used came from the local recycling facility and was $3 for a pretty big piece.They always have at least 1 pallet full of good quality weldable structural aluminum, it's wonderful.
I'll buy some stainless studs that are shorter, these long ones are all I had laying around.
I had to offset the sensor just a little in hopes that it wouldn't register off of the balancer between the teeth. I think this will work out fine, MegaSquirt also has a filter for the signal if it does pick it up just a little.
The sensor body is a M12x1.0 so I drilled a hole and threaded it. The sensor asks for a gap of 1.5mm or ~ 0.060"
Re: Long time coming AKA My 91 Z28 Vert build thread
Had to spend most of my free time lately on inside and outside home projects so not much has been done. I have my new oil pump drive dropped in and the wiring is in place and halfway loomed but not hooked up to MegaSquirt. Hoping this week to have the wiring fully connected because I'll be working another 7 days straight after this coming weekend.
Re: Long time coming AKA My 91 Z28 Vert build thread
Engine bay is all wrapped up (literally) and the new wires are soldered up to MegaSquirt.
Next on the To Do list is to change all of the software parameters in MegaSquirt. Then run the Tooth Logger in MegaSquirt to make sure the crankshaft sensor is reading the toothed wheel correctly and MegaSquirt is getting a clean signal. I am using a shielded three wire bundle for the crankshaft position sensor so I don't expect much noise. Then verify that all the coils are putting out spark and it should start up. I avoided a potential SNAFU with the ignition coil wiring yesterday. I wired the ignition coils as anyone probably would, cylinder 1 was coil A, 2 was B, 3 was C and so on. Then I realized that MegaSquirt fires the coils in order of A,B,C... and A SBC needs a firing order of 1,8,4,3,6,5,7,2. Haha, whoops. Glad I fixed that before I tried starting it up and blaming the problem on something else.
Re: Long time coming AKA My 91 Z28 Vert build thread
Verified that MegaSquirt was receiving a strong and clean signal from the crankshaft position sensor and checked the spark from each coil. It's pretty neat. MegaSquirt offers a test mode that allows you to check (with the ignition on and engine off) spark at each coil, each injector, the idle air control valve, fuel pump and coolant fans. I changed all of the applicable software parameters that I was supposed to and the engine fired up on the first try. I was surprised to see that the idle was actually more stable. I had been forever used to seeing the tach needle bounce around 50 RPM or so but this is just dead steady. I literally thought my tach needle was stuck when it was idling because it wasn't moving. It seems like I'll really enjoy the new ignition system. Now I can go out to a wrecking yard to pull an 8.8 rear and start on that project.
Re: Long time coming AKA My 91 Z28 Vert build thread
I took a trip to the junkyard and pulled an 8.8 rear end from a 1994 Ford Ranger that had 3.73s, Traction Lock and an ABS ring/sensor. The same trip I pulled the complete rear end from a 99 (LS style) Firebird Formula. I used this site that made identification of 8.8s a breeze off of just the door tag: https://www.therangerstation.com/how...ag-door-codes/
I managed to pull both rear ends by myself and be in and out in about 2.5 hours. The simplified plan is to cut the center section out of both rear end assemblies and weld the GM tubes onto the Ford. Both rear ends are 28 spline so as long as the axle tubes end up the proper length for the GM axles all should be good.
Here is a picture of the inside of the Ford 8.8 differential. On the left side is the stock Ford axle with it's C clip and the Right side is the GM axle and it's C clip
The GM axle fit pretty well and it seemed as if it had less play in it so I measured the play off of the lug nuts in the amount that you could roll each axle forward and backward. The GM axle had 0.030" less play in it than the stock Ford axle did. I pulled the axles and took a bunch of measurements of the C lips and axles:
I feel much more comfortable with this project after measuring the axles and play. I had read a couple accounts online about how the GM axles were looser but my measurements show otherwise. Next step will be making a welding jig based off of the GM LS style rear end.
Re: Long time coming AKA My 91 Z28 Vert build thread
A few more measurements, this time for the axle tubes. From what I've found the Ford 8.8 in a 28 spline and 31 spline both share the same center section housing and inner axle tube measurements but the lateral aspect of the 8.8 28 spline axle tubes neck down. You can see it in this picture, I've already removed the brackets from the tube here:
So you can see that the way to do this will be to cut the Ford tubes before they neck down and then lightly sand down the OD of the GM tubes so that they can be slid into the ID of the Ford tubes. Below is a picture of the Ford 8.8 after I cut the necked down portions of the tubes off. Ford did not use two identical tubes length wise.
This coming week I'll have to finish grinding off the brackets on the Ford's tubes and build a positioning/welding jig based off the GM "LS style" ten bolt rear. I also have a spare thirdgen ten bolt housing so I will try to make the jig also fit that size.
 12-22-2018, 12:28 PM