Automatic Window Project
 01-03-2015, 02:45 PM
#1
Junior Member

Thread Starter
iTrader: (1)

Join Date: Apr 2011
Location: Ames, Iowa
Posts: 47
Likes: 0
Received 0 Likes
on
0 Posts
Car: 84 Z28
Engine: 350
Transmission: 700R4
Automatic Window Project
My driver side door always closes hard when the window is up. A while ago, I began wondering if I could make the window roll down when the door is open, and back up when it's closed. This would make the door significantly easier to close. For a different project, I had been learning the ropes of an Arduino (A very cool micro-controller, check out the link to learn more). So I began the process, and over the course of several months I wrote the code, gathered the parts, and built the circuit. Here are a few pictures, a video, and several notes at the end:
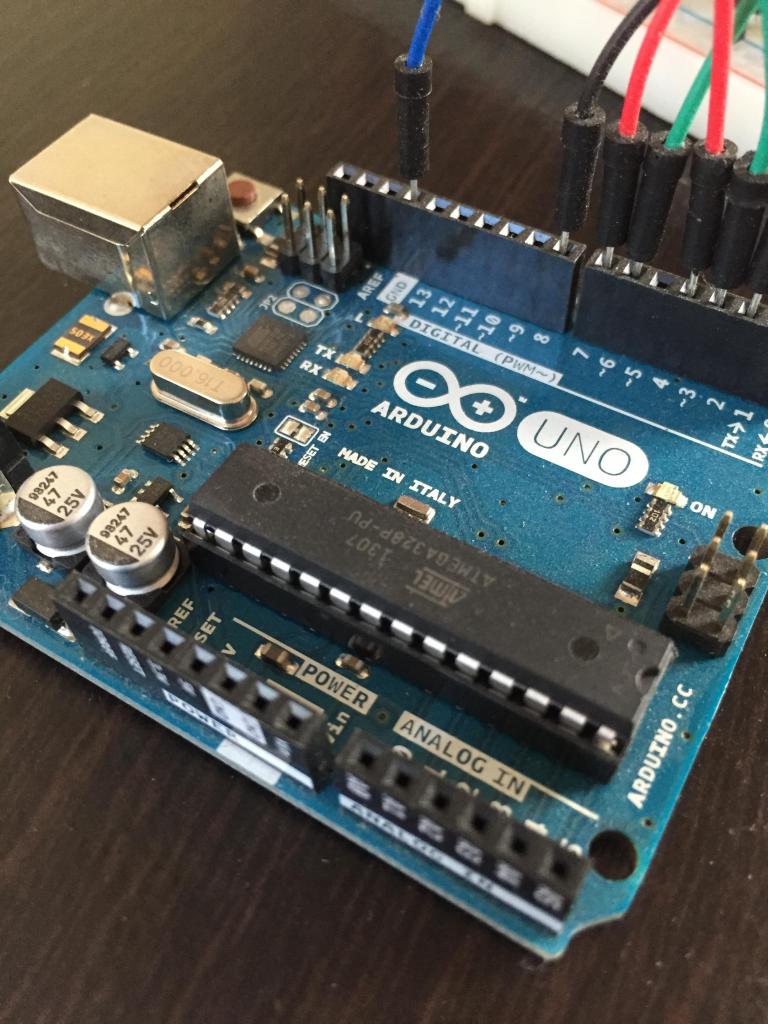
The Arduino, which was used to develop and test the circuit, then to program the smaller chip (ATtiny84) that would go in the permanent circuit.

One of my first prototype circuits

Box of parts from Mouser

The circuit before it got soldered together. Here you can see the ATtiny84 in its socket.

Bench testing before the install
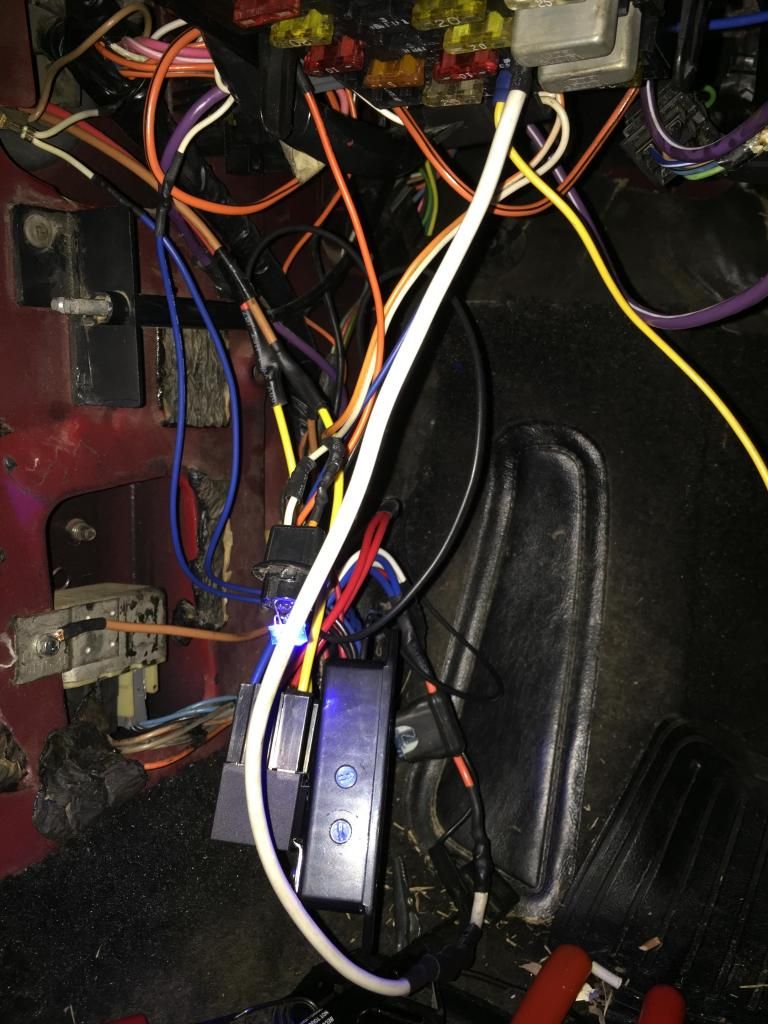
The messiest part — the install. Here you can see the relays mounted on top of the box and the two blue potentiometers on the side of the box. They control the amount of time the window spends rolling up and down. I used the push buttons on the door to sense when it is open. They're normally open, then ground when the door is opened.
A video showing the thing in action.
One potential problem with this is setup is if I had the window roll every time the door was opened, it would do it if the window was purposely left cracked. To solve this, I added a little push button under the dash; the window will only roll after you tap it (it doesn't roll when you tap it, it just tells the micro-controller that it's okay to roll the window when the door is opened). In the future, I want to add a sensor in the door that will detect when the window is all the way up. This will accomplish two things: it will know if it needs to roll the window, and it will roll the window up until it's closed (currently it's timing based).
My passenger side door opens and closes fine, so I didn't add it to that, but in the future I would like to add it to both doors and rewire them so that they are both ran off relays; only the driver side is wired up with a relay right now. This will allow me much greater control over the windows — including automatic roll up/down and key fob rolling (yes, there are pre-made modules that allow you to do this, but I enjoy the electronics bit).
Another interesting thing I noted is that, contrary to every wiring diagram and forum post I could find, our window switches are rest at open. This means that when the switch is in the neutral position, both legs of the motor are simply open. Check out this wiring diagram from austinthirdgen.org, and you'll see that it would have you believe they rest at ground.
The rest at ground is a much more common configuration, and I only found two sources (1, 2 - Page 4) that indicate our car's switches do, in fact, rest at open. According to theses sources, only our cars are wired in this configuration. I even took one of my switches apart to confirm (again, forgot to take a picture
  ).
).
In addition to the window rolling, all my interior lights are LEDs, so I also set this up to fade my lights on and off when the door is opened/closed. Anyway, I haven't put a lot of time on it, but it seems to work great. I'm already looking forward to improving it with an in-door sensor.
The Arduino, which was used to develop and test the circuit, then to program the smaller chip (ATtiny84) that would go in the permanent circuit.
One of my first prototype circuits
Box of parts from Mouser
The circuit before it got soldered together. Here you can see the ATtiny84 in its socket.
Bench testing before the install
The messiest part — the install. Here you can see the relays mounted on top of the box and the two blue potentiometers on the side of the box. They control the amount of time the window spends rolling up and down. I used the push buttons on the door to sense when it is open. They're normally open, then ground when the door is opened.
A video showing the thing in action.
One potential problem with this is setup is if I had the window roll every time the door was opened, it would do it if the window was purposely left cracked. To solve this, I added a little push button under the dash; the window will only roll after you tap it (it doesn't roll when you tap it, it just tells the micro-controller that it's okay to roll the window when the door is opened). In the future, I want to add a sensor in the door that will detect when the window is all the way up. This will accomplish two things: it will know if it needs to roll the window, and it will roll the window up until it's closed (currently it's timing based).
My passenger side door opens and closes fine, so I didn't add it to that, but in the future I would like to add it to both doors and rewire them so that they are both ran off relays; only the driver side is wired up with a relay right now. This will allow me much greater control over the windows — including automatic roll up/down and key fob rolling (yes, there are pre-made modules that allow you to do this, but I enjoy the electronics bit).
Another interesting thing I noted is that, contrary to every wiring diagram and forum post I could find, our window switches are rest at open. This means that when the switch is in the neutral position, both legs of the motor are simply open. Check out this wiring diagram from austinthirdgen.org, and you'll see that it would have you believe they rest at ground.
The rest at ground is a much more common configuration, and I only found two sources (1, 2 - Page 4) that indicate our car's switches do, in fact, rest at open. According to theses sources, only our cars are wired in this configuration.
I even took one of my switches apart to confirm (again, forgot to take a picture ).In addition to the window rolling, all my interior lights are LEDs, so I also set this up to fade my lights on and off when the door is opened/closed. Anyway, I haven't put a lot of time on it, but it seems to work great. I'm already looking forward to improving it with an in-door sensor.
Last edited by acliad; 01-03-2015 at 03:00 PM.
 01-03-2015, 04:22 PM
#2
Member
iTrader: (3)
Join Date: May 2009
Location: Des Moines IA
Posts: 384
Likes: 0
Received 13 Likes
on
8 Posts
Car: 89 forrmula
Engine: 350 TBI
Transmission: T-5
Axle/Gears: 3.55
Re: Automatic Window Project
I found the same thing to be true about the switches using the express down option. Almost any other GM vehicle without a BCM has window switches which are grounded @ rest. I had to add a grounding relay to the "up" trigger wire to my test harness for the auto express down feature to work properly.
Anyway, what about if its raining out and you open the door?
Anyway, what about if its raining out and you open the door?
01-03-2015, 05:18 PM
#3
Junior Member
Thread Starter
iTrader: (1)
Join Date: Apr 2011
Location: Ames, Iowa
Posts: 47
Likes: 0
Received 0 Likes
on
0 Posts
Car: 84 Z28
Engine: 350
Transmission: 700R4
Re: Automatic Window Project
Haha, it's ridiculous. I had the thing installed when I discovered they are rest at open.
That's what the button is for. It won't roll the window if I don't press it. So if it's raining, I just won't press it. But I don't think it'd be a big deal either way. The window only stays open for 1 and a half seconds after the door is shut.
That's what the button is for. It won't roll the window if I don't press it. So if it's raining, I just won't press it. But I don't think it'd be a big deal either way. The window only stays open for 1 and a half seconds after the door is shut.
01-03-2015, 06:30 PM
#4
Re: Automatic Window Project
Awesome to see someone with a working prototype of this!
I would buy a kit like this in an instant if it were for both doors and installation was easy. I take pride that not a single wire on my car has ever been cut or tapped, even the speakers. If I could install this with absolutely minimal alterations that would be awesome!
Are you considering making a production version for resale?
Alex
01-03-2015, 08:46 PM
#6
Junior Member
Thread Starter
iTrader: (1)
Join Date: Apr 2011
Location: Ames, Iowa
Posts: 47
Likes: 0
Received 0 Likes
on
0 Posts
Car: 84 Z28
Engine: 350
Transmission: 700R4
Re: Automatic Window Project
That's really cool! I bet there aren't very many older cars, let alone Camaro's/Firebird's out there like that. Props.
I have thought about it. I actually designed it with the possibility in mind. But I'd like to make my improvements and test it out a bit before I sold it. The hookup would require a good, constant, 12v source and ground, but those could both be added rather than spliced. You would have to intercept the window switches, but that's basically just cutting them, then hooking both sides up to the board. I spliced in to the buttons on the doors to tell the ATtiny that the doors were open, but I'm considering making a small switch in the door handle instead. If I did that, then the only wires that would need to be cut are the switch/motor wires.
If there's a lot of interest for this, then I'll consider working on the improvements a bit sooner.
01-03-2015, 08:50 PM
#7
Re: Automatic Window Project
Could you make an adapter that would go under the shifter plate the window switches could plug into and run so those wires don't need to be cut either? Possibly the same or the window motors? That would be freaking awesome and totally worth the $$$.
If you did it to the door handle instead, how would that keep the windows from coming down when someone pulled the handle even if the door was locked, thus allowing someone access to pop the locks? I mean if you did it to the inside door handle then it wouldn't go down when opening from the outside, same for vice versa I guess, hmmm.
If you did it to the door handle instead, how would that keep the windows from coming down when someone pulled the handle even if the door was locked, thus allowing someone access to pop the locks? I mean if you did it to the inside door handle then it wouldn't go down when opening from the outside, same for vice versa I guess, hmmm.
Trending Topics
01-03-2015, 08:56 PM
#8
Junior Member
Thread Starter
iTrader: (1)
Join Date: Apr 2011
Location: Ames, Iowa
Posts: 47
Likes: 0
Received 0 Likes
on
0 Posts
Car: 84 Z28
Engine: 350
Transmission: 700R4
Re: Automatic Window Project
Could you make an adapter that would go under the shifter plate the window switches could plug into and run so those wires don't need to be cut either? Possibly the same or the window motors? That would be freaking awesome and totally worth the $$$.
If you did it to the door handle instead, how would that keep the windows from coming down when someone pulled the handle even if the door was locked, thus allowing someone access to pop the locks?
If you did it to the door handle instead, how would that keep the windows from coming down when someone pulled the handle even if the door was locked, thus allowing someone access to pop the locks?
The switch would have to be triggered when the door latch actually opens, or else when the mechanism is actuated. That way it wouldn't trigger if the doors were locked.
01-03-2015, 09:06 PM
#9
Re: Automatic Window Project
I don't see why I couldn't. I hadn't even thought about putting anything in the center console, but I certainly will now.
The switch would have to be triggered when the door latch actually opens, or else when the mechanism is actuated. That way it wouldn't trigger if the doors were locked.
The switch would have to be triggered when the door latch actually opens, or else when the mechanism is actuated. That way it wouldn't trigger if the doors were locked.
I see, gotcha, makes sense.
I have my interior ripped out while my car is in the paint shop right now. If you could have something for us in the next 2 or 3 months, you would so have my money. I'm thinking about installing a Viper alarm so I can have keyless/remote start, GPS tracking, and use the SmartStart app on my phone. The installer wants to cut and solder everything rather than just use taps, which I can totally understand, but I'm still going to try and talk him out of it, if the install can even be done that way. It would be great to install your kit as well all before my new interior goes back in!
01-04-2015, 08:54 AM
#10
Junior Member
Thread Starter
iTrader: (1)
Join Date: Apr 2011
Location: Ames, Iowa
Posts: 47
Likes: 0
Received 0 Likes
on
0 Posts
Car: 84 Z28
Engine: 350
Transmission: 700R4
Re: Automatic Window Project
Hell yeah, if you could do a plug-n-play kit that would not have to cut anything, I can't even express how awesome that would be!!!! Tapping into say a 12v wire I would be cool with, just cut cutting and splicing unless there was absolutely no other way.
I see, gotcha, makes sense.
I have my interior ripped out while my car is in the paint shop right now. If you could have something for us in the next 2 or 3 months, you would so have my money. I'm thinking about installing a Viper alarm so I can have keyless/remote start, GPS tracking, and use the SmartStart app on my phone. The installer wants to cut and solder everything rather than just use taps, which I can totally understand, but I'm still going to try and talk him out of it, if the install can even be done that way. It would be great to install your kit as well all before my new interior goes back in!
01-11-2015, 04:40 PM
#11
Member
Join Date: Jul 2008
Posts: 177
Likes: 0
Received 0 Likes
on
0 Posts
Re: Automatic Window Project
The new Corvette has a flap in the rear bumper that is open with the hatch so that it is easier to close the hatch. You might try something like this with your current programming/idea. You could put the flaps in the B pillar or rear bumper.
Here is the reference: http://autoweek.com/article/car-news...stingray-hatch
Here is the reference: http://autoweek.com/article/car-news...stingray-hatch
01-11-2015, 05:03 PM
#12
Junior Member
Thread Starter
iTrader: (1)
Join Date: Apr 2011
Location: Ames, Iowa
Posts: 47
Likes: 0
Received 0 Likes
on
0 Posts
Car: 84 Z28
Engine: 350
Transmission: 700R4
Re: Automatic Window Project
That's quite interesting. Right now, the window has the advantage of not needing much modification. Still, I didn't know about that. Quite interesting.
04-21-2015, 09:43 AM
#13
Member

Join Date: Jun 2014
Location: Ny queens
Posts: 164
Likes: 0
Received 0 Likes
on
0 Posts
Car: 87 GTA Trans Am
Engine: 5.7 350 TPI
Transmission: TCI transmission
Axle/Gears: 4th gen rear end. With 3.83
Re: Automatic Window Project
My driver side door always closes hard when the window is up. A while ago, I began wondering if I could make the window roll down when the door is open, and back up when it's closed. This would make the door significantly easier to close. For a different project, I had been learning the ropes of an Arduino (A very cool micro-controller, check out the link to learn more). So I began the process, and over the course of several months I wrote the code, gathered the parts, and built the circuit. Here are a few pictures, a video, and several notes at the end:

The Arduino, which was used to develop and test the circuit, then to program the smaller chip (ATtiny84) that would go in the permanent circuit.
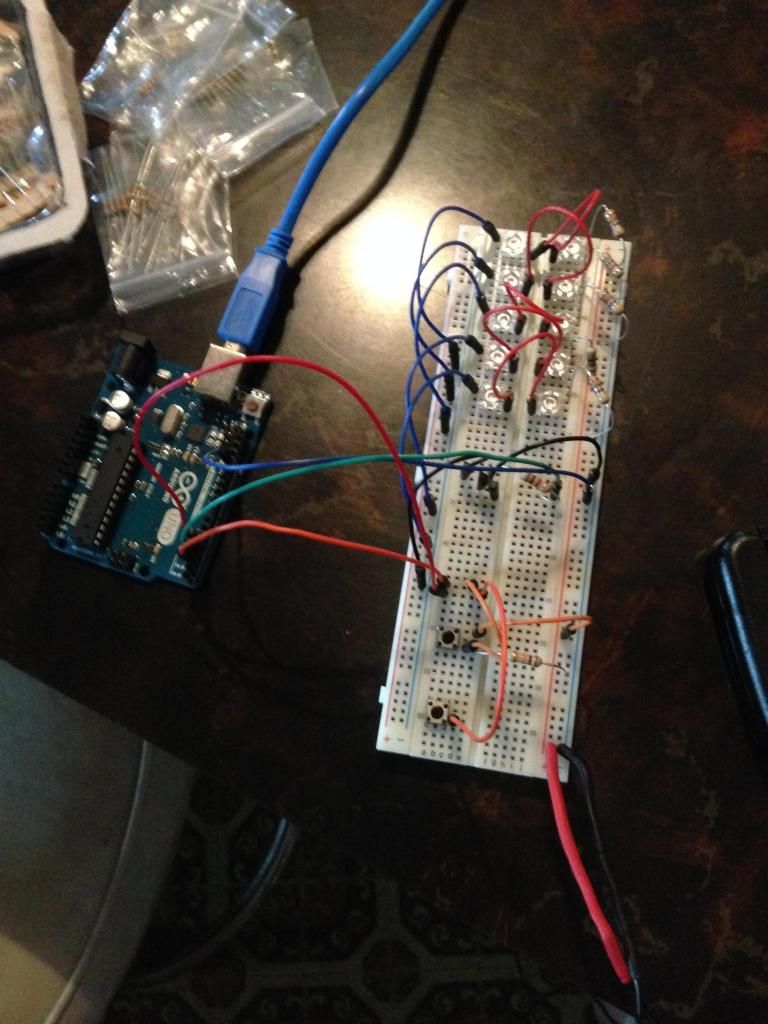
One of my first prototype circuits
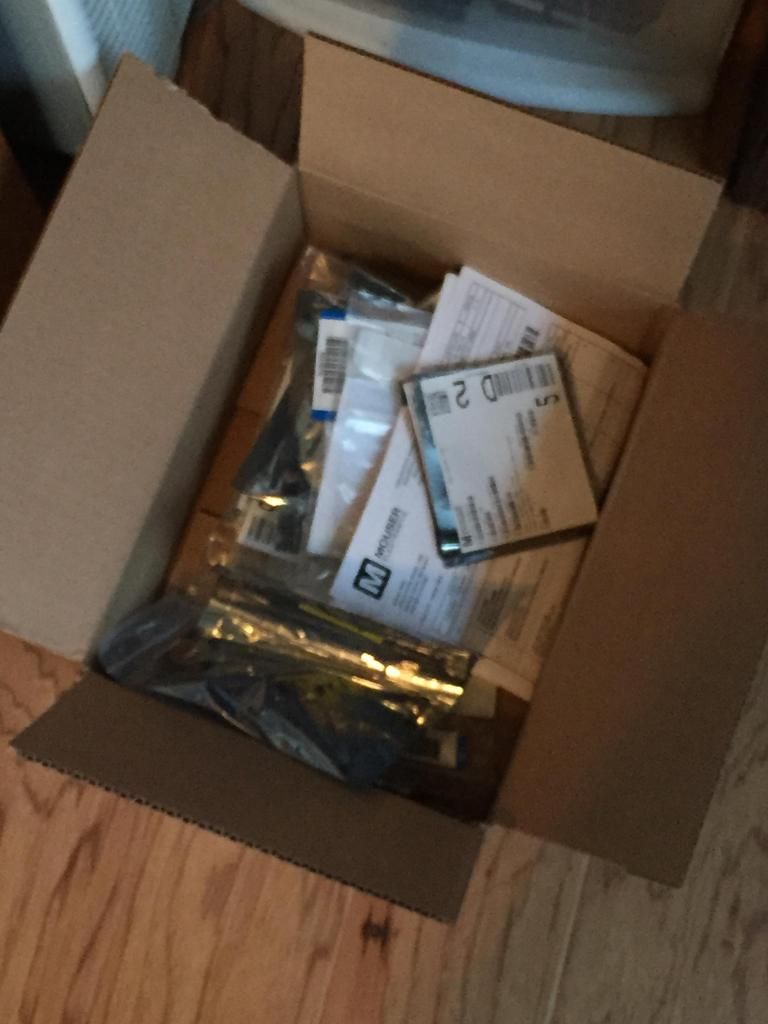
Box of parts from Mouser
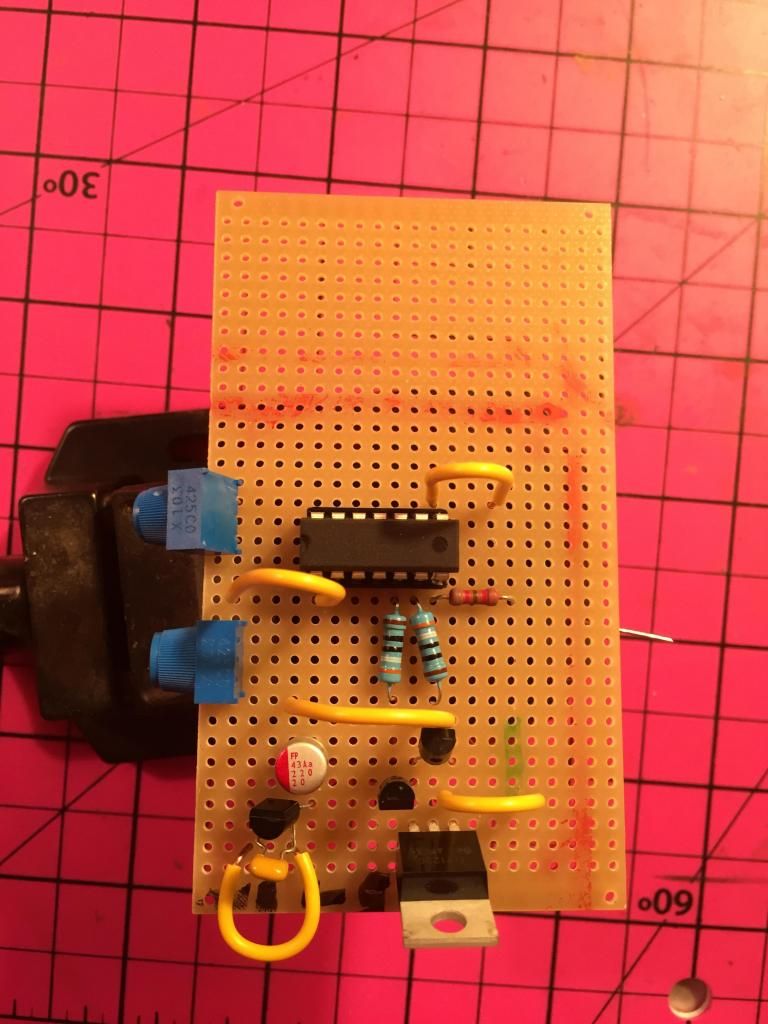
The circuit before it got soldered together. Here you can see the ATtiny84 in its socket.
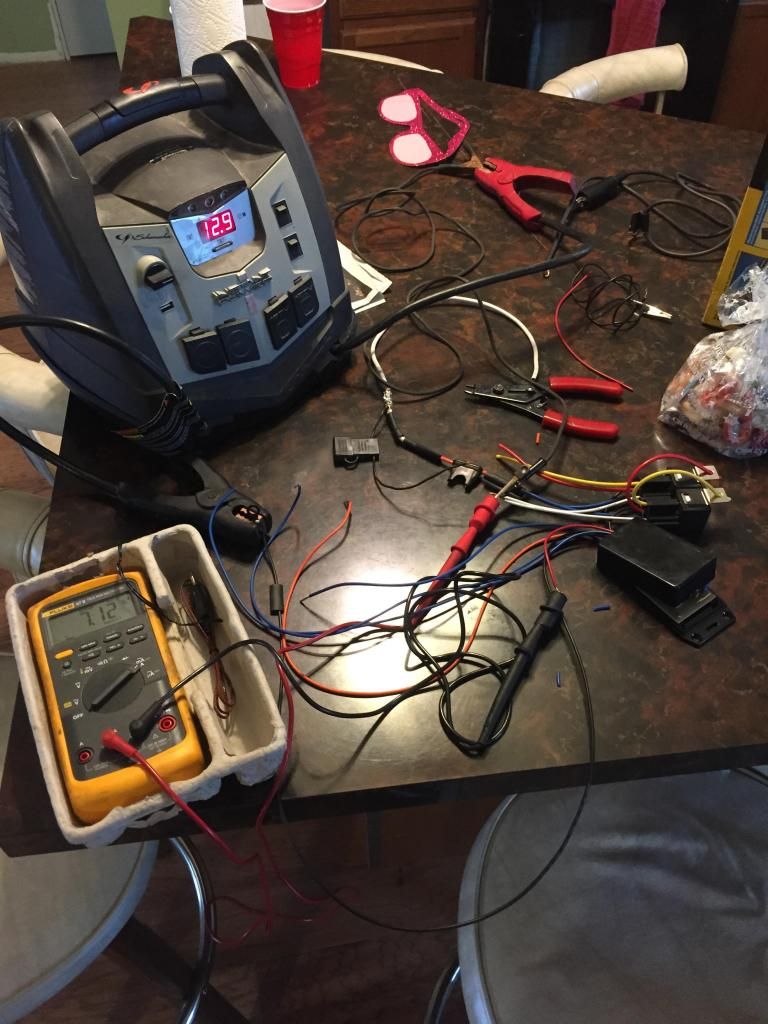
Bench testing before the install
The messiest part � the install. Here you can see the relays mounted on top of the box and the two blue potentiometers on the side of the box. They control the amount of time the window spends rolling up and down. I used the push buttons on the door to sense when it is open. They're normally open, then ground when the door is opened.
A video showing the thing in action.
One potential problem with this is setup is if I had the window roll every time the door was opened, it would do it if the window was purposely left cracked. To solve this, I added a little push button under the dash; the window will only roll after you tap it (it doesn't roll when you tap it, it just tells the micro-controller that it's okay to roll the window when the door is opened). In the future, I want to add a sensor in the door that will detect when the window is all the way up. This will accomplish two things: it will know if it needs to roll the window, and it will roll the window up until it's closed (currently it's timing based).
My passenger side door opens and closes fine, so I didn't add it to that, but in the future I would like to add it to both doors and rewire them so that they are both ran off relays; only the driver side is wired up with a relay right now. This will allow me much greater control over the windows � including automatic roll up/down and key fob rolling (yes, there are pre-made modules that allow you to do this, but I enjoy the electronics bit).
Another interesting thing I noted is that, contrary to every wiring diagram and forum post I could find, our window switches are rest at open. This means that when the switch is in the neutral position, both legs of the motor are simply open. Check out this wiring diagram from austinthirdgen.org, and you'll see that it would have you believe they rest at ground.
The rest at ground is a much more common configuration, and I only found two sources (1, 2 - Page 4) that indicate our car's switches do, in fact, rest at open. According to theses sources, only our cars are wired in this configuration. I even took one of my switches apart to confirm (again, forgot to take a picture ).
In addition to the window rolling, all my interior lights are LEDs, so I also set this up to fade my lights on and off when the door is opened/closed. Anyway, I haven't put a lot of time on it, but it seems to work great. I'm already looking forward to improving it with an in-door sensor.
The Arduino, which was used to develop and test the circuit, then to program the smaller chip (ATtiny84) that would go in the permanent circuit.
One of my first prototype circuits
Box of parts from Mouser
The circuit before it got soldered together. Here you can see the ATtiny84 in its socket.
Bench testing before the install
The messiest part � the install. Here you can see the relays mounted on top of the box and the two blue potentiometers on the side of the box. They control the amount of time the window spends rolling up and down. I used the push buttons on the door to sense when it is open. They're normally open, then ground when the door is opened.
A video showing the thing in action.
One potential problem with this is setup is if I had the window roll every time the door was opened, it would do it if the window was purposely left cracked. To solve this, I added a little push button under the dash; the window will only roll after you tap it (it doesn't roll when you tap it, it just tells the micro-controller that it's okay to roll the window when the door is opened). In the future, I want to add a sensor in the door that will detect when the window is all the way up. This will accomplish two things: it will know if it needs to roll the window, and it will roll the window up until it's closed (currently it's timing based).
My passenger side door opens and closes fine, so I didn't add it to that, but in the future I would like to add it to both doors and rewire them so that they are both ran off relays; only the driver side is wired up with a relay right now. This will allow me much greater control over the windows � including automatic roll up/down and key fob rolling (yes, there are pre-made modules that allow you to do this, but I enjoy the electronics bit).
Another interesting thing I noted is that, contrary to every wiring diagram and forum post I could find, our window switches are rest at open. This means that when the switch is in the neutral position, both legs of the motor are simply open. Check out this wiring diagram from austinthirdgen.org, and you'll see that it would have you believe they rest at ground.
The rest at ground is a much more common configuration, and I only found two sources (1, 2 - Page 4) that indicate our car's switches do, in fact, rest at open. According to theses sources, only our cars are wired in this configuration.
I even took one of my switches apart to confirm (again, forgot to take a picture ).In addition to the window rolling, all my interior lights are LEDs, so I also set this up to fade my lights on and off when the door is opened/closed. Anyway, I haven't put a lot of time on it, but it seems to work great. I'm already looking forward to improving it with an in-door sensor.
04-21-2015, 10:53 AM
#14
Supreme Member
iTrader: (2)
Join Date: Apr 2000
Location: Huntsville AL
Posts: 3,938
Received 97 Likes
on
62 Posts
Car: 88GTA
Engine: 5.7TPI
Transmission: Auto
Axle/Gears: 3.27
Re: Automatic Window Project
The new Corvette has a flap in the rear bumper that is open with the hatch so that it is easier to close the hatch. You might try something like this with your current programming/idea. You could put the flaps in the B pillar or rear bumper.
Here is the reference: http://autoweek.com/article/car-news...stingray-hatch
Here is the reference: http://autoweek.com/article/car-news...stingray-hatch
88camaroluvr....so we gone full circle in the last 30 years. Used to slam the hatch in our 3rd gens......then came along the great idea of power pulldowns for the hatch.........then we got rid of the power pullldown for the hatch...........back to slamming the hatch.............back to power pulldowns............now to vents in trunk.
OK, My How Far We come!
04-21-2015, 10:57 AM
#15
Re: Automatic Window Project
I had a dream about this the other night.
We all know the new Corvettes use meta-metal in the bottom of their trunks for this. Current passes to a piece of metal which warps it for air to escape then it returns to it's original shape.
A couple years ago when I first heard about this it went in one ear and out the other. I've been thinking though if there would be a way to retro fit that feature somehow to thirdgens....
Just a thought...
While auto windows are great, it is ALLOT of wear on the VERY badly engineered power window motors we have and our regulators.
04-21-2015, 11:58 AM
#16
Member
iTrader: (3)
Join Date: May 2009
Location: Des Moines IA
Posts: 384
Likes: 0
Received 13 Likes
on
8 Posts
Car: 89 forrmula
Engine: 350 TBI
Transmission: T-5
Axle/Gears: 3.55
Re: Automatic Window Project
I can set up a window kit using 2 modules triggered off the courtesy light to allow 1 second down on opening and 1.5-2 upon closing. It maybe too costly for the feature but its doable.
04-21-2015, 12:39 PM
#17
Senior Member
iTrader: (3)
Join Date: Jan 2012
Location: Clark NJ
Posts: 877
Likes: 0
Received 2 Likes
on
2 Posts
Car: 1988 Pontiac Transam GTA Notchback
Engine: 2003 Chevy 5.3 Vortec (325 cu)
Transmission: 4L60E
Axle/Gears: 3.27
Re: Automatic Window Project
Not sure if you guys are aware of this, but a stock 3rd gen tpi fuse box has provisions for you to plug stuff into to get either batt power, ign power and or accessory power. All you need are the brown/green/orange connectors for it. Actually LS1 and LT1 cars also have something like that too. That way you wouldn't have to tap into anything. (They also vary in guage so you should be good.)
04-22-2015, 07:48 AM
#18
Junior Member
Thread Starter
iTrader: (1)
Join Date: Apr 2011
Location: Ames, Iowa
Posts: 47
Likes: 0
Received 0 Likes
on
0 Posts
Car: 84 Z28
Engine: 350
Transmission: 700R4
Re: Automatic Window Project
Sure! Like an idiot, I recorded it in portrait mode, but you can see it work: https://www.youtube.com/watch?v=kr3c...ature=youtu.be
Wow, that's neet! I thought my auto window was cool; I love the useless and awesome stuff their doing now.
That's true. I thought I saw a while back someone who made a retrofit motor for a Fiero, and there was talk as to whether it would work in our cars. I'd like to see a good motor upgrade.
I do know on the Camaro there is a terminal block behind the kick panel right next to the fuse block. It has switched and constant power, and it's all fused by a 30 Amp auto reset (I believe) fuse. I need to get a few of the connectors to plug into it.
Not sure if you guys are aware of this, but a stock 3rd gen tpi fuse box has provisions for you to plug stuff into to get either batt power, ign power and or accessory power. All you need are the brown/green/orange connectors for it. Actually LS1 and LT1 cars also have something like that too. That way you wouldn't have to tap into anything. (They also vary in guage so you should be good.)
04-22-2015, 08:51 AM
#19
Senior Member
iTrader: (3)
Join Date: Jan 2012
Location: Clark NJ
Posts: 877
Likes: 0
Received 2 Likes
on
2 Posts
Car: 1988 Pontiac Transam GTA Notchback
Engine: 2003 Chevy 5.3 Vortec (325 cu)
Transmission: 4L60E
Axle/Gears: 3.27
Re: Automatic Window Project
I have it and a bunch of plastic connectors if you want it. Also the terminals that go inside are GM Pack-con III
If you type that into google or ebay or amazon you should get some results. (well alot)
However the plastic connectors are nearly impossible to find short of getting the whole block. And on firebirds this was continued in 1989.
If you type that into google or ebay or amazon you should get some results. (well alot)
However the plastic connectors are nearly impossible to find short of getting the whole block. And on firebirds this was continued in 1989.
04-22-2015, 03:13 PM
#20
Supreme Member
iTrader: (11)

Join Date: Sep 1999
Location: NJ
Posts: 4,345
Received 298 Likes
on
234 Posts
Car: 92 Firebird
Engine: 4.8 LR4
Transmission: T56
Axle/Gears: 3.45 9 Bolt
Re: Automatic Window Project
Not sure if you guys are aware of this, but a stock 3rd gen tpi fuse box has provisions for you to plug stuff into to get either batt power, ign power and or accessory power. All you need are the brown/green/orange connectors for it. Actually LS1 and LT1 cars also have something like that too. That way you wouldn't have to tap into anything. (They also vary in guage so you should be good.)
My 92 actually has connections on the back of the fuse block. I used that for the alarm I installed
04-22-2015, 11:13 PM
#21
Senior Member
iTrader: (3)
Join Date: Jan 2012
Location: Clark NJ
Posts: 877
Likes: 0
Received 2 Likes
on
2 Posts
Car: 1988 Pontiac Transam GTA Notchback
Engine: 2003 Chevy 5.3 Vortec (325 cu)
Transmission: 4L60E
Axle/Gears: 3.27
Re: Automatic Window Project
This:
http://www.ebay.com/itm/82-92-Camaro-Firebird-Driver-Side-Under-Dash-Electrical-Power-Junction-Block-/321283156550?fits=Model%3AFirebird&hash=item4acdf7ea46&vxp=mtr
Again this was discontinued in 1989 and they simplified the wiring.
This is a junction block behind the drivers side kickpanel with wires going to the fuise block.
04-22-2015, 11:15 PM
#22
Senior Member
iTrader: (3)
Join Date: Jan 2012
Location: Clark NJ
Posts: 877
Likes: 0
Received 2 Likes
on
2 Posts
Car: 1988 Pontiac Transam GTA Notchback
Engine: 2003 Chevy 5.3 Vortec (325 cu)
Transmission: 4L60E
Axle/Gears: 3.27
Re: Automatic Window Project
What you plugged your alarm into, that is what I am talking about, those ports on the fuseblock. Except, GM made many different color connectors for it. (they are sort of specialized)
04-23-2015, 04:51 AM
#23
Member

Join Date: Aug 2007
Posts: 363
Likes: 0
Received 4 Likes
on
4 Posts
Car: 85 Firebird C&C T-Top
Engine: 347ci LS1
Transmission: 4L60E LS1
Axle/Gears: BW 9 Bolt Posi,3.27,C5+VE Brakes
Re: Automatic Window Project
I sure like this idea, expanding it a little to sensor under the door handles to pre activate the window down provided the car is unlocked. That way it activates before the door is ajar.
Most GM motors from what i have seen have the same gear tooth. I do know that VY SS / GTO Window motors do work on them for a much newer motor/design with more torque as well and speed.
Most GM motors from what i have seen have the same gear tooth. I do know that VY SS / GTO Window motors do work on them for a much newer motor/design with more torque as well and speed.
04-23-2015, 08:56 AM
#24
Junior Member
Thread Starter
iTrader: (1)
Join Date: Apr 2011
Location: Ames, Iowa
Posts: 47
Likes: 0
Received 0 Likes
on
0 Posts
Car: 84 Z28
Engine: 350
Transmission: 700R4
Re: Automatic Window Project
Next time I take off the door panel (I'm planning on modding my design to add a position sensor for the window), I'm gonna check and see how difficult it'll be to put a door latch sensor on.
04-23-2015, 09:13 AM
#25
Member
Join Date: Aug 2007
Posts: 363
Likes: 0
Received 4 Likes
on
4 Posts
Car: 85 Firebird C&C T-Top
Engine: 347ci LS1
Transmission: 4L60E LS1
Axle/Gears: BW 9 Bolt Posi,3.27,C5+VE Brakes
Re: Automatic Window Project
Not sure about the original firebird setup, but i know my cdl motors and keylock on the doors have a position sensor. So in my case i could have a trigger to only allow the function to work with the microswitch on the handle when the doors are unlocked for opening. If you went similar to this i'd guess that you'd just use the negative trigger from the door ajar to tell when closed.
I like where this is headed.
 04-24-2015, 08:44 AM
#26
Junior Member
Thread Starter
iTrader: (1)
Join Date: Apr 2011
Location: Ames, Iowa
Posts: 47
Likes: 0
Received 0 Likes
on
0 Posts
Car: 84 Z28
Engine: 350
Transmission: 700R4
Re: Automatic Window Project
Thats actually a better idea, could use a microswitch mounted off the lever that goes on the inside of the handle, since they are nc/c/no usually you can have it so its c/no with the lever pushed in and soon as you start lifting the handle, the pressure comes off and makes the circuit. Should be easy to do with a bracket mounted off the door handle bolts.
Not sure about the original firebird setup, but i know my cdl motors and keylock on the doors have a position sensor. So in my case i could have a trigger to only allow the function to work with the microswitch on the handle when the doors are unlocked for opening. If you went similar to this i'd guess that you'd just use the negative trigger from the door ajar to tell when closed.
I like where this is headed.
As you pointed out, it'll need to be triggered off the latch mechanism, not just the handle. I don't think that'll be any big deal though. I like the idea of being able to detect the lock too. My Jetta rolls the windows down if you hold the key in the unlock position, and up if you hold it in the lock.
01-24-2017, 07:05 AM
#27
Member
Join Date: Aug 2007
Posts: 363
Likes: 0
Received 4 Likes
on
4 Posts
Car: 85 Firebird C&C T-Top
Engine: 347ci LS1
Transmission: 4L60E LS1
Axle/Gears: BW 9 Bolt Posi,3.27,C5+VE Brakes
Re: Automatic Window Project
How did you end up going with this ???
I've got a test board sorted on my own version using a window sensor to monitor each window when its up, a door handle sensor per side, door lock sensor and using the door pins as well.
It all works well, with only working under certain conditions that wont allow it to work in any other state other than lock and unlocking the car.
I still have to work out a timer setup so its adjustable in how far the windows drop down, currently its using a delay timer which works however it only allows 1 door at a time to operate (upto a 2 sec delay), but on those occasions you might have both doors open at the exact same time (i know for me its rare) but i want that to be covered.
The downside of this on my car is 1 door uses are switch ground and one is open circuit, so i will have to redo the wiring a little to setup as a common ground.
01-24-2017, 08:05 AM
#28
Junior Member
Thread Starter
iTrader: (1)
Join Date: Apr 2011
Location: Ames, Iowa
Posts: 47
Likes: 0
Received 0 Likes
on
0 Posts
Car: 84 Z28
Engine: 350
Transmission: 700R4
Re: Automatic Window Project
I've been working on a version 2.0 similar what yours sounds like. Can I ask how you have set up your door handle and lock sensors? I am assuming that when you say delay timer, you're talking about a relay that latches on for a set amount of time? Or are you talking about code? In the original design, I used an Atmel ATtiny84 microcontroller with a trimpot to adjust the timing on the window roll. If I could see your wiring and program (if you're using a microcontoller), I might be able to help you figure out the timing and simultaneous door opening issue.
Your car is wired so that one door's jam switch is opposite the other? So one is NO and the other NC?
This project has been on hiatus for a while, but not forgotten. I've been super busy the last couple years, but I'm getting close to wrapping up some other projects, and this is close on the list.
Your car is wired so that one door's jam switch is opposite the other? So one is NO and the other NC?
This project has been on hiatus for a while, but not forgotten. I've been super busy the last couple years, but I'm getting close to wrapping up some other projects, and this is close on the list.
01-24-2017, 05:12 PM
#29
Member
Join Date: Aug 2007
Posts: 363
Likes: 0
Received 4 Likes
on
4 Posts
Car: 85 Firebird C&C T-Top
Engine: 347ci LS1
Transmission: 4L60E LS1
Axle/Gears: BW 9 Bolt Posi,3.27,C5+VE Brakes
Re: Automatic Window Project
So the way i've set up mine, is LH and RH Doors, Both are independent of each other with the exception of Door Open/Door Lock Sensors, These are shared between both doors.
(Since the door pin circuit is shared between both doors(factory wiring), the only disadvantage of this is the up activation will only happen if both doors are closed, if both open then 1 is closed, the up wont activate till the other door is closed. Not a big deal in my case since it all does the same thing anyway and i dont wish to install more stuff than i have too).
The lock sensor is just setup off the central door locking and the handle is setup off the door latch mechanism so it works on both the inner and outer handle.
At the moment, i've just got it all setup on a Arduino Uno R3, i plan to change that to a Nano when building the circuit as those are cheap here and easily allow for usb connection to update etc...
The delay is just in the code of how i wrote it, its simple at the moment on that section as it just links either door trimpot to a mapped value to each delay timer instead of the delay timer being a number value.
I wrote the previous post late at night so i missed the window part, not the door jam but each one of my windows is different to each other in wiring. My Pass is open circuit switching + & - direct to the motor. The Drivers is a single common ground relay that the open circuit window switch goes thru the bcm first, at a guess this is since it one touch auto open on it.
So i can keep all these functions and just run a seperate Up/Down relay per side using common ground, this way i will at least keep the factory features.
(my car uses the GTO bcm/wiring etc...)
Whats the easiest way to get you the code? its quite involved to post it in here.
Last edited by LX_SS; 01-24-2017 at 08:30 PM.
01-24-2017, 09:16 PM
#30
Junior Member
Thread Starter
iTrader: (1)
Join Date: Apr 2011
Location: Ames, Iowa
Posts: 47
Likes: 0
Received 0 Likes
on
0 Posts
Car: 84 Z28
Engine: 350
Transmission: 700R4
Re: Automatic Window Project
Okay, I think I understand how you have it wired up to the jam switches. For mine, I basically cut the wire at the switch on either side and connected those jam switches directly (and only) to the Arduino. I used a transistor to ground that circuit instead, functionally replacing the jam switches. That way, I knew what door was open and could still control ground however I wanted. I think that is what you are talking about doing with the common ground? Your way works perfectly fine, and is definitely easier if you don't mind that both the doors have to be closed. Changing the wiring and adding the transistor are not that difficult either.
I'm not sure I'm following the central lock sensor. I'm not that familiar with GTO wiring. Are you using a microswitch in one of the doors to sense locked/unlocked?
Did you have any trouble figuring out a place to mount your switch for the door latch? I haven't studied mine yet.
I think I follow how it is wired up. I'm with you on keeping factory features. On the other hand, it may simplify things to tie your window switches directly to your Arduino, and completely control the windows with it instead. Then you just program all the features you want. Just a thought. I just would make sure to double check that there is no possible combinations of switching relays that will short your power directly to ground.
You can use the "CODE" tag to post code. It's the # sign on the top of the forum text editor. Looks like this (my sketch formatting is a little tough to read):
If you'd rather, I can PM you my email address.
I'm not sure I'm following the central lock sensor. I'm not that familiar with GTO wiring. Are you using a microswitch in one of the doors to sense locked/unlocked?
Did you have any trouble figuring out a place to mount your switch for the door latch? I haven't studied mine yet.
I think I follow how it is wired up. I'm with you on keeping factory features. On the other hand, it may simplify things to tie your window switches directly to your Arduino, and completely control the windows with it instead. Then you just program all the features you want. Just a thought. I just would make sure to double check that there is no possible combinations of switching relays that will short your power directly to ground.
You can use the "CODE" tag to post code. It's the # sign on the top of the forum text editor. Looks like this (my sketch formatting is a little tough to read):
Code:
/*
Window Control Sketch - ATTiny84
V1.0
This sketch has two purposes and is designed for use in a car.  The first
 purpose of this sketch is to fade a set of LEDs on when the car door is opened,
 then fade them back off when the car door is closed.  The second purpose of
 this sketch is to make a push button that when pressed, the door window will
 roll down when the door is opened, then roll back up when the door is clossed.
 Sin fading is defualt, linear fading is commented out.*/
// Define the pins the potentiometers are on
const int potPin0 = A0;
const int potPin1 = A1;

// Define the pins the pushbutton and door switches are on
const int buttonPin[] = {
  10, 9, 5};
// Define the pins that will ultimately control the window rolling up or down
const int windowPin[] = {
  7, 8};
// Define the pin the LEDs to fade are on
const int ledPin = 6;

// Sin function incriment amount
const float sinDelay = 0.0007;


// Linear Fade Variables
/*
// Define the amount of time the fade delay will be
const int fadeDelay = 15;
// Define the brightness increase interval
const int fadeAmount = 3;
*/


// Define the delay for button debounce
const int debounceDelay = 25;
// Define the amount of time the windows will spend rolling up and down.
//rollUpDelay will be longer to ensure window rolls all the way up.
int rollUpDelay = 3000;
int rollDownDelay = 2000;

//Variables that will change

// Variable to track the current state of the push button, in an array the size
//of buttonPin.
boolean currentButtonVal[sizeof(buttonPin)/sizeof(buttonPin[0])];
// Initialize variables to define and store the debounced switch values. doorSwitch
//is in an array the size of buttonPin
byte doorSwitch[2];
byte windowButton;
// Define the inital brightness of the LED. Starts off, or 0
int brightness = 0;
// Define the inital "previous time" variable for comparison with millis().
//Will start at 0 and be redifned every time fadeDelay has passed.
unsigned long previousTime = 0;
// Define the inital comparison time for the debounce function. Must be in array
//the size of buttonPin[].
static unsigned long lastDebounceTime[sizeof(buttonPin)/sizeof(buttonPin[0])];
// Create a local variable to be returned as the button state.  Must be in array
//the size of buttonPin[].
static byte buttonState[sizeof(buttonPin)/sizeof(buttonPin[0])];
// Initialize a variable that is set to millis() every time a button state is
//toggled. In an array the size of buttonPin[], and is unique to each button.
unsigned long toggleTime[sizeof(buttonPin)/sizeof(buttonPin[0])];
// Define the inital state for a button toggle. This value will be reversed
//when a button is pressed. In an array the size of buttonPin[], and is unique
//to each button.
boolean buttonToggle[sizeof(buttonPin)/sizeof(buttonPin[0])] = {};
// Initialize a variable to track if the rollWindow function should be active
boolean rollWindowToggle;
// Initialize a variable to detect if the rollWindow button should finish
boolean continueFunction;

void setup () {
  for (int i = 0; i < sizeof(buttonPin)/sizeof(buttonPin[0]); i++) {
    pinMode (buttonPin[i], INPUT_PULLUP);
  }
  pinMode (potPin0, INPUT);
  for (int i = 0; i < sizeof(windowPin)/sizeof(windowPin[0]); i++) {
  pinMode (windowPin[i], OUTPUT);
  }
  pinMode (ledPin, OUTPUT);
}


void loop () {

  // Define variables to debounce and keep track of the different switches
  doorSwitch[0] = debounce(0); // buttonPin[0]
  doorSwitch[1] = debounce(1); // buttonPin[1]
  windowButton = debounce(2); // buttonPin[2]

  // Create a variable to store the millis() value this time through the loop
  unsigned long currentTime = millis();

  // Take a reading from pot and store the value in a local variable
  int potValue0 = analogRead (potPin0);
  int potValue1 = analogRead (potPin1);

  // Map potValue to be within the desired second range, and assing it to
  //rollUpDelay and rollDownDelay
  rollUpDelay = map(potValue0, 0, 1023, 250, 2500);
  rollDownDelay = map(potValue1, 0, 1023, 250, 2500);


  //Variables for sin fading
  // Initial input value, 4.712 is the bottom of a sine wave
  static float input = 4.712;
  // Define the variable "sinOut" as floating
  float sinOut;

  // If either car door is open, then fade the LEDs.  If both car doors are
  //closed, then fade the LEDs off.
  if (doorSwitch[0] == LOW || doorSwitch[1] == LOW) {

    // Sin fade
    // Increase the input number by the defined amount
    input = input + sinDelay;
    // If the input has reached the "top" of the wave, reset it to the top
    if (input >= 7.853) input = 7.853;
    // Create the number between 0 and 255 for brightness
    sinOut = sin(input) * 127.5 + 127.5;
    // Write the brightness to the LED
    analogWrite (ledPin, sinOut);


    // Linear Fade
    /*
    if (currentTime - previousTime > fadeDelay) {
      previousTime = currentTime;
      brightness = brightness + fadeAmount;
      // Limit the fade amount from going above 255
      brightness = min(brightness, 255);
      analogWrite (ledPin, brightness);
    }
    */

  }
  else {
    // Sin fade
    // Increase the input number by the defined amount
    input = input - sinDelay;
    // If the input has reached the "top" of the wave, reset it to the top
    if (input <= 4.712) input = 4.712;
    // Create the number between 0 and 255 for brightness
    sinOut = sin(input) * 127.5 + 127.5;
    // Write the brightness to the LED
    analogWrite (ledPin, sinOut);


    // Linear Fade
    /*
    if (currentTime - previousTime > fadeDelay) {
      previousTime = currentTime;
      brightness = brightness - fadeAmount;
      // Limit the fade amount from going bellow 0
      brightness = max(brightness, 0);
      analogWrite (ledPin, brightness);
    }
    */

  }

  // If windowButton has been toggled to true (on) and the door switch is HIGH,
  //then make rollWindowToggle true. This Allows the rollWindow function to
  //begin. If buttonToggle is not true (on), then make rollWindowToggle false.
  if (buttonToggle[2] == true) { //Start function when buttonToggle is true
    if (doorSwitch[0] == LOW) { //If the door is open
      rollWindowToggle = true; //Let the rollWindow function execute
    }
  }
  else rollWindowToggle = false;

  // Test to see if rollWindowToggle was toggled on while the door was open,
  //if it was, then reset toggleTime so the window will still roll the correct
  //amount of time. continueFunction must not equal true so toggleTime does not
  //continuously reset if rollWindowToggle gets toggled while the function is
  //in progress.
  if (!rollWindowToggle && doorSwitch[0] == LOW && !continueFunction) {
    toggleTime[0] = millis();
  }

  // Iniate rollWindow function if either requirment is meant. continueFunction
  //tracks if the function should continue, even if rollWindowToggle is
  //toggled to false.
  if (rollWindowToggle || continueFunction) {
    // Iniate rollWindow function, doorSwitch and toggleTime indicate which
    //switch will activate the function. currentTime passes the variable assigned
    //to millis().
    rollWindow(0, currentTime);
  }
}


void rollWindow (int thisSwitch, unsigned long currentTime) {
  // Variable to check if the window is Allowed to roll down
  static boolean downAllow = true;

  // Variable to keep the window rolling down until the desired time has passed
  static boolean continueDown = false;

  // Variable to check if the toggle time needs to be recorded
  static boolean checkTime = true;

  // If statements checks if door is open or closed and performs apropriate function

  // If the door is open
  if (doorSwitch[thisSwitch] == LOW || continueDown == true) {

    // Define the state of continueFunction to indicate that the function is
    //in progress and should continue until it is complete
    continueFunction = true;

    // Define startTime to compare against currentTime to see if rollDownDelay
    //has passed
    static unsigned long startTime;

    // Check to see if the window has just started rolling, and if so record
    //toggleTime
    if (checkTime == true) {
      startTime = toggleTime[thisSwitch];

      // Time has been recored, don't do it again until function restarts
      checkTime = false;
    }

    // If the rollDownDelay time has passed, stop rolling the window. If not,
    //roll the window down. Make windowPin[1] LOW to ensure the window will
    //not try to roll down and up at the same time.

    //If roll up time has passed:
    if (currentTime - startTime > rollDownDelay) {
      digitalWrite (windowPin[0], LOW); //Stop rolling the window down
      digitalWrite (windowPin[1], LOW); //Prevent window from rolling up
      downAllow = false; // Prevent window from rolling down until next time
      continueDown = false; // Time has passed, window has finished rolling down
    }
    else {
      digitalWrite (windowPin[1], LOW); //Make sure the window is not rolling up
      if (downAllow == true) {
        digitalWrite (windowPin[0], HIGH); //Make the window roll down

        // Define the state of continueDown to indicate that the window
        //should continue to roll down
        continueDown = true;
      }
    }
  }
  // If the door is closed:
  else {
    // If the rollUpDelay time has passed, stop rolling the window, reset
    //buttonToggle[2] to false, and make continueFunction false to indicate
    //the function is complete. If rollUpDelay time has not passed, then
    //roll the window up and make windowPin[0] LOW to ensure the window will
    //not try to roll up and down at the same time.
    if (currentTime - toggleTime[thisSwitch] > rollUpDelay + 1500) { // + 1500 for delay in else
      digitalWrite (windowPin[1], LOW);
      buttonToggle[2] = false;
      continueFunction = false;
      // Function is done. Reset downAllow and checkTime
      downAllow = true;
      checkTime = true;
    }
    else {
      digitalWrite (windowPin[0], LOW);
      // Wait 500 mS to ensure door is closed before rolling window
      if (currentTime - toggleTime[thisSwitch] >= 1500) {
      digitalWrite (windowPin[1], HIGH);
      }
    }
  }
}


// Create a debounce function to debounce the switches, start the toggleTime
//timer, and toggle the buttonToggle variable. Return the value current.
byte debounce(int buttonNumber) {


  // Take a reading of the switch pin and store it in a local variable.
  byte current = digitalRead(buttonPin[buttonNumber]);


  // If the reading does not equal the current recorded state of the button,
  //wait the debounceDelay, then take another reading of the currenet value and
  //begin the toggle timer.  If the state of the switch is high, then toggle
  //buttonToggle.
  if (current != currentButtonVal[buttonNumber]) {
    lastDebounceTime[buttonNumber] = millis();
  }
  if (millis() - lastDebounceTime[buttonNumber] > debounceDelay) {
    if (current != buttonState[buttonNumber]) {
      buttonState[buttonNumber] = current;
      toggleTime[buttonNumber] = millis();
      if (buttonState[buttonNumber] == LOW) {
      buttonToggle[buttonNumber] = !buttonToggle[buttonNumber];
      }
    }
  }
  // Record the curent button value and return buttonState
  currentButtonVal[buttonNumber] = current;
  return buttonState[buttonNumber];
}


// Old, broken debounce function.

/*
// Create a debounce function to debounce the switches, start the toggleTime
//timer, and toggle the buttonToggle variable. Return the value current.
byte debounce(int thisButton) {
  // Take a reading of the switch pin and store it in a local variable.
  byte current = digitalRead(buttonPin[thisButton]);
  // If the reading does not equal the current recorded state of the button,
  //wait the debounceDelay, then take another reading of the currenet value and
  //begin the toggle timer.  If the state of the switch is high, then toggle
  //buttonToggle.
  if (currentButtonVal[thisButton] != current) {
    if (millis() - lastDebounceTime[buttonNumber] > debounceDelay) {
      current = digitalRead(buttonPin[thisButton]);
      toggleTime[thisButton] = millis();
      if (current == HIGH) {
        buttonToggle[thisButton] = !buttonToggle[thisButton];
      }
    }
  }
  // Record the curent button value and return current
  currentButtonVal[thisButton] = current;
  return current;
}
*/
01-24-2017, 09:45 PM
#31
Member
Join Date: Aug 2007
Posts: 363
Likes: 0
Received 4 Likes
on
4 Posts
Car: 85 Firebird C&C T-Top
Engine: 347ci LS1
Transmission: 4L60E LS1
Axle/Gears: BW 9 Bolt Posi,3.27,C5+VE Brakes
Re: Automatic Window Project
Yeah def, send us a pm and i'll shoot you the ino file.
I can see from yours, the code is simplified from what i've got but also different in features. Forgetting the fade side of things, Yours is button activated where as mine is full automatic control.
Since i run a bcm that controls lots of various items including interior light fading, so im being careful with what modifications i do.
I've still got some wiring things to check over, as i might be able to get the lock/unlock directly from the door lock motors rather than an additional micro switch.
The lock mechanism will have to be a micro switch. I've checked and there is enough room but you have to remove the lock to fit it.
Last edited by LX_SS; 01-24-2017 at 09:51 PM.
01-25-2017, 08:15 AM
#32
Junior Member
Thread Starter
iTrader: (1)
Join Date: Apr 2011
Location: Ames, Iowa
Posts: 47
Likes: 0
Received 0 Likes
on
0 Posts
Car: 84 Z28
Engine: 350
Transmission: 700R4
Re: Automatic Window Project
I PM'd you my email.
Even without the button, the theory is the same. You might even be able get away with less code by just calling the roll function when your desired conditions are met. I had to account for human error (me)
Obviously my code is a fairly specific use case. I am planning on making V2 a little more flexible.
Is your BCM a custom unit? What about using it to control your windows? That would give your BCM all the same information for the windows (lock position, latch position, door jam information). That could be helpful for some other projects. Just food for thought, I tend to overcomplicate things.
01-25-2017, 08:32 AM
#33
Member
Join Date: Aug 2007
Posts: 363
Likes: 0
Received 4 Likes
on
4 Posts
Car: 85 Firebird C&C T-Top
Engine: 347ci LS1
Transmission: 4L60E LS1
Axle/Gears: BW 9 Bolt Posi,3.27,C5+VE Brakes
Re: Automatic Window Project
The BCM is a standard GTO unit, I dont have a pin out for it, but i got a few things to check to see what i can get from it. It does control my windows but only the drivers window to do the auto one touch down feature.
So the way its wired factory, i have to redo the pass and driver window setup to a common ground unit.
So the way its wired factory, i have to redo the pass and driver window setup to a common ground unit.
01-25-2017, 08:36 AM
#34
Member
Join Date: Aug 2007
Posts: 363
Likes: 0
Received 4 Likes
on
4 Posts
Car: 85 Firebird C&C T-Top
Engine: 347ci LS1
Transmission: 4L60E LS1
Axle/Gears: BW 9 Bolt Posi,3.27,C5+VE Brakes
Re: Automatic Window Project
Email sent.
I'm pretty new to coding on it, but it seems to work well. I just need to change the delay timer.
I'm pretty new to coding on it, but it seems to work well. I just need to change the delay timer.
01-25-2017, 09:32 PM
#35
Junior Member
Thread Starter
iTrader: (1)
Join Date: Apr 2011
Location: Ames, Iowa
Posts: 47
Likes: 0
Received 0 Likes
on
0 Posts
Car: 84 Z28
Engine: 350
Transmission: 700R4
Re: Automatic Window Project
You definitely know more about that wiring than me. You seem to have a pretty good handle on it all, but if you have any wiring questions I'll be happy to help.
I got your sketch. I'll go over it tomorrow and give you my notes. At a glance it's nicely formatted and commented. Thanks! That makes it a lot easier to read.
I got your sketch. I'll go over it tomorrow and give you my notes. At a glance it's nicely formatted and commented. Thanks! That makes it a lot easier to read.
01-26-2017, 06:36 AM
#36
Member
Join Date: Aug 2007
Posts: 363
Likes: 0
Received 4 Likes
on
4 Posts
Car: 85 Firebird C&C T-Top
Engine: 347ci LS1
Transmission: 4L60E LS1
Axle/Gears: BW 9 Bolt Posi,3.27,C5+VE Brakes
Re: Automatic Window Project
I did some testing on the bcm tonight, i have 2 separate wires for a +12v pulse of lock and unlock. So i don't need a micro switch for it, however i will have to add a little bit of code and use another input so i have one for lock and another for unlock.
I gotta test for the door pins when i get a chance, just quickly i hada look at it seems i will have to get this a different way than the door pins as they are different circuits on the left and right side.
Thinking about the door pins, the separate circuits might not be a bad thing, it would allow for lh and rh doors up activation.
Last edited by LX_SS; 01-26-2017 at 06:59 AM.
01-26-2017, 09:24 PM
#37
Junior Member
Thread Starter
iTrader: (1)
Join Date: Apr 2011
Location: Ames, Iowa
Posts: 47
Likes: 0
Received 0 Likes
on
0 Posts
Car: 84 Z28
Engine: 350
Transmission: 700R4
Re: Automatic Window Project
Hey, long day at work. I've made a few suggestions in your code, but I haven't finished yet. In a nutshell, the way you want to avoid using the delay() function is by using the millis() function. millis() returns a number equal to the time, in milliseconds, since the thing booted (or close enough). So when you start rolling the windows down (RH_WindowDownOutput, HIGH), you set a variable equal to millis(). Then you check to see if millis() - variable >= setTollTime. If you haven't seen it already, theres an example sketch called BlinkWithoutDealy under Examples > Digital. I'll have a few more comments on it in the code, but that's the basic idea.
I definitely recommend using the jam switches as separate sensors. You can use a transistor or relay to close your ground instead. It lets you expand if you have more stuff you want the controller to do, and it's nice to have the doors independent.
I definitely recommend using the jam switches as separate sensors. You can use a transistor or relay to close your ground instead. It lets you expand if you have more stuff you want the controller to do, and it's nice to have the doors independent.
Last edited by acliad; 01-26-2017 at 09:29 PM. Reason: Clarity
01-28-2017, 05:17 PM
#38
Junior Member
Thread Starter
iTrader: (1)
Join Date: Apr 2011
Location: Ames, Iowa
Posts: 47
Likes: 0
Received 0 Likes
on
0 Posts
Car: 84 Z28
Engine: 350
Transmission: 700R4
Re: Automatic Window Project
I sent your code back with some edits. You'll obviously want to bench check it, but it compiles fine.
Here's are the changes; my comments are inset:
I put all your condition checks on one line. This uses the millis() function I was talking about earlier. When the handle is pulled, the doors are unlocked, and the window is up the if statement becomes true. This starts the millis() timer, turns on the relay, and sets your Door_Up_Activation to true. When the set amount of time has passed, the 'else if' statement becomes true (the first if statement is not true as long as the window is down). That turns off your down relay, so this accomplishes your timed roll without using delay.
The reason for putting Door_Up_Activation in the first if statement is because that second 'else if' statement can become true when the windows are manually rolled down (i.e., you don't want the whole rolling thing to happen). That would cause the windows to roll up virtually every time the doors are closed. The downside is apparent when you close your doors before the windows have finished rolling down. In this case, the roll up function will execute, and it will just start rolling your windows up a little early. I haven't found it to be an issue on mine.
Here's the other change:
Again, I put your conditional statements on the same line. The only other change I made here was to put in the line digitalWrite(LH_WindowDownOutput, LOW);, so that you can't accidentally turn on both of the relays.
One other benefit of this change is the way the windows are handled when the doors are locked. In your original code, it looks like you could have issues if you try to lock the doors during the rolling execution. Take a look here (original code):
If you lock the doors before they're both closed, then DoorLockState becomes 0 before DoorOpenState becomes 1, and your windows never get rolled up. Worse still, if you locked them while the windows are rolling then DoorLockState becomes 0 before your 'else if' statement becomes true, then the function won't be called and you'll never get to do digitalWrite(RH_WindowUpOutput, LOW);. Your up window relay won't shut off. (original code)
Here's are the changes; my comments are inset:
Code:
void Down_Process()
{
  static unsigned long RH_StartTime;                       // Create a variable to hold the RH window's start time
  static unsigned long LH_StartTime;                       // Create a variable to hold the LH window's start time

  // RH Window:
  if (DoorLockState == 1 && RH_DoorHandleState == 1 && RH_WindowUpState == 1)  // If the Doors are Un-Locked, the window is up, and the handle is pulled
    {
      RH_StartTime = millis();                             // Set startTime to the ammmount of time elapsed (since boot)
      digitalWrite(RH_WindowDownOutput, HIGH);               // Activate the RH Window Down Output Relay
      RH_Door_Up_Activation = 1;                             // RH Door Activation Window Up Register - To allow Up on only after a triggered down
    }
  else if (millis() - RH_StartTime >= RH_WindowTimer && RH_WindowUpState == 0 && RH_Door_Up_Activation == 1) // If the time since RH_StartTime was set is greater than roll time and the window is not up:
    {
      digitalWrite(RH_WindowDownOutput, LOW);                // De-Activate the RH Window Down Output Relay
    }

  // LH Window
  if (DoorLockState == 1 && LH_DoorHandleState == 1 && LH_WindowUpState == 1)
    {
      LH_StartTime = millis();
      digitalWrite(LH_WindowDownOutput, HIGH);               // Activate the LH Window Down Output Relay
      LH_Door_Up_Activation = 1;                             // RH Door Activation Window Up Register - To allow Up on only after a triggered down
    }
  else if (millis() - LH_StartTime >= LH_WindowTimer && LH_WindowUpState == 0 && LH_Door_Up_Activation == 1) // If the time elapsed since RH_StartTime was set is greater than your rolling time:
    {
      digitalWrite(LH_WindowDownOutput, LOW);                // De-Activate the RH Window Down Output Relay
    }
} The reason for putting Door_Up_Activation in the first if statement is because that second 'else if' statement can become true when the windows are manually rolled down (i.e., you don't want the whole rolling thing to happen). That would cause the windows to roll up virtually every time the doors are closed. The downside is apparent when you close your doors before the windows have finished rolling down. In this case, the roll up function will execute, and it will just start rolling your windows up a little early. I haven't found it to be an issue on mine.
Here's the other change:
Code:
void Up_Process()
{
  // RH Window:
  if (RH_WindowUpState == 0 && RH_Door_Up_Activation == 1 && DoorOpenState == 0)    // If the window is down, RH_Door_Up_Activation is active, and the door is clossed.
    {
      digitalWrite(LH_WindowDownOutput, LOW);                                       // De-Activate the RH Window Down Output Relay (in case it's active)
      digitalWrite(RH_WindowUpOutput, HIGH);                                          // Activate the RH Window Up Output Relay
    }
  else if (RH_WindowUpState == 1 && RH_Door_Up_Activation == 1)                     // If the RH Window is in the UP Position & last activation was window down
        {
         RH_Door_Up_Activation = 0;                                                   // RH Door Activation Register as it was moved Up in this function previously - 0 is UP
         digitalWrite(RH_WindowUpOutput, LOW);                                        // De-Activate the RH Window Down Output Relay
        }

  // LH Window:
  if (LH_WindowUpState == 0 && LH_Door_Up_Activation == 1 && DoorOpenState == 0)    // If the window is down, LH_Door_Up_Activation is active, and the door is clossed.
    {
      digitalWrite(LH_WindowDownOutput, LOW);                                       // De-Activate the RH Window Down Output Relay (in case it's active)
      digitalWrite(LH_WindowUpOutput, HIGH);                                           // Activate the RH Window Down Output Relay
    }
  else if (LH_WindowUpState == 1 && RH_Door_Up_Activation == 1)                     // If the LH Window is in the UP Position & last activation was window down
    {
        LH_Door_Up_Activation = 0;                                                     // LH Door Activation Register as it was moved Up in this function previously - 0 is UP
        digitalWrite(LH_WindowUpOutput, LOW);                                          // De-Activate the LH Window Down Output Relay
    }
} One other benefit of this change is the way the windows are handled when the doors are locked. In your original code, it looks like you could have issues if you try to lock the doors during the rolling execution. Take a look here (original code):
Code:
void Up_Process()
{
  if (DoorLockState == 1 && DoorOpenState == 0)         // If the Doors are Un-Locked & Doors are closed & last activation was window down
    {
     RH_Door_Up_Process();                              // RH Door Up Process
     LH_Door_Up_Process();                              // LH Door Up Process
    }
} Code:
if (RH_WindowUpState == 0 && RH_Door_Up_Activation == 1)                        // RH Window is Not in the UP Position & Doors are closed & last activation was window down
          {
           digitalWrite(RH_WindowUpOutput, HIGH);                                     // Activate the RH Window Down Output Relay
          } else if (RH_WindowUpState == 1 && RH_Door_Up_Activation == 1)             // If the RH Window is in the UP Position & last activation was window down
            {
             RH_Door_Up_Activation = 0;                                               // RH Door Activation Register as it was moved Up in this function previously - 0 is UP
             digitalWrite(RH_WindowUpOutput, LOW);                                    // De-Activate the RH Window Down Output Relay
            }
Last edited by acliad; 01-28-2017 at 05:26 PM. Reason: Clarity; Elaborate on Door_Up_Activation
01-28-2017, 07:03 PM
#39
Junior Member
Thread Starter
iTrader: (1)
Join Date: Apr 2011
Location: Ames, Iowa
Posts: 47
Likes: 0
Received 0 Likes
on
0 Posts
Car: 84 Z28
Engine: 350
Transmission: 700R4
Re: Automatic Window Project
A side note on the millis() function. millis() returns an unsigned long, which is why those variables are declared as such. Unsigned longs hold values up to 4,294,967,295 which is around 50 days. When it rolls over, it starts back at zero. So this is virtually not an issue when you see how it works. Say you set StartTimer at 4,294,967,294 milliseconds (1 before it rolls over). Then it checks it again at 2 milliseconds. 2 - 4,294,967,294 becomes 3 (I believe, I need to hook up an Arduino to run the math), but it still tracks your time correctly with rollover.
01-28-2017, 07:03 PM
#40
Member
Join Date: Aug 2007
Posts: 363
Likes: 0
Received 4 Likes
on
4 Posts
Car: 85 Firebird C&C T-Top
Engine: 347ci LS1
Transmission: 4L60E LS1
Axle/Gears: BW 9 Bolt Posi,3.27,C5+VE Brakes
Re: Automatic Window Project
I did some testing on the code you sent, whilst it compiles fine, it causes havoc on the outputs.
You did raise some very good points that i didn't think of, like both activating at the same time. The lock state is more for roll down that roll up, but again very simple small issues that are easily fixed. Always good to have a second set of eyes on things.
I get the timer section you added. But in practice on my board it didn't function. I'll update when i get some time to tinker on it more.
01-28-2017, 07:05 PM
#41
Junior Member
Thread Starter
iTrader: (1)
Join Date: Apr 2011
Location: Ames, Iowa
Posts: 47
Likes: 0
Received 0 Likes
on
0 Posts
Car: 84 Z28
Engine: 350
Transmission: 700R4
Re: Automatic Window Project
Okay. Let me know what you turn up. I may have missed some conditional statement or something of the sort. Debugging

Thread
Thread Starter
Forum
Replies
Last Post