When you click on links to various merchants on this site and make a purchase, this can result in this site earning a commission. Affiliate programs and affiliations include, but are not limited to, the eBay Partner Network.
Well guys, I have used this community to gain a wealth of knowledge and felt like it was finally time to give back. I know there are plenty of threads on here about this subject (because I’ve read them all) but I felt like it was still up in the air on a few things.
I just mated my hydroboost unit to my stock brake booster bracket, and went through the entire thing taking photos galore for this write up. It’s pretty long and I hope someone finds it useful.
*** DISCLAIMER*** I AM NOT RESPONSIBLE FOR THE FAILURE OF BRAKES OR ANY OTHER EVENT THAT OCCURS FROM THE USE OF THE BELOW INFORMATION. IF YOU CHOOSE TO PERFORM THE BELOW INSTALLATION, YOU ARE ACCEPTING RESPONSIBILITY FOR ANYTHING THAT OCCURS AS A RESULT OF DOING SO. BY READING THIS INFORMATION, YOU HAVE AGREED TO THIS DISCLAIMER AND FORFEIT ANY RIGHT YOU MAY HAVE HAD TO FILE SUIT, GAIN COMPENSATION, OR FILE ANY OTHER LEGAL ACTION AGAINST THE WRITER.
It’s a sad world unfortunately, so I had to put that in here.
The two things I felt were really missing from the other threads were A) A solution for people that are purchasing reman hydroboost units that don’t come with the power piston return spring, retainer, and master cylinder pushrod, and B) Clear photos of the inside pedal assembly and how and why you can’t use the pedal pushrod from the new hydroboost. As well as clear photos on how to make one yourself.
Before I begin, let me first give you the background. The car is a 91 Camaro RS, born a lowly 3.1 V6. It now has a 5.3L out of a 2003 Tahoe. Lucky enough for me, the Tahoe had hydroboost and therefor has the additional port. The car is stripped inside all the way to the firewall for minor rust repair, and the motor is coming out very soon so the car can go up on a rotisserie. I will NOT be able to test this installation for quite some time, but am beyond 100% confident it will work flawlessly.
Here’s my install.
Parts purchased and costs:
Remanufactured Hydroboost Booster: 2000 Chevrolet Express 2500 Van w/ 6.5L V8 Diesel
AC Delco P/N 14PB4168 – Rockauto $146.79 including core charge
New Master Cylinder: 2001 Chevrolet Camaro w/ 5.7L V8
Dorman P/N M630022 – Rockauto $65.89 no core
Whiz Nuts(has the locking washer built on): M10 1.5 – Ace Hardware $6.00
Power Piston Return Spring Kit: Tallon Hydraulics P/N: THI-27288 – Tallon Hydraulics $30.00
Concave Power Piston (Master Cylinder Pushrod): Tallon Hydraulics P/N THI-3000
Tallon Hydraulics $12.00 **THIS HAD TO BE CUT DOWN – SEE BELOW TUTORIAL**
Other parts you will need: 7/16” Nut, 3/8” Threading Die, 3/8” Nut, Snap Ring Pliers
Shipping in total: $35.00
If you buy all of the above you will be at about $350.00 including the die and snap ring pliers. This is everything you need to physically get the system into the car, NOT including brake lines or hydraulic lines that need to be made/adapted to fit properly. Once I get to that point when the car is going back together, I will update this with that information.
In the photos below I had the pedal assembly out of the car and used washers to simulate the thickness of the firewall between the pedal assembly and the booster bracket.
First (obviously) remove the brake booster and master cylinder from the car. Remove the clip holding the booster pushrod. You will need a 15mm deep socket for the master cylinder bolts and the booster bolts that also hold the pedal on.
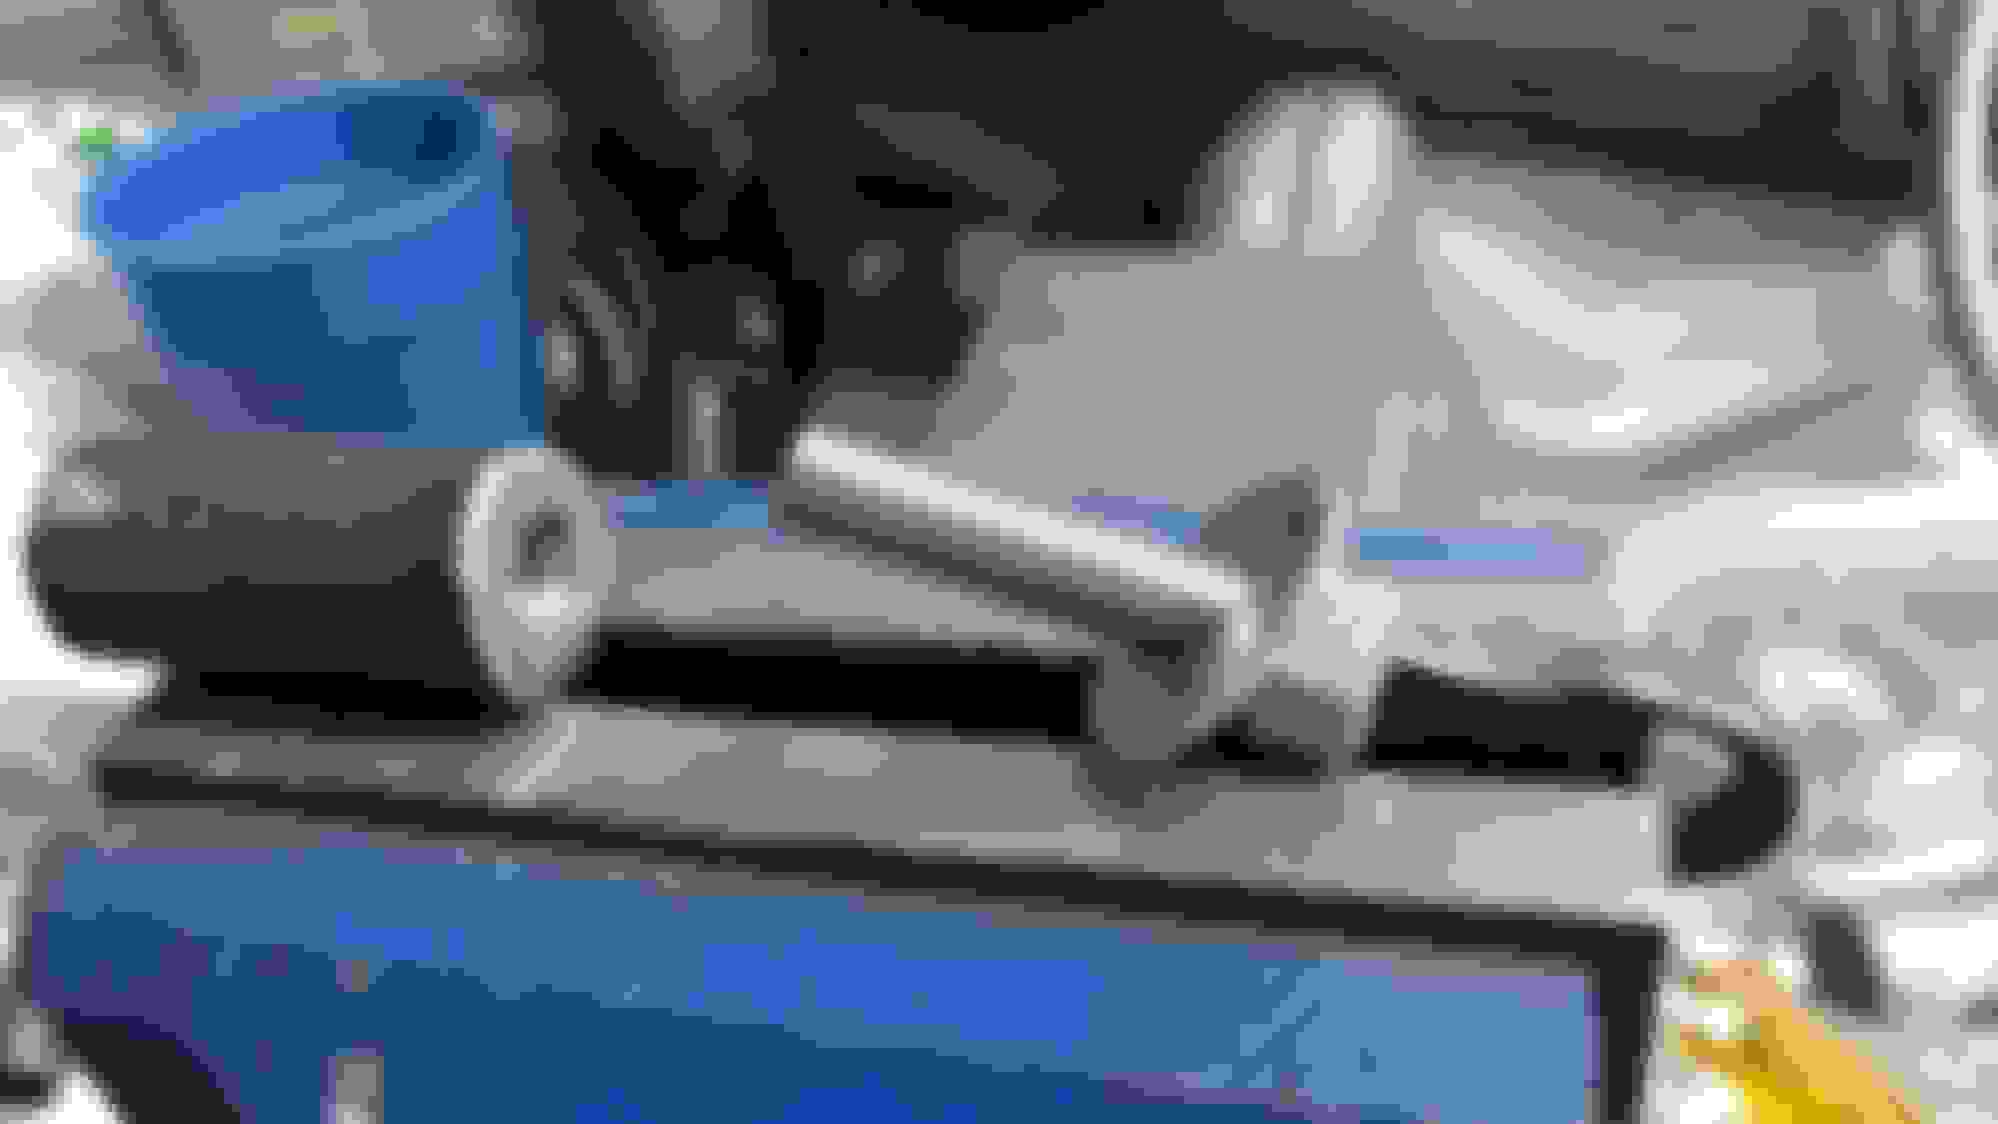
Next, take the brake booster and bracket assembly and remove the booster from the bracket. This will require either drilling or grinding off the rivets. Now take the pedal rod, and cut it off 3” from the end of the rod. Once you are done, discard the booster. The new hydroboost booster will bolt directly to this bracket with no further modification.
The new hydroboost rod is too short, and the eye is too large, for the third gen. We have to make an adjustable rod to put in its place using part of the old, and part of the new. (the old rod is already threaded in this photo) (This is what will happen if you try to use 10MM instead of 3/8” the threads are not deep enough because the rod is too small. 3/8” looks much better (Glad I had another booster out back))
Cut the factory end off of the new hydroboost booster. I went an inch from the tapered portion. In the photo below, I had already cut the eye off before realizing I needed to cut it much further back.
Weld a 7/16” nut to the rod that is remaining. Be SURE to put this on perfectly straight! Avoid getting the rod too hot as you could burn the seals inside the hydroboost near the rod. I used a constant stream of air from a blow gun on the rod itself as I welded on the nut. This seemed to work well.
Take your 6” Pipe Nipple and cut off the threads on one end. Cut the pipe again 1” from the cut you just made. These cuts need to be perfectly straight. If you welded your 7/16” nut on at an angle, now is the time to correct this. One cut on your pipe needs to be angled to match your error on the 7/16” nut. (Yes, this is from experience unfortunately)
Take a 3/8” nut and put it in the end of the pipe. It’s not going to slide in, you will have to persuade it some. Put a bolt in the nut, ensure it is straight, and weld the nut into the pipe. The bolt is to align the nut as well as keep any weld slag off of your threads. Don’t take it out before you weld but don’t weld it in either!
Next, thread the 3” piece of pedal rod that we took off the old booster. This thread needs to match the nut you just welded into your 1” piece of pipe. 3/8” is what I used and the threads look good. 10mm did NOT work, the threads were not complete.
Put a washer and nut on the pedal rod and insert the pedal rod into the nut in the pipe. The washer and nut will jamb against the pipe once everything is adjusted as well as serve as a fail safe in the event you stomp the pedal and somehow strip the pedal rod threads (I don’t foresee this happening in any event, but why not be safe?)
Weld the pipe to the 7/16” nut that is on the end of the hydroboost rod.
Your adjustable pedal rod assembly is now complete. Install the clip onto the pedal and pull the pedal back with some force to ensure the booster is all the way into the returned position. Turn the pipe until the pedal comes into full contact with the brake switch, and then tighten the nut and washer up to the pipe, making sure the pipe doesn’t turn as you do so.
Next we are going to install the power piston return spring. The kit comes with an extra washer and snap ring. We are going to use the smaller of the two snap rings, and the washer that is already on the spring. Insert the spring into the booster, washer end out. Make sure the spring is fully seated into the hole inside the booster. Press the washer into the housing, and install the snap ring. Make SURE the snap ring is as far out (toward you) as it can be.
Now we have to cut down the Power Piston (Master Cylinder Pushrod). The one Tallon sent me was too long. I knew this ahead of time, as they specifically told me they were going to send me their longest so I could trim it to size. Now that I have done so, the final length came out to be 3.375”. They may have one in stock that is the right length, we just didn’t know how long it was going to need to be at the time. Call them and ask, they are extremely easy to deal with and as soon as I explained my problem with not having the spring and retainer he immediately knew what I needed.
The NICEST part of the Tallon parts is that the rod can be removed WITHOUT removing the spring and retainer. As I understand it, this is NOT how the stock setup is. Because of this, you can insert and remove the rod with no effort at all, so there’s no reason to not have it the correct length. The rod needs to be short enough that the Master Cylinder does not touch it at ALL until the pedal is pushed. Again, make sure your booster is in the fully returned position, insert the rod, and slide on the master cylinder. The master should not wobble left to right AT ALL. It should seat fully against the face of the booster. If it wobbles, the rod is still too long, keep trimming. If you leave the rod too long, your brakes will constantly have a small amount of pressure which will burn up your brakes QUICK.
In order to cut this down, I first cut off Ľ” of the rod. This left me with a flat ended rod instead of the rounded end rod I needed. I broke out the poor mans lathe (a drill and a die grinder) and started curving the end of the rod to match what I had cut off. Check your length CONSTANTLY during this process. You can always trim more, you CANNOT add material back to the rod. Be sure to use some emery cloth or 320 grit sandpaper to smooth out the end. I don’t recommend doing this with a grinder or bench grinder because you will never get a uniform end. You will always have flat spots somewhere.
If you are slow and careful, you will end up with the below.
Here is the finished rod vs the original third gen rod in case anyone is wondering if they can use it. The answer is definitely a no.
Photos below are every measurement I could think to take for this rod after I shortened it. If you happen to have a friend with a lathe, have them turn one out for you!
Here are some photos of the entire assembly put together out of the car. I really need to clean my workbench, just ignore that part.
 02-04-2017, 11:11 AM