BlackTopKing's "Concrete Angel" Build
 03-28-2013, 03:47 AM
#101
Member
Join Date: Jun 2009
Location: Toledo ohio
Posts: 317
Likes: 0
Received 0 Likes
on
0 Posts
Car: 87 Black Irocz28
Engine: 350 TPI
Transmission: 700r4 shift kit
Axle/Gears: 3:73 richmend axles and eaton gears
Re: BlackTopKing's "Concrete Angle" Build
Oh no ????
If I had the room, I would try it...but as you can see in some pics I have on my profile...I have a 2car garage, but I only get half of it...I live in a twin plix...the neighbor gets the other half...its there yellow car and truck in some pics ...I can spin a wrench but body work, no they won't allow it...they own the place...
What I'm worried about is getting the drivers side and passenger side to match....I met George Barris and asked him, how he matches one side to the other ...He told me he has a photographic memory....he would do one side..then the other..just by looking at it...WoW!!!
Did you see muscle car with Lou Santiago...he did a ruststang...he welded pins around the wheel wells...the kind you woul use with a dent puller. ...then took floral foam and pushed it on to the pins ...then shaped it...
I know you have your lamb hinges on...but ...back before I had my iroc...I had a 81 Oldsmobile Cutlass...I wanted to put lambo doors on but suicide them...by putting the hinges on the B piller....
 03-28-2013, 07:54 AM
#102
Supreme Member
Thread Starter
iTrader: (1)
Join Date: Oct 2008
Location: Charleston SC
Posts: 1,107
Likes: 0
Received 0 Likes
on
0 Posts
Car: 1987 Trans Am GTA
Engine: 350 TPI
Transmission: T56
Axle/Gears: Posi 3:42
Re: BlackTopKing's "Concrete Angle" Build
So I gotta see about rims. I am having a hard time finding domething I like n can afford thatll work with h widebody.
The issue...is getting out. n ill explain like this, if I could bring stock gta rims out 2 to 2.5" I be happy.
I found a set of ccw (good deal) 18x12 r and 18x10f....lil concerned with front fittment, but bsvis 7.5r n 7.25 f.
Issue is..offest, I dont get it...lol mm verse inch is 25.4mm to 1"... Seems not right.
Was looking at mmr gt1 but say 48mm os as 3" lip...which 48mm is 1.8"?
So if im ccorrect, I would need a 2" spacer to get bs of 7.5" with in 5.5" but....that woud mean,
Rims out of fender 1.5".... Or 0"?????
03-28-2013, 07:59 AM
#103
Junior Member


Join Date: Mar 2009
Location: Charleston, SC
Posts: 59
Likes: 0
Received 0 Likes
on
0 Posts
Car: 1989 IROC Z28
Engine: Empty
Transmission: T-56
Re: BlackTopKing's "Concrete Angle" Build
Would you be willing to swap your rear for a 4th gen? Of course I think that is only 1.5".
03-28-2013, 08:10 AM
#104
Supreme Member
Thread Starter
iTrader: (1)
Join Date: Oct 2008
Location: Charleston SC
Posts: 1,107
Likes: 0
Received 0 Likes
on
0 Posts
Car: 1987 Trans Am GTA
Engine: 350 TPI
Transmission: T56
Axle/Gears: Posi 3:42
Re: BlackTopKing's "Concrete Angle" Build
Oh no ????
If I had the room, I would try it...but as you can see in some pics I have on my profile...I have a 2car garage, but I only get half of it...I live in a twin plix...the neighbor gets the other half...its there yellow car and truck in some pics ...I can spin a wrench but body work, no they won't allow it...they own the place...
What I'm worried about is getting the drivers side and passenger side to match....I met George Barris and asked him, how he matches one side to the other ...He told me he has a photographic memory....he would do one side..then the other..just by looking at it...WoW!!!
Did you see muscle car with Lou Santiago...he did a ruststang...he welded pins around the wheel wells...the kind you woul use with a dent puller. ...then took floral foam and pushed it on to the pins ...then shaped it...
I know you have your lamb hinges on...but ...back before I had my iroc...I had a 81 Oldsmobile Cutlass...I wanted to put lambo doors on but suicide them...by putting the hinges on the B piller....
If I had the room, I would try it...but as you can see in some pics I have on my profile...I have a 2car garage, but I only get half of it...I live in a twin plix...the neighbor gets the other half...its there yellow car and truck in some pics ...I can spin a wrench but body work, no they won't allow it...they own the place...
What I'm worried about is getting the drivers side and passenger side to match....I met George Barris and asked him, how he matches one side to the other ...He told me he has a photographic memory....he would do one side..then the other..just by looking at it...WoW!!!
Did you see muscle car with Lou Santiago...he did a ruststang...he welded pins around the wheel wells...the kind you woul use with a dent puller. ...then took floral foam and pushed it on to the pins ...then shaped it...
I know you have your lamb hinges on...but ...back before I had my iroc...I had a 81 Oldsmobile Cutlass...I wanted to put lambo doors on but suicide them...by putting the hinges on the B piller....
I havent seen those, so ill search it, check.it out.
As for matching, im pretty good, visually but its easiest to create land marks...in if just im minds eye. The land marks really help guiding your design.
Also ill do both sides, at same time....so that I do both steps both sides same time, same way.
Consideribg I did rear, ive already thought of a couple improved steps,
that wouldd throw me off.lil bit.
N for the stud effect, yes sir...big trick and a great way to apply on areas thatll "hang".
You can use rivits (try not to with screws, but can do it) rivits are good, cause you cab ger steel rivits n tak heads latee, grind out n poof...perfect, plus youll have a stem to secure to.
When using foam, try to fiberglass it all, and behind kinda incase it..fb is water tight, water in foam, years later....not good freezin, plus mold...just gets nasty n rotts...but no videeo eer tells ya that.
You really want to keep as clean as you can, expecially fb.... I have seen for fiberglass bodies, drive around for years, get painted only for the pain to peel off... do to poorly cat fiberglass
03-28-2013, 10:13 AM
#106
Junior Member
Join Date: Mar 2009
Location: Charleston, SC
Posts: 59
Likes: 0
Received 0 Likes
on
0 Posts
Car: 1989 IROC Z28
Engine: Empty
Transmission: T-56
Re: BlackTopKing's "Concrete Angle" Build
Let me check out my 4th gen rear when I get home around mid April (just found out yesterday the date I come home!  ) and make sure it is not a 9 in or 12 bolt. Since I am fairly sure it is stock, I would be willing to swap for a third gen rear as long as it has disk. I will also check the gears for you. Was planning to put it in my 89 but dont want the wheels sticking out.
) and make sure it is not a 9 in or 12 bolt. Since I am fairly sure it is stock, I would be willing to swap for a third gen rear as long as it has disk. I will also check the gears for you. Was planning to put it in my 89 but dont want the wheels sticking out.
03-28-2013, 12:38 PM
#107
Supreme Member
Thread Starter
iTrader: (1)
Join Date: Oct 2008
Location: Charleston SC
Posts: 1,107
Likes: 0
Received 0 Likes
on
0 Posts
Car: 1987 Trans Am GTA
Engine: 350 TPI
Transmission: T56
Axle/Gears: Posi 3:42
Re: BlackTopKing's "Concrete Angle" Build
Let me check out my 4th gen rear when I get home around mid April (just found out yesterday the date I come home! ) and make sure it is not a 9 in or 12 bolt. Since I am fairly sure it is stock, I would be willing to swap for a third gen rear as long as it has disk. I will also check the gears for you. Was planning to put it in my 89 but dont want the wheels sticking out.
) and make sure it is not a 9 in or 12 bolt. Since I am fairly sure it is stock, I would be willing to swap for a third gen rear as long as it has disk. I will also check the gears for you. Was planning to put it in my 89 but dont want the wheels sticking out.Mine is solid, check when I first got it. Nice n clean internals, disc 9bolt with pin suport n TA performance cover...looks killer.
I like it, bites nice.
I mean, really I bought a really nice trans n rear with a stock running motor....the car was just included, lol
Def like the 6sp...never going to 5again...lol
03-28-2013, 12:38 PM
#108
Supreme Member
Thread Starter
iTrader: (1)
Join Date: Oct 2008
Location: Charleston SC
Posts: 1,107
Likes: 0
Received 0 Likes
on
0 Posts
Car: 1987 Trans Am GTA
Engine: 350 TPI
Transmission: T56
Axle/Gears: Posi 3:42
Re: BlackTopKing's "Concrete Angle" Build
Let me check out my 4th gen rear when I get home around mid April (just found out yesterday the date I come home! ) and make sure it is not a 9 in or 12 bolt. Since I am fairly sure it is stock, I would be willing to swap for a third gen rear as long as it has disk. I will also check the gears for you. Was planning to put it in my 89 but dont want the wheels sticking out.
) and make sure it is not a 9 in or 12 bolt. Since I am fairly sure it is stock, I would be willing to swap for a third gen rear as long as it has disk. I will also check the gears for you. Was planning to put it in my 89 but dont want the wheels sticking out.
03-28-2013, 01:33 PM
#109
Junior Member
Join Date: Mar 2009
Location: Charleston, SC
Posts: 59
Likes: 0
Received 0 Likes
on
0 Posts
Car: 1989 IROC Z28
Engine: Empty
Transmission: T-56
Re: BlackTopKing's "Concrete Angle" Build
I def be interested in something like that, Its on wish list already.
Mine is solid, check when I first got it. Nice n clean internals, disc 9bolt with pin suport n TA performance cover...looks killer.
I like it, bites nice.
I mean, really I bought a really nice trans n rear with a stock running motor....the car was just included, lol
Def like the 6sp...never going to 5again...lol
 .
.Thanks man! Me too, just hope it warms up before I get there, lol.
03-28-2013, 04:22 PM
#110
Member
Join Date: Jun 2009
Location: Toledo ohio
Posts: 317
Likes: 0
Received 0 Likes
on
0 Posts
Car: 87 Black Irocz28
Engine: 350 TPI
Transmission: 700r4 shift kit
Axle/Gears: 3:73 richmend axles and eaton gears
Re: BlackTopKing's "Concrete Angle" Build
Blacktopking ...thanks for the invite ..but yeah It would be a helluva drive...I'm on the ohio/Michigan line...last city on i75 before you cross over to Michigan. ..
03-28-2013, 08:12 PM
#111
Member
Join Date: Jun 2009
Location: Toledo ohio
Posts: 317
Likes: 0
Received 0 Likes
on
0 Posts
Car: 87 Black Irocz28
Engine: 350 TPI
Transmission: 700r4 shift kit
Axle/Gears: 3:73 richmend axles and eaton gears
Re: BlackTopKing's "Concrete Angle" Build
When you do get a chance...take a look at my pics...I had my iroc in the body shop ...and had front blinkers, door handles, key holes, mirrors, and antenna shaved...I have vett tail lights so no rear side maker lights ...so I had the fender blinkers shaved. ..I want to use 4gen Ta mirrors. .and they mount on the rubber triangle. .and the list goes on and on and on ..... lol
03-28-2013, 10:31 PM
#112
Supreme Member
Thread Starter
iTrader: (1)
Join Date: Oct 2008
Location: Charleston SC
Posts: 1,107
Likes: 0
Received 0 Likes
on
0 Posts
Car: 1987 Trans Am GTA
Engine: 350 TPI
Transmission: T56
Axle/Gears: Posi 3:42
Re: BlackTopKing's "Concrete Angle" Build
When you do get a chance...take a look at my pics...I had my iroc in the body shop ...and had front blinkers, door handles, key holes, mirrors, and antenna shaved...I have vett tail lights so no rear side maker lights ...so I had the fender blinkers shaved. ..I want to use 4gen Ta mirrors. .and they mount on the rubber triangle. .and the list goes on and on and on ..... lol
I really like the notch, lol. Cool to see one custom made, think we talked about it before (needed to be finished??)
Also like the shaven effect, im a hug fan of shaving n molding.
Great work on the TTop repair.
What year mirriors did you use?
03-29-2013, 05:46 AM
#113
Member
Join Date: Jun 2009
Location: Toledo ohio
Posts: 317
Likes: 0
Received 0 Likes
on
0 Posts
Car: 87 Black Irocz28
Engine: 350 TPI
Transmission: 700r4 shift kit
Axle/Gears: 3:73 richmend axles and eaton gears
Re: BlackTopKing's "Concrete Angle" Build
yeah we might have ....I had two people working on The car ...my so called friend that worked at the shop...and the shop..My friend started to work on my car before he worked at the shop...when he got a job there...I paid the shop $400 to let it sit in the shop so friend could work on it after hours...when he was done ...I had the shop do some work on it...for that part my friend didn't do all the work ...the shop had someone help him....the fix to the top...I'm really happy with that...
The 4th gen TA mirrors you can get from any year....I've only seen 1 person do this...he put 4th gen TA mirrors on his 3rd gen...but he didn't fill in the holes from the 3rd gen mirrors. ..he covered them with tape that was same color has his car...he drilled 3 holes in to the rubber triangle. .the only bad thing is ..you have to make something to cover the inside. ...I don't like that triangle thing...and I don't understand why on a f-body has it but a G-body don't. ..both came with T-tops ...both have frameless doors ( meaning nothing around the window ) ..what I would like to do is get a window from a G-body ..and just try to see if it would fit.....another idea was to cover the triangle in fiberglass, that way it would be the same color as the body will be ( satin/flat black ) but I had the holes filled so I'm going to make the 4th gen TA mirrors work....
The 4th gen TA mirrors you can get from any year....I've only seen 1 person do this...he put 4th gen TA mirrors on his 3rd gen...but he didn't fill in the holes from the 3rd gen mirrors. ..he covered them with tape that was same color has his car...he drilled 3 holes in to the rubber triangle. .the only bad thing is ..you have to make something to cover the inside. ...I don't like that triangle thing...and I don't understand why on a f-body has it but a G-body don't. ..both came with T-tops ...both have frameless doors ( meaning nothing around the window ) ..what I would like to do is get a window from a G-body ..and just try to see if it would fit.....another idea was to cover the triangle in fiberglass, that way it would be the same color as the body will be ( satin/flat black ) but I had the holes filled so I'm going to make the 4th gen TA mirrors work....
03-29-2013, 10:09 PM
#114
Supreme Member
Thread Starter
iTrader: (1)
Join Date: Oct 2008
Location: Charleston SC
Posts: 1,107
Likes: 0
Received 0 Likes
on
0 Posts
Car: 1987 Trans Am GTA
Engine: 350 TPI
Transmission: T56
Axle/Gears: Posi 3:42
Re: BlackTopKing's "Concrete Angle" Build
yeah we might have ....I had two people working on The car ...my so called friend that worked at the shop...and the shop..My friend started to work on my car before he worked at the shop...when he got a job there...I paid the shop $400 to let it sit in the shop so friend could work on it after hours...when he was done ...I had the shop do some work on it...for that part my friend didn't do all the work ...the shop had someone help him....the fix to the top...I'm really happy with that...
The 4th gen TA mirrors you can get from any year....I've only seen 1 person do this...he put 4th gen TA mirrors on his 3rd gen...but he didn't fill in the holes from the 3rd gen mirrors. ..he covered them with tape that was same color has his car...he drilled 3 holes in to the rubber triangle. .the only bad thing is ..you have to make something to cover the inside. ...I don't like that triangle thing...and I don't understand why on a f-body has it but a G-body don't. ..both came with T-tops ...both have frameless doors ( meaning nothing around the window ) ..what I would like to do is get a window from a G-body ..and just try to see if it would fit.....another idea was to cover the triangle in fiberglass, that way it would be the same color as the body will be ( satin/flat black ) but I had the holes filled so I'm going to make the 4th gen TA mirrors work....
The 4th gen TA mirrors you can get from any year....I've only seen 1 person do this...he put 4th gen TA mirrors on his 3rd gen...but he didn't fill in the holes from the 3rd gen mirrors. ..he covered them with tape that was same color has his car...he drilled 3 holes in to the rubber triangle. .the only bad thing is ..you have to make something to cover the inside. ...I don't like that triangle thing...and I don't understand why on a f-body has it but a G-body don't. ..both came with T-tops ...both have frameless doors ( meaning nothing around the window ) ..what I would like to do is get a window from a G-body ..and just try to see if it would fit.....another idea was to cover the triangle in fiberglass, that way it would be the same color as the body will be ( satin/flat black ) but I had the holes filled so I'm going to make the 4th gen TA mirrors work....
Yeaah, I remeber, we did. Im still not sure if I am gonna do hatch or not, if I do, itll be like a stage II modification.
but yeah, like ya car. Def different n the lil thibgs sometimes hit the biggest when doing xustom. I asked about mirriors, because it was brought to my attention that tech thatll be the only stock body part on car...lol...said, well I guess ill have to change em. Lol, but thatll be later.
04-01-2013, 09:07 AM
#115
Supreme Member
Thread Starter
iTrader: (1)
Join Date: Oct 2008
Location: Charleston SC
Posts: 1,107
Likes: 0
Received 0 Likes
on
0 Posts
Car: 1987 Trans Am GTA
Engine: 350 TPI
Transmission: T56
Axle/Gears: Posi 3:42
Re: BlackTopKing's "Concrete Angle" Build
Well, tonight like 7ish I should have some cool eye candy for everyone.
Some pics of the doors (both done n fuctional) rear quaters are sanded out (just a lil tweeking to do) & ive started the prototype actuating spoiler, got ton of pics for.
Finally sat down n made a stage schedual as well.
So ill have up tonight....debating if im gonna be daring enough to post video's....got a for real one n a bit of a goof one...lol
Anywaay im looking fwd to posting n hearing feed back.
04-01-2013, 03:25 PM
#116
Member
Join Date: Jun 2009
Location: Toledo ohio
Posts: 317
Likes: 0
Received 0 Likes
on
0 Posts
Car: 87 Black Irocz28
Engine: 350 TPI
Transmission: 700r4 shift kit
Axle/Gears: 3:73 richmend axles and eaton gears
Re: BlackTopKing's "Concrete Angle" Build
Thanks...I've been slowly doing things to my car...but my wish list is still bigger then what I have completed. ...speaking of wish list,,, have you been reading mine...I've thought about somekind of rising wing...in the jegs catalog. .with the gauges. ..they have a rpm active switch. ...it turns things on and off at a Rpm that you want...example Nos ...but I thought it could be used to raise and lower a wing....
I'll be looking for the update. ...
I'll be looking for the update. ...
04-01-2013, 06:44 PM
#117
Supreme Member
Thread Starter
iTrader: (1)
Join Date: Oct 2008
Location: Charleston SC
Posts: 1,107
Likes: 0
Received 0 Likes
on
0 Posts
Car: 1987 Trans Am GTA
Engine: 350 TPI
Transmission: T56
Axle/Gears: Posi 3:42
Re: BlackTopKing's "Concrete Angle" Build
BlackTopKing's
87 Trans Am GTA
Stage I
Custom Wide Body
Custom Hood (Fiberglass, maybe carbon)
RearQuarters/Fenders (fiberglass)
Doors/SideSkirts (Fiberglass)
Sideskirt Splitters (carbon)
Front Bumper/Rear Bumper (fiberglass)
Front Lower Lip (front spoiler) (Carbon)
Rear Valance (Carbon)
Roof Mod (fiberglass, maybe carbon)
Lambo Doors
Foward Hood Tilt
Actuating Spoiler ( Fiberglass, maybe carbon)
Stage II
Interior and Suspention
Stage III
Targa Top
Full Front Tilt
Stage IIII
Motor Swap or Build
04-01-2013, 06:44 PM
#118
Supreme Member
Thread Starter
iTrader: (1)
Join Date: Oct 2008
Location: Charleston SC
Posts: 1,107
Likes: 0
Received 0 Likes
on
0 Posts
Car: 1987 Trans Am GTA
Engine: 350 TPI
Transmission: T56
Axle/Gears: Posi 3:42
Re: BlackTopKing's "Concrete Angle" Build
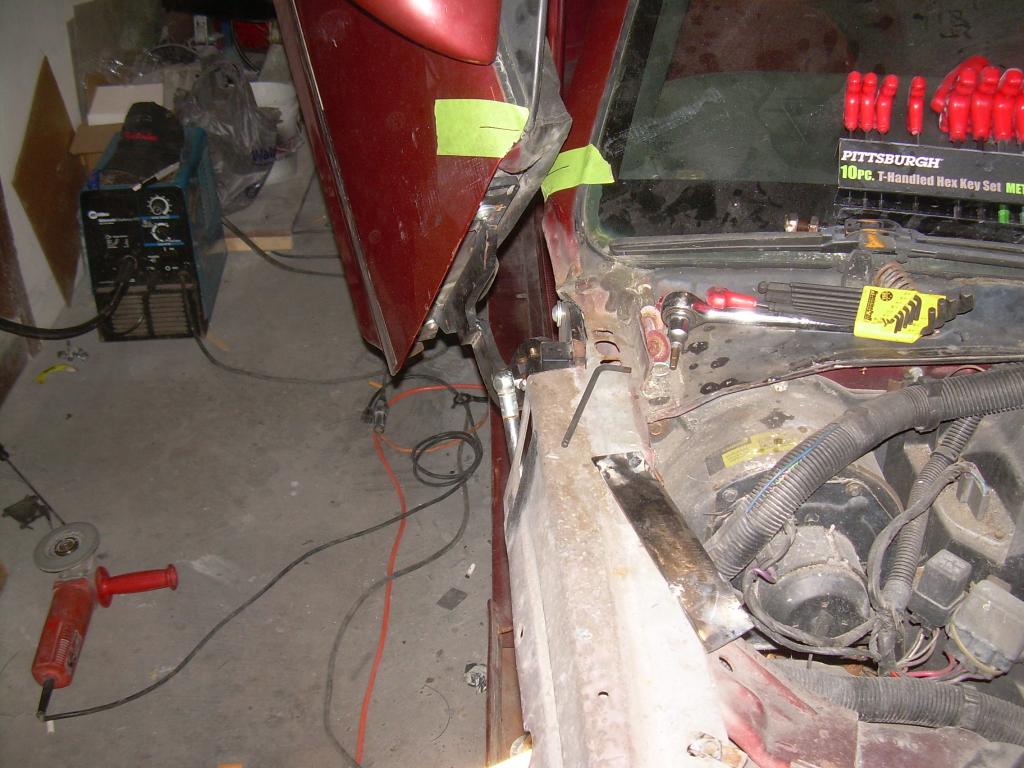
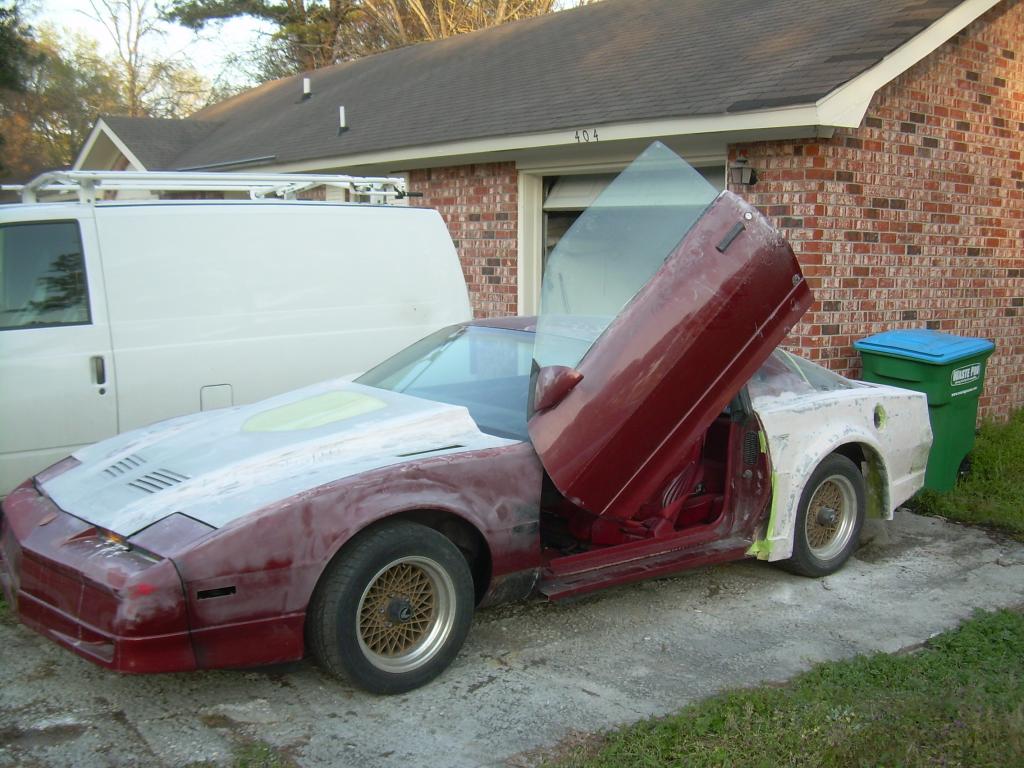
Pictures of the Lambo Doors in the making.
Basically Tape off door as markers, make marks to re aline later, remove door and cut off the hinges off of door side. Unbolt hinges on body side and cut:
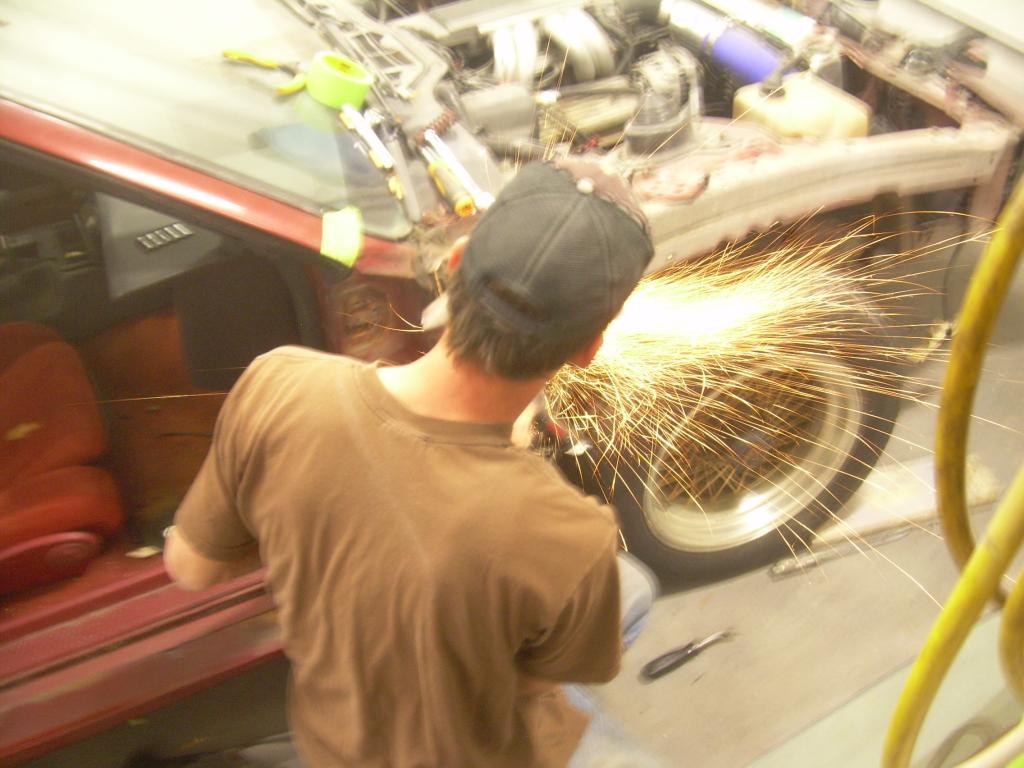
Removing a 5x2 section of the rear inner/fender frame to make room for the hing its self. You want the hing as high and as tight to the body and you can.
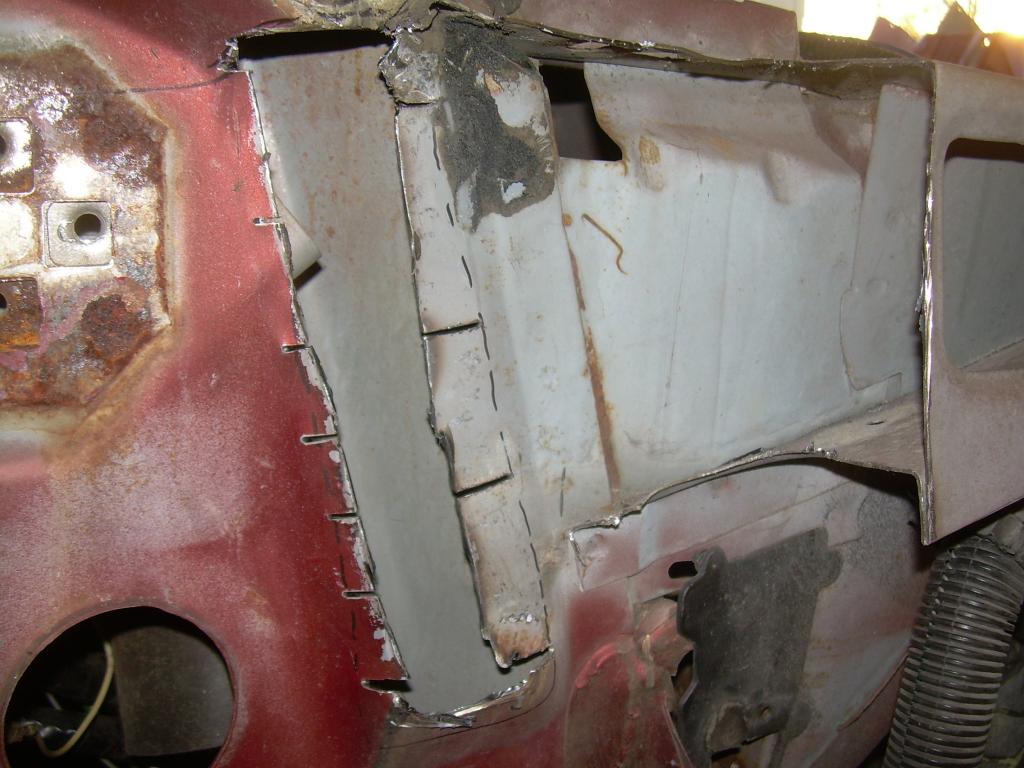
You will need to cut this section as well so that the hing can and will lay level in the down postion. Simply cut the top off, about 1/4" in and
then butterfly cut the rest so that you can keep this metal, hammer down so it is fulsh and level with the body hing area. you will be able to feed a donar piece
(metal from the back and tak into the car if you want, just not on outside as you want level)
Trick of the day. In my case i had to cut some of the "door side hing plates", so that when the hing is folded in a downward postion. The door side of the hing is as close to door (skin) area as you can
remeber you designing the closed postion first.
I drilled the hing plate, marked and drilled/taped the door. So that I can bolt the hing to the door as an aid in the layout. Repeat this for the body side, but you only need one here
this is about were you need the hing.
Once you have it bolted in you can test the door and aline it correctly prior to welding anything, incase you need to adjust it.
********
Basically Tape off door as markers, make marks to re aline later, remove door and cut off the hinges off of door side. Unbolt hinges on body side and cut:
Removing a 5x2 section of the rear inner/fender frame to make room for the hing its self. You want the hing as high and as tight to the body and you can.
You will need to cut this section as well so that the hing can and will lay level in the down postion. Simply cut the top off, about 1/4" in and
then butterfly cut the rest so that you can keep this metal, hammer down so it is fulsh and level with the body hing area. you will be able to feed a donar piece
(metal from the back and tak into the car if you want, just not on outside as you want level)
Trick of the day. In my case i had to cut some of the "door side hing plates", so that when the hing is folded in a downward postion. The door side of the hing is as close to door (skin) area as you can
remeber you designing the closed postion first.
I drilled the hing plate, marked and drilled/taped the door. So that I can bolt the hing to the door as an aid in the layout. Repeat this for the body side, but you only need one here
this is about were you need the hing.
Once you have it bolted in you can test the door and aline it correctly prior to welding anything, incase you need to adjust it.
********
04-01-2013, 06:45 PM
#119
Supreme Member
Thread Starter
iTrader: (1)
Join Date: Oct 2008
Location: Charleston SC
Posts: 1,107
Likes: 0
Received 0 Likes
on
0 Posts
Car: 1987 Trans Am GTA
Engine: 350 TPI
Transmission: T56
Axle/Gears: Posi 3:42
Re: BlackTopKing's "Concrete Angle" Build
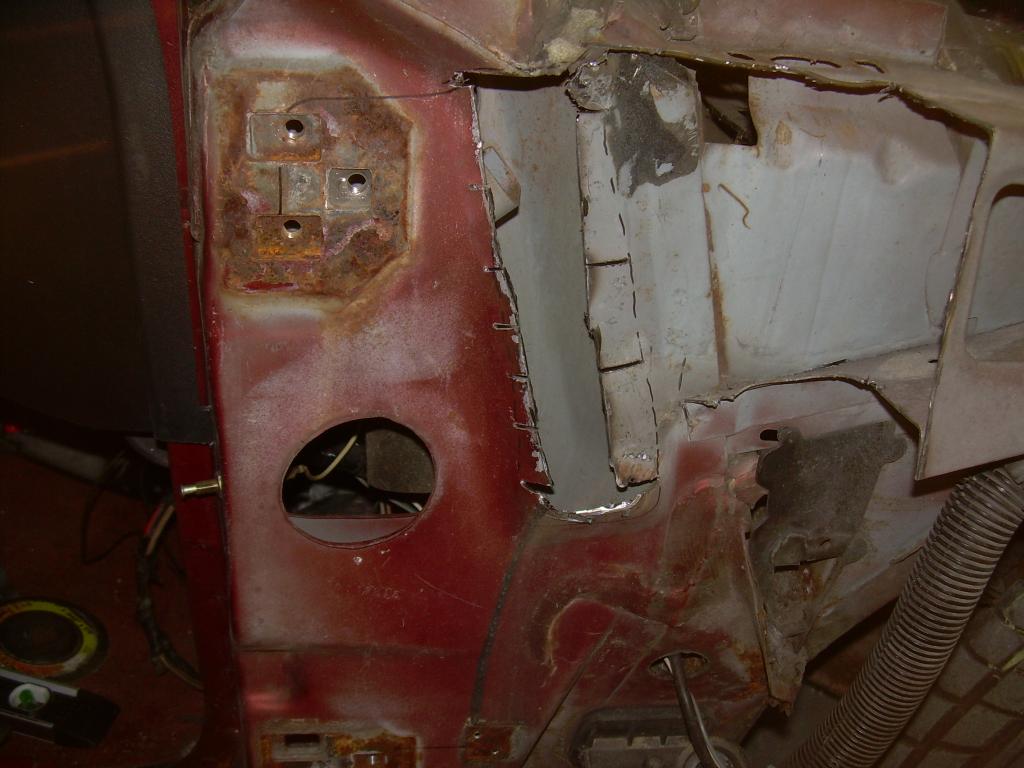
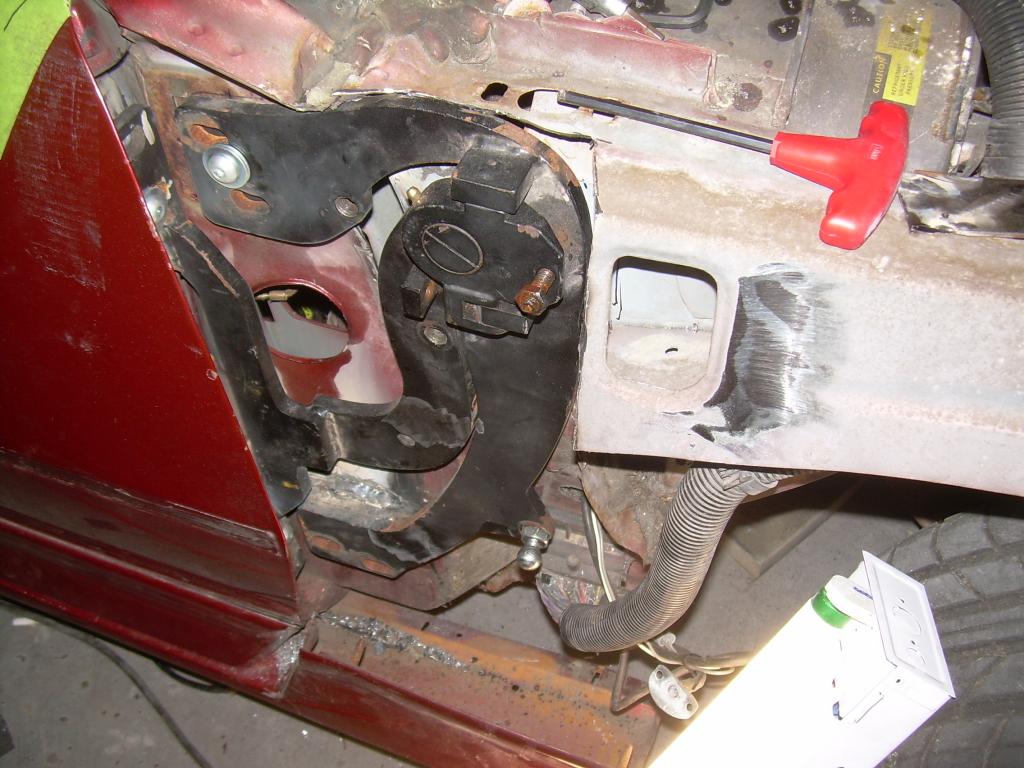
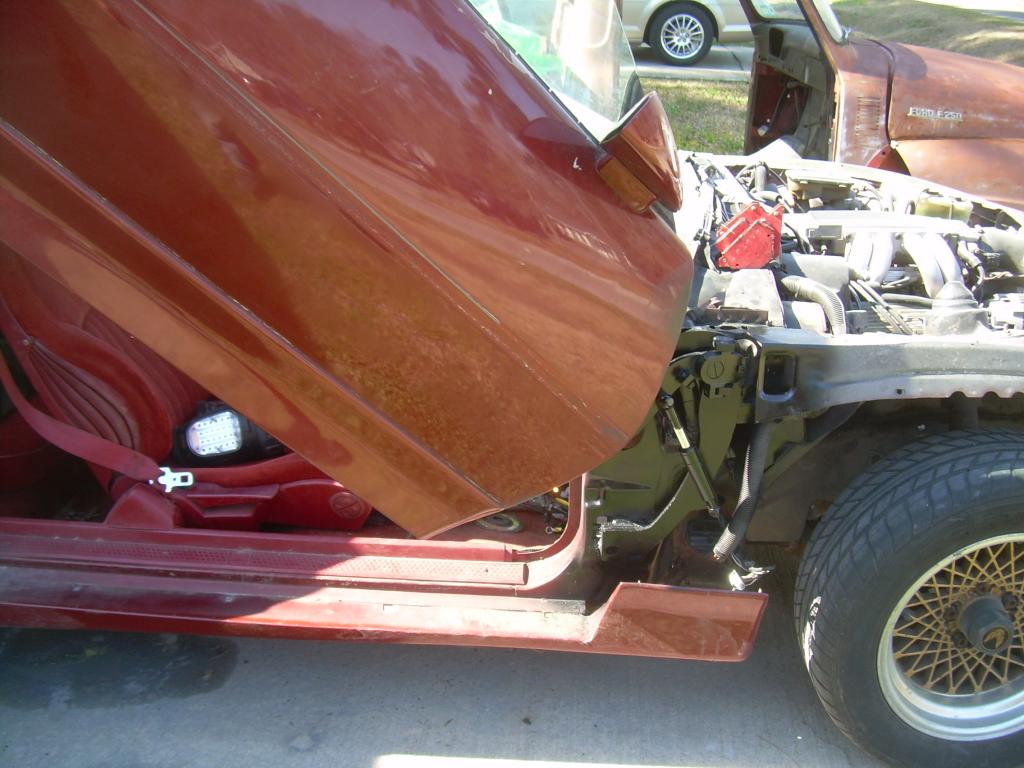
Once your happy welded it together and clean it up!!!

In my case i am not try worried about the cleaning part until paint when i have to take car apart anyway. but for now atleast something...
*******
In my case i am not try worried about the cleaning part until paint when i have to take car apart anyway. but for now atleast something...
*******
04-01-2013, 06:46 PM
#120
Supreme Member
Thread Starter
iTrader: (1)
Join Date: Oct 2008
Location: Charleston SC
Posts: 1,107
Likes: 0
Received 0 Likes
on
0 Posts
Car: 1987 Trans Am GTA
Engine: 350 TPI
Transmission: T56
Axle/Gears: Posi 3:42
Re: BlackTopKing's "Concrete Angle" Build
********
Once your happy welded it together and clean it up!!!
In my case i am not try worried about the cleaning part until paint when i have to take car apart anyway. but for now atleast something...
*******
Once your happy welded it together and clean it up!!!
In my case i am not try worried about the cleaning part until paint when i have to take car apart anyway. but for now atleast something...
*******
04-01-2013, 06:48 PM
#121
Supreme Member
Thread Starter
iTrader: (1)
Join Date: Oct 2008
Location: Charleston SC
Posts: 1,107
Likes: 0
Received 0 Likes
on
0 Posts
Car: 1987 Trans Am GTA
Engine: 350 TPI
Transmission: T56
Axle/Gears: Posi 3:42
Re: BlackTopKing's "Concrete Angle" Build
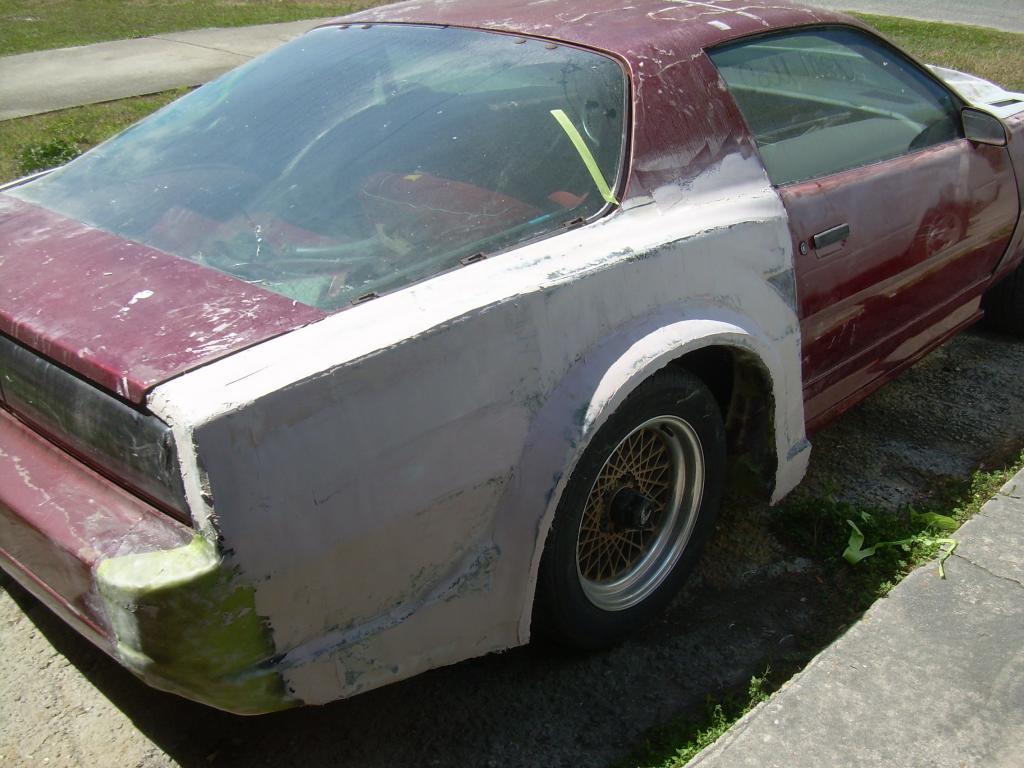
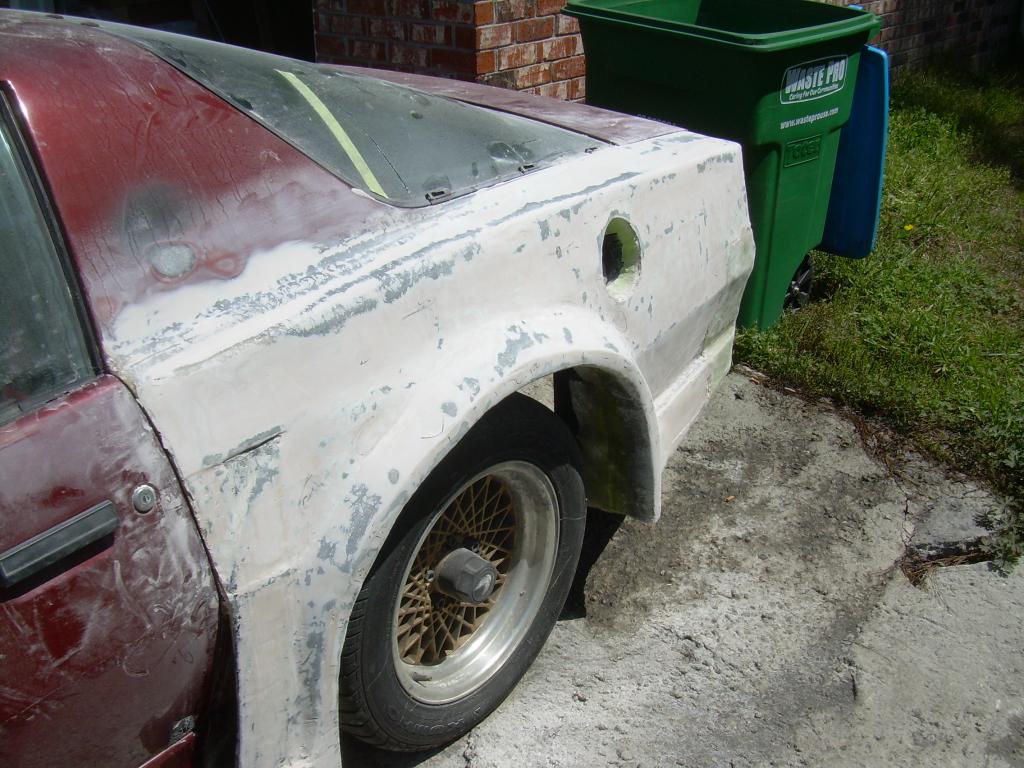
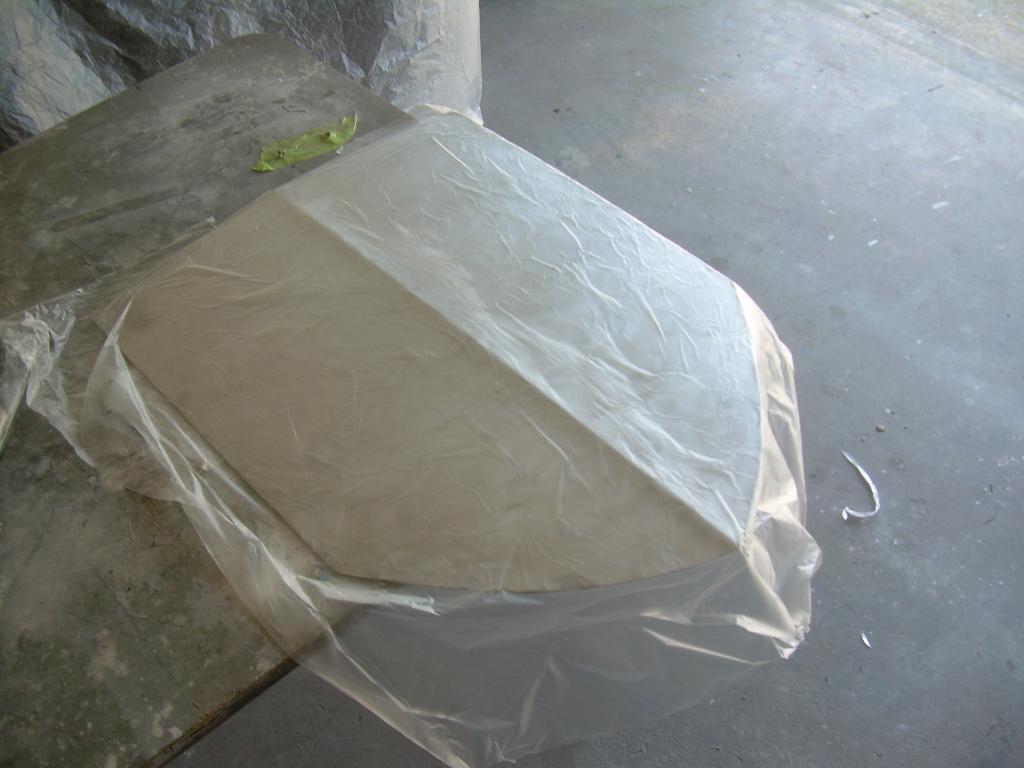
Widebody update
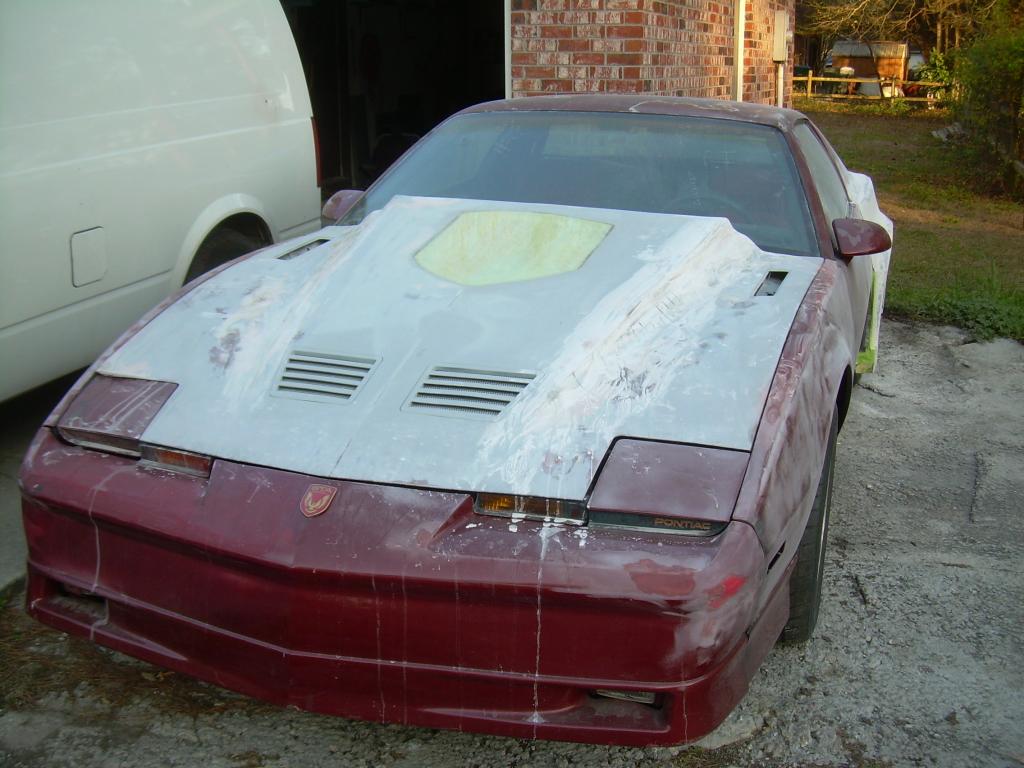
Basicall the fiberglass is done, and now i am going to try to gage how close am i...
so i will put a dummy spread on top, filler, so that i can sand it out.
You can sand out the fiberglass first and see you high and lows but for my case i am doing this for a different reason then just high and lows.
Mainly to see it, prior to sanding out.
plus the car was outside for a few days in the rain when i was working on a bike, i need to see if there was any damage. A block and sand paper, tell no lies.
Same thing here, knock it down and it will show that i reall only have a few spots
Now I will simply, block it down to 0 (60g to 100g ) and apply a skim (poly), block out again in a finer, then finer, then finer grit...basically i want it to go from a 120 to a 320 state.
Its over kill in some ways, but its just the way i like to do it, i feel as if its not right at 120grit its not gonna be right at 320.
But remeber, try not to keep adding...then more you add the more you will have to sand. in person (after two sand outs, not in pictures) you can just see the fiberglass in most areas...
and i mean just see it threw trhe bondo its, very thin, there are spots were i needed to blend or feather out, so some spots will be a lil thicker.
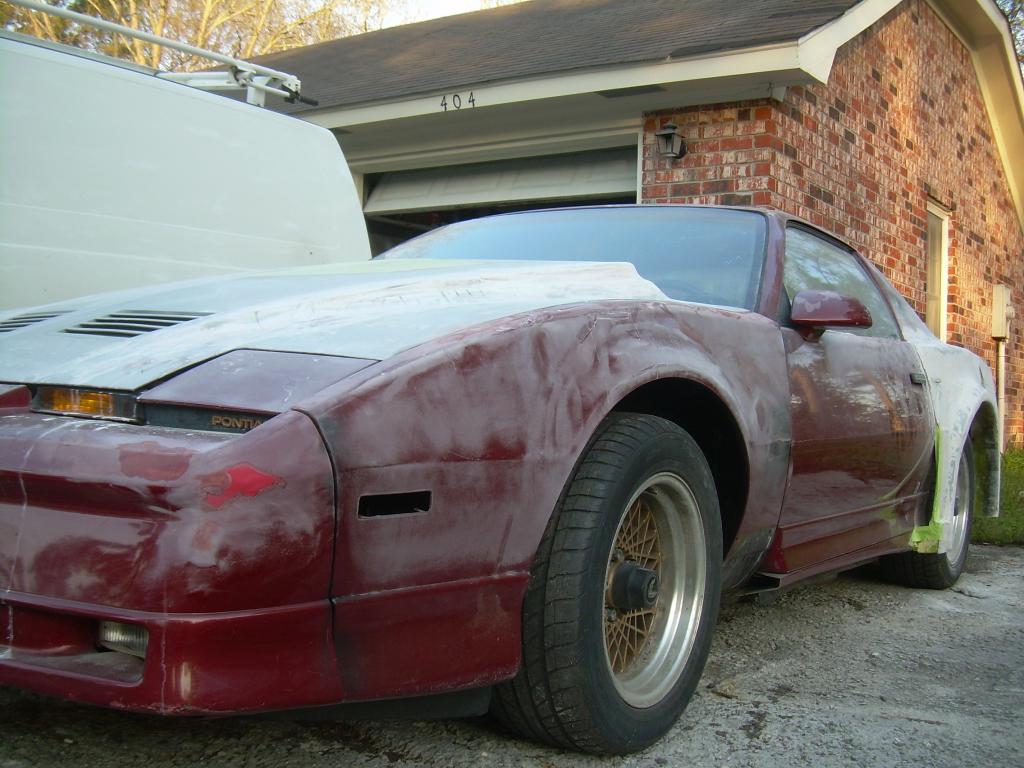
I still need to do the lip, and trim the inner well,
but i want to wait for the rims and tires to decided how much and were i have to do that. Simply will lift car, pull tire, scale out new set up and the come in with a 3"wheel and cut the inner fender side well out
as needed. then trim the (current 1"lip) down to what i want. I started with a 1" lip because I dont really want more (although alot of the newer cars are at 1.5" like the chargers,ect)
but it is easyier to add at this point if needed verse, too short. so i will wait to clean that area up when i am at that step. in the mean time, it just looks raw and untapered.
Hopefully i will get a coat of primer on this week, although nothing final, just something to get the quarters in a single color...so when i sand out i can pluck out any other lil issues that can be missed when starting at all these colors and materials
********
Basicall the fiberglass is done, and now i am going to try to gage how close am i...
so i will put a dummy spread on top, filler, so that i can sand it out.
You can sand out the fiberglass first and see you high and lows but for my case i am doing this for a different reason then just high and lows.
Mainly to see it, prior to sanding out.
plus the car was outside for a few days in the rain when i was working on a bike, i need to see if there was any damage. A block and sand paper, tell no lies.
Same thing here, knock it down and it will show that i reall only have a few spots
Now I will simply, block it down to 0 (60g to 100g ) and apply a skim (poly), block out again in a finer, then finer, then finer grit...basically i want it to go from a 120 to a 320 state.
Its over kill in some ways, but its just the way i like to do it, i feel as if its not right at 120grit its not gonna be right at 320.
But remeber, try not to keep adding...then more you add the more you will have to sand. in person (after two sand outs, not in pictures) you can just see the fiberglass in most areas...
and i mean just see it threw trhe bondo its, very thin, there are spots were i needed to blend or feather out, so some spots will be a lil thicker.
I still need to do the lip, and trim the inner well,
but i want to wait for the rims and tires to decided how much and were i have to do that. Simply will lift car, pull tire, scale out new set up and the come in with a 3"wheel and cut the inner fender side well out
as needed. then trim the (current 1"lip) down to what i want. I started with a 1" lip because I dont really want more (although alot of the newer cars are at 1.5" like the chargers,ect)
but it is easyier to add at this point if needed verse, too short. so i will wait to clean that area up when i am at that step. in the mean time, it just looks raw and untapered.
Hopefully i will get a coat of primer on this week, although nothing final, just something to get the quarters in a single color...so when i sand out i can pluck out any other lil issues that can be missed when starting at all these colors and materials
********
04-01-2013, 06:48 PM
#122
Supreme Member
Thread Starter
iTrader: (1)
Join Date: Oct 2008
Location: Charleston SC
Posts: 1,107
Likes: 0
Received 0 Likes
on
0 Posts
Car: 1987 Trans Am GTA
Engine: 350 TPI
Transmission: T56
Axle/Gears: Posi 3:42
Re: BlackTopKing's "Concrete Angle" Build
GTA Wall ART
Off topic, but the other day in a store, i noticed camaro this and that, mustang this and that....but no...pontiac or trans am anythings......so i will be using my center section (GTA Emblem) to make molds from so i can paint different things with in the Trans Am/Firebird/GTA/Pontiac Theme
as man cave wall art....
since i cant find what i want ima make it
Basically, I took 3m plastic static stick, placed on the center section and placed two layers of chop fiberglass and 1 layer of clothe fiberglass, dried and popped off.
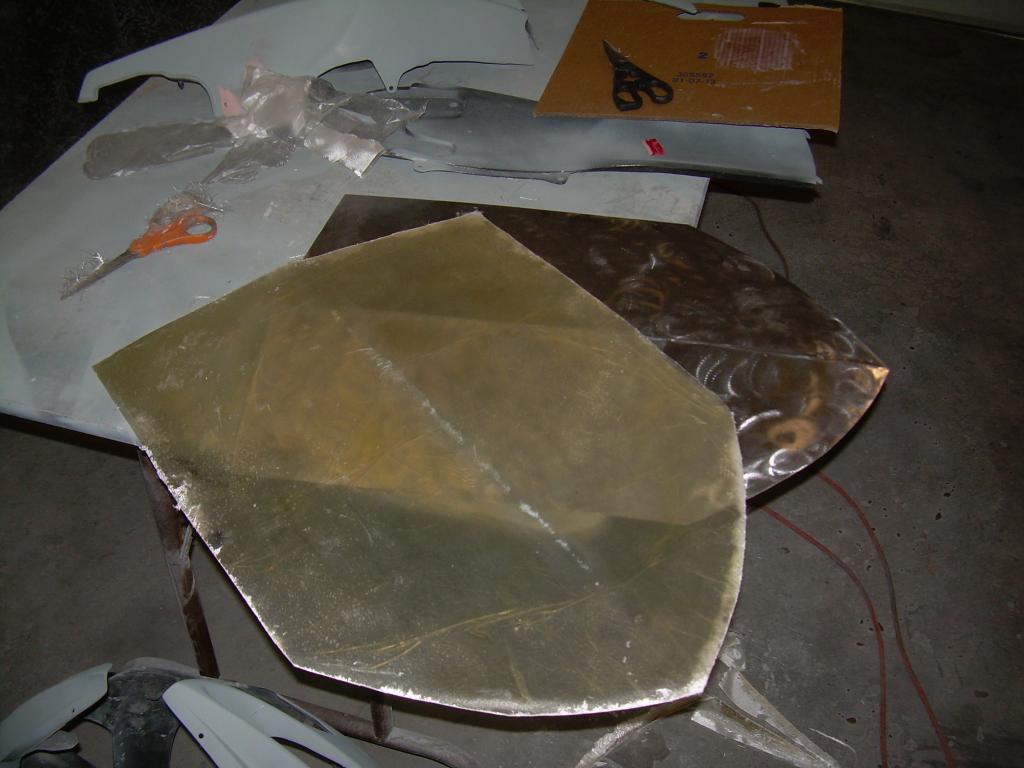
lol, i know...stupid...but i get kicks outta this stuff.
lol
Off topic, but the other day in a store, i noticed camaro this and that, mustang this and that....but no...pontiac or trans am anythings......so i will be using my center section (GTA Emblem) to make molds from so i can paint different things with in the Trans Am/Firebird/GTA/Pontiac Theme
as man cave wall art....
since i cant find what i want ima make it
Basically, I took 3m plastic static stick, placed on the center section and placed two layers of chop fiberglass and 1 layer of clothe fiberglass, dried and popped off.
lol, i know...stupid...but i get kicks outta this stuff.
lol
Last edited by BlackTopKing; 04-01-2013 at 06:51 PM. Reason: add, what i did
04-01-2013, 08:27 PM
#123
Member
Join Date: Jun 2009
Location: Toledo ohio
Posts: 317
Likes: 0
Received 0 Likes
on
0 Posts
Car: 87 Black Irocz28
Engine: 350 TPI
Transmission: 700r4 shift kit
Axle/Gears: 3:73 richmend axles and eaton gears
Re: BlackTopKing's "Concrete Angle" Build
Looks good...
04-01-2013, 09:06 PM
#124
Member
Join Date: Jun 2009
Location: Toledo ohio
Posts: 317
Likes: 0
Received 0 Likes
on
0 Posts
Car: 87 Black Irocz28
Engine: 350 TPI
Transmission: 700r4 shift kit
Axle/Gears: 3:73 richmend axles and eaton gears
Re: BlackTopKing's "Concrete Angle" Build
Looks good...
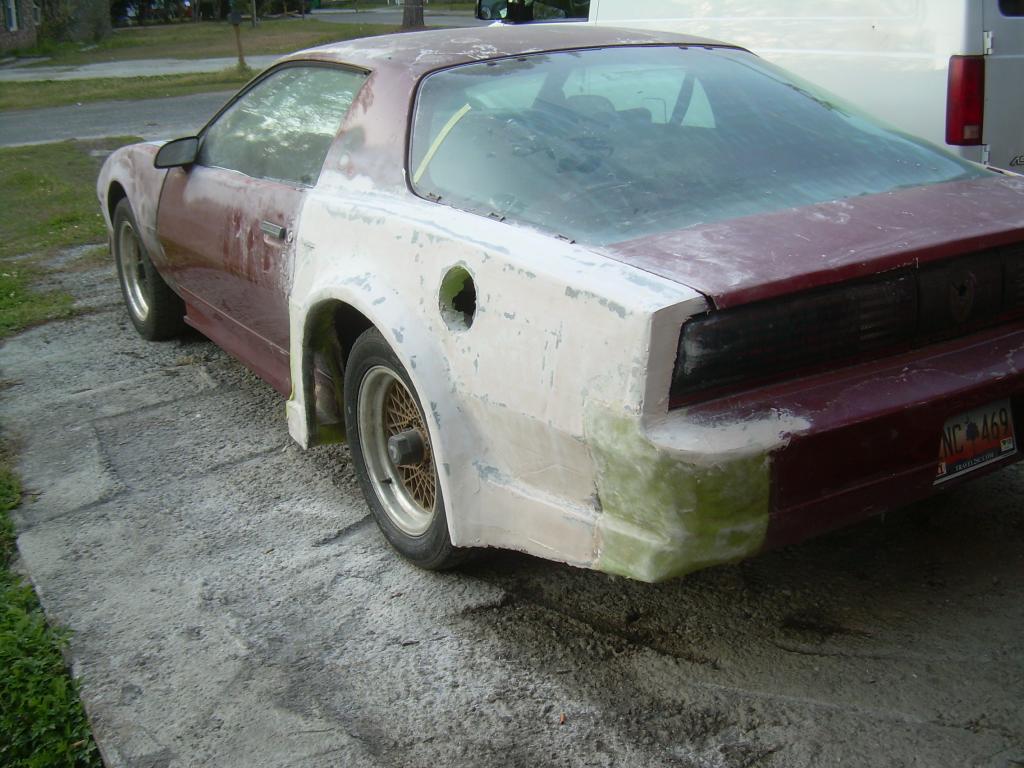
I didn't know fiberglass would hold to the rubber bumpers ??
Also something I would change ...is behind the rear tire. ..how the body goes up ...for my car I want it to stay at the same hight as in front of my rear tire. ..
I didn't know fiberglass would hold to the rubber bumpers ??
Also something I would change ...is behind the rear tire. ..how the body goes up ...for my car I want it to stay at the same hight as in front of my rear tire. ..
04-01-2013, 10:13 PM
#125
Supreme Member
Thread Starter
iTrader: (1)
Join Date: Oct 2008
Location: Charleston SC
Posts: 1,107
Likes: 0
Received 0 Likes
on
0 Posts
Car: 1987 Trans Am GTA
Engine: 350 TPI
Transmission: T56
Axle/Gears: Posi 3:42
Re: BlackTopKing's "Concrete Angle" Build
This is why I will be taking n post much more n will make my best attemp to show this build in better detail for now on.
Or ill have to make a short video for this.
(didnt have chance to post other two, yet)
But, ill answer my best in a writin matter (from my experiance) berglass will not stick to anything by its self but itself. The resign will also plau a part. Different kindsa will react diffetently to different materials.
1st. Outter edge of Rear bumper: in order to foam, you need something for foam to attach to. So grind down corners, and attach rivets or screws even (if you do this screw from back side) this is like studs or rebar. You can then attach cardboradbon bottom of corner or fiberglass board (as I did) this is the base. For me im keeeping attached like a cor. Then foam, carve to shape. If you use two.part itll stay solid n dence enough to glass over, but if you use great stuff as I did (too small to mix 2pt for, personally) then you can use green tape (3m for mine) its corse enough to hold n sticky enough to stay.
Thee key is, keeping your shape long enough for tge fiberglass to fully cure, then its secured and you can either remove the donar (whay ever was used to make shape or leave it) most times, like with foam ill leave, only makes more solid. Just when leaving you want to fully seal the donar in fiberglass.
Once you taped it off (note:alumium tape will release fiberglass, good for mold making. Duck tape will also release foam, good for mold making, just not duck take eith fiberglass, resin will eat glue n tape which will worp part or bubble into glass.)
tape you area/part cleanly to...think like present. Nice even cuts, overlaps, curves n tucks...no creases or rinkles youll only have it in the glass later.
Wrap it nice and fiberglass. When glassing the area to remain n not rease, remember all corbers n sides. When attaching to the bumper, like I did for a blend out. First layer, say 6"past. Second 4"pass and third 2" pass. With chop you can get away with heavy resin n will lay thin enough not to chunck.up but grind/sand out. Your filler is best as polymer for fibeglass, light n flexible not to crack, but bondo in a light coat will be ok. Jusy let set for day or two to really tighten up.
Will it stay, yes. You sanded area well with a corse grit, itll bite to it. Its not applied in a thick edge so wont crack at a seem n your not filling part with bondo simply using bondo to level slight high lows....if you get a ripple or a ding/dent style high low. Grind alittle out and fix with addibg fibe1glass. Not bondo.
Most ppl make mistake of not ancoring (as I call it, rivet/stud methoid) & the dont blend out, either stop glasd on edge or simply not far enough pasd the joint of two parts n or rely in bondo or filler to fix simple fiberglass errors.
The more matterial, your adding the more ancors youll need. Like on the quaters. I litterlt made a frame that is attached to car to build off of. Like you would for custom systems.
04-01-2013, 10:20 PM
#126
Supreme Member
Thread Starter
iTrader: (1)
Join Date: Oct 2008
Location: Charleston SC
Posts: 1,107
Likes: 0
Received 0 Likes
on
0 Posts
Car: 1987 Trans Am GTA
Engine: 350 TPI
Transmission: T56
Axle/Gears: Posi 3:42
Re: BlackTopKing's "Concrete Angle" Build
You mean, the lower gfx behind rear tire inclines upwards verse the lower flare infront of rear tire (sideskirt, vent area)
Now the incline is a factory feature and for a profie point of view alot higher then front bumper and sideskirts, I hated it with my 89GTA when lowered becaise it didnt look level, but for this case. Its a 1"lower then factory.
My intention is to kill that look with the valance which will be almost same hight at point closes to rear tire and travel staight outward. Alot like the rear difusers of imports or road race cars. So from side, itll all look level, from rear itll look inclined.
But yeah, for yours you could create it to be like a rear extention or rear bumpr n valance as a single piece. And change that feature
Last edited by BlackTopKing; 04-01-2013 at 10:25 PM. Reason: Adding
04-07-2013, 01:44 PM
#127
Supreme Member
Thread Starter
iTrader: (1)
Join Date: Oct 2008
Location: Charleston SC
Posts: 1,107
Likes: 0
Received 0 Likes
on
0 Posts
Car: 1987 Trans Am GTA
Engine: 350 TPI
Transmission: T56
Axle/Gears: Posi 3:42
Re: BlackTopKing's "Concrete Angle" Build
Well def cool some of ya guys hot me up on Facebook and liked BlackTop Ink page and I welcome abyone else too.
For thos ho have, yas all got tovsee what ive been doing, other then finish my spoiler, working lo
But hurray, project gsxryder is done n in glass, so that means...
Clean up n back to work on TA.
I have Monday n Tueday to get spoiler to a bolt on point and maybe just maybe get side skirts going...
Looking to post last weeks pic of spoiler tomorrow since I dont have a mad rush, but this "work on TA" motovation is great...got bike knocked out in less then week...lol
04-13-2013, 10:26 AM
#128
Supreme Member
Thread Starter
iTrader: (1)
Join Date: Oct 2008
Location: Charleston SC
Posts: 1,107
Likes: 0
Received 0 Likes
on
0 Posts
Car: 1987 Trans Am GTA
Engine: 350 TPI
Transmission: T56
Axle/Gears: Posi 3:42
Re: BlackTopKing's "Concrete Angle" Build
Ok for the Spoiler, that i hope to have in fiberglass today....
we need to make a prototype so that we can design it to actually function with actuators, but first thing is first lets make a plug to glass from. In this case i will use cardboard simply because its easy to cut and
replace if i dont like something.
Basically my crude design....18" window and 22" wings (as ill call them) we will need to make a metal frame that will core the fibergalss. this will allow me to bolt to the car for now until i get to the hatch
one i mod the hatch the actuators will be intergrated.
Design
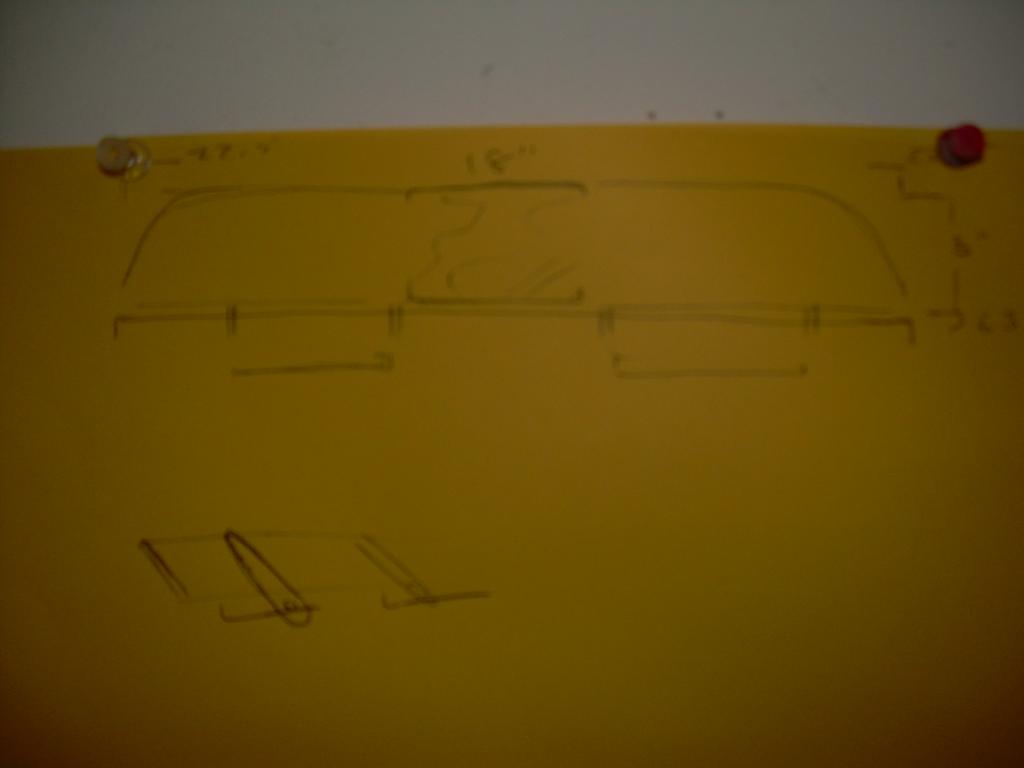
Cut the cardboard using the folded seem (will make rounder edge easier later) 10" x 22" each wing
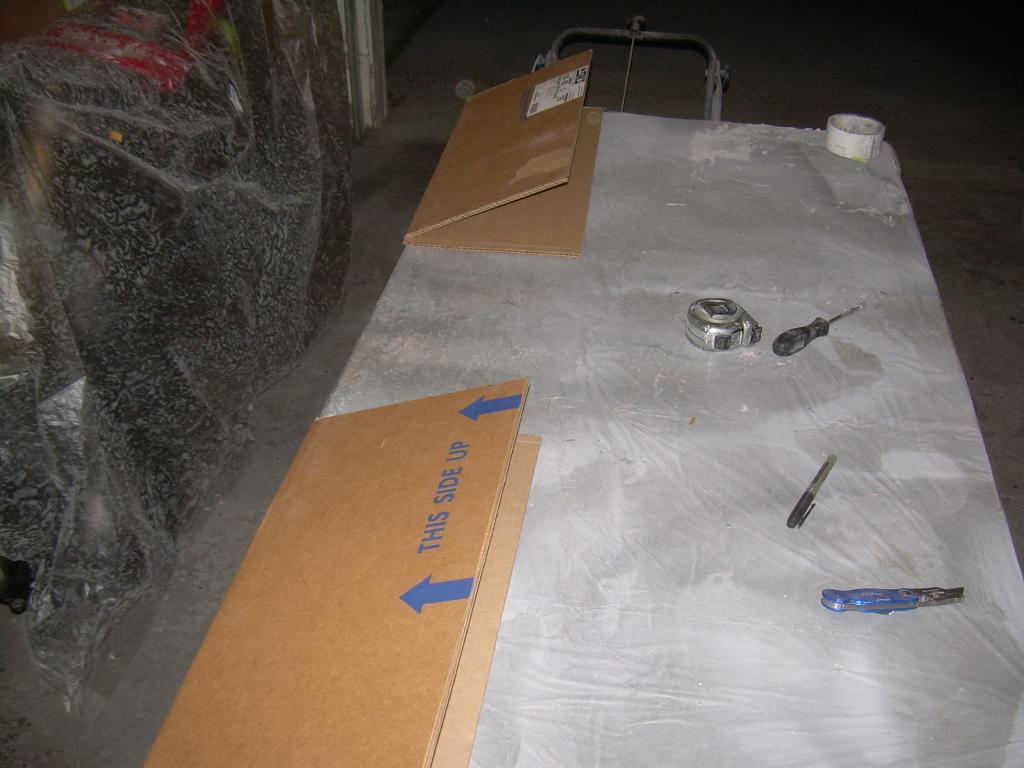
Cut the plexi (use as a test dummy, cheaper then lenax untill ready and this window will be removable)
10x18"
Plexi

Just like arts and crafts in lil school, cut your butterfly wings and create the arches
Arch
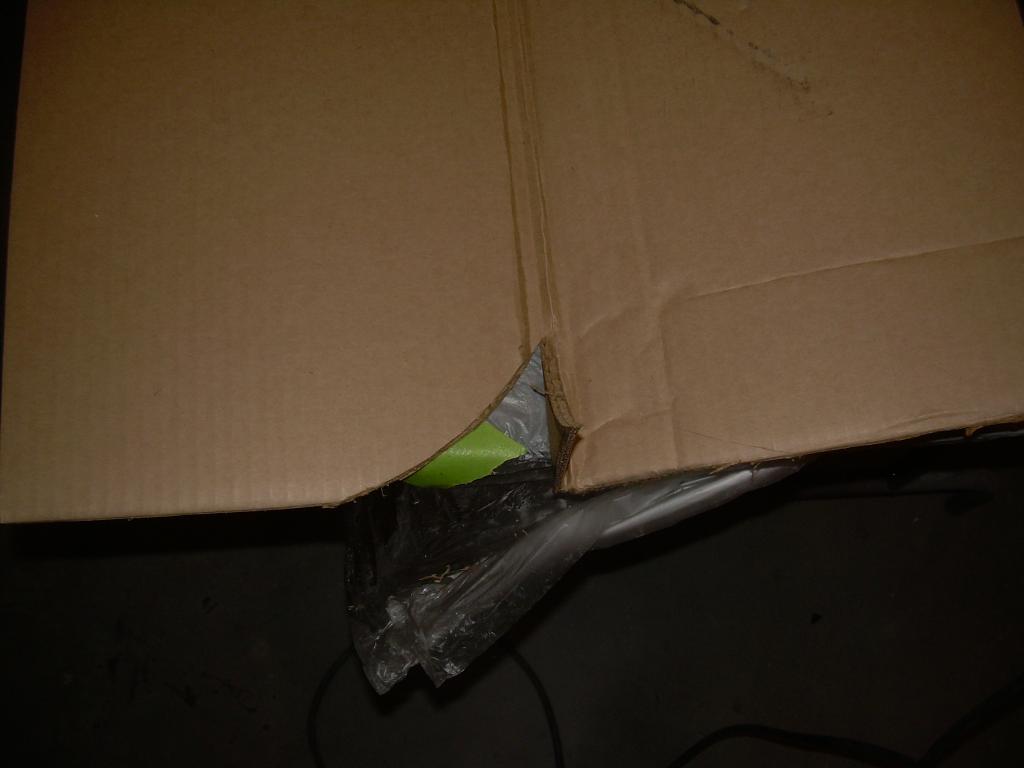
This is the arches and the spoiler folded together. I am going to have a 2" flooring on the spoiler so that there is enough room for frame and rods. The trick here is to cust the back side of spoiler shorter then the face side to get the angle you want
remeber the closer you get this to what you want, the closer the fiberglass mold will be to what you want.
Angle
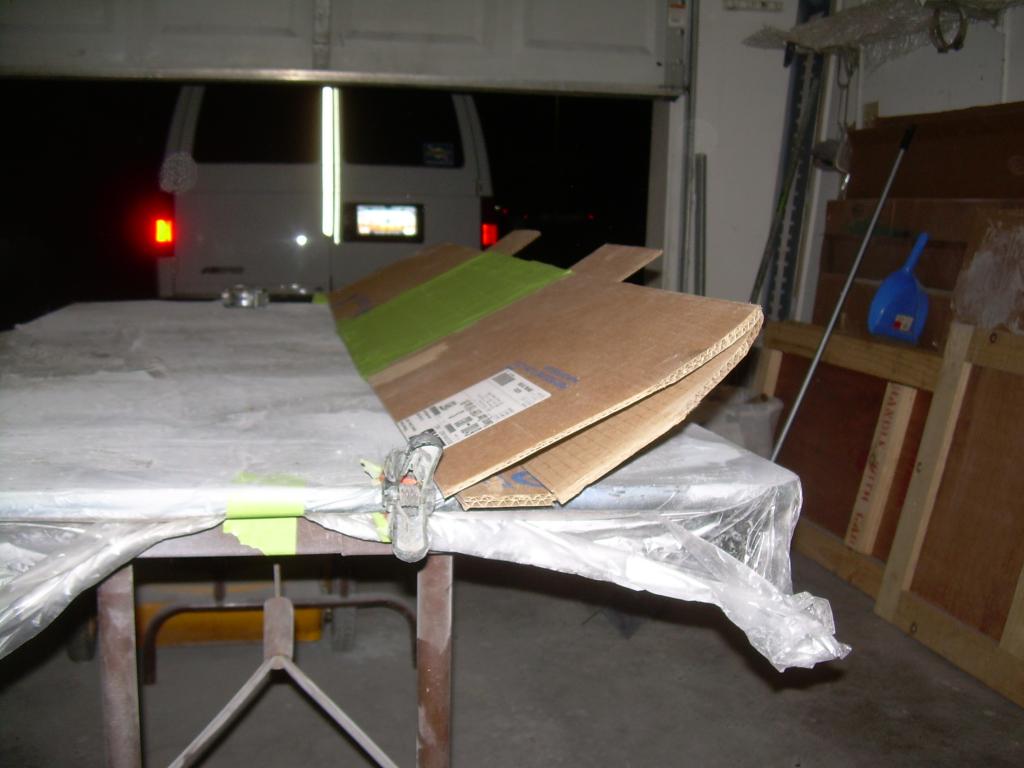
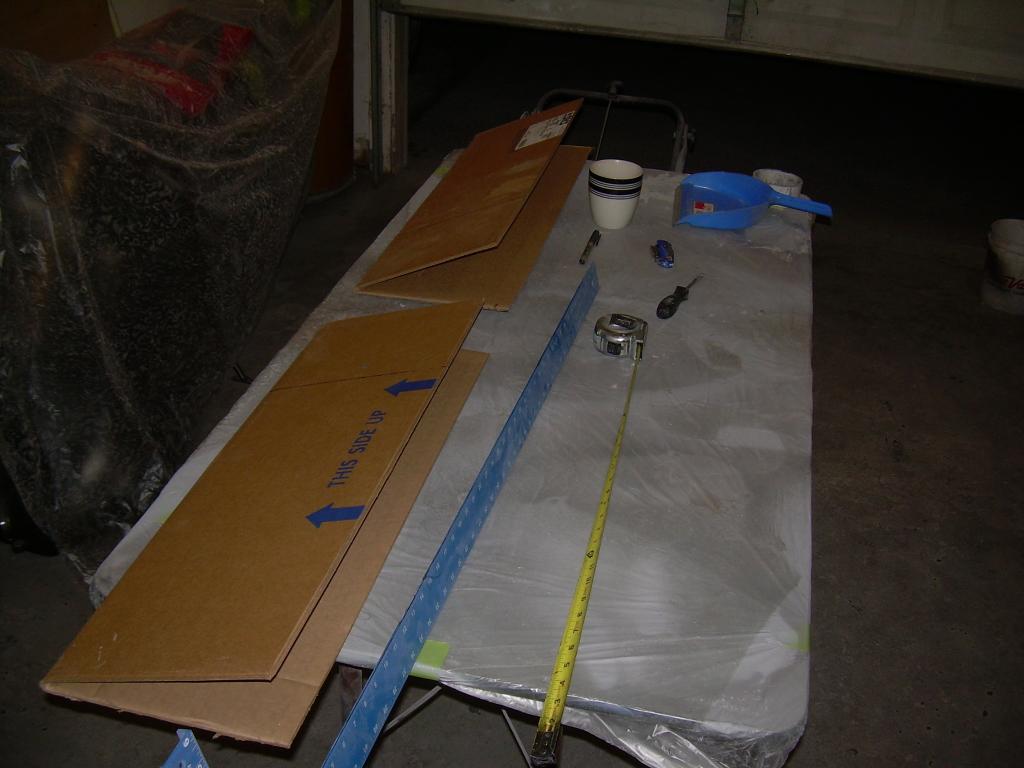
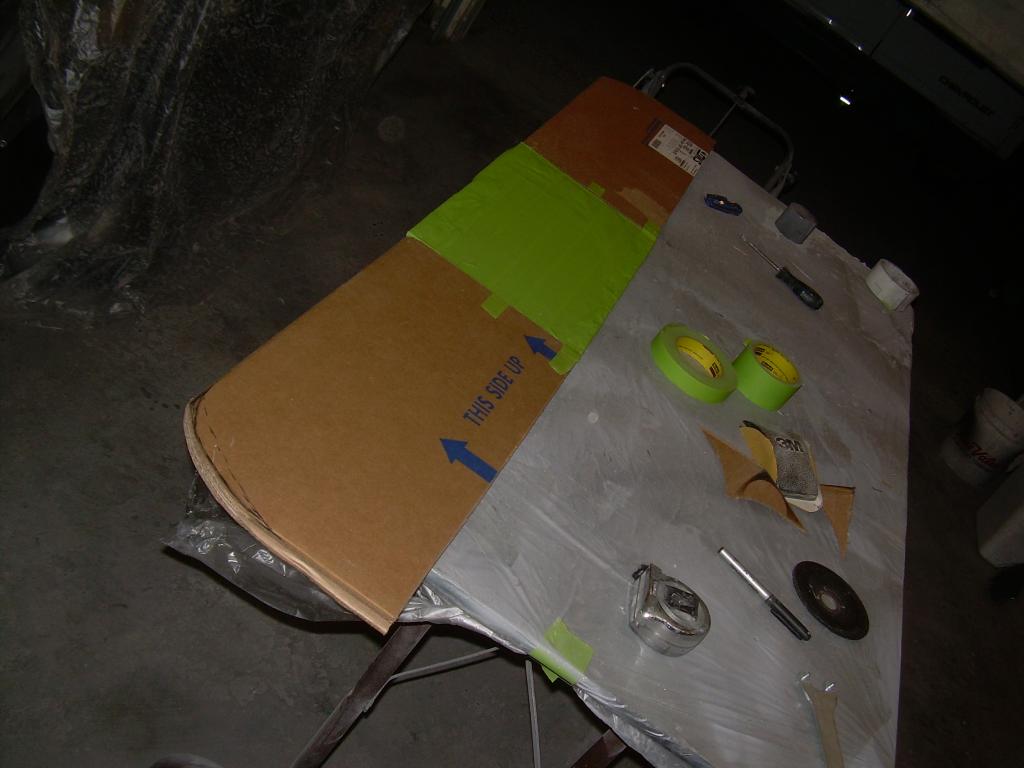
Today i have already started the counter sinking effect on the wings and the frame. Basically you can cut an outline on the spoilers wings and resess the middle section on the cardboard and securing it to stay down.
This will create somewhat of a body groove/line effect...so its not so flat and boarding and you dont have to add that effect by adding matterial later.
The frame...basically the 2" flat stock will be my new flooring and this will sandwhich the fiberglass flooring of the spoiler. I will then have a rod at each end of the spoiler and a rod by the plexi. from the rods on the plexi, i will have a .05" flat to frame the
sides of the plex to mount the plexi to.
So picture spoiler wings and a 3 sided pic frame in the center.
well....so is the plan...but i guess we will see how things turn out later today.
we need to make a prototype so that we can design it to actually function with actuators, but first thing is first lets make a plug to glass from. In this case i will use cardboard simply because its easy to cut and
replace if i dont like something.
Basically my crude design....18" window and 22" wings (as ill call them) we will need to make a metal frame that will core the fibergalss. this will allow me to bolt to the car for now until i get to the hatch
one i mod the hatch the actuators will be intergrated.
Design

Cut the cardboard using the folded seem (will make rounder edge easier later) 10" x 22" each wing


Cut the plexi (use as a test dummy, cheaper then lenax untill ready and this window will be removable)
10x18"
Plexi

Just like arts and crafts in lil school, cut your butterfly wings and create the arches
Arch


This is the arches and the spoiler folded together. I am going to have a 2" flooring on the spoiler so that there is enough room for frame and rods. The trick here is to cust the back side of spoiler shorter then the face side to get the angle you want
remeber the closer you get this to what you want, the closer the fiberglass mold will be to what you want.
Angle

Today i have already started the counter sinking effect on the wings and the frame. Basically you can cut an outline on the spoilers wings and resess the middle section on the cardboard and securing it to stay down.
This will create somewhat of a body groove/line effect...so its not so flat and boarding and you dont have to add that effect by adding matterial later.
The frame...basically the 2" flat stock will be my new flooring and this will sandwhich the fiberglass flooring of the spoiler. I will then have a rod at each end of the spoiler and a rod by the plexi. from the rods on the plexi, i will have a .05" flat to frame the
sides of the plex to mount the plexi to.
So picture spoiler wings and a 3 sided pic frame in the center.
well....so is the plan...but i guess we will see how things turn out later today.
04-13-2013, 11:28 AM
#131
Supreme Member
Thread Starter
iTrader: (1)
Join Date: Oct 2008
Location: Charleston SC
Posts: 1,107
Likes: 0
Received 0 Likes
on
0 Posts
Car: 1987 Trans Am GTA
Engine: 350 TPI
Transmission: T56
Axle/Gears: Posi 3:42
Re: BlackTopKing's "Concrete Angle" Build
Beep*******
I dont know what happened....links broken from photobucket
I dont know what happened....links broken from photobucket
04-13-2013, 03:10 PM
#134
Supreme Member
Thread Starter
iTrader: (1)
Join Date: Oct 2008
Location: Charleston SC
Posts: 1,107
Likes: 0
Received 0 Likes
on
0 Posts
Car: 1987 Trans Am GTA
Engine: 350 TPI
Transmission: T56
Axle/Gears: Posi 3:42
Re: BlackTopKing's "Concrete Angle" Build
Yeah, looks like I royally messed it up n not sure if I can put back or correct
04-14-2013, 04:41 AM
#135
Member
iTrader: (2)

Join Date: Aug 2004
Location: Harpersfield, OH
Posts: 200
Likes: 0
Received 0 Likes
on
0 Posts
Car: 91 RS
Engine: 355
Transmission: 700R4
Axle/Gears: 3.73
Re: BlackTopKing's "Concrete Angle" Build
So bummed out that I can't see any of the pics. Guess I will have to check back later.
I did want to say, however, to keep up the good work. It's great to see somebody use their talents to turn thoughts into reality. And the humble way you handle the naysayers...fantastic.
Learn from this people, because any idiot can spend money.
I did want to say, however, to keep up the good work. It's great to see somebody use their talents to turn thoughts into reality. And the humble way you handle the naysayers...fantastic.
Learn from this people, because any idiot can spend money.
04-14-2013, 09:25 AM
#136
Supreme Member
Thread Starter
iTrader: (1)
Join Date: Oct 2008
Location: Charleston SC
Posts: 1,107
Likes: 0
Received 0 Likes
on
0 Posts
Car: 1987 Trans Am GTA
Engine: 350 TPI
Transmission: T56
Axle/Gears: Posi 3:42
Re: BlackTopKing's "Concrete Angle" Build
So bummed out that I can't see any of the pics. Guess I will have to check back later.
I did want to say, however, to keep up the good work. It's great to see somebody use their talents to turn thoughts into reality. And the humble way you handle the naysayers...fantastic.
Learn from this people, because any idiot can spend money.
I did want to say, however, to keep up the good work. It's great to see somebody use their talents to turn thoughts into reality. And the humble way you handle the naysayers...fantastic.
Learn from this people, because any idiot can spend money.
Maybe ill make a slide show for what was already posted....n just keep posting from here forward.
04-14-2013, 10:36 AM
#138
Supreme Member
Thread Starter
iTrader: (1)
Join Date: Oct 2008
Location: Charleston SC
Posts: 1,107
Likes: 0
Received 0 Likes
on
0 Posts
Car: 1987 Trans Am GTA
Engine: 350 TPI
Transmission: T56
Axle/Gears: Posi 3:42
Re: BlackTopKing's "Concrete Angle" Build
Think, I could re edit each post with the pics
04-15-2013, 12:08 AM
#142
Supreme Member

Join Date: Apr 2011
Location: Huntsville, AL
Posts: 1,051
Likes: 0
Received 0 Likes
on
0 Posts
Car: 89 Black IROC-Z convertible
Engine: 305 TBI
Transmission: Auto
Re: BlackTopKing's "Concrete Angle" Build
Still not there. I would really like to see them. Can you just repost them?
04-15-2013, 03:03 AM
#143
Senior Member
Join Date: May 2009
Location: Conway SC
Posts: 744
Likes: 0
Received 0 Likes
on
0 Posts
Car: 1988 Camaro
Engine: 385
Transmission: 700r4
Axle/Gears: 9 bolt
Re: BlackTopKing's "Concrete Angle" Build
Was wondering what you was talking about Saturday. Subscribed!
04-15-2013, 09:42 AM
#144
Supreme Member
Thread Starter
iTrader: (1)
Join Date: Oct 2008
Location: Charleston SC
Posts: 1,107
Likes: 0
Received 0 Likes
on
0 Posts
Car: 1987 Trans Am GTA
Engine: 350 TPI
Transmission: T56
Axle/Gears: Posi 3:42
Re: BlackTopKing's "Concrete Angle" Build
yeah I'm going to try today around 6:30 to correct these links and we're just re post
04-15-2013, 09:43 AM
#145
Supreme Member
Thread Starter
iTrader: (1)
Join Date: Oct 2008
Location: Charleston SC
Posts: 1,107
Likes: 0
Received 0 Likes
on
0 Posts
Car: 1987 Trans Am GTA
Engine: 350 TPI
Transmission: T56
Axle/Gears: Posi 3:42
Re: BlackTopKing's "Concrete Angle" Build
good news is I'm a good progress yesterday on a spoiler and now side skirts.
if the rain to slow down a little bit I may actually be able to get in fiberglass and on the car for a mockup
if the rain to slow down a little bit I may actually be able to get in fiberglass and on the car for a mockup
04-15-2013, 09:46 AM
#146
Supreme Member
Thread Starter
iTrader: (1)
Join Date: Oct 2008
Location: Charleston SC
Posts: 1,107
Likes: 0
Received 0 Likes
on
0 Posts
Car: 1987 Trans Am GTA
Engine: 350 TPI
Transmission: T56
Axle/Gears: Posi 3:42
Re: BlackTopKing's "Concrete Angle" Build
oh that is too funny.... and I'm sorry I didn't even think of it, I just thought maybe you were being nice and not saying anything.
Lol
this is definitely one of those love or hate kind of things. but as a bodyguard I'm sure you will appreciate the work.... once I post the pictures backup....
definitely the hard way, but upside is that I get exactly what I want I'm fairly reasonable price
Lol
this is definitely one of those love or hate kind of things. but as a bodyguard I'm sure you will appreciate the work.... once I post the pictures backup....
definitely the hard way, but upside is that I get exactly what I want I'm fairly reasonable price
04-15-2013, 11:41 AM
#147
Supreme Member
Thread Starter
iTrader: (1)
Join Date: Oct 2008
Location: Charleston SC
Posts: 1,107
Likes: 0
Received 0 Likes
on
0 Posts
Car: 1987 Trans Am GTA
Engine: 350 TPI
Transmission: T56
Axle/Gears: Posi 3:42
Re: BlackTopKing's "Concrete Angle" Build
Pic are Back!!!!, more to come
04-15-2013, 12:43 PM
#149
Senior Member
Join Date: Mar 2012
Location: Ballwin, MO
Posts: 553
Likes: 0
Received 0 Likes
on
0 Posts
Car: 1987 Trans Am
Engine: 355 tpi
Transmission: 5 speed
Re: BlackTopKing's "Concrete Angle" Build
Good to see the picks back, and your spoiler seems to be a good idea and a great shape. How much degree of change do you think the spoiler will be able to have ?
04-15-2013, 02:18 PM
#150
Supreme Member
Thread Starter
iTrader: (1)
Join Date: Oct 2008
Location: Charleston SC
Posts: 1,107
Likes: 0
Received 0 Likes
on
0 Posts
Car: 1987 Trans Am GTA
Engine: 350 TPI
Transmission: T56
Axle/Gears: Posi 3:42
Re: BlackTopKing's "Concrete Angle" Build
Rrrr...they gone again....wtf...ill try again, once back at shop