**Project PITA** 86 TA frame up restoration
 04-16-2011, 07:54 AM
#601
Member

Join Date: Jun 2010
Location: New Jersey
Posts: 215
Likes: 0
Received 0 Likes
on
0 Posts
Car: 1986 Camaro Iroc Z
Engine: V8 305 TPI
Transmission: 700R4
Re: **Project PITA** 86 TA frame up restoration
")
 04-16-2011, 11:42 AM
#602
Supreme Member

Thread Starter
iTrader: (8)

Join Date: Dec 2005
Location: Northern CT
Posts: 2,412
Likes: 0
Received 14 Likes
on
11 Posts
Car: 1986 Trans am
Engine: 5.3 LM7
Transmission: T56 6 speed
Axle/Gears: Dana 44 w/ 3.55's
Re: **Project PITA** 86 TA frame up restoration
I's part number 38064 (gloss black) on this page. It's actually called "rust shield" coating. I though it was called chassis coat but just looked at my can I have and sure enough, this is it!
 04-18-2011, 06:24 AM
#604
Re: **Project PITA** 86 TA frame up restoration
whitedevil... Is that painless kit specific to an F-body? I guess I could stop being lazy and look on the site haha...
Just curious if the wires are organized in a way to make routing them in our cars easier. I.E. for center console window switches, but door mounted locks (which isnt that common).
Its looking and sounding like a great solution. As for wiring the hatch and defrost...thats not a big deal. If the painless kit gives you a couple AUX circuits, youre all set.
J.
04-18-2011, 12:58 PM
#605
Supreme Member
Thread Starter
iTrader: (8)
Join Date: Dec 2005
Location: Northern CT
Posts: 2,412
Likes: 0
Received 14 Likes
on
11 Posts
Car: 1986 Trans am
Engine: 5.3 LM7
Transmission: T56 6 speed
Axle/Gears: Dana 44 w/ 3.55's
Re: **Project PITA** 86 TA frame up restoration
whitedevil... Is that painless kit specific to an F-body? I guess I could stop being lazy and look on the site haha...
Just curious if the wires are organized in a way to make routing them in our cars easier. I.E. for center console window switches, but door mounted locks (which isnt that common).
Its looking and sounding like a great solution. As for wiring the hatch and defrost...thats not a big deal. If the painless kit gives you a couple AUX circuits, youre all set.
J.
Just curious if the wires are organized in a way to make routing them in our cars easier. I.E. for center console window switches, but door mounted locks (which isnt that common).
Its looking and sounding like a great solution. As for wiring the hatch and defrost...thats not a big deal. If the painless kit gives you a couple AUX circuits, youre all set.
J.
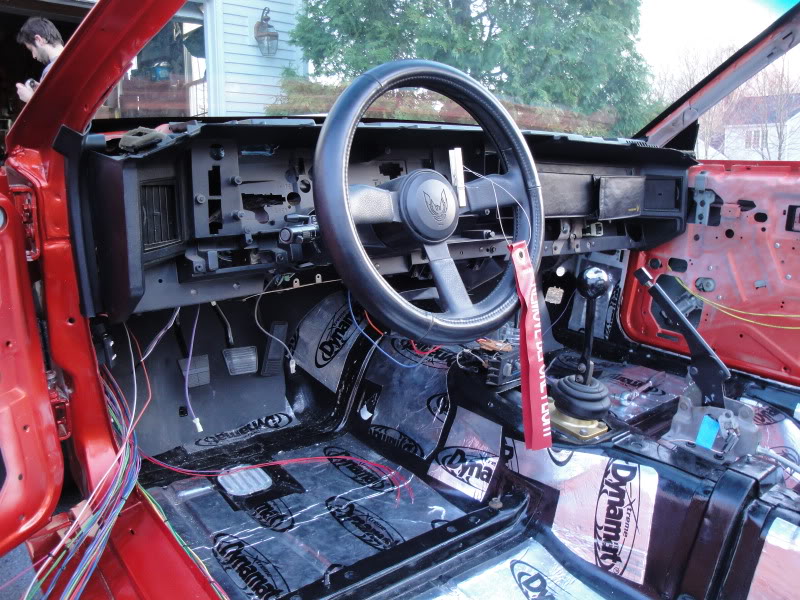
Had to remove the dash to run the pass power door wires accross the firewall
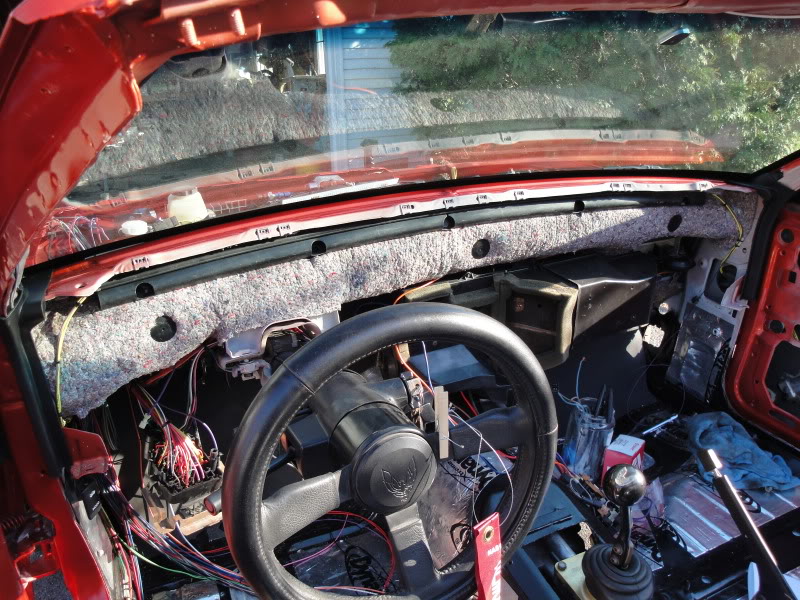
Heres the turn signal, ignition, and wiper steering column plugs. It's amazing that everything on the painless harness is a direct plug in on the stock 3rd gen harness! (except the wipers. Painless gives you a power to wire and you need to use the stock 3rd gen plugs and harness to hook it up) Getting this done cleaned up a ton of wires and there really isn't much left to do.
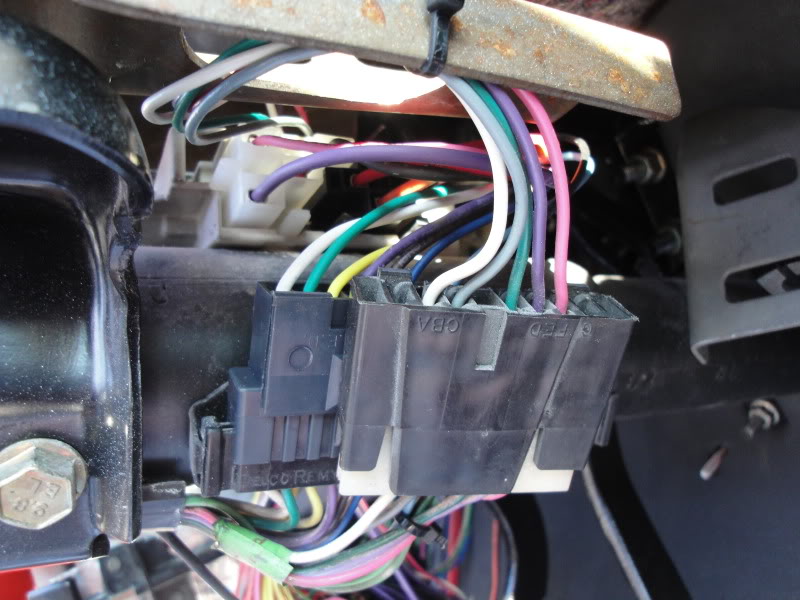
Other side of column with brights on/off plug
Factory tail harness hooked up
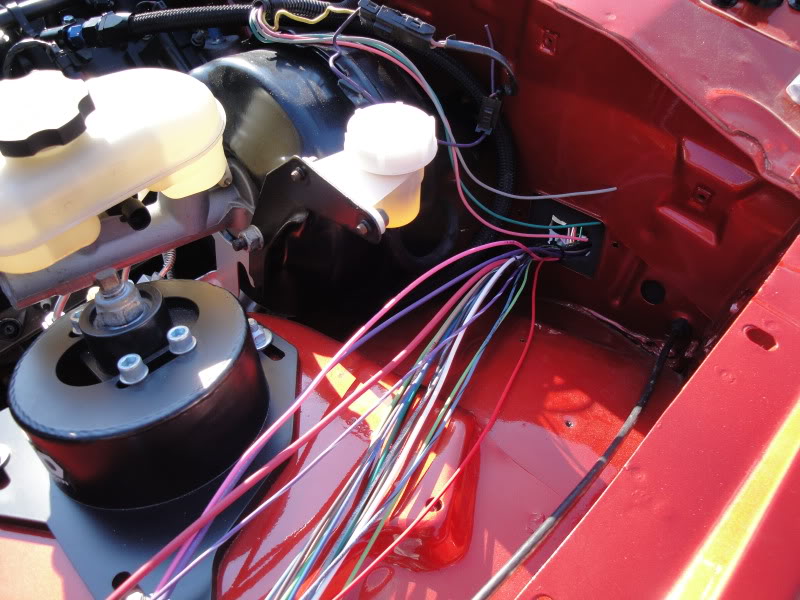
Heres the engine bay section which is mostly headlight/turn signal wires and 2 or 3 gauge sending unit wires. These will mostly be hidden in the front fender so that they won't be visible in the engine bay.
 04-18-2011, 01:05 PM
#606
Supreme Member
Thread Starter
iTrader: (8)
Join Date: Dec 2005
Location: Northern CT
Posts: 2,412
Likes: 0
Received 14 Likes
on
11 Posts
Car: 1986 Trans am
Engine: 5.3 LM7
Transmission: T56 6 speed
Axle/Gears: Dana 44 w/ 3.55's
Re: **Project PITA** 86 TA frame up restoration
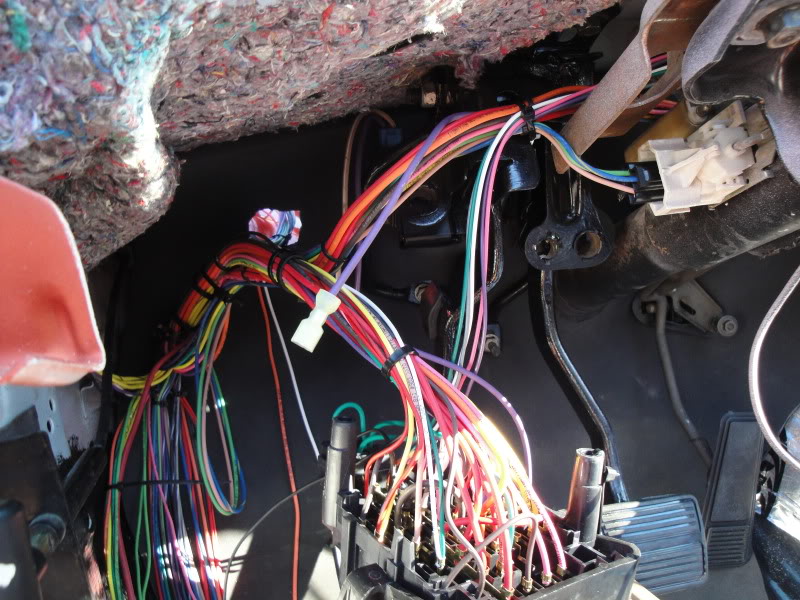
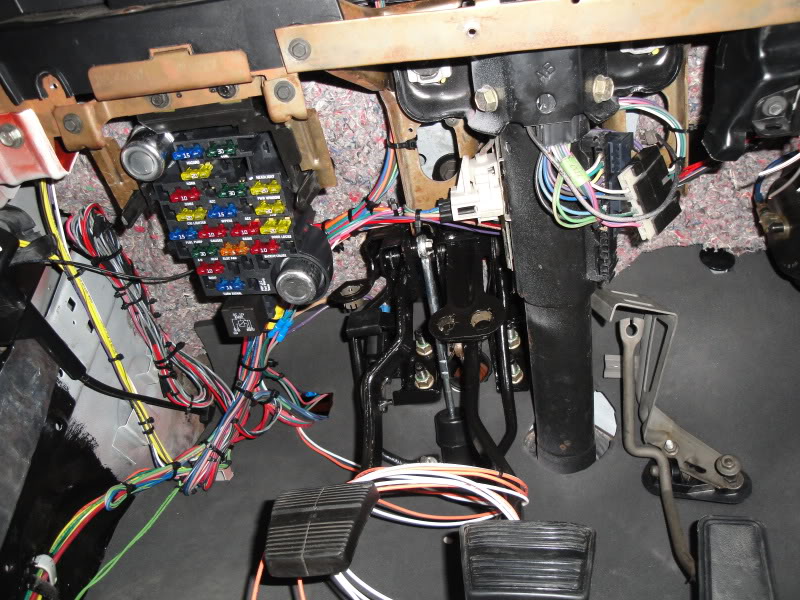
Dash back in and wiring cleaned up a bit
Fuse block mounted back up
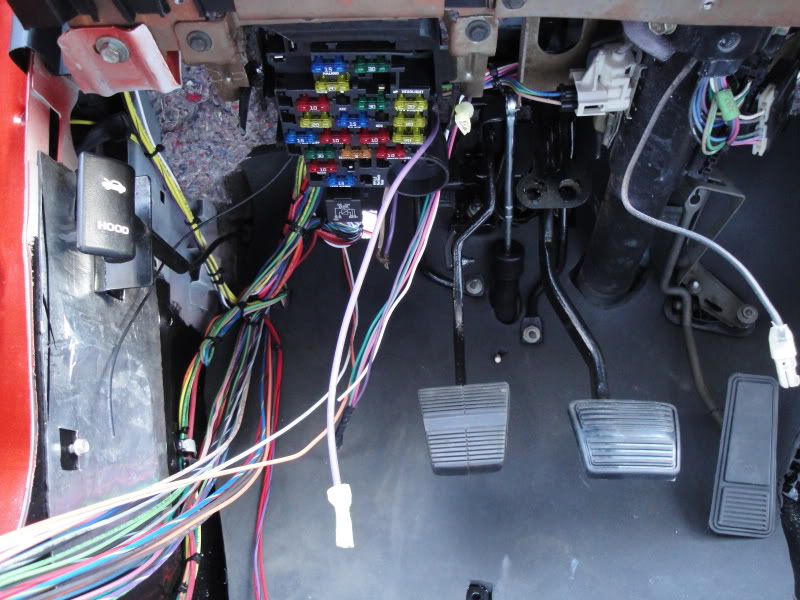
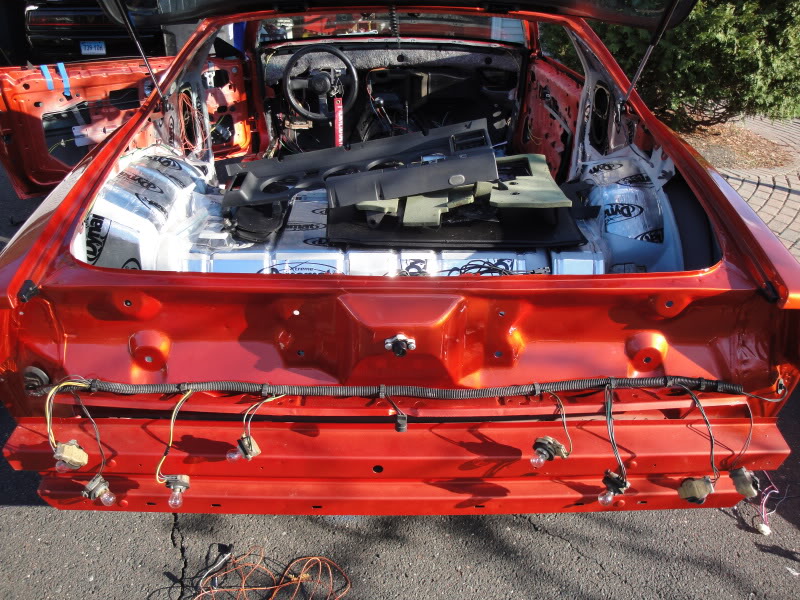
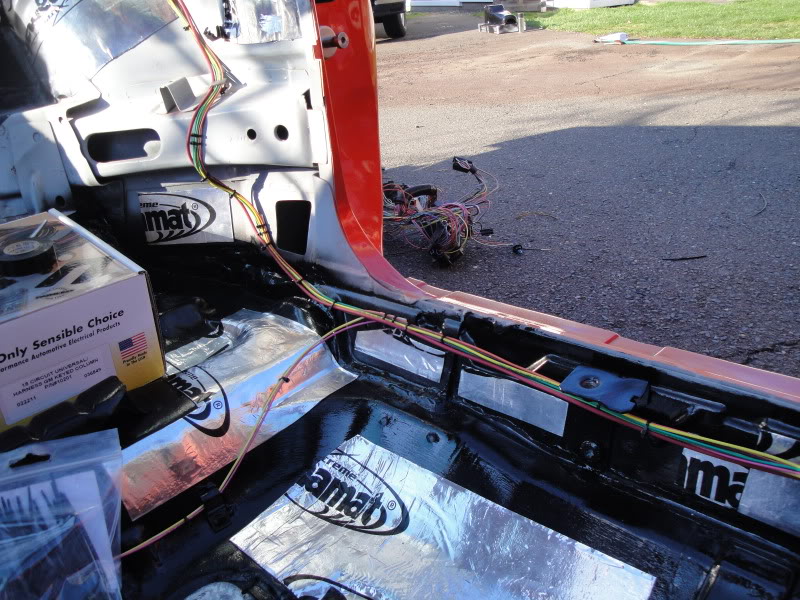
Heres the tail section wiring including brake lights, turn signals, reverse lights, fuel pump & sending unit, and the main power wire which is supposed to go to the engine bay but I re-routed it since I will have a trunk mounted battery.
Fuse block mounted back up
Heres the tail section wiring including brake lights, turn signals, reverse lights, fuel pump & sending unit, and the main power wire which is supposed to go to the engine bay but I re-routed it since I will have a trunk mounted battery.
04-18-2011, 09:09 PM
#607
Member
Join Date: Feb 2008
Location: Northeast Ohio
Posts: 171
Likes: 0
Received 0 Likes
on
0 Posts
Car: 1991 Chevy Camaro RS w/t-tops
Engine: BBC 396 .090 over (414)
Transmission: LS1 T-56
Axle/Gears: Shortened Ford 9, 3.25, discs, posi
Re: **Project PITA** 86 TA frame up restoration
Its lookin pretty... for wires anyway. But have that exact same kit for my 91 so I'm hopin it goes as smooth as yours. How much harder would you say itll be if all my old harness is out (which it is)
04-18-2011, 09:33 PM
#608
Supreme Member

Re: **Project PITA** 86 TA frame up restoration
Car is going to be so damn nice when he finishes, for all intents and purposes it WILL be a new car.
04-18-2011, 10:03 PM
#609
Supreme Member
Thread Starter
iTrader: (8)
Join Date: Dec 2005
Location: Northern CT
Posts: 2,412
Likes: 0
Received 14 Likes
on
11 Posts
Car: 1986 Trans am
Engine: 5.3 LM7
Transmission: T56 6 speed
Axle/Gears: Dana 44 w/ 3.55's
Re: **Project PITA** 86 TA frame up restoration
Thanks man! And it will be a paid off "new" car lol. Thats my favorite part.
04-18-2011, 10:09 PM
#610
Supreme Member
iTrader: (1)
Join Date: Jun 2009
Location: Central Connecticut
Posts: 1,777
Likes: 0
Received 0 Likes
on
0 Posts
Car: 91 Trans Am 'vert
Engine: LB9
Transmission: T5
Axle/Gears: 3.45 9 bolt
Re: **Project PITA** 86 TA frame up restoration
Man, getting closer and closer to terrorizing the pike! 

04-18-2011, 10:13 PM
#611
Member
Join Date: Feb 2008
Location: Northeast Ohio
Posts: 171
Likes: 0
Received 0 Likes
on
0 Posts
Car: 1991 Chevy Camaro RS w/t-tops
Engine: BBC 396 .090 over (414)
Transmission: LS1 T-56
Axle/Gears: Shortened Ford 9, 3.25, discs, posi
Re: **Project PITA** 86 TA frame up restoration
[quote=whitedevilTA;4895411]Well I started with a bare shell and my old harness was completely out so it should be about the same for you lol. Just KEEP ALL YOUR OLD HARNESSES!! I have used a ton of the factory plugs and switches so far plus the factory harness is good to take a relay or two off of if you plan on adding other circuits. Having the factory plugs to add to the painless harness basically makes it a factory like plug and play harness, and much easier in case you need to replace something down the road like a door lock motor. [quote]
SWEEET! looks like its time to dive up into the attic and pull the old bulk o' wires out again....
SWEEET! looks like its time to dive up into the attic and pull the old bulk o' wires out again....
 04-18-2011, 11:26 PM
#613
Supreme Member
Thread Starter
iTrader: (8)
Join Date: Dec 2005
Location: Northern CT
Posts: 2,412
Likes: 0
Received 14 Likes
on
11 Posts
Car: 1986 Trans am
Engine: 5.3 LM7
Transmission: T56 6 speed
Axle/Gears: Dana 44 w/ 3.55's
Re: **Project PITA** 86 TA frame up restoration
 Cant wait!!
I don't have an exact number and I honestly don't want to either lol. Cost isn't my concern at all with this project, but doing it right the first time is. If I had to take a quick guess I'd say around $13K-$14K with probably a few thousand more till it's completely done.
04-19-2011, 02:03 AM
#614
On Probation
iTrader: (9)
Join Date: Feb 2005
Location: So Cal
Posts: 2,042
Likes: 0
Received 2 Likes
on
2 Posts
Car: 87 IROC-Z
Engine: LsX
Transmission: MN12 6speed
Axle/Gears: 3:42
Re: **Project PITA** 86 TA frame up restoration
that wiring kit looks so pretty! im usually scared of wring soldering etc. lol
great updates with the work right here. everything looks brand spanking new!
great updates with the work right here. everything looks brand spanking new!
 04-19-2011, 05:30 AM
#616
Senior Member
Join Date: Apr 2006
Location: CT
Posts: 685
Likes: 0
Received 0 Likes
on
0 Posts
Car: 1988 Iroc
Engine: 5.7L
Transmission: '96 T56, Hurst Shifter, Mech VSS
Axle/Gears: 3.45 9 Bolt
04-20-2011, 08:41 AM
#620
Re: **Project PITA** 86 TA frame up restoration
If you are never going to use cruise, and you really want to clean things up, you can remove the stalk and wire and get a non-cruise stalk. They are cheap. But if there is even a chance that you'll use cruise again might as well zip tie it.
Thanks for the extra pics of the wiring. Ide probably have to make some mods to that harness either way since Im wired for a hotwire fuel pump harness, and since Im using the LS fuse blocks. Tho...maybe that would be my opportunity to ditch those and go to a custom relay set up. So many ideas.... haha.
So you wont have any harnesses running down the chassis rail for lights or anything? It'll all come out of the C100 area? Be nice to be able to seal up some of those extra holes down near the column and master cylinder.
J.
04-20-2011, 12:34 PM
#621
Supreme Member
Thread Starter
iTrader: (8)
Join Date: Dec 2005
Location: Northern CT
Posts: 2,412
Likes: 0
Received 14 Likes
on
11 Posts
Car: 1986 Trans am
Engine: 5.3 LM7
Transmission: T56 6 speed
Axle/Gears: Dana 44 w/ 3.55's
Re: **Project PITA** 86 TA frame up restoration
If you are never going to use cruise, and you really want to clean things up, you can remove the stalk and wire and get a non-cruise stalk. They are cheap. But if there is even a chance that you'll use cruise again might as well zip tie it.
Thanks for the extra pics of the wiring. Ide probably have to make some mods to that harness either way since Im wired for a hotwire fuel pump harness, and since Im using the LS fuse blocks. Tho...maybe that would be my opportunity to ditch those and go to a custom relay set up. So many ideas.... haha.
So you wont have any harnesses running down the chassis rail for lights or anything? It'll all come out of the C100 area? Be nice to be able to seal up some of those extra holes down near the column and master cylinder.
J.
Thanks for the extra pics of the wiring. Ide probably have to make some mods to that harness either way since Im wired for a hotwire fuel pump harness, and since Im using the LS fuse blocks. Tho...maybe that would be my opportunity to ditch those and go to a custom relay set up. So many ideas.... haha.
So you wont have any harnesses running down the chassis rail for lights or anything? It'll all come out of the C100 area? Be nice to be able to seal up some of those extra holes down near the column and master cylinder.
J.
As far as the pumps, I will have a custom relay setup for the dual in tank pumps I have. The painless harness gives you a keyed fuel pump power-on wire and thats it. I plan on running it to a set of relays and then having direct battery power going to the pumps to give them as much juice as I can. That way they will be on there own circuit but still use the key-on wire so I'm not dealing with any annoying switches or anything.
And the headlight harness will come out of the upper area on the driver side there (C100?). I'm then going to hide all the wiring inside the front fender rail piece so you won't even see it in the engine bay. Only visible harness will be engine related, and hopefully I can make that one almost dissapear too!
04-20-2011, 02:50 PM
#622
Supreme Member
Join Date: May 2004
Location: Kingston, Tn
Posts: 2,924
Likes: 0
Received 1 Like
on
1 Post
Car: 1987 GTA
Engine: LT1
Transmission: T56
Axle/Gears: 9 bolt 3.70 posi
Re: **Project PITA** 86 TA frame up restoration
spoiler1.jpg?t=1303329079
spoiler.jpg?t=1303329022
04-20-2011, 03:00 PM
#623
Supreme Member
Thread Starter
iTrader: (8)
Join Date: Dec 2005
Location: Northern CT
Posts: 2,412
Likes: 0
Received 14 Likes
on
11 Posts
Car: 1986 Trans am
Engine: 5.3 LM7
Transmission: T56 6 speed
Axle/Gears: Dana 44 w/ 3.55's
Re: **Project PITA** 86 TA frame up restoration
^^ Klortho looks GREAT!! Now I'm real excited to get mine back from paint and get it on. I absolutely love how the 85-90 cars look from the back veiw with the 91-92 spoiler. Good luck with the car!
04-20-2011, 08:41 PM
#624
Supreme Member
Thread Starter
iTrader: (8)
Join Date: Dec 2005
Location: Northern CT
Posts: 2,412
Likes: 0
Received 14 Likes
on
11 Posts
Car: 1986 Trans am
Engine: 5.3 LM7
Transmission: T56 6 speed
Axle/Gears: Dana 44 w/ 3.55's
Re: **Project PITA** 86 TA frame up restoration
BIG UPDATE. Worked on the painless chassis harness a lot today and got a bunch of stuff done. Wiring is coming along very nicely on the car and I expect it to be pretty much done in the next week. Also ordered a BMR trunk battery mount bracket and all the cable needed to run the battery to the trunk. Once thats in place the carpet and a lot of the interior will be going back in! Heres the pics with the rundown on progress.
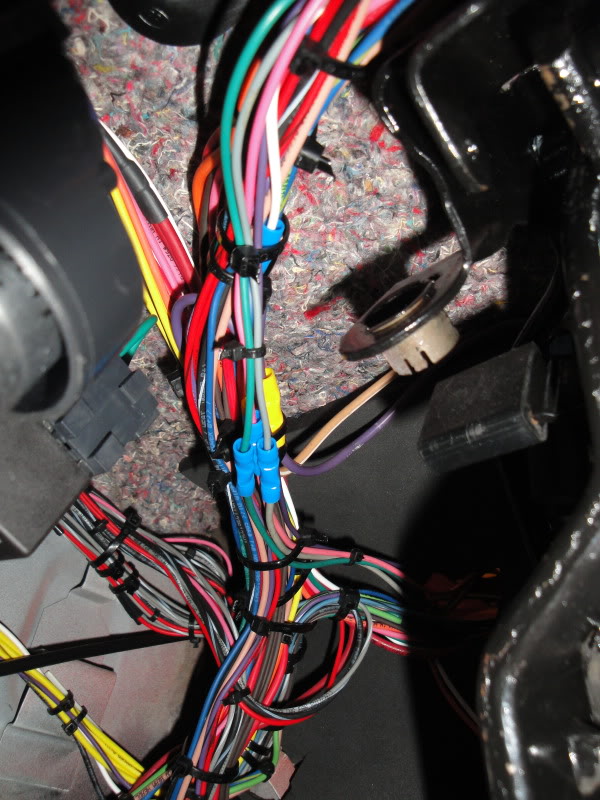
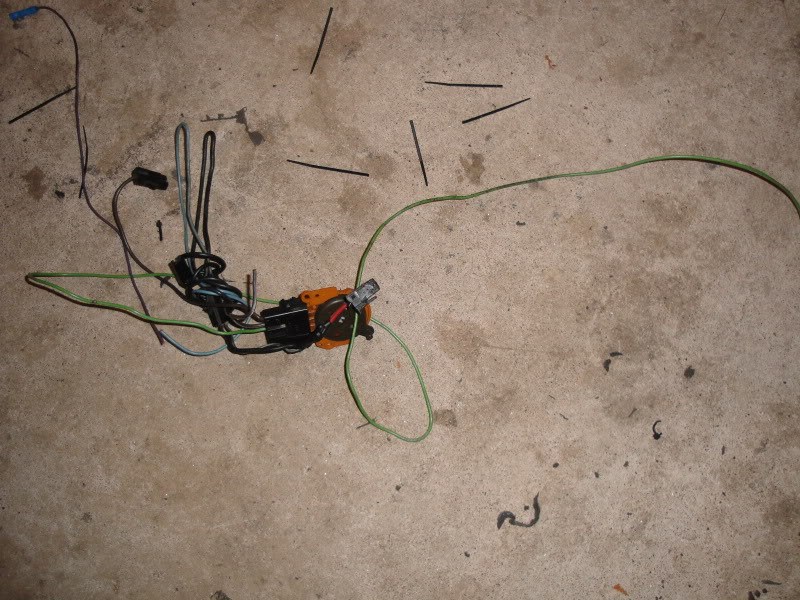
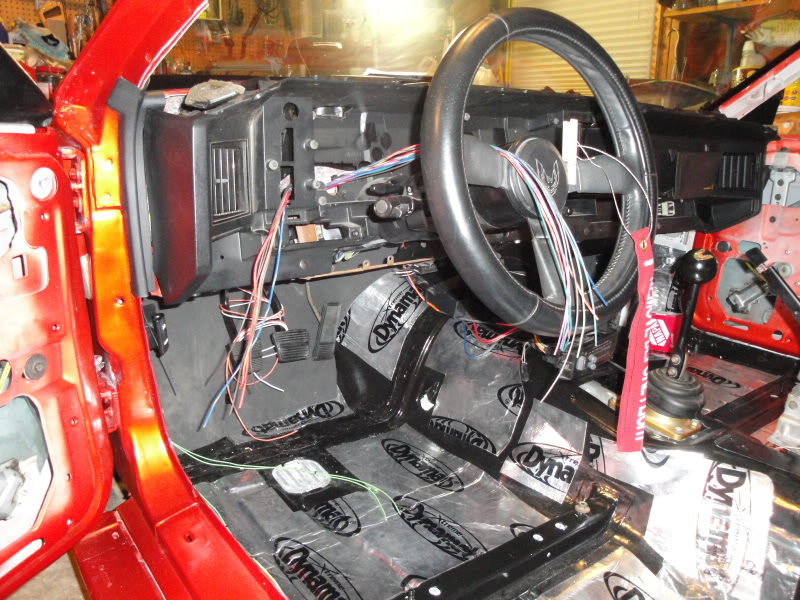
Seperated the wiper circuit from the rest of the harness and wired it into the painless harness so the wipers are good to go now.

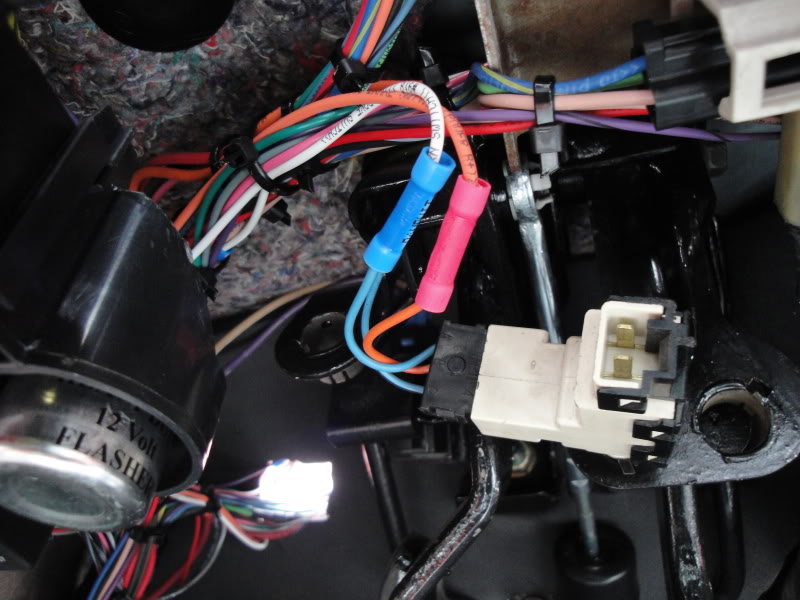
Heres where the wiper wires run into the dash harness area (blue butt connectors on the main line). There is a white wire that comes off the wiper connector on the steering column that is the main fused power feed which I attached to the painless harnesses wiper fused wire, and then there are a purple, pink, green, and grey wires that control the various wiper functions which go directly from the steering column plug to the wiper motor. You can also see the neutral safety wires (thick tan and purple) integrated into the painless harness so the car will only start when the clutch pedal is depressed.
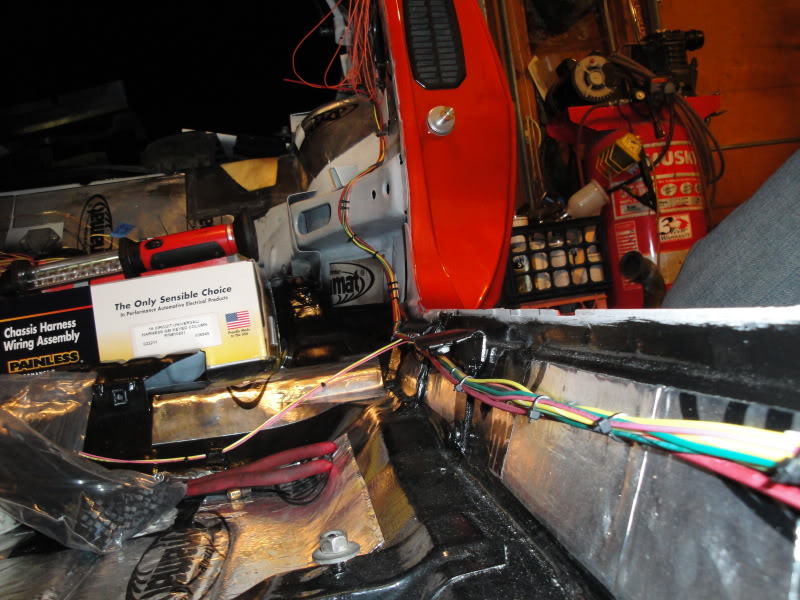
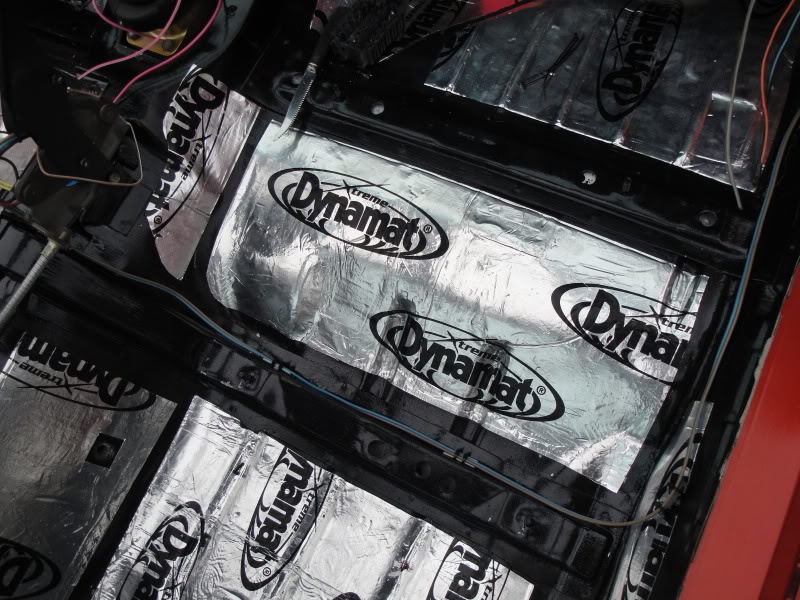
Heres where the tail harness runs along the floorboard to the rear of the car (3rd brake light wire is haning off my speaker area for the moment)
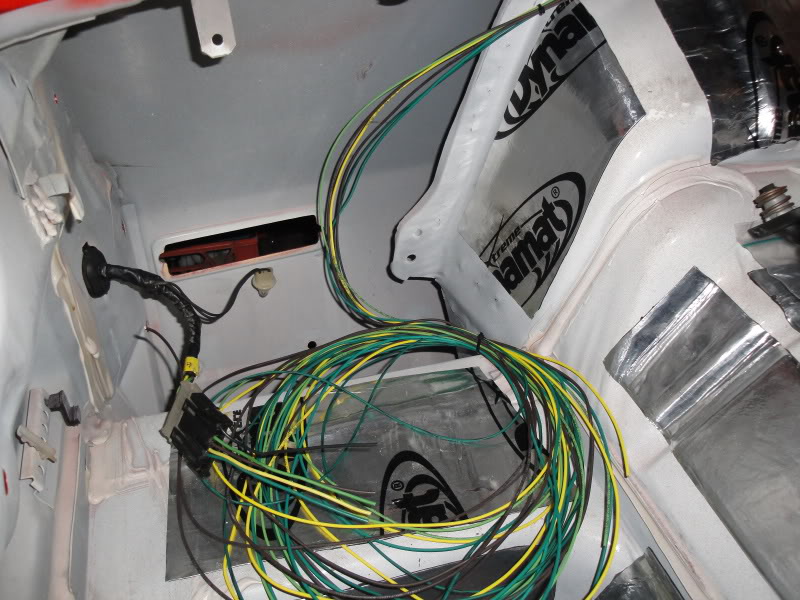
And heres where the wires will connect to the tail harness. The plug for the tail harness is in place but I need to run an inline relay because the painless harness isn't meant to send power to the 10 bulbs that the stock trans am setup has.
Seperated the wiper circuit from the rest of the harness and wired it into the painless harness so the wipers are good to go now.
Heres where the wiper wires run into the dash harness area (blue butt connectors on the main line). There is a white wire that comes off the wiper connector on the steering column that is the main fused power feed which I attached to the painless harnesses wiper fused wire, and then there are a purple, pink, green, and grey wires that control the various wiper functions which go directly from the steering column plug to the wiper motor. You can also see the neutral safety wires (thick tan and purple) integrated into the painless harness so the car will only start when the clutch pedal is depressed.
Heres where the tail harness runs along the floorboard to the rear of the car (3rd brake light wire is haning off my speaker area for the moment)
And heres where the wires will connect to the tail harness. The plug for the tail harness is in place but I need to run an inline relay because the painless harness isn't meant to send power to the 10 bulbs that the stock trans am setup has.
Last edited by whitedevilTA; 04-20-2011 at 09:00 PM.
04-20-2011, 08:52 PM
#625
Supreme Member
Thread Starter
iTrader: (8)
Join Date: Dec 2005
Location: Northern CT
Posts: 2,412
Likes: 0
Received 14 Likes
on
11 Posts
Car: 1986 Trans am
Engine: 5.3 LM7
Transmission: T56 6 speed
Axle/Gears: Dana 44 w/ 3.55's
Re: **Project PITA** 86 TA frame up restoration
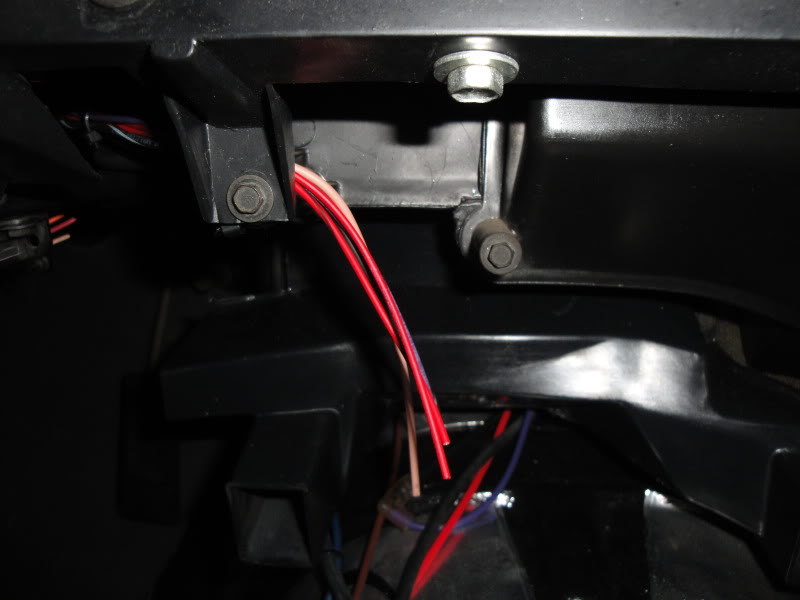
Went through my heater/AC wiring as well and pulled every wire used for the AC system out leaving only the wires needed to run heat. Here you can see the heater controls with the plug in it and a brown wire hanging off the back. This is the power feed wire to the heater controls which the painless harness will attach to.

Heres the section of wires from the painless harness that go to the center console area including the heater control feed wire, radio power wires, a power antena wire, and the cigarette lighter wire.
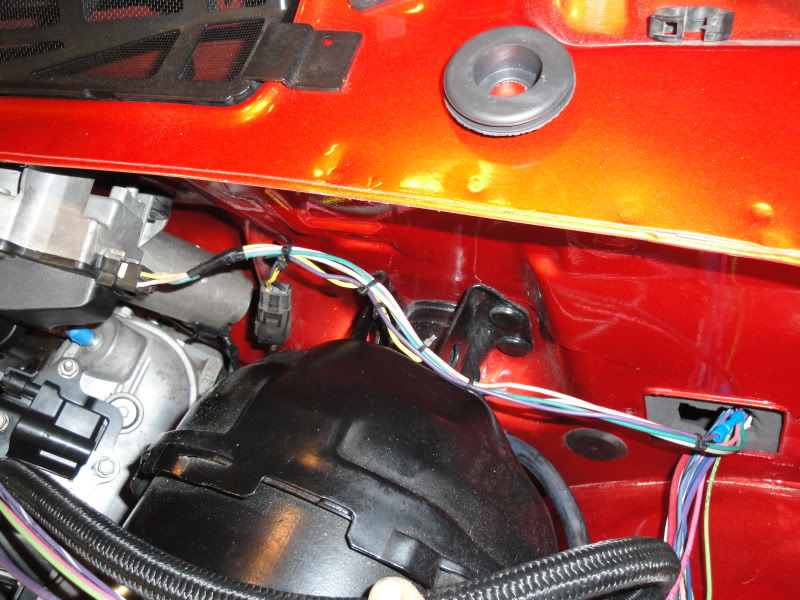
Used the stock hole and grommet to run the heater wires through the firewall and there is a nice small port on the back of the LS6 intake to operate the vacuum flapper box controls. I'll neaten these up and get them plugged in in the next day or so.
These were the unused AC wires off the back of the heater control area
Really no wires left hanging down since everything has been run now. The orange and white wires around the pedal are for the brake light switch and there are 2 green wires for the cruise control that I'll have to tie up out of the way. You can see up in the corner of all the wiring is the AC, choke, etc wires that painless gives you that I will not be using but I don't want to cut anything so I tied them up out of the way.
Heres the section of wires from the painless harness that go to the center console area including the heater control feed wire, radio power wires, a power antena wire, and the cigarette lighter wire.
Used the stock hole and grommet to run the heater wires through the firewall and there is a nice small port on the back of the LS6 intake to operate the vacuum flapper box controls. I'll neaten these up and get them plugged in in the next day or so.
These were the unused AC wires off the back of the heater control area
Really no wires left hanging down since everything has been run now. The orange and white wires around the pedal are for the brake light switch and there are 2 green wires for the cruise control that I'll have to tie up out of the way. You can see up in the corner of all the wiring is the AC, choke, etc wires that painless gives you that I will not be using but I don't want to cut anything so I tied them up out of the way.
04-20-2011, 08:57 PM
#626
Supreme Member
Thread Starter
iTrader: (8)
Join Date: Dec 2005
Location: Northern CT
Posts: 2,412
Likes: 0
Received 14 Likes
on
11 Posts
Car: 1986 Trans am
Engine: 5.3 LM7
Transmission: T56 6 speed
Axle/Gears: Dana 44 w/ 3.55's
Re: **Project PITA** 86 TA frame up restoration
And theres where I stand. Like I said, nice not seeing any wires hanging down on the floorboard. Carpet will be coming soon!!
Also picked up a starter from my local junkyard for a 5.3 engine and cleaned it up. I refuse to pay the $130 that autozone wanted for one new WITH another $40 or so for a core which I do not have! Once the battery cable kit comes to put the battery in the trunk there shouldn't be anything left to run in the floors other than maybe speaker wire so the interior should be going in very soon.

Also picked up a starter from my local junkyard for a 5.3 engine and cleaned it up. I refuse to pay the $130 that autozone wanted for one new WITH another $40 or so for a core which I do not have! Once the battery cable kit comes to put the battery in the trunk there shouldn't be anything left to run in the floors other than maybe speaker wire so the interior should be going in very soon.
04-20-2011, 09:24 PM
#628
Supreme Member
Thread Starter
iTrader: (8)
Join Date: Dec 2005
Location: Northern CT
Posts: 2,412
Likes: 0
Received 14 Likes
on
11 Posts
Car: 1986 Trans am
Engine: 5.3 LM7
Transmission: T56 6 speed
Axle/Gears: Dana 44 w/ 3.55's
Re: **Project PITA** 86 TA frame up restoration
Yea, but I want to wait until all the wires are properly run and sized before I start covering them. I'll probably end up using that new black mesh stlye covering in the engine bay rather than the plastic loom because the plastic loom collects dust and then looks like crap haha. I won't be covering the interior wires since it's really not needed and I like the look of them being bare on the inside of the car (even though you'll never see them.)
04-20-2011, 09:24 PM
#629
Senior Member
Join Date: Apr 2006
Location: CT
Posts: 685
Likes: 0
Received 0 Likes
on
0 Posts
Car: 1988 Iroc
Engine: 5.7L
Transmission: '96 T56, Hurst Shifter, Mech VSS
Axle/Gears: 3.45 9 Bolt
Re: **Project PITA** 86 TA frame up restoration
Dude, you don't waste any time. Your just flying through this build. You think the car will be done in a couple weeks? Thats crazy.
04-20-2011, 09:26 PM
#630
Re: **Project PITA** 86 TA frame up restoration
not too sure what you are talking about with the mesh stuff, but yeah the looms do get cruddy, adn ill take your word on the other stuff. now are you going to go black with them or go with an orange color. i knew you said you wanted it all to look factoryish but i dont know how far youll take that
04-20-2011, 09:27 PM
#631
Supreme Member
Thread Starter
iTrader: (8)
Join Date: Dec 2005
Location: Northern CT
Posts: 2,412
Likes: 0
Received 14 Likes
on
11 Posts
Car: 1986 Trans am
Engine: 5.3 LM7
Transmission: T56 6 speed
Axle/Gears: Dana 44 w/ 3.55's
Re: **Project PITA** 86 TA frame up restoration
I wish it would be done in a few weeks! LOL, I meant the wiring will be done in about a week or so. I'm still going to try to meet my June/July timeframe for it being completely done though.
04-20-2011, 09:30 PM
#632
Supreme Member
Thread Starter
iTrader: (8)
Join Date: Dec 2005
Location: Northern CT
Posts: 2,412
Likes: 0
Received 14 Likes
on
11 Posts
Car: 1986 Trans am
Engine: 5.3 LM7
Transmission: T56 6 speed
Axle/Gears: Dana 44 w/ 3.55's
Re: **Project PITA** 86 TA frame up restoration
not too sure what you are talking about with the mesh stuff, but yeah the looms do get cruddy, adn ill take your word on the other stuff. now are you going to go black with them or go with an orange color. i knew you said you wanted it all to look factoryish but i dont know how far youll take that
04-20-2011, 10:08 PM
#633
Member
Join Date: Feb 2008
Location: Northeast Ohio
Posts: 171
Likes: 0
Received 0 Likes
on
0 Posts
Car: 1991 Chevy Camaro RS w/t-tops
Engine: BBC 396 .090 over (414)
Transmission: LS1 T-56
Axle/Gears: Shortened Ford 9, 3.25, discs, posi
Re: **Project PITA** 86 TA frame up restoration
Comin along very nice!!! not lookin forward to doin that to the 'maro but if you dont mind... I'm workin out a budget here and got a huge a$$ parts list with fairly precise numbers except the braided fuel lines and stainless brake lines etc. How much did you end up spending on your lines and what did you get? thanks!!!
Last edited by iluvmy91camaro; 04-20-2011 at 10:12 PM.
04-20-2011, 10:22 PM
#634
Supreme Member
Thread Starter
iTrader: (8)
Join Date: Dec 2005
Location: Northern CT
Posts: 2,412
Likes: 0
Received 14 Likes
on
11 Posts
Car: 1986 Trans am
Engine: 5.3 LM7
Transmission: T56 6 speed
Axle/Gears: Dana 44 w/ 3.55's
Re: **Project PITA** 86 TA frame up restoration
Comin along very nice!!! not lookin forward to doin that to the 'maro but if you dont mind... I'm workin out a budget here and got a huge a$$ parts list with fairly precise numbers except the braided fuel lines and stainless brake lines etc. How much did you end up spending on your lines and what did you get? thanks!!!
04-22-2011, 08:18 PM
#636
Supreme Member
Thread Starter
iTrader: (8)
Join Date: Dec 2005
Location: Northern CT
Posts: 2,412
Likes: 0
Received 14 Likes
on
11 Posts
Car: 1986 Trans am
Engine: 5.3 LM7
Transmission: T56 6 speed
Axle/Gears: Dana 44 w/ 3.55's
Re: **Project PITA** 86 TA frame up restoration
Got more wiring done today guys. Got pretty much the entire power window circuit finished minus the relay for it, and hooked up a few wires I was a bit confused on before. I will try to document this as much as I can since I know a lot of people ask about putting an aftermarket chassis harness in these cars and there is not much info out there on it. Maybe I'll even put together a complete wiring thread in the electrical section of these boards with steps on what everything attaches to so that people can duplicate it in the future. Anyways, heres a few shots...
Heres the doors with the power window and door lock wiring. I re-used the factory wiring for these since I found out I had to add a relay in the circuit and pulled the yellow painless wires back out of the doors since theres no need for them (since they will run to the relay now rather than the electric motors). It's a learning curve though since I am new to wiring so I learn more every day! Easiest just to use the factory wiring here.
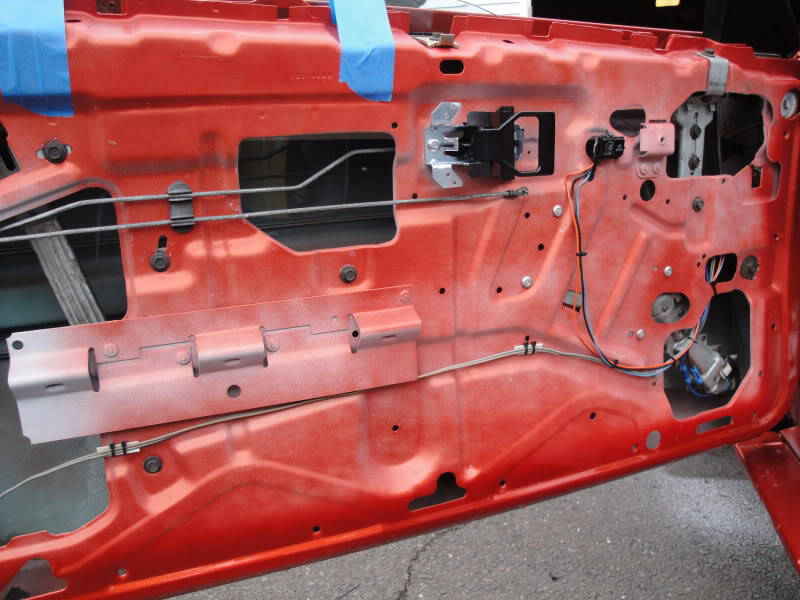
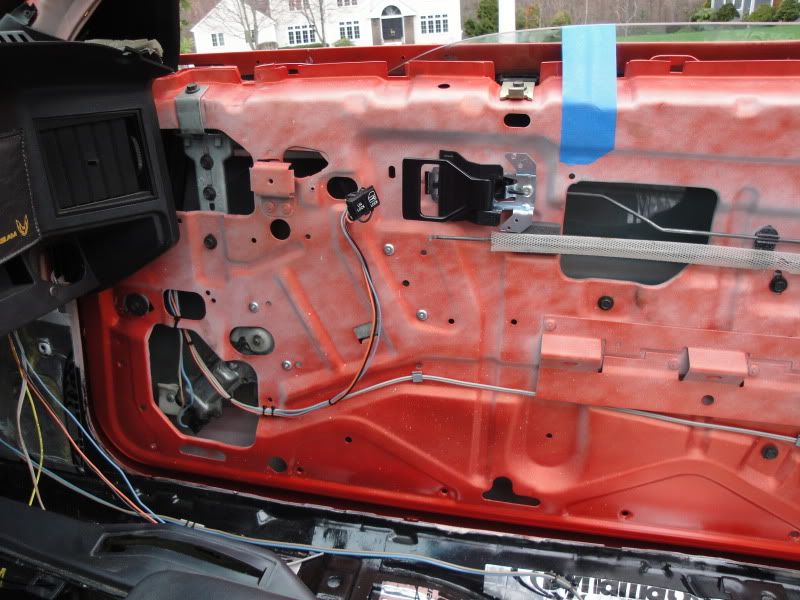
Heres where the door wiring comes out of the rubber connector between the doors. Tan and grey are the door lock motors, black and blue are the window motor wires, and orange, light blue, and black are for the door lock switch.
Heres the window switches and plugs in the stock location. I've got the ground wire attached to the tunnel and the pink wires are the 2 wires that will go into the relay for power where the yellow wires off the painless harness will supply them with keyed on power.
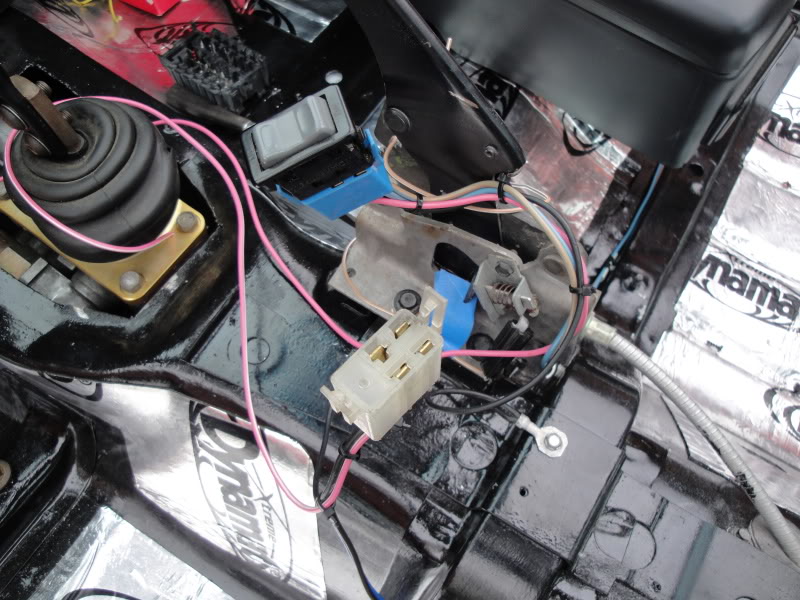
Heres how I routed the wires from the window switches to the doors....right between the front seat location on each side. There were already 1/4" holes for the wire clips I am using so it worked out nice!
Heres the doors with the power window and door lock wiring. I re-used the factory wiring for these since I found out I had to add a relay in the circuit and pulled the yellow painless wires back out of the doors since theres no need for them (since they will run to the relay now rather than the electric motors). It's a learning curve though since I am new to wiring so I learn more every day! Easiest just to use the factory wiring here.
Heres where the door wiring comes out of the rubber connector between the doors. Tan and grey are the door lock motors, black and blue are the window motor wires, and orange, light blue, and black are for the door lock switch.
Heres the window switches and plugs in the stock location. I've got the ground wire attached to the tunnel and the pink wires are the 2 wires that will go into the relay for power where the yellow wires off the painless harness will supply them with keyed on power.
Heres how I routed the wires from the window switches to the doors....right between the front seat location on each side. There were already 1/4" holes for the wire clips I am using so it worked out nice!
04-22-2011, 08:21 PM
#637
Supreme Member
Thread Starter
iTrader: (8)
Join Date: Dec 2005
Location: Northern CT
Posts: 2,412
Likes: 0
Received 14 Likes
on
11 Posts
Car: 1986 Trans am
Engine: 5.3 LM7
Transmission: T56 6 speed
Axle/Gears: Dana 44 w/ 3.55's
Re: **Project PITA** 86 TA frame up restoration
Also got the brake switch hooked up. The factory brake switch has 3 wires and the painless harness only gives you 2. I found that one blue wire on the switch is for the brake lights and the other is for the 3rd brake light so I just spliced them together into the painless wire and hopefully thats fine.
Also got my battery relocation wiring kit which includes a nice engine to chassis braided grounding wire. The BMR battery trunk bracket was on backorder so hopefully I'll have that in another week or so.
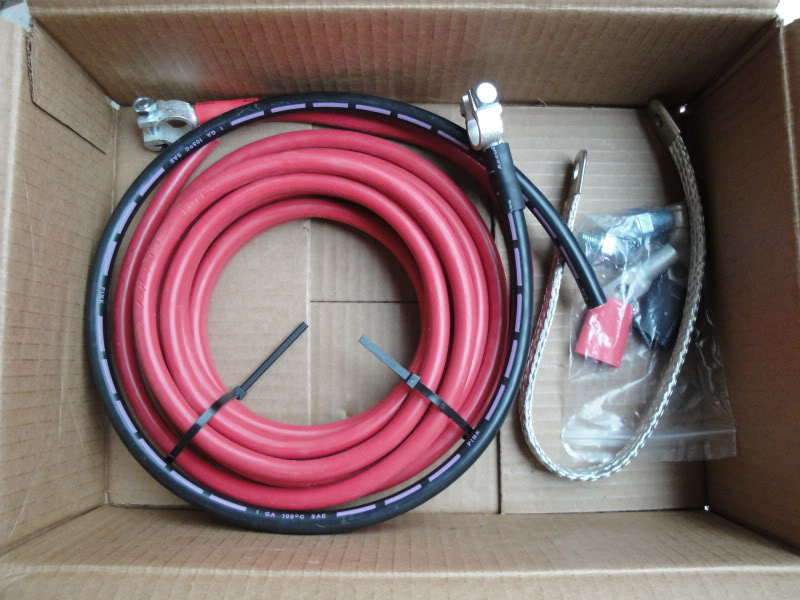
Also got my battery relocation wiring kit which includes a nice engine to chassis braided grounding wire. The BMR battery trunk bracket was on backorder so hopefully I'll have that in another week or so.
04-23-2011, 03:28 AM
#639
Senior Member
Join Date: Sep 2007
Location: Chicagoland Area
Posts: 617
Likes: 0
Received 0 Likes
on
0 Posts
Car: '89 GTA/'86 TA/98 TA
Engine: 350/350/LS1
Transmission: R4/T5/4L60E
Axle/Gears: 3.23/2.77/3.73
Re: **Project PITA** 86 TA frame up restoration
Can I has some cash???? I wish I had your kind of money but 2 years a blown engine and a bike later, I kinda just want my car done, so I am reusing some parts from the car before until I actually get money to get new things, such luxurys.
04-23-2011, 04:06 AM
#640
Supreme Member
iTrader: (2)
Join Date: Feb 2009
Location: Delaware
Posts: 1,450
Likes: 0
Received 1 Like
on
1 Post
Car: Lots of 'em
Re: **Project PITA** 86 TA frame up restoration
I know what you mean there. I've already dropped about another $3,000 into the Mustang since buying it, and still have a couple things that need to be done. Need to have my new front bumper painted and installed, need to pick up some new headlights, small stuff. Big stuff is done for now, the T56 swap, SCT tuner, the stuff that matters. 
Don't know what to do next. I'm finally getting serious about doing something with the IROC. I've been talking for 2 years about what I want to do, and sutff may finally happen. I'm having the engine pulled next weekend so I can tear it down, see what went wrong, and check if it's a 4 bolt block.
If I have a decent 4 bolt block to work with (hoping it didn't throw a rod and score a cylinder wall real bad since there was a terrible knock), it may possibly see an Eagle 383 stroker kit this year. If not, don't know. I'll let it sit longer, and choose between my few plans.
1. Buy a truck (03-07 Dodge Ram 2500 diesel)
2. Buy another DD (MK4 Jetta TDI) and a bike (2004+ Yamaha R1) for fun and a good weather DD
3. Buy another DD and turbo or supercharge the Mustang
Have $2,000+ saved and counting, and I'm thankful for what I have and all, but it still seems like nothing. Cars are one expensive hobby.
And on that note, whitedevil, that thing is coming together beautifully man. You're making me want to stick to a full, nice interior. A/C, heat, radio, along with keeping my power windows, locks, all that jazz. But the Mustang is my cruiser with those creature comforts. The IROC will one day be the weekend warrior car, that's actually fast.
04-23-2011, 01:12 PM
#641
Supreme Member
Thread Starter
iTrader: (8)
Join Date: Dec 2005
Location: Northern CT
Posts: 2,412
Likes: 0
Received 14 Likes
on
11 Posts
Car: 1986 Trans am
Engine: 5.3 LM7
Transmission: T56 6 speed
Axle/Gears: Dana 44 w/ 3.55's
Re: **Project PITA** 86 TA frame up restoration

It comes and is gone the day I get it lol. This project is a huge commitment and I have been living broke for the past year or so! I can't wait till it's done so I can feel what it's like to have cash in my wallet again haha.
And thanks for the compliments everyone!
04-23-2011, 03:26 PM
#642
Supreme Member
Join Date: Feb 2007
Location: Andover, NJ
Posts: 1,275
Likes: 0
Received 0 Likes
on
0 Posts
Car: '88 Trans Am GTA; '84 Trans Am
Engine: L98 350TPI; 5.3 LSx built
Transmission: N/A; T56
Axle/Gears: 3.70 9 bolt; 3.73 10 bolt
Re: **Project PITA** 86 TA frame up restoration
I have been debating the wiring on my car, I was wondering if the idea of re doing all the wiring in my car was worth it. I have some hacks due to an old cell phone setup and an old security system. Not to mention some of the wiring is all old, with worn broken insulation. I'm not a wiring expert, but, what was the PN for that kit and how much did it set you back? I want to keep everything I've got factory stock (some of the changes I'm doing like the 160 speedo will be refaced and keep the factory look.) Does it come with all the new connectors attached too? I have a couple broken ones. I guess I want to know how much work is really involved other than following a diagram or re running it via old wires. I need to figure out what I will need to to with my L69 computer to run the 383 too. I'm guessing nothing. Seeing as I have my interior out it would make sense to re run wires.
I've heard Painless gives you everything you need, but there are some things like the rear defroster...that I'm not sure they give you the wiring for. Also, did you replace your switches too? I've never seen a door lock switch that looks that good cept on low mileage originals.
I've heard Painless gives you everything you need, but there are some things like the rear defroster...that I'm not sure they give you the wiring for. Also, did you replace your switches too? I've never seen a door lock switch that looks that good cept on low mileage originals.
04-23-2011, 04:50 PM
#643
Supreme Member
Thread Starter
iTrader: (8)
Join Date: Dec 2005
Location: Northern CT
Posts: 2,412
Likes: 0
Received 14 Likes
on
11 Posts
Car: 1986 Trans am
Engine: 5.3 LM7
Transmission: T56 6 speed
Axle/Gears: Dana 44 w/ 3.55's
Re: **Project PITA** 86 TA frame up restoration
I have been debating the wiring on my car, I was wondering if the idea of re doing all the wiring in my car was worth it. I have some hacks due to an old cell phone setup and an old security system. Not to mention some of the wiring is all old, with worn broken insulation. I'm not a wiring expert, but, what was the PN for that kit and how much did it set you back? I want to keep everything I've got factory stock (some of the changes I'm doing like the 160 speedo will be refaced and keep the factory look.) Does it come with all the new connectors attached too? I have a couple broken ones. I guess I want to know how much work is really involved other than following a diagram or re running it via old wires. I need to figure out what I will need to to with my L69 computer to run the 383 too. I'm guessing nothing. Seeing as I have my interior out it would make sense to re run wires.
I've heard Painless gives you everything you need, but there are some things like the rear defroster...that I'm not sure they give you the wiring for. Also, did you replace your switches too? I've never seen a door lock switch that looks that good cept on low mileage originals.
I've heard Painless gives you everything you need, but there are some things like the rear defroster...that I'm not sure they give you the wiring for. Also, did you replace your switches too? I've never seen a door lock switch that looks that good cept on low mileage originals.
I will honestly say it is not going to be a simple straightforward swap. I'm sure if you did do it it would be something you would never have to worry about again in your car but it really depends on how bad the factory wiring really is. My car is so far from a "trans am" at the moment and more like a custom hot rod that the wiring doesn't matter. With the painless harness you will lose certain relays and I have no idea how you would hook the stock gauges up to the painless harness. I'm sure it's possible but I don;t know how since I'm using autometer gauges in my dash.
The painless harness only comes with connectors into the steering column. Everything else like window switches, headlight switches, etc you have to cut and use your old ones. It's really not too bad and the instruction manual painless gives you is very simple to understand and they do a great job explaining things. Thier tech line is also great if you need that extra help. It's a big job if you want to keep ALL of your old power accesories like the defroster and hatch pull down. I'll be wiring all those things back up so you could always wait and see how mine turns out and then decide if it's worth it or not on yours.
04-24-2011, 11:05 AM
#644
Supreme Member
Join Date: Feb 2007
Location: Andover, NJ
Posts: 1,275
Likes: 0
Received 0 Likes
on
0 Posts
Car: '88 Trans Am GTA; '84 Trans Am
Engine: L98 350TPI; 5.3 LSx built
Transmission: N/A; T56
Axle/Gears: 3.70 9 bolt; 3.73 10 bolt
Re: **Project PITA** 86 TA frame up restoration
Actually, I found your other post about the painless wiring after I posted that LOL. I also had a discussion with a friend of mine that I went to school with too. I decided that since just about everything worked I'll leave it alone and just tape or solder and shrink the hacks. I'll use the factory manual and other things to eliminate the three or four breaks that are in my system. And also tidy things up a bit.
Also, since I'm putting in a carb 383 stroker, I decided to eliminate the computer and related wiring. Amazing what that did to the engine bay as far as cleaning it up. I'm gonna put all that stuff in a box in case I decide to rebuild the numbers matching motor and put it back in (unlikely though). Looks like you're cruising along though. I'm trying to work on a bunch of little things myself so that stuff is over with when I get there. I gotta put up a build thread on here....maybe sometime this week I'll get around to doing it.
Also, since I'm putting in a carb 383 stroker, I decided to eliminate the computer and related wiring. Amazing what that did to the engine bay as far as cleaning it up. I'm gonna put all that stuff in a box in case I decide to rebuild the numbers matching motor and put it back in (unlikely though). Looks like you're cruising along though. I'm trying to work on a bunch of little things myself so that stuff is over with when I get there. I gotta put up a build thread on here....maybe sometime this week I'll get around to doing it.
04-25-2011, 10:01 PM
#645
Supreme Member
Thread Starter
iTrader: (8)
Join Date: Dec 2005
Location: Northern CT
Posts: 2,412
Likes: 0
Received 14 Likes
on
11 Posts
Car: 1986 Trans am
Engine: 5.3 LM7
Transmission: T56 6 speed
Axle/Gears: Dana 44 w/ 3.55's
Re: **Project PITA** 86 TA frame up restoration
Little update...got a few annoying things done today that I've been putting off so I felt pretty good about that! Heres a few pics...
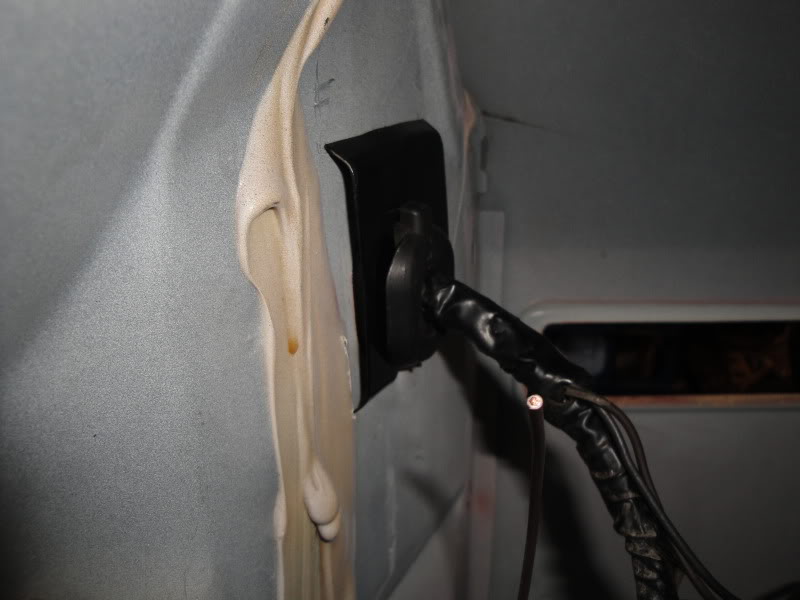
Heres a bracket I made up to hold the tail harness grommet in place. For the life of me I could NOT find the original even though I am positive I kept it, but this one came out good, and holds the grommet nice and tight.
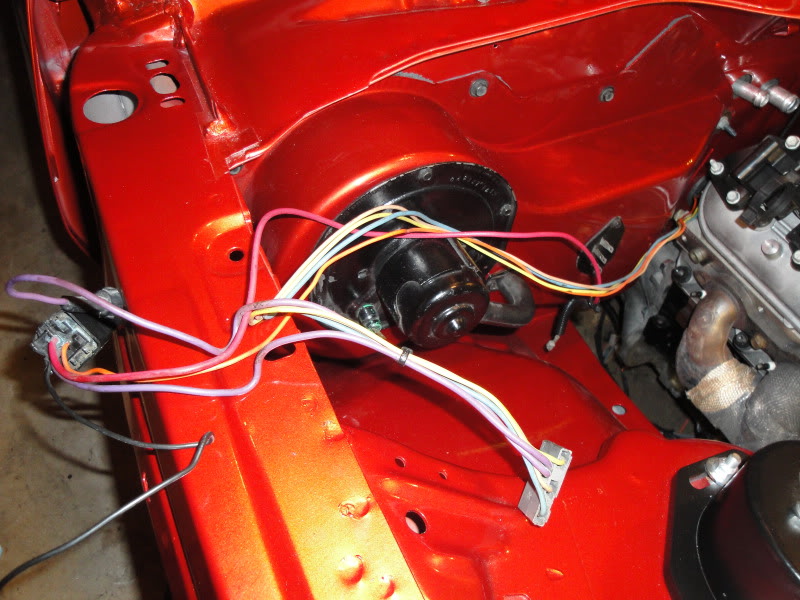
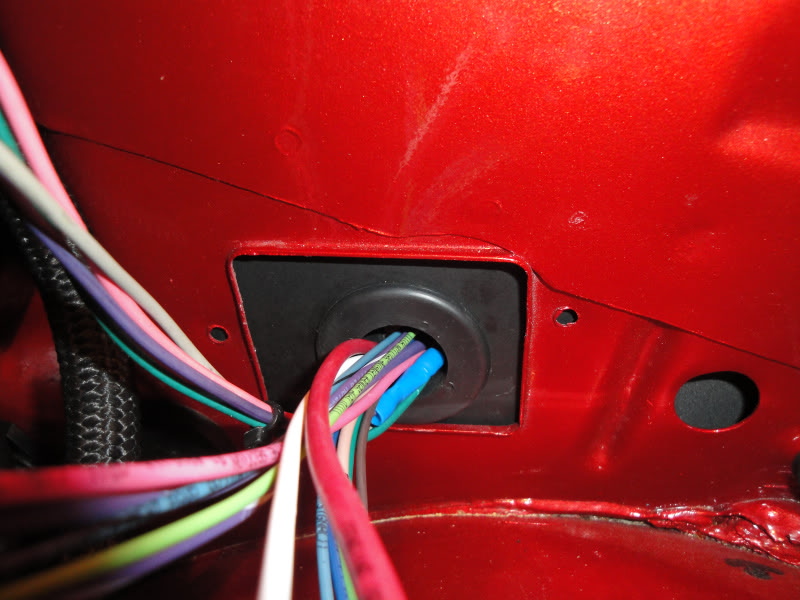
Also made the grommet plate on the engine bay side for the chassis harness wires to pass through. The holes are there too but the plate is sitting kinda low so you can't see them. I'll be riveting this in place tomorrow probably.
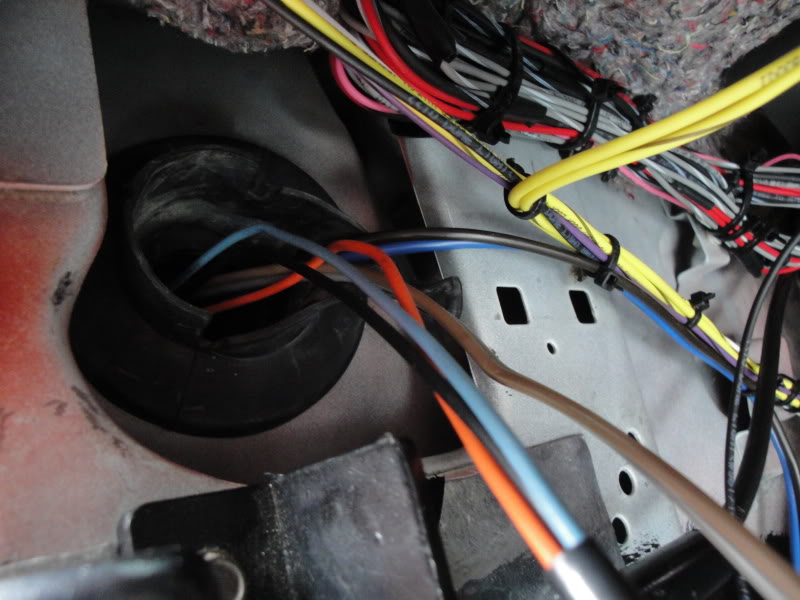
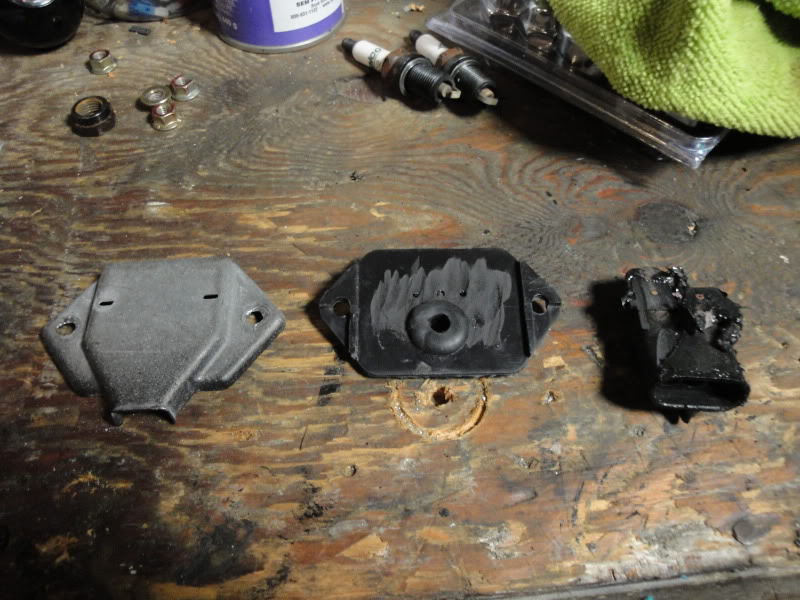
Took the stock fuel pump connector apart and modified it to fit the extra wires for the dual pumps/sending unit through it. I ended up cutting off the plug, smoothing it down, and drilling a hole for a rubber grommet. Came out nice! I'll be riveting this on tomorrow as well.
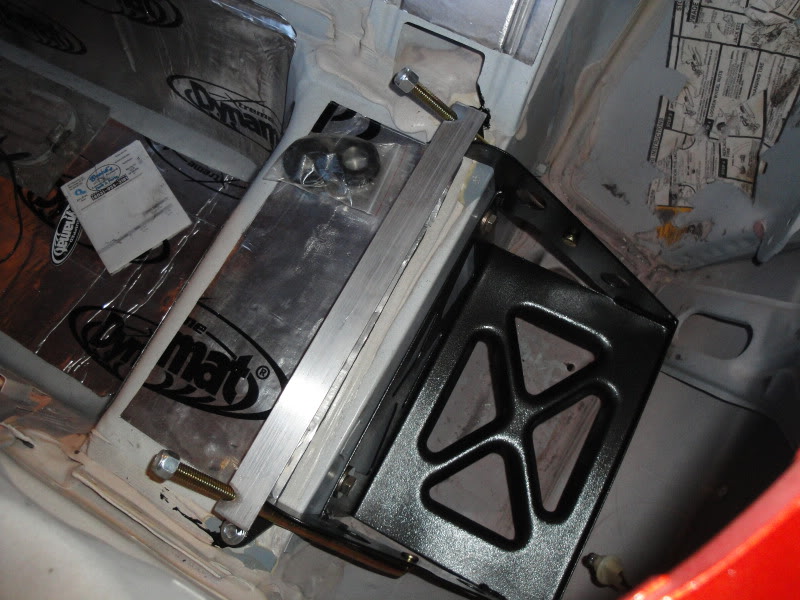
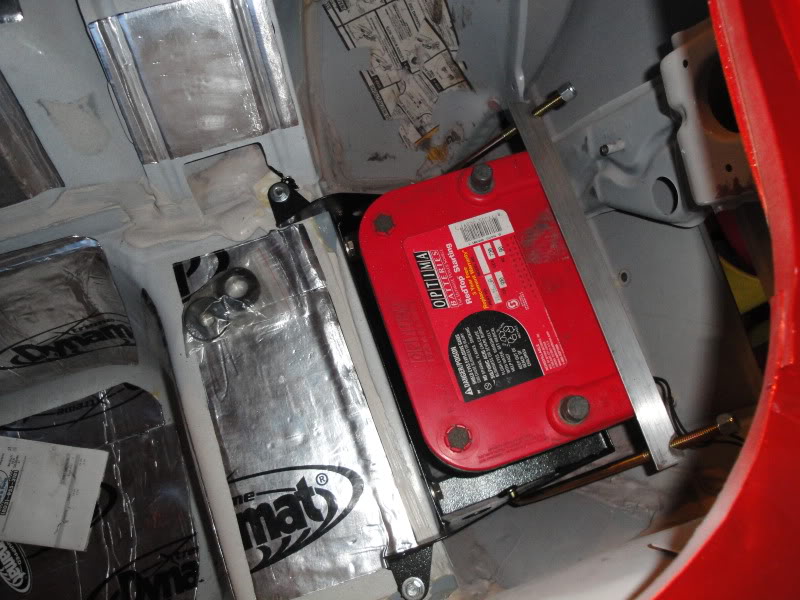
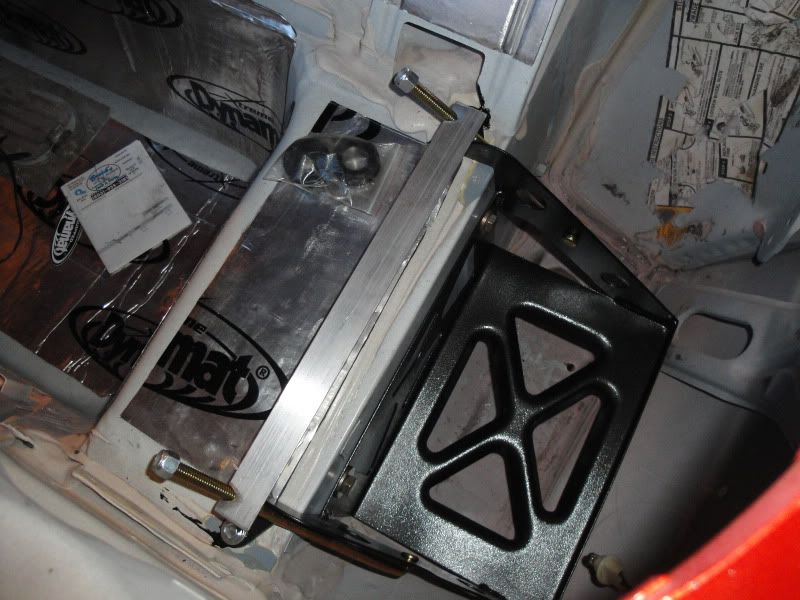
And heres the BMR rear battery mount bracket that came today. Got it installed and the fit was very good. Now I can get the cables run and the it should be all set.
Heres a bracket I made up to hold the tail harness grommet in place. For the life of me I could NOT find the original even though I am positive I kept it, but this one came out good, and holds the grommet nice and tight.
Also made the grommet plate on the engine bay side for the chassis harness wires to pass through. The holes are there too but the plate is sitting kinda low so you can't see them. I'll be riveting this in place tomorrow probably.
Took the stock fuel pump connector apart and modified it to fit the extra wires for the dual pumps/sending unit through it. I ended up cutting off the plug, smoothing it down, and drilling a hole for a rubber grommet. Came out nice! I'll be riveting this on tomorrow as well.
And heres the BMR rear battery mount bracket that came today. Got it installed and the fit was very good. Now I can get the cables run and the it should be all set.
04-26-2011, 12:19 PM
#646
Supreme Member
Join Date: Feb 2007
Location: Andover, NJ
Posts: 1,275
Likes: 0
Received 0 Likes
on
0 Posts
Car: '88 Trans Am GTA; '84 Trans Am
Engine: L98 350TPI; 5.3 LSx built
Transmission: N/A; T56
Axle/Gears: 3.70 9 bolt; 3.73 10 bolt
Re: **Project PITA** 86 TA frame up restoration
So, um...where is the spare tire going? 

 04-26-2011, 03:11 PM
#648
Supreme Member
iTrader: (1)
Join Date: Jun 2009
Location: Central Connecticut
Posts: 1,777
Likes: 0
Received 0 Likes
on
0 Posts
Car: 91 Trans Am 'vert
Engine: LB9
Transmission: T5
Axle/Gears: 3.45 9 bolt
Re: **Project PITA** 86 TA frame up restoration
Runflats are an option... not sure WhiteDevil is gonna do that though.
And just look at this picture when you're getting fed up with wiring lol.
http://image.gmhightechperformance.c...t+interior.jpg
And just look at this picture when you're getting fed up with wiring lol.
http://image.gmhightechperformance.c...t+interior.jpg
04-26-2011, 03:50 PM
#649
Supreme Member
Join Date: Feb 2007
Location: Andover, NJ
Posts: 1,275
Likes: 0
Received 0 Likes
on
0 Posts
Car: '88 Trans Am GTA; '84 Trans Am
Engine: L98 350TPI; 5.3 LSx built
Transmission: N/A; T56
Axle/Gears: 3.70 9 bolt; 3.73 10 bolt
Re: **Project PITA** 86 TA frame up restoration
Runflats are an option... not sure WhiteDevil is gonna do that though.
And just look at this picture when you're getting fed up with wiring lol.
http://image.gmhightechperformance.c...t+interior.jpg
And just look at this picture when you're getting fed up with wiring lol.
http://image.gmhightechperformance.c...t+interior.jpg
04-26-2011, 10:09 PM
#650
Member
Join Date: Feb 2008
Location: Northeast Ohio
Posts: 171
Likes: 0
Received 0 Likes
on
0 Posts
Car: 1991 Chevy Camaro RS w/t-tops
Engine: BBC 396 .090 over (414)
Transmission: LS1 T-56
Axle/Gears: Shortened Ford 9, 3.25, discs, posi
Re: **Project PITA** 86 TA frame up restoration
And just look at this picture when you're getting fed up with wiring lol.
http://image.gmhightechperformance.c...t+interior.jpg
http://image.gmhightechperformance.c...t+interior.jpg
 haha... I struggle to wire anything more than a simple toggle switch or a ceiling fan.