My 1992 Trans Am
 01-17-2016, 05:06 PM
#101
Junior Member

Thread Starter
Join Date: Nov 2008
Location: NV
Posts: 36
Likes: 0
Received 1 Like
on
1 Post
Car: 1992 Trans Am
Engine: 5.0 TPI
Transmission: T56
Axle/Gears: 3.73
Re: My 1992 Trans Am
Thanks Rick! Talk to you soon.
On Thursday I finished blasting all of my remaining parts and dropped them off at the powder coated on my way to pick up my engine mounts and panhard bar from the shop.
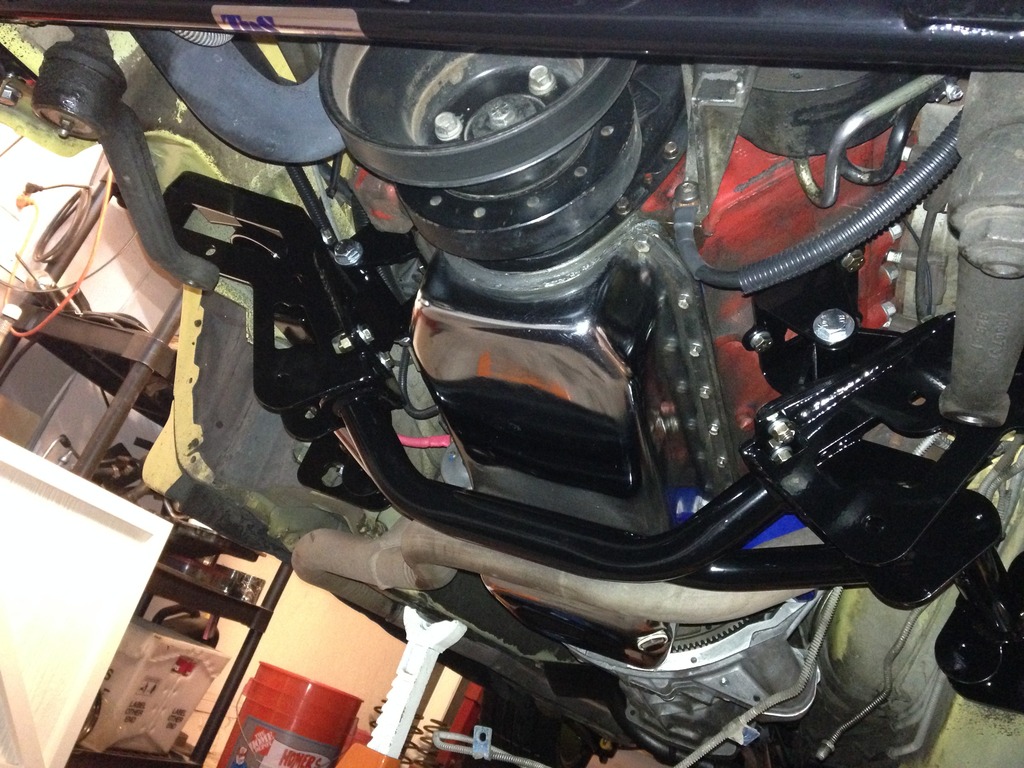
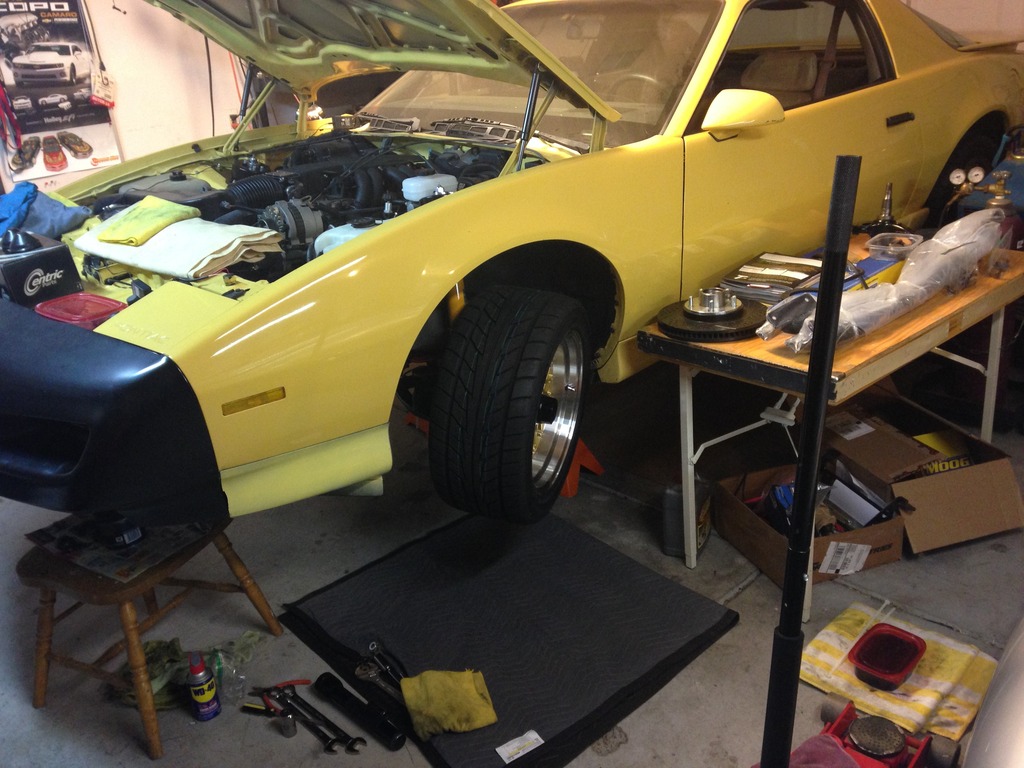
When I got home I pulled the old block mounts off and installed the UMI pieces. I also did a little cleaning. Well, one thing leads to another, and by the end of the night the k-member was in. I have to say it was really easy to do, and I didn't have any help. I started by loosely installing the mounts on the k-member. Then I lowered the engine a little bit and attached the k-member to the engine by the engine mounts. After I had the engine mount bolts in, I jacked the engine back up into place and installed the six k-member bolts. After all the bolts were in I torqued everything down and called it a night. It was a really uneventful install which is always nice. Here's how she's sitting right now.
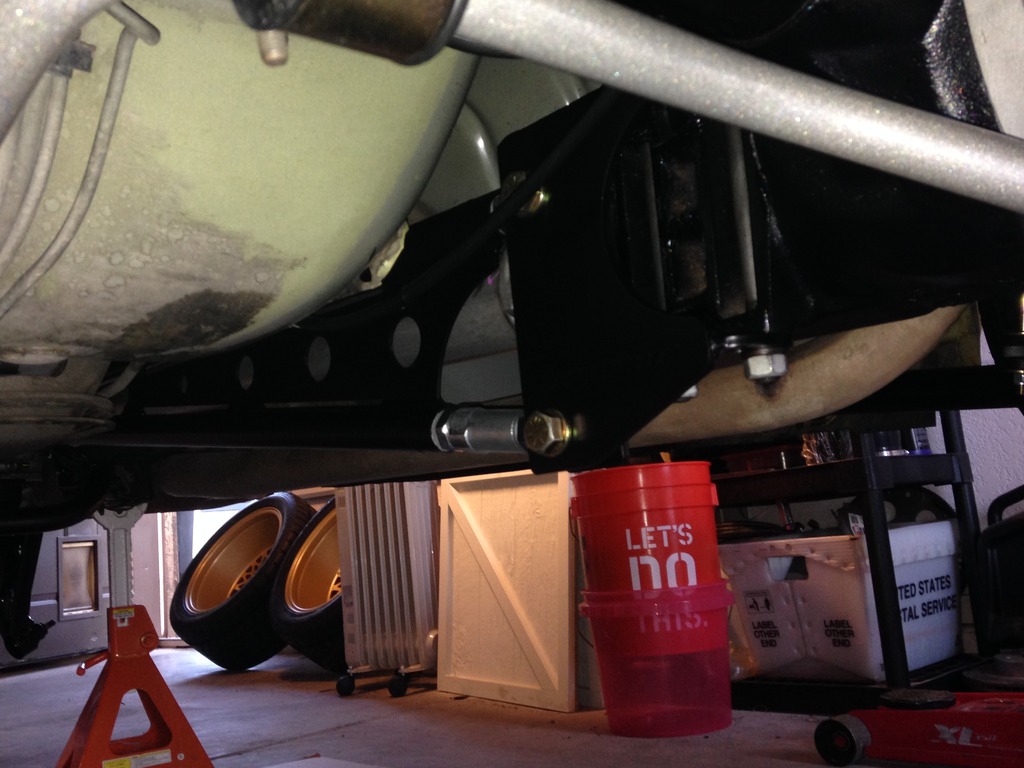
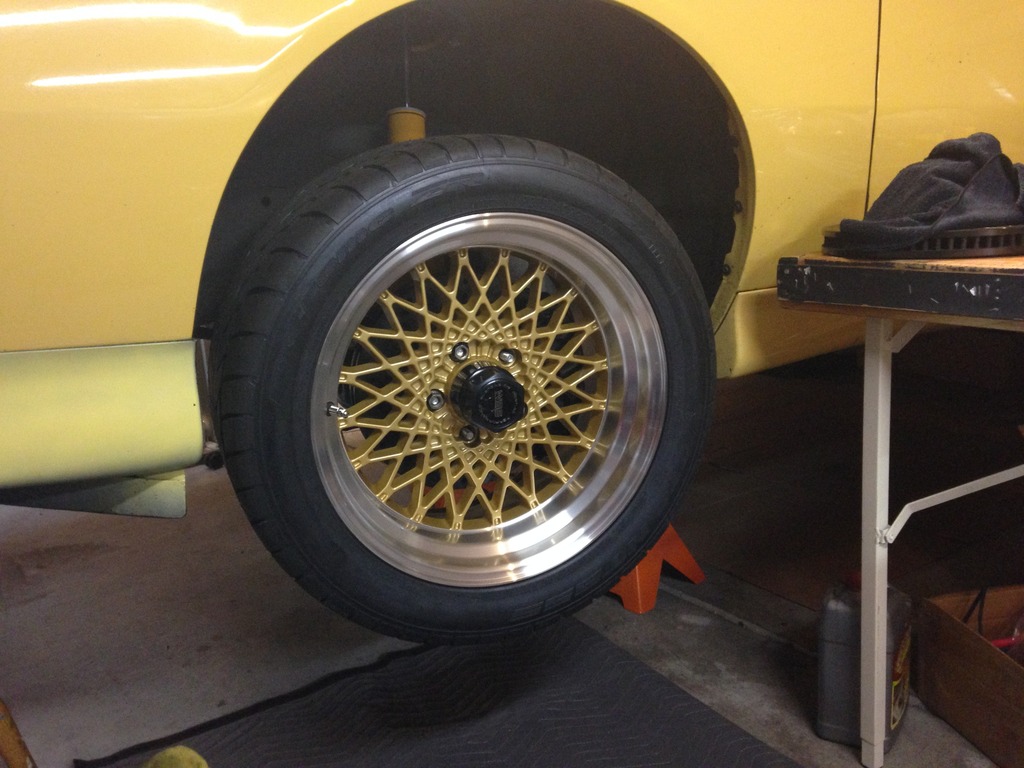
While I was outside I also snapped a picture of the rear wheels installed, but it's not a really good reflection of how the car will sit. With the front of the car on jack stands the rear suspension is unloaded so it's not an accurate picture of the stance the car will have when it's down on its wheels. Anyway, here's how the wheels look on the car. I think it looks great.

It's off to the garage right now for a little bit. Can't go very far without the spindles but I'll have them back tomorrow.
On Thursday I finished blasting all of my remaining parts and dropped them off at the powder coated on my way to pick up my engine mounts and panhard bar from the shop.

When I got home I pulled the old block mounts off and installed the UMI pieces. I also did a little cleaning. Well, one thing leads to another, and by the end of the night the k-member was in. I have to say it was really easy to do, and I didn't have any help. I started by loosely installing the mounts on the k-member. Then I lowered the engine a little bit and attached the k-member to the engine by the engine mounts. After I had the engine mount bolts in, I jacked the engine back up into place and installed the six k-member bolts. After all the bolts were in I torqued everything down and called it a night. It was a really uneventful install which is always nice. Here's how she's sitting right now.

While I was outside I also snapped a picture of the rear wheels installed, but it's not a really good reflection of how the car will sit. With the front of the car on jack stands the rear suspension is unloaded so it's not an accurate picture of the stance the car will have when it's down on its wheels. Anyway, here's how the wheels look on the car. I think it looks great.

It's off to the garage right now for a little bit. Can't go very far without the spindles but I'll have them back tomorrow.
 01-24-2016, 12:12 AM
#104

Re: My 1992 Trans Am
I did a search on TDS for the purpose of verifying that any links to my products still worked after the recent upgrade of my Web site. I've enjoyed following your build thread and am happy you decided to keep the car. I'd love to drop by later this year when I'moved in town for SEMA. Keep up the good work on your project. Lastly, thanks again for considering Top-Down Solutions products for your project.
Lon Salgren
Lon Salgren
 01-24-2016, 04:34 PM
#106
Junior Member
Thread Starter
Join Date: Nov 2008
Location: NV
Posts: 36
Likes: 0
Received 1 Like
on
1 Post
Car: 1992 Trans Am
Engine: 5.0 TPI
Transmission: T56
Axle/Gears: 3.73
Re: My 1992 Trans Am
Thanks Carlos!
Thank you. Do you live in NV or are you in the desert of AZ or CA? This car is being built to be driven so I'm always up for a little road trip. Let me know when you're car is done.
Thanks Lon. I'd highly recommend Top-Down Solution's products to anyone with a thirdgen, and customer service is second to none. I really appreciate the guys like to you who, in the grand scheme of all things car, cater to a pretty small market. Thanks for being such a thirdgen supporter! Any time I can get something from you, I do. Please look me up when you're out here for SEMA. We have lots of cool projects going on at the shop that any car guy would appreciate.
Thanks Dave! Definitely going to have the car all one color before it hits the road in May for Anti-Tour.
Thanks for all the positive responses guys. When no one comments, I feel like I'm posting for myself, but it's good to know that people do enjoy reading this thread as mush as I enjoy keeping it updated, and of course, working on my car.
This will be the update for last weekend and last night. I'm going to do about an hours worth of work today, and I'll get some pictures up later on tonight or some time this week.
I started off last weekend by finishing the strut mount install, installing the lower control arms, and hanging the shocks.

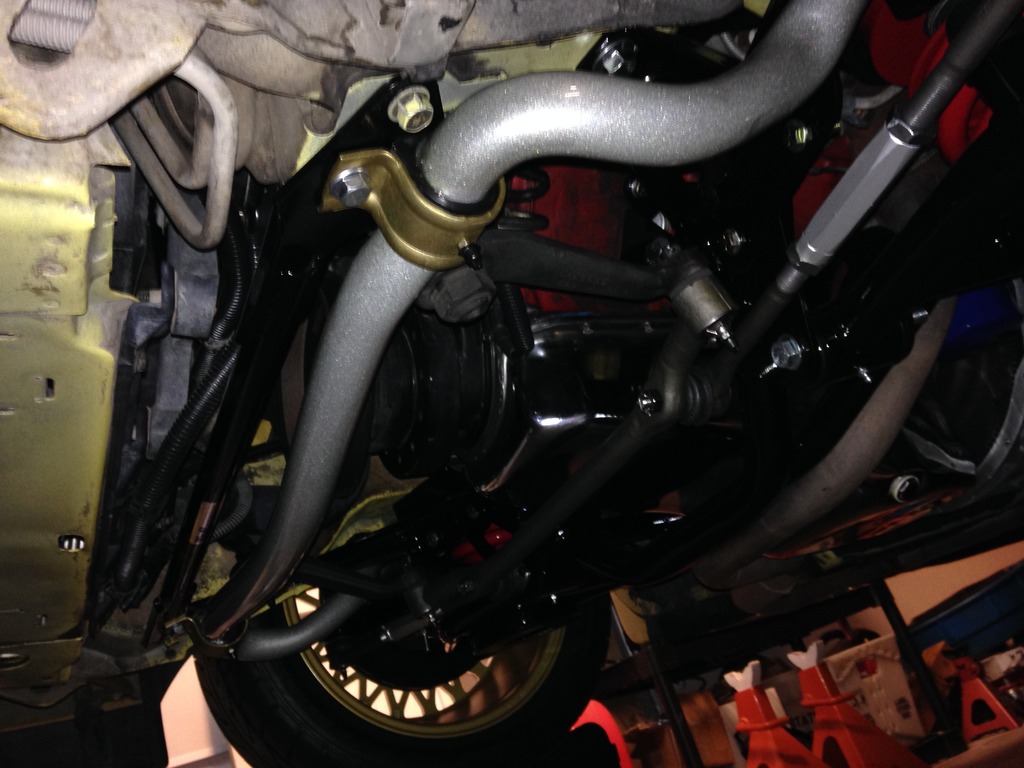
I also had some time to put in the new adjustable torque arm.
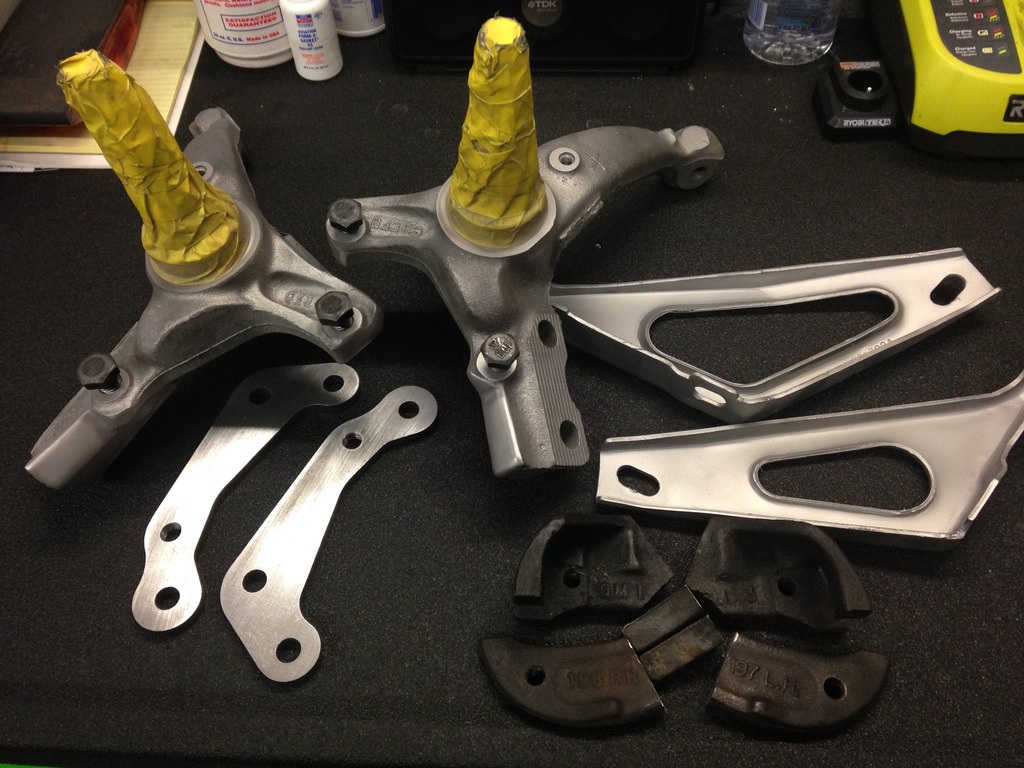
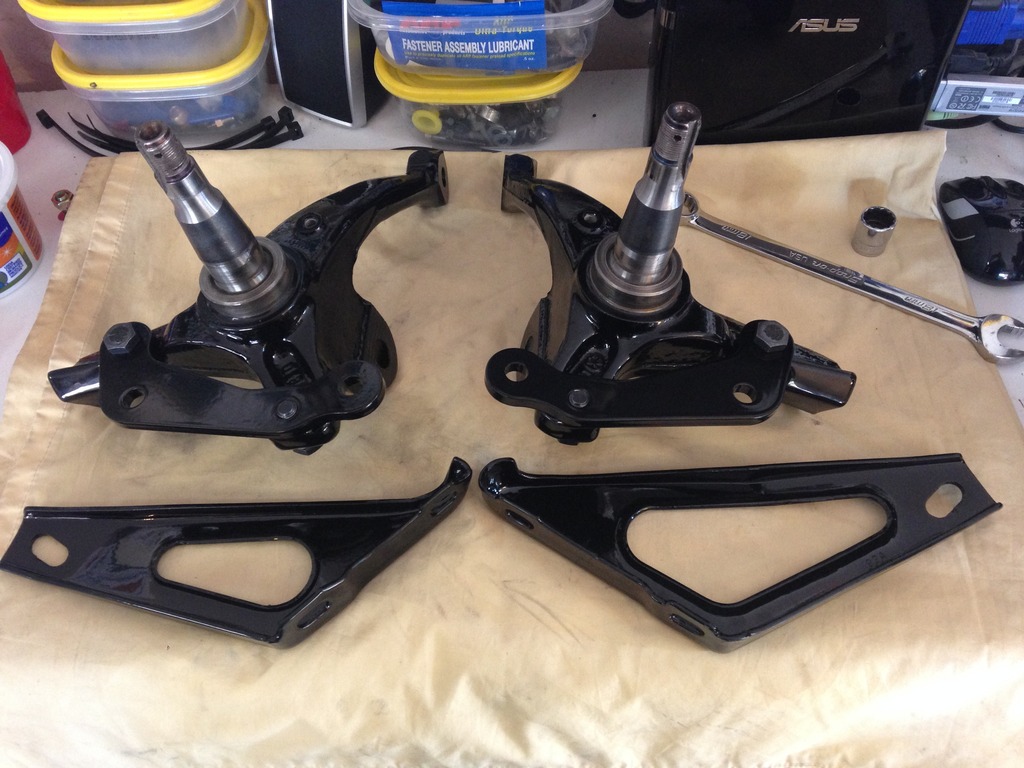
On Wednesday, I made it over to the powder coater to pick up my spindles, brake brackets, and the k-member supports. While they didn't do a great masking job like I asked them to, fortunately what they missed wasn't applied too heavy and I was able to scrape it off without marring any of the powder coat. It was mostly in the holes for the ball joint and the tie-rod ends. In this picture I've assembled the brackets and spindles.
Here you can see the newly coated brackets attached to the frame and the k-member. I think I did this Wednesday afternoon.

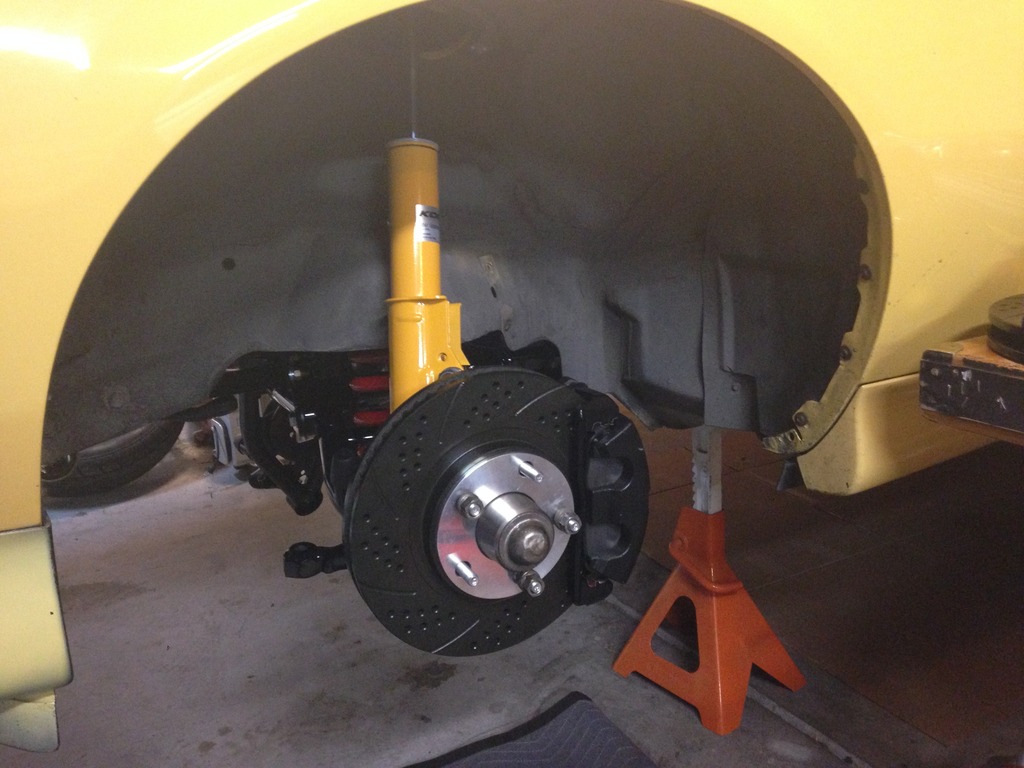
Last night, I spent about two hours assembling the front suspension. With the weight jacks adjusted down all the way, I could almost bolt it all together without even using a floor jack. After the suspension went on I could help but install the new hubs, then the brakes, and then I threw on a wheel for good measure and set up the steering stops. By tonight, I'm going to try and get the other side assembled and get the front of the car on the Race Ramps so I can set the pinion angle and start adjusting the springs. Right now I'm being brow beat by my children to go for a bike ride so we'll see how much I get done.

I did a search on TDS for the purpose of verifying that any links to my products still worked after the recent upgrade of my Web site. I've enjoyed following your build thread and am happy you decided to keep the car. I'd love to drop by later this year when I'moved in town for SEMA. Keep up the good work on your project. Lastly, thanks again for considering Top-Down Solutions products for your project.
Lon Salgren
Lon Salgren
Thanks Dave! Definitely going to have the car all one color before it hits the road in May for Anti-Tour.
Thanks for all the positive responses guys. When no one comments, I feel like I'm posting for myself, but it's good to know that people do enjoy reading this thread as mush as I enjoy keeping it updated, and of course, working on my car.
This will be the update for last weekend and last night. I'm going to do about an hours worth of work today, and I'll get some pictures up later on tonight or some time this week.
I started off last weekend by finishing the strut mount install, installing the lower control arms, and hanging the shocks.


I also had some time to put in the new adjustable torque arm.

On Wednesday, I made it over to the powder coater to pick up my spindles, brake brackets, and the k-member supports. While they didn't do a great masking job like I asked them to, fortunately what they missed wasn't applied too heavy and I was able to scrape it off without marring any of the powder coat. It was mostly in the holes for the ball joint and the tie-rod ends. In this picture I've assembled the brackets and spindles.

Here you can see the newly coated brackets attached to the frame and the k-member. I think I did this Wednesday afternoon.

Last night, I spent about two hours assembling the front suspension. With the weight jacks adjusted down all the way, I could almost bolt it all together without even using a floor jack. After the suspension went on I could help but install the new hubs, then the brakes, and then I threw on a wheel for good measure and set up the steering stops. By tonight, I'm going to try and get the other side assembled and get the front of the car on the Race Ramps so I can set the pinion angle and start adjusting the springs. Right now I'm being brow beat by my children to go for a bike ride so we'll see how much I get done.


 01-24-2016, 07:19 PM
#108
Supreme Member
iTrader: (11)
Join Date: Aug 2013
Location: MICHIGAN
Posts: 4,637
Received 751 Likes
on
577 Posts
Car: 1988 Trans Am
Engine: L03
Transmission: 700R4
Axle/Gears: 10 Bolt 2.73 Open
Re: My 1992 Trans Am
Ain't that the truth! My boy just turned 19, and is off to my Alma-mater next fall. It's going to be very strange seeming him go, him not being here every day as he has been for the last couple of decades.
Last edited by DynoDave43; 01-24-2016 at 07:57 PM.
01-24-2016, 07:54 PM
#109
Supreme Member
iTrader: (8)
Join Date: Oct 2001
Location: Il
Posts: 11,698
Received 748 Likes
on
507 Posts
Car: 1989-92 FORMULA350 305 92 Hawkclone
Engine: 4++,350 & 305 CIs
Transmission: 700R4 4800 vig 18th700R4 t56 ZF6 T5
Axle/Gears: 3.70 9"ford alum chunk,dana44,9bolt
Re: My 1992 Trans Am
She's coming together now, nice work!
01-24-2016, 09:57 PM
#110
Junior Member
Thread Starter
Join Date: Nov 2008
Location: NV
Posts: 36
Likes: 0
Received 1 Like
on
1 Post
Car: 1992 Trans Am
Engine: 5.0 TPI
Transmission: T56
Axle/Gears: 3.73
Re: My 1992 Trans Am
Thanks man. I'm on the home stretch now.
Ok so bike ride, check. Mario Kart, check. Finish the front suspension, check. Really went together quickly after having all the tools ready to go from yesterday. It's a little low right now. I need to grab a 1/2" extension to raise it up. Really excited to have all this adjustability in the suspension.
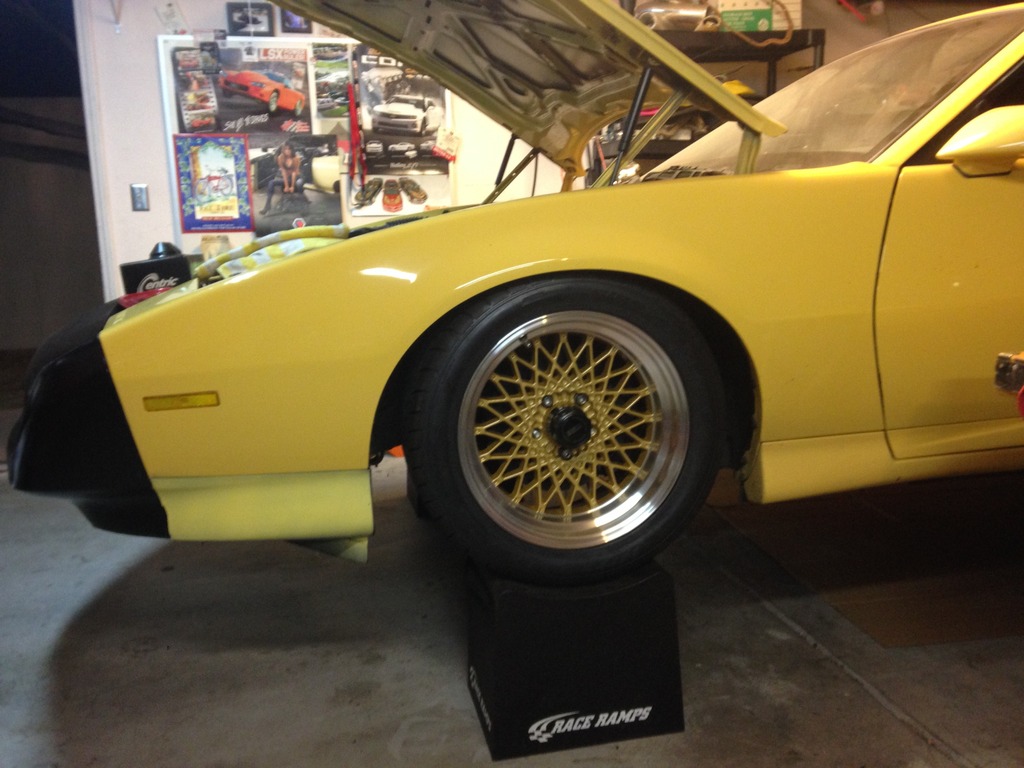
Ok so bike ride, check. Mario Kart, check. Finish the front suspension, check. Really went together quickly after having all the tools ready to go from yesterday. It's a little low right now. I need to grab a 1/2" extension to raise it up. Really excited to have all this adjustability in the suspension.


 02-05-2016, 10:24 PM
#113
Junior Member
Thread Starter
Join Date: Nov 2008
Location: NV
Posts: 36
Likes: 0
Received 1 Like
on
1 Post
Car: 1992 Trans Am
Engine: 5.0 TPI
Transmission: T56
Axle/Gears: 3.73
Re: My 1992 Trans Am
DO IT! They're awesome!
Oh man Greg's Regal and Rod's Chevelle were a couple of my favorite cars growing up. That picture at D&D really brings back some memories. I worked there before I was even old enough to get my learner's permit. I remember coming in to work that first day you started and thinking to myself, "Damn, that's a mountain of a man! I better stay out of this guy's way." I'm glad you and Ralph took me under your wings. That picture has to be about 20 years old. If that's a recent picture of your Camaro, it doesn't look a day older than the last time I saw it. Always loved that car too. While your digging up old pictures, see if you can find the one of me sitting on Ralph's trailer in the Hamptons. The T-Bucket is still in black primer in it. I'm like 15 or 16 in it. Thanks for the memories Rick!
Oh man Greg's Regal and Rod's Chevelle were a couple of my favorite cars growing up. That picture at D&D really brings back some memories. I worked there before I was even old enough to get my learner's permit. I remember coming in to work that first day you started and thinking to myself, "Damn, that's a mountain of a man! I better stay out of this guy's way." I'm glad you and Ralph took me under your wings. That picture has to be about 20 years old. If that's a recent picture of your Camaro, it doesn't look a day older than the last time I saw it. Always loved that car too. While your digging up old pictures, see if you can find the one of me sitting on Ralph's trailer in the Hamptons. The T-Bucket is still in black primer in it. I'm like 15 or 16 in it. Thanks for the memories Rick!
02-05-2016, 11:46 PM
#114
Junior Member
Join Date: Jan 2005
Location: long island n.y.
Posts: 67
Likes: 0
Received 0 Likes
on
0 Posts
Car: chevrolet
Engine: lots of em
Re: My 1992 Trans Am
I remember the look in your eyes when something hot would pull in the shop, you always had the feel for steel. Gotta try to get those other pics from Ralph he's probably still got them in the top draw of his tool box down there in Florida. Im still trying to get the video tapes from west hampton burned to dvd from him.
That pic from D&D was about 25 years ago, the shot of my 73 is about a year or two old, and the sig of my 92 convertable is about 2-3 years old.
Just got my vacation picks in and scored two weeks off in the end of July, but I want to come out there to the strip for one of the big shows. Let me know when something good is happening out there on the surface of the sun. Later
02-15-2016, 10:52 PM
#115
Junior Member
Thread Starter
Join Date: Nov 2008
Location: NV
Posts: 36
Likes: 0
Received 1 Like
on
1 Post
Car: 1992 Trans Am
Engine: 5.0 TPI
Transmission: T56
Axle/Gears: 3.73
Re: My 1992 Trans Am
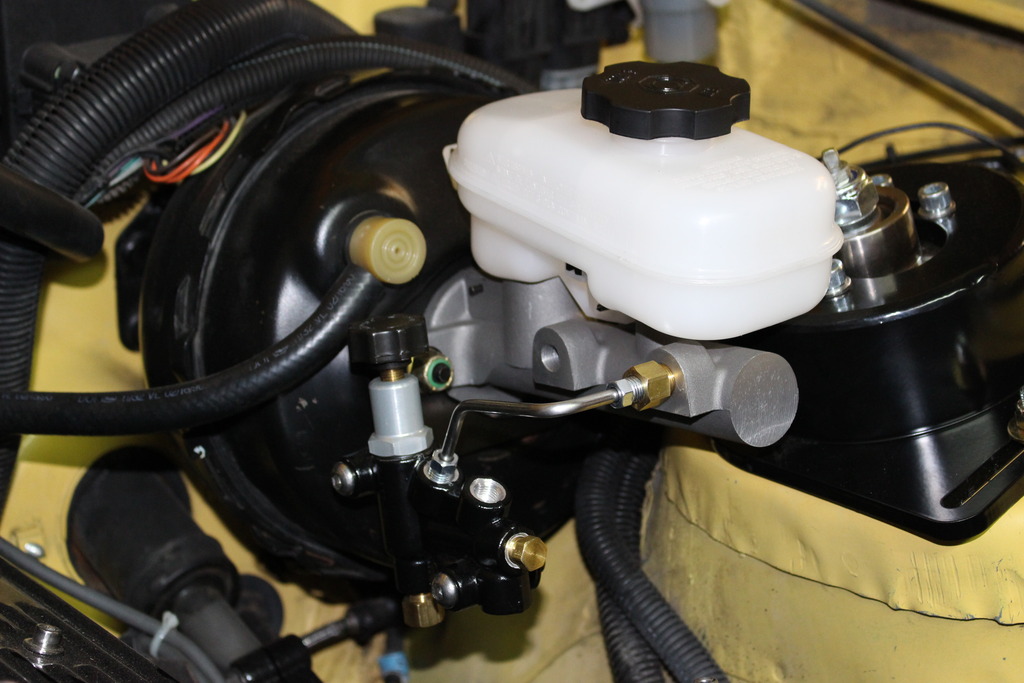
As of yesterday afternoon, the parts table is officially cleared off and there's nothing left to install. Today, I received a bracket from Wilwood to mount my proportioning valve assembly on the master cylinder. Really, all I have to do now to get her on the road is make some new brake lines, bleed the brakes, and take the car for an alignment. The weather here has been so nice that I really want to be driving the car. I'd especially like to get some miles on it before Car Craft's Anti-Tour in the beginning of May. It's my dad's birthday that weekend so we're going to do Anti-Tour and the Cruisin' Morro Bay Car Show. I'm really excited to be going. It should be a really nice weekend. Anyway, on to the pictures.
Here's the only suspension picture I have right now. I'll try and get some better shots when I have more light.
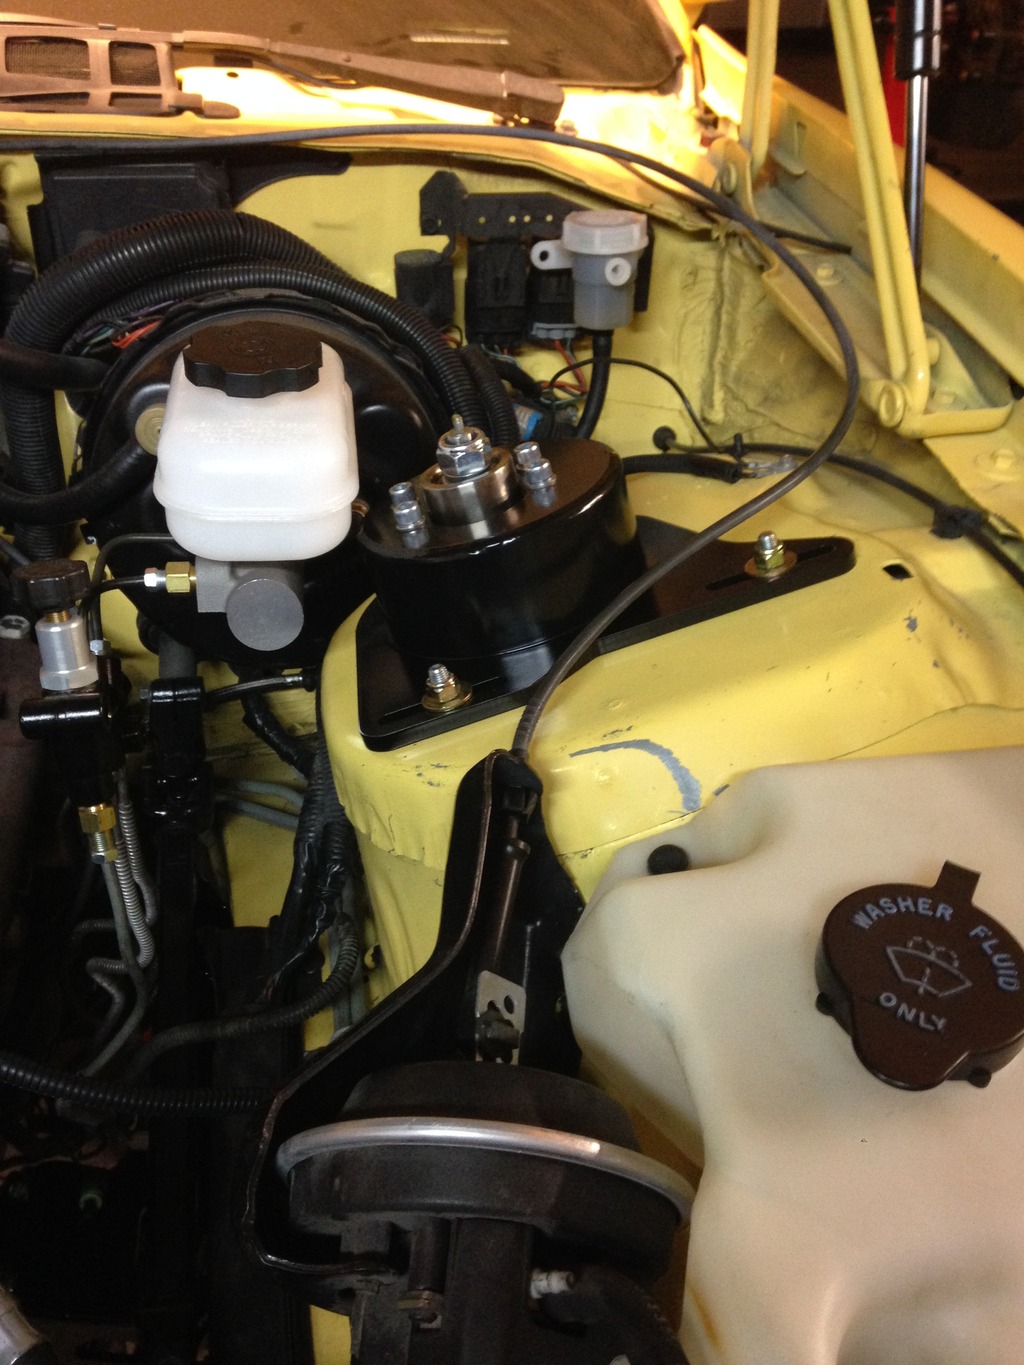
Here's the proportioning valve mount from Wilwood.

Here's the way it looks in the car. (Notice how good this picture is. It was take with my wife's new camera which I'll be stealing to document my builds!)
My wife has been asking for a good DSLR camera for a while now. The guilting usually sounded something like, "Don't you want to have nice pictures of your children?" So, in the spirit of trying to keep things equal between us, about two weeks ago I got her the complete setup with a couple of lenses, a carrying case, memory cards, and all the other accouterments necessary for her to look like a professional soccer mom, I mean photographer. Honestly, I don't know if it's her or the camera, but the pictures she's been taking are really good so I feel like it's money well spent. The bonus is that I'll also get to use the camera too. By now, you may be asking yourself, what did I get that made me feel like I'd better go out and buy my wife a new camera? Let me introduce to you project "Piece of Crap" as my neighbor called it.
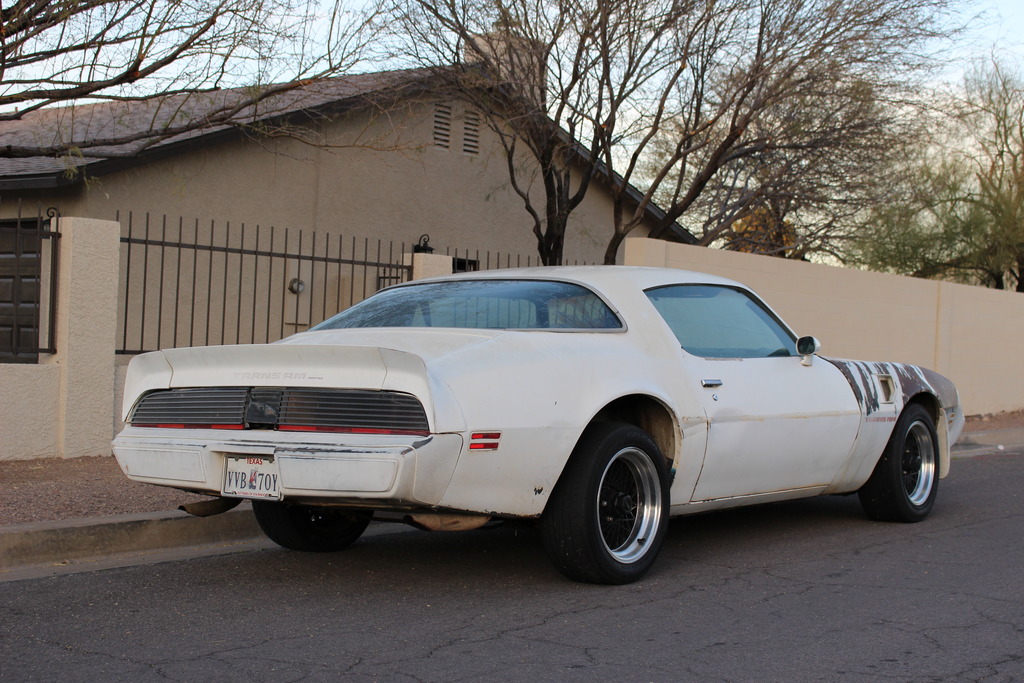
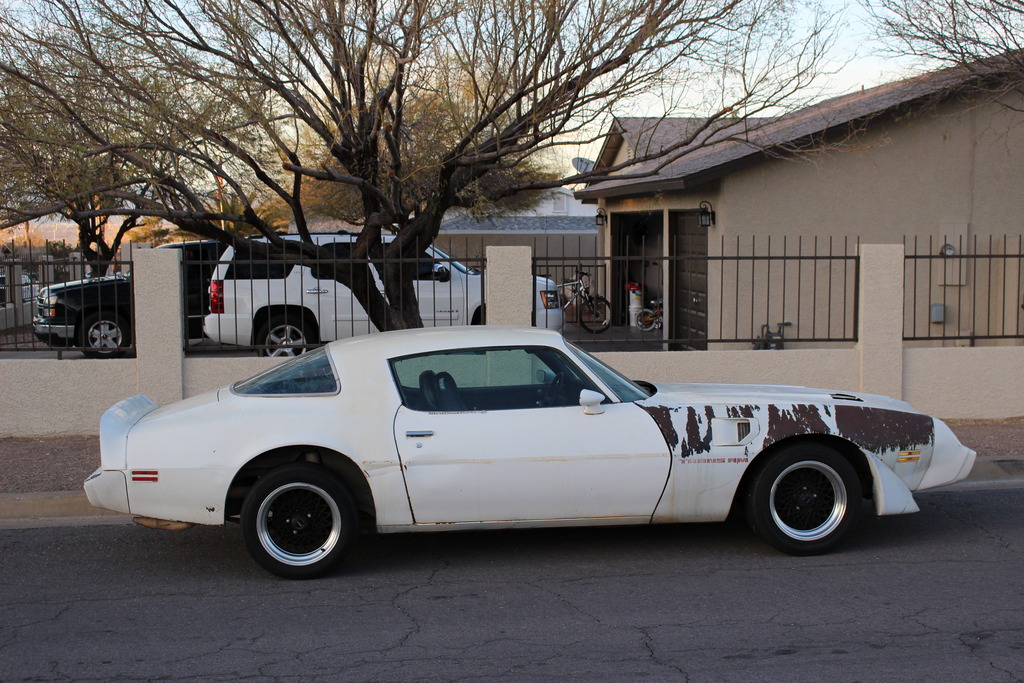

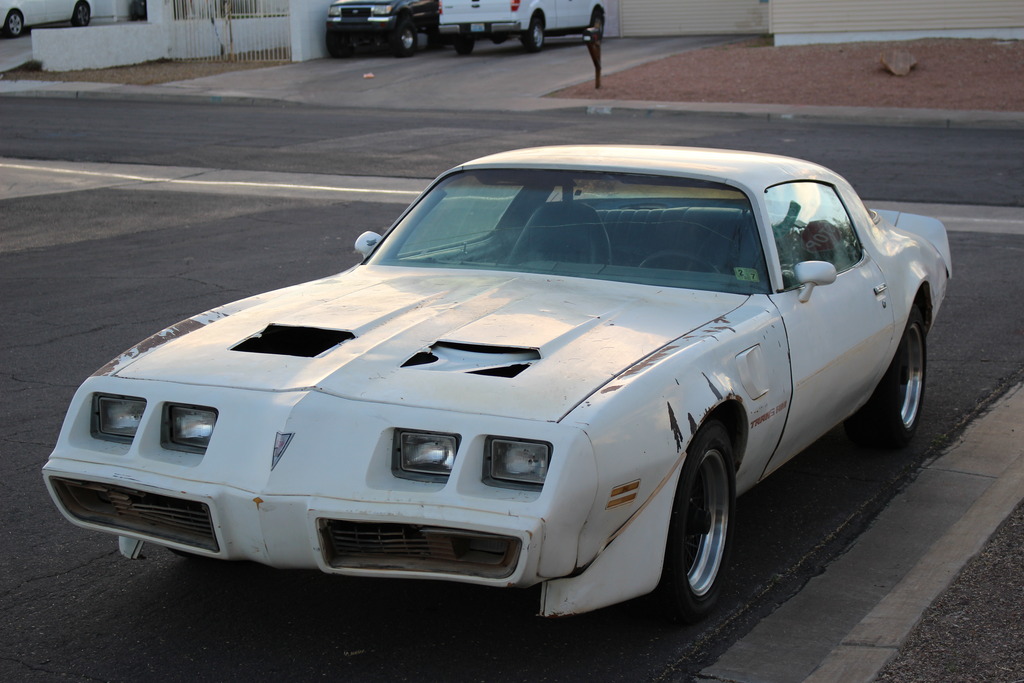
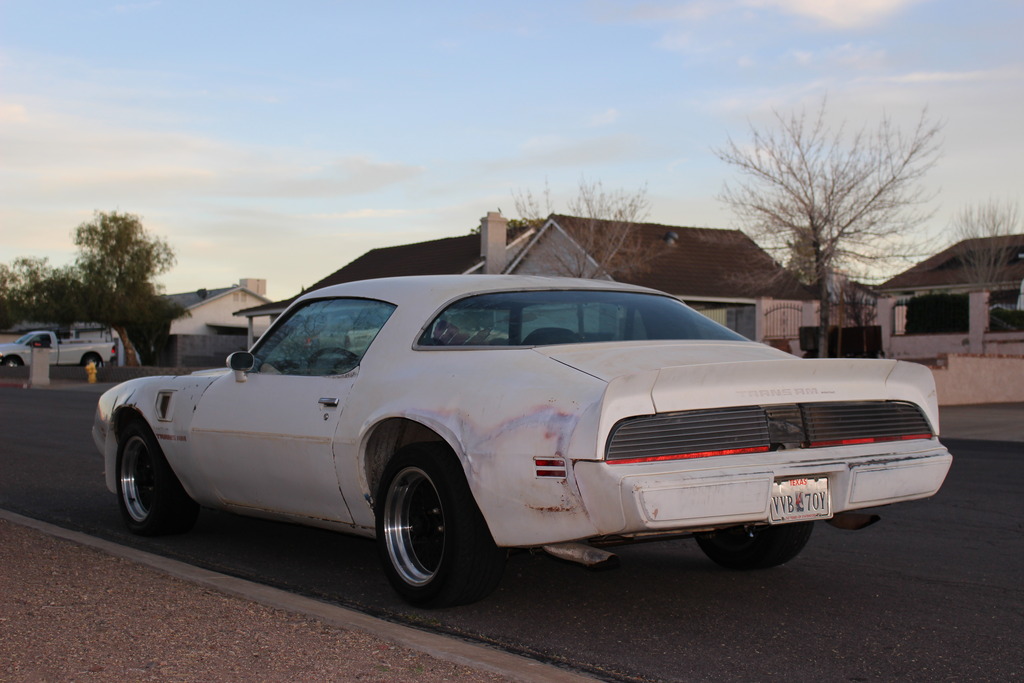
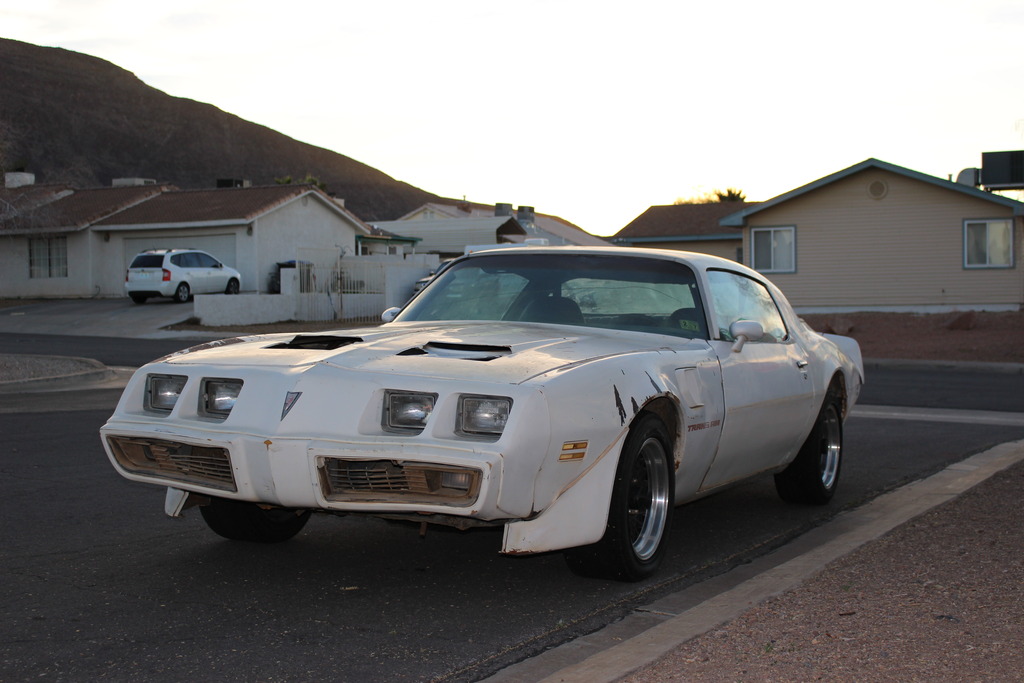
The car is a 1980 Firebird Formula that's wearing Trans Am fenders and front spoilers. It's a Texas car and while there's a dent or ding on every panel, it's a solid, running, rot free car with complete interior. For now the plan is to cover it up and park it until both of my other cars are done. I have big Pro-Touring dreams for it one day.
Here's the only suspension picture I have right now. I'll try and get some better shots when I have more light.

Here's the proportioning valve mount from Wilwood.

Here's the way it looks in the car. (Notice how good this picture is. It was take with my wife's new camera which I'll be stealing to document my builds!)

My wife has been asking for a good DSLR camera for a while now. The guilting usually sounded something like, "Don't you want to have nice pictures of your children?" So, in the spirit of trying to keep things equal between us, about two weeks ago I got her the complete setup with a couple of lenses, a carrying case, memory cards, and all the other accouterments necessary for her to look like a professional soccer mom, I mean photographer. Honestly, I don't know if it's her or the camera, but the pictures she's been taking are really good so I feel like it's money well spent. The bonus is that I'll also get to use the camera too. By now, you may be asking yourself, what did I get that made me feel like I'd better go out and buy my wife a new camera? Let me introduce to you project "Piece of Crap" as my neighbor called it.


The car is a 1980 Firebird Formula that's wearing Trans Am fenders and front spoilers. It's a Texas car and while there's a dent or ding on every panel, it's a solid, running, rot free car with complete interior. For now the plan is to cover it up and park it until both of my other cars are done. I have big Pro-Touring dreams for it one day.
02-16-2016, 12:47 AM
#117
Junior Member
Thread Starter
Join Date: Nov 2008
Location: NV
Posts: 36
Likes: 0
Received 1 Like
on
1 Post
Car: 1992 Trans Am
Engine: 5.0 TPI
Transmission: T56
Axle/Gears: 3.73
Re: My 1992 Trans Am
I ordered some grease fitting covers from you tonight to finish up my front end. Those things are great!
02-17-2016, 05:42 PM
#120
Supreme Member
iTrader: (11)
Join Date: Aug 2013
Location: MICHIGAN
Posts: 4,637
Received 751 Likes
on
577 Posts
Car: 1988 Trans Am
Engine: L03
Transmission: 700R4
Axle/Gears: 10 Bolt 2.73 Open
Re: My 1992 Trans Am
Looking good Doobie! Take some pics on that Car Craft cruise...I'm not familiar with that one.
02-18-2016, 12:55 AM
#121
Junior Member
Thread Starter
Join Date: Nov 2008
Location: NV
Posts: 36
Likes: 0
Received 1 Like
on
1 Post
Car: 1992 Trans Am
Engine: 5.0 TPI
Transmission: T56
Axle/Gears: 3.73
Re: My 1992 Trans Am
Anti-Tour is Car Craft's shorter version of the Hot Rod Power Tour. They haven't released much information yet for this year, but last year the info didn't come out until April and the tour was in May. I'll be driving from Las Vegas to Los Angeles on Thursday night the 5th and spending the night. The tour kicks off at the Wilwood Brake Factory on Friday morning in Camarillo. After a tour of the factory, it's a cruise up to San Luis Obispo for the Cruisin' Morro Bay Car Show. The dates for the show are May 5-8. I've already booked my hotel in Morro Bay for May 6th and 7th. I found this link with information about the tour last year.
http://www.hotrod.com/events/1509-anti-tour-2015/
That nice new camera will be coming with me to take lots of pictures. You can count on that!
If anyone is interested in meeting up for the tour, let me know. Looks like you're only about an hour from Camarillo Lon!

 04-20-2016, 11:06 AM
#123
Junior Member
Thread Starter
Join Date: Nov 2008
Location: NV
Posts: 36
Likes: 0
Received 1 Like
on
1 Post
Car: 1992 Trans Am
Engine: 5.0 TPI
Transmission: T56
Axle/Gears: 3.73
Re: My 1992 Trans Am
Although I’ve been absent from posting, the work hasn’t stopped on the car in the last 2 months. My last post was from the alignment shop and since that day, I’ve been driving the car as much as I can. About 2 weeks after the alignment, when I felt like the car had settled the new suspension, I adjusted the ride height of the car to a reasonable level for street driving. Ground clearance is really good with the exception of the BMR T56 transmission crossmember which sits super close to the ground. It doesn’t like speed bumps, or large rocks that randomly appear in the middle of the road (that’s a whole other story).
Shortly after the alignment, I had a new windshield put in the car. At this time I also replaced the cowl screen with a basically brand new one, and I hooked up the windshield washers. I figured they would be nice to have on a long road trip through the desert.
I had spring break during the third week in March and I got a lot done during my time off. I bought a power bulge hood for the car years ago, and it has been sitting at the shop. The paint was all flaking off so I took it down to metal, and my guys in the body shop used a little glaze on it to get it nice and straight, and then primed it for me. During this week, the new reproduction front ground effects showed up from Hawk’s. I also scored a set of almost new GM side marker lights for the front of the car. Yesterday my 1AAuto order showed up that had a new hood pad and cowl seal. This week or next, the car will finally be all one color!
During my spring break I also changed out the stereo in the car. When I tore into it, the front speakers were original and completely wiped out, and the rears were mismatched and barely clinging to life as well. Best Buy was having a sale, and I had some rewards points, so I ended up getting some Pioneer speakers for the front and rear, and a Kenwood digital media receiver for about $160. The digital media receiver has no CD player so it’s about half the weight and depth of a standard single din radio. It connects to my phone through Bluetooth so I can stream music from iTunes, Sirius, and Pandora. There’s also an AM/FM receiver so I have the radio as well. I’m no audiophile, so this setup is great. I can cruise down the highway with the windows down and my music sounds clear, even over the wind noise.
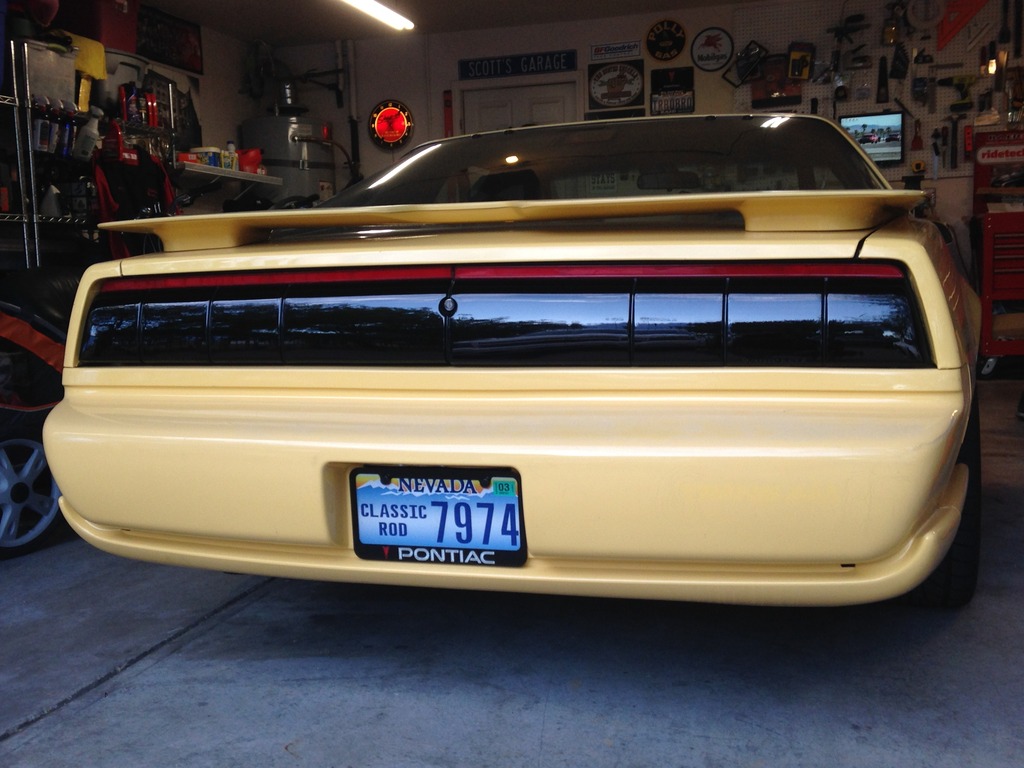
About three weeks ago I got the bug to clean up my tail lights. While they came out good, I thought they’d look better a little darker so I enlisted the guys in the body shop for some help. I ended up taking the lights off the car, cleaning them really well, masking the red reflector that runs along the top of the light, and knocking the lenses down a little bit with some 1,200 wet. I went over that with a gray scuff pad, cleaned the lights again, and did a final masking. The guys in the body shop mixed up some clear tinted with black and laid down three coats on the lights. We let them dry for a week, knocked them down again with some 3,000 wet, and then polished them. The lights look awesome! They’re easily visible and all the imperfections in the lenses are covered up now. I also took this time to clean the tail light harness, and the area where the tail lights bolt to. I also changed all the bulbs.
While the car wasn’t driveable because I had the tail lights out, I sent the PROM out to Scott Hansen of Tuned Port Induction Programming Services. With everything I’ve done to the car, I wanted the most power out of it I could get. I called him on a Friday afternoon, and we went over everything I wanted done. Thirty minutes after our phone conversation I had the PROM pulled from my computer, boxed up, and I was in line at the post office to send it to him. It got to him on Monday, and I had it back on Wednesday. I’d highly recommend him for any tuning needs you may have. That Friday I reinstalled to the PROM back in my car, set the fuel pressure on the adjustable regulator I had also installed while doing the tail lights, and took the car for a nice cruise. It’s about 90 miles round trip from my home in Henderson out to Searchlight and the car felt great doing it. The only problem I had was rolling back into town I looked at my gauges and saw I only had 15psi of oil pressure when moving. They car wasn’t acting funny and it wasn’t making any noise so I got it back into the garage to investigate. I really didn’t suspect anything was wrong but I put my oil pressure gauge on the car just to be safe. As I was doing this, I saw that oil was leaking through the body of the sensor. Anyway, the car had great oil pressure on my gauge, and it was just a bad sensor.
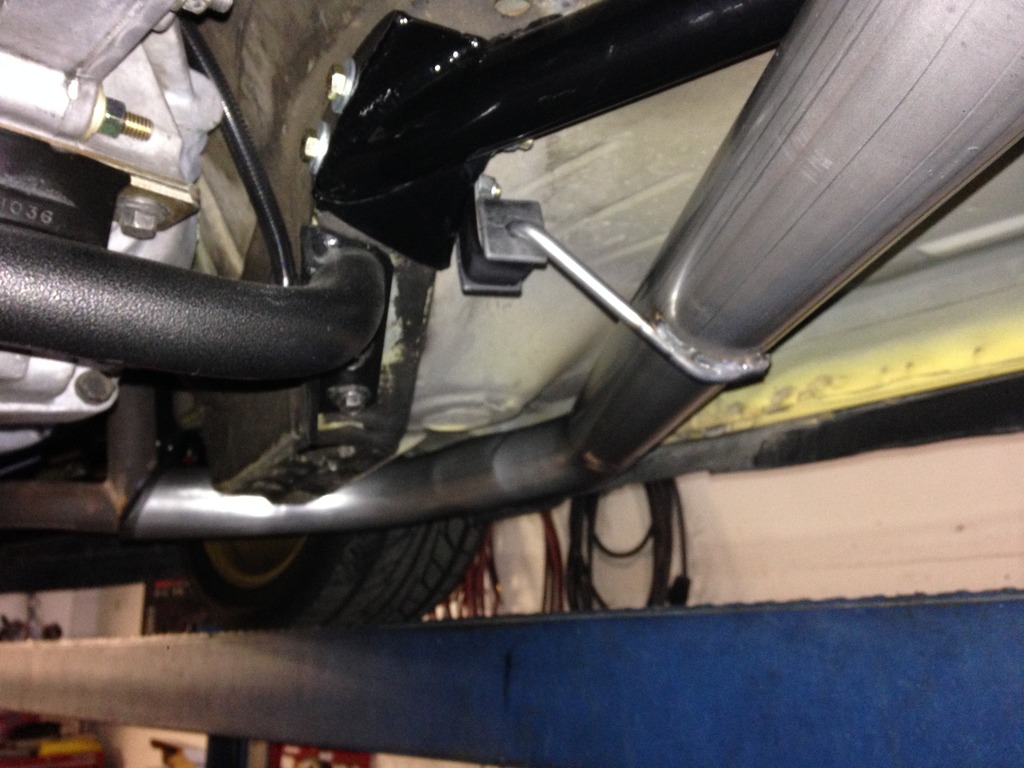
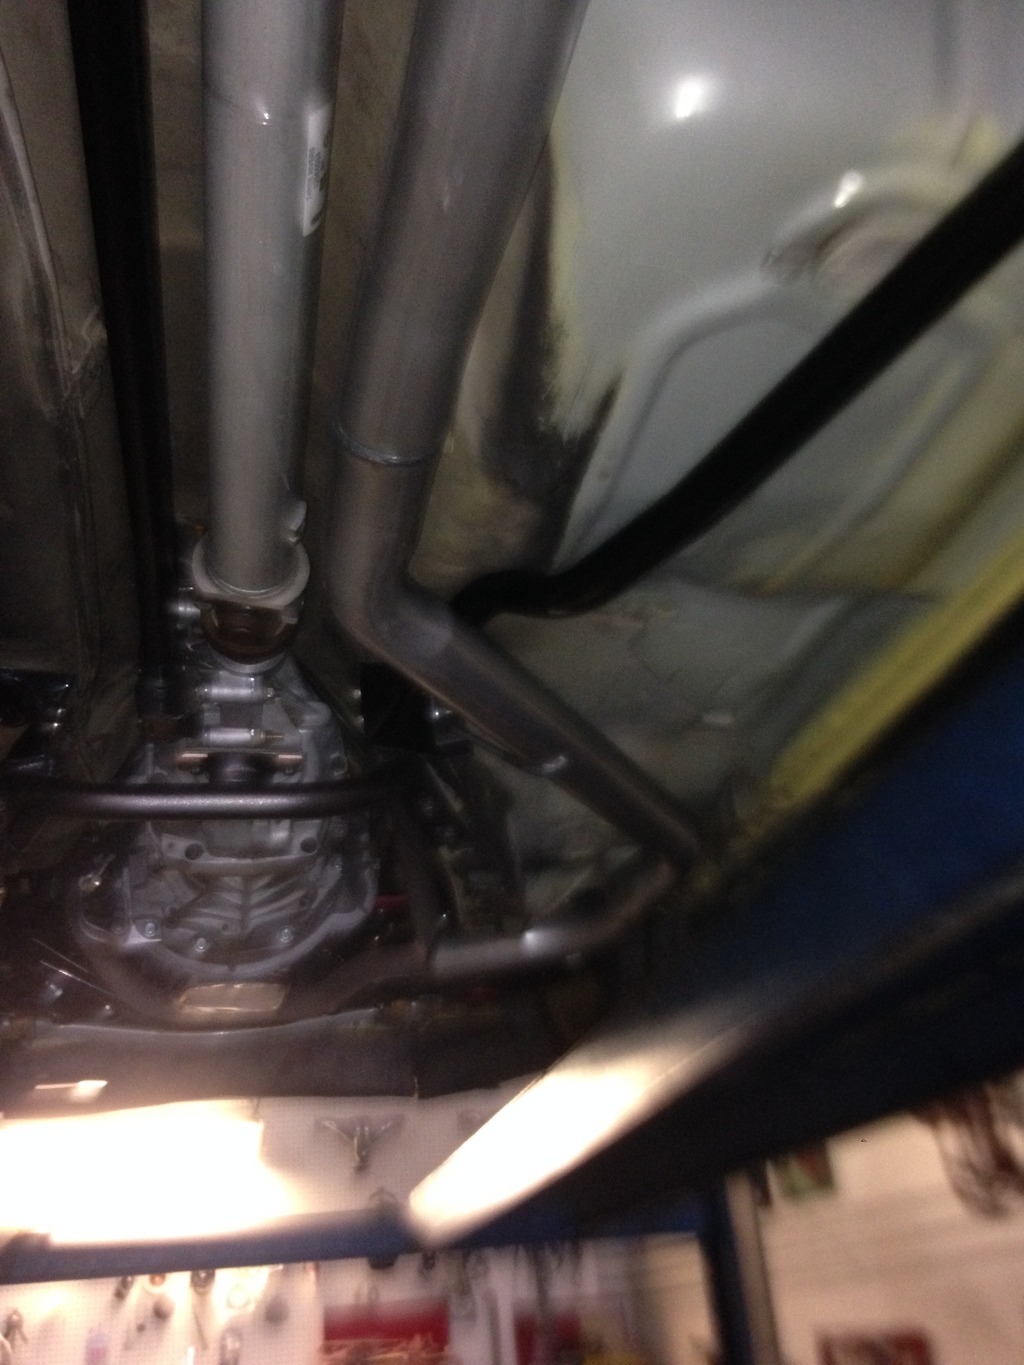
On Monday, I dropped the car off at the exhaust shop, and I picked it up yesterday. The exhaust guy fabbed me up a 3” exhaust going from the merge of my y-pipe all the way to the back of the car to a Magnaflow muffler with a single hidden tail pipe. Between the tune and the exhaust, the car really picked up a substantial amount of power.
I know I did a lot more to the car that I’m forgetting about, but it has been a busy two months and the car has gotten a ton of love. Details about Anti-Tour came out at the end of March. I’m all registered and can’t wait to hit the road. I’ll update this post with some pictures over the next day or so.
Shortly after the alignment, I had a new windshield put in the car. At this time I also replaced the cowl screen with a basically brand new one, and I hooked up the windshield washers. I figured they would be nice to have on a long road trip through the desert.
I had spring break during the third week in March and I got a lot done during my time off. I bought a power bulge hood for the car years ago, and it has been sitting at the shop. The paint was all flaking off so I took it down to metal, and my guys in the body shop used a little glaze on it to get it nice and straight, and then primed it for me. During this week, the new reproduction front ground effects showed up from Hawk’s. I also scored a set of almost new GM side marker lights for the front of the car. Yesterday my 1AAuto order showed up that had a new hood pad and cowl seal. This week or next, the car will finally be all one color!
During my spring break I also changed out the stereo in the car. When I tore into it, the front speakers were original and completely wiped out, and the rears were mismatched and barely clinging to life as well. Best Buy was having a sale, and I had some rewards points, so I ended up getting some Pioneer speakers for the front and rear, and a Kenwood digital media receiver for about $160. The digital media receiver has no CD player so it’s about half the weight and depth of a standard single din radio. It connects to my phone through Bluetooth so I can stream music from iTunes, Sirius, and Pandora. There’s also an AM/FM receiver so I have the radio as well. I’m no audiophile, so this setup is great. I can cruise down the highway with the windows down and my music sounds clear, even over the wind noise.
About three weeks ago I got the bug to clean up my tail lights. While they came out good, I thought they’d look better a little darker so I enlisted the guys in the body shop for some help. I ended up taking the lights off the car, cleaning them really well, masking the red reflector that runs along the top of the light, and knocking the lenses down a little bit with some 1,200 wet. I went over that with a gray scuff pad, cleaned the lights again, and did a final masking. The guys in the body shop mixed up some clear tinted with black and laid down three coats on the lights. We let them dry for a week, knocked them down again with some 3,000 wet, and then polished them. The lights look awesome! They’re easily visible and all the imperfections in the lenses are covered up now. I also took this time to clean the tail light harness, and the area where the tail lights bolt to. I also changed all the bulbs.
While the car wasn’t driveable because I had the tail lights out, I sent the PROM out to Scott Hansen of Tuned Port Induction Programming Services. With everything I’ve done to the car, I wanted the most power out of it I could get. I called him on a Friday afternoon, and we went over everything I wanted done. Thirty minutes after our phone conversation I had the PROM pulled from my computer, boxed up, and I was in line at the post office to send it to him. It got to him on Monday, and I had it back on Wednesday. I’d highly recommend him for any tuning needs you may have. That Friday I reinstalled to the PROM back in my car, set the fuel pressure on the adjustable regulator I had also installed while doing the tail lights, and took the car for a nice cruise. It’s about 90 miles round trip from my home in Henderson out to Searchlight and the car felt great doing it. The only problem I had was rolling back into town I looked at my gauges and saw I only had 15psi of oil pressure when moving. They car wasn’t acting funny and it wasn’t making any noise so I got it back into the garage to investigate. I really didn’t suspect anything was wrong but I put my oil pressure gauge on the car just to be safe. As I was doing this, I saw that oil was leaking through the body of the sensor. Anyway, the car had great oil pressure on my gauge, and it was just a bad sensor.
On Monday, I dropped the car off at the exhaust shop, and I picked it up yesterday. The exhaust guy fabbed me up a 3” exhaust going from the merge of my y-pipe all the way to the back of the car to a Magnaflow muffler with a single hidden tail pipe. Between the tune and the exhaust, the car really picked up a substantial amount of power.


I know I did a lot more to the car that I’m forgetting about, but it has been a busy two months and the car has gotten a ton of love. Details about Anti-Tour came out at the end of March. I’m all registered and can’t wait to hit the road. I’ll update this post with some pictures over the next day or so.
Last edited by Doobie52; 04-21-2016 at 08:15 PM.
04-23-2016, 09:32 AM
#124
Re: My 1992 Trans Am
About three weeks ago I got the bug to clean up my tail lights. While they came out good, I thought they’d look better a little darker so I enlisted the guys in the body shop for some help. I ended up taking the lights off the car, cleaning them really well, masking the red reflector that runs along the top of the light, and knocking the lenses down a little bit with some 1,200 wet. I went over that with a gray scuff pad, cleaned the lights again, and did a final masking. The guys in the body shop mixed up some clear tinted with black and laid down three coats on the lights. We let them dry for a week, knocked them down again with some 3,000 wet, and then polished them. The lights look awesome! They’re easily visible and all the imperfections in the lenses are covered up now. I also took this time to clean the tail light harness, and the area where the tail lights bolt to. I also changed all the bulbs.
04-23-2016, 12:54 PM
#125
Junior Member
Thread Starter
Join Date: Nov 2008
Location: NV
Posts: 36
Likes: 0
Received 1 Like
on
1 Post
Car: 1992 Trans Am
Engine: 5.0 TPI
Transmission: T56
Axle/Gears: 3.73
Re: My 1992 Trans Am
I didn't let them dry for the week, the body guys did. Maybe it has something to do with the clear being applied to plastic without any paint being laid down first. I really don't know. Unless I need some sand paper, or they need an extra set of hands, I don't really spend much time over there.
04-24-2016, 09:35 PM
#127
Junior Member
Thread Starter
Join Date: Nov 2008
Location: NV
Posts: 36
Likes: 0
Received 1 Like
on
1 Post
Car: 1992 Trans Am
Engine: 5.0 TPI
Transmission: T56
Axle/Gears: 3.73
Re: My 1992 Trans Am
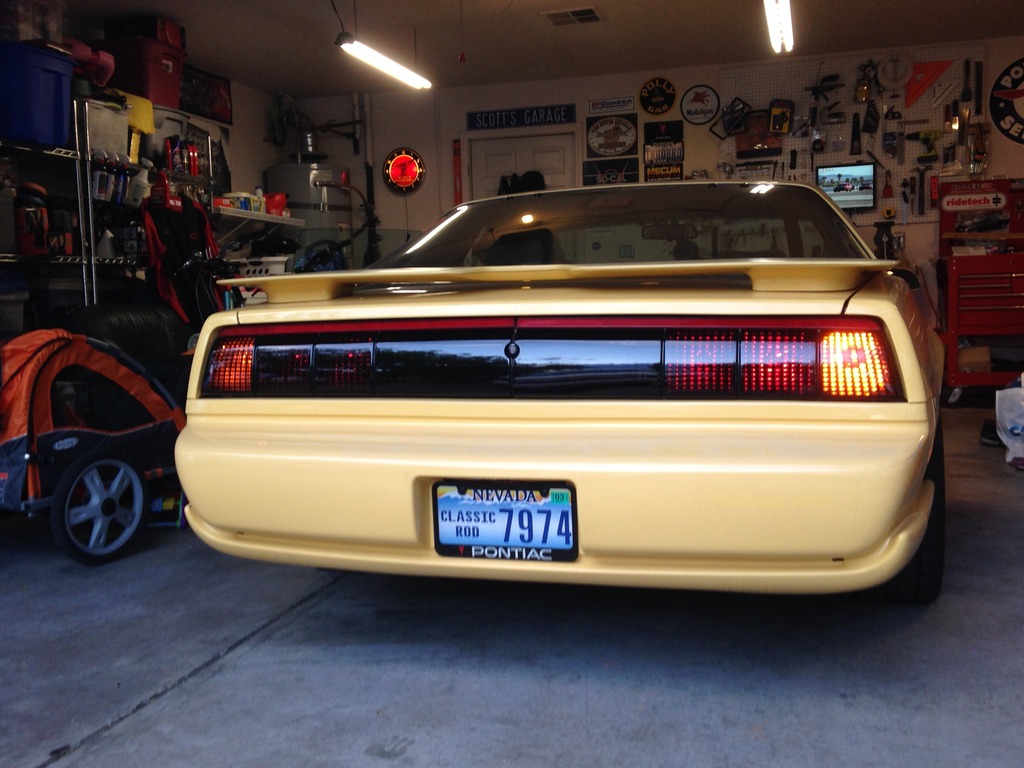
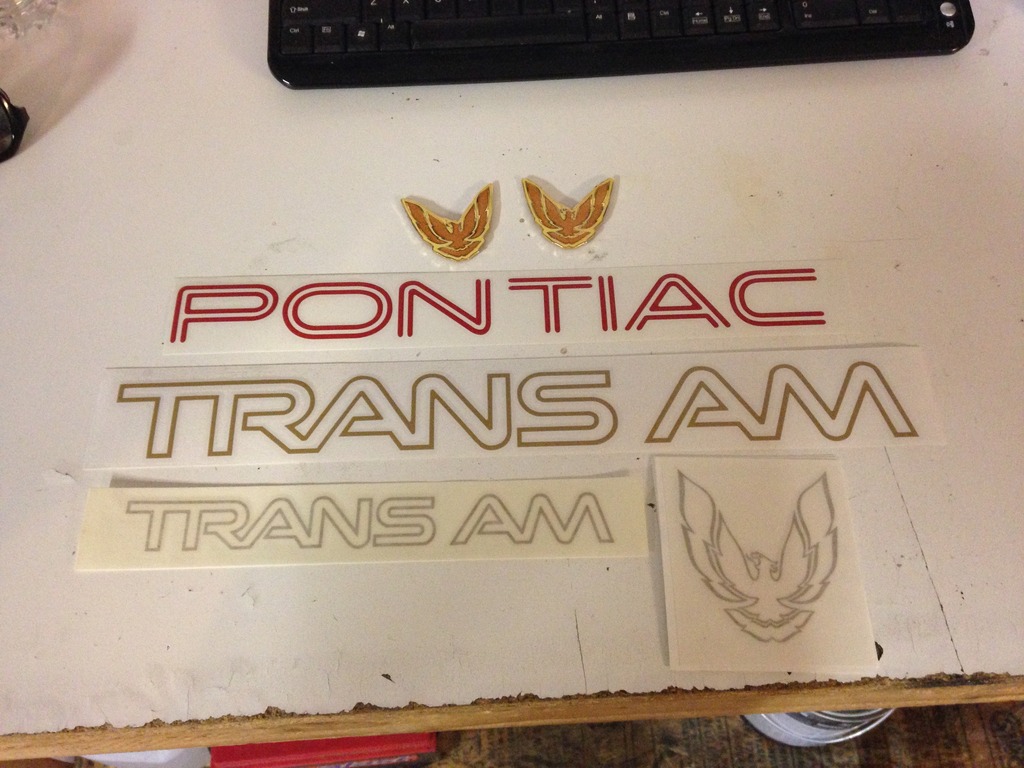
Here you go. I took the second picture with the flashers and parking lights on. The first picture makes the lights look extremely dark. Last picture shows the new graphics from Phoenix Graphix including the PONTIAC script for the tail lights. I'm substituting the GTA sail panel birds for the originals.


 04-24-2016, 11:10 PM
#128

Re: My 1992 Trans Am
I also had my t/a tails tinted. Looks great! Look forward to seeing the progress. You have done qhotel a bit so far. Also, let's see some videos or pictures when you do race it.
Last edited by CharcoalBird; 04-25-2016 at 10:23 AM.

 04-26-2016, 12:11 AM
#132
Junior Member
Thread Starter
Join Date: Nov 2008
Location: NV
Posts: 36
Likes: 0
Received 1 Like
on
1 Post
Car: 1992 Trans Am
Engine: 5.0 TPI
Transmission: T56
Axle/Gears: 3.73
Re: My 1992 Trans Am


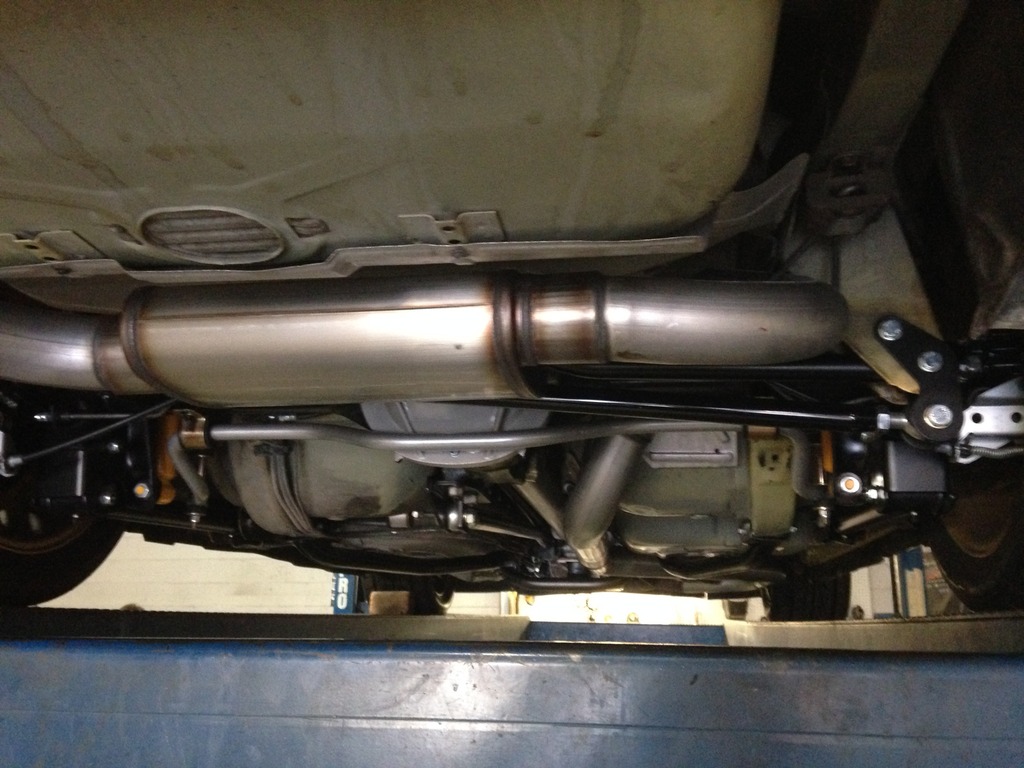
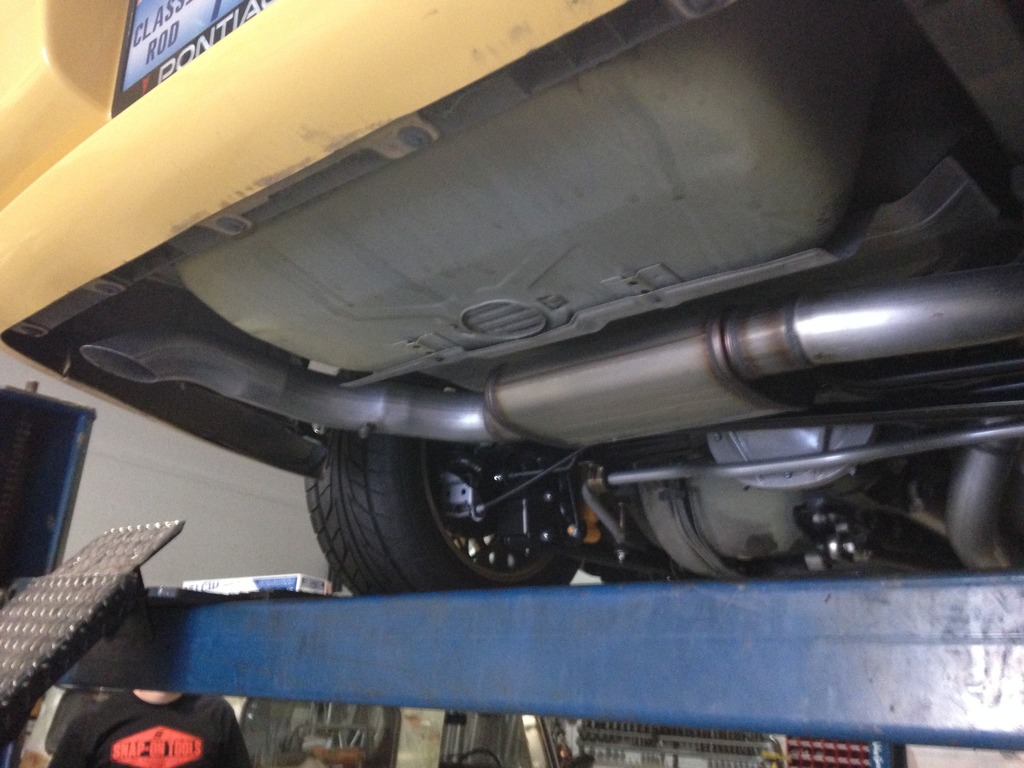
If you look at the second picture of the exhaust, you can see that I have done some cleaning under the car. It's just a really messy job on your back, and the taunting I receive at work when I try to do it there on the lift isn't worth it. I'll eventually go in on a Sunday all by myself, bust out the power washer, and go to town on it. I agree with you 100% that it would really make the new parts pop.
Here are new ground effects for the front and the hood. I also got the cowl seal and a new hood blanket from 1AAuto.com.


 04-26-2016, 11:46 AM
#133
Supreme Member
iTrader: (7)
Join Date: Nov 2006
Location: Alamogordo, NM
Posts: 3,740
Likes: 0
Received 9 Likes
on
9 Posts
Car: 88 Formula 350
Engine: 5.7
Transmission: T-56
Axle/Gears: 9" 3.89
Re: My 1992 Trans Am
Subscribed. This build ended up being way better than I though! Just read all 3 pages. Well done and sweet ride!

 04-27-2016, 01:24 PM
#135
Junior Member
Thread Starter
Join Date: Nov 2008
Location: NV
Posts: 36
Likes: 0
Received 1 Like
on
1 Post
Car: 1992 Trans Am
Engine: 5.0 TPI
Transmission: T56
Axle/Gears: 3.73
Re: My 1992 Trans Am
I don't know but I took more pictures of that car than any other. I'll post some of them up later. What an awesome car.
That's the way those pieces came. All I did before taking the picture was remove them from the box. Unlike the original urethane pieces, the reproductions are made out of injection molded ABS plastic. The inner structure is actually glued to the outer. They're nice pieces but they're going to take a bit of work to finish. If you check out the pictures of them on Hawks website, you'll see the same sanding marks on the pieces.
04-27-2016, 04:48 PM
#136
Supreme Member
iTrader: (11)

Join Date: Sep 1999
Location: NJ
Posts: 4,345
Received 298 Likes
on
234 Posts
Car: 92 Firebird
Engine: 4.8 LR4
Transmission: T56
Axle/Gears: 3.45 9 Bolt
Re: My 1992 Trans Am
That's the way those pieces came. All I did before taking the picture was remove them from the box. Unlike the original urethane pieces, the reproductions are made out of injection molded ABS plastic. The inner structure is actually glued to the outer. They're nice pieces but they're going to take a bit of work to finish. If you check out the pictures of them on Hawks website, you'll see the same sanding marks on the pieces.
04-27-2016, 05:13 PM
#137
Re: My 1992 Trans Am
Those will bring big $$ in the future.
Last edited by CharcoalBird; 04-27-2016 at 05:17 PM.
04-27-2016, 09:44 PM
#138
Supreme Member
iTrader: (11)
Join Date: Aug 2013
Location: MICHIGAN
Posts: 4,637
Received 751 Likes
on
577 Posts
Car: 1988 Trans Am
Engine: L03
Transmission: 700R4
Axle/Gears: 10 Bolt 2.73 Open
Re: My 1992 Trans Am
I've had third gens, fourth gens, an 06 GTO, and various other sports cars, all with work done to them, and this car would embarrass every other car I've owned. Hands down just an awesome handling car. I've yet to scare myself or overdrive my abilities. You point the car where you want to go, and it goes. I've taken a few my friends and co-workers on rides and they've all had a new respect for the car since the suspension has been completed.
 04-27-2016, 09:45 PM
#139
 04-27-2016, 11:05 PM
#140
Junior Member
Thread Starter
Join Date: Nov 2008
Location: NV
Posts: 36
Likes: 0
Received 1 Like
on
1 Post
Car: 1992 Trans Am
Engine: 5.0 TPI
Transmission: T56
Axle/Gears: 3.73
Re: My 1992 Trans Am
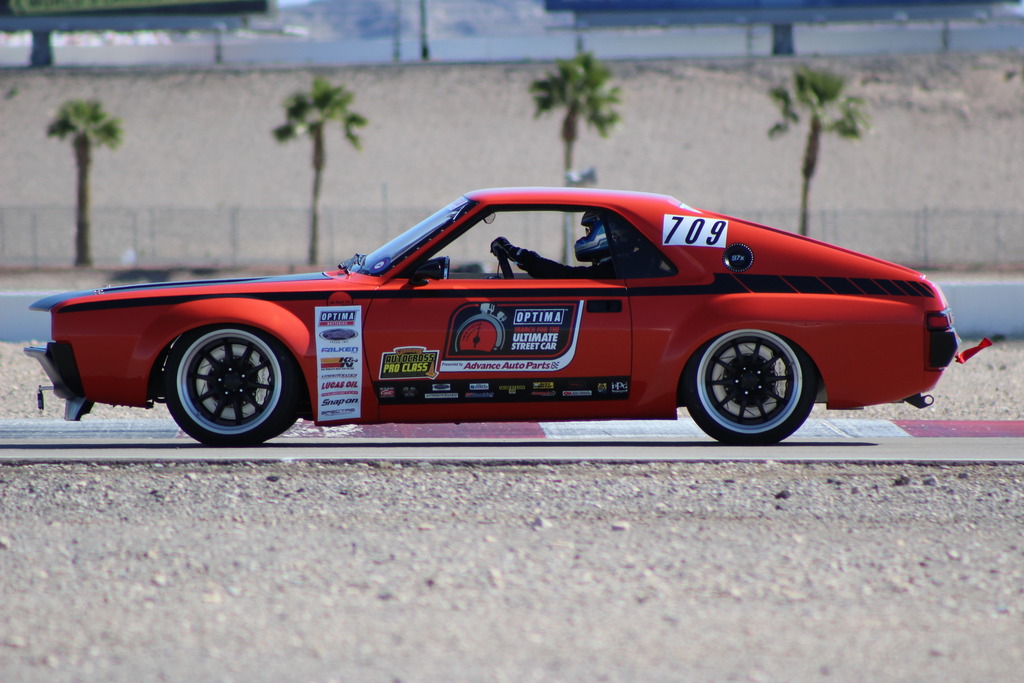
Thanks Dave! Here's another picture of that AMX for you scooter. And if you send me YOUR address, I'll save you the trouble of shipping the ground effects to CharcoalBird and just come by and pick them up from you.
 04-28-2016, 05:37 AM
#141
Supreme Member
iTrader: (8)
Join Date: Oct 2001
Location: Il
Posts: 11,698
Received 748 Likes
on
507 Posts
Car: 1989-92 FORMULA350 305 92 Hawkclone
Engine: 4++,350 & 305 CIs
Transmission: 700R4 4800 vig 18th700R4 t56 ZF6 T5
Axle/Gears: 3.70 9"ford alum chunk,dana44,9bolt
Re: My 1992 Trans Am
Very cool!!
04-28-2016, 07:57 PM
#142


 05-04-2016, 05:41 AM
#146
Supreme Member
iTrader: (8)
Join Date: Oct 2001
Location: Il
Posts: 11,698
Received 748 Likes
on
507 Posts
Car: 1989-92 FORMULA350 305 92 Hawkclone
Engine: 4++,350 & 305 CIs
Transmission: 700R4 4800 vig 18th700R4 t56 ZF6 T5
Axle/Gears: 3.70 9"ford alum chunk,dana44,9bolt
Re: My 1992 Trans Am
That makes me moist...
05-04-2016, 05:34 PM
#147
Junior Member
Thread Starter
Join Date: Nov 2008
Location: NV
Posts: 36
Likes: 0
Received 1 Like
on
1 Post
Car: 1992 Trans Am
Engine: 5.0 TPI
Transmission: T56
Axle/Gears: 3.73
Re: My 1992 Trans Am
 05-04-2016, 11:27 PM
#149
Junior Member
Thread Starter
Join Date: Nov 2008
Location: NV
Posts: 36
Likes: 0
Received 1 Like
on
1 Post
Car: 1992 Trans Am
Engine: 5.0 TPI
Transmission: T56
Axle/Gears: 3.73
Re: My 1992 Trans Am
Sadly, no pictures today.  Something happened to the clear on the hood so they stripped it and resprayed it this morning. I'll have it back tomorrow.
Something happened to the clear on the hood so they stripped it and resprayed it this morning. I'll have it back tomorrow.
05-05-2016, 05:45 AM
#150
Supreme Member
iTrader: (8)
Join Date: Oct 2001
Location: Il
Posts: 11,698
Received 748 Likes
on
507 Posts
Car: 1989-92 FORMULA350 305 92 Hawkclone
Engine: 4++,350 & 305 CIs
Transmission: 700R4 4800 vig 18th700R4 t56 ZF6 T5
Axle/Gears: 3.70 9"ford alum chunk,dana44,9bolt
Re: My 1992 Trans Am
Hope it gets "cleared" up for you 