Overhead Console Installation
By IROCZDave(iroczdave@aol.com)
If you have ever seen one of these before you would probably want one in YOUR car!
Last offered in 87 for Camaros, this multi-featured addition listed at $50.00 and gave you the following:
- A swiveling single map light
- 2 reminder/selector roller wheels for appointments, mileage,service etc.
- 2 activation buttons, one for the map light, one for all the rest of the interior lights
- A sunglass pouch or garage door opener holder
- A neat little flashlight that snaps into it own little compartment ( it even has the word CAMARO on it)
- And of course the dome light
NOTE: As this article deals with my personal experience with installing this console on a car with T-Tops, I know for a fact that there is a Non T-Top version of this roof console and I’m pretty sure the cut outs will be the same however just be warned I have NO experience with the Non T-Top version.
Parts needed:
- The roof console ( did yours come with the flashlight?) mine did and it works great!
- the mounting posts X 4
- dome light mounting screws X 2 ( very important you need these in order to correctly mount the dome light section!)
- Unscrew the black ground wire
- cut off about 2" of the wires from the connector back ( were gonna patch it in, hope your’e good at this)
NOTE: pay attention to the dome light bulb holders they tend to get heated up and break this seems to be the weakest part of this console!
Preparation:
REMOVE BATTERY CABLE Your gonna be playing with the electrical wiring!
HEADLINER REMOVAL:
If you have removed your headliner before do so now and skip to the next section, if you have never done this before do the following:
- Remove sunvisors and mounting assembly
- Remove "B" pillar black plastic mouldings/ rear T-Top lock mouldings
- Remove the coat hangers\ rear speaker covers
- Snap off the seat belt receptacle trim ( be careful they break easily)
- Remove the plastic moulding between the headliner and rear window ( 4 screws)
- Remove the dome light assembly ( slide the clips off of the studs)
Note: there are 4 plastic clips held in place with steel retainers embedded into the headliner material in the forward section of the headliner where your visors sit, these are almost impossible to get off without doing some damage, try to pull gently slowly and constantly, don’t jerk or pull quickly, otherwise damage will occur!
Go around and gently remove the headliner, parts of it may be stuck in place be carefull!
Set the headliner aside for now, remove the old dome light mounting studs and install the console mount posts, there should be some little divits already pre-punched for you to drill a small hole into. Do not over tighten!
Go ahead and check the mount posts position stick the console up there and and push it forward into the mounting posts, everything at this point should be ok. Remove the console.
HEADLINER HOLE CUTTING:
This was a nerve racking experience for me because I had just had my headliner re-upholstered but let me assure you it’s really quite easy.
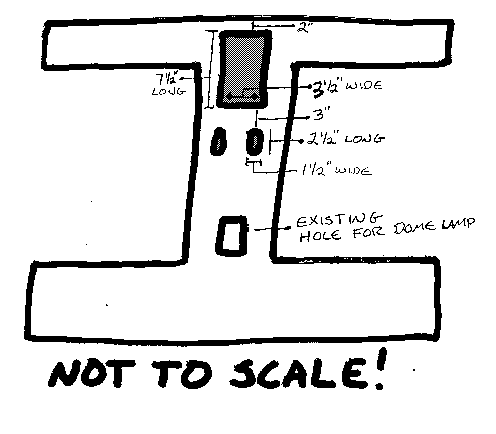
Use the template below to mark the positions of the holes on the ( fiberglass) side of your headliner use a magic marker (nice big black lines!)
Use a sharp cutting knife when you start cutting, and GO SLOW, make your cuts on the inside of the lines,( it’s better to have to go back and trim a little more out than having cut out too much!) you will see that the headliner is accually layered and you can peel off layer by layer untill you get to the other side of your headliner upholstery.
DO NOT CUT OUT YOUR HEADLINER UPHOLSTERY!!!!!
What you need to do is cut from the center of the area where your upholstery is into 4 triangular sections cut down to 1/2" away from each corner of the headliner and stretch the fabic around and over where you cut out the headliner material ( kind of like your exsisting dome light hole is) use spray glue or what I used gray duct tape to affix the cloth this will hold the fabric in place and there will be no chance of the material ever pulling out.
After having cut the upholstery material go ahead and test fit the console and see if its going to fit, if you have to make any additional cuts do so now while the headliner is out of the car.
After you have finished with the first hole cut out the second two smaller oval holes, (you won’t have to worry about stretching the fabric on these holes cut all the way through.
Go back into the car and remove the wiring harness clips for the dome light, you’ll have to feed it through the forward hole in your headliner when you install it.
Re-install your headliner
WIRING:
Ok lets get this thing hooked up to power, you should have the orange and white wiring harness sticking through the forward hole in your headliner, let about 3 " of wire stick out and cut it off, prep the wires.
The wiring from the console is as follows:
- Black- ground to body
Orange- to orange wire from car
Purple/purple and white and or white wires from console to white wire from car
Do a good job of splicing these wires, if you use wire connectors like I did be warned that when it comes time to install the console, there’s not a lot of space up there and you may have to stuff the wires around a bit.
Before you install the console check and make sure the map light bulb is good and also make sure the bulb receptacle is making good contact with the board.
Install the plug into your console and install the console itself. Line up the posts with the console, you may have to push up as well as forward because of the headliner material GO SLOW!
Now install the 2 dome light post screws (don’t over tighten!)
Hook your battery back up and try it out, the button on the console closest to the driver seat should turn on the map light, the other should turn on the rest of your interior lights.
I myself removed the ugly sunglass pouch I had to cut off the posts from the other side to get the retainer plate off, and I think it looks better, but that’s up to you!
I hope I didn’t leave anything out, if you have any questions feel free to e-mail me and I’ll try to answer any questions you may have.