Finally starting to get serious about mine ([*budget] project thread!)
 02-12-2010, 02:26 PM
#51
Supreme Member

Thread Starter
iTrader: (1)
Join Date: Jun 2009
Location: Central Connecticut
Posts: 1,777
Likes: 0
Received 0 Likes
on
0 Posts
Car: 91 Trans Am 'vert
Engine: LB9
Transmission: T5
Axle/Gears: 3.45 9 bolt
Re: Finally starting to get serious about mine (project thread!)

I saw the clip, I just didn't know how to remove it and I was afraid to break it. Oh well, good for future reference I guess lol.
Last edited by musclecar70sfan; 02-12-2010 at 03:36 PM.
 02-15-2010, 08:23 PM
#52
Supreme Member
Thread Starter
iTrader: (1)
Join Date: Jun 2009
Location: Central Connecticut
Posts: 1,777
Likes: 0
Received 0 Likes
on
0 Posts
Car: 91 Trans Am 'vert
Engine: LB9
Transmission: T5
Axle/Gears: 3.45 9 bolt
Re: Finally starting to get serious about mine (project thread!)
Small update...
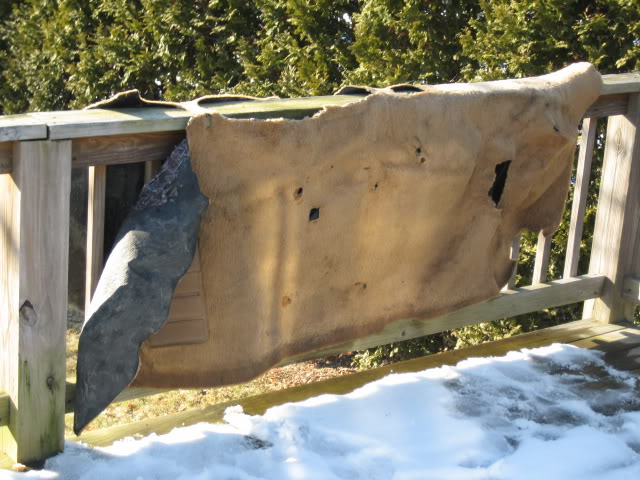
It was a little warmer than before today so I pressure-washed the carpet from my car today with Purple Power, I think it did a good job, it's taking a while to dry from the cold though.
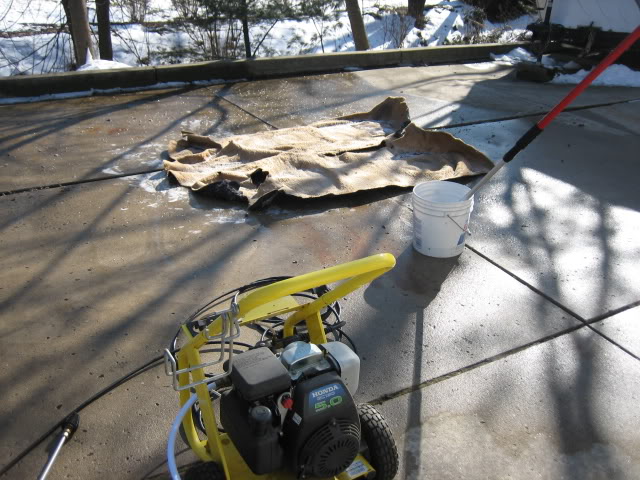
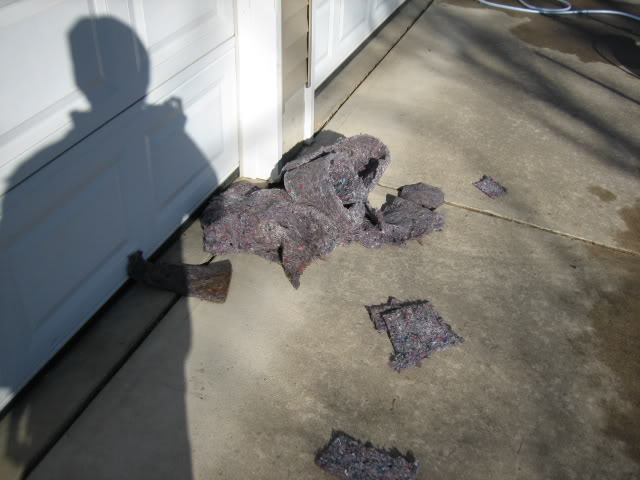
Bought a roll of new insulation so I won't need this crap anymore.
Letting it dry on my porch...
I visited the car today as well to do some sanding on the interior.
Decided to bring it outside and do it in the fresh air, the car was more than eager to start despite sitting for a few weeks.
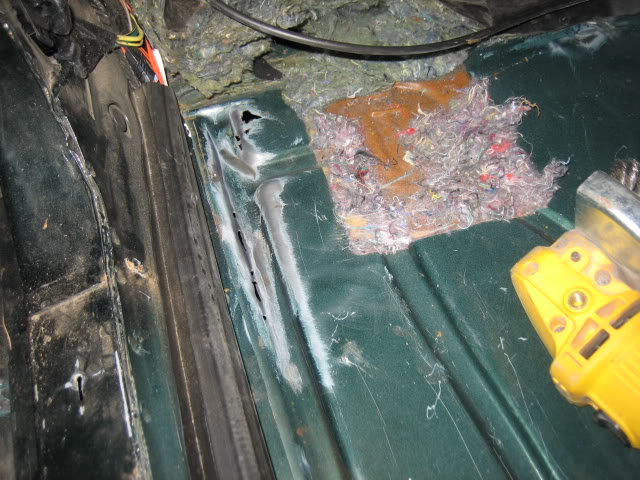
I had a few rust holes open up.
This one isn't bad, the metal underneath it looks fine so apparently it rotted from the inside out, I think I might just put a touch of bondo on that considering that the hole is only a 1/4 inch big.
It was a little warmer than before today so I pressure-washed the carpet from my car today with Purple Power, I think it did a good job, it's taking a while to dry from the cold though.
Bought a roll of new insulation so I won't need this crap anymore.
Letting it dry on my porch...
I visited the car today as well to do some sanding on the interior.
Decided to bring it outside and do it in the fresh air, the car was more than eager to start despite sitting for a few weeks.
I had a few rust holes open up.
This one isn't bad, the metal underneath it looks fine so apparently it rotted from the inside out, I think I might just put a touch of bondo on that considering that the hole is only a 1/4 inch big.
Last edited by musclecar70sfan; 02-15-2010 at 08:45 PM.
02-15-2010, 08:28 PM
#53
Supreme Member
Thread Starter
iTrader: (1)
Join Date: Jun 2009
Location: Central Connecticut
Posts: 1,777
Likes: 0
Received 0 Likes
on
0 Posts
Car: 91 Trans Am 'vert
Engine: LB9
Transmission: T5
Axle/Gears: 3.45 9 bolt
Re: Finally starting to get serious about mine (project thread!)
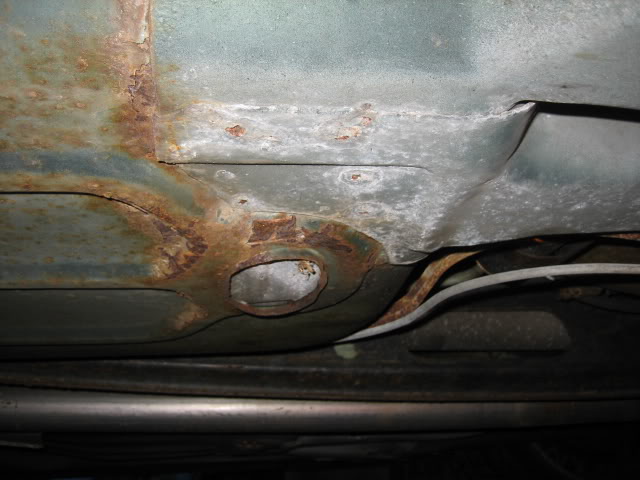
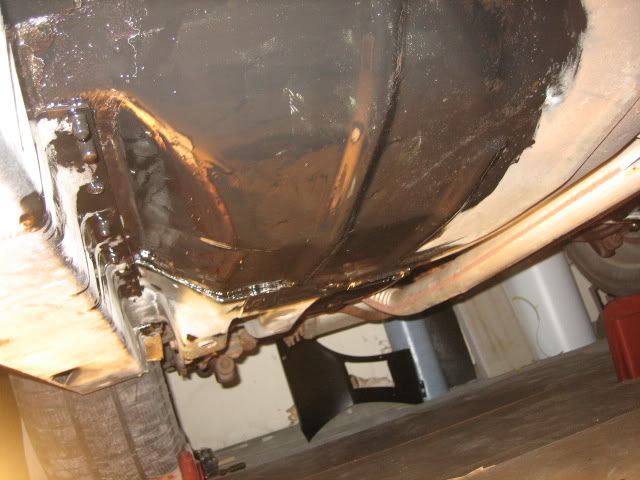
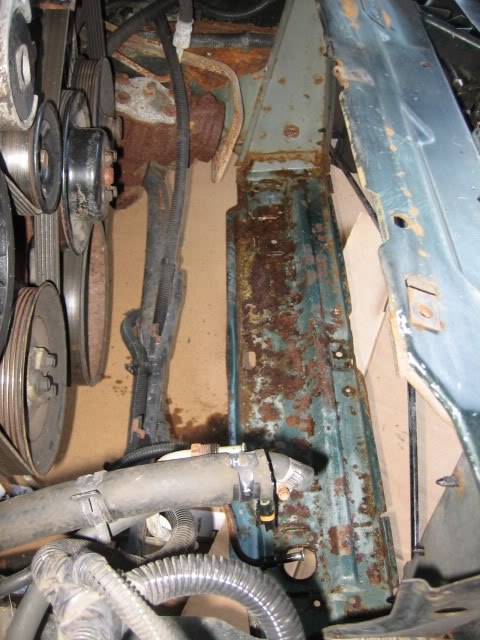
But this is where it got ugly...

Here's the floor underneath that:
Not good, I was hoping that was only surface rust, I guess not though. Gonna have to find a shop to cut out and patch in a new section there. Anybody know any good and cheap places that do that in central Connecticut? I always die a little inside when I see rust like this, but at least its fixable though.
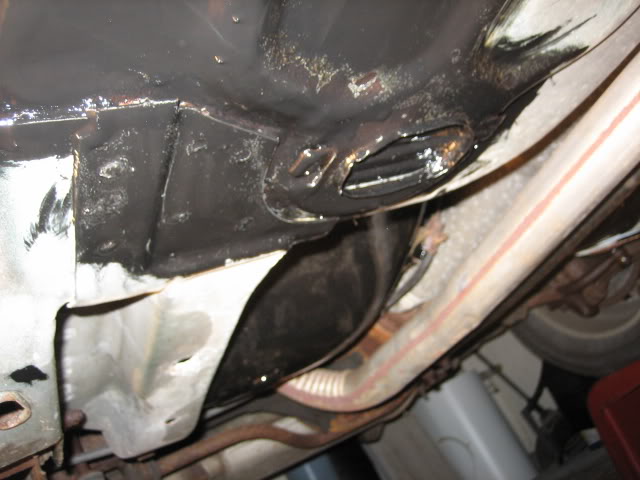
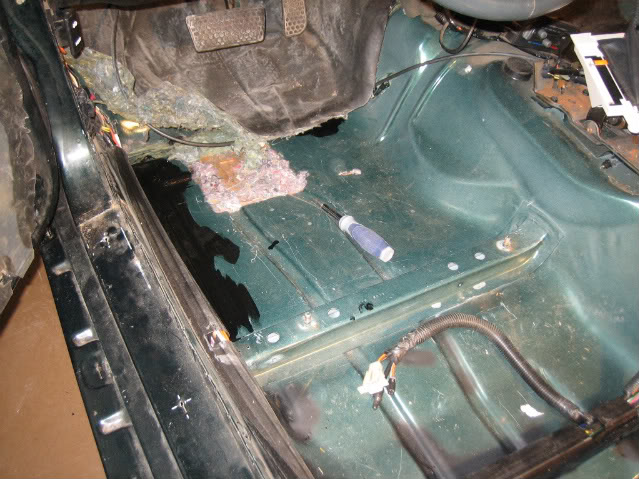
Although I found rust here, this is gonna be tough to fix:
I think I might clean that up the best I can with a brush and then just coat it heavily with POR-15? Your thoughts?
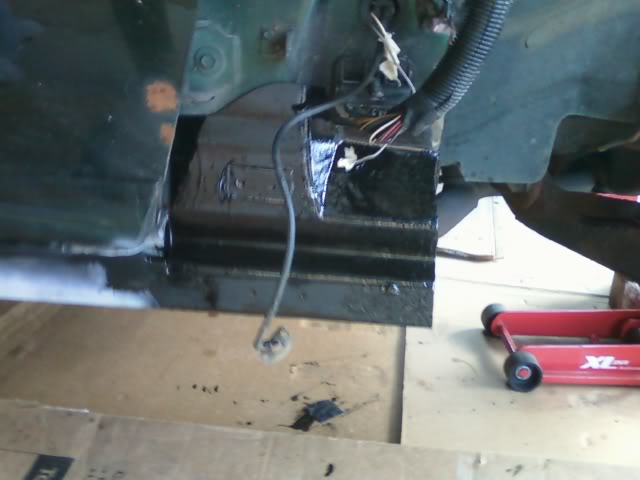
Other floors look ok though; sanding should fix em:
Well that rotted driver's floor section has brought my plans on the interior to a screeching halt. I was hoping to be able to reassemble it before the end of this week, but now I'll have to wait until I get that patched. That'll probably take a few weeks since I wanna wait until after a good rainstorm to rinse the salt off the roads. I was thinking of learning how to weld myself, but my dad is concerned about the "health risks." And I'd probably suck at welding anyway lol.
Here's the floor underneath that:
Not good, I was hoping that was only surface rust, I guess not though. Gonna have to find a shop to cut out and patch in a new section there. Anybody know any good and cheap places that do that in central Connecticut? I always die a little inside when I see rust like this, but at least its fixable though.
Although I found rust here, this is gonna be tough to fix:
I think I might clean that up the best I can with a brush and then just coat it heavily with POR-15? Your thoughts?
Other floors look ok though; sanding should fix em:
Well that rotted driver's floor section has brought my plans on the interior to a screeching halt. I was hoping to be able to reassemble it before the end of this week, but now I'll have to wait until I get that patched. That'll probably take a few weeks since I wanna wait until after a good rainstorm to rinse the salt off the roads. I was thinking of learning how to weld myself, but my dad is concerned about the "health risks." And I'd probably suck at welding anyway lol.
Last edited by musclecar70sfan; 02-15-2010 at 08:45 PM.
02-16-2010, 11:54 AM
#54
Supreme Member
iTrader: (5)
Join Date: Aug 2006
Location: Cleveland, Ohio
Posts: 2,491
Likes: 0
Received 5 Likes
on
5 Posts
Car: 89' IROC-Z
Engine: LO3
Transmission: 700R4
Axle/Gears: 10-Bolt/2.73
Re: Finally starting to get serious about mine (project thread!)
Your floors aren't nearly as bad as mine, your driver side is about as big as my spot, but mine has small little holes everywhere, same for my passenger side, other than that my rear wheel wells are rotted through (mini tubbing the car) and thats all my rust, so happy about getting it patched with some 'looks like stock' pieces. This will be this coming winter. Im just working towards getting her started this year so i can rev her up during the interior tear down process. Enough about me.
Your doing great in your progress so keep it up.
Your doing great in your progress so keep it up.
02-17-2010, 10:12 AM
#55
Supreme Member
Thread Starter
iTrader: (1)
Join Date: Jun 2009
Location: Central Connecticut
Posts: 1,777
Likes: 0
Received 0 Likes
on
0 Posts
Car: 91 Trans Am 'vert
Engine: LB9
Transmission: T5
Axle/Gears: 3.45 9 bolt
Re: Finally starting to get serious about mine (project thread!)
OK I have a small update... With the rough driver's floor, I decided to get under there and sand it the best I can. Assuming a large hole doesn't open up, I'll probably just put a fiberglass patch on those small little holes that opened up. Then I'll coat it all with POR-15 to contain the rust. The purists might hate me, but is cutting and welding something like that REALLY necessary? This fix will last fine for the next couple years I'm sure. And this car won't be driven all the time anyway. My dream would be to do a total frame-up restoration of this car in a few years assuming I find the time and space.
02-17-2010, 11:10 AM
#56
Senior Member
Join Date: Apr 2006
Location: CT
Posts: 685
Likes: 0
Received 0 Likes
on
0 Posts
Car: 1988 Iroc
Engine: 5.7L
Transmission: '96 T56, Hurst Shifter, Mech VSS
Axle/Gears: 3.45 9 Bolt
Re: Finally starting to get serious about mine (project thread!)
OK I have a small update... With the rough driver's floor, I decided to get under there and sand it the best I can. Assuming a large hole doesn't open up, I'll probably just put a fiberglass patch on those small little holes that opened up. Then I'll coat it all with POR-15 to contain the rust. The purists might hate me, but is cutting and welding something like that REALLY necessary? This fix will last fine for the next couple years I'm sure. And this car won't be driven all the time anyway. My dream would be to do a total frame-up restoration of this car in a few years assuming I find the time and space.
Im not saying the way you fix it wont hold up or is wrong, but for me personally, i feel there is a right way and a wrong way to fix something.
Either way you fix it, your still gonna have a kick *** vert to drive around come summertime........
Did you ever check out that site i sent you?
02-17-2010, 12:11 PM
#57
Supreme Member
Thread Starter
iTrader: (1)
Join Date: Jun 2009
Location: Central Connecticut
Posts: 1,777
Likes: 0
Received 0 Likes
on
0 Posts
Car: 91 Trans Am 'vert
Engine: LB9
Transmission: T5
Axle/Gears: 3.45 9 bolt
Re: Finally starting to get serious about mine (project thread!)
Personally, what i would do is weld up the little holes (if they are small enough to not need a patch pannel, you can just weld a couple beads), grind them down and then por-15 it. MIG welders can be had pretty cheap, you can prob find one at harbor freight for around $60.
Im not saying the way you fix it wont hold up or is wrong, but for me personally, i feel there is a right way and a wrong way to fix something.
Either way you fix it, your still gonna have a kick *** vert to drive around come summertime........
Did you ever check out that site i sent you?
Im not saying the way you fix it wont hold up or is wrong, but for me personally, i feel there is a right way and a wrong way to fix something.
Either way you fix it, your still gonna have a kick *** vert to drive around come summertime........
Did you ever check out that site i sent you?
And yeah, I was getting that "hack job" feeling when I decided to stick with fiberglass, but my dad insists that it's fine and that welding is unnecessary; at least for now. But I will need a new battery tray welded in, no question about it.
02-17-2010, 01:43 PM
#58
Senior Member
Join Date: Apr 2006
Location: CT
Posts: 685
Likes: 0
Received 0 Likes
on
0 Posts
Car: 1988 Iroc
Engine: 5.7L
Transmission: '96 T56, Hurst Shifter, Mech VSS
Axle/Gears: 3.45 9 Bolt
Re: Finally starting to get serious about mine (project thread!)
Yep I saw that website. Cool stuff, nice to know we have a bunch of thirdgen owners nearby. Cruises in the summer time are gonna be a must. Any idea when your IROC is gonna be on the road?
And yeah, I was getting that "hack job" feeling when I decided to stick with fiberglass, but my dad insists that it's fine and that welding is unnecessary; at least for now. But I will need a new battery tray welded in, no question about it.
And yeah, I was getting that "hack job" feeling when I decided to stick with fiberglass, but my dad insists that it's fine and that welding is unnecessary; at least for now. But I will need a new battery tray welded in, no question about it.
The iroc is on the road. I bought it last may and it didnt run, i spend about 1.5 months checking, rebuiling, replacing things and finnaly got it to run. I put about 800 miles on it last summer. It still needs lots of little things (interior, paint, bodywork, breaks..........), but has NO rust. I has never and will never be driven in the winter.
My dad is the same way. back in the day he fixed his 64 tempist with fiberglass. The holes on yours proably wont be big at all, and you probably wont be able to tell after its done if you welded the holes or fiberglassed them. I still say invest in a mig welder and then that way you can fix your own battery tray.
Good luck man, keep up the good work!
02-17-2010, 04:20 PM
#59
Supreme Member
Thread Starter
iTrader: (1)
Join Date: Jun 2009
Location: Central Connecticut
Posts: 1,777
Likes: 0
Received 0 Likes
on
0 Posts
Car: 91 Trans Am 'vert
Engine: LB9
Transmission: T5
Axle/Gears: 3.45 9 bolt
Re: Finally starting to get serious about mine (project thread!)
Thanks man! And speaking of which... I did some sanding on the floors today to prepare the underside for some Chassis Saver, and only a few more tiny pinholes opened up in that area. So I'll just coat the bad parts on the underside with the stuff, then I'll patch the few small holes with some fiberglass from the top. Thank God that paint goes over rust since I would've gone nuts a long time ago cleaning all of that crap off. LOL
02-17-2010, 10:59 PM
#60
Member

Join Date: May 2008
Location: Huntington WV
Posts: 224
Likes: 0
Received 0 Likes
on
0 Posts
Car: 1988 convertible Z28 I think
Engine: 30 over 350 carbed and HEI
Transmission: T5 5speed
Axle/Gears: 9bolt 327posi disk brakes
Re: Finally starting to get serious about mine (project thread!)
I did some sanding on the floors today to prepare the underside for some Chassis Saver, and only a few more tiny pinholes opened up in that area. So I'll just coat the bad parts on the underside with the stuff, then I'll patch the few small holes with some fiberglass from the top. Thank God that paint goes over rust since I would've gone nuts a long time ago cleaning all of that crap off. LOL
02-17-2010, 11:04 PM
#61
Junior Member

Join Date: Apr 2009
Location: Alpharetta, GA
Posts: 94
Likes: 0
Received 0 Likes
on
0 Posts
Car: 1984 Camaro Z28
Engine: 350ci
Transmission: 700r4
Axle/Gears: 3.31 non posi = no traction
Re: Finally starting to get serious about mine (project thread!)
 Love the car. It is great that you are working on it. When I was young I saw a Trans Am with the same color combination and fell in love. You should stick with the green in my opinion.
02-18-2010, 09:06 AM
Love the car. It is great that you are working on it. When I was young I saw a Trans Am with the same color combination and fell in love. You should stick with the green in my opinion.
02-18-2010, 09:06 AM
#62
Supreme Member
Thread Starter
iTrader: (1)
Join Date: Jun 2009
Location: Central Connecticut
Posts: 1,777
Likes: 0
Received 0 Likes
on
0 Posts
Car: 91 Trans Am 'vert
Engine: LB9
Transmission: T5
Axle/Gears: 3.45 9 bolt
Re: Finally starting to get serious about mine (project thread!)
Hey if you do decide to use the chassis saver stuff, the guy at the store where I bought it said if you have small pin holes you can put some tape on the opposite side of where your applying it and when it hardens the hole is sealed. I didn't try it cause I welded the pin holes up but it may be worth a try if you don't want to glass up the tiny holes.
 02-18-2010, 09:50 AM
#63
Re: Finally starting to get serious about mine (project thread!)
NOOOOOOOOO!! Don't do it. Keep it clean and simple. Looks fantastic as it is! I recently foundd rust on my Vert too, check out my thread on the European Board. I had the shop cut out and weld in a new piece.
02-18-2010, 10:04 AM
#64
Supreme Member
Thread Starter
iTrader: (1)
Join Date: Jun 2009
Location: Central Connecticut
Posts: 1,777
Likes: 0
Received 0 Likes
on
0 Posts
Car: 91 Trans Am 'vert
Engine: LB9
Transmission: T5
Axle/Gears: 3.45 9 bolt
Re: Finally starting to get serious about mine (project thread!)
or this

http://www.phoenixgraphix.com/transam/7981ta-99.htm
02-18-2010, 10:10 AM
#65
Re: Finally starting to get serious about mine (project thread!)
No? I thought something like this would look neat, but in green of course

or this
http://www.phoenixgraphix.com/transam/7981ta-99.htm
or this
http://www.phoenixgraphix.com/transam/7981ta-99.htm
1) Everyone knows what it is anyway
2) It's not original
oh and 3 (I know I said 2), to me it just shouts at trying to get more attention.
Just my opinions of course
 02-19-2010, 08:16 PM
#66
Supreme Member
Thread Starter
iTrader: (1)
Join Date: Jun 2009
Location: Central Connecticut
Posts: 1,777
Likes: 0
Received 0 Likes
on
0 Posts
Car: 91 Trans Am 'vert
Engine: LB9
Transmission: T5
Axle/Gears: 3.45 9 bolt
Re: Finally starting to get serious about mine (project thread!)
UPDATE:
Made some decent progress today.
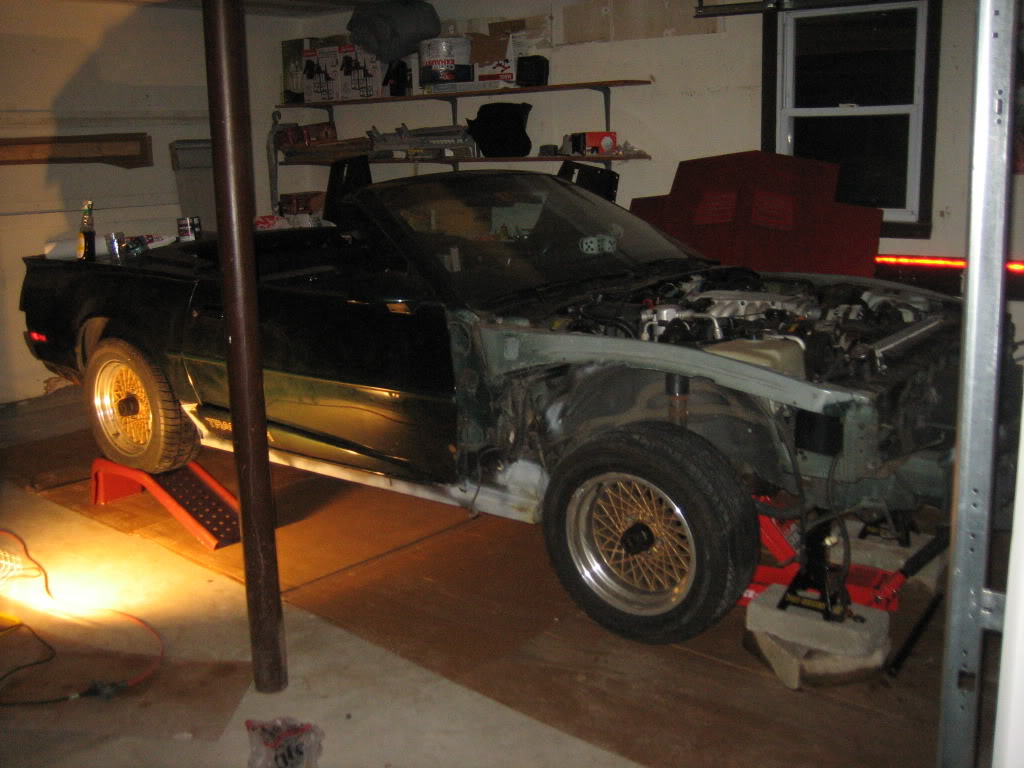
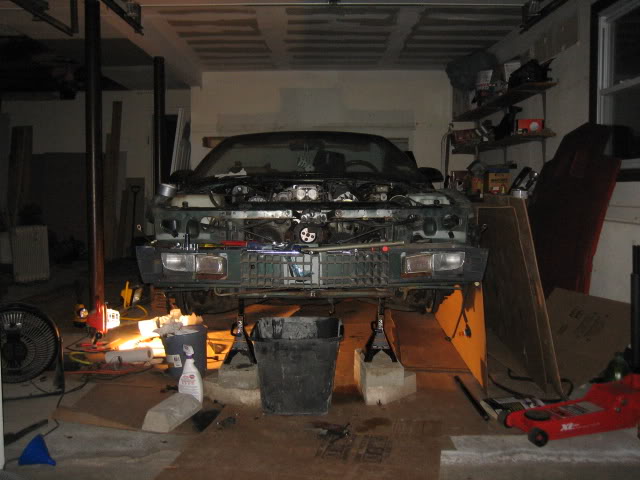
Got the front end of the car jacked up with the rear on ramps for some room to work underneath:
And I applied the first coat of Chassis Saver on most of the bad parts of the underside of the car as well.
Got a little on the exhaust... oh well!
I hope to apply the 2nd coat tomorrow.
The runs kinda make the work look shabby but at least its under the car.
Once it totally cures, I think I might coat the stuff with a layer of rubberized undercoating or truck bed liner to protect it from chips from rocks and other road debris. And for a factory appearance I think I might run it over with some green rattle can paint.
Made some decent progress today.
Got the front end of the car jacked up with the rear on ramps for some room to work underneath:
And I applied the first coat of Chassis Saver on most of the bad parts of the underside of the car as well.
Got a little on the exhaust... oh well!
I hope to apply the 2nd coat tomorrow.
The runs kinda make the work look shabby but at least its under the car.
Once it totally cures, I think I might coat the stuff with a layer of rubberized undercoating or truck bed liner to protect it from chips from rocks and other road debris. And for a factory appearance I think I might run it over with some green rattle can paint.
Last edited by musclecar70sfan; 02-19-2010 at 09:53 PM.
02-19-2010, 09:38 PM
#67
Supreme Member
Thread Starter
iTrader: (1)
Join Date: Jun 2009
Location: Central Connecticut
Posts: 1,777
Likes: 0
Received 0 Likes
on
0 Posts
Car: 91 Trans Am 'vert
Engine: LB9
Transmission: T5
Axle/Gears: 3.45 9 bolt
Re: Finally starting to get serious about mine (project thread!)
Oh and guys, I thought I'd mention this. If you ever get Chassis Saver (or something similar) on your skin and don't want to wait a month for it to eventually wear off, soak and scrub the affected area with lots of soap and hot water as soon as possible. And if that doesn't get it off, scrub it with a pumice stone. Obviously it'll sting, but speaking bluntly you'll just have to suck it up lol. But be careful, you don't wanna go too hard and make yourself bleed. I did this about an hour and a half after getting it on my wrist and fingers and I got about 70% off. After the redness goes down I'll have another go at it.
Just thought I'd throw my 2 cents in on the subject.
Just thought I'd throw my 2 cents in on the subject.
02-20-2010, 12:10 AM
#68
Senior Member
Join Date: Apr 2006
Location: CT
Posts: 685
Likes: 0
Received 0 Likes
on
0 Posts
Car: 1988 Iroc
Engine: 5.7L
Transmission: '96 T56, Hurst Shifter, Mech VSS
Axle/Gears: 3.45 9 Bolt
Re: Finally starting to get serious about mine (project thread!)
UPDATE:
Made some decent progress today.
Got the front end of the car jacked up with the rear on ramps for some room to work underneath:

And I applied the first coat of Chassis Saver on most of the bad parts of the underside of the car as well.

Got a little on the exhaust... oh well!


I hope to apply the 2nd coat tomorrow.
The runs kinda make the work look shabby but at least its under the car.
Once it totally cures, I think I might coat the stuff with a layer of rubberized undercoating or truck bed liner to protect it from chips from rocks and other road debris. And for a factory appearance I think I might run it over with some green rattle can paint.
Made some decent progress today.
Got the front end of the car jacked up with the rear on ramps for some room to work underneath:
And I applied the first coat of Chassis Saver on most of the bad parts of the underside of the car as well.
Got a little on the exhaust... oh well!
I hope to apply the 2nd coat tomorrow.
The runs kinda make the work look shabby but at least its under the car.
Once it totally cures, I think I might coat the stuff with a layer of rubberized undercoating or truck bed liner to protect it from chips from rocks and other road debris. And for a factory appearance I think I might run it over with some green rattle can paint.
Ok i was actually gonna post a thread about this, but ill ask since you see to have done it already. How the hell do you get the front on jackstands. When i back my car on to the ramps, the car is so low, i cant get my jack under there. Not only that, i got that radiator deflector thing in front too. I know i can take that off, but that would be a PITA every time i need to jack up my car.
NOw, i have worked on vehicles my whole life (mostly IH scouts, and suv's) and im not unfarmilliar on using a jack and jackstands, but this car is so low......
Anyway, looks good, keep up the good work, crusin weather is just around the corner.
02-20-2010, 08:46 AM
#69
Supreme Member
Thread Starter
iTrader: (1)
Join Date: Jun 2009
Location: Central Connecticut
Posts: 1,777
Likes: 0
Received 0 Likes
on
0 Posts
Car: 91 Trans Am 'vert
Engine: LB9
Transmission: T5
Axle/Gears: 3.45 9 bolt
Re: Finally starting to get serious about mine (project thread!)
Ok i was actually gonna post a thread about this, but ill ask since you see to have done it already. How the hell do you get the front on jackstands. When i back my car on to the ramps, the car is so low, i cant get my jack under there. Not only that, i got that radiator deflector thing in front too. I know i can take that off, but that would be a PITA every time i need to jack up my car.
NOw, i have worked on vehicles my whole life (mostly IH scouts, and suv's) and im not unfarmilliar on using a jack and jackstands, but this car is so low......
Anyway, looks good, keep up the good work, crusin weather is just around the corner.
NOw, i have worked on vehicles my whole life (mostly IH scouts, and suv's) and im not unfarmilliar on using a jack and jackstands, but this car is so low......
Anyway, looks good, keep up the good work, crusin weather is just around the corner.
Do you have a low-profile jack?
Mine slipped in under the k-member pretty easily considering that the nose and rad deflector were removed just like in the picture. I have a low profile jack too btw.
But what I guess you can try (without taking stuff off) would be to back up onto the ramps, and then slide your jack in through behind the car under the k-member. But that's a bit risky IMO since at least a part of your body will be under the car while jacking it up. I guess your best option would be to remove the rad deflector, it was only 4 or 5 screws on my car so I'm assuming it's the same on your Camaro. And if it still doesn't fit, maybe try removing the front chin spoiler as well? I'm not sure how easily those come off though. Good luck!
Last edited by musclecar70sfan; 02-20-2010 at 08:11 PM.
02-20-2010, 08:07 PM
#70
Supreme Member
Thread Starter
iTrader: (1)
Join Date: Jun 2009
Location: Central Connecticut
Posts: 1,777
Likes: 0
Received 0 Likes
on
0 Posts
Car: 91 Trans Am 'vert
Engine: LB9
Transmission: T5
Axle/Gears: 3.45 9 bolt
Re: Finally starting to get serious about mine (project thread!)
Alright well today I got the 2nd coat of chassis saver on the car. That stuff looks great, brushes on easily and leaves a smooth finish. It looks like I sprayed it on except for the edges. I also put some on the sub frame reinforcement, mainly because I had some extra and I didn't wanna waste it. I didn't do an A+ job of prepping that part so this is sort of a test run to see how well it sticks on a less than perfect surface.
And I sprayed some rustoleum rust reformer on the spots inside the car on the floor. It looks terrible with all the runs but it's gonna be under a carpet so who cares.
Crappy quality but you can kinda see the black spots from the paint:
And once the Chassis Saver completely cures in a few days, I'm planning on taking a pressure washer to wash off the wheels wells to prep those for chassis saver.
02-21-2010, 04:28 PM
#71
Member
Join Date: Jan 2006
Location: Central Alberta,Canada
Posts: 393
Likes: 0
Received 0 Likes
on
0 Posts
Car: 88 Iroc Vert/ 1980 Z28
Engine: 305 TPI/ 350
Transmission: 700R4/ TH350
Axle/Gears: 2.73posi/ 3.08 Open
Re: Finally starting to get serious about mine (project thread!)
Another way of putting rear on ramps is to put the front on jackstands first then jack up the rear and slide the ramps under the tires. Or else the front is too low.
02-24-2010, 02:33 PM
#72
Supreme Member
Thread Starter
iTrader: (1)
Join Date: Jun 2009
Location: Central Connecticut
Posts: 1,777
Likes: 0
Received 0 Likes
on
0 Posts
Car: 91 Trans Am 'vert
Engine: LB9
Transmission: T5
Axle/Gears: 3.45 9 bolt
Re: Finally starting to get serious about mine (project thread!)
quick update:
Chassis Saver is great stuff! I tried the method that wvabreeze suggested and it actually worked.
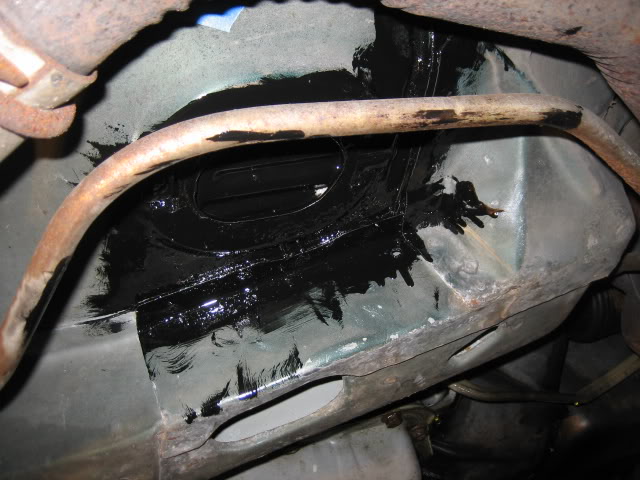
So now I won't have to use fiberglass to patch those small holes in the driver's floor. There were still a few super tiny pinholes left, but I just ran over the top with Chassis Saver to seal them up. That should do the trick.
Before:
After:
Now I just gotta wait for the paint to dry, and hopefully this weekend I can start reassembling the interior.
Chassis Saver is great stuff! I tried the method that wvabreeze suggested and it actually worked.
Hey if you do decide to use the chassis saver stuff, the guy at the store where I bought it said if you have small pin holes you can put some tape on the opposite side of where your applying it and when it hardens the hole is sealed. I didn't try it cause I welded the pin holes up but it may be worth a try if you don't want to glass up the tiny holes.
So now I won't have to use fiberglass to patch those small holes in the driver's floor.
There were still a few super tiny pinholes left, but I just ran over the top with Chassis Saver to seal them up. That should do the trick.Before:
After:
Now I just gotta wait for the paint to dry, and hopefully this weekend I can start reassembling the interior.
Last edited by musclecar70sfan; 02-24-2010 at 02:37 PM.
02-27-2010, 03:46 PM
#73
Supreme Member
Thread Starter
iTrader: (1)
Join Date: Jun 2009
Location: Central Connecticut
Posts: 1,777
Likes: 0
Received 0 Likes
on
0 Posts
Car: 91 Trans Am 'vert
Engine: LB9
Transmission: T5
Axle/Gears: 3.45 9 bolt
Re: Finally starting to get serious about mine (project thread!)
Another Saturday spent on the 'vert.
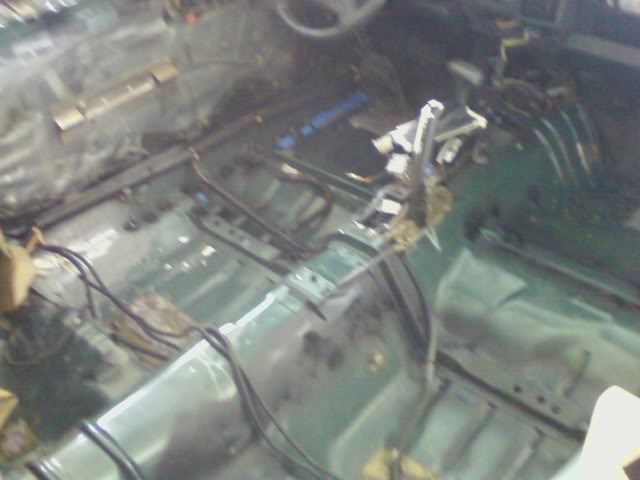
Finally started to reassemble the interior...
Here's a shot with the new insulation put in (quite a PITA):
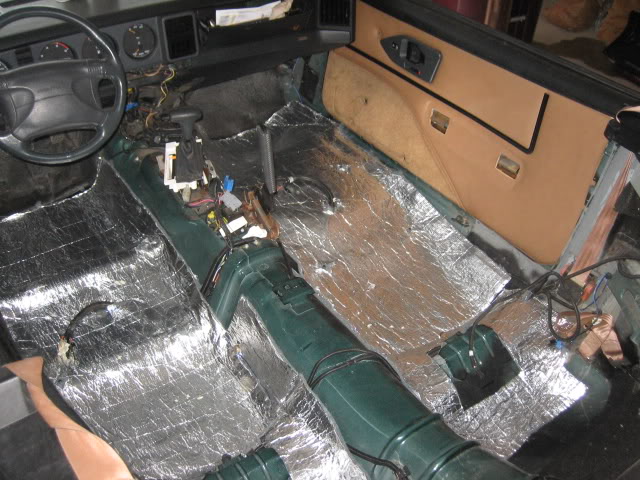
And the carpet:
The carpet actually held its shape pretty well, it's not perfectly smooth but it's still pretty good.
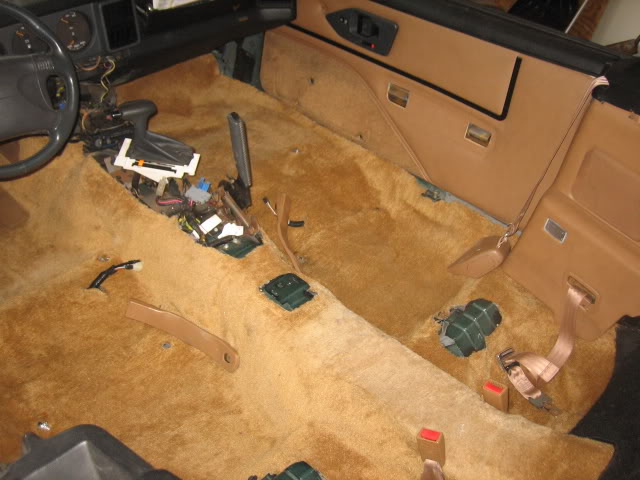
And this is as far as I got today (cell phone pic, my camera battery died):
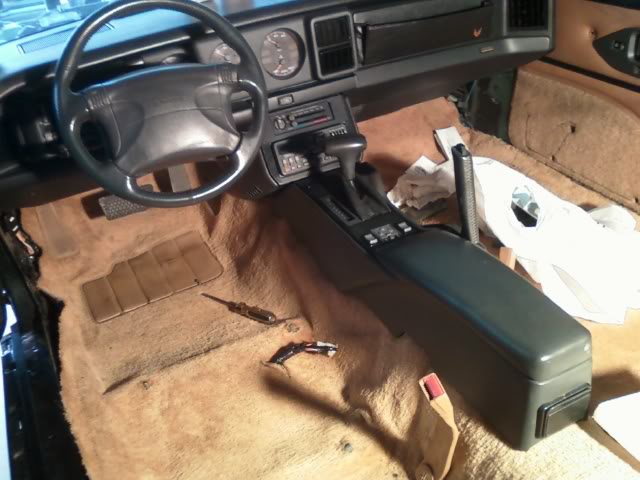
The center console looks 100 times better now that it's all cleaned up nice,
that took probably 12 years off the car's appearance (at least inside).
For the interior, all that's left are the seats, some random trim panels, and the door panels, however those are gonna wait a little while since you need to remove em for access to the bolts holding the side skirts in.
March is almost here... that means driving season is around the corner!!
Finally started to reassemble the interior...
Here's a shot with the new insulation put in (quite a PITA):
And the carpet:
The carpet actually held its shape pretty well, it's not perfectly smooth but it's still pretty good.
And this is as far as I got today (cell phone pic, my camera battery died):
The center console looks 100 times better now that it's all cleaned up nice,
that took probably 12 years off the car's appearance (at least inside).
For the interior, all that's left are the seats, some random trim panels, and the door panels, however those are gonna wait a little while since you need to remove em for access to the bolts holding the side skirts in.
March is almost here... that means driving season is around the corner!!
03-06-2010, 08:06 PM
#74
Supreme Member
Thread Starter
iTrader: (1)
Join Date: Jun 2009
Location: Central Connecticut
Posts: 1,777
Likes: 0
Received 0 Likes
on
0 Posts
Car: 91 Trans Am 'vert
Engine: LB9
Transmission: T5
Axle/Gears: 3.45 9 bolt
Re: Finally starting to get serious about mine (project thread!)
I'll just keep talking to myself... 

It's been a little while, but I got some stuff done today...
But not nearly as much as I would've liked, thanks to a good 3-4 hours lost to a muffler that slipped out of the cat in my DD (the Jimmy). Fixing it took 30 minutes... the rest of the time was spent on finding the damn parts. Is it just me or do a lot of auto parts stores just hate updating their inventories?
But back to the T/A. I ordered an ac delete pulley earlier this week from Summit and that came in 2 days later... with regular shipping (that's why I never get the expensive shipping... its a rip off!).
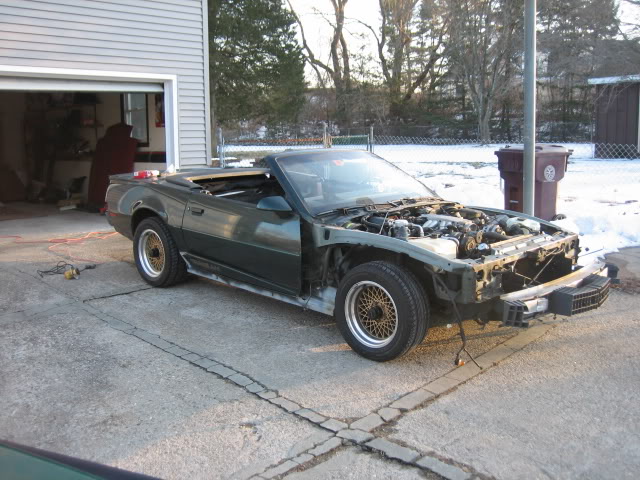
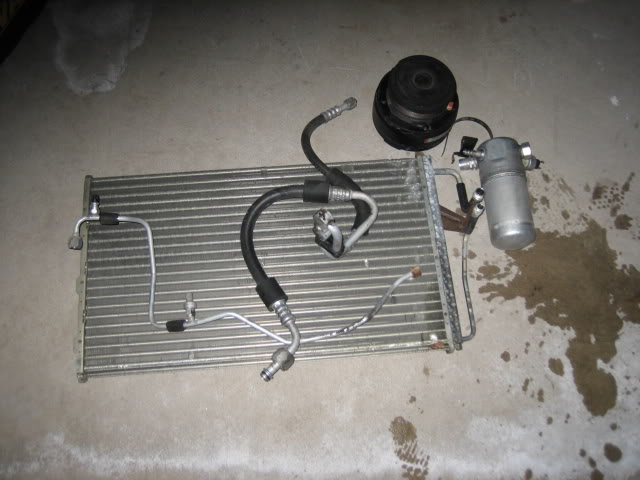
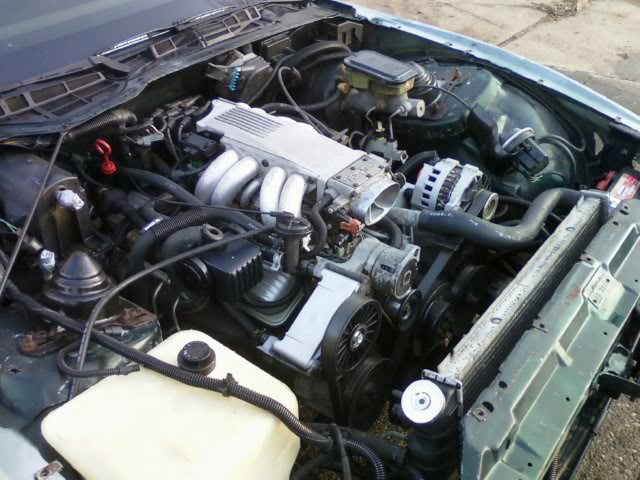
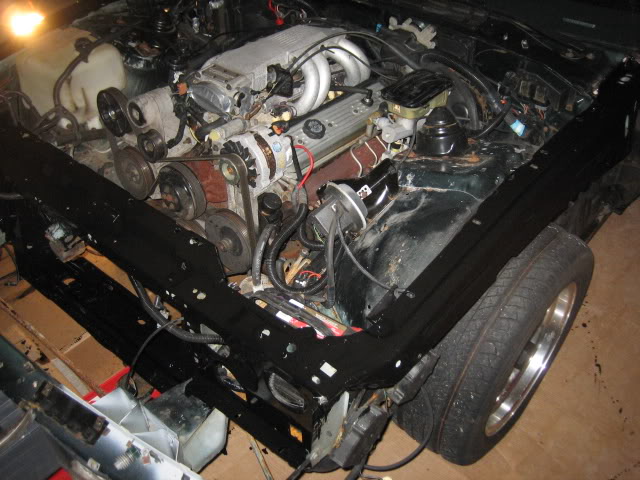
And today I DID manage to remove the radiator and the AC components. My rad cradle was NASTY! I pulled out the rad and condenser and I was greeted by a ton of dried up leaves, cigarette butts, and other crud. Apparently the fans do a good job of pulling crap up into there...
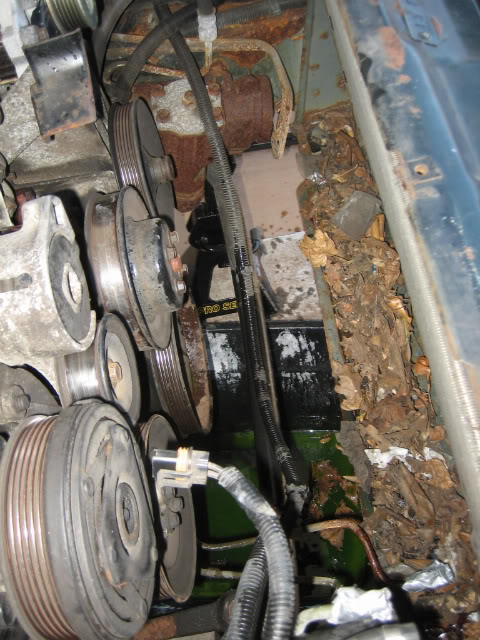
But a shop vac cleaned that up pretty nicely.
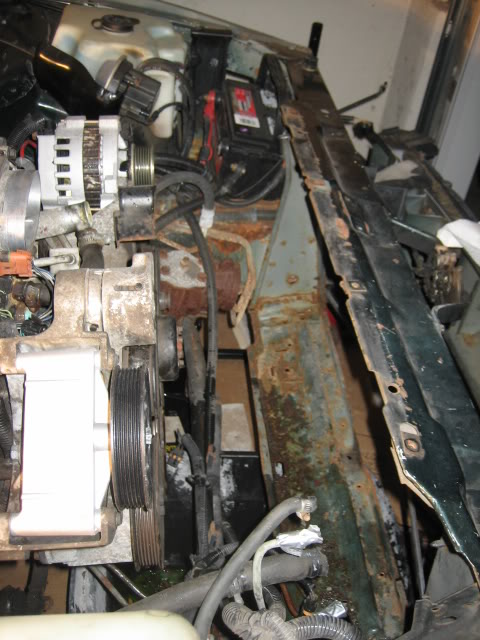
A picture of the engine bay without the AC stuff... looks a lot cleaner.
New heat exchange valve too... I broke the old one when when removing it.
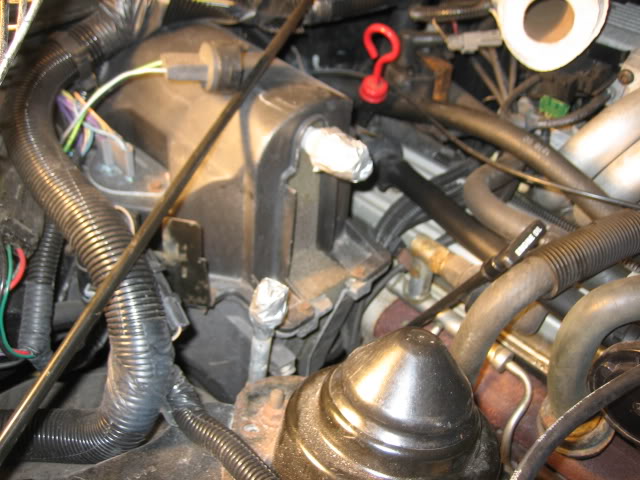
I duct taped the hoses sticking out of the heater box for now, but anybody know if there are caps made for them? I don't wanna convert the whole box.
AC equip, lots of dead weight gone (didn't work).
It's been a little while, but I got some stuff done today...
But not nearly as much as I would've liked, thanks to a good 3-4 hours lost to a muffler that slipped out of the cat in my DD (the Jimmy). Fixing it took 30 minutes... the rest of the time was spent on finding the damn parts. Is it just me or do a lot of auto parts stores just hate updating their inventories?
But back to the T/A. I ordered an ac delete pulley earlier this week from Summit and that came in 2 days later... with regular shipping (that's why I never get the expensive shipping... its a rip off!).
And today I DID manage to remove the radiator and the AC components. My rad cradle was NASTY! I pulled out the rad and condenser and I was greeted by a ton of dried up leaves, cigarette butts, and other crud. Apparently the fans do a good job of pulling crap up into there...
But a shop vac cleaned that up pretty nicely.
A picture of the engine bay without the AC stuff... looks a lot cleaner.
New heat exchange valve too... I broke the old one when when removing it.
I duct taped the hoses sticking out of the heater box for now, but anybody know if there are caps made for them? I don't wanna convert the whole box.
AC equip, lots of dead weight gone (didn't work).
Last edited by musclecar70sfan; 03-06-2010 at 08:17 PM.
03-06-2010, 08:11 PM
#75
Supreme Member
Thread Starter
iTrader: (1)
Join Date: Jun 2009
Location: Central Connecticut
Posts: 1,777
Likes: 0
Received 0 Likes
on
0 Posts
Car: 91 Trans Am 'vert
Engine: LB9
Transmission: T5
Axle/Gears: 3.45 9 bolt
Re: Finally starting to get serious about mine (project thread!)
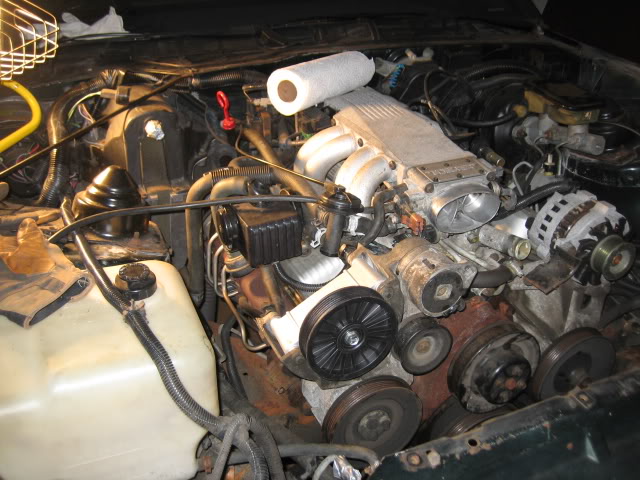
Just an overall shot of where I left off:
I'm considering getting a bigger cam now... considering that with all this stuff gone in front of the engine this would probably be the easiest time to do it.
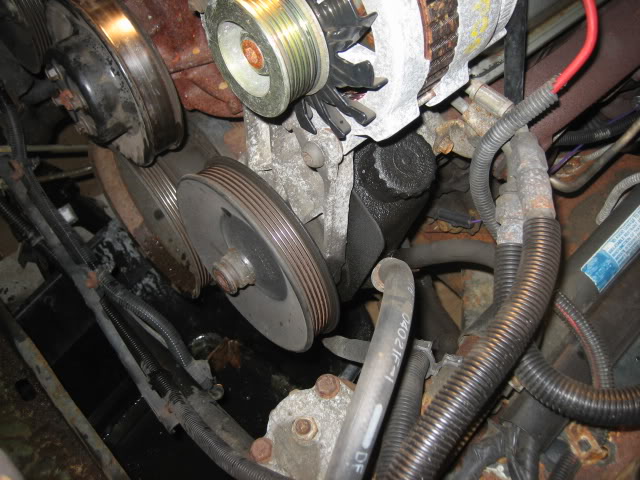
I think I might replace the PS pump now since it looks like it has a small leak
If it wasn't for my setbacks today, I would've rolled the car out and pressure washed it today. However the weather is supposed to be just as nice tomorrow (52 and sunny) so I plan on doing that then. I wanna degrease the engine bay and underside as best as I can, since it looks awful now. This older engine has some random small oil leaks, same with the transmission. Which gaskets are the ones that usually go on these?
Notice how I changed the title of this thread to include "budget." I haven't spent over $300 so far and by the looks of it I probably won't be spending a lot more, and this project isn't as serious as some that I've seen.
I'm considering getting a bigger cam now... considering that with all this stuff gone in front of the engine this would probably be the easiest time to do it.
I think I might replace the PS pump now since it looks like it has a small leak
If it wasn't for my setbacks today, I would've rolled the car out and pressure washed it today. However the weather is supposed to be just as nice tomorrow (52 and sunny) so I plan on doing that then. I wanna degrease the engine bay and underside as best as I can, since it looks awful now. This older engine has some random small oil leaks, same with the transmission.
Which gaskets are the ones that usually go on these?Notice how I changed the title of this thread to include "budget." I haven't spent over $300 so far and by the looks of it I probably won't be spending a lot more, and this project isn't as serious as some that I've seen.
Last edited by musclecar70sfan; 03-06-2010 at 08:15 PM.
03-06-2010, 08:13 PM
#76
Member
iTrader: (3)
Join Date: Jan 2009
Location: Classified
Posts: 319
Likes: 0
Received 0 Likes
on
0 Posts
Car: '92 Z28 Convertible
Engine: 305ci TPI
Transmission: 700R4 shifted
Axle/Gears: 2.73 (for now)
Re: Finally starting to get serious about mine ([*budget] project thread!)
Coming along nicely! When are you coming down to TX to help with my Vert?
03-06-2010, 08:21 PM
#77
Supreme Member
Thread Starter
iTrader: (1)
Join Date: Jun 2009
Location: Central Connecticut
Posts: 1,777
Likes: 0
Received 0 Likes
on
0 Posts
Car: 91 Trans Am 'vert
Engine: LB9
Transmission: T5
Axle/Gears: 3.45 9 bolt
Re: Finally starting to get serious about mine ([*budget] project thread!)
03-06-2010, 09:27 PM
#78
Member
iTrader: (3)
Join Date: Jan 2009
Location: Classified
Posts: 319
Likes: 0
Received 0 Likes
on
0 Posts
Car: '92 Z28 Convertible
Engine: 305ci TPI
Transmission: 700R4 shifted
Axle/Gears: 2.73 (for now)
Re: Finally starting to get serious about mine ([*budget] project thread!)
Thanks! I just wish I had the kind of garage space you have to work on her. I've got about 6 inches from the front bumper of extra space... When I told the wife what I was going to do she flipped because it will take up the entire garage and then some! It's nice to see that another convertible is going to stay on the road for years to come!
03-07-2010, 02:05 AM
#80
Member
Join Date: Jul 2000
Location: peru, il usa
Posts: 218
Likes: 0
Received 0 Likes
on
0 Posts
Car: 1989 Camaro convertible
Engine: 350
Transmission: 700r4
Axle/Gears: 3.27
Re: Finally starting to get serious about mine ([*budget] project thread!)
Going through some of the same stuff on my 89 convertible. I love your colors(green/tan). My car was Maroon to begin with, but the Pontiac color Dark yellow green was to nice. What kind of insulation did you put on the floor, and where did you get it, and how much$$ if you don't mind me asking? I have used about 5 different donor cars for parts for mine, so I am test fitting everything, and drilling new holes for the 91-92 ground effects. Almost ready for the primer, and paint.
03-07-2010, 08:05 AM
#81
Supreme Member
Thread Starter
iTrader: (1)
Join Date: Jun 2009
Location: Central Connecticut
Posts: 1,777
Likes: 0
Received 0 Likes
on
0 Posts
Car: 91 Trans Am 'vert
Engine: LB9
Transmission: T5
Axle/Gears: 3.45 9 bolt
Re: Finally starting to get serious about mine ([*budget] project thread!)
Going through some of the same stuff on my 89 convertible. I love your colors(green/tan). My car was Maroon to begin with, but the Pontiac color Dark yellow green was to nice. What kind of insulation did you put on the floor, and where did you get it, and how much$$ if you don't mind me asking? I have used about 5 different donor cars for parts for mine, so I am test fitting everything, and drilling new holes for the 91-92 ground effects. Almost ready for the primer, and paint.
03-07-2010, 08:35 AM
#82
Senior Member
Join Date: Apr 2006
Location: CT
Posts: 685
Likes: 0
Received 0 Likes
on
0 Posts
Car: 1988 Iroc
Engine: 5.7L
Transmission: '96 T56, Hurst Shifter, Mech VSS
Axle/Gears: 3.45 9 Bolt
Re: Finally starting to get serious about mine (project thread!)
Clean all the oil and tranny fluid residue, and get some dye. Put some in the oil, and some in the tranny. (they are different dyes, dont use the same for both) run the engine, and it will pin point exactly where they are coming from.
Good luck.
03-07-2010, 08:54 AM
#83
Supreme Member
Thread Starter
iTrader: (1)
Join Date: Jun 2009
Location: Central Connecticut
Posts: 1,777
Likes: 0
Received 0 Likes
on
0 Posts
Car: 91 Trans Am 'vert
Engine: LB9
Transmission: T5
Axle/Gears: 3.45 9 bolt
Re: Finally starting to get serious about mine (project thread!)
Most of the time it isnt gaskets. I have a small oil leak and trans leak. The oil leak, is coming from the oil pressure sender switch (the one above the oil filter) ad some random pin hole leaks around the oil pan. The tranny, mine leaks out of the seal in the tail shaft. Its right where the driveshaft enters the trans.
Clean all the oil and tranny fluid residue, and get some dye. Put some in the oil, and some in the tranny. (they are different dyes, dont use the same for both) run the engine, and it will pin point exactly where they are coming from.
Good luck.
Clean all the oil and tranny fluid residue, and get some dye. Put some in the oil, and some in the tranny. (they are different dyes, dont use the same for both) run the engine, and it will pin point exactly where they are coming from.
Good luck.
03-07-2010, 09:10 AM
#84
Senior Member
Join Date: Apr 2006
Location: CT
Posts: 685
Likes: 0
Received 0 Likes
on
0 Posts
Car: 1988 Iroc
Engine: 5.7L
Transmission: '96 T56, Hurst Shifter, Mech VSS
Axle/Gears: 3.45 9 Bolt
03-07-2010, 07:44 PM
#85
Supreme Member
Thread Starter
iTrader: (1)
Join Date: Jun 2009
Location: Central Connecticut
Posts: 1,777
Likes: 0
Received 0 Likes
on
0 Posts
Car: 91 Trans Am 'vert
Engine: LB9
Transmission: T5
Axle/Gears: 3.45 9 bolt
Re: Finally starting to get serious about mine (project thread!)
Just a quick update... forgot my camera so the cell phone pictures will have to do.
Finally got to pressure wash the car today!
I just threw the wheels on and took it off the stands. It fired up instantly after sitting for at least 3 weeks. I put the rad back in temporarily just because it has transmission lines going into it.
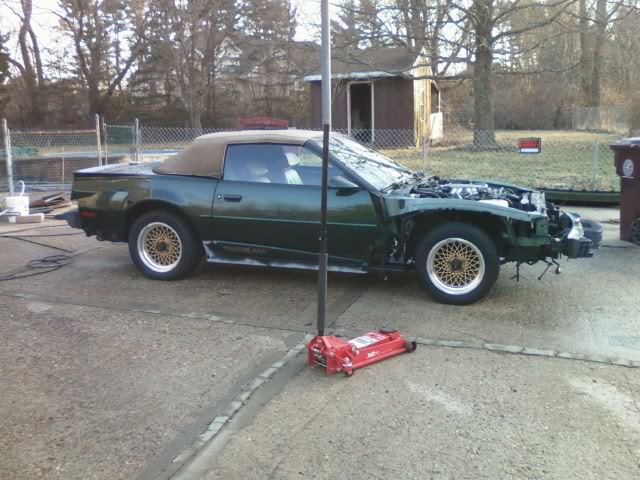
Engine doesn't look perfect, but MUCH better. I was using Purple Power. I think I might wash it again sometime with a cleaner designed just for degreasing engines. The engine actually wasn't running during the washing. I had the air intake (TB) covered up with tape. It actually started up right away despite being soaked.
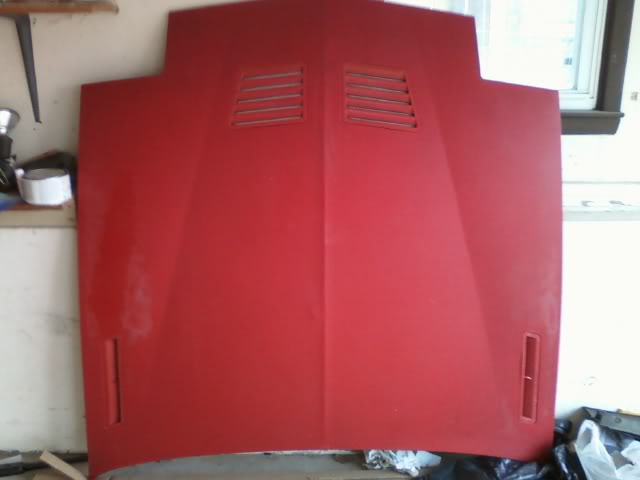
And I also washed the new hood. It's a pretty straight hood with just 1 small dent and the paint really isn't that bad except for some peeling clear coat on the left, buffing should make it nice. Too bad it doesn't match the color of my car.
I also reinstalled both front seats. It felt good to sit in the driver's seat again. Just a couple more weeks! I hope.
The car won't be totally perfect, but it won't take much to make it road worthy again. Since the idea for now is to make it drivable and ready for paint. I'll do the other random things (new rear end, headers, a few spots under the body, etc) whenever I get the chance. Hopefully it'll get painted in a month or less.
Finally got to pressure wash the car today!
I just threw the wheels on and took it off the stands. It fired up instantly after sitting for at least 3 weeks.
I put the rad back in temporarily just because it has transmission lines going into it.Engine doesn't look perfect, but MUCH better. I was using Purple Power. I think I might wash it again sometime with a cleaner designed just for degreasing engines. The engine actually wasn't running during the washing. I had the air intake (TB) covered up with tape. It actually started up right away despite being soaked.
And I also washed the new hood. It's a pretty straight hood with just 1 small dent and the paint really isn't that bad except for some peeling clear coat on the left, buffing should make it nice. Too bad it doesn't match the color of my car.
I also reinstalled both front seats. It felt good to sit in the driver's seat again. Just a couple more weeks! I hope.
The car won't be totally perfect, but it won't take much to make it road worthy again. Since the idea for now is to make it drivable and ready for paint. I'll do the other random things (new rear end, headers, a few spots under the body, etc) whenever I get the chance. Hopefully it'll get painted in a month or less.
Last edited by musclecar70sfan; 03-07-2010 at 08:32 PM.
03-07-2010, 08:09 PM
#86
Senior Member
Join Date: Apr 2006
Location: CT
Posts: 685
Likes: 0
Received 0 Likes
on
0 Posts
Car: 1988 Iroc
Engine: 5.7L
Transmission: '96 T56, Hurst Shifter, Mech VSS
Axle/Gears: 3.45 9 Bolt
Re: Finally starting to get serious about mine ([*budget] project thread!)
I really hope you didnt pressure wash the engine bay with the throttle body exposed like that....
It seems like everyone was working on or driving their cars this weekend (in ct at least) i worked on the iroc a little and drove it about 25 miles.
It seems like everyone was working on or driving their cars this weekend (in ct at least) i worked on the iroc a little and drove it about 25 miles.
03-07-2010, 08:28 PM
#87
Supreme Member
Thread Starter
iTrader: (1)
Join Date: Jun 2009
Location: Central Connecticut
Posts: 1,777
Likes: 0
Received 0 Likes
on
0 Posts
Car: 91 Trans Am 'vert
Engine: LB9
Transmission: T5
Axle/Gears: 3.45 9 bolt
Re: Finally starting to get serious about mine ([*budget] project thread!)
Hahaha don't worry... I appreciate the concern though. But I can see why everyone was working on their cars, the weather was TERRIFIC! Did you notice how suddenly it changed once March came? Last edited by musclecar70sfan; 03-07-2010 at 08:34 PM.
03-08-2010, 05:58 PM
#88
Supreme Member
Thread Starter
iTrader: (1)
Join Date: Jun 2009
Location: Central Connecticut
Posts: 1,777
Likes: 0
Received 0 Likes
on
0 Posts
Car: 91 Trans Am 'vert
Engine: LB9
Transmission: T5
Axle/Gears: 3.45 9 bolt
Re: Finally starting to get serious about mine ([*budget] project thread!)
Update... wow 3 days in a row woohoo!
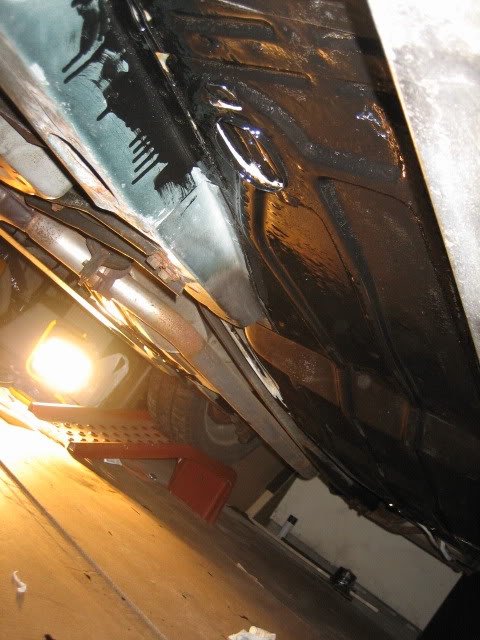
I coated the front unibody frame (whatever you call it) and the rad cradle with Chassis Saver.
Before:
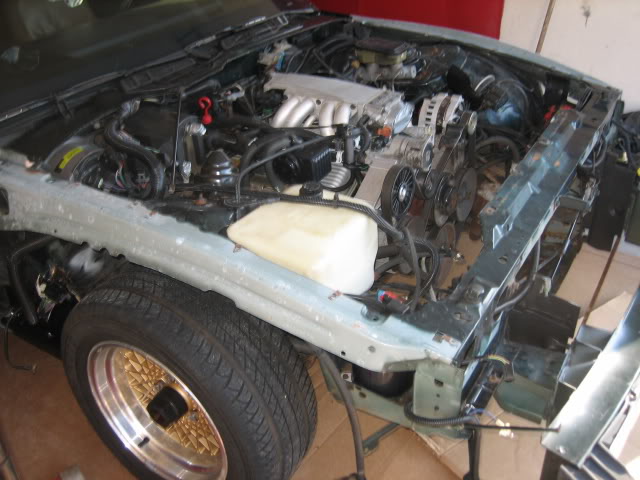
After:


At first I thought I would only hit the rusty parts but then I decided it would look better if it was all a consistent black rather than look like some rare skin disease. This stuff didn't stick too well on some of the shinier metal parts... don't worry... I WILL make it stick.
I'll probably hit the 2nd coat tomorrow. How many coats do you guys recommend?
However painting this stuff on has to be my least favorite part of the project. But hopefully it'll be worth it!
I know... my garage is a mess.
I coated the front unibody frame (whatever you call it) and the rad cradle with Chassis Saver.
Before:
After:
At first I thought I would only hit the rusty parts but then I decided it would look better if it was all a consistent black rather than look like some rare skin disease. This stuff didn't stick too well on some of the shinier metal parts... don't worry... I WILL make it stick.
I'll probably hit the 2nd coat tomorrow. How many coats do you guys recommend?
However painting this stuff on has to be my least favorite part of the project. But hopefully it'll be worth it!
I know... my garage is a mess.
03-08-2010, 08:47 PM
#89
Junior Member

Join Date: Jan 2005
Location: trenton IL
Posts: 80
Likes: 0
Received 1 Like
on
1 Post
Car: 86 berlinetta
Engine: 383
Transmission: built 700r4
Axle/Gears: 3.42 zexel torsen
Re: Finally starting to get serious about mine ([*budget] project thread!)
looks like your on your way to a nice ride. However, you should have cut all the rust out and replaced it with good steel. even if it cost you some cash it would have been worth it in the long run. Never cover up rust. Sorry, just being honest. Other than the rust everything looks good and your doing a good job. Just remember not to "patch" things....fix it and you won't have to do the job twice.
03-08-2010, 08:55 PM
#90
Supreme Member
Thread Starter
iTrader: (1)
Join Date: Jun 2009
Location: Central Connecticut
Posts: 1,777
Likes: 0
Received 0 Likes
on
0 Posts
Car: 91 Trans Am 'vert
Engine: LB9
Transmission: T5
Axle/Gears: 3.45 9 bolt
Re: Finally starting to get serious about mine ([*budget] project thread!)
looks like your on your way to a nice ride. However, you should have cut all the rust out and replaced it with good steel. even if it cost you some cash it would have been worth it in the long run. Never cover up rust. Sorry, just being honest. Other than the rust everything looks good and your doing a good job. Just remember not to "patch" things....fix it and you won't have to do the job twice.
03-08-2010, 09:33 PM
#91
Supreme Member
iTrader: (5)
Join Date: Aug 2006
Location: Cleveland, Ohio
Posts: 2,491
Likes: 0
Received 5 Likes
on
5 Posts
Car: 89' IROC-Z
Engine: LO3
Transmission: 700R4
Axle/Gears: 10-Bolt/2.73
Re: Finally starting to get serious about mine ([*budget] project thread!)
Cleaned up great. I need to do this to mine, in which I am going to fix my rust as I fix the parts that bolt to it or by it. Resulting in the skin disease look for a little while. I'm not going for looks just yet so it won't bother me.
03-10-2010, 05:44 PM
#92
Supreme Member
Thread Starter
iTrader: (1)
Join Date: Jun 2009
Location: Central Connecticut
Posts: 1,777
Likes: 0
Received 0 Likes
on
0 Posts
Car: 91 Trans Am 'vert
Engine: LB9
Transmission: T5
Axle/Gears: 3.45 9 bolt
Re: Finally starting to get serious about mine ([*budget] project thread!)
Sure whatever works. I just got a little "paint brush happy" so I did almost all of it lol.
03-11-2010, 10:00 AM
#93
Supreme Member

Re: Finally starting to get serious about mine ([*budget] project thread!)
Looks like you are doing a nice job here.
03-11-2010, 02:11 PM
#94
Supreme Member
Thread Starter
iTrader: (1)
Join Date: Jun 2009
Location: Central Connecticut
Posts: 1,777
Likes: 0
Received 0 Likes
on
0 Posts
Car: 91 Trans Am 'vert
Engine: LB9
Transmission: T5
Axle/Gears: 3.45 9 bolt
Re: Finally starting to get serious about mine ([*budget] project thread!)
Thanks! I'm thinking of pulling the water pump out and doing that "electrolysis" rust removal method on it and then paint it black or silver since that rust-colored thing is an eyesore. I might also paint the accessory brackets... those are aluminum right?
03-11-2010, 02:21 PM
#95
Supreme Member
iTrader: (5)
Join Date: Aug 2006
Location: Cleveland, Ohio
Posts: 2,491
Likes: 0
Received 5 Likes
on
5 Posts
Car: 89' IROC-Z
Engine: LO3
Transmission: 700R4
Axle/Gears: 10-Bolt/2.73
Re: Finally starting to get serious about mine ([*budget] project thread!)
Can the driver side accessory bracket be removed without removing the power steering pulley. Maybe snaking the bottom of it out by twisting it away from the pump/pulley towards the passenger side? I am under the impression the pulley and pump will need removed as well?
Last edited by I H8 WWD; 03-11-2010 at 02:31 PM.
03-11-2010, 02:26 PM
#96
Supreme Member
Thread Starter
iTrader: (1)
Join Date: Jun 2009
Location: Central Connecticut
Posts: 1,777
Likes: 0
Received 0 Likes
on
0 Posts
Car: 91 Trans Am 'vert
Engine: LB9
Transmission: T5
Axle/Gears: 3.45 9 bolt
Re: Finally starting to get serious about mine ([*budget] project thread!)
Yeah it probably would need that. I didn't take a good look at that yet.
03-11-2010, 02:35 PM
#97
Supreme Member
iTrader: (5)
Join Date: Aug 2006
Location: Cleveland, Ohio
Posts: 2,491
Likes: 0
Received 5 Likes
on
5 Posts
Car: 89' IROC-Z
Engine: LO3
Transmission: 700R4
Axle/Gears: 10-Bolt/2.73
Re: Finally starting to get serious about mine ([*budget] project thread!)
I'm asking because I have my passenger side bracket out and want to paint them both, but do not want to mess up removing the pulley and not getting it back on. I have a puller but unsure if it will work as an installer, since these pulleys are pressed on, and if it is an installer, won't that put stress on the internals pushing on the pump shaft to install the pulley? I just don't want to have to buy my KRC setup yet. Just want to clean these nasty brackets.
03-11-2010, 02:49 PM
#98
Supreme Member
Thread Starter
iTrader: (1)
Join Date: Jun 2009
Location: Central Connecticut
Posts: 1,777
Likes: 0
Received 0 Likes
on
0 Posts
Car: 91 Trans Am 'vert
Engine: LB9
Transmission: T5
Axle/Gears: 3.45 9 bolt
Re: Finally starting to get serious about mine ([*budget] project thread!)
I'm asking because I have my passenger side bracket out and want to paint them both, but do not want to mess up removing the pulley and not getting it back on. I have a puller but unsure if it will work as an installer, since these pulleys are pressed on, and if it is an installer, won't that put stress on the internals pushing on the pump shaft to install the pulley? I just don't want to have to buy my KRC setup yet. Just want to clean these nasty brackets.
03-11-2010, 02:50 PM
#99
Member
Join Date: Jul 2000
Location: peru, il usa
Posts: 218
Likes: 0
Received 0 Likes
on
0 Posts
Car: 1989 Camaro convertible
Engine: 350
Transmission: 700r4
Axle/Gears: 3.27
Re: Finally starting to get serious about mine ([*budget] project thread!)
When I did my engine in 2003, we had to use a special removal tool to take the pulley off, and put it back on if I remember. I bet they rent the tool at most chain auto parts stores. I think I had to take the pulley off to remove the driver's side serpentine bracket. It has been awhile, but I am pretty sure that is the only way to get that off there!
03-11-2010, 02:52 PM
#100
Supreme Member
Thread Starter
iTrader: (1)
Join Date: Jun 2009
Location: Central Connecticut
Posts: 1,777
Likes: 0
Received 0 Likes
on
0 Posts
Car: 91 Trans Am 'vert
Engine: LB9
Transmission: T5
Axle/Gears: 3.45 9 bolt
Re: Finally starting to get serious about mine ([*budget] project thread!)
When I did my engine in 2003, we had to use a special removal tool to take the pulley off, and put it back on if I remember. I bet they rent the tool at most chain auto parts stores. I think I had to take the pulley off to remove the driver's side serpentine bracket. It has been awhile, but I am pretty sure that is the only way to get that off there!
Thanks man! I might need a new PS pump anyway since mine's pretty dirty... probably has a leak somewhere.