FINALLY! Out with the old...in with the new!!
 04-03-2012, 07:25 PM
#101
Supreme Member

Join Date: Mar 2004
Location: In the Garage
Posts: 2,519
Likes: 0
Received 4 Likes
on
3 Posts
Car: Camaro
Engine: 6.2L
Transmission: T56
Re: FINALLY! Out with the old...in with the new!!
The only "issues" Ive seen with rod bolt swaps is the damn ferrules. Some have them, some dont, some are small, some are BIG, Regardless if they are present it seems if they are not removed this is what causes all the muss and fuss with a straight rod bolt swap rather than the resizing myth.
 04-10-2012, 07:11 PM
#102
LS1 carnage confirmed!!!
Thanks cam... I think I'm pretty much at ease at this point. I think I might actually remove the pistons from the rods on the LS1 and sell the pistons by themselves, and the LS1 block + crank as another item. This way I can just use the ARP bolts that are in there and not worry about trying to sell it without em.
UPDATE: I got to tear into the LS1 a little. Not nearly as much as I wanted to get done, but enough that I officially know what happened.
My thought was that I bent a rod. And I was right. When I tried to turn the motor over without the heads on, it wouldn't budge. It would go in one direction then stop. Then go the other..and stop. I had to give it a good shove for it to keep going. This stopping point was when #7 was at the bottom of its travel. So... #7 bent.
Here are some pics and more explanation.
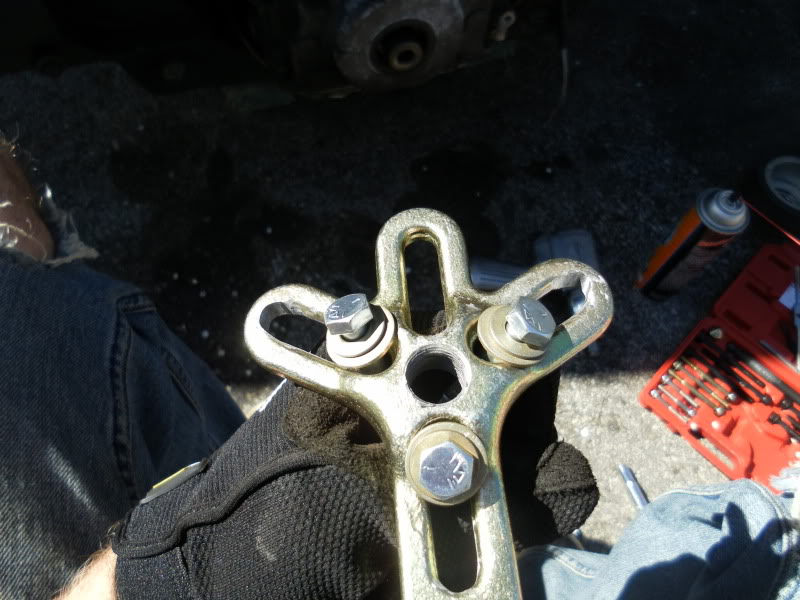
First thing I wanted to do was remove the balancer. This was a PITA. The ASP underdrive pulley has three threaded holes for a puller. The threads are SUPPOSED to be 5/16-24, fine thread. However someone apparently jambed 5/16-18 in...then tried 8mm. So they were buggered. I tapped/restored them back to original. Then realized I had no bolts in fine thread haha. Trip to the hardware store.
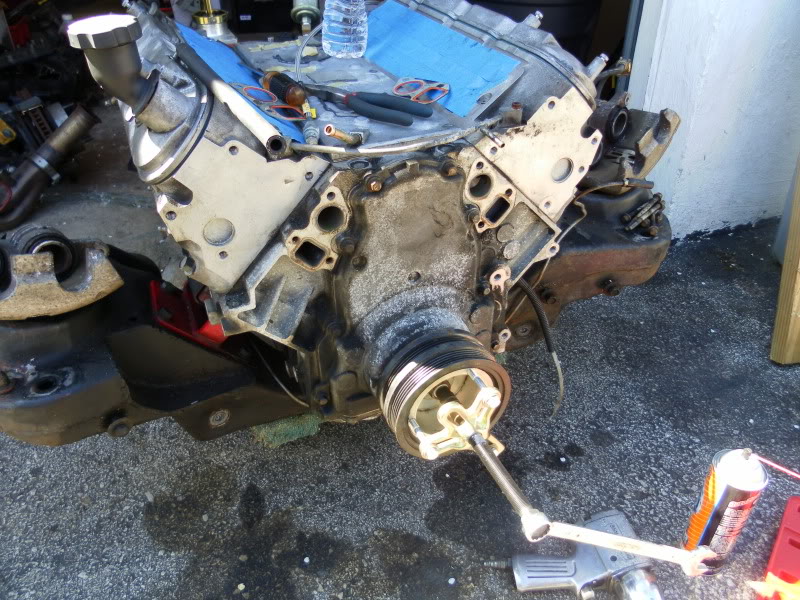
Second issue was that the balancer puller I was using was JUST a hair too small. The spread. SO I had to modify it. And the only thing I had at my parents house was an air dremel and one little stone bit.
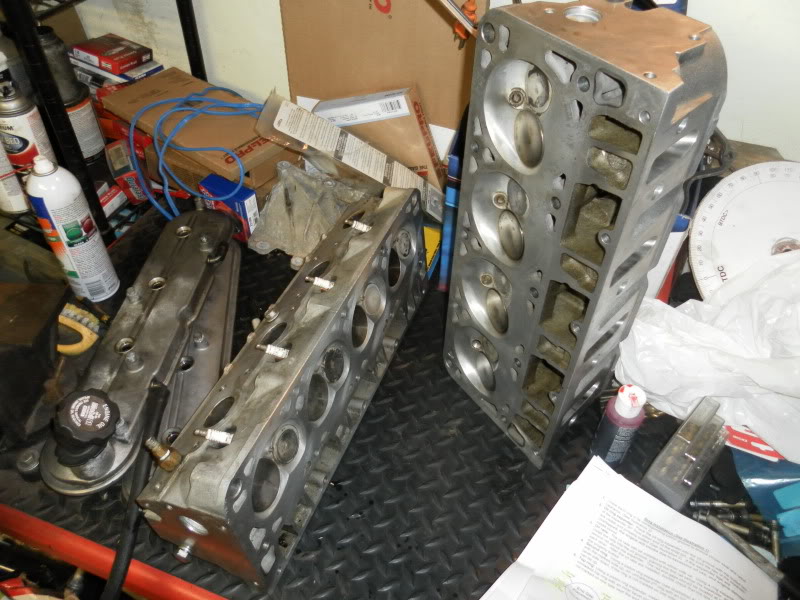
Then I started pulling heads. VC's off and things are still looking nice and clean in there.
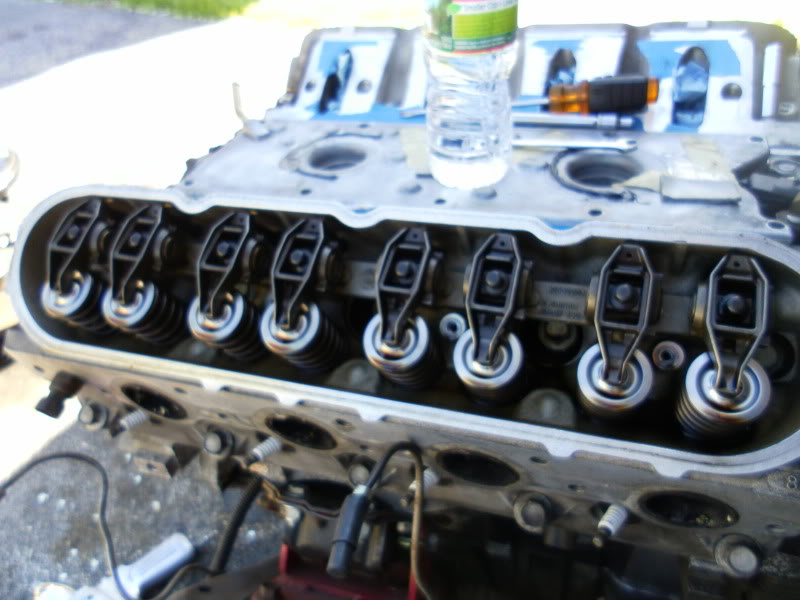
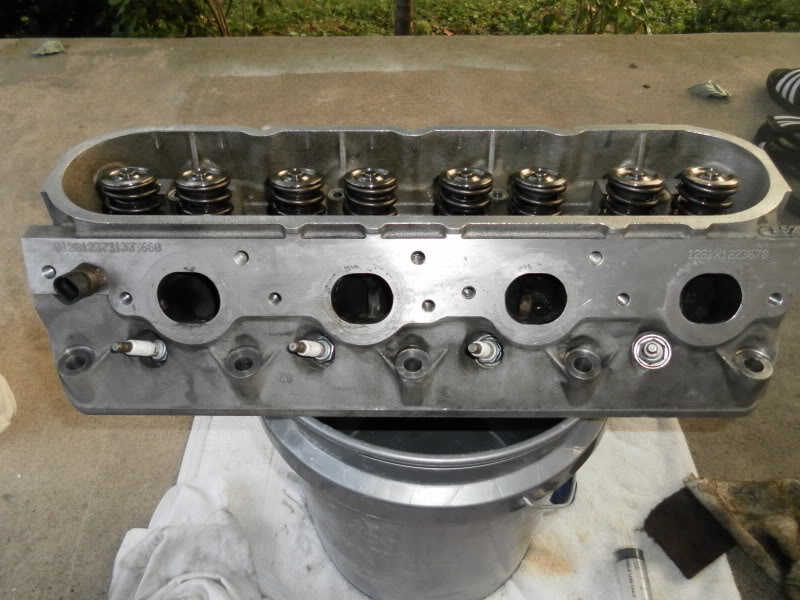
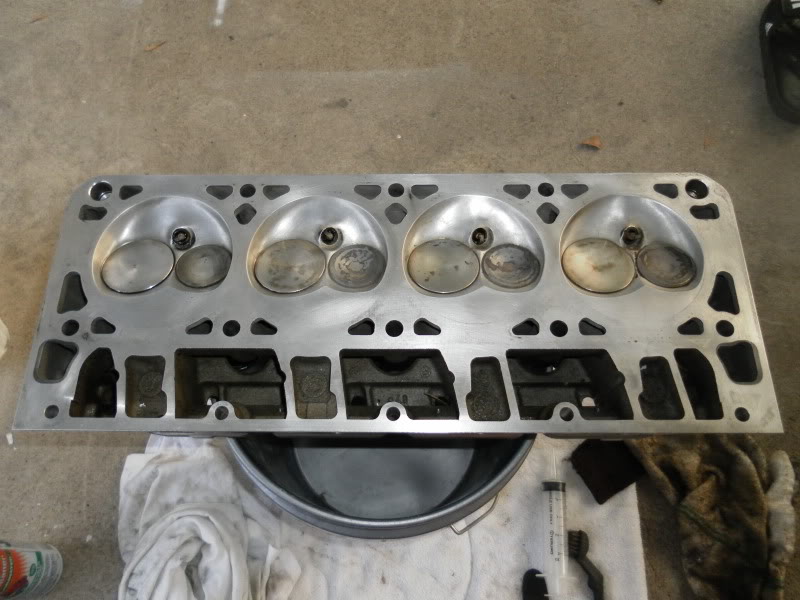
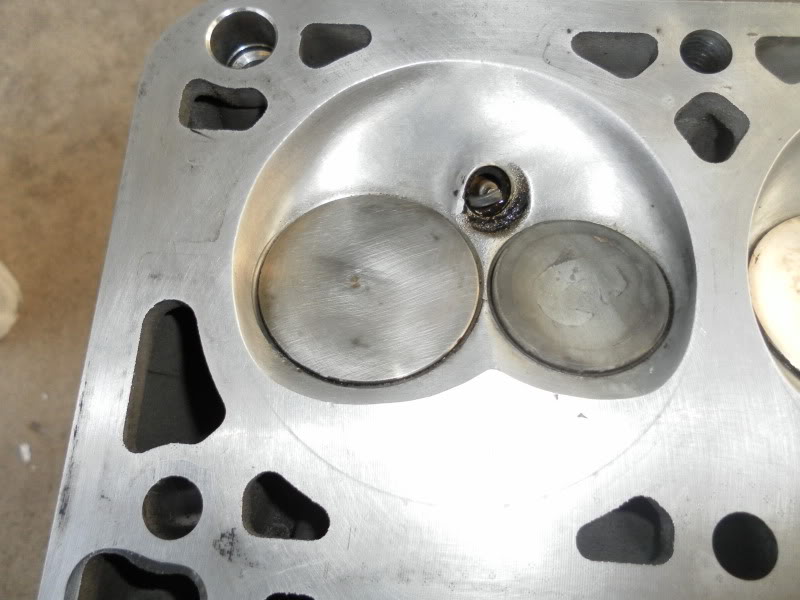
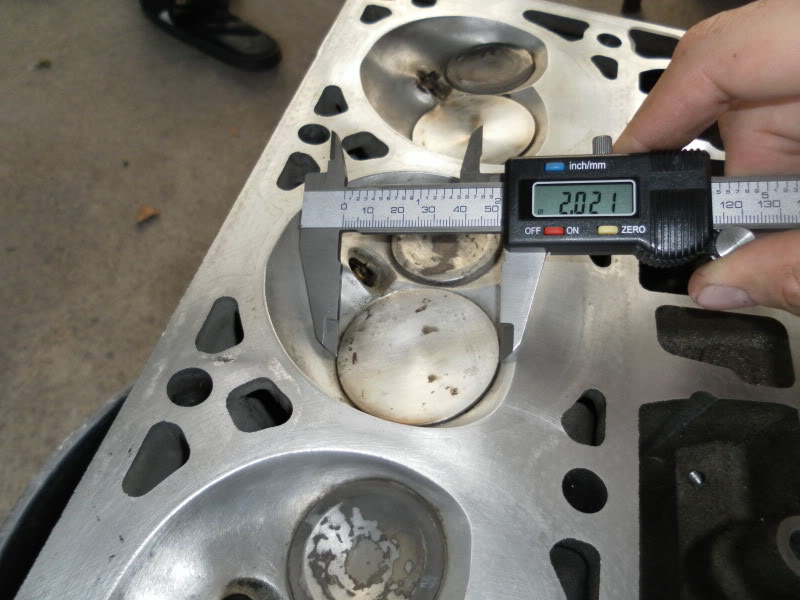
Here's the underside of the one of the heads. They have some soot, but will clean up nice with a little work. Up until now, I had no real idea what I had for heads. Just the sellers word. They are claimed to be MTI Stage 2e heads. However they are an older set. So no fancy markings or anything. They are 862 casting 5.3 heads. I know they are ported and polished. The first thing I did was measure the intake valve. 2.01". NICE! So those were upgraded. Im feeling pretty confident they are still a nice set of heads and they seemed to flow really well on the LS1. So I shouldnt have any issues with em. New springs like some suggested and seals.
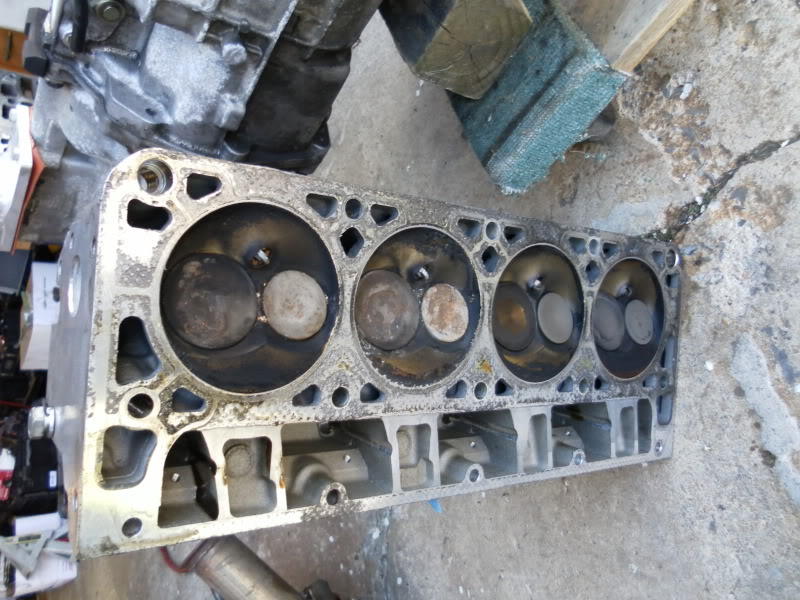
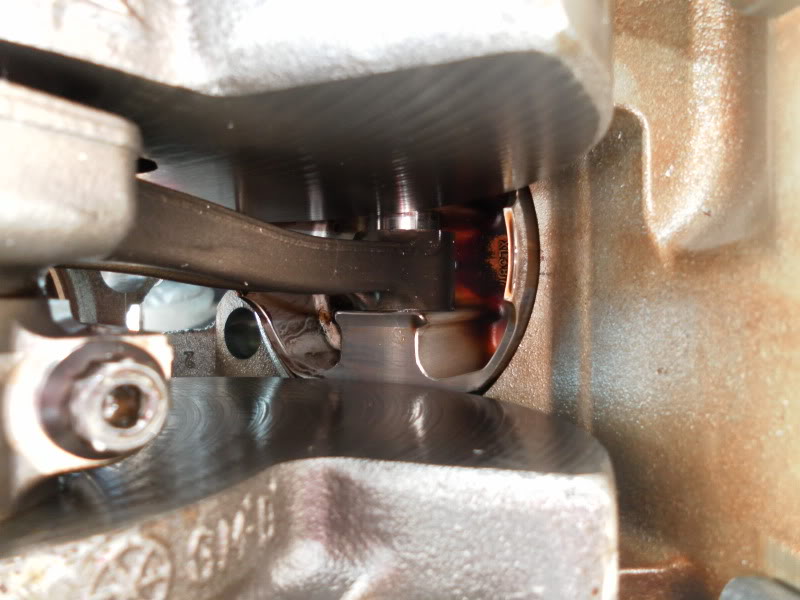
Here is proof of the damage. Piston #4. TDC.
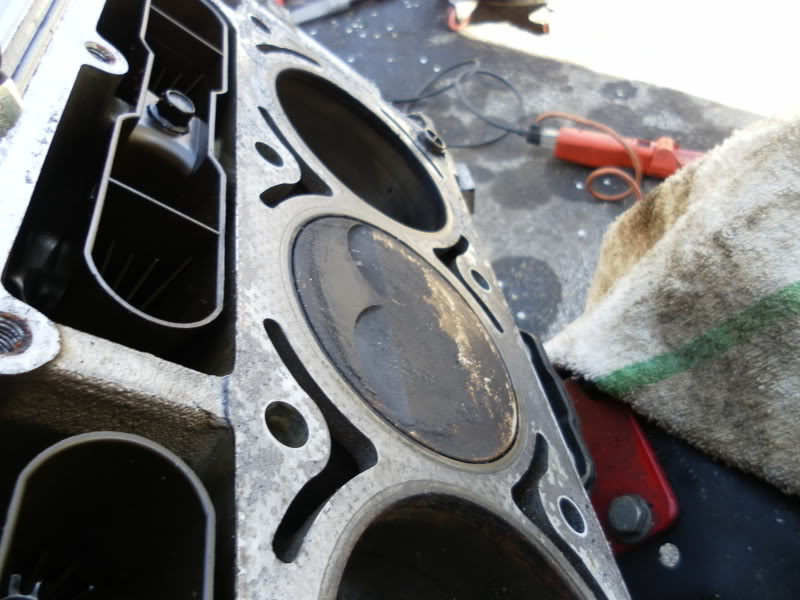
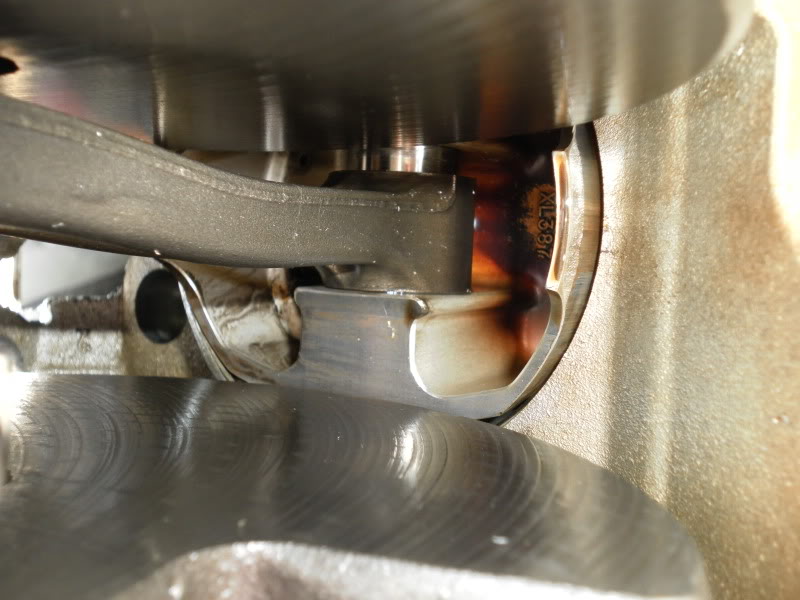
Piston #7 which should also be at TDC...
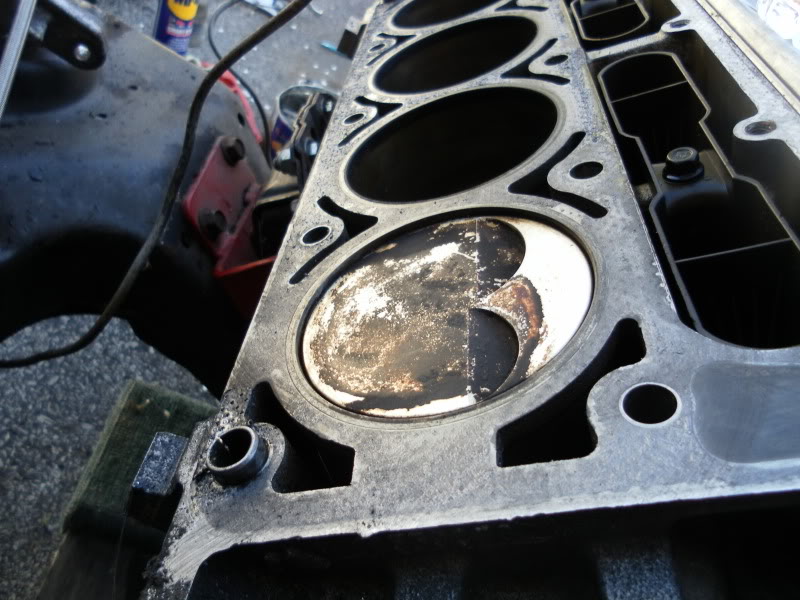
As you can see, its not bent THAT bad. Probably due to locking at an idle vs. under load. So Im hoping that the block didnt get too tore up since it was able to rotate fairly easily.
Thats about as far as I got. I want to finish tearing the LS1 down asap. Does anyone have any suggestions on selling the block/pistons? Should I just steal the ARP bolts out of it, and sell it as an LS1 short block that needs new rods and rod bolts? Or should I take out the ARPs, ditch the rods, and sell the LS1 block + crank as a set and sell the pistons separate?
The pistons are nice. Ross Boost flat tops with reliefs. #7 looks fine from the top. Cylinder wall looks great. So Im assuming, and will confirm, that the piston is ok. Since the stock rod was the weak point and bent quick.
More to come soon hopefully!
J.
UPDATE: I got to tear into the LS1 a little. Not nearly as much as I wanted to get done, but enough that I officially know what happened.
My thought was that I bent a rod. And I was right. When I tried to turn the motor over without the heads on, it wouldn't budge. It would go in one direction then stop. Then go the other..and stop. I had to give it a good shove for it to keep going. This stopping point was when #7 was at the bottom of its travel. So... #7 bent.
Here are some pics and more explanation.
First thing I wanted to do was remove the balancer. This was a PITA. The ASP underdrive pulley has three threaded holes for a puller. The threads are SUPPOSED to be 5/16-24, fine thread. However someone apparently jambed 5/16-18 in...then tried 8mm. So they were buggered. I tapped/restored them back to original. Then realized I had no bolts in fine thread haha. Trip to the hardware store.
Second issue was that the balancer puller I was using was JUST a hair too small. The spread. SO I had to modify it. And the only thing I had at my parents house was an air dremel and one little stone bit.
Then I started pulling heads. VC's off and things are still looking nice and clean in there.
Here's the underside of the one of the heads. They have some soot, but will clean up nice with a little work. Up until now, I had no real idea what I had for heads. Just the sellers word. They are claimed to be MTI Stage 2e heads. However they are an older set. So no fancy markings or anything. They are 862 casting 5.3 heads. I know they are ported and polished. The first thing I did was measure the intake valve. 2.01". NICE! So those were upgraded. Im feeling pretty confident they are still a nice set of heads and they seemed to flow really well on the LS1. So I shouldnt have any issues with em. New springs like some suggested and seals.
Here is proof of the damage. Piston #4. TDC.
Piston #7 which should also be at TDC...
As you can see, its not bent THAT bad. Probably due to locking at an idle vs. under load. So Im hoping that the block didnt get too tore up since it was able to rotate fairly easily.
Thats about as far as I got. I want to finish tearing the LS1 down asap. Does anyone have any suggestions on selling the block/pistons? Should I just steal the ARP bolts out of it, and sell it as an LS1 short block that needs new rods and rod bolts? Or should I take out the ARPs, ditch the rods, and sell the LS1 block + crank as a set and sell the pistons separate?
The pistons are nice. Ross Boost flat tops with reliefs. #7 looks fine from the top. Cylinder wall looks great. So Im assuming, and will confirm, that the piston is ok. Since the stock rod was the weak point and bent quick.
More to come soon hopefully!
J.
04-10-2012, 10:28 PM
#103
Supreme Member
iTrader: (1)
Join Date: Mar 2007
Location: Apopka, Florida
Posts: 1,237
Likes: 0
Received 7 Likes
on
6 Posts
Car: 1989 Pontiac Trans Am GTA
Engine: cammed LS1
Transmission: Monster SS 4L65E
Axle/Gears: 9 bolt posi w/ 3.70 gears
Re: FINALLY! Out with the old...in with the new!!
It sucks that you bent a rod! Were you getting on it when it happened?
Couldn't you just put the rod bolts from your current engine on the LS1 rods and use the ARP's on your current engine? Chances are whomever buys that engine will put new rod bolts on it anyways. Maybe just let the buyer know that they are stock rod bolts. How about getting another rod and selling the complete short block? Assuming the block is okay from the bent rod. That's what I would do if possible.
Couldn't you just put the rod bolts from your current engine on the LS1 rods and use the ARP's on your current engine? Chances are whomever buys that engine will put new rod bolts on it anyways. Maybe just let the buyer know that they are stock rod bolts. How about getting another rod and selling the complete short block? Assuming the block is okay from the bent rod. That's what I would do if possible.
04-11-2012, 06:33 AM
#104
Re: FINALLY! Out with the old...in with the new!!
Nope. Clutch in, car at idle. Rolled into a puddle, realized it was deeper than I thought...but it was too late. Darn motor huffed enough in to shut it down.
I thought about trying to replace the rod. I guess it wouldnt be too bad, but I feel like that motor should be gone through at this point anyway. Maybe Ill see what it looks like when I get it apart.
Im pretty sure Ill just stick the stock rod bolts from the 6.0 in there. But Im not 100% sure what rods are in my LS1. They are "resized" stockers according to the invoices. But I dont know if they'll use the ferrules, or if I can even get the ferrules in them...etc. We'll see!
J.
04-11-2012, 09:13 AM
#105
Supreme Member
iTrader: (1)
Join Date: Mar 2007
Location: Apopka, Florida
Posts: 1,237
Likes: 0
Received 7 Likes
on
6 Posts
Car: 1989 Pontiac Trans Am GTA
Engine: cammed LS1
Transmission: Monster SS 4L65E
Axle/Gears: 9 bolt posi w/ 3.70 gears
Re: FINALLY! Out with the old...in with the new!!
Oh, bummer!
Yeah, I was thinking that the person that buys that engine should go through it just to be safe. I think if everything was there that was needed though that it would still be a nice deal for someone. Again, this is assuming everything looks okay once you get it apart.
I just did my research on ferrules since I am swapping out my rod bolts too. I just bought a set of the ARP2000 rod bolts for mine. I'm glad you guys mentioned the ferrules. Otherwise I could have been in trouble down the road.
04-11-2012, 01:28 PM
#106
Member
iTrader: (4)
Join Date: Jun 2001
Location: new phila, oh
Posts: 278
Likes: 0
Received 0 Likes
on
0 Posts
Car: 1990 RS
Engine: LS1
Transmission: T56
Axle/Gears: 3.73 9 bolt
Re: FINALLY! Out with the old...in with the new!!
For rod bolts I just put Katechs in my LS1 and from what I read all 00+ LS motors got the ferrules, because of the weak rod bolts in previous years. Mine were really easy to remove. I loosened the bolt up and threaded it into the ferrule and then used a pair of vise grips to lock onto the head and with a slight wiggle they all popped right out.
05-10-2012, 10:32 AM
#107
Re: FINALLY! Out with the old...in with the new!!
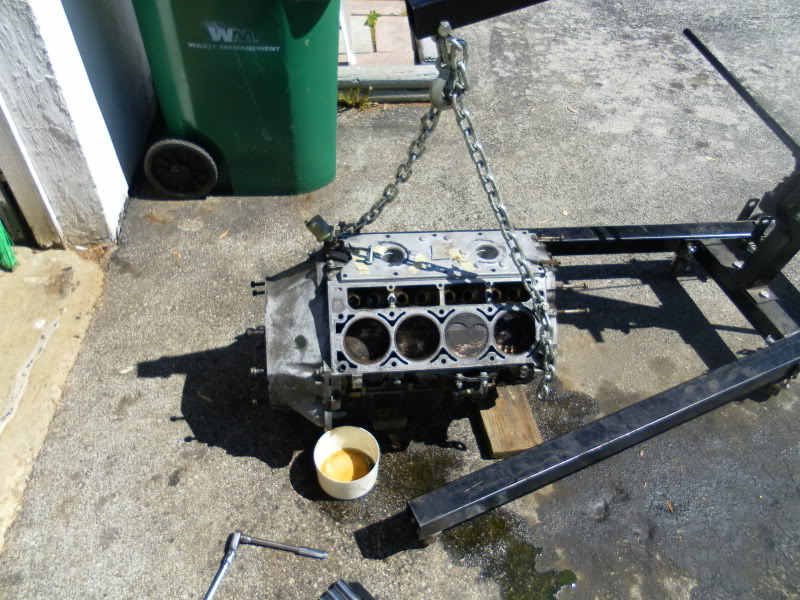
Hey all. Well...I havent given up. Life is just kind of hectic right now. I have lots of family obligations, no time...and NO MONEY. Ive been slowly pecking away at getting things apart. And I really need to get on the ball with selling things so I can get more parts in.
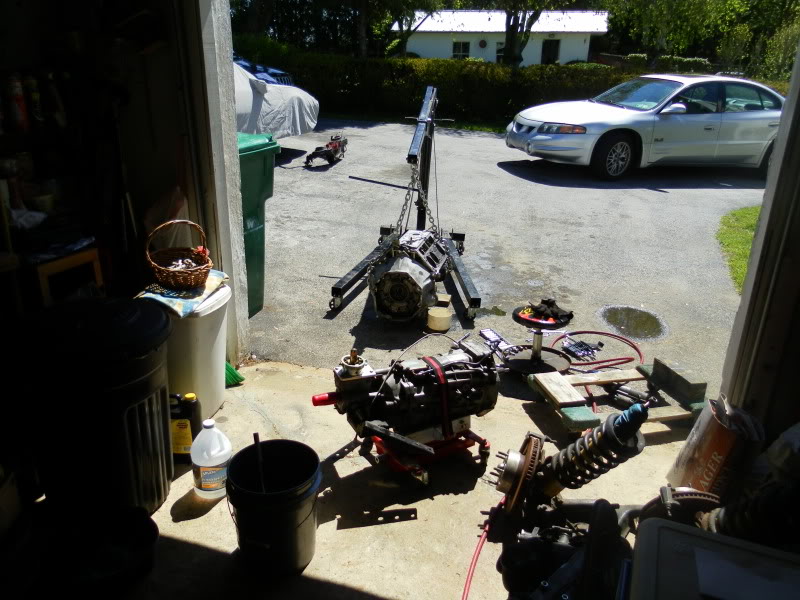
Here are some pictures of the LS1/T56 separation and tear down in case anyone is bored haha.
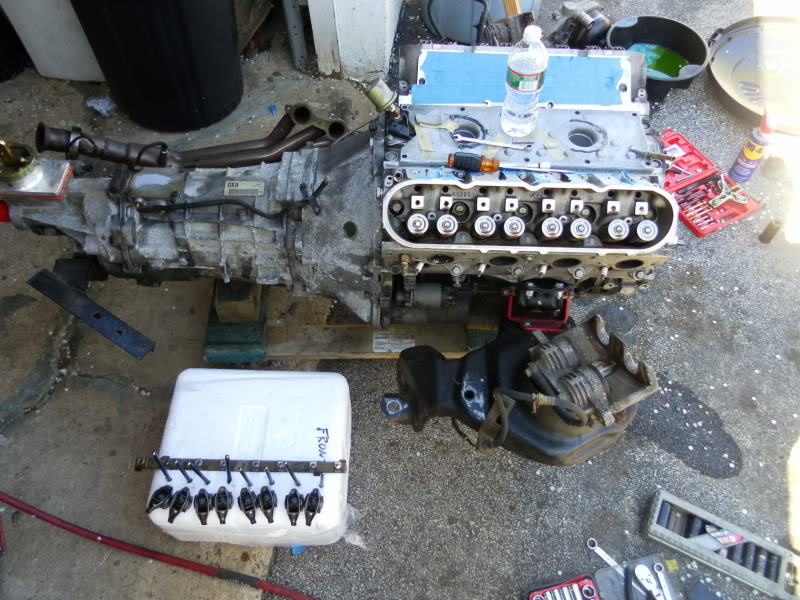
Started by separating the trans and motor.
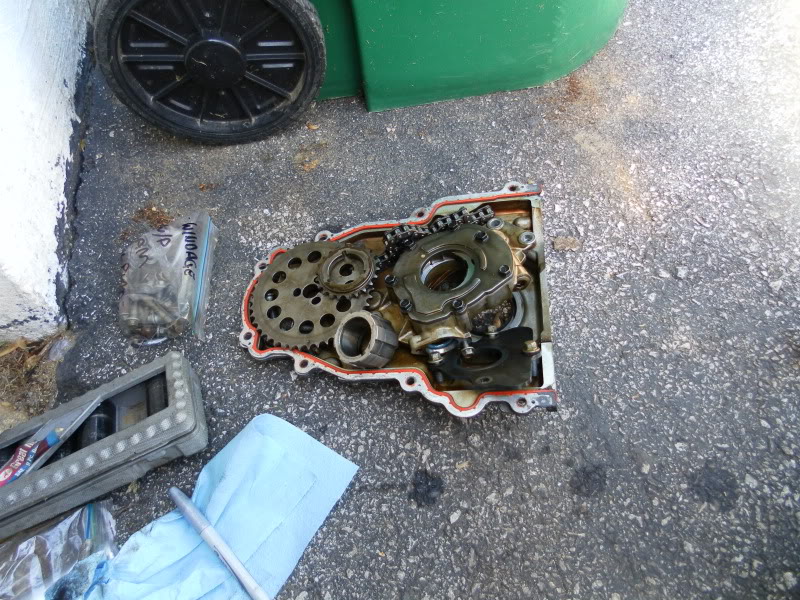
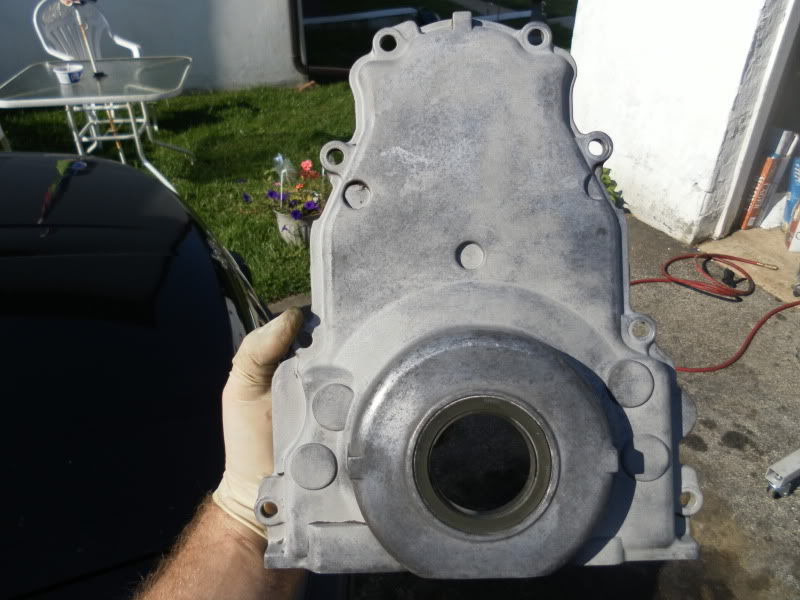
Then I pulled off the front cover. You can see the Cloyes adjustable timing set here.
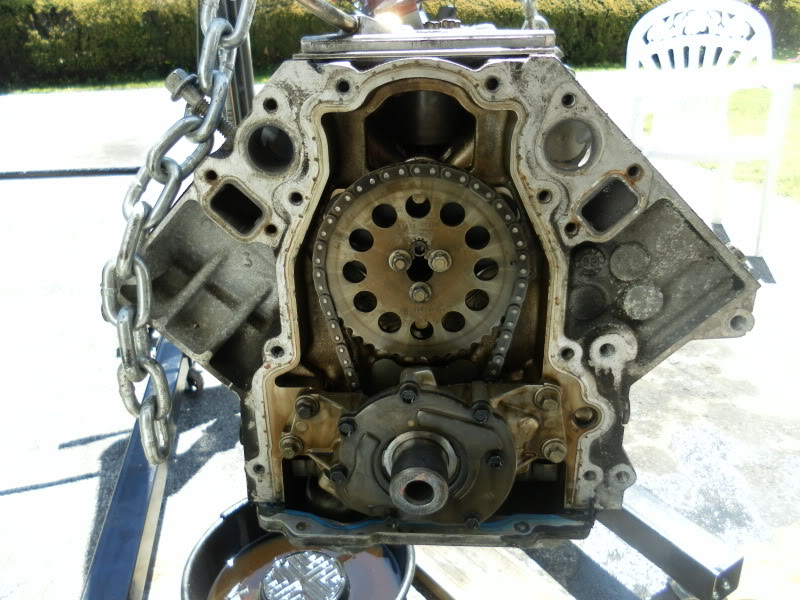
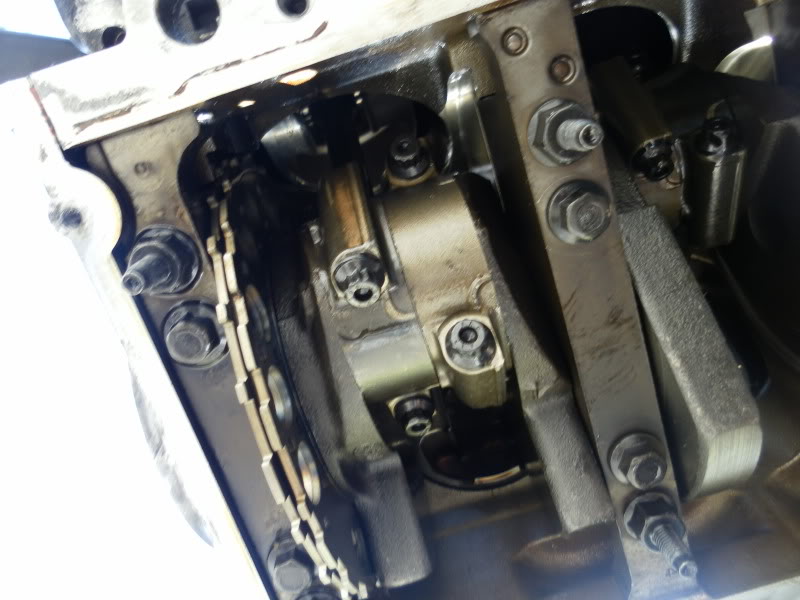
Pulled off the timing gear and...SURPRISE!! 3 out of 4 bolts holding the cam retainer plate on!! This motor was beaten on constantly. Lots of 7k rpm pulls. But I guess 3 is enough hahaha. It did not vibe out and get eaten by the motor...
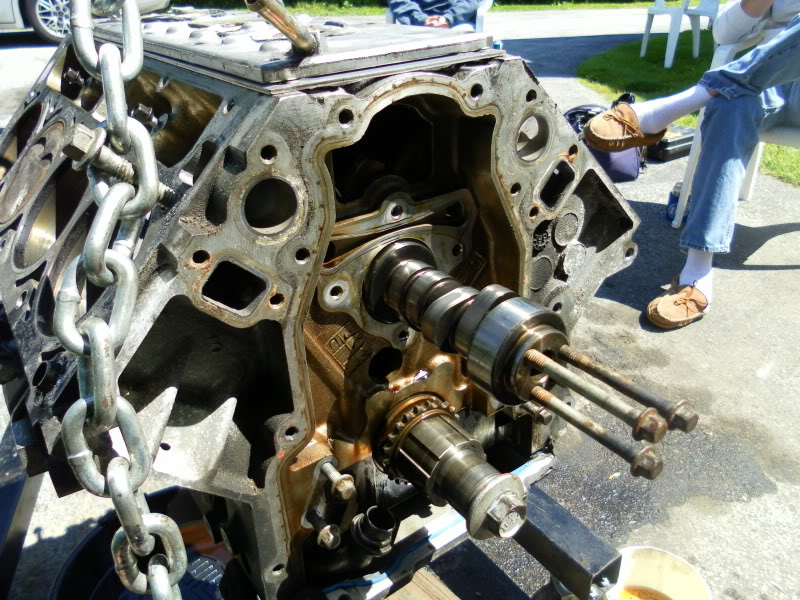
Pulled the cam. Looks pretty good. Normal roller wear on the lobes. Everything is smooth. I would like to sell it I think..esp if it helps me get something new. I dont want to mess with the hex-a-just timing set. Just want to install something straight up.
Pile of parts.
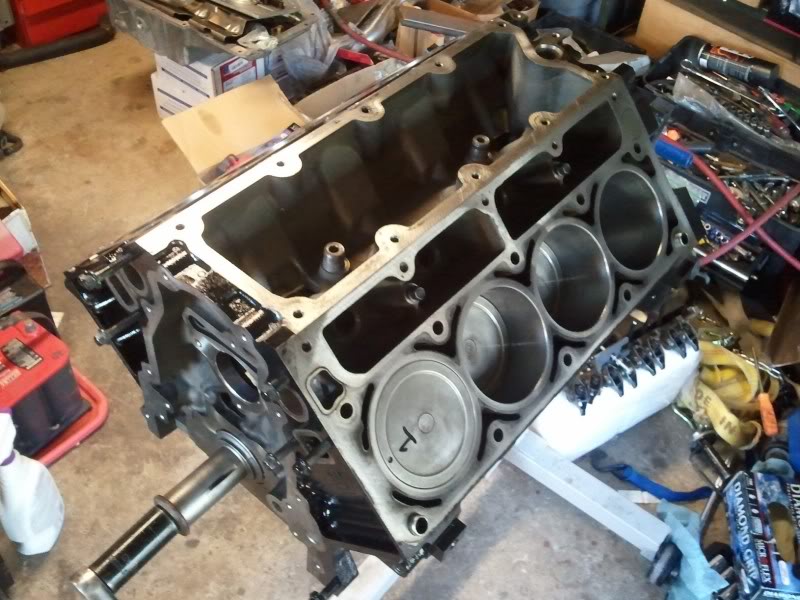
Shortblock ready to go.
Couldnt get a pic of any damage...didnt flip the motor over yet to check.
Just a fun picture.
Im still not sure how to sell off the old LS1...
1) Sell as a short block with good crank, Ross custom boost pistons, and one bent rod.
2) Sell just the block as a good bare block/mains. Sell the pistons off the rods, assuming #7 is ok, as a set. Throw the rods away.
Any input?
I need to get more parts and the block has to go to the shop soon. Or else Ill be stalled for a while. I also quit my second job. I just wasnt getting enough time with my family due to my wifes crazy work schedule. Wasnt worth the extra few bucks...and was actually creating less time fo rme to work on the car. So we'll see.
J.
Here are some pictures of the LS1/T56 separation and tear down in case anyone is bored haha.
Started by separating the trans and motor.
Then I pulled off the front cover. You can see the Cloyes adjustable timing set here.
Pulled off the timing gear and...SURPRISE!! 3 out of 4 bolts holding the cam retainer plate on!! This motor was beaten on constantly. Lots of 7k rpm pulls. But I guess 3 is enough hahaha. It did not vibe out and get eaten by the motor...
Pulled the cam. Looks pretty good. Normal roller wear on the lobes. Everything is smooth. I would like to sell it I think..esp if it helps me get something new. I dont want to mess with the hex-a-just timing set. Just want to install something straight up.
Pile of parts.
Shortblock ready to go.
Couldnt get a pic of any damage...didnt flip the motor over yet to check.
Just a fun picture.
Im still not sure how to sell off the old LS1...
1) Sell as a short block with good crank, Ross custom boost pistons, and one bent rod.
2) Sell just the block as a good bare block/mains. Sell the pistons off the rods, assuming #7 is ok, as a set. Throw the rods away.
Any input?
I need to get more parts and the block has to go to the shop soon. Or else Ill be stalled for a while. I also quit my second job. I just wasnt getting enough time with my family due to my wifes crazy work schedule. Wasnt worth the extra few bucks...and was actually creating less time fo rme to work on the car. So we'll see.
J.
08-14-2012, 10:50 AM
#108
Re: FINALLY! Out with the old...in with the new!!
Well this thread kinda fizzled out didnt it? haha.
I expected this to take a while, but not this long. Having a kid, a house, and a 45 minute drive to where the car is stashed kind of puts a damper on progress unfortunately.
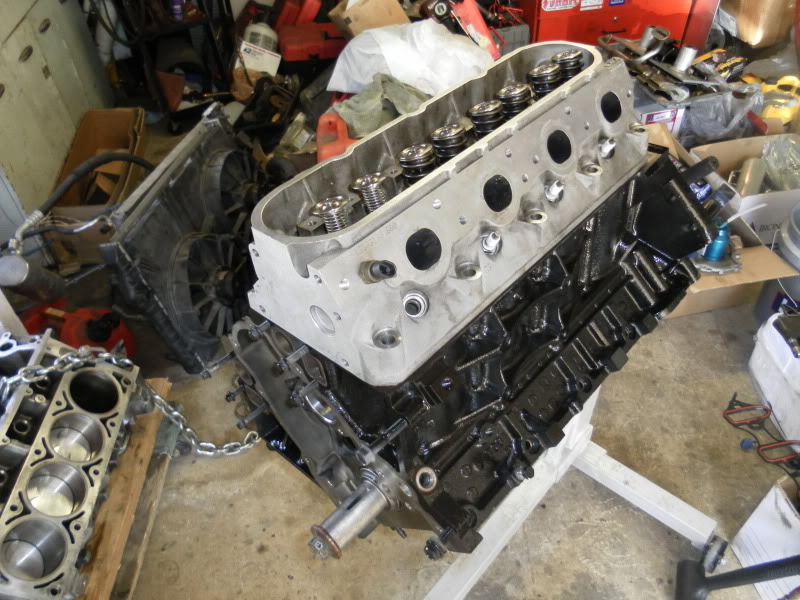
However I did get some things done. I brought my heads and some other parts to my house so I could start cleaning them up.. Might as well knock that out.
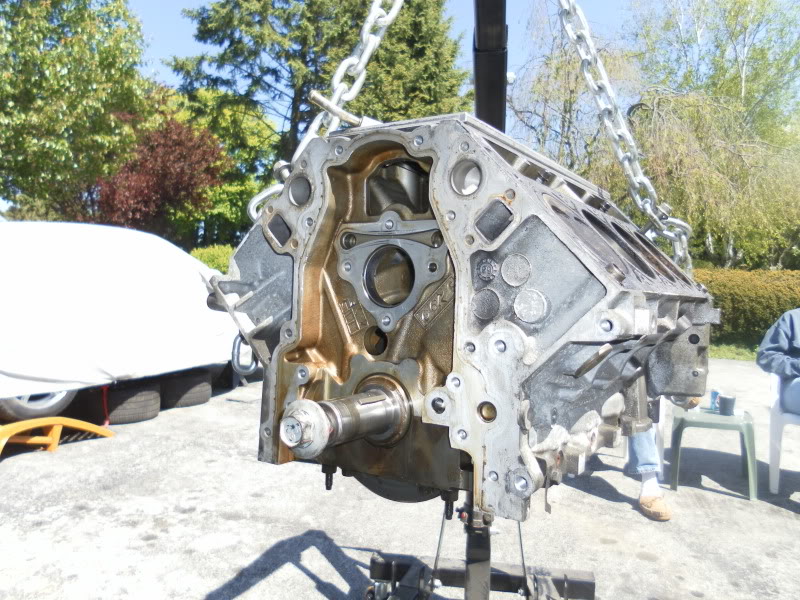
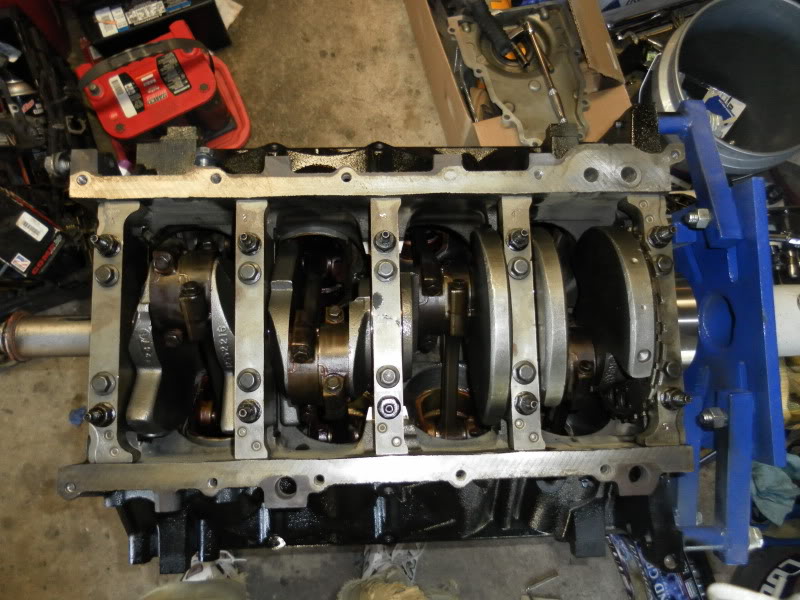
I got the LS1 on a stand..so first off, here are a few pictures of that. Specifically the damage.
Here are how my heads are cleaning up. I also measured the valves to verify that they are in fact bigger valves than the 862's originals. And I CC'd the chambers.

My first attempt at CC'ing the chamber. I revised my attack and got all the bubbles out, but didnt get pictures.
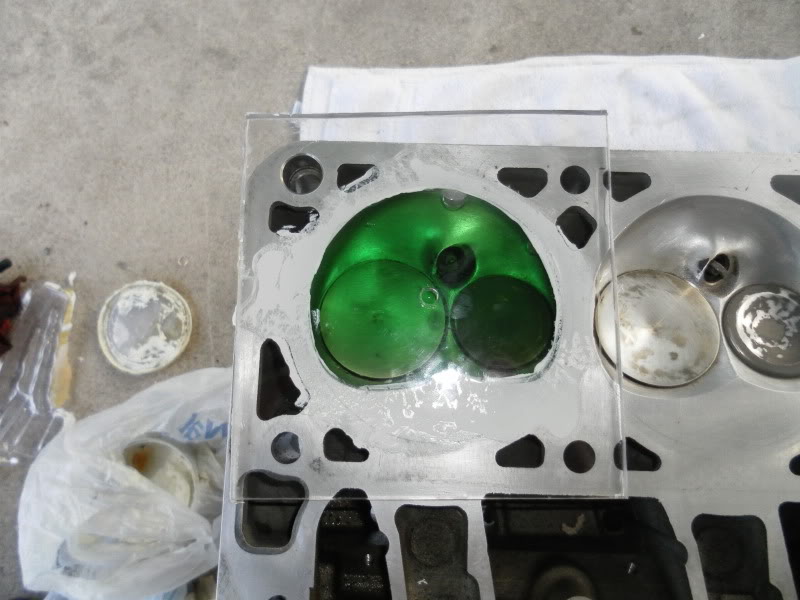
Final head stats... 862 castings, ported and polished, chambers polished, 2.02 intake 1.57 exhaust valves, 60cc chambers. So they were probably resurfaced at some point just a tiny bit to true them up Im guessing.
I expected this to take a while, but not this long. Having a kid, a house, and a 45 minute drive to where the car is stashed kind of puts a damper on progress unfortunately.
However I did get some things done. I brought my heads and some other parts to my house so I could start cleaning them up.. Might as well knock that out.
I got the LS1 on a stand..so first off, here are a few pictures of that. Specifically the damage.
Here are how my heads are cleaning up. I also measured the valves to verify that they are in fact bigger valves than the 862's originals. And I CC'd the chambers.
My first attempt at CC'ing the chamber. I revised my attack and got all the bubbles out, but didnt get pictures.
Final head stats... 862 castings, ported and polished, chambers polished, 2.02 intake 1.57 exhaust valves, 60cc chambers. So they were probably resurfaced at some point just a tiny bit to true them up Im guessing.
08-14-2012, 10:55 AM
#109
Re: FINALLY! Out with the old...in with the new!!
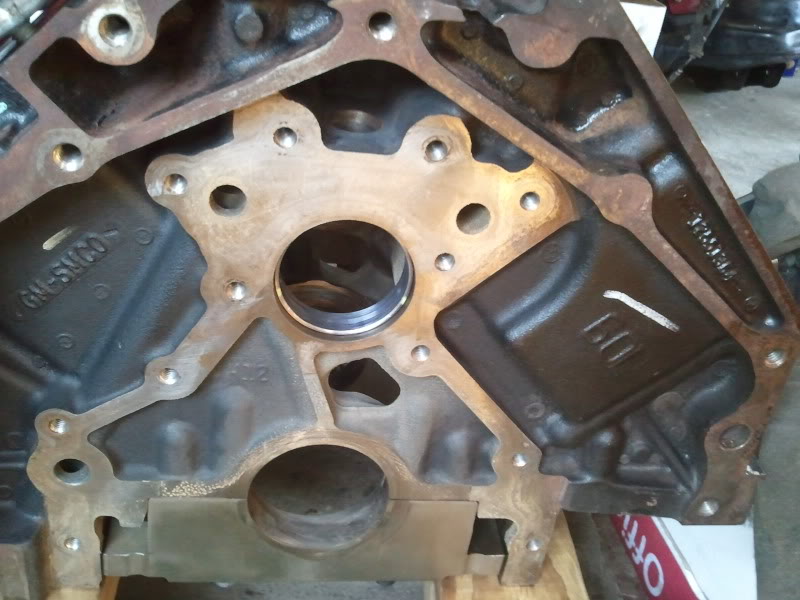
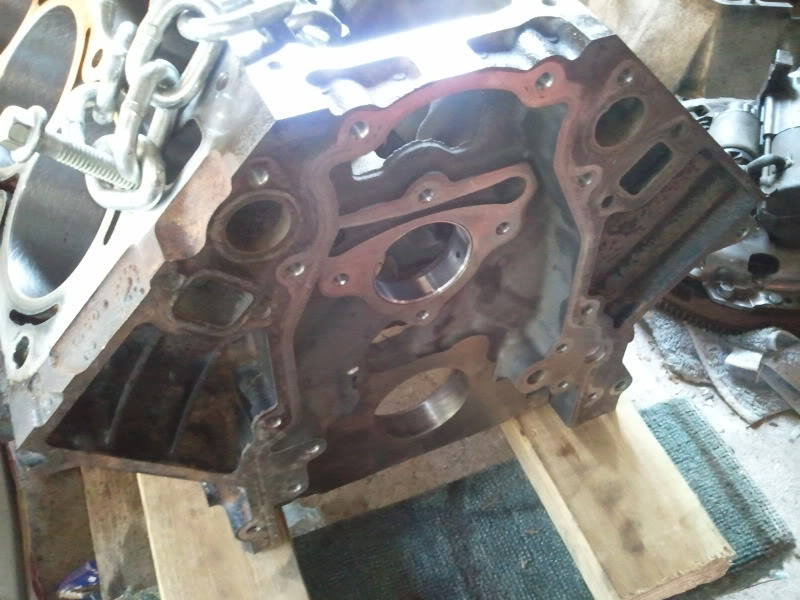
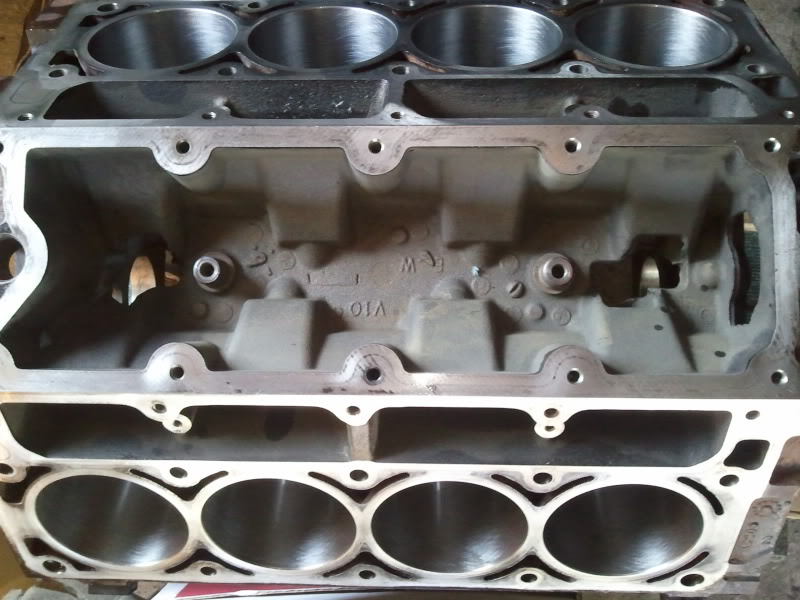
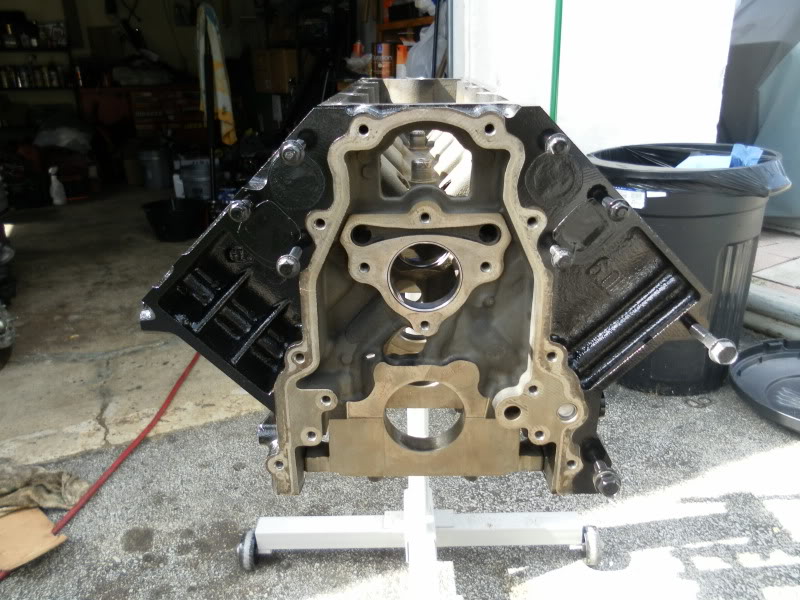
And I FINALLY got the block over to the machine shop. New cam bearings and a hot tank. No great pictures, but I thought I would show those who dont know what a block fresh from the hot tank looks like. Basically...all paint that wasnt on there from the assembly line is taken off...along with all of the grime, carbon, tarnish, gunk...etc. It looks really good and a little wire wheel action and it will be ready for primer/paint. Really happy with the way it came out.
So my next plan of action is to get my crank installed, get #1 piston set up and installed with one ring, get my head on there and see what my PTV clearance looks like.
As of right now, my calcuations are putting my SCR right at 10.5:1. Im OK with this, but wouldnt mind it a bit higher. So if my PTV allows it, and after some discussion with PatG, I might get the heads milled a tiny bit more. OR I might find a set of LQ9 pistons...but that jacks the SCR up to 11.5:1 or something around there. We'll see.
But Im leaning towards getting a new cam. I just dont think the 228/224 588/581 is what is best. Ide like to get a new cam ground, and ditch the adjustable timing set also. I would like to just a new set straight up and not fiddle with that at all.
Good news is that since the LS1 block didnt get damaged, and the pistons are ok, I should get a nice little kickback from selling that off. The parts hoarder in me wants to keep it and someday build another alum motor...but my wallet says get what you can so you can drive this car sometime this decade!
J.
08-14-2012, 11:02 AM
#110
Supreme Member
Join Date: Mar 2004
Location: In the Garage
Posts: 2,519
Likes: 0
Received 4 Likes
on
3 Posts
Car: Camaro
Engine: 6.2L
Transmission: T56
Re: FINALLY! Out with the old...in with the new!!
Cool pics. Especially the bent rod its just so smoothly done it almost looks as if it was meant to be that way.
+1 on the cam swap ( PatG ) and mill the heads to .80 clearance. DO the clay test and post up that'll be a mint addition to this thread!
Run some fresh valve springs and dont forget to check pushrod length and yeee haww easy 11's
+1 on the cam swap ( PatG
) and mill the heads to .80 clearance. DO the clay test and post up that'll be a mint addition to this thread!Run some fresh valve springs and dont forget to check pushrod length and yeee haww easy 11's
08-14-2012, 12:34 PM
#111
Re: FINALLY! Out with the old...in with the new!!
Haha... reading my mind Cam! I dont really know what to expect with the PTV yet. Not a whole lot of people running 862s. Most say to abandon them...but mine already have loads of work, and the bigger valves. So Im thinking they'll do fine. I really dont want to have to fly cut. Ill be measuring without a head gasket...since I dont have one yet haha. Ill just add the .051 to whatever i end up seeing.
Im def doing the clay test...but you need to have the cam youre going to run first correct? I figured it went like this... PTV, pick cam based on PTV over a range of crank rotation, degree cam, slap together for clay test, then check.
Milling is $95 a pair at my shop, so knocking some alum off wont be expensive. And I was planning to swap the valve springs. I did some thinking on mine...they have to have less than 15k miles on them. Which, since they are PRCs, should be ok. But since Ill be changing the cam...Im probably going to swap them. I want new seals and all anyway. Might as well freshen it all up.
And I will be measuring for push rod length too. I have the checker and will probably measure that after the heads are on the for the final time. Going to be using new LS7 lifters so I doubt my current PR's will work.
Ide be lying if I said that after seeing that the rod was the only damage I didnt think about buying a stock rod and just slapping the LS back together hahaha. But Im enjoying the build, and hopefully will end up with a decent runner. Plus the money I get for the LS and pistons will offset the extra weight Im gaining from this iron slug... MAN is it heavy compared to the alum block. I know the figures...but just hefting it around really shows.
J.
08-14-2012, 01:03 PM
#112
Supreme Member
Join Date: Mar 2004
Location: In the Garage
Posts: 2,519
Likes: 0
Received 4 Likes
on
3 Posts
Car: Camaro
Engine: 6.2L
Transmission: T56
Re: FINALLY! Out with the old...in with the new!!
Id run those heads fo sho! With the work done to them im sure they would outflow any other stock cathedral casting. Easy way to find out is get em flowed its not that expensive. The issue with running a one off type of head is matching the cam is more of a guessing game. Thats why a lot of "cam only" swaps work so well theres been a boat load of trial and error matching cams up with them and thats how the winner winner chicken dinner cam comes along.
Those are ARE heads too are they not? As crazy as things got over there in the end they sure did build some good stuff.
FWIW I ran hand ported 853's ( pretty much the same head as yours ) with the TR224 and it went low 12's all day long so with a newer and better cam plus the extra cubes and compression your planning? Umm yeah shes gonna fly
BTW yes you need the cam to check ptv but id avoid any that need flycutting. Those older donkery dienk cams are just plain nasty. An easy choice is the TSP228R if you follow what a lot of otehrs say they sure seem to love that cam.
A small note on lobes.... When i got my PatG cam I was one of the first to get these new EPS lobes which were supposedly designed for valve train stability and much quieter idle manners. I can tell you this much mine doesnt sound like a sewing machine at all with this cam and Ive spun the sucker to 7500 RPM... lots LOL. Crazy I know but i wanted to be sure it would hold together. This is with the so called "heavy" stock L92 valves and 1518 PAC beehives too. Stable valve train? Sure seems the case here. I havent been paying much attention to cam tech of late but iirc Pat is now spec'ing a combo of EPS and other lobes. Making some pretty impressive numbers too
08-14-2012, 02:05 PM
#113
Re: FINALLY! Out with the old...in with the new!!
Funny you mention getting them flowed. I found one shop near me that does it...and when I inquired, he told me "I dont think you want to waste that kind of money on stock casting heads"... So...I wont be dealing with him for anything I guess haha.
The LS1 was an ARE bottom end. Balanced, blue printed, ARP rod bolts with custom spec Ross Boost pistons. Flat tops with reliefs...
The heads are SUPPOSEDLY MTI Stage IIe. They are older...I actually have the reciept so I can get some more info on them. But they seem to match other work from MTI that Ive seen, and the work seems to be nice. Im betting they could use a little work given all the new info, but Im sure they're ok. One thing I was considering was doing some port work on the FAST 90. I had an idea that Tony Momo might have touched it at some point, but was never able to comfirm it. It has been lightly ported, but I think it could see some more.
Im cam dumb... Im trying to learn, but all the specs and degrees and timing just get all jumbled up. So Im pretty much going to leave it up to PatG or one of the other guru's over there. Im partial to the EPS lobes though as Ive heard they are really nice drivers but can still unleash hell. I wouldnt mind the idle being a little more radical, or at least a little more pronounced than my older set up, but Ill take a smooth running, quiet in the engine bay cam over that. I know how I want the car to behave, so Im trusting they can get me close.
I figured Im going to run checker springs on #1 valves, and put on a degree wheel. Then rotate the crank through 20 btc and atc and sort of plot the PTV. Then, with that info, and my chamber size/head info, get with one of the guys and pick a reasonable cam or discuss milling options. Ide DEF like to not flycut, and I think I can find a good cam that will work without having to be big enough for that.
I need to try to sell the LS1, old cam, and remaining parts to try to fund the cam package, new injectors, and the rest of the odds and ends (gaskets, hardware, etc). Because right now the bill is climbing haha.
J.
08-20-2012, 09:22 AM
#114
Re: FINALLY! Out with the old...in with the new!!
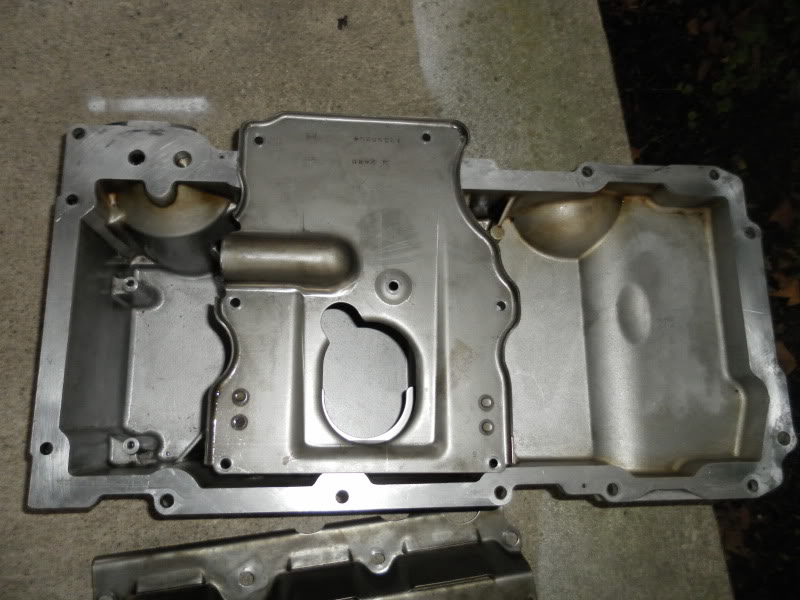
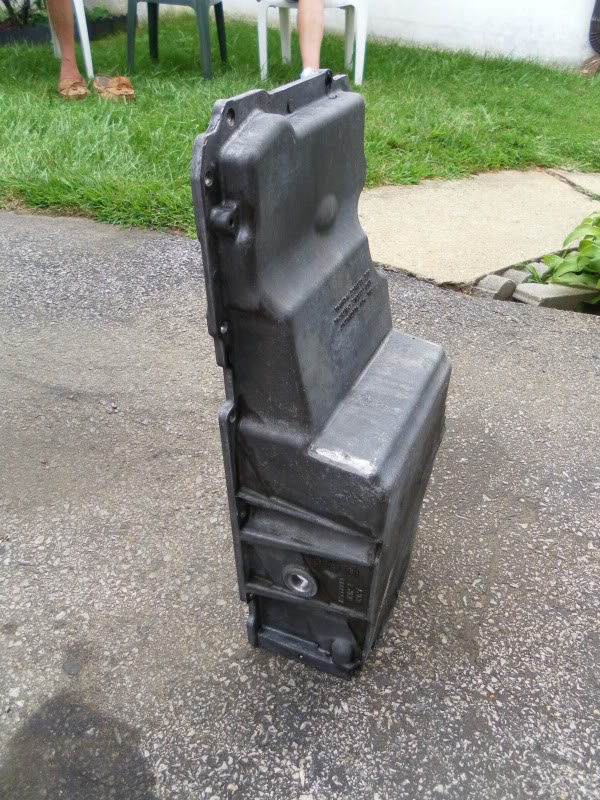
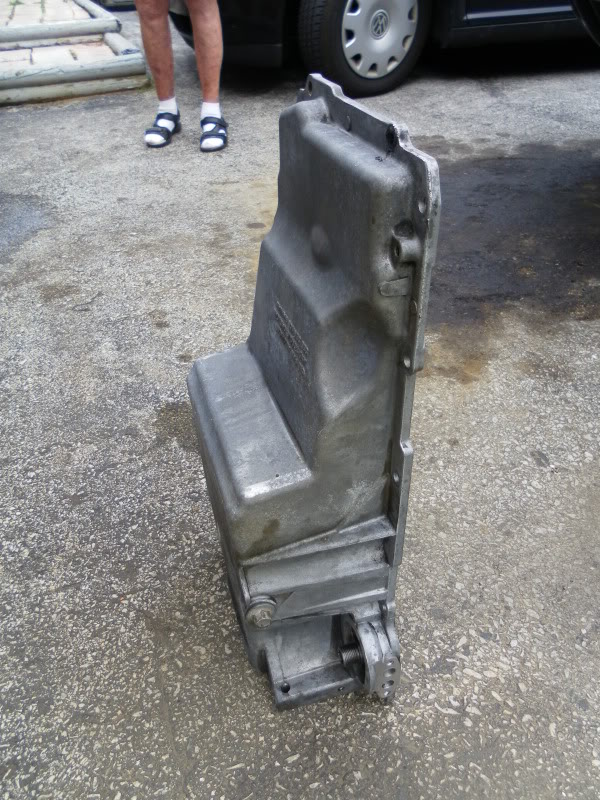
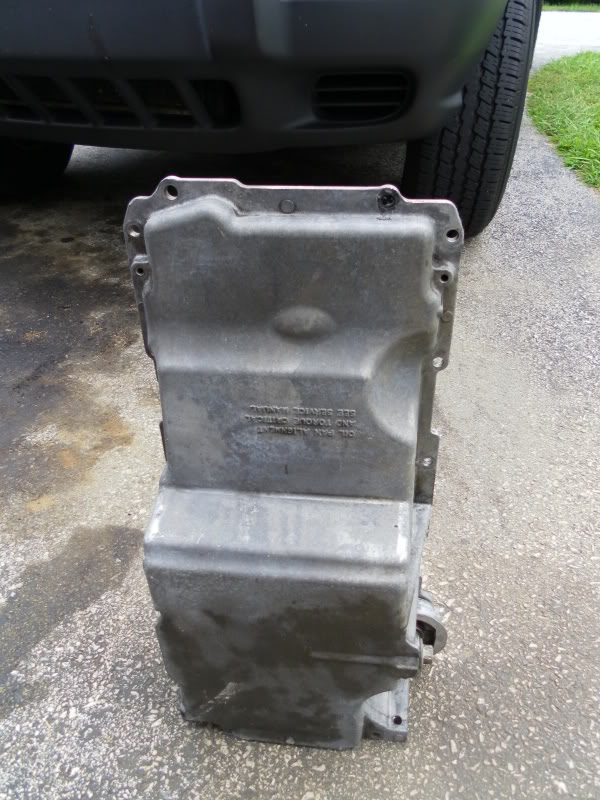
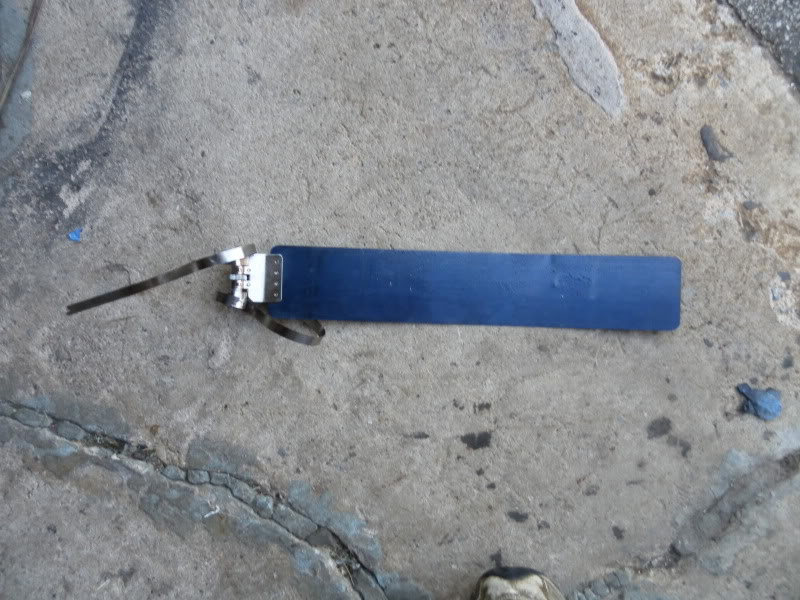
Whats up all. Nothing real major to report. Ive been cleaning parts. Being slightly **** about it... I cant figure out how to get the outside of the oil pan nice and clean. Yes you'll never see it. Yes I want it to look as good as possible before I bury it under the motor haha. Any suggestions? Here's the pile I got finished.
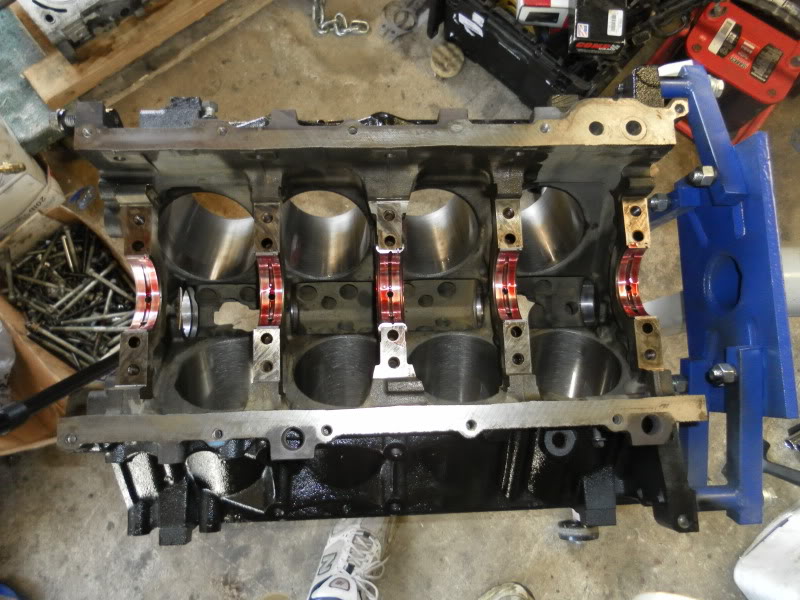
I do have a question for anyone thats replaced their cam bearings...
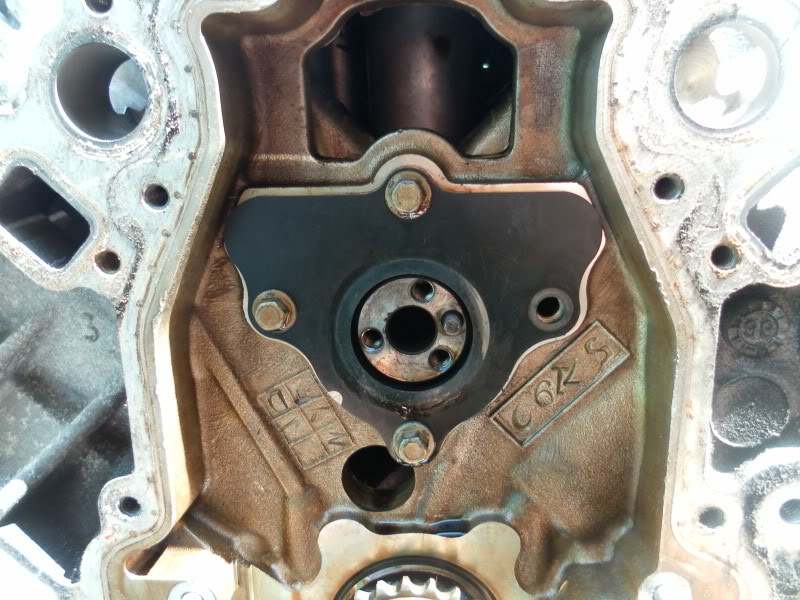
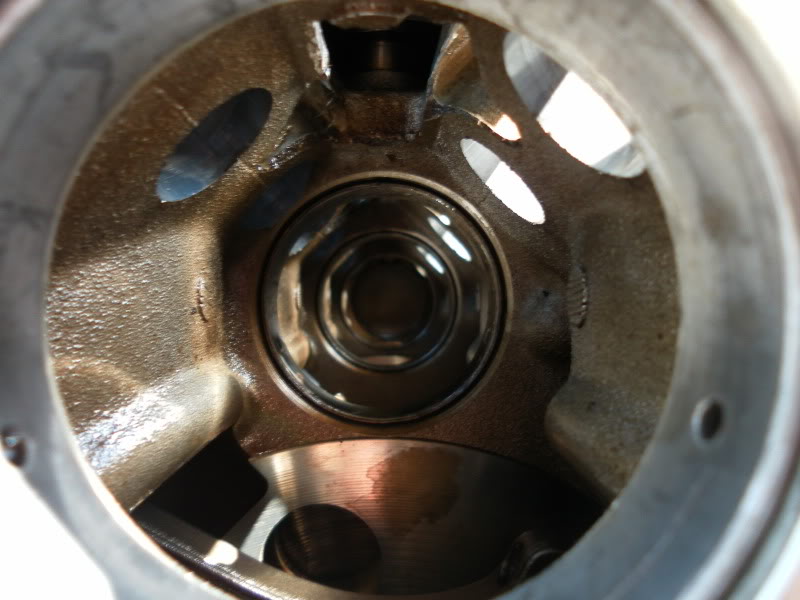
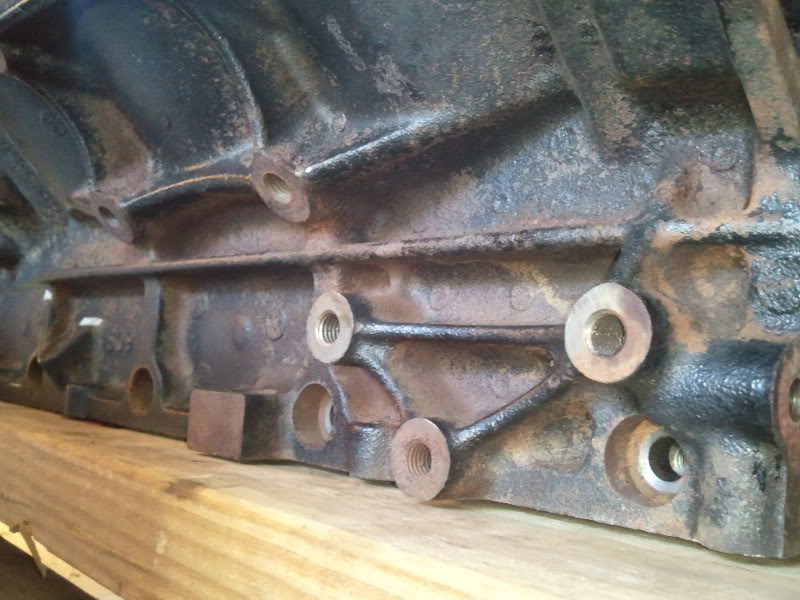
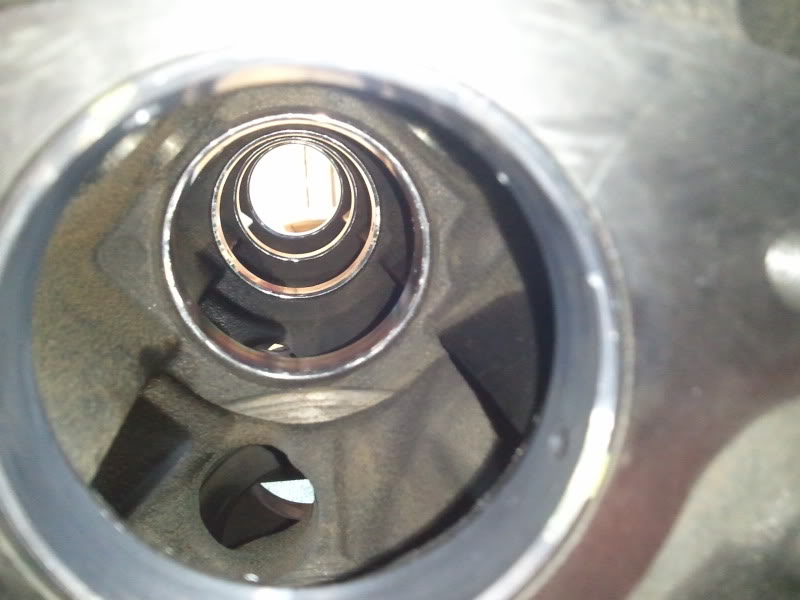
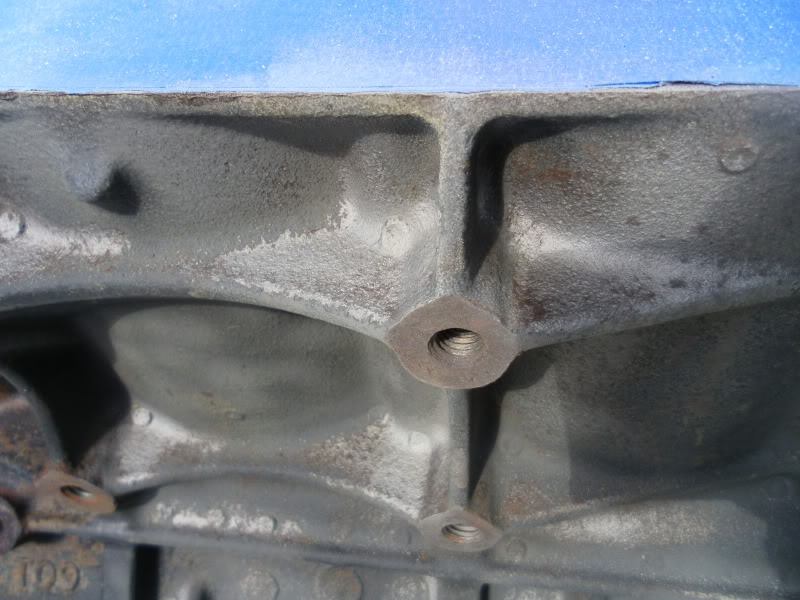
I noticed that the front bearing on my LQ4 is clocked differently than my LS1. I was kind of alarmed, because one of the bearing holes led to an oil passage, and th eother did not. I immediately thought the installer screwed up. So I checked my LS1... Same thing, only clocked different.
So I guess my question is, is there only one oil gallery hole in each cam journal? If so...is it only important that ONE of the bearing holes (not even sure why there are multiple) is lined up? And does it really matter how things are clocked?
Here is a picture of the LS1 front cam bearing. Oil gallery hole at 4 o'clock, and the other at 8.

Here is the LQ4. Oil hole at 4 o'clock and the other at 11.
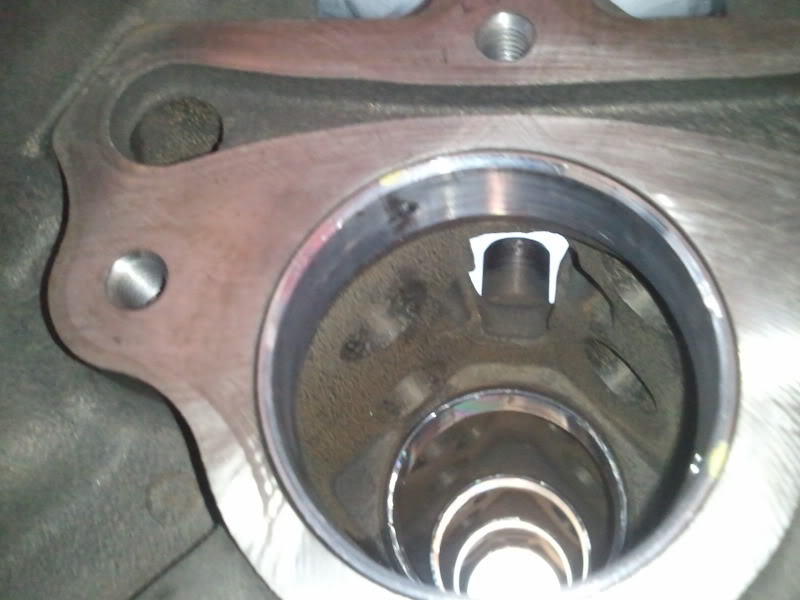
My gut is telling me its ok. But I wanted to check. I havent checked the other bearings, because the block is sitting on a dolly, and its too damn heavy to tip over and look haha. I will verify each bearing has an open hole oviously. Just wanted to get a little feedback quick.
Im buying a valve spring compressor tool...the ones Ive tried were ugly with the double springs. Pretty soon Im taking a day off, and assembling my bottom end, installing checker springs, and figuring some things out. Will have some better updates more often after that I hope!
J.
I do have a question for anyone thats replaced their cam bearings...
I noticed that the front bearing on my LQ4 is clocked differently than my LS1. I was kind of alarmed, because one of the bearing holes led to an oil passage, and th eother did not. I immediately thought the installer screwed up. So I checked my LS1... Same thing, only clocked different.
So I guess my question is, is there only one oil gallery hole in each cam journal? If so...is it only important that ONE of the bearing holes (not even sure why there are multiple) is lined up? And does it really matter how things are clocked?
Here is a picture of the LS1 front cam bearing. Oil gallery hole at 4 o'clock, and the other at 8.
Here is the LQ4. Oil hole at 4 o'clock and the other at 11.
My gut is telling me its ok. But I wanted to check. I havent checked the other bearings, because the block is sitting on a dolly, and its too damn heavy to tip over and look haha. I will verify each bearing has an open hole oviously. Just wanted to get a little feedback quick.
Im buying a valve spring compressor tool...the ones Ive tried were ugly with the double springs. Pretty soon Im taking a day off, and assembling my bottom end, installing checker springs, and figuring some things out. Will have some better updates more often after that I hope!
J.
08-20-2012, 09:53 AM
#115
Supreme Member
iTrader: (1)
Join Date: Mar 2007
Location: Apopka, Florida
Posts: 1,237
Likes: 0
Received 7 Likes
on
6 Posts
Car: 1989 Pontiac Trans Am GTA
Engine: cammed LS1
Transmission: Monster SS 4L65E
Axle/Gears: 9 bolt posi w/ 3.70 gears
Re: FINALLY! Out with the old...in with the new!!
I tried a few things on mine & had the same problem. It's like it was permanently stained. I ended up just painting mine with Aluminum high temperature engine paint.
08-20-2012, 03:07 PM
#116
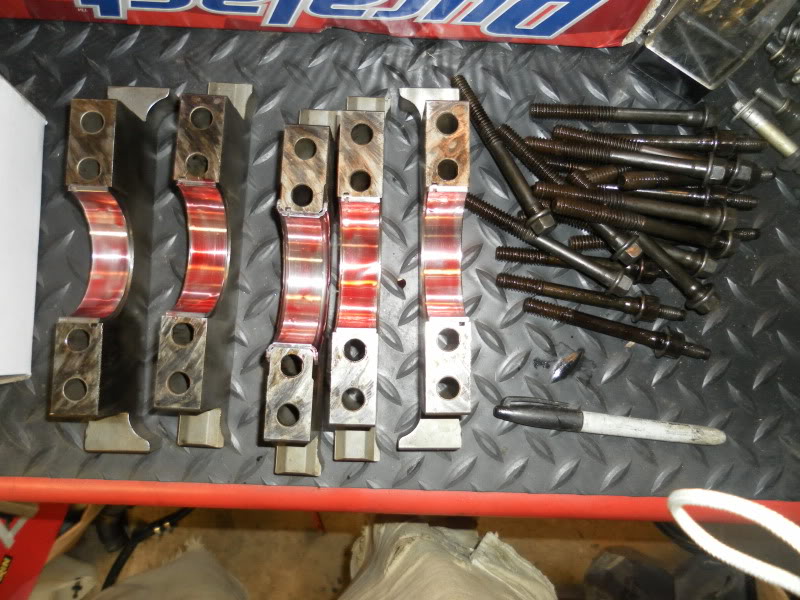
Re: FINALLY! Out with the old...in with the new!!
Also... brand new ARP rod bolts... yes or no?
I decided against removing my LS1 bolts...just going to include them with the shortblock or rod/piston sale.
But Im also still on the fence with this whole "resizing" the rods thing. Ill have to buy another set of rod bearings, and another machine shop expense. Dang it haha..
J.
I decided against removing my LS1 bolts...just going to include them with the shortblock or rod/piston sale.
But Im also still on the fence with this whole "resizing" the rods thing. Ill have to buy another set of rod bearings, and another machine shop expense. Dang it haha..
J.
08-20-2012, 03:23 PM
#117
Supreme Member
iTrader: (1)
Join Date: Mar 2007
Location: Apopka, Florida
Posts: 1,237
Likes: 0
Received 7 Likes
on
6 Posts
Car: 1989 Pontiac Trans Am GTA
Engine: cammed LS1
Transmission: Monster SS 4L65E
Axle/Gears: 9 bolt posi w/ 3.70 gears
Re: FINALLY! Out with the old...in with the new!!
I put new ARP bolts in mine. Hopefully the resizing thing won't be an issue. Maybe check with a good engine builder to get their input on the issue. From what I read, the stock rod bolts are the weak link in the bottom end. I would think it would be worth it to replace them with ARP's
08-20-2012, 05:19 PM
#118
Re: FINALLY! Out with the old...in with the new!!
As for the ARP bolts....ill probably put them in without resizing. I deglazed my own cylinders for crying out loud. Why start being cautious now?!?
08-22-2012, 08:02 AM
#119
Supreme Member
Join Date: Mar 2004
Location: In the Garage
Posts: 2,519
Likes: 0
Received 4 Likes
on
3 Posts
Car: Camaro
Engine: 6.2L
Transmission: T56
Re: FINALLY! Out with the old...in with the new!!
The bolt swap is easy and a definite step up in bottom end security. i wouldnt run an LS1 without doing the bolt swap personally but I like to scream the hell out of em. 7500 so far on this latest hehe
08-22-2012, 09:14 AM
#120
Re: FINALLY! Out with the old...in with the new!!
I scored a set of ARP's for $70. So...Im going to jamb em in. I would LOVE to spin this to 7k+ like I did with the LS1. However Ill be happy with reasonable HP and shifting at 6000-6500 at this point haha.
Im making a valve spring compressor so I can get the heads apart. Def getting new springs nad seals and all so I might as well take them apart and really clean things out while Im bored at home.
With the decision to buy new ARPs, Ill be leaving the LS1 assembled and trying to sell it as a shortblock with a bent rod. Someone could re-ring it, put a new stock rod in even if they have to get it resized to match the rest, and have a really good start.
Then the cam will go for sale along with the cloyes adjustable timing set since the new cam will be spec'd to be installed straight up...if I have it my way. Or I can stab the cam back in and re-install the timing set if the seller wants. Then lifters and pushrods (assumign the PRs arent going to be the right length) will go.
Should be able to afford some of the parts I need with that!!
J.
08-22-2012, 09:36 AM
#121
Junior Member
iTrader: (1)

Join Date: Aug 2011
Location: cincinnati ohio
Posts: 43
Likes: 0
Received 0 Likes
on
0 Posts
Car: 91 camaro rs
Engine: ls6
Transmission: mn12
Axle/Gears: s60 3.73
Re: FINALLY! Out with the old...in with the new!!
what i did to my pan was steam clean it in a hot tank. most of it came off but after i glass beaded it and i looks brank new now
08-26-2012, 08:41 AM
#122
Re: FINALLY! Out with the old...in with the new!!
Just wanted to show how I finished up witht he oil pan. Pretty minor post haha. I ended up using Purple Power. Full strength. I put some on and let it soak, then put more on. Then rinsed it with water. Then put more on, and went over it real quick with a tire scrubber brush. All of the gunk is off. Of course the alum is still stained...but its "clean". So Im not sure if Im going to leave it, or maybe hit it with some paint just for fun.
Im actually still undecided on my motor color combo. Right now Im at gloss black block, bare alum heads, wrinkle black on the valve covers and front cover. high temp silver on the acc brackets, water pump, and maybe oil pan. Im not sure how that'll look. I dont want to go too black on everything and make the engine bay look dreary.
I spent most of the day yesterday cleaning up the LS1. Since now Im selling it as a complete bottom end with rear cover. The cam and timing set will be up for grabs...or included with the motor. Someone can most likely do a light deglaze on the cylinders, new rings, a new rod, and run it. And have quite a nice motor if the heads are right.
J.
08-26-2012, 09:24 AM
#123
Supreme Member
iTrader: (1)
Join Date: Mar 2007
Location: Apopka, Florida
Posts: 1,237
Likes: 0
Received 7 Likes
on
6 Posts
Car: 1989 Pontiac Trans Am GTA
Engine: cammed LS1
Transmission: Monster SS 4L65E
Axle/Gears: 9 bolt posi w/ 3.70 gears
Re: FINALLY! Out with the old...in with the new!!
Right now Im at gloss black block, bare alum heads, wrinkle black on the valve covers and front cover. high temp silver on the acc brackets, water pump, and maybe oil pan. Im not sure how that'll look. I dont want to go too black on everything and make the engine bay look dreary.
Your pan still didn't clean-up very well. Mine didn't either which is why I painted mine. It's not like anyone is going to see it though.
08-27-2012, 06:50 AM
#124
Re: FINALLY! Out with the old...in with the new!!
Yeah. I dont care that it didnt turn out like new alum. I just wanted all the gunk off, and it was getting tedious scrubbing all the little areas with a brush.
I later read some reviews where people claimed purple power oxidized the alum and made it more black. Ok haha. Now ya tell me.
Im trying one more thing. Im getting a hopper gun from harbor freight, and dumping baking soda in it. Ive heard good things from the harley guys cleaning engine cases. Where they dont want to change the surface or be really aggressive, just brighten itup. For the price, its worth a shot because I still hvae to clean up my front cover and a few other odds and ends. Ill report back probably friday since Im taking the dya off to finish cleaning the LS1 and all.
J.
08-27-2012, 07:49 AM
#125
Supreme Member
Join Date: Mar 2004
Location: In the Garage
Posts: 2,519
Likes: 0
Received 4 Likes
on
3 Posts
Car: Camaro
Engine: 6.2L
Transmission: T56
Re: FINALLY! Out with the old...in with the new!!
Wash it with baking soda mixed with water now and that will stop the acid from further "cleaning"
Dont sandblast it unless your going to paint it.... Makes aluminum a literal sponge for grunge afterwards.
Ive wanted one of those tumblers for a while now.... Let us know how it works. Pics after maybe?
Mind you that will be unnecessary if you do the baking soda and paint.
Dont sandblast it unless your going to paint it.... Makes aluminum a literal sponge for grunge afterwards.
Ive wanted one of those tumblers for a while now.... Let us know how it works. Pics after maybe?
Mind you that will be unnecessary if you do the baking soda and paint.
08-28-2012, 12:31 PM
#126
Member
iTrader: (2)
Join Date: Nov 2004
Location: New Mexico
Posts: 379
Likes: 0
Received 0 Likes
on
0 Posts
Car: 87 Firebird,
Engine: lq4
Transmission: gto t56 (mn12)
Re: FINALLY! Out with the old...in with the new!!
Have you checked into blasting your pan with walnut shells or plastic media? I've heard that those are a good option for cleaning parts without being too abrasive. There are a hundred different media types out there to try and experiment with. Tell us which ones work the best!
09-03-2012, 11:33 AM
#127
Re: FINALLY! Out with the old...in with the new!!
Well I wanted to type this Friday while it was all fresh in my mind. But we left for the shore...and going away with a 10 month old is a hectic situation so I didnt get a chance. So...to the best of my memory...
I got my LS1 all cleaned up and ready for sale. You can see pictures of that when I get the for sale ad up. Good news is it really cleaned up pretty nice. I think someone could probably throw a rod in it, and just run it. It optimally could use a very light cylinder clean up and some new rings. Bearings and all should be fine. So we'll see what happens with that. My parts budget is relying on it. Not sure how much im going to ask yet.
I tried some different blasting options. First...the harbor freight 20oz blast gun worked pretty good. No real issues there. I tried baking soda first. It did a fair job of cleaning the front cover and not really etching the surface. However it made a friggin MESS. Wow... Huge baking soda dust plume and it just went all over.
The next thing I tried was some dry sifted play sand. That did a great job. It did etch the surface slightly...but since Im painting most of the parts, it didnt bother me. It actually looks pretty cool.
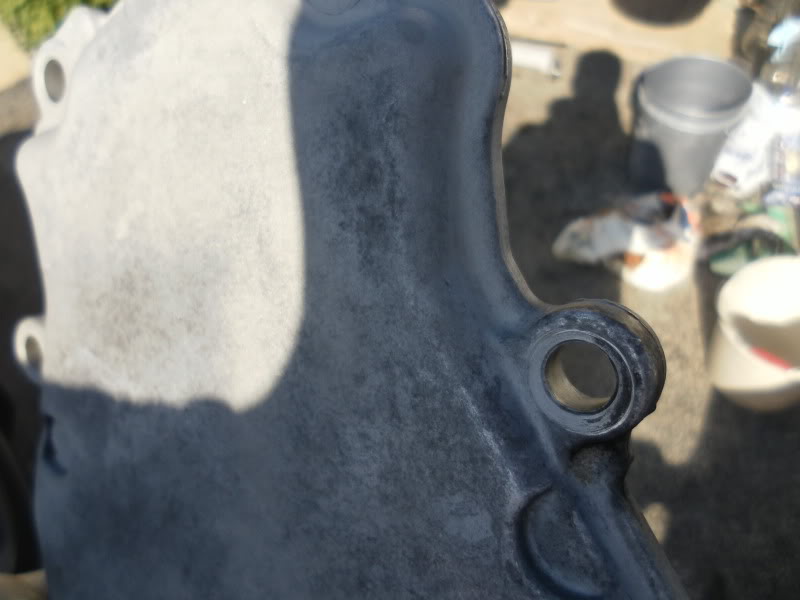
Here's the cover after blasting with sand. It was really cruddy before I started.

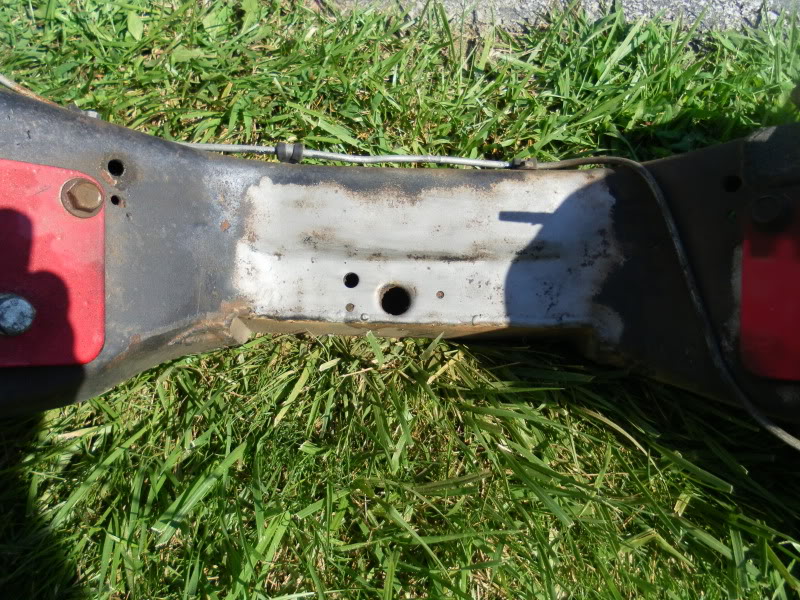
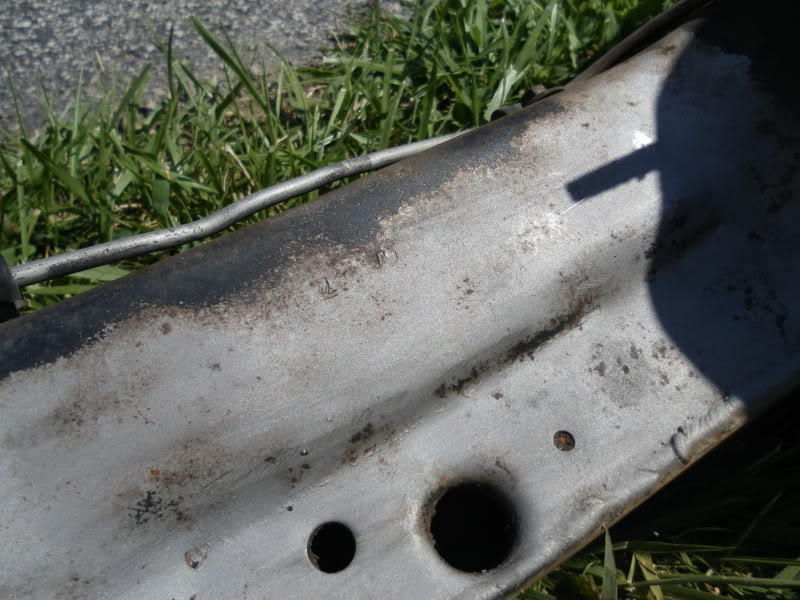
I decided that Im probably going to hit the oil pan with some HI-Temp silver just for the heck of it. So I didnt blast it. But I did try the sand on the k-member in a spot. Things that it took off... paint, rust, grime, and anything else. Left a pretty nice finish with only a little touch up needed. I used only a handful of sand, and it went pretty quick. So I might actually do more of the k-member and a-arms with this. Play sand is so cheap...
I think Im actually going to tape off the 6.0 real good, and blast it before priming. Its going to make a mess, but I think it'll be much better than wire wheeling it or trying to coat over the rust.
Im taking the day sunday to do some work, and also next monday. So I should have some good updates! Plus if the LS1 sells Ill have more parts to keep me moving.
J.
I got my LS1 all cleaned up and ready for sale. You can see pictures of that when I get the for sale ad up. Good news is it really cleaned up pretty nice. I think someone could probably throw a rod in it, and just run it. It optimally could use a very light cylinder clean up and some new rings. Bearings and all should be fine. So we'll see what happens with that. My parts budget is relying on it. Not sure how much im going to ask yet.
I tried some different blasting options. First...the harbor freight 20oz blast gun worked pretty good. No real issues there. I tried baking soda first. It did a fair job of cleaning the front cover and not really etching the surface. However it made a friggin MESS. Wow... Huge baking soda dust plume and it just went all over.
The next thing I tried was some dry sifted play sand. That did a great job. It did etch the surface slightly...but since Im painting most of the parts, it didnt bother me. It actually looks pretty cool.
Here's the cover after blasting with sand. It was really cruddy before I started.
I decided that Im probably going to hit the oil pan with some HI-Temp silver just for the heck of it. So I didnt blast it. But I did try the sand on the k-member in a spot. Things that it took off... paint, rust, grime, and anything else. Left a pretty nice finish with only a little touch up needed. I used only a handful of sand, and it went pretty quick. So I might actually do more of the k-member and a-arms with this. Play sand is so cheap...
I think Im actually going to tape off the 6.0 real good, and blast it before priming. Its going to make a mess, but I think it'll be much better than wire wheeling it or trying to coat over the rust.
Im taking the day sunday to do some work, and also next monday. So I should have some good updates! Plus if the LS1 sells Ill have more parts to keep me moving.
J.
09-03-2012, 01:47 PM
#128
Member
iTrader: (2)
Join Date: Feb 2010
Posts: 460
Likes: 0
Received 3 Likes
on
3 Posts
Car: '89 Camaro
Engine: LS1
Transmission: 4L65/70E
Axle/Gears: 9 Inch, 3.70 gears
Re: FINALLY! Out with the old...in with the new!!
are you going to put the sand back in the same sandbox you got it from after you finish cleaning up?
09-03-2012, 04:03 PM
#129
Re: FINALLY! Out with the old...in with the new!!
Cleaning up? hahahaha. This sand will be forever free. Along with the grit and grime that it is now mixed with. Benefits of living out in the country and having friendly neighbors haha. Ill likely put up a tarp or at least give a small effort to keep the sand from going everywhere. But it will probably be in vein.
One thing I have to do is dry sift it with a finer screen because I still got a couple good sized chunks stuck in the gun. Had to give it a tap and rack...er a tap and keep shooting. I read some tricks online about opening up the hopper ports in the gun to help with that though. Looking forward to trying it again...with a face mask, respirator, and long sleeves/pants this time hahaha
One thing I have to do is dry sift it with a finer screen because I still got a couple good sized chunks stuck in the gun. Had to give it a tap and rack...er a tap and keep shooting. I read some tricks online about opening up the hopper ports in the gun to help with that though. Looking forward to trying it again...with a face mask, respirator, and long sleeves/pants this time hahaha
09-04-2012, 12:20 AM
#130
Moderator
iTrader: (14)
Join Date: Mar 2000
Location: Littleton, CO USA
Posts: 43,169
Likes: 0
Received 35 Likes
on
34 Posts
Car: 82 Berlinetta/57 Bel Air
Engine: LS1/LQ4
Transmission: 4L60E/4L80E
Axle/Gears: 12B-3.73/9"-3.89
Nobody else said anything, so I'll chime in.
The conventional wisdom is you need to resize the big ends of rods when you replace the rod bolts. But, you can't resize factory LS1 rods. Unlike Gen I SBC and BBC rods, which have precision ground mating surfaces for the rod & cap, the LS1 rod cap is literally cracked off of the rod during the manufacturing process. The rough fractured surfaces mate back together when the bolts are installed, preventing cap "walk". The big end is then honed to size for the bearing.
The first thing you do when you resize a rod is to grind off a bit of the cap mating surface. Then you bolt the rod & cap back together, and hone it to size, which takes a little material off of both the rod and cap. Since the factory LS1 rods rely on the rough fractured surfaces, grinding one or both sides down will take that feature away. I suppose you could try to grind both sides down, but that is a precision process that most shops aren't equipped to handle.
When you replace the rod bolts on factory LS1 rods, first carefully mate the two halves and snug down the bolts. Remove one bolt, and replace that bolt with the new ARP bolt. Snug it down. Now repeat for the other side. You will have maintained the alignment with the new bolts, aided by the fractured surfaces.
09-04-2012, 06:58 AM
#131
Re: FINALLY! Out with the old...in with the new!!
Thanks five7! I hadnt thought of putting the stock bolts in for initial seating. I always read about doing the one at a time method...but since my rotating assembly is out I didnt think it would be any use. I planned on making sure the cracked surfaces were as clean as humanly possible and lined up carefully. Got any good advice on cleaning/prepping the cracked surface? I was thinking carb/brake cleaner and then blow it off with air should do ok. Shouldnt be any real gunk in there.
What Ive seen, is you can take the big end out like .002" to clean it up. Then you have to get .002" larger on the OD bearings...and in my case Ide also need them to be .010" undersized for the ground crank. The rods in my LS1 were "resized" from ARE. But Im going to just run them. Enough folks have had no issues. I priced out having the rods done, and then getting the bearings, it just takes it more and more out of a budget build.
J.
09-04-2012, 09:10 AM
#132
Junior Member
iTrader: (1)
Join Date: Aug 2011
Location: cincinnati ohio
Posts: 43
Likes: 0
Received 0 Likes
on
0 Posts
Car: 91 camaro rs
Engine: ls6
Transmission: mn12
Axle/Gears: s60 3.73
Re: FINALLY! Out with the old...in with the new!!
if you want aluminum to look the best you should use glass beads..thats wat i did and it looks great. it put a small polish on it
09-05-2012, 08:18 AM
#133
Re: FINALLY! Out with the old...in with the new!!
For anyone intrested in seeing it... I posted the LS1 for sale along with the rest of the stuff I wont be using.
Im not sure if this is against the rules or not...but since the two sites compliment each other so well, Im hoping its ok.
http://ls1tech.com/forums/parts-clas...iming-set.html
J.
Im not sure if this is against the rules or not...but since the two sites compliment each other so well, Im hoping its ok.
http://ls1tech.com/forums/parts-clas...iming-set.html
J.
09-09-2012, 05:22 PM
#134
Re: FINALLY! Out with the old...in with the new!!
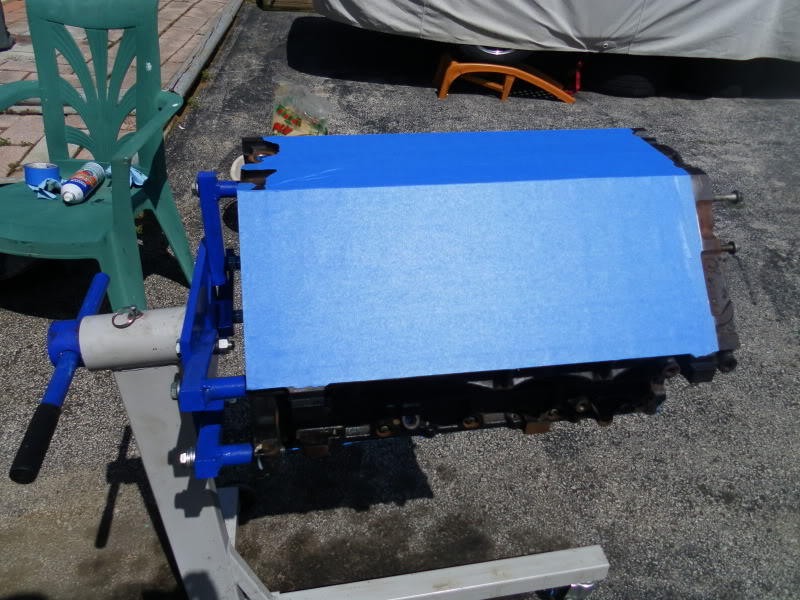
Got a decent update. I spent a couple hours masking off the 6.0 and sand blasting it. Then I got it primed, painted and cleared. Tomorrow (Monday) I took off work. Planning to do some light assembly and check my PTV. Need to get creative and come up with a way of "faking" a gasket since Im using 5.3 heads and no head gasket. I have some ideas....
Anyway...some pics from today.
Double layered in opposite directions to keep the sand out.
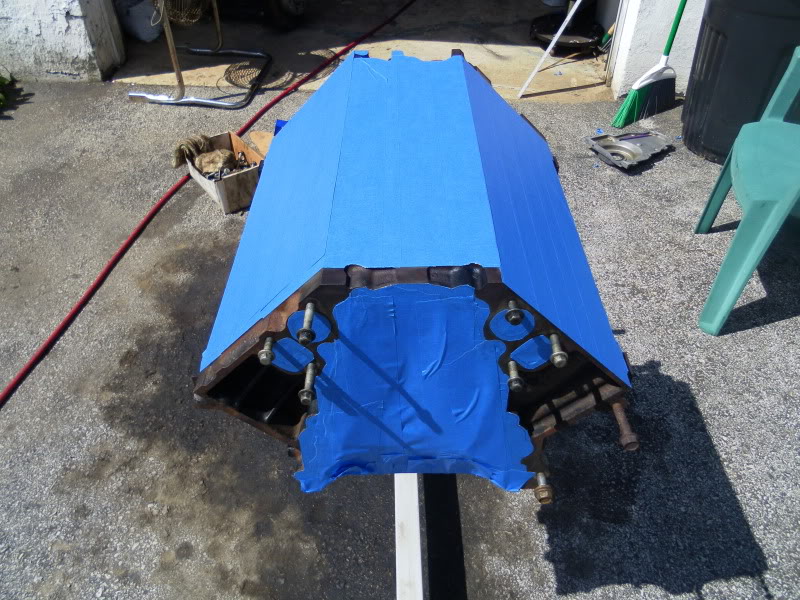
A before blasting shot.
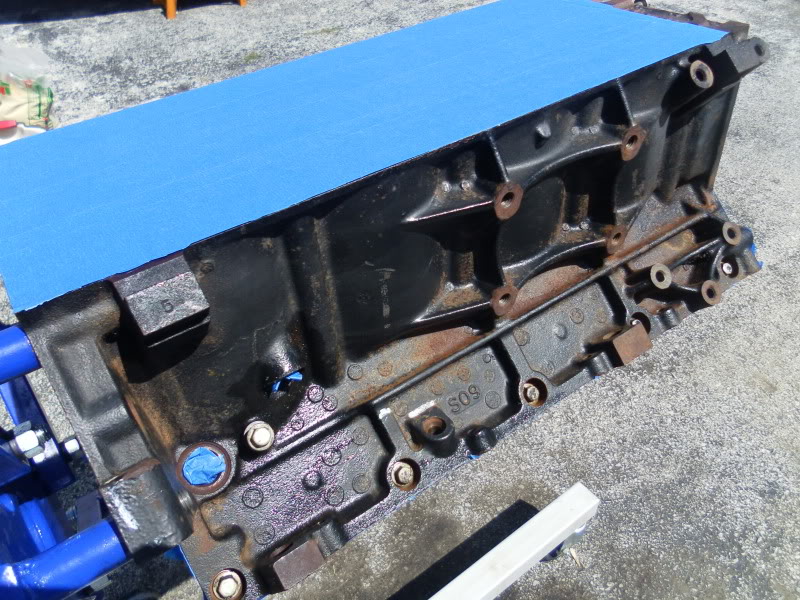
3/4 of the way done on this side to show the difference.
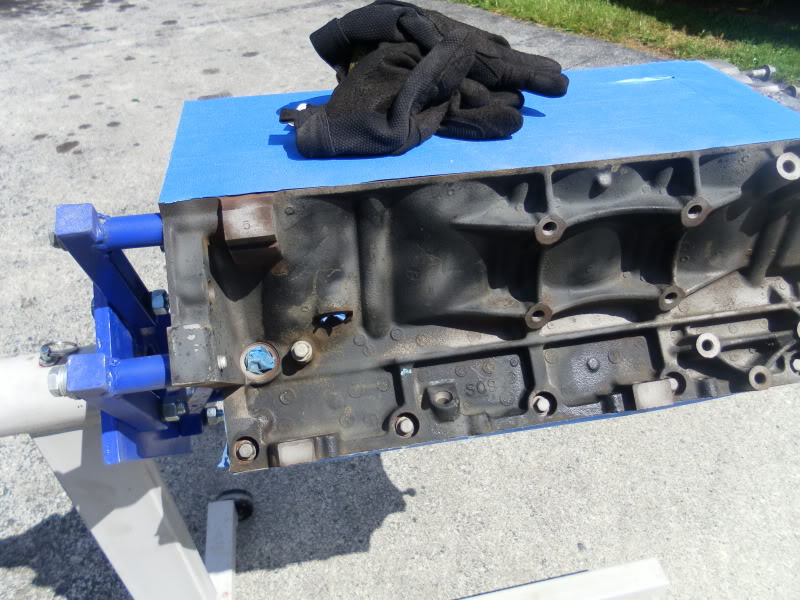
Gotta say. Aside from my compressor getting a work out, this little baster gun from harbor freight worked pretty good. It didnt make TOO much mess. Just a sandy driveway. And it was less hassle than a wire wheel. I wore long sleeves, gloves, long pants, face shield and respirator and it wasnt too unpleasant. Eats through most rust and what not. The factory coating on the block was tough, and I really just went over that quick. It hasnt come off yet, it probably wont.
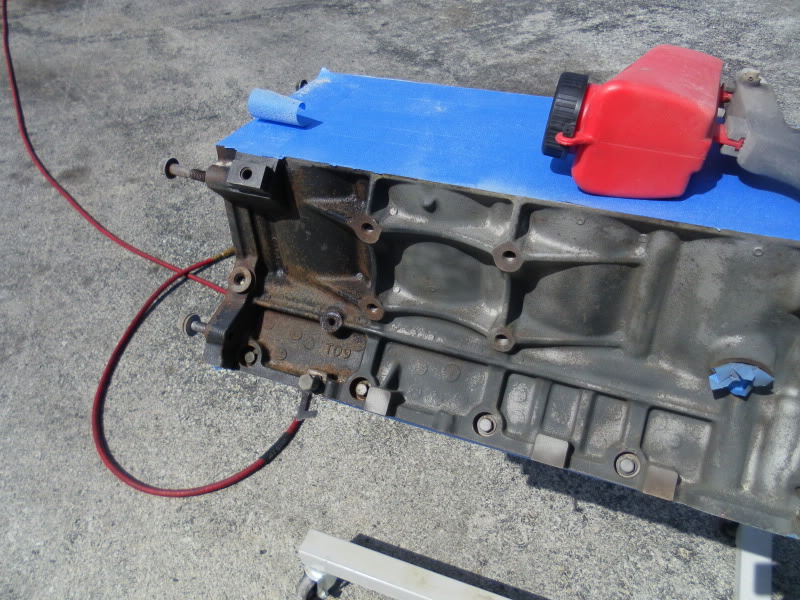
And here is the finished product. No in between shots as I was trying to get it done.
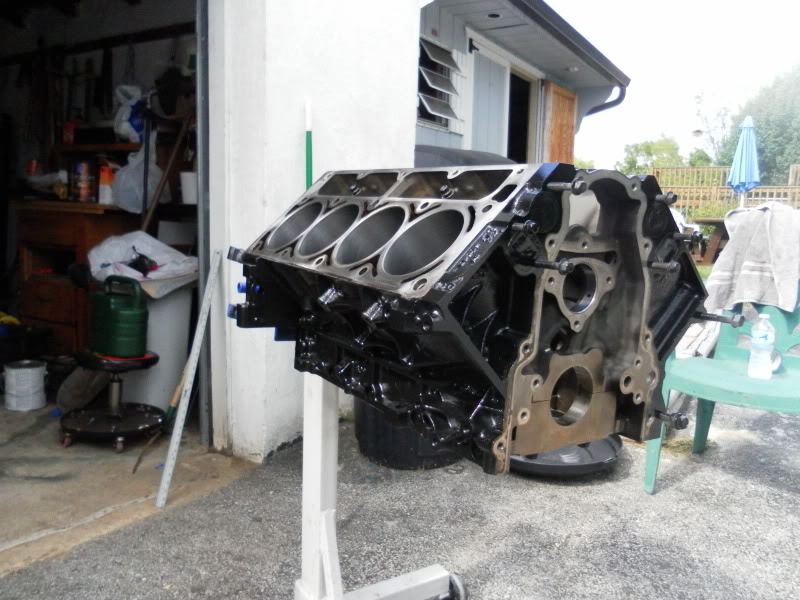
Thats it for now...but we're getting there. Got some bites on the LS1 so maybe I can finally buy some parts!
J.
Anyway...some pics from today.
Double layered in opposite directions to keep the sand out.
A before blasting shot.
3/4 of the way done on this side to show the difference.
Gotta say. Aside from my compressor getting a work out, this little baster gun from harbor freight worked pretty good. It didnt make TOO much mess. Just a sandy driveway. And it was less hassle than a wire wheel. I wore long sleeves, gloves, long pants, face shield and respirator and it wasnt too unpleasant. Eats through most rust and what not. The factory coating on the block was tough, and I really just went over that quick. It hasnt come off yet, it probably wont.
And here is the finished product. No in between shots as I was trying to get it done.
Thats it for now...but we're getting there. Got some bites on the LS1 so maybe I can finally buy some parts!
J.
Last edited by ghettocruiser; 09-09-2012 at 05:26 PM.
09-10-2012, 12:38 AM
#135
Member
iTrader: (2)
Join Date: Feb 2010
Posts: 460
Likes: 0
Received 3 Likes
on
3 Posts
Car: '89 Camaro
Engine: LS1
Transmission: 4L65/70E
Axle/Gears: 9 Inch, 3.70 gears
Re: FINALLY! Out with the old...in with the new!!
block looks great, and it looks like you taped it off really good. i personally would have washed it real good one last time, only because of my experience in iraq and kuwait sand gets everywhere. keep up the good work though, i've been taking note of the work of guys like you, pocket, whitedevil, and bluezee28 for a little project when i get back to the states.
09-11-2012, 07:47 AM
#136
Re: FINALLY! Out with the old...in with the new!!
Big update...FINALLY!!
I got a full day of work in yesterday. Had some hang ups, had to make a supply run, etc. But got a lot done.
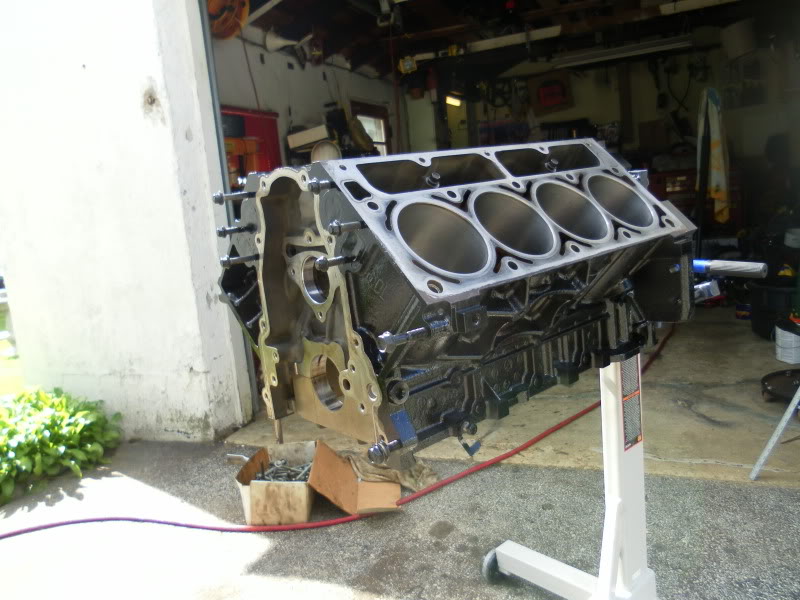
I installed the crank with just motor oil, to check my thrust and to do some PTV checking.
After that pulled it all back apart, cleaned everything thoroughly again, and then reinstalled the bearings and crank with assembly lube..for the FINAL TIME!
And... no pictures of this because it was HORRIBLY frustrating. I got all of the rings installed on the pistons. I weighed each assembly, and they're all almost exactly the same... No not as good as a full balance...but gotta be better than not right?
I lubed it all up and sent the pistons home. This was one of the most frustrating things Ive ever done. Word of wisdom... BUY A TAPERED PISTON INSTALLER!!!! This thing....
...is a royal piece of garbage. It exploded on #8. Most pistons I had to do 2 or 3 tries to get them in without the rings popping out. So frustrating. Never again.
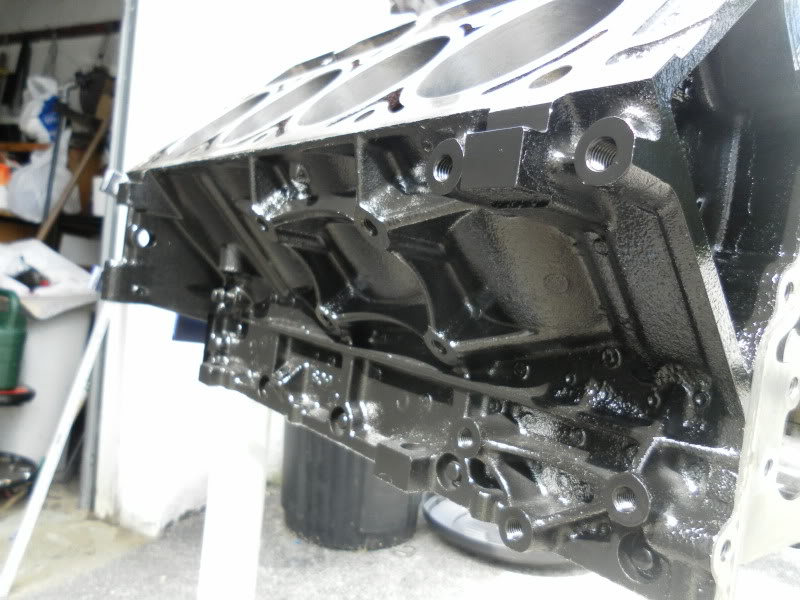
But its together!
Everything rotates really nice. My bearing clearances, and thrust clearance is spot on. The assembly lube kind of stiffened things up a bit but you could still turn it over by hand until I got about 6 pistons in then it needed a socket.
Lastly I got my other head cleaned up. So now I can remove the springs to get rid of them, and remove the valves to finish cleaning up the ports a little.
I wish I took more pictures but I just lost steam with the photography. My hands were so oily and I had cuts all over from that stupid sharp ring compressor.
For rod bolts, I just torqued down the stock bolts to get things together. I was going to install the ARP bolts, but realized I didnt have ARP assembly lube. Ide like to get some of that so I can adhere to the 45 ft-lbs that ARP recommends when not using a stretch gauge. Ill be removing one stock bolt, torquing down the ARP, loosen, torque, loosen torque 3 or 4 times, then do a final toque. The do the other bolt.
For PTV... Im confused on the information that I gathered. Im not sure if Ill need to flycut...or if Ill be able to mill my heads any. I plotted the PTV from 20* BTDC to 20* ATDC without a gasket. So I have to add .051" to all my measurements. And Ill probably have to redo this again just to verify. At top dead center, I have about .215" on the exhaust. Oddly enough, my intake was closer to the piston than the exhaust...which might be attributed by the dished pistons. I know that at TDC, the piston is chasing the valves and that max lift doesnt occur at TDC, so it wont be closest at that point. So maybe Im actually ok.
But I have a tough time with cam specs...so I need to do some thinking. I might have to re-check it over a broader degree. Probably not thinking about this correctly at all... Its easy to recheck though.
Enough babbling... Hopefully more updates soon!
J.
I got a full day of work in yesterday. Had some hang ups, had to make a supply run, etc. But got a lot done.
I installed the crank with just motor oil, to check my thrust and to do some PTV checking.
After that pulled it all back apart, cleaned everything thoroughly again, and then reinstalled the bearings and crank with assembly lube..for the FINAL TIME!
And... no pictures of this because it was HORRIBLY frustrating. I got all of the rings installed on the pistons. I weighed each assembly, and they're all almost exactly the same... No not as good as a full balance...but gotta be better than not right?
I lubed it all up and sent the pistons home. This was one of the most frustrating things Ive ever done. Word of wisdom... BUY A TAPERED PISTON INSTALLER!!!! This thing....
...is a royal piece of garbage. It exploded on #8. Most pistons I had to do 2 or 3 tries to get them in without the rings popping out. So frustrating. Never again.
But its together!
Everything rotates really nice. My bearing clearances, and thrust clearance is spot on. The assembly lube kind of stiffened things up a bit but you could still turn it over by hand until I got about 6 pistons in then it needed a socket.
Lastly I got my other head cleaned up. So now I can remove the springs to get rid of them, and remove the valves to finish cleaning up the ports a little.
I wish I took more pictures but I just lost steam with the photography. My hands were so oily and I had cuts all over from that stupid sharp ring compressor.
For rod bolts, I just torqued down the stock bolts to get things together. I was going to install the ARP bolts, but realized I didnt have ARP assembly lube. Ide like to get some of that so I can adhere to the 45 ft-lbs that ARP recommends when not using a stretch gauge. Ill be removing one stock bolt, torquing down the ARP, loosen, torque, loosen torque 3 or 4 times, then do a final toque. The do the other bolt.
For PTV... Im confused on the information that I gathered. Im not sure if Ill need to flycut...or if Ill be able to mill my heads any. I plotted the PTV from 20* BTDC to 20* ATDC without a gasket. So I have to add .051" to all my measurements. And Ill probably have to redo this again just to verify. At top dead center, I have about .215" on the exhaust. Oddly enough, my intake was closer to the piston than the exhaust...which might be attributed by the dished pistons. I know that at TDC, the piston is chasing the valves and that max lift doesnt occur at TDC, so it wont be closest at that point. So maybe Im actually ok.
But I have a tough time with cam specs...so I need to do some thinking. I might have to re-check it over a broader degree. Probably not thinking about this correctly at all... Its easy to recheck though.
Enough babbling... Hopefully more updates soon!
J.
09-11-2012, 08:06 AM
#137
Supreme Member
Join Date: Mar 2004
Location: In the Garage
Posts: 2,519
Likes: 0
Received 4 Likes
on
3 Posts
Car: Camaro
Engine: 6.2L
Transmission: T56
Re: FINALLY! Out with the old...in with the new!!
I plotted the PTV from 20* BTDC to 20* ATDC without a gasket. So I have to add .051" to all my measurements. And Ill probably have to redo this again just to verify. At top dead center, I have about .215" on the exhaust. Oddly enough, my intake was closer to the piston than the exhaust...which might be attributed by the dished pistons. I know that at TDC, the piston is chasing the valves and that max lift doesnt occur at TDC, so it wont be closest at that point. So maybe Im actually ok.
Slice the clay through the middle of the valve indentations and using calipers you can measure the thickness of the clay at its thinnest point. Thats your PTV. Then using that measurement take your heads to the machine shop and have them mill them .100 less than the thickness of the thinnest clay measurement and your good to go. .0800 is safe too but right on the edge of the generally agreed safe ptv zone. You can CC them after if you wish to calculate compression ratio
You'll most likely have to get new pushrods once the heads are milled btw
09-11-2012, 08:18 AM
#138
Re: FINALLY! Out with the old...in with the new!!
Well that method only works if I have my cam installed correct? Im just trying to gather information in order to get my cam spec'd. Then Ill DEF be doing the clay method, and probably the caliper method as well just to be sure.
Im probably going to need different pushrods anyway since Im changing to the LS7 lifters...Im holding onto the ones that I have for now until I verify though.
If I leave my heads as they are, Ill be around 10.5 SCR. Which isnt horrible. I was thinking Ide like to be closer to 11...but Im going to see what PatG recommends with the info that I have now, and decide on the milling and all after I get things straight.
I guess I COULD install my current cam and check things with that installed? Then see where I stand. I wasnt sure if the reverse split would cause confusing information though since I wont be putting a reverse back in I dont think...
J.
09-11-2012, 08:26 AM
#139
Supreme Member
Join Date: Mar 2004
Location: In the Garage
Posts: 2,519
Likes: 0
Received 4 Likes
on
3 Posts
Car: Camaro
Engine: 6.2L
Transmission: T56
Re: FINALLY! Out with the old...in with the new!!
You have to check with the cam your going to run yes correct. I didnt even realize with above post that you dont have a cam yet. Compression is like nitrous. More you add the more you get its just building within the safety zone thats important. You get a LOT more snap out of engines with higher compression. There is a crossover point where too much CR will hurt your engine if you dont run a high enough octane fuel but a proper tune becomes MUCH more important as CR goes up. I ran .080 on an LS with 91 octane and no issues at all. Over the winter im going to mill my L92 heads down a bit and maybe do a bit of bowl work. All the little things are what make one combo seemingly over achieve vs the slap together and go builds.
Blueprinting is what they used to call this type of stuff LOL. Blueprinting.... old <
Blueprinting is what they used to call this type of stuff LOL. Blueprinting.... old <
09-11-2012, 08:59 AM
#140
Re: FINALLY! Out with the old...in with the new!!
Lol... Yeah.
My bowls are already touched up. I really believe the heads will work well. LQ9 pistons will put my CR too high in my opinion. So the LQ4 dish, plus some milling, will allow me to sneak up on the CR that I want. IF I have room to mill.
So...maybe I ought to just put my old cam in, and just for giggles check my clearances. If nothing else, it might help me wrap my head around the numbers that Im getting. The old cam just confuses me more because it was installed with an adjustable timing set, and set 2* advance I think. I wont be doing that this time around...going to just order cam spec'd to my set up and run straight up.
Oh...as for my plotting of the PTV. What I did was start at 20* BTDC, set up a dial caliper on the valve stem, and measured how much travel before hitting the piston. Then I rotated to 15* BTDC and checked...etc. I did this past TDC and to 20* ATDC. I figure this would give me an idea of what clearance I have to compare to the max lift of a cam at a given time. But without fully understand valve events and timing of said events, the info really isnt meaning much to me right now.
I always make things more complicated haha.
J.
09-17-2012, 10:53 AM
#141
Re: FINALLY! Out with the old...in with the new!!
Ugh... ok. Im still racking my brain here. I feel like I need to decide whether i can mill my heads or use thinner gaskets....THEN get my cam spec'd. Taking into account whatever my CR's will be and what kind of PTV Ill be able to get away with.
Problem is...Im having a heck of a time wrapping my head around cam timing and what the valves are doing when and what the ball parks will be for clearances. I took measurements at different degrees to get an idea of what my clearances are, but cant really apply that with cam theory.
Anyone willing to get into a PM or email discussion with me to help me understand better? I dont want to clog the thread up with too much chatter. The picture to babbling ratio is already lopsided haha.
J.
09-17-2012, 11:00 AM
#142
Senior Member
Re: FINALLY! Out with the old...in with the new!!
j., if you go to a good cam grinder/designer, they should be able to accomodate your needs, relieving you of the headache. let them know what you are looking for, and what you are thinking about doing. start at the source.
09-17-2012, 11:43 AM
#143
Re: FINALLY! Out with the old...in with the new!!
I actually messaged/emailed a couple people including the guy that Im going to go to for my cam specs...but I guess I had too many questions or was too jumbled in my thoughts. Or they are just busy, because I didnt get any feedback.
I wish more guys were running the 6.0 with 862 heads so I could have something to base off of. Get an idea of what works. Its just not a porpular combo haha.
J.
I wish more guys were running the 6.0 with 862 heads so I could have something to base off of. Get an idea of what works. Its just not a porpular combo haha.
J.
10-20-2012, 04:42 PM
#144
Re: FINALLY! Out with the old...in with the new!!
So...Ive stalled haha. Ran out of disposable income for a bit, and also time. October is a horrible month...
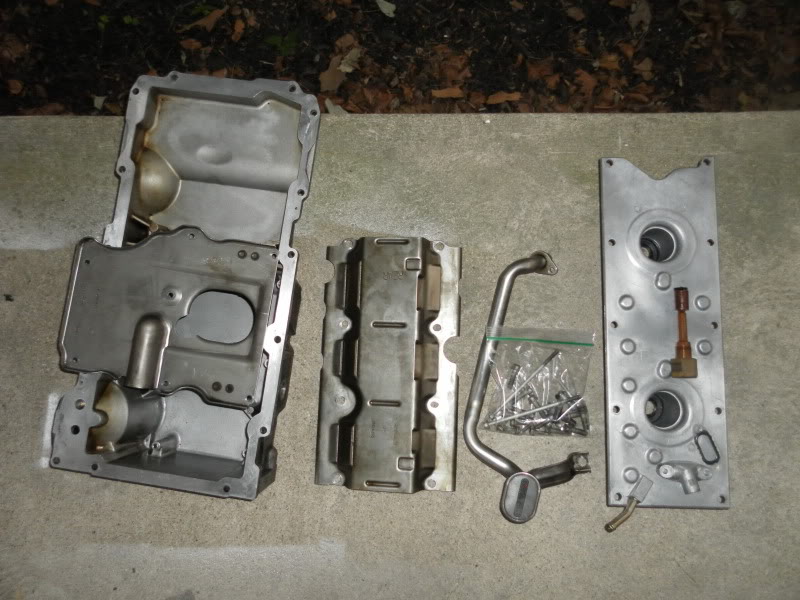
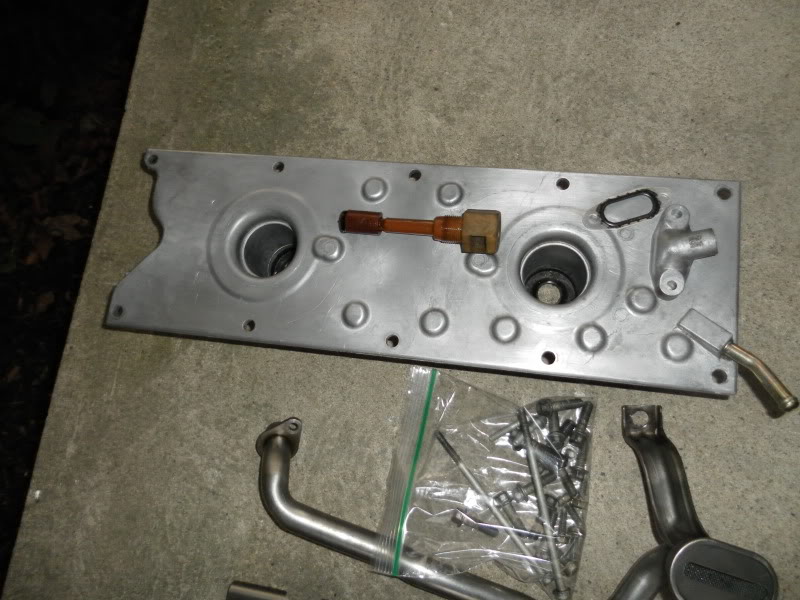
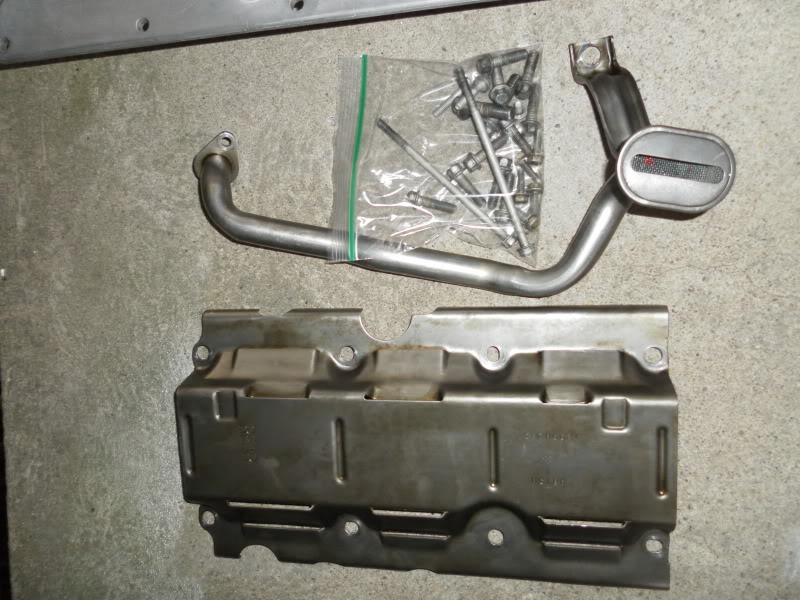
BUT...I sold my cam, so I was able to get some parts. Here's what I picked up today for the ridiculous price of $200 after tax and in my hand... Im not sure why, but Fred Beans had what I felt was awesome prices on this stuff and I went and picked it up.
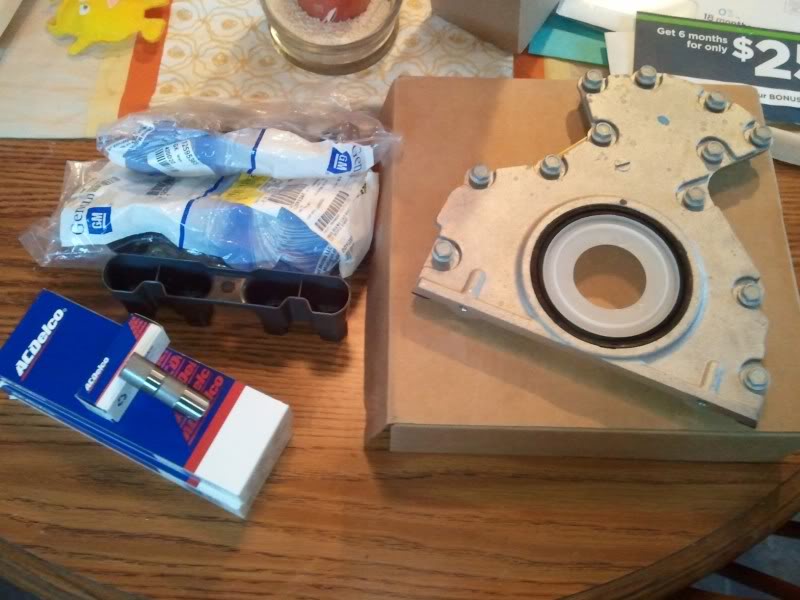
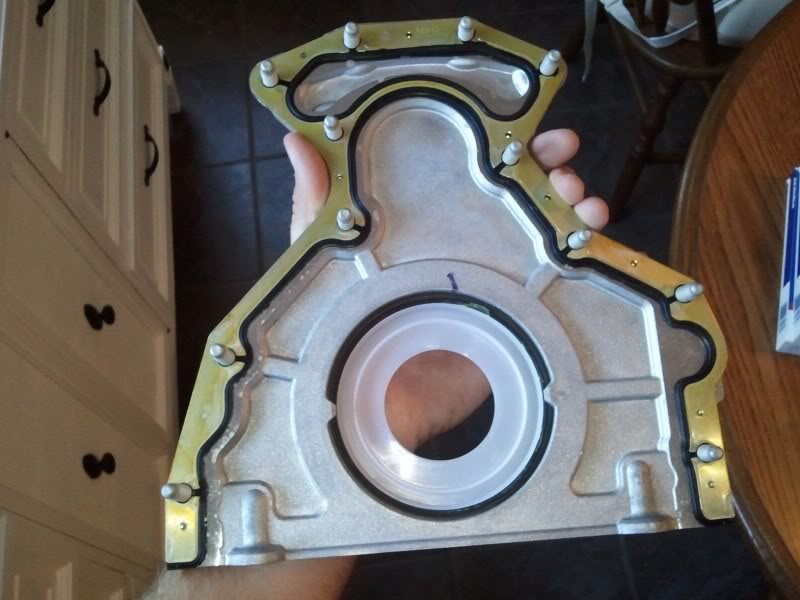
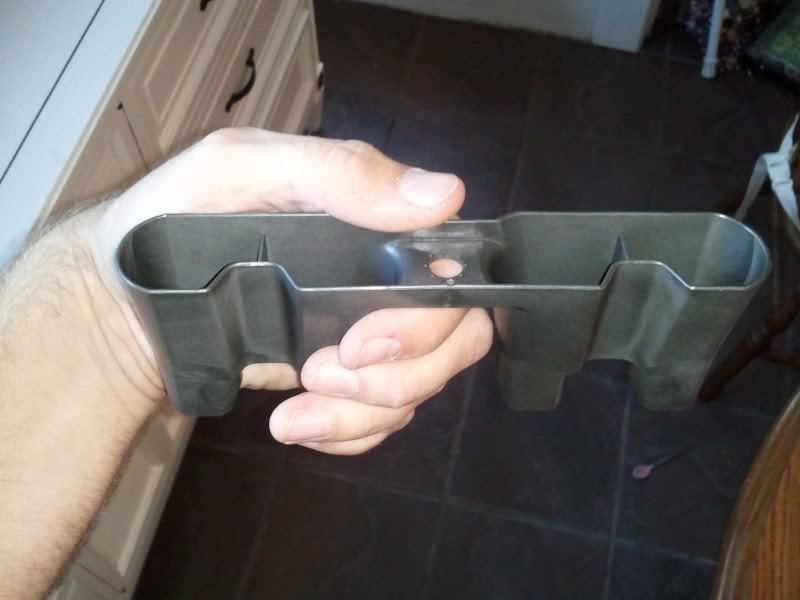
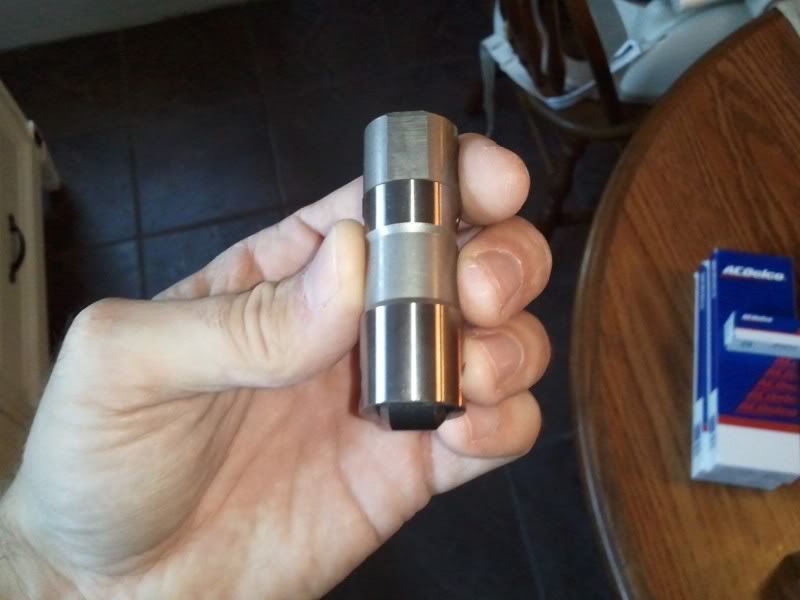
New rear cover complete with RMS, gasket and hardware. This was only a tiny bit more than buying the gasket and RMS by themselves. Full set of LS7 lifters, and new LS2 lifter trays.
I also sent in my cam request form to Patrick G...along with 50 paranoid emails making sure he knew what I was looking for haha. I think he gets it.
One more parts order from GMPartsdirect, the cam...and MAYBE injectors if I can swing them. Thats it! Still up in the air as to whether I can mill my heads...but its sounding like Im going to have to flycut if I want a nice cam in there. We'll see...Im ok with it at this point. Will be one more DIY thing to cut my teeth on.
Im hoping to do some painting tomorrow. And I know this thread has been majorly slow and lacking content compared to my previous threads....but Ill post pics if I do anything haha.
J.
BUT...I sold my cam, so I was able to get some parts. Here's what I picked up today for the ridiculous price of $200 after tax and in my hand... Im not sure why, but Fred Beans had what I felt was awesome prices on this stuff and I went and picked it up.
New rear cover complete with RMS, gasket and hardware. This was only a tiny bit more than buying the gasket and RMS by themselves. Full set of LS7 lifters, and new LS2 lifter trays.
I also sent in my cam request form to Patrick G...along with 50 paranoid emails making sure he knew what I was looking for haha. I think he gets it.
One more parts order from GMPartsdirect, the cam...and MAYBE injectors if I can swing them. Thats it! Still up in the air as to whether I can mill my heads...but its sounding like Im going to have to flycut if I want a nice cam in there. We'll see...Im ok with it at this point. Will be one more DIY thing to cut my teeth on.
Im hoping to do some painting tomorrow. And I know this thread has been majorly slow and lacking content compared to my previous threads....but Ill post pics if I do anything haha.
J.
10-23-2012, 12:55 PM
#145
Junior Member

Join Date: Sep 2011
Location: Houston, Texas
Posts: 58
Likes: 0
Received 0 Likes
on
0 Posts
Car: 1986 Camaro
Engine: LS6
Transmission: Tick Stage 2 T56
Axle/Gears: Moser 12 Bolt
Re: FINALLY! Out with the old...in with the new!!
Do anything more? Sucks about your other engine. I always enjoy an engine build thread.
10-23-2012, 02:36 PM
#146
Re: FINALLY! Out with the old...in with the new!!
Kind of stuck right now. I got my alum parts cleaned up and ready for paint, but didnt get to paint anything. Mostly just going to hit the brackets with cast alum paint and a little clear. And then hit some of the other parts with flat black. Not sure how its going to look together...
Im also waiting on my cam specs. I really cant do anything else until I get a cam, check my PTV, and probably flycut. Then one massive parts order and I can fully assemble the motor.
Just...taking WAY longer than I wanted. Still have brake work on the car to do, and maybe some fuel upgrades.
J.
Im also waiting on my cam specs. I really cant do anything else until I get a cam, check my PTV, and probably flycut. Then one massive parts order and I can fully assemble the motor.
Just...taking WAY longer than I wanted. Still have brake work on the car to do, and maybe some fuel upgrades.
J.
 04-10-2013, 10:32 AM
#148
Re: FINALLY! Out with the old...in with the new!!
Holy..... Have I really not posted in here since Oct of last year?!?!
Oh man, its worse than I thought. Ive alwasy read stories of builds taking years, and thought to myself "man ide go crazy if it took me that long".
Well, IM GOING CRAZY!!! Geez... I havent touched it. Not even so much as a peek at any of it until this weekend. Wanted to make sure my bagged 6.0 wasnt rusting up haha.
No new news really. I did get my cam I have to go back to Geoff at EPS though, because I thought I paid extra to have him check this on his cam pro. But all I got was ONE cam spec sheet from Cam Motion, which Im guessing it was ground. I was expecting two sheets, and shipment from EPS, not shipment from Cam Motion.
Also...has anyone seen a cam with copper colored metal??? Check out my crappy pic. In between the journals is copper.
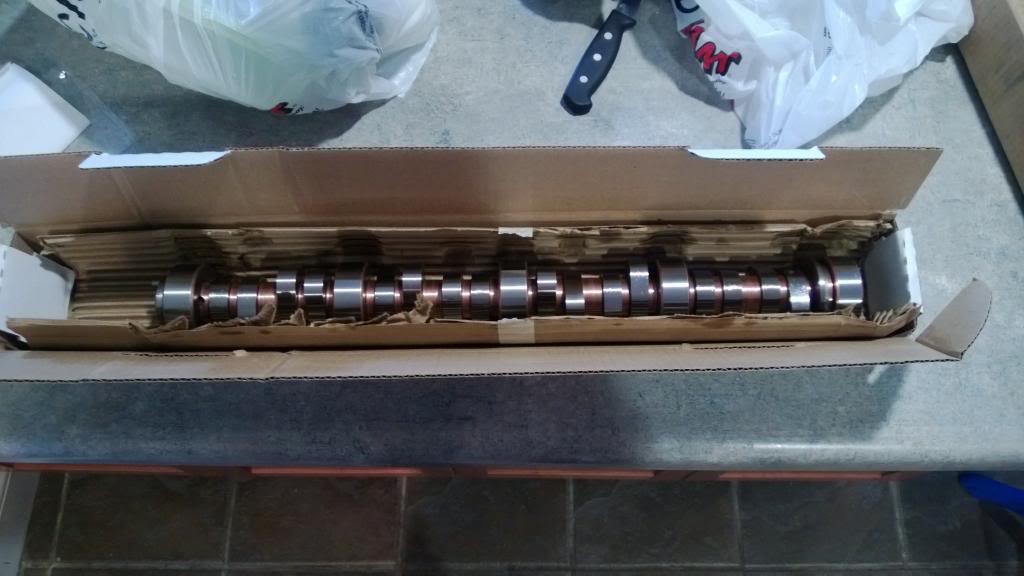
The HUGE delay with EPS, it not going through cam pro, and now this weird copper color has me feeling uneasy. haha.
Anyway, Im going to be stripping my block again. Yes...you heard me. After my ring compressor broke, it left me feeling horrible about my rings. I ended up buying a new full set of rings, and a tapered compressor. Im going to remove each piston, inspect the rings, and if I see even the slightest bit of damage, Im changing them. Screw it...whats another $160 at this point.
Also, after I get #1 re-installed, Im going to install my cam, put my head on with some set up springs, and check my PTV. That should be interesting... So look for videos/posts on that.
Hope to be around more! I bought a "new" car. Subaru Legacy GT Limited. And its surprising how addicted to it I am already. What a great car. I need my TA back though. BAD.
J.
Oh man, its worse than I thought. Ive alwasy read stories of builds taking years, and thought to myself "man ide go crazy if it took me that long".
Well, IM GOING CRAZY!!! Geez... I havent touched it. Not even so much as a peek at any of it until this weekend. Wanted to make sure my bagged 6.0 wasnt rusting up haha.
No new news really. I did get my cam
I have to go back to Geoff at EPS though, because I thought I paid extra to have him check this on his cam pro. But all I got was ONE cam spec sheet from Cam Motion, which Im guessing it was ground. I was expecting two sheets, and shipment from EPS, not shipment from Cam Motion.Also...has anyone seen a cam with copper colored metal??? Check out my crappy pic. In between the journals is copper.
The HUGE delay with EPS, it not going through cam pro, and now this weird copper color has me feeling uneasy. haha.
Anyway, Im going to be stripping my block again. Yes...you heard me. After my ring compressor broke, it left me feeling horrible about my rings. I ended up buying a new full set of rings, and a tapered compressor. Im going to remove each piston, inspect the rings, and if I see even the slightest bit of damage, Im changing them. Screw it...whats another $160 at this point.
Also, after I get #1 re-installed, Im going to install my cam, put my head on with some set up springs, and check my PTV. That should be interesting... So look for videos/posts on that.
Hope to be around more! I bought a "new" car. Subaru Legacy GT Limited. And its surprising how addicted to it I am already. What a great car. I need my TA back though. BAD.
J.
Last edited by ghettocruiser; 04-10-2013 at 10:38 AM.
04-10-2013, 10:38 AM
#149
Senior Member
Re: FINALLY! Out with the old...in with the new!!
j, no worries on the cam color, my fms f-13 had the same coloring, and i think its sub'd through cam motion.
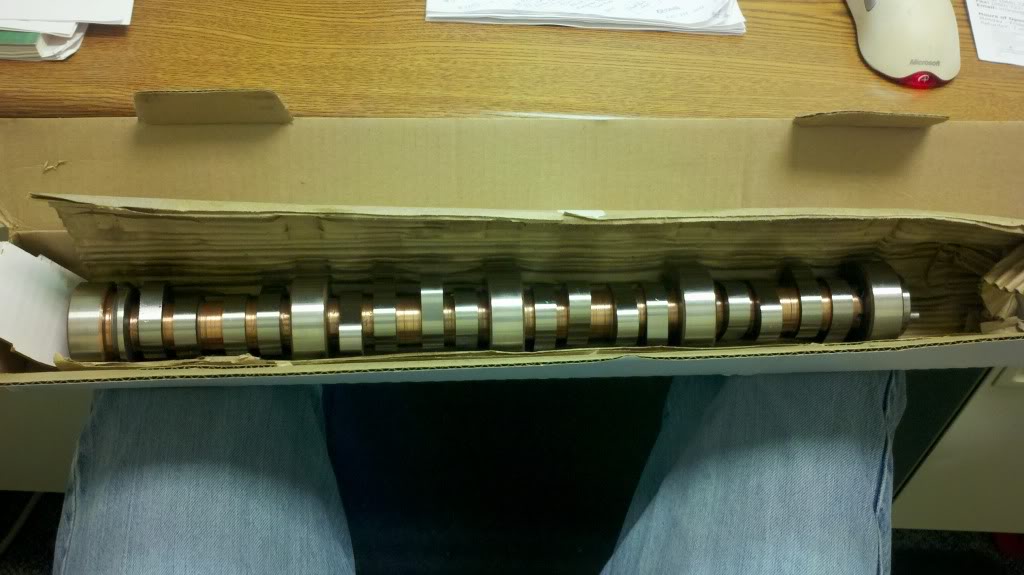
04-10-2013, 10:50 AM
#150
Supreme Member
Join Date: Mar 2004
Location: In the Garage
Posts: 2,519
Likes: 0
Received 4 Likes
on
3 Posts
Car: Camaro
Engine: 6.2L
Transmission: T56
Re: FINALLY! Out with the old...in with the new!!
Cam color is fine, i have one sitting on my desk just like that in fact.
As for the cam delay? Well.... Geoff is one BUSY man and is/was years ahead of the curve with LS1 cams and still holds the top dog record for cam only LS powered cars with grinds he designed about ten years ago now so... that said... even our last cam from him took quite some time so pain in the *** aside. Its a good sign, not a bad sign, that hes very busy, he really is a solid guy too ive spoken with him quite a few times.
I am a bit surprised about the cam pro sheet missing. Maybe he has one from another same grind that he can send? Regardless in my experience with computer ground cams these days there really isnt anything off stated specs that ive seen yet so rest easy im sure the cam will work mint.
Time becomes harder to find to play with each passing day. Life happens. Toy builds are done when they're done, it takes me ages to get them built nowadays. Carpe Diem