1989 Camaro - "The Project" Begins...
 01-10-2011, 02:19 PM
#101
Supreme Member

iTrader: (6)
Join Date: Dec 2008
Location: Norwalk, CA
Posts: 2,540
Likes: 0
Received 0 Likes
on
0 Posts
Car: 91Z28
Engine: 5.7 ls1
Transmission: 4l60e
Axle/Gears: 3.42
Re: 1989 Camaro - "The Project" Begins...
Does the license plate slide down or or how since my car is a bit low and i think it will hit.
 01-13-2011, 04:13 AM
#102
Supreme Member
Thread Starter
iTrader: (6)

Join Date: Oct 2006
Location: West of Toronto
Posts: 3,041
Likes: 0
Received 7 Likes
on
7 Posts
Car: 89 IROC
Engine: 305 TPI / ZZ4 cam
Transmission: Stage 2 700R4, LS1 driveshaft
Axle/Gears: Strange 3.42 w/ Auburn
Re: 1989 Camaro - "The Project" Begins...
 )
)In Ontario, we have to run a plate on the front so its more for hiding the plate at shows than anything else.
If the police stop me for no plate, I tell them the kids must have done it.

Last edited by The Project; 01-13-2011 at 04:21 AM.
02-24-2011, 08:26 AM
#103
Member
Join Date: Feb 2008
Location: Northeast Ohio
Posts: 171
Likes: 0
Received 0 Likes
on
0 Posts
Car: 1991 Chevy Camaro RS w/t-tops
Engine: BBC 396 .090 over (414)
Transmission: LS1 T-56
Axle/Gears: Shortened Ford 9, 3.25, discs, posi
Re: 1989 Camaro - "The Project" Begins...
Dude it is looking very nice. Love the plate holder! Good luck and I'd almost consider the electric one so you could just flip it up from inside the car if the cops pull you over....
03-19-2011, 03:12 PM
#104
Supreme Member
iTrader: (1)
Join Date: Jun 2009
Location: Central Connecticut
Posts: 1,777
Likes: 0
Received 0 Likes
on
0 Posts
Car: 91 Trans Am 'vert
Engine: LB9
Transmission: T5
Axle/Gears: 3.45 9 bolt
Re: 1989 Camaro - "The Project" Begins...
Wow i just went through this whole thread and the progress looks great! Any updates?
04-08-2011, 12:21 PM
#105
Supreme Member
Thread Starter
iTrader: (6)
Join Date: Oct 2006
Location: West of Toronto
Posts: 3,041
Likes: 0
Received 7 Likes
on
7 Posts
Car: 89 IROC
Engine: 305 TPI / ZZ4 cam
Transmission: Stage 2 700R4, LS1 driveshaft
Axle/Gears: Strange 3.42 w/ Auburn
Re: 1989 Camaro - "The Project" Begins...
")
We are talking about doing a "live build" next year at Performance World Car Show; consisting of Dynamat the front half of the car and doors, replacing all door weatherstripping, new front carpet, reupholster the headliner and custom door panels. All the work needs to be done in three days

For now I'm picking up parts needed to change all the interior and exterior lighting to true LEDs.
05-03-2011, 09:48 PM
#106
Junior Member

Join Date: May 2010
Location: Montana
Posts: 61
Likes: 0
Received 0 Likes
on
0 Posts
Car: 1991 Camaro RS
Engine: ewww...the 3.1L
Transmission: Not sure. It shifts quite hard.
Axle/Gears: 3.23 8.75" 10 bolt
Re: 1989 Camaro - "The Project" Begins...
How much dynamat are you using to cover the rear and front of the car. Also, how far up the firewall are you going? I want to cover the floor of mine before I install the interior.
08-26-2011, 12:21 AM
#107
Senior Member

Join Date: Oct 2010
Location: bellingham WA
Posts: 885
Likes: 0
Received 0 Likes
on
0 Posts
Car: 85 Z28
Engine: 327
Transmission: 700R4
Axle/Gears: 3.23
Re: 1989 Camaro - "The Project" Begins...
I am intersted in what you have gathered and what your plan is for the true LED interior and exterior
08-28-2011, 12:28 PM
#108
Supreme Member
Thread Starter
iTrader: (6)
Join Date: Oct 2006
Location: West of Toronto
Posts: 3,041
Likes: 0
Received 7 Likes
on
7 Posts
Car: 89 IROC
Engine: 305 TPI / ZZ4 cam
Transmission: Stage 2 700R4, LS1 driveshaft
Axle/Gears: Strange 3.42 w/ Auburn
Re: 1989 Camaro - "The Project" Begins...
As for the interior, I only have the 9 led dome light so far. All the interior lights (194's) will be changed. The dash and console will get the brightest clear light I can find, while the under dash lights/footwell will be bright blue. My humount plate will be blue to match the deck and add symmetry to the interior colour.
08-28-2011, 12:33 PM
#109
Supreme Member
Thread Starter
iTrader: (6)
Join Date: Oct 2006
Location: West of Toronto
Posts: 3,041
Likes: 0
Received 7 Likes
on
7 Posts
Car: 89 IROC
Engine: 305 TPI / ZZ4 cam
Transmission: Stage 2 700R4, LS1 driveshaft
Axle/Gears: Strange 3.42 w/ Auburn
Re: 1989 Camaro - "The Project" Begins...

I'll probably use another 2 36sq.ft. packs to do the front and doors (inner and outer). Probably 3 bulks pack or 108 sq.ft. in total.
If I have any left over, I start at the bottom of the firewall and work the area that will be under the carpet. I don't need to cover the entire firewall. Doors and floors are the most important areas to do. I also doubled up on the area over the cats.
I'll also add some Raammat ensolite to cover most of the dynamat.
08-28-2011, 12:38 PM
#110
Senior Member
Join Date: Oct 2010
Location: bellingham WA
Posts: 885
Likes: 0
Received 0 Likes
on
0 Posts
Car: 85 Z28
Engine: 327
Transmission: 700R4
Axle/Gears: 3.23
Re: 1989 Camaro - "The Project" Begins...
As far az exteriors did you find any lights worked better then others as fae as amount of leds per bulb or anything
09-04-2011, 09:19 AM
#111
Supreme Member
Thread Starter
iTrader: (6)
Join Date: Oct 2006
Location: West of Toronto
Posts: 3,041
Likes: 0
Received 7 Likes
on
7 Posts
Car: 89 IROC
Engine: 305 TPI / ZZ4 cam
Transmission: Stage 2 700R4, LS1 driveshaft
Axle/Gears: Strange 3.42 w/ Auburn
Re: 1989 Camaro - "The Project" Begins...
MY rear lens and front bumper bulbs have 36 led's. I also took the tail lights apart and repainted the inside bright silver to help with the light reflection.Just be careful and insure the led's you purchase fit through the bulb opening on the lens.
I've heard of a few guys that had to grind the opening as the led's were too big.
09-04-2011, 04:04 PM
#112
Senior Member
Join Date: Oct 2010
Location: bellingham WA
Posts: 885
Likes: 0
Received 0 Likes
on
0 Posts
Car: 85 Z28
Engine: 327
Transmission: 700R4
Axle/Gears: 3.23
Re: 1989 Camaro - "The Project" Begins...
I am going to have to check it out. I VHT red nighshade my front bumper light and side markers. Came out nice, and I think some really bright LEDS would set it off. Right now because my car is a satin black, at night it looks like red eyes coming at you.
09-04-2011, 04:46 PM
#113
Supreme Member
Thread Starter
iTrader: (6)
Join Date: Oct 2006
Location: West of Toronto
Posts: 3,041
Likes: 0
Received 7 Likes
on
7 Posts
Car: 89 IROC
Engine: 305 TPI / ZZ4 cam
Transmission: Stage 2 700R4, LS1 driveshaft
Axle/Gears: Strange 3.42 w/ Auburn
Re: 1989 Camaro - "The Project" Begins...
Sounds cool. Throw some pics up.
09-04-2011, 10:21 PM
#114
Senior Member
Join Date: Oct 2010
Location: bellingham WA
Posts: 885
Likes: 0
Received 0 Likes
on
0 Posts
Car: 85 Z28
Engine: 327
Transmission: 700R4
Axle/Gears: 3.23
09-04-2011, 10:55 PM
#116
Member
iTrader: (1)
Join Date: Sep 2009
Location: Allegan, MI
Posts: 199
Likes: 0
Received 1 Like
on
1 Post
Car: 89' camaro RS TTOP
Engine: 92 5.0tpi Bosch III, headers, msd
Transmission: 700r4 built. trans go. 2,300 stall
Axle/Gears: 3:73 posi ls disc brake conversion
Re: 1989 Camaro - "The Project" Begins...
Looking great!!!
10-11-2011, 09:23 AM
#117
Junior Member
Join Date: Feb 2008
Location: Third Coast Outlaw(South Texas)
Posts: 47
Likes: 0
Received 0 Likes
on
0 Posts
Car: 1987 Camaro IROC-Z
Engine: 383 Carbed
Transmission: 700R4
Axle/Gears: 3.23
Re: 1989 Camaro - "The Project" Begins...
Damn, your car is coming along great! Looks awesome, keep up the work, truly inspiring!
11-20-2011, 12:02 PM
#119
Supreme Member
Thread Starter
iTrader: (6)
Join Date: Oct 2006
Location: West of Toronto
Posts: 3,041
Likes: 0
Received 7 Likes
on
7 Posts
Car: 89 IROC
Engine: 305 TPI / ZZ4 cam
Transmission: Stage 2 700R4, LS1 driveshaft
Axle/Gears: Strange 3.42 w/ Auburn
Re: 1989 Camaro - "The Project" Begins...
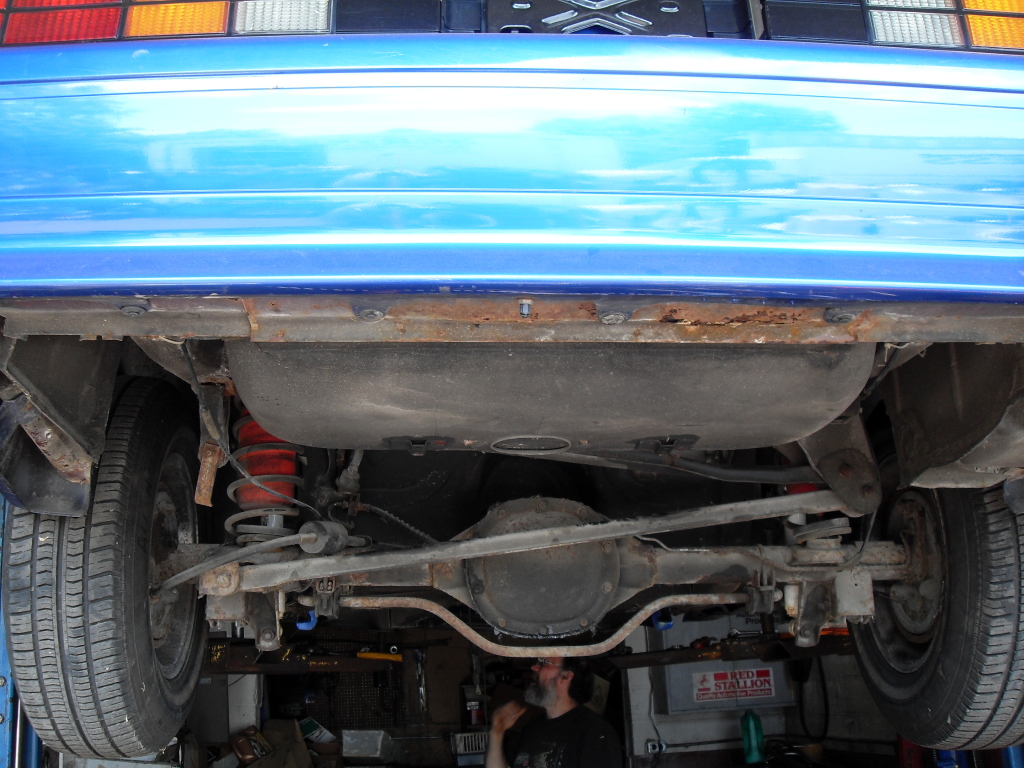
Been under the Camaro lately cleaning the undercarriage in preparation of using some POR-15 getting applied in the spring. 
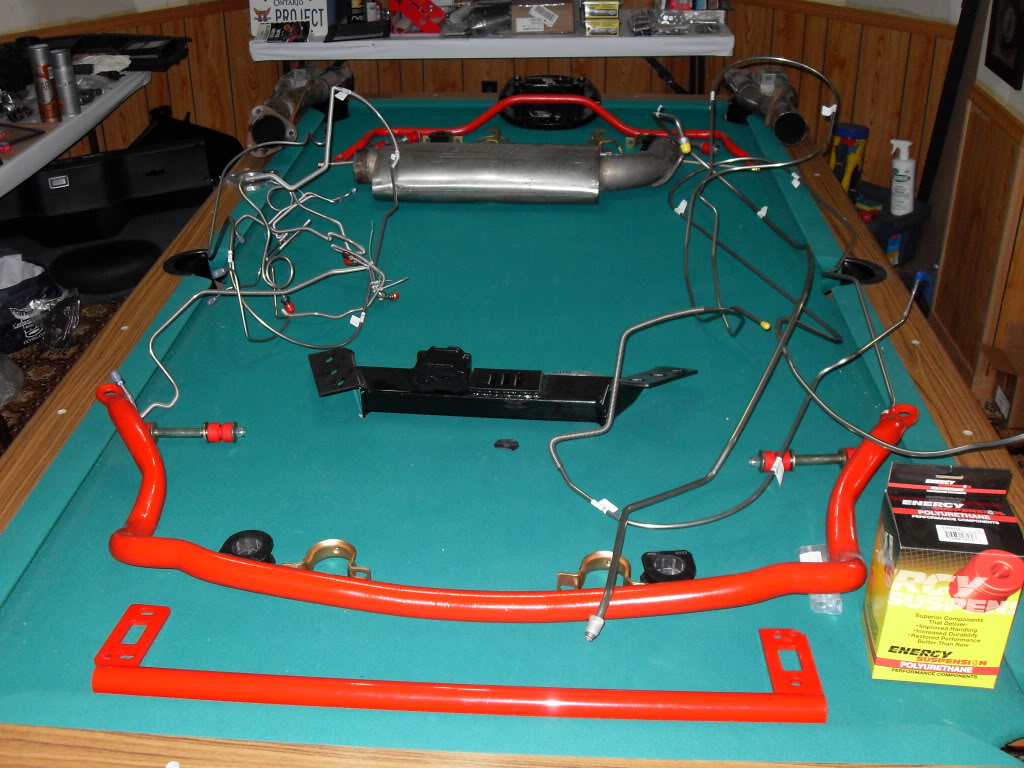
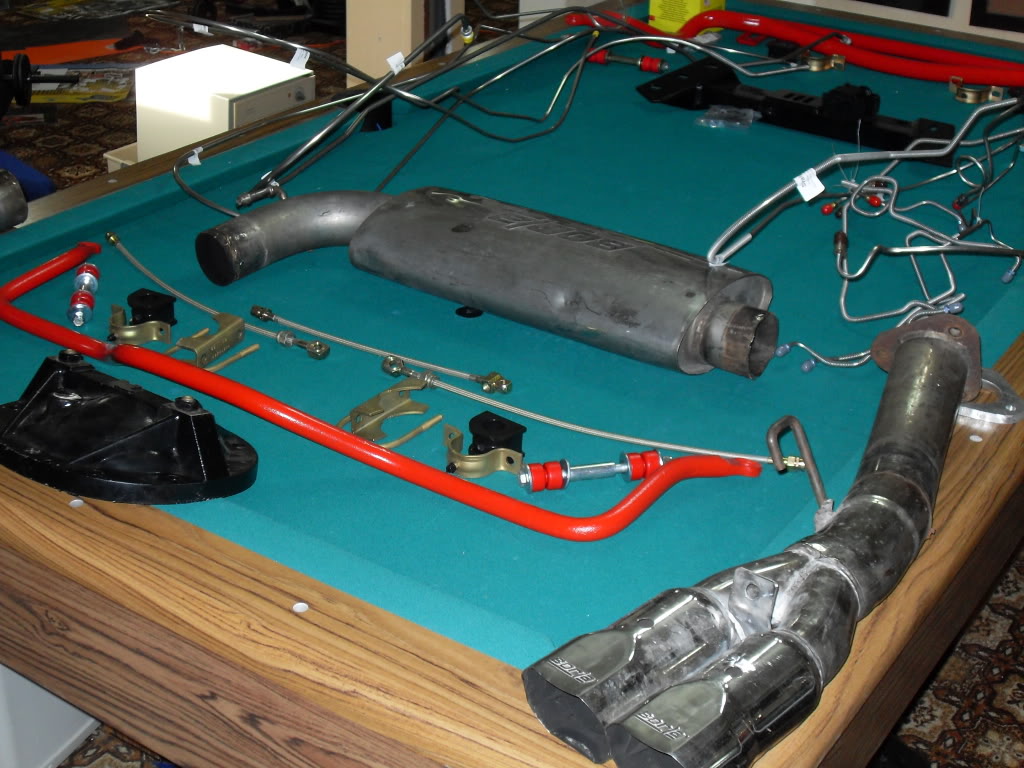
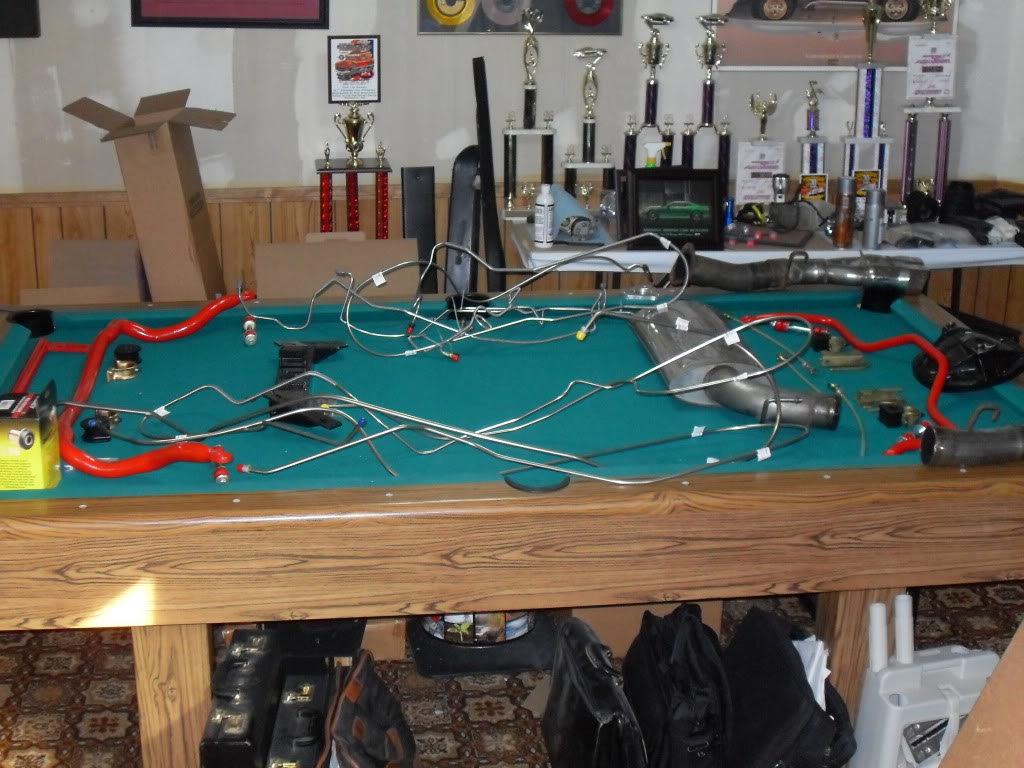
Meanwhile, I picked up some more new parts for when I replace the suspension and all the lines. Did a rough mock up on the pool table.
IROC 36/24mm sway bar combo
UMI wonderbar
UMI trans cross member
ES a-arm bushings
ES front and Spohn rear poly endlinks
Spohn front and TDS rear swarbar bushings
All new hardware
Inline Tube SS fuel lines
Inline Tube SS brake lines
Teflon braided rear brake flex lines
TA diff cover
Borla cat back
Can't wait for spring...note to self, put car on hoist getting too old for the creeper.
11-20-2011, 02:48 PM
#120
Junior Member
Join Date: Dec 2007
Location: Spirit Lake, Idaho
Posts: 42
Likes: 0
Received 0 Likes
on
0 Posts
Car: 91 RS and 89 RS, 99 Tacoma TRD
Engine: 91-L03, 89-350 TBI
Transmission: 91-700r4, 89-T5
Re: 1989 Camaro - "The Project" Begins...
I love the mockup. Good way to visualize ahead of time.
11-20-2011, 03:29 PM
#121

Re: 1989 Camaro - "The Project" Begins...
The Project--
I gotta Lol the pool table!!
My Bride isn't exactly over-joyed~ her pool table has our interior plastics & headliner taking residence!!!
Thanks for proving there's more than 2 uses for a pool table!!....
I gotta Lol the pool table!!
My Bride isn't exactly over-joyed~ her pool table has our interior plastics & headliner taking residence!!!
Thanks for proving there's more than 2 uses for a pool table!!..
..
11-20-2011, 08:26 PM
#122
Senior Member
Join Date: Mar 2009
Location: Bloomfield, IN
Posts: 880
Likes: 0
Received 1 Like
on
1 Post
Car: 87 Camaro
Engine: 305
Transmission: 700R4
Re: 1989 Camaro - "The Project" Begins...
Car looks great! Looked like brand new once you put the front nose back on! Do you have a link for those gauge faces? I can't find one that changes colors like yours does.
11-21-2011, 05:50 PM
#123
Supreme Member
Thread Starter
iTrader: (6)
Join Date: Oct 2006
Location: West of Toronto
Posts: 3,041
Likes: 0
Received 7 Likes
on
7 Posts
Car: 89 IROC
Engine: 305 TPI / ZZ4 cam
Transmission: Stage 2 700R4, LS1 driveshaft
Axle/Gears: Strange 3.42 w/ Auburn
Re: 1989 Camaro - "The Project" Begins...
Thanks guys. Appreciate the feedback.
Awesome-X...I picked up the gauge inlays from ebay a while back.
Awesome-X...I picked up the gauge inlays from ebay a while back.
12-16-2011, 03:47 AM
#124
Member
Re: 1989 Camaro - "The Project" Begins...
Decided it was time to repaint the hood louvers.
I bought some 400 grit sandpaper to remove the oxidization and a can of SEM trim black spray paint.
Old louver on the top (with all the oxidization), while the one on the bottom has been prep sanded with 400 grit sandpaper.

I made sure I sanded the edges and the underneath of the louvers so the paint would adhere properly. After I sanded each louver I washed them with some Mothers car wash and thoroughly rinsed them off and let stand to dry.
Paint wise, each louver was sprayed three times - top-to-bottom, bottom-to-top and top-to-bottom again. This way the underside of the louver receives the proper amount of paint.
The outcome.....pretty darn nice. Very happy with the result.


SEM Trim Black (satin finish) $15.00

I bought some 400 grit sandpaper to remove the oxidization and a can of SEM trim black spray paint.
Old louver on the top (with all the oxidization), while the one on the bottom has been prep sanded with 400 grit sandpaper.
I made sure I sanded the edges and the underneath of the louvers so the paint would adhere properly. After I sanded each louver I washed them with some Mothers car wash and thoroughly rinsed them off and let stand to dry.
Paint wise, each louver was sprayed three times - top-to-bottom, bottom-to-top and top-to-bottom again. This way the underside of the louver receives the proper amount of paint.
The outcome.....pretty darn nice.
Very happy with the result.SEM Trim Black (satin finish) $15.00
12-16-2011, 05:53 PM
#125
03-11-2012, 12:47 AM
#126
Member
Join Date: Oct 2011
Location: Paris Texas
Posts: 344
Likes: 0
Received 2 Likes
on
2 Posts
Car: 91 Camaro RS, 84 2.8 5speed
Engine: 305 5.0L
Transmission: Auto, 5 speed
Re: 1989 Camaro - "The Project" Begins...
What are good sites for buying all the interior stuff? like the plastic siding in the back with the trunk and the whole dash and all??
03-11-2012, 11:58 AM
#127
Supreme Member
Thread Starter
iTrader: (6)
Join Date: Oct 2006
Location: West of Toronto
Posts: 3,041
Likes: 0
Received 7 Likes
on
7 Posts
Car: 89 IROC
Engine: 305 TPI / ZZ4 cam
Transmission: Stage 2 700R4, LS1 driveshaft
Axle/Gears: Strange 3.42 w/ Auburn
Re: 1989 Camaro - "The Project" Begins...
I have the most luck trolling ebay and other f-body sites. Many of the bigger interior panels I picked up from a guy in Ohio (8 hours away) who contacted me thru a post I put on the Ohio fbody site. It pays to put the word out as much as you can and follow up.
You could also try perrypam (www.moderndaymuscle.com) he sometimes has stuff or can find stuff if you ask that is not on the website.

You have to be truly patient and determined especially when it comes to an NOS black interior. In 5 years I have only ever seen one spare tire panel cover (NOS, black and still in the original GM box) on ebay. It is currently in my car. Even a pair of NOS kick panels (no carpet) will go for over $100.
04-08-2012, 02:45 PM
#128
Supreme Member
Thread Starter
iTrader: (6)
Join Date: Oct 2006
Location: West of Toronto
Posts: 3,041
Likes: 0
Received 7 Likes
on
7 Posts
Car: 89 IROC
Engine: 305 TPI / ZZ4 cam
Transmission: Stage 2 700R4, LS1 driveshaft
Axle/Gears: Strange 3.42 w/ Auburn
Re: 1989 Camaro - "The Project" Begins...
Car will be going to the shop in a few weeks. Right now I'm pulling the heads off the 305 for some screw-in studs, then installing the ZZ4 cam GMPP springs, locks and retainers and getting the engine together with a comp cams double roller timing chain before the car goes on the hoist. 
Will be sending the k-member, a-arms and engine accessory brackets over to the powder coater while I work on the undercarriage.
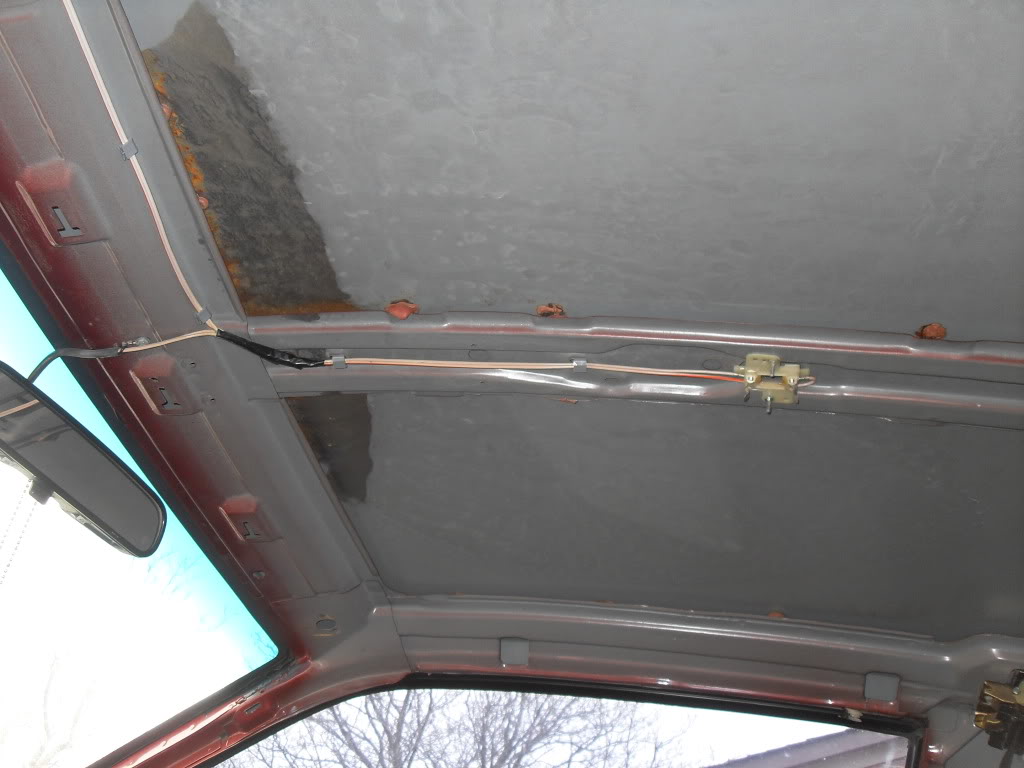
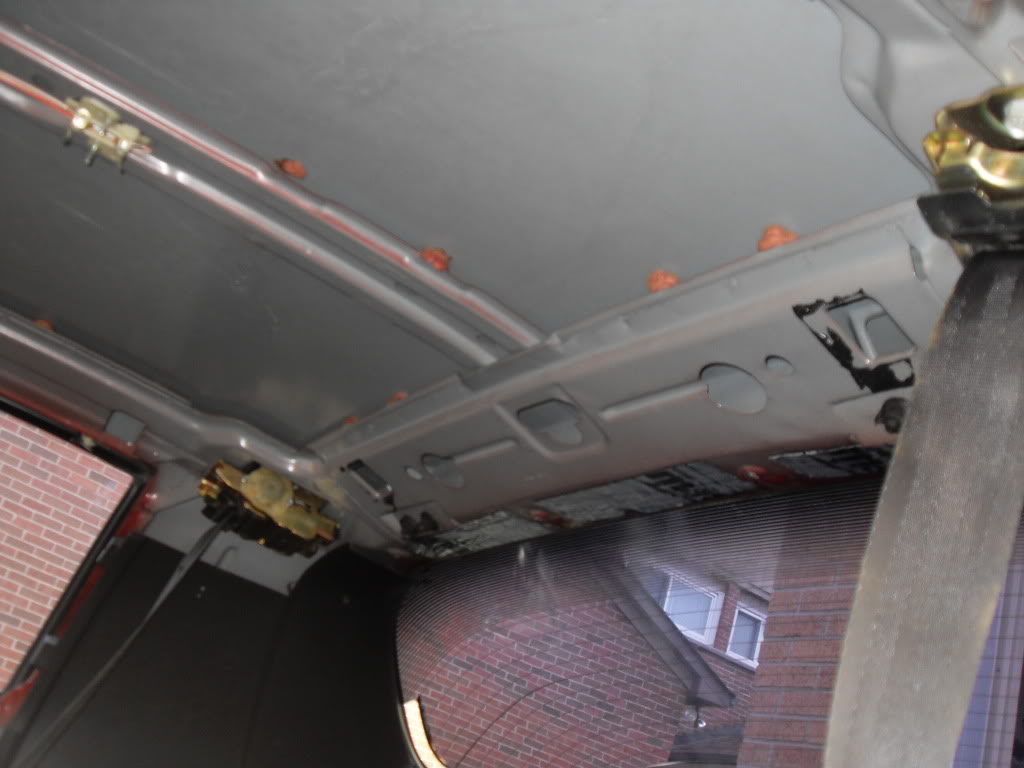
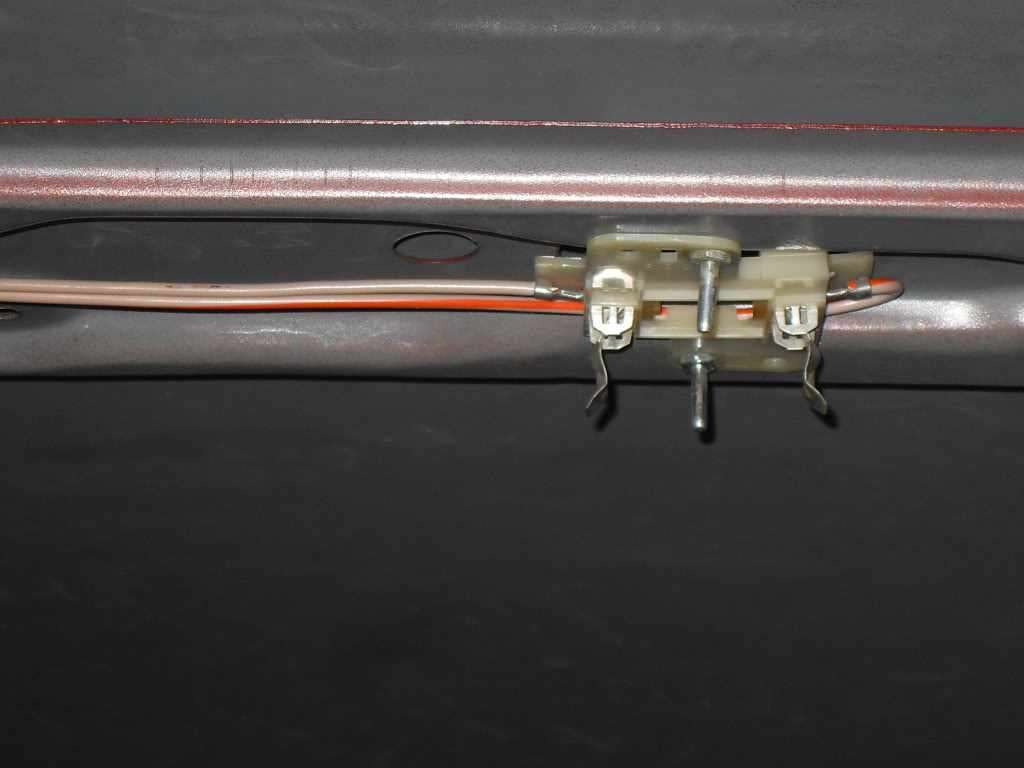
Also decided to pull the headliner down as it was sagging pretty badly.
Few shots or the roof...pretty clean, almost new
 [/quote]
Will be sending the k-member, a-arms and engine accessory brackets over to the powder coater while I work on the undercarriage.
Also decided to pull the headliner down as it was sagging pretty badly.
Few shots or the roof...pretty clean, almost new
[/quote]
06-09-2012, 06:44 AM
#129
Supreme Member
Thread Starter
iTrader: (6)
Join Date: Oct 2006
Location: West of Toronto
Posts: 3,041
Likes: 0
Received 7 Likes
on
7 Posts
Car: 89 IROC
Engine: 305 TPI / ZZ4 cam
Transmission: Stage 2 700R4, LS1 driveshaft
Axle/Gears: Strange 3.42 w/ Auburn
Re: 1989 Camaro - "The Project" Begins...
Got the car over to the shop to start the teardown on the undercarriage.
Kmember, a-arms, heat shields and brackets went off the the sand blaster. They will be coated in POR-15 after they get stripped of 20 plus years of rust and dirt.
Engine accessory brackets and spindles were sent to Fireball for powder coating.
The entire front suspension was disassembled. Sway bars, links and bushings went to the scrap yard as I have all new pieces going in. Same for the fuel and brake lines but I saved the clips just in case.
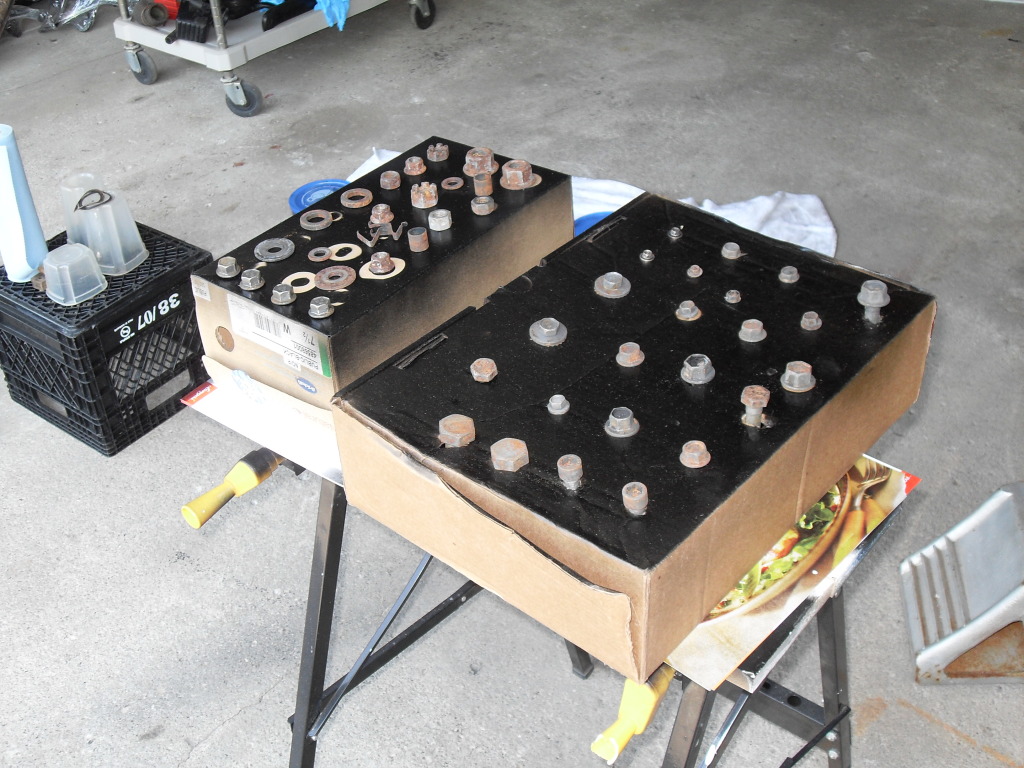
All the bolts and nuts were kept and cleaned up. They were soaked in CLR for three hours, cleaned with a nail brush, soaked in PO 15 Marine clean (1:1 dilution) for another two hours and then rinsed and dried. It was a lot of cleaning but worth the effort. I will repaint the bolt heads so they look pretty.
Reassembly will begin soon.
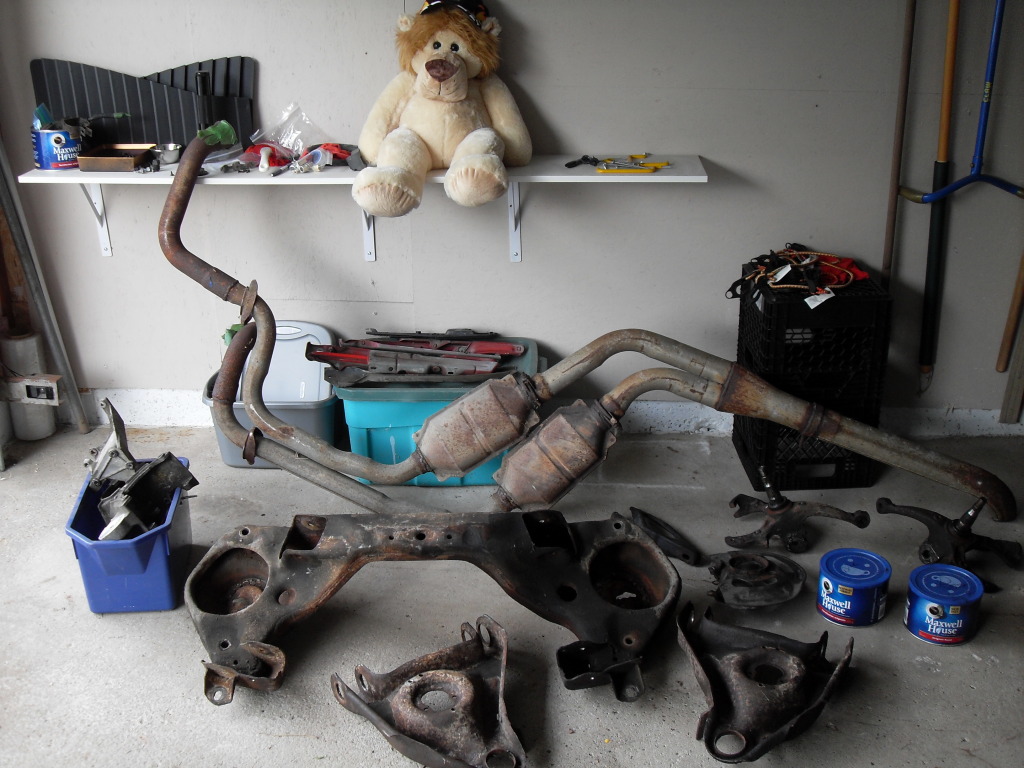
Before pics of the parts
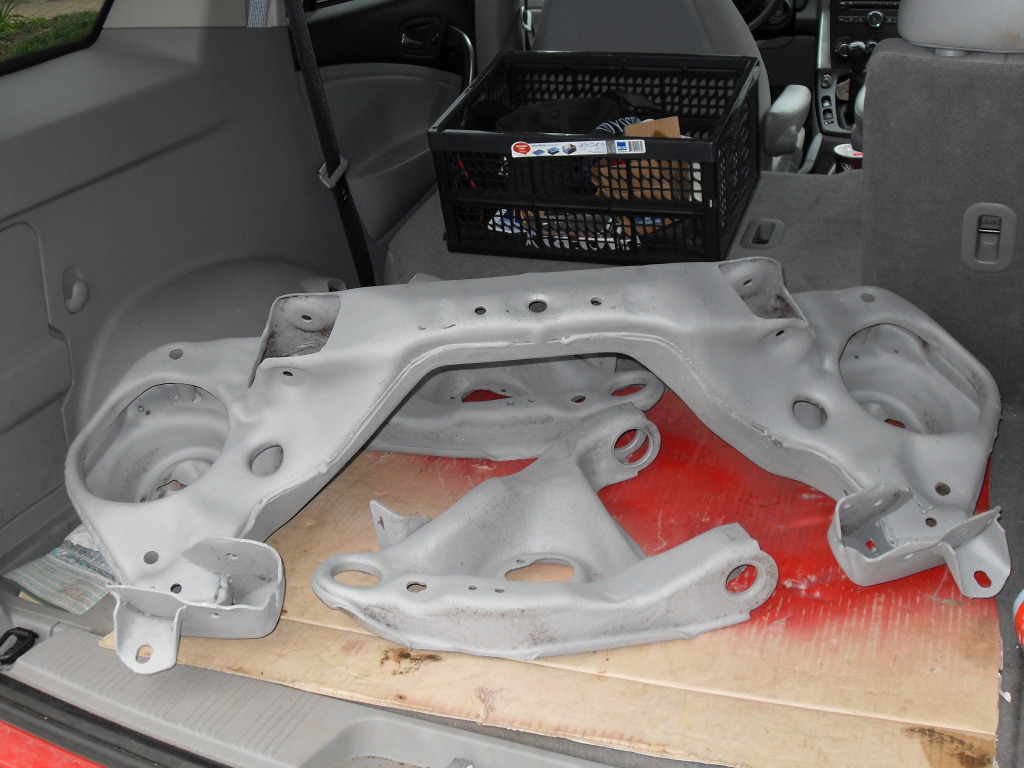
K-Member and Arms back from the sand blaster
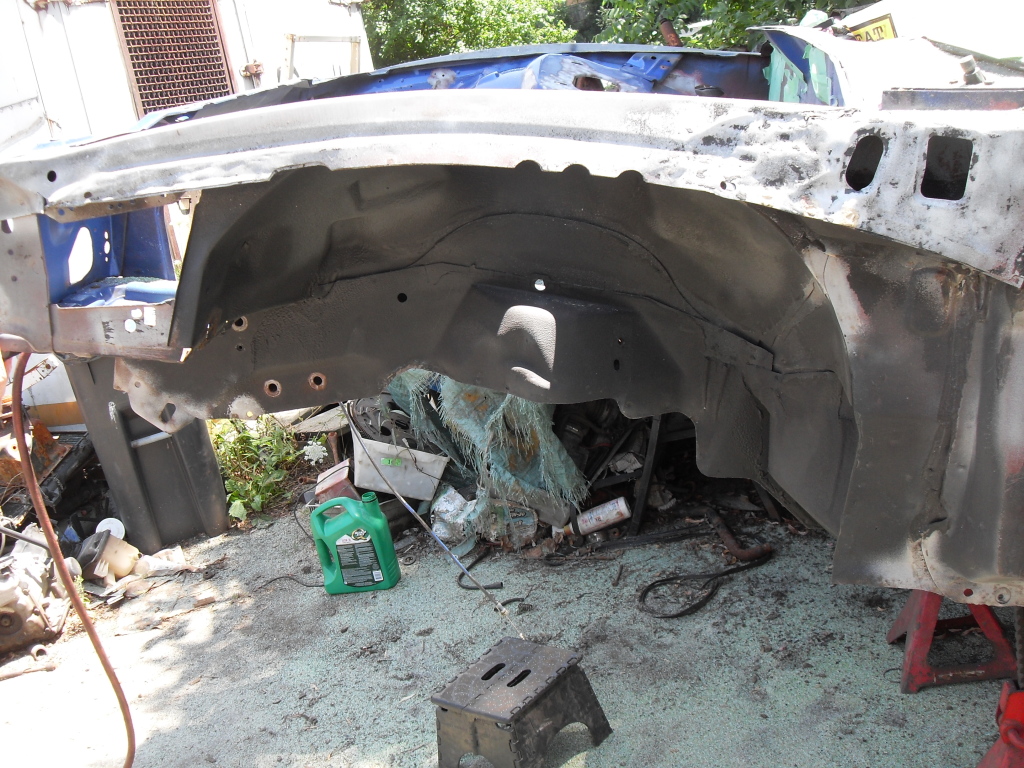
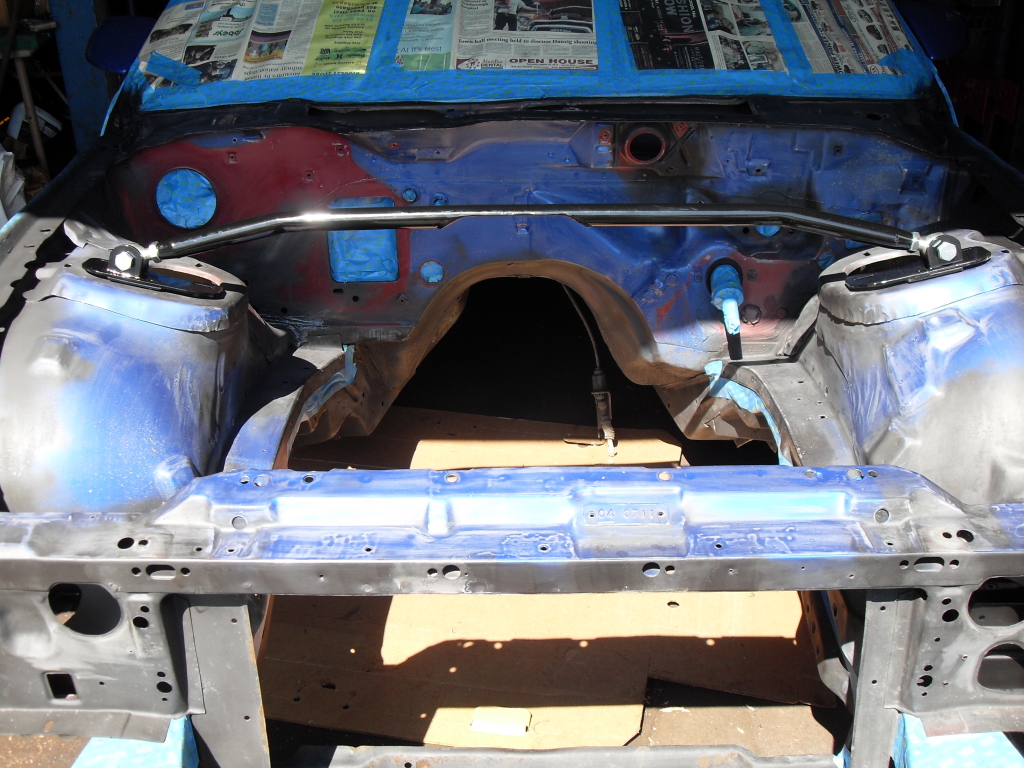
Bare front end - dis-assembly complete
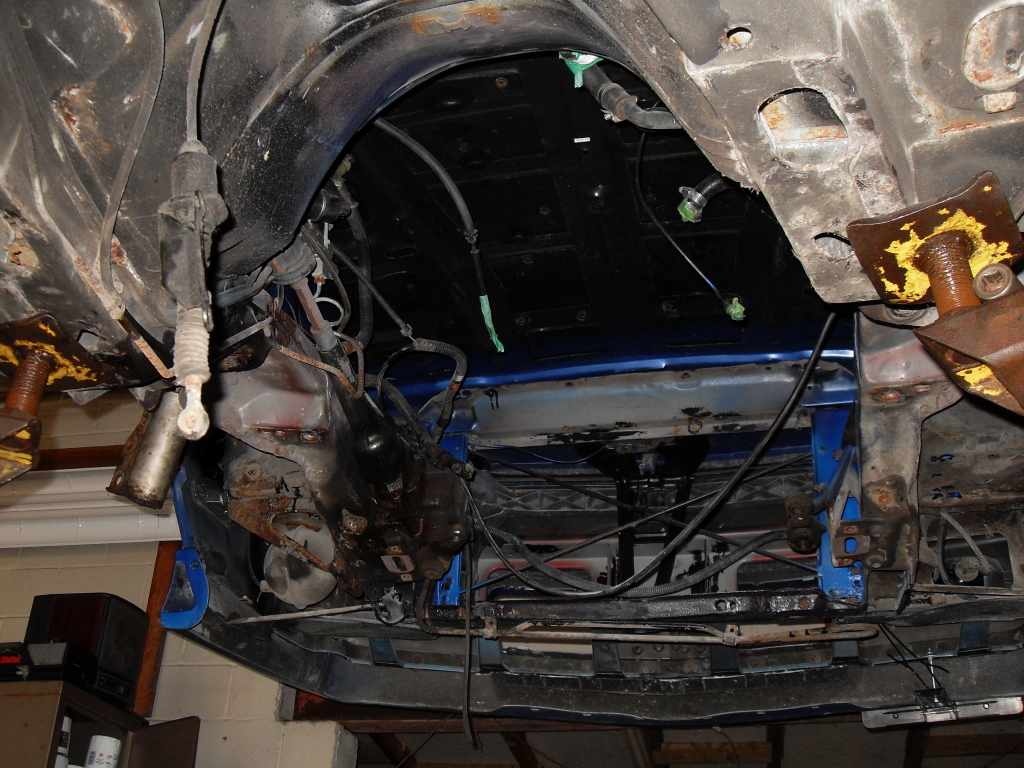
Discovered a few issues. Will have to address some unforeseen rust before we reassemble.
How she sits now...waiting.
Kmember, a-arms, heat shields and brackets went off the the sand blaster. They will be coated in POR-15 after they get stripped of 20 plus years of rust and dirt.
Engine accessory brackets and spindles were sent to Fireball for powder coating.
The entire front suspension was disassembled. Sway bars, links and bushings went to the scrap yard as I have all new pieces going in. Same for the fuel and brake lines but I saved the clips just in case.
All the bolts and nuts were kept and cleaned up. They were soaked in CLR for three hours, cleaned with a nail brush, soaked in PO 15 Marine clean (1:1 dilution) for another two hours and then rinsed and dried. It was a lot of cleaning but worth the effort. I will repaint the bolt heads so they look pretty.
Reassembly will begin soon.
Before pics of the parts
K-Member and Arms back from the sand blaster
Bare front end - dis-assembly complete
Discovered a few issues. Will have to address some unforeseen rust before we reassemble.
How she sits now...waiting.
06-10-2012, 04:10 PM
#130
Supreme Member
Thread Starter
iTrader: (6)
Join Date: Oct 2006
Location: West of Toronto
Posts: 3,041
Likes: 0
Received 7 Likes
on
7 Posts
Car: 89 IROC
Engine: 305 TPI / ZZ4 cam
Transmission: Stage 2 700R4, LS1 driveshaft
Axle/Gears: Strange 3.42 w/ Auburn
Re: 1989 Camaro - "The Project" Begins...
Spent the day painting parts and applying the POR-15 to the a-arms and k-member.
Good idea to wear gloves when using POR-15. Long sleeves are an idea as well. Took a fair bit of work to apply the coating to the inside of the k-member. Dollar store foam paint brushes came in useful. Glad I got three sets.
Decided the best way was to hang twine and metal hangers from the garage beams and let the parts sit just below chest height to be painted. Used a small LED flashlight to ensure no spots were missed. Very easy to miss a spot or put too little in some areas. I gave the parts two coats to ensure they stayed looking good for some time.
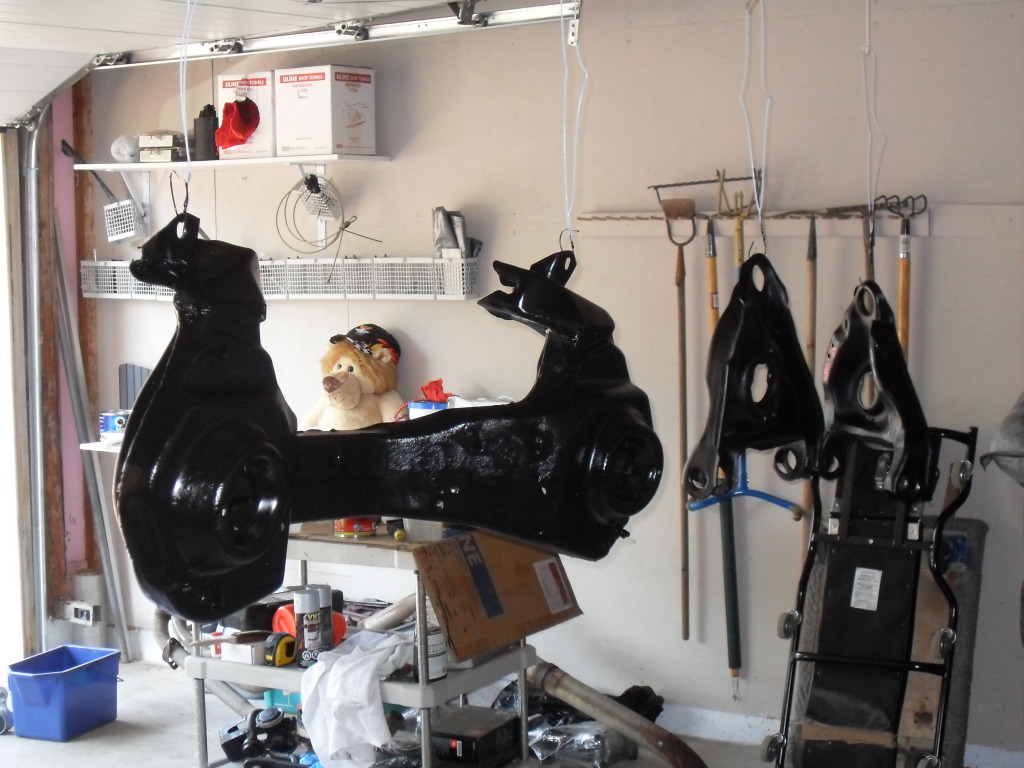
Bolts getting painted...finally put the wifes shoe boxes to good use.
Good idea to wear gloves when using POR-15. Long sleeves are an idea as well. Took a fair bit of work to apply the coating to the inside of the k-member. Dollar store foam paint brushes came in useful. Glad I got three sets.
Decided the best way was to hang twine and metal hangers from the garage beams and let the parts sit just below chest height to be painted. Used a small LED flashlight to ensure no spots were missed. Very easy to miss a spot or put too little in some areas. I gave the parts two coats to ensure they stayed looking good for some time.
Bolts getting painted...finally put the wifes shoe boxes to good use.
07-02-2012, 05:54 AM
#131
Supreme Member
Thread Starter
iTrader: (6)
Join Date: Oct 2006
Location: West of Toronto
Posts: 3,041
Likes: 0
Received 7 Likes
on
7 Posts
Car: 89 IROC
Engine: 305 TPI / ZZ4 cam
Transmission: Stage 2 700R4, LS1 driveshaft
Axle/Gears: Strange 3.42 w/ Auburn
Re: 1989 Camaro - "The Project" Begins...
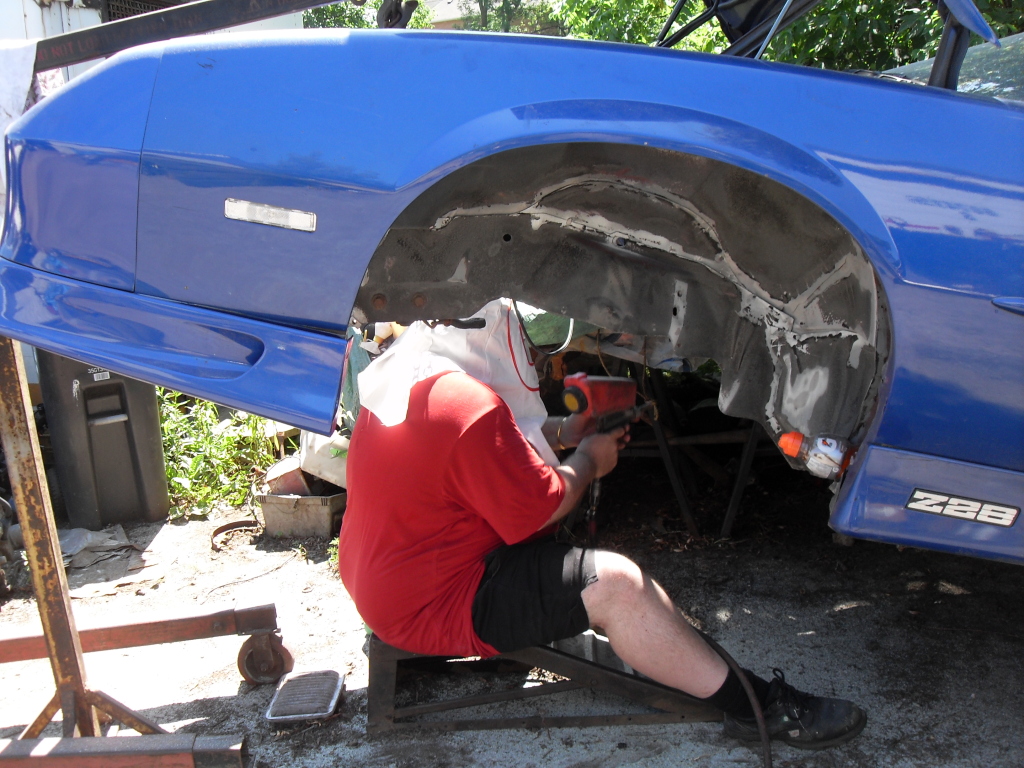
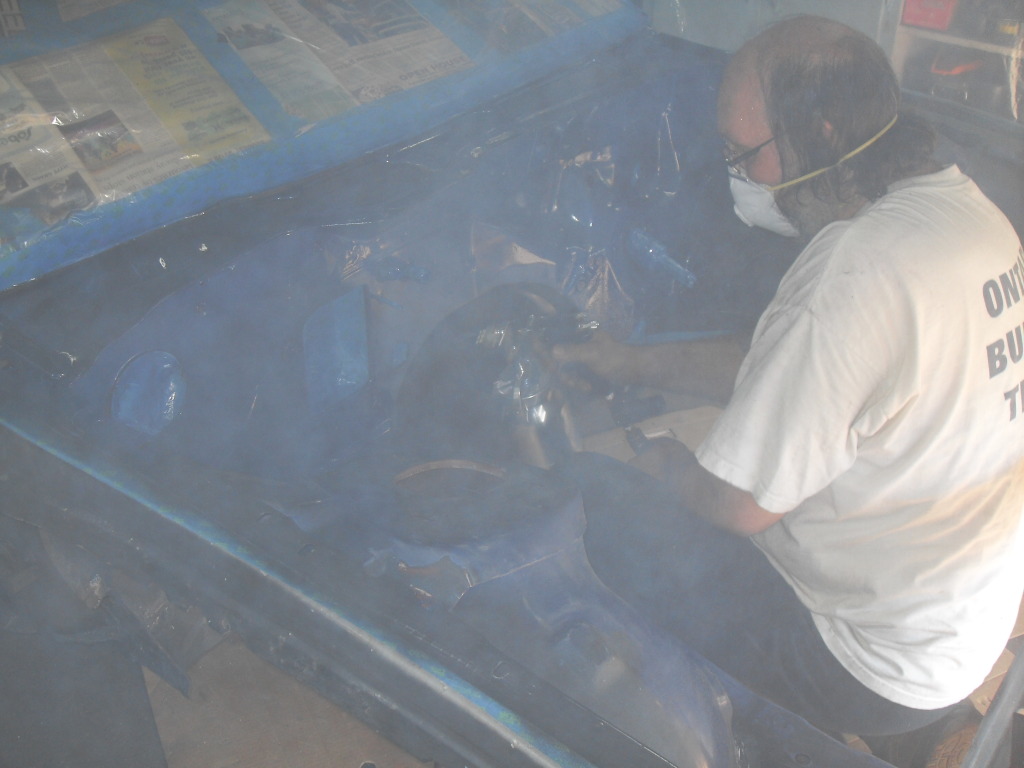
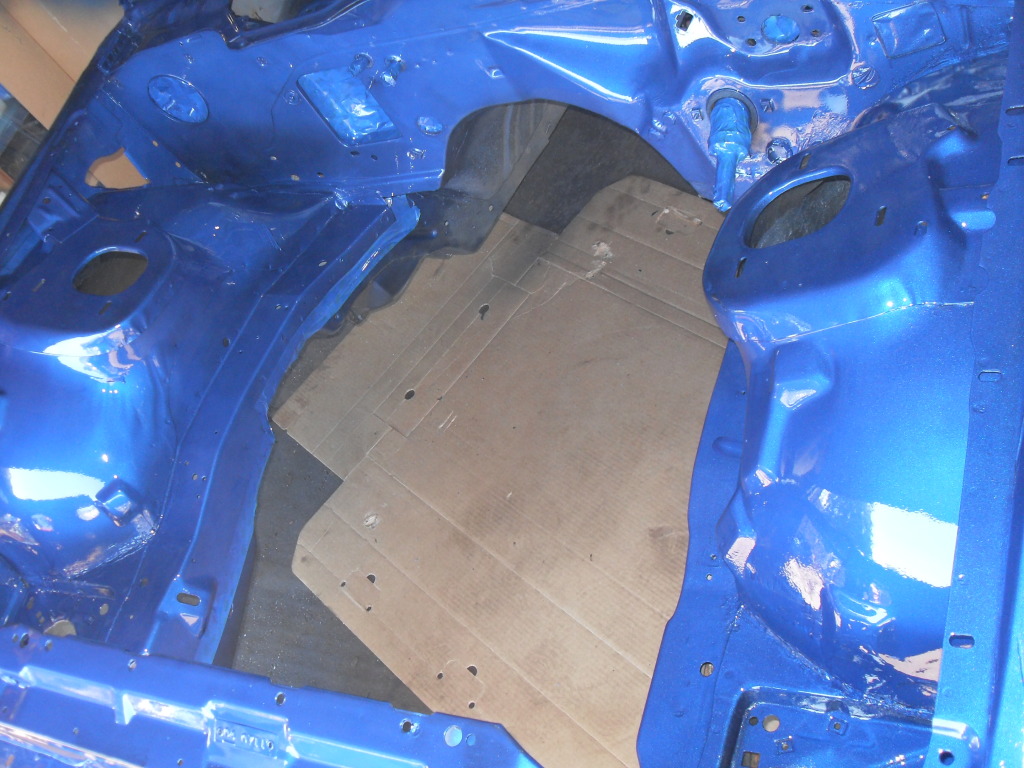
Well its been a busy weekend so far. The seam filler in the wheel wells are crumbling with age. Had to clean the seams so we could apply some primer and reseal. I hit the seams and all the rust on the front of the car with the sandblaster. This stuff gets EVERYWHERE.
Me with the sandblaster...it get HHHOT under the mask. Wonder if I can get a Gatorade sponsorship
Seams primered
Other sports getting blasted and cleaned
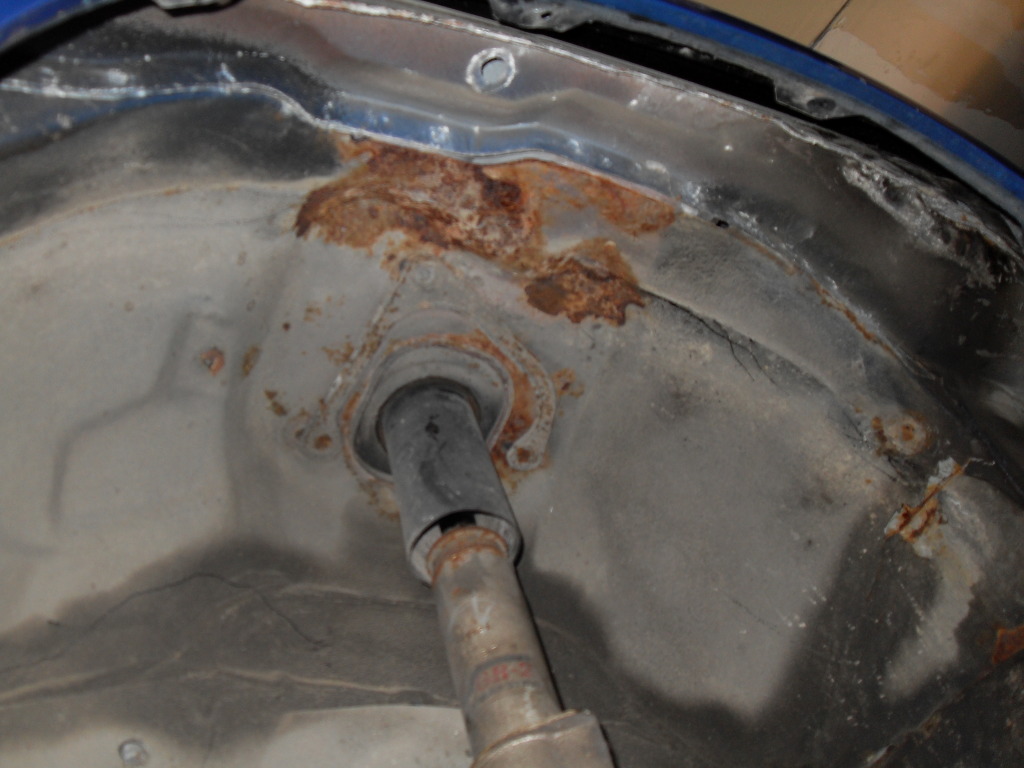
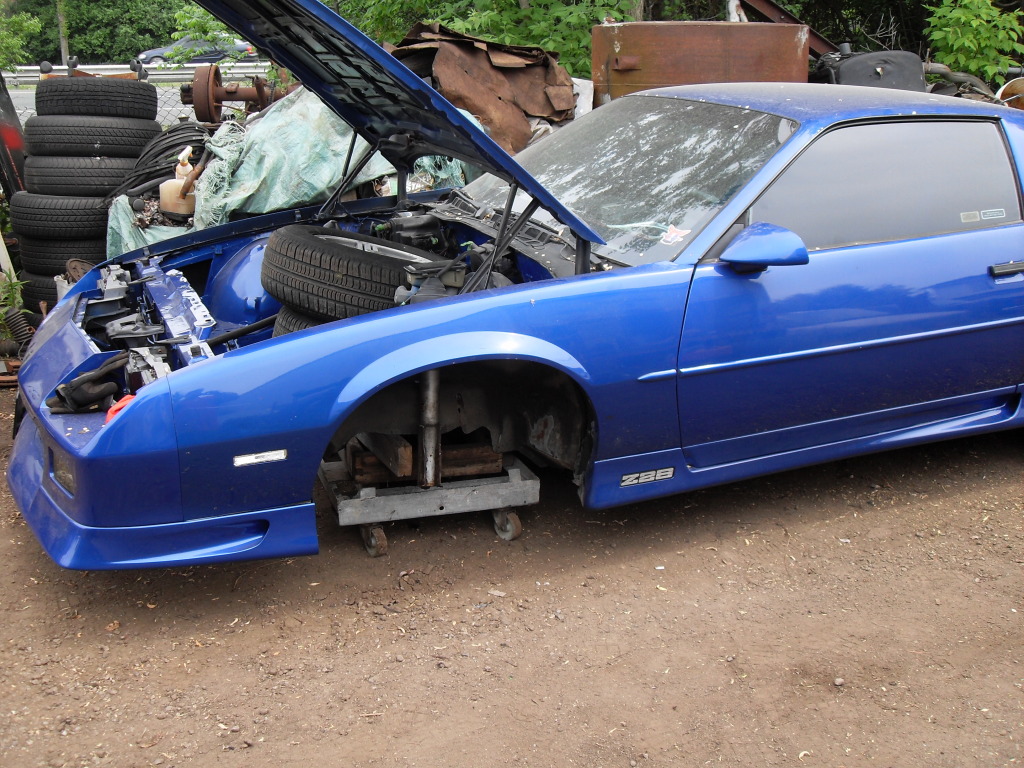
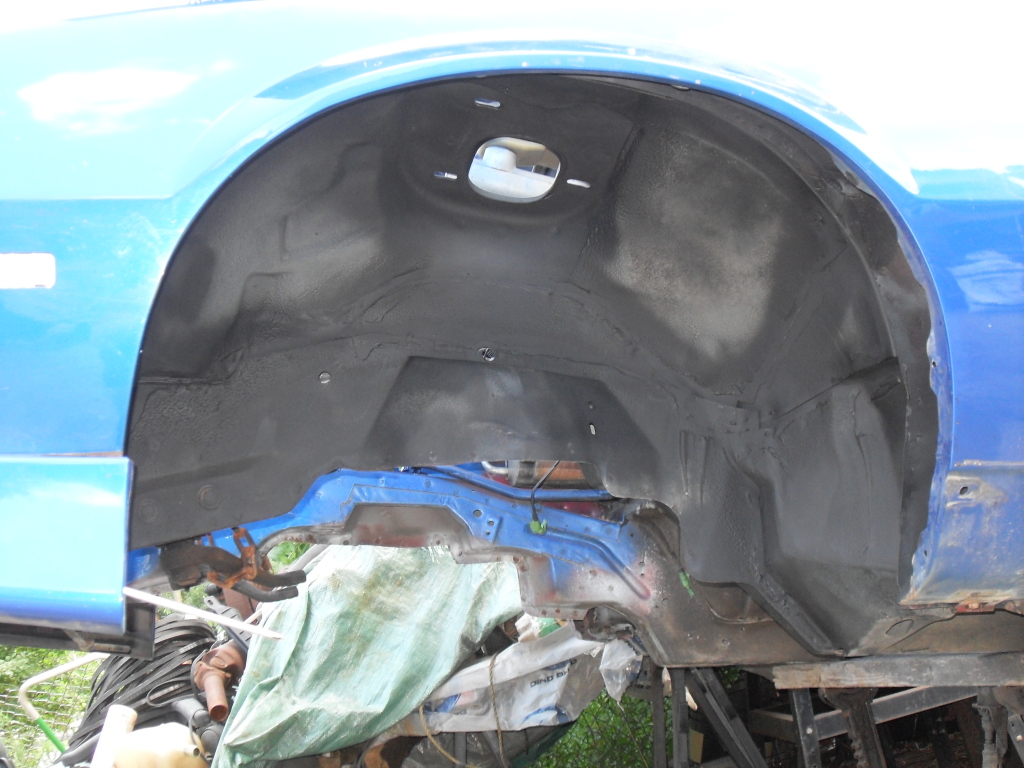
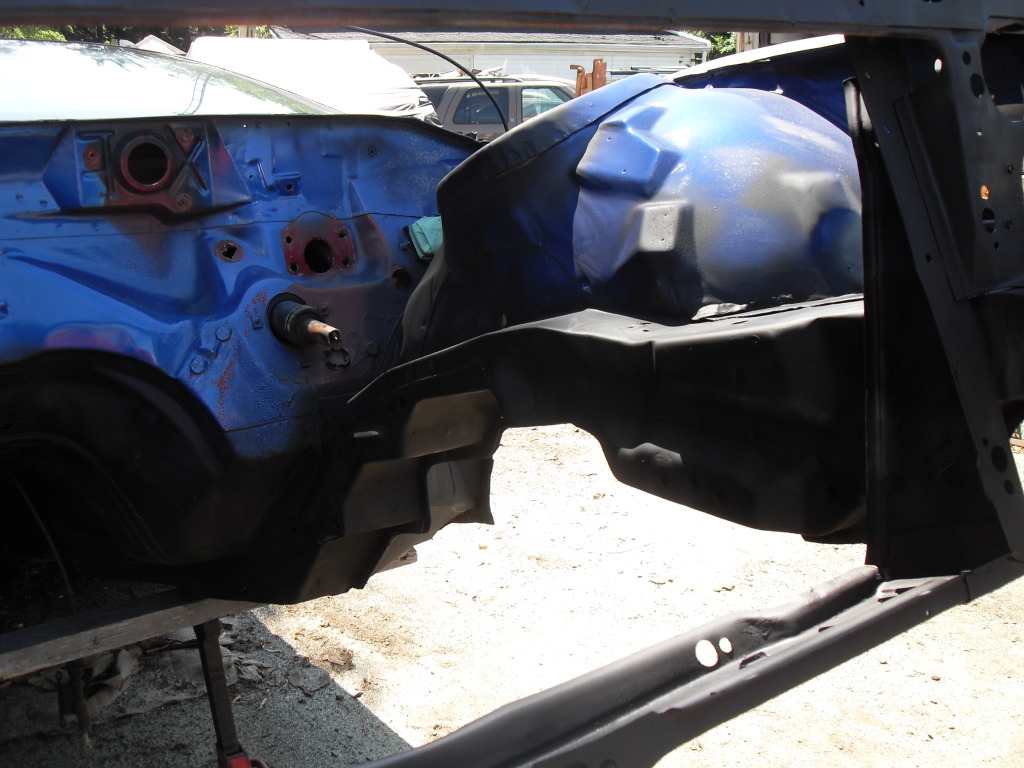
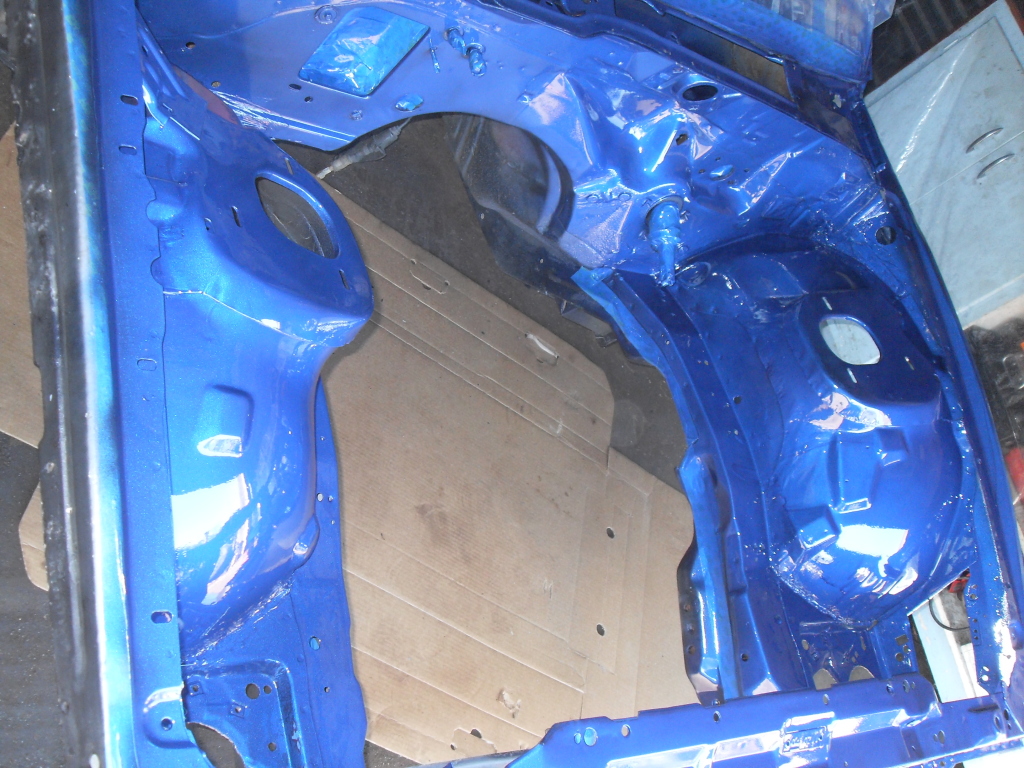
While blasting the pass side I noticed a fair bit of rust in the wheel well. Decided to pull the fender to see what the deal was. Unfortunately the bottom of the fender was rusted beyond repair so I'll have to replace. Also noticed a few holes that will have to be cut our and some new metal weld up. Can actually feel the carpet in one hole.
Since the fender was off, I decided to pull the front end and have a look.
Might as well give a clean and new coat of paint, clean all the fasteners and tighten everything up. Maybe I should start with the reassembly and not go in reverse.
Did notice that the car was hit on the drivers side in a previous life. Actually found a door pin in the bottom of the fender. Also noticed that some bolts and clips are missing from the front end that that the wheels have been moved back (no alignment after the accident) which explains the rubbing on the inner fenders. LOTS of work to do.....
Here is how I left her.
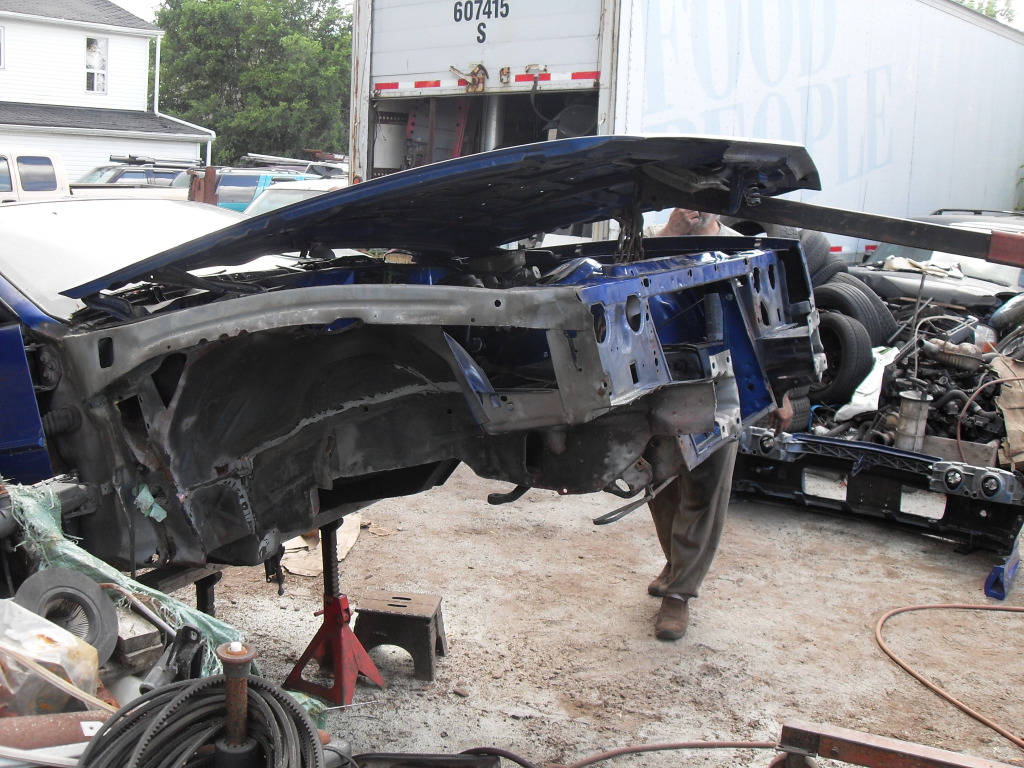
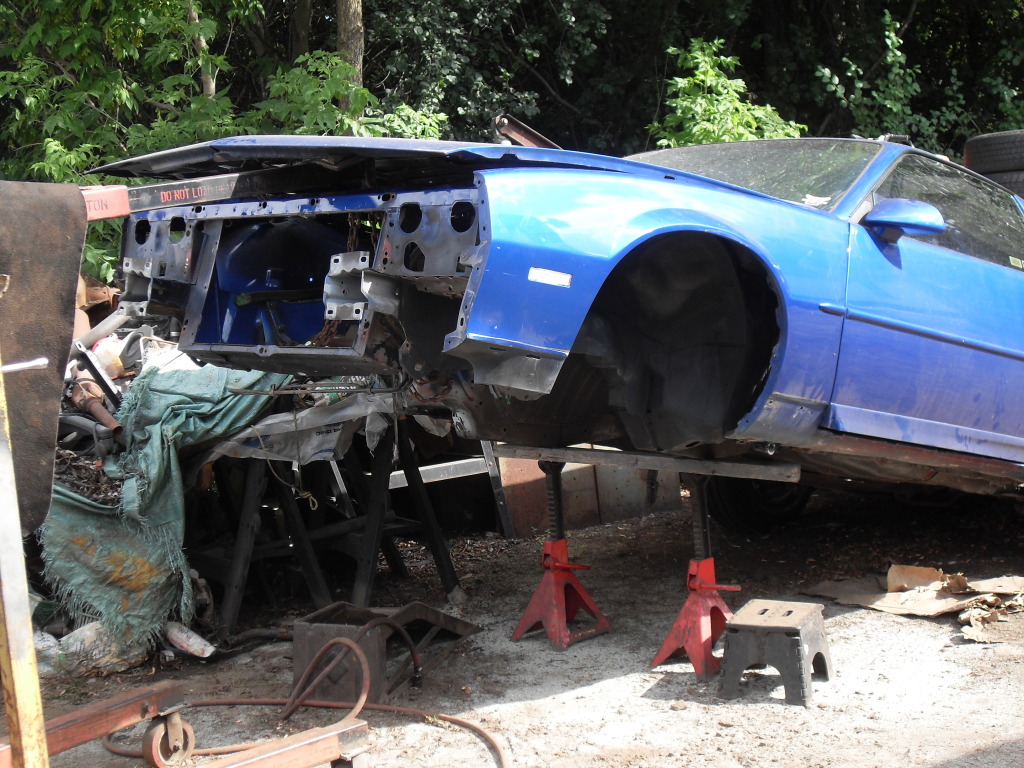
Back at it tomorrow.....lots of little jobs to get done and reassemble. The car is worse than I thought especially being in the garage for the past 5+ years. Still...better to get all these little things looked at now as the car is partially disassembled than wait 'till alter and have to take the car apart again. Not sure when it will get done. I honest ly thought I would be driving it by now. Now maybe it will be done by Christmas.
Me with the sandblaster...it get HHHOT under the mask. Wonder if I can get a Gatorade sponsorship
Seams primered
Other sports getting blasted and cleaned
While blasting the pass side I noticed a fair bit of rust in the wheel well. Decided to pull the fender to see what the deal was. Unfortunately the bottom of the fender was rusted beyond repair so I'll have to replace. Also noticed a few holes that will have to be cut our and some new metal weld up. Can actually feel the carpet in one hole.
Since the fender was off, I decided to pull the front end and have a look.
Might as well give a clean and new coat of paint, clean all the fasteners and tighten everything up. Maybe I should start with the reassembly and not go in reverse.
Did notice that the car was hit on the drivers side in a previous life. Actually found a door pin in the bottom of the fender. Also noticed that some bolts and clips are missing from the front end that that the wheels have been moved back (no alignment after the accident) which explains the rubbing on the inner fenders. LOTS of work to do.....
Here is how I left her.
Back at it tomorrow.....lots of little jobs to get done and reassemble. The car is worse than I thought especially being in the garage for the past 5+ years. Still...better to get all these little things looked at now as the car is partially disassembled than wait 'till alter and have to take the car apart again. Not sure when it will get done. I honest ly thought I would be driving it by now. Now maybe it will be done by Christmas.
07-22-2012, 08:04 PM
#132
Supreme Member
Thread Starter
iTrader: (6)
Join Date: Oct 2006
Location: West of Toronto
Posts: 3,041
Likes: 0
Received 7 Likes
on
7 Posts
Car: 89 IROC
Engine: 305 TPI / ZZ4 cam
Transmission: Stage 2 700R4, LS1 driveshaft
Axle/Gears: Strange 3.42 w/ Auburn
Re: 1989 Camaro - "The Project" Begins...
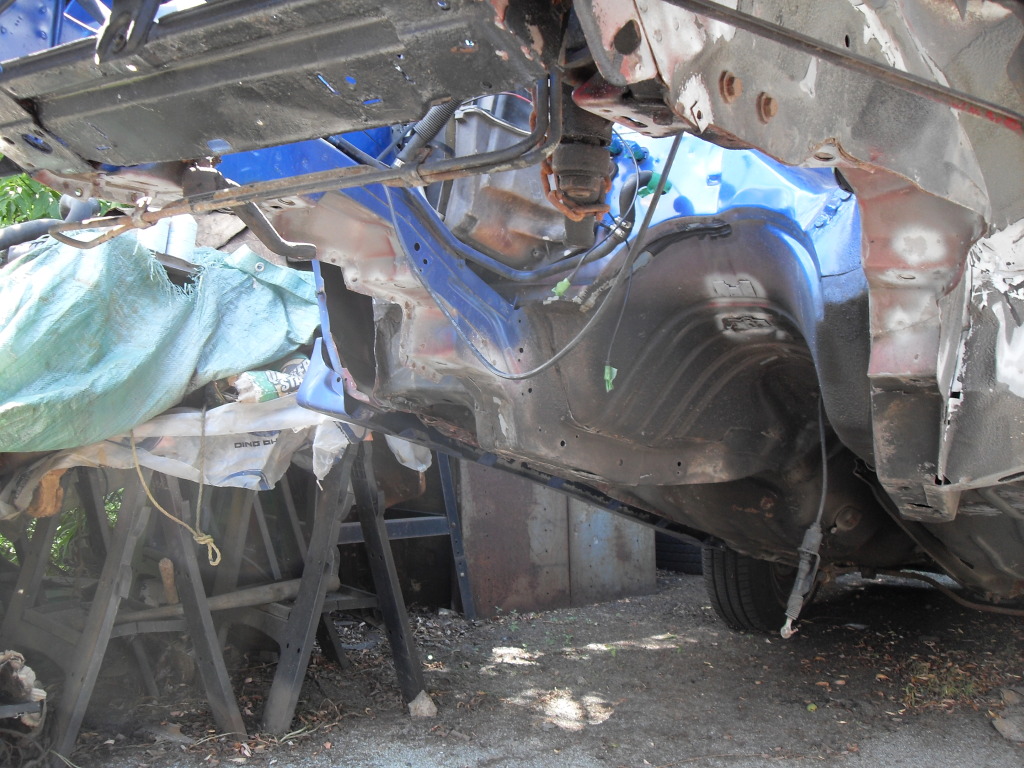
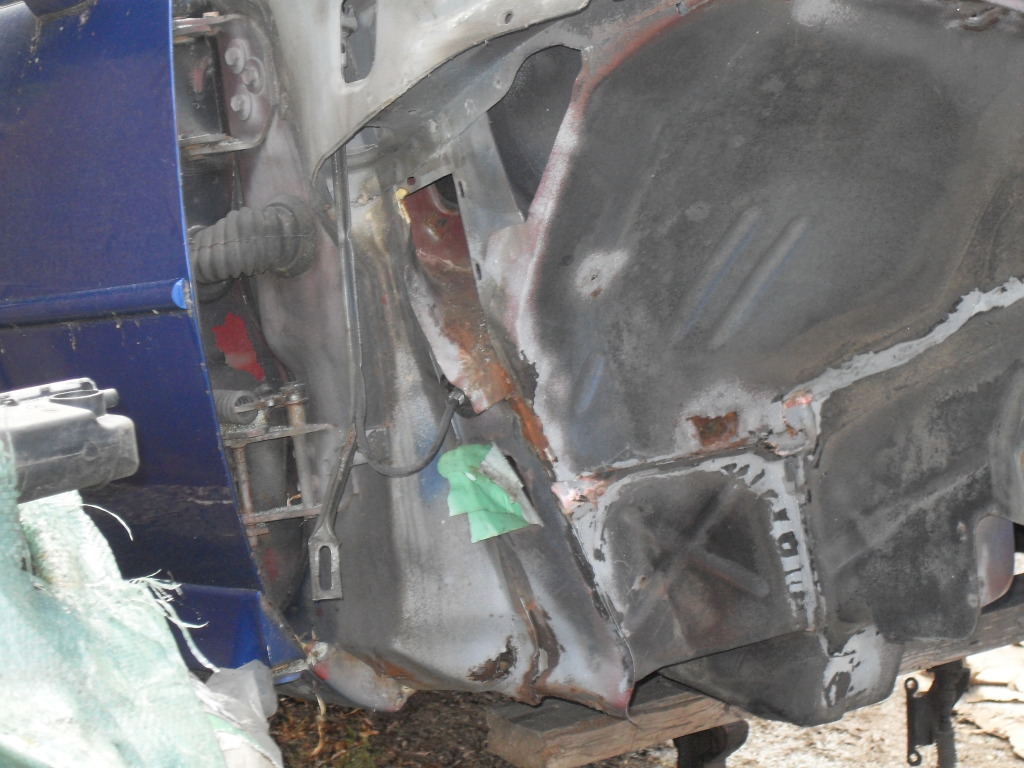
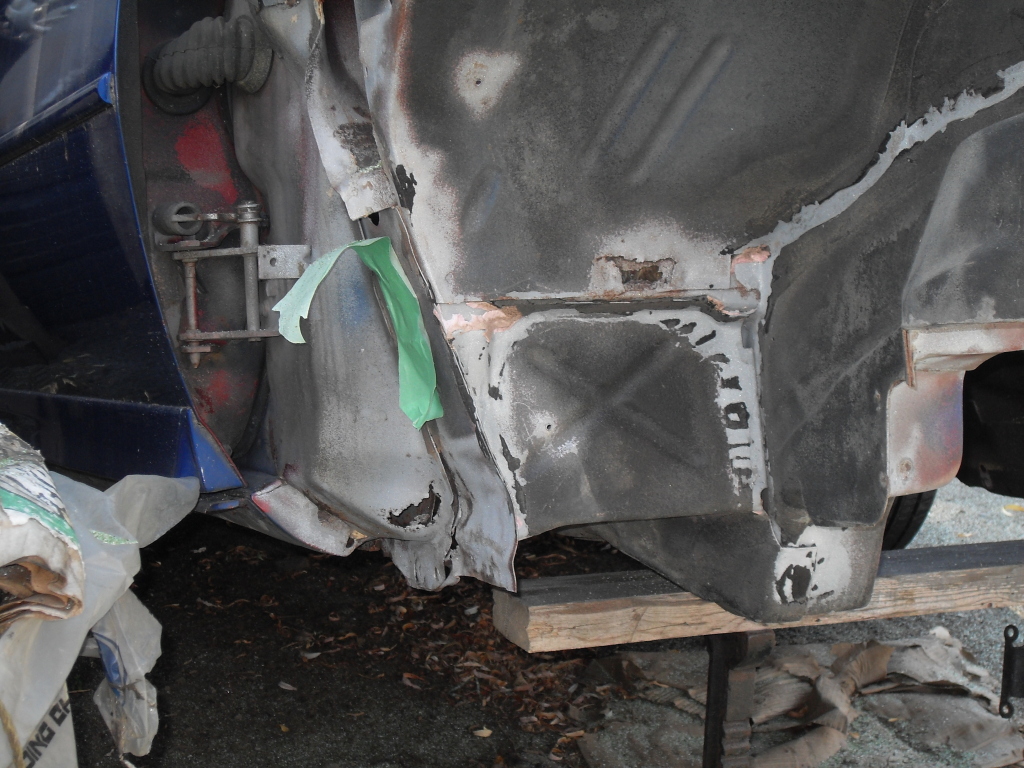
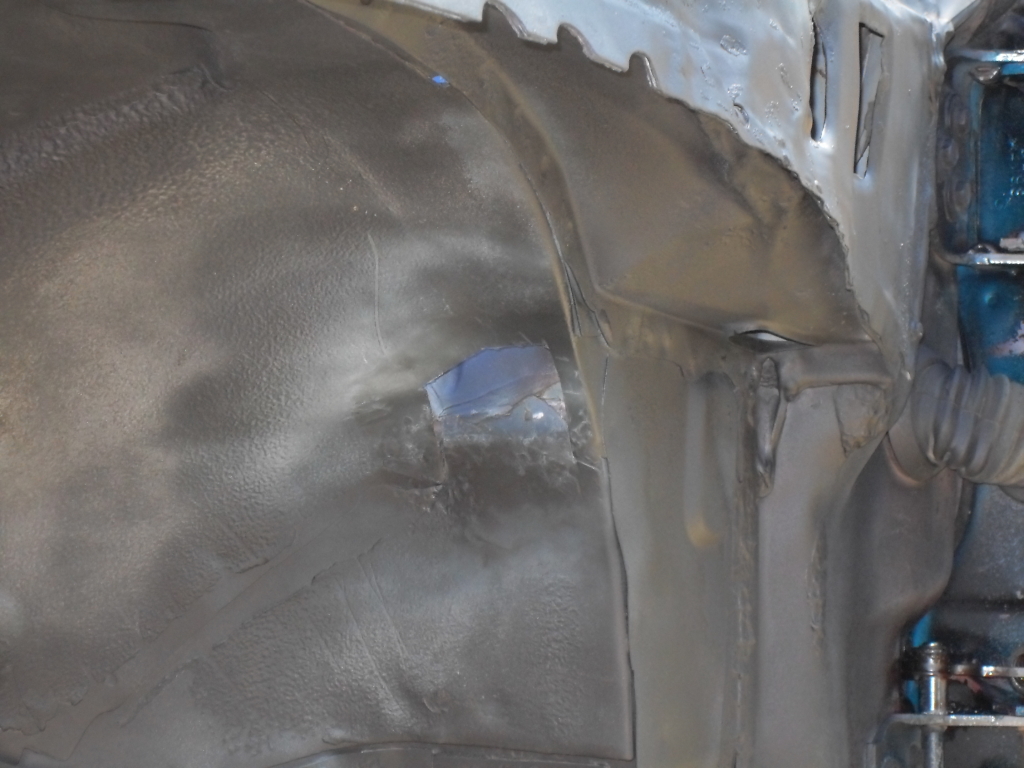
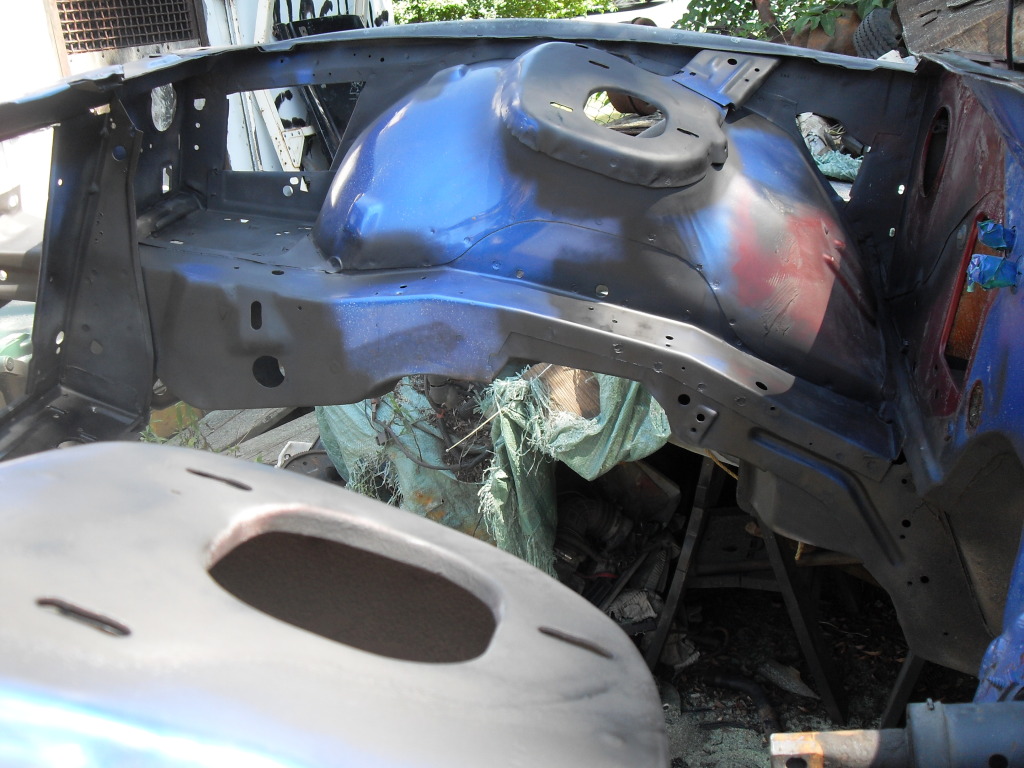
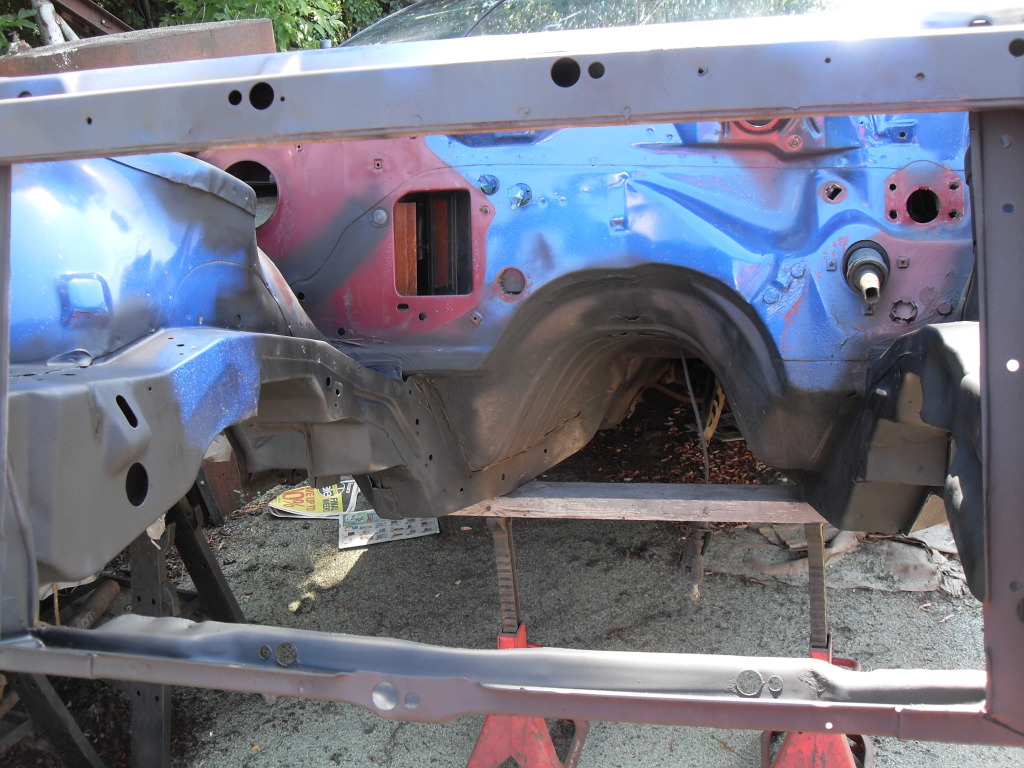
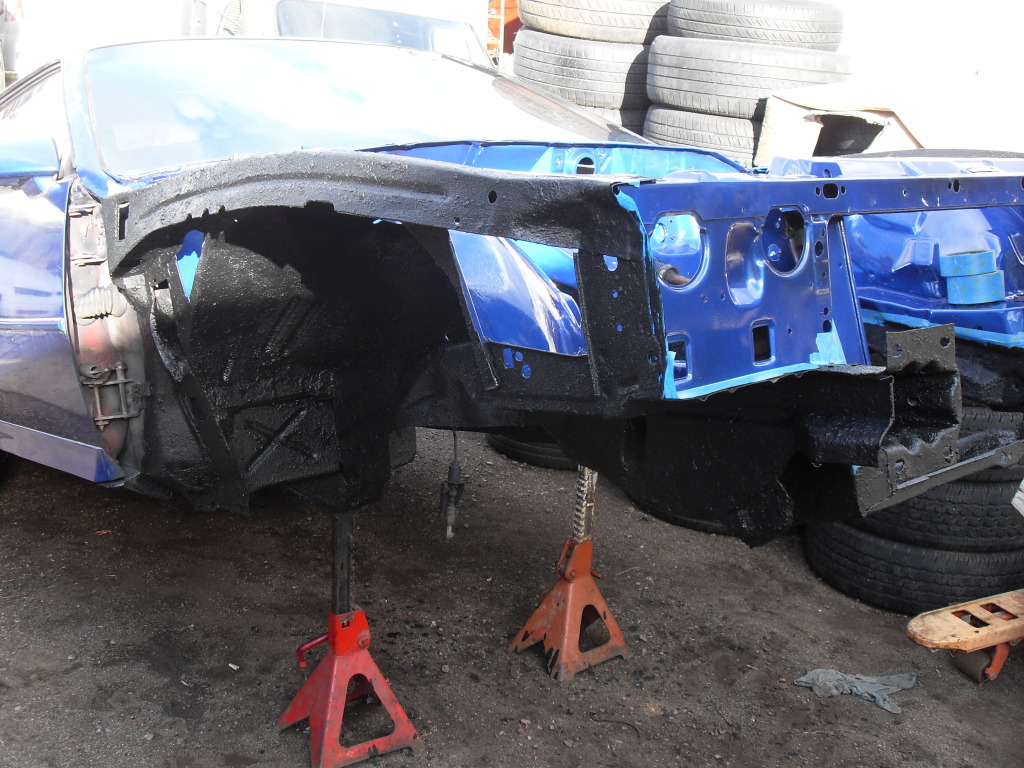
Here's a few pics of the collision damage to the driver side. Not as bad as I thought but had to pull the fender to see. Also noticed some small rust spots that got blasted clean.
How I left it on Saturday. I blasted down both sides of the frame rails and underneath.

So far we have rust 200 lbs (4 bags) of recycled glass for blasting. One more bag should do the trick as I want to blast the rear before applying the POR15. I have to reblast the rad cradle clean as I notices some more...you guessed it rust. I also noticed pin hole rust coming through where the fender meets the battery tray.
Some pics of more pin hole rust on the pass dies.
I'm glad I covered the front windshield as the glass gets EVERYWHERE. My front door squeaks so bad, I think its haunted.
I'm also painting all the brackets, heat shields (including the gas tank ones) and all accessories. As the car is completely stripped, it cheaper to address all these things now than wait a few years to do a lot of this over again.
Heat shields blasted and sprayed in a Zinc primer and then some high temp header paint.
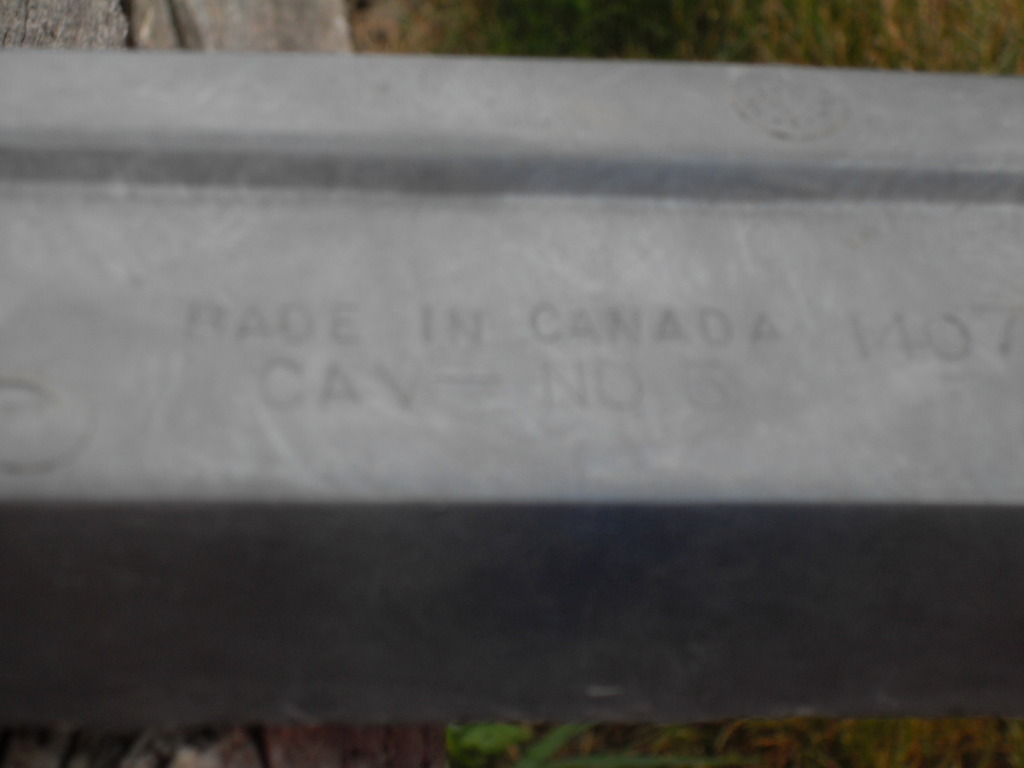
Decided to disassemble, clean and repaint the entire headlight assy. I noticed a "Made in Canada" stamp on the header piece. Pretty cool.
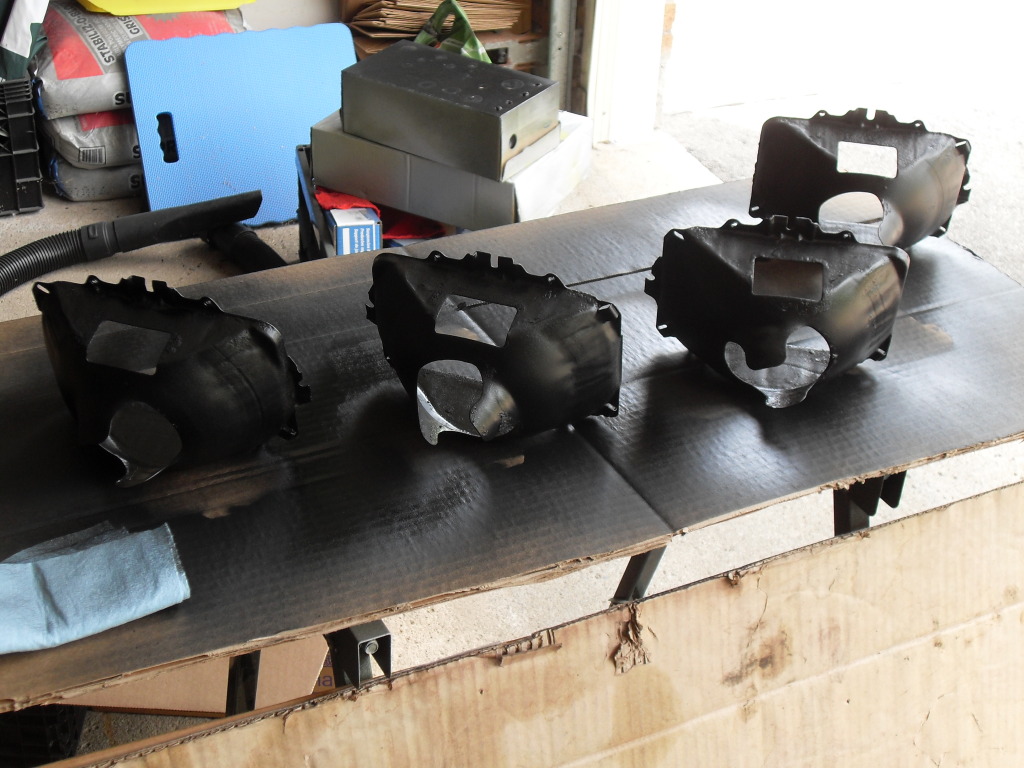
Headlight buckets blasted and painted with black chassis paint
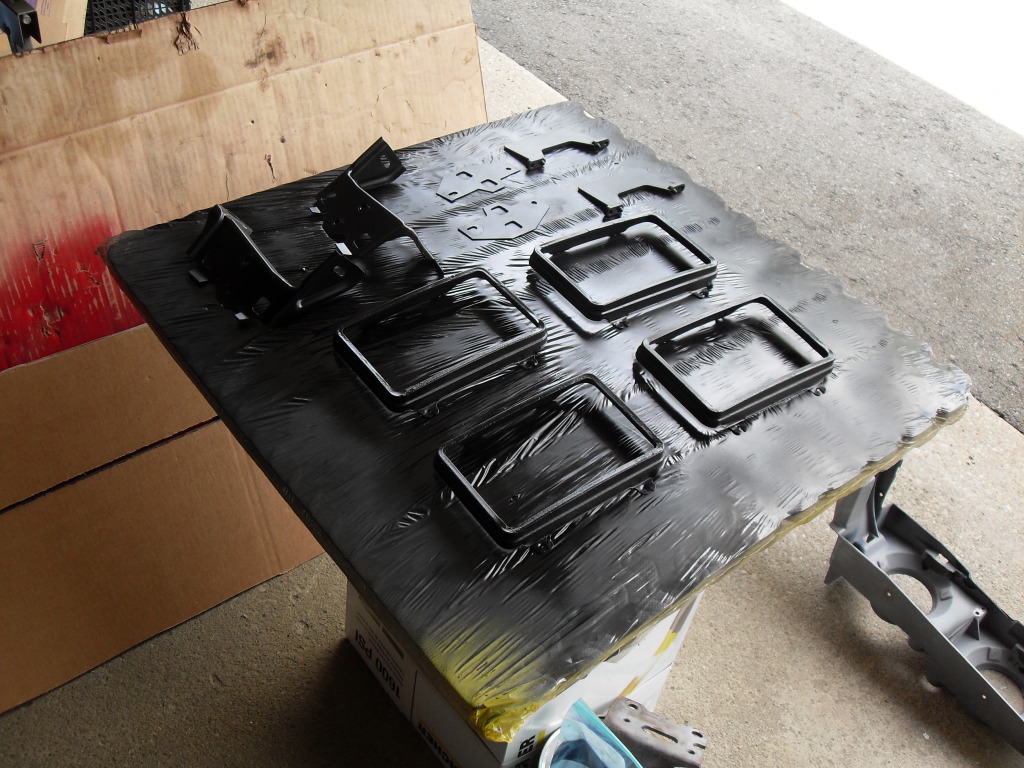
Same black chassis paint used on the brackets and housing.
Headlight housing painted black as well. Looks killer over the stock grey.
Also decided to paint the AIR pump as I was bored and had the materials. Came out pretty goods. Sanded it down with some 180 grit, Zinc primer and silver header paint.
As I have to paint the replacement fender, I decided to ditch the factory hood and will prep fit and install the Harwood Show series Cowl Hood in my basement. Only cost and extra gallon of paint.
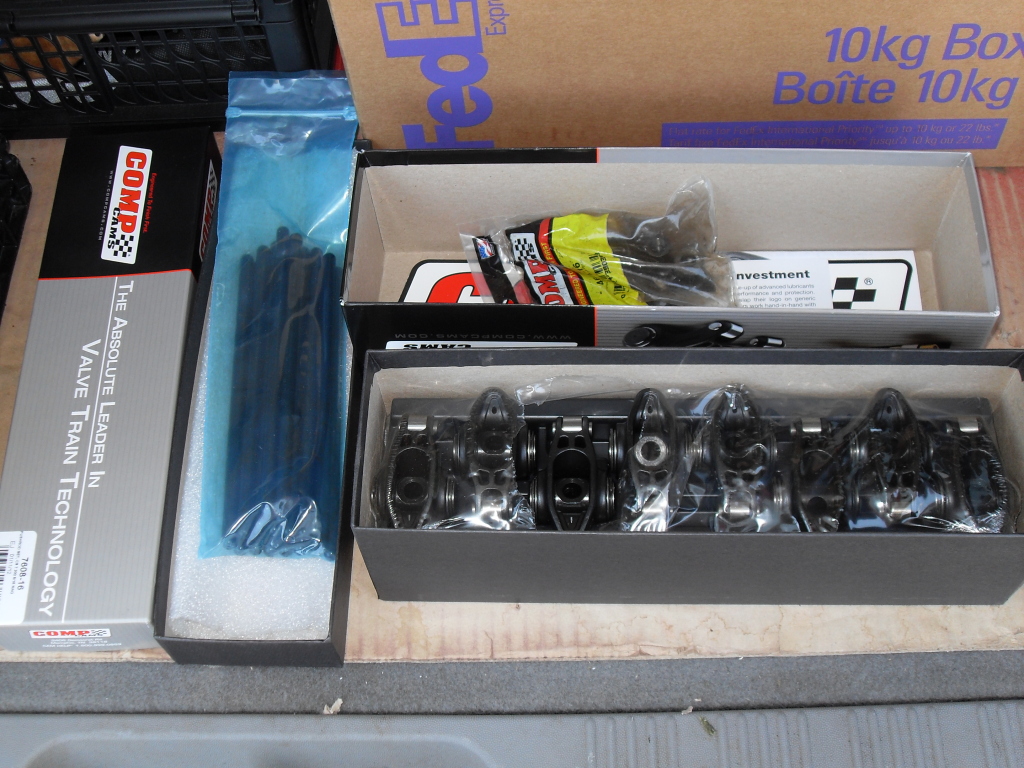
Should be starting the reassembly soon. I picked up a few goodies for the engine to help the ZZ4 cam. Comp Cams Chrome Moly Rods and Magnum full roller Roller Rockers.
How I left it on Saturday. I blasted down both sides of the frame rails and underneath.
So far we have rust 200 lbs (4 bags) of recycled glass for blasting. One more bag should do the trick as I want to blast the rear before applying the POR15. I have to reblast the rad cradle clean as I notices some more...you guessed it rust. I also noticed pin hole rust coming through where the fender meets the battery tray.
Some pics of more pin hole rust on the pass dies.
I'm glad I covered the front windshield as the glass gets EVERYWHERE. My front door squeaks so bad, I think its haunted.
I'm also painting all the brackets, heat shields (including the gas tank ones) and all accessories. As the car is completely stripped, it cheaper to address all these things now than wait a few years to do a lot of this over again.
Heat shields blasted and sprayed in a Zinc primer and then some high temp header paint.
Decided to disassemble, clean and repaint the entire headlight assy. I noticed a "Made in Canada" stamp on the header piece. Pretty cool.
Headlight buckets blasted and painted with black chassis paint
Same black chassis paint used on the brackets and housing.
Headlight housing painted black as well. Looks killer over the stock grey.
Also decided to paint the AIR pump as I was bored and had the materials. Came out pretty goods. Sanded it down with some 180 grit, Zinc primer and silver header paint.
As I have to paint the replacement fender, I decided to ditch the factory hood and will prep fit and install the Harwood Show series Cowl Hood in my basement. Only cost and extra gallon of paint.
Should be starting the reassembly soon. I picked up a few goodies for the engine to help the ZZ4 cam. Comp Cams Chrome Moly Rods and Magnum full roller Roller Rockers.
 07-30-2012, 04:46 AM
#134
Supreme Member
Thread Starter
iTrader: (6)
Join Date: Oct 2006
Location: West of Toronto
Posts: 3,041
Likes: 0
Received 7 Likes
on
7 Posts
Car: 89 IROC
Engine: 305 TPI / ZZ4 cam
Transmission: Stage 2 700R4, LS1 driveshaft
Axle/Gears: Strange 3.42 w/ Auburn
Re: 1989 Camaro - "The Project" Begins...
Thank you kind sir.
Finished blasting and applied primer to all the panels and underside. Started cutting out the rust spots and will weld in replacement pieces next week. Still need a final sanding before we repaint the engine bay and then begin to reassemble.
Rust cut out
Engine bay primered.

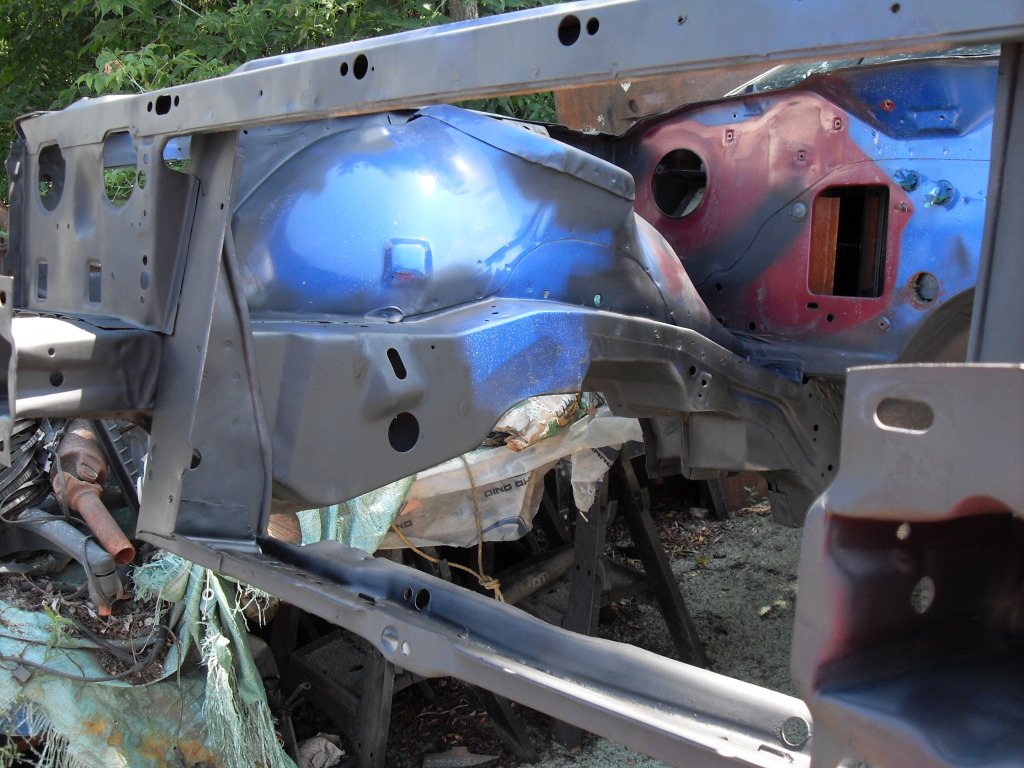
Finished blasting and applied primer to all the panels and underside. Started cutting out the rust spots and will weld in replacement pieces next week. Still need a final sanding before we repaint the engine bay and then begin to reassemble.
Rust cut out
Engine bay primered.
08-06-2012, 03:31 PM
#135
Supreme Member
Thread Starter
iTrader: (6)
Join Date: Oct 2006
Location: West of Toronto
Posts: 3,041
Likes: 0
Received 7 Likes
on
7 Posts
Car: 89 IROC
Engine: 305 TPI / ZZ4 cam
Transmission: Stage 2 700R4, LS1 driveshaft
Axle/Gears: Strange 3.42 w/ Auburn
Re: 1989 Camaro - "The Project" Begins...
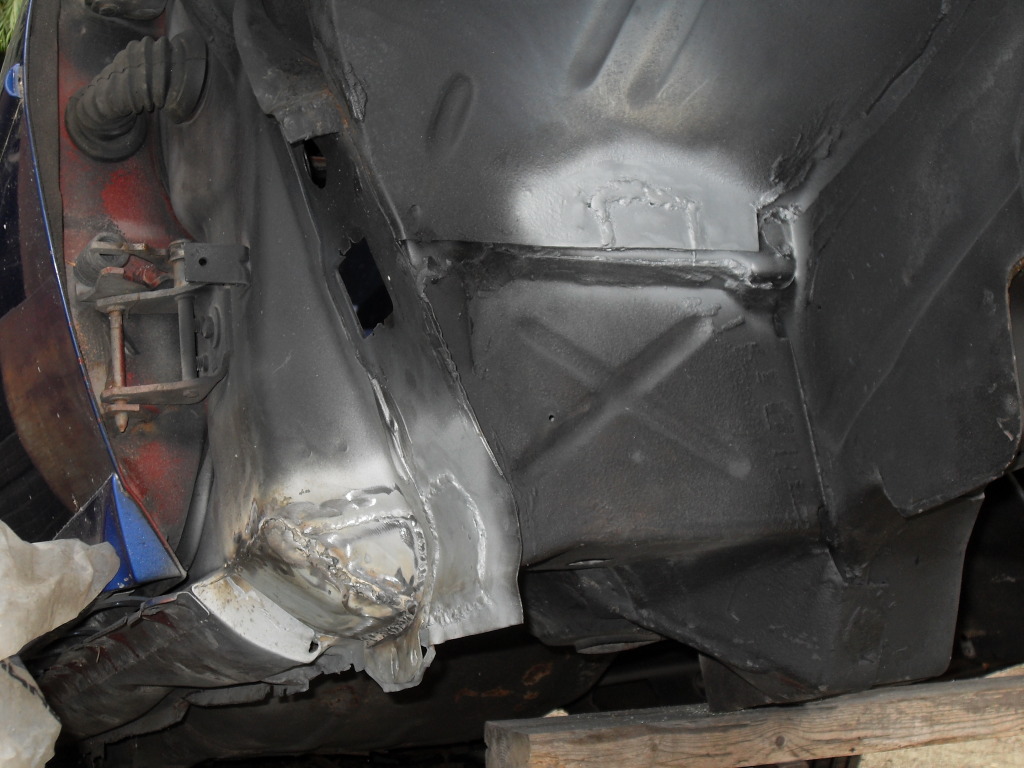
Rust issues are finally coming to an end.
Picked up some flat sheet metal and started test fitting pieces and cutting into shape.
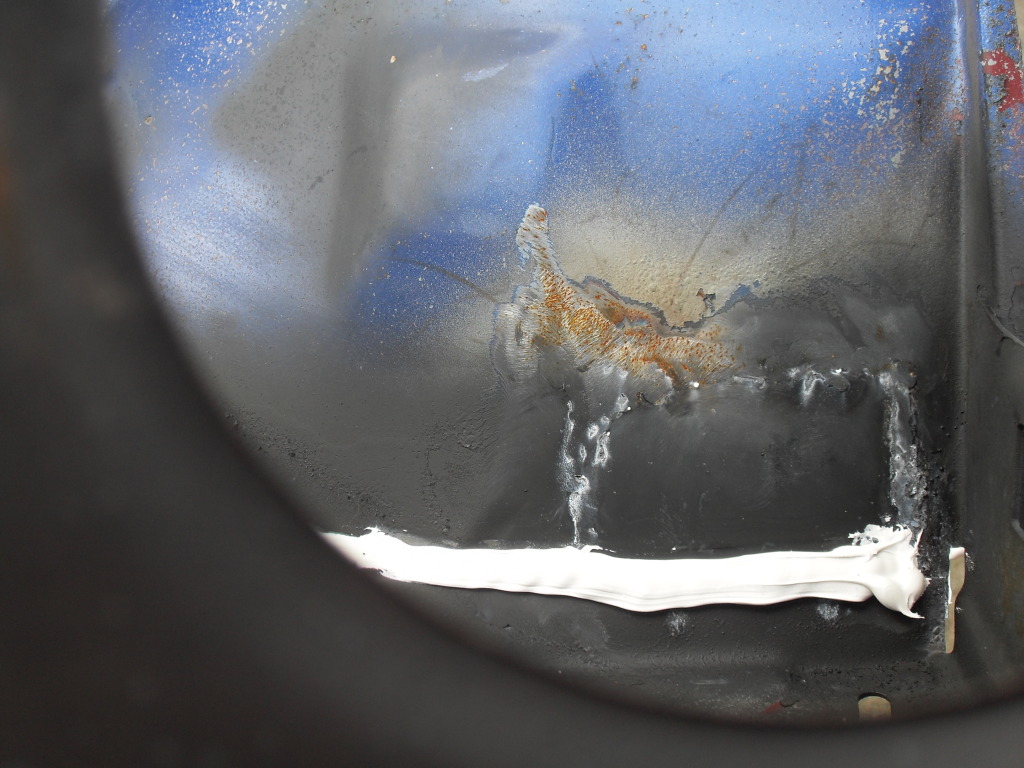
Next step was to tack weld in place and finished off with the mig and a grinder. The pieces look pretty good.
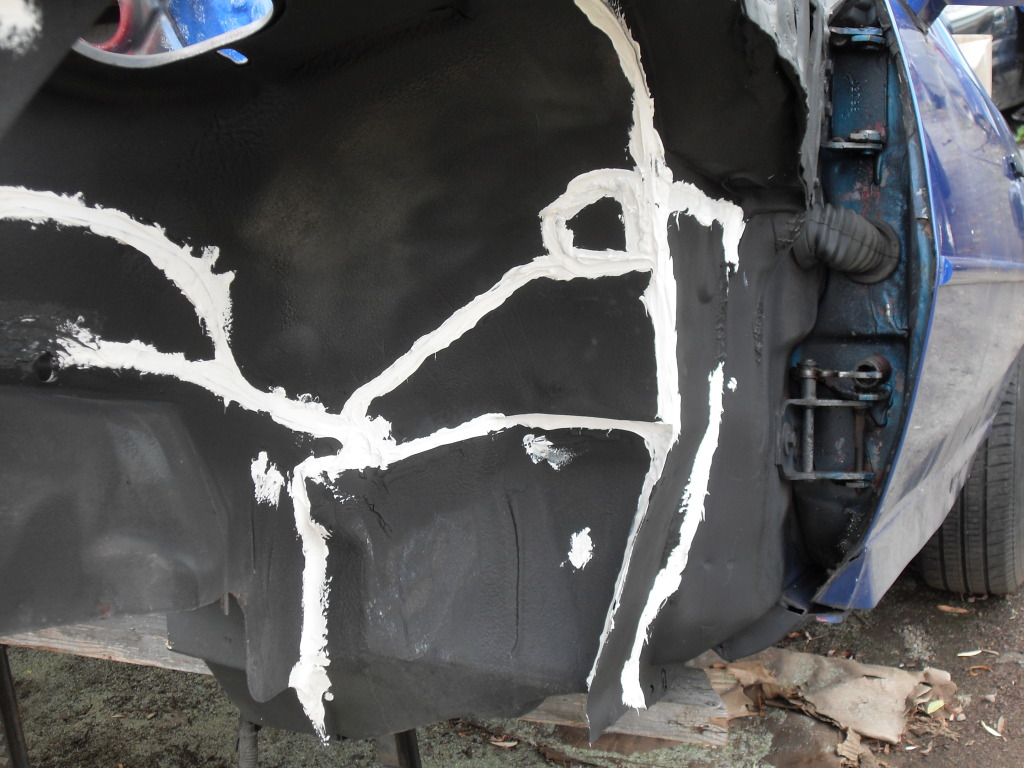
Started to apply the seam sealer with a tube gun (white). After it cured, we went back over with paint on seam sealer (black) to ensure all the air holes were covered.
All the rust holes have been cut out, patched and sealed.
Next weekend, we start prepping the engine bay for paint....then its reassembly time. Hopefully have the car running by the end of the month.
Picked up some flat sheet metal and started test fitting pieces and cutting into shape.
Next step was to tack weld in place and finished off with the mig and a grinder. The pieces look pretty good.
Started to apply the seam sealer with a tube gun (white). After it cured, we went back over with paint on seam sealer (black) to ensure all the air holes were covered.
All the rust holes have been cut out, patched and sealed.
Next weekend, we start prepping the engine bay for paint....then its reassembly time. Hopefully have the car running by the end of the month.
09-02-2012, 05:47 AM
#136
Supreme Member
Thread Starter
iTrader: (6)
Join Date: Oct 2006
Location: West of Toronto
Posts: 3,041
Likes: 0
Received 7 Likes
on
7 Posts
Car: 89 IROC
Engine: 305 TPI / ZZ4 cam
Transmission: Stage 2 700R4, LS1 driveshaft
Axle/Gears: Strange 3.42 w/ Auburn
Re: 1989 Camaro - "The Project" Begins...
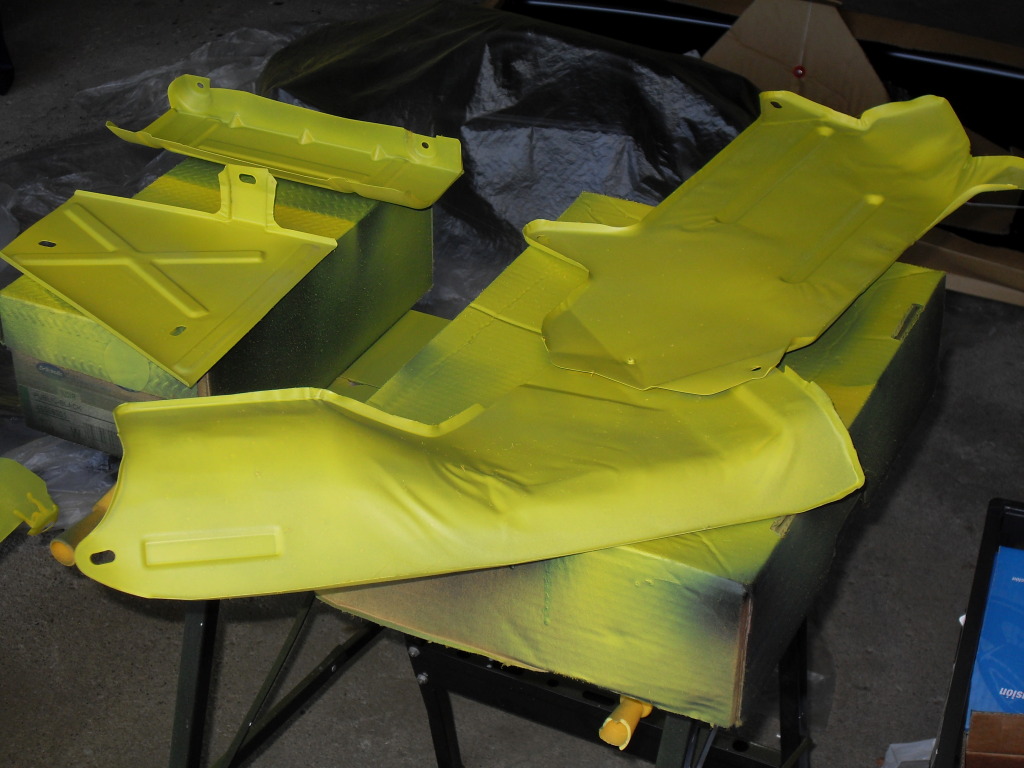
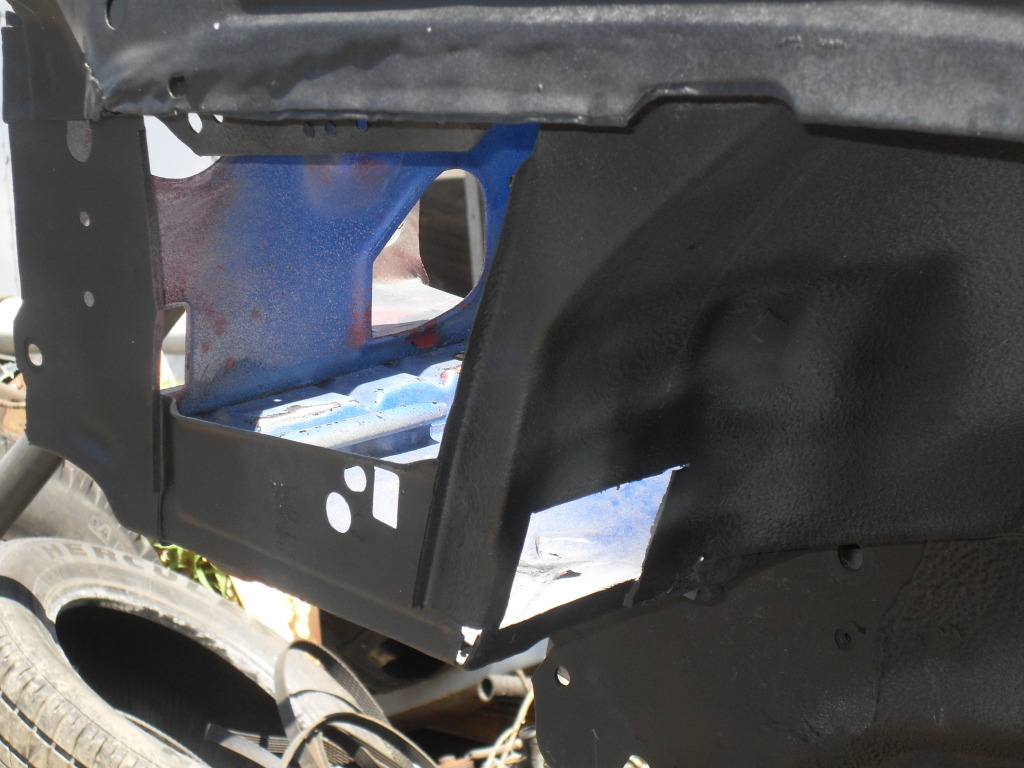
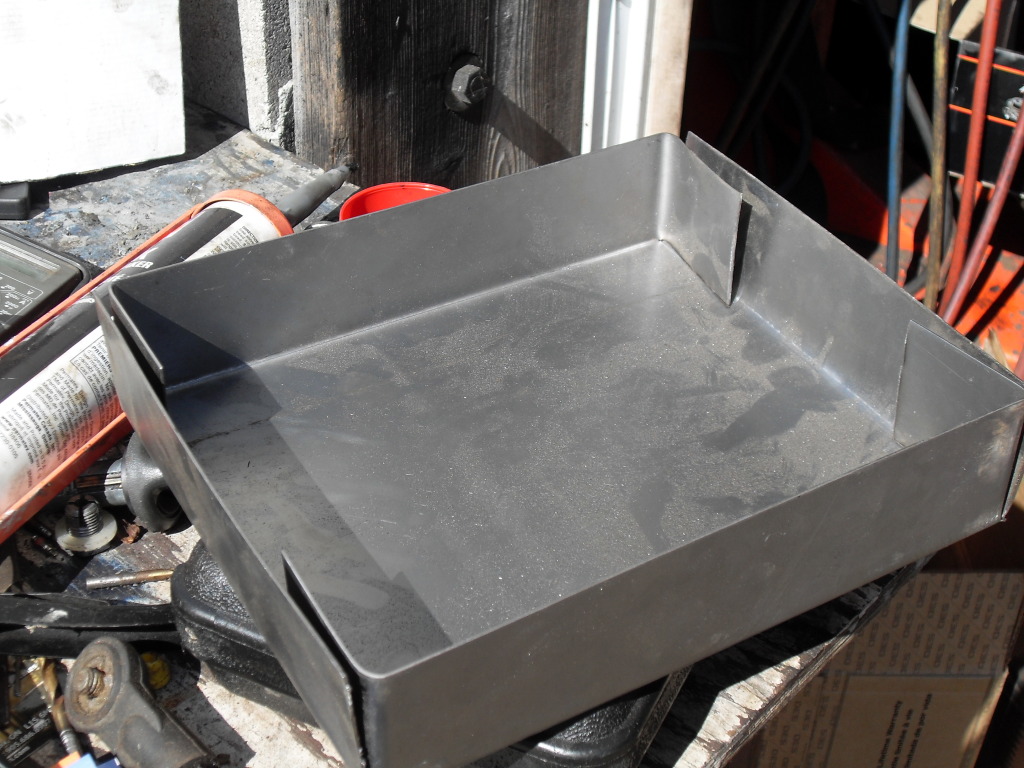
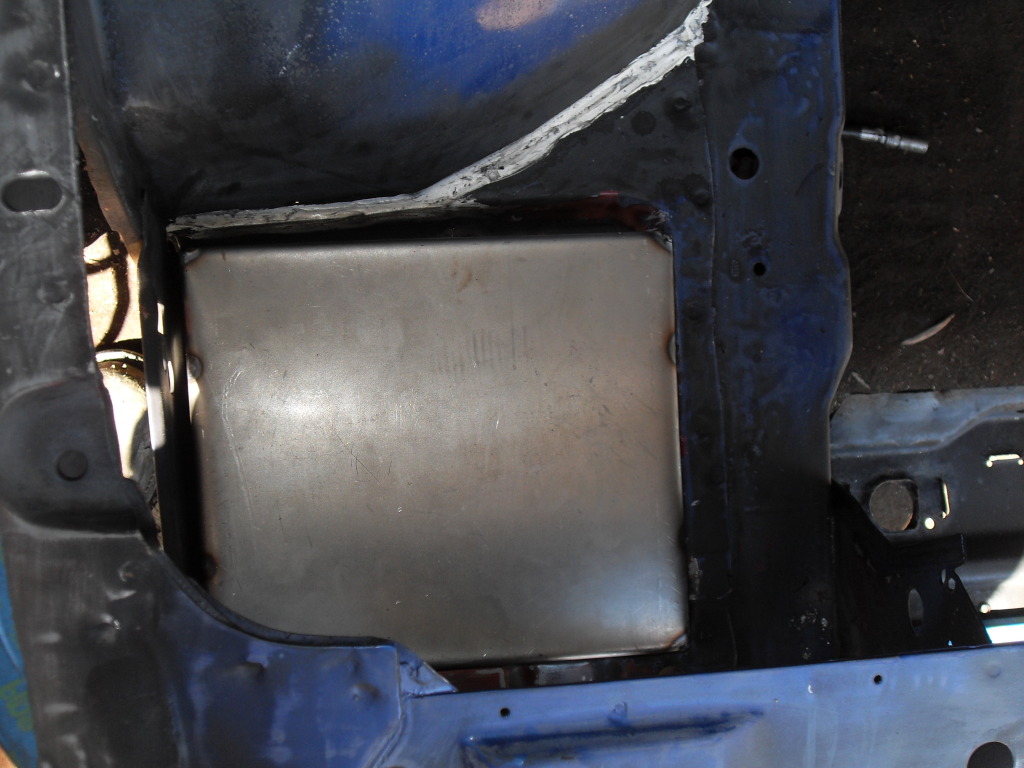
Prepping to get the engine bay painted and started thinking about how and where to mount the wiper fluid and rad overflow bottles. I bought stainless steel bottles to save space and have a cleaner look. Also wanted to move the AC accumulator (dryer) as the pass side seems to look "busy".
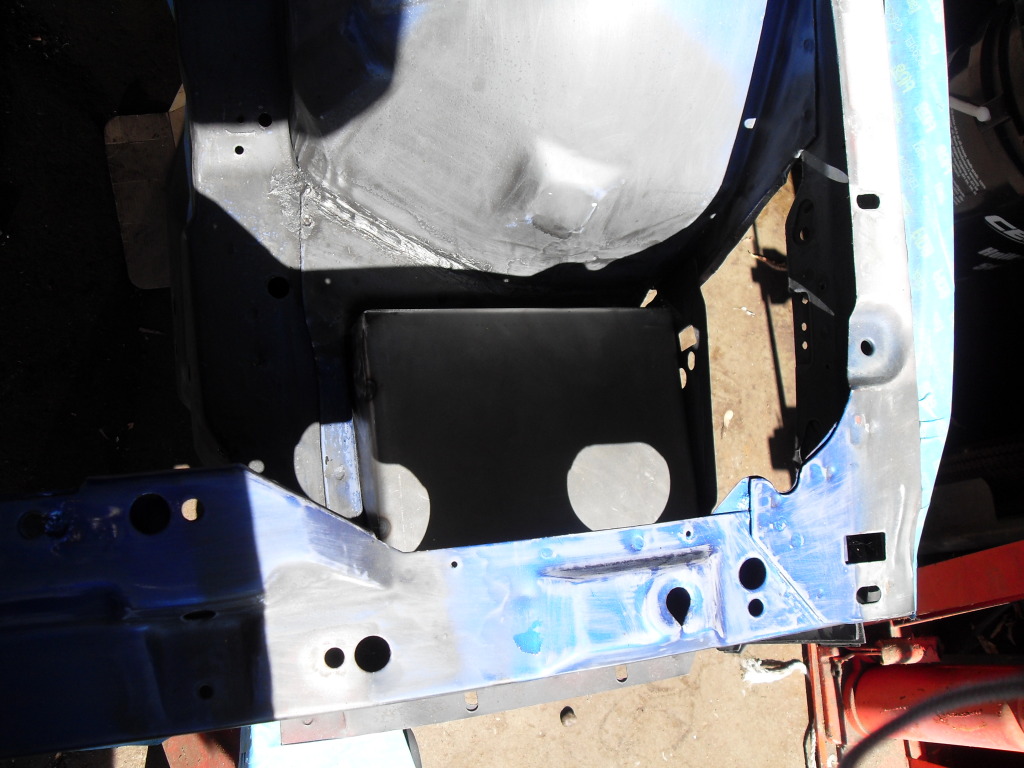
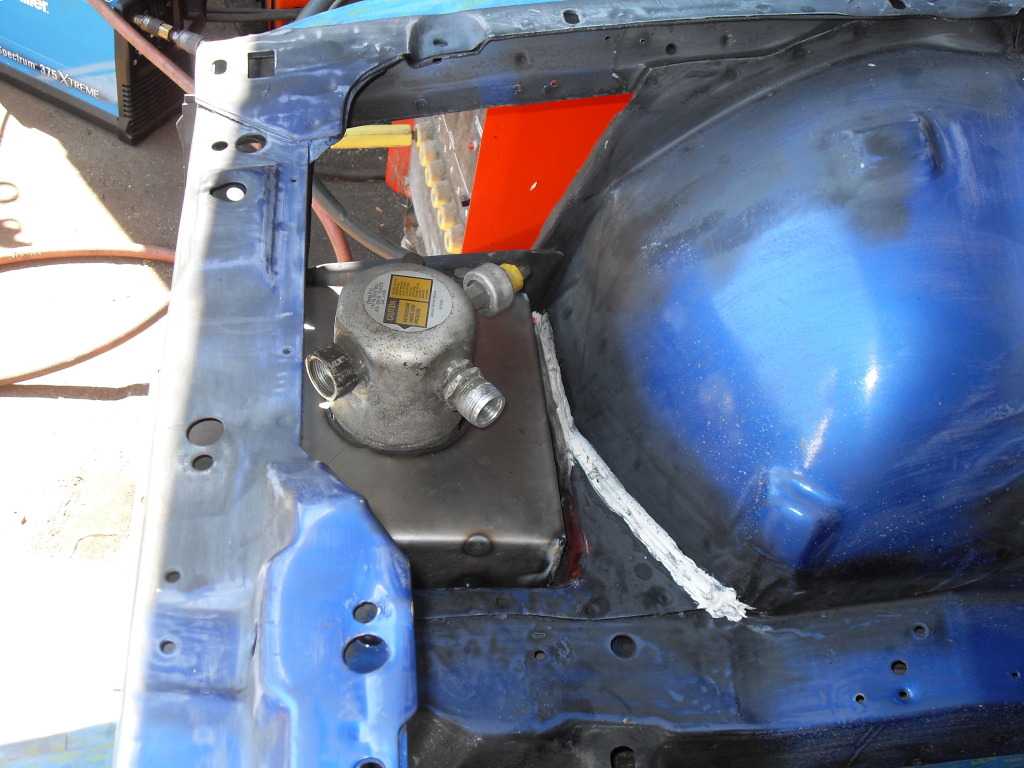
Here is what I came up with...Steel box fitted inside the battery tray, holes cut for the bottles and brackets made to mount everything to. Since the bottles are stainless steel, I'll put some tubing around the opening.
I also cut and welded in some angle iron for brackets and drilled a hole in the mount to secure to one of the threaded holes in the battery tray. Didn't want to weld the box in place.
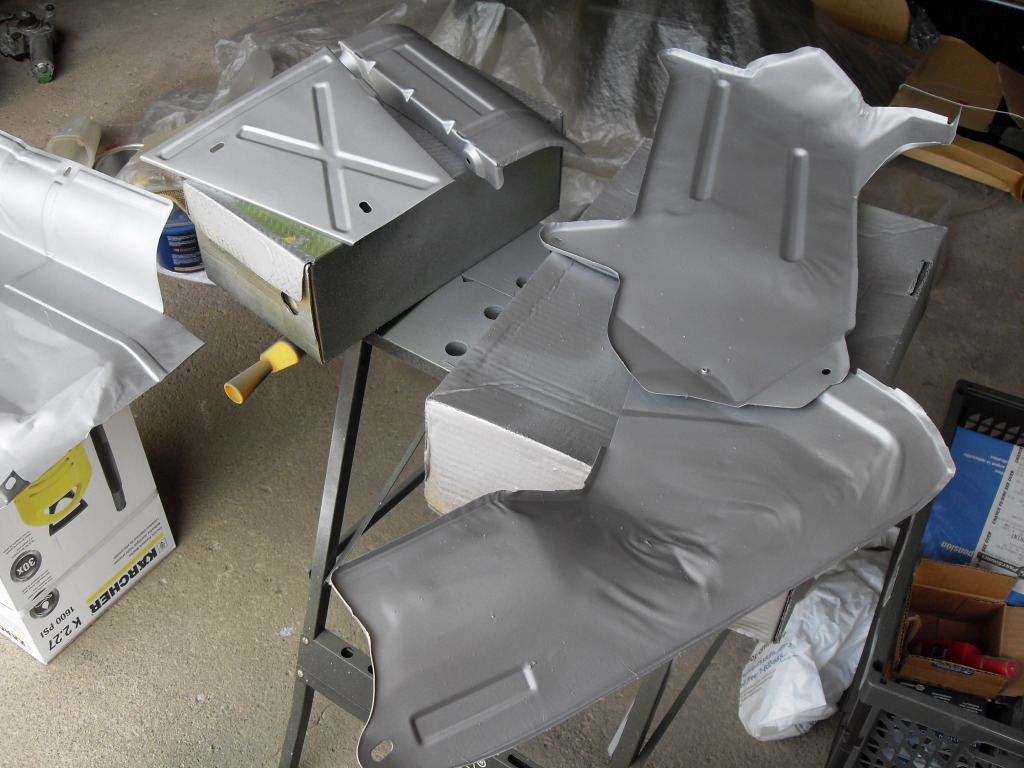
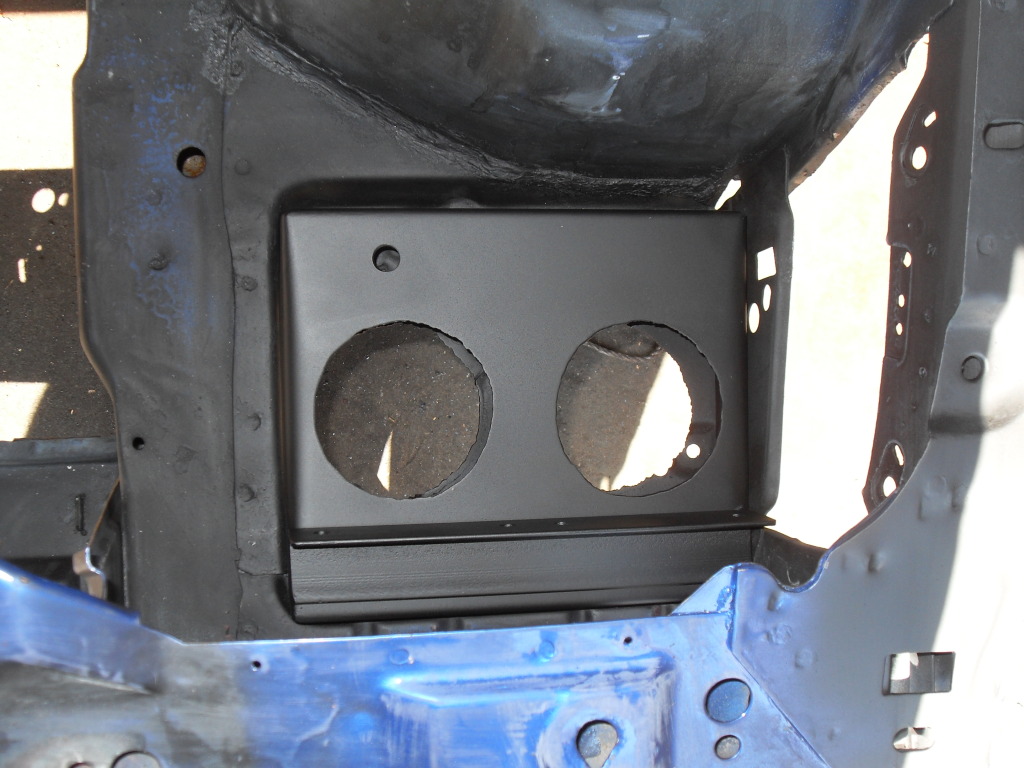
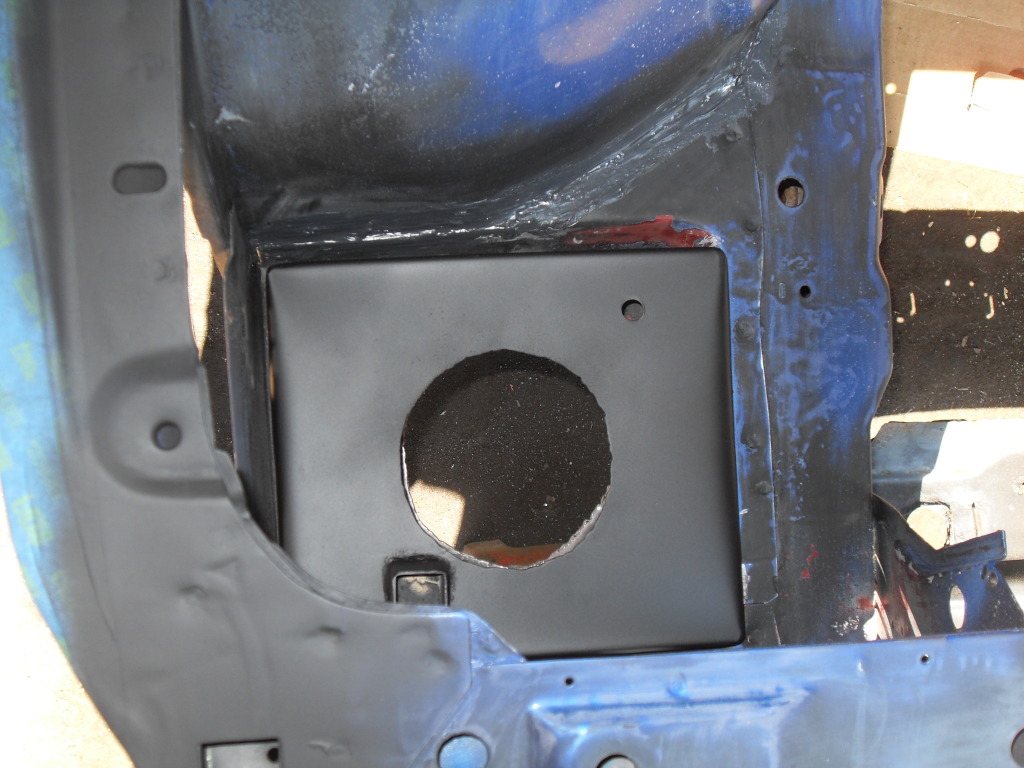
Lastly, sanded the boxes with some 180 grit and hit the new boxes with some primer.
Pretty happy with the results......
Box cut and ends folded ready for welding
Test fit...Wiper fluid lines and pump will be hidden.
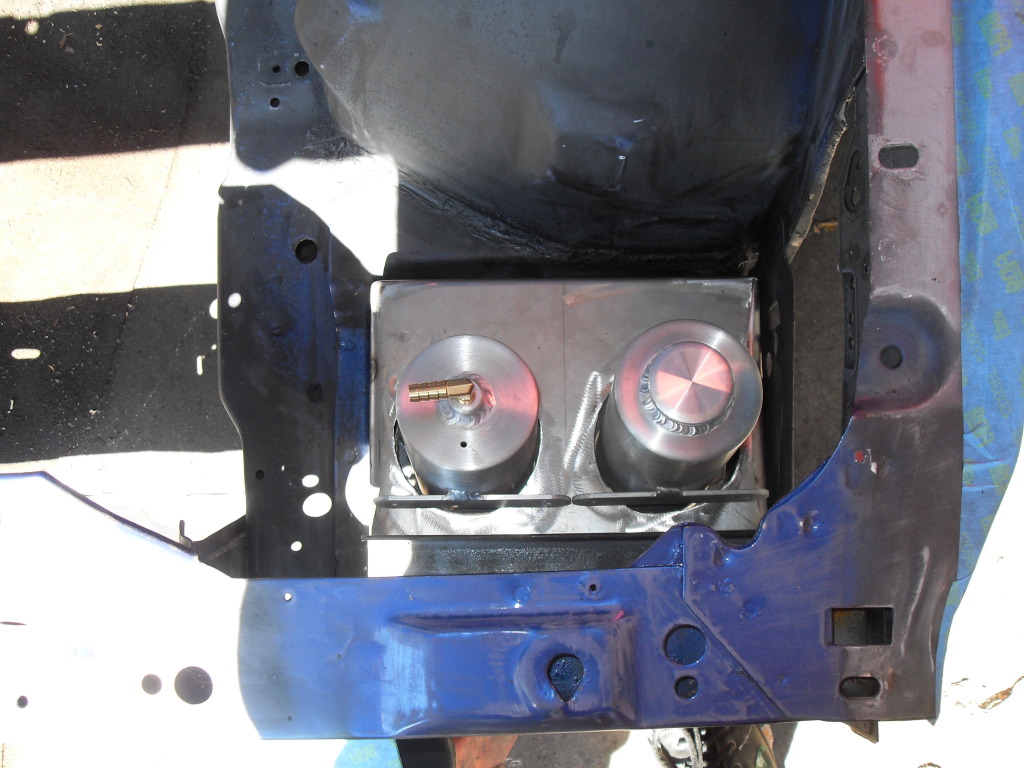
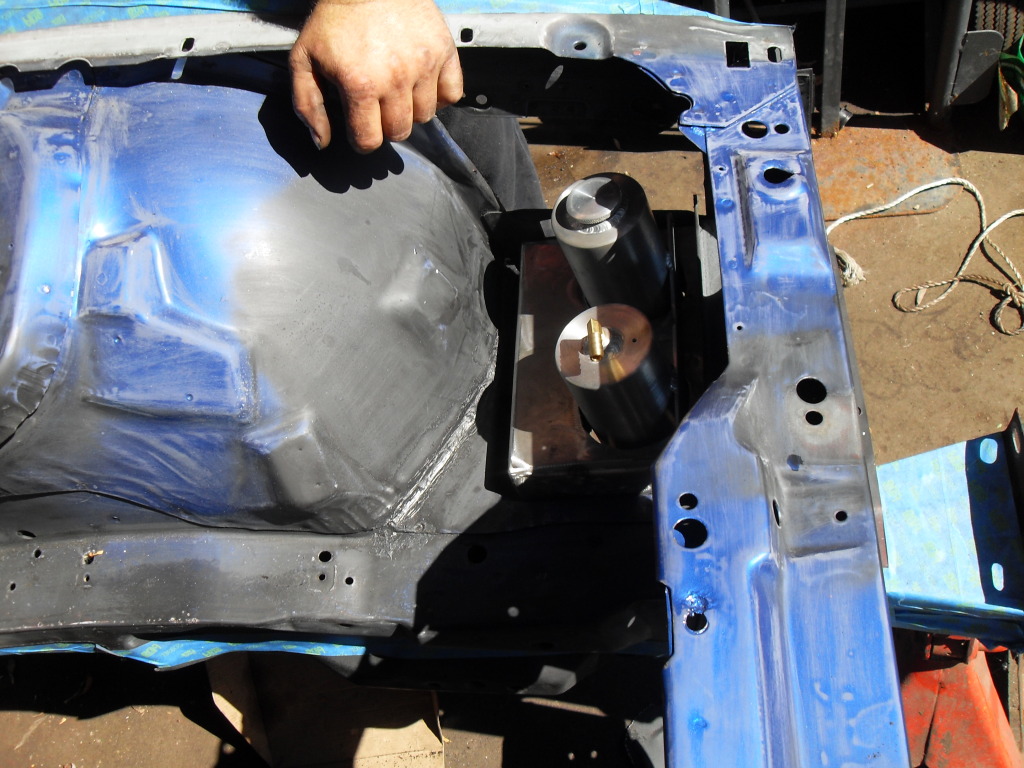
AC dryer test fit
Plasma cutter made quick work of the hold cutting.
Stock holder for the AC dryer will be reused but removed the stock mounting bracket and fabbed up something easier.
Now working on re-routing the AC lines and A.I.R. pump while still meeting emissions.
Here is what I came up with...Steel box fitted inside the battery tray, holes cut for the bottles and brackets made to mount everything to. Since the bottles are stainless steel, I'll put some tubing around the opening.
I also cut and welded in some angle iron for brackets and drilled a hole in the mount to secure to one of the threaded holes in the battery tray. Didn't want to weld the box in place.
Lastly, sanded the boxes with some 180 grit and hit the new boxes with some primer.
Pretty happy with the results......
Box cut and ends folded ready for welding
Test fit...Wiper fluid lines and pump will be hidden.
AC dryer test fit
Plasma cutter made quick work of the hold cutting.
Stock holder for the AC dryer will be reused but removed the stock mounting bracket and fabbed up something easier.
Now working on re-routing the AC lines and A.I.R. pump while still meeting emissions.
09-05-2012, 05:04 AM
#137
Supreme Member
Thread Starter
iTrader: (6)
Join Date: Oct 2006
Location: West of Toronto
Posts: 3,041
Likes: 0
Received 7 Likes
on
7 Posts
Car: 89 IROC
Engine: 305 TPI / ZZ4 cam
Transmission: Stage 2 700R4, LS1 driveshaft
Axle/Gears: Strange 3.42 w/ Auburn
Re: 1989 Camaro - "The Project" Begins...
Here are few shots of the holders primered and brackets welded on. The other hole is for the attachment bolt that will secure the steel box to the battery tray below.
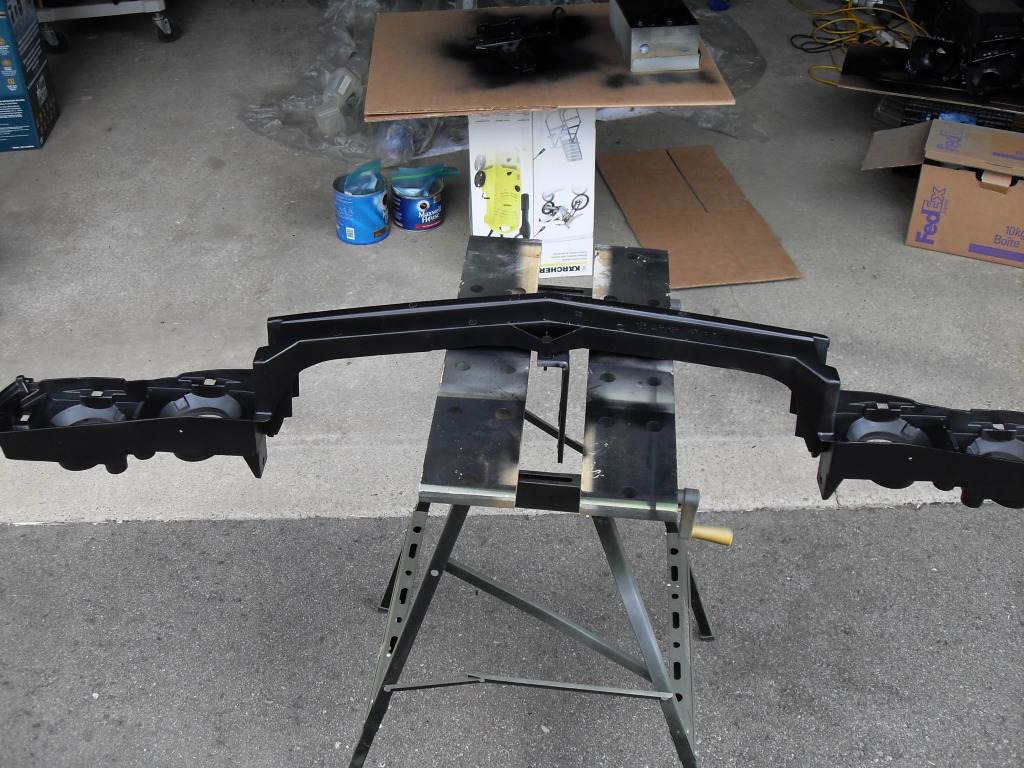
Test fit of the new UMI STB.
Test fit of the new UMI STB.
09-06-2012, 03:19 AM
#138
Supreme Member
Thread Starter
iTrader: (6)
Join Date: Oct 2006
Location: West of Toronto
Posts: 3,041
Likes: 0
Received 7 Likes
on
7 Posts
Car: 89 IROC
Engine: 305 TPI / ZZ4 cam
Transmission: Stage 2 700R4, LS1 driveshaft
Axle/Gears: Strange 3.42 w/ Auburn
Re: 1989 Camaro - "The Project" Begins...
TIME FOR PAINT!!!!!!
Decided to cover the top part of the engine bay where the wipers sit and overlap the fenders to ensure full coverage.
Laying down the first coat.
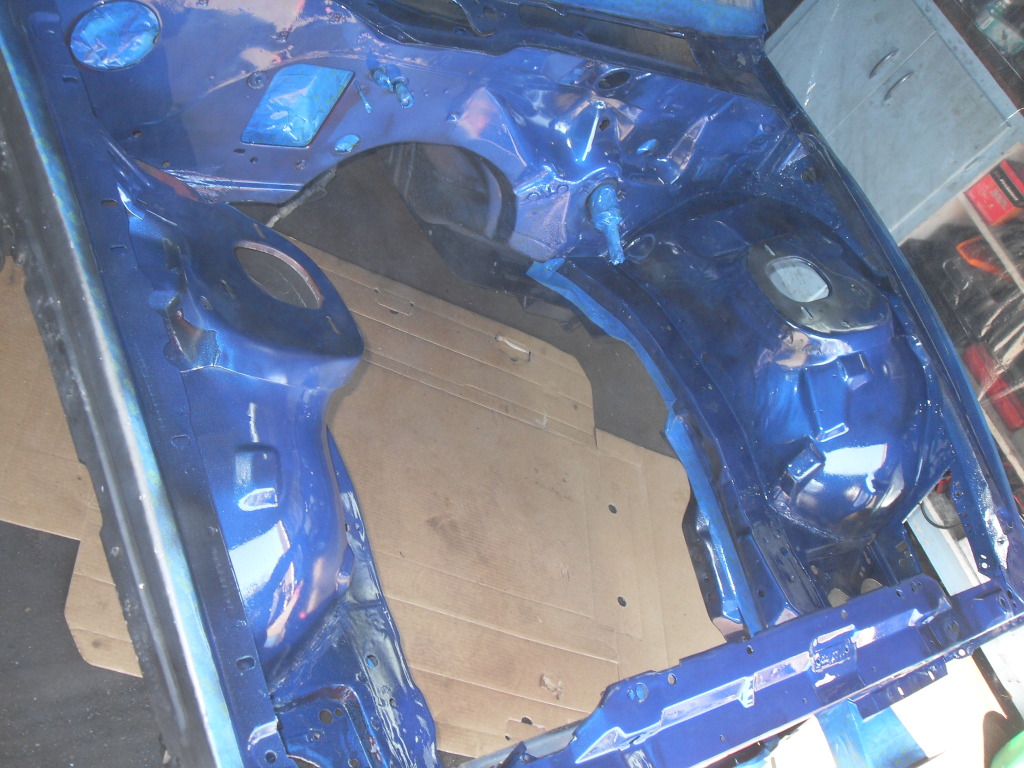
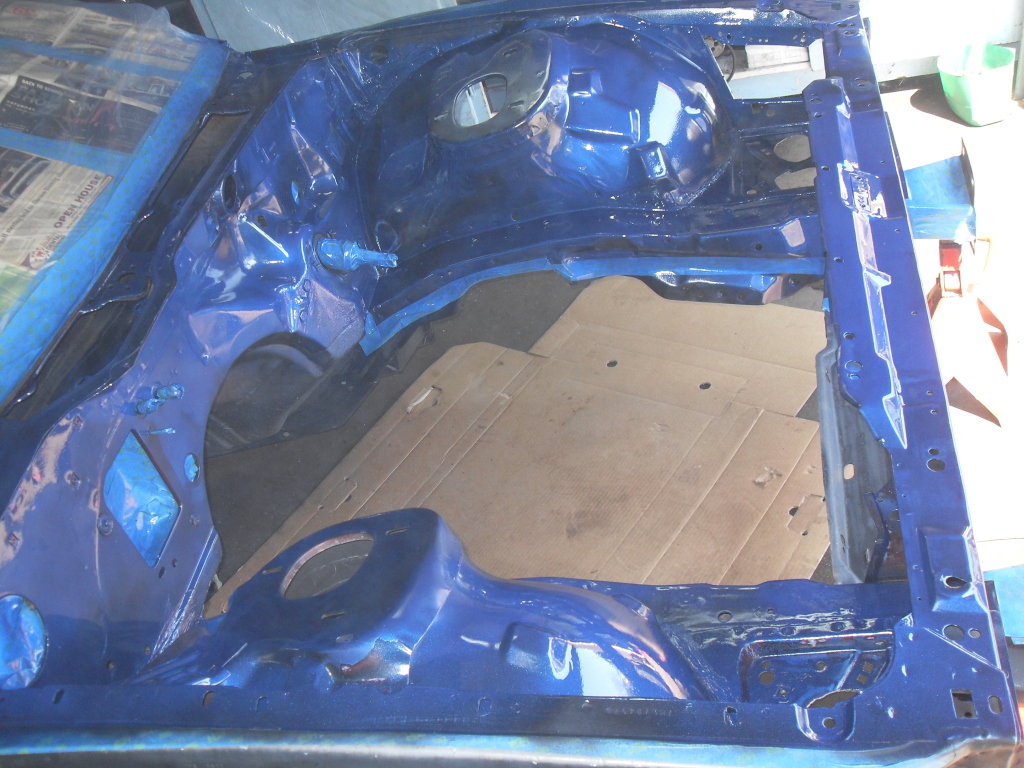
Final Coat
Decided to cover the top part of the engine bay where the wipers sit and overlap the fenders to ensure full coverage.
Laying down the first coat.
Final Coat
09-15-2012, 10:58 PM
#139
Supreme Member
Thread Starter
iTrader: (6)
Join Date: Oct 2006
Location: West of Toronto
Posts: 3,041
Likes: 0
Received 7 Likes
on
7 Posts
Car: 89 IROC
Engine: 305 TPI / ZZ4 cam
Transmission: Stage 2 700R4, LS1 driveshaft
Axle/Gears: Strange 3.42 w/ Auburn
Re: 1989 Camaro - "The Project" Begins...
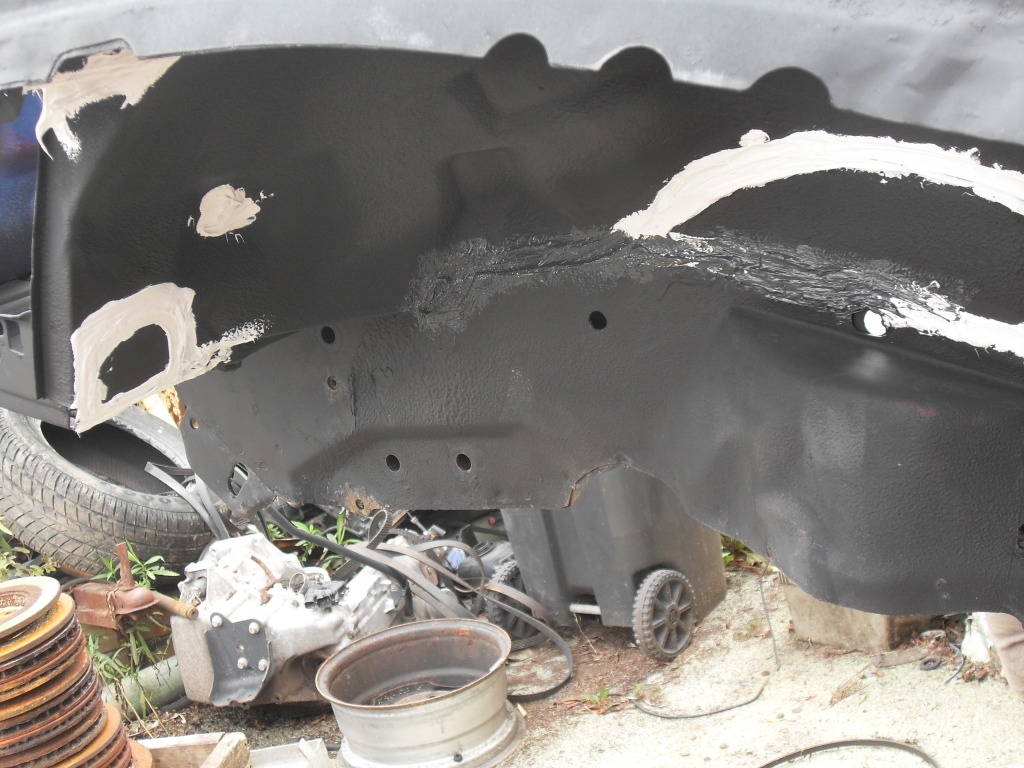
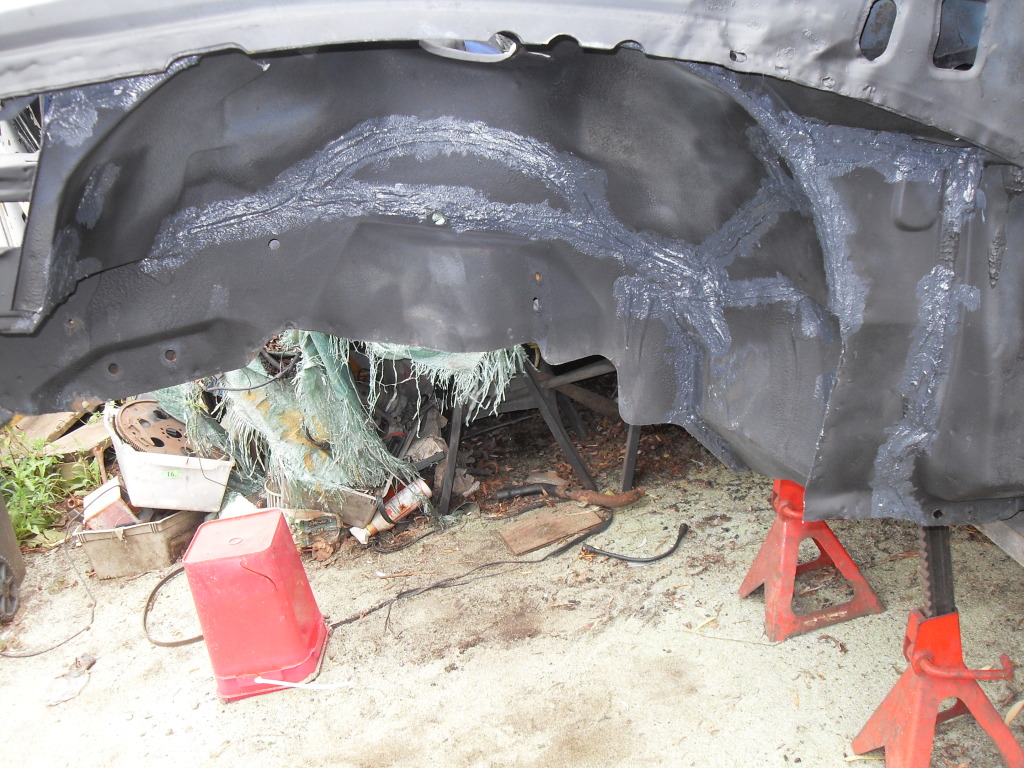
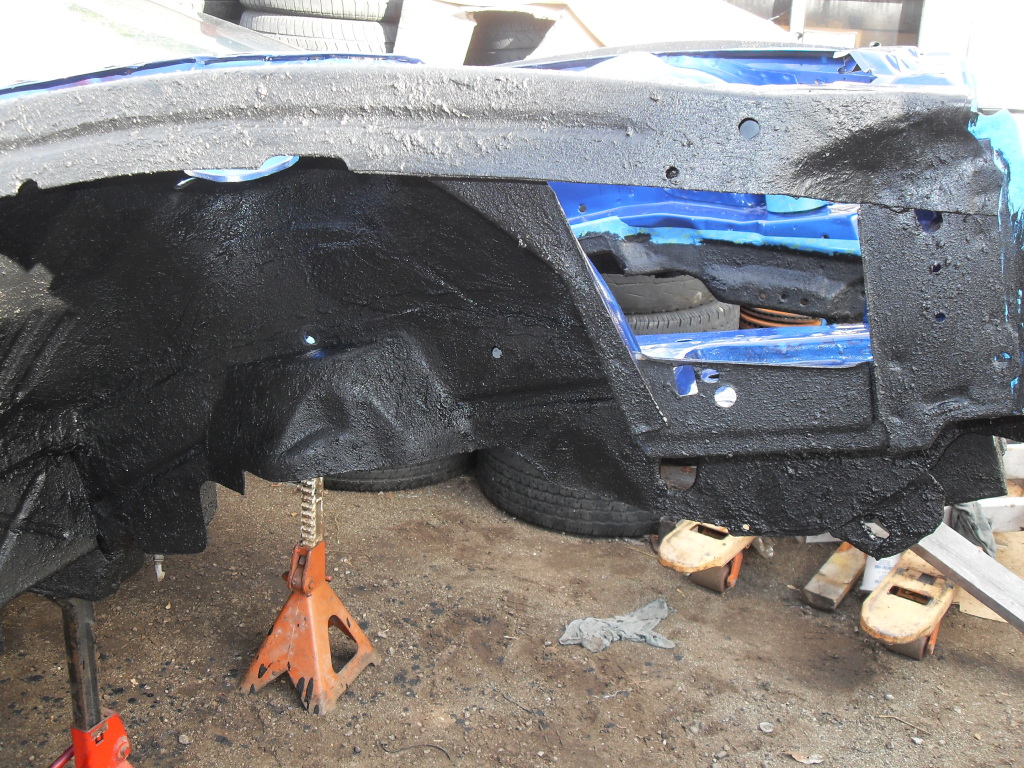
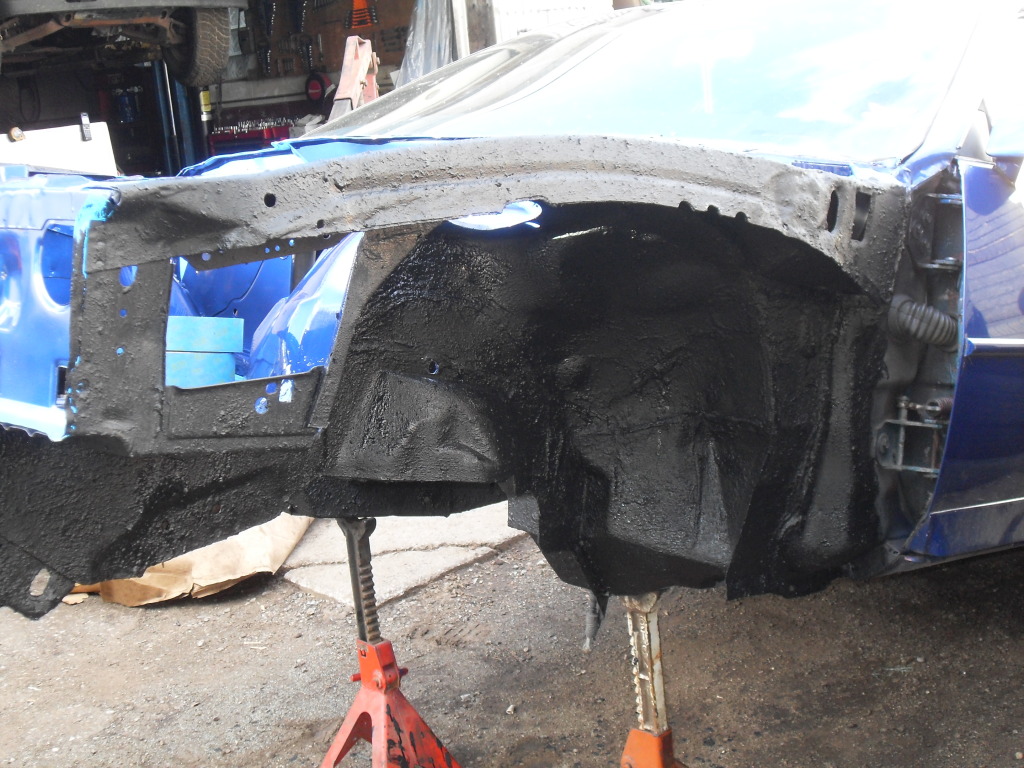
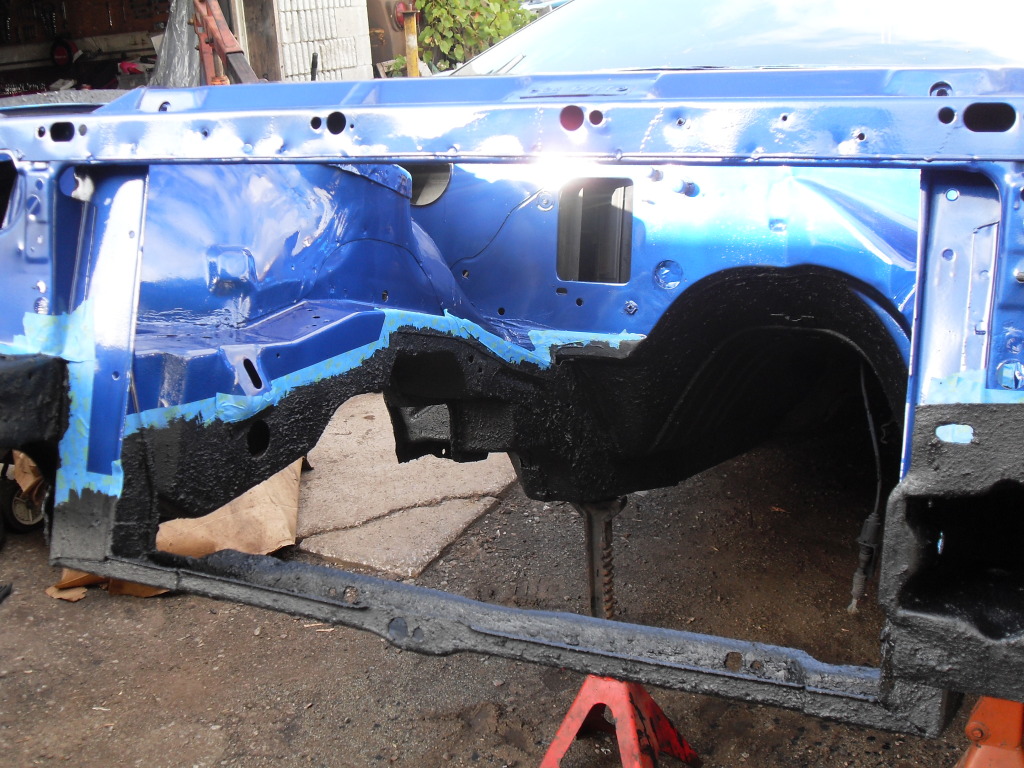
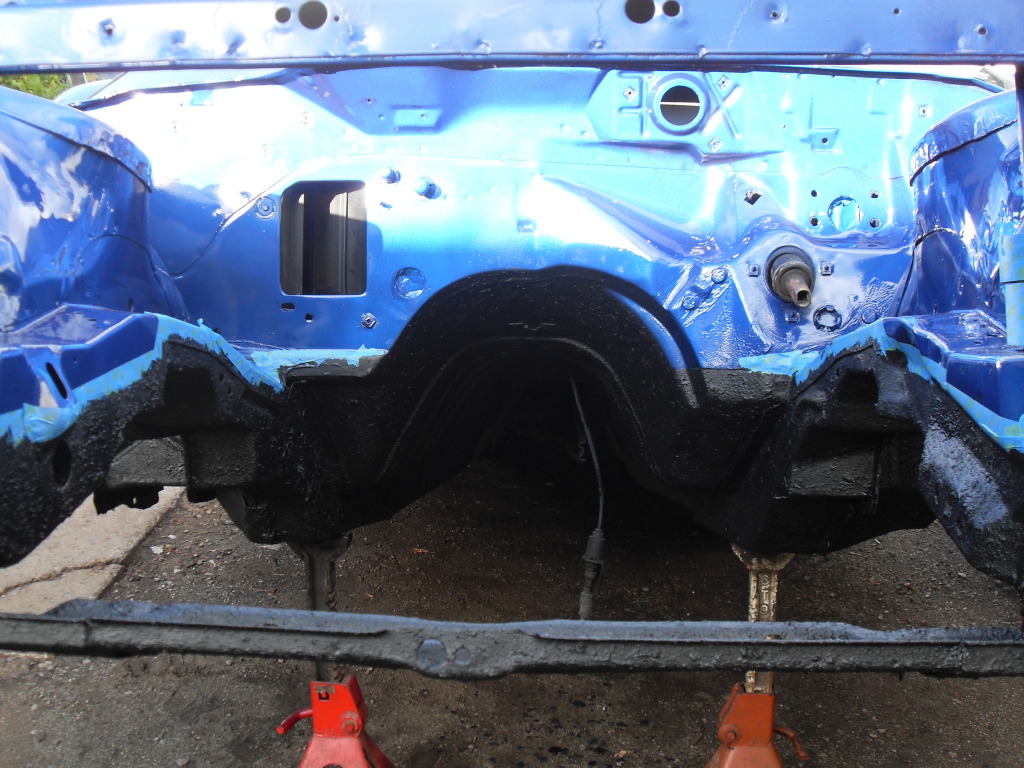
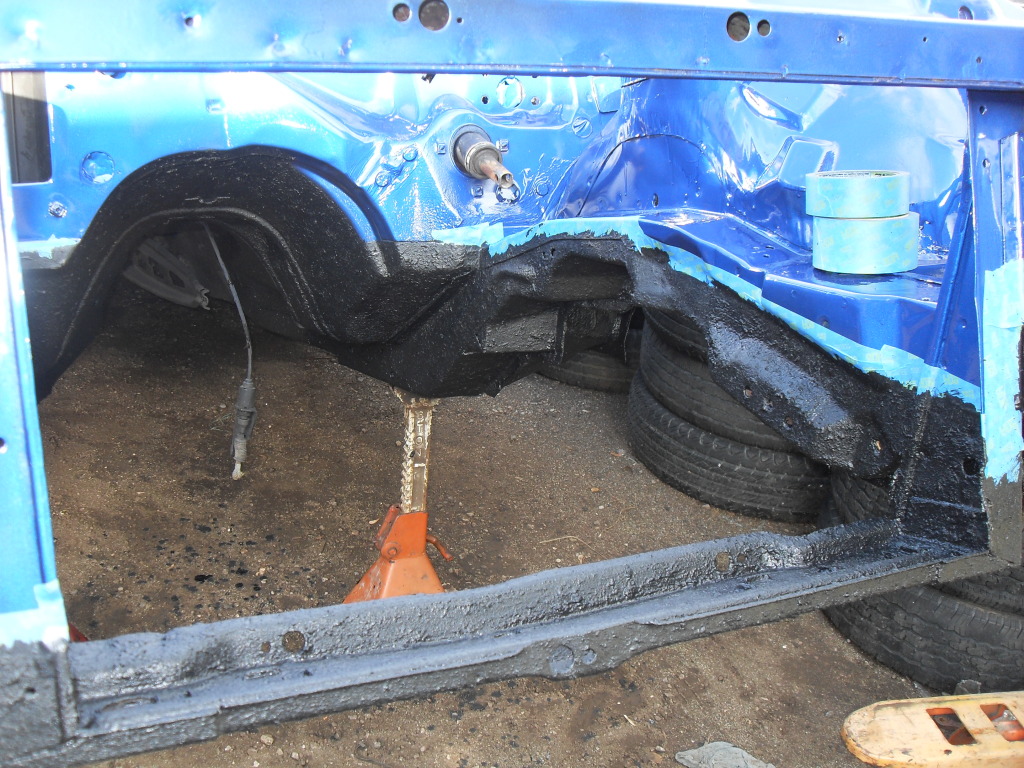
Spent the day applying the Duplicolor bed liner to the inner fenders, tranny tunnel, underside, frame rails and rad cradle.
If you're going to use this stuff (and it works great) a few things; the supplied roller does not work on non flat surfaces but thankfully the supplied brush does, go the dollar store and buy another brush (for the second coat) and a smaller brush (1") for the hard to reach places, lastly USE GLOVES!! bed liner is a pain to remove!!
You should apply two coats and the second coat can go on a bit thicker. It dries quickly and there is little smell. I put three coats on the rad cradle just because.
It dries to a texture but as you won't see most of the bed liner, it doesn't matter if it dries smooth or not.
09-29-2012, 06:23 PM
#140
Supreme Member
Thread Starter
iTrader: (6)
Join Date: Oct 2006
Location: West of Toronto
Posts: 3,041
Likes: 0
Received 7 Likes
on
7 Posts
Car: 89 IROC
Engine: 305 TPI / ZZ4 cam
Transmission: Stage 2 700R4, LS1 driveshaft
Axle/Gears: Strange 3.42 w/ Auburn
Re: 1989 Camaro - "The Project" Begins...
Picked up a set of almost new SLP headers and matching Y pipe. They look like they were never used and have no rust on them. Decided to give them a few coats of High Temp paint. Came out pretty good. Wonder if VHT will give me a discount!!
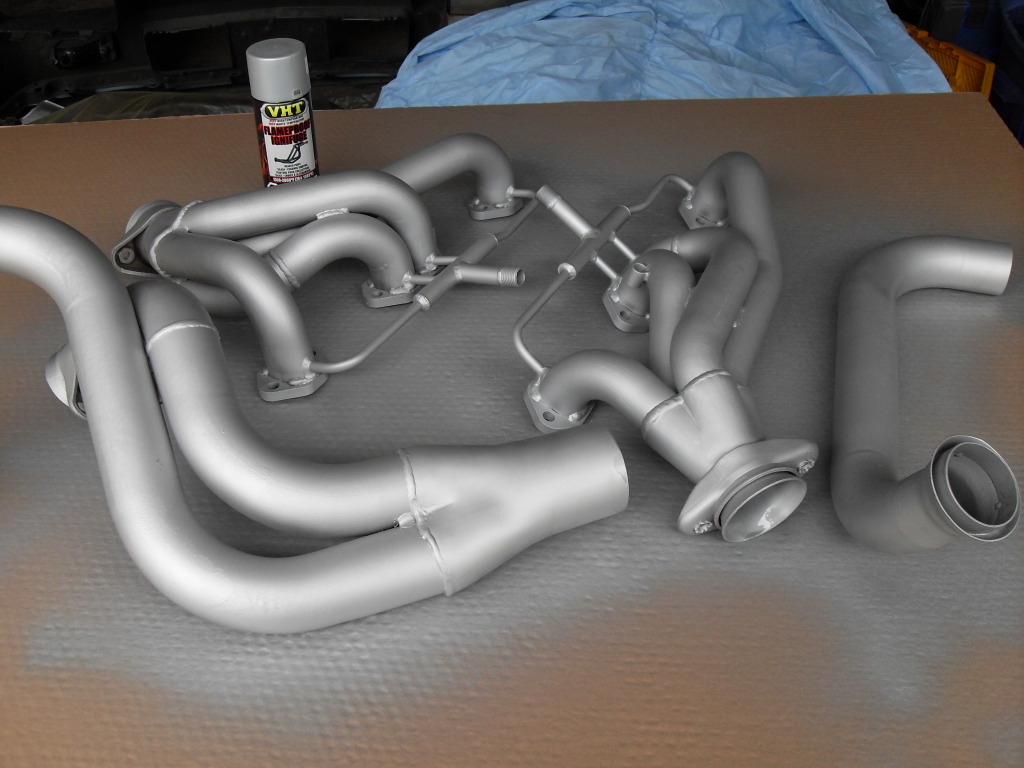
ENGINE REBUILD TIME.
Few pics of the engine teardown and prep before adding the ZZ4 cam, springs and retainers as well as Comp Cams Pro Magnum rockers, Comp Cams Chrome Moly rods, Comp Cams double roller timing chain, MSD 8.8 wires, Holley AFPR and above mentioned SLP headers.
Motor was in storage at the shop for a few years. Came out of a US IROC with only 35,000 mi.
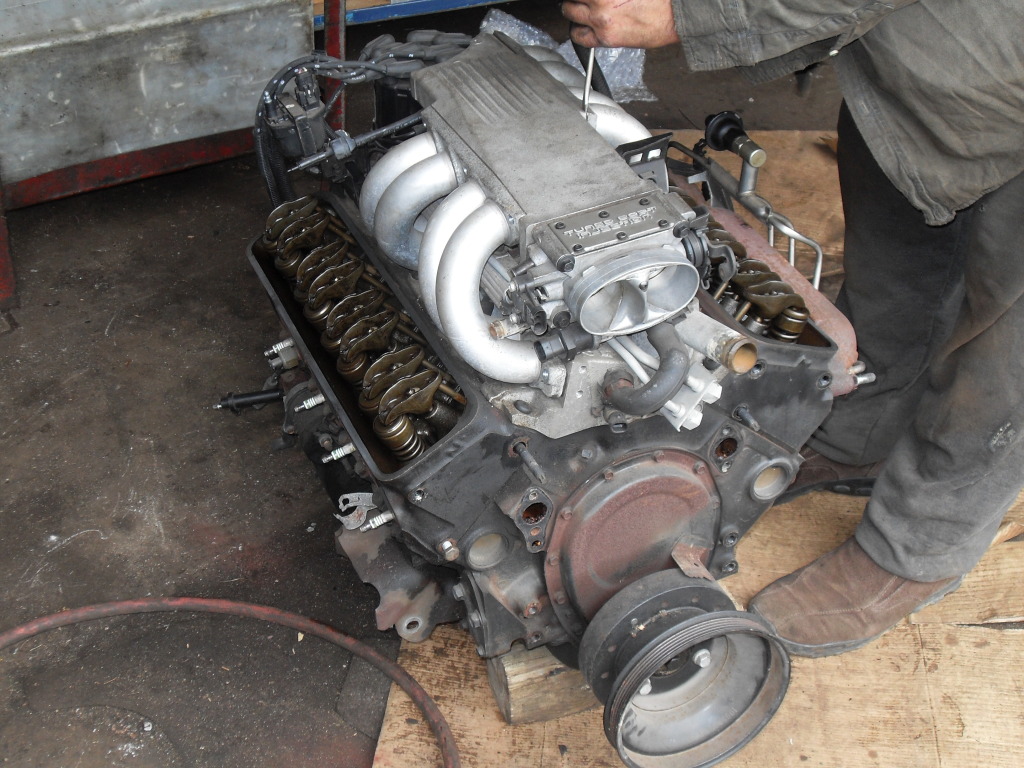
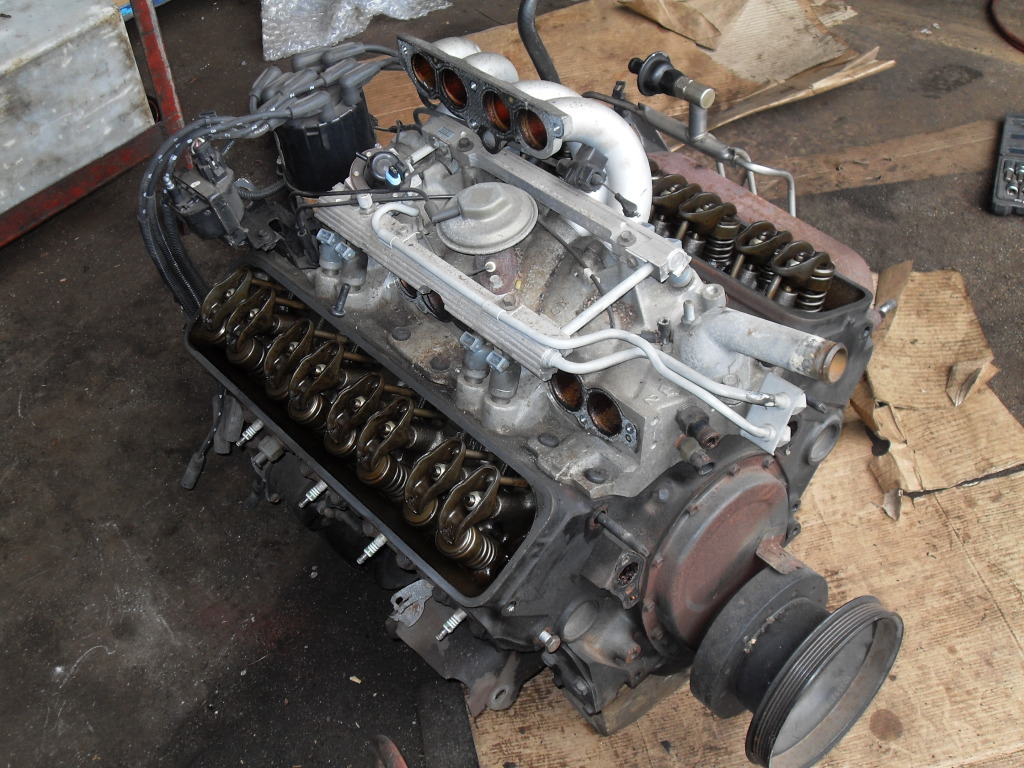
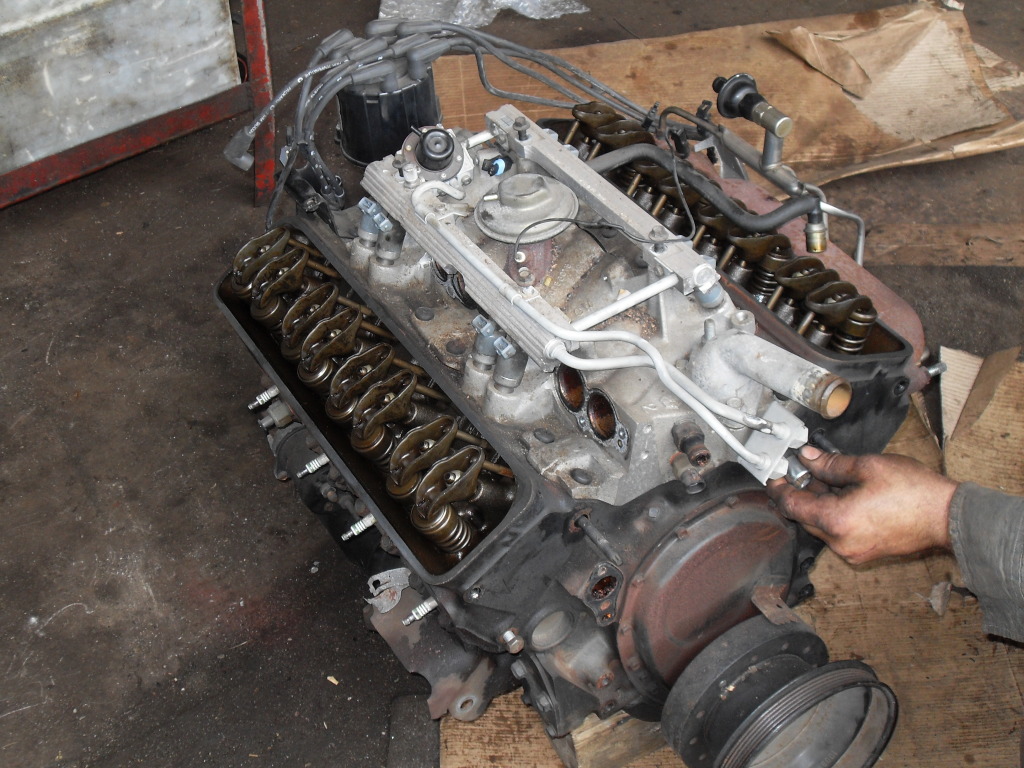

Removed parts waiting for a good clean.
Will start the build next week.
ENGINE REBUILD TIME.
Few pics of the engine teardown and prep before adding the ZZ4 cam, springs and retainers as well as Comp Cams Pro Magnum rockers, Comp Cams Chrome Moly rods, Comp Cams double roller timing chain, MSD 8.8 wires, Holley AFPR and above mentioned SLP headers.
Motor was in storage at the shop for a few years. Came out of a US IROC with only 35,000 mi.
Removed parts waiting for a good clean.
Will start the build next week.
10-07-2012, 06:46 PM
#141
Supreme Member
Thread Starter
iTrader: (6)
Join Date: Oct 2006
Location: West of Toronto
Posts: 3,041
Likes: 0
Received 7 Likes
on
7 Posts
Car: 89 IROC
Engine: 305 TPI / ZZ4 cam
Transmission: Stage 2 700R4, LS1 driveshaft
Axle/Gears: Strange 3.42 w/ Auburn
Re: 1989 Camaro - "The Project" Begins...
Quick update�head work today.
Removed the factory push-in studs and then taped the holes for the Comp Cams screw-in studs. It was a MAJOR PIA to tap the studs by hand but well worth the effort. Used LOTS of oil to keep the tool from getting hot while tapping and cleaned after each stud.
Discovered the ZZ4 springs would not fit the 305 heads without machining the spring pocket. Fortunately, my mechanic �just happened� to have a complete set of Comp Cams bee hive springs with matching retainers and locks. A quick call to Com Cams and �Randy� at CC confirmed the springs would fit but the exhaust valves would probably need a spacer to keep valve float at bay. Good news is the springs are good for 600 lift!!
Lastly, installed Fel-Pro posi valve seals to keep the excess oil from coming thru.
Will post pics next week.
10-08-2012, 11:13 AM
#142
Supreme Member
Thread Starter
iTrader: (6)
Join Date: Oct 2006
Location: West of Toronto
Posts: 3,041
Likes: 0
Received 7 Likes
on
7 Posts
Car: 89 IROC
Engine: 305 TPI / ZZ4 cam
Transmission: Stage 2 700R4, LS1 driveshaft
Axle/Gears: Strange 3.42 w/ Auburn
Re: 1989 Camaro - "The Project" Begins...
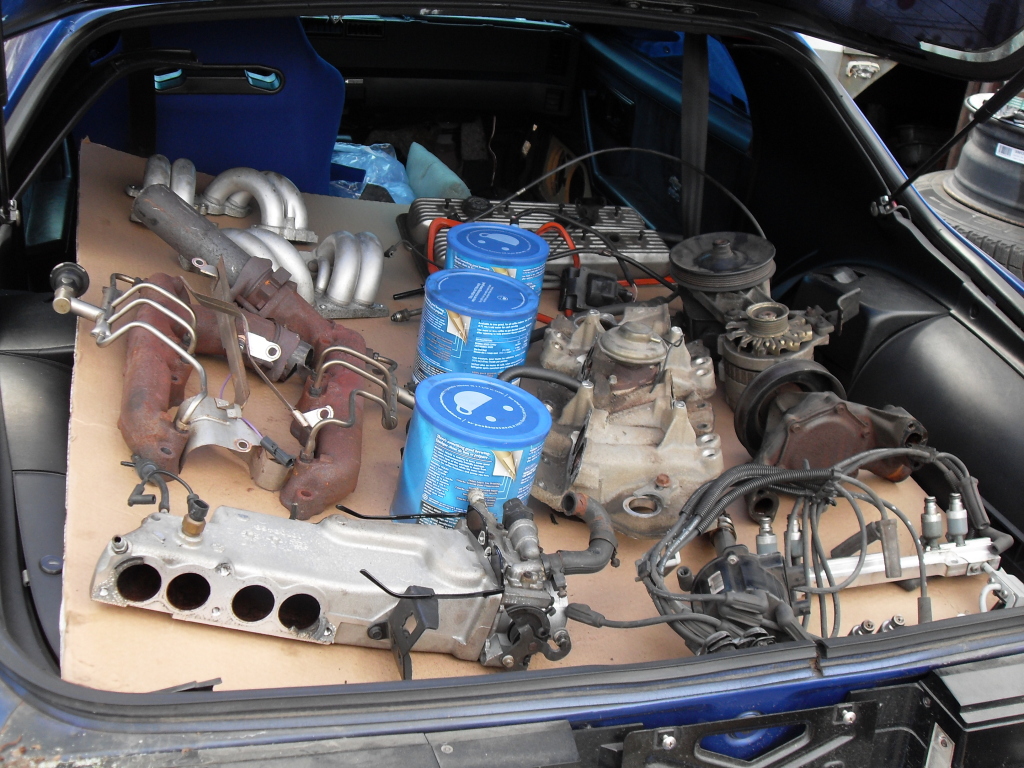
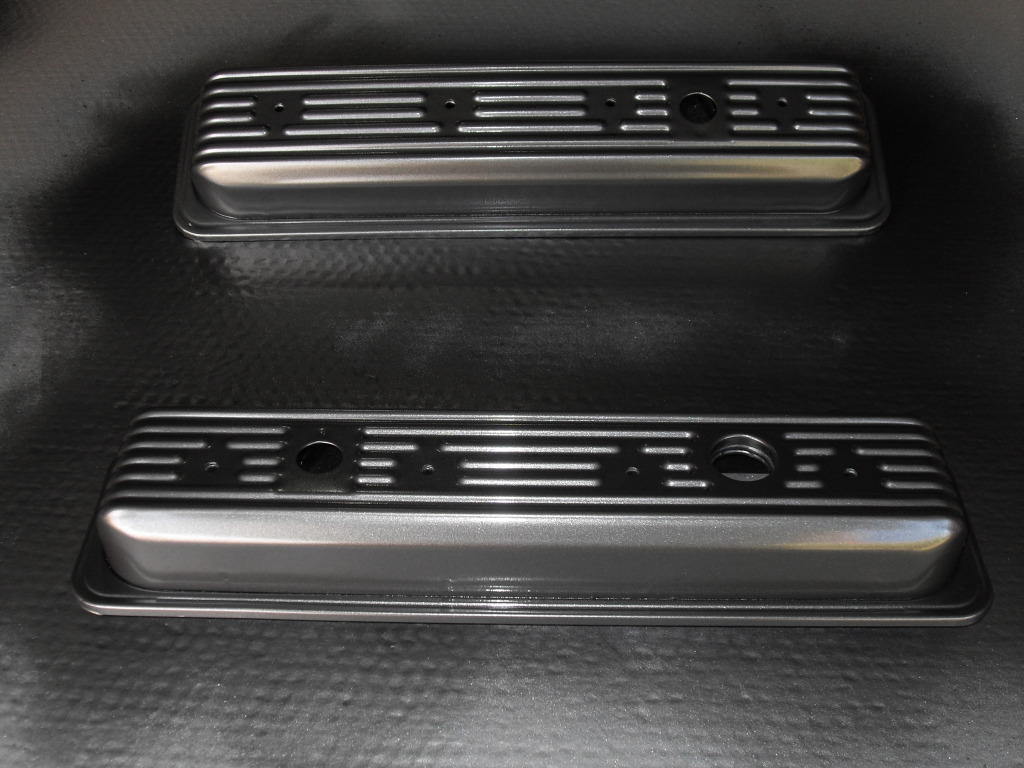
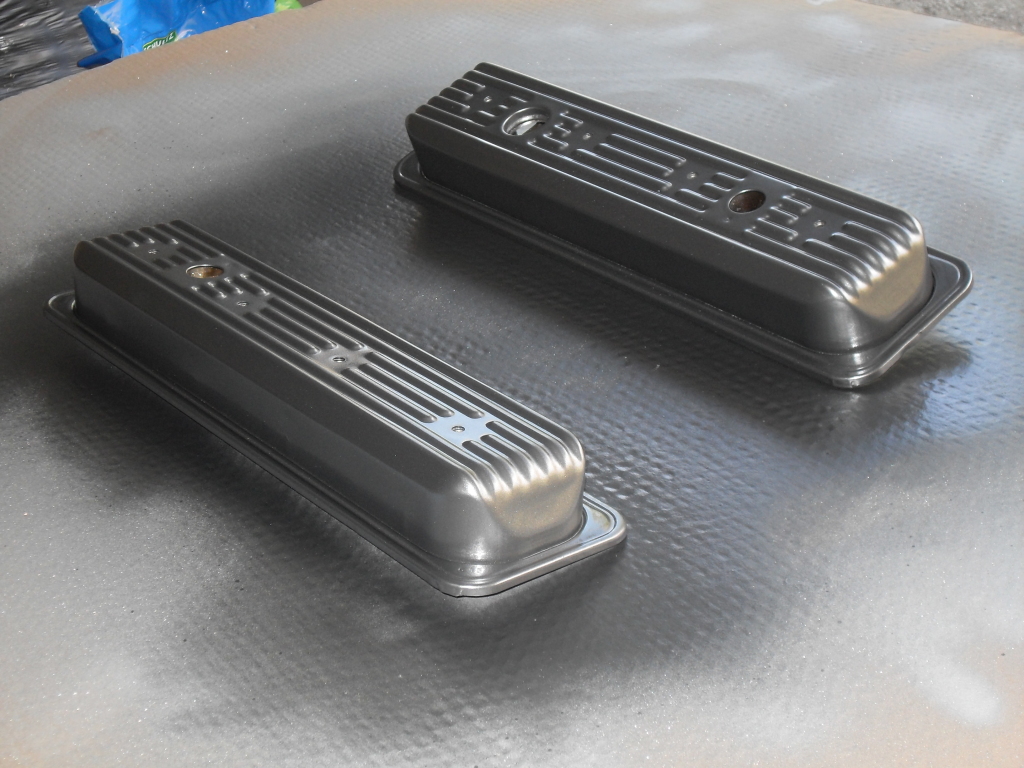
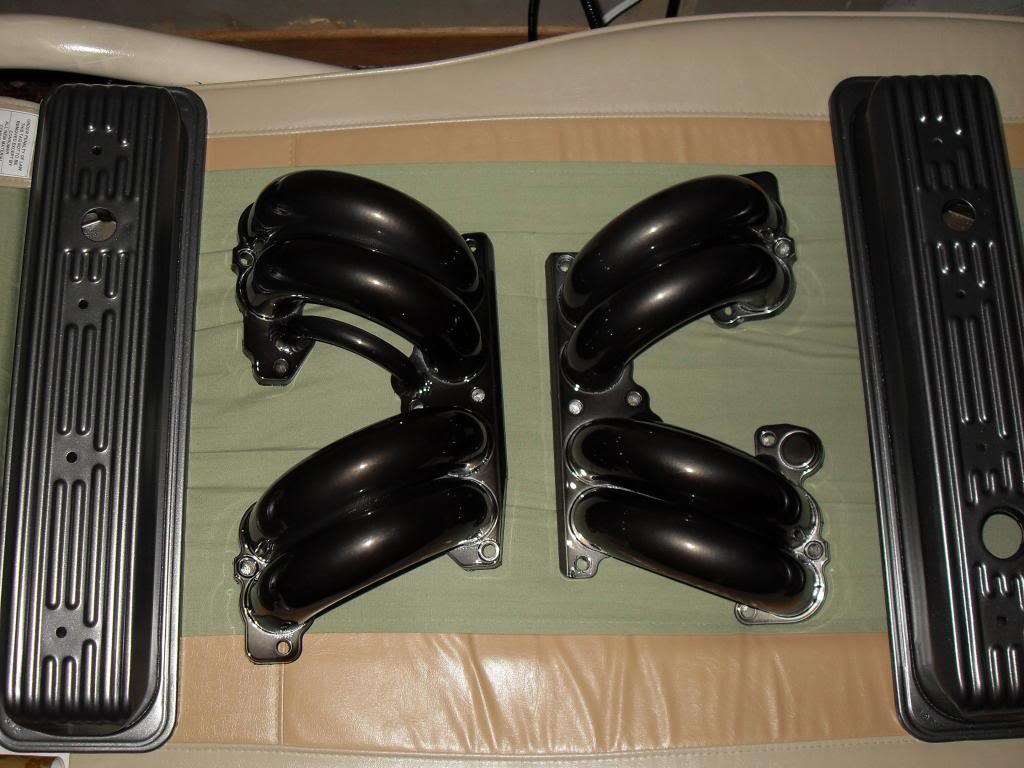
Since the valve covers were off the car, decided to give them a good clean, light 180 grit scuff and apply some Duplicolor Charcoal Gray Met. paint. Didn't turn out too bad.
Picked up a set if TPIS runners and port matched plenum. Haven't decided what to do with the paint scheme yet
Anyone have ideas?
Picked up a set if TPIS runners and port matched plenum. Haven't decided what to do with the paint scheme yet
Anyone have ideas?
10-28-2012, 04:27 PM
#143
Supreme Member
Thread Starter
iTrader: (6)
Join Date: Oct 2006
Location: West of Toronto
Posts: 3,041
Likes: 0
Received 7 Likes
on
7 Posts
Car: 89 IROC
Engine: 305 TPI / ZZ4 cam
Transmission: Stage 2 700R4, LS1 driveshaft
Axle/Gears: Strange 3.42 w/ Auburn
Re: 1989 Camaro - "The Project" Begins...
Picked up a set of TPIS large tube runners, had them stripped and powdercoated in Black Chrome.
Here are some before and after shots and the runners with the painted valve covers. Looks pretty good so far.
Still not sure what to do with the plenum.
Before
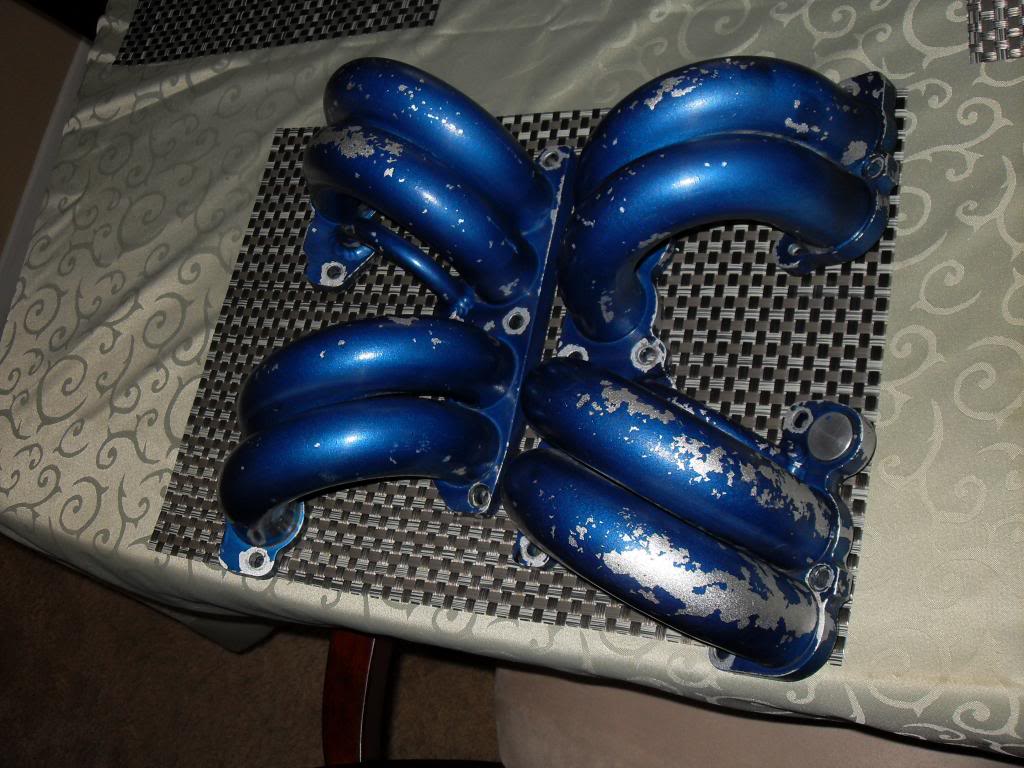
After
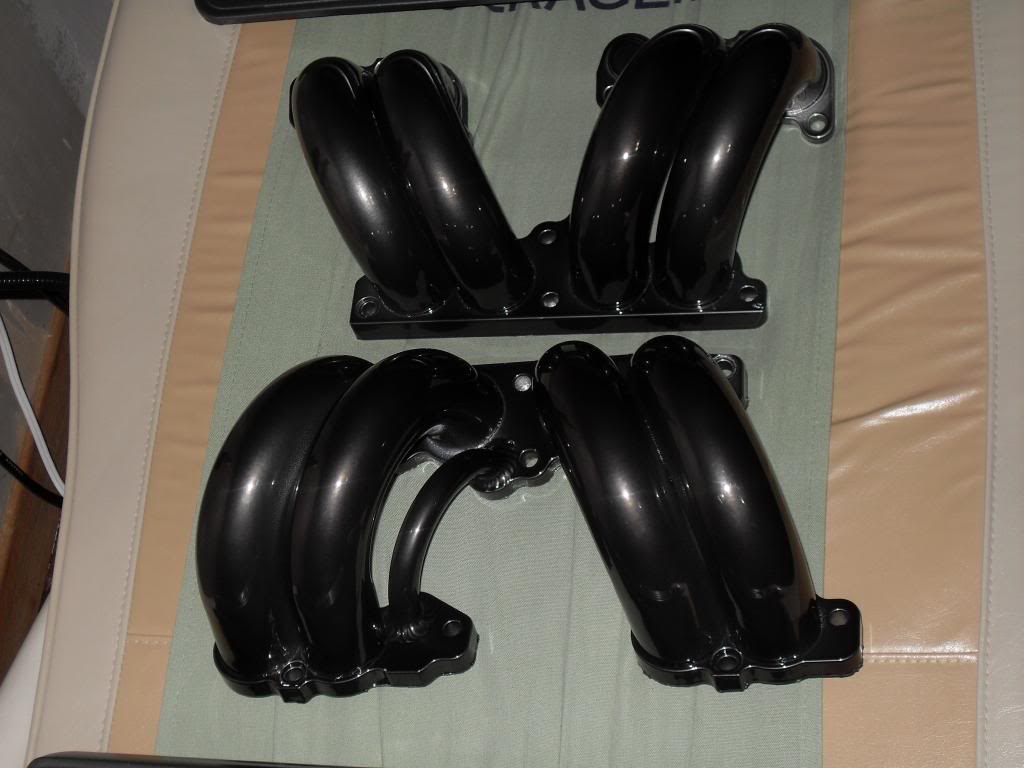
With valve covers
Here are some before and after shots and the runners with the painted valve covers. Looks pretty good so far.
Still not sure what to do with the plenum.
Before
After
With valve covers
10-30-2012, 01:56 AM
#145
Supreme Member
Thread Starter
iTrader: (6)
Join Date: Oct 2006
Location: West of Toronto
Posts: 3,041
Likes: 0
Received 7 Likes
on
7 Posts
Car: 89 IROC
Engine: 305 TPI / ZZ4 cam
Transmission: Stage 2 700R4, LS1 driveshaft
Axle/Gears: Strange 3.42 w/ Auburn
Re: 1989 Camaro - "The Project" Begins...
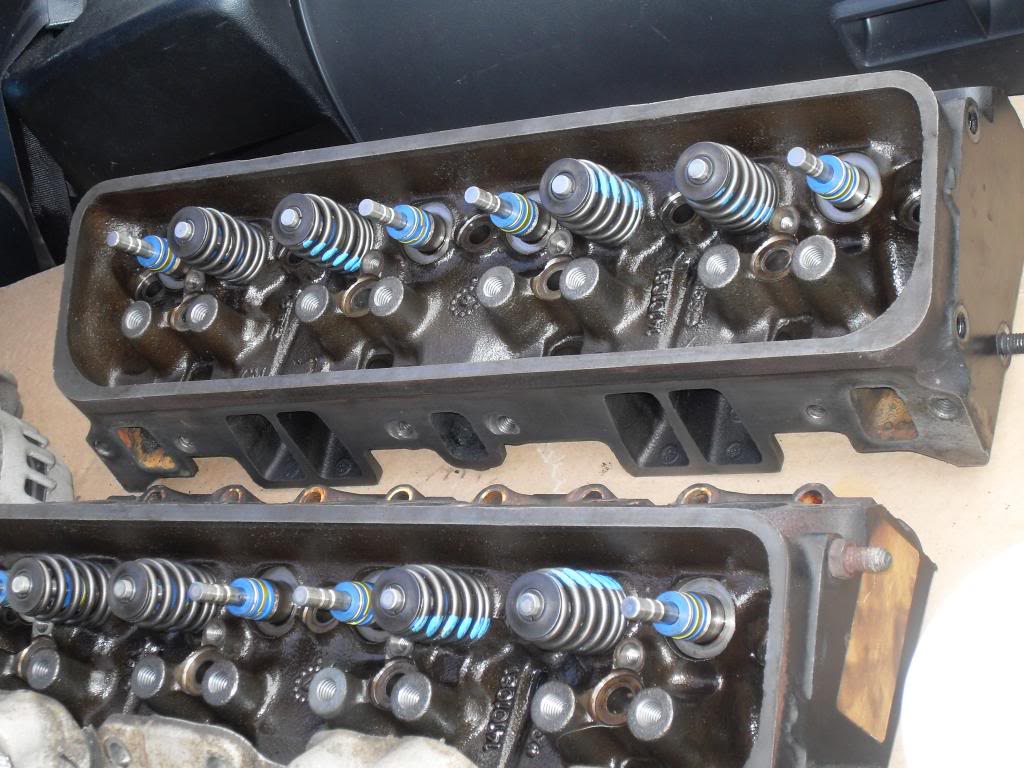
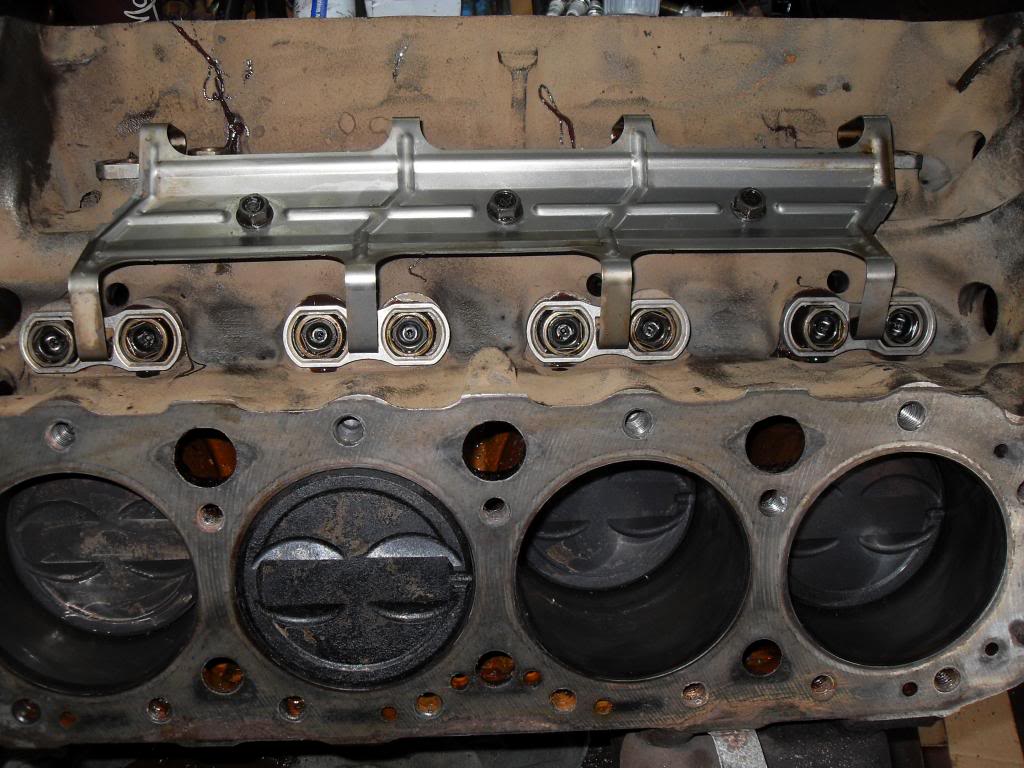
Started the engine reassembly.
Heads with the Comp Cams valve springs & Fel-Pro posi valve seals.
Shot of the block...no cracks or "extra metal" present
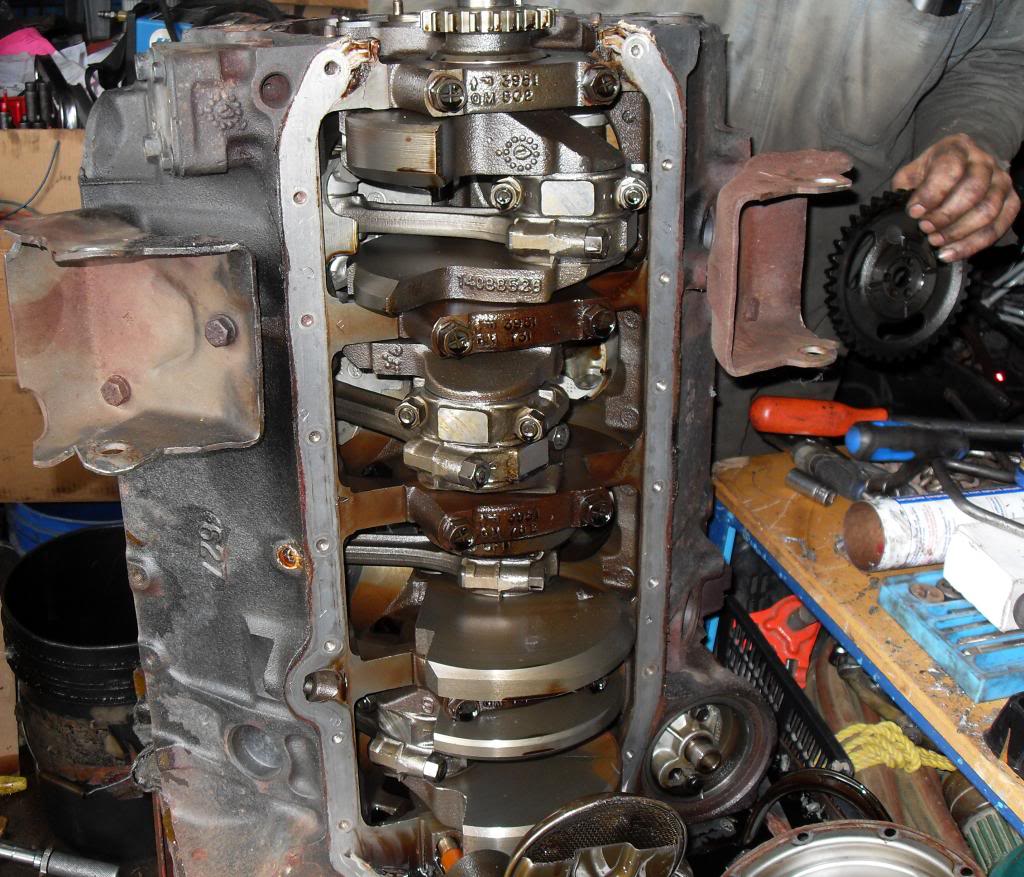
ZZ4 cam installed
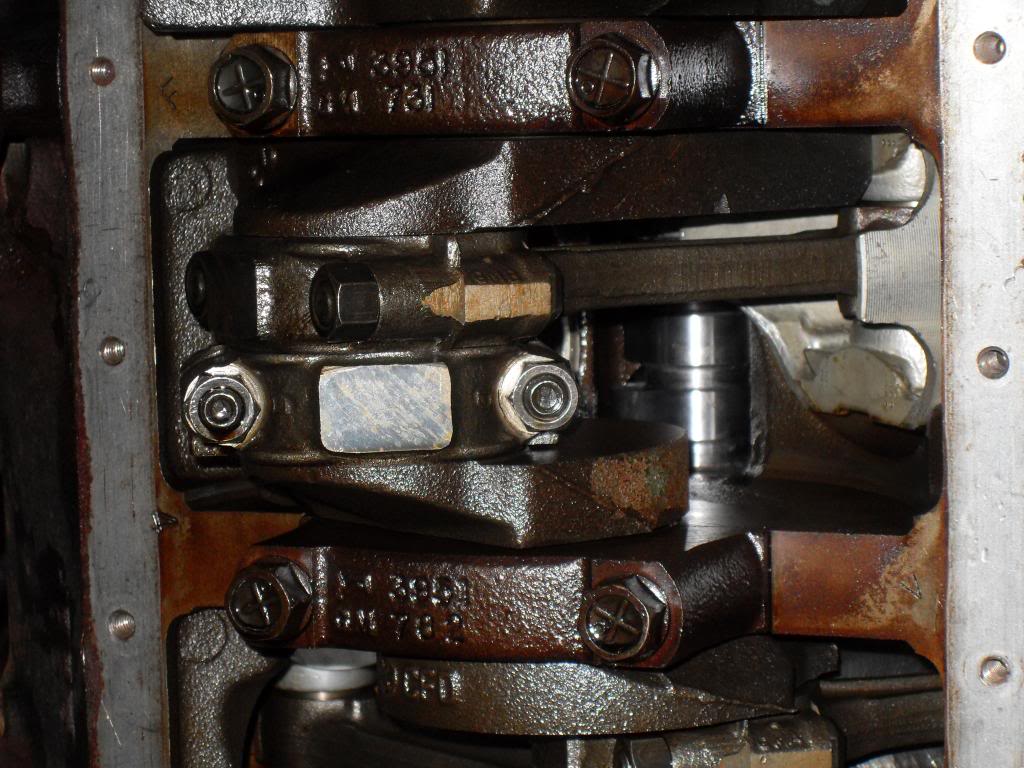
Comp Cams Double Roller Timing Chain

Melling High Volume oil pump and solid shaft
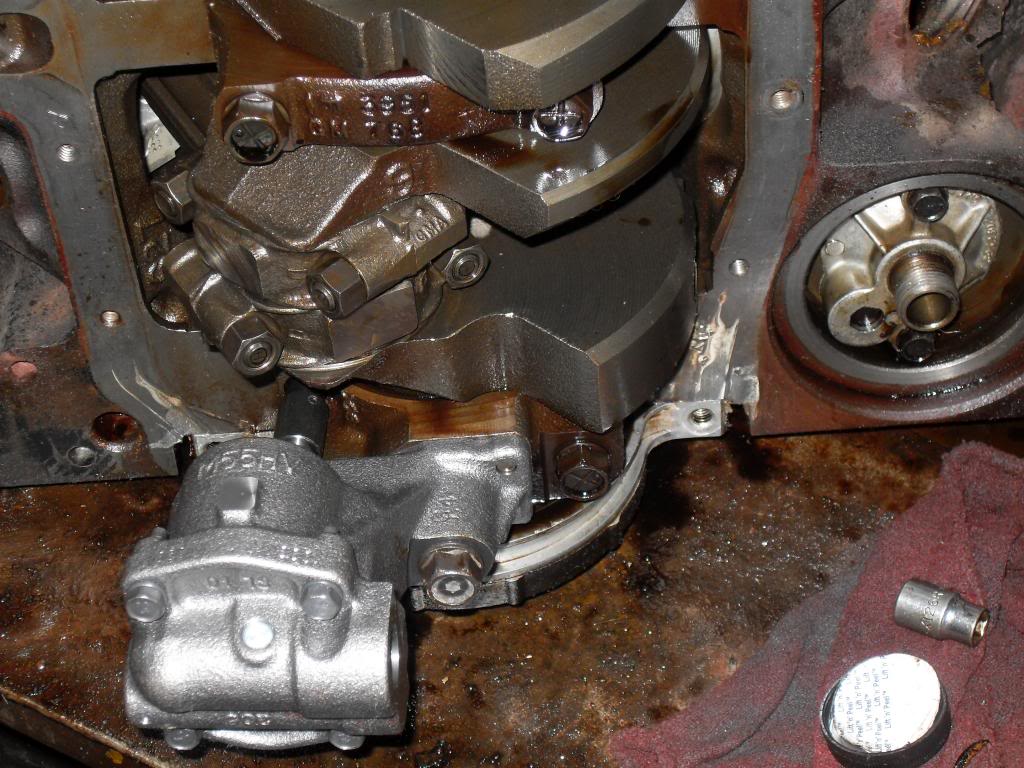
Lifters reinstalled
Reusing the stock oil pan and added a deeper timing chain cover to clear the double roller. More pics soon.
Heads with the Comp Cams valve springs & Fel-Pro posi valve seals.
Shot of the block...no cracks or "extra metal" present
ZZ4 cam installed
Comp Cams Double Roller Timing Chain
Melling High Volume oil pump and solid shaft
Lifters reinstalled
Reusing the stock oil pan and added a deeper timing chain cover to clear the double roller. More pics soon.
10-30-2012, 01:08 PM
#146
Junior Member
Join Date: Dec 2007
Location: Spirit Lake, Idaho
Posts: 42
Likes: 0
Received 0 Likes
on
0 Posts
Car: 91 RS and 89 RS, 99 Tacoma TRD
Engine: 91-L03, 89-350 TBI
Transmission: 91-700r4, 89-T5
Re: 1989 Camaro - "The Project" Begins...
I enjoyed doing my first rebuild. Makes me itch to do another one. I hope someday I have the patience to do a complete teardown on my car as well, maybe my wife's car too! Thanks for the updates!
11-02-2012, 03:52 AM
#147
Supreme Member
Thread Starter
iTrader: (6)
Join Date: Oct 2006
Location: West of Toronto
Posts: 3,041
Likes: 0
Received 7 Likes
on
7 Posts
Car: 89 IROC
Engine: 305 TPI / ZZ4 cam
Transmission: Stage 2 700R4, LS1 driveshaft
Axle/Gears: Strange 3.42 w/ Auburn
Re: 1989 Camaro - "The Project" Begins...
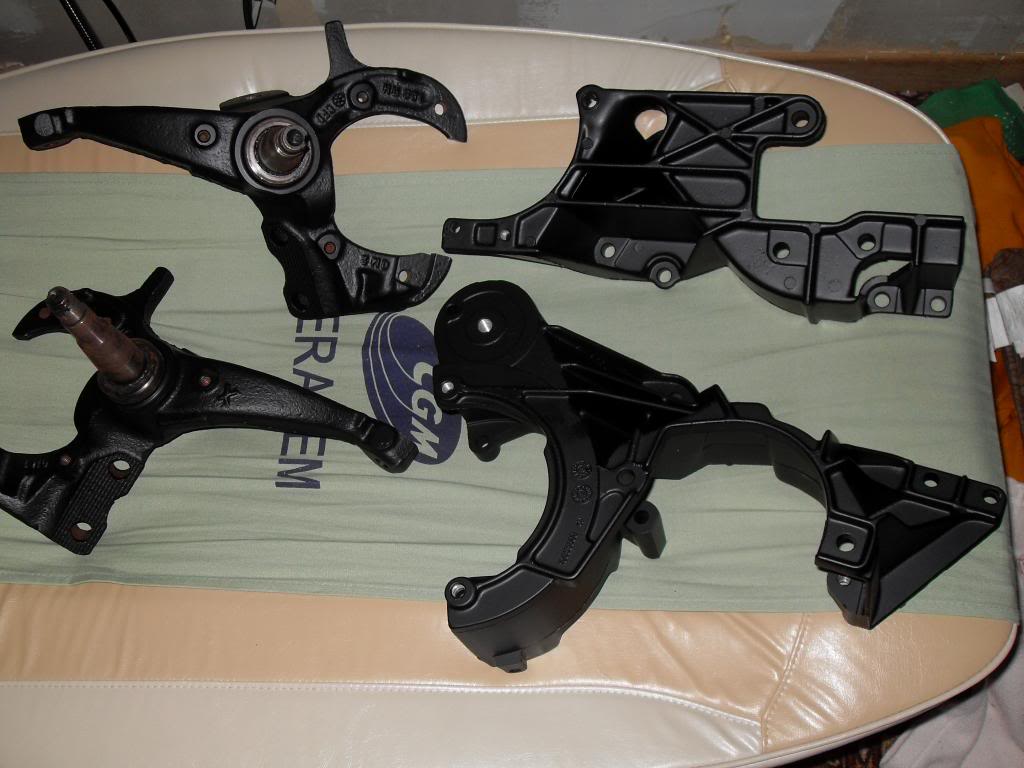
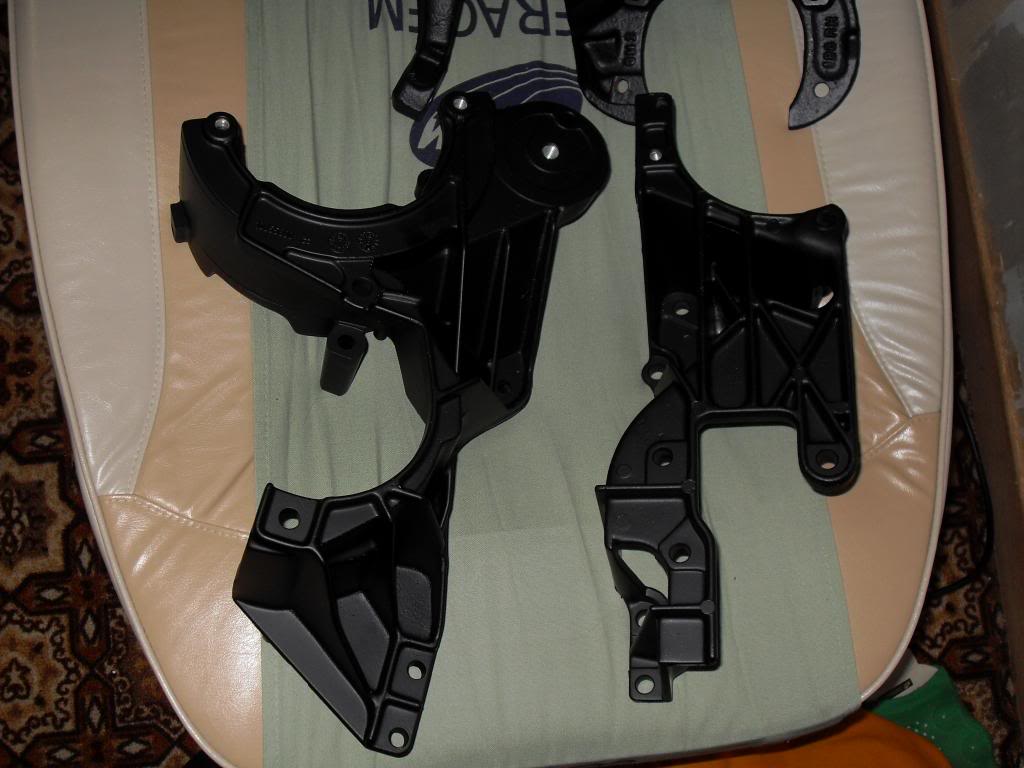
Had the spindles and engine accessory brackets powdercoated in a flat black. Came out pretty good.
Here are a few pics.

Here are a few pics.
 11-07-2012, 10:19 PM
#149
Senior Member

Join Date: Jul 2000
Location: Tampa,FL
Posts: 553
Likes: 0
Received 0 Likes
on
0 Posts
Car: 89 Irocz
Engine: L98
Transmission: 700r4
Axle/Gears: 342
Re: 1989 Camaro - "The Project" Begins...
Picked up a set of TPIS large tube runners, had them stripped and powdercoated in Black Chrome.
Here are some before and after shots and the runners with the painted valve covers. Looks pretty good so far.
Still not sure what to do with the plenum.
Before

After

With valve covers

Here are some before and after shots and the runners with the painted valve covers. Looks pretty good so far.
Still not sure what to do with the plenum.
Before
After
With valve covers
 man that would look great with a polished plenum, I think it would make it pop! Or just murder it out with that black chrome. Still would be sharpe either way. Now your new problem, are you going with a aftermarket tb or stock one? then another choice powder coat or polished.
11-24-2012, 07:03 AM
man that would look great with a polished plenum, I think it would make it pop! Or just murder it out with that black chrome. Still would be sharpe either way. Now your new problem, are you going with a aftermarket tb or stock one? then another choice powder coat or polished.
11-24-2012, 07:03 AM
#150
Supreme Member
Thread Starter
iTrader: (6)
Join Date: Oct 2006
Location: West of Toronto
Posts: 3,041
Likes: 0
Received 7 Likes
on
7 Posts
Car: 89 IROC
Engine: 305 TPI / ZZ4 cam
Transmission: Stage 2 700R4, LS1 driveshaft
Axle/Gears: Strange 3.42 w/ Auburn
Re: 1989 Camaro - "The Project" Begins...
Thank you.
Will either polish the plenum or paint it silver. Keeping the stock TB for now but will paint it flat black in the spring. The plenum is ported out to fit a 58mm so I don't need to worry if I decide to upgrade the tb later on.
Man that looks sharpe, man that would look great with a polished plenum, I think it would make it pop! Or just murder it out with that black chrome. Still would be sharpe either way. Now your new problem, are you going with a aftermarket tb or stock one? then another choice powder coat or polished.
man that would look great with a polished plenum, I think it would make it pop! Or just murder it out with that black chrome. Still would be sharpe either way. Now your new problem, are you going with a aftermarket tb or stock one? then another choice powder coat or polished.