
Repainted engine bay - on the cheap!


Thread Starter
Member
iTrader: (10)
Joined: Jul 2008
Posts: 426
Likes: 2
From: Binghamton, NY
Car: 1986 IROC-Z
Engine: 360cu @ 10.5:1
Transmission: T56 - Pro 5.0
Axle/Gears: 4.10 - Zexel Torsen - Moser Axles
Repainted engine bay - on the cheap!
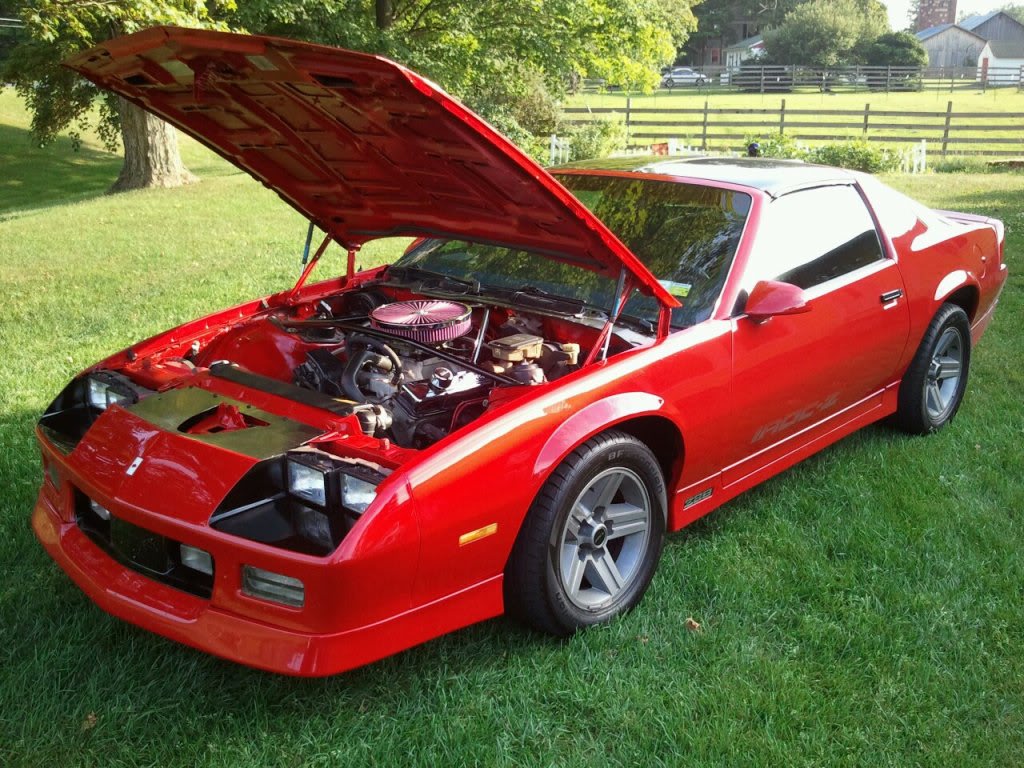
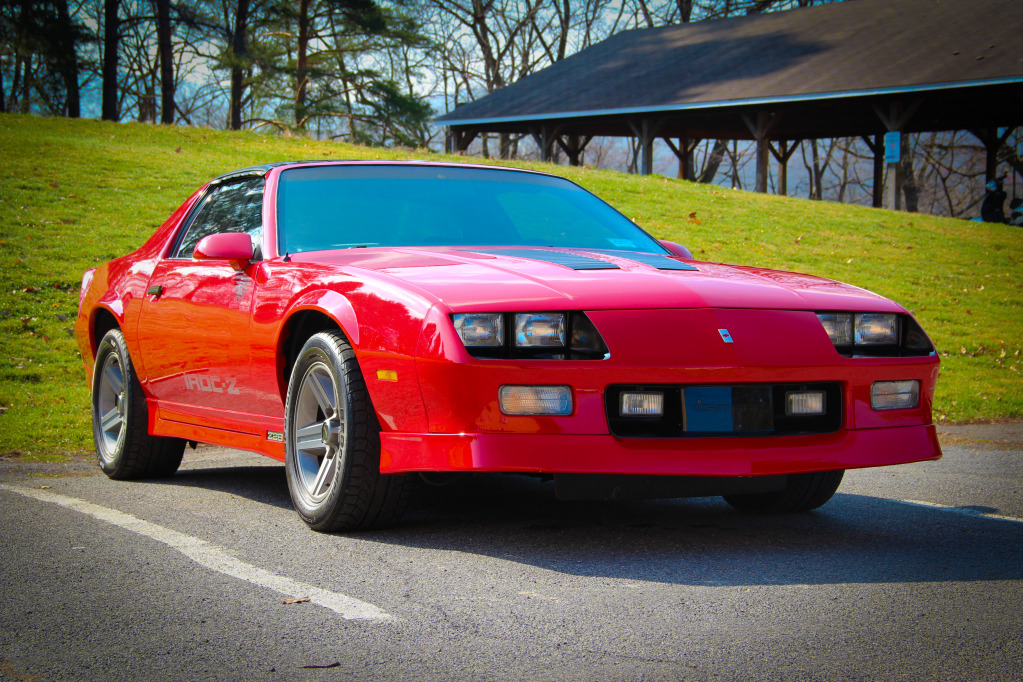
I have owned my 86 IROC since summer of 2008. Since then, the car has seen countless washes, waxes, details, and even a fresh basecoat/clearcoat (bc/cc) of GM Victory Red paint code 74u. The car really does look great!
 EXCEPT FOR UNDER THE HOOD!
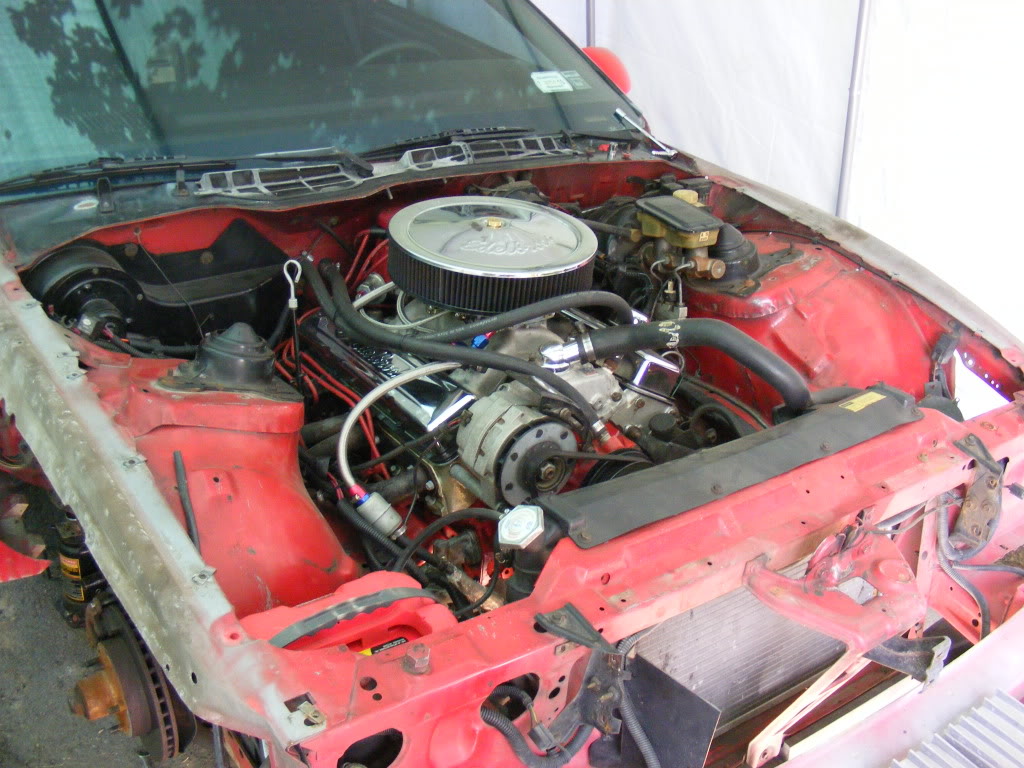
Terrifying, I know... There is nothing worse than having a great paintjob, only to be asked "What's under the hood?" and staring back at you is a hideous, greasy, scratched, crusty engine bay. It made me cringe every time.
I had enough of that.
So last weekend I decided that it was time to attack the engine bay. I had always wanted to pull the engine, brake lines, wires, etc from the car like so many others and do a really, really nice paint job in there, but I just could not do that and will not be able to do that any time soon (I'm getting married in 3 weeks, and after that I won't have lots of time to work on the car anymore =/). So, I decided to improvise and take bits and pieces of what I have learned via the interwebs to tackle painting the engine bay without removing the engine, wires, brakes lines - anything really.
_______________________________
Areas to be painted:
- All red areas under the hood
- Underside of hood itself
- Wiper arms
- Top of firewall (where wipers are)
Materials used:
- Duplicolor Victory Red (BGM0519) - 6 Cans
- Duplicolor Clear Top Coat (BCL0125) - 6 Cans
- Duplicolor University Flat Black (BUN0104) - 1 Can
- Metal primer - 1 can
- 120 grit and 400 grit sandpaper, dry
- Large 10x20 plastic sheet to cover car (trim to fit)
- Painters Tape, 2 inches wide
- Engine degreased and a rag
- Newspapers
- Plastic Bags
- Old bed sheet
___________________________________
Total estimate (including using Advance Auto online coupons and random items around the house):
$65.00
The Process:
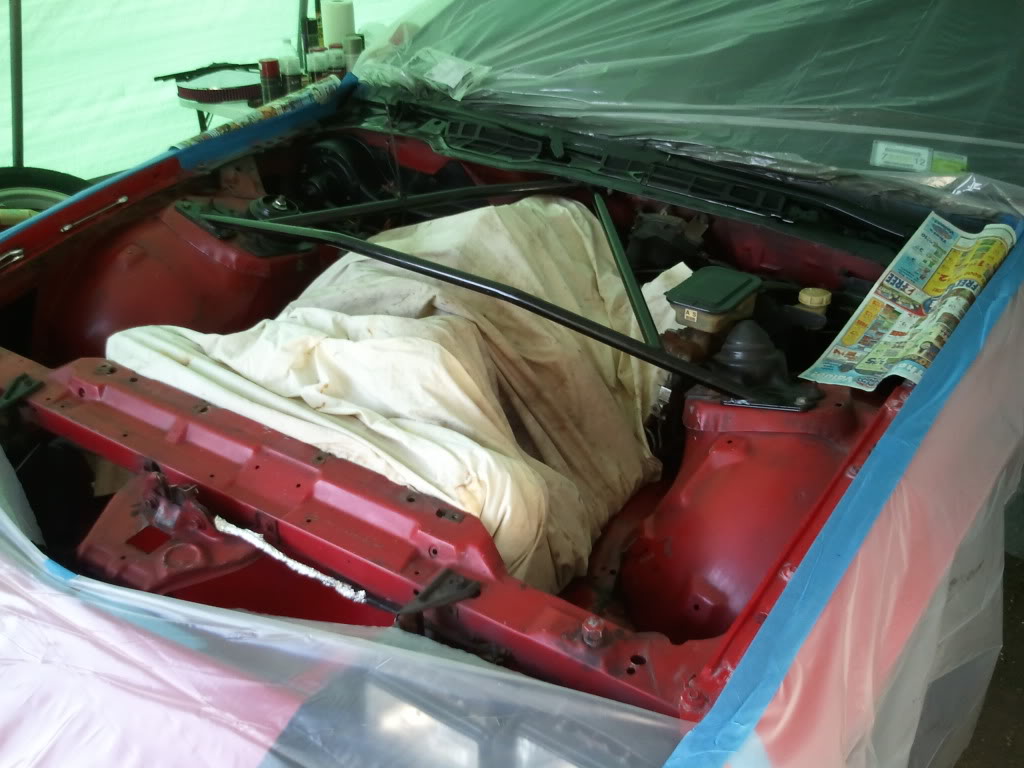
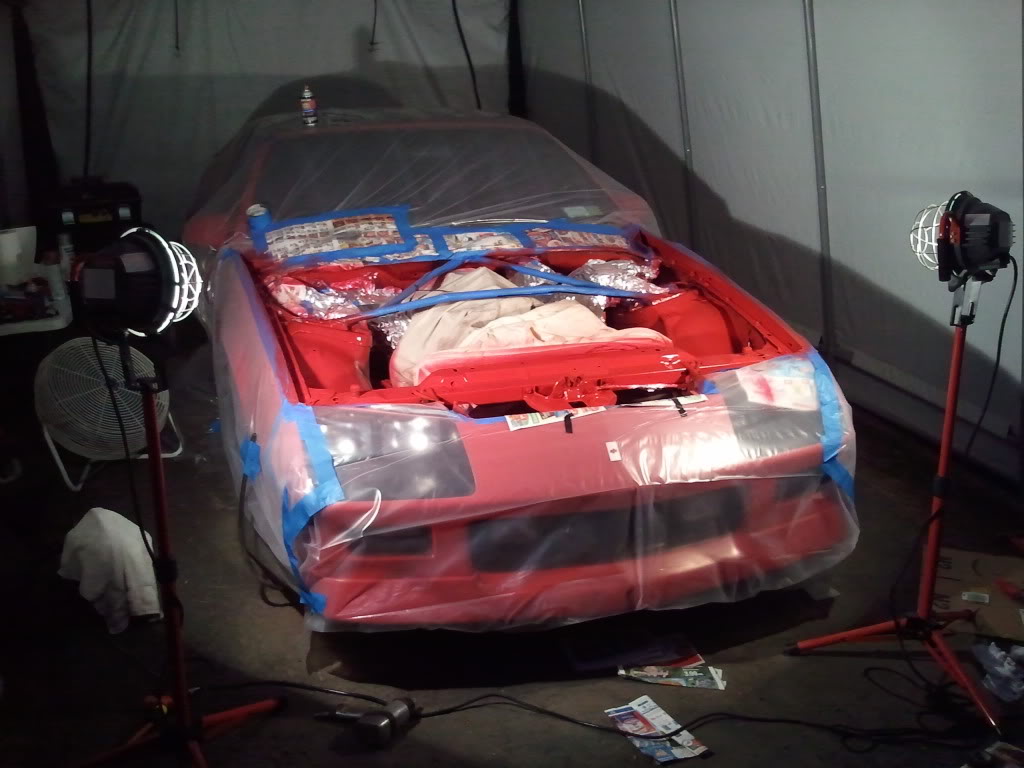
What I found to be of utmost importance was the protection from overspray ANYWHERE on the car that I did not want paint. So, this meant that I needed to first tape off the entire car so that zero overspray would get on any other area of the car.
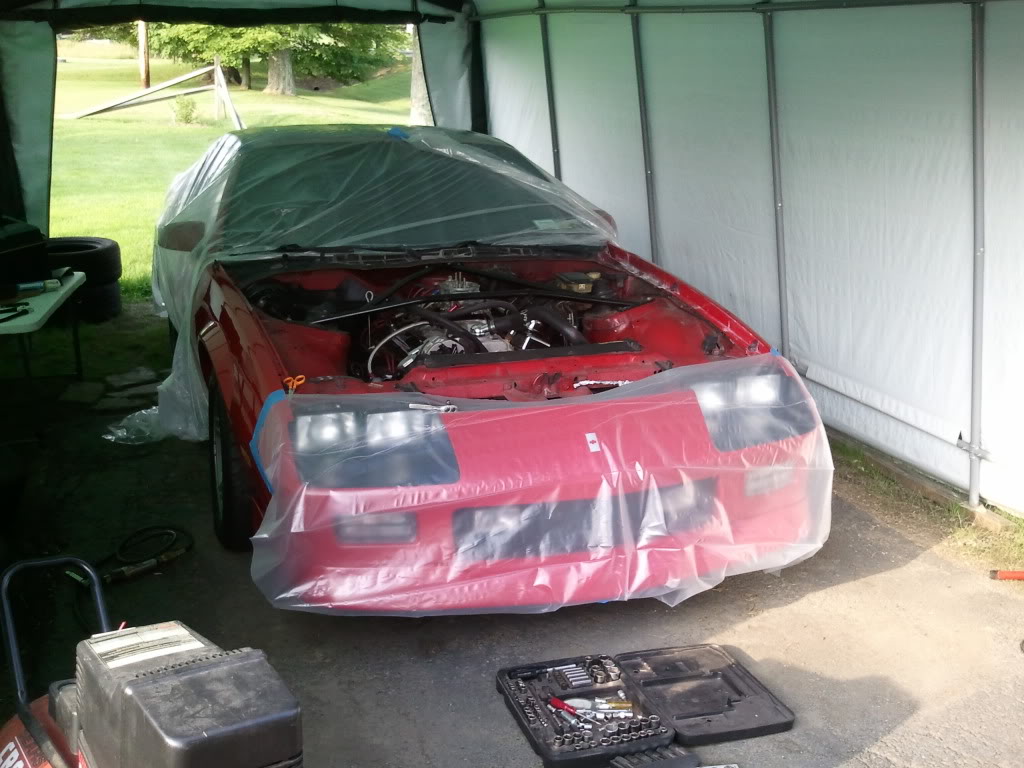
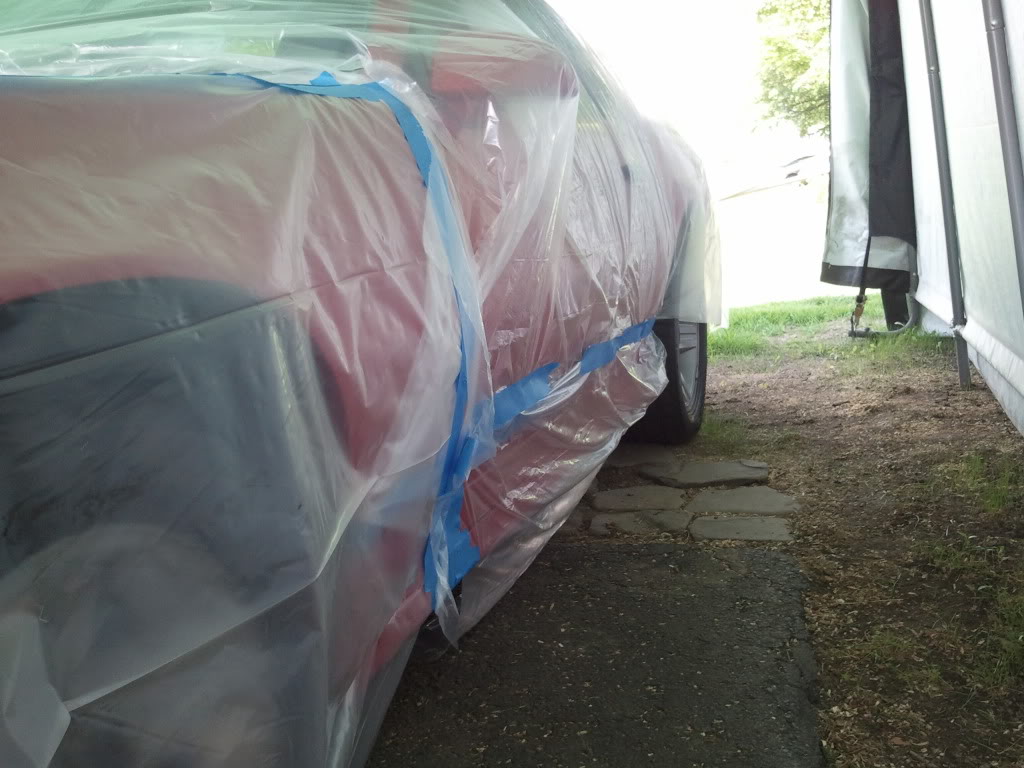
At this point, go ahead and use your rag and engine degreaser and SCRUB every area under the hood you can to get it free of grease and grime. Don't forget to go back over all those areas with water-wetted rag to clean off the degreaser.
Next, I decided to first paint the wiper area. This meant making sure the engine bay was properly covered and the windshield as well. I cannot stress enough the importance of taking your time and ensuring that everything is taped off properly - unless you want a botched paintjob look. After taping everything off, I went ahead and sprayed the entire can of flat black on the wiper area. I then also used most of a can of clear coat to top it off:
Next, I removed the cover for the engine bay and went to work at tucking any of the wires I could. This meant removing some of the wire mounts, a few snaps here, a few bolts there, and just generally getting things tucked out of the way. If you decide to tackle this project, you'll see what I mean pretty quickly. It's difficult to go into much detail here, but generally, if you can tuck the wires either in towards the engine and cover them with a sheet, or tuck them out towards the fenders, you'll get the desired paint clearance. Just unplug a few things along the way.
EXCEPT FOR UNDER THE HOOD! Terrifying, I know... There is nothing worse than having a great paintjob, only to be asked "What's under the hood?" and staring back at you is a hideous, greasy, scratched, crusty engine bay. It made me cringe every time.
I had enough of that.
So last weekend I decided that it was time to attack the engine bay. I had always wanted to pull the engine, brake lines, wires, etc from the car like so many others and do a really, really nice paint job in there, but I just could not do that and will not be able to do that any time soon (I'm getting married in 3 weeks, and after that I won't have lots of time to work on the car anymore =/). So, I decided to improvise and take bits and pieces of what I have learned via the interwebs to tackle painting the engine bay without removing the engine, wires, brakes lines - anything really.
_______________________________
Areas to be painted:
- All red areas under the hood
- Underside of hood itself
- Wiper arms
- Top of firewall (where wipers are)
Materials used:
- Duplicolor Victory Red (BGM0519) - 6 Cans
- Duplicolor Clear Top Coat (BCL0125) - 6 Cans
- Duplicolor University Flat Black (BUN0104) - 1 Can
- Metal primer - 1 can
- 120 grit and 400 grit sandpaper, dry
- Large 10x20 plastic sheet to cover car (trim to fit)
- Painters Tape, 2 inches wide
- Engine degreased and a rag
- Newspapers
- Plastic Bags
- Old bed sheet
___________________________________
Total estimate (including using Advance Auto online coupons and random items around the house):
$65.00
The Process:
What I found to be of utmost importance was the protection from overspray ANYWHERE on the car that I did not want paint. So, this meant that I needed to first tape off the entire car so that zero overspray would get on any other area of the car.
At this point, go ahead and use your rag and engine degreaser and SCRUB every area under the hood you can to get it free of grease and grime. Don't forget to go back over all those areas with water-wetted rag to clean off the degreaser.
Next, I decided to first paint the wiper area. This meant making sure the engine bay was properly covered and the windshield as well. I cannot stress enough the importance of taking your time and ensuring that everything is taped off properly - unless you want a botched paintjob look. After taping everything off, I went ahead and sprayed the entire can of flat black on the wiper area. I then also used most of a can of clear coat to top it off:
Next, I removed the cover for the engine bay and went to work at tucking any of the wires I could. This meant removing some of the wire mounts, a few snaps here, a few bolts there, and just generally getting things tucked out of the way. If you decide to tackle this project, you'll see what I mean pretty quickly. It's difficult to go into much detail here, but generally, if you can tuck the wires either in towards the engine and cover them with a sheet, or tuck them out towards the fenders, you'll get the desired paint clearance. Just unplug a few things along the way.
Last edited by plasmeh; Jul 6, 2011 at 12:54 PM.
Thread Starter
Member
iTrader: (10)
Joined: Jul 2008
Posts: 426
Likes: 2
From: Binghamton, NY
Car: 1986 IROC-Z
Engine: 360cu @ 10.5:1
Transmission: T56 - Pro 5.0
Axle/Gears: 4.10 - Zexel Torsen - Moser Axles
Re: Engine Bay Paint - on the cheap!
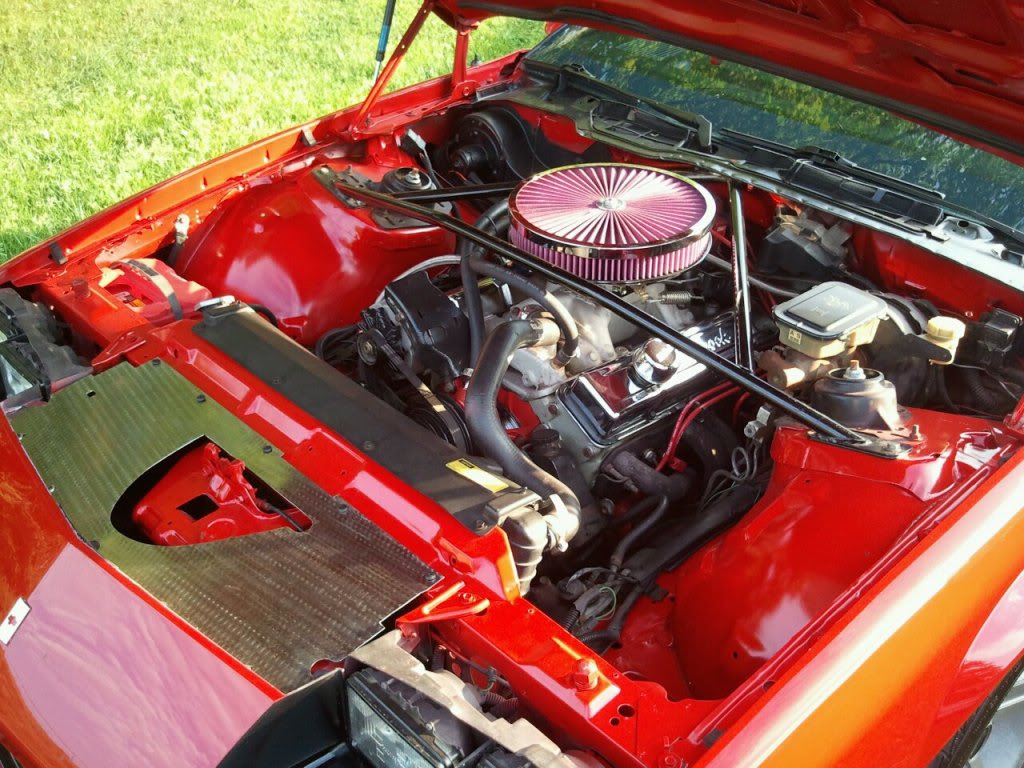
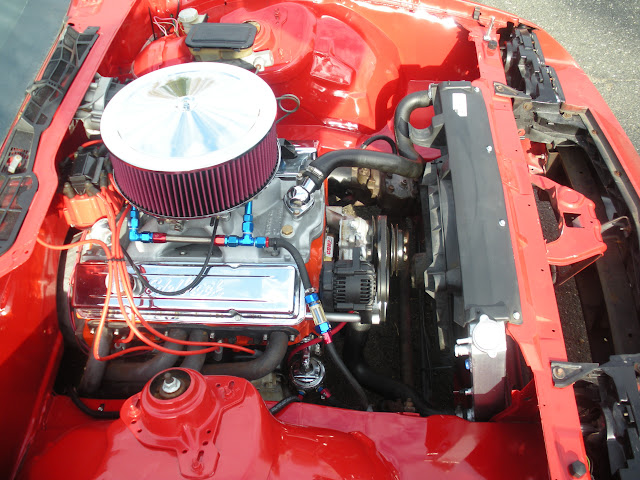
Also, as mentioned in a few threads on thirdgen, tin foil is a GREAT little trick to use when painting under the hood. It easily conforms to the strangley shaped objects under the hood and makes a quick, effective job of things (just be sure to tape any tin foil seams that may let paint pass underneath them).
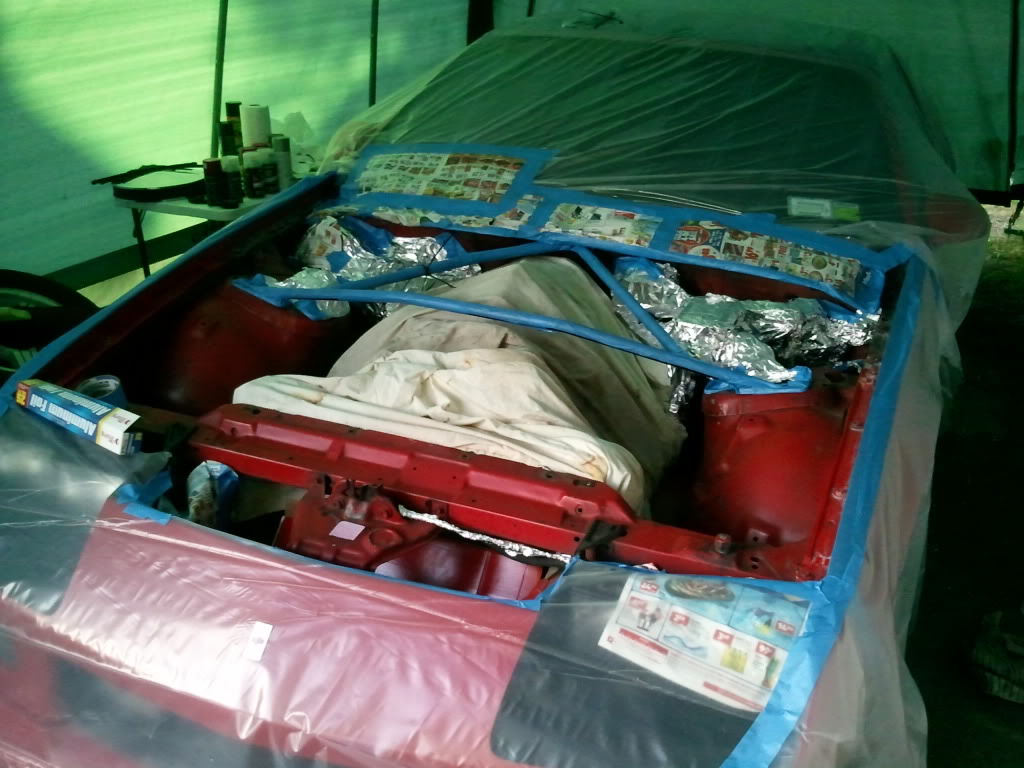
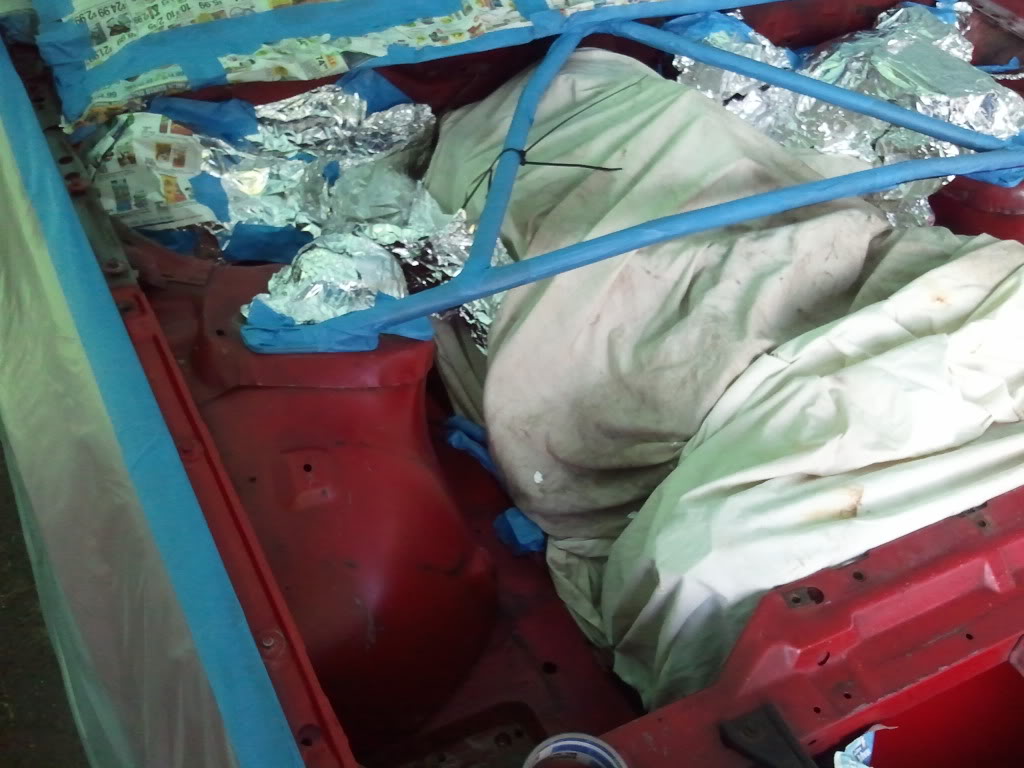
After you have done your best to ensure that everything you can possibly tape off/cover is done, go ahead and grab your favorite metal primer, sand down questionable spots (see: battery tray), and blast them. After the primer dries, grab some paint, and go to town:


After you have exhausted 3-4 cans of paint, go ahead and throw 3 cans of clear on top shortly after the paint. When the clear settles out of the air, you should have a nice shiny engine bay staring back at you!
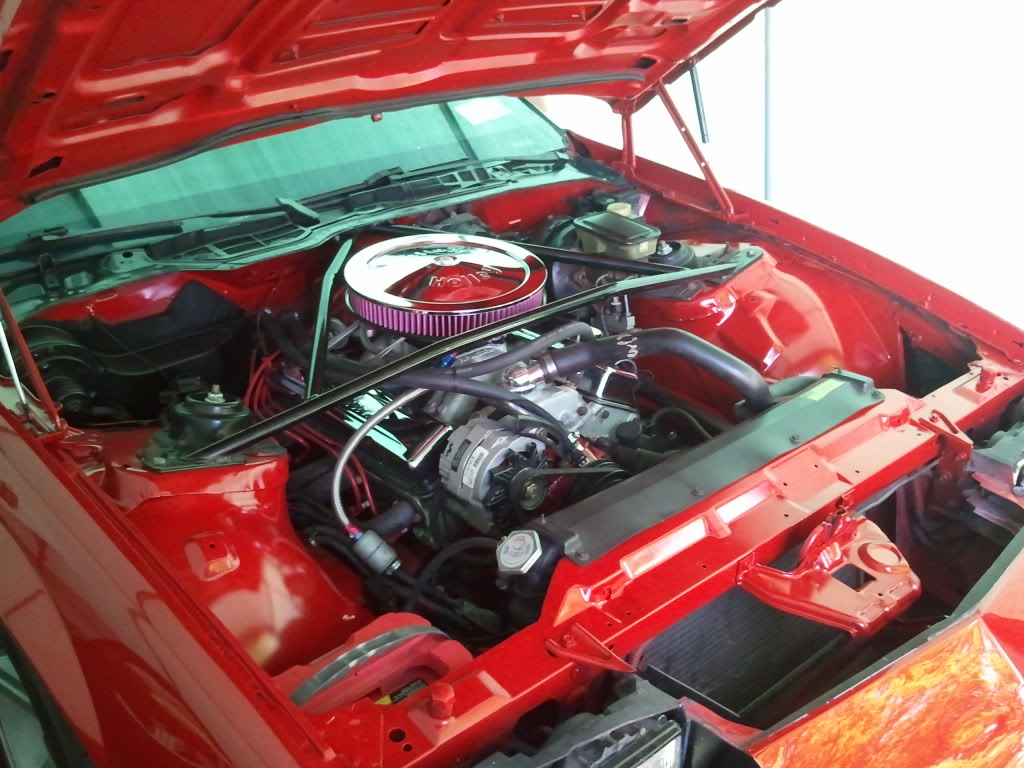
The perfectionists will see that if you look closely enough, you will notice small areas that were missed here and there, but overall I think it went on very well. I may even decide to shine it up some more with fine wetstanding and some buffing - only time will tell!
Hope this helps/motivates someone.
After you have done your best to ensure that everything you can possibly tape off/cover is done, go ahead and grab your favorite metal primer, sand down questionable spots (see: battery tray), and blast them. After the primer dries, grab some paint, and go to town:
After you have exhausted 3-4 cans of paint, go ahead and throw 3 cans of clear on top shortly after the paint. When the clear settles out of the air, you should have a nice shiny engine bay staring back at you!
The perfectionists will see that if you look closely enough, you will notice small areas that were missed here and there, but overall I think it went on very well. I may even decide to shine it up some more with fine wetstanding and some buffing - only time will tell!
Hope this helps/motivates someone.
Last edited by plasmeh; Jul 5, 2011 at 09:59 AM.
Thread Starter
Member
iTrader: (10)
Joined: Jul 2008
Posts: 426
Likes: 2
From: Binghamton, NY
Car: 1986 IROC-Z
Engine: 360cu @ 10.5:1
Transmission: T56 - Pro 5.0
Axle/Gears: 4.10 - Zexel Torsen - Moser Axles
Re: Engine Bay Paint - on the cheap!
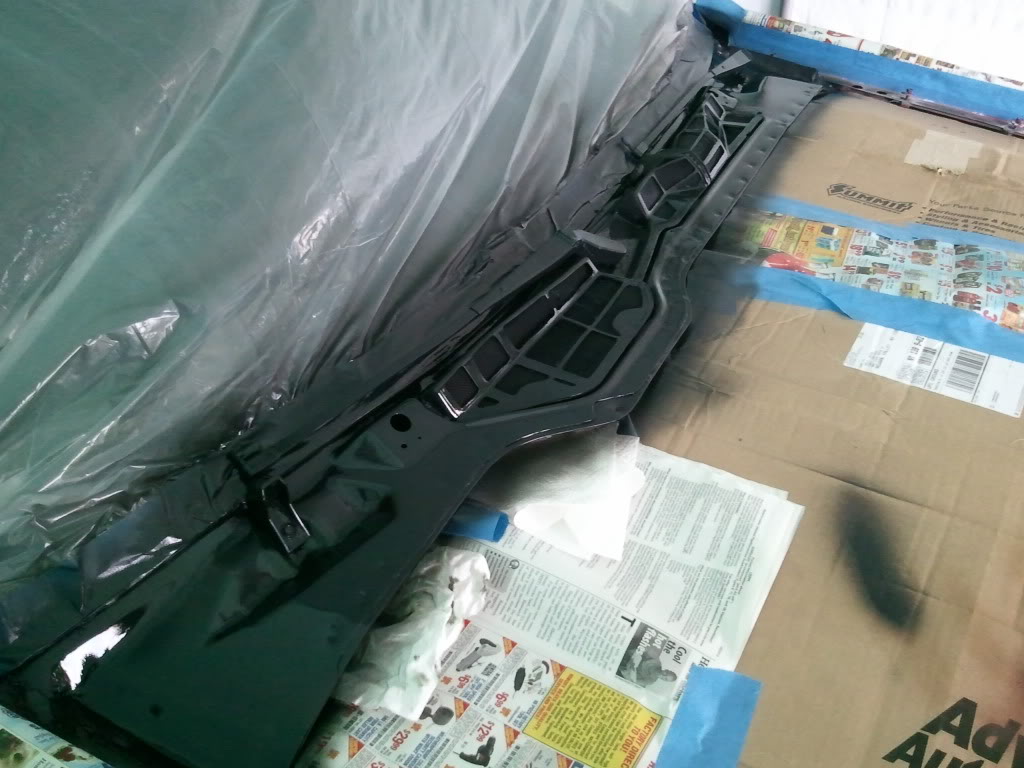
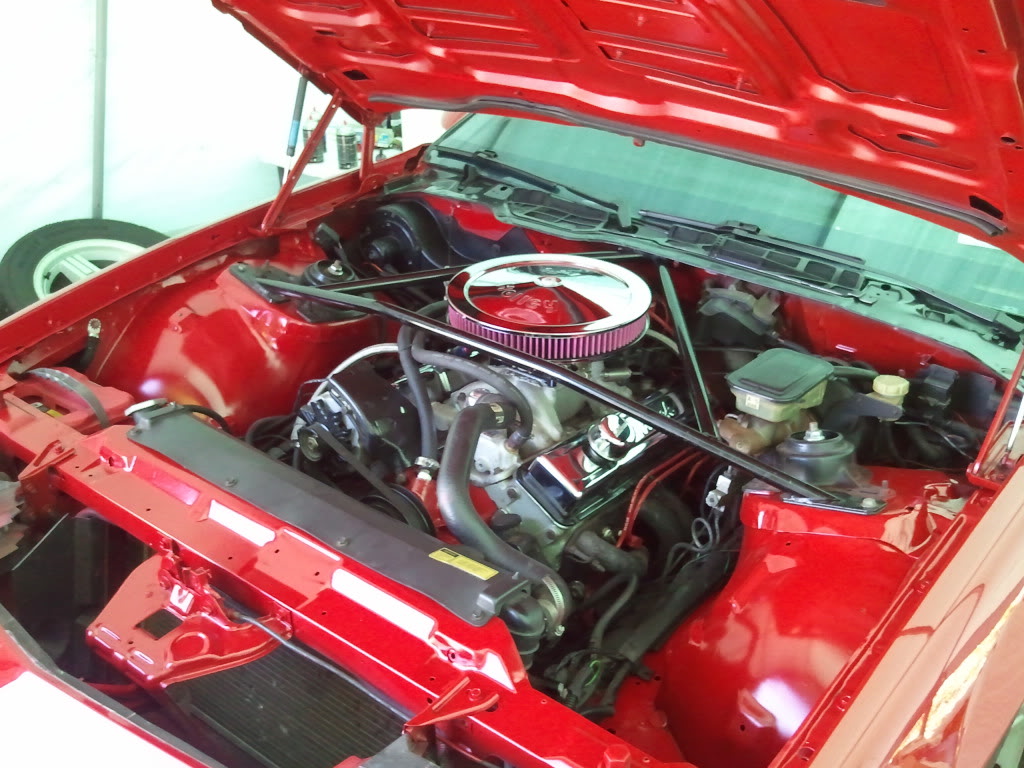
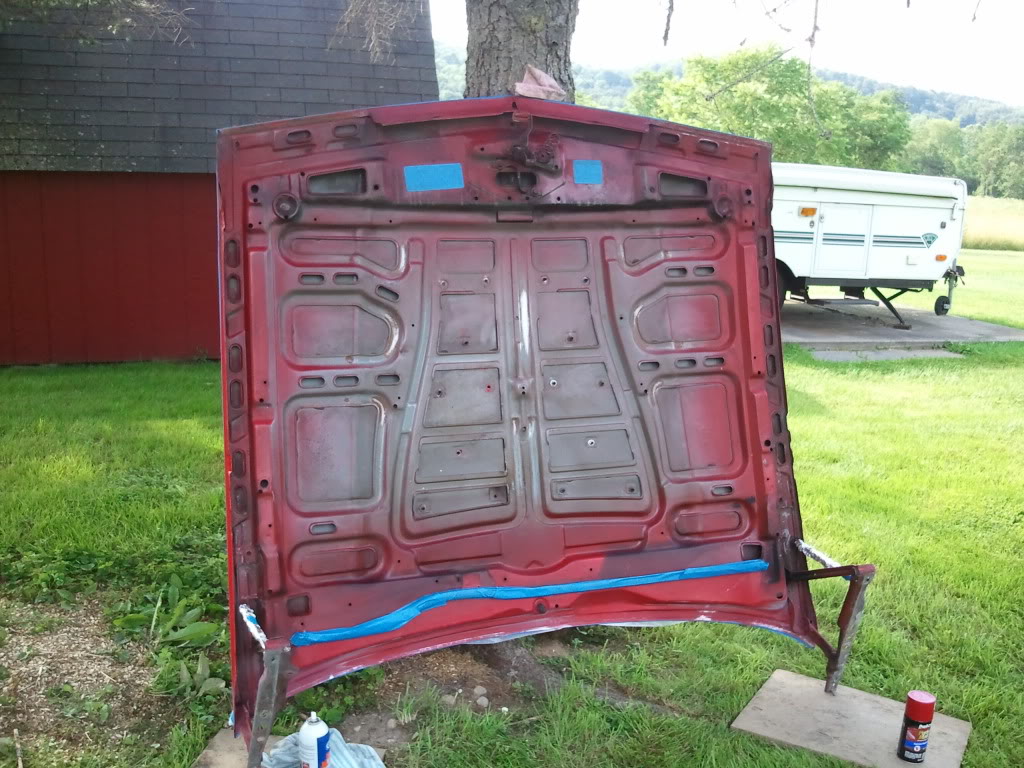
And before I forget, this is the hood before:
And after:
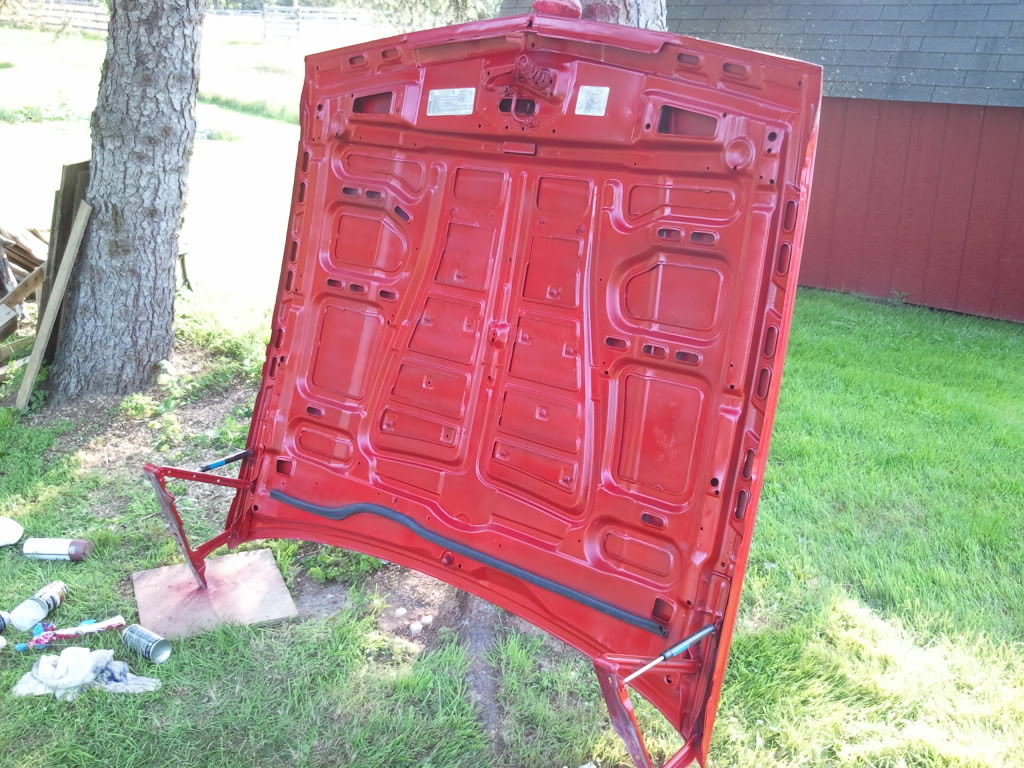
Same idea: Take your time, tape off everything (including the other side of the hood), and do a thorough job. The hood alone I used 3 cans of paint, and 3 cans of clear. Even if it doesn't look perfect, it is MUCH better than it was. I cleaned up all the somewhat rusty spots and slammed it with primer to boot.
And after:
Same idea: Take your time, tape off everything (including the other side of the hood), and do a thorough job. The hood alone I used 3 cans of paint, and 3 cans of clear. Even if it doesn't look perfect, it is MUCH better than it was. I cleaned up all the somewhat rusty spots and slammed it with primer to boot.
Last edited by plasmeh; Jul 5, 2011 at 10:07 AM.

Thread Starter
Member
iTrader: (10)
Joined: Jul 2008
Posts: 426
Likes: 2
From: Binghamton, NY
Car: 1986 IROC-Z
Engine: 360cu @ 10.5:1
Transmission: T56 - Pro 5.0
Axle/Gears: 4.10 - Zexel Torsen - Moser Axles
Re: Engine Bay Paint - on the cheap!
Thanks \o/ The effort is really, really worth it.


Joined: Apr 2006
Posts: 1,025
Likes: 7
From: Santa Ana, CA
Car: 90 IROC-Z
Engine: Lsa
Transmission: M6
Axle/Gears: 9" spooled 3.70
Re: Engine Bay Paint - on the cheap!
Very nice! Did you use the little expensive duplicolor cans? I did mine with them, you can check it out in the link in my sig.


Trending Topics
Thread Starter
Member
iTrader: (10)
Joined: Jul 2008
Posts: 426
Likes: 2
From: Binghamton, NY
Car: 1986 IROC-Z
Engine: 360cu @ 10.5:1
Transmission: T56 - Pro 5.0
Axle/Gears: 4.10 - Zexel Torsen - Moser Axles
Re: Engine Bay Paint - on the cheap!
Thread Starter
Member
iTrader: (10)
Joined: Jul 2008
Posts: 426
Likes: 2
From: Binghamton, NY
Car: 1986 IROC-Z
Engine: 360cu @ 10.5:1
Transmission: T56 - Pro 5.0
Axle/Gears: 4.10 - Zexel Torsen - Moser Axles
Re: Repainted engine bay - on the cheap!
Now I just have to start snipping the extra wires and re-routing them... hmm...
Supreme Member
iTrader: (35)
Joined: Aug 2006
Posts: 1,470
Likes: 1
From: Mississauga,Ont,Canada
Car: 89 IROC
Engine: LSX 6.0 370, TU2 Cam, Fast intake
Transmission: T56 w/ lots of goodies
Axle/Gears: 8.8, Posi, 4.10, 31 Spline
Re: Repainted engine bay - on the cheap!
Wow that looks amazing. I think I will do the same this weekend as it looks that good. What strut tower brace are you running?
Thread Starter
Member
iTrader: (10)
Joined: Jul 2008
Posts: 426
Likes: 2
From: Binghamton, NY
Car: 1986 IROC-Z
Engine: 360cu @ 10.5:1
Transmission: T56 - Pro 5.0
Axle/Gears: 4.10 - Zexel Torsen - Moser Axles
Re: Repainted engine bay - on the cheap!
You know, there aren't any markings on it, and it was on the car when I got it. Edelbrock rings a bell, but I haven't been able to locate what exact model it is anywhere. I'll post back here if I find out - you've peaked my interest again, haha.
Supreme Member
iTrader: (35)
Joined: Aug 2006
Posts: 1,470
Likes: 1
From: Mississauga,Ont,Canada
Car: 89 IROC
Engine: LSX 6.0 370, TU2 Cam, Fast intake
Transmission: T56 w/ lots of goodies
Axle/Gears: 8.8, Posi, 4.10, 31 Spline
Re: Repainted engine bay - on the cheap!
I have an edelbrock one the the mounts on the top of the towers are completely different as yours is a nice clean flat piece. edelbrock has these U shaped pieces that go ontopand the brace slides into it

Thread Starter
Member
iTrader: (10)
Joined: Jul 2008
Posts: 426
Likes: 2
From: Binghamton, NY
Car: 1986 IROC-Z
Engine: 360cu @ 10.5:1
Transmission: T56 - Pro 5.0
Axle/Gears: 4.10 - Zexel Torsen - Moser Axles
Re: Repainted engine bay - on the cheap!
Thanks for the information conlinj, much appreciated. That's a question that's been lurking since I've owned the car. It's a well-made STB.

Thread Starter
Member
iTrader: (10)
Joined: Jul 2008
Posts: 426
Likes: 2
From: Binghamton, NY
Car: 1986 IROC-Z
Engine: 360cu @ 10.5:1
Transmission: T56 - Pro 5.0
Axle/Gears: 4.10 - Zexel Torsen - Moser Axles

Supreme Member
iTrader: (3)
Joined: Jul 2011
Posts: 1,826
Likes: 0
From: Katy TEXAS (West Houston)
Car: 1992 Camaro RS
Engine: 5.0 TBI L03 V8
Transmission: Rebuilt 700R4 W/ Corvette shift kit
Axle/Gears: 2:73 open
Re: Repainted engine bay - on the cheap!
That is a beautifull job. That looks pro. I have only used engine degreaser on mine, but it makes all the difference on a car that is this old. Here are some before and after pics. I only did a quick spray and rince, but it's pretty Obvious which one is the the before and which ones are the afters haha.
Thread Starter
Member
iTrader: (10)
Joined: Jul 2008
Posts: 426
Likes: 2
From: Binghamton, NY
Car: 1986 IROC-Z
Engine: 360cu @ 10.5:1
Transmission: T56 - Pro 5.0
Axle/Gears: 4.10 - Zexel Torsen - Moser Axles
Re: Repainted engine bay - on the cheap!
Thanks guys. Painting the bay really is not a hard job just as long as you take your time and do things right. People that rush through it in just an hour or two of work come out with a paintjob that LOOKS like it was done in an hour or two. You just can't do that.


Senior Member
Joined: Sep 2003
Posts: 738
Likes: 1
From: Hurlburt Field
Car: 84 Z28, '15 Colorado
Engine: L69
Transmission: A4
Axle/Gears: 3.73
Re: Repainted engine bay - on the cheap!
My wife could usually care less when I show her stuff on here, but she was sitting with me on the couch so I showed her anyways.
Me: So here is his car. He's done a great job keeping it clean.
Wife: Oh wow! I like it.
Me: Now here's his engine bay.
Wife: Eww, gross.
Me: Now pictures of him painting it..... And painted.
Wife: PRETTY!!!
So yeah, now I have to do this. Thanks a lot :-)
Me: So here is his car. He's done a great job keeping it clean.
Wife: Oh wow! I like it.
Me: Now here's his engine bay.
Wife: Eww, gross.
Me: Now pictures of him painting it..... And painted.
Wife: PRETTY!!!
So yeah, now I have to do this. Thanks a lot :-)
Thread Starter
Member
iTrader: (10)
Joined: Jul 2008
Posts: 426
Likes: 2
From: Binghamton, NY
Car: 1986 IROC-Z
Engine: 360cu @ 10.5:1
Transmission: T56 - Pro 5.0
Axle/Gears: 4.10 - Zexel Torsen - Moser Axles
Re: Repainted engine bay - on the cheap!
Bahaha, I'll accept that compliment! And I understand completely about the wife not giving a hoot about stuff I show her when it comes to cars, lol. I think it's a commonality to most wives. Although mine actually enjoys going to car shows with me... hmm..
Moderator

Joined: Jun 2000
Posts: 8,464
Likes: 219
From: Florida
Car: 87 IROC-Z, 82 Pace Car
Re: Repainted engine bay - on the cheap!
Just an FYI that the color you mentioned in your first post as 74U is not the color of your car. My car is 74U and yours is probably 81U or similar.

Thread Starter
Member
iTrader: (10)
Joined: Jul 2008
Posts: 426
Likes: 2
From: Binghamton, NY
Car: 1986 IROC-Z
Engine: 360cu @ 10.5:1
Transmission: T56 - Pro 5.0
Axle/Gears: 4.10 - Zexel Torsen - Moser Axles
Re: Repainted engine bay - on the cheap!
I purchased the 74U paint myself. Definitely is 74U. Was also a perfect match to the 74U paint that I bought to paint the underhood as you can see.
Moderator
Joined: Jun 2000
Posts: 8,464
Likes: 219
From: Florida
Car: 87 IROC-Z, 82 Pace Car
Re: Repainted engine bay - on the cheap!
Well, it might be 74U from another year, but not for an 86 Camaro. It appears that 74U was reused as a Victory Red for newer vehicles, but it is not the same for 86. If you need to replace paint at some point, be careful that they give you the same that you have now. If you tell them that it's 74U for an 86 Camaro, you will get the same color as my car.
Thread Starter
Member
iTrader: (10)
Joined: Jul 2008
Posts: 426
Likes: 2
From: Binghamton, NY
Car: 1986 IROC-Z
Engine: 360cu @ 10.5:1
Transmission: T56 - Pro 5.0
Axle/Gears: 4.10 - Zexel Torsen - Moser Axles
Re: Repainted engine bay - on the cheap!
Ah, thanks for the clarification. I'm told the 74U Victory Red I have matches that of the most recent GM models.
Thread Starter
Member
iTrader: (10)
Joined: Jul 2008
Posts: 426
Likes: 2
From: Binghamton, NY
Car: 1986 IROC-Z
Engine: 360cu @ 10.5:1
Transmission: T56 - Pro 5.0
Axle/Gears: 4.10 - Zexel Torsen - Moser Axles
Re: Repainted engine bay - on the cheap!
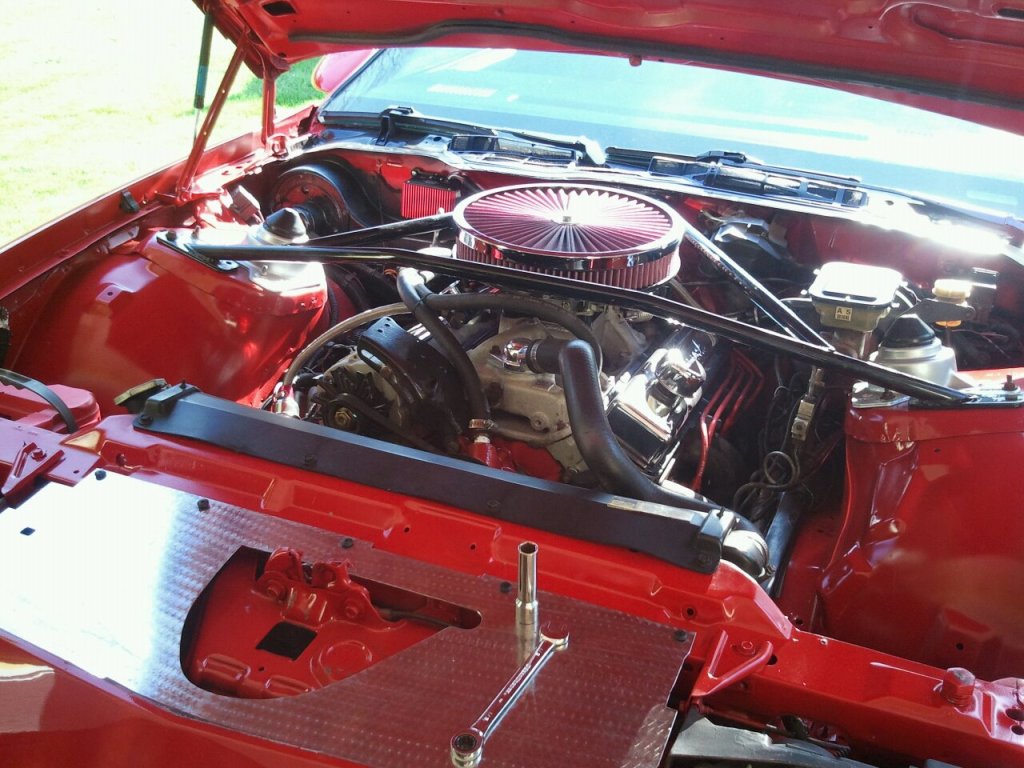
My stepdad hand made it - took 11 hours of work. Solid piece of stainless.
Supreme Member


Joined: Apr 2010
Posts: 1,029
Likes: 11
From: Modesto, California
Car: 88 Firebird Formula
Engine: LO5 5.7 TBI/Ebl Flash
Transmission: 700R4
Axle/Gears: 2.73 stock rear end
Re: Repainted engine bay - on the cheap!
Amazing!!! You've inspired me to do my own!

Supreme Member
iTrader: (3)
Joined: Jul 2009
Posts: 1,311
Likes: 3
From: Chicago, IL
Car: 1986 Pontiac Firebird
Engine: 97 LT1 W/ Alot of goodies.
Transmission: 4L60E W/ Yank SS3600
Axle/Gears: 3.27 9 Bolt BW
Re: Repainted engine bay - on the cheap!
Looks good. Gonna be doing this soon after I finish my exhaust. Sucks having a pretty engine but not a pretty engine bay.
Thread Starter
Member
iTrader: (10)
Joined: Jul 2008
Posts: 426
Likes: 2
From: Binghamton, NY
Car: 1986 IROC-Z
Engine: 360cu @ 10.5:1
Transmission: T56 - Pro 5.0
Axle/Gears: 4.10 - Zexel Torsen - Moser Axles
Re: Repainted engine bay - on the cheap!
Tell me about it! haha
I am slowly deciding to go ahead and paint other things under the hood as well to really clean it up the way I really want it. I'll be tackling the airbox soon.


Thread Starter
Member
iTrader: (10)
Joined: Jul 2008
Posts: 426
Likes: 2
From: Binghamton, NY
Car: 1986 IROC-Z
Engine: 360cu @ 10.5:1
Transmission: T56 - Pro 5.0
Axle/Gears: 4.10 - Zexel Torsen - Moser Axles
Re: Repainted engine bay - on the cheap!
Painting some more parts soon - will post pics!


Supreme Member
Joined: Feb 2006
Posts: 1,366
Likes: 1
From: St.Louis, IL
Car: 1988 Camaro
Engine: 377
Transmission: TH350; Circle D 4200 converter
Axle/Gears: Ford 9"
Re: Repainted engine bay - on the cheap!
Awesome results. I'll do the same when I get my car up and rolling and post pictures. I think the only difference will be the fact I'll use a touchup gun instead. Nice!
Member
Joined: May 2011
Posts: 151
Likes: 5
From: patterson, ca
Car: 1986 iroc-z
Engine: 5.0 tpi
Transmission: 700r4
Axle/Gears: stock.
Re: Repainted engine bay - on the cheap!
awesome job, my bro has a victory red colorado its a nice color, looks awesome on your camaro.

Senior Member

Joined: Mar 2010
Posts: 865
Likes: 2
From: LI, NY
Car: 1985 IROC-Z
Engine: 355
Transmission: T5
Axle/Gears: 3.42 10 Bolt Posi
Re: Repainted engine bay - on the cheap!
Wow looks real good. Did you try cutting and buffing it? I did mine while I had the motor out. But it looks very similar. Mine is 1985 75U blaze red.

Joined: May 2009
Posts: 4,915
Likes: 41
From: Far West
Car: 1986 Camaro Z28 IROC-Z
Engine: 350 Tuned Port Injection, for now.
Transmission: 700R4
Axle/Gears: Posi - 3.23
Re: Repainted engine bay - on the cheap!
Very good job. Suscribed!!!!!
Member
iTrader: (1)
Joined: Feb 2007
Posts: 489
Likes: 0
From: Spring, TX
Car: 91 Bird
Engine: TPI 350
Transmission: 5-Speed
Axle/Gears: 2.77 posi
Re: Repainted engine bay - on the cheap!
I was about to say yours looked like mine - junk everywhere. Then I scrolled down a little. I'll get to clean mine up a little in about 4 years.
In the meantime I think I'll paint the firewall and stuff before my repaint. Unless I can convince the wife that under the hood is like one big finger nail and it needs some work... My wife would never say a car is pretty, much less the engine compartment.
In the meantime I think I'll paint the firewall and stuff before my repaint. Unless I can convince the wife that under the hood is like one big finger nail and it needs some work... My wife would never say a car is pretty, much less the engine compartment.
Thread Starter
Member
iTrader: (10)
Joined: Jul 2008
Posts: 426
Likes: 2
From: Binghamton, NY
Car: 1986 IROC-Z
Engine: 360cu @ 10.5:1
Transmission: T56 - Pro 5.0
Axle/Gears: 4.10 - Zexel Torsen - Moser Axles
Re: Repainted engine bay - on the cheap!
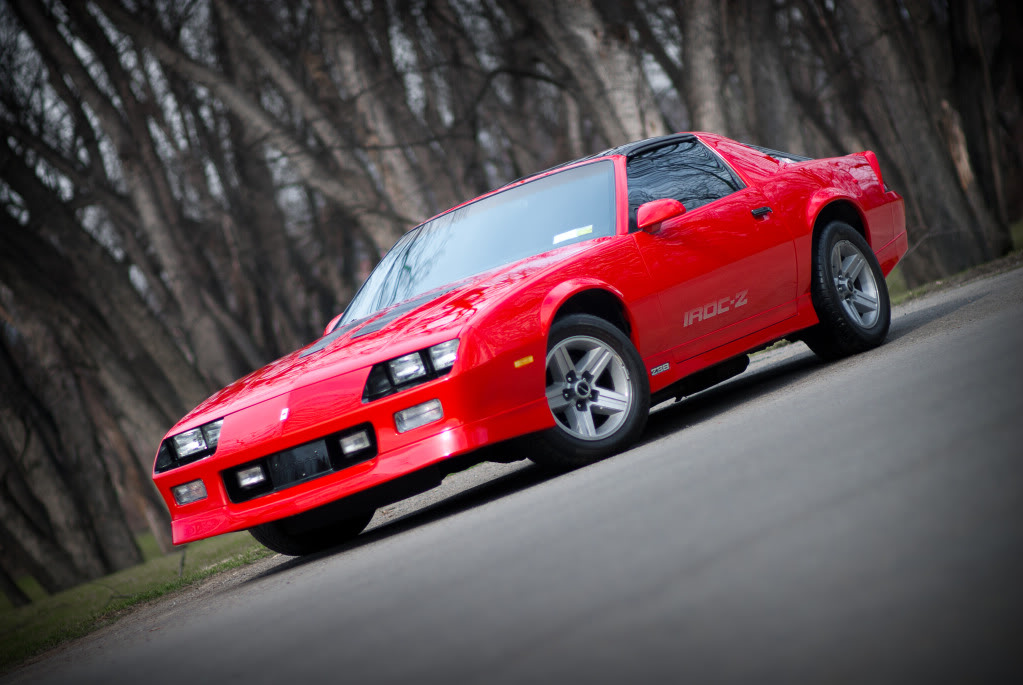
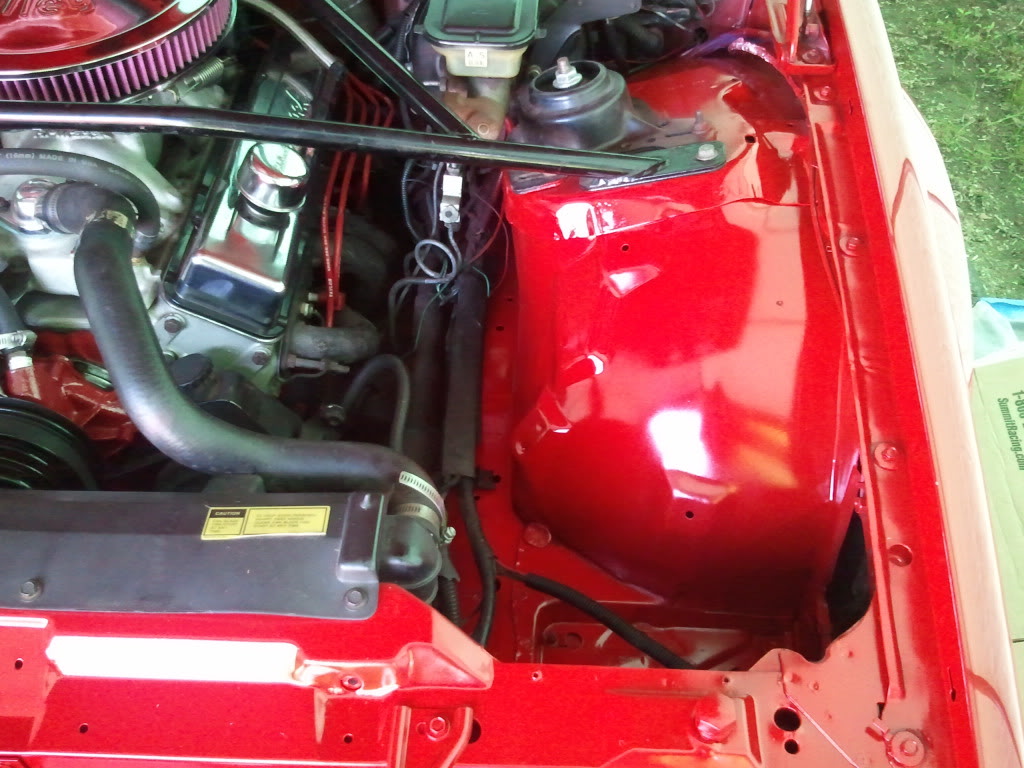
The paint is holding up well so far. Grabbed a few pics my with Rebel T3I and 18-135mm lens I just got (still getting use to it, I'm what you would call an extreme noobie photographer). I haven't cleaned under the hood since winter storage yet, so it's not as good as it will be yet.
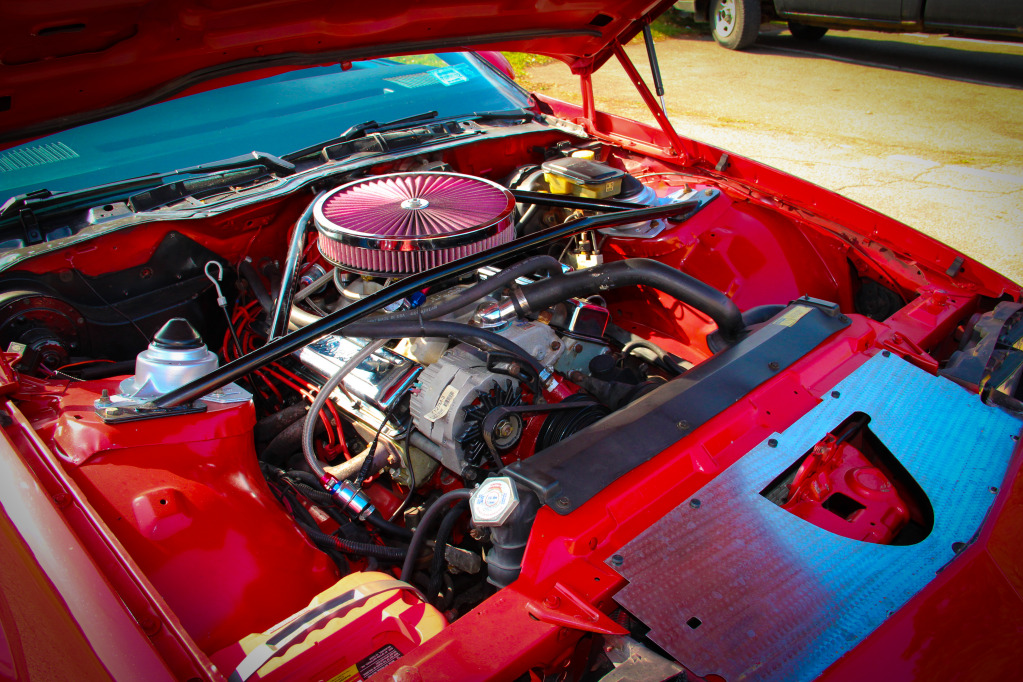
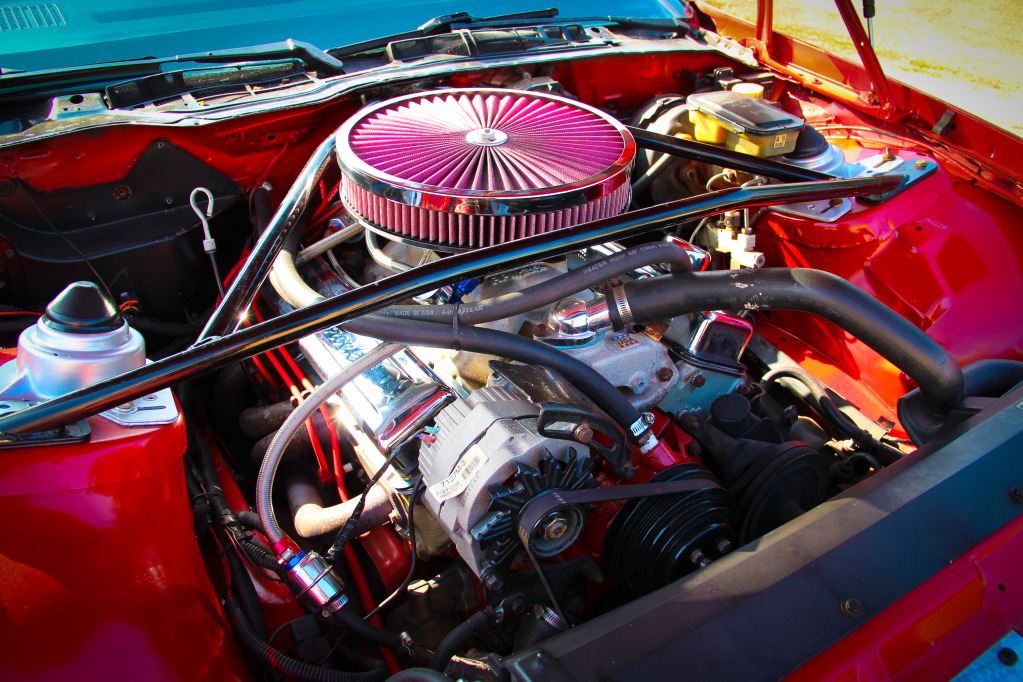
and for giggles...
and for giggles...
Thread Starter
Member
iTrader: (10)
Joined: Jul 2008
Posts: 426
Likes: 2
From: Binghamton, NY
Car: 1986 IROC-Z
Engine: 360cu @ 10.5:1
Transmission: T56 - Pro 5.0
Axle/Gears: 4.10 - Zexel Torsen - Moser Axles
Re: Repainted engine bay - on the cheap!
Reviving this thread again - I'll be posting pics soon of some more engine bay work and will provide another update on how the paint is holding up!