
Painting your car at home


Thread Starter
Member
Joined: Jan 2006
Posts: 166
Likes: 0
From: Cincinnati
Car: '91 Firebird Formula
Engine: 383 w/ BW S400 turbo
Transmission: TH400
Axle/Gears: QP 9", 35 spline, spool, 3.15:1
Painting your car at home
There seems to be quite a few posts relating to paint jobs and why or why not one should do it themselves or "leave it to the pros"/maaco. I painted my car a few years ago, and while it does certainly take a lot of effort, it's really not as hard as most people make it out to be. Now, I'm no paint expert, nor do I even claim to know a whole lot about autobody refinishing in general, but I haven't seen anyone else write about this subject, so I'll try to chime in and tell what I can. This is a long post, but painting a car is pretty involved. It's not hard, but it's involved. Still, this should just be a general overview of what the process whole process is like.
I was told by more than one person that a good paint job just couldn't be done at home, and honestly I had plenty of doubts about how well I could do it, considering I had never picked up a sprayer before, and that I was planning on doing this in the timespan of two or three weeks.
I didn't intend to produce a show car. If you do, then you probably have no options other than laying down the thousands it takes for a good paintshop to do it for you. Painting your own car, especially if it's your first time, is always going to lead to a few runs or dust particles or orange peel in the coat, but hopefully it's nothing that can't be fixed with a little wet sanding and buffing; something no shop is going to do for you unless you pay extra for it - a lot extra.
I never totaled up my receipts, but I estimate I spent about $700-900 in painting my car from start to finish. That includes all the tools I had to buy along with supplies. I already had a compressor, dual-action pneumatic sander, paint mask.. and that's about it. Everything else went into my budget. Now, sure, you can get a Maaco paintjob done cheaper than that, and it might even look good for a year or two. But for a few hundred more, you CAN do a better job, it WILL look better, and you'll have a durable, shiny urethane basecoat/clearcoat that'll last longer than anything coming out of Maaco OR Van Nuys.
So where do you start? Well, if you're already comfortable doing bodywork, and have managed to rattle can primer a car without it looking like *ss, then you're pretty much done. In a several week (or month) long painting project, you'll probably spend just one day (hopefully the last) actually *painting* the car. If the surface is properly sanded and prepped, and you've got a decent gun, the actual process of spraying the paint is really not that involved. Some call it an art, yes. But, again, you're not painting a show car. And by following some general procedures, you should be able to spray out a nice, shiny new paint job without much trouble at all.
But I'll assume you're starting out like me, with no clue how to do any of that stuff. In fact, there's still a bunch of stuff I don't know how to do even *after* painting my car. There's just so much to know and so many tricks to learn; every car needs different kinds and degrees of work to be done to it in order to get a proper coat of paint on it. I simply read a lot and did what worked for me. Two years later the car still looks as good as it did when it rolled out of the paint booth.
Anyways, let's start.
It shouldn't really have to be said, but before you begin, all the paintable surfaces of your car need to be as clean as possible. Scrub it down with detergent, pressure wash it, anything to get off as much dirt and road grime as possible. After that's finished, you'll need to use a good wax and grease remover to get off anything else. The big killer here is silicone: most waxes and other car care products have it, and new paint will absolutely *not* stick to it.. It's the last thing that you want on the car as you're sanding it down; as you'll just be grinding it into the layers below. I believe the cleaner I used was Martin Senour product # 15250, which I got from Napa. However, any surface cleaner should be good.
Next, you're going to need sandpaper. Lots of it. For taking off old paint and rust, I used anywhere between 60 to 120 grit sandpaper. You'll also need this for sanding down body filler, along with 180-240 grit to clean up with, and finally 320-400 to prep for primer and to prep for basecoat. You'll probably also need 600 grit for fixing any mistakes in the basecoat or possibly some bad runs in the clearcoat. If you're fixing up any clearcoat problems, or planning to color sand (more on that later), you'll also need 1200 and 2000 grit sandpaper, and a buffing and polishing system, all of which will be covered at the end.
In addition to sandpaper, a dual-action power sander is a must. If you're not going to be taking the old paint off, or doing much body work, you might be able to get away without one, however I wouldn't recommend it. You'll use it primarily with 80-120 grit sandpaper, working up to hand sanding everything as you move up to 320. You'll also need sanding blocks. I got various types of rubber blocks from Napa, and made a few out of good hardwood for sanding straight edges and such. I also bought a "cheese grater" for cutting down excess body filler, but I found myself using my D/A sander with 80 grit instead.
As far as the old paint is concerned, as long as it's the factory paint, and in relatively good condition, you can get away with roughing up the surface, doing any bodywork that might need to be done, and painting overtop it. But remember that your new paintjob will never be better than your base, so if you've got paint peeling off right now, it all needs to come off. In my case, the old paint was still pretty solid, but I did have lots of chips in it that went all the way to the primer, or even to the metal. Therefore I ended up sanding most of the paint off just to remove all the chips and keep things even. If you do sand this far, and get to the metal, you'll find it has a tendency to "flash rust" when uncovered. You'll need a metal etchant to apply to the bare metal or primer that advertises the ability to act as an etchant as well.
I used Martin Senour part # 6877, triple etch metal cleaner.
I won't go through the actual process of bodywork, as every car is going to need varying types and amounts. The smart thing to do would be to buy a book on the subject, and read it over well. I just spent a lot of time online googling for "autobody repair" and "automotive refinishing" until I had read enough how-to's to start experimenting on my own. I don't think you can ever go wrong with Evercoat. I used Evercoat short strand reinforced body filler for anything that had to be, well, filled, and Evercoat glazing compound to skim coat over it. I also fixed a rusted out fender flare and a *4 inch hole* in the front bumper using Evercoat Kitty Hair, and both repairs have completely exceeded my expectations.
Once your body is straightened out, everything is sanded down with 220-320 grit (depending on what your primer requires), and you're ready to start masking the car off. Of course, you might have had to mask certain parts of the car off beforehand, but in my case I still needed to be able to drive it into the garage. I simply used copious amounts of newspaper and automotive masking tape, and made sure everything was sealed up nice and tight. A nice touch around areas such as doorjambs is to lay down the tape like you normally would, then lift up the edge about an eighth of an inch along the entire length of the tape. This allows a little paint to flow underneath the side of the tape, and eliminates "hard lines" from forming between the new and old paint. I didn't paint my doorjambs, as they weren't in very bad shape to begin with and I was spraying the car with the same color. If you're painting yours, my guess would be that the doors would need to come off.
Once you've got the car all masked up, you're ready for primer, so let's start talking about what you're going to spray it with. I got a DeVilbiss FinishLine gravity-feed HVLP spray gun. I also splurged and got a box of paint cup liners. They're basically zip lock bags that you pour the paint into instead of putting it directly in the cup. Not only do they make cleaning up a whole lot easier, but they actually let you spray upside down! It was nice for doing the lower parts of the car. The gun came with a 1.6mm tip, which I use for primer, and a 1.4mm tip, which I used for the basecoat and clear coat. You'll also need a good compressor. Most spray gun manufacturers have airflow ratings for each of their guns in CFM, and you'll have to compare that to the airflow rating on your compressor to make sure it'll be able to handle the job. In addition, you'll need a clean air hose and an inline desiccant dryer. I got my dryer from Harbor Freight for a few bucks.
So, let's primer. I personally used Martin Senour/Crossfire #15200 primer from Napa. If you use that you'll also need the thinner, #15245. It's a 1:1 ratio, and I used a gallon of both. To be safe, you should probably use 6 quarts of both, because I really stretched mine. If I remember correctly a gallon of both was just under $100.
Cleanliness while primering isn't as crucial as basecoating or clearcoating, since you'll be sanding some of it off, but it's still good practice to make the job as close to perfect as you can. I hung tarps from the ceiling of my garage and also tarped the floor. I washed them down well before they went in the garage, but DID NOT WET them before painting. With primer, wetting things down shouldn't really be a problem, but I didn't want to take the risk. Don't quote me on this, but I believe urethane (which is what you'll be using for your base/clear) is a moisture cure system. Excess moisture in the air can cause small bits of paint to harden before they hit the surface of the car, getting little chunks of cured paint in an otherwise smooth coating. Anyway, set your pressure, fan (spray) width, and paint feed amount to the manufacturer recommended defaults. It's been awhile, but I believe I set up for 40psi at the gun / 10 psi at the tip, 6-8 inch fan width, and, while holding the gun 12-18 inches a way, set the paint feed so that a quick spray was just enough to wet a test panel without causing any runs. Spray two or three medium coats (or whatever your primer suggests), taking your time to make sure you're staying a constant distance from the surface you're painting, moving the gun over the surface at a comfortable and constant speed, and overlapping each pass by an inch or two. Obviously, it might be a good idea to practice on a test panel a few times to set up fan width and paint feed to your liking. Hopefully, a few coats later you've got a nice, dull primer car!
The primer will have to set for awhile until it's dry enough to start sanding on. At this point you lightly spray a contrasting color, a guide coat, over the primer, and start to lightly sand with 320-400 grit. The low areas will retain the guidecoat while the high areas will be sanded off. Skim coat over the low areas and sand smooth, reprime, rise, lather and repeat. Once you're happy and the primer is sanded smooth, you can start with the exciting stuff; base and clear.
Continued below..
Thread Starter
Member
Joined: Jan 2006
Posts: 166
Likes: 0
From: Cincinnati
Car: '91 Firebird Formula
Engine: 383 w/ BW S400 turbo
Transmission: TH400
Axle/Gears: QP 9", 35 spline, spool, 3.15:1
I used Martin Senour Crossfire basecoat for my car. I don't have a part number on my paint can, but I believe it's # 56. It's also referred to as EconoBody, as it's not an exact match like you would use for touching up a panel. It is, however, extremely close. The guy at Napa mixed it up on the spot, I went home and painted up a test panel with it and could see no difference whatsoever in color compared to the factory paint. I got a gallon, but I would recommend getting a quart or two more. You never know when you'll have a fender bender or see a nice ram air hood for cheap. Total price was somewhere around $100 for a gallon of paint + thinner. I had my receipts somewhere... I used thinner # CR234, but it's temperature dependent, so you'll need whatever the datasheet/Napa guy says you need. The clearcoat I used was MS Crossfire # 15405 Overall Clearcoat. If you're going the same route, you'll also need the overall hardener, #15438. Again, I believe the clear was $100-$150. So that's about $300-400 total in paint. It's good paint, too.
To start out, make sure your painting booth / garage is as clean as possible. Wash out all that sanding dust and pocket lint. I bought a cheap painting suit from, of course, Napa; but really all you need to do is wear something that's not going to be shedding debris all over the place. I parked the car in the garage, shut the garage door about 3/4ths of the way, and set up a box fan to exhaust all the overspray I would be creating. I let it set for an hour or so, then mixed up my paint in another area of the garage. Right before painting, I went into the paint booth with a tack cloth (which you can get from Napa), and ran it over the whole car to make sure it was absolutely clean. Then I hooked the gun up and went at it. Exactly how you lay down the basecoat is mostly up to you. I started at the roof and worked my way down, so I wouldn't be leaning into any of my fresh paint. I sprayed down three medium coats, waiting 5 to 10 minutes between coats. Those 5 to 10 minutes go quick, since you're usually mixing up a new batch of paint. After you're done, you might have a few little dust nibs in the paint. Wait 15-20 minutes, then sand them out lightly with 600 grit, and put on another coat. After another 20 minutes, you're ready for clear!
If you're re-using the same gun for the clearcoat like I did, spend those next 20 minutes really cleaning your gun out. You don't want any of your basecoat tinting your clearcoat. When mixed, the clear to me seemed to act like thin syrup. Keep this in mind when shooting it. I shot two medium-thin coats, one medium coat, and one thick coat, allowing 5-10 minutes between coats. Remember, it's like syrup, so try not to spread it too thick or you'll look back and see it running down the sides of your car. You'll most likely get a few runs - they can be wet sanded out later. The major concern is that you don't get any solvent popping. If you haven't allowed enough time for the lower coats to flash, a run could thicken up enough to trap little bubbles of solvent as it tries to evaporate. This is bad, because to get rid of those bubbles means removing that much clearcoat, which might end up bringing you back down to the basecoat. Fortunately, if you take your time and allow each coat to flash properly, you shouldn't have to worry about that.
When you're all done, give a few hours to set up. The clear will usually be "dry" within 20-30 minutes, but it'll still be very soft and easily damaged. About an hour after painting, I started pulling the masking off. I'm not sure if this was gutsy or if it was necessary. My concern was getting it off before it the clear was too dry and started really sticking to it.
No, stand back, and admire your new beauty.
Congratulations! You're half-way there!
Well, actually, you may or may not be half-way there. That depends on if you've got any mistakes to fix, and if you're planning on color sanding. Any paint job, no matter how good, will always have a certain amount of orange peel. Orange peel is exactly what it sounds like, little wavy bumps in the paint that look like orange rind. Color sanding involves sanding the surface of the paint smooth, then buffing and polishing it to a nice, mirror-clean shine. Color sanding technique can also be used to fix other problems in the clear coat, such as those dreaded runs.
To colorsand, get a nice, flexible, rubber sanding block, some 1200 grit and 2000 grit sandpaper, and a bucket of water with a drop of dish soap in it. I used some rubber sanding blocks I got from Napa that worked excellent, and were soft enough to double as squeegees. You soak the sanding paper in the water, put it on the block, and proceed to sand your new, shiny paint job down to a dull, flat finish. Start with 1200 grit. If you've got some large runs and you're really bold, you could even try 600, just don't do the unthinkable and hit the basecoat. From time to time, squeegee off the water around the area you're working on so you can see what progress you're making. You'll see kind of a leopard print of shiny indentations where you haven't yet sanded down to the "valleys" of the orange peel. Once you get a uniform, dull finish, you can clean up your 1200 grit scratches by sanding over with 2000. One fender might take anywhere from one to several hours to do.. it's a very long process.
After you've got whichever panel it is you're working on all sanded flat and smooth, you can start the buffing and polishing process. I used the 3M Perfect-It II system. You'll need an electric buffer for this process. I didn't have one, so I bought a cheap one from Harbor Freight that worked excellent. First I used the rubbing compound # 051131-05973 and a foam compounding pad # 051131-05731, following the directions on the bottle. After you're finished, you'll (hopefully) have a nice, beautiful, freshly buffed body panel to look at. But if you look at it in the right light, you'll see lots of little swirl marks from the rubbing compound. You take these out by using the polishing pad glaze # 051131-05996 (for dark paints, you'll use a different glaze if you have light colored paint), and then a foam polishing pad # 051131-05735. Stand back and admire your new beauty!
-Bryan
By the way, here's my car. I quit work to paint it two weeks before starting college.
Supreme Member
Joined: Jul 2005
Posts: 2,123
Likes: 0
From: North Central Mass.
Car: 1985 Berlinetta
Engine: Megasquirted TPI
Transmission: Transgo 700R4
Axle/Gears: 3.42
Thank you for your excellent write up. Sticky for sure 
Last edited by Toehead; Jan 20, 2006 at 02:10 PM.


Junior Member
Joined: Oct 2005
Posts: 73
Likes: 0
?
could you just add what you bought/did with the "flex" stuff you add to the primer/paint ref the bumpers and how its different than painting the steel,,,,,,,,,,,,,,,,awesome write up,,,,inspired and cant wait til spring!!!!!
Thread Starter
Member
Joined: Jan 2006
Posts: 166
Likes: 0
From: Cincinnati
Car: '91 Firebird Formula
Engine: 383 w/ BW S400 turbo
Transmission: TH400
Axle/Gears: QP 9", 35 spline, spool, 3.15:1
I didn't use any flex agent on the bumpers, I primed and painted them like the rest of the car. So far it's held up great, except that I've gotten a few rock chips on the nose that might have been less likely to form had I used flex agent. If you want to use some, usually it's just an extra additive that you mix in with your paint. I do recall it being expensive though.. Napa would only sell by the quart, which I think would've cost me around $80.
Senior Member
Joined: Mar 2003
Posts: 523
Likes: 0
From: Marion, Iowa
Car: 92 Camaro
Engine: ZZ4 Crate Engine w/Hot Cam
Transmission: Rebuilt 700R4 with Transgo and MW 3
Axle/Gears: 3.73 Eaton Posi
Here's mine. Took me 3 months start to finish. But it was my FIRST paint / body job ever. Had to replace a door and two fenders because of rust/dents.
Total cost: about $600 in materials. About $1k total with all required tools.
I used Dupont materials.
Camaro Paint Job
Total cost: about $600 in materials. About $1k total with all required tools.
I used Dupont materials.
Camaro Paint Job
Last edited by mdricken; Aug 7, 2006 at 01:09 PM.
Trending Topics

Supreme Member
Joined: May 2005
Posts: 1,701
Likes: 0
From: San Diego, CA
Car: 1991 Camaro RS
Engine: LO3
Transmission: 700R4
Axle/Gears: 3.42 LS1
YES !!!!!!!!!
Finally someone who painted a teal 91/92 Camaro RS !!!
Coz I got a teal 91
Nice job
More closeup pics .. and pics in the evening and direct sunlight ?
Coz I got a teal 91
Nice job More closeup pics .. and pics in the evening and direct sunlight ?

Member

Joined: Mar 2004
Posts: 420
Likes: 0
From: missouri
Car: 91 Camaro RS 383
Engine: carbed 383
Transmission: 700R4
Axle/Gears: 3.42 posi
All the flex agent does is allow you to put the panel on without the paint cracking. After a few months it basically disapears, but with todays paint technology most don't see it as neccesary to use.
Also great job on both cars guys and nice writeup
Also great job on both cars guys and nice writeup
Supreme Member
Joined: Feb 2005
Posts: 1,286
Likes: 3
From: Torrance, CA
Car: 1991 Camaro RS
Engine: THE LT1 SWAP SHALL BEGIN!!!!
Transmission: 700 R4
Axle/Gears: LSD! =(
Im planning on painting my baby in my friends backyard..
Hes got those White Canopy tents through out his whole back yard...I was thinking of putting Plastic shading as walls.. and a few fans blowing outward sucking in air and blowing it out, what do you think about this? Also we are planning to do it in the spring when it gets a bit hotter? if we spray paint the car and it condenses over night will this ruin the paint job because the car is outdoors???
That is my only concern

Supreme Member
Joined: Jan 2003
Posts: 1,786
Likes: 1
From: Paxton, MA
Car: 1987 Camaro Z28
Engine: 335 TPI Stroker
Transmission: Tremec TKO 500
Axle/Gears: 10 bolt / 3.42
My car was painted in a garage bay, there is one spot with a little dust...and its on the GFX so nobody see's it anyways. It's a driver, and i'm happy with it. I doubt anyone would be able to notice a difference

Junior Member
Joined: Jan 2006
Posts: 2
Likes: 0
From: Cincinnati
Car: '91 Formula
Engine: 305 TPI
Transmission: slushbox
Originally posted by Psycho_91Camaro
Im planning on painting my baby in my friends backyard..
Hes got those White Canopy tents through out his whole back yard...I was thinking of putting Plastic shading as walls.. and a few fans blowing outward sucking in air and blowing it out, what do you think about this? Also we are planning to do it in the spring when it gets a bit hotter? if we spray paint the car and it condenses over night will this ruin the paint job because the car is outdoors???
That is my only concern

Supreme Member
iTrader: (1)
Joined: Sep 2004
Posts: 1,372
Likes: 2
From: Toledo, OH
Car: 1982 Trans Am
Engine: SBC 400
Transmission: 700-R4
Axle/Gears: 9 Bolt 2.77
Cool write up...I've thought about doing it myself also, but it's aways off. Maybe this will give me some confidence/motivation
Supreme Member
Joined: May 2005
Posts: 1,701
Likes: 0
From: San Diego, CA
Car: 1991 Camaro RS
Engine: LO3
Transmission: 700R4
Axle/Gears: 3.42 LS1
I've painted my headlight buckets, and before it had dried 100 percent, it got damp in the air, I was doing it a few hundred yards from the ocean. The humidity and chill in the air almost seemed to cure it even better. Maybe that's why they've come out with that water based paint now.
Supreme Member
Joined: Apr 2001
Posts: 5,675
Likes: 3
From: Changing Tires
Car: too many ...
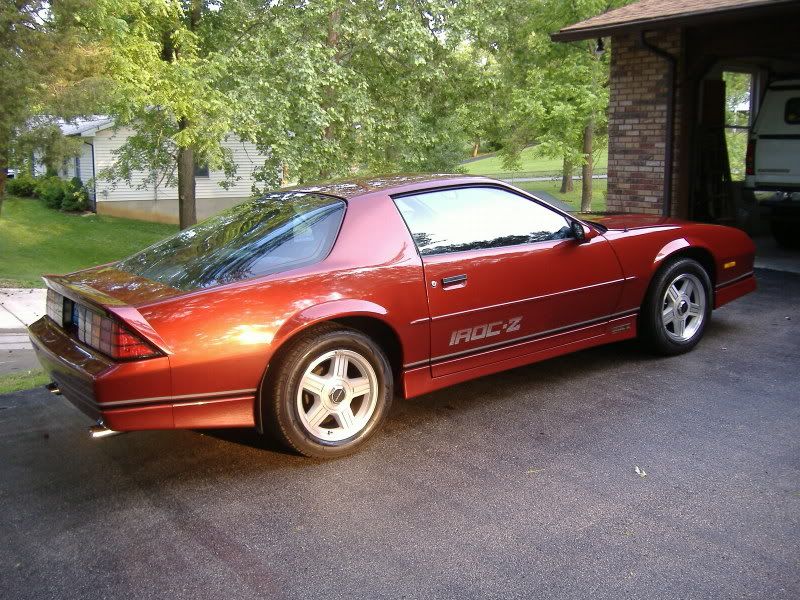
Yeah great writeup! My 89 IROC-Z was painted in an open carport at 9pm!! Its definately possible, though I still say a booth is the best way to go if you really want to ensure the job is perfect. Its definately possible to do a good job in a garage but it'll never compare to a booth with good ventilation, heat control, and good air compressors. Around here we can rent a booth for between $50-$200 depending on who you know. So do all the prep work in the garage and spray it in the booth, works out good. For my IROC-Z its a drift car so we didnt really care if it was perfect. We prepped and sprayed it in the carport and dried it off on the freeway! Then wetsand the bugs off LOL!! The wonderfull things you can do when you dont give a F!! hahaha
Supreme Member
Joined: Jul 2003
Posts: 2,779
Likes: 2
From: any clime or place...
Car: 1987 Camaro SC, 1999 Z28
Engine: GMPP 350HO, LS1
Transmission: Built 700r4/EDGE 3200, T56
Axle/Gears: 3.42 Eaton 7.625, 3.42 Zexel Torsen
Originally posted by CrazyHawaiian
Yeah great writeup! My 89 IROC-Z was painted in an open carport at 9pm!! Its definately possible, though I still say a booth is the best way to go if you really want to ensure the job is perfect. Its definately possible to do a good job in a garage but it'll never compare to a booth with good ventilation, heat control, and good air compressors. Around here we can rent a booth for between $50-$200 depending on who you know. So do all the prep work in the garage and spray it in the booth, works out good. For my IROC-Z its a drift car so we didnt really care if it was perfect. We prepped and sprayed it in the carport and dried it off on the freeway! Then wetsand the bugs off LOL!! The wonderfull things you can do when you dont give a F!! hahaha
Yeah great writeup! My 89 IROC-Z was painted in an open carport at 9pm!! Its definately possible, though I still say a booth is the best way to go if you really want to ensure the job is perfect. Its definately possible to do a good job in a garage but it'll never compare to a booth with good ventilation, heat control, and good air compressors. Around here we can rent a booth for between $50-$200 depending on who you know. So do all the prep work in the garage and spray it in the booth, works out good. For my IROC-Z its a drift car so we didnt really care if it was perfect. We prepped and sprayed it in the carport and dried it off on the freeway! Then wetsand the bugs off LOL!! The wonderfull things you can do when you dont give a F!! hahaha


Junior Member
Joined: Jan 2005
Posts: 50
Likes: 0
From: Concord, NC
Hell yea do it yourself all the way. Perfect write up. I have a few things to add from my painting experience.
1.Using Newspaper.....not so good. Yea sure its cheap cuz everyone has one on their front lawn but the print can sometimes leave marks on whatever was masked and the paint can bleed through it onto the panel that you were protecting.
2. When spraying basecoat, make sure someone is there helping you mix paint to help keep a "wet edge" so that the color flows togother easier. This is very important on Metatllics.
3. When spraying Clearcoat. This is probably even more cruicial to keep a wet edge at all times to help burn in your clear so that there is no roughness. A good gauge to see if the bottom coat is dry is to touch the paint. NO not on the fender!!!! on a part that you have masked off. If the paint strings off your finger when you pull it away like glue its still too wet. If its really sticky but no strings time for the next coat.
Thats all i can add whether it was needed or not.
Here is my baby in its stages of the flame job. Notice the garden equipment on the wall.
http://www.geocities.com/flameblueca...?1111296542677

Senior Member
Joined: Sep 2003
Posts: 797
Likes: 0
From: NC
Car: Camaro
Engine: 305
Transmission: 700r4
Axle/Gears: 3.73
Good overall write up. Here are my agreements /disagreements
What Smokey said, definately a huge NO NO on using newspaper due to bleed through.
Overlap should be about 50% not just an inch or two.
You should use the tack cloth in between every coat just before spraying. You stir up dust every time you move and you can eliminate trash this way.
Flash time is usually detrmined by the paint manufacturer with temp. and moisture being a big part of it. 5 to 10 minutes could be fine if its not humid but it may take 15 to 25 minutes. READ the directions.
The box fan for ventilation could be a very dangerous. The fumes from painting are HIGHLY flamable and that type of fan is not supposed to be used as an electrical spark inside the motor could lead to an explosion, BE CAREFUL!!!
You did a fine job and I hope this helps alot of first timers get some trigger time in cause painting cars is some serious fun!
Senior Member
Joined: Sep 2003
Posts: 797
Likes: 0
From: NC
Car: Camaro
Engine: 305
Transmission: 700r4
Axle/Gears: 3.73
One more note, if you don't wanna end up with a streaky paint job on the hood or roof when doing a metalic paint job make sure you dont just spray front to back. This only applies to the base coat. The last coat I like to spray at an angle from left to right (or R to L if you wanna get picky ). This will help brake up the streaks that might show from heaviness and lightness in certain areas. It will look like *** if you get a streaky metalic!! This is good to do on all large flat areas.
). This will help brake up the streaks that might show from heaviness and lightness in certain areas. It will look like *** if you get a streaky metalic!! This is good to do on all large flat areas. 
Supreme Member
Joined: Apr 2004
Posts: 1,002
Likes: 0
From: Boscobel, Wisconsin
Car: 1987 Iroc-Z
Engine: 355
Transmission: 700r4 w/ about 7500 miles on rebuild
I'm looking for a good and cheap air dryer.. the only one i could find on harbor freight was $300... any suggestions?
Senior Member
Joined: Mar 2003
Posts: 523
Likes: 0
From: Marion, Iowa
Car: 92 Camaro
Engine: ZZ4 Crate Engine w/Hot Cam
Transmission: Rebuilt 700R4 with Transgo and MW 3
Axle/Gears: 3.73 Eaton Posi
Originally posted by Rabbitt
I'm looking for a good and cheap air dryer.. the only one i could find on harbor freight was $300... any suggestions?
I'm looking for a good and cheap air dryer.. the only one i could find on harbor freight was $300... any suggestions?
Do some more shopping, or see what your local shops have to offer.
Thread Starter
Member
Joined: Jan 2006
Posts: 166
Likes: 0
From: Cincinnati
Car: '91 Firebird Formula
Engine: 383 w/ BW S400 turbo
Transmission: TH400
Axle/Gears: QP 9", 35 spline, spool, 3.15:1
Originally posted by Rabbitt
I'm looking for a good and cheap air dryer.. the only one i could find on harbor freight was $300... any suggestions?
I'm looking for a good and cheap air dryer.. the only one i could find on harbor freight was $300... any suggestions?
EDIT:
Do a google search for "Desiccant Snake". DeVilbiss is making them. It's not what I used, but may be a good alternative to a full-out air dryer if you're not planning on painting much.
Last edited by bnoble; Feb 18, 2006 at 11:54 PM.

Member
Joined: Jul 2005
Posts: 110
Likes: 0
From: illinois
Car: 1991 camaro rs
Engine: v6 3.1
Transmission: auto
just to let you guys know its better to use an "automotive painting paper" ( in other words i dont remember whats it s called ) then newspaper. newspaper will alllow the paint to bleed through and could possibly mess up things for you . especially with rally stripes and things of that nature

Junior Member
Joined: Nov 2005
Posts: 74
Likes: 0
i painted mine in my garage i had to keep the doors down cause all the bugs (started about 7:30 at night)and i didnt have a resporator(sp?) i just used a bandana  needles to say the last coat of clear was hard to apply since by that time i was high as a kite but with alittle wetsanding it came out lookin good
needles to say the last coat of clear was hard to apply since by that time i was high as a kite but with alittle wetsanding it came out lookin good 


Member
Joined: Jan 2001
Posts: 257
Likes: 0
From: North Salem Ny United States
Car: 86 Z-28
Engine: 356 4-bolt
Transmission: Borg warner T-5
Great write up. you have inspired me to paint my car at home. was going to do the macco thing, but id rather say "i did it". thanks alot...
if anyone has any details they would like to add, please do so.
also, you mentioned using a thinner, how did u know how much thinner to use?
if anyone has any details they would like to add, please do so.
also, you mentioned using a thinner, how did u know how much thinner to use?

Joined: Sep 2005
Posts: 6,258
Likes: 6
From: O'Fallon, MO
Car: 1991 Z28 convertible built 3/1/1990
Engine: Cammed 6.0L LSX
Transmission: T56
Axle/Gears: custom Ford 8.8", 4.10 gears
awesome write up man  it's always 95% prep, 5% paint
my dad and i painted our IROC in our garage, he's a painting contractor for interior/exterior decorating, so he's got a steady hand. he used to paint his own cars back in highschool so he's not completely new to painting cars either. here's how it turned out:

it's always 95% prep, 5% paint my dad and i painted our IROC in our garage, he's a painting contractor for interior/exterior decorating, so he's got a steady hand. he used to paint his own cars back in highschool so he's not completely new to painting cars either. here's how it turned out:
Junior Member
Joined: May 2006
Posts: 44
Likes: 0
Car: '84 Recaro Trans Am
Engine: 350 H.O.
Transmission: 700r4
Awesome posts all around!
I got my '84 T/A professionally done, but I've got this '91 Toyota Pickup just sitting out there begging to be repainted. The NADA high blue book is $3400 and the low is $1700 -- the only issues are some major dents on top of the wheel wells (which is the best place to have 'em, in my opinion, because they're easiest to hammer/dolly out thanks to easy access) and a necessary new paint job. I've been wanting to get into auto painting for a while but have always thought professional work was necessary.
Looks like I'll be spending a month or so doing the bodywork and painting and then selling a truck for a profit! Hehe! Hopefully that'll give me enough experience to be able to do the ground effects on my T/A.

Supreme Member
Joined: Oct 2001
Posts: 8,113
Likes: 6
From: NWOhioToledoArea
Car: 86-FireBird
Engine: -MPFI
Transmission: T5
Axle/Gears: 3:42
Never get exposed bondo wet. Unless you have made darn sure it is 100% dry before your paint. Bondo will soak up moisture [not allot, but enogh]and then let it lose later when it gets hot. You will then have tiny bubbles appear in your fresh paint job weeks later that will be filled with water.
I know first hand......
I know first hand......
Supreme Member
Joined: Oct 2001
Posts: 8,113
Likes: 6
From: NWOhioToledoArea
Car: 86-FireBird
Engine: -MPFI
Transmission: T5
Axle/Gears: 3:42
Originally Posted by z28crazy
Great write up. you have inspired me to paint my car at home. was going to do the macco thing, but id rather say "i did it". thanks alot...
if anyone has any details they would like to add, please do so.
also, you mentioned using a thinner, how did u know how much thinner to use?
if anyone has any details they would like to add, please do so.
also, you mentioned using a thinner, how did u know how much thinner to use?
Id try to get tips form the place you buy it from. When I did mine the can said 3-1 mix but guy who sold me the pait said go 4-1 if you want a nice finish.
He was right. 3-1 wouldn't lay as smooth.
Senior Member
iTrader: (3)
Joined: Apr 2006
Posts: 518
Likes: 0
From: Hammond IN
Car: 1989 RS convertible
Engine: 305 TBI LO3
Transmission: TH-700-R4
Axle/Gears: stock axles 3.73 LSD
I am in the process of getting my vert into all primer. Sanding, scuffing, prepping as good as i can... I was planning on having the base and clear coats sprayed by a proffesional but now ill have to think twice... Great job!

Supreme Member
Joined: Sep 1999
Posts: 1,383
Likes: 0
From: Oakville, Ct
Car: 1991Firebird T/A
Engine: 350
Transmission: Modified Viper t-56
Axle/Gears: dana 44, 3.55
using top quality paint is a big thing... i didn't paint the exteiror of my car, but i did do the engine bay - and needless to say it came out great - i used all dupont paint, chroma base and chroma clear... I too did it in a garage, the only problem that i had was dusting, but a good wet coat took care of that...

Junior Member
Joined: Jul 2006
Posts: 55
Likes: 0
From: I currently live in ohio
Car: I have a 1987 firebird
Engine: it has a 7.5l 455 in it
Transmission: i have a turbo 400
Axle/Gears: im not sure their factory
i love painting at home i can usally paint someones car for about $200 thats way cheaper then a paint shop.I do good jobs its just that im a few weeks shy of being certified in autobody so i dont charge much to have work done
Supreme Member
iTrader: (2)
Joined: Jul 2003
Posts: 3,205
Likes: 0
From: Dallas, TX area
Car: 91 Formula WS6 (Black, T-Tops)
Engine: 383 MiniRam (529 HP, 519 TQ - DD2K)
Transmission: Built '97 T56, Pro 5.0, CF-DF
Axle/Gears: 4.11 posi Ford 9"
D@MN! Wish I was near Ohio....
Junior Member
Joined: Jul 2006
Posts: 55
Likes: 0
From: I currently live in ohio
Car: I have a 1987 firebird
Engine: it has a 7.5l 455 in it
Transmission: i have a turbo 400
Axle/Gears: im not sure their factory
dont worry i wont be in ohio much longer i hope it kinda sucks here im looking to move where you can make more money and have more fun
Thread Starter
Member
Joined: Jan 2006
Posts: 166
Likes: 0
From: Cincinnati
Car: '91 Firebird Formula
Engine: 383 w/ BW S400 turbo
Transmission: TH400
Axle/Gears: QP 9", 35 spline, spool, 3.15:1
Originally Posted by knightrider2278
dont worry i wont be in ohio much longer i hope it kinda sucks here
Everyone knows Ohio's the coolest state in the union. After all, we've got Cleveland!
.. right?
Member
Joined: Jul 2005
Posts: 132
Likes: 0
Car: 86 trans am
Engine: 350 cid from a 69 chevy truck
Transmission: original 700r4
Painting your car at home
the only problem I had when painting my car was my sisters cat!
I had managed to keep the bugs and dirt away but dint think about her dang cat, it had walked from the front bumper, up over to the drivers side mirror and onto the rear areowing. leaving small feet prints in the fresh paint.
but thats not the worst part of the paint job. see I painted the car back in mid november of last year. but anyhow, my wife had a wreck in it last month. and now im shopping for her a car to drive to keep her out of my baby.
and hopefully in the next week or 2, I will be replace the nose, hood, both front fenders and the headlights. but this time I plan to paint it black with flames and some custome graphics of GHOSTRIDER on it. and that will be what im going to call my car. With it being resurrected from the dead and more bad@ss than ever.
----------
the only problem I had when painting my car was my sisters cat!
I had managed to keep the bugs and dirt away but dint think about her dang cat, it had walked from the front bumper, up over to the drivers side mirror and onto the rear areowing. leaving small feet prints in the fresh paint.
but thats not the worst part of the paint job. see I painted the car back in mid november of last year. but anyhow, my wife had a wreck in it last month. and now im shopping for her a car to drive to keep her out of my baby.
and hopefully in the next week or 2, I will be replace the nose, hood, both front fenders and the headlights. but this time I plan to paint it black with flames and some custome graphics of GHOSTRIDER on it. and that will be what im going to call my car. With it being resurrected from the dead and more bad@ss than ever.
----------
the only problem I had when painting my car was my sisters cat!
I had managed to keep the bugs and dirt away but dint think about her dang cat, it had walked from the front bumper, up over to the drivers side mirror and onto the rear areowing. leaving small feet prints in the fresh paint.
but thats not the worst part of the paint job. see I painted the car back in mid november of last year. but anyhow, my wife had a wreck in it last month. and now im shopping for her a car to drive to keep her out of my baby.
and hopefully in the next week or 2, I will be replace the nose, hood, both front fenders and the headlights. but this time I plan to paint it black with flames and some custome graphics of GHOSTRIDER on it. and that will be what im going to call my car. With it being resurrected from the dead and more bad@ss than ever.
Last edited by darrells3rdgen; Jul 21, 2006 at 10:37 PM. Reason: Automerged Doublepost
Member
Joined: Jul 2005
Posts: 132
Likes: 0
Car: 86 trans am
Engine: 350 cid from a 69 chevy truck
Transmission: original 700r4
Painting your car at home
P.S
also I have a cool trick you can do when color sanding you'r car with 2000 grit paper!
if you have a jitterbug airsander or can get one cheep, use a spong soaked in water and holding the spong just close enough to the jitterbug and squeez the spong just enough to keep the sand paper wet while sanding this will make for one incredible smooth paint job, but you must only do small sections at a time and pay close attention as not to sand off to much paint and dont let the jitterbug or any type of sander sand in one spot for to long or you will be sorry.
Thread Starter
Member
Joined: Jan 2006
Posts: 166
Likes: 0
From: Cincinnati
Car: '91 Firebird Formula
Engine: 383 w/ BW S400 turbo
Transmission: TH400
Axle/Gears: QP 9", 35 spline, spool, 3.15:1
The term colorsanding is probably a throwback from the days of single-stage lacquer pants. To colorsand a car nowadays entails cutting down the clearcoat to get rid of the orangepeel and other imperfections. (then compounding/polishing/etc).
Supreme Member
iTrader: (2)
Joined: Jul 2003
Posts: 3,205
Likes: 0
From: Dallas, TX area
Car: 91 Formula WS6 (Black, T-Tops)
Engine: 383 MiniRam (529 HP, 519 TQ - DD2K)
Transmission: Built '97 T56, Pro 5.0, CF-DF
Axle/Gears: 4.11 posi Ford 9"
Originally Posted by knightrider2278
dont worry i wont be in ohio much longer i hope it kinda sucks here im looking to move where you can make more money and have more fun
Think about Dallas, TX......
